RevKB
-
Posts
51 -
Joined
-
Last visited
Recent Profile Visitors
509 profile views


.thumb.jpeg.fc5d633a7b34428fcf19419a73d56d55.jpeg)

-
 EricWilliamMarshall reacted to a post in a topic:
Rattlesnake/Cormorant 1780 by RevKB - Model Shipways - 1/64
EricWilliamMarshall reacted to a post in a topic:
Rattlesnake/Cormorant 1780 by RevKB - Model Shipways - 1/64
-
RevKB reacted to a post in a topic:
Rattlesnake/Cormorant 1780 by RevKB - Model Shipways - 1/64
-
RevKB reacted to a post in a topic:
Rattlesnake/Cormorant 1780 by RevKB - Model Shipways - 1/64
-
Kenneth Powell reacted to a post in a topic:
Rattlesnake/Cormorant 1780 by RevKB - Model Shipways - 1/64
-
JesseLee reacted to a post in a topic:
Rattlesnake/Cormorant 1780 by RevKB - Model Shipways - 1/64
-
JesseLee reacted to a post in a topic:
Rattlesnake/Cormorant 1780 by RevKB - Model Shipways - 1/64
-
 Thanks JS , Im Looking to do a scratch build , and possibly a cut away for the viewing of the berth and storage areas. so blue prints would be my beginning point
 -
RevKB reacted to a post in a topic:
Rattlesnake/Cormorant 1780 by RevKB - Model Shipways - 1/64
-
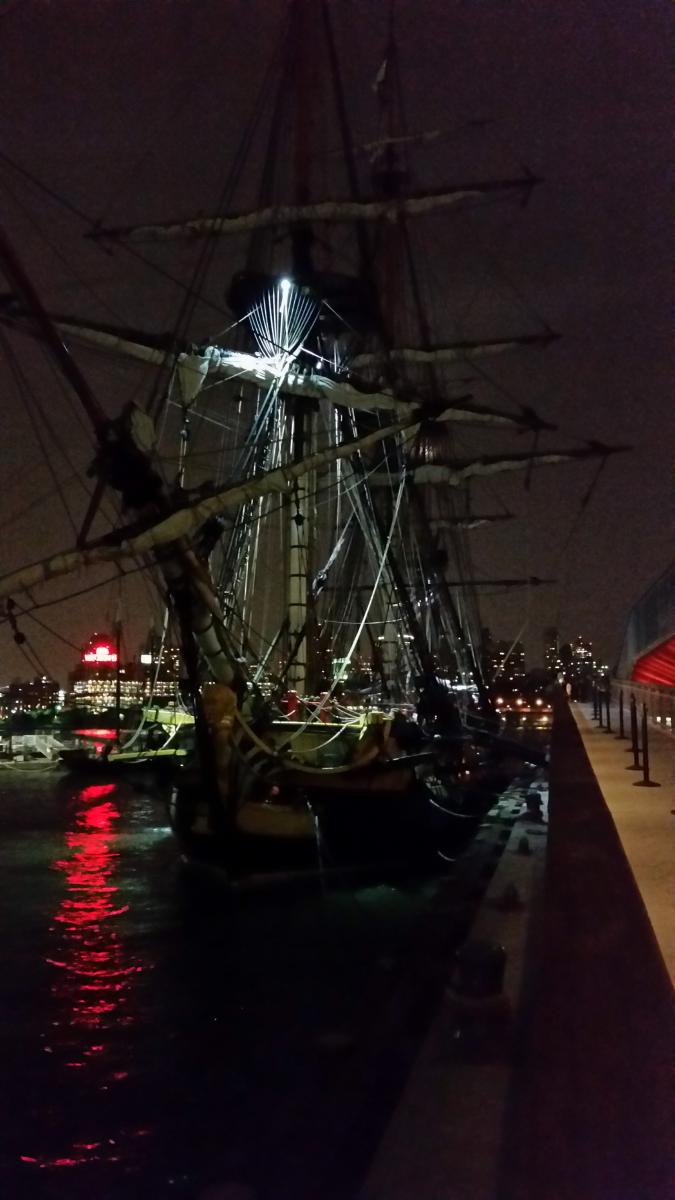
Ok a little side note , I have been working nicely on the Snake over the past 2 weeks or so , adding some detail . But the great news is I was blessed to take a business trip to Philly this past week and afterwards headed to NYC to see the L' Hermione. Here are some great pics of that trip , can anyone guess what ship Im working on next? On a side note I does anyone know where I can find plans for Her? More Pictures to follow


-
Scott, she looks fantastic
-
RevKB reacted to a post in a topic:
Rattlesnake/Cormorant 1780 by RevKB - Model Shipways - 1/64
-
Howdy Guys , I know its been some time since my last post , But the spring session was a bear and I only got to play on my build a few times. But here is the latest video from my build . I Plan on working on the Snake these next few weeks . Have a look and subscribe to my channel.
-
cristikc reacted to a post in a topic:
Rattlesnake/Cormorant 1780 by RevKB - Model Shipways - 1/64
-
maso reacted to a post in a topic:
Rattlesnake/Cormorant 1780 by RevKB - Model Shipways - 1/64
-
VonHoldinghausen reacted to a post in a topic:
Rattlesnake/Cormorant 1780 by RevKB - Model Shipways - 1/64
-
RevKB reacted to a post in a topic:
Rattlesnake/Cormorant 1780 by RevKB - Model Shipways - 1/64
-
sport29652 reacted to a post in a topic:
Rattlesnake/Cormorant 1780 by RevKB - Model Shipways - 1/64
-
JesseLee reacted to a post in a topic:
Rattlesnake/Cormorant 1780 by RevKB - Model Shipways - 1/64
-
dgbot reacted to a post in a topic:
Rattlesnake/Cormorant 1780 by RevKB - Model Shipways - 1/64
-
Howdy everybody! It sure has been a very busy couple of Months with my daughters wedding , masters classes and ministry. I just uploaded a new video of planking and look to progress more this week on the old snake. Take a look and I will post some more of my progress this next week. https://www.youtube.com/watch?v=WWr_U1claH4
-
Jesselee, thanks for the great encouragement. Also I did get you message and will respond to you tonight, but you are in my prayers.
-
Johnathan, great build ! I absolutely love what you did in the stern, i had contemplated the same thing , but chose not to as this was only going to be my second ship and I wanted to get another one under my belt by the book before I wreaked one.again great work.
-
Ryan, welcome to the snake pit, as many of the boys have been so helpful to me I am sure they will be an encouragement to you as well. I just finnished my planking and would sugest you vet the bow fillers well. I HAD though i did a good job on mine only to find i left a smidge to much roundness that caused a few planks to miss the a bulkhead completely. This of course wont be seen or know of once the rest of the planking and decks are on but its something to look at .
-
Jessee, this is an amazing build , she is beautiful and I found some really nice points to look forward to doing on my build.
- 607 replies
-
- 1
-
-
- scottish maid
- artesania latina
- (and 1 more)
-
RevKB reacted to a post in a topic:
Scottish Maid by JesseLee - FINISHED - Artesania Latina - 1:50
-
RevKB reacted to a post in a topic:
Rattlesnake/Cormorant 1780 by RevKB - Model Shipways - 1/64
-
RevKB reacted to a post in a topic:
Rattlesnake/Cormorant 1780 by RevKB - Model Shipways - 1/64
-
RevKB reacted to a post in a topic:
Rattlesnake/Cormorant 1780 by RevKB - Model Shipways - 1/64
-
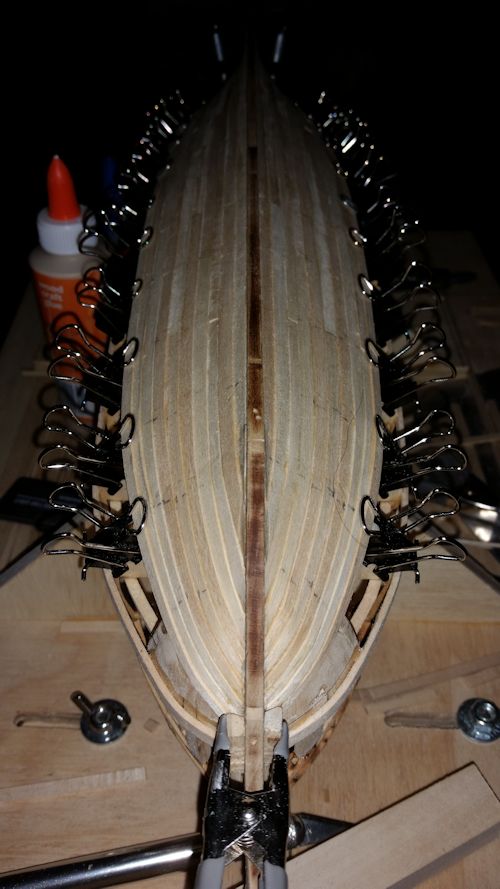
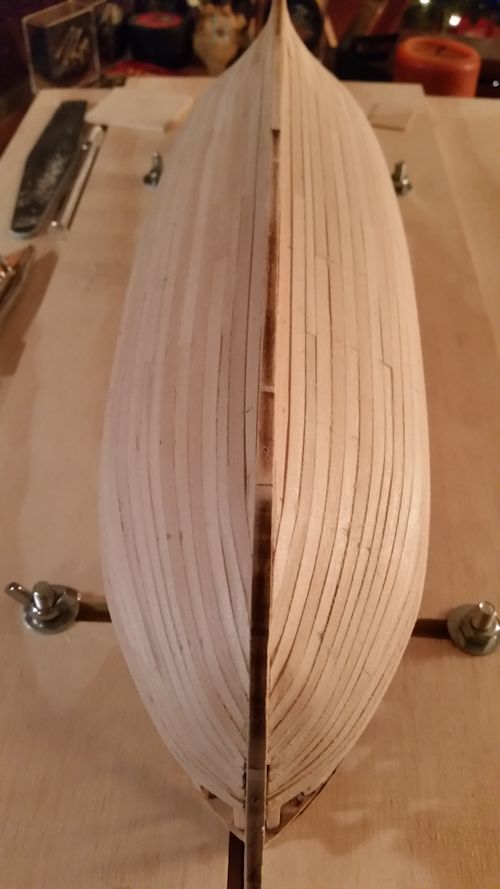
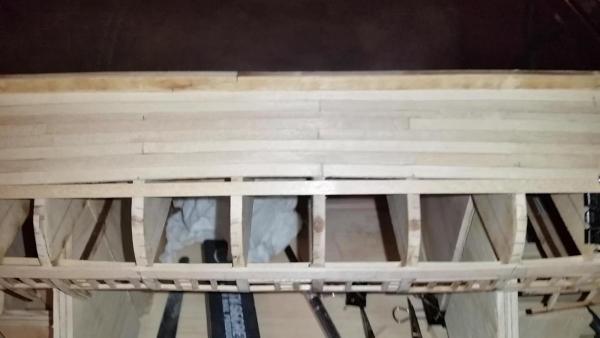
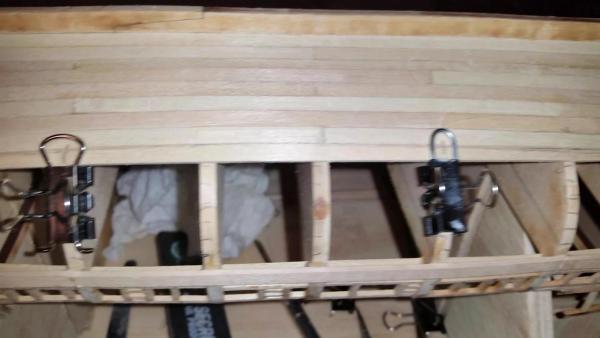
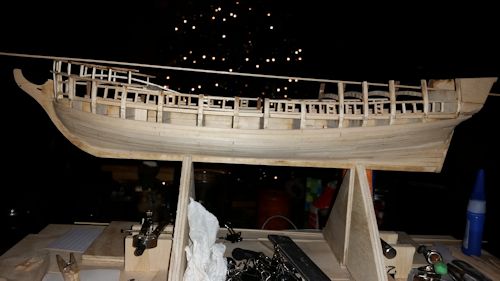
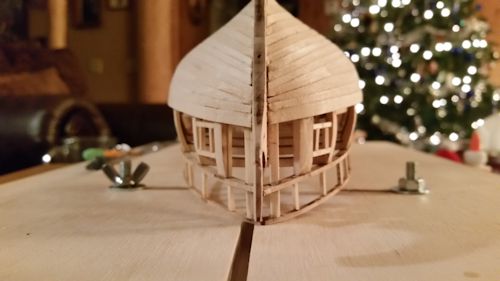
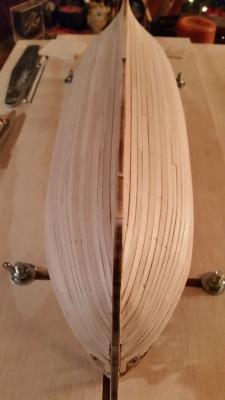
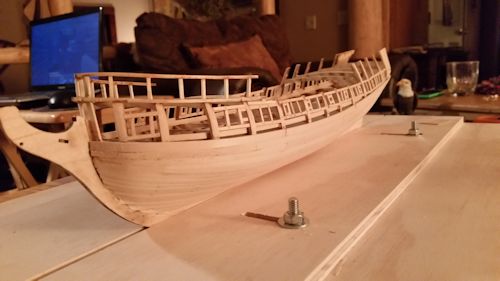
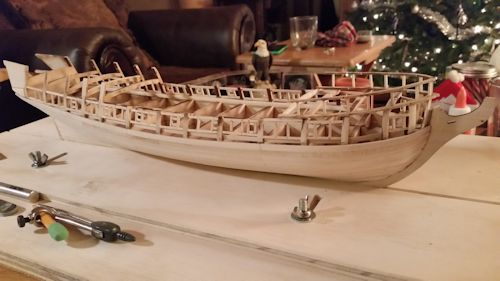
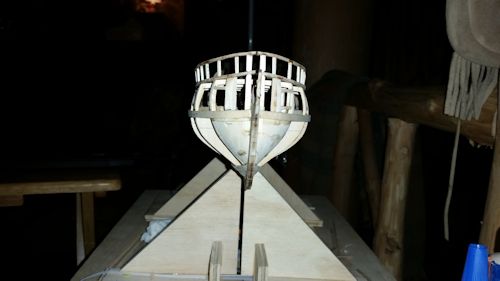
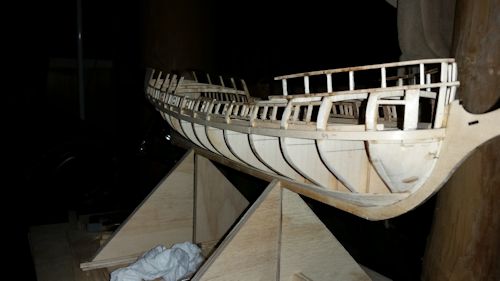
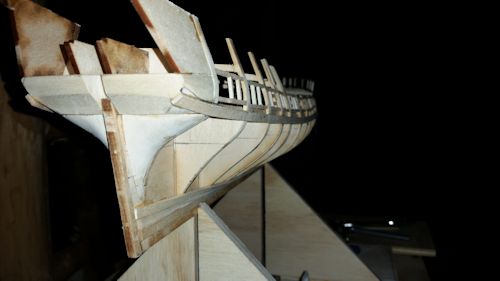
I pray that all of your Christmas celebrations were filled with love of family and friends and your new year’s found you all safe and sound .its been a little while since my last post as this past Holiday season was filled with family and church . I start out this build log saying that I had a blast at planking and found that following the directions to the letter was almost impossible to do . I made it up to where the first batten was and found that the curvature of the hull called for some spilling in order to keep the plank line I wanted. This process also revealed that My wale board was a little off and so I needed to remove it and re-situate it . so here is the progress thus far. Here is where you can see the hull line did not match the line I wanted for the hull. so some trimming had to be done Here is the spilled piece in place to check for alignment Progression of planking went easy after that and i found I didnt have too much bunching at the stem although I did have to place one stealer , because i thought it would look cool and authentic so far so good all done view , notice the stealer and that not too much bunching at the stem of the planks , I mantained at least half the plank width these pictures are pre-sanding, I have decided to stain this hull with a ceramic process of staining and then antiquing it to look worn and weathered. Over all I am very pleased with how well this hull came out , although I did learn some new things as the planking process advances. I will be making a short video of this process as well .

-
RevKB reacted to a post in a topic:
Rattlesnake/Cormorant 1780 by RevKB - Model Shipways - 1/64
-
Scott, that is superb work ! Im looking forward to getting to that step, but alas im still on the hull planking. Your ships is coming along beautifully
-
Ok so , I made my planking video and I pray it helps somebody understand the basic idea of How I have reconciled the Job of planking . Please feel free to comment . Here is the video link ,
-
Thanks for the great replies guys, I also find working on the planking very therapeutic . I am also going to work a little instructional video of how I tackled the hull planking. I also worked the planking fan measurements tonight and found an easier way for me to take samples.
-
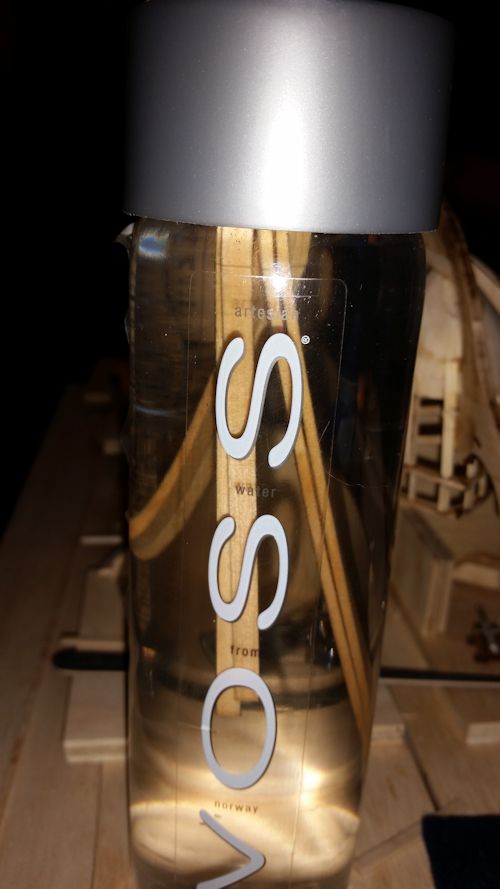
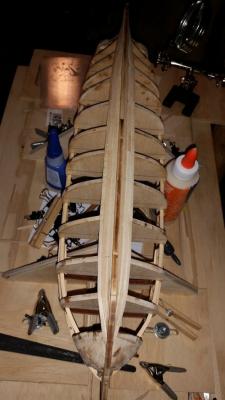
Ships log, After spending time reading and re-re-re-re-reading the planking instructions I found myself confused and a little hesitant on trying to attempt the planking of my snake the ways they were instructing, mostly because of their differing approaches on how to do it . I also came to the realization that the RS instructions are unique to this hull and the practicums were on different hulls, I know that the methods were the same but none of them could reconcile what I knew from experience. So with the practicums echoing in my mind ( I know they really had room to echo) I decided to embark into the saw dust. As shown above I measured and cut out the Garboard plank and placed it into Very Hot water so that I could make a wet set . I like this method as it lets the board dry in place before gluing and allows you to fine tune it easier than fighting to keep it in place. For all of my soaking I use a Voss wide mouth water bottle filled all the way to the top. I let the planks soak only about 5 mins as any longer makes the wood swell to much and no further pliability comes as a result. Here you can see the Garboad plank is bent to the shape of the hull One thing I took to the extreme cost me in having to spill the third strake downward and that was not allowing the garboard plank to naturally ride up the Stem, I was overly mindful to keep it flat and level along its length.Now I took all of your advise in not letting the Garboad go too far up the stem and yet didn’t realize that it can naturally ride up instead of staying flatt. If you look closely you will notice the third plank in the middle is only 3mm while in the stern and stem it is 5mm. It took some extra work to make it fair for the future planks and was well worth the effort. This is where I had an apostrophe, I knew I was going to have a measurement problem going from stern to stem. I knew I couldn’t have the planks less than half of their width , and my sample planks shwed me I would be way over that it I didn’t have exact measurements. But how could I have exact measurements to use the planking fan unless I had something to measure against? The battons / lines I had placed on the hull were not exact and I found others troubles with them to be of no use on how to solve this issue so It dawned on me now that I had the three planks in at the keel and they were fixed , I needed another fixed position to measure against . that being the wale line > it was time to place the wale line . So I wet set the wale plank and took exact measurements to assure fairness on both sides, I let it set over night to dry and marked each bulkhead to assure their proper gluing in place, I then glued them with wood glue to allow me to fine tune them into position. The end result was a flowing wale plank down the length of the hull and their measurements were right on the money. Over all I am very pleased at how they came out and look forward to trying the planking fan now that I have something to measure against. This concludes my ships build log for December 12, 2014


-
Howdy Scott, so far it seems to be working fine . I am in the process of adding strakes now and am up to the third one above the Garboard. one thing I found was that I went a little to far the other way from your suggestion to not allow the garboad to rise up the keel. I took the over cautious rout and ended up having to spill the second strake up in order to make it back to true on the hull. I will post pictures tomorrow if I can . I have found that the planking plans are a little confusing to me with all the measuring and strips. I also find that out of three different directions they all come at it differently. So I decided to employ my experience to the wood and only time will tell if it was the wise choice. I will say this , that oddly enough this is very relaxing to work on these planks , Im not finding it the problem child of the ship modeling . Time will tell, but so far Im having a blast, and that's what truly counts in the end right?