


gsdpic
-
Posts
520 -
Joined
-
Last visited
2 Followers


About gsdpic

Recent Profile Visitors
2,752 profile views


-
 Egilman reacted to a post in a topic:
Sopwith Camel by gsdpic - FINISHED - Artesania Latina - 1/16th scale
Egilman reacted to a post in a topic:
Sopwith Camel by gsdpic - FINISHED - Artesania Latina - 1/16th scale
-
Canute reacted to a post in a topic:
Caroline N by mbp521 - Scale 1:64 - Mississippi River Towboat
-
king derelict reacted to a post in a topic:
Ferrari Dino 246gt by gsdpic - Fujimi - 1/24th scale
-
Jack12477 reacted to a post in a topic:
Sopwith Camel by gsdpic - FINISHED - Artesania Latina - 1/16th scale
-
gsdpic reacted to a post in a topic:
Ferrari Dino 246gt by gsdpic - Fujimi - 1/24th scale
-
Thanks everyone for the very positive comments. I really appreciate it!
-
 gsdpic reacted to a post in a topic:
Sopwith Camel by gsdpic - FINISHED - Artesania Latina - 1/16th scale
gsdpic reacted to a post in a topic:
Sopwith Camel by gsdpic - FINISHED - Artesania Latina - 1/16th scale
-
Canute reacted to a post in a topic:
Ferrari Dino 246gt by gsdpic - Fujimi - 1/24th scale
-
Canute reacted to a post in a topic:
Sopwith Camel by gsdpic - FINISHED - Artesania Latina - 1/16th scale
-
Jack12477 reacted to a post in a topic:
Ferrari Dino 246gt by gsdpic - Fujimi - 1/24th scale
-
Old Collingwood reacted to a post in a topic:
Ferrari Dino 246gt by gsdpic - Fujimi - 1/24th scale
-
gsdpic reacted to a post in a topic:
Ferrari Dino 246gt by gsdpic - Fujimi - 1/24th scale
-
CDW reacted to a post in a topic:
Ferrari Dino 246gt by gsdpic - Fujimi - 1/24th scale
-
Egilman reacted to a post in a topic:
Ferrari Dino 246gt by gsdpic - Fujimi - 1/24th scale
-
gsdpic reacted to a post in a topic:
Sopwith Camel by gsdpic - FINISHED - Artesania Latina - 1/16th scale
-
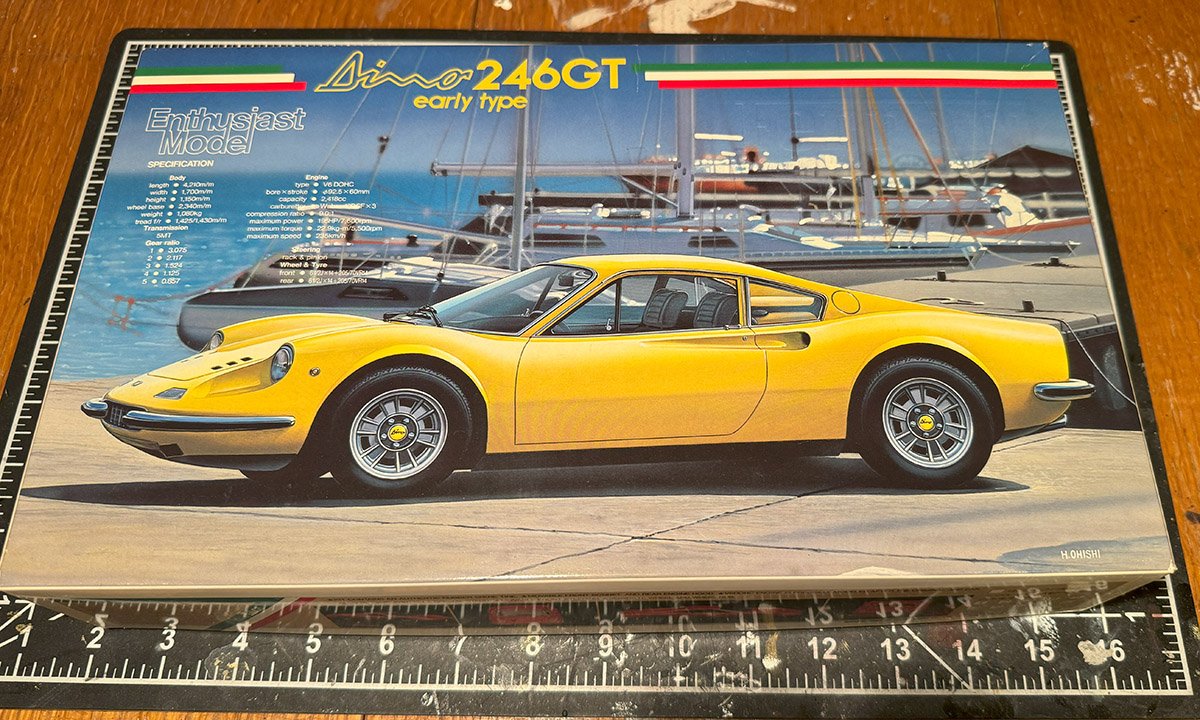
Inspired by @CDW's Ferrari 288 build and also by the way he immediately starts a new build after finishing the previous one, I present the start of my build log for the Fujimi Ferrari Dino 246gt. I actually also have the 288 in my stash but did not want to be too much of a copycat so I pulled out the 246gt. The Car: In the 1950s, 60s, and 70s, Ferrari had a sub-brand of cars named "Dino", after Enzo Ferrari's son Alfredo "Dino" Ferrari. Initially they produced only race cars for some of the lesser racing series with smaller, less powerful cars and engines. In the mid 1960s they displayed a concept car for a road car in the form of a mid-engined coupe. That concept car was well received and became the Dino 206gt. In those days the model number was derived from the engine size and type. The 206 indicated a 2.0 liter engine with 6 cylinders. Before long, they upgraded the engine to 2.4 liters, and so it became known as the 246gt. In the late 60s, this car competed with the then current Porsche 911 in terms of price and specs. The 246gt was sold from the late 60s into the early 70s, with a few minor modifications along the way. For example, the early cars had the "clapping hands" windshield wipers while later ones have parallel wipers. They also sold a spyder/targa version with a removable roof known as the 246gts. The Kit: The kit I acquired is the original version from 1986, according to scalemates.com. This is from Fujimi's "Enthusiast Model" line of kits, so it is quite detailed, including the engine, chassis, and interior, with over 200 parts. And they were not afraid to make small parts, some are literally pin head size. This early kit had some very attractive box art, as you can see below. You'll also note the "early type", indicating this is one of the early 246gt cars. Fujimi reboxed this kit many times over the years, and in later versions they included parts for both the early and later versions of the car. They also created a "curbside" version of this kit with far fewer parts but no engine detail. This kit includes opening front bonnet, engine cover, and trunk cover, giving at least a little bit more of a view of the details included in the kit. The body parts are molded in white plastic. The engine, chassis and interior parts are all gray plastic. There is a small fret of chrome parts, which I may or may not strip. The wheels are a very nice satin chrome and will be left as is. My Plans: While I like the yellow on the box art, I am more likely to paint it red, with a tan interior. As noted, the kit is already highly detailed but there may be a few more things I can add, such as spark plug wires. At least one bank of three cylinders on the v6 should be visible when opening the engine cover.
-
gsdpic reacted to a post in a topic:
Sopwith Camel by gsdpic - FINISHED - Artesania Latina - 1/16th scale
-
gsdpic reacted to a post in a topic:
Sopwith Camel by gsdpic - FINISHED - Artesania Latina - 1/16th scale
-
gsdpic reacted to a post in a topic:
Sopwith Camel by gsdpic - FINISHED - Artesania Latina - 1/16th scale
-
gsdpic reacted to a post in a topic:
Sopwith Camel by gsdpic - FINISHED - Artesania Latina - 1/16th scale
-
gsdpic reacted to a post in a topic:
Sopwith Camel by gsdpic - FINISHED - Artesania Latina - 1/16th scale
-
gsdpic reacted to a post in a topic:
Sopwith Camel by gsdpic - FINISHED - Artesania Latina - 1/16th scale
-
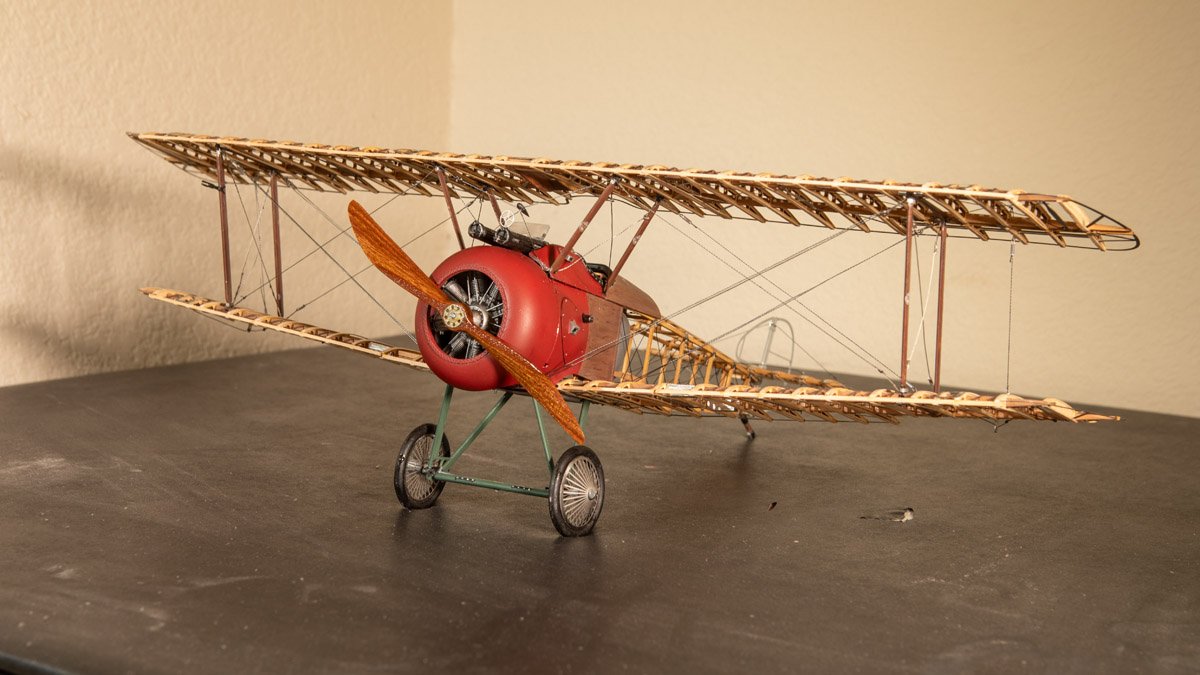
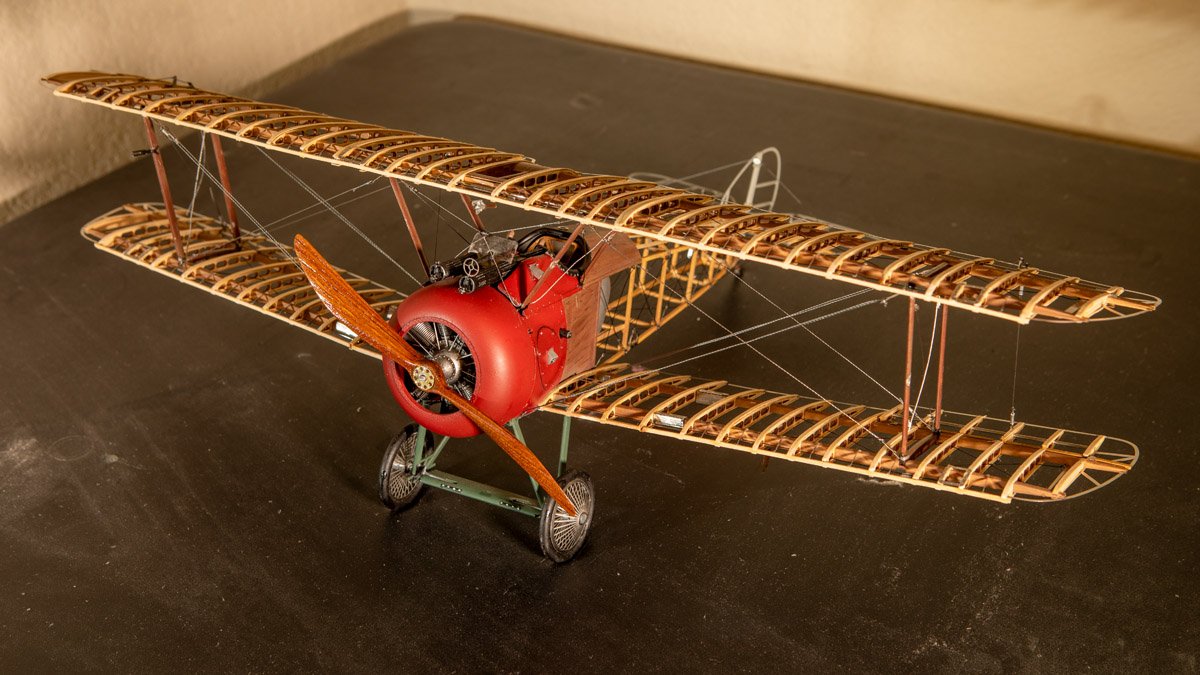
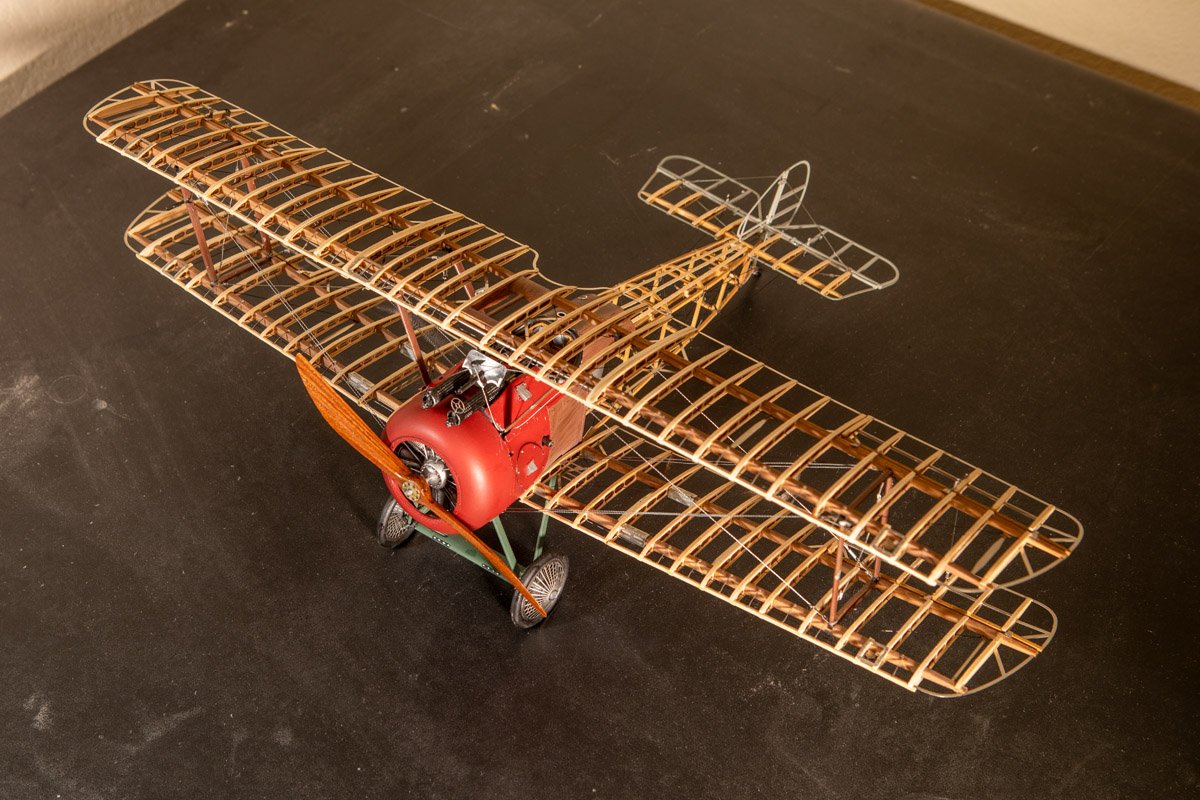
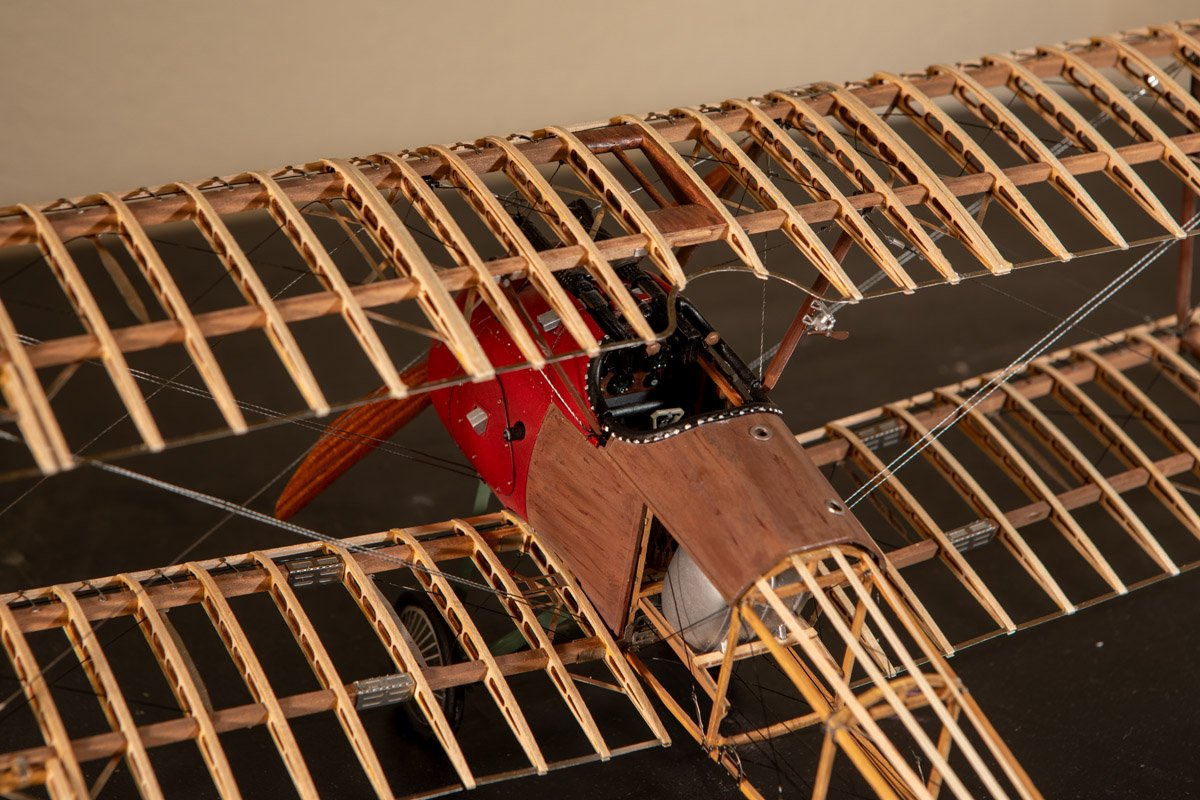
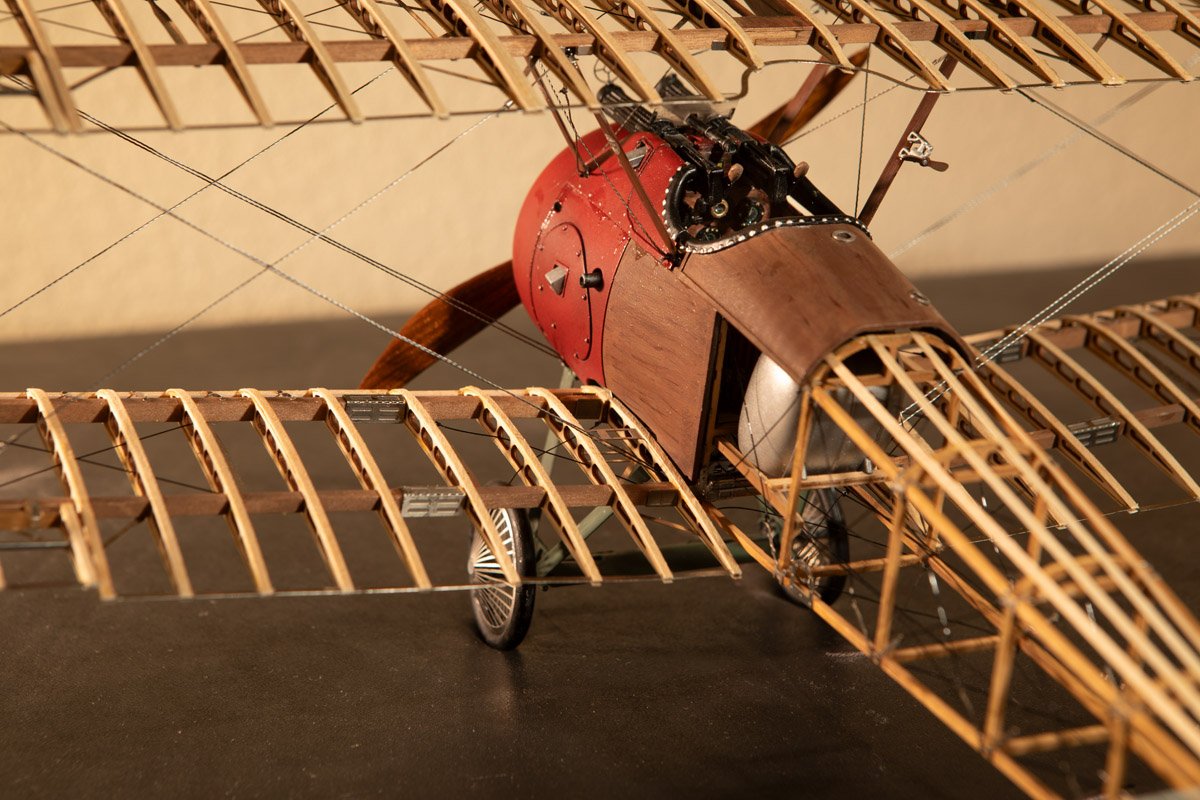
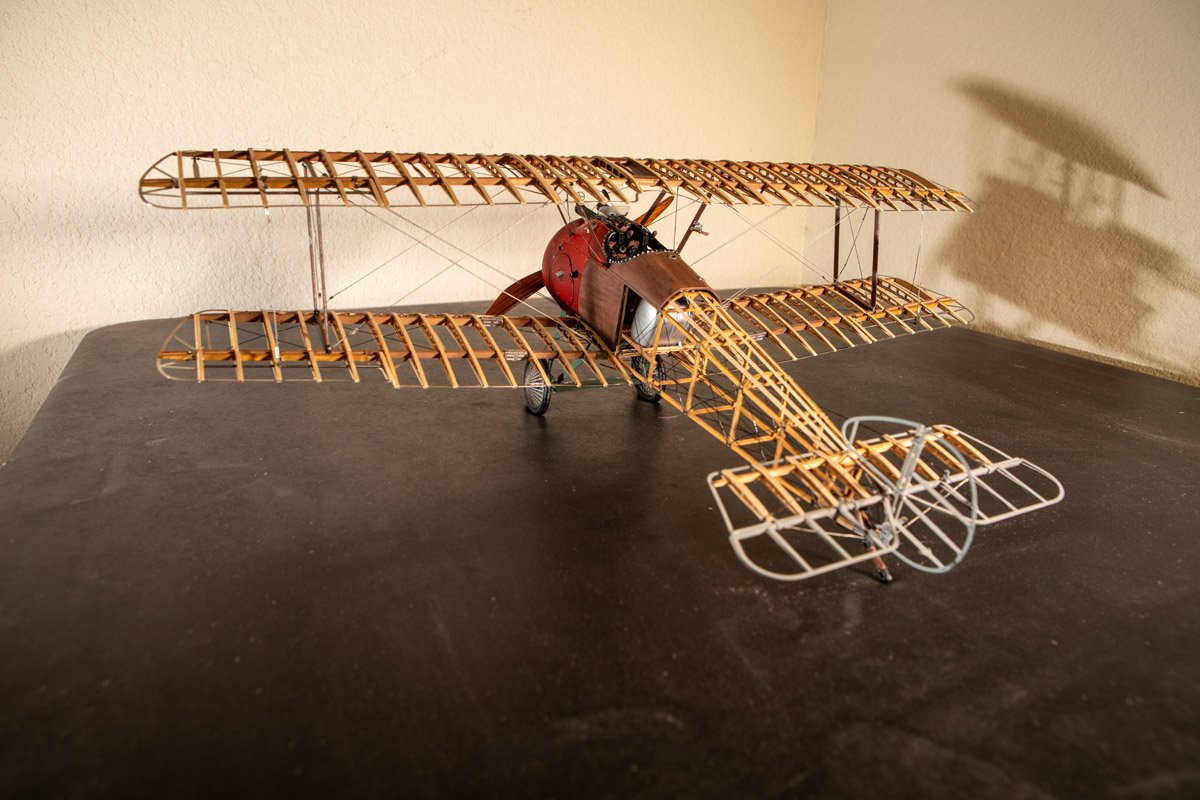
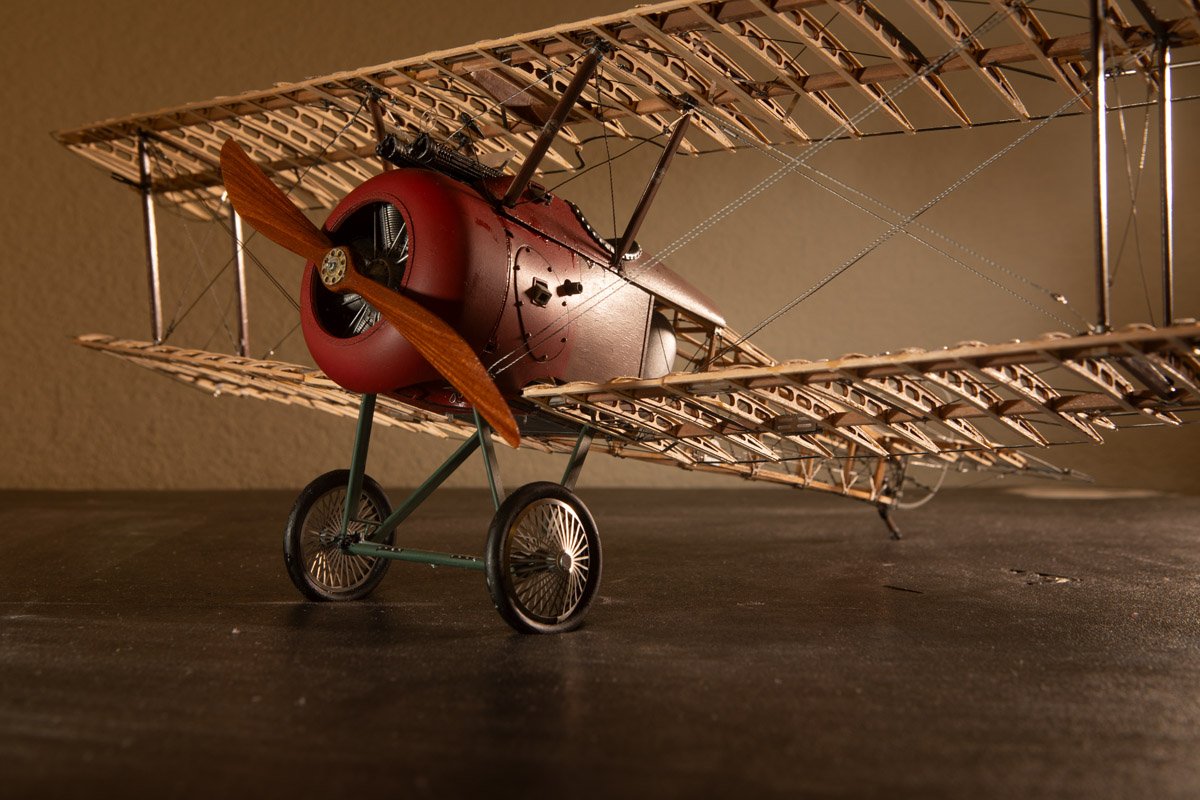
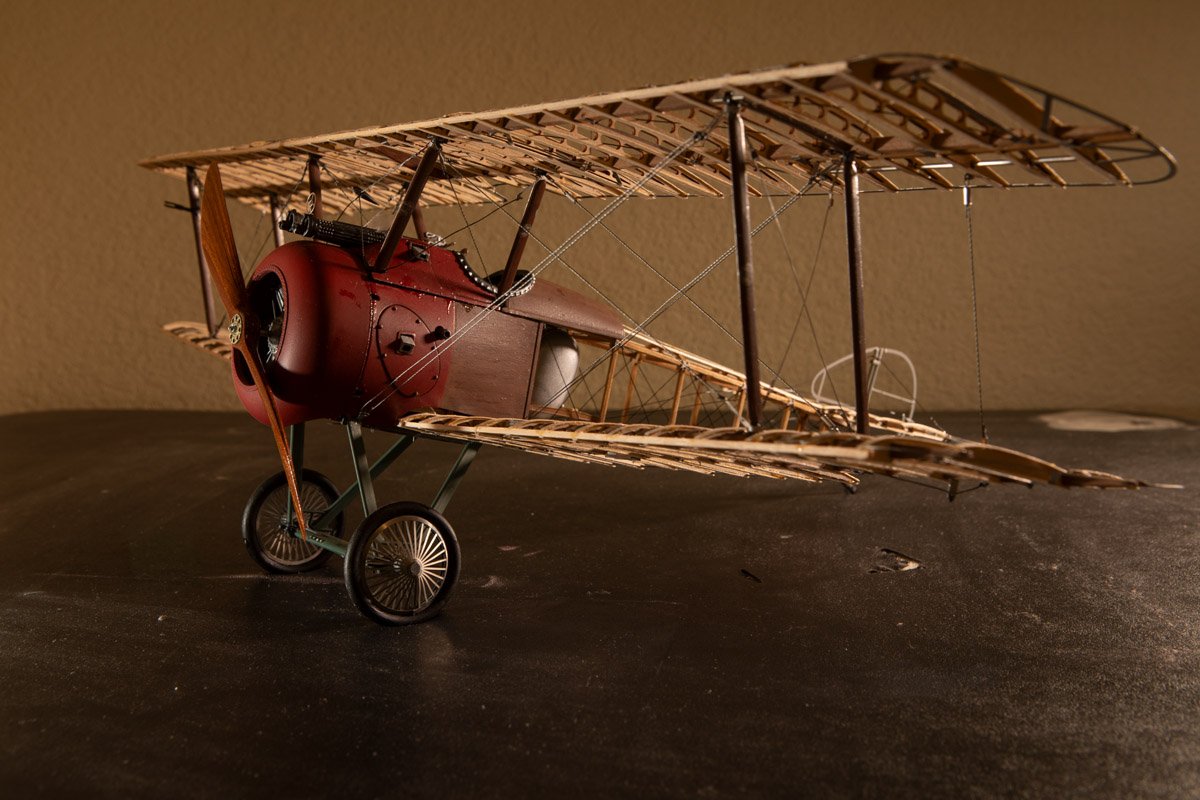
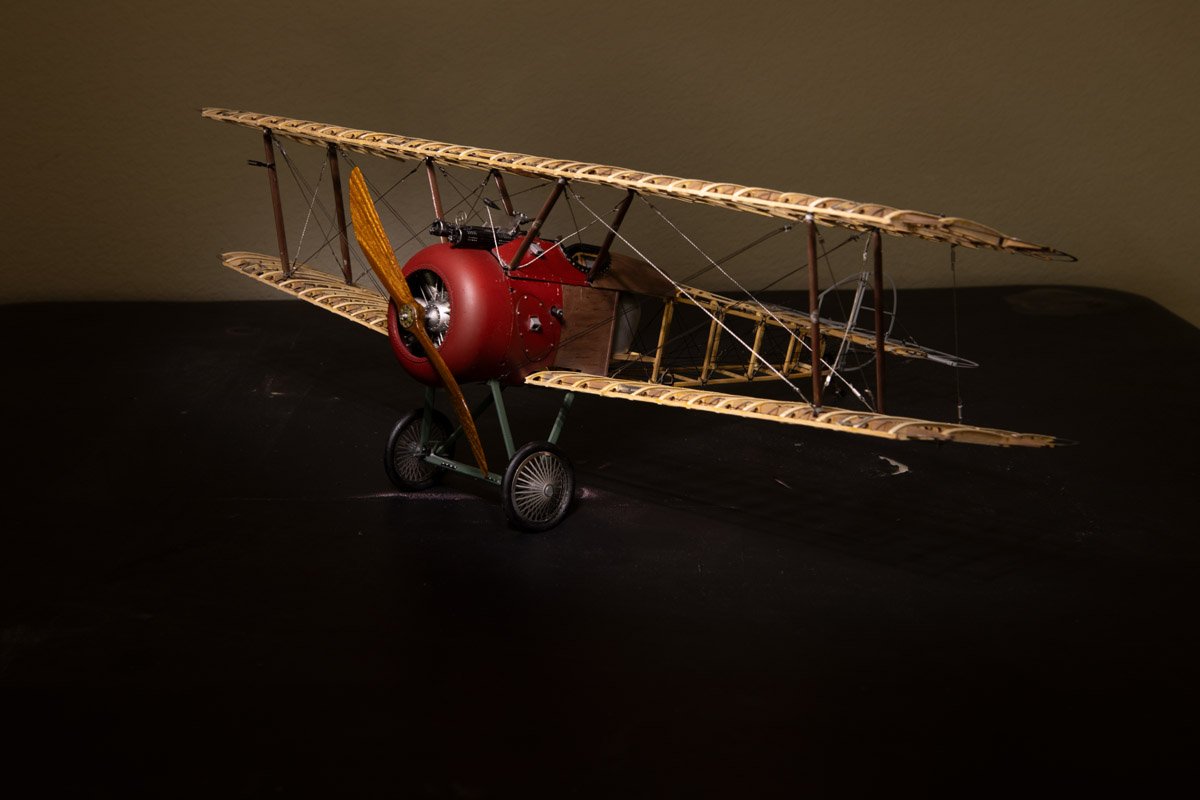
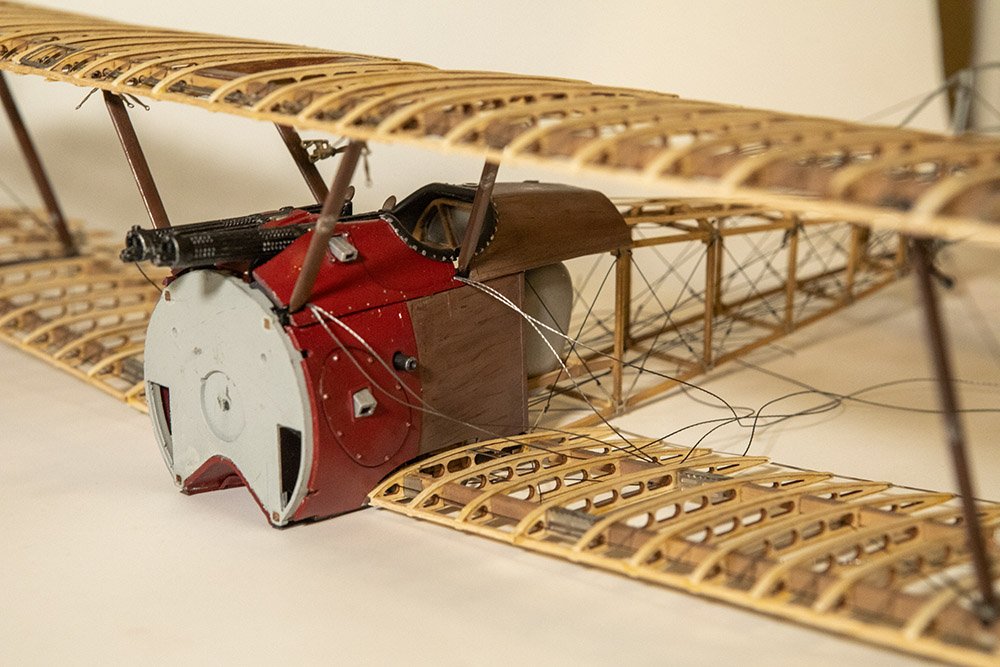
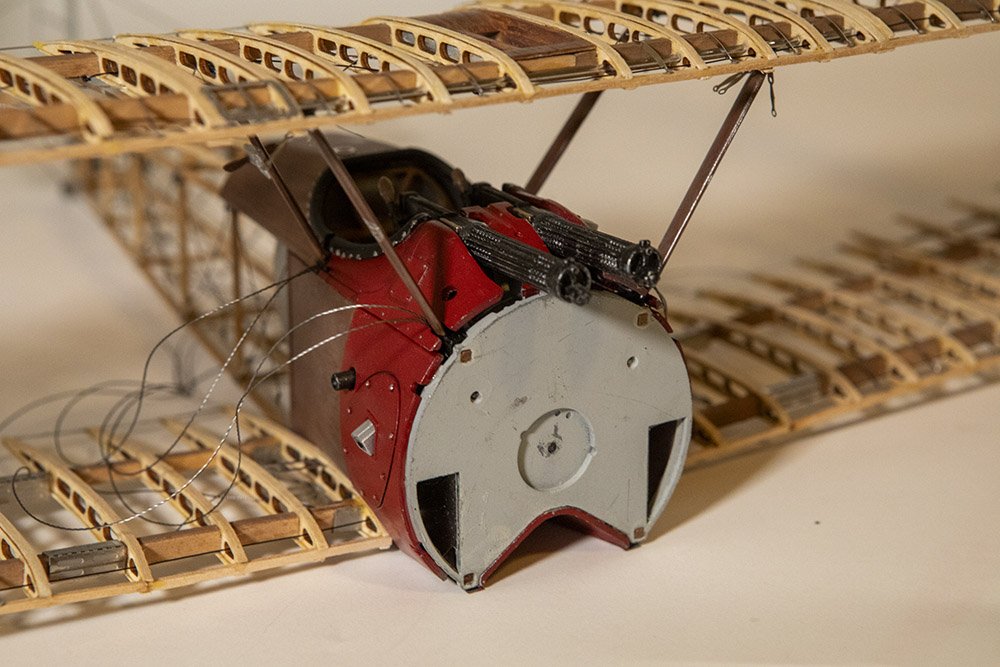
Finished I sort of limped over the finishing line but I am calling this one done. It was a bit of a roller coaster at times but I am pleased with the end results. I completed the rigging, at least as much as I plan to do. There was supposed to be some rigging on the landing gear as well but I am going to leave that off. Overall it was a very good kit with a lot of positives, but just a few really glaring negatives as well. And it definitely had some challenging aspects too....I accept at least some blame for any flaws in the final product. Initially I had thought about maybe creating some sort of diorama, or at least a base, something like @chadwijm6 created for his Sea King helicopter. I still could do that in the future, but for now I will just display it on the stand once I get the remaining stand parts that were missing from the original kit. As for the rigging, post #129 of @DocRob's AEG G.IV build log was a great help. I used a lot of those techniques, except with the stainless steel braided thread and slightly larger aluminum tube. I put a bit of CA on the end of the thread to hold it together, then passed the thread through the tube, then through the hole in the model, then back through the tube. I then put a drop of CA on the thread near the eyelet and slide the tube up to the eyelet and it worked like a charm. All that after trying several different types of thread or wire and several different methods of attaching it. That method was easy and also very effective so thanks to docrob for that post. Thanks also to everyone who has followed along and commented or at least hit the like button. And finally the pictures. This model is too large for my DIY photo stand/light box so I just put it on a somewhat beat up card table for its photo shoot.

-
I agree, I like the mirror too. Perhaps you already plan this, but any chance you can inset the mirror into the base instead of just having it sit on top? Maybe with the help of the fancy new laser engraver?
-
Westland Sea King HU.5 by chadwijm6 - Airfix - 1/48
gsdpic replied to chadwijm6's topic in Non-ship/categorised builds
Nice job on the bird, and the base looks very realistic. -
Thanks Peter. A few months back, I ordered a few things that I could not find at any US-based store from spotmodel in Spain. Those took about 2 weeks to arrive, so that is my guess for these parts as well. But since it is just parts for the stand, I can finish the model and move on before they arrive.
-
Just a quick note that I already received a reply from Artesania Latina and they are sending the missing parts for the stand. So, happy with that level of service. I assume they are sending from Spain, be interesting to see when they get here.
-
Excellent work! Interesting that it appears to have a compact spare tire. I guess that is all they had room for.
-
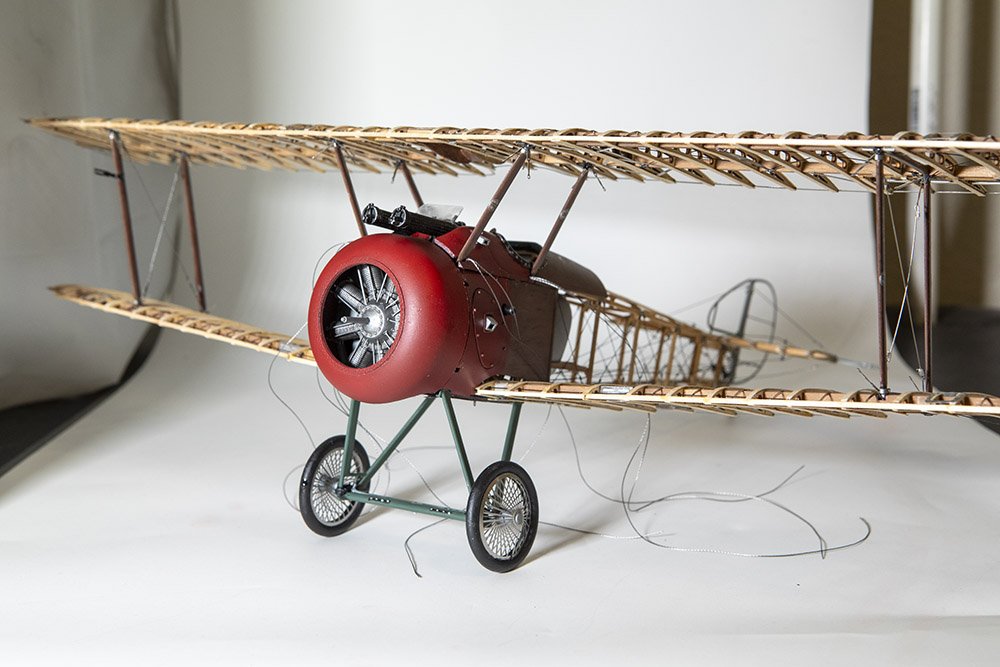
Just a couple quick notes. I've not yet tossed this thing in the bin but the temptation has been going up of late 😬 I decided I wanted a glossier finish for my propeller, so moving in that direction and brushed on some microscale clear gloss. Was also wondering about/tempted to try some thinned down Tamiya "Clear Yellow" to warm up the color a bit more. I started on the rigging with some of the rigging around the cockpit and it has been tricky. Not entirely pleased with the results but they are good enough, though in doing the rigging I also pulled loose one of the upper side metal cockpit parts. I decided to take a break from the rigging and assemble the acrylic stand, only to discover that three of the six pieces of the stand are missing. In the very first post of this log, with the unboxing photos, you can see the shrink wrapped stand with a large base and two curved upright pieces. There are supposed to be three additional smaller pieces that connect the two uprights. I went to the AL website and submitted a "parts request". We'll see how that goes. Looking at those photos, I also do not see the clear windscreen piece so I suspect it may have also been missing from the kit and not misplaced.
-
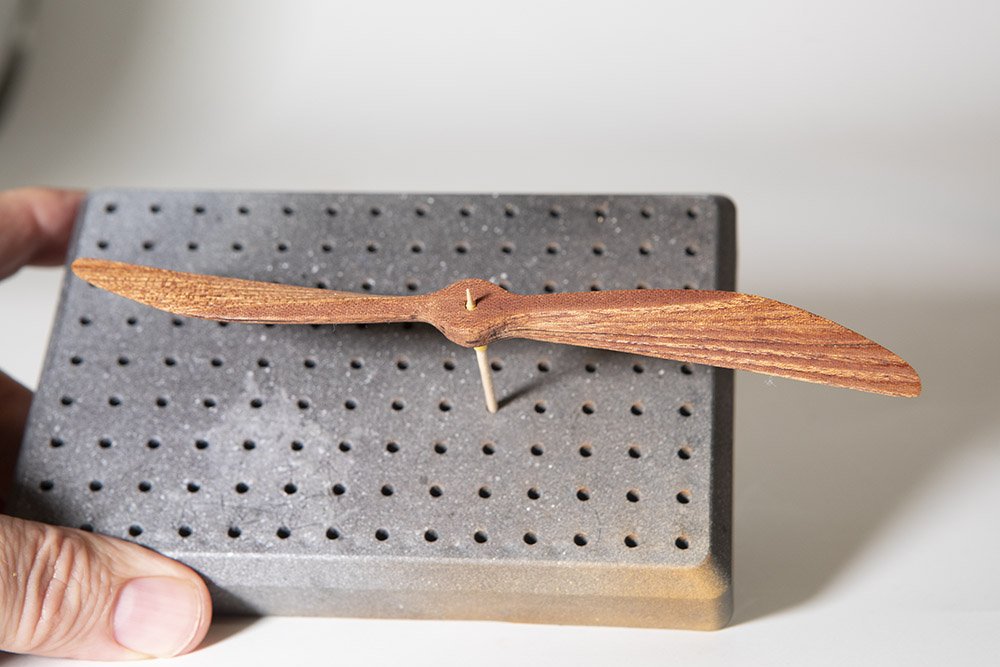
And here's the prop sanded to shape and with one coat of satin wipe on poly applied. I'll let it dry a bit more, sand a bit more, apply another coat, and repeat several more times.
- 90 replies
-
- 15
-
-
Thanks as always for the likes and comments. Ken, you may be right, though I thought this kit was fairly new. But I do not know its full history for certain. But I can say that I cannot imagine this kit without laser cut wood. Trying to hand cut all of the "lightening holes" in the ribs would drive me insane. Anyway, with a bit of a struggle, I've attached the landing gear, the engine, and the front cowl. I already noted issues with the landing gear. The engine was mostly easy though I did have to snip off a couple "locator pins" on the back of the engine that did not have corresponding holes in the firewall. The cowl was definitely more of a struggle. The biggest issue was that it was a rather tight fit and it is tricky to figure out how to grasp the model firmly without breaking things. At this point, there are just a handful of small parts remaining, plus the propeller and the rigging. The prop is laminated from 6 or 7 laser cut pieces of a dark wood...mahogany or walnut or something...and then sanded to shape. I've started on that but have a way to go with it. Oh, they also provide an acrylic stand that needs to be assembled and glued together if one wishes to use that.
- 90 replies
-
- 18
-
-
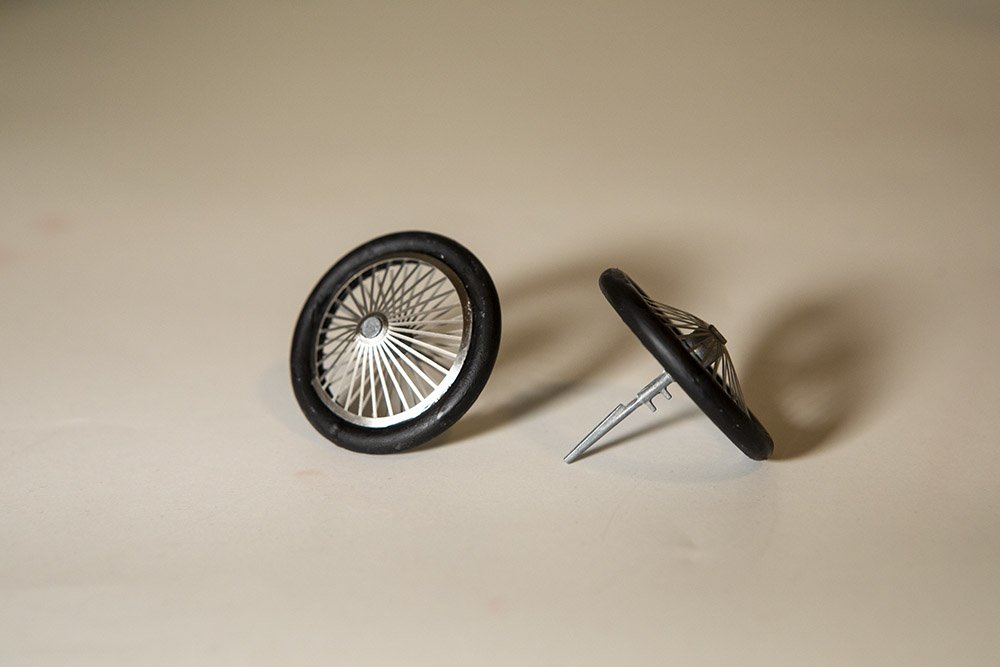
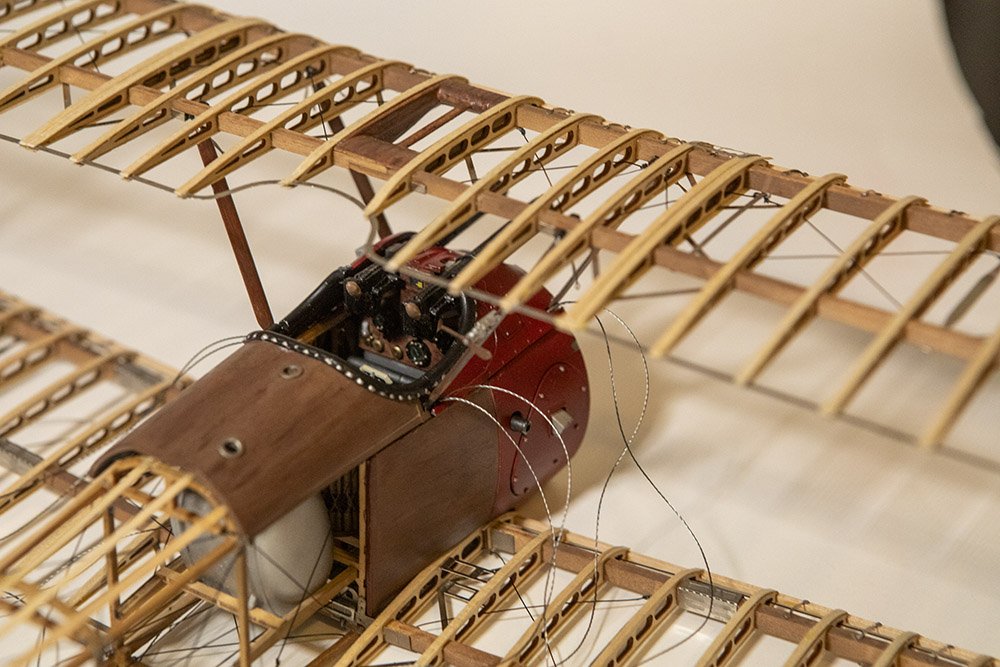
Thanks for the likes and comments. @PvG Aussie it is strange to me....though I admit I know nothing about manufacturing, I am a software guy....but the laser cut wood pieces for the most part fit together great. It has been the cast and photo etch metal pieces causing most of the problems. I would have expected the casting of metal to be more "precise" than laser cutting wood. Though in the description below I guess there was a counter example to that. And yes, I am getting close to completion, definitely in the dangerous "just want to finish the project" mode. I got the windscreen and third small gun installed. The windscreen does not look as scratched/fogged as it does in the picture. All those bits were a challenge to get in place. A lot of that work would have been easier before installing the top wing, but you really had to put the top wing on first to locate the struts. I've also started on the landing gear. Below is a picture of the two wheels. The tires were cast metal, painted flat black, while the spokes were photo etched parts, and the hubs and axles were also cast metal, all glued together with CA. The design of the wheels was such that they should be able to spin, but I guess I got a bit too much CA where it should not have been, so my wheels do not spin. The cone shaped outer spokes were a bit of a challenge to get them in place. I've now started trying to put the landing gear struts on the fuselage, but that is proving to be a challenge. Each strut attaches to the frame in two places. In the front, some of the cowling and internal photo etch are getting in the way a bit. At the rear attachment point, it is not fitting due to a prior tweak I made. Way back in post #17, in the second and third pictures, you can see that I doubled up the frame across the bottom in the cockpit area, to compensate for the poor fit of the wood pieces at the side of the cockpit....the laser cut wood pieces were too short for my model. Anyway, the rear attach point of the landing gear is supposed to sort of clip on to that fuselage frame but it cannot because my frame is twice as thick right there. So I need to figure out if I can cut away a bit of that doubled up frame or if there is some other way to compensate.
- 90 replies
-
- 12
-
-
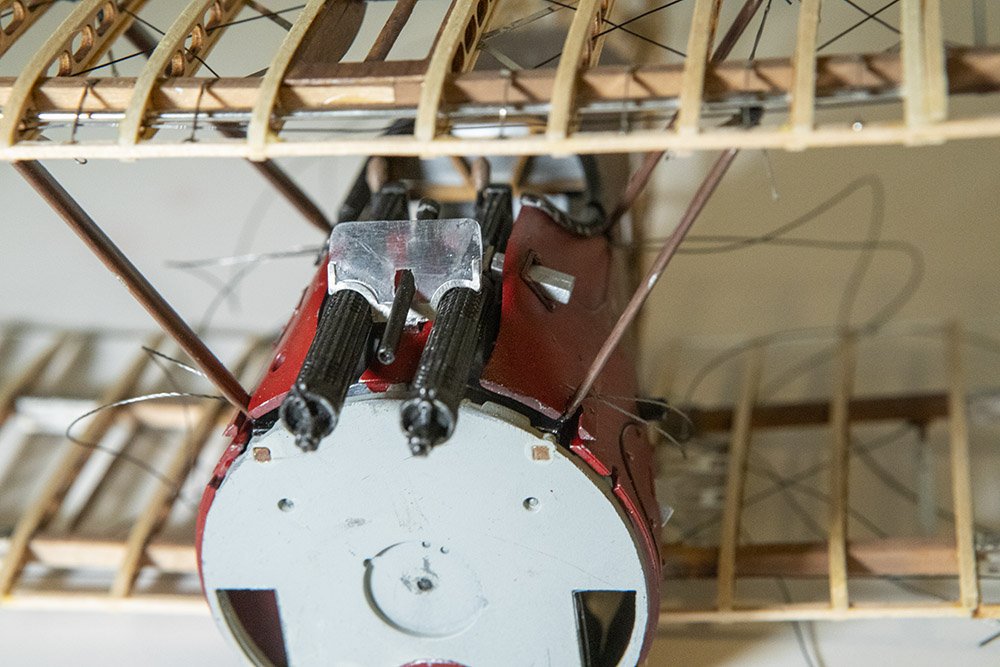
As always, thanks for the likes and comments, and to those who just take a look from time to time. The kit continues to be a bit of a roller coaster, as some parts go well and others are a bit frustrating. The most recent bits fall more into the latter camp. I've put on the rest of the metal parts around the cowl and cockpit. The fit of those parts ranged from mediocre to poor. The one "poor" fit was the piece between the two machine guns....I admit the instructions did call that part out and say "adjust if necessary" showing someone taking a file to the side of the part. Sadly, no amount of filing would make the part 1/8th of an inch longer, which probably would have helped. As for the other parts, they did not always line up well and it was difficult to tell where the back side of the part came in contact with the rest of the model....e.g. where to apply glue. Further, those parts had three different "access holes" to allow access to the filler caps for fuel or oil tanks. Two of those holes do not line up at all with the tank filler below and the third partially lined up. Oh well. Below are some pictures. Oh, you can also see some loose rigging...those lines had to be glued to the back of the metal parts before installing the metal parts. The other ends will be attached in later steps. Next up is the windshield, though I seem to have misplaced the clear plastic bit for that. But it should be easy enough to recreate it from the ton of clear plastic packaging used to contain all the cast metal parts in the kit.
- 90 replies
-
- 17
-
-

-
Looking good. I like the way the icebergs in front fit together. Do you plan to add any tinges of color to the icebergs? Maybe a tiny bit of brown/tan and some blue or blue/green?
- 88 replies
-
- 5
-
-
-
- Ghost Ship
- Jenny
- (and 1 more)
-
The sails, like the rest of the model, are really looking great! For some reason, I feel like sails really belong on a model with fore-and-aft rigged sails. They really add to the model without obscuring the view of the rest of the model as much as square sails.
