thibaultron
-
Posts
2,944 -
Joined
-
Last visited
Content Type
Profiles
Forums
Gallery
Events
Everything posted by thibaultron
-

3D Printing Cannons in Resin
thibaultron replied to thibaultron's topic in 3D-Printing and Laser-Cutting.
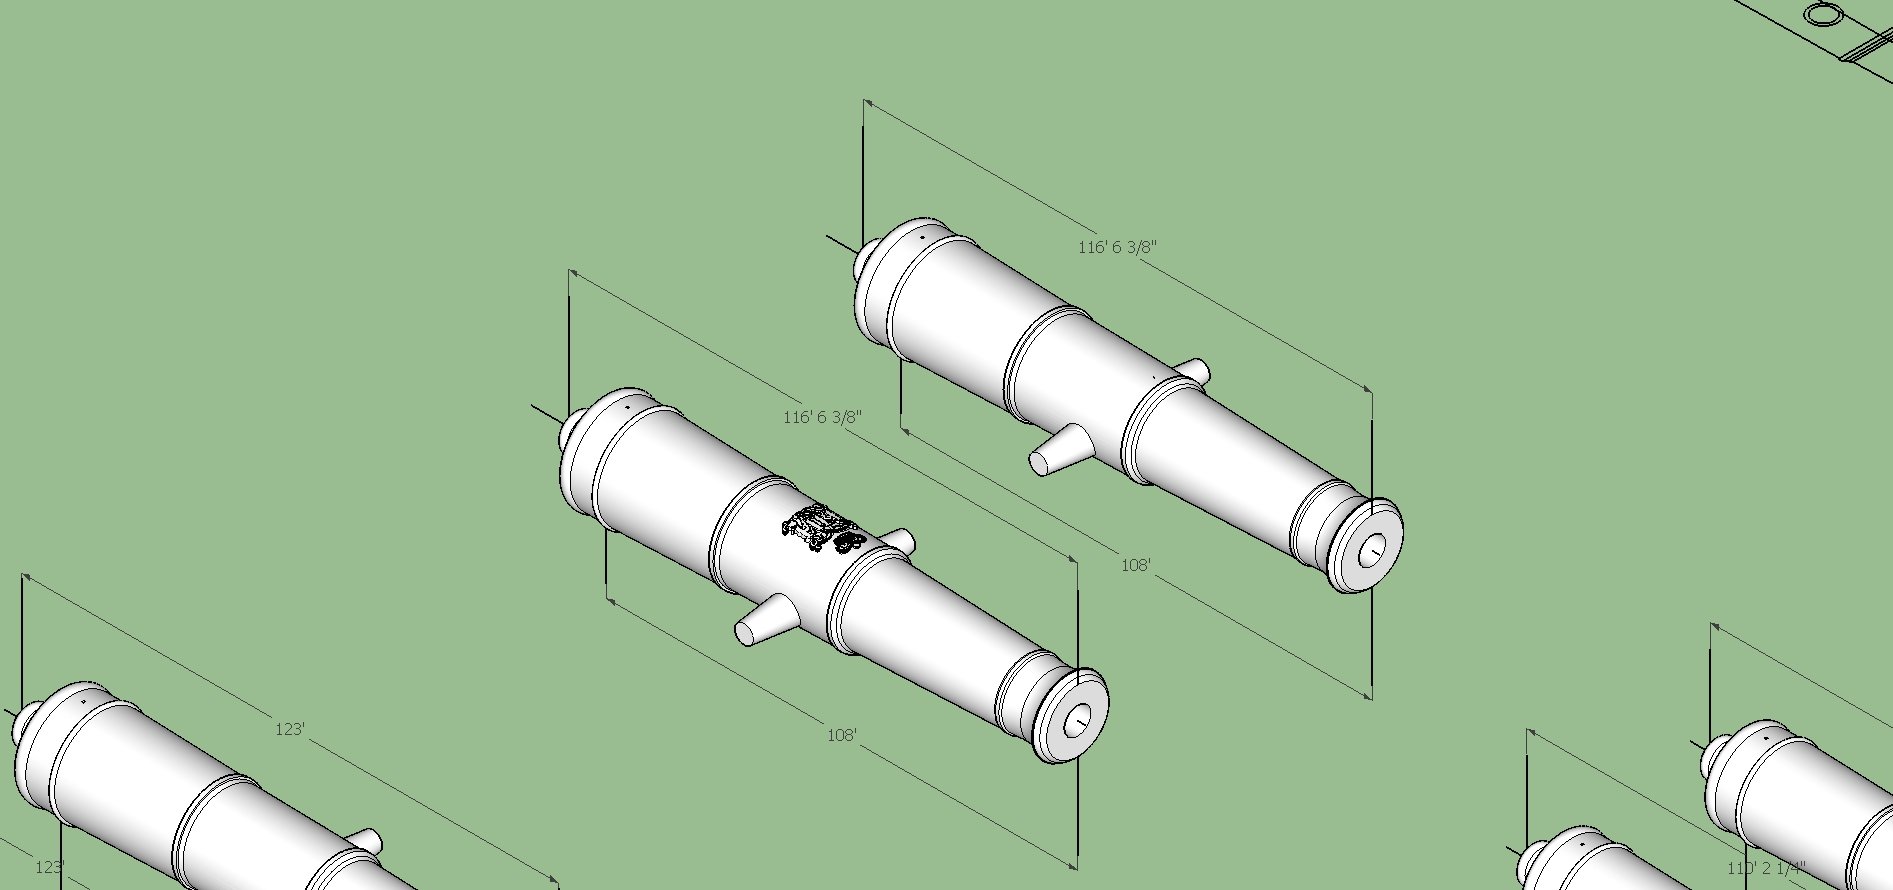
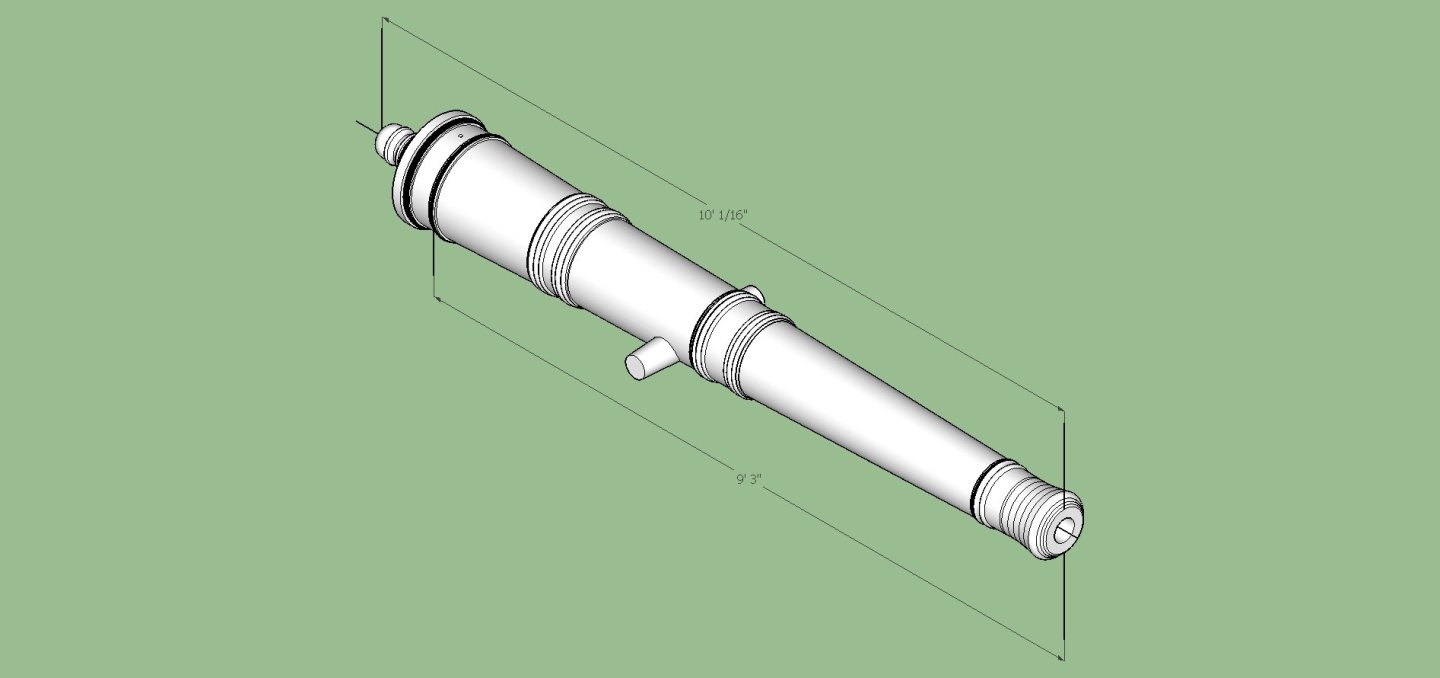
Commonwealth 24 Pounder 102 Commonwealth Pattern 24 Pounder 102 Charles II Cypher Full Size_2798_76mm.stl Commonwealth Pattern 24 Pounder 102 No Cypher Full Size_2798_76mm.stl Commonwealth 24 Pounder 108 Commonwealth Pattern 24 Pounder 108 Charles II Cypher Full Size_2960_16mm.stl Commonwealth Pattern 24 Pounder 108 No Cypher Full Size_2960_16mm.stl Commonwealth 24 Pounder 114 Commonwealth Pattern 24 Pounder 114 Charles II Cypher Full Size_3124._60mm.stl Commonwealth Pattern 24 Pounder 114 No Cypher Full Size_3124_60mm.stl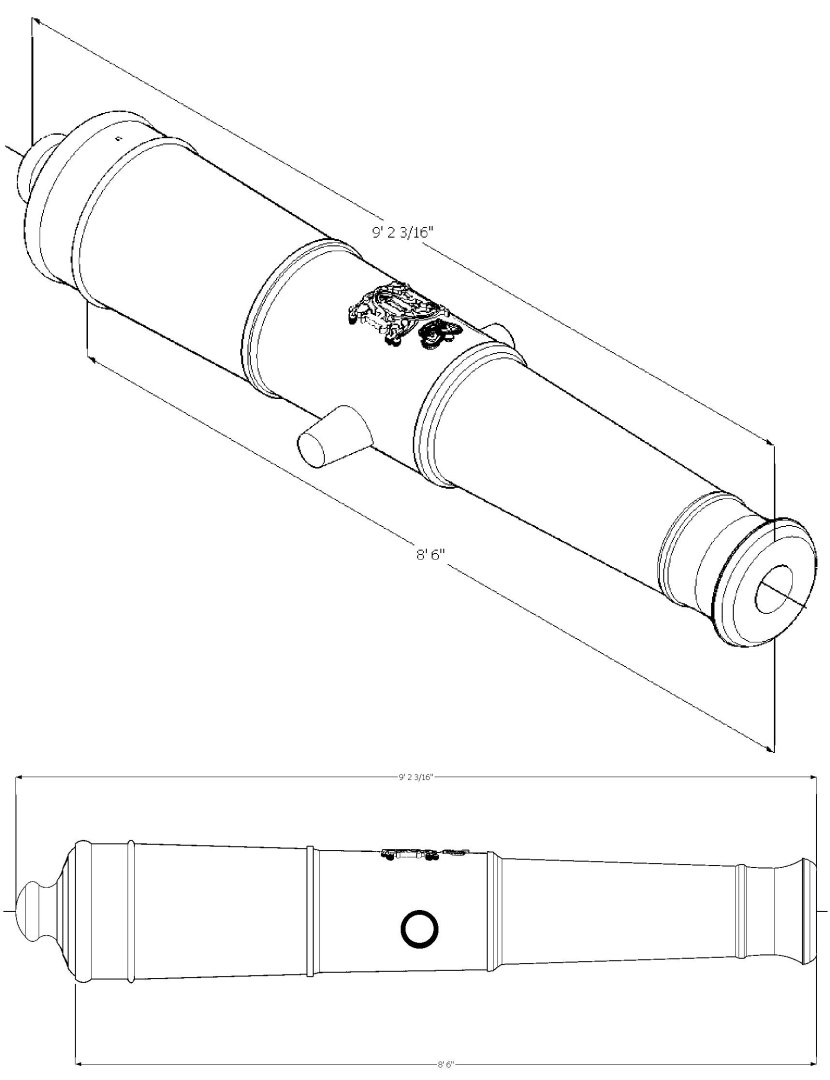

-
3D Printing Cannons in Resin
thibaultron replied to thibaultron's topic in 3D-Printing and Laser-Cutting.
Commonwealth 18 Pounder 108 Commonwealth Pattern 18 Pounder 108 Charles II Cypher Full Size_2959_63mm.stl Commonwealth Pattern 18 Pounder 108 No Cypher Full Size_2959_63mm.stl Commonwealth 18 Pounder 114 Commonwealth Pattern 18 Pounder 114 Charles II Cypher Full Size_3124_46mm.stl Commonwealth Pattern 18 Pounder 114 No Cypher Full Size_3124_46mm.stl

-
3D Printing Cannons in Resin
thibaultron replied to thibaultron's topic in 3D-Printing and Laser-Cutting.
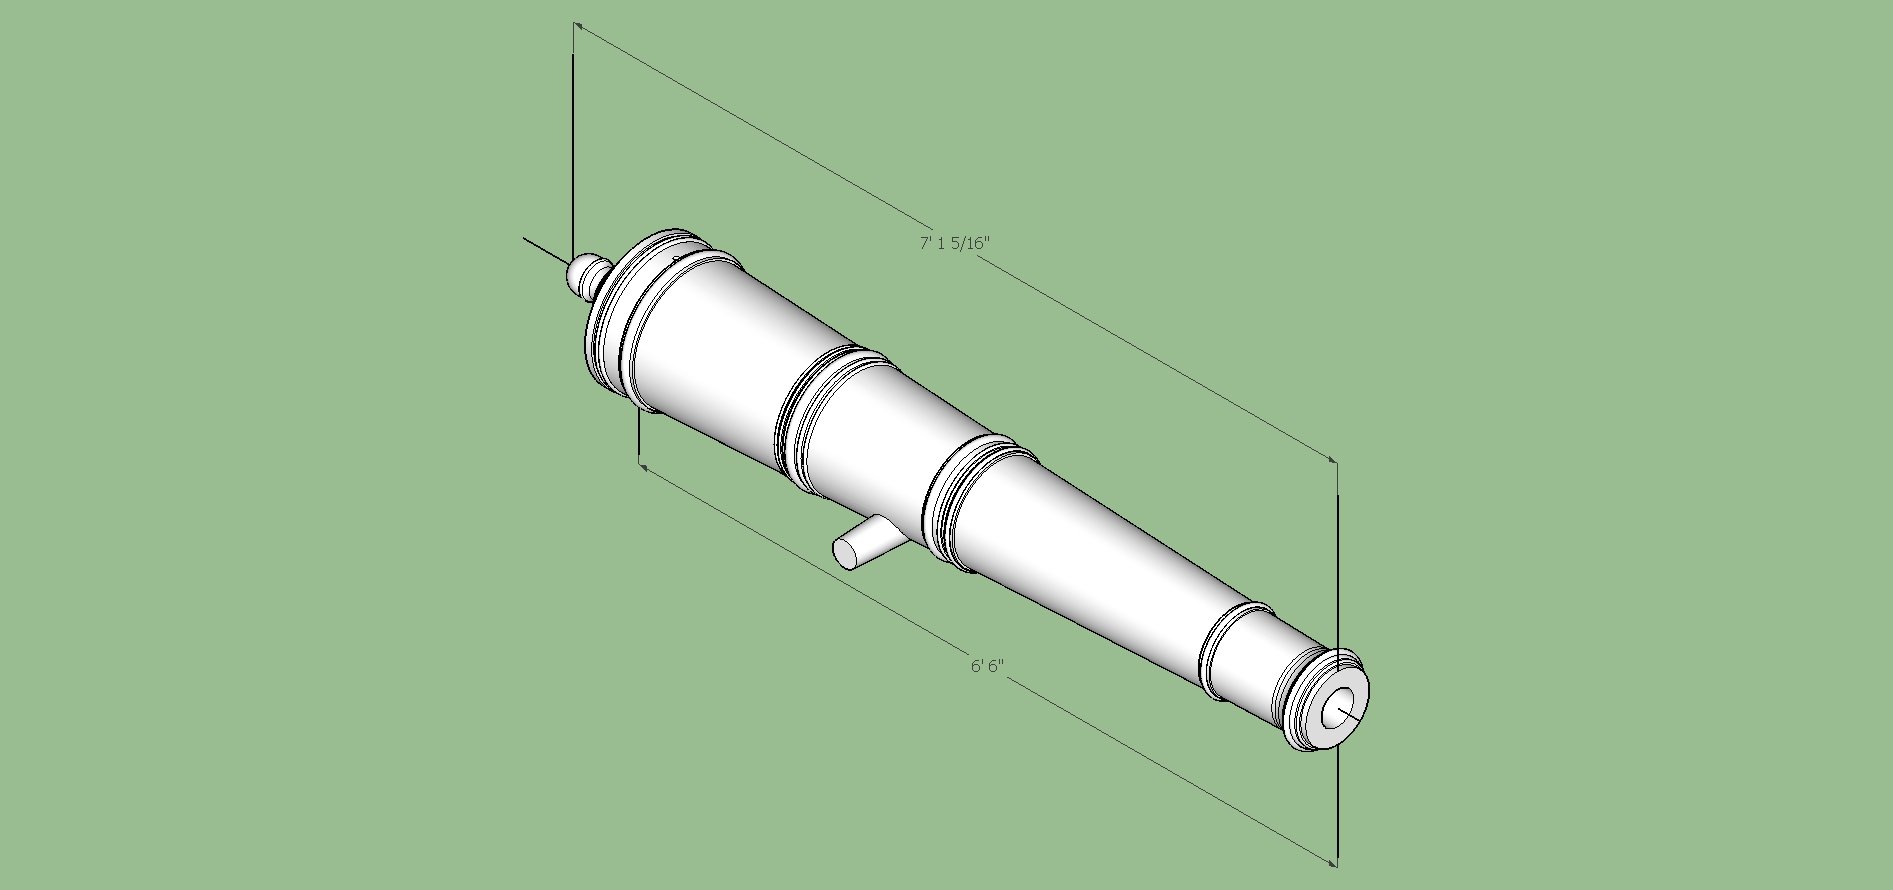
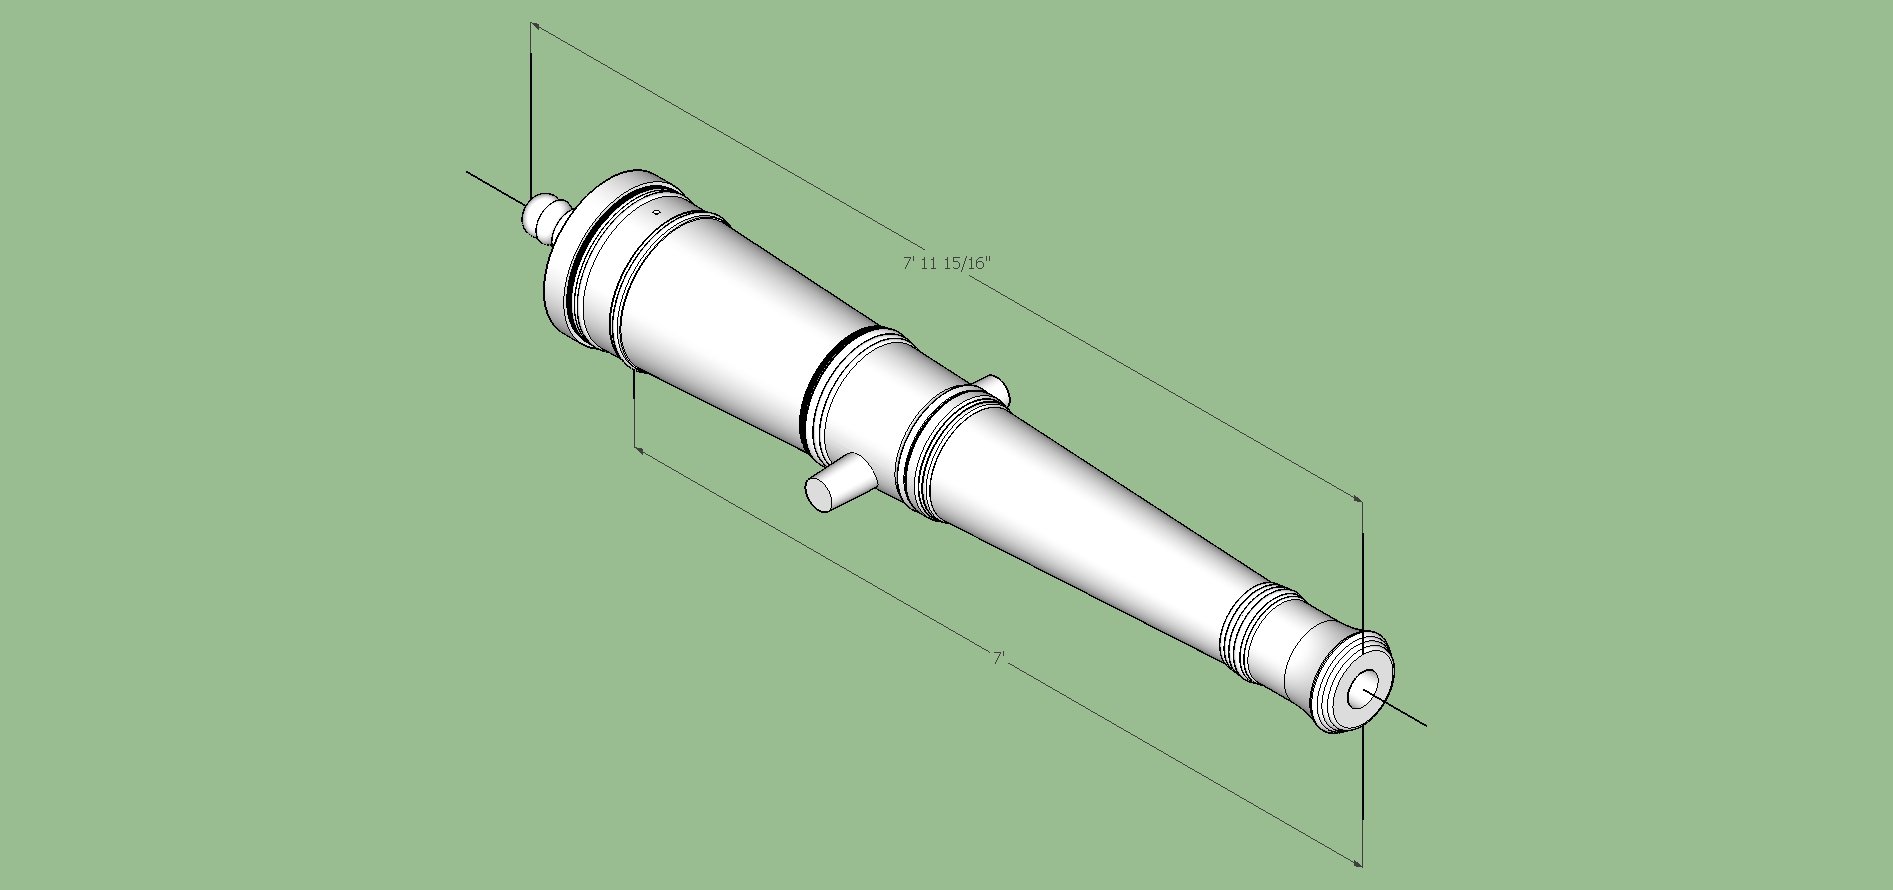
Commonwealth 12 Pounder 96 Commonwealth Pattern 12 Pounder 96 Charles II Cypher Full Size_2633_40mm.stl Commonwealth Pattern 12 Pounder 96 No Cyphe Full Size_2533_40mm.stl Commonwealth 12 Pounder 108 Commonwealth Pattern 12 Pounder 108 Charles II Cypher Full Size_2958_84mm.stl Commonwealth Pattern 12 Pounder 108 No Cypher Full Size_2958_84mm.stl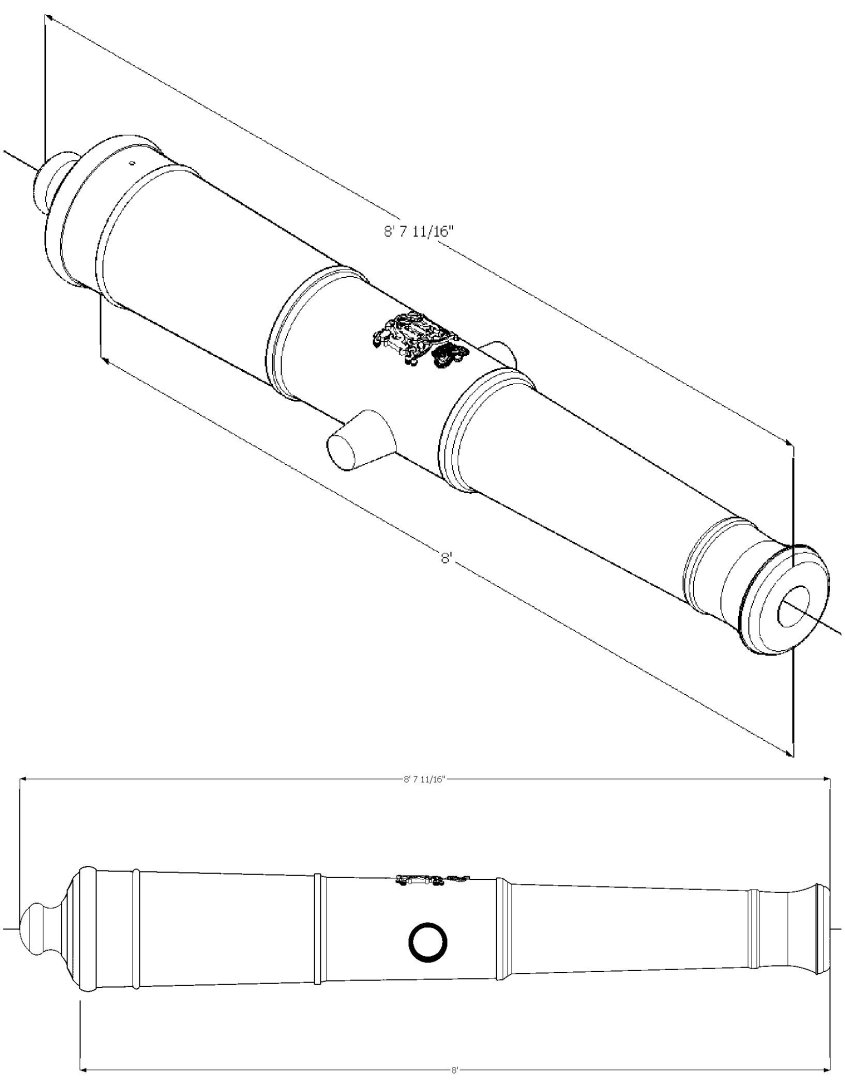
-
3D Printing Cannons in Resin
thibaultron replied to thibaultron's topic in 3D-Printing and Laser-Cutting.
Here are the files. Commonwealth 9 Pounder 96 Commonwealth Pattern 9 Pounder 96 Charles II Cypher Full Size_2633_40mm.stl Commonwealth Pattern 9 Pounder 96 No Cypher Full Size_2633_40mm.stl Commonwealth 9 Pounder102 Commonwealth Pattern 9 Pounder 102 Charles II Cypher Full Size_2785_14mm_006 (repaired).stl Commonwealth Pattern 9 Pounder 102 No Cypher Full Size_2785_14mm.stl Commonwealth 9 Pounder 108 Commonwealth Pattern 9 Pounder 108 Charles II Cypher Full Size_2935_82mm.stl Commonwealth Pattern 9 Pounder 108 No Cypher Full Size_2935_82mm.stl


-
3D Printing Cannons in Resin
thibaultron replied to thibaultron's topic in 3D-Printing and Laser-Cutting.
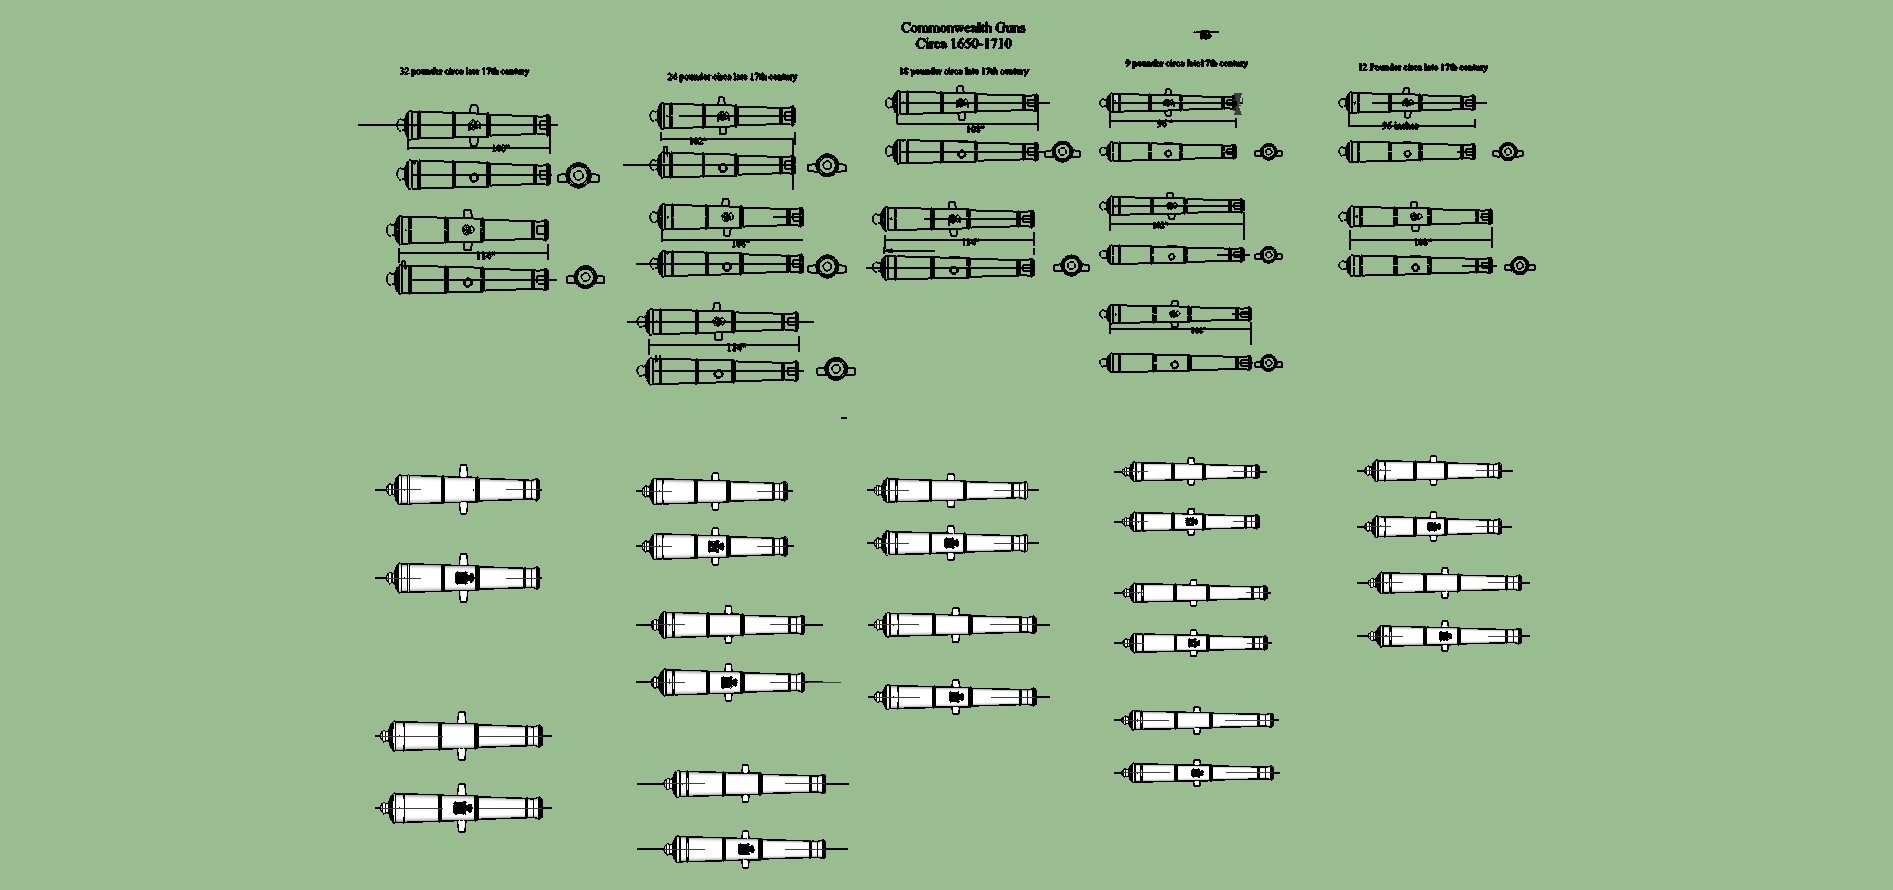
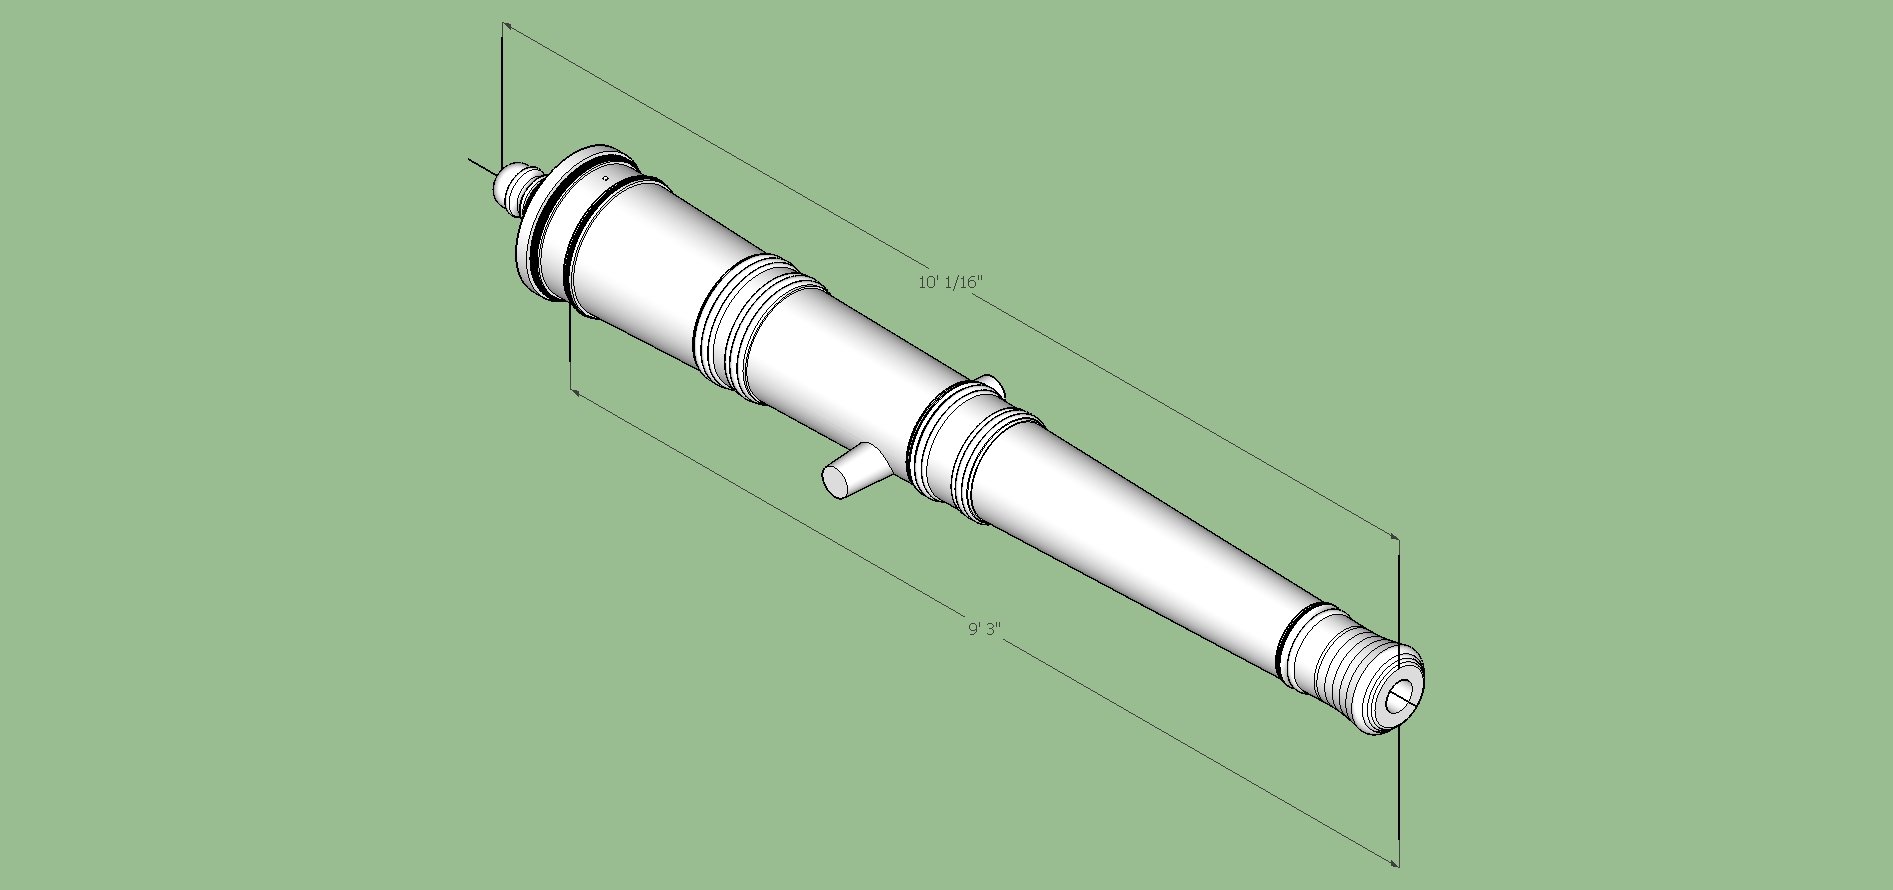
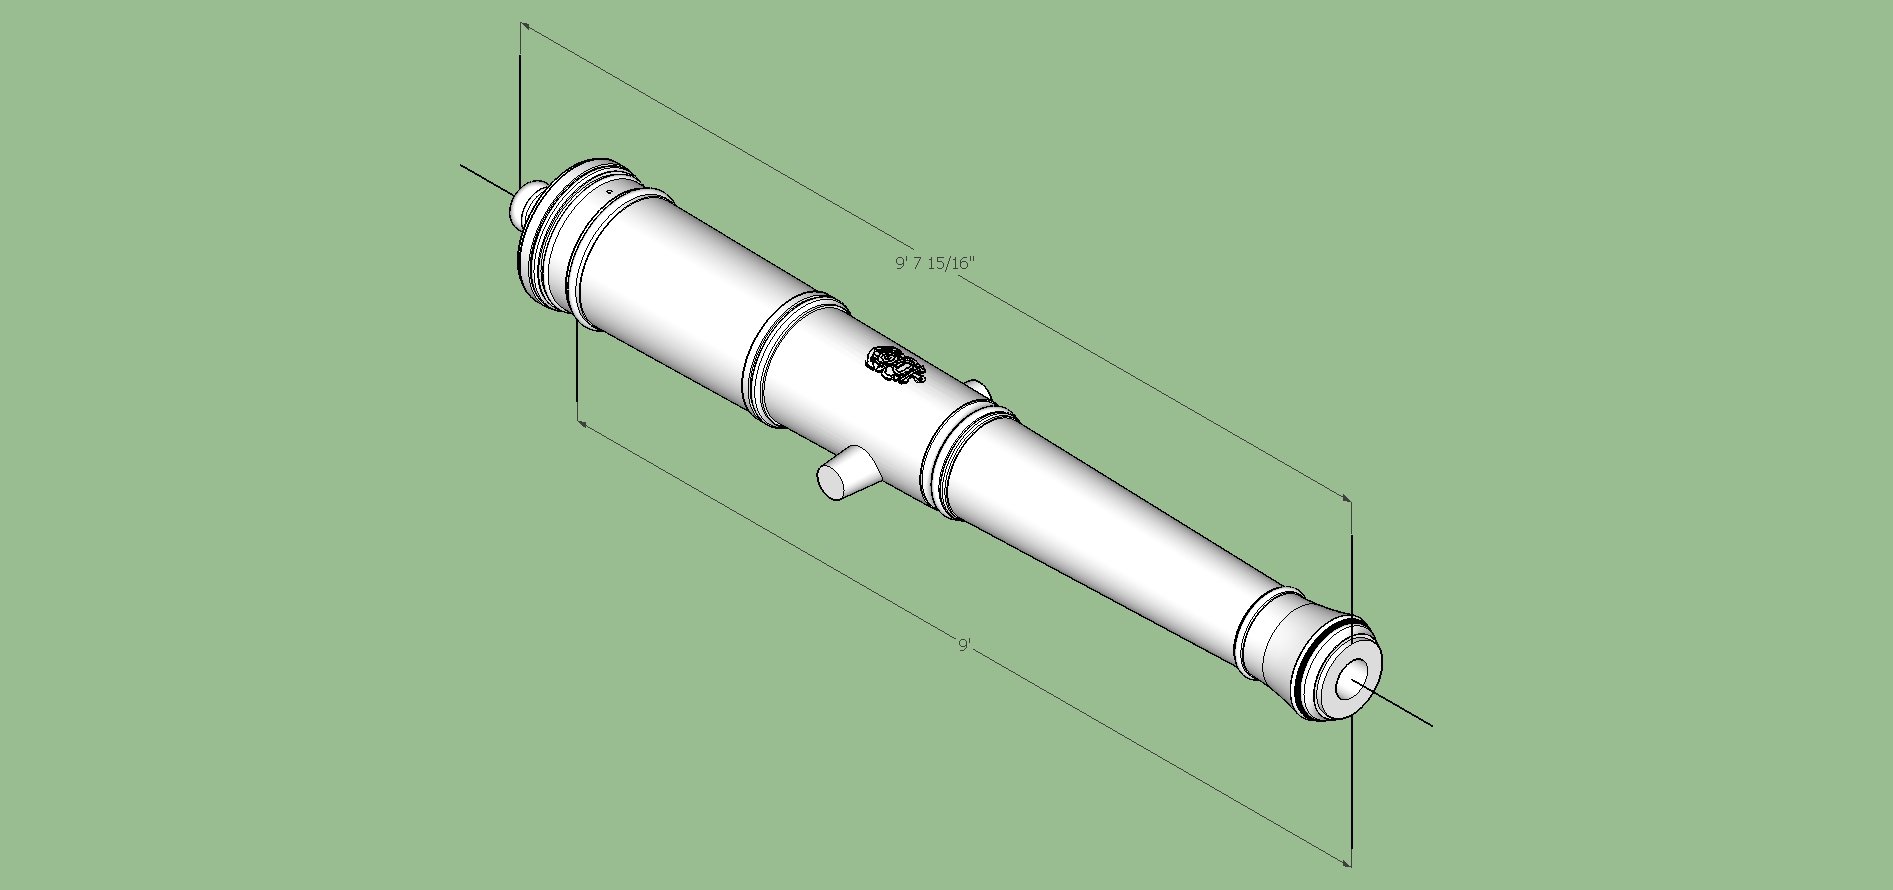
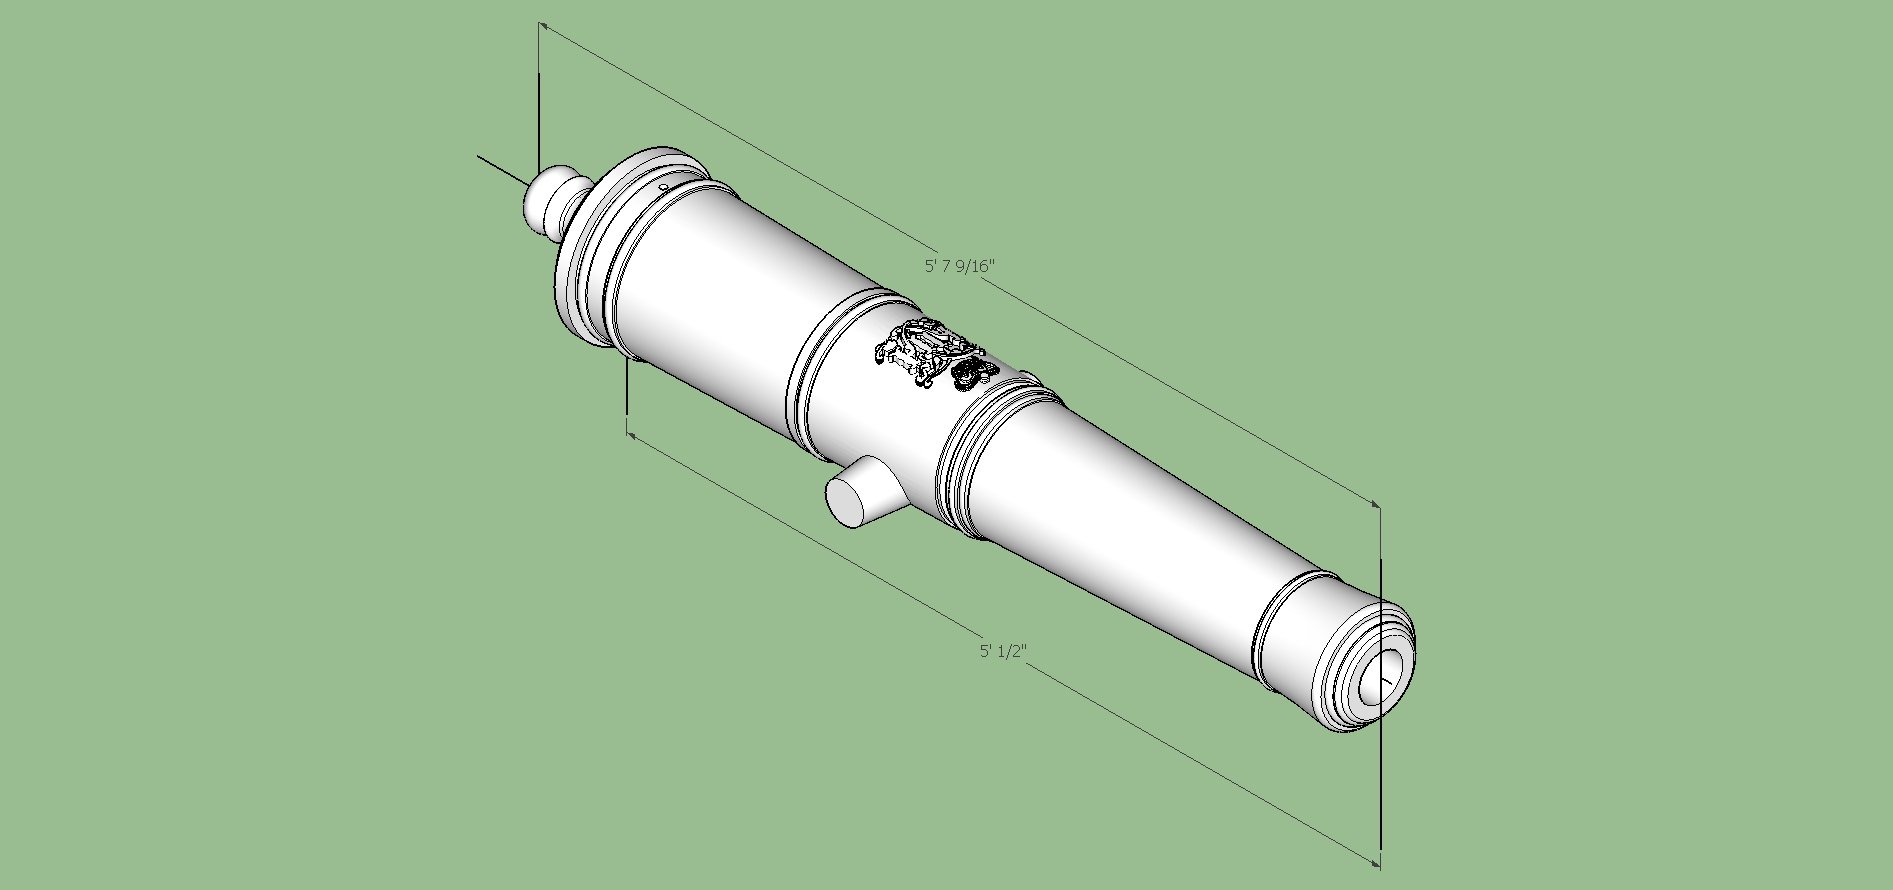
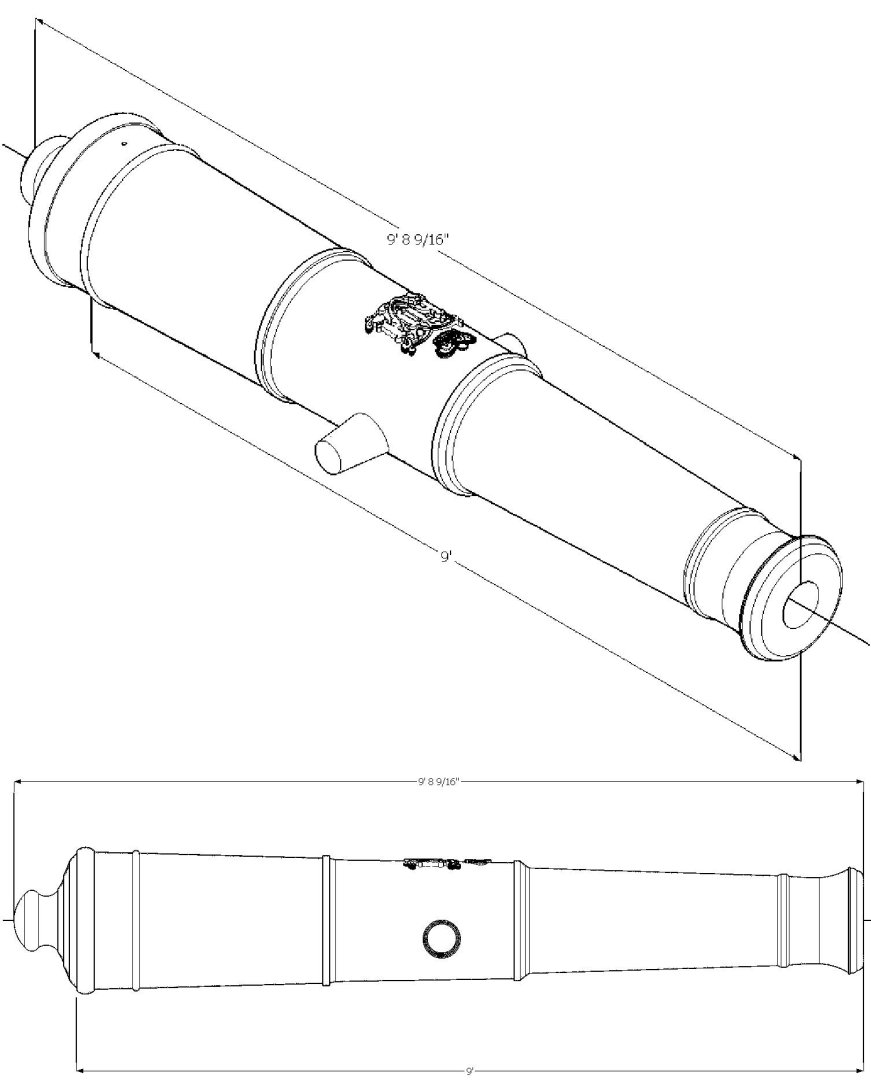
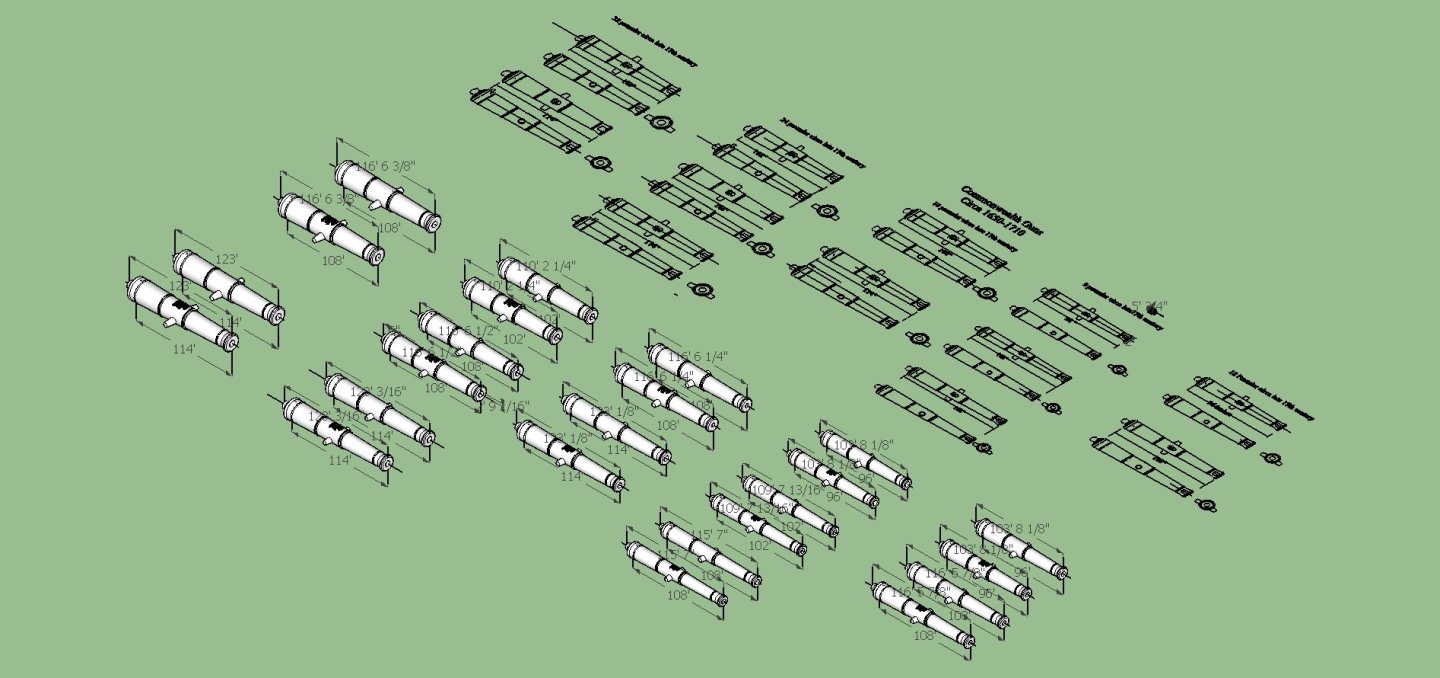
The next several post are the files for the Commonwealth Pattern cannons. After the British Civil War, when the Commonwealth came to power, new cannons were cast to the Commonwealth Pattern, with their cypher. When Charles II came to power, the cyphers on all these cannons were removed. I drew the "No Cypher" barrels to represent this. New cannons cast after the start of Charles II's reign, were cast with his cypher using the commonwealth design. I will be posting the graphics for cannon X followed by the .STL files for both styles of barrel. As a note: The first post will show the first cannon graphic for both the "Charles II" and the "No Cypher" barrels, followed by the two associated .STL files. To save on posted file sizes, the subsequent posts will show only the Charles II graphic, followed by both assoicated .STL files. The only difference in the barrels of cannon X is the presence or absence of the cypher. -
San Francisco cable car by kgstakes - FINISHED - OcCre
thibaultron replied to kgstakes's topic in Non-ship/categorised builds
I have this kit, and will be following along. -
3D Printing Cannons in Resin
thibaultron replied to thibaultron's topic in 3D-Printing and Laser-Cutting.
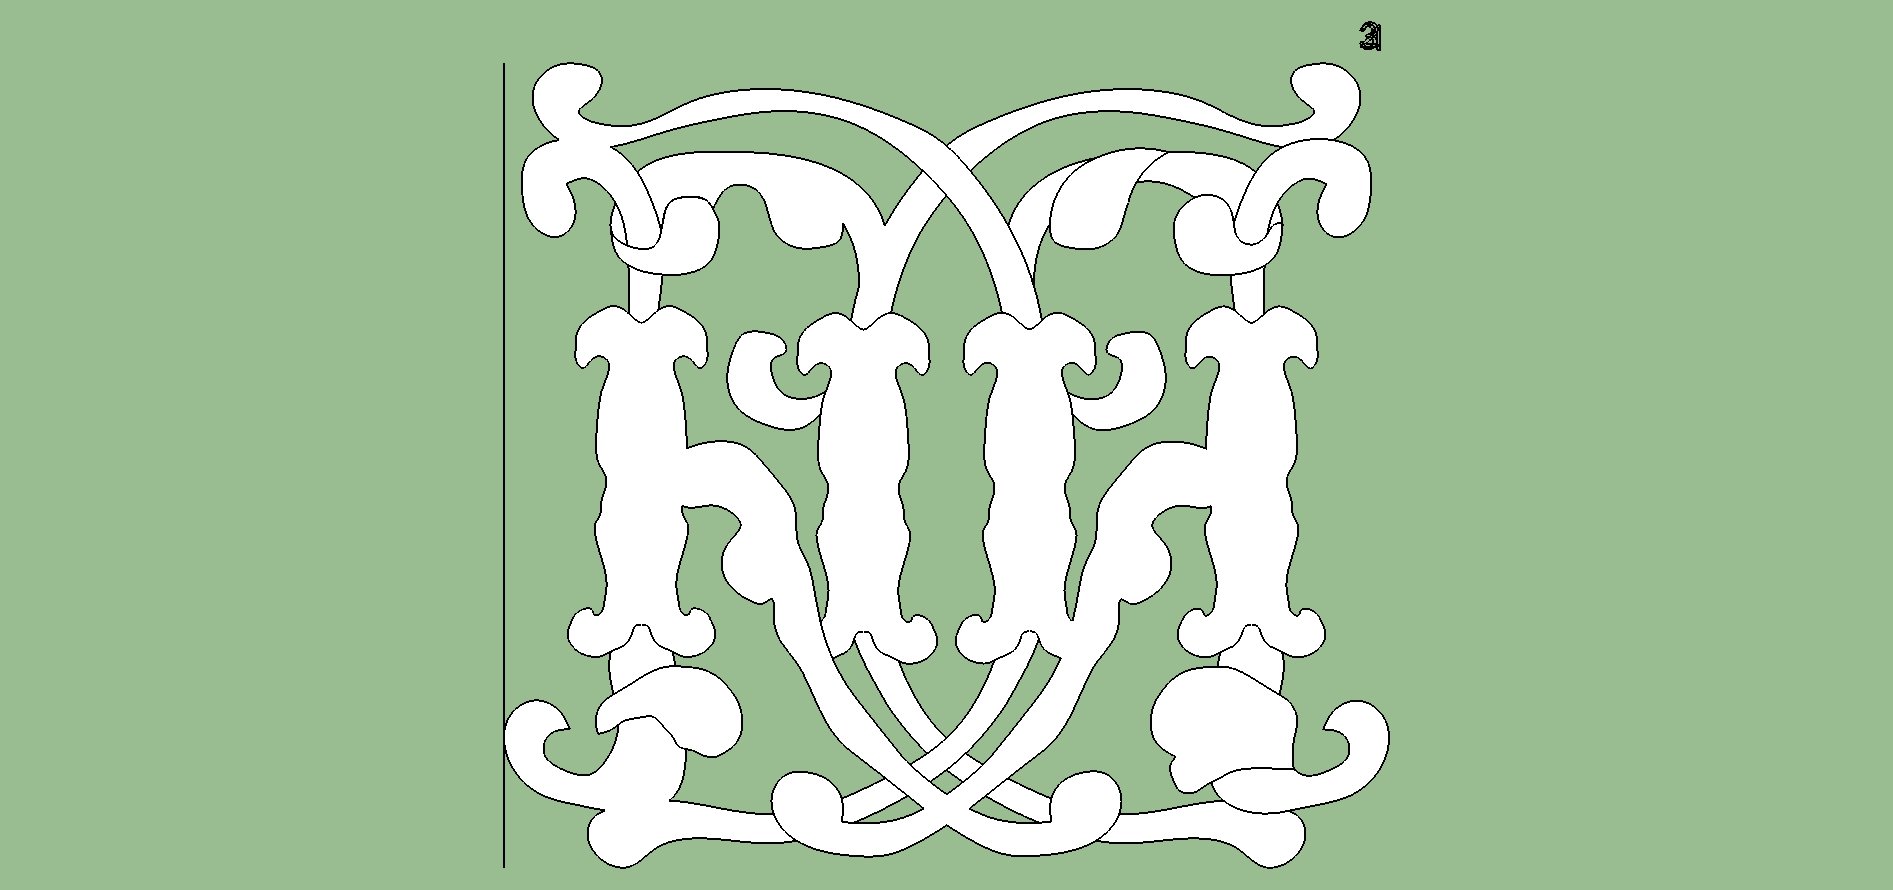
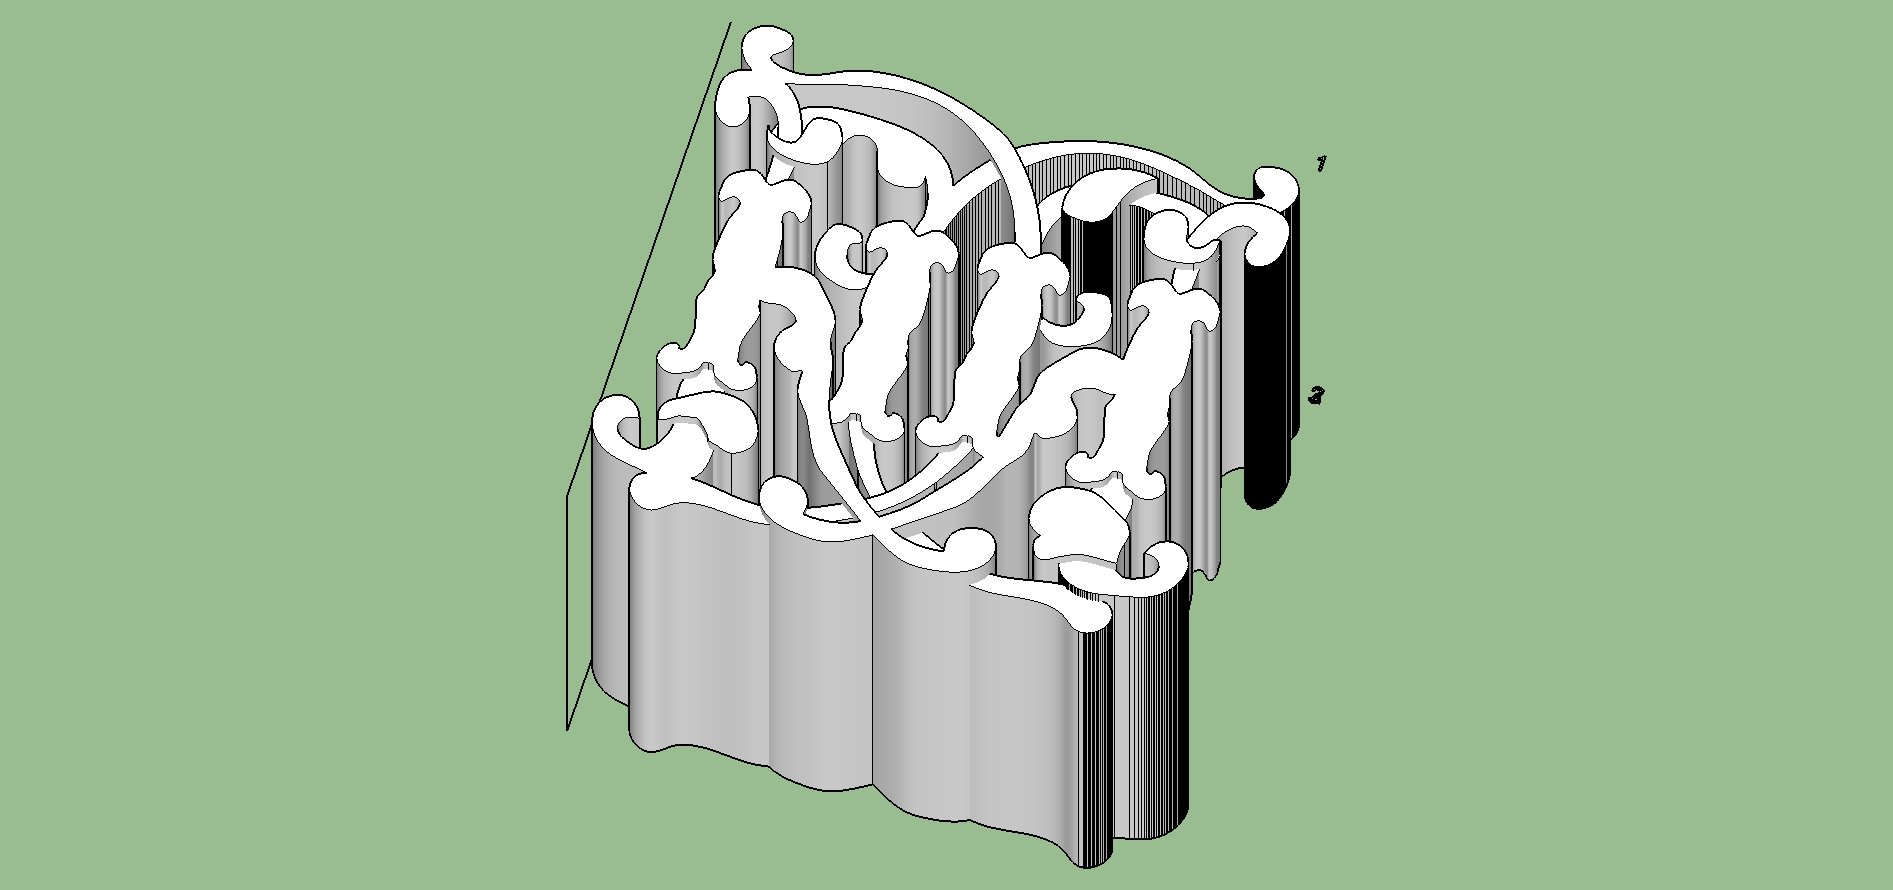
I finished the drawings for the Commonwealth Pattern cannons from 1650 to the end of Charles II's reign. The original pattern was developed during the Commonwealth control 1640 to 49, and originally featured their cypher. When Charles came to power those cyphers were removed from the existing cannons, leaving cannons with plain barrels. These drawings feature the plain barrels and those with Charles' cyphers. I still need to go through and create the STL files, and the graphics for each cannon, as well as updating the spreadsheet to include them. So it will be a couple of weeks before I publish them. I hope to add these to the NRG Resource page. Overhead and perspective views with the original 2D drawing at the top. The 2D drawing mistakenly shows the Tutor Rose as the correct cypher. A closeup of one of the larger caliber guns showing both types of barrels. Note: that the drawing shows them 12X size this is how I typically scale the drawings to be able to get the fine details, as SketchUp is designed for architecture and has a 1/32" minimum drawing unit (at least my 2017 version). For these drawings I had to go with 144X due to the small "pearls" in the crown. When I create and verify the STL files, I rescale to 1:1 in the verification program.


- 131 replies
-
- 13
-

-

-
M3A1 Scout Car by brunnels - Tamiya - 1/35 - PLASTIC
thibaultron replied to brunnels's topic in Non-ship/categorised builds
I found the above on Ebay. Are these what what you are looking for? -
M3A1 Scout Car by brunnels - Tamiya - 1/35 - PLASTIC
thibaultron replied to brunnels's topic in Non-ship/categorised builds
https://www.ebay.com/itm/175335227343?_skw=M3A1+Scout+Car+6+hole+wheels&itmmeta=01K59FRXJS4THZ3CCT7MCVQK5F&hash=item28d2cb3fcf:g:pOwAAOSwWgtivEAR&itmprp=enc%3AAQAKAAAA4FkggFvd1GGDu0w3yXCmi1ejOSTayye1qs01G3rCbsUF0XjrGoaLJ3iikEKmN0yUGuL0amYfy6FLybKgPkhxTPYAF%2Bu8j%2BpTHEDFIBJmSL59nIHQdAq798i0B2sPIAy3mCZkQOwtj%2FyMej70wAdMcSLI4R2DYyDaAGPFICQR4jW1Q9sQeQxI0lFdjrj6l1PIpwGd9ujWOnaJ6PmPV4RGK1GrtIZjR6W13C92XFzQB4qG%2BMksHVmqEZ83mUiK%2FlgpA7HB3C9C91eK8nXSQImvfM8DbAKXIrKFyJYUksYV60pe|tkp%3ABk9SR-LZ46-qZg -
If you store your IPA and water(if used),in sealed clear or very translucent containers, you can set them in the sun between sessions and the sun light will cure the resin. After the resin cures it will fall to the bottom of the container, and can be filtered out. This allows the fluids to be reused many times, before they become to "dirty" to reuse.
-
3D Printing Cannons in Resin
thibaultron replied to thibaultron's topic in 3D-Printing and Laser-Cutting.
On a note about the above post. The Commonwealth Pattern cannons came in three major "favors". With the Commonwealth Cypher, a plain barrel (After King Charles reign started, the Commonwealth cypher were filed off any existing cannons), and with the Charles II cypher cast on. I have the defaced, plain, barrels drawn, already. I will not be doing the Commonwealth cypher for this set. The cyphers take a long time to get right, and I have many projects on my plate, so drawing a cypher that only spanned 10 years is more than I want to take on. The same applies for any cannons cast after Charles reign, if the cypher pattern was changed. -
3D Printing Cannons in Resin
thibaultron replied to thibaultron's topic in 3D-Printing and Laser-Cutting.
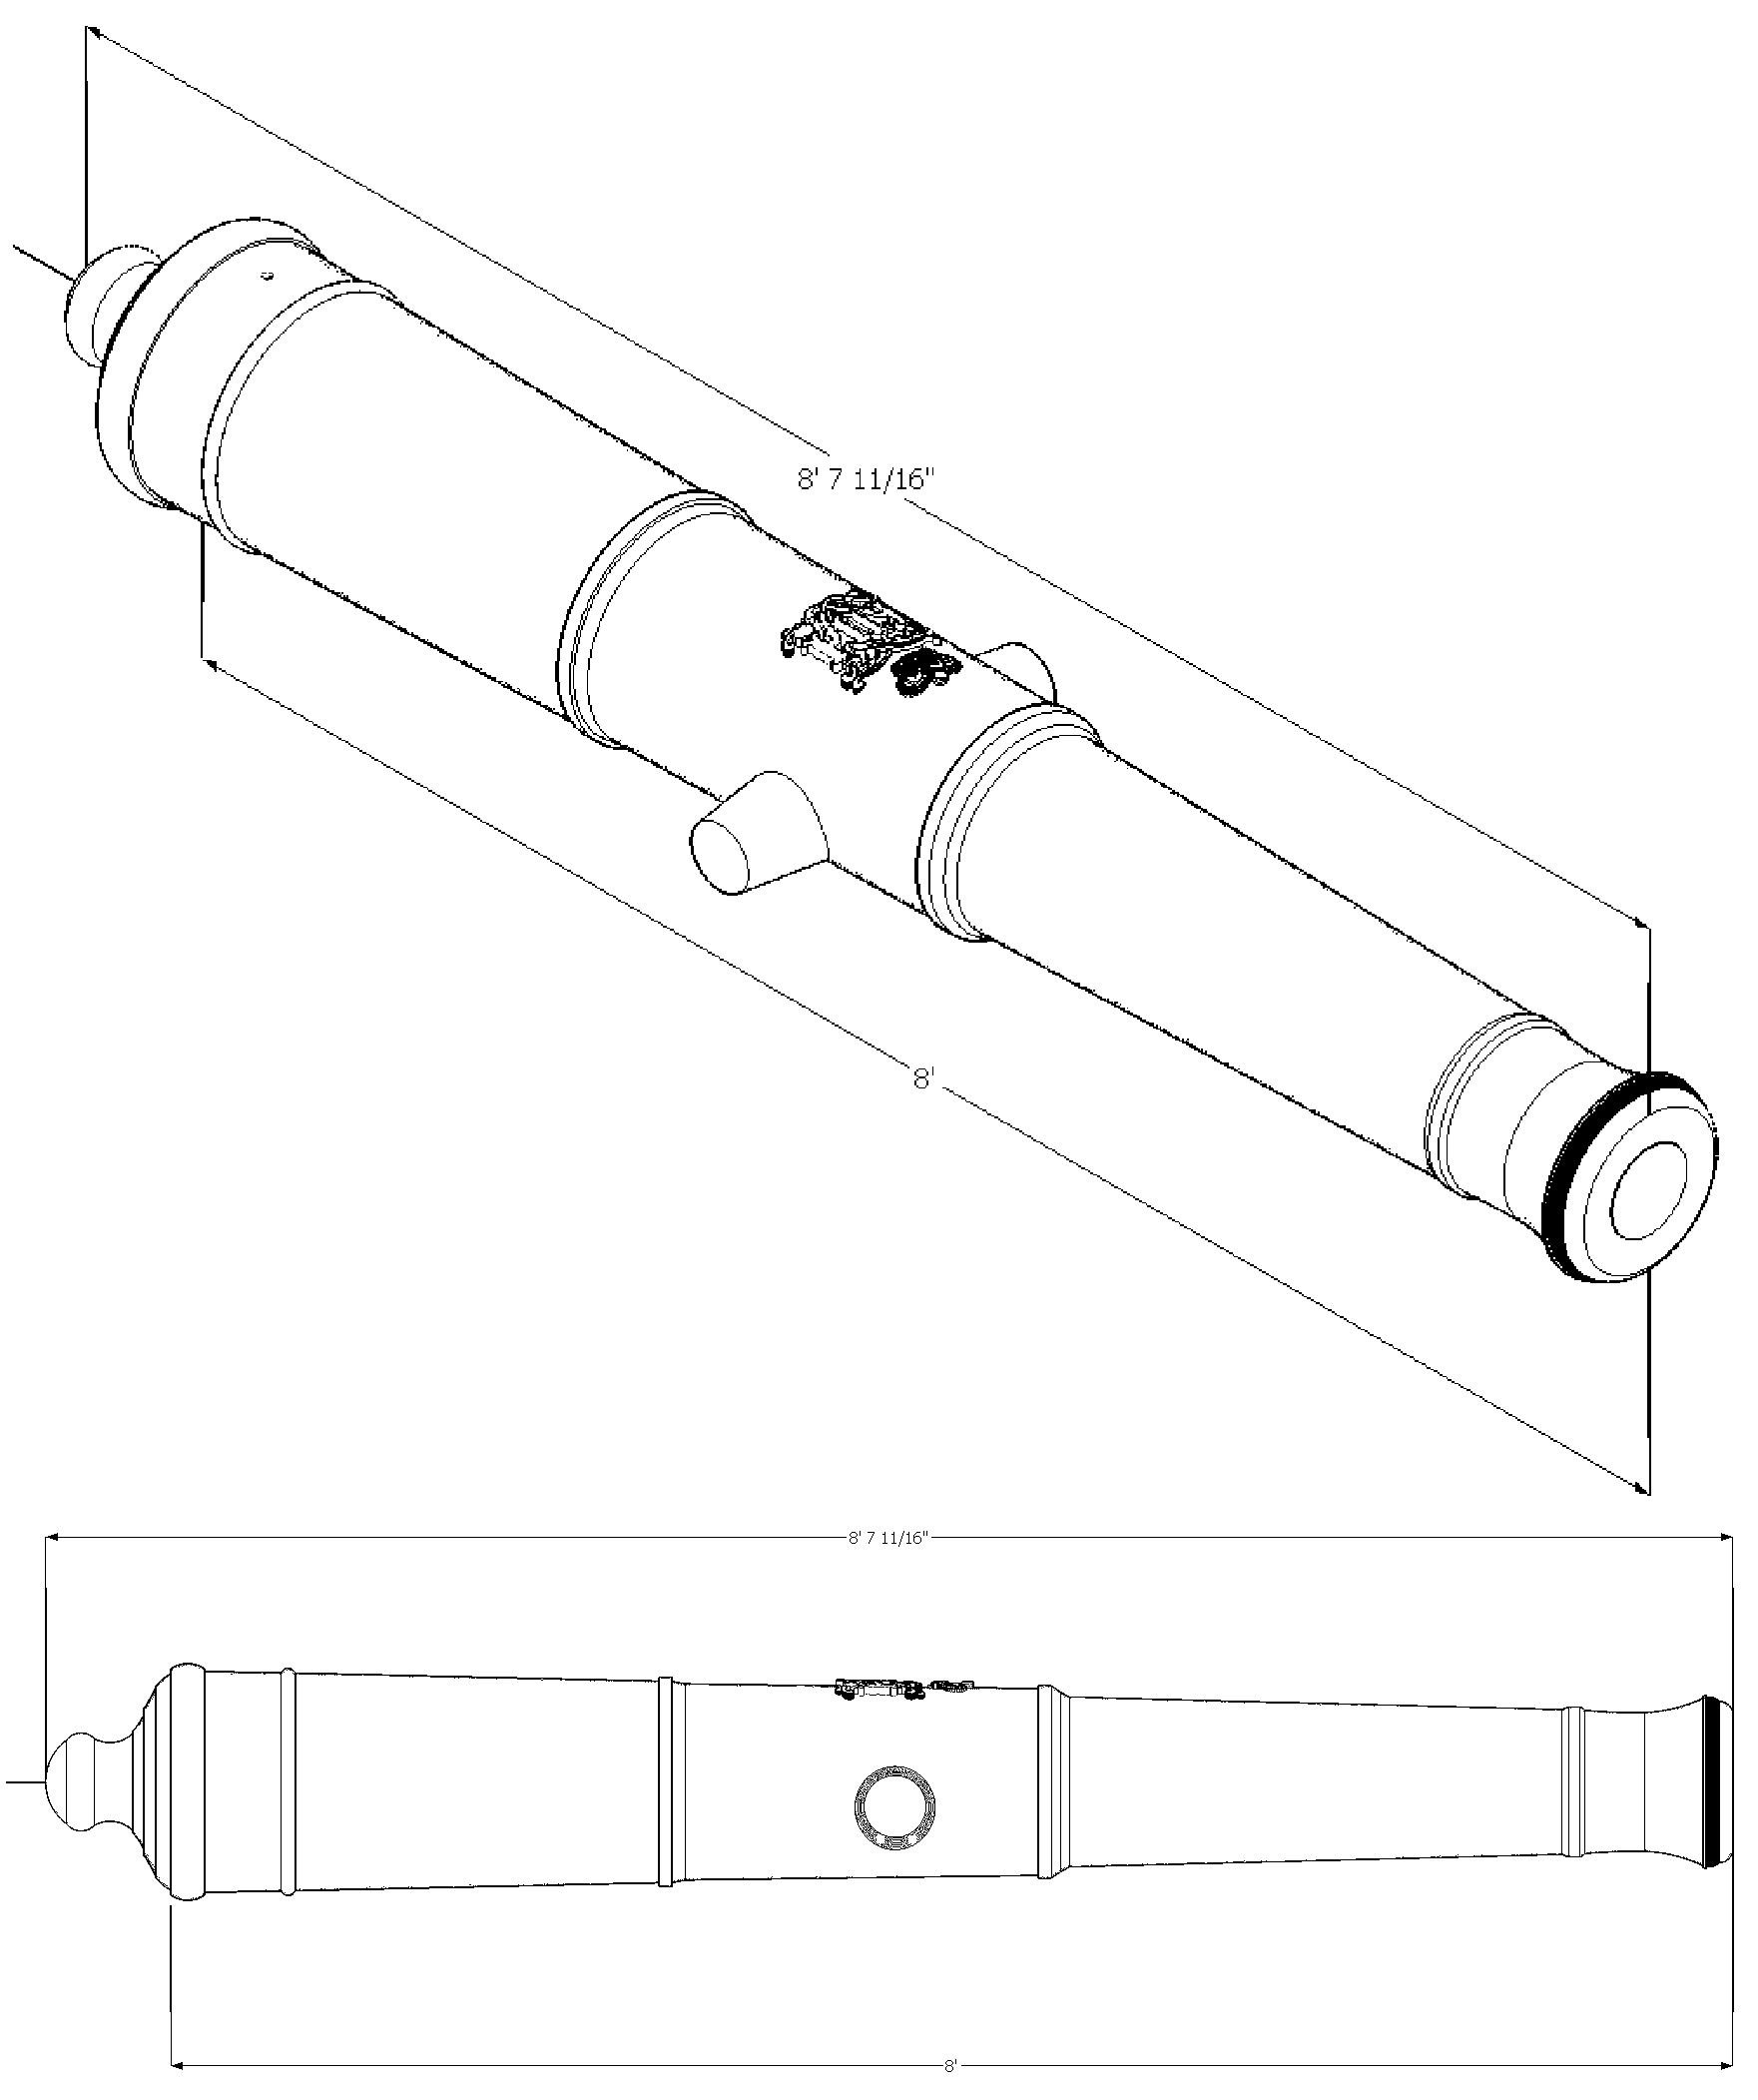
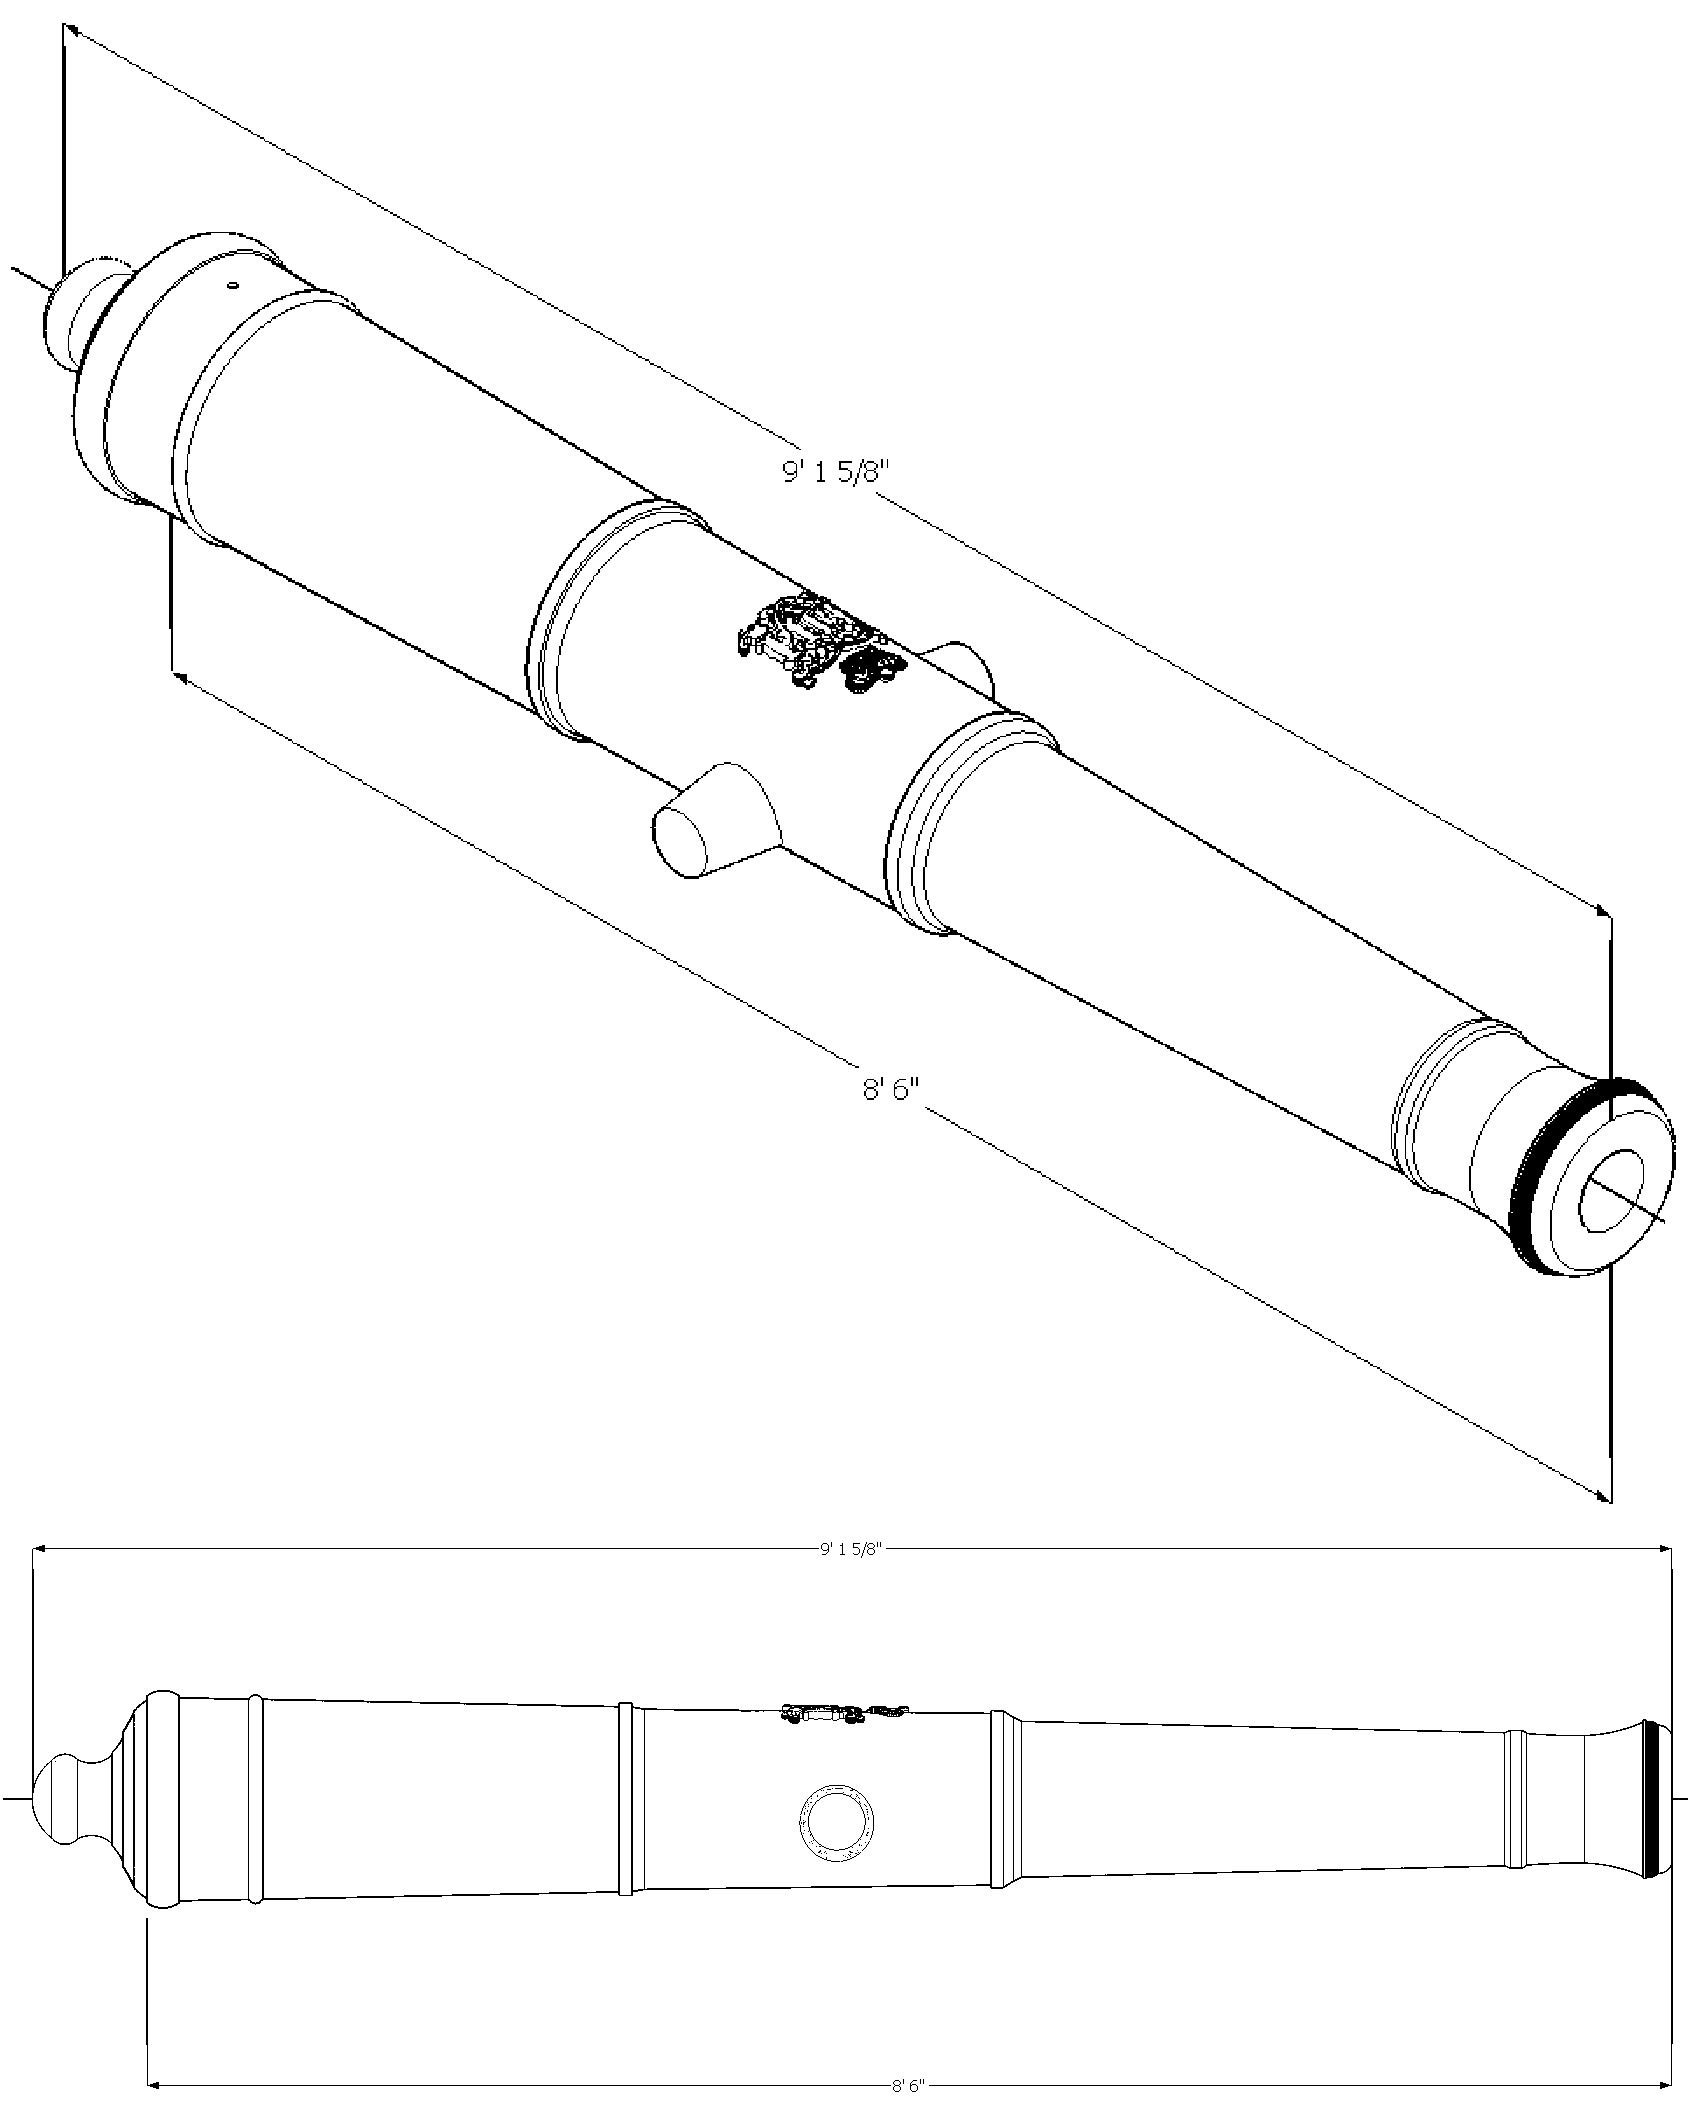
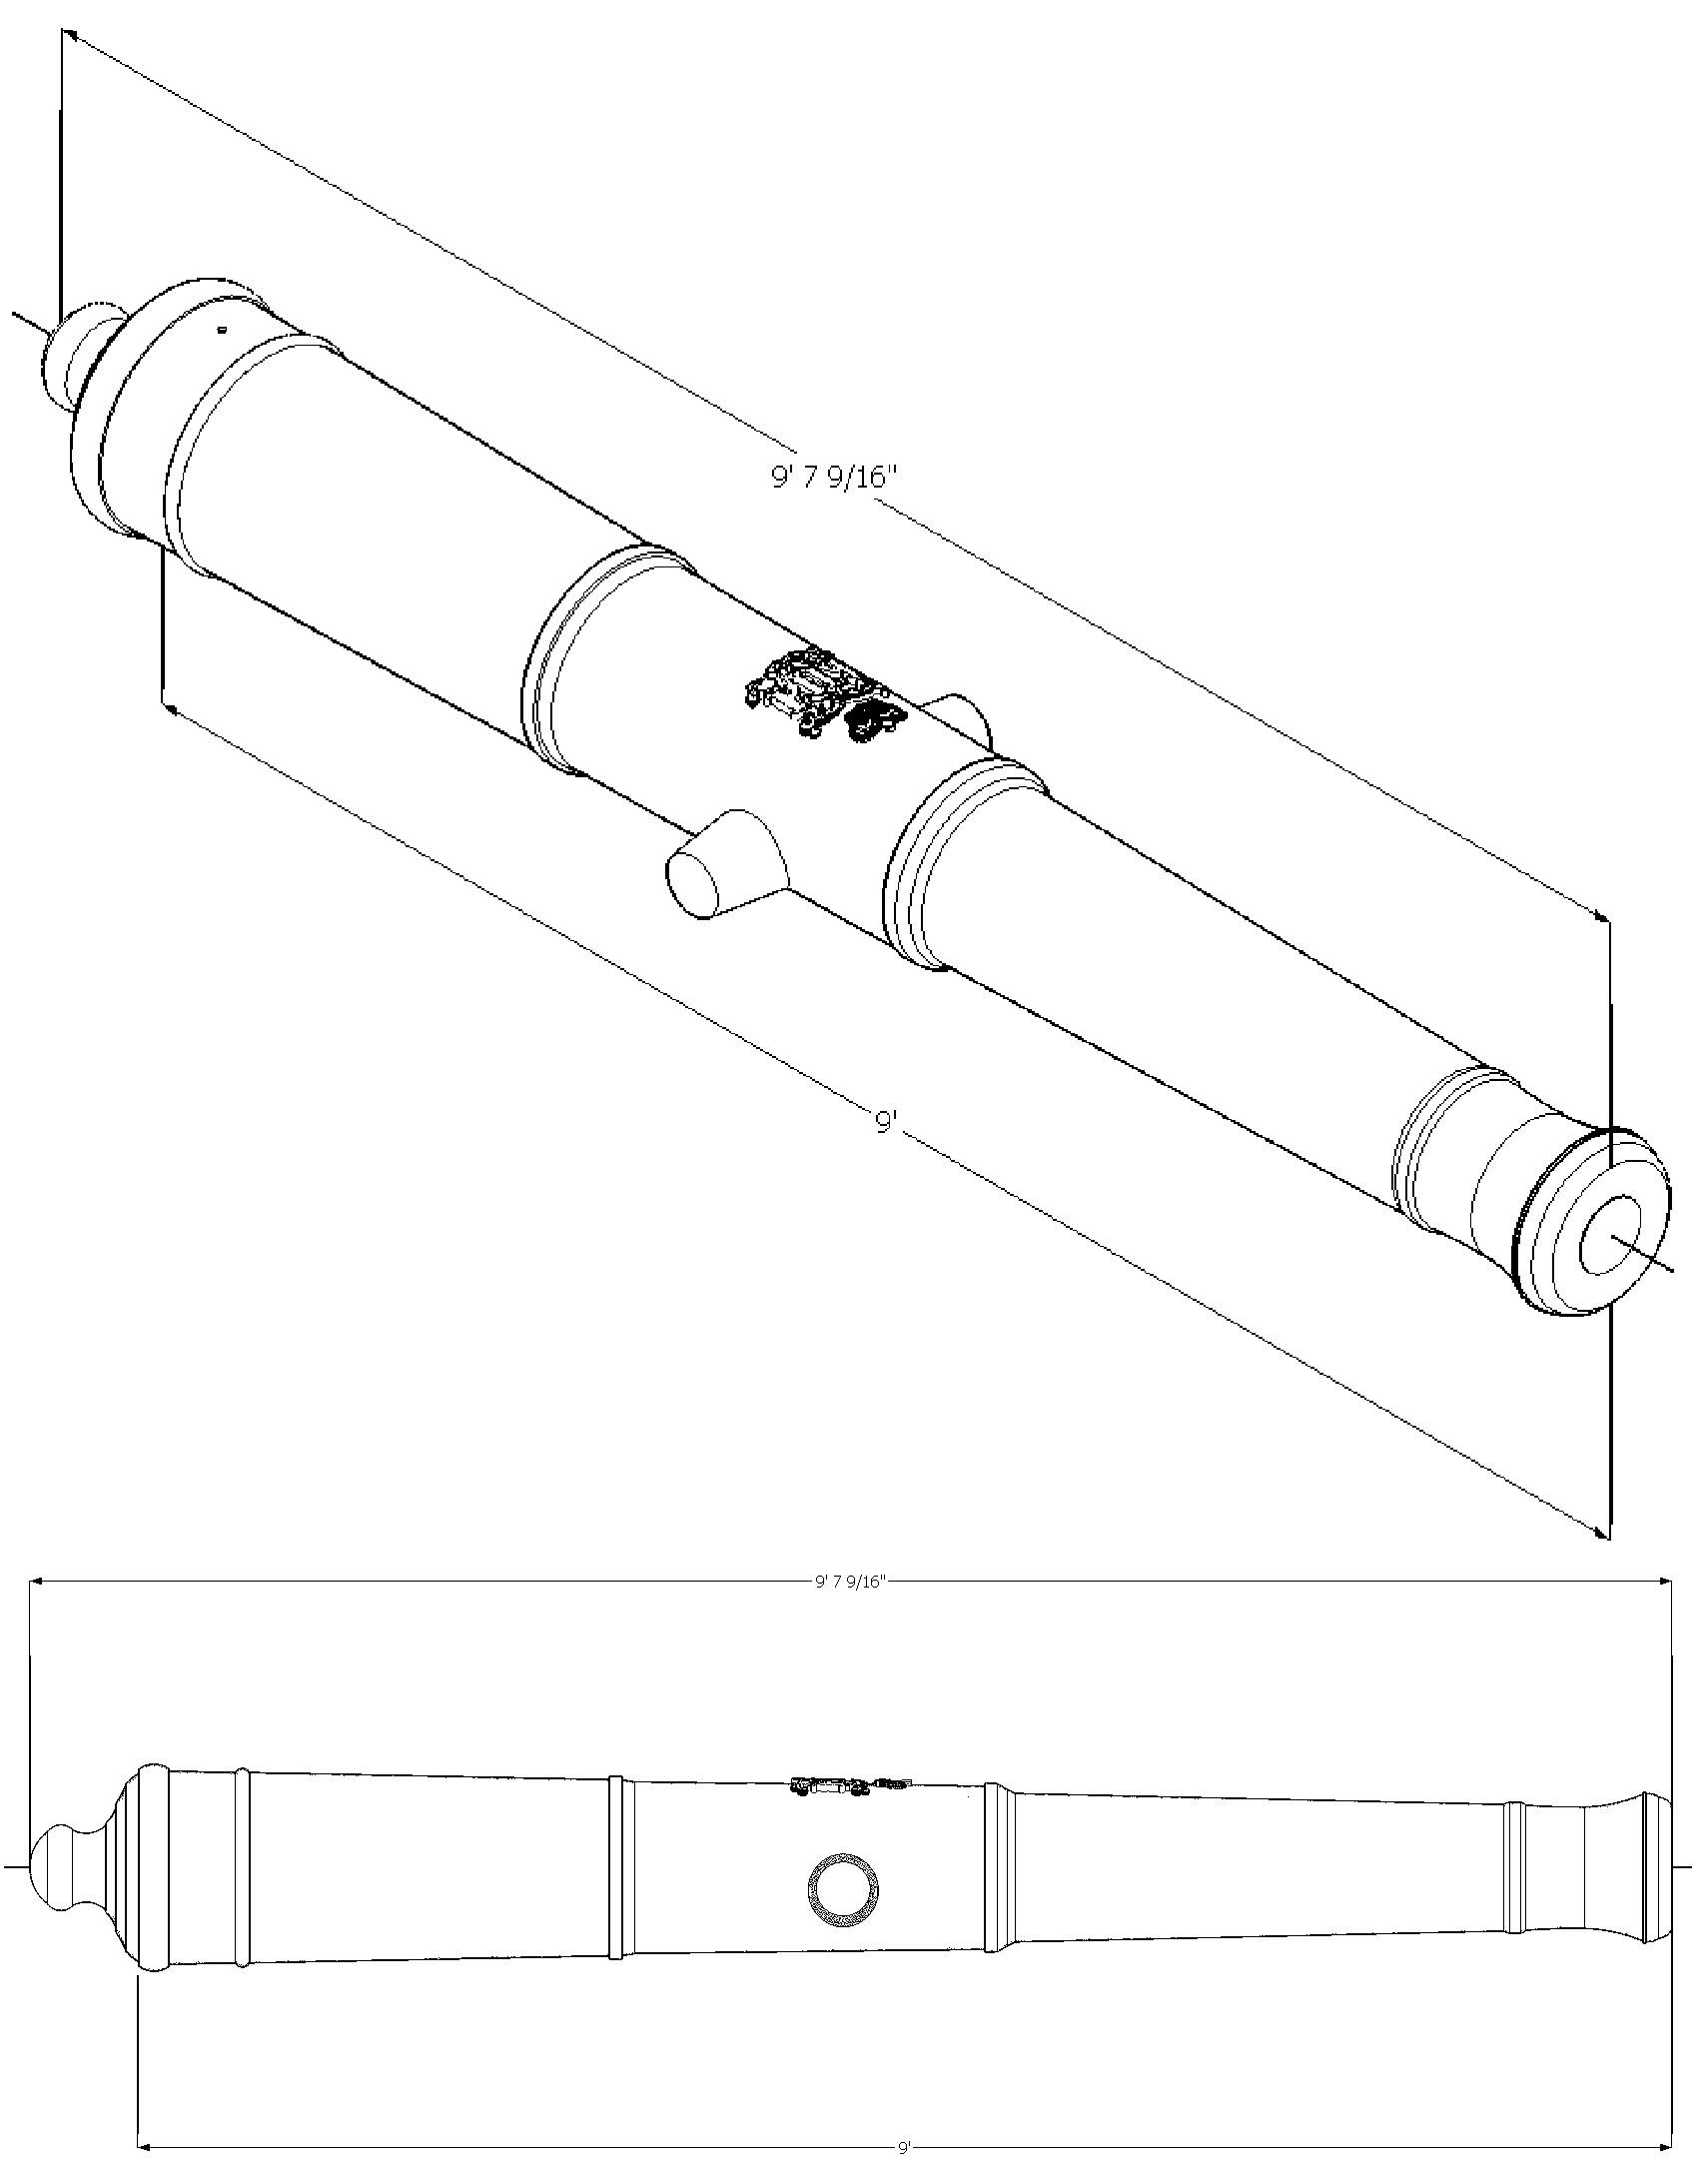
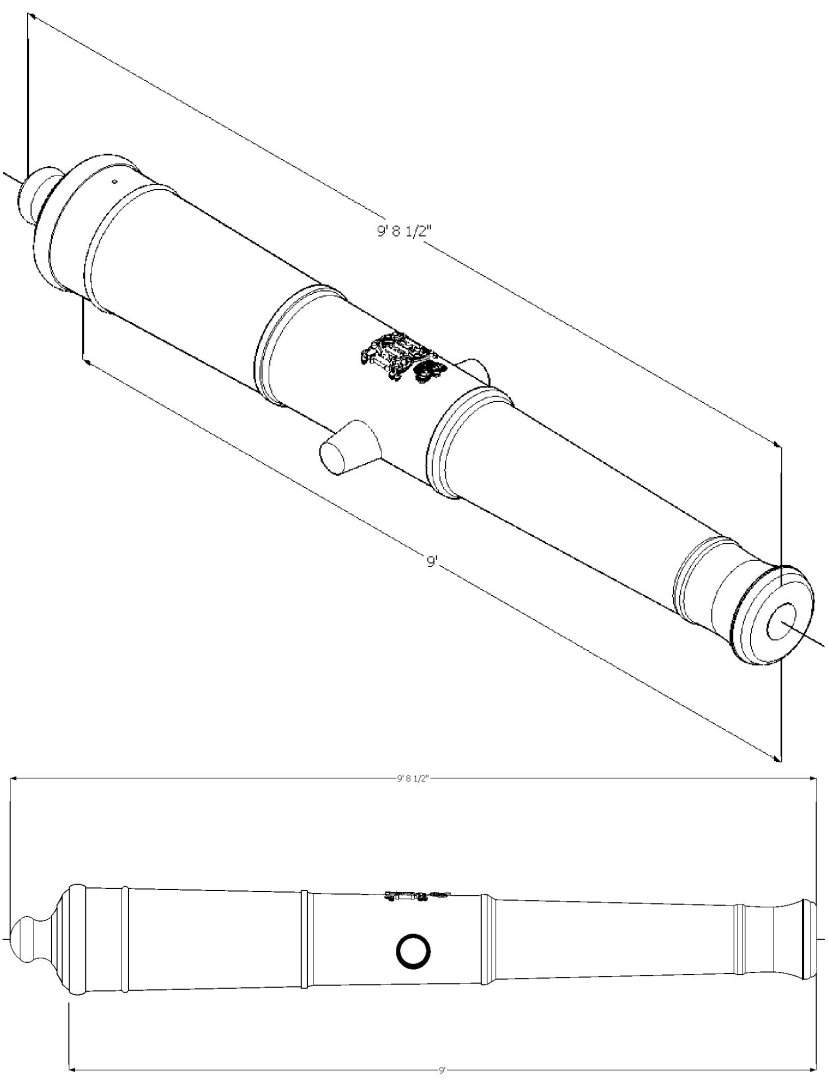
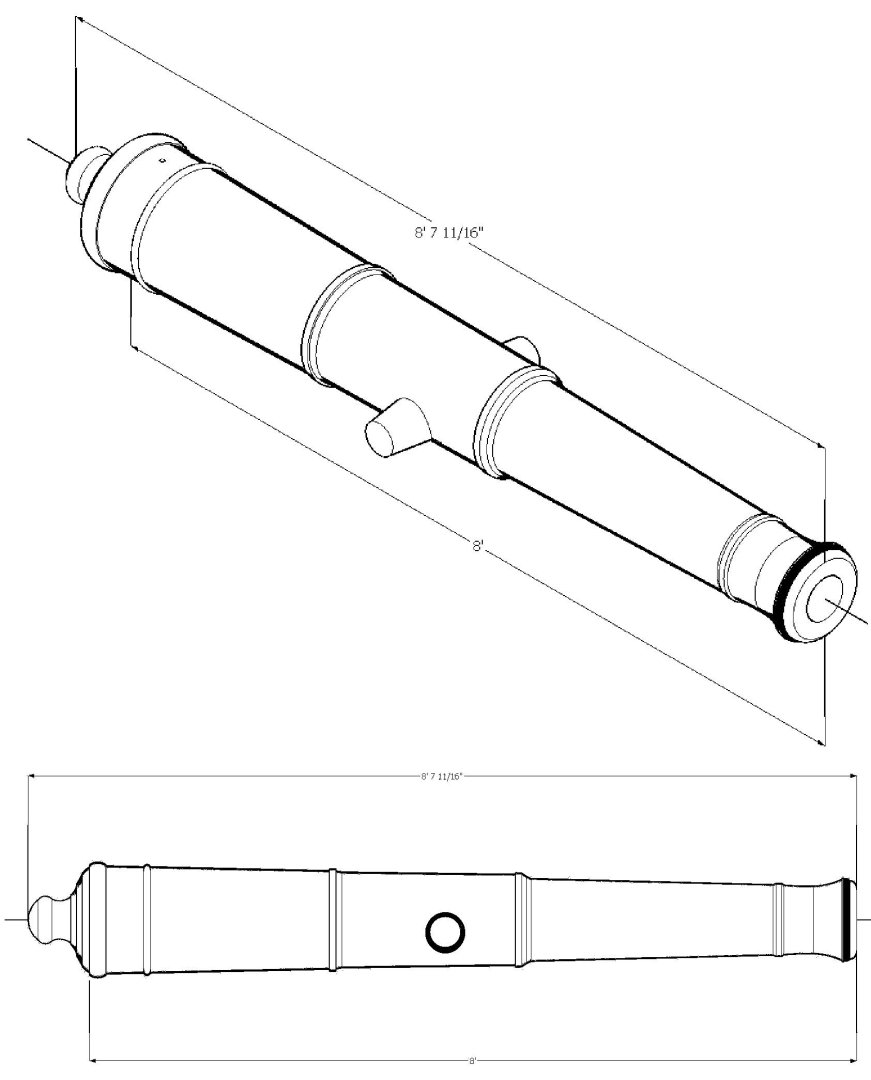
Finished the files for the cannons on HMS Tiger ca. 1650 to 1690. I'm not sure just when this set of cannons were carried. The cannons are from illustrations in the book "The Master Shipwright's Secrets". Three of the cannons in the pictures had no cypher, so that is how I drew them. These drawings were requested by a forum member. 6 Foot 6 Inch Saker 6 Pounder 6 Foot 6 Inch Saker 6 Pounder Full Size_2166_14mm.stl 7 foot Saker 6 Pounder 7 Foot Saker 6 Pounder_Full Size_2436_94mm.stl 9 Foot 3 Inch Saker 6 Pounder 9 Foot 3 Inch Saker 6 Pounder Full Size_3050_38mm.stl 9 Foot Demi-Culvern 12 Pounder This was shown with the Tudor Rose cypher. 9 Foot Demi_Culveren 12 Pounder Full Size_2945_34mm.stl Rupertino Saker Cutt 6 Pounder. This cannon is based on a cut down cannon. They shortened cannons from a previous design whose muzzles had cracked, for the original Cutt cannons, liked the performance, and cast new cannons to this length with a muzzle flair. This cannon has the King Charles II cypher. Rupertino_Saker_Cutt 6 Pounder Full Size_1716_09mm.stl Though I can't promise when, I have already drawn the Commonwealth Pattern cannon barrels, and will be posting them after I've added the Charles II cyphers. This cypher gave me a lot of trouble, and takes a while to "weld" to the 3D barrels.


-
M3A1 Scout Car by brunnels - Tamiya - 1/35 - PLASTIC
thibaultron replied to brunnels's topic in Non-ship/categorised builds
What a wonderful reason to build a model! Thank you for sharing this! -
3D Printing Cannons in Resin
thibaultron replied to thibaultron's topic in 3D-Printing and Laser-Cutting.
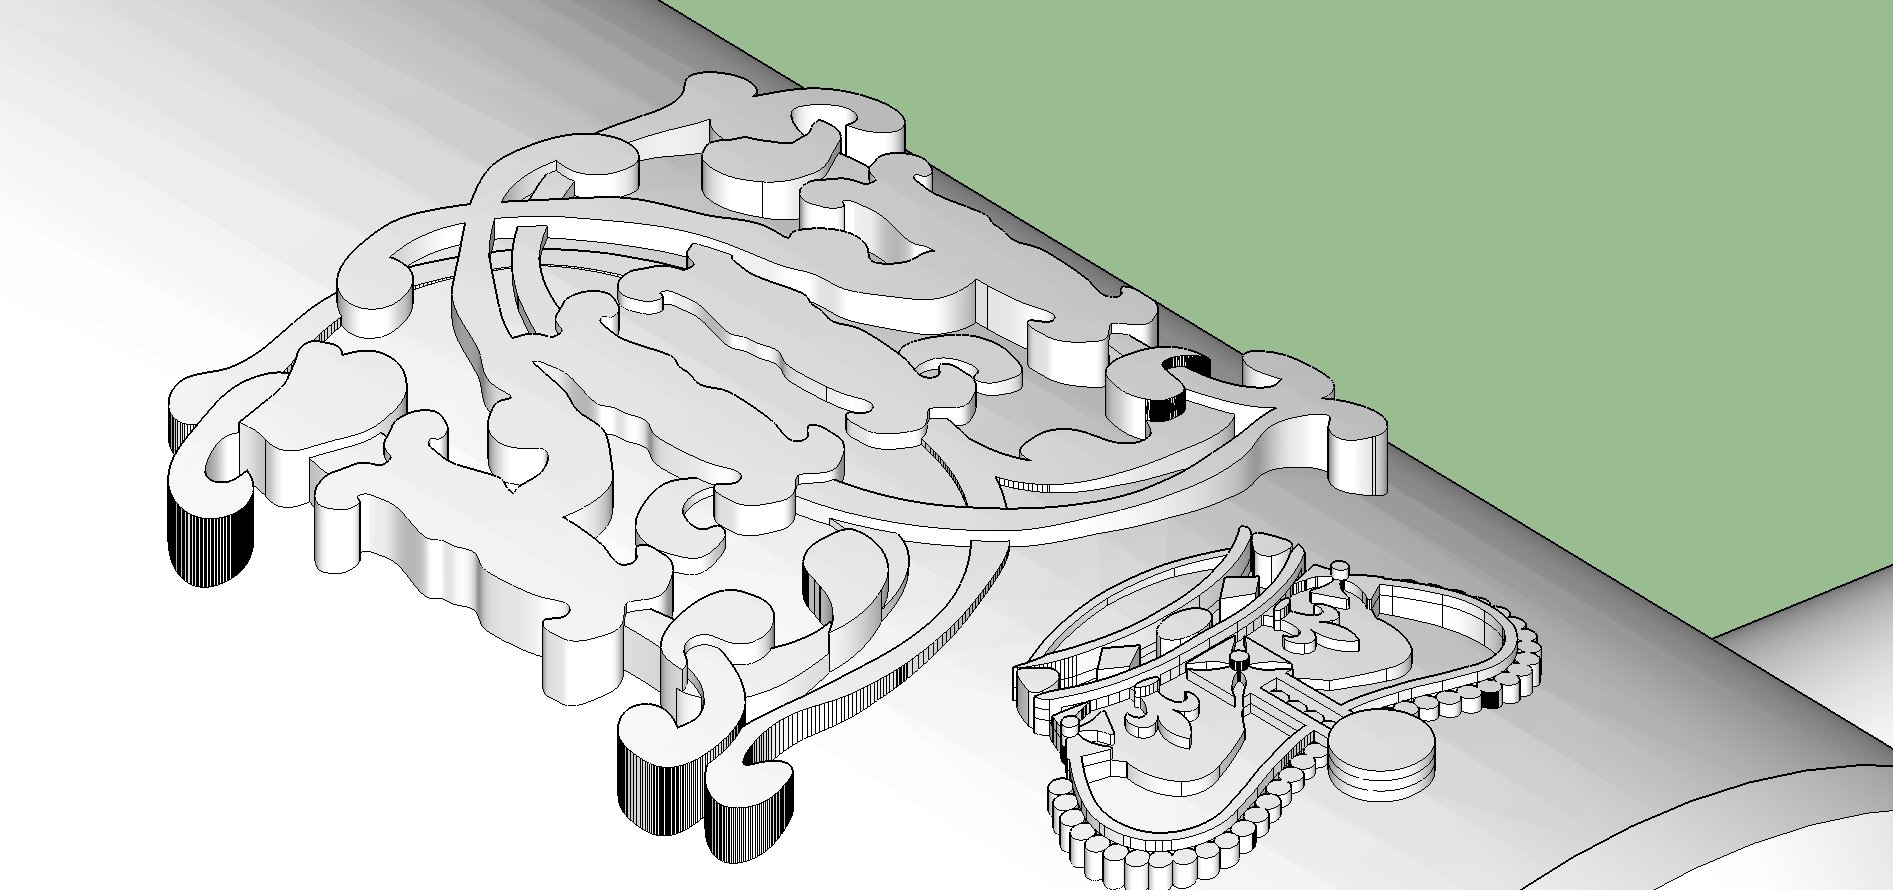
Back to ship stuff. I finished the master drawing for the King Charles II cypher. This is the last piece for the HMS Tiger cannons I'm doing for a forum member. After I finish those I will complete the Charles II era Commonwealth cannons, to (hopefully) be added to the other cannon files in the Resources Section of the NRG site. The Commonwealth barrels are drawn, I need to add this cypher to the barrels. The depth of the Solid is so I can fit it in the 3D barrels. The 3 different levels of relief with be trimmed parallel to the barrel, and the part sticking inside removed.

-
I asked Google if cocker spaniels were still having their tails docked? It replied that most were born with the tails docked! AI can not be trusted. By the way other sites said that yes they were for breed show standards. I thought we were over such things! At least the cat community has mostly stopped the declawing of cats.
-
The NRG office is back open
thibaultron replied to ferretmary1's topic in NAUTICAL RESEARCH GUILD - News & Information
Try Arthritis Strength 8 Hour Tylenol. That's what I took, and still do, after my replacement. -
Nice, though now I'm going to have to look up "Bacon Candy"!
-
Once again you have brought us a wonderful product! You are a resin printing Guru!
-
A flag from Trafalgar flown by HMS Spartiate
thibaultron replied to druxey's topic in Nautical/Naval History
Thanks for the link! -
Not assuming the same density. I asked how big a planet 1.3 times the mass of Earth would be. (Mars and the assumed similarly size impacting proto-planet (named Thea) being about the same size.) So the starting value would be 1 Earth mass, not .9. And then it went off into strange assumptions and calculations.
-
I have a thread on printing cannons in resin, that may be of help.
-
If using CATGPT, just be careful to verify the answers! I asked it a simple question about what size a planet with 1.3 Earth masses would be, and it started with the Earth being .9 Earth masses, and went into LA LA land after that! (Yes, I have weird questions in my head! I was watching a documentary on the formation of the moon. Mars size proto-planet sideswipes Earth sized proto-planet and leaves our Earth, the Moon, and the leftover stuff escapes orbit).
-
Found this description. https://amesburycarriagemuseum.org/news/2024/5/10/spotlight-on-collections-the-doctors-buggy
-
Well just stick in a few "Pink Flamingo"statues!