


popeye2sea
-
Posts
1,934 -
Joined
-
Last visited
Content Type
Profiles
Forums
Gallery
Events
Everything posted by popeye2sea
-
 Yes, just a standard #11 blade. I was very careful to start by lightly scoring along the cut line and then gradually deepen the cut with repeated passes. Regards,
- 1,508 replies
-
- 2
-

-
- Le Soleil Royal
- Heller
- (and 1 more)
-
Seats of Ease
popeye2sea replied to stuglo's topic in Discussion for a Ship's Deck Furniture, Guns, boats and other Fittings
Adding another layer... to get "pooped" meant to take a following sea over the stern. Regards, -
Pay no attention to the electric wiring, light fixtures, and fire suppression plumbing. 😃 That was a fun day. I was topside teaching them how to shoot muskets. Regards,
- 58 replies
-
- 3
-
-
- Revell
- Constitution
- (and 1 more)
-
Basically, I took the cut out inserts and thinned them from the back so they would not project out too much and then mounted them on a sheet of styrene stock that is shaped to fit between the wales. The upper one is also shaped to fit around the gun port molding. I filled the gaps between the figures with additional strip styrene to make them all flush with each other. Then I shaped and fitted a floor between the bulwark and the quarter gallery. I cut a small rebate on the back of each forward pillar on the quarter gallery to fit over the new inserts, then puttied all the crevices and painted. The slight difference in the apparent thickness of the bulkheads is barely noticeable because the transition is hidden behind the pillars and up against the rearmost 3rd battery gun port molding. Regards,
- 1,508 replies
-
- 3
-
-

-
- Le Soleil Royal
- Heller
- (and 1 more)
-
The crew mostly ate a stew made from salt beef or salt pork or salt cod and dried peas. This was boiled in the coppers behind the stove pipe (those lids on top of the stove). It was usually only the officers who got something roasted in the front of the stove. The ships biscuit or hard tack, which if you have ever tried it is too hard to bite, would have been broken into pieces and soaked in their stew to soften it up for eating. It was pretty much the same food every day for the crew. The officers were also privileged to get various boiled puddings made from the roasting pan drippings, suet and raisins, etc. Regards,
- 27 replies
-
- 2
-
-
- galley stove
- Syren Ship Model Company
- (and 1 more)
-
ventre-de-biche is French for belly of the doe. He is referring to the tan color of the sides. Regards,
- 1,508 replies
-
- 1
-
-
- Le Soleil Royal
- Heller
- (and 1 more)
-
In the 1795 flag act the two extra stars and stripes were added for Kentucky and Vermont. Tennessee (1796) and Ohio (1803) Louisiana (1812) entered as states, however no new flag act was established. Various unofficial flags were flown with the additional stars and stripes. The United States flag was fifteen stars and stripes throughout the war of 1812. In 1818 Congress decreed that one star would be added for each state on the 4th of July following statehood, and there was to be thirteen stripes to represent the 13 original states. There was no standard pattern for the arrangement of the stars until 1912. Regards,
-
The kit does not have chains. They instruct you to install eye bolts into the hull and connect the deadeye strops to the eyebolts with string. That is why I made my own chains. Regards,
-
I made my own iron strops and chains for the deadeyes from wire that I soldered and blackened. Regards,
- 1,508 replies
-
- 3
-
-
- Le Soleil Royal
- Heller
- (and 1 more)
-
Round deadeyes are the way to go. I am using 3,4,5 and 6mm deadeyes from Syren. Regards,
- 1,508 replies
-
- 3
-
-
- Le Soleil Royal
- Heller
- (and 1 more)
-
A cannon that broke loose on a lower deck. I would hate to be the sailors on that deck with a loose 3 ton cannon careening across the deck every time she rolls. Regards,
-
Also called transom windows. Good for improving airflow within the building. The warm air near the ceiling is able to escape. Regards,
- 333 replies
-
- 10
-
-
There is no set position. The trim of the sail would be determined by conditions of the moment. ie. direction of the wind, wind speed, position of the rudder, etc. It would be analogous to flying a plane. You get the plane going at the correct pitch angle then you set the trim tabs (your ships mizzen) to relieve back pressure on the control stick or yoke (your ships helm). It is a constant or at least frequent adjustment. Regards,
-
Lateen mizzen sails, drivers, spankers, etc. are all what are known as steering sails. They work by increasing or decreasing pressure on the after part of the rig. This in turn helps to keep the ship pointing into the wind in the right direction. By hauling in the sheet (bringing the sail closer to the centerline, you increase the pressure on the aft part of the rig which will pushes the stern more downwind and the bow up further into the wind. The fore sails and jibs work in the same manner but in the opposite direction, helping to push the bow off the wind. So the answer to your question is. Set it however you find looks pleasing to you. It is more than likely to have been put in any position and adjusted depending on steering orders and fine tuning of the sail trim. Regards,
-
Are we speaking of a square mizzen or a fore and aft or lateen mizzen? Regards,
-
That I can not tell you. Your instructions must have a belaying plan somewhere. The beakhead is the small deck or grating that extends from the bow of the ship under the bowsprit to the stem of the ship. Some ships there is a fife rail situated on that deck. Other times there might be a fife rail on the forecastle. Or the lines might belay directly to the rail of beakhead bulkhead (the forward rail of the forecastle). Regards,
-
What Marc said!!! But one additional item that I would add is to be careful with the entire stern balconies assembly. The parts do not have any tabs or notches to align them so they just butt together, Getting everything in place and even from port to starboard can be difficult. Regards,
-
This is one confusing drawing. We are looking at the starboard side profile of the mast. But the yards are depicted as swung completely around fore and aft on the starboard side of the mast so we are looking at he forward side of the port yardarm. On the lower yard, the sheet, tack and clew garnet for the course (lower sail) are depicted as I had described hanging below the yard near the mast. Where this arrangement of blocks ends up hanging is completely determined by where the clew line and the clew line block are seized to the yard. Depending on the era of the vessel the position of the clew block varied from 1/3 to 1/2 or more out from the center of the yard. The positioning of the clew line had to do with the way that the sails were furled which changed over the years. That block suspended approximately level with them on what looks like a pendant seized at the yard arm appears to be a yard tackle with an additional tricing line attached at the block. Regards, Of course, after rereading your question I see that you are referring to the topsail sheet and clew garnet.🙄 I think that whatever point the block was suspended at would be determined by the sailing master. My personal opinion is that since the topsail gear was attached to the sail by men in the top when the sail was being bent on that they would want these lines handy near the top to accomplish this without delay or unnecessary additional work.
-
A harbor furl is basically a tighter, more compact rolling up of the sail on top of the yard. The last fold of the canvas is stretched like a skin over the top of the sail bundle. The gaskets used to hold the sail to the yard are longer and put on more securely. I think also that the clews of the sail are also tucked in to the sail bundle as opposed to leaving those corners hanging out with the rigging attached. The purpose of all this is to keep as much water out of the sail bundle as possible so that the sail does not rot while the ship is going to be in harbor for a while and the sail is to stay on the yard. Regards,
-
I do not take a stance on sails or no. On the one hand, a sailing ship is missing something when there are no sails. On the other hand, for a scale model, it is very difficult to get sails to look right or to scale. Furled sails can make a good compromise. I have done all my previous models with full sails. One even included all of the studding sails. It is a very impressive sight, but the sails do obscure much of the ship. My current build will have a combination of furled and set sails. She will be depicted as cleared for action with cannons run out on one side, close hauled under battle sail. Do whatever you feel works for you. It's your model. Just an side note. You have mentioned several times in your previous posts something about removing or detaching the clews from the sails. The clew of the sail is physically part of the sail. It can not be detached. I think I understand what you are referring to though is removing the rigging (sheets, clew garnet blocks, tacks) from the clew. Yes? Regards,
-
I don't mind answering your questions at all, Bill. Happy to help 1. The tack for the lower sails (courses) can either run single or double. For some ships the tack is just a single line coming from the sail and leading forward and down to the deck. For other ships, typically larger vessels where the course is a very large sail the tack runs double. Meaning there is a block at the clew of the sail. This is what is shown in your rigging plan. One part of the tack, called the standing part, will be seized to a ring bolt somewhere on the bulwarks of the ship. The other part, called the working or running part, after running through the block at the clew will belay on deck somewhere. 2. Depending on if the sail is to be set relatively soon or not would determine if the sheet, tack, and clew line were removed from the clew of the sail when furling. It is possible to furl the sail and leave the clews hanging out from the sail bundle a bit with all the rigging still attached. This would make it expedient to let fly and set sail at a moments notice. If the ship was, say, to be in harbor for a long period, the crew would harbor furl or completely un-bend the sail from the yard and remove all the associated rigging. At this point they could attach the sheet, clew line and tack together and suspend them from the clew line block like the diagrams, or they could un-reeve and strike below the sheet and tack and just haul the clew line block up to the yard. One additional point that may be instructive. When a lower course was to be bent on to it's yard, the clew lines, bunt lines, leech lines, etc. were overhauled and brought down till they reached the deck. All of the gear/lines were attached on deck, and then the sail was hoisted aloft to the yard by a sail tackle, it's bunt lines, leech lines, and reef tackles. 3. Yes, for the upper sails (topsail, topgallant, royal, etc.) there is no sheet block at the clew of the sail. The sheet is toggled or bent on to the clew of it's sail then in the case of the topgallants and royals it reeves down through a sheeve at the yard arm. For the topsail you have that sheet block that is sistered to the lift block. In all cases the sheet then passes along underneath the yard and through a leading block near the mast and then down towards the deck. Now, that is not to say that there was no tackle involved. Particularly for larger sails like topsails there was frequently a tackle employed between that leading block and the deck. Regards,
-
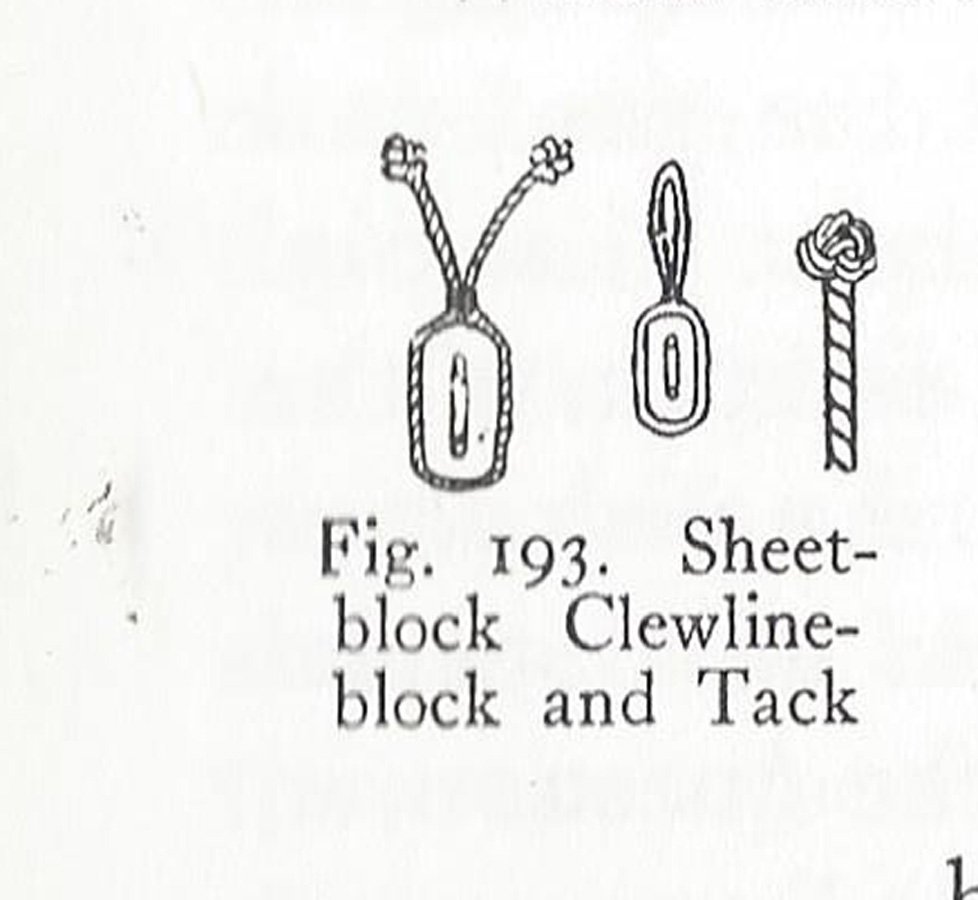
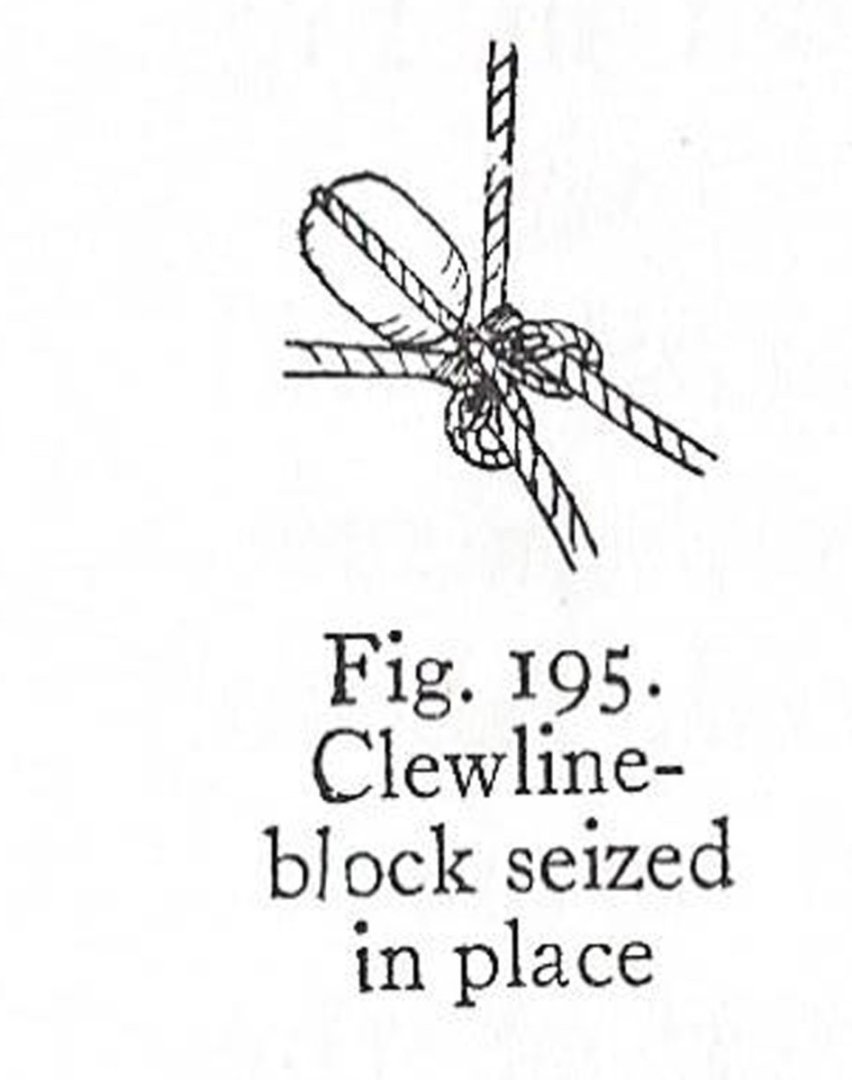
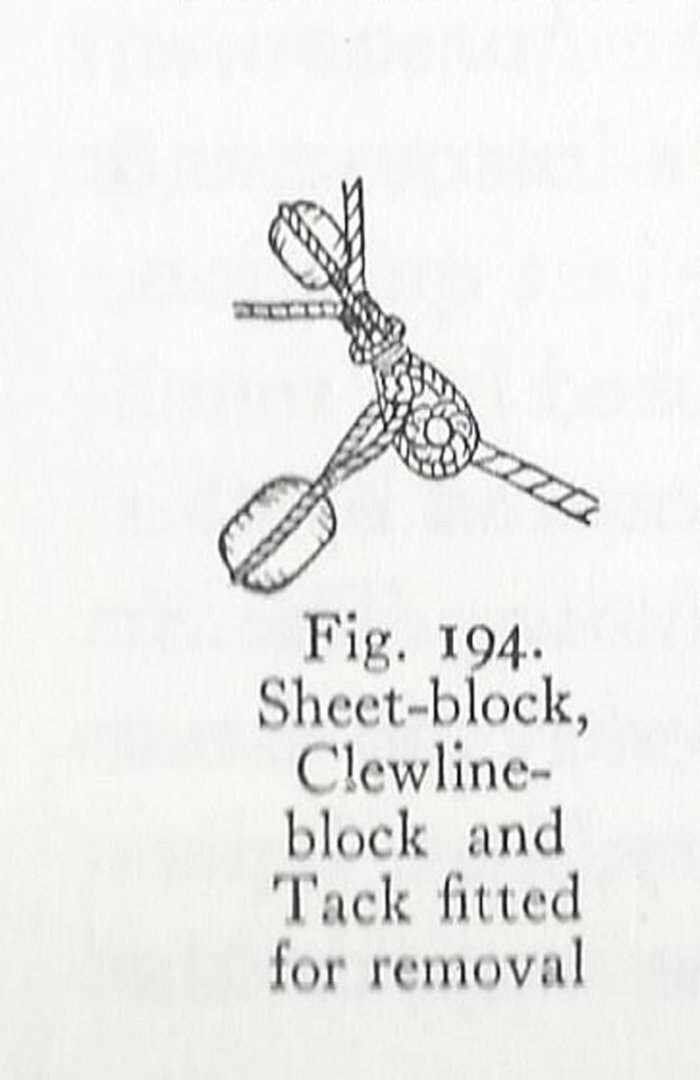
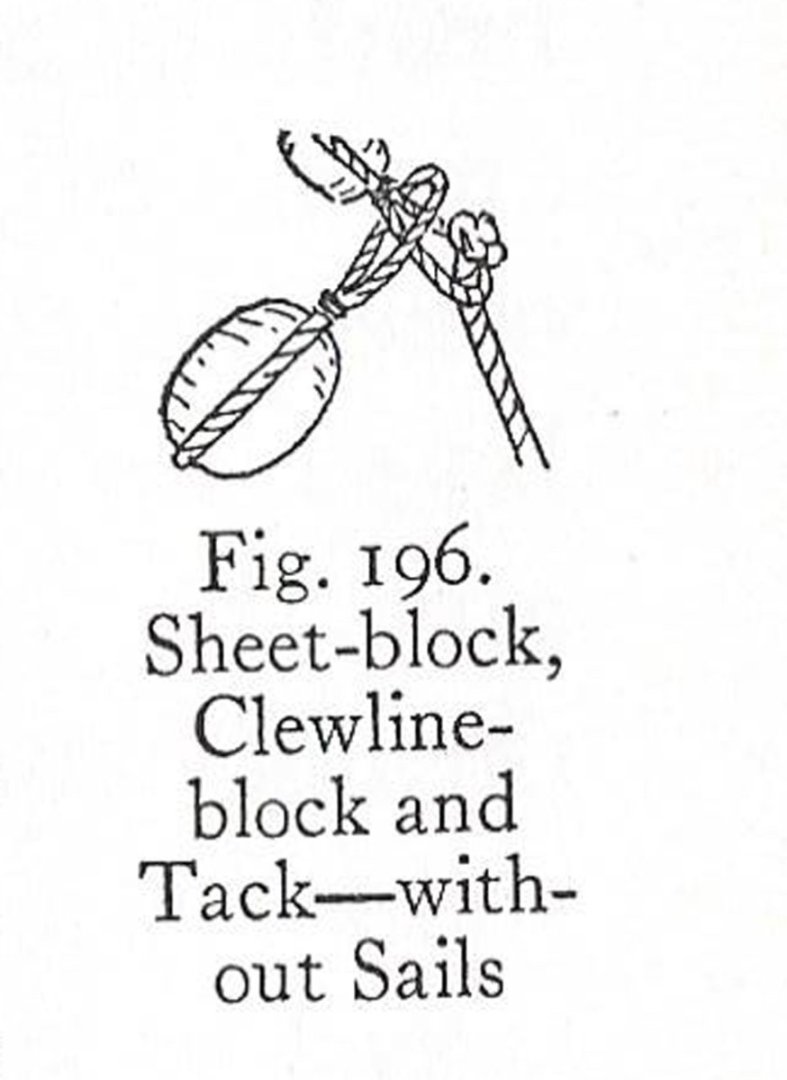
There is a lot to unpack from your question, but I will give it a try. First I need to clarify what we are talking about. This is where proper nomenclature becomes important for explaining what is going on. The loop at the lower corner of a square sail is called the clew. One line that controls this corner is also called the clew, but to disambiguate we refer to this as the clew line. The other lines that control the clew you already know. They are the sheet and the tack. In your diagram above, for the main yard, the blocks that we are talking about are the ones in the triangle arrangement (D, F, and F) hanging from the mainsail clew line (R). In my figure 194 above, the sail corner with its bolt rope is shown. The bolt rope comes down vertically. The eye for the clew of the sail extends towards the lower right and the bolt rope continues around to exit horizontally towards the left. To affix the clew line block to the corner of the sail (the clew) the strop of the clew line block is thrust through the eye of the clew and then brought back over the eye so that the clew block strop now loops around the sail corner eye securing the clew line block to the corner of the sail. Then the two legs of the sheet block strop are thrust through the clew eye from opposite directions, locking the sheet block in place. Finally, the stopper knot on the end of the tack line is thrust through the clew eye, which locks the whole together. So, to answer part of your question ( I hope), the blocks at the corner of the sail are readily removeable from sail when the sail is furled or un-bent from the yard. Now, on to the upper yards. Starting again on the main yard. Out towards the end of the yard are two blocks sistered together (D and F). The upper one is for the main yard lift and the lower one is for the topsail sheet (V). If you follow that topsail sheet line up it terminates at a clew line block (D). This arrangement would look identical to the one described for the lower yard. The clew line block will have a strop which, when a sail is set passes through and around the clew of the topsail. The end of the sheet would be attached to the clew of the topsail with a knot called a sheet bend (I know, so original with their naming of things, right?). The only difference between the topsail and the mainsail being that the upper sails do not require tacks. When the sail is un-bent the sheet is simply bent on to the strop of the clew line block. Last point. For the upper yards there is no sheet block. The sheet is lead through a sheave let in to the end of the lower yard. You can see it, vaguely, when you look at the end of the main topmast yard in your rigging diagram. The main topgallant sail sheet is passing through a slot just inboard of the main topmast yard lift block (D). I know the above is a lot of strange words. But, learning the proper names for things is part of the path towards understanding how ships work. Regards,
-
Correct. Here are a few photos to help. In this instance the tack line is single. Here are the three fitted on to the clew of the sail. The clew uppermost and the sheet to the lower left. Detail on how the clew block is seized onto the sail clew. One way to rig if there is no sail. Regards,
-
How metal hooks are stropped onto block
popeye2sea replied to glennb17's topic in Metal Work, Soldering and Metal Fittings
Those works , unfortunately, do not go into very great detail about iron forge type of work that would be involved in making metal grommets or hooks or how one gets intertwined with the other. Getting the strop on after that is the part that is done on board or in the rigging loft and is covered in those books. Regards,


