DONATION DRIVE - SUPPORT MSW - DO YOUR PART TO KEEP THIS GREAT FORUM GOING!
×


popeye2sea
-
Posts
1,935 -
Joined
-
Last visited
Content Type
Profiles
Forums
Gallery
Events
Everything posted by popeye2sea
-
 Your hooks look fine. Gear up; your going to need hooks, too! Regards, Henry
 -
If it is to be taken as a list of actions it doesn't work grammatically. Beat to Quarters, Stow'd our hammocks, ________? in the tops, fill'd our Lockers. There is a verb missing. What happened in the tops? Regards, Henry
-
For vertical ladders, if you mount the ladder so that it is off of the bulkhead with spacers, the rungs and sides become handholds. For inclined ladders, I have never once, in 24 years of naval service, gone down an inclined ladder backwards. That is a sure sign of a landlubber aboard ship. Vertical ladders, can only be traversed facing the ladder. BTW, ships do not have stairs. They have ladders. Regards, Henry
-
Since the reef points seem to be at the bottom of the sail it sems to me like they would shorten sail by lowering the yard and gathering the foot of the sail up to each succeeding reef band. This style of reefing would almost naturally morph into bonnets and drabblers laced to the foot of the sail. And then the next step was reef points at the top of the sail with the reef band lifted up and gathered at the yard. This was also accompanied with the addition of footropes. Regards, Henry
-
Gap on flat bottom
popeye2sea replied to WGibson's topic in Building, Framing, Planking and plating a ships hull and deck
What about hiding the small gap with a waterway? Regards, Henry -
Officers and gentlemen were required to display a level of disinterest and decorum at all times. They had to hold themselves above the fray. Even in social situations. It was one of the ways to show your social status and worthiness to be called a gentlemen. Officers were also on display for the crew. The sailors would be more likely to follow an officer who did not show fear in the face of danger. Regards, Henry
-
Does anyone know what this rigging is called?
popeye2sea replied to RobMann79's topic in Masting, rigging and sails
Crowsfeet in other applications are there to distribute the pull on another piece of the rigging. For example, in the 1600's or so crowsfeet were rigged on spritsail backstays, some yard braces, mizzen topping lifts, etc. Often the crowsfeet were employed where there would be excessive pull on another rope so as not to pull it out of alignment, ex. the spritsail topmast backstays pulling against the fore stays, or braces pulling against a shroud, etc. Regards, Henry -
Does anyone know what this rigging is called?
popeye2sea replied to RobMann79's topic in Masting, rigging and sails
Actually, the function of the these crowsfeet is to prevent the topsail from getting caught beneath the top. Regards, Henry -
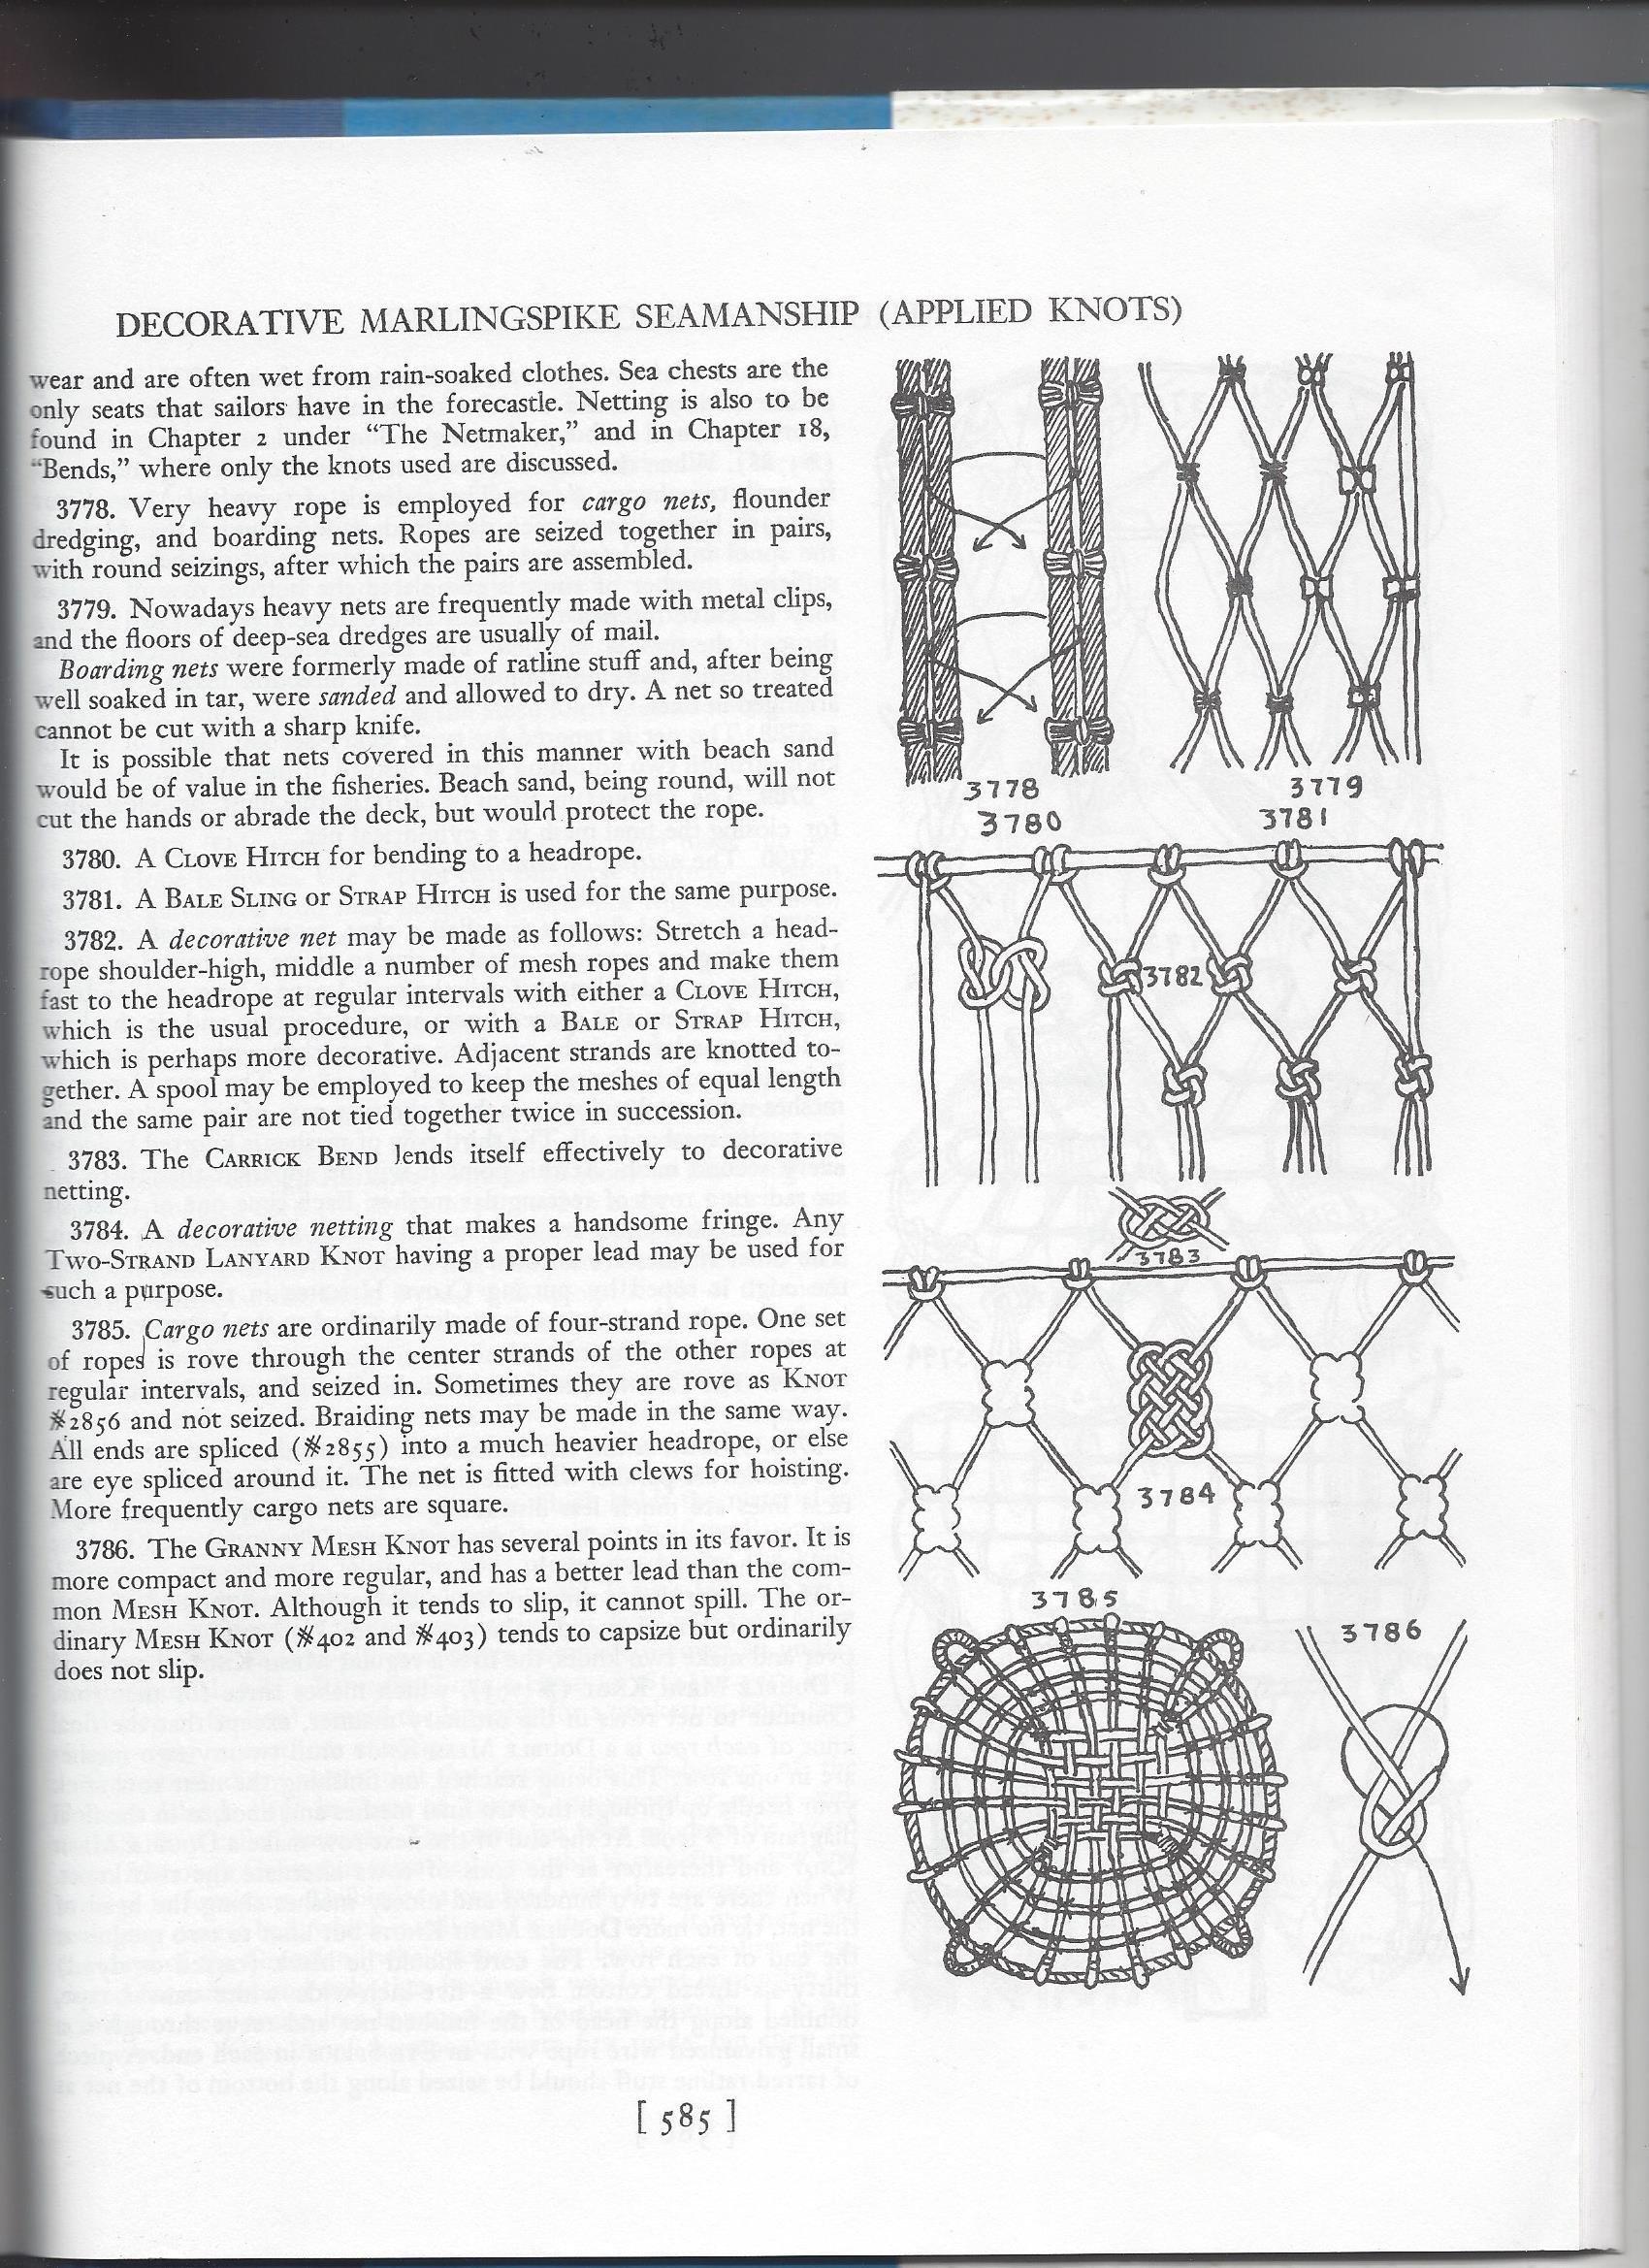
Each strand of the netting material is doubled on the top rope. The top rope will be stretched between the stanchions. The side ends of the netting are simply the last leg of the doubled netting that will run vertically from top to bottom. I actually don't know how to end the mesh on the bottom rope. I will try to look it up in Ashley's book and let you know. Regards, Henry
-
Here are a couple of ways to make a netting. These are from The Ashley Book of Knots. 3780 or 3781 and 3782 are probably the easiest. The use of a spool or dowel to control the spacing is also very helpful. Regards, Henry

-
cutting, feeding, fixing model ship rope
popeye2sea replied to palmerit's topic in Masting, rigging and sails
If you want an authentic way to finish a rope end, whip the end with thread before trimming the rope close to the whipping. Might be worth the effort for the larger ropes used on a ship. Probably not worth the effort for smaller stuff. Regards, Henry -
Furled , unfurled or no sails -Preference
popeye2sea replied to Canada Steve's topic in Masting, rigging and sails
Gaskets -
Those are called reef points, and many modelers include them on their builds. The hardest part of including them is getting them to lay down in a natural fashion. Regards, Henry
-
I do not think square riggers had or even needed tell tails on their sails. Fore and aft rigs are, naturally, different, and I have no knowledge one way or the other of tell tails on their sails. Regards, Henry
-
Spritsail yards on Niagara and Constitution
popeye2sea replied to gak1965's topic in Masting, rigging and sails
Footropes were still fitted to facilitate getting out to the ends of the spritsail yard. There is an endless amount of maintenance that needs to be done on even the standing rigging. Regards, Henry -
I have a pair with tips starting at 4mm and tapering down to just less than 2mm, but I modified one tip so that it tapers down to about 0.5mm in order to make really small hooks, eyebolts and rings. That one plier will suffice for any size rings that I am likely to encounter. Regards
-
Most of the discussion above applies to smaller fore and aft rigs. Big square riggers act very differently. I have read that one of the reasons for mast rake in large square rigs is to get the yards pivot points more aligned in the vertical plane. Each additional upward section of mast being stepped slightly in front of the lower section. Regards, Henry
-
If the stem sweeps up to meet the underside of the bowsprit won't you end up with a higher beak head? Henry
-
The sheets pass through the side to come inboard for handling. On some ships the "block" that they pass through is no more than a closed chock or hole through the side. In this case they are specifying a rotating sheave let into the hole. Regards,
-
google parbuckle for a quick how to. Regards, Henry
-
BTW, thought you might want to know that the shaded striping effect on the shield is not a thing either. They would have been solid stripes with distinct edges. The proper blazon would be " Bendy of eight, Gules ands Or". That translates to eight diagonal stripes, alternating red and gold. The two lions rampant (describes how the lions are standing), Or (gold) in chief (the uppermost part of the shield) are actually covering the upper stripes. Think of it as a field of stripes painted on a shield with decorations (they are called charges) placed or painted on top. Regards, Henry
-
On the box art the inner lining of the cape is showing the traditional heraldic depiction of "vair", which is squirrel or weasel fur. The alternating dark and light bell figures represent the darker upper fur and the lighter underbelly fur of the animal that were stitched together alternately to form the garment. That could give you some idea as to the color of the cloak lining. Vair was frequently used for the inner linings of the cloaks of the nobility. The other heraldic fur was ermine, considered to be a regal fur used in the crowns and robes of royals. Regards, Henry
-
To properly belay a line to a pin the first turn is around the lower part of the pin and then straight up around the top part. In other words, no cross over. The next turn is to cross the line over itself around the lower part of the pin and then the last turn is to throw a half hitch over the top. You end up with 2 thicknesses of line over both the top and bottom parts of the pin. That will provide enough friction to hold any load. As a practical matter, there would not be that large of a variation between the diameters of lines coming down to pins. Anything much bigger than an inch in diameter would probably be belayed to a kevel, knight head, or large cleat. One size of pin throughout the whole vessel would be entirely plausible and practical. Regards, Henry
-
Help with depicting extra line on bitts
popeye2sea replied to usedtosail's topic in Masting, rigging and sails
I think the problem is that your rigging and belaying plan has led you astray. There were, more than likely, belaying pins or a fife rail for all of those lines. Those bitts are primarily for the anchor cable. There may have been belaying pins set in between the uprights of the bitts. Regards, Henry -
Building on what Pat just said, I would start with the rearmost shroud on each side. With the greatest angle to the mast it has the most influence on the position of the mast. Then do the foremost, followed by the middle. You just have to make sure that all the shroud pairs are laying fair at the masthead. It will be hard to readjust after the rear shrouds are set up since they are on top of all the others. Regards, Henry
- 301 replies
-
- 5
-

-

-
- Constitution
- Bluejacket Shipcrafters
- (and 1 more)