


fnkershner
-
Posts
1,595 -
Joined
-
Last visited
Content Type
Profiles
Forums
Gallery
Events
Posts posted by fnkershner
-
-
Welcome! I am sure you will enjoy this build. I personally have made a vow to not build anything that is not designed by Chuck.
-
Roger - Where did you get the crew person under the bowsprit? Very nice job!
-
If everything mentioned here is correct and I cut the 50% out of the middle, I am ready to go. thanks!
-
Bob - I do have some experience with sails. but my experience is much more crude than this.
-
If I understand correctly the 2nd layer of the Silkspan had the solid lines (the edge) & the 3rd layer has the dotted line (the stitching). So, bolt rope along the luff, Gaff, & Boom. and this applies to all sails. The Leach has no Bolt rope. Trying to remember my Sail instructions from when I was on a race crew. It appears if I cut the plys down 50% I should be able to get all 4 plys for all sails from one sheet of Sailspan. If everything mentioned here is correct and I cut the 50% out of the middle, I am ready to go. thanks!
Can you also share a photo of the Hank you describe for the foresails. Lastly, should the 3rd or 4th ply have a little extra around the edges to fold over the bolt rope?
-
Tom - Thanks so much for your quick response. Can you comment on the Bolt rope? Since we have cut the sail by 50%. Do we run the bolt rope all the way around? And what size of Chuck's line do you recommend for the bolt rope and the lashings to the gaff, boom, & mast? I would really appreciate some pictures of either of the Jibs. I am not sure how to cut them down by 50% and still maintain the right shape etc.
Just confirming - It sounds like I am cutting the middle 50% from each sail. Thus the top 25% & bottom 25% are correct. Maybe I do need pictures.
PS let me tell you what I have so far. I have 2 sheets of Silkspan. I have cut out, from regular paper, 4 copies of the pattern for each of the sails. This was done primarily to make sure I had enough Silkspan. Now it's time to cut the patterns down and draw the stitching on the silkspan.
-
Bob - thanks for your response. I have so many questions. Are you planning to have the sails full or partially furled? If you furl them, do you install the bolt rope all the way around? What size do you think is best for the Bolt rope? Do you make the 4th layer slightly larger so you can fold it over and cover the bolt rope?
PS I have enough Biocide to make 5 gallons. Obviously, I will never use all of it. I would be very willing to share.
-
Is there anyone who added sails to their Longboat?
-
Tom - I hope you get this note. First, I want to thank you for putting this together. You have inspired me, and I am now cutting my silkspan.
I do have a question - I understand that for furled sails you need to cut the size of the sail in 1/2. Let's start with the main sail. To cut the sail down, you took the full pattern and cut the top 1/2 off. and ran the seam lines from the end of the boom to the top of the 1/2 size sail. Is this correct? The result is pencil line have a steeper angle. I am trying to create a pattern for the shorter sail.
-
Just in case anyone has decided, as I did, to add sails to their model. Let me share the following information. I found that the sail plans are on a 20" by 30" sheet of paper. I had them printed at an office supply store that prints engineering drawings.
I also searched Lowes, Home Depot and several local Hardware locations. For the Biocide as mentioned in the guide. I finally found the right item in a Sherwin Williams store. I am now ready to begin.
- Nirvana and Ryland Craze
-
 2
2
-
As mentioned above I am looking for small modeling projects I can do inside until the snow melts. My garage is partially heated but with all this cold weather and no insulation on the garage doors. I don't want to waste the energy. So, temporarily I am working indoors. I think the best project for indoors is the sails for this model. I have received my silkspan and want to cut out the sails. I have tried to print the Sail Plan from Chuck's site. But either my system scales the full page down or crops the page. Can anyone suggest how I get this to print properly so that I have a pattern?
I also notice in the instructions for the sails. He recommends that you add a Biocide to the glue mixture so that the Glue does not attract Mold. Can anyone suggest a source for this biocide? I have searched all the local Home improvement stores and Amazon. I find additives for paint or Mold removal. But they are in such huge sizes and higher cost. I may have to consider a different solution.
-
Currently we are having some artic weather. Which is keeping me out of the garage. So, I may be a bit slowed. I have also become very intrigued over the silkspan sails. There is still that step to come. But I expect that will be fun. And not too challenging
-
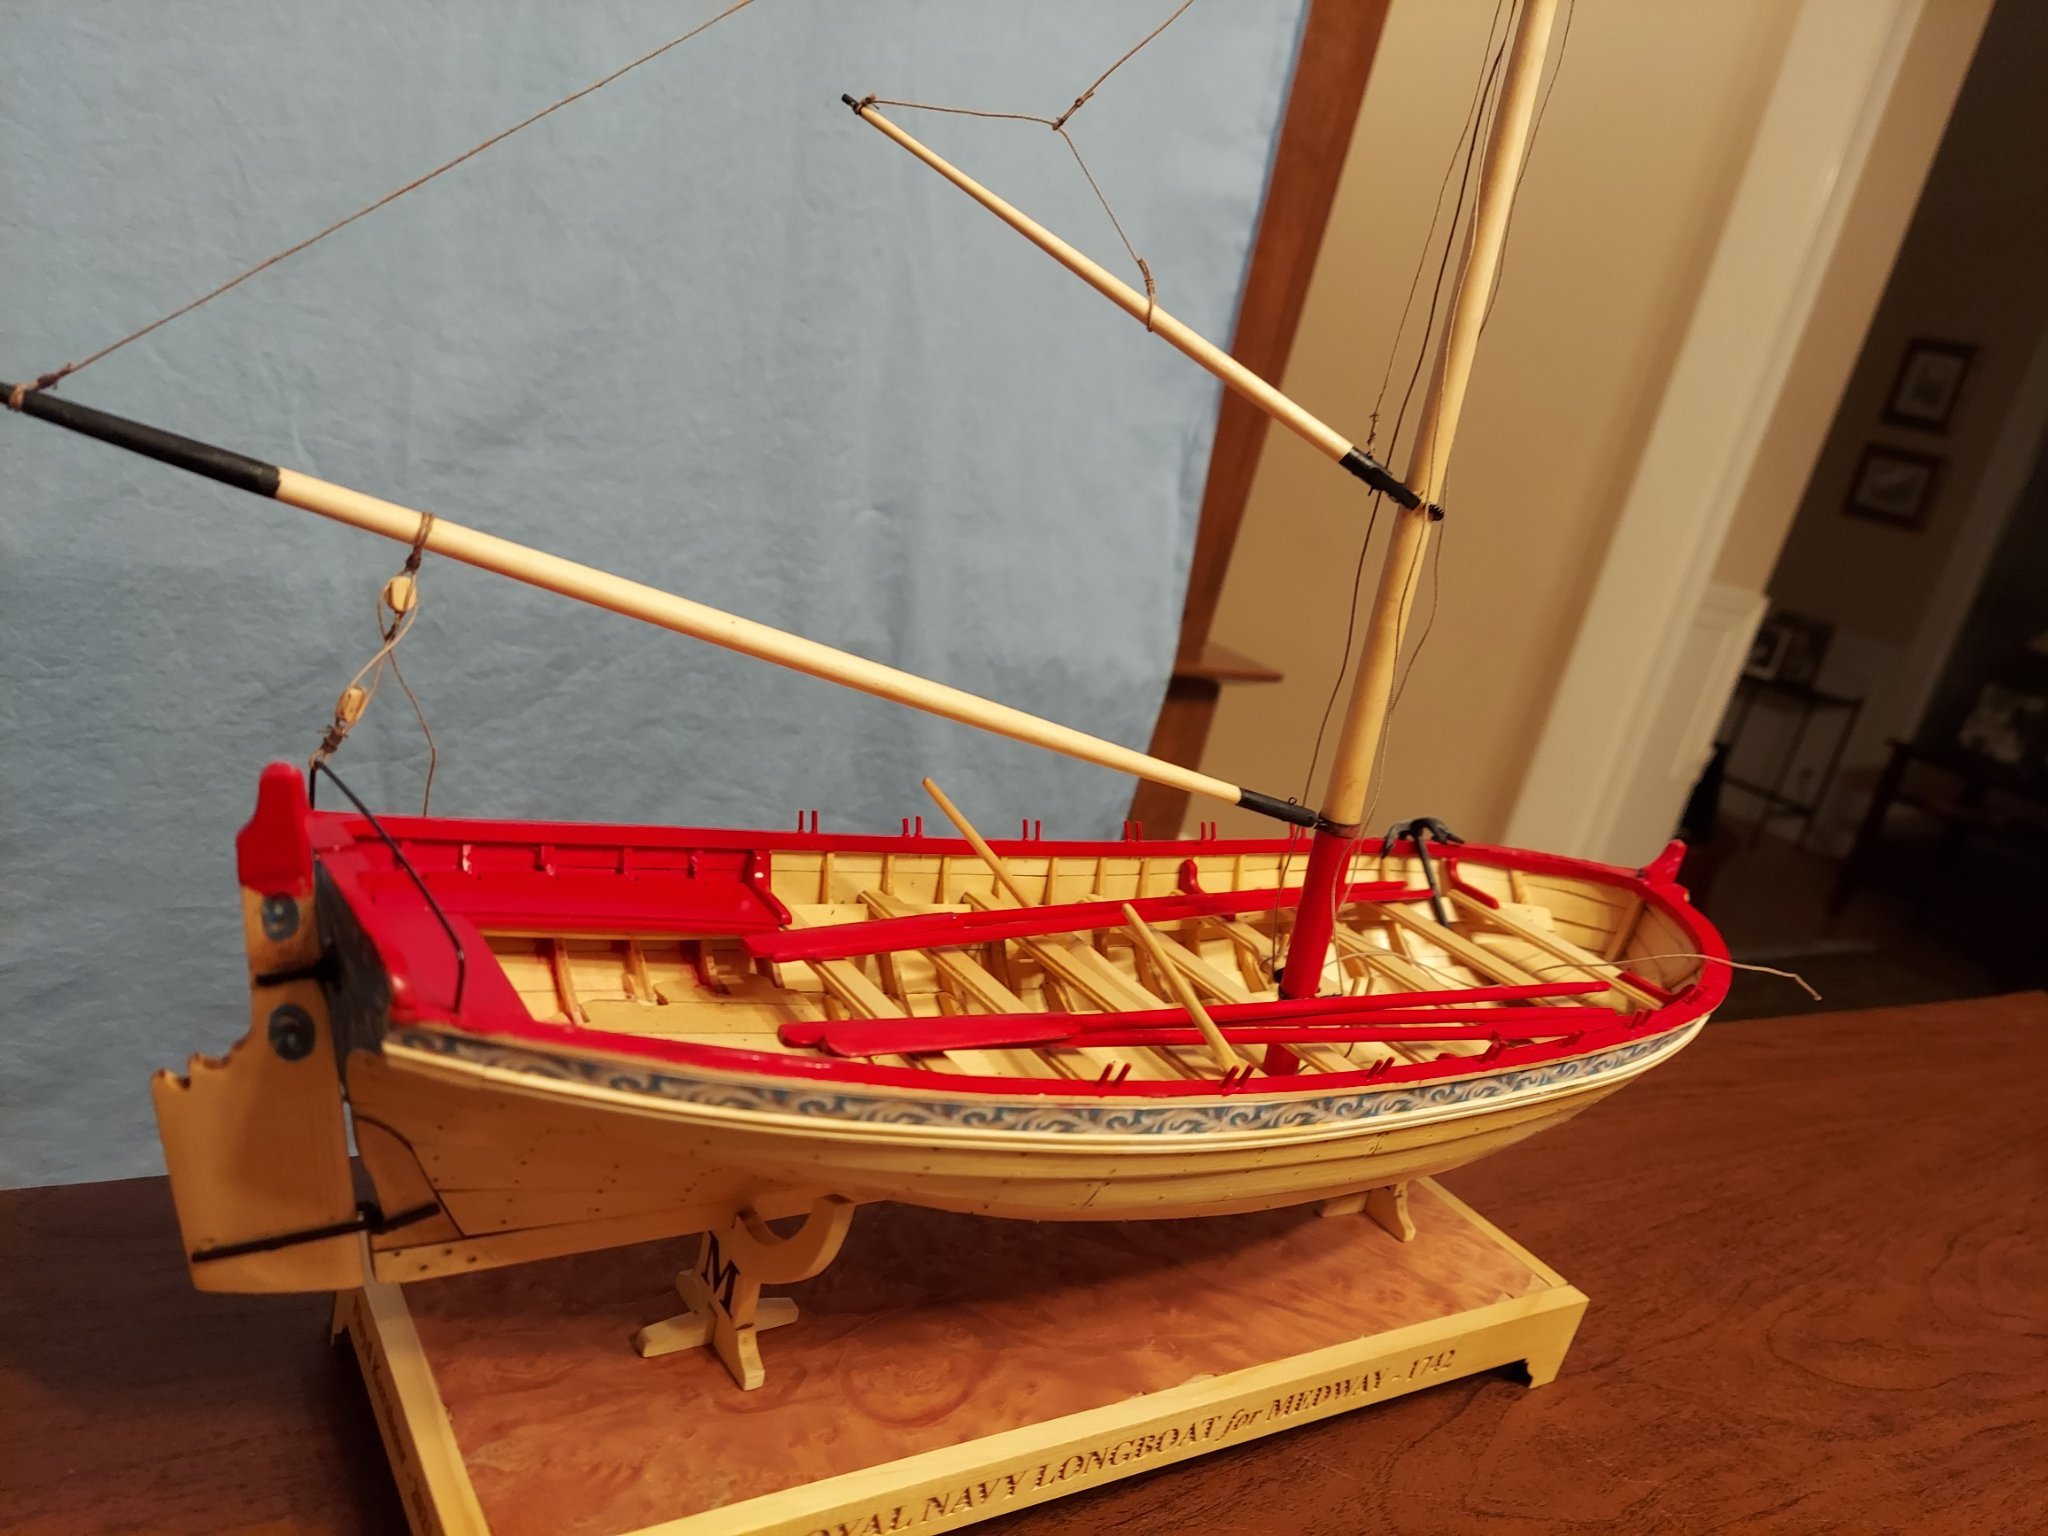
Sorry Ryland the color is so close to the same. It is hard to tell. I am getting excited. I can taste the finish line. I am going to install the metal straps (chainplates) tomorrow. It will be fun to use my serving machine. Another week or 2 and I will be done!!
PS I am on my 3rd needle threarder. I seem to break them often.
-
After posting the above note. I took a closer look at both of your pictures. I can see clearly that you did not serve the bottom end of the shroud. and it looks like Ryland did not serve the look around the mast.
Grant - I don't see a picture of the top of your mast so I don't know what you did for your shrouds.
I think from what I have learned from both of you. I will serve the loop and roughly 1 to 2 inches coming down from the mast. I will also seize the end of the shroud to create the loop. And finally I will not serve the bottom where is connects to the deadeye.
-
Let me try to explain this better. It is my understanding that you are supposed to serve the shroud for all of the loop around the mast and approx. 1 inch down the line from the joining of the loop. You are also supposed to serve the other end of the line before you wrap it around the deadeye. Is this not correct?
I have a serving machine, so it is not a problem top wrap the smaller thread around the .35 diameter shroud. Thus it is no hard for me to serve both ends of the shroud. What I am trying to determine is how to close the loop at the mast end of the shroud. If I understand Ryland he is just using a seizing. Of course, there is not much difference between a seizing and serving aside from the number of wraps. With a seizing there is 3 to 10 wraps, and with serving there is enough wraps to cover a certain length of the shroud. And at the deadeye end the served line will be seized 2 maybe 3 times.
PS Merry Christmas to all of you!
-
I only have one other completed model that is a fully rigged ship. And that model doesn't have any served lines. I do have a serving machine. Do you start the serving with a 1/2 hitch & end with one as well? Also, in the case of this long boat, once you have served the shroud at the top mast. Do you serve again where the loop is joined? I.E. you have the length of the shroud that is served which consists of the length of shroud that goes around the mast and down the Shroud approx 1 inch. How do you join the end to the shroud to form the loop?
-
Thanks Ryland. A related question - how did you get uniform separation for the deadeye? I was thinking of creating a wire gig that could be inserted into 4 of the holes - 2 at the top and 2 at the bottom. A large X shape.
-
-
-
Now it is time to strop the deadeyes. Chuck says to use 24 gauge wire. I would like to know others did this. Since this is the shrouds, there will be significant tension. So, I am thinking I need a twist in the wire at the top of the deadeye. there will also be a small loop for the hook at the bottom. Suggestions?
-
-
Can you provide the link to Rino. I see many links some cost $$ and some are free. I have the plans for the America from the Smithsonian Museum. It is my hope to build this using the CNC. I have loaded these plans into Fusion360 (the only CAD/CAM S/F I know.) I am very interested in help lofting from 2D plans to a Solid and then output to Gcode.
-
FYI there is a free addon for F360 called Slicer. It will take a solid hull and slice it up to create the bulkheads and former. It will also lay them out for you on plywood so you can cut them with either a CNC or Laser. Once you have the solid shape created in Fusion all you need to do is specify the thickness of your material and the number of Bulkheads and it will do the rest. This includes the slots in the former for the Bulkheads.
-
Ryland - Thanks so much this is perfect.

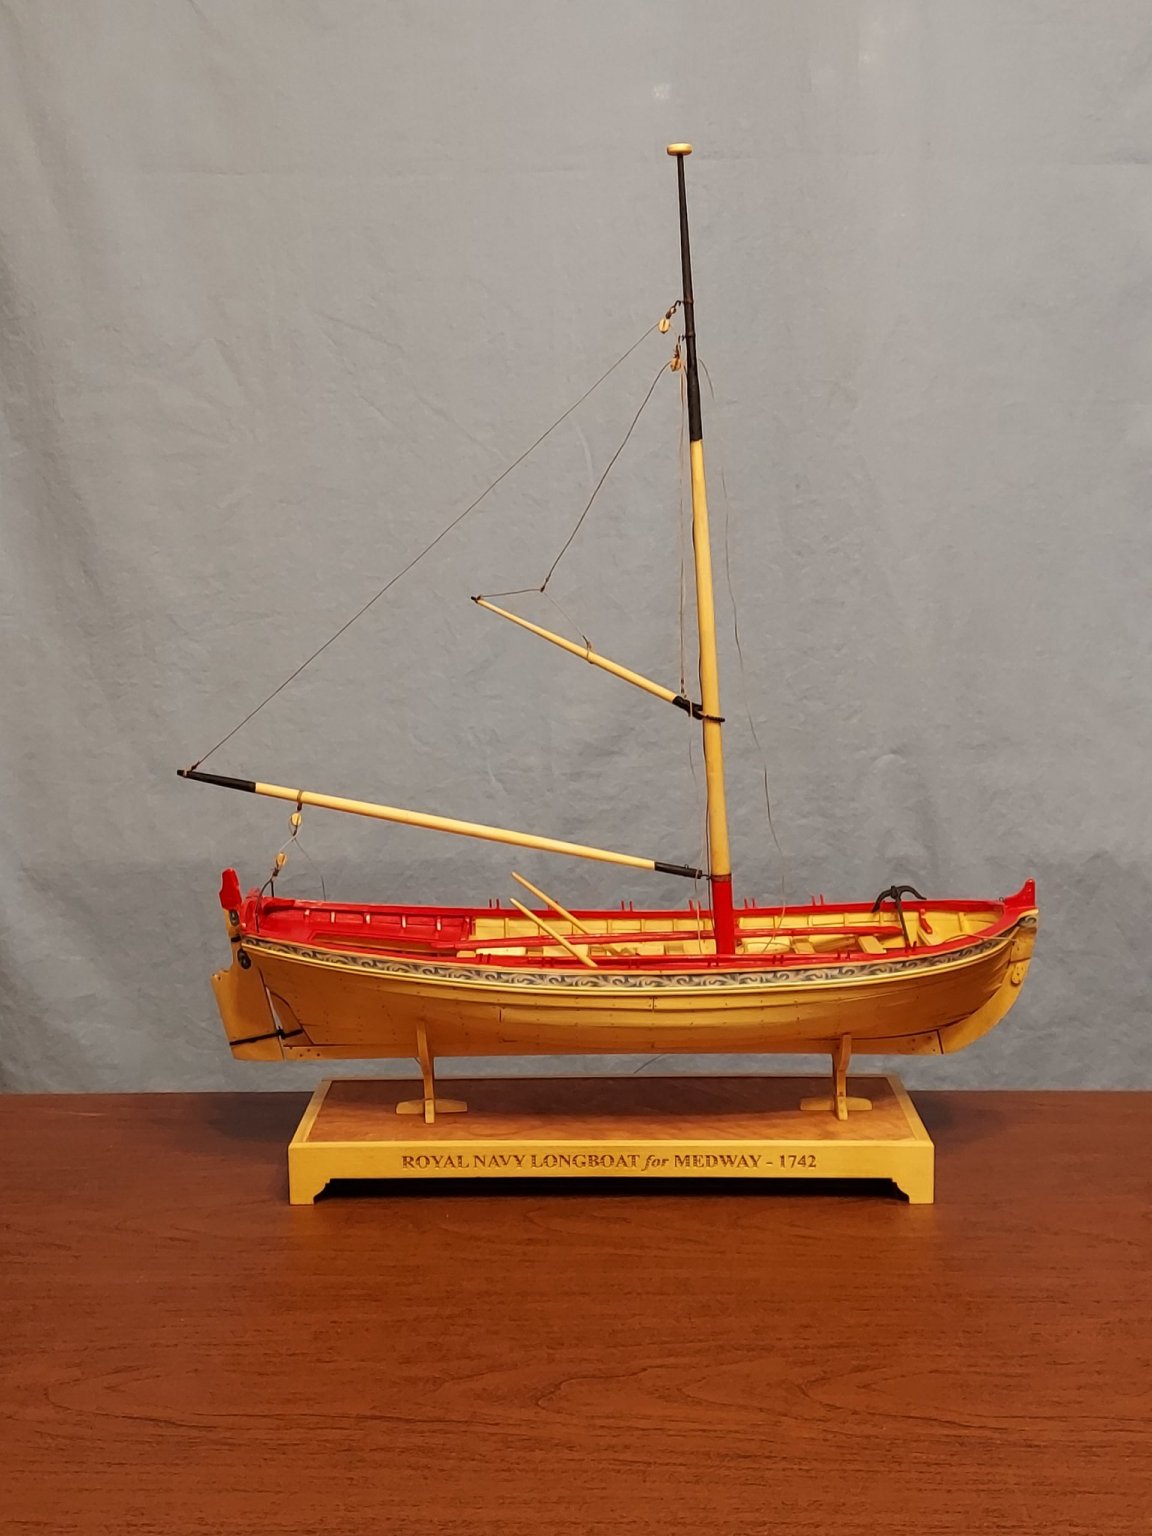
Sails for a Cutter Rigged Long Boat (Medway Longboat)
in Medway Long Boat - 1742 - Public group project.
Posted
Tom - I sat down today to make the new patterns with the removal of 50% from the middle of the main sail. I must say I was shocked. Before I start to do the real cutting, I want to confirm with you. Can you give me the actual dimensions of the Main sail. The length of the Luff, & leach. I already know the length of the foot from the boom. and the length of the top (I don't know the name of the part on the Gaff). those 2 lengths are defined already.