


fnkershner
-
Posts
1,595 -
Joined
-
Last visited
Content Type
Profiles
Forums
Gallery
Events
Posts posted by fnkershner
-
-
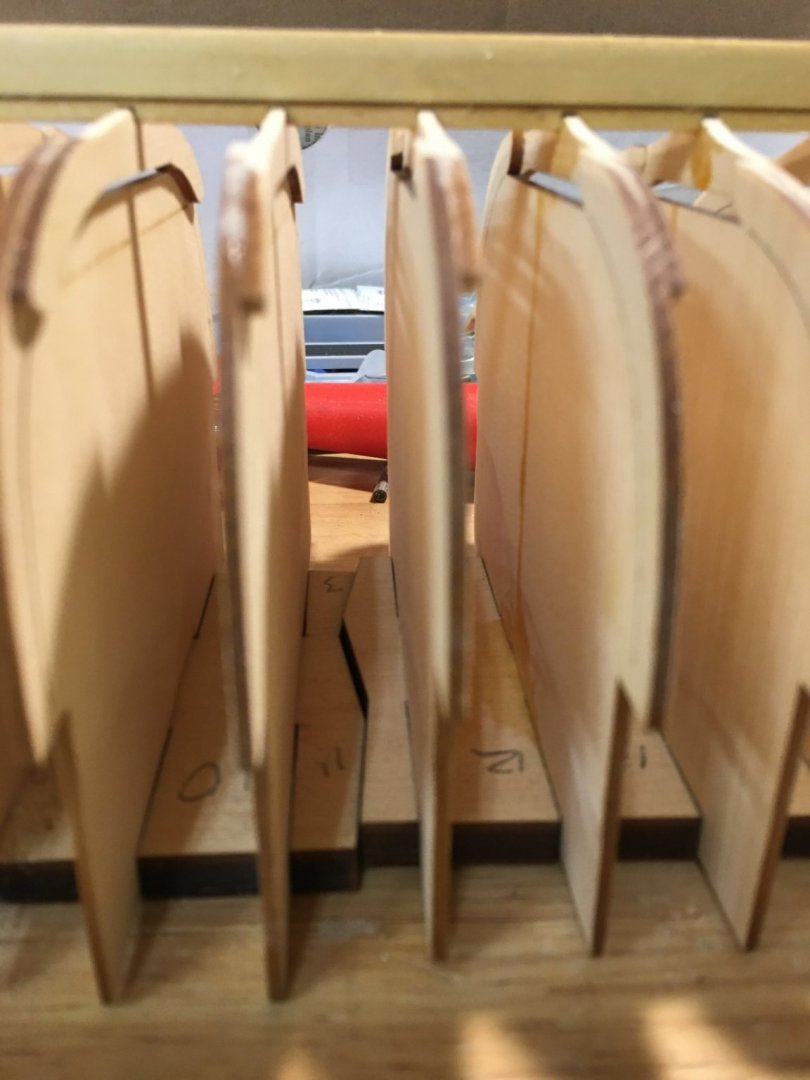
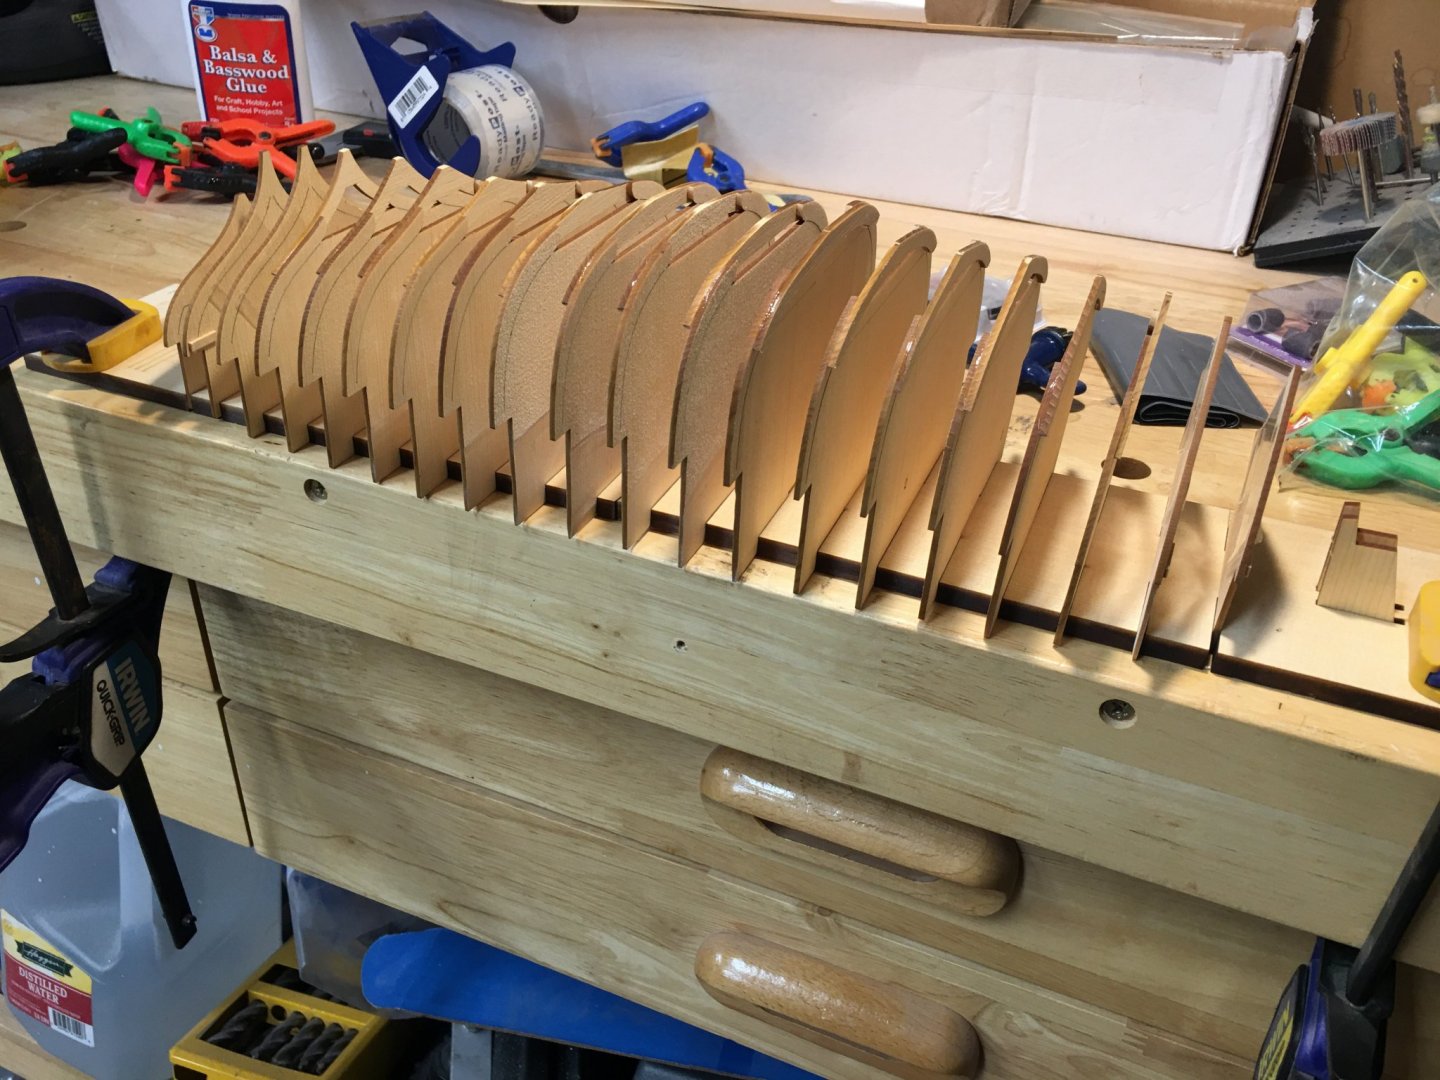
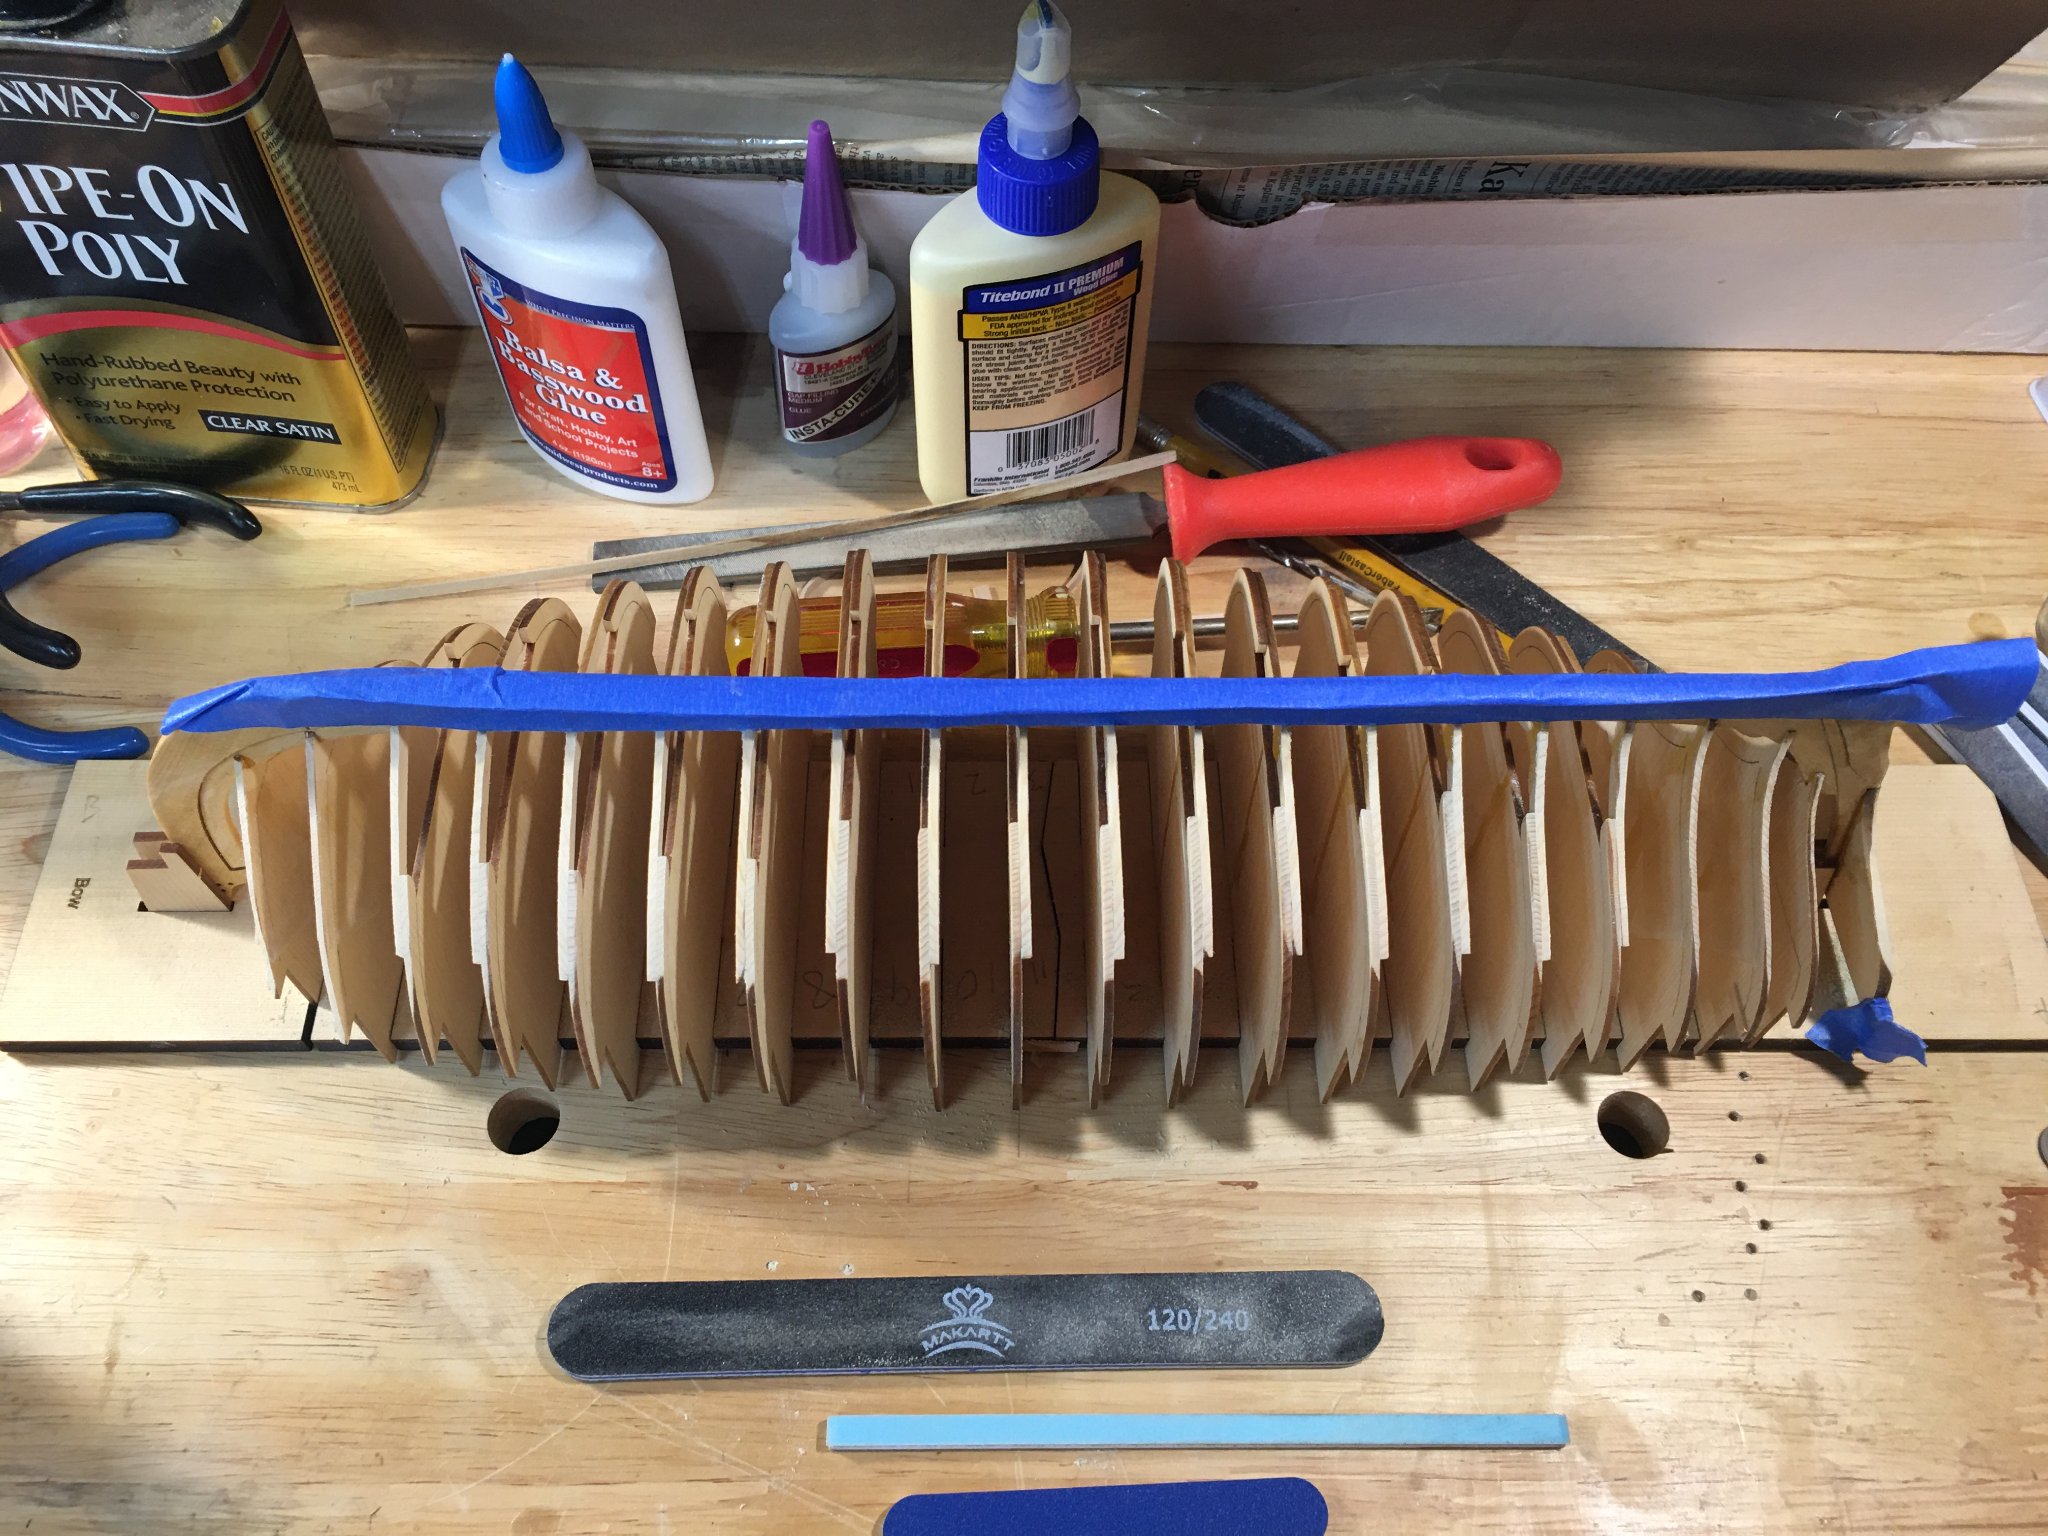
Ok now I an asking for more advice. Please see picture below. I should mention that at first I did not understand the concept or purpose of lining off before planking. So I purchased the narrowest art tape I could find, this was 1/32" wide. Now that I have reached this point in the build. I find that the tape is too narrow to get good adhesion. So I have used 1/16" wide and I purchased 1/8" just in case.
Now to my problem. I followed Chuck's guidance religiously but it appears I have made tick marks for 10 planks instead of 9. So do I start over with the paper strips or do I take advantage of pre-spiled planks and just start planking. I have learned the value of this process and will now use it in future builds.
Additional question - What size of drill bit did anyone use in the planks for the Trenailing?

-
Ryland - My Medway mast kit just arrived. I will restrain myself from jumping ahead. But it does bring up the question of a finger plane. Where did you find yours?
-
-
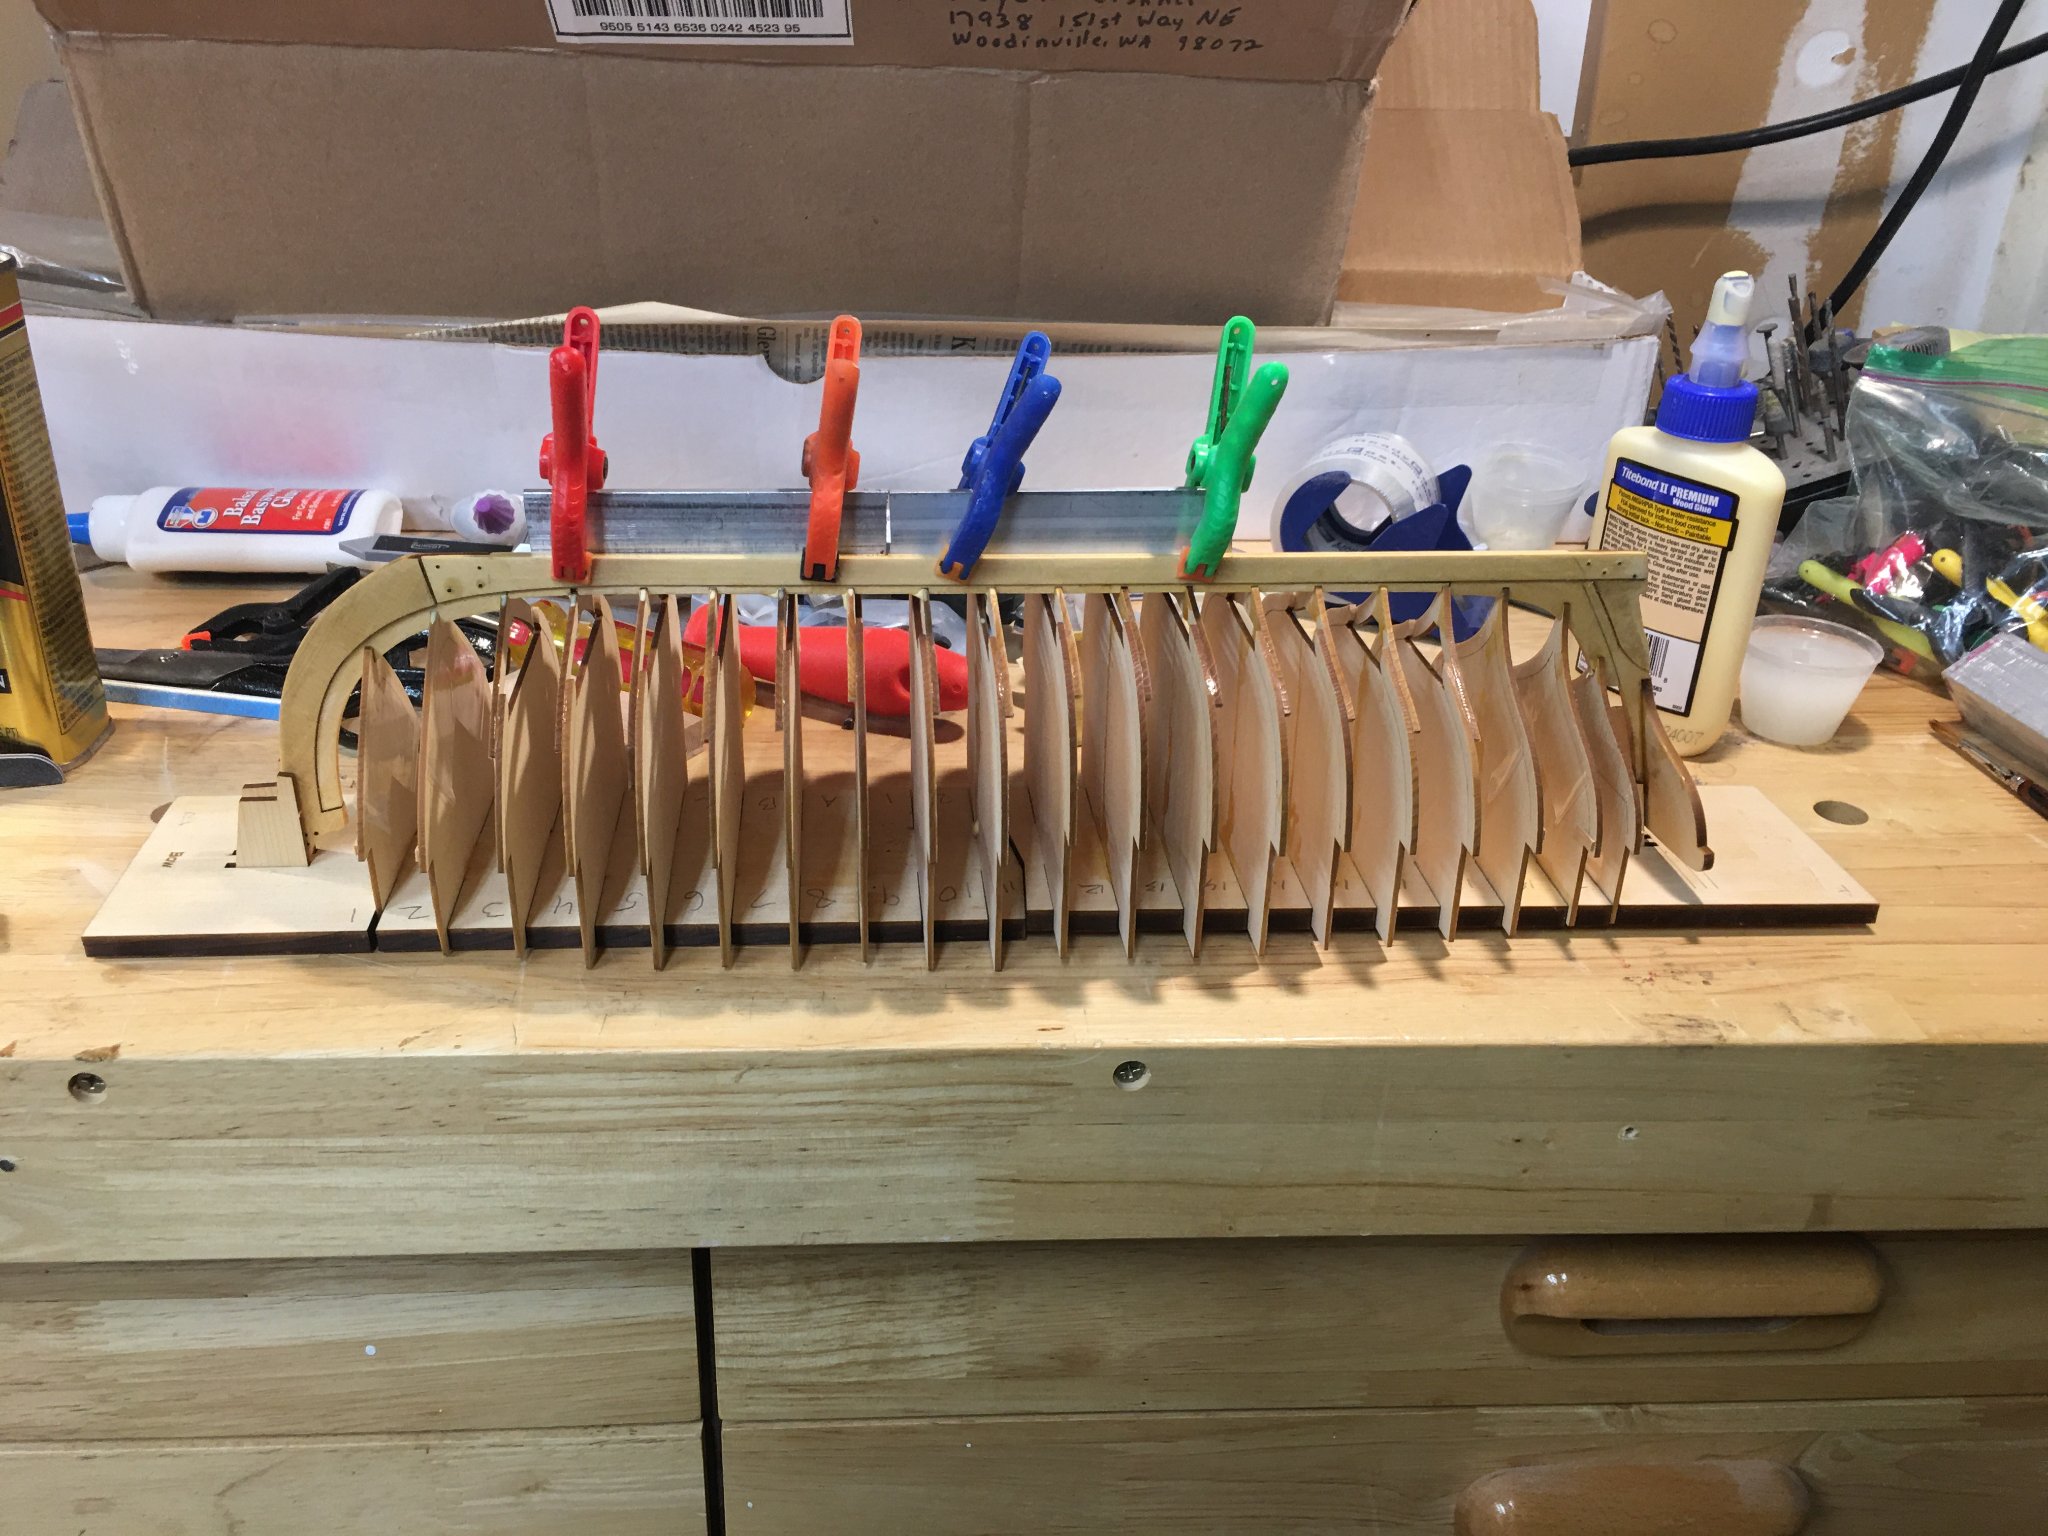
I want to thank everyone who has expressed an interest in my build. We really have a great group that works hard to support each other. I wanted to post just a brief update. In the picture below you will see the results of the repair. And I am happy to report that Fairing is complete. All Laser char is gone. Tomorrow it is on to chapter 2.

- gjdale, Ryland Craze, Canute and 5 others
-
 8
8
-
Ok thanks Chuck. And please excuse my frantic message to you. I was using 220 grit. But I think I hit it with the end of my sanding stick.
- Ryland Craze, Canute and BobG
-
3
-
Thanks to all for your response. And again Ryland you are my main man
") . You gave me the info I needed. First off I had forgotten about sanding the interior. But I agree with I am going to attempt a repair. If the repair fails I will have to replace the frame. I was going to have to do that anyway. But I will wait for Chuck's sage advice. I also thank you for the info that the break is above the floor. That is a key piece of info I needed.
. You gave me the info I needed. First off I had forgotten about sanding the interior. But I agree with I am going to attempt a repair. If the repair fails I will have to replace the frame. I was going to have to do that anyway. But I will wait for Chuck's sage advice. I also thank you for the info that the break is above the floor. That is a key piece of info I needed.
Justin you are very welcome to follow. I promise you that I am going to make more mistakes than anyone here.
- Ryland Craze, Canute and Nirvana
-
3
-
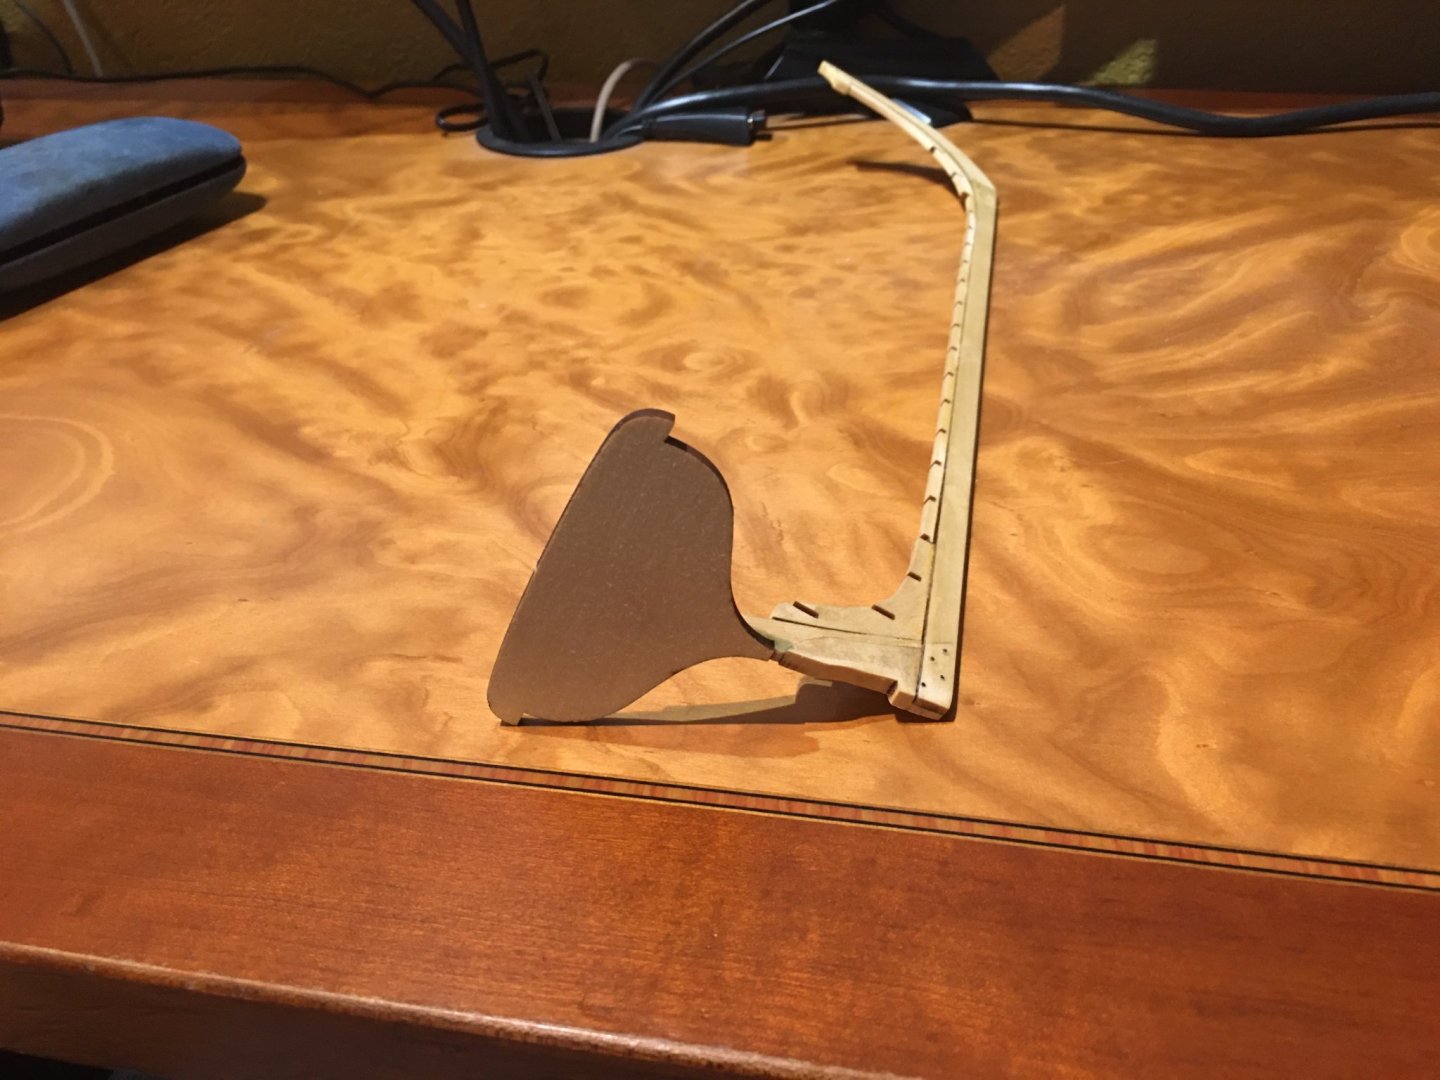
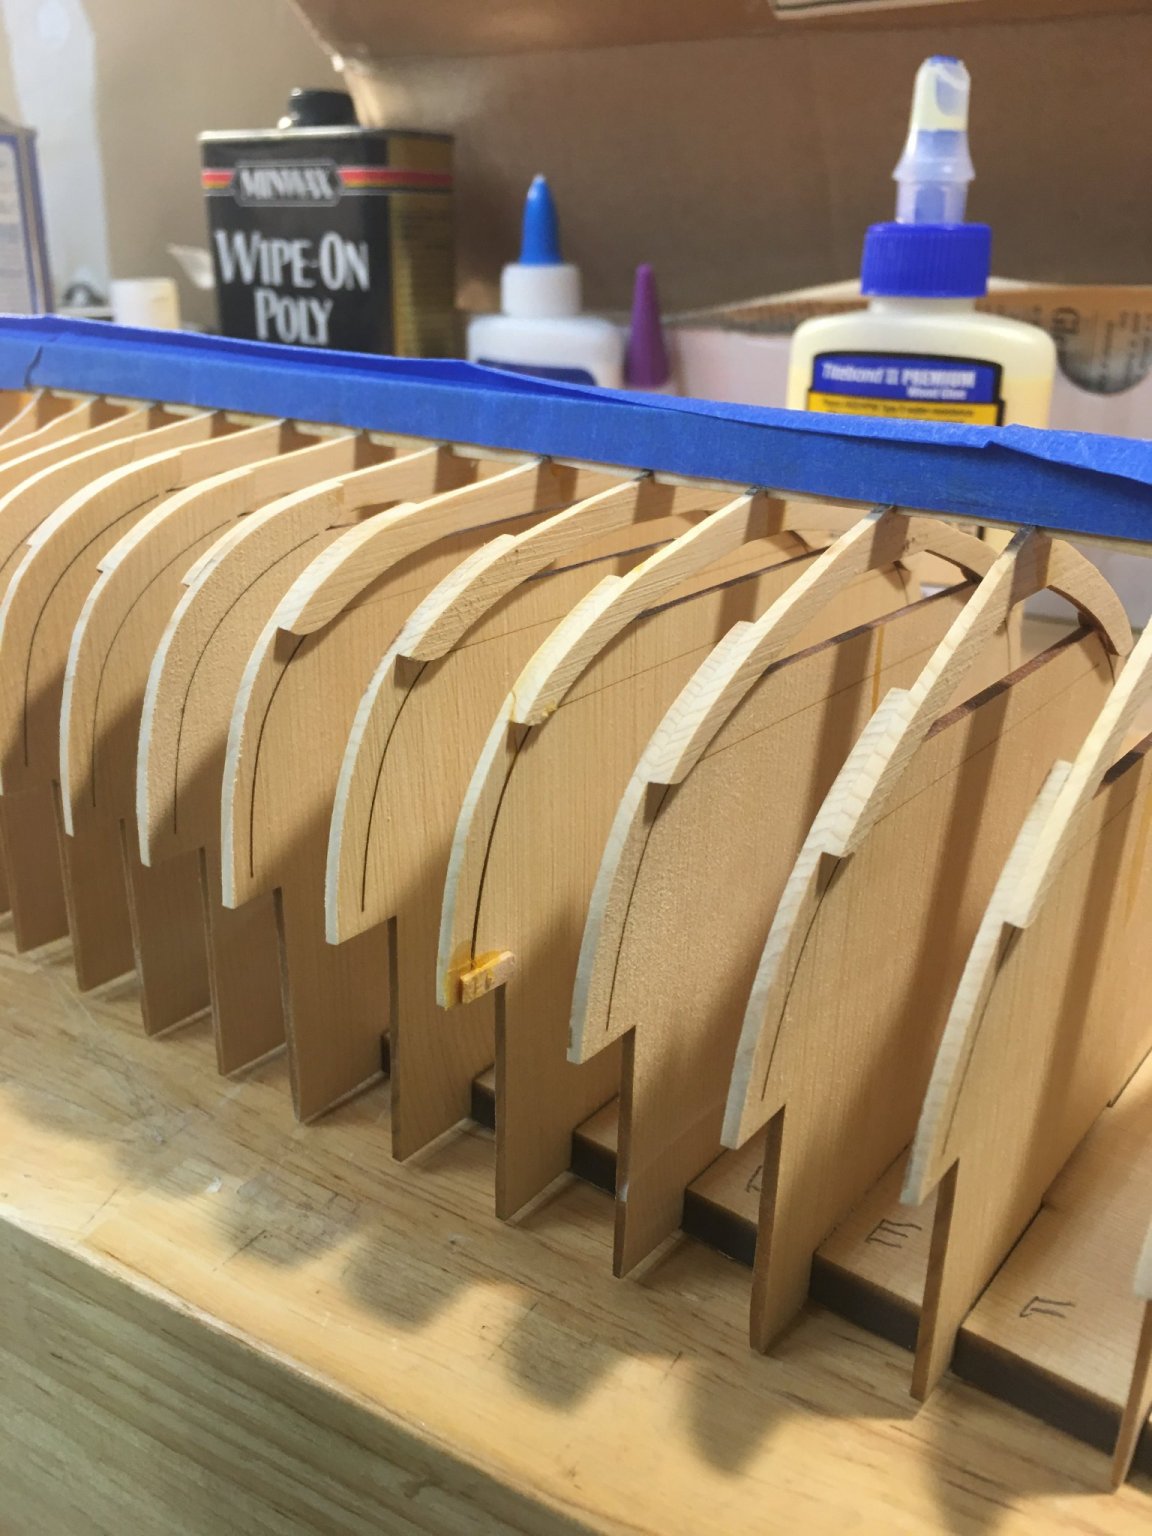
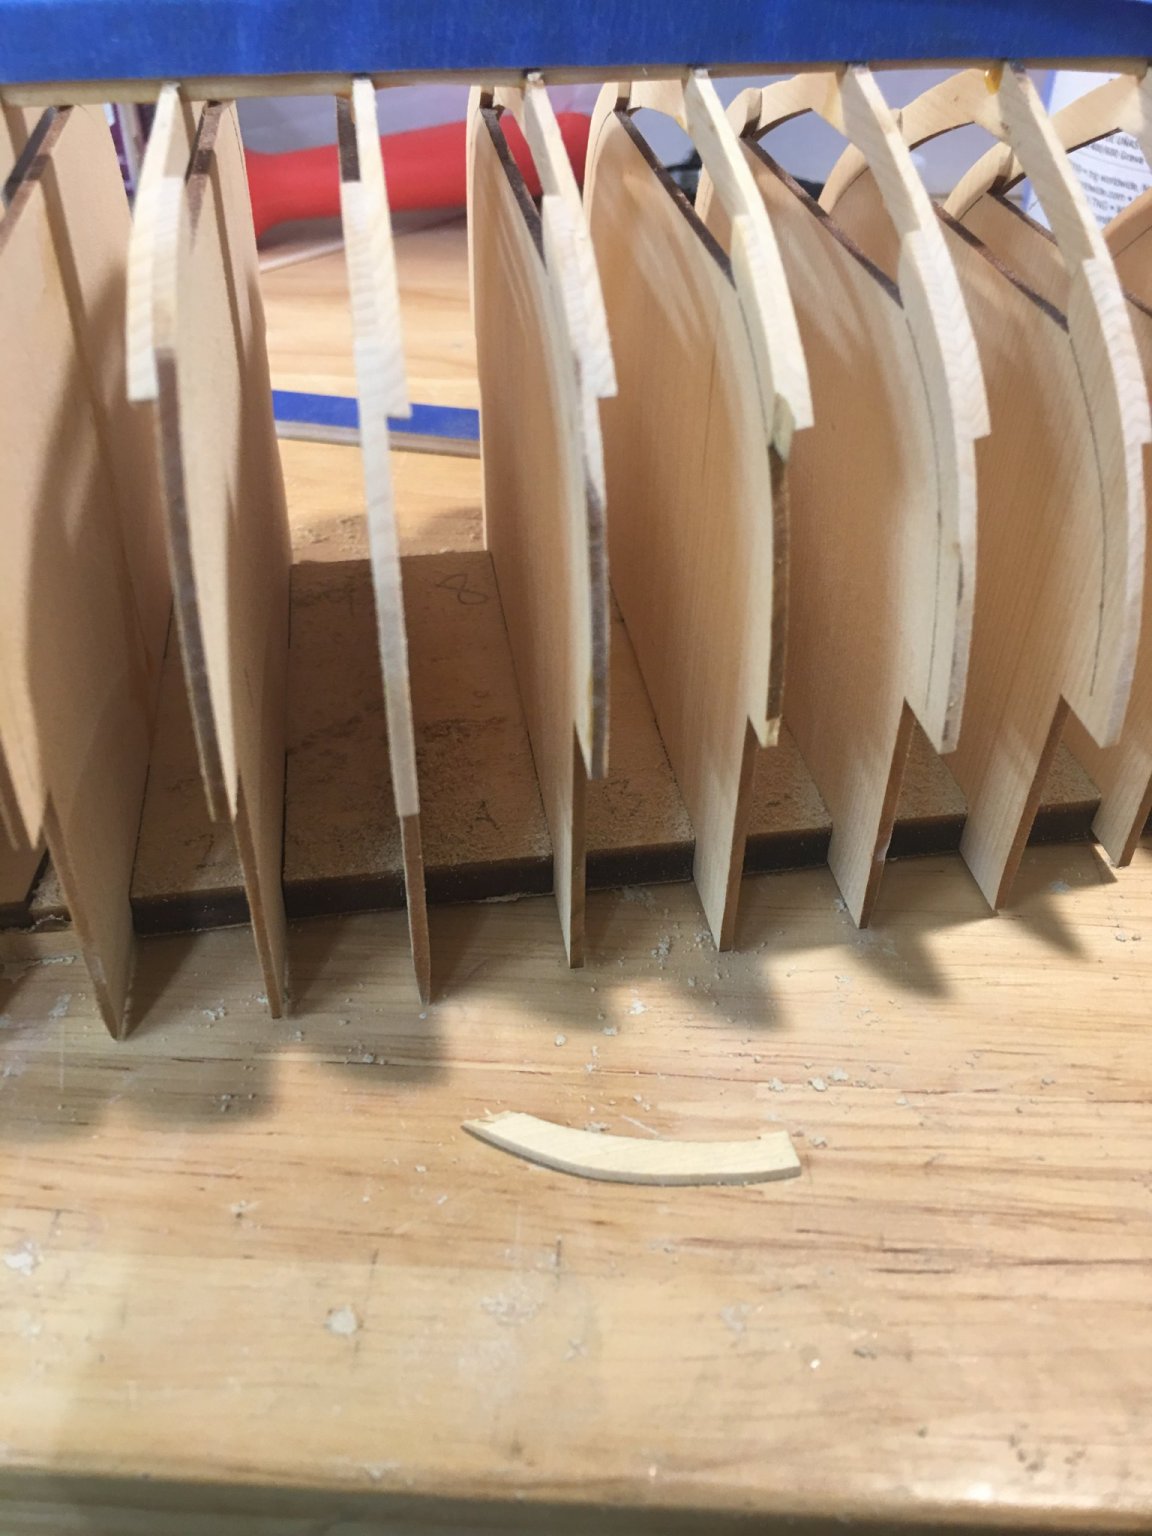
Ok I have hit another snag. Things were going so well. I have completed the fairing on the port side and more than 1/2 on the starboard side. The tip of Frame 6 has broken off. See the Picture below. This is the 6th frame from the bow. So I expect it is Frame "F" as in Floyd F*ed up. I will continue to fair the rest of the starboard side. But this will require more Acetone to remove and replace this frame.
Ok now that I have cooled off from this major disaster. I took a closer look at the situation. It is Frame "C" not F. And it broke right at the join between the first & second part of the frame. As you can see the fairing is almost done and this frame has been faired. So here is my question - If I glue this piece back and if I use some small scrap to reinforce the join. Will it be in a location where it will show? I am sure that once there is planking in place it will be sturdy enough that it could be ok. Maybe not even use any scrap? I am not exactly excited about the prospect of removing and replacing this frame. As you can see I have what approximates a scarf joint. Please share your insight.

-
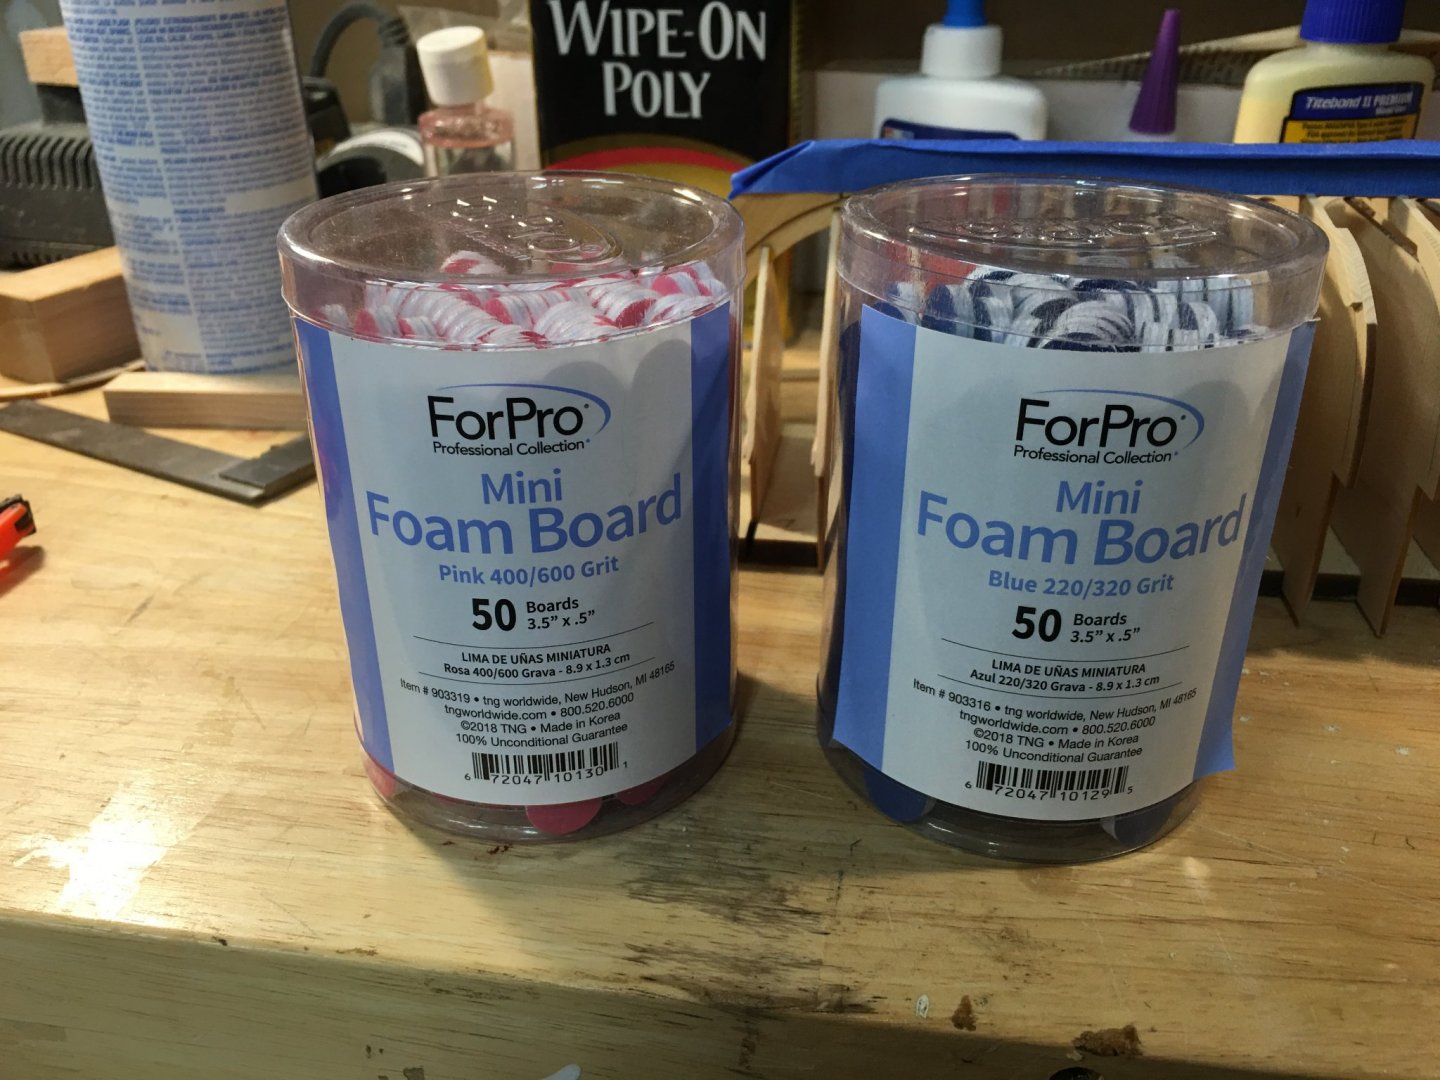
Here is a brief update. All frames have been glued properly and sanding has begun. After 2 hrs of sanding I have almost completed 1 side. I should also mention that Ryland suggested these nail files - 1 is 400/600 grit & the other is 220/320. I could not find them in a smaller quantity that 50 for each size. I have found the very useful. I had been using the larger one in the pictures but these are better. I am also using the sanding stick for the tight corners.


- BobG and Ryland Craze
-
2
-
Ok finally I can give an update on my build. First a huge shout out to Ryland. We spent a couple hours on the phone talking this thru.
I spent a couple days using Alcohol trying to dissolve the Titebond II. That did not work very well. So I bought some Acetone. It took 3 days of careful soaking and disassembly, but I successfully removed most of the frames from the keel. I have just reassembled everything and left it to dry. I added the guidance tabs Ryland used. I also used toothpicks to get the glue into the notches in the keel. It appears to cause less mess and not need the brush with water. So cross your fingers and tomorrow we will see the results.
-
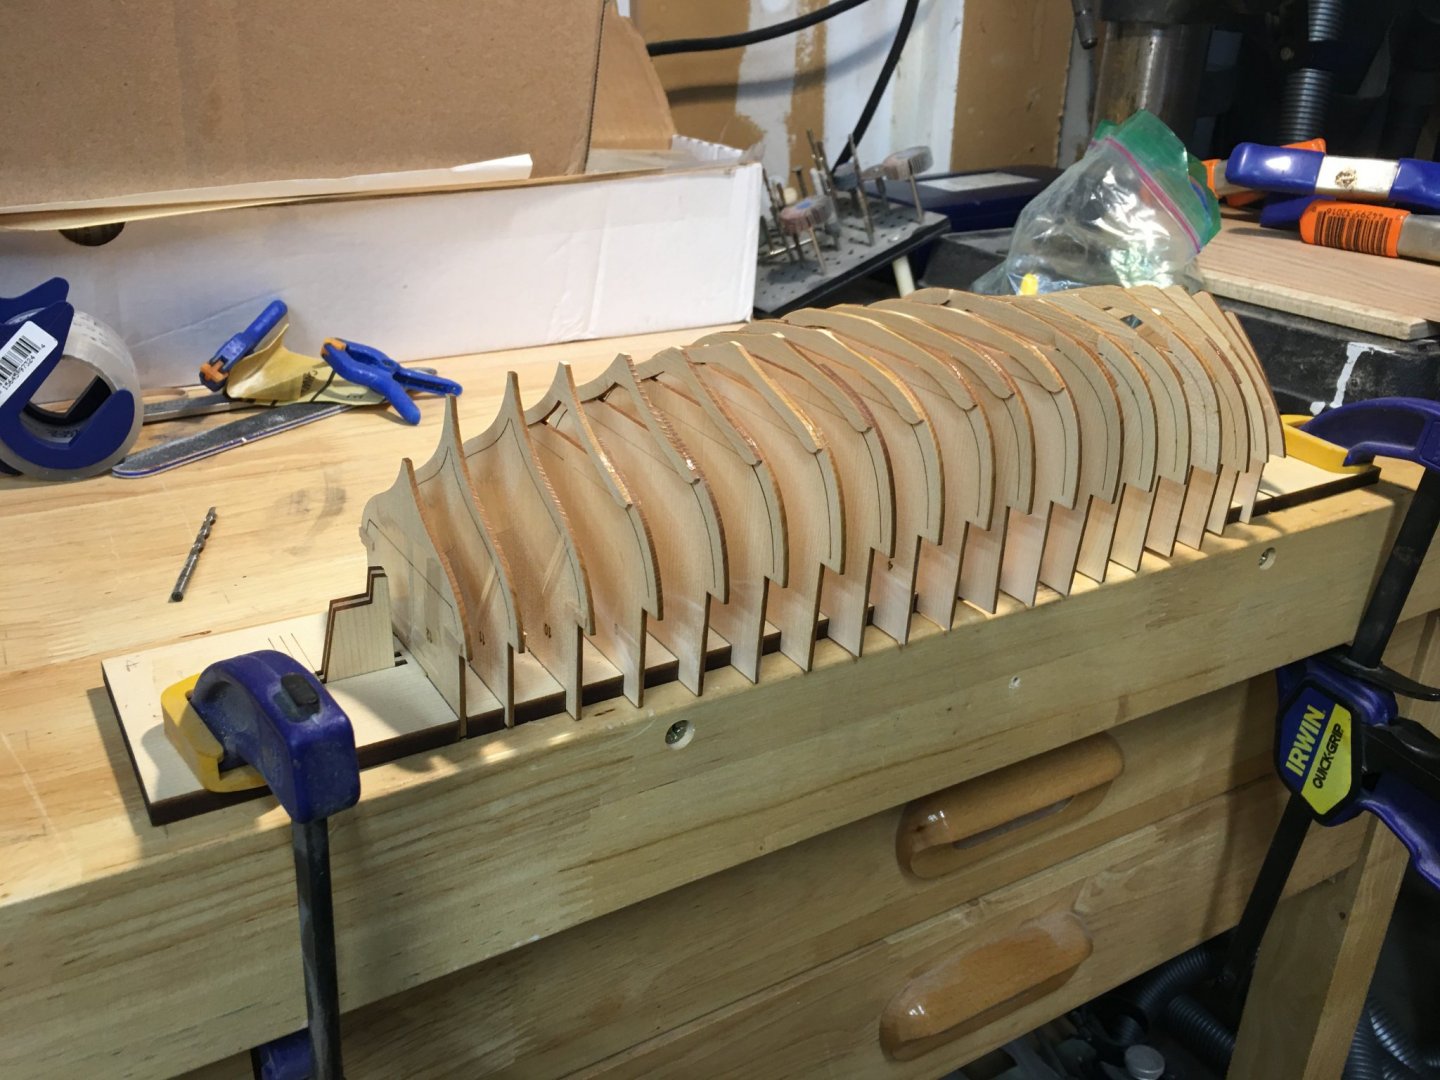
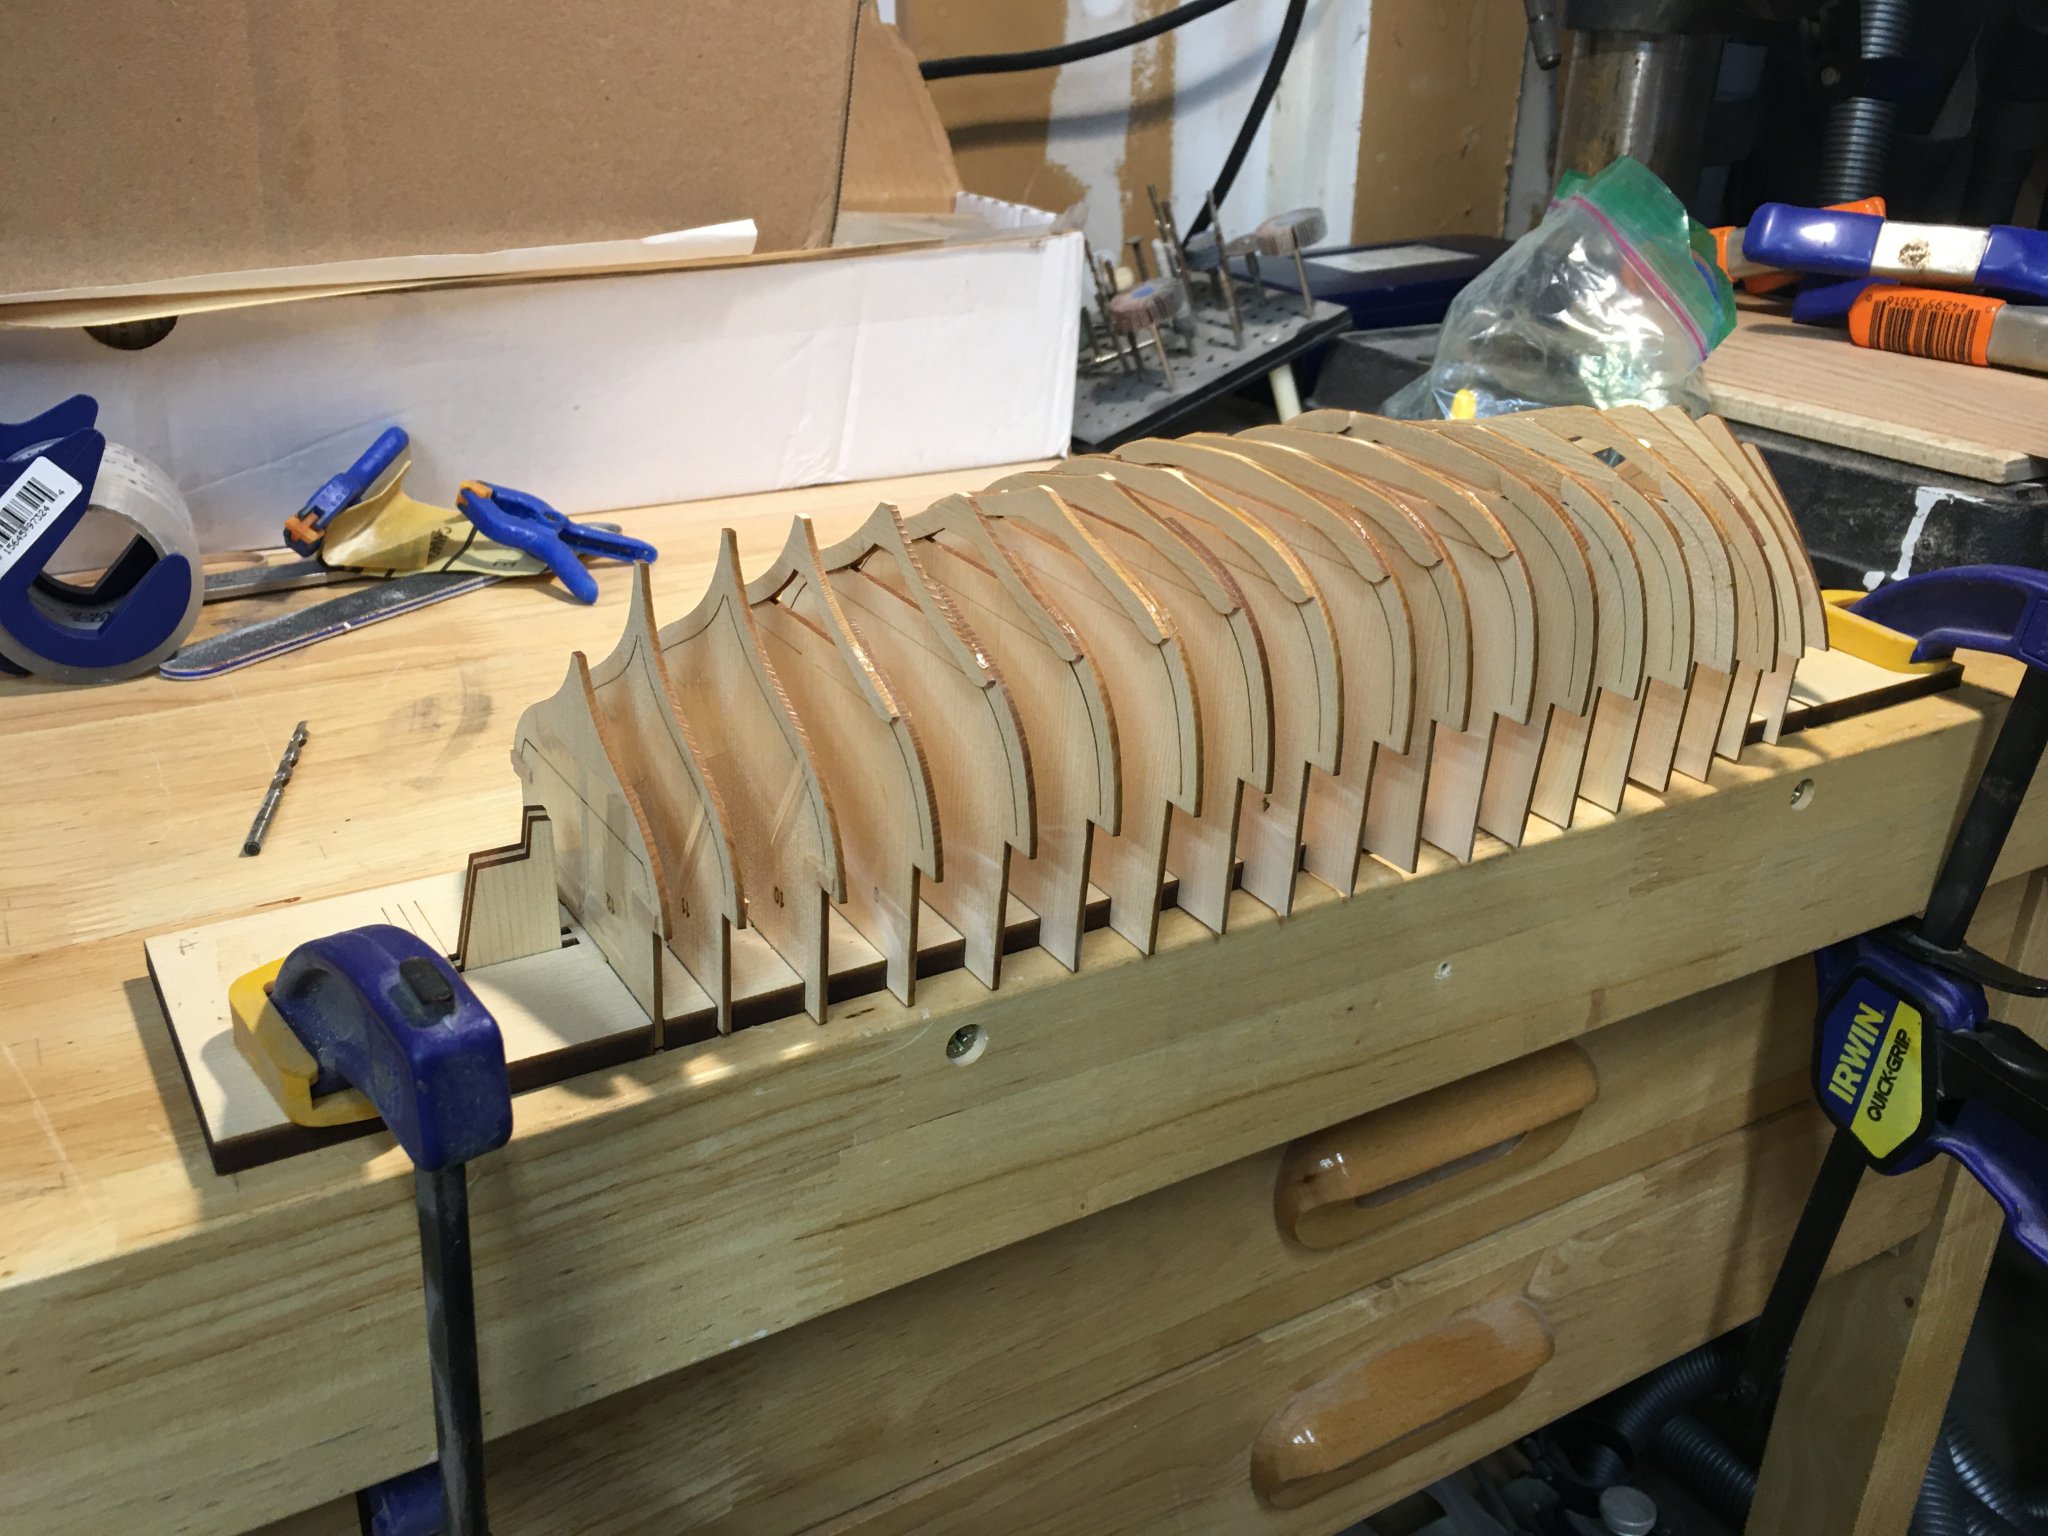
Ok As I have been sanding and fairing I have found a problem. Please look at the photo below. I need to bring the bow and stern of the build board into alignment. I am considering gluing a spacer block between the those 2 bulkheads. Suggestions?
The 2 halves of the build board are out of alignment both vertically and side to side. The vertical misalignment is approx. 1/64". Which likely can be resolved by just joining the 2 halves together. The Horizontal misalignment is approx 5/32". This is more concerning. Suggestions please? Is there any problem with using some strip wood to glue & clamp things into place.

-
-
Ok an update. 😀 First I should mention a couple minor issues I ran into. It appears that when I assembled the 2 part frames 3 of them were just about 1/64" short. I tried to make sure the added frame was flush with the bottom edge. But 3 of them were a small bit short when I went to add the Keel. It wasn't a big deal. But it was a surprise. My solution was to raise these frames just enough in the slots in the build board so that the were snug in the slots in the keel.
My 2nd issues was when gluing the bow frames I developed a very subtle bend in the Keel. you could not see it with your eye but when I placed a metal straight edge along the length you could see it. this is why you see the clamps in the following picture.

The gluing of the frames will be done tomorrow. Then the fairing will begin.
-
😬 Ryland you are so correct. The Admiral and I have been away for a week long holiday and I am now test fitting and sanding.
-
Ok after a bit of trial and error. I got the saw blade to the correct height. And yesterday I finished the Keel. Complete with fishing line Treenails and 2 coats of Wipe On Polly here you go! Now come the fun of joining the keep to the bulkheads. This does not appear as easy as I expected. I will be searching various logs to get ideas.
PS I have a new favorite wood. This Alaskan Cedar is wonderful stuff. It sands easily and still holds and edge. and the aroma is just another benefit.
- gjdale, Ryland Craze, JpR62 and 3 others
-
6
-
Here is my latest installment on my build.
My Igaging device arrived yesterday. I studied Chuck Seiler's Log for how he used this tool. He has very good pictures and a detailed description. I took the same measurements he did and came up with the same settings. but when I made some test cuts they were too deep. I tried a few different solutions and found that I needed set the blade height on my Byrnes Saw to .045". This is almost 1/2 the height that Chuck used. so I am concerned. For the time being I have stopped work unitl I resolve this. I look forward to any insight for this wonderful group.
PS My simple Keel has been cut into short strips so that I could test this method. So I am committed to making this work.
-
Chuck - I want to thank you for your detailed pictures using the Igaging device. I have been anxiously waiting for mine to arrive. It arrived yesterday and so I have been closely following your approach. But when I measure and set my blade I am getting too deep a cut. I have had to set my blade height to .045 inches. and I can't figure out why. I could go forward just testing over and over but I want this to turn out right, My measurements are the same as yours and yet when I set the blade height to the same setting as you do I cut too deep. Suggestions?
PS the simple keel has now been cut into several pieces for testing. So there is no going back 😅
-
Ryland - I want to thank you for your log. Your log has the detail that I need for my model. I have been using it extensively for my build. Can you tell me where you found the thumb plane? I have not yet purchased the rigging kit. but I plan to once Chuck has them in stock.
-
Ok here are some pictures of my progress. I am told that my Rockler Order will arrive tomorrow. I will start working on the Keel then.
- BobG, Nunnehi (Don), Ryland Craze and 5 others
-
8
-
Thanks to all for the responses. I am moving ahead today.
- BobG and Ryland Craze
-
2
-
OK a bit of info and also some questions - first Bob I just received my Quad Hands! boy do I wish I had found this sooner. Very nice and I can see many projects I would use it on.
Chuck - If you are listening to the late comer. a Friendly suggestion - Could burn the Letters & numbers of the frames into the build board? Also I have just finished reading all the build logs. And I suggest 2 hard keels instead of the hard & easy. The Hard is not really that hard but still could be messed up. So a fall back would be nice.
So now an update on my build - I discovered today that I screwed up on my Rockler order. So it will be another week. 😢
So I have decided to move on and begin working on the frames. Since I have had more failures than completed Models. I want to follow this one exactly as instructed. it says to use a cedar strip 1/16" X 1/32". I don't find that strip in the inventory or on the checklist. I know this is being anal. but is there any reason I can't use Boxwood or another type of wood that is 1/32" X 1/8"? I have lots of this from other failed models.
-
Thanks Bob! I have placed my order. I think Chuck needs to talk to Rockler. I am still waiting for my order. Since we are still in lockdown I depend on Amazon and other online sources for my supplies. Rockler has had a week and still no delivery. I ordered Titebond, Sandpaper, & the depth gauge for my Byrnes Saw. FYI to anyone who is building this model. I found 1/64" wide art tape on Amazon and it has now arrived.
Last comment - while waiting for all the orders to come thru I was working on the build board to clean out the grooves and one of the pieces broke. I believe someone else mentioned the same problem. Stay tuned I will upload pictures as soon as I have something to share.
This site is such a wonder! I so appreciate all of you guys. I will admit I have far more Viking Burials than completed models. But it is you guys that keep me trying.
Someone mentioned that the only camera they have is an Iphone. It is the same for me. So I have a dump question. How do you get your pictures form the phone to the computer so they can be uploaded to this blog. I have been emailing them to myself and I know there has be be a better way.
- Ryland Craze and BobG
-
2
-
Ryland - Thanks for the info. I too have a Byrnes Table Saw. I will do exactly as you suggest. Did you use an 80 tooth blade? As mentioned elsewhere I also have commercial nail files with 120/240 grit. I will clean it up that way. Now all I need to do is find my Micro Chisels.
- BobG, Ryland Craze and Nirvana
-
3
-
-
And so it begins. I just received my Medway Kit. And this is the beginning of my build log. I contacted Chuck a couple weeks ago and asked when he would have some kits in stock. He was kind enough to drop me an email telling there were 6 new kits. But the time I placed my order 4 were gone. 4 days later I received my kit. There is no comparison to receiving a Kit from Chuck and any other supplier. This is my first order from the Syren ship company besides parts & rigging. The quality is unmatched. The nice aroma of Cedar isn't bad either.
I did the checklist (which by the way he provides for you). And of course everything was there and in good condition.
So I have my first question - In reading other logs I have found a digital tool mentioned which appears to be a height gauge for a table saw. Can someone explain how you use your table saw for the Keel scarf joint? If I understand correctly you are cutting the depth and then cutting away the extra wood by hand?
PS I have ordered the tool (we can never have enough tools). So I am waiting for my order from Rockler. It also appears that Rockler need to talk to Chuck. His package arrived 2 days ago. And still no sign of Rockler.


Medway Longboat 1742 1:24 scale by fnkershner
in Medway Long Boat - 1742 - Public group project.
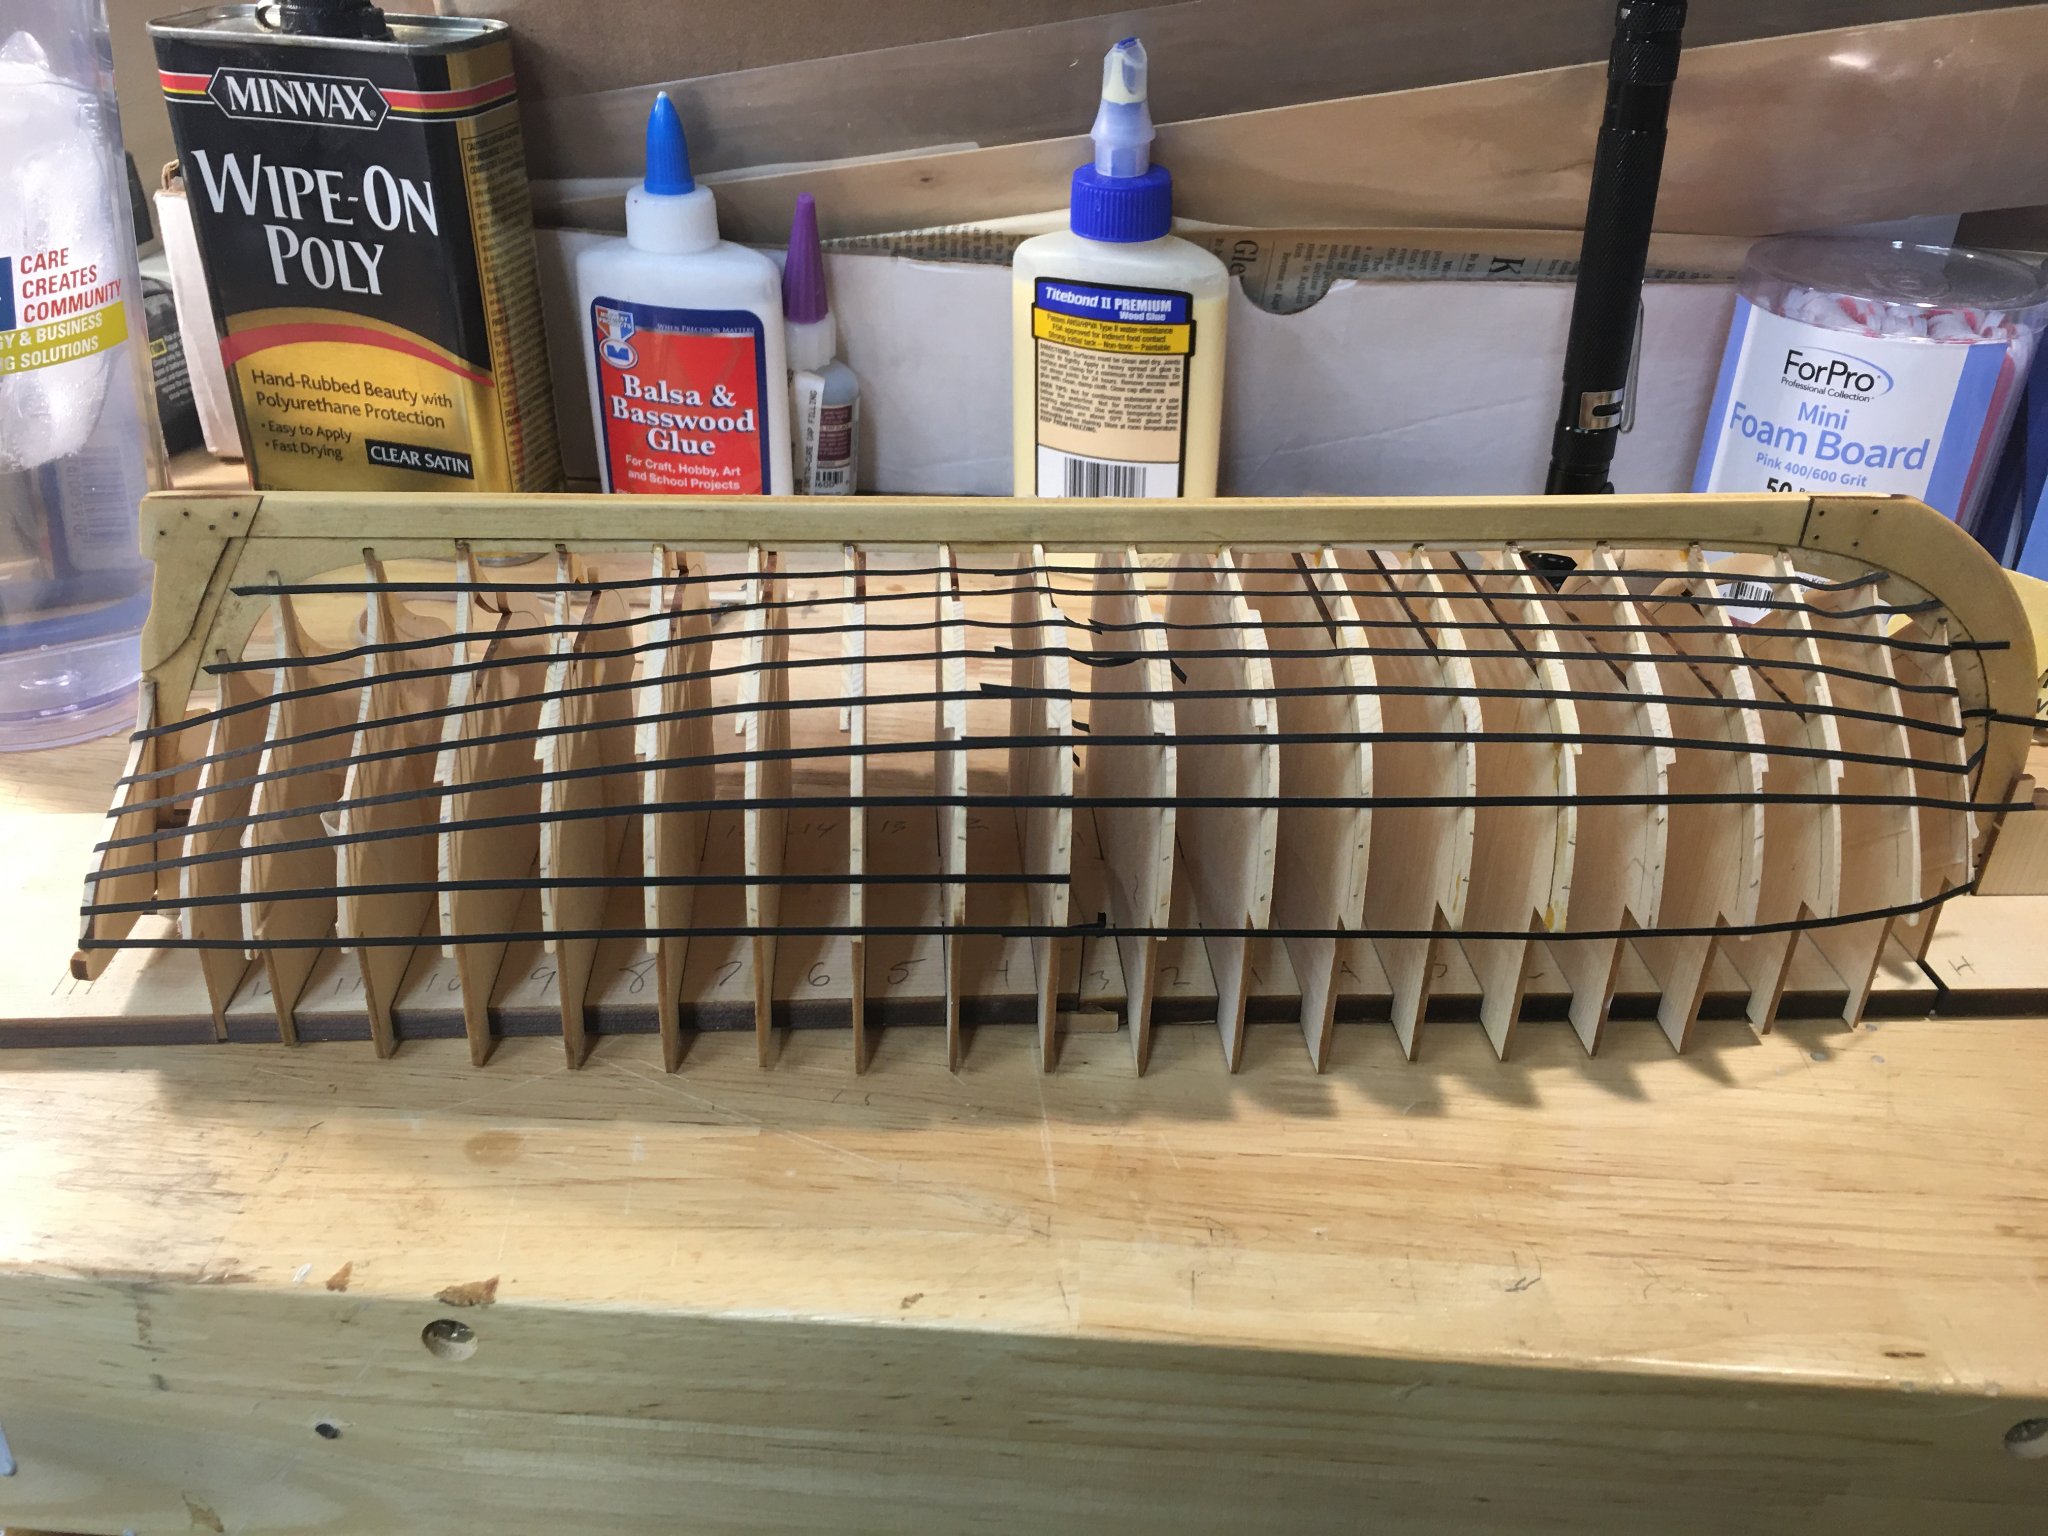
Posted
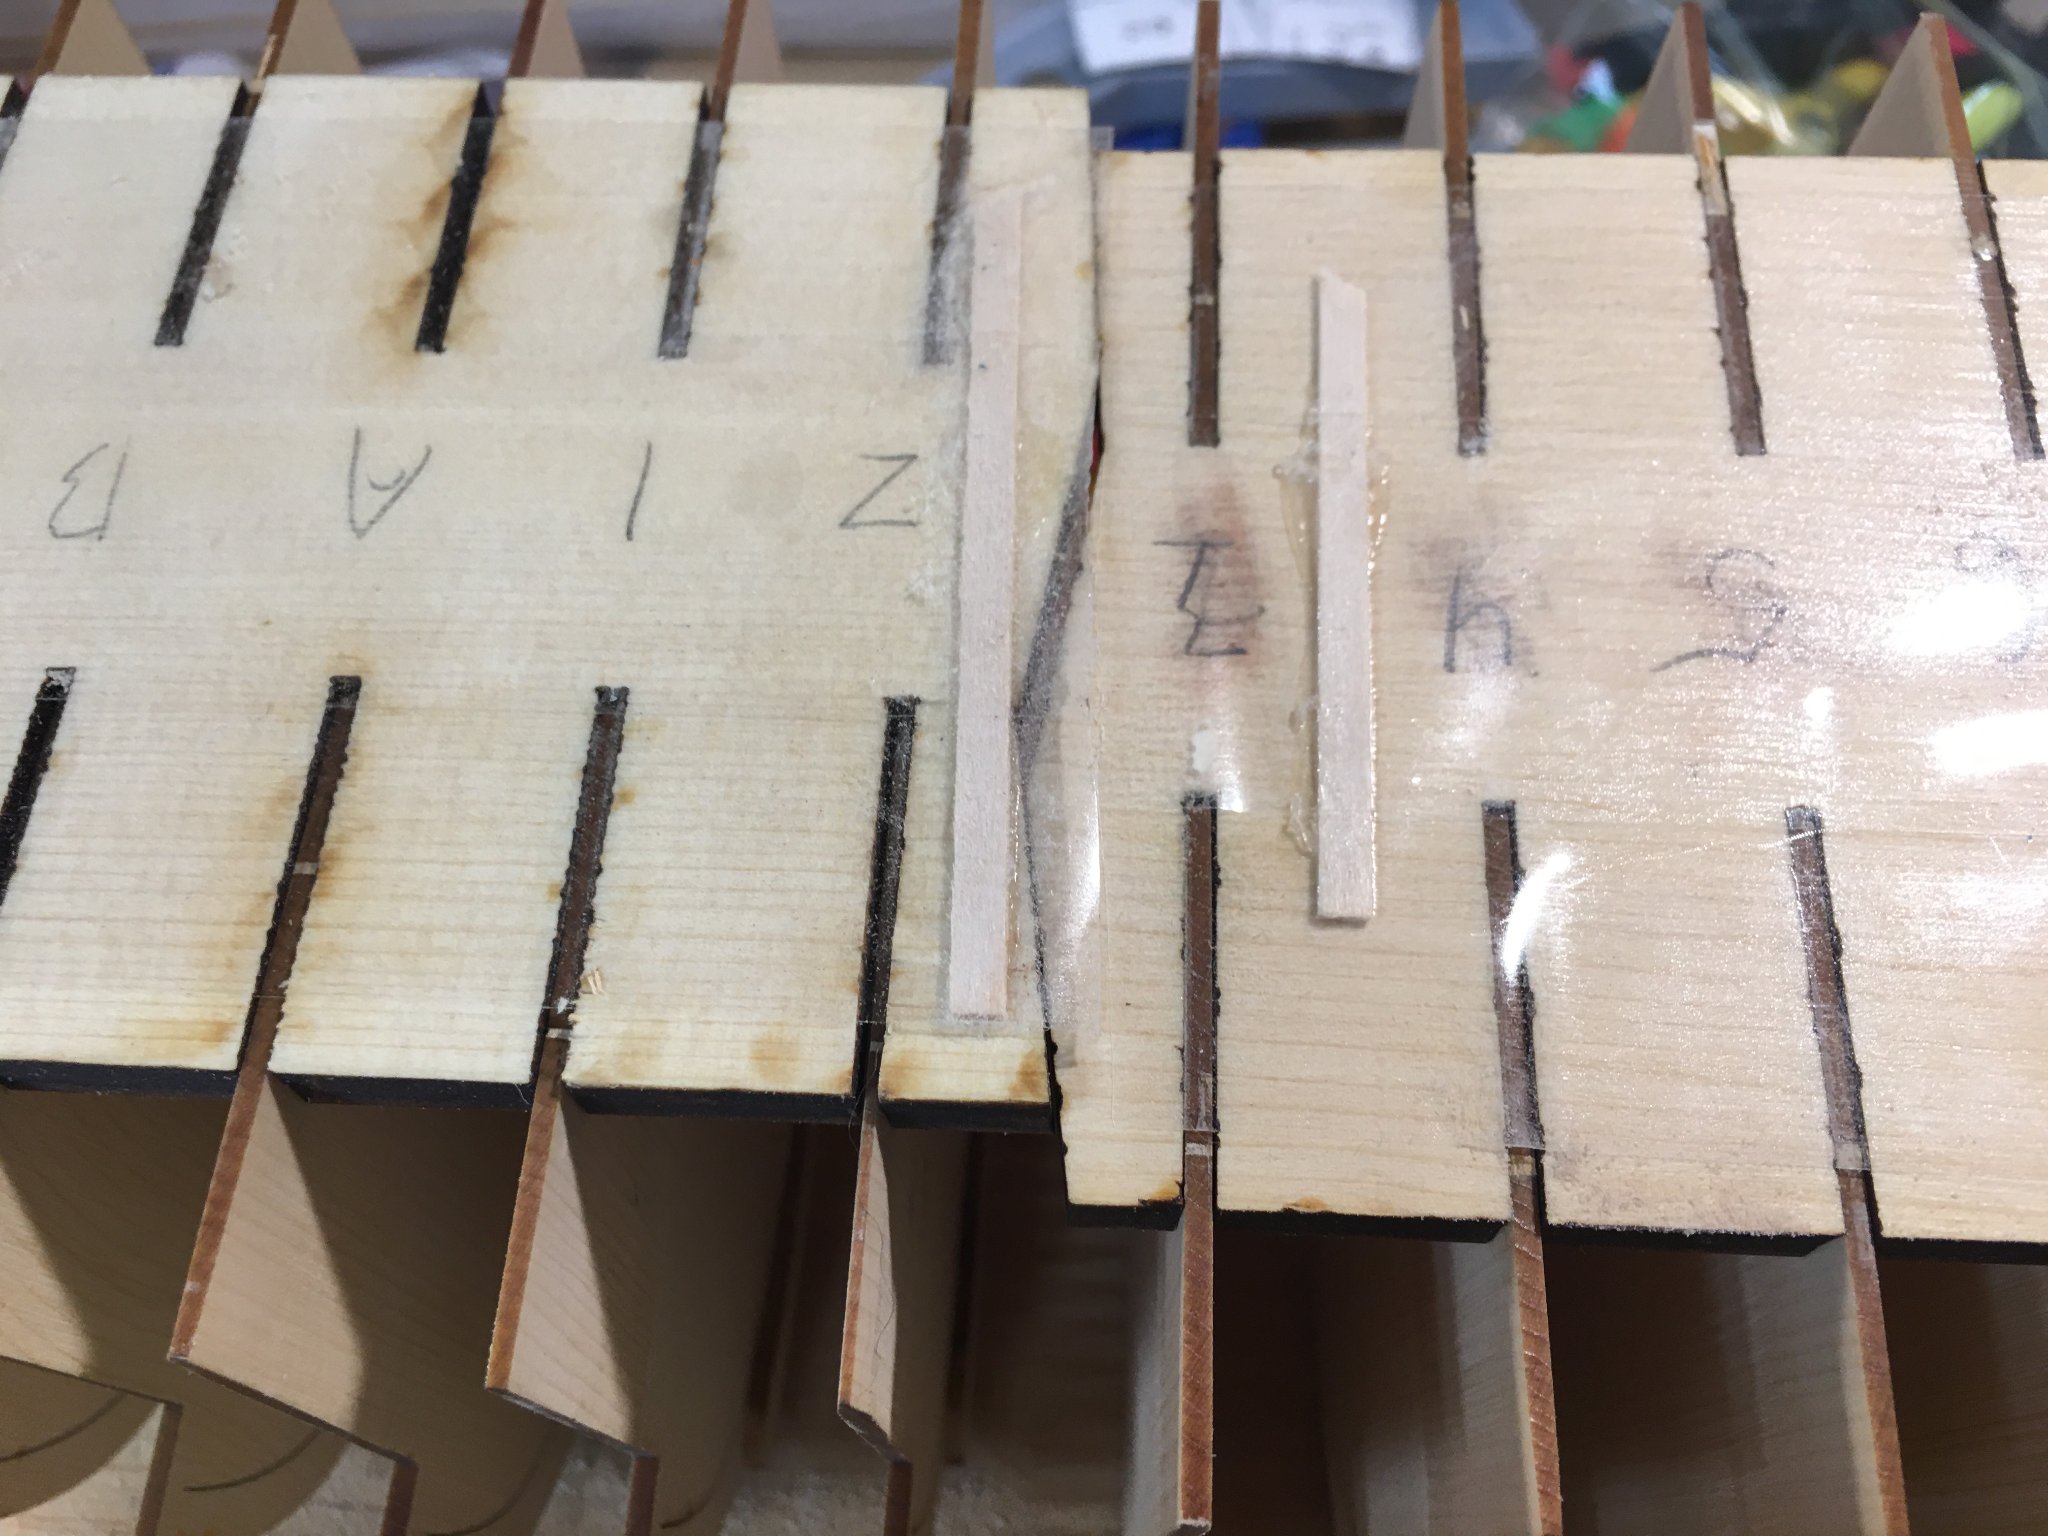
If you look closely at the tick marks on the frames you will see that the tape strip next to the garboard is between 2 sets of tick marks. As I was lining things off I could see that it was not coming out right so I switched and started from the garboard and the next strip was just dividing the open space. It is definitely not correct. The width of those last 2 planks is way off.