fnkershner
-
Posts
1,595 -
Joined
-
Last visited
Content Type
Profiles
Forums
Gallery
Events
Everything posted by fnkershner
-
what powertools to buy
fnkershner replied to Adrieke's topic in Modeling tools and Workshop Equipment
Reluctantly I have to Agree with Crackers. I of course am one of those that replace skill with Power. I have just about every tool you can imagine and I have tirid and given some away. -
Ship Modeler's Workbench
fnkershner replied to CaptCraig's topic in Modeling tools and Workshop Equipment
Well I don't know about your hosuehold. But my Admiral said "There will be no sawdust in this House!" So I HAD to build my own shop. I downloaded the plans from the web and made a few modifications and took them to the Admiral for inspection. She said "oh go ahead build whatever you want I will never go out there". But I persisited. A wise captian once told me if they are not happy you will be miserable. So even though she said she would never set foot inside. It now has sheet rock, molding, Paint, & carpet on the inside. And about ever month or so a misterious thing happens - a Knome shows up and the floor is suddenly clean! -
Actually Augie I use a pale Blue sheet for photo work. It helps you see the light color items and it still works as a useful back drop. In fact I went to the local fabric store and bought a yard or 2 and ironed to take out the creases (well the admiral ironed it). and I keep it in my shop just for that purpose. Particularly when we are having a local club meeting I hang it up so we have a back drop for all the photos of everyone progress. You can also do this with Contruction paper. It is nto expensive and works very well.
-
Ship Modeler's Workbench
fnkershner replied to CaptCraig's topic in Modeling tools and Workshop Equipment
I was trying to find that thread. Thanks! I knew it had been restored. -
Ship Modeler's Workbench
fnkershner replied to CaptCraig's topic in Modeling tools and Workshop Equipment
Wow! what are the dimensions? About 8 yrs ago I did what you are doing now. Mine was 12 by 16 feet. The reason for this was that in Washington State if you build a building larger than 200 sq feet enclosed you must get a building permit and inspection. I didn't want to hassle with this in my back yard. I will dig up some photos and post thme for you. -
Augie - I wouldn't worry about losing narrative. With 22 pages on this log you have done a masterful job of making up for the loss.
-
Ken - Instead of PVC have you thought of cardboard tubes? Like what you get from Wax paper or aluminum foil? All you need is a honeycomb to store your strips and the price is right. Have fun with your build. I will be in the front row with Mark & Augie.
-
Where is Hubert these Days? He does such wonderful stuff, and he was so much help to me.
-
Many year ago, I was faced with similar questions. I was building what turned out to be my first completed model. It was of a British man of war battlestation. You can see the pictures in the completed builds forum. What I found is this - As mentioned above they were rolled very tight and lengthwise to get the best airing. They were folded in the middle to simulate a U shape. They were lashed using what is called a Marlinspike hitch (which does include 7 wraps). The lucky sailor who actually had a blanket (very few) rolled his balndet inside the hammock. Covering was not done until the early 19th century. Storing in the hammock cranes had 3 purposes: 1. Air the bloody things out. They tended to smell after a few days at sea. 2. Protection from splinters and small arms fire when in battle 3. Improvised life preservers. Most sailors could not swim. The hammock would often float for up to 1 hr. ie it took that long to get water logged. As to storing then sideways or at an angle. My research found this was not done in the American or British navies. I never found any evidence of taring the covers. The only way a Hammock got washed was by exposure to the sea.
-
Gil - Now who is talking about an Obituary? Rocking chair? Somehow I don't see that fitting you.
-
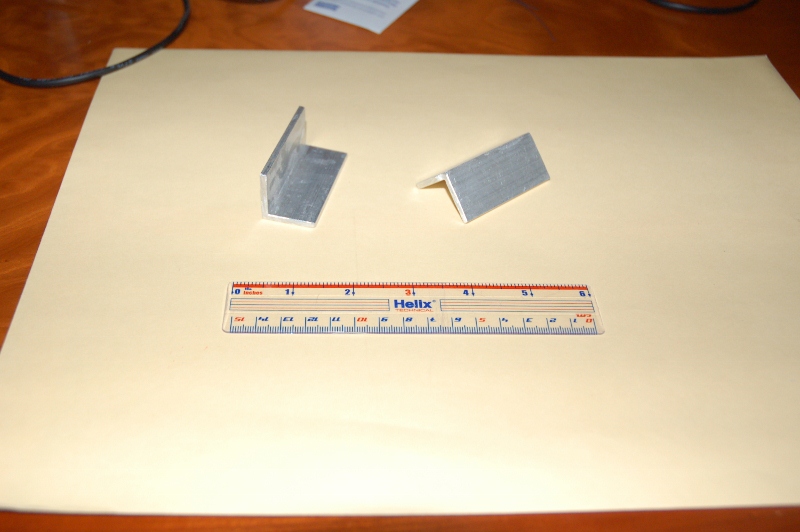
Eric, It is great to see your log. I agree those binder clips are the best tool and even better for the price. I don't know what you do for work but I picked up about 3 dozen of them in my companie's office supplies. If you look around you will find a thread I posted on how to modify them to use for planking clamps. You mght have found that particular modification useful for your sills. Another suggestion that I have found quite useful. I went to my local Home Depot and bought a piece of aluminum angle iron. I used my hack saw to cut it into 4 inch lengths. I then used the resulting pieces as to clamp with my bulkheads. I now use them over and over on all my models. The glue does not stick and it the holds the bulkheads square. In about 6 months I will get back to my Syren and post that log. Keep up the great work I will be following you! By the way normally I would agree with you this is a challenging project for a first model. But with the great design and wonderful practicum from Chuck and all the help here. I don't think it will be any issue at all.
-
I will tell her and we will be there! Great chance to see your other models too! it has been at least 5 yrs since I last saw them. You know that between you and Harvey she wants me to work on a copper bottom model soon.
-
Gil - I also notice the stunsil boom irons. did you amke them or were thye supplied? I am think of adding this to my Harvey once I get there. by the way my wife thanks you for the pictures. She is sorry the Victory will no longer travel to our house.
-
Jim Byrnes Model Machines
fnkershner replied to Mahuna's topic in Modeling tools and Workshop Equipment
Officer of the deck an extra tot of rum for Donna! And for a man who I smart enough to leave the wife in charge! -
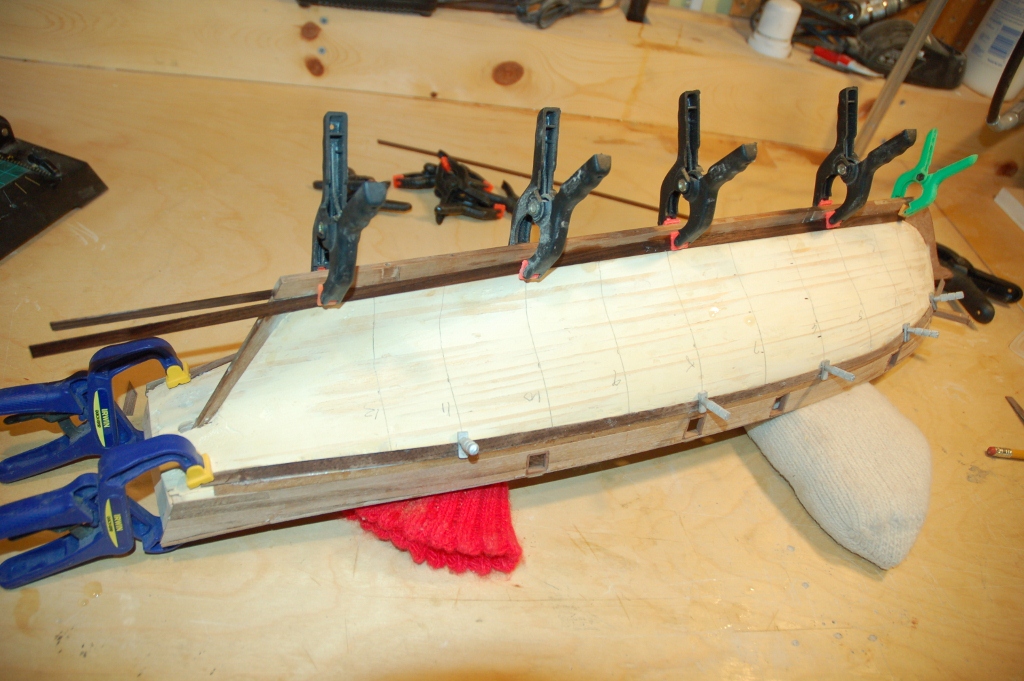
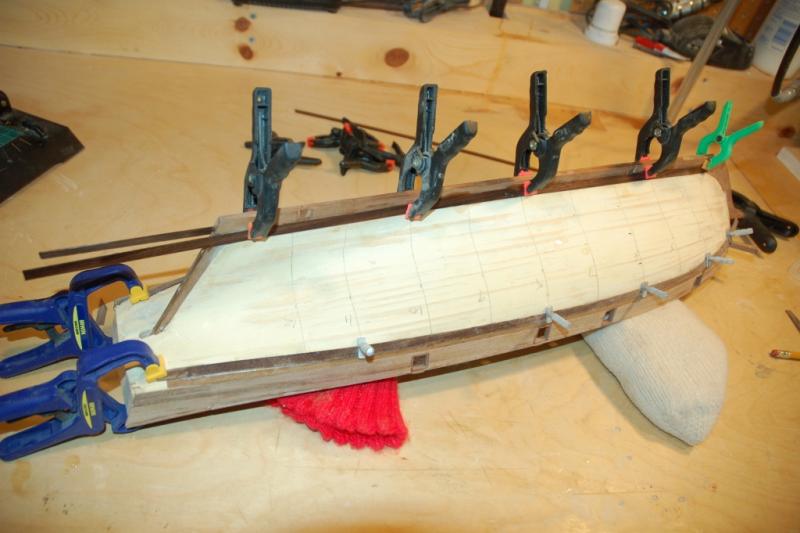
Well another week has gone by. As some of you may know I started another discussion related to planking in the Planking forum. Previously all the planking I have done was either covered by paint or putty. This is the first time I have done the 2nd layer. I do want to learn how to spile. But in this case I had already milled the wood for this layer before I understood the need. So I am going to opt for the planking method described for using the material that comes with the kit. So I have decided to add 1 strake at the Bulwarks and 1 at the Keel to provide a straight line to work from. From there I will taper and fit as needed. I also noticed that others were posting more details. So I will add some of the intermediate pictures that I have not posted before from now on. So for today, In the attached picture you will see that I have installed the first 4 strakes of planking. I wanted to make sure the first strake below the bulwarks was complete so that I had something for the wales to attach to. I soaked the planks and used spot welding with CA to get these planks to hold. I will let them and the PVA glue dry and then continue. Hopefully I will get 4 more strakes tonight.
-
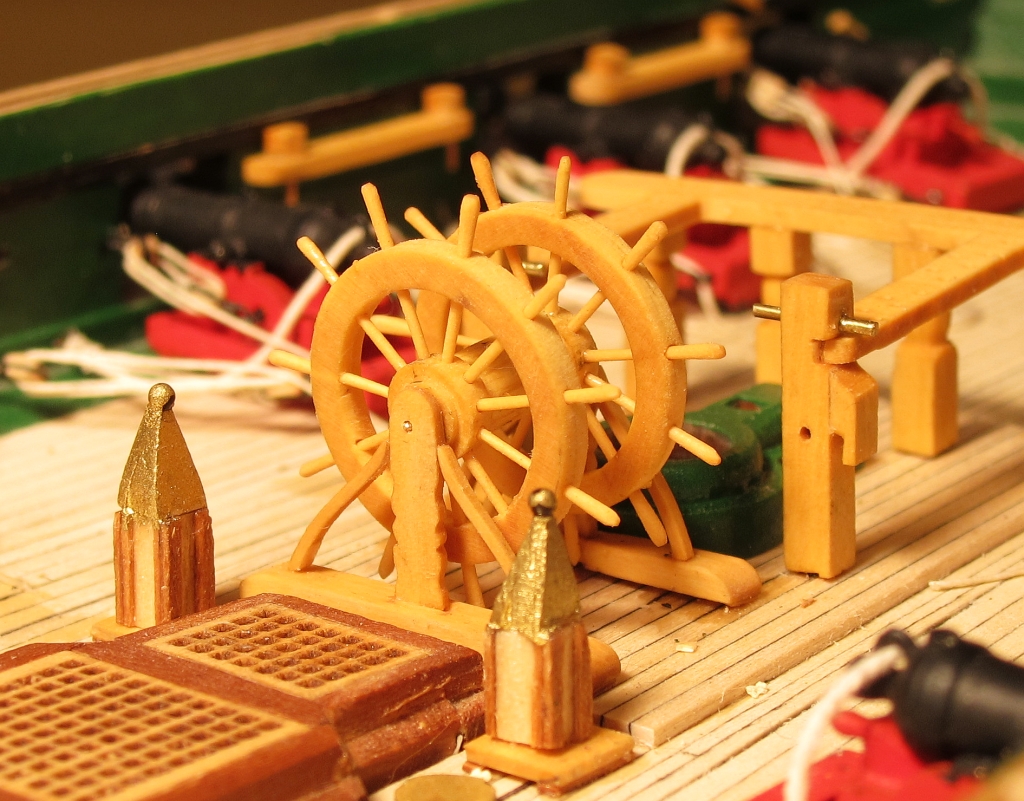
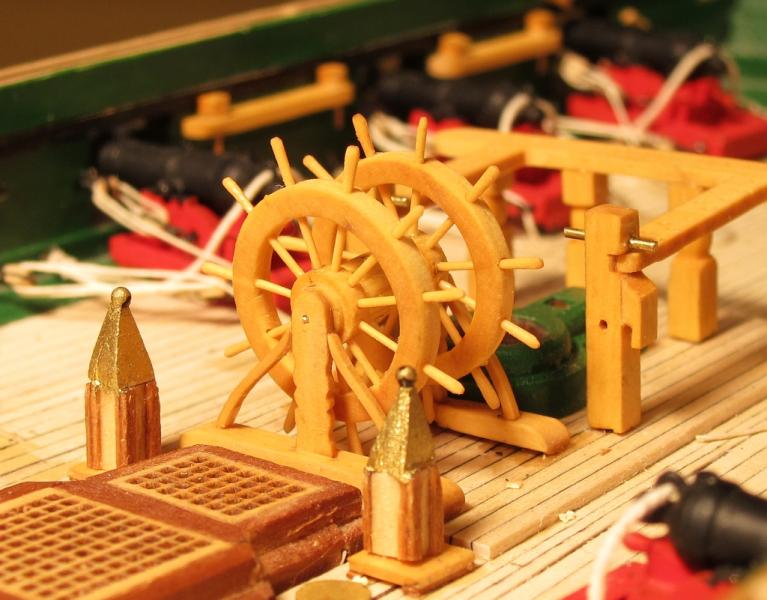
Often the work we do here on this forum is very fine. But rarely does it stand up the the unbiased eye of the camera at extreme magnification. In this case Harvey's Double Wheel does! Take a good look! A hearty well done!!
-
Well yesterday was out first local club meeting since we recieved our Rope Walk. We spent lots of time tinkering. The most notable discovery is how hard it is the see the lay of the result. You need a macro lens or magnifying hood. To get a better handle on it I took one of the supply spools and changed the color. This made a world of difference. It was much easier to see if you had the right tension or not. I also discoverd another extreme way to determine the correct tension - if the winding is occuring inside the appeture of the Die stand you have the take up tension correct. If you have the motor turning to quickly you will find the join getting closer to the spools. Also with a macro lens I found that the die was too large. Mark - I like the lay of the rope in your pictures. Can you tell me what size die you used for these? So far all I have used is the pre drilled die that came with the machine. Can someone explain the value or purpose of being able to turn the large knurled knob on the Left side of the supply wheel? As mentioned above I have used a belt to make it stationary. By the way it is not necessary to buy another belt. If you bought an extra set of belts from Jim you will find that the largest belt works well to hold this wheel still.
-
I must confess I am the one who pushed Harvey to post this again. I have seen the model in person and more of the pictures. Harvey I think you are too humble this is a great achievement. I am sure there are many people who will never know how you did this or be able to tell. But if it were me I would be beaming for at least a week. Well done! Harvey I will add a link to this tutorial in the newsletter.
-
Thanks David, Maybe I should also mentioned that I have 3 kits that met with a viking burial mostly out of frustration with planking. But I am determined to get past this roadblock. I have 2 very important tools - this web site and my local club.
-
Druxey - I have read all 3 tutorials several times. Russ - Thanks, what is the width & thickness you use for your sheets? And if I was to use the planks provided I don't worry about not getting the the way to the bow? and I don't worry about pointy ends?
-
Bristol Cutter Sail Control
fnkershner replied to michael mott's topic in RC Kits & Scratch building
Mike - Let me give it a stab. As I understand it you want to scratch build a model of this cutter and R/C it. Sorry I didn't answer sooner I have been heads down on my static build. Let me begin by asking a few questions - What is your target scale? ie how big do you plan for the hull? Do you have R/C sailign experience? How many channels are you planning to operate? Do you want to be able to tack both the staysail and the jib? And waht are your plans for the topsail? I also suggest you contant the AMYA (American Model Yacht Association) http://www.theamya.org/ They have information on just about anything with sails and R/C. -
Ok, It is true confessions time. At this point in my modeling experience I have only planked 2 kits. The first was my Bluenose. As many of you know this ship is rather easy to plank. Only 1 stealer and with just a bit of tapering all the planks make the full run. And since it is painted any issues can easily be covered up. The next planking job I did was the first layer of planking on my Harvey kit. Which also is going to be hidden. So to make a long story short my Achilles heel is planking. I have done lots of things to avoid this but it is time to get past this. I have read just about everything there is written about planking. And I have made about every mistake possible. So I am here to throw myself at all of your collective mercy and help me get past this problem. Let me talk thru some steps below as I understand them and ask for correction or advice. I will use my build of the Harvey as my example here - I will also start with the 1st layer complete. Step 1. I have measured and marked the location of all 14 bulkheads on each side of the Hull from the bulwarks down to the keel. Step 2. Using a tick strip and proportional dividers I have measured the distance from the deck to the keel at the widest point. The widest point is bulkhead #5 & 6. This distance measures almost exactly 4 inches. Step 3. Divide the distance from Deck to keel into 4 bands on each of the bulkheads. Here is where I start to run into trouble. If I take a plank and test lay it on the line that marks the bottom of the first band at bulkheads 5 & 6. The front end of the strip does not even make it to the bow. Because of the curvature it ends at about bulkhead #2. Using simple math I find I have a problem. The width is 4 inches at bulkhead 5 & 6. but it is only 1 inch at bulkhead #1. Since no single plank should be tapered less that 50% of its width How do I get 16 planks each 1/4" wide down to 1" total width? Seems like a lot of drop planks. Also as I understand what I have read in the practicums etc. There are basically 2 ways of doing this. The first is where you spile the planks. This requires wider planking than is supplied with the kit. And the 2nd way is using the wood supplied. So first off I am not sure I completely understand Spiling. But more importantly for now how do I complete the 2nd layer with the wood that I have?
-
Using Blacken-IT
fnkershner replied to fnkershner's topic in Painting, finishing and weathering products and techniques
Rob - What was your concentration of solution? -
Using Blacken-IT
fnkershner replied to fnkershner's topic in Painting, finishing and weathering products and techniques
Any time Augie. I am glad it was useful to others besides me. I am a few weeks away from finishing the hull of my Baltimore Clipper/Harvey. I need to think about the metal work. As I mention above my experience has not be very satisfactory. I think from this thread I have some great ideas on what to try. -
Jim Byrnes Model Machines
fnkershner replied to Mahuna's topic in Modeling tools and Workshop Equipment
Rusty - How many times have you used your Sander? you must use it more than I have to wear out the switch! I should also mention that my Sander is very close to the tool I use the most. So let me also share my 2nd Jim story. Well actually it is my first which makes it all the more impressive to me. This occured before I had purchased any tools from Jim. I had purchased and X Y Table from Micromark and I had a table top Drill press. The drill press had been acquired so long ago I don't remember how and why. Well no matter how I tried I could not get the X Y table to mount on the press reliably. So I contacted Micromark and they refferred me to the manufacter of the XY Table. They told me that they had an adaptor plate that for $45 would solve my problem. I told them the make and model of my drill press and they assured me it would work. Well I ordered the adaptor plate and guess what? It didn't even come close to fitting. It was a very bad solution. I was pretty upset. I called the manufacter and they essentially shrugged and said send it back and they would charge me a restocking fee. We argued for a while and the result was I did send it back at my own cost for shipping and very late I got partial refund. So now I am out about $50 and still have a useless XY Table. Well I explained my problem to Jim. He offered to make me an adaptor plate custom if I would send him a design. Remember at this point I wasn't even a customer of Jim. I had a friend at work who liked to mess with CAD. He helped me design a plate and I sent the design to Jim and I ordered my sander. For $50 Jim custom made my plate out of solid aluminum and included it in the box with my sander. What I recieved was infinately better than the previous plate and worked perfectly. And there was no additional shipping cost. So I am the proud owner of 2 custom items from Jim's workshop and I will be a customer for life!