fnkershner
-
Posts
1,595 -
Joined
-
Last visited
Content Type
Profiles
Forums
Gallery
Events
Everything posted by fnkershner
-
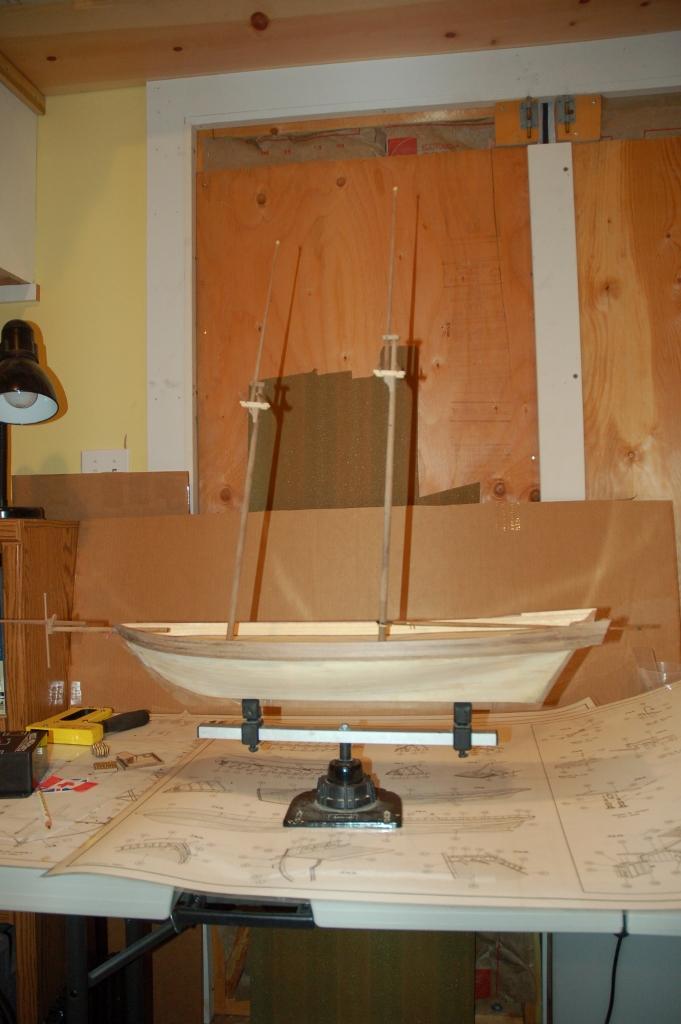
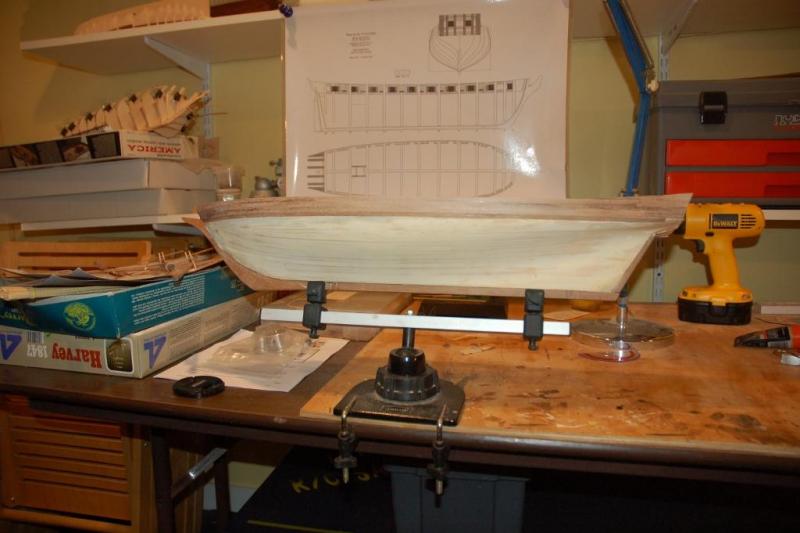
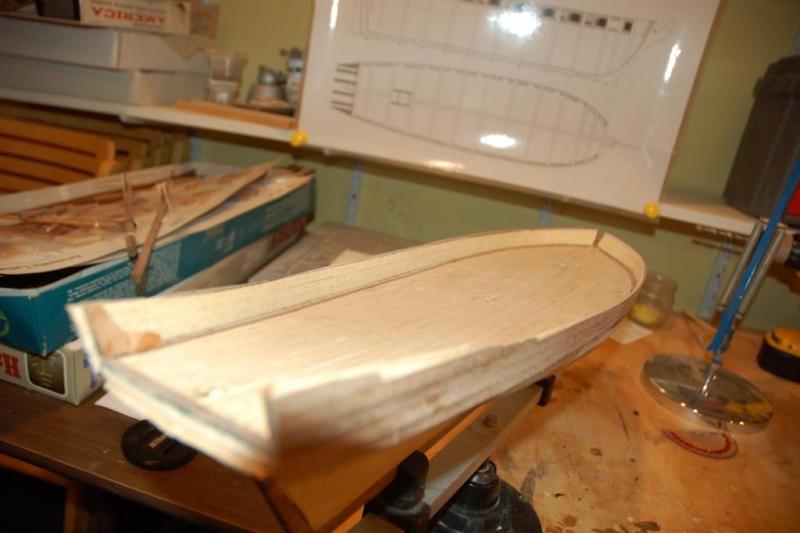
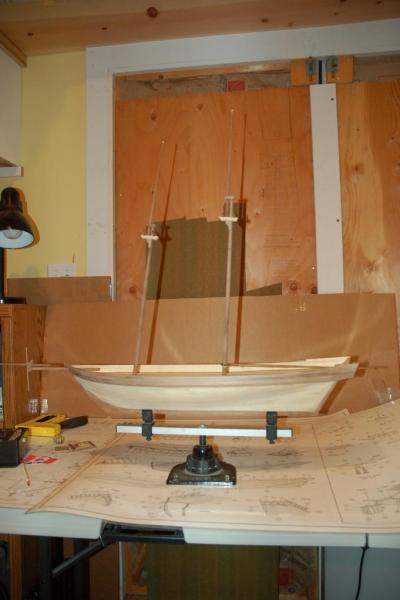
Ok, its time to post this weekend's progress. (admiral wants to go to a concert so there will not be much progress today.) I mentioned before the bulwarks are made of 4 pieces of thin plywood and are likely to delaminate if soaked in water. Also I could just see the issues of having to line up 2 different pieces at midships. So I created 1 full length piece out of 1/32" Balsa. Now I know that the next step should have been to begin the 2nd layer of planking. But as I started to line off the bulkheads. I became very concerned with how fragile those Bulwarks were. So I decided to reverse things a bit and plank the bulwarks. The plans call for planking the bluwarks inside and out with the same strips as the 2nd layer of the hull. This is when I ran into a major problem. There was not enough wood! I counted out the strips and there was only enough to plank the hull below the deckline and no extra! God bless my Jim Saw. I found a piece of Walnut that was close to the same color etc. and I made myself enough planks to plank the bulwarks. I used the micrometer attachment to get the strips down to .75 mm. It worked beautifully. This was the first time I had used my slitting blade. I also had long ago decided this model would not have any paint. it was going to have all of its color from the wood used to build it. So I decided to plank the inside of the Bulwarks with a lighter wood and a different color from the deck. I used some leftover deck planking from another kit. You will also see that I took the opportunity to install the knees for the Transom. I am planking that now. The last time I worked on this model many years ago. I wanted to try my hand at tapering the masts using the electric drill lathe. So my final picture shows her on the stand with the masts and bow sprit in place. This will also give the admiral an idea how much space she needs to find in the house.
-
Thanks for all the help. I will try again today. So Jim I would like to suggest an attachment - How about a magnifying glass so you can see the rope you are creating?
-
I have just spent part of this morning trying out my club's Rope Walk. My question is how do you know if you have the die the right size? How tight should the rope be going through the die? I used some old Mantua rigging thread for testing. I started with a pretty small diameter. I used the die that came with the rope walk. I think it is too big. But I am not sure.
-
Dave - If memory serves me (and it often doesnt) there are 960 clove hitchs on the main and fore lower shrouds. I would do about 8 rows and then take a break for an hr and come back and do 8 rows. Lots of fun!
-
John - I am so glad you shared this post with us. I too have known Gil for many years and yes I have seen all of his models. Even when he thought he was a beginner. I also appreciate that there are details here that I had never known. You should also mention the he and his wife live in a condo and she thinks he is turning it into a Nautical museum. And a fine one at that.
-
Yes Harvey I will be publishing the newsletter this weekend (in between playing with the rope walk) and I expect that our meeting on the 16th will be mostly dedicated to rope making. I have strick instructions from the admiral that the Harvey (ship) needs to show some progress this weekend. So we will see how far I get.
-
Its Here! my Wife called me at work and told me I had recieved a package. I made her read the label and then I played hooky from work for the rest of the day! I now have one and guess what I will be doing tomorrow! Jim Thank you thank you.
-
A little trick I use on eye bolts - I used to do as you did and buy them for the size I wanted. But now all I do is make them. This started when I had trouble with eye bolts in the deck pulling loose when the rigging was tight. Now I take a small pair of needle nose pliers and wire of the proper diameter. Then I cut a length of wire and bend it in to s long U shape. I grab the top of the U with the Needle nose and twist. The result is an eye bolt that has the size of eye I want. I can twist more and get a smaller eye. I also get the benefit of the eye bolt shaft having a spiral in it. this give more surface to glue with and it holds in the wood much better. It doesn't pull out when rigging. The final step is to trim the twisted shaft to the desired length.
-
Me thinks Frank is trying to get to Sub Lieutenant by posting here! LOL
-
Desert Sailor - Thanks so much for this. Can you tell me approx. what year you completed this Kit. It appears there are significant differences from my kit. Also is your ships boat Plastic? Mine is a plank on frame kit by its self.
-
Thanks Ben, I know it may be in the dim dark past but I would love to here a few details from your experience. For example right now I am trying to figure out how best to install the bulwarks. As I mention they are made from Plywood and are likely to delaminate if I soak them. They also are too short. But my biggest concern is how to clamp them in place. There is very little wood to bond to and I am trying to figure out a method of clamping to hold them while the glue sets. Also related to this. How did you join the 2 sides of bulwarks together at the bow. lots of bending force there. I am considering some sort of block for the bow. And finally how to join the aft Bulwark piece to the sides? It needs to be planked both inside and outside before attaching the supports. Yes Sarah I am dreaming of my build and trying to visualize the solutions to these problems before I get to the shop.
-
Bob - I know what you mean. As I say in my log this was one of my first kits too. I started and stopped a couple times. Mostly discouraged by the design and instruction errors.
-
Small bit of progress - The Waterways are now on. The Bulwarks are made of plywood so no good to soak them. I am cutting new bulwarks out of balsa that is 1/32" thick. Also it appears that the bulwarks are approx 1/4" short. This is going to be interesting. After the bulwarks we begin the 2nd layer of planking.

-
So what is that? Over 1000 clove hitches? Nice Job Augie. I dream of some day being where you are. She is impressive. Now all you need is some spars. lol
-
You have a good point - Would chain be proper for a for a ship of this period?
-
Caroline - Are you using Magnets as planking clamps?
-
Great I think I can use these. Can I ask how did you make the drum and the gears?
-
Dave - Looks good. I agree with Bob on the color of the siezings. what jig did you use to keep the deadeyes lined up?
-
Ben - Since you built her, do you have any suggestions or comments? Did you include those outhouses? Did you do any modifications? Per - It turns out that there is about 1/4" difference in the length of the 2 hulls. So I had no choice. This has also proved to be a challenge with the Bulwarks. I was going to use the bulwarks from the older kit since they are 1 piece. But they don't fit! Grrr Rob - Good to hear from you. You were missed. But I still have a kit for both you & your son. By the next meeting we will have a rope walk. So you can make real scale rope for the shrouds and anchor line on your Bluenose. By the way you sure put a smile on the Admiral when I mentioned selling you those kits.
-
John - I must confess, I had not seen this log prior to the MSW upgrade. and now I wish that wasn't so. I noticed that you and I are both building ship that are in approx. the same decade. Can you share with me the plans for your Windlass?
-
Dave - There is one cardinal rule I have learned about this hobby. That is Never Ever go back and redo once you have finished a model. If you do you will be in Model Fix Hell. There is always something that could have been done better of differently based on new information or experience. If I were to open up the display case for my Bluenose and try to apply some of the things I have learned from this forum. The horror of it would have me running away. I am sure you know we are our own worst critics. It really takes the encouragement we receive from this wonderful group to keep going forward at times. Before I was part of a club and found this forum I had 3 different models that reached various states of completion before they met with a Viking burial. So my friend, I will never revisit my Bluenose. She currently stands in the entry to our home and impresses many who do not have quite as critical an eye as I do. That is good enough. Besides the Admiral wants to see more completions and she thinks those shiny copper bottoms would look good in our front room. So a building we will go!
-
Thanks Mark, any suggestions on the design of the Windlass & Binnacle? Also what would you suggest between the masts besides a Main hatch and stove pipe? I am guessing that there should be a grating for ventilation near the stove pipe. What do you think?
-
This depends on how much of a purist you are. Or do you just like making rope. You are correct the kit does include thread for your rigging. But the kit only includes 3 diameters of line, and it doesn't look like real rope. Also the color is not accurate. On my Bluenose I used the line provided and I added some very fine black thread I bought at a sewing store. I used the thread for siezing. The whole idea of a rope walk is that you can make scale rope that looks like rope. In the case of the Bluenose I think this is especially true of the anchor line. my club's new ropewalk should be here today. I am going to be having fun after work trying my hand at making rope. So we will see how it turns out.
-
Model Shipways Syren - The new Carronades have arrived !
fnkershner replied to yvesvidal's topic in Wood ship model kits
Wow! this is good news. Now will they replace the figurehead with Resin? -
Do you hve a ropewalk? how are you going to make your shrouds?