
HOLIDAY DONATION DRIVE - SUPPORT MSW - DO YOUR PART TO KEEP THIS GREAT FORUM GOING! (89 donations so far out of 49,000 members - C'mon guys!)
×


shoule
-
Posts
102 -
Joined
-
Last visited
Content Type
Profiles
Forums
Gallery
Events
Everything posted by shoule
-
Mayflower by SawdustDave - Finished
shoule replied to SawdustDave's topic in - Build logs for subjects built 1751 - 1800
She's really looking fine, Dave. -
Very nice. I like the messy work bench, too; it makes me feel better about my own.
- 786 replies
-
- 1
-

-
- Royal Louis
- Finished
- (and 1 more)
-
Very nice job with the planking. You nailed it (please, forgive the horrible pun).
-
This is a nice project. I would like to tag along, if thats ok. I've never tried the magic marker, or pencil trick, but rather glue thin brown paper to a long and short edge of the planking, in batches, first. It's a small matter. The fine, discolored dust would fill in the small pores when sanded with a finer grit than the unprepped stock came as. It probably wouldn't be so noteworthy if you fine sanded the planks, first, a bit. My scrapers are some of my most valued and used tools, however. They save so much time, effort and sand paper. There are many sizes, shapes and guages to choose from, if you were interested in the method. You can always change the texture with a single grit of paper, if you wanted a different feel, afterward. On small or projects with relief, the old standard "Red Devil", one inch, scraper has a 3/8ths, 16 guage blade that can be shaped and/ or sharpened, with a simple file, for miles of use and is a good choice to begin with. It's also cheap and easy to find in a hardware store. With a little pracrice, for angle and control, I think they are worth the effort. I do like the ruler edge idea, never tried that, but I'd most likely sharpen it, from habbit. You have a very nice start and I hope you are pleased with your progress. Regards, Steve
-
That's a good kit, Zach. it's forgiving and wide opened for artistic license. Don't be afraid to replace some of that plywood or the cast parts. There are some very nice ones here, on the site. Feel free to ask if you have questions. Take your time, think ahead, and have fun. Steve
-
Mayflower by SawdustDave - Finished
shoule replied to SawdustDave's topic in - Build logs for subjects built 1751 - 1800
Should make painting the decorative work a little easier, this time around, but where are you going to find enough bamboo serving trays? You'll give Wallmart a heart attack. -
Mayflower by SawdustDave - Finished
shoule replied to SawdustDave's topic in - Build logs for subjects built 1751 - 1800
Yeah, embarrassing is not what it looks like from my screen. Quite admirable, is what sticks in my mind. If you keep raising the bar, like this, I'm going to need a bigger ladder. It is a pleasure to watch you work, Dave. It makes my own work better. Gratefully, Steve -
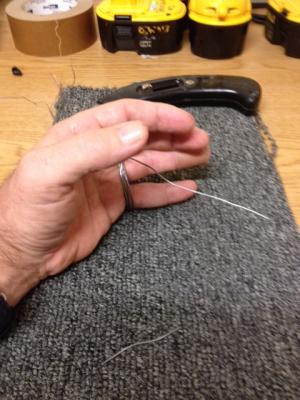
Oh, and here's my trick for handling the solder. I wrap a semi loose coil around my ring and little fingers with the end coming out between the middle and ring finger. This way I can use my hand and fingers for stability and manipulation, while the solder can be bent or adjusted to be right where I want it. You can also tuck it out of the way to keep working until you need it again. I hope it helps.
- 569 replies
-
- 5
-
-
- shenandoah
- corel
- (and 1 more)
-
I can't add much more, but soldering, as welding, is just capillary attraction. Every alloy just seems a little different, these days, so you can't always rely on color changes. I just pay attention to the texture, and the reaction of the flux. You can see, hear and sometimes smell, when the metal is ready to soak up filler. When it's done at the optimun tempreture, there's very little pooling and it's smooth. At first, it helps to add the heat a little away from the joint. It'll heat up, just slower. If you buy stock, intead of kit parts, you can afford a little practice piece.
- 569 replies
-
- 1
-
-
- shenandoah
- corel
- (and 1 more)
-
Beautiful job, looks great! S
-
Mayflower by SawdustDave - Finished
shoule replied to SawdustDave's topic in - Build logs for subjects built 1751 - 1800
I, too, am eager to see some some progress, Dave, so don't take this the wrong way, but hurry up. Cheers, S -
Sounds like a lot of wood. I refinished a 100%, prime, solid, quarter sawn oak ( they called it "tiger oak") stand up player-piano for a neighbore, once. They had a whole box of old timey music cylinders that were priceless. it was a beautiful thing. I hope nobody tears it up. My schooner's in pieces. I just finished the rails (ipe stanchions and teak limbers) and am finishing up the rudder assembly and deck furniture. I want to use an oil and Bree wax finish so I'm waiting assemble and finish the hull and deck at the same time. I'd like to show you the picture when she's pretty. You understand. Again, you've done great work. S
- 569 replies
-
- 1
-
-
- shenandoah
- corel
- (and 1 more)
-
"Steve, did you ever tear a piano apart for the wood? I got some absolutely incredible massive curly maple back braces off a 110 year old upright grand." Sorry, but when I read that I was drinking from a carton of milk and it came out my nose. In retrospect, I get ya, we're kindred spirits, but at the moment I was thinking " jeez, this guy tears up 110 year old pianos! What a mad man.". But no, I haven't; now if I see a good one and no one is looking.... what a great idea. I do repair stringed instruments, and have built a couple. I also build some furniture and geegaws, now and then. Those activities put me in contact with a lot of neat timber. Building boats and interiors to yachts, I come across heaps of the same old sapelli, mahogany, teak and cherry. Padauk and purple heart even show up on my bench, from time to time. Oh, and by the way, love the bilge pumps. Everyone hide your pianos. S
- 569 replies
-
- 2
-
-
- shenandoah
- corel
- (and 1 more)
-
new clear product!! WoW
shoule replied to leroy's topic in Painting, finishing and weathering products and techniques
A refreshing pause to look back at the roots of our desire; high gloss it is. S -
Outstanding. another shameless scavenger
-
It's true that the first layer can be "slapped" on and filled. It could also be used as practice for later planking. However you decide, it makes some sense to not have the plank seams, on both layers, in the same place, but rather overlapping. So, some offset or less meticulousness could be advised. I do agree with David regarding the battons, weather you temporarily install them or just mark their runs on the frames. They keep you from letting a small error become larger down the run. They devide the space evenly, show you the best run and give you a nearer target. Proportional deviders can come in very handy at this stage, though not necessary. It may seem daunting, at first, but you'll get the hang of it, quikly. Steve
-
Wonderful micro joinery, Steve. Every part is relly a work in itself. I look forward to the next instalment. S
-
Steve, I've just been catching up on your log and I can only repeat what's been said an awful lot, before: Beautiful, tight, and creative work; very impressive. S
-
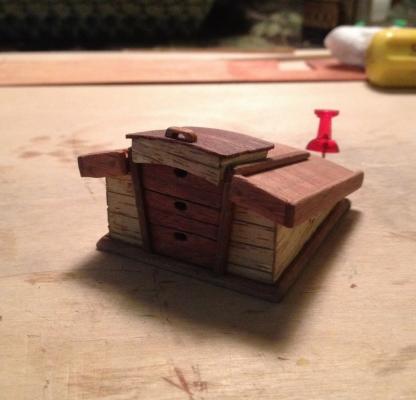
Thanks Steve, gosh. Yeah, the companionway works and the barrels are actually barrels (and you were worried about overkill). These are older pictures, the parts weren't finished yet. I started this project before I found MSW. I was just stumbling around without a plan, so I didn't start a build log. I start the rigging, soon and will post it to the gallery. Yes, I love scraps. My work will never wind up in a museum unless it lasts long enough to be archeology. I look forward to following your project. S
-
Steve, no, I didn't build the Shenandoah; not yet, anyway. I'm just getting into the craft. This is just the companionway from a mostly scratch Virginia schooner. I'm building off the picture of the Virginia 1819, but wanted to build it from materials that I picked up off the ground around the boat yard, here at work. All of the wood, here, came from scraps, pallets, and such. I'm not too concerned with much, at this point, but learning to work in scale and trying different techniques. Give me a couple projects like this and I will try my hand at something with more historical reference and accuracy. Right now, I'm just a carpenter having fun. Steve

-
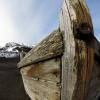
Steve, this probably doesn't help but I recently asked myself the same question and thought it just wouldn't look right, to me. It would have been a streight line surrounded by curves, in this case. I decided to build it as if I was in charge and crowned the roof, slightly, in addition to the bevel, and added side boards to channel the water and act as hand holds (which always come in handy). Authentic, who knows; practical and pleasing, a little bit. I'm sure what ever you do, you will make it work.
-
She looks fantastic, Robert, you can be proud of that. What direction do you thnk you will head next? Great job, Steve
-
cmann, to answer your question regarding "contact cement", in a hardware store it would be labled just that. It is a petrolium based glue similar to the rubber cement that you probably used as a kid in school. Though it has many uses, it is the primary means of applying most laminates, including wood vaneers and formica. It cleans up easily with laquer thinner, 3M adhesive remover or mineral spirits. If you choose to experiment with it, I suggest that you buy the smallest bottle, because repeated exposure to air will thicken it and make it apply less even. Though it has a brush installed on the underside of the cap, I use a small, cheap, artest brush and rest that in a shot glass with a little laquer thinner, inbetween applications, to keep it from gumming up and to help thin the next stroke. There may be better ways to accomplish this, and I'm open to new ideas, but I'm happy with this solution.
-
I think that you've gotten many good answers, here; it's a very nice place with very nice people. Perhaps I can add to them, a little. The books: they can be found for very little expense in the "used" section of most online book sellers. I've found some for as little as fifty cents, plus shipping. I've found most used books to be practically new, anyway. Just buy things as you need them because your understanding, skill, creativity, and intuition will change rapidly. This is especially true with tools; you'd be surprised at how much you can come up with on your own. For instance, I use a thrift shop travel sized steam iron as a plank bender. I prefer it to the more expensive, purchased, one that I thought I had to have. Diluting carpenters glue is something that I'm surprised took me so many years to appreciate. It never occurred to me, until modeling. It allows the glue to penetrate most wood fibers much better, reduces gap and shrinkage, and cleans up much better; all without noticeable loss of strength. As a means to my own livelihood, I never use straight glue any more. You will have to experiment with the proportions, a little, as each glue, and each application, is a little different. It's just my opinion, but I've found it to be a valuable trick of the trade. Until something better comes along, or someone here opens my eyes, I use contact cement for the second planking (it's used on veneers, anyway). I don't let it dry, full term, before I attach the part, and it allows a little room for error and adjustment before it bites. It also allows you you to keep working without waiting for drying time. Your model also is very open to improvisation; so don't be afraid to make some your own parts if you feel like straying from the path. I think I used very little but the final hull planking and the mast dowels, on mine. And lastly, as everyone says: Take your time. Like a tattoo, you don't want to rush something that you invest so much of yourself in. Good luck and I look forward to following your progress. Cheers, Steve
- 98 replies
-
- 1
-
-
- artesania latina
- finished
- (and 1 more)
-
I've just come across your log, Mick, and I have to say: very nice work, so far. I look forward to following along. Oh, and I wish that I had a Byrne's saw on the way. I'm stuck doing everything the old fashioned way, with blades, scrapers and lots of sand paper. Fortunately, I'm quite used to it. Keep them coming. Steve


