shoule
-
Posts
102 -
Joined
-
Last visited
Content Type
Profiles
Forums
Gallery
Events
Everything posted by shoule
-
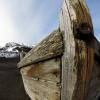 It sure looks hard-used, alright; great effect. I can't wait to see how you tackle the rigging. Keep them coming.
 -
Nice work all around; your sail looks great.
-
Thanks, Nigel. I use very thin brown paper, like from packing or botique type bags, with diluted, water soluable, glue and I don't find strength an issue because it seems to penetrate the paper well. Whatever finish I use, usually darkens it to a dark, natural color. I may be underthinking it, but works well enoigh for the look I like. I look forward to your extended use and thanks for the post. Cheers, Steve
-
I'm an old gunner's mate, as well, and I think its cool; lots of possibilities. Keep playing with it; I'm fascinated.
-
Very nice; I can't wait to see more pictures.
-
Mayflower by SawdustDave - Finished
shoule replied to SawdustDave's topic in - Build logs for subjects built 1751 - 1800
Wonderful; I can see the demand for bamboo serving trays is about to skyrocket. Better stock up on them now, while they are still cheap. -
Mayflower by SawdustDave - Finished
shoule replied to SawdustDave's topic in - Build logs for subjects built 1751 - 1800
I'm sorry to interject, and it might not apply here as I didn't work with laminates, but years ago I worked a lot with bamboo and I found, at least in the species that I had available, that the outer, appealing, hard layer was very thin. Once sanded through, the texture lost its luster and became very soft and bland. It was also sort of dangerous to sand because the fibers are long, straight and sharp. It wasn't uncommon to wind up with a three inch splinter. Again, it may not be the case but it's just a little info on bamboo. I enjoy following your project and have taken in quite a lot. Cheers, Steve -
It looks like all the basics have been covered, well. The only thing that I could add, in my humble opinion, is to, at some point, mill it down to the approximate size that you think you will work from, and let it season for at least a couple months indoors, where the project will stay. The smaller the piece, the quicker it will dry, and the more it will be affected by a dramatic climate change. For example, back in Michigan, we milled lumber for hardwood floors, and would always leave it in the house, after final milling, for a couple weeks to acclimate, before installing. Here, in South Florida, I dry my lumber indoors, where there is less humidity. For what it's worth, there are advantages to working with greener lumber, and I prefer closer to 16% moisture content for material that has to adhere to a shape. Also, try to quarter saw it, rather than flat saw the pieces. The wood will work much better with the growth rings across the thickness (a rift grain) as apposed to the width (flat sawn). Sorry for all the words, good luck.
-
Very good, I eagerly await your expierience. I think that you picked a nice project.. I don't pretend to be taken too seriously, but there's a rule of thought not to force a joint too much. Maybe if you figure out where it's sticking, and why, you might find a small problem to correct. Just staring at it a while, sometimes helps. If you force it, the pressure will always be there, looking for a weakness. Best of luck, Steve
-
My measly two cents buy's only that every comment, here, is correct. There is no wrong way, in a given perspective. Making wood do, or look, like I want, comes easy to me. Painting does not. It suits that I like a "natural wood" look. There are so many examples, here, but when I look at, for instance, what Matti (Nazgul) has done with his Wasa, painting scares me. His approach is so complex and practiced and the effort pays off wonderfully. I hope to be able to want to paint a model, like that, at some point. A well painted model just has another layer of skill incorporated. I wouldn't look at it as covering something up. If you want that, and are confident, let the paint fly. You can always build another ship.
-
Very nice work, Robert. I'm building the same model, though I'm a couple of steps behind you. I started it before I joined MSW, but I'm glad that you created a build log because it's nice to see what you've done with it. The gun carriage is something that I'm trying to improve upon, as well, though I might borrow your bilge pump idea. Cheers, Steve
-
THE BLACKEN-IT TRIALS
shoule replied to Erebus and Terror's topic in Metal Work, Soldering and Metal Fittings
Between the test, the results and the post posts, I have a better understanding. It takes a lot of bricks to make wall. Good one E&T. -
Well, Miroslav, I hope that you caught some fish, that's a good looking piece of river, you have there. I see that you are off to a good start. I like the Chinese tool idea, too. I look forward to seing it come together. Steve
-
I appreciate the scholarly contributions. They all add up. Cheers for that, guy's. Steve
-
I just jumped on the log, Len, and everything looks fantastic. I recently ordered the kit, so I can't wait to see your progress. I was planning to give it a hard used look, but I really like you "clean" look. Regards, Steve
-
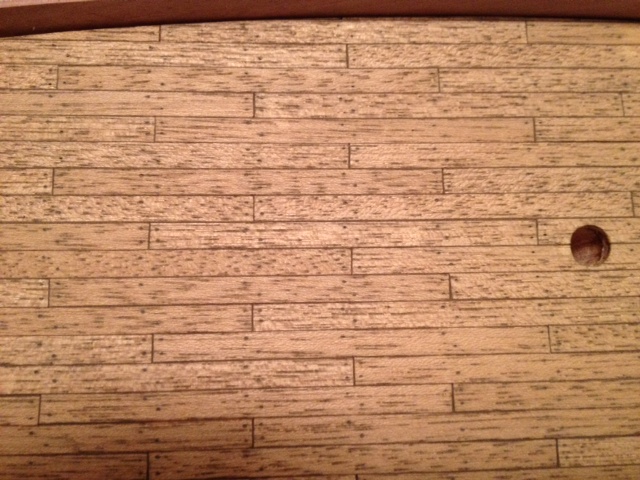
Simulated caulking
shoule replied to Nirvana's topic in Painting, finishing and weathering products and techniques
To Chris's comments above: I suppose you are right. Things evolve, though, with notions and ideas over time. Who know what criteria they will focus on in ship modeling in another hundred years. Me, I'm looking at my first project as the boat builder that I am. Like Nigel, I wanted something to make the planks look individual and on purpose. As a boat builder, I would also caulk because when water gets trapped under the planks, the resulting decay would spread and undermine the structural integrity that I worked so hard for. Also there's also a need to plan for expansion and contraction, lest the planks loosen themselves over time. And, of course, leaks. Even now, in the age of composite construction, great care is given to seal every nook and cranny and provide a way for water to run aft and outboard, so that it doesn't stand. Is it necessary on a model, no, and to scale might not be even noticeable, but it's a detail that you can be proud of, if you choose, and one that was likely on the plate of the guy who built the boat that the model represents. But, alas, I'm a novice at best. I've only just graduated from "Lurker" and I will likely never reach the abilities of many here. Perhaps I'll go in a different direction, next time. Steve -
Simulated caulking
shoule replied to Nirvana's topic in Painting, finishing and weathering products and techniques
Thank you; I'll edit in a picture of the finished product when it dries.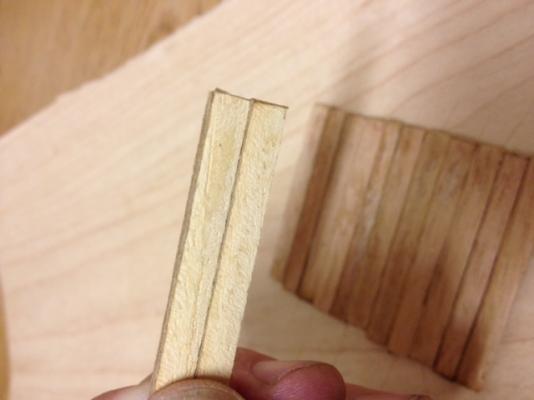

-
Simulated caulking
shoule replied to Nirvana's topic in Painting, finishing and weathering products and techniques
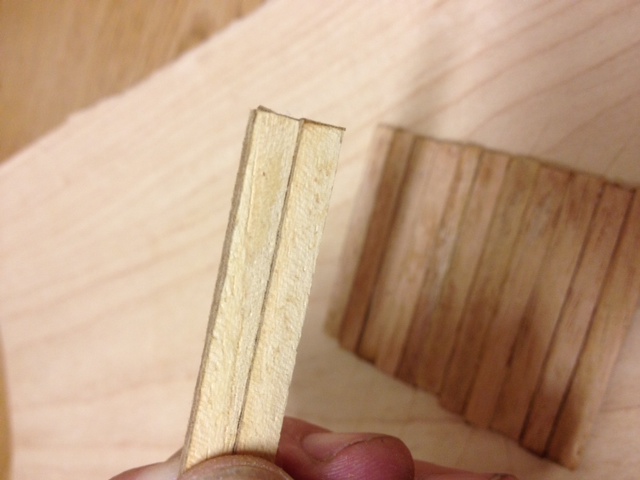
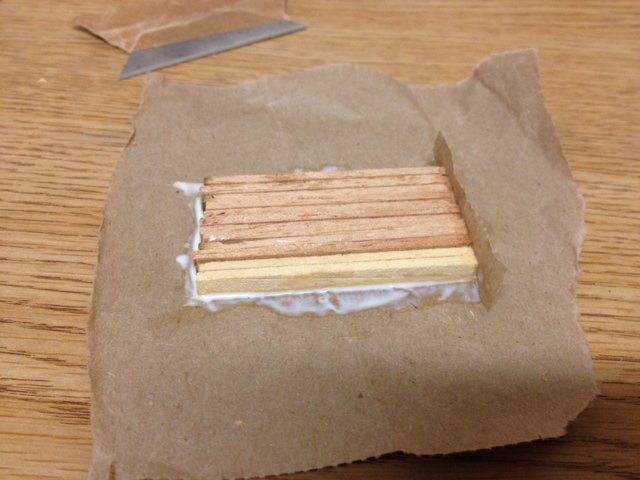
Ulises, The prefab decking that I referred to is a process, I believe first incorporated as a manufacturing process, by a company called Teak Deckers, out of Sarasota, Fl. They go to a boat and make doorskin (1/8th luan ply wood) templates of the decks and ways and bring them back to the factory to make deck "panels". They leave the outside planks uncaulked, and the king and scallop planks out. When they bring the completed panels to the boat, they finish fit them, fit the king plank, and caulk the few panel seams and edges remaining. Two people can do in a day, what would normally take a week or more. The advantage, besides time, is less work or opertunities to damage something on the boat (the two are synonymous on boats), and an easy clean up without much dust. You can also make very fine listellos, and inlays in a more controled, ergonomic enviornment. I've done them this way and the conventional way. The conventional way is fun, but prefab is cleaner, allows more artistic flexibility and, of course, is much easier on the back and knees. You also need less tools and room. As far as what I did, Nigel seems to have put more thought into it, than I, to a fine result. Below, is just a quick set up for some hatch planks, with perhaps too much glue in my hatse to answer your question, just to show you my crude method. Once dry, I trim the paper up and draw a thin, sharp blade down through the laminated width edge and back along the plank to the end. It's really very little trouble and I'm surprisd that this is actually news to anyone. The paper will take a dark color with most finish or stain that you put on it, in the end. Regards, Steve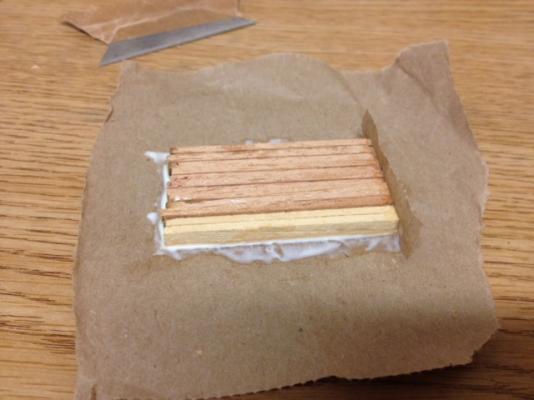
-
Simulated caulking
shoule replied to Nirvana's topic in Painting, finishing and weathering products and techniques
Please pardon me if I sounded like I know what I'm doing. I've never built any kind of model before now; though I've planked a lot of decks and floors. I found an old AL Virginia Schooner kit, and some free time, and decided to give it a try. I didn't think much of the instructions or the kit parts so I've been improvising my way through it; stumbeling, is more like it. When I got to the decking, I was copying the way prefab decks are made by attaching the caulk joint to the plank ahead of installation. At the end of the day, they use an adhesive and vacume bag system to bind them into a panel, which goes to the boat rough fit. It's a cheat, sort of, but a big time saver on the boat. The quality is there, too. Regards, Steve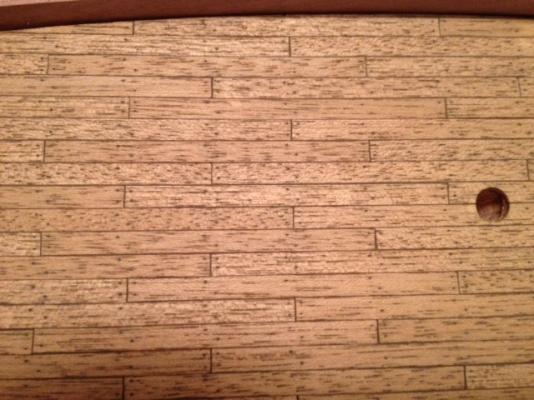
-
Simulated caulking
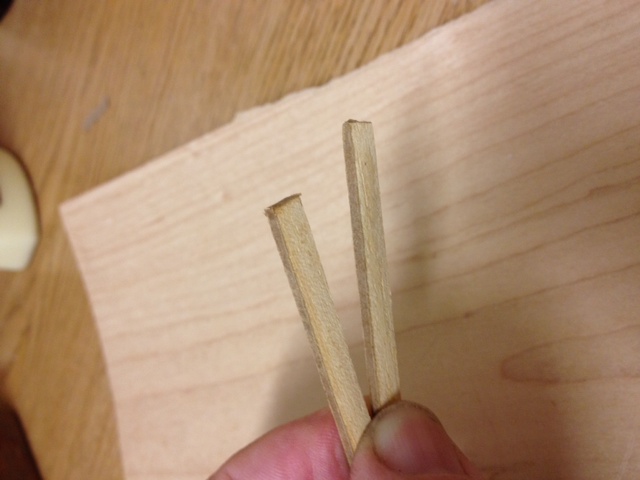
shoule replied to Nirvana's topic in Painting, finishing and weathering products and techniques
I cut my plaking strips and then use diluted glue (the consistancy of coffee) to glue them, in batches, long edge down on a thin piece of paper, like a stationary store sopping bag and then glue a thin strip across one of the short edges. After it dries well, the paper and wood soak up the dilluted glue nicely, I use my thinest blade and cut each plank away from the sheet, leaving one long and one short edge with a thin laminant of paper. I a use plain brown bag, but I suppose any thin paper would do. After that, you just plank keeping the laminated edges going in the same direction. It sands and finishes without incident. The finish will also highlight the paper at that stage. It's not really much work for an actual effect.