HOLIDAY DONATION DRIVE - SUPPORT MSW - DO YOUR PART TO KEEP THIS GREAT FORUM GOING!
×


Martin W
-
Posts
1,412 -
Joined
-
Last visited
Content Type
Profiles
Forums
Gallery
Events
Everything posted by Martin W
-
 Those are terrific guns, Robert. Your blackening (and matte) make them just right. Can't wait to see them on the carriages and on deck! Martin
 -
That's very tidy work, Peter. Your rigging makes me envy its consistency. Your bumkins look a lot stouter than the ones I have made for the Rattlesnake, so they'll surely be up to their task. I also have to admire your traveller, which looks neat -- not an easy accomplishment, given the various lines that pass through it. Cheers, Martin
-
Eric -- Have you tried using a draw plate? The one from Jim Byrnes works the best, and runs $25. It's tedious making all those hundreds of tiny splinters, but the payoff is a good looking deck. I used walnut for my holly deck, since the contrast between the dark and light woods was the strongest. Walnut isn't much fun at all, since it splinters a lot, but I managed. Looking forward to more progress! Martin
-
Hi Eric -- It all looks really good. I especially like that triangular pattern you put in for the rudder -- very nice indeed. Cheers, Martin
-
Fine work, Ron. Your builds show up the beauty of the wood very nicely, and that is accentuated by your craftsmanship. Cheers, Martin Oh, and by the way, my copy of Chapelle's History of American Sailing Ships is from Bonanza Books and is dated 1935. It has 400 pages. It's not listed as a First Edition, so certainly there were others before.
-
I would probably buy it as well. It has irritated me many times, but it has also shown me how to do things that I simply did not know before. And, because of the practicum, I bought a Byrnes saw. Bob's account of the rigging is based wholly on the Mamoli plans, though, and so you'll have to decide whether the MS plans work better -- or look better. Cheers, Martin
-
Hi Jon -- I like the look of those sheaves. Unlike you, I simply (and thoughtlessly) followed Bob's method of putting the plain pieces of wood on the outside and nothing on the inside, and the result (I looked at my model last night to see) is a kind of incoherent representation of the sheave. Like you, I learned a lot from that practicum, but in hindsight have had to wonder about some of the shortcuts. Bravo to you for thinking this through! Cheers, Martin
-
Rattlesnake rigging help, please - moved by Moderator
Martin W replied to GaryKap's topic in Masting, rigging and sails
Thanks Gary -- I have both of Chapelle's books, and have found them useful in lots of ways. In fact, it was from reading one of them (I can't recall which one now) that I decided to go for the Rattlesnake (my second model). I have also foregone the gangways, since the midships is full enough without them; and those guns were enough of a chore that I wanted to be able to see them. Hahn doesn't show the gangways. Here's a photo by Hahn of his Rattlesnake, which has 2 notable details: First, you can see that the sailor is standing where the gangways would be, and that he's tall enough to make the gangways unnecessary. Second, back on the quarterdeck, you can see . . . Belaying Pins !!! The confusion continues. Cheers, Martin
-
Rattlesnake rigging help, please - moved by Moderator
Martin W replied to GaryKap's topic in Masting, rigging and sails
Hi Gary -- It's funny you should raise that question, since I am just about to turn from the standing to the running rigging, and found myself faced with that very same "uhh, let's see" problem. The MS plans show belaying pins along the front rail and in the foredeck rail. There are cleats and kevels in numerous places, along with ringbolts and eyebolts, but it doesn't seem that this ship had that many pins. It could be -- just speculation here -- because of the removable gangway that ran along the midships. Cheers, Martin -
Rattlesnake rigging help, please - moved by Moderator
Martin W replied to GaryKap's topic in Masting, rigging and sails
In volume 4 of The Fully Framed Model, pages 134-5, Antscherl refers to shroud cleats, and how he makes them. He also seems to corroborate your idea that they'd be within reach of the sailors on deck. One point, though, is that the model he describes is 1:48 scale, so that items like the cleats would be larger. And he has a mill to make the detailed cuts necessary. A kit from the 70s, eh? That sounds intriguing, and it also sounds like your rigging plans might show different details that the current Model Shipways and Mamoli plans (I've also been studying Harold Hahn's plans, which are detailed but without explanation). And the rain you're getting is probably the snow storm that passed through here on Friday. It's snowing again this morning, so I'll probably sit at my work bench quite a while today as well.\ Cheers, Martin -
Rattlesnake rigging help, please - moved by Moderator
Martin W replied to GaryKap's topic in Masting, rigging and sails
My fingers get fatter as the rigging line gets thinner. The blocks that came with my Mamoli kit are really crummy -- I've gotten some from Chuck and some from Lloyd Warner at Warner Woods West. And on the topic of the shroud cleats, maybe you can help me figure out just where they go. My kit didn't supply any that I've seen, nor do they appear on the Mamoli plans; the Model Shipways plans mention them, but I can't spot them. And David Antscherl describes making them. I assume they go up above the deadeyes somewhere. And what gets belayed to them? I made some sister blocks, that I described in my own Rattlesnake rigging log. They weren't too hard to make or to tie in the shrouds. I also made the euphroes for the crowsfeet, which were a bit trickier, but still fun. Whenever I look at my wife's fingers, I wonder why mine can't be that slim and long. Hmmm Cheers, Martin -
Beautiful work, Remco. I'll have to leave the questions about frapping and treenailing to all those scholars I'm learning from, but I'm sure the discussion will be fruitful. Cheers, Martin
-
Rattlesnake rigging help, please - moved by Moderator
Martin W replied to GaryKap's topic in Masting, rigging and sails
Hi Gary -- As I read the plans, the single block allows for 2 legs, one going to each side of the vessel. Each leg of the runner has the double block connected to the single block that has the becket; this becket passes up through the double block, back down to the single, and up to the double again, and ends in a hook on the channel. I haven't gotten to the running rigging on my Rattlesnake yet, so my comment holds none of the authority that would come with having worked out the problem in actuality. But that's how it seems theoretically. The Petersen book is truly invaluable. It shows only one leg (the starboard), however, which I assume to be replicated on the other side. How about some pictures of your build and rigging? Cheers, Martin -
Ron -- That's ingenious work on the compass in the binnacle. Your build is an inspiration to follow! Cheers, Martin
-
That is really lovely work, Ron. The photos show up so much detail that it's easy to forget just how small those pieces really are. Cheers, Martin
-
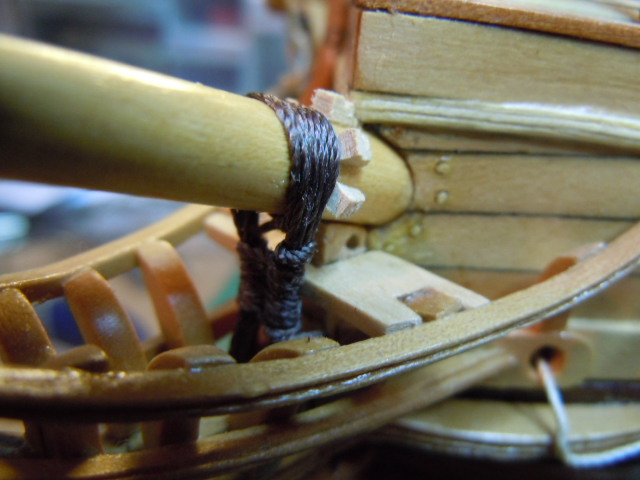
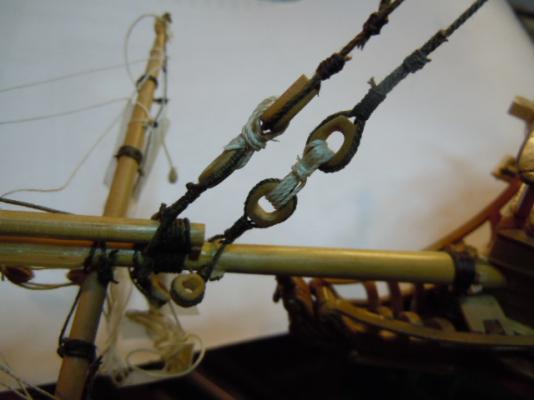
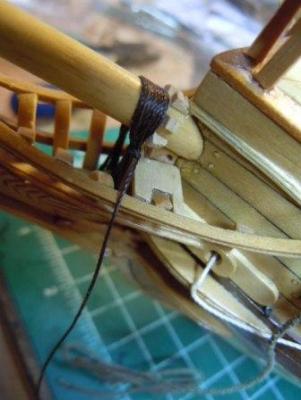
So I'm skipping out from work today, supposedly to get ready for our house guests who'll be here through the Thanksgiving week (this is the week every year when I become an utterly unabashed American, since we have this holiday devoted to eating large amounts of food and drinking even larger amounts of wine). Right now, though, I'm going to add just a bit to the narrative of my latest travails in rigging. Here goes. The most consistent problem I've had has come with the deadeyes along the tops. As I tighten the shroud and the lanyard, the bottom deadeye creeps up from where I'd positioned it. The bottom deadeyes are all connected by chain plates to the lower shrouds with futtocks that I fashioned from metal wire served with brown rigging line. I tried tying a loop around the top of the chain plates, but only with slight success. That's a problem that awaits a solution, so if anybody has a suggestion I'd be happy to hear it. Here's the procedure I've worked out (largely from reading multiple times through Antscherl's account and then trying to translate that into the reality of fat fingers, slippery tweezers, and bifocals that insist on slipping down my nose): I stretch the shroud to its taut length, holding it in a big loop with tweezers at the bottom where the deadeye will go. When I have the bottom at the right distance from the bottom deadeye (but see the account of the problem above), I put an alligator clamp higher up the shroud to hold the loop in place. Then I seize the bottom of the loop, insert the deadeye (3/32" deadeyes at the tops), and thread the lanyards as shown on the MS plans. A good strategy here is to harden the tip of the lanyard with some super glue so it can serve as a needle to pass through the deadeye holes. The important part here is to keep the alligator clamp in place so that the shroud will stay taut and the deadeye won't slip in its seizing until everything is tied off and glued. Sorry I don't have photos of this, but it's very straightforward. Now to the main forestays, all of which belay onto the bowsprit. First I had to attach the bowsprit, which I'd delayed doing from fear of breaking it when I moved the model back and forth tying the shrouds on alternating sides. Once attached, I put the gammoning on the bowsprit. For this I used some brown .5mm nylon thread that Keith Jewell sent me as a sample in my last order. It doesn't quite match the color of the other standing rigging, but it's nice and smooth looking, especially for something like gammoning where all the threads are lined up. Basically I just followed Antscherl's account in FFM vol 4, which starts by attaching a long length of line (he says 56", I started with about 48", since I'm working at a smaller scale; I found that that was well beyond what I needed; for the Ratt, at 1:64, I would recommend something like 30", which will be more than ample). This is connected to the port side of the bowsprit with an eyesplice. I hadn't seen Blue Ensign's stategy for faking one yet, so I just seized a loop in a way that the seizing won't show. The line then passes straight down through the foreward end of the gammoning slot, then up from the starboard side, passing behind the thread to the port side of the bowsprit, then over the bowsprit in front of the splice, down the starboard side of the bowsprit, to the port side of the slot and behind the line that's in it, and so on. This photo sort of shows the process about 3/4 done: And this one shows it complete: Next came the forestay and the preventer stay. These are belayed to the hearts seized on the bowsprit, with corresponding hearts. To carve the hearts, I uses 5/32" thick boxwood 1/4" wide, and roughly traced the outline of a heart that I cut out with my jeweller's saw (it just seemed simpler with such a small piece than going outside to the still-in-process workshop to use my scroll saw). Then I filed off the rough edges. I opened a hole slightly below center with the Dremel, and then widened and shaped the hole, eventually finishing off with a needle file. When I had the shape -- inside & out -- that seemed as right as I could get -- a flattened round wide top and squared narrow bottom -- I cut a groove on the outer edge with an exacto knife. I might add that the little bugger leapt from my fingers countless time, but without ever finding its way into oblivion. After eyeballing the heart from as many angles as I could imagine, to check for appearance, I sanded it, starting with 180 and ending with 400 grit paper, and rubbed some lemon oil on it to smooth out the scars. Here are the hearts in place -- the one in the forestay twists in defiance of my best effort, but the one in the preventer is visible. As always, comments are more than welcome. Cheers, Martin

- 104 replies
-
- 3
-

-
- rattlesnake
- mamoli
- (and 1 more)
-
Hi Eric -- I've found my little package of grating parts. If you send me a PM, I'll drop them in the mail to you, and I'll be happy that they're being used instead of being sent to the "maybe someday I'll need this" box. Cheers, Martin
-
Hi Eric -- here's a pretty simple way to do the caulking: you can just blacken the edges of each piece of decking with a pencil and voila there you have it -- when you sand the planking, the blackened sides will become more prominent. I used a black magic marker on some earlier planking, and had trouble with it running when I glued the plank down, but the pencil has worked just fine. As for the gratings, you can make a jig pretty easily to cut the pieces and to hold them together, but JSGerson is right, you probably need a Byrnes saw. I would guess that there are some descriptions of making them somewhere on MSW. And I keep coming across the pieces from my kit that I didn't use since I fabricated my own. I'll look around in all the clutter and if I find them I'd be more than happy to send them your way. I'll let you know. Cheers, Martin
-
Hi JPett -- going backwards is the same as going forwards in the modelling universe. Is that the hawse hole you just milled out? It looks good. In the practicum that both JSGerson & I have followed, that part is made by layering 2 pieces of thin boxwood -- I'm not sure the result looks as good as yours, but it was probably a whole heck of a lot easier. Cheers, Martin
-
It looks good, Jon, well done. That's a good solution to the anchor problem, which I actually didn't encounter because I planked the entire deck. Cheers, Martin
-
Hi Eric -- great to have you back. So what exactly seems out of whack with the gunports? I can't make out any problems in the photos. But I do remember that the gun ports gave me endless problems, and then the stern windows made those problems seem small. I still have digestive problems thinking about them -- and last night I knocked a gun port lid off while tying off some rigging line (just before my seizing broke). cheers, Martin
-
Ahoy JPett, Fellow Rattler! Golly it's good to see your post again. And I'll say that your perseverance has paid off. The broadside photo shows the gunports off well -- they're aligned nicely, and your choice of colors I think works to highlight the lines of this ship. Keep at it (even if it's slowly), Martin
-
Well, now that everyone is cheering for the Proxxon, I feel kinda bad about having bought the MicroMark instead. It's not as small, but my hope is that it will be as reliable and versatile -- it tilts. Martin
-
Very nice capstan, Ron. Your photos show the successive steps clearly, and your narrative gives a good explanation of what's involved. As for your mast --- well, I think we all throw at least some into the scrap wood bin. Cheers, Martin
-
This is looking good, Jon. That rope from Syren you used on the anchor looks especially good -- it caught my eye immediately. I'm also interested in the "rope" rings you installed, since I don't remember these at all. I'll have to look at my own build this evening next to the MS plans -- I do recall that I just made some large diameter ring bolts and ran the rope through them. But like you, I installed the fore bitts in the wrong place and had to pull it out. Great photos, and impressive progress. Cheers, Martin