MD11pilot
-
Posts
110 -
Joined
-
Last visited
Content Type
Profiles
Forums
Gallery
Events
Everything posted by MD11pilot
-
 Augie, just curious. Now that you're on the home stretch and your model has turned out as well or better than you could have ever hoped, do you find yourself asking -- "hmmm, I was gonna display it over here out of the way, but now I think I'll put it right on the fireplace mantle or right in front of the main door where everybody is going to see it!" Good luck with the blizzard. The good news is that this time of year it warms back up quick and should melt off in a hurry.
 -
What is the best glue for cast metal parts?
MD11pilot replied to vas1949's topic in Metal Work, Soldering and Metal Fittings
Garward! What in the world is that fancy contraption you are using to build your gun ports?! Another home made invention? Love it. -
Weathered decking
MD11pilot replied to MD11pilot's topic in Building, Framing, Planking and plating a ships hull and deck
Larry, looking at your test. The wood has a gray tone which matches what I've seen on the Weather-it web site. But I've seen builds here where the wood ends up with a more whiteish, sun bleached look. I'll experiment with various dilutions and see if it makes a difference. Maybe it depends more on the wood you start with. -
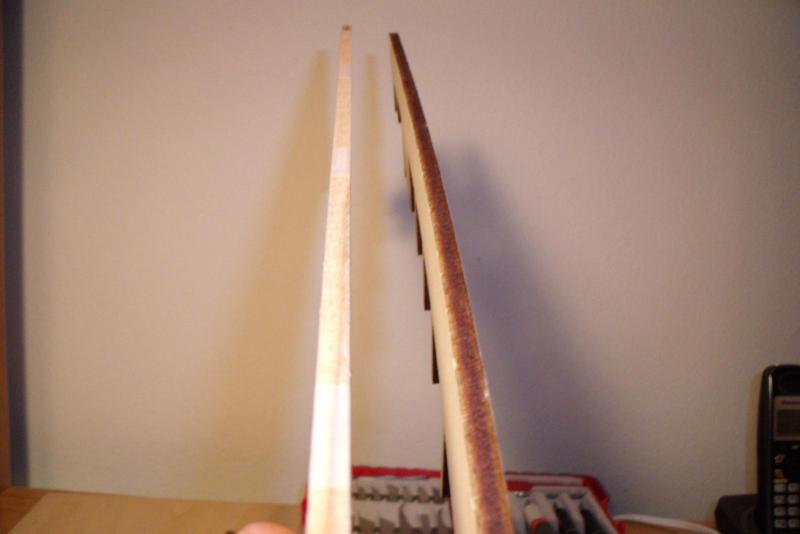
Do you have any friends that are into RC airplanes? If so, they could lend you a special pair of pliers used to put 90 degree angles in control rods. It's just what you need. I'm traveling right now, so can't post a picture but you could find a description on any RC hobby sales web site.
-
Thanks Augie. Sorry to make you write all that. I thought you had some extra secret Chuck jig. I've read the pinned planking tutorials once. When I get closer to the big day, I'll read them again - and again. Can you put a few planks in the jig? Or do you make several jigs? Seems that if you wait for each plank to dry, this would be a very long process. I'm really enjoying your log Augie. The rigging looks fantastic. I'm looking forward to that phase. All of the the sudden it starts looking like a real sailing ship.
-
Hey Augie, way back on page one you mention a planking jig that you found invaluable. Care to share a little more detail? Planking is in my very near future and I can already feel the sweat breaking on my brow.
-
I think I'd rather be in Japan enjoying the cherry blossoms than shoveling snow. The ship will be patiently waiting.
-
You guys crack me up. Are you trying to say, "Go big or stay home" doesn't apply to model building?
-
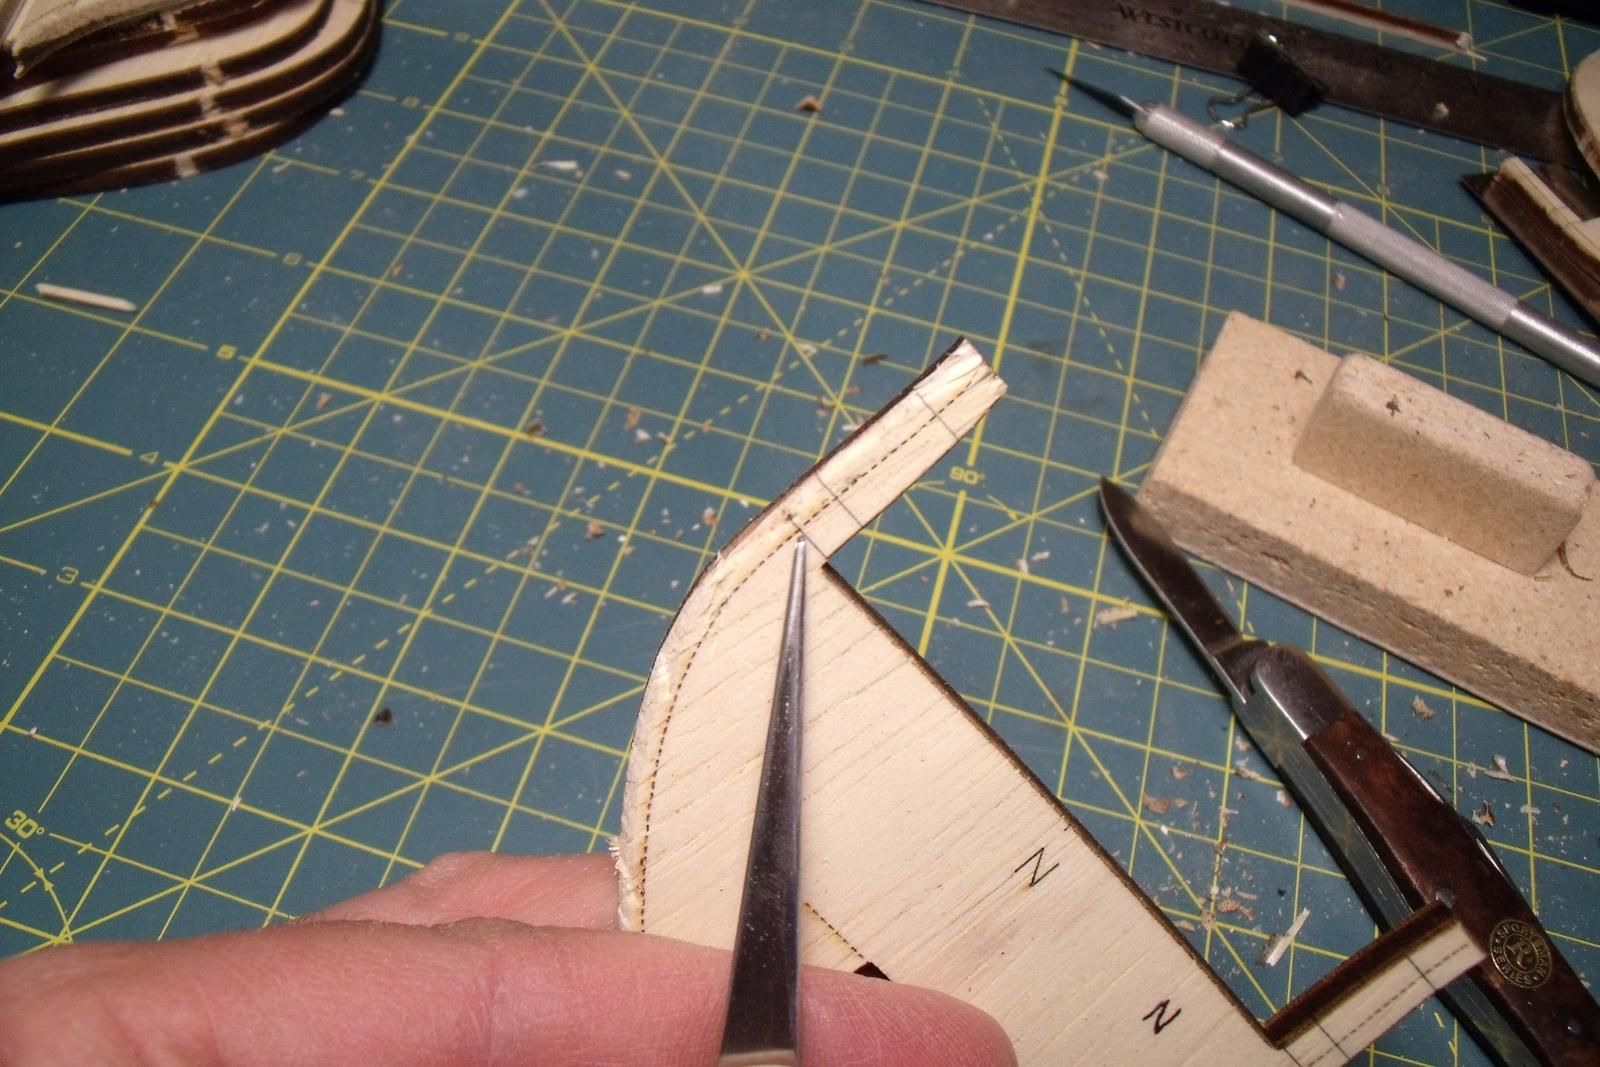
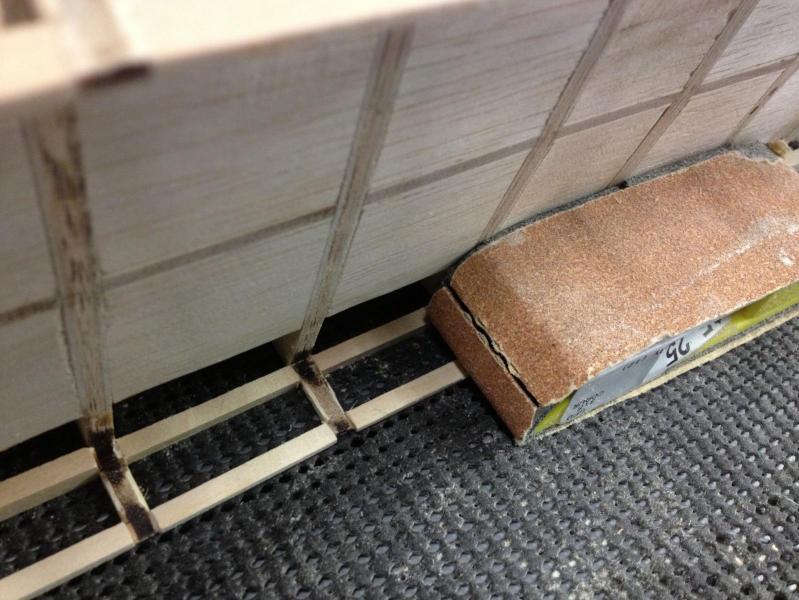
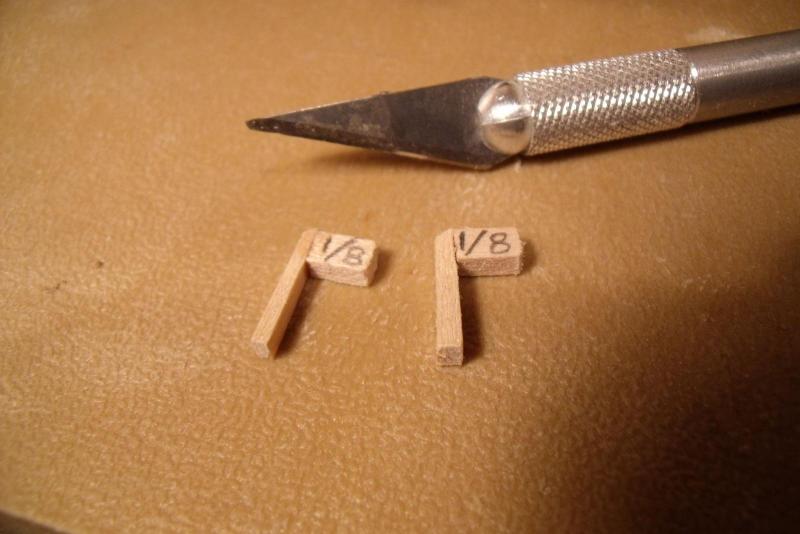
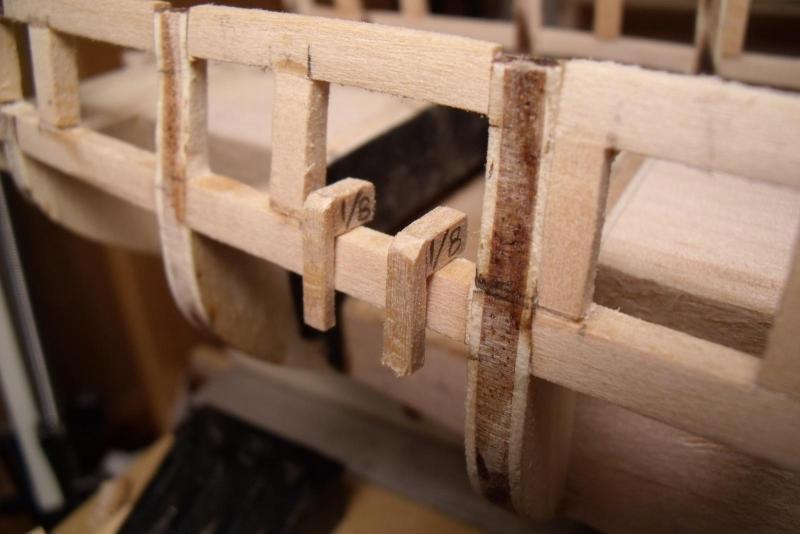
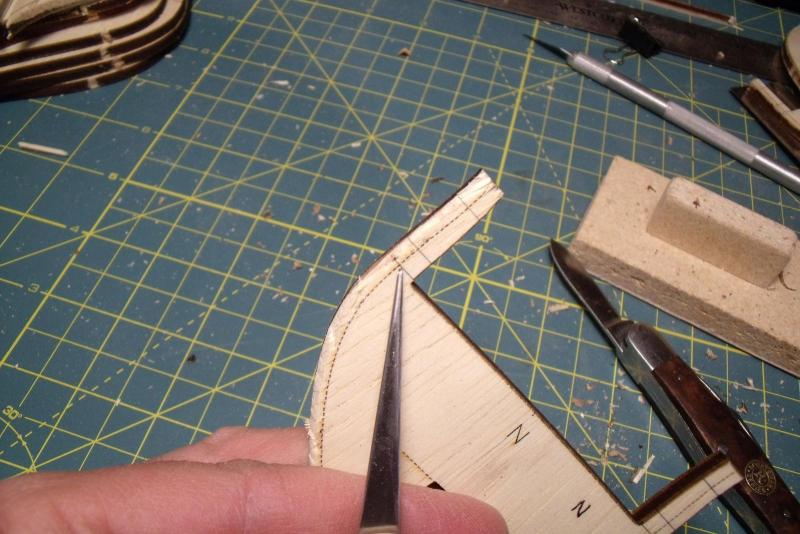
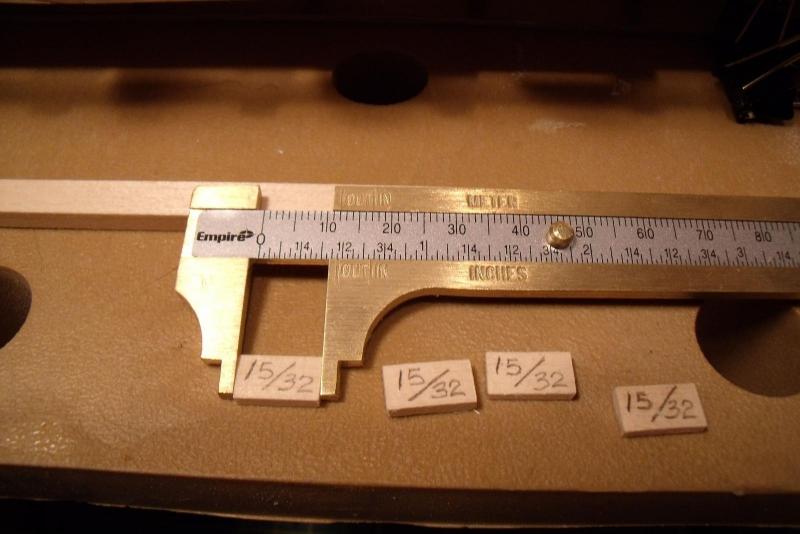
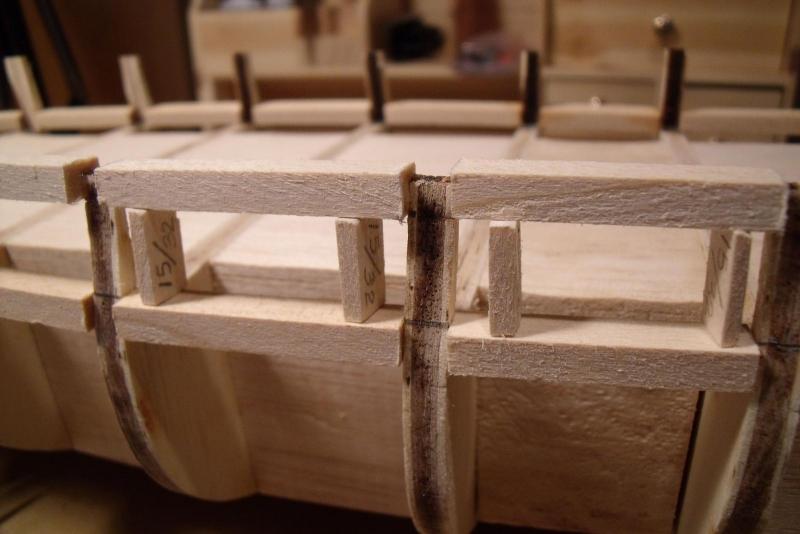
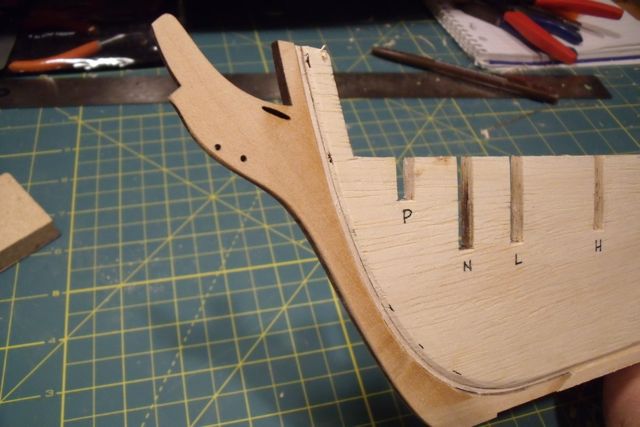
Sanding the sill and lintels to match the bulwarks. I started with the big sander. It takes off wood in a scary hurry, so I had to use a light touch. One slip and I'd be rebuilding big sections. I got away with it. Back to sanding blocks and files to do the inside curve. Trying to get the "graceful" curve. Satisfied so far. The tops of the sweep ports need to be 1/8" above the sills, so I made these little spacers to help make the job easier. The little tail on the spacers helps keep the spacer in place and makes sure I don't accidentally place the spacer in place with the wrong side facing up.
-
I've seen some beautiful weathered decks in these forums. I love the sun-bleached, holy-stoned look and would like to give it a try. I've got a bottle of "Weather-It" on order and am hoping to get some input. Any forums that I may have missed? Anybody have suggestions on dilution, time, etc.?
-
I've got one of those shell casing tumblers. I've been thinking about giving it a try with those square blocks. Surely someone on this forum has already gone down this road and will chime in. One problem. The blocks are not much bigger than the corn husk medium. Would be a bit of a chore to separate the blocks out.
-
When I think of plastic models, I think of the stuff we did as kids. You've made it an art form! Very nice! I love the deck treatment. Very realistic wood look to it.
-
Hey Ken, Great to see that you got started! We should have a good weekend for building -- crummy weather predicted in the Pikes Peak region. We're gonna make a big pot of chili at my place and the boss will work on her cross-stitch while I make sawdust in the basement.
-
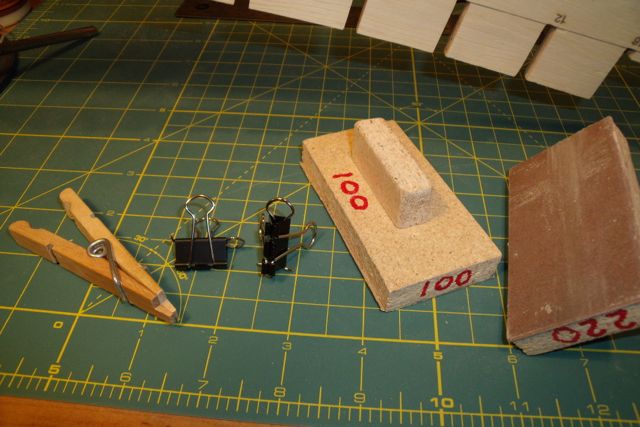
Floyd, thanks for checking in. One of the first things I did to get started while waiting for my kit to arrive was to make some of the tools I found here in the Forums. I thought your idea for the planking clips was brilliant so I made up a bunch of them. It wont be long now before I can put them to use.
-
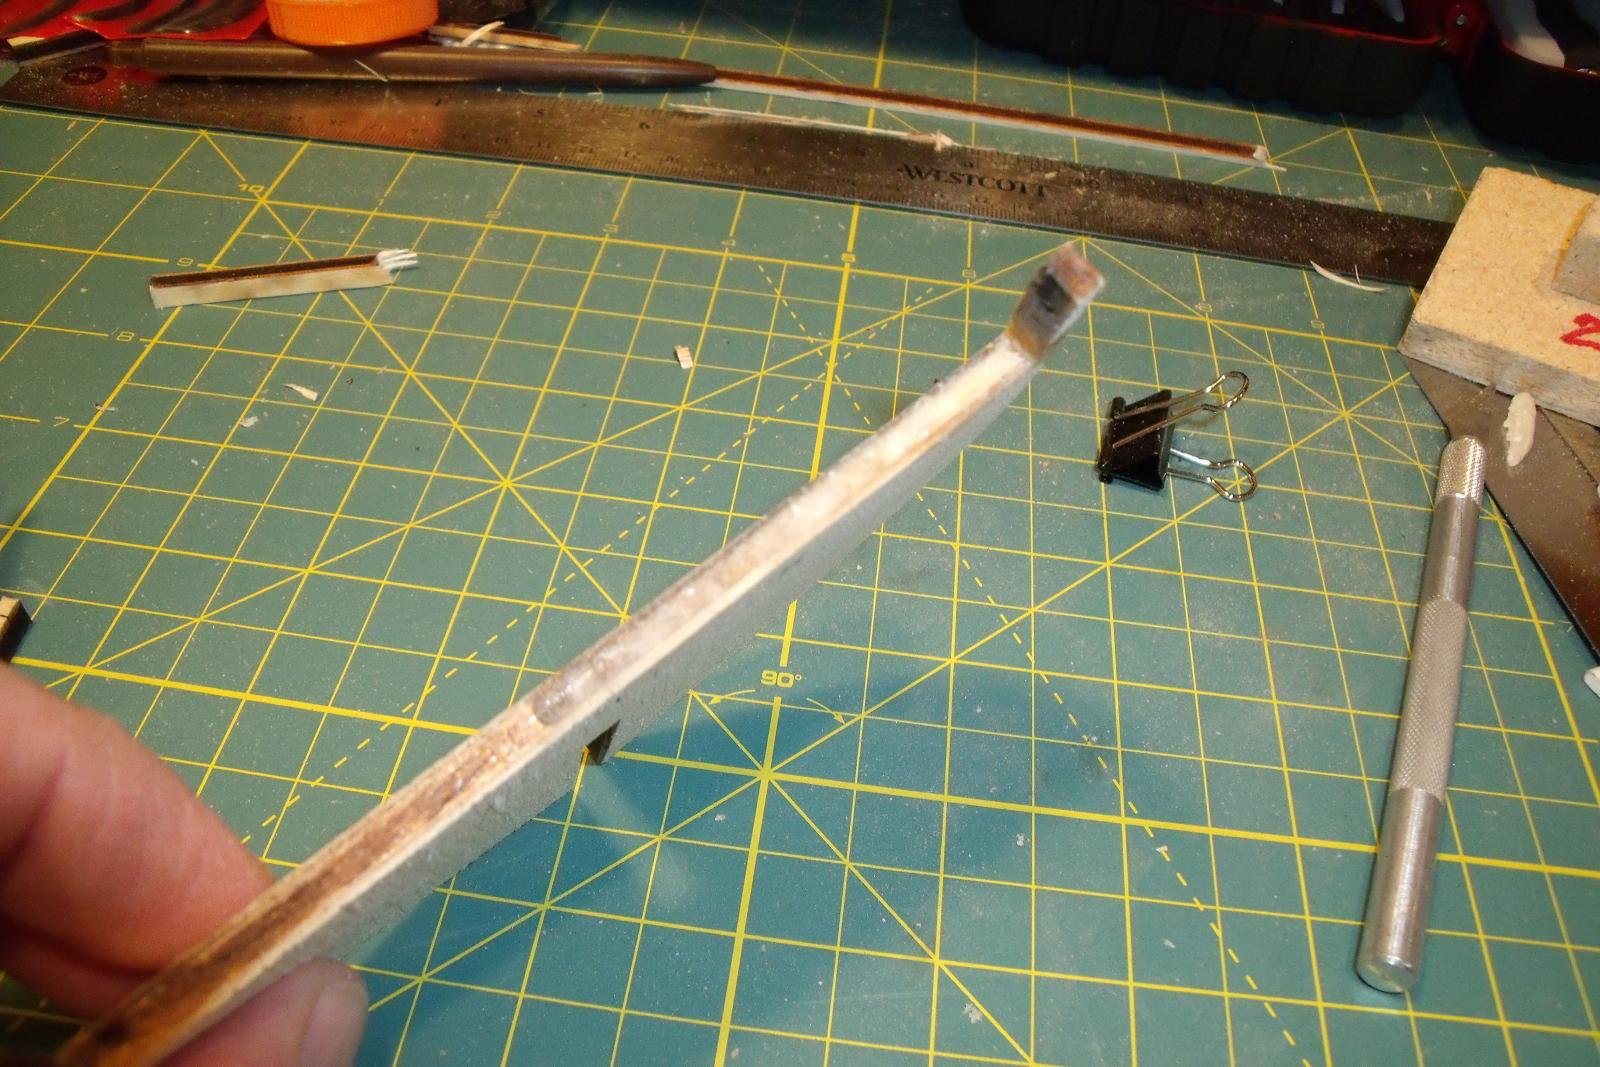
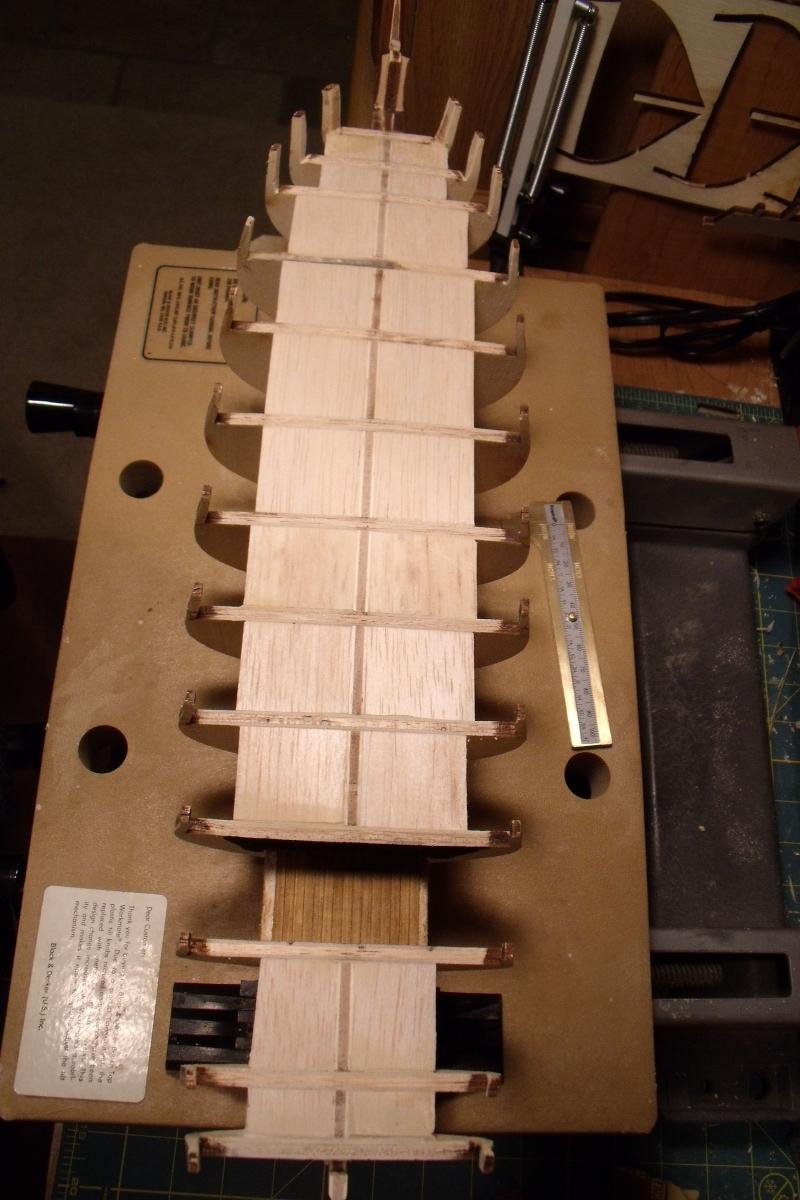
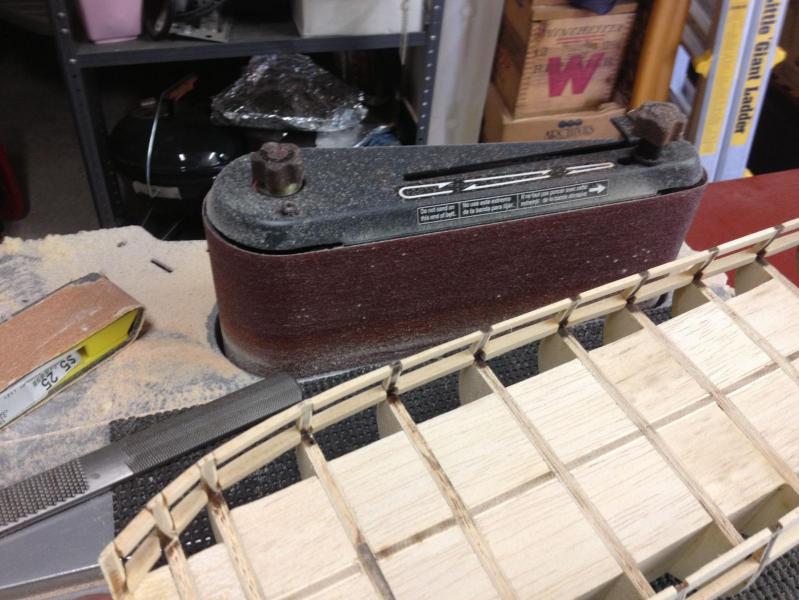
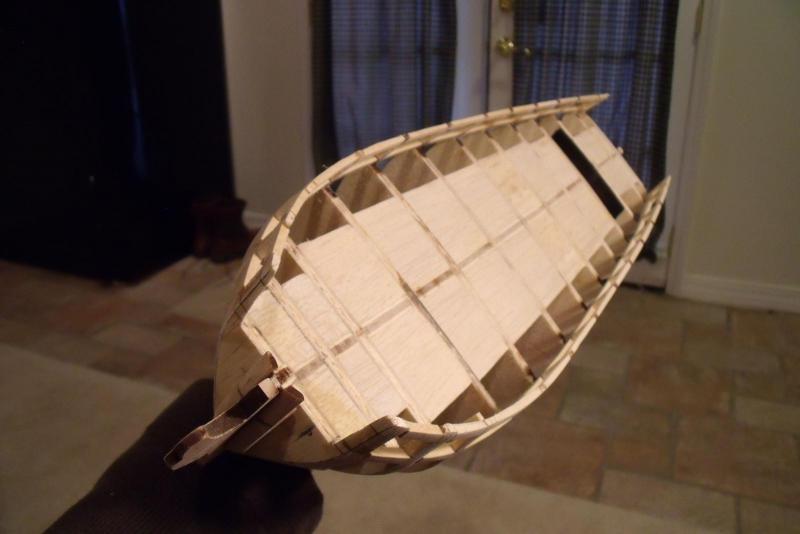
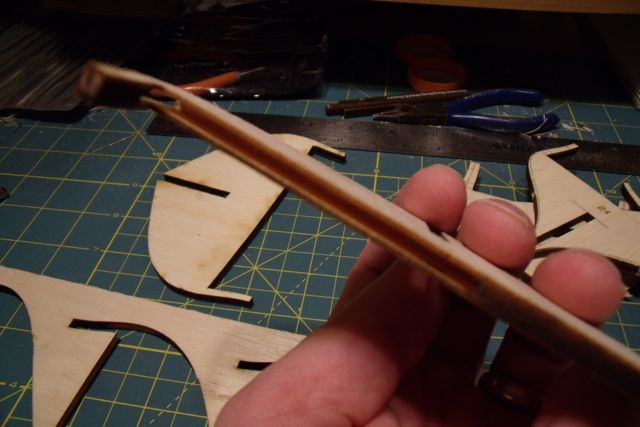
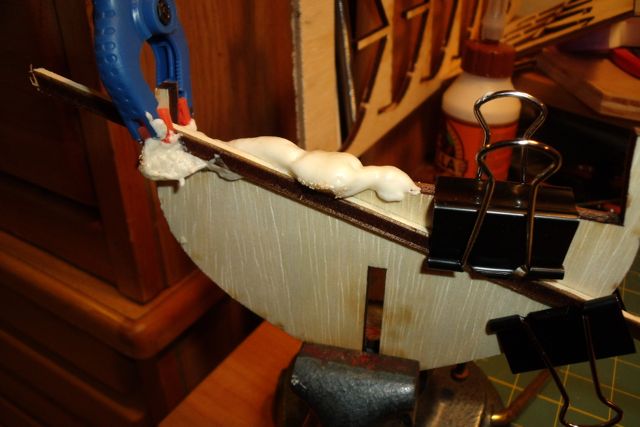
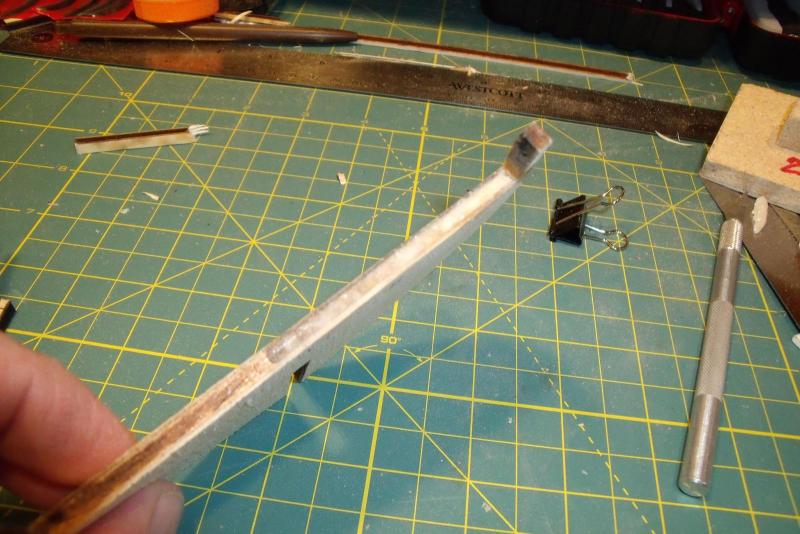
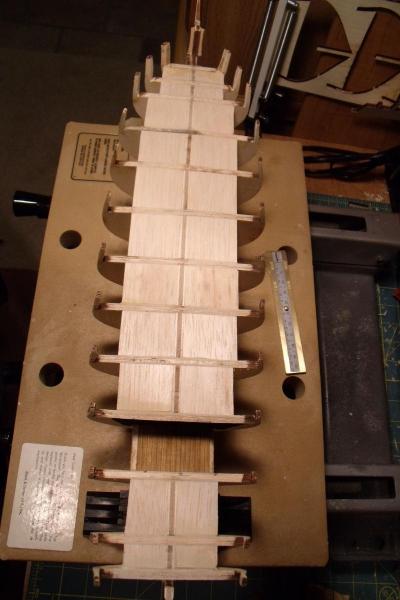
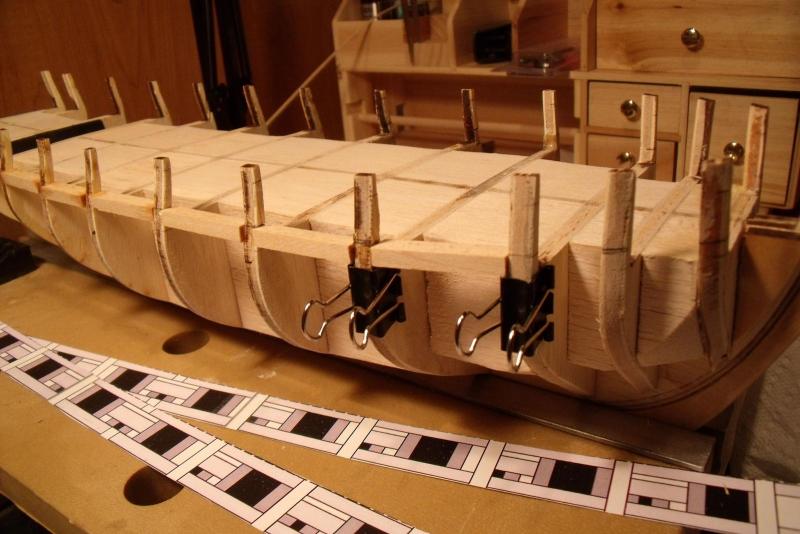
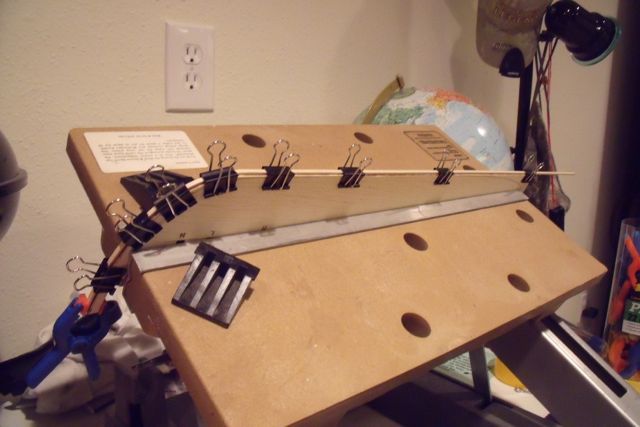
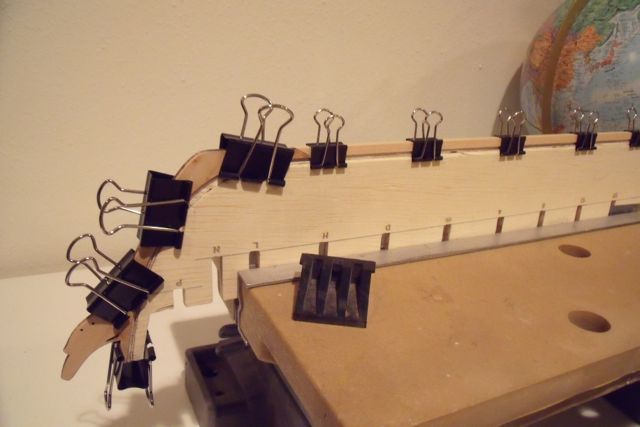
Making a little progress after getting back in town from a trip. After attaching the keel and knees and letting the whole thing sit in the DeskMate for a couple of days, I was pleasantly surprised to see that the BF warp was completely gone. Now time to add the bulkheads. I found one that was missing a sizable portion of the middle ply and the bulwark extension was hanging by just a thread of the outer ply. The picture is not so good, but you get the idea.... What to do, what to do? I braced the bulkhead and shot it full of expanding foam. After it cured, I carved off the excess foam and hardened the exposed surface of the foam with some glue. Came out pretty good I think. Was a lot easier than trying to carve wood to fit exactly in the hole. Gluing in the bulkheads trying to be very precise with alignment.... It is no secret that the bulwark extensions on the bulkheads are fragile. But, in my kit, they were extra flimsy. I think the laser cutter was set too hot. Instead of making a nice little line on the surface of the wood, the reference lines burned thru the first ply and, in some cases, half way thru the center core. You can see how that would make them even easier to break than normal. I think I probably broke off half of them at one point or another. If you're getting ready to start your own Syren, you may want to dab some CA on these reference marks before you remove the bulkheads from the plywood sheets. Has anyone else had this problem, or was I just the lucky one? Out into the garage for the next step. Going to make lots of sawdust cutting and fitting the filler blocks. Used balsa filler blocks to stiffen things up. Shaped and sanded the filler blocks to match the bulkheads. Used a drum sander on a drill press to do the initial shaping/faring of the bulkheads. Back inside to start working on the gun port framing. Used a batten and the gun port template to find a nice line across the hull. Turns out the reference lines on my kit were dang close. My line never varied by more than 1/32" from the reference marks. This step is just a lot of cutting, trimming, sanding, and gluing. Kind of relaxing. I found that Binder clips really helped with the sills. After dry fitting, the binder clips make a nice little shelf to sit the sill on when gluing it in and help to keep the sills nice and level. To make it easier to install the lintels, I made little 15/32" spacers. Now I didn't have to worry about measuring anything. Just sit the lintels on the spacers for perfect parallel installation. Now it's back out into the garage to sand the framing down to match the bulwarks....


-
I love this log! I think I'm learning more from your amusing tales of woe (and subsequent corrections) than from the conventional, "next I installed the planking" type of log entries. I've just started my first kit and your detailed description of the trials and tribulations of planking are sure to help me when I get to that stage. Eric O.
-
Chapter one: Clamped the BF into a desktop "Workmate" to straighten a slight warp. Soaked and formed the rabbet strip. Glued it on the next day. I'm using "Gorilla" brand wood glue. I like it. It "grabs" rapidly and is tough stuff. Cut in the taper to the rabbet. It gets interesting at the aft end where the taper area is large - the grain of the different layers of ply want to fight your blade. But with a combination of a wide blade X-acto, a chisel, and sandpaper, I got 'er done. Tapered the fore end of the stem. Added the stem knee and keel as one step. I purchased a small bucket of assorted binder clips. Glad I did. I'm finding them very useful.
-
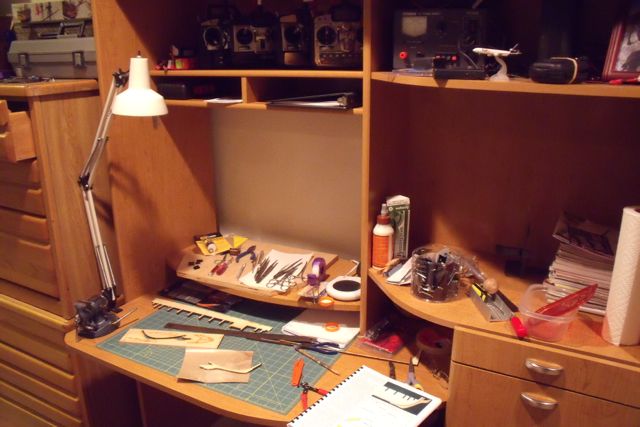
Hi all. Yup, another Syren. It's popular for good reason - a quality kit, Chuck's detailed instruction set, lots of Forum support, and it's a gorgeous little ship. This is my first ship model. Yes, I know, it's too ambitious for a first build. But I've been a hobbyist, woodworker, do-it-your-selfer all my life so I thought I'd dive into the deep end. If I want to learn the entire skill set needed for my ultimate dream boat, the Surprise, then I need to practice on a ship that has all the same elements. Feel free to chime in if you see me heading in the wrong direction. I don't plan to stray from Chucks practicum, so hopefully I wont make any irreparable errors. While waiting for the Syren to arrive, I set up shop in the basement using an old computer hutch as my work station. Gathered all my hobby tools and purchased a few more. Found some great ideas for planking clips on other folks logs, so I made some of those too. The kit arrived in fine shape - good packaging by Model Expo. Initial impressions very good. The hardware kit is very complete. Glad to see the bags of blocks/deadeyes - thought I was going to have to make all of 'em. Back in the day, I built RC airplanes just when laser cutting was coming on the scene. It has come a long way. The laser cut parts in this kit are very precise and crisp. So after a cursory inventory of all the included parts and a day of reading through the manual it's finally time to start making dust...... Eric
-
Hey Augie, Finally got my Syren. Finished chapter one (the dust is rising over Pikes Peak) and decided I had better start a log. As a newbie, I looked at your log to see how one should be set up. Well, an hour later and I'm no closer to getting my log started 'cuz I've been completely absorbed by the details in your's. Magnificent work! If I lived a bit further up the Front Range, I'd volunteer to be your riggers mate, just to learn some techniques. Eric