


hof00
-
Posts
1,631 -
Joined
-
Last visited
Content Type
Profiles
Forums
Gallery
Events
Posts posted by hof00
-
-
Hi All,
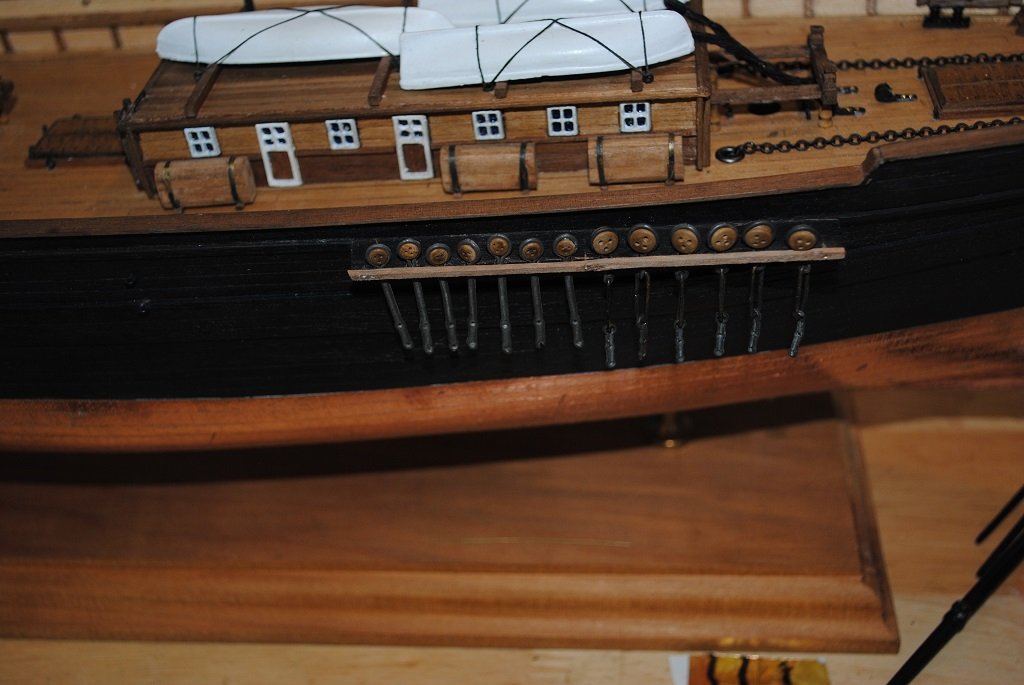
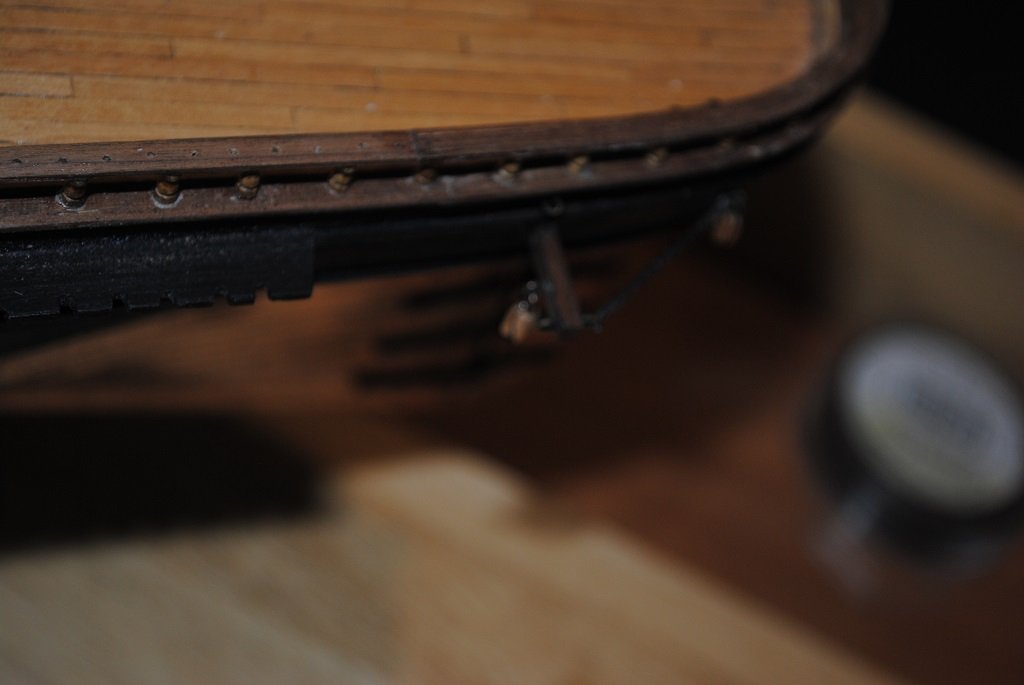
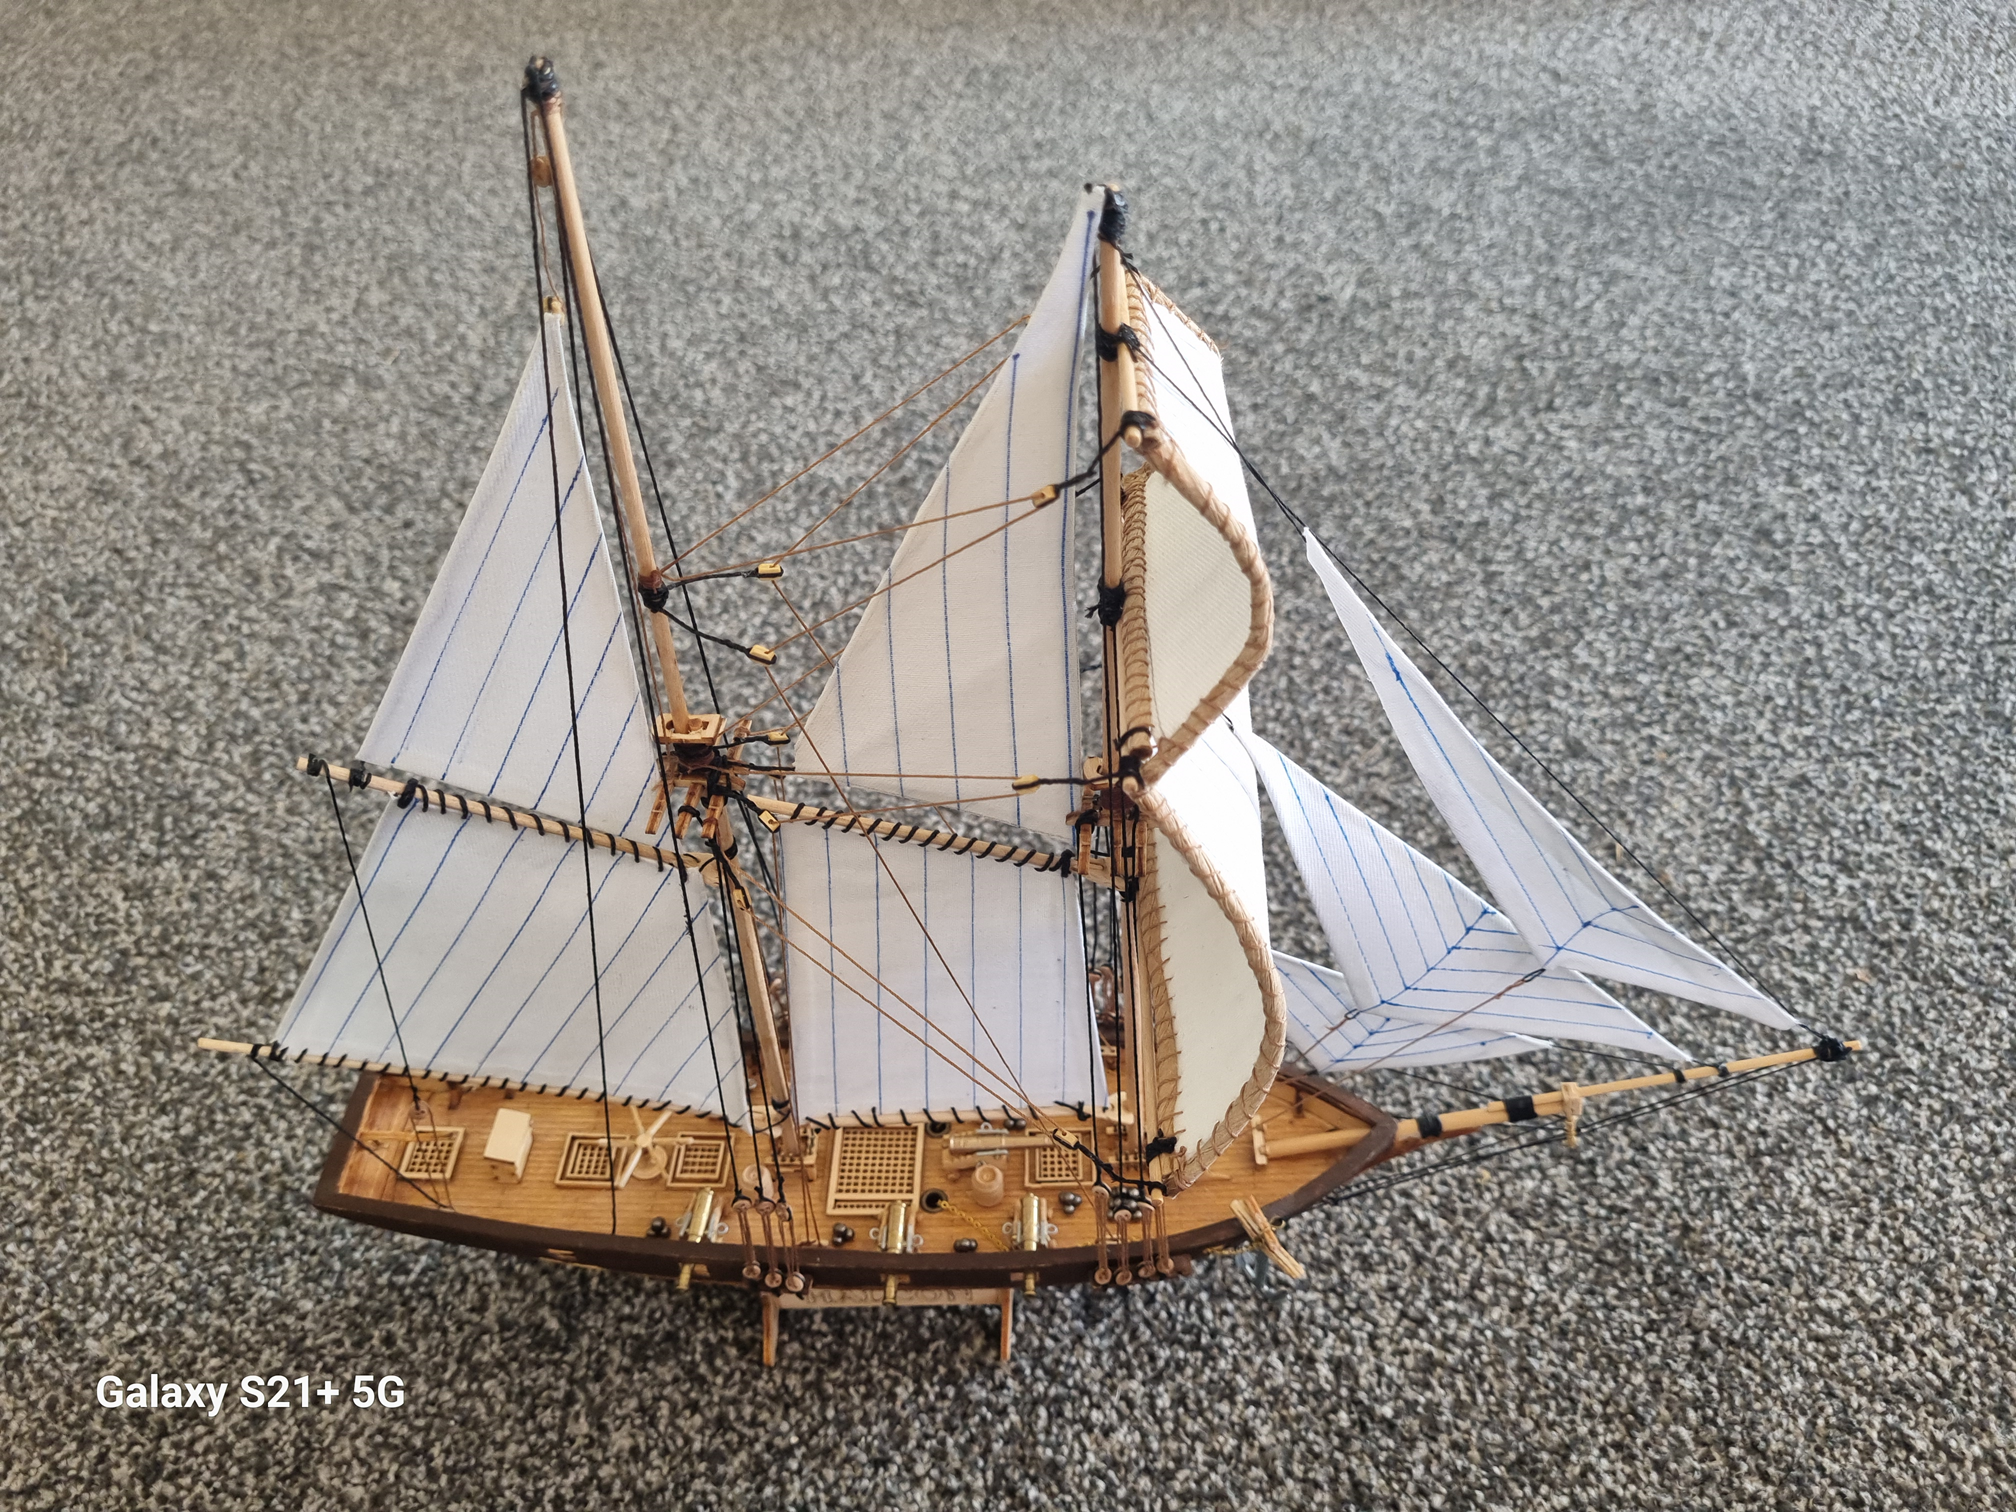
An issue, (Opportunity?), that I have currently, and one that has been playing on my mind is how do I install the Lower Channels and locate Chainplates within the Channels ensuring the correct angle of the Chainplate with respect to Shrouds/Backstays?
Installation and placement of the Upper Channels was pretty much a "No Brainer."
Kit instructions/plans show the installation of a "Chainplate Support," a 2.0 X 3.0mm strip to act as the Lower Channel. You would think this to be the simplest option. I had a tinker with this yesterday and it doesn't really seem to be.... For a start, the upper Channels are 1.5mm thick, 2.0mm Lower Channels are way too thick.
Secondly, the spacing from Hull to Chainplate, (Chainplate hanging "Plumb" from the Upper Channel, varies from about 3.0mm, (Fore), 2.0mm, (Main) and 2.5mm (Mizzen))
One solution that I thought about, make a clone of the Upper Channels. (Lower Channel Width reduced of course.)
The problem with this is that the slots that I would need in the Lower Channel would not allow for the angle of the individual Chainplate with respect to Shrouds/Backstays.
(Chainplates would be "Vertical."
The only other solution that I can think of is to omit the Lower channels altogether. (That would make my life a whole lot simpler.... 🙂)
There are 72 Chainplates in total.
So, what do others do? 😗
I am a bit "Stumped."
Cheers... HOF.
A couple of photos of the Fore Channels:
(Channel Cap is "Pinned" only.)


-
8 hours ago, Rick310 said:
According to the plans for the flying fish, only the fore and main topsail yards, had Flemish horses.
Rick
Thanks Rick,
There seem to be a few differing opinions regarding these.
The late, great Manstini, (Ship Modelling Simplified), adv. Flemis Horses fitted on Yards with Studding Sail Booms.
I'm leaning to Top-Sail Yards only. (Less work? 🙂)
At the mo. I am struggling with the Lower Channels. Upper Channels are pretty much a doddle, but I cannot wrap my head around how to get the Chainplates set up to the correct angle with respect to Shrouds/Backstays and at the same time house the Chainplate.
The kit instructions don't mention a dedicated Lower Channel but adv. to install a 2.0 X 3.0mm strip and call it a Chainplate Support.
Any ideas? (I'll have a look at your build in a few minutes to see if I can see a way forward.
Cheers and Regards,
Harry.
-
3 hours ago, rwiederrich said:
Flemishhorses, generally were used on yards that supported the stunsail booms. Crew deeded to get out far to rig and tend to the sail affixed to the boom.
Rob
Thanks Rob.
I'll equip the Mainsail, Top-Sail and Topgallant Fore and Main with "Horses." 🙂
A question for you:
Do you have a diagram/key for Running Rigging Fairleads associated with the Fore, Main and Mizzen Main Tops? (Platforms)
I am trying to figure out if these were used for Sail Handling only or if Sheets, etc. utilized these, or, if they passed through the "Lubbers" hole in the Tops.
Cheers and Regards,
Harry.
-
Hi All,
Small update.
A little dull perhaps just some progress on Yards.
Photos are more or less complete Topsail Yards. (These require the addition of Flemish Horses and a bit of paint touch-up here and there.)
I think about one month for these three items. (I am trying not to be too "Precious" with the Yards otherwise I would never get them done!! 🙂)
I am also still trying to decide which Yard were equipped with Flemish Horses. Opinion seems a little divided on the subject. (The advice that I have received is that only Top-Sail Yards were equipped with Flemish Horses. I wonder if this applies to the Mizzen Top-Sail Yard also? If anyone has opinions regarding McCay's Ships, I'd be very keen to hear them.)
I also include a couple of photos of the next three Yards, Topgallant, Fore, Main and Mizzen. (I prepped all Yards some time ago except for Paint and attaching Blocks and other items, prepared also.)
Anyway, that's me for the mo.
Cheers.... HOF.


-
Hi All,
A quick update tonight.
Completed the Fore, Main and Mizzen Yard. (Main Course?)
I am reasonably happy with the result although the process took me a little time to figure out an assembly sequence that seems to work for me anyway. (I guess the next 12 Yards will be practice enough. 🙂)
I decided to blacken, (Paint) the Jackstays as they just didn't look right "Bright." (I have prepped all remaking Jackstays Black.)
Footropes are 5.0mm below the Yard and are 0.15mm A/L "Waxed" Black Thread. (In the photo, the Footropes look a bit "Random," they look much better "Off Camera.")
Stirrups are 4 X strands of Copper wire, (0.1mm?), twisted together with a 0.5mm loop in the end for the Footropes.
Just a couple of touch-ups on these items that I have just seen!! 🙂
Tomorrow, I'll make a start on the Top-Sail Yards. These are, (Painted)), ready for thier "Furniture" which is also prepared.
Thats me for the Mo.
Cheers....HOF.
Photo:
-
On 8/28/2025 at 4:23 PM, rwiederrich said:
I’ve always reminded builders to keep their stirrups/foot ropes very short. I made sure they were on my Glory of the Seas. The men working the sails are able to do so.
Rob

Hi Rob,
Very Nice!!
Thanks for your input, helps with the visualization.
I made a "Dummy" Spar about the same as the Foretop. I can "Fiddle" with the Stirrups/Footropes without making mistakes on the prepared Spars.
I am pretty sure that I have the Stirrups the correct length for the Top Sail Yards.
The Main Yard Stirrups are going to need to be a millimeter or so longer as the Yard is thicker, anyway, consistency is what I'll be after. 🙂
Cheers and Regards,
Harry.
-
Many thanks to you all!!
I think I can move on a bit now.
I am making up a "Test" Yard to gauge how different materials, (Thread/Wire), look and behave to avoid re-work on items already created. 🙂
Good to know a definitive answer regarding Flemish Horses.
Cheers and Regards,
Harry.
-
Hi All,
Thought I'd pose a question regarding Footropes, Flemish Horses and Stirrups.
I am currently building the 1/96 Mamoli Flying Cloud and in the process of building the Yards.
The plans show Footropes and Stirrups but no Flemish Horses. I don't think that this is entirely correct.
I have looked at various publications, Ship Modeling Simplified adv. that Flemish Horses were only installed on Yards that had Stunsail Booms fitted, other info is either very vague and one adv. that Flemish Horses were only installed on Top Sail Yards.
Another question, is there a formula for the spacing of Stirrups over the length of the Yard or arbitrary placement?
So, what is the answer? 🙂
I am hoping that someone can offer some "Seer" advice on the subject.
I am also tossing up the practicalities of adding Flemish Horses if they are too small at 1/96.
Many thanks in advance.
Cheers....HOF.
-
On 8/16/2025 at 1:50 AM, rwiederrich said:
Wonderful job...she is coming along nicely. The attention to detailing the yards out with *ALL* their blocks, stirrups foot ropes , flemishhorses, and sheet blocks can be daunting. Not to mention the jackstays.
Many modelers tend to forego many of these and keep the yard furniture to a minimum. If you plan on adding leach and buntlines...you'll need these blocks as well. Not failing to mention those pesky jewel blocks for the reef tackle.
 It can get pretty busy for sure.
Good luck.
Will you be adding sails...furled or otherwise?
Rob
Many thanks Rob.
I built the Mantua/Sergal Cutty Sark, (On this site), a few years ago, this now seems much simpler, (The Cutty that is), due to the bigger scale.
1/96 is much more challenging.
Anyway, the answer to you question regarding Sails, no. 🙂
Bare Bones will do nicely.
Incidentally, I have an A/L 1/84 Cutty in the cupboard with sails. After the FC I might be tempted....
Cheers and Regards,
Harry.
-
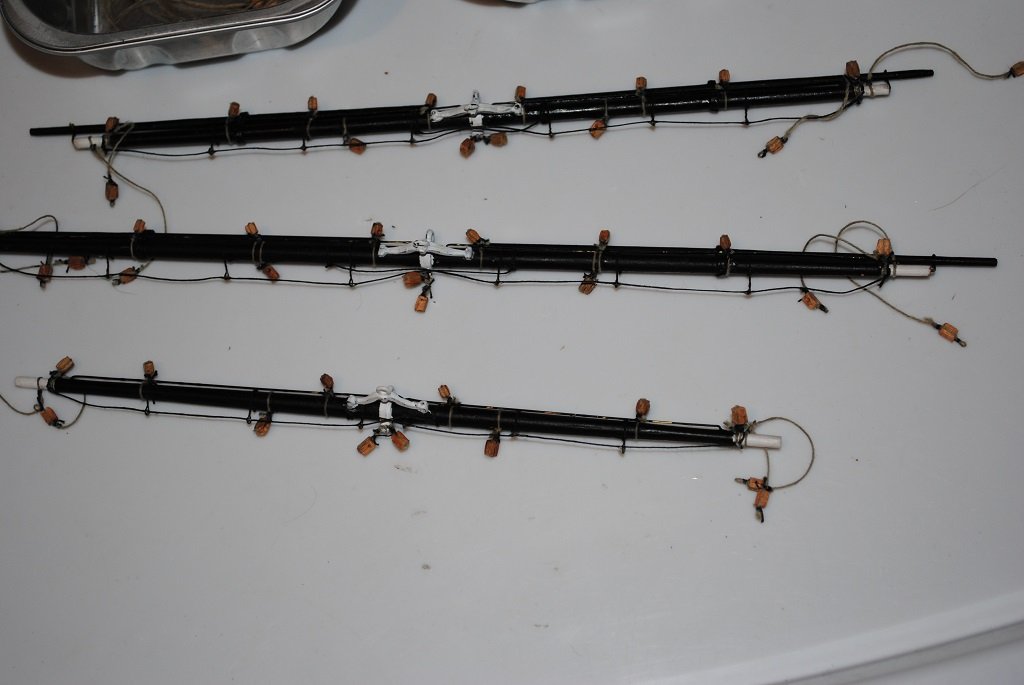
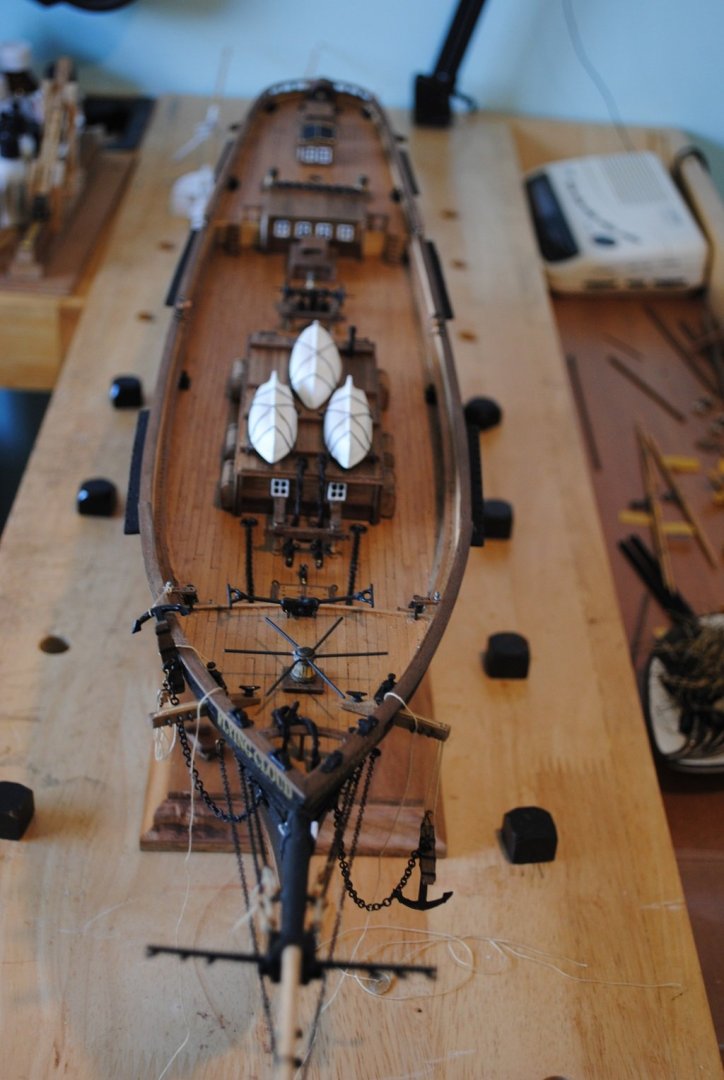
Hi All,
Bit of an update seeing that it's been a few weeks....
Working on Spars, Blocks and Hooks tiring to get my "Recipe" correct for these items. 🙂
I have completed Block installation for the Mainsail yards. For the Blocks that attach directly to the yards I first made up "Pigtails" with the Block siezed to one end using a "Slidey" Siezing secured with a dab of CA.
I then wrapped the "Pigtail" around the Yarad and used the same Siezing to secure the Block and "Pigtail."
After much Gnashing of teeth and brow beating the method works for me, a little more work but the results are more acceptable than other methods attempted. I also utilized the Jack Stay installation to line up Blocks along the center of the Yard. (Blocks for Boom and Gaff a similar approach for Block installation.
The Stunsail Booms are not yet glued in position as I need to develop a method for Footropes and Stirrups. While I experiment, it will be nice to remove any "Clutter." (I have some ideas for Stirrups and Footropes.)
I took some time to have a think about Hooks for Blocks and Rigging and developed a simple Jig to create 5.0mm Hooks. (I need quite a few of these as I am thinking that allot of the Running Rigging will eventually be secured to "Hooked" Blocks with Eyebolts on the Deck.)
Next was to think about attaching the Hooks to the Blocks.... These Blocks require a Becket, no problem to create these but I was disappointed with the result after tying the Siezing on the "Hook" side of the Block. (Even with 0.15mm Rigging Thread, the result was disappointing.)
I decided to resort to 0.4mm Black "Art Wire" More acceptable results and much easier.
Next tasks:
- Stirrups and Footropes
- Topsail Yard Furniture
That's me for the mo.
Comments/suggestions always welcome.
Cheers....HOF.
Photos:


-
Good Stuff!! 🙂
Unsure if you already know of this resource....
sobco.com/ship_model/fc/Flying_Cloud_plans_bradner.html
I have found it very useful.
(There is sod all information out there it would seem.)
Cheers.... HOF.
-
I sincerely hope that you have enough material(s) in your kit.
As you may have read in my log, I was rather frustrated by the lack thereof in mine.
Take care of the small components as I found that there were just enough....
I am finding, at this juncture, that there are not nearly enough Blocks, I am glad I have plenty from other builds.
Cheers....HOF.
-
Nice Build!!
I really like the color scheme.
Cheers.... HOF.
- Diver and king derelict
-
 2
2
-
-
8 hours ago, Rick310 said:
Nice job on the bell and binnacle, look’s really good!
your Flying Cloud is coming along nicely!!Check the lengths of your chai plates, in the picture they look a bit long.
Rick
Hi Rick,
Thank you for your kind comments, appreciated.
Regarding Chain Plate lengths, I'll definitely have a look-see. I do think that it's a little too late to adjust the lengths.
(They are quite a bit shorter when the bottom Link of the Shroud Chainplate is held on the Wales.)
I will have a wee break from proceedings while I ponder suggestions by yourself and Rob.
(Maybe do some Yard and Mast work? 🙂)
Comments and suggestions very welcome thank you.
Cheers and Regards,
Harry.
-
13 hours ago, rwiederrich said:
Fine work....but McKay clippers utilized, double channel chainplates...not single. Before you get too far.
Rob
Hi Rob,
Thanks for the "Heads-Up."
I am aware of the Double Channel set-up used.
The Kit does not supply secondary Channels. The do however instruct the modeler to install a 2.0mm? strip to represent the secondary Channels.
Yup, I have been thinking about these items and am considering "Scratching" something. (It's not too late, the Channel Caps are not fixed yet, just pinned. 🙂)
Cheers and Regards,
Harry.
-
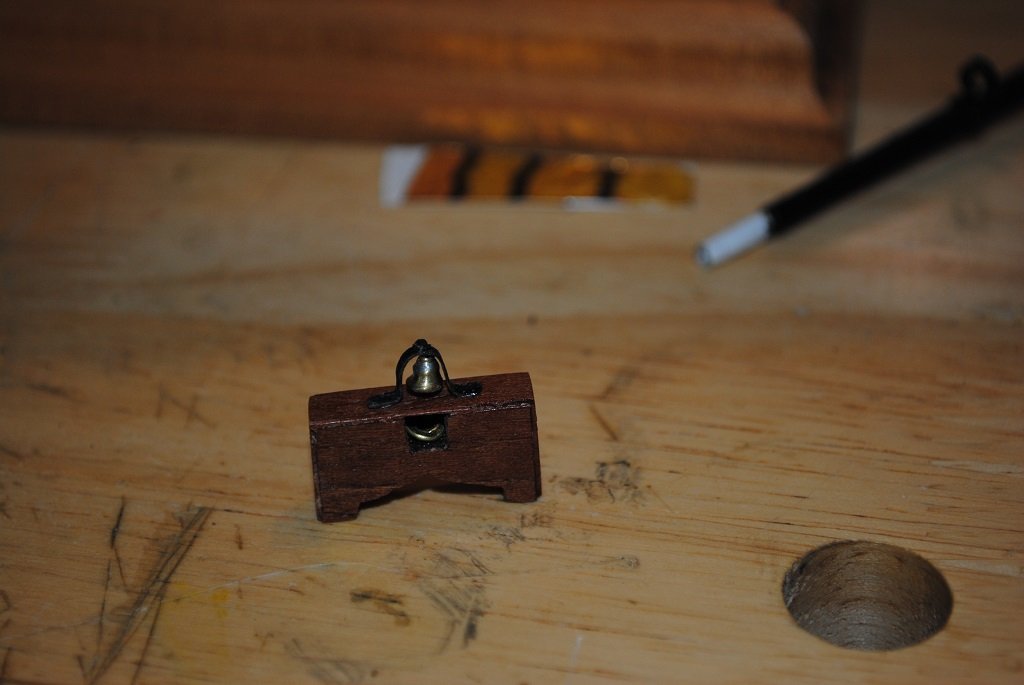
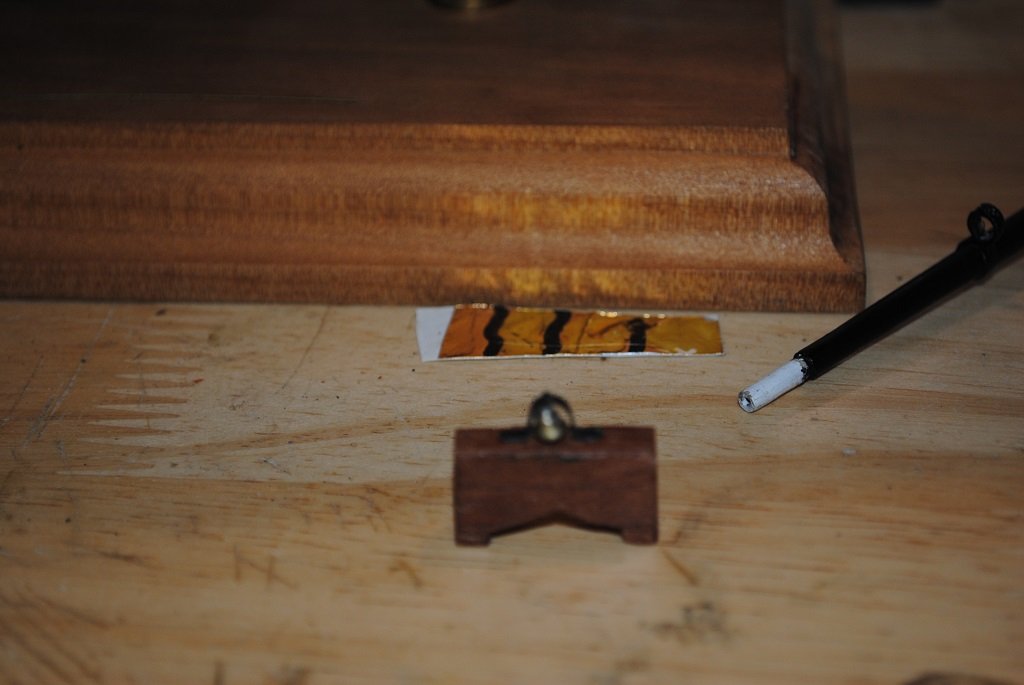
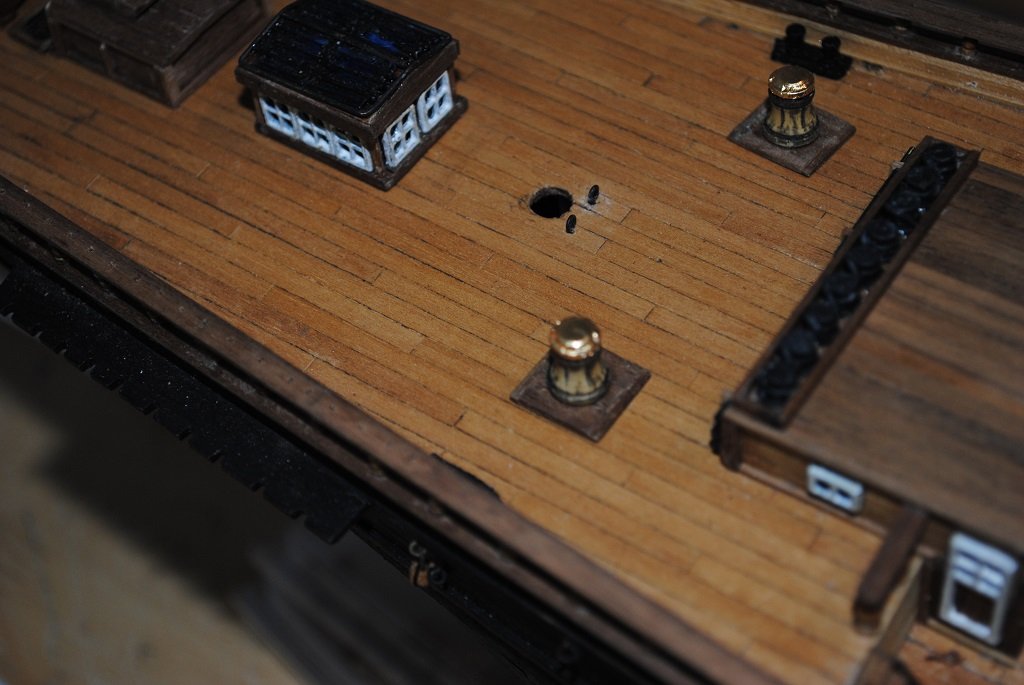
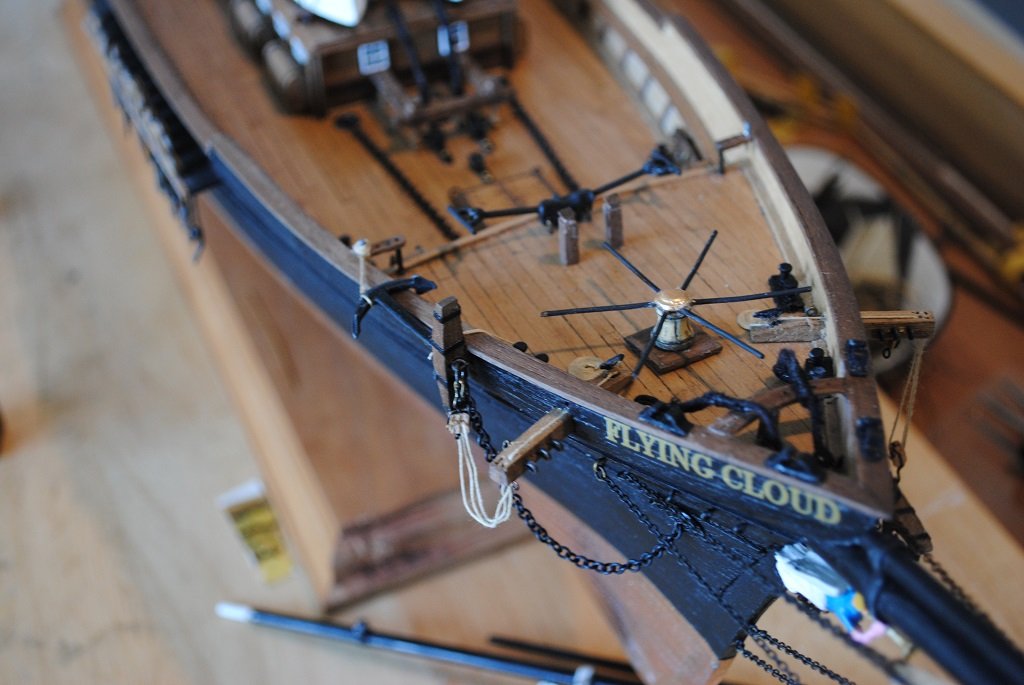
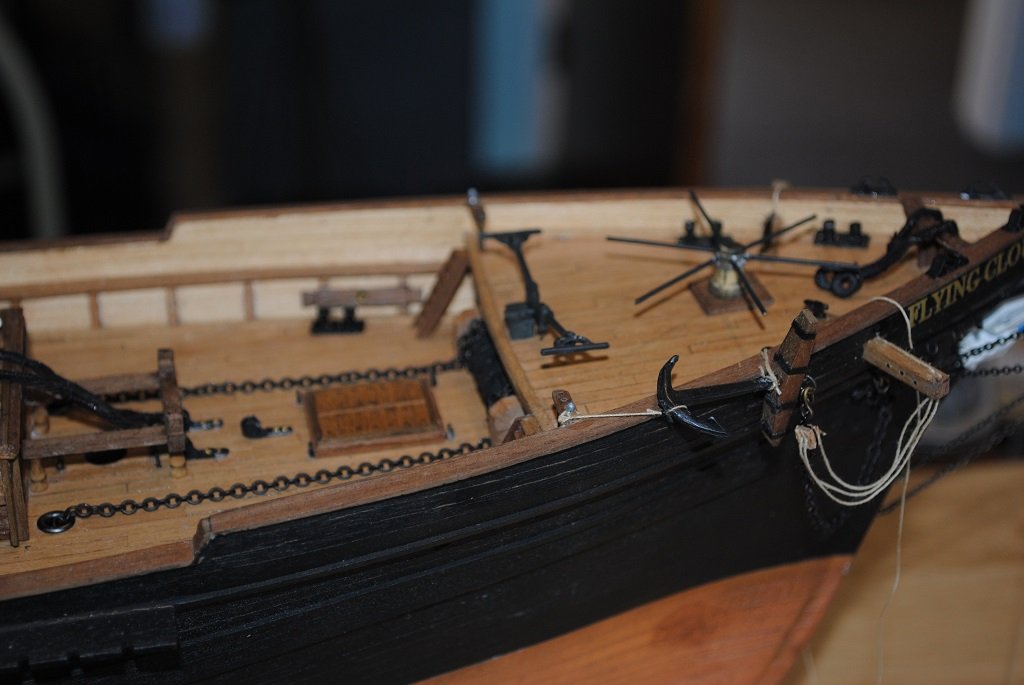
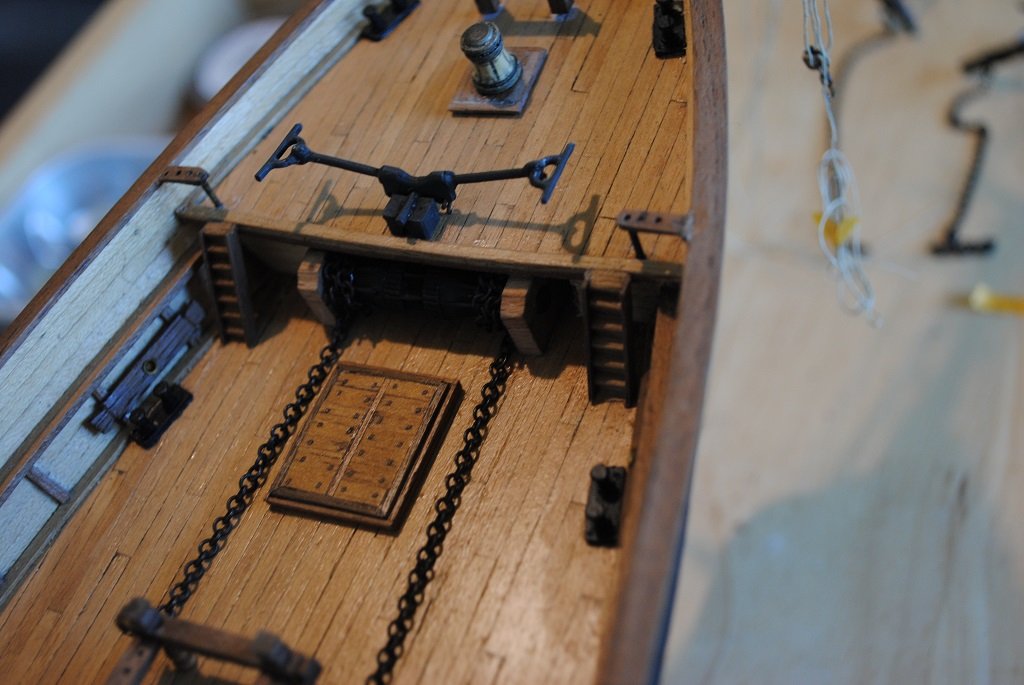
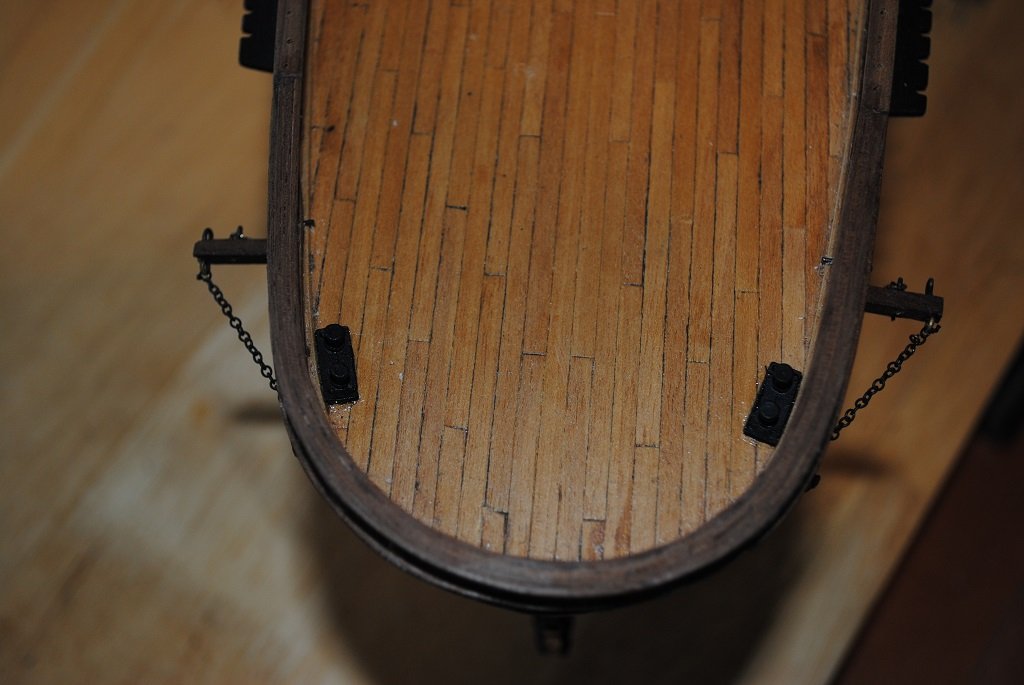
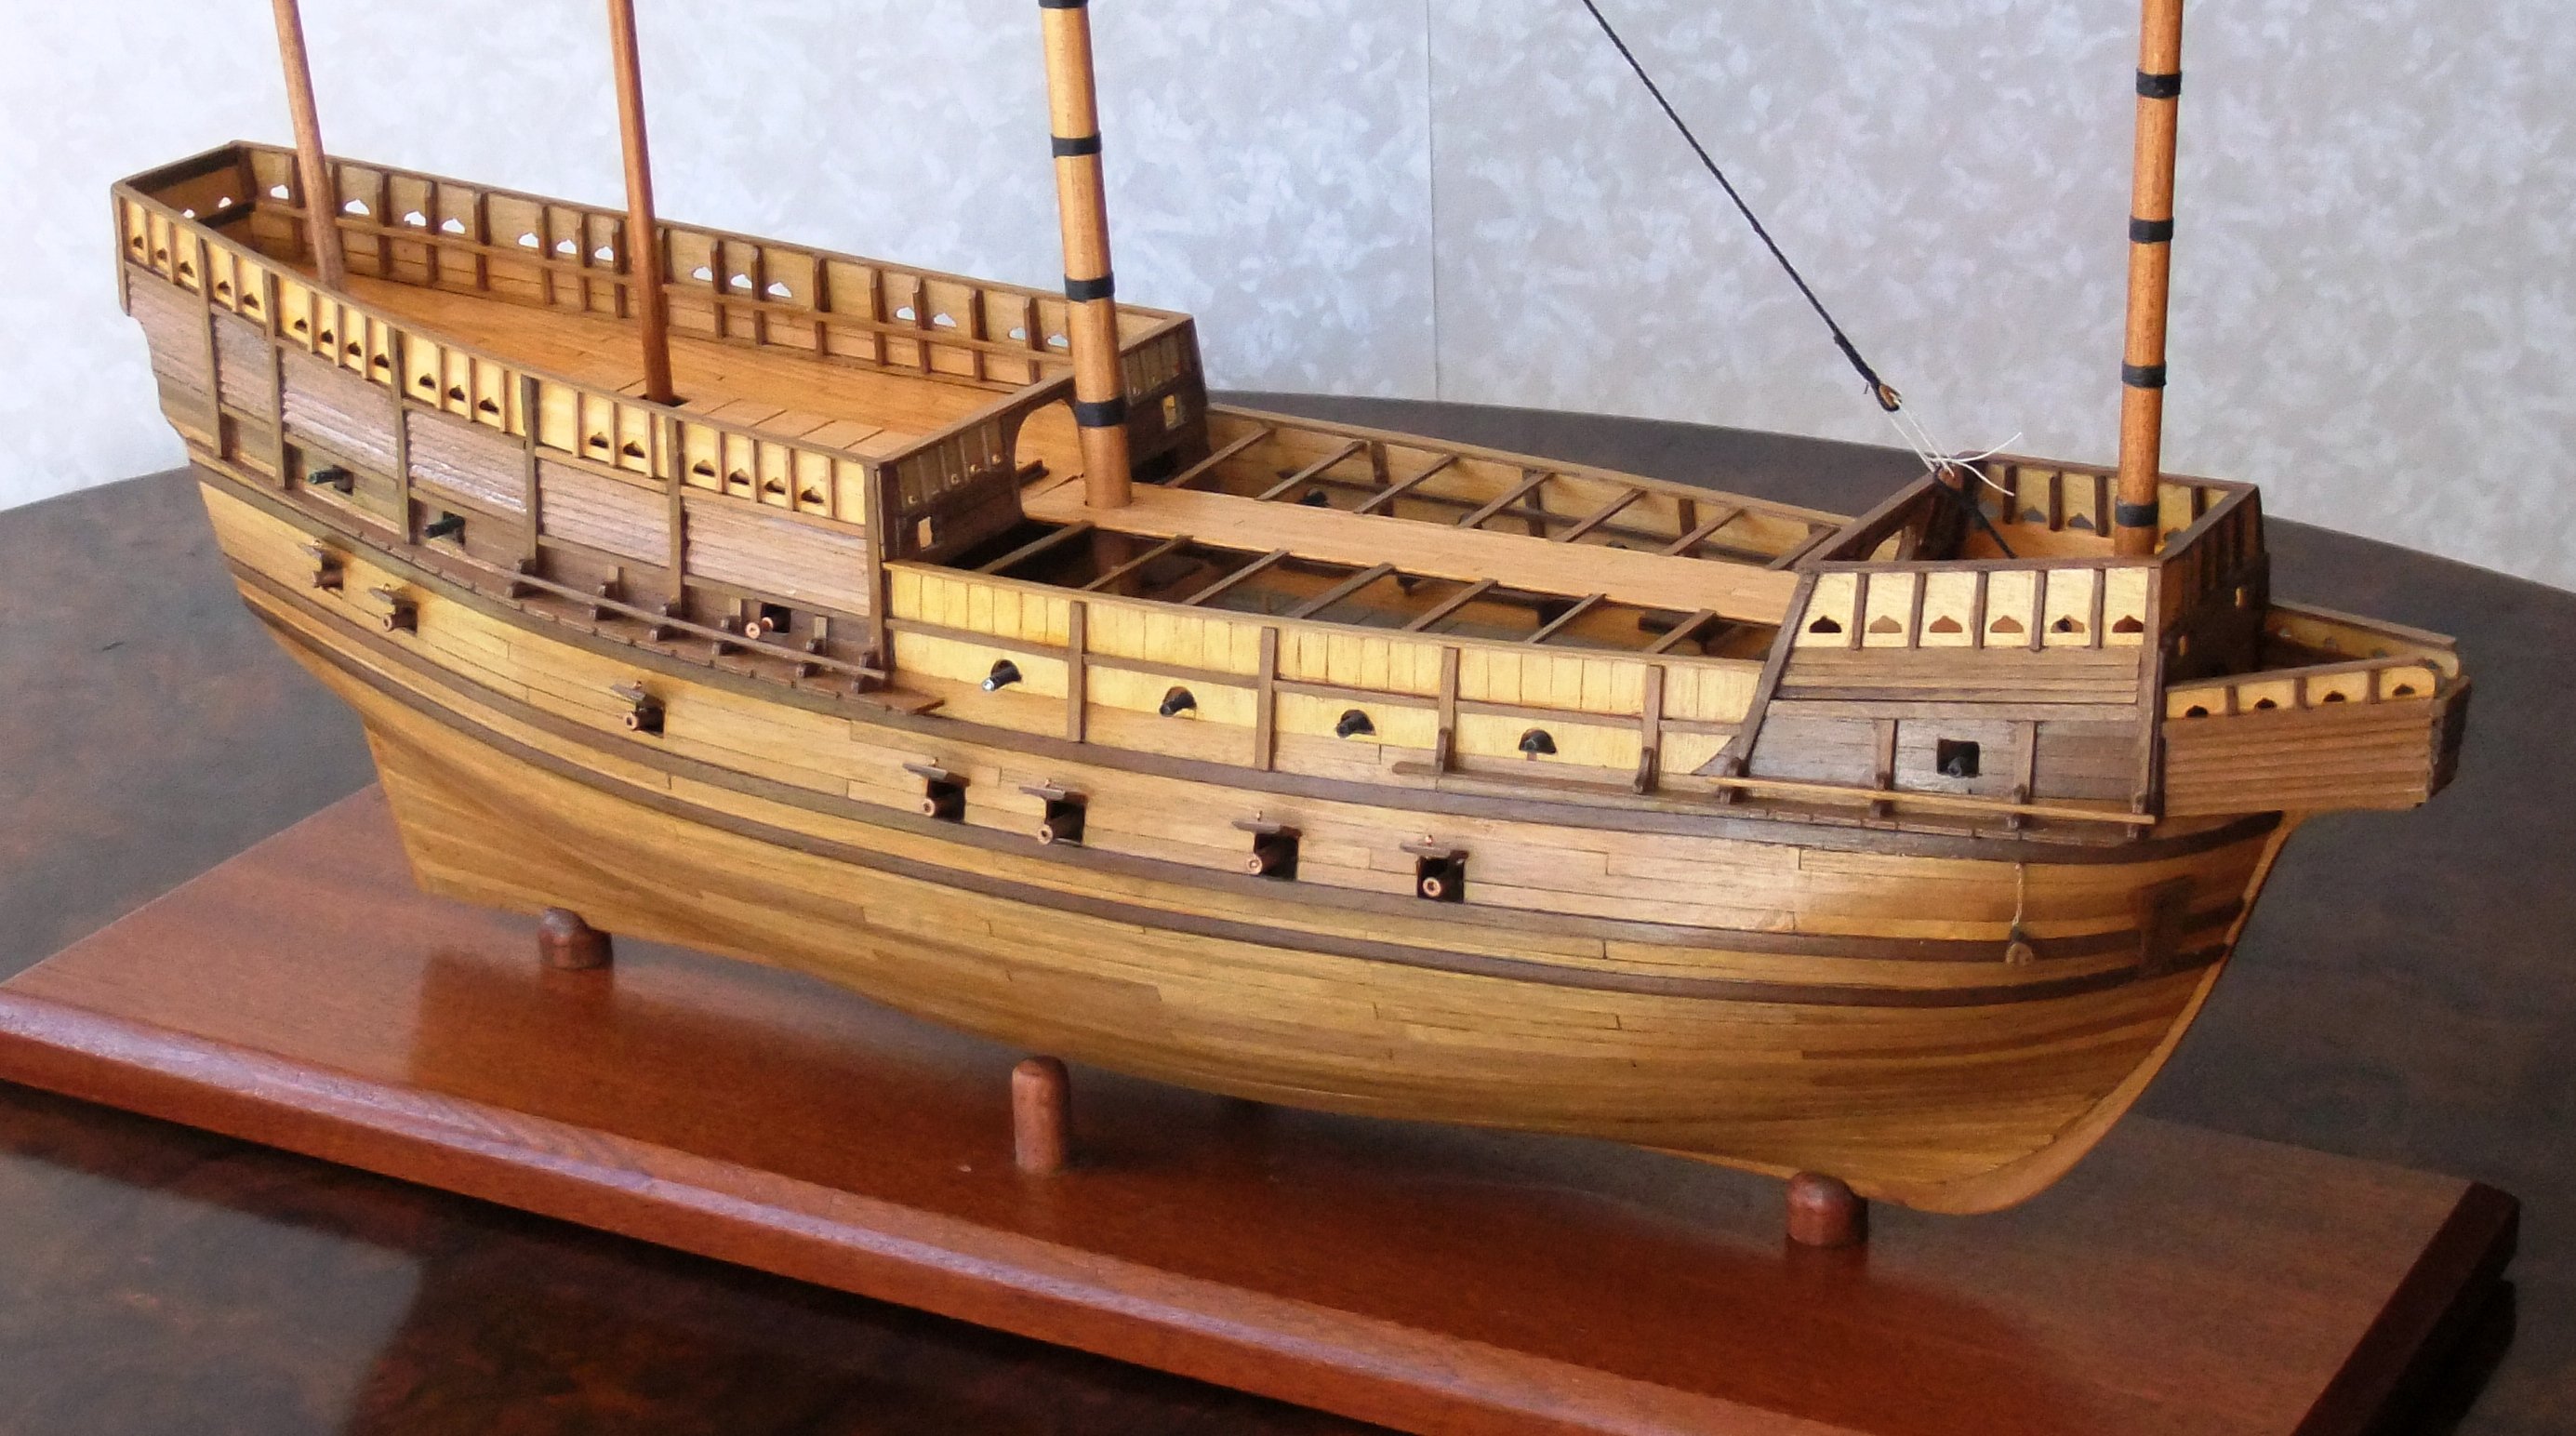
Hi All,
Time for a small update:
For some time, I have been struggling with tying my Stropped Blocks on to my first Yard, Fore Main Course. Several attempts later I think I have the correct "Recipe", one that seems to work for me anyway. I will post my fourth attempt after the Blocks are on.... 🙂
One of my issues was lining up the Blocks along the length of the Yard. I have some 0.5mm Brass Rod on order for the Jackstays, my plan is to utilize these to assist.
Anyway, I digress, I decided to make my own Binnacle, the Kit supplied one was a "Later" 19th Century, Similar to a small pillar. Photos show my second attempt. I turned a Bell, also my second attempt as the first was way too large.
I added "Brass" Caps to the Vertical Capstans. The material is actually Gold Bare Metal Foil but I think it does the job.
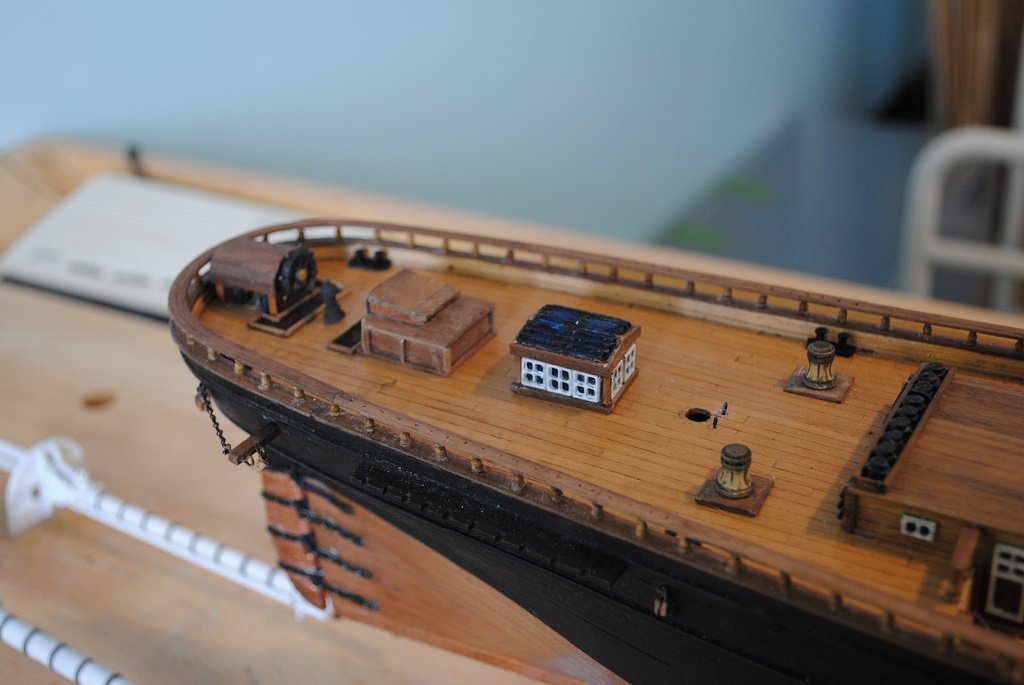
This morning, I decided to have a bash at mounting the Chain plates. For the Channel Capping I cut 1.5 X 1.5 strips, pinned middle and both ends.
Photos show unpainted capping strip. This will be painted Black before affixing.
Anyway, that's about it for the day.
Cheers.... HOF.
Photos:
- jpalmer1970, uscharin, Nunnehi (Don) and 1 other
-
4
-
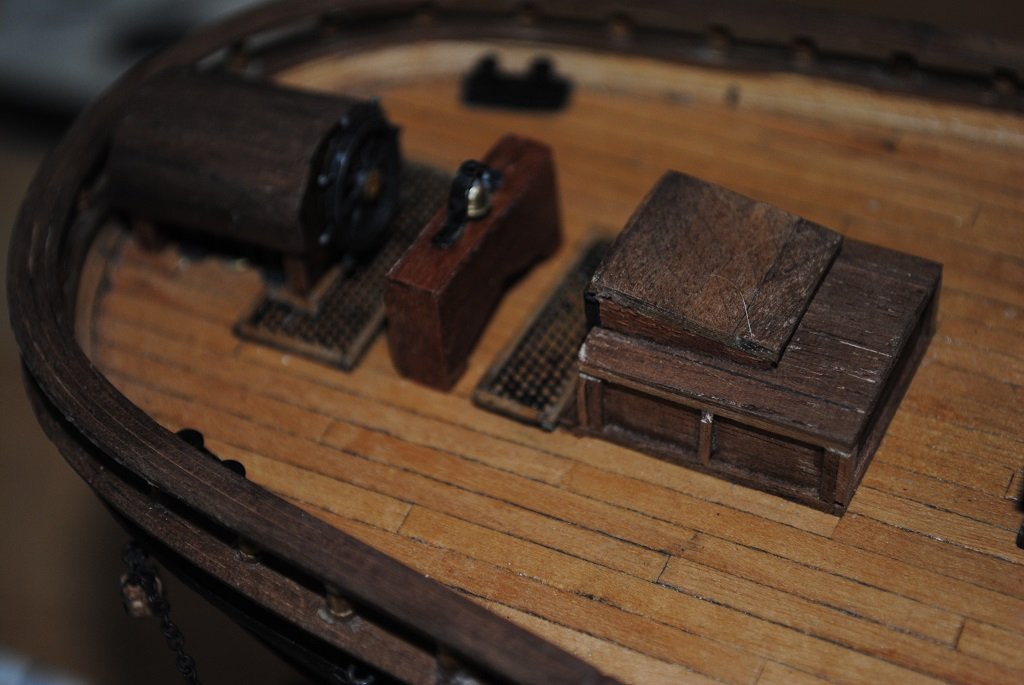
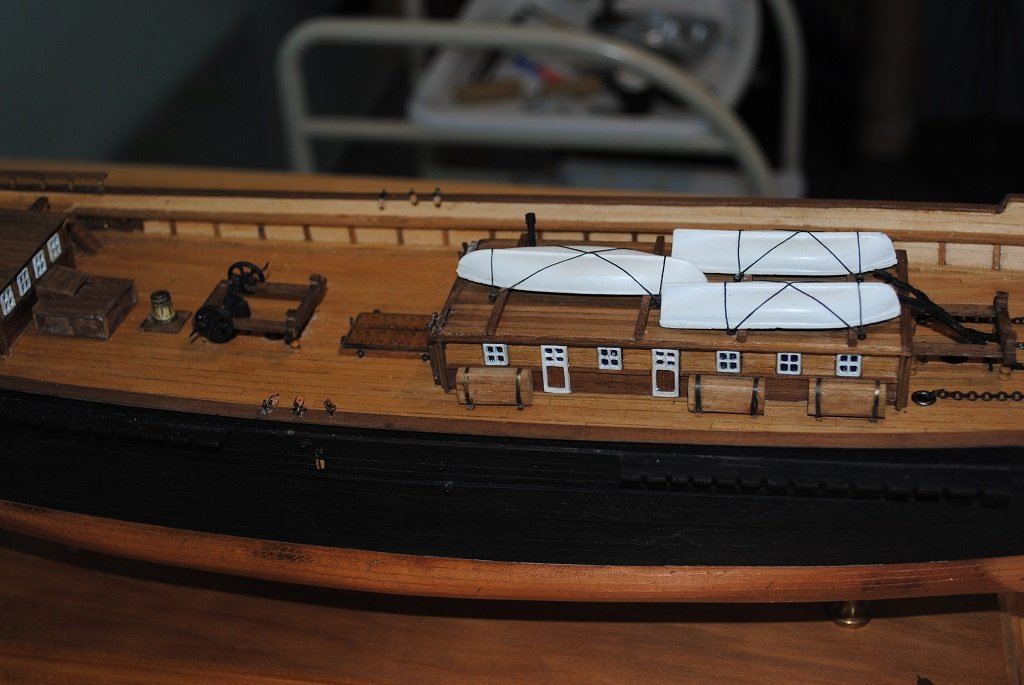
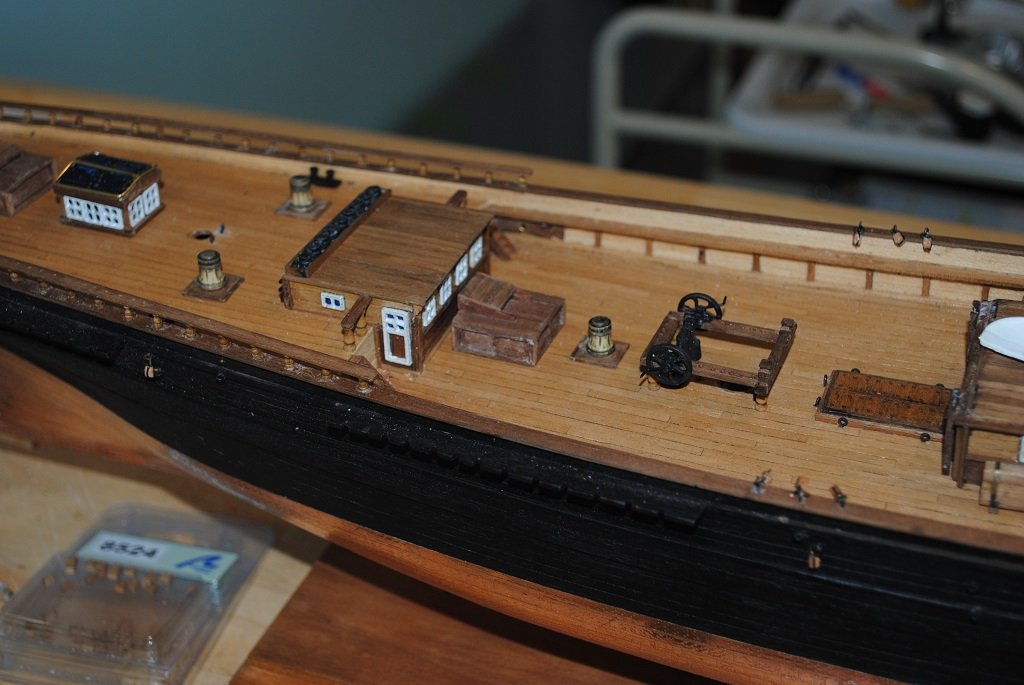
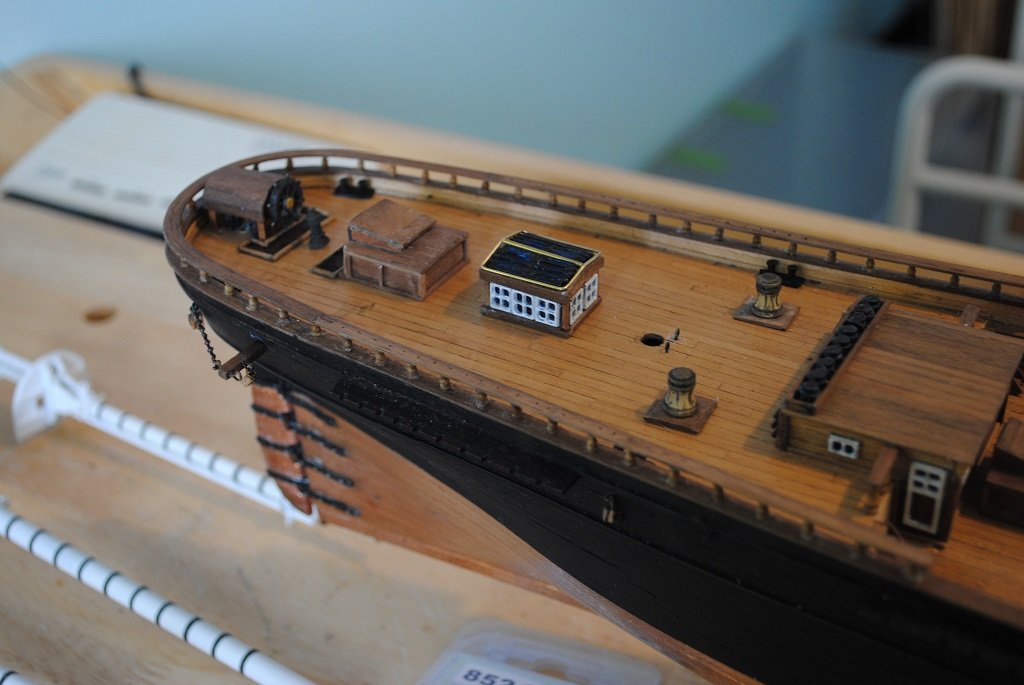
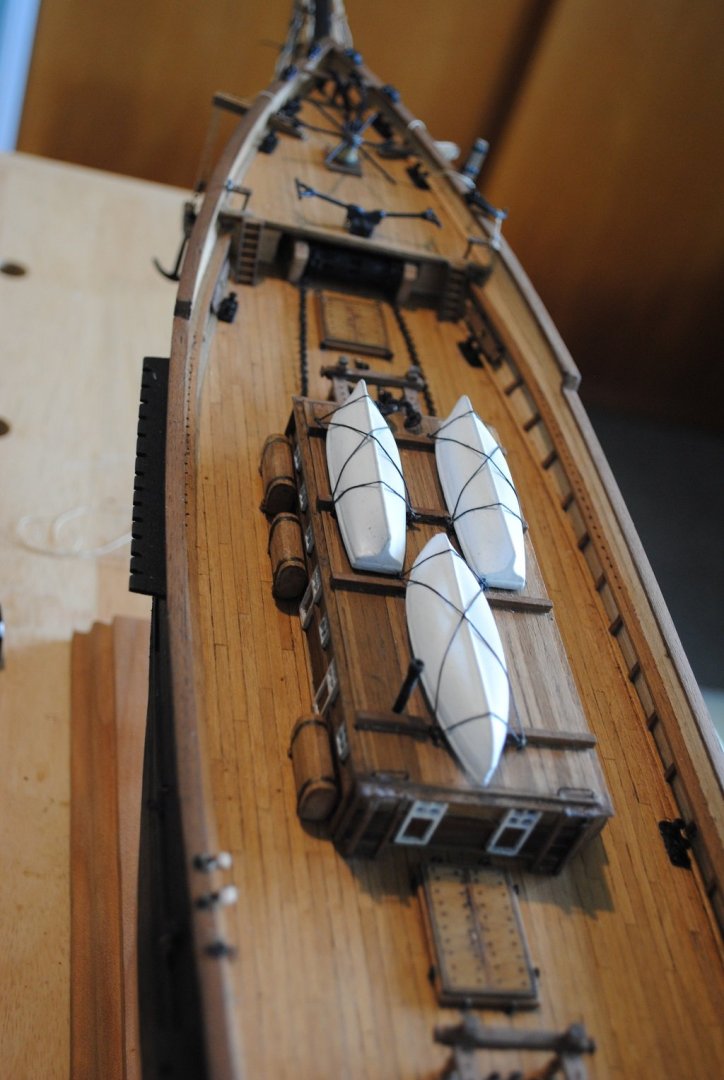
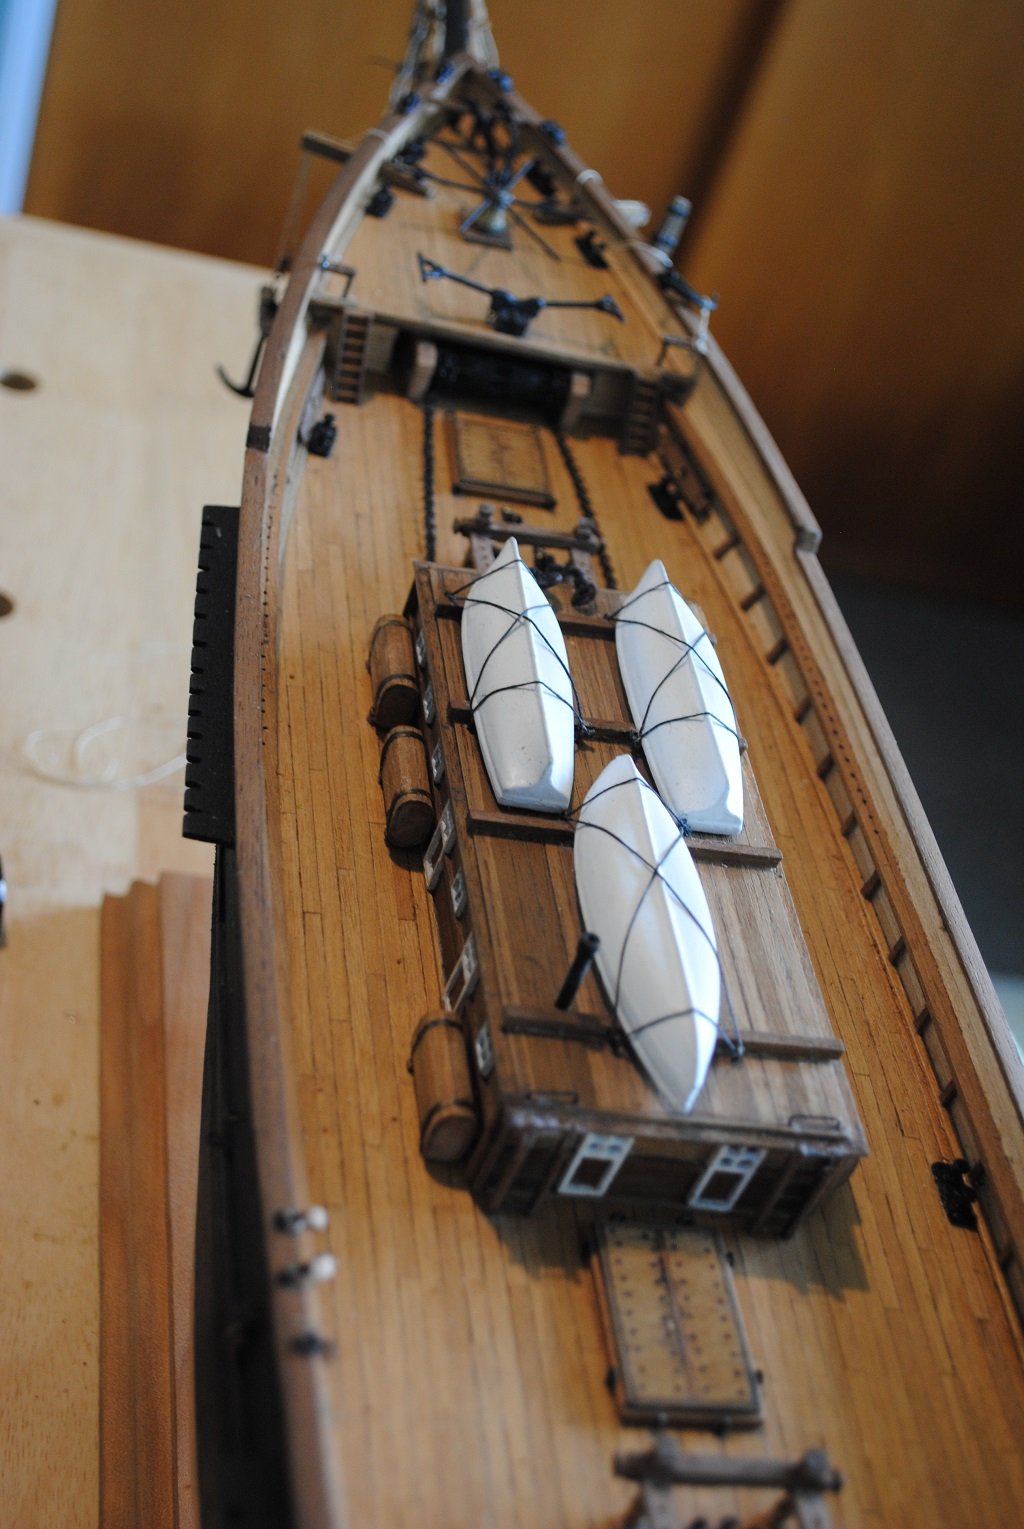
Hi All,
Time for a small update....
- Fitting of Deck Funiture progresses, only a few Deck Eye Bolts yet to place and a couple of Blocks on the Aft side of the Catheads.
- Thanks to @petervisser for his suggestion on Anchor Stowage. (I have done one up and one down.)
- I removed the Focsle Mooring Bitts in order to be a little more accurate with the Capstan placement, I also decided to install Capstan Bars for a little added interest. (Vertical Capstans are A/L as the kit supplied ones were pretty nasty.)
- I made up a couple of Gratings, one in front of the Ships Wheel and one for the Aft Companionway.
- The only things left unattached at the mo. are the Vertical Capstans and the Skylight structure/block. The Skylight continues to be a point of indecision for me as I am not happy with the way the Roof Windows look. (Photos show structure with a Brass frame around these and one without for comparison, feel free to comment. I have a couple of ideas yet to represent these Roof Windows a little better perhaps? (I might just be better to leave well alone.... 🙂))
- Shroud Chainplates and Deadeyes assembled, (No photo sorry), and I'll assemble the Backstay Chainplates soonish. The Chainplate material is a "Soft" white Metal, and I overstressed a couple of these so had to replace with ones made from Brass wire.
I think that's it for the mo. If I remember anything else, I'll update.
Apologies for a couple of "Out of focus" pictures but I think that you'll get the idea. 🙂
Cheers....HOF.
Photos:

- GrandpaPhil, Scott Crouse, Ian_Grant and 1 other
-
3
-
 1
1
-
6 hours ago, petervisser said:
Hi HOF. Just saw your latest post and see that you're rigging anchors. You might want to take a look at Prince de Neufchatel by Coyote_6 – Constructo – 1/58 scale - American privateer. I ran across his build log and he has rigged his just recently. I will be following his procedure which appears to me as being the most accurate method.
Cheers,
Peter
Thanks Peter,
I'll have a look.
Many thanks.
Cheers and Regards,
Harry.
-
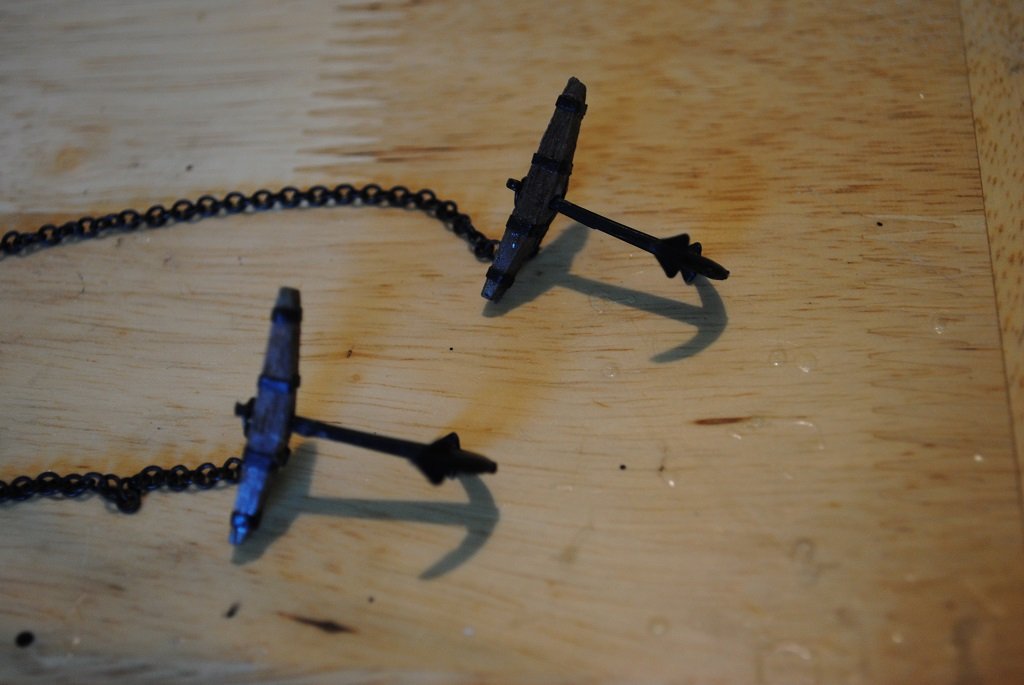
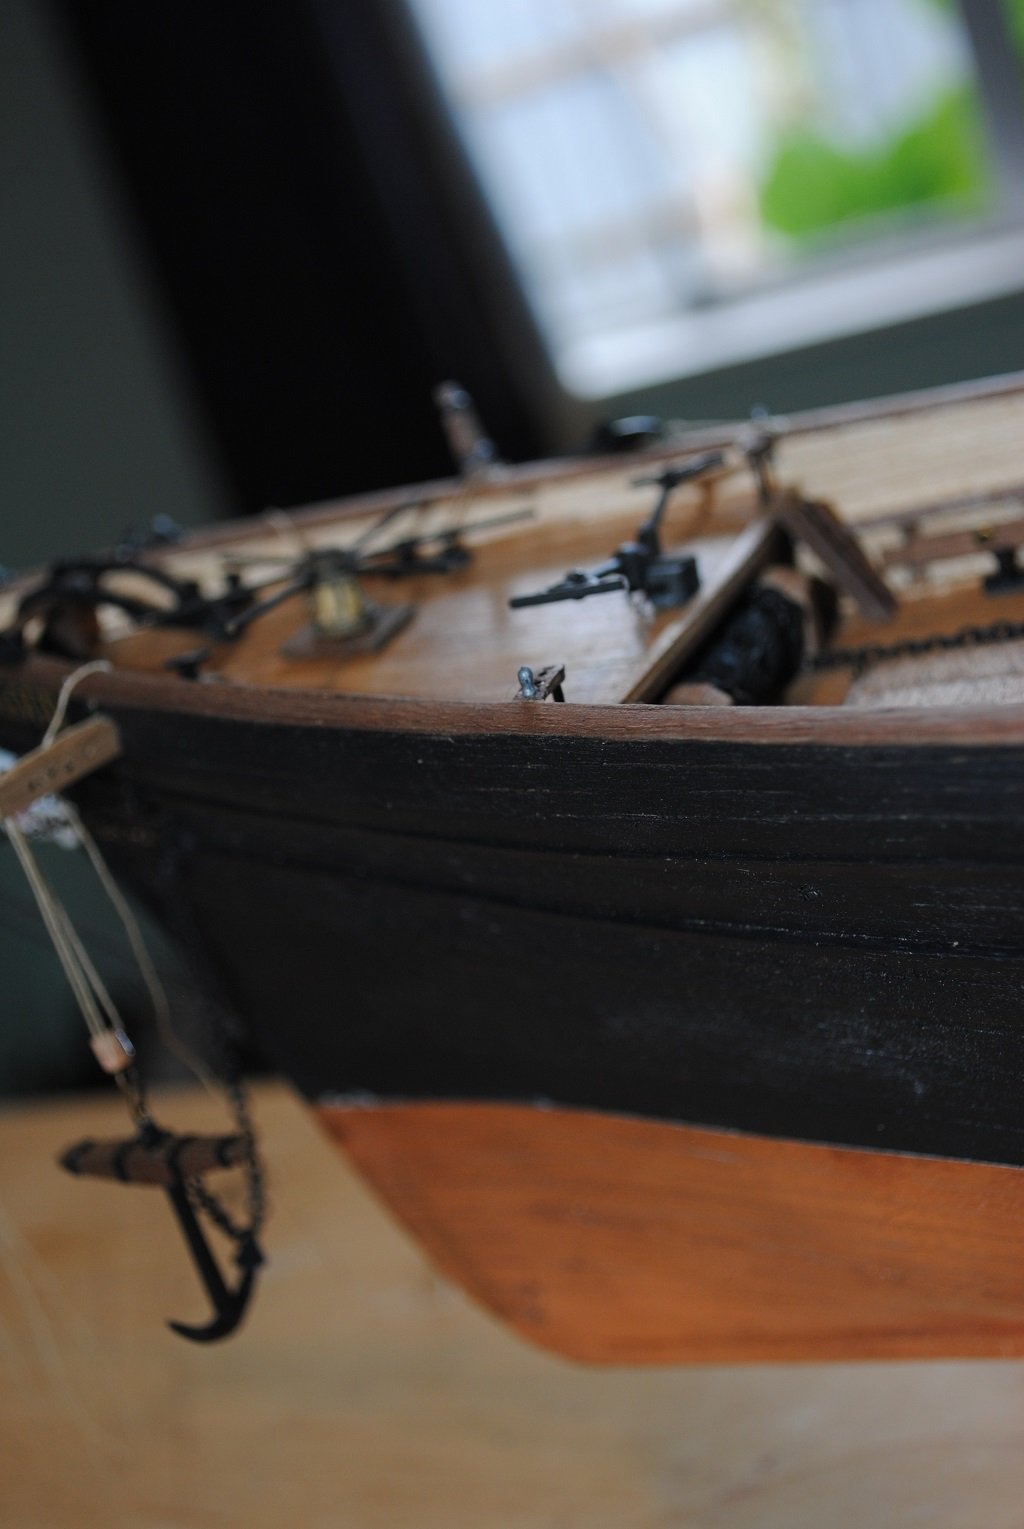
Hi All,
Small update:
Progressing with Fittings, I realized the Anchors were not correct, the kit supplied Anchors were "Admiralty" pattern, i.e.. Anchor Stock was a bar not a wooden Stock. What made things difficult, the Bar was cast as part of the Anchor.
I had a look on-line, Model Expo sold the correct size and pattern, (Corel?), but the shipping was just way too expensive.
So, making my own Stock and some careful surgery seemed the only course of action.
I was reasonably happy with the results.... (Photos)
Prior to this, the Anchor Chain/Cable/Spurling holes drilled on the Deck, Chains fitted to the Capstan and installed. (Kit supplied Hawse/Spurling fittings would not accommodate the Chain Diameter, so I found suitable replacements in my parts boxes.)
This morning, I fitted the Anchors/Chains, but I have not determined how to mount/tie them to the Hull sides.
Plenty of time.... 🙂
Cheers....HOF.
Photos:

-
49 minutes ago, neuman5022 said:
Hello guys,
My name is Isaac Neuman, almost 72 years old and I am happy to be here.
My hobby life always revolved around flying, simulated and real life, which with the years made me to build a real flight simulator (sold already) CNC machines and Laser cuttings one too.
Years ago I have purchased with a friend a small ship model from China (a 1:100 Halcon) which came with only one page of instructions and some. I was too busy with other stuff - so this project was shelved for few years. When my good friend passed away I thought it will be good idea to finish it. I let my imagination loose, and with some help from a Russian guy - I was able to finish it to my liking.
Few weeks ago I went to a toy shop to buy something for my grandkids, and low and behold I cam across a big box which said Heller HMS Victory which was about half price. I could not resist and brought it home, not knowing what will come ahead...
Anyway, I am good for a real challenge, eager to learn new thinks and skills - and hopefully utilize the vast knowledge of the members here to move me foeward to the right direction.
Thank you in advance.
 24 minutes ago, Brian Tonks said:
Isaac Hi.
I am Brian from Wellington, new on this site and still finding how to use it. I am a few years on from you but have built and sailed model boats for most of my life, currently building Caldercraft's Mary Rose. Have found reports from other members on that model extremely helpful and have got me through a few sticky points, I'm sure you will find the same with HMS Victory.
Good luck with your build.
Brian

Hi Gentlemen,
My name is Harry. (Taranaki) I have been knocking around for quite a few years on this site.
You will find very good advice and comradeship here no matter what ship you are modeling.
Nice to have some fellow New Zealanders on board!! 🙂
Cheers....HOF.
- mtaylor and Keith Black
-
2
-
Hi All,
Not much of an update but update, nonetheless.
Poop Boomkins installed.
These were a bit of a bother to install although I thought that I had mitigated any issues prior to installation.
I am pleased that they are done, I feel I can now move on with remaining Deck fixtures.
Cheers....HOF.
Photos:
- Rick310, petervisser, catopower and 1 other
-
4
-
On 4/12/2025 at 4:33 AM, petervisser said:
Great model so far HOF. As Ian mentioned in an earlier post, Underhill’s masting and rigging book may be a really good investment at this point in your project. I have been using it with my own model and it has really helped. I see it listed on Abe Books for less than $20US. With your model at the very early stages of rigging, it will make your life much easier and you can rig it with greater accuracy and confidence. All the best going forward!
Peter
Thanks Peter,
Appreciated.
Cheers and Regards,
Harry.
-
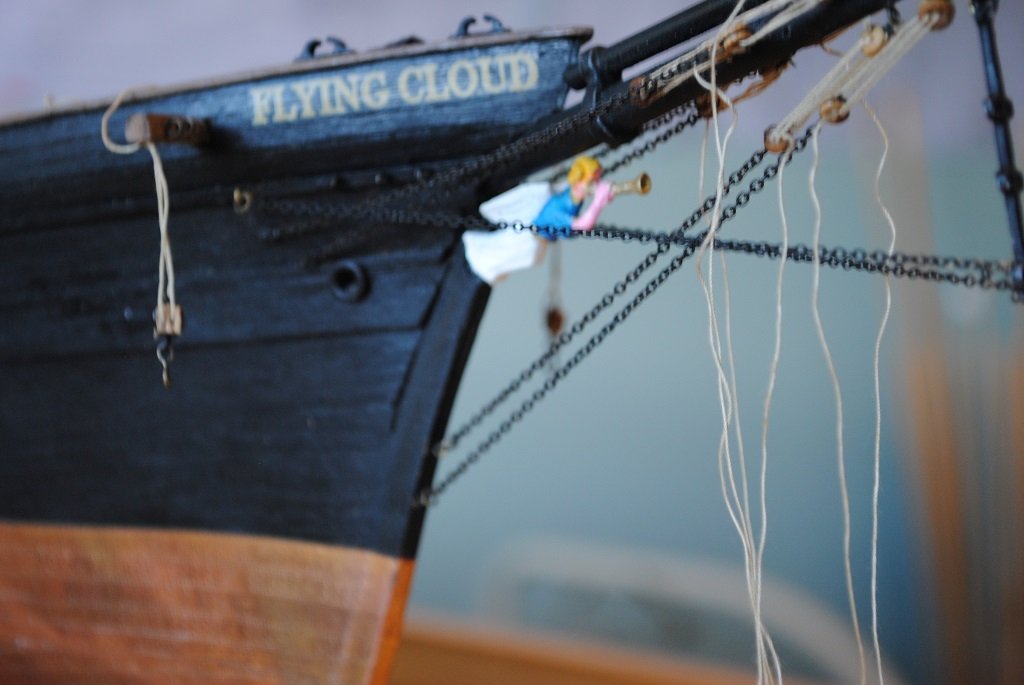
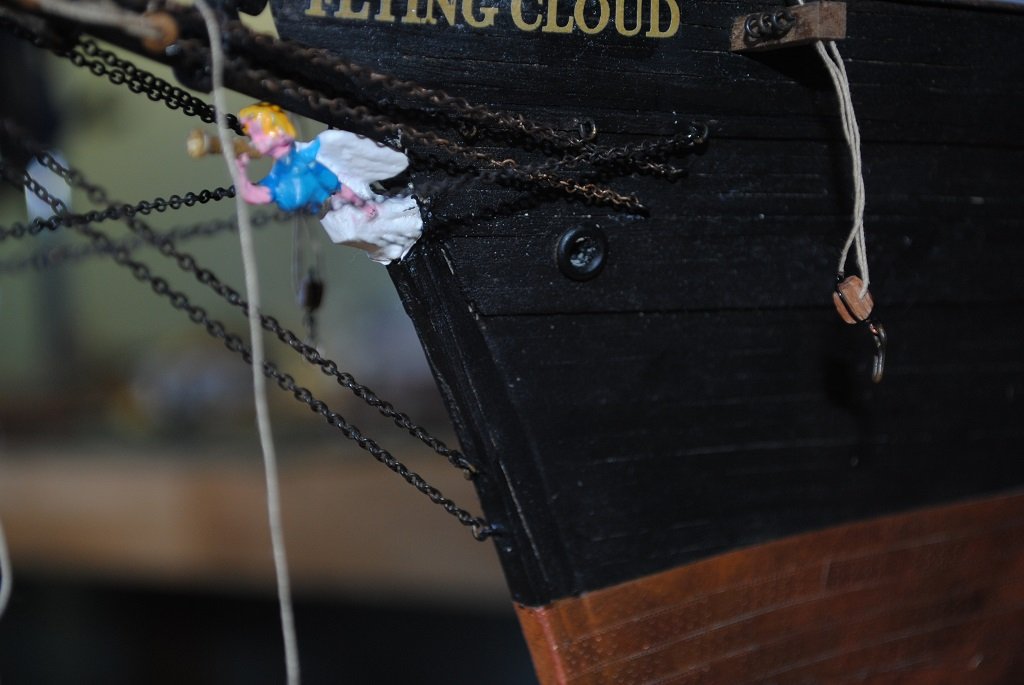
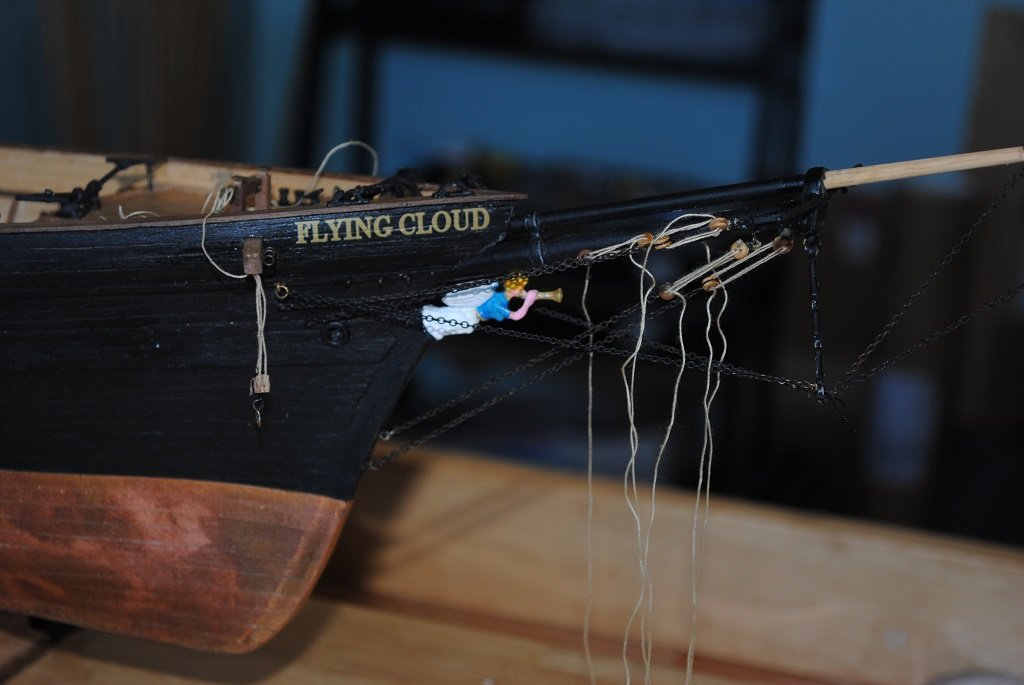
Hi All,
Small Update....
@rwiederrich Rob had stated a few posts back that my Bowsprit Shrouds were terminated too far aft on the Hull.
I needed a second opinion so reached out to Mr. Scott Bradner who advised that this was correct.
So, armed with this knowledge I decided to "Adjust" the Shrouds.
(I think I am a little happier with the result.)
I have to polish the Copper again, too many grubby finger marks....
(Thanks, Rob, I just needed the second opinion.)
Hopefully things are a little more accurate.
Cheers....HOF.
Photos:

Double Channels
in Masting, rigging and sails
Posted
Thanks Jan,
I think that sometimes I can't see the wood for the trees....
I do recall seeing this in Flying Fish instructions I downloaded years ago.
I'll have a go once I have completed the remainder of the Flying Cloud Yards.
The time spent on this task will give me more time to ponder my approach.
Cheers and Regards,
Harry.