HOLIDAY DONATION DRIVE - SUPPORT MSW - DO YOUR PART TO KEEP THIS GREAT FORUM GOING! (83 donations so far out of 49,000 members - C'mon guys!)
×


palmerit
-
Posts
1,056 -
Joined
-
Last visited
Content Type
Profiles
Forums
Gallery
Events
Everything posted by palmerit
-
When you get to rigging, check out the videos from Curtis_Wooden_Shipyard (as well as the ModelKitStuff videos). His are short and topical, usually with little talking, except upfront in the intro, but it's helpful to see how he does some of his rigging steps. I found it especially useful when doing ratlines. I bought a 90 degree pair of tweezers that I saw him using (they're from Bernina, a sewing company) and they made doing lots of rigging (especially ratlines) way easier than the ones I was using (and I have several different kinds).
-
I did exactly the same thing on mine - overeager sanding to get it just right, then it popped and was lost forever, and made a new one out of spare PE sprue. Being painted, no one but me would ever know looking at it which is original and which is a substitute. Model looks great.
-
Yeah, I could imagine that closing when stock runs out could lead to some hoarding behavior. I've been trying to order just what I need for the models I'm working on, and if now it might be 6-8 weeks before my order gets to me, that is something I can certainly be fine with. I'd love to try to make my own rope. And when I retire in a few years I may have more time to do that for myself. While the other Byrnes products seem to be coming back, I have not heard the same about their rope walk. I looked at the motorized one from the guy in Poland, but it is pretty pricey and overkill for the little I would do. Fingers crossed yours will be coming back in some form.
-
I don't know if this is a single-plank or double-plank model. You don't want to use pins if this is single-plank (or the second planking of a double-plank). Lots of people use CA, but it causes a bit of a mess for me. I sometimes use it to secure the end into a rabbet at the bow or something like that and use wood glue elsewhere. You often need to just clamp the planks (with clamps of various shapes and sizes and rubber bands) and just let it dry. This is a video of turning binder clips into plank clips. I made some like this with different size binder clips (small and very small).
-
I thought I had seen all the various tools to use. This is a new one. Just stuck them in my amazon cart. Yeah, nothing worse than a piece of PE flying across the room never to be seen again. Some pieces can be hand-made from scrap PE. If I had lost one of the tiny little roman numerals that go on the bow I don't know what I would have done to replace it.
-
This is a good video on prepping and painting PE parts:
-
Medium CA is definitely too thick for thin surface parts like this. This glue will likely seep out from the sides. And might glue faster than you have time to position. You definitely want a descent set of tweezers and practice a bit without any glue. It’s especially going to seep because the rudder pieces are filled with holes. Thicker CA can work for planking because when you push down it’s less likely the glue will seep all the way to the outside of the planking because the planks are thick by comparison to the PE parts. Maybe try painting some scrap PE pieces to see what works. You could also try gluing the painted scrap PE to a piece of scrap wood. Always better to experiment before trying on the model.
-
Are you painting these PE parts of keeping them brass (or using brass black)? I ask because I first tried to use Vallejo airbrush primer and Vallejo airbrush paint and the paint just peeled off. I found that using a Tamiya surface primer worked fairly well - certainly better than the Vallejo airbrush primer. I just use the Tamiya in a shake can. I struggled using CA with the PE parts. I tried using a thick-ish CA, which was a mistake. A thin CA might work better, but it's a struggle to get these tiny positions in place before the CA glue dries. Another possibility is to use a Tamiya Flat Clear paint. The paint is clear and it acts like a glue.
-
I clearly figured it out but I honestly don't remember what I did. I'd just do what you've shown and try to make sure each place has a home that fits and looks like the photos. I probably just tried to lay them out in a way that looked like the photo in the instructions.
-
I bet Advanced as well at least. The 'Novice' kits are still quite challenging - not just from Vanguard - if you've never built a wooden ship. My first build was the Sherbourne. When I was first thinking about getting a wooden ship model, I was using my knowledge of Lego models (lots of experience with my boys getting Lego models for years - even now into their 20s) and plastic models (which I had built a bunch as a kid). With a Lego kit, nearly any adult would be able to build the most difficult 18+ model, maybe with a few do-overs with the most challenging Technics model. With a plastic kit, most adult would be able to put together a mid-level plastic kit. The lowest level plastic kits are for 8 year olds. With wooden model ships, novice still means a lot of learning and weeks or months of working on the build. I took a year to build the Vanguard Sherbourne - but that was because in parallel I built the three novice models from the Model Shipways Shipwright series. Check out the Modelkit Stuff build of the Sherbourne. I bought the Duchess (Experienced) as my second model, but then I decided to instead first build three of the Vanguard fishing boats (two are Novice, one is Amateur). I'll probably do the Grecian next - I just really like its look. Then I'll do the Duchess.
-
Check out this build log by @Glenn-UK, post #19, for some nice recent examples wrt planking:
-
The Vanguard Zulu 'Lady Isabella' - what I'm building now - has minimal rigging. Probably not much more than the boat you built. On Vanguard's web site you can download the manual to see how it's built. You can also download most manuals on Model Expo (Model Shipways and Midwest). Some other model manufacturers also make their manuals available online. They'll often also come with plans that won't be available online. I also built the Model Shipways Shipwright Series. I actually started building them mid-way into building my Vanguard Sherbourne. I wanted to get some experience with simpler models before getting to the rigging on the Sherbourne. The Dory has no rigging, the Pram just a tiny bit, the Smack probably as much as the Vanguard Zulu 'Lady Isabella'. They're a nice experience. They are quite a bit different from building plank-on-bulk types of models.
-
I always recommend Vanguard Models: https://vanguardmodels.co.uk/ They have a wide range of kits. With just one build under your belt, I'd still recommend the Novice kits (or the Amateur if you're up for a challenge). I've done the Sherbourne (an armed cutter) and Ranger (a fishing boat) and am currently building the Zulu 'Lady Isabella'. The materials are fantastic. The engineering is so much better than the other models I've built (from Model Shipways and Midwest, now from the same company), and the instructions are wonderful. With the Model Shipways and Midwest models, a lot of the time is spent trying to understand the instruction, get past mistakes in the instructions or materials, figuring out how to make something work that seemingly defies the laws of physics. With Vanguard you can focus on just building the model to the next level of your abilities. There are other model kit manufacturers that others might recommend that I have not built. I'd like to try a Bluejacket model sometime since they're highly recommended. I have an Occre in my stash but I'm gathering from other builds that their instructions are not the best. There are kits like Billings Boats that I don't think really give much of any instructions for many of their models. The Vanguard and Bluejacket owners both contribute to this site a lot - they sometimes jump in to answer questions or give a thumbs up when someone is building one of their kits. Chuck Passaro designed some of the kits for Model Shipways (I have his Syren in my stash) but now has his own company (Syren Ship Model Company) and contributes here a ton. I don't even know if there is a model builder working for Model Shipways / Expo / Midwest and I don't know if they've actually put out a newly-designed kit of their own in years - right now they're reissuing Midwest models that they bought out, and not really changing much about them, retaining instructions written decades ago that don't always match the materials they supply; I've read that they might be doing some updates of some of their own model kits.
-
I absolutely love the scrap pile. Now I don't feel bad about how much scrap I produce when I plank. One thing I really appreciated watching the Olha Batchvarov live videos is how long she takes to do the (seemingly) simplest thing to get it right, and she's been building these professionally for years. With my first model, I thought planking the hull was surely something I should be able to get done in a weekend. Now I know better.
-
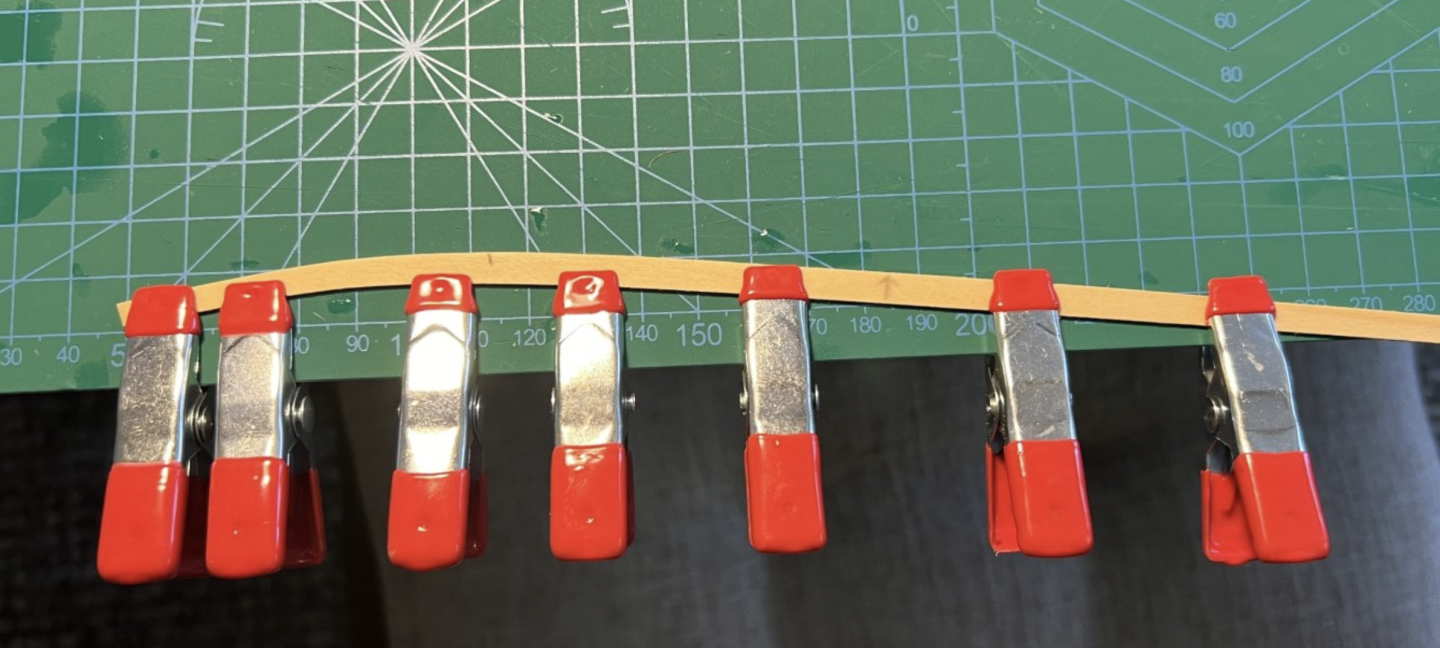
I read those articles when I started, and they are very well written, and I read a number of others, and bought some books, and now they make complete sense to me. But when getting started, I was confused and lost. I learned by trying different things, seeing how they didn't work, and learning from the few times they did work, then going back and rereading some of those articles, and not being afraid to make a mistake. Rinse and repeat. If it looks like garbage - and my first try certainly did - you can use filler and sand and paint. Oh, and the NRG Half Hull helped me understand the geometry. I'm really impressed when I see new builders who are able to get a nice looking planking on the first try. For me, it was a challenge translating the written descriptions and static photos into what needed to be done manually and how the planks needed to be shaped in three dimensions, and figuring out how to do that. Then also trying to figure out how to hold everything in place, especially on the second planking where I couldn't just pin the planks in place. Not being some who has done much with my hands - my day job is as a university professor - it took some more effort for me to figure out how to solve the visual-manual problem. That challenge is one thing I like about this hobby. There's always a new challenge. So @Pitts2112, you're not alone if you read the articles and build logs and still feel like planking is a mystery and it hasn't turned out. Maybe try to cut out some strips from something like a manilla folder so that you just need to bend it around the hull into place. That's essentially what the NRG Half Hull has you do. If you cut out the piece right, it'll lay flat against the frame and not leave a gap. And if the piece is the thickness of a plank, including a taper as needed, you'll essentially have a template for what you're trying to shape with bending and beveling. Some people do that template approach for lots of their planks to get it just right. If the geometry is clear, then it's probably a matter of trying various ways of doing edge bending - water, heat, clamps, forms - maybe a bit of beveling, and lots of patience. Treat each individual plank as a separate project. Good luck.
-
Planking is probably the hardest part of model ship building. Take a look at my Sherbourne build log - my first kit started, my first planking - and you'll see how terrible a planking can be. But with a lot of filler and sanding - and filler and sanding - and a second planking doing the same - and painting - you can end up with something that looks descent. Each model I build, the planking gets a little better. Maybe some day it'll be good enough to leave the wood bare. I'm sure it'll take me a dozen more models to get there. From what I understand, it's the heat, not the water, that makes the planks bend. Having them wet allows more efficient heat transfer. I haven't tried an iron - I know some some use that - I've used one of these plank benders: https://www.amazon.com/Electric-Plank-Bender-Model-Shipways/dp/B01F0IEUTI/ref=sr_1_1 I just get the outside of the planks a bit wet before using the bender. Note that this plank bender is just a cheap soldering iron with a round head - and it's not really well engineered - but it works. Though nearly every time I use it, I get burned someplace out of carelessness. As you probably say, there are two directions of bending. One is to bend to the natural curve of the hull, such as bending in from the side to the bow. The Amati plank bender comes with a form to help shape those bends. The other - more challenging - are the edge bends. Those are counter intuitive - at least they were to me - but once you get a few shaped right you begin to get a sense of what the planks should look like. The NRG Half Hull planking project also helped get the 3D shape in my mind - even though that kit doesn't use planks. I've pasted how I first tried edge bending with clamps (from my Sherbourne build). I've seen folks who have made jigs and forms to help make it happen. In this example, I'm just clamping. There really should be a piece of wood between the clamp and the plank, and there could be pieces of wood to help with the shaping. Note that I don't just hold the plank like this in shape. I use the plank bender between the clamps, and move the planks around, as I heat the wood. These clamps aren't the best since they have plastic covers and if you touch them with the plank bender they'll melt. If you don't do the edge bending (and taper) you'll likely end up with having the planks lifted off the bulkheads. After doing the edge bending, you can bend (with the plank bender) in the other direction (the bend say from the side of the hull to the bow. A few times I've gotten a plank just right and it fits to the hull like you were adding a shaped piece to a plastic model. Folks that are really good at planking will say that you don't even need clamps if you're doing it right because the pieces just fit into place. And if you do some beveling on the side of the plank, you can get an even tighter fit. I've seen some streams of model kit builds and even experts spend a long time on each plank. I thought I was doing something wrong because I could just take a plank and add it. I could easily spend a half an hour on each plank and still not get it perfect. Hope this helps a little bit.
-
I use PVA for most things, but sometimes reach for CA (thin and thick). Buy blades by the 100 and replace them often - very often. It makes a big difference. I eventually “graduated” to using non-medical grade scalpel blades. Get a range of sandpaper. I cut some into small square. Sometimes glue pieces to blocks with rubber cement. I use 80-120 when I need to remove a bunch quickly, but carefully. 180-220 as a medium to turn to next. Then 320-400 for fine sanding. You don’t need anything finer unless you’re sanding coats of paint. I like using the thick emery boards used by manicurists. They have come with a different grit on each side. I have probably five different sizes and shapes of clamps. You can also turn binder clips into clamps to hold planks (google it). Rubber bands of various sizes are useful. Keep all the old wood from kits. I often cut them into pieces to use when clamping pieces down. You can never have too many clamps. I find it interesting seeing the creative ways people clamps things into place. A power drill - which most people already have - is useful as a makeshift lathe to shape and sand masts. I wrap paper around the end secure in the chuck to keep the end safe. Small paint brushes are useful not just to paint but to apply PVA glue. Sometime I use tooth picks to apply PVA. I use toothpicks or metal pins to apply CA glue. I never glue anything from a bottle. Just start a build log. It helps people who build a model later and folks might follow if it’s a model they’ve built and could pop in to comment or answer a question. I do build logs for me, trying to talk about challenges I had, giving caution if a model has an issue or a hiccup. Some build logs are very tutorial. Others like mine are verbose here and there but sometimes just a few photos since with some steps there is not much to talk about.
-
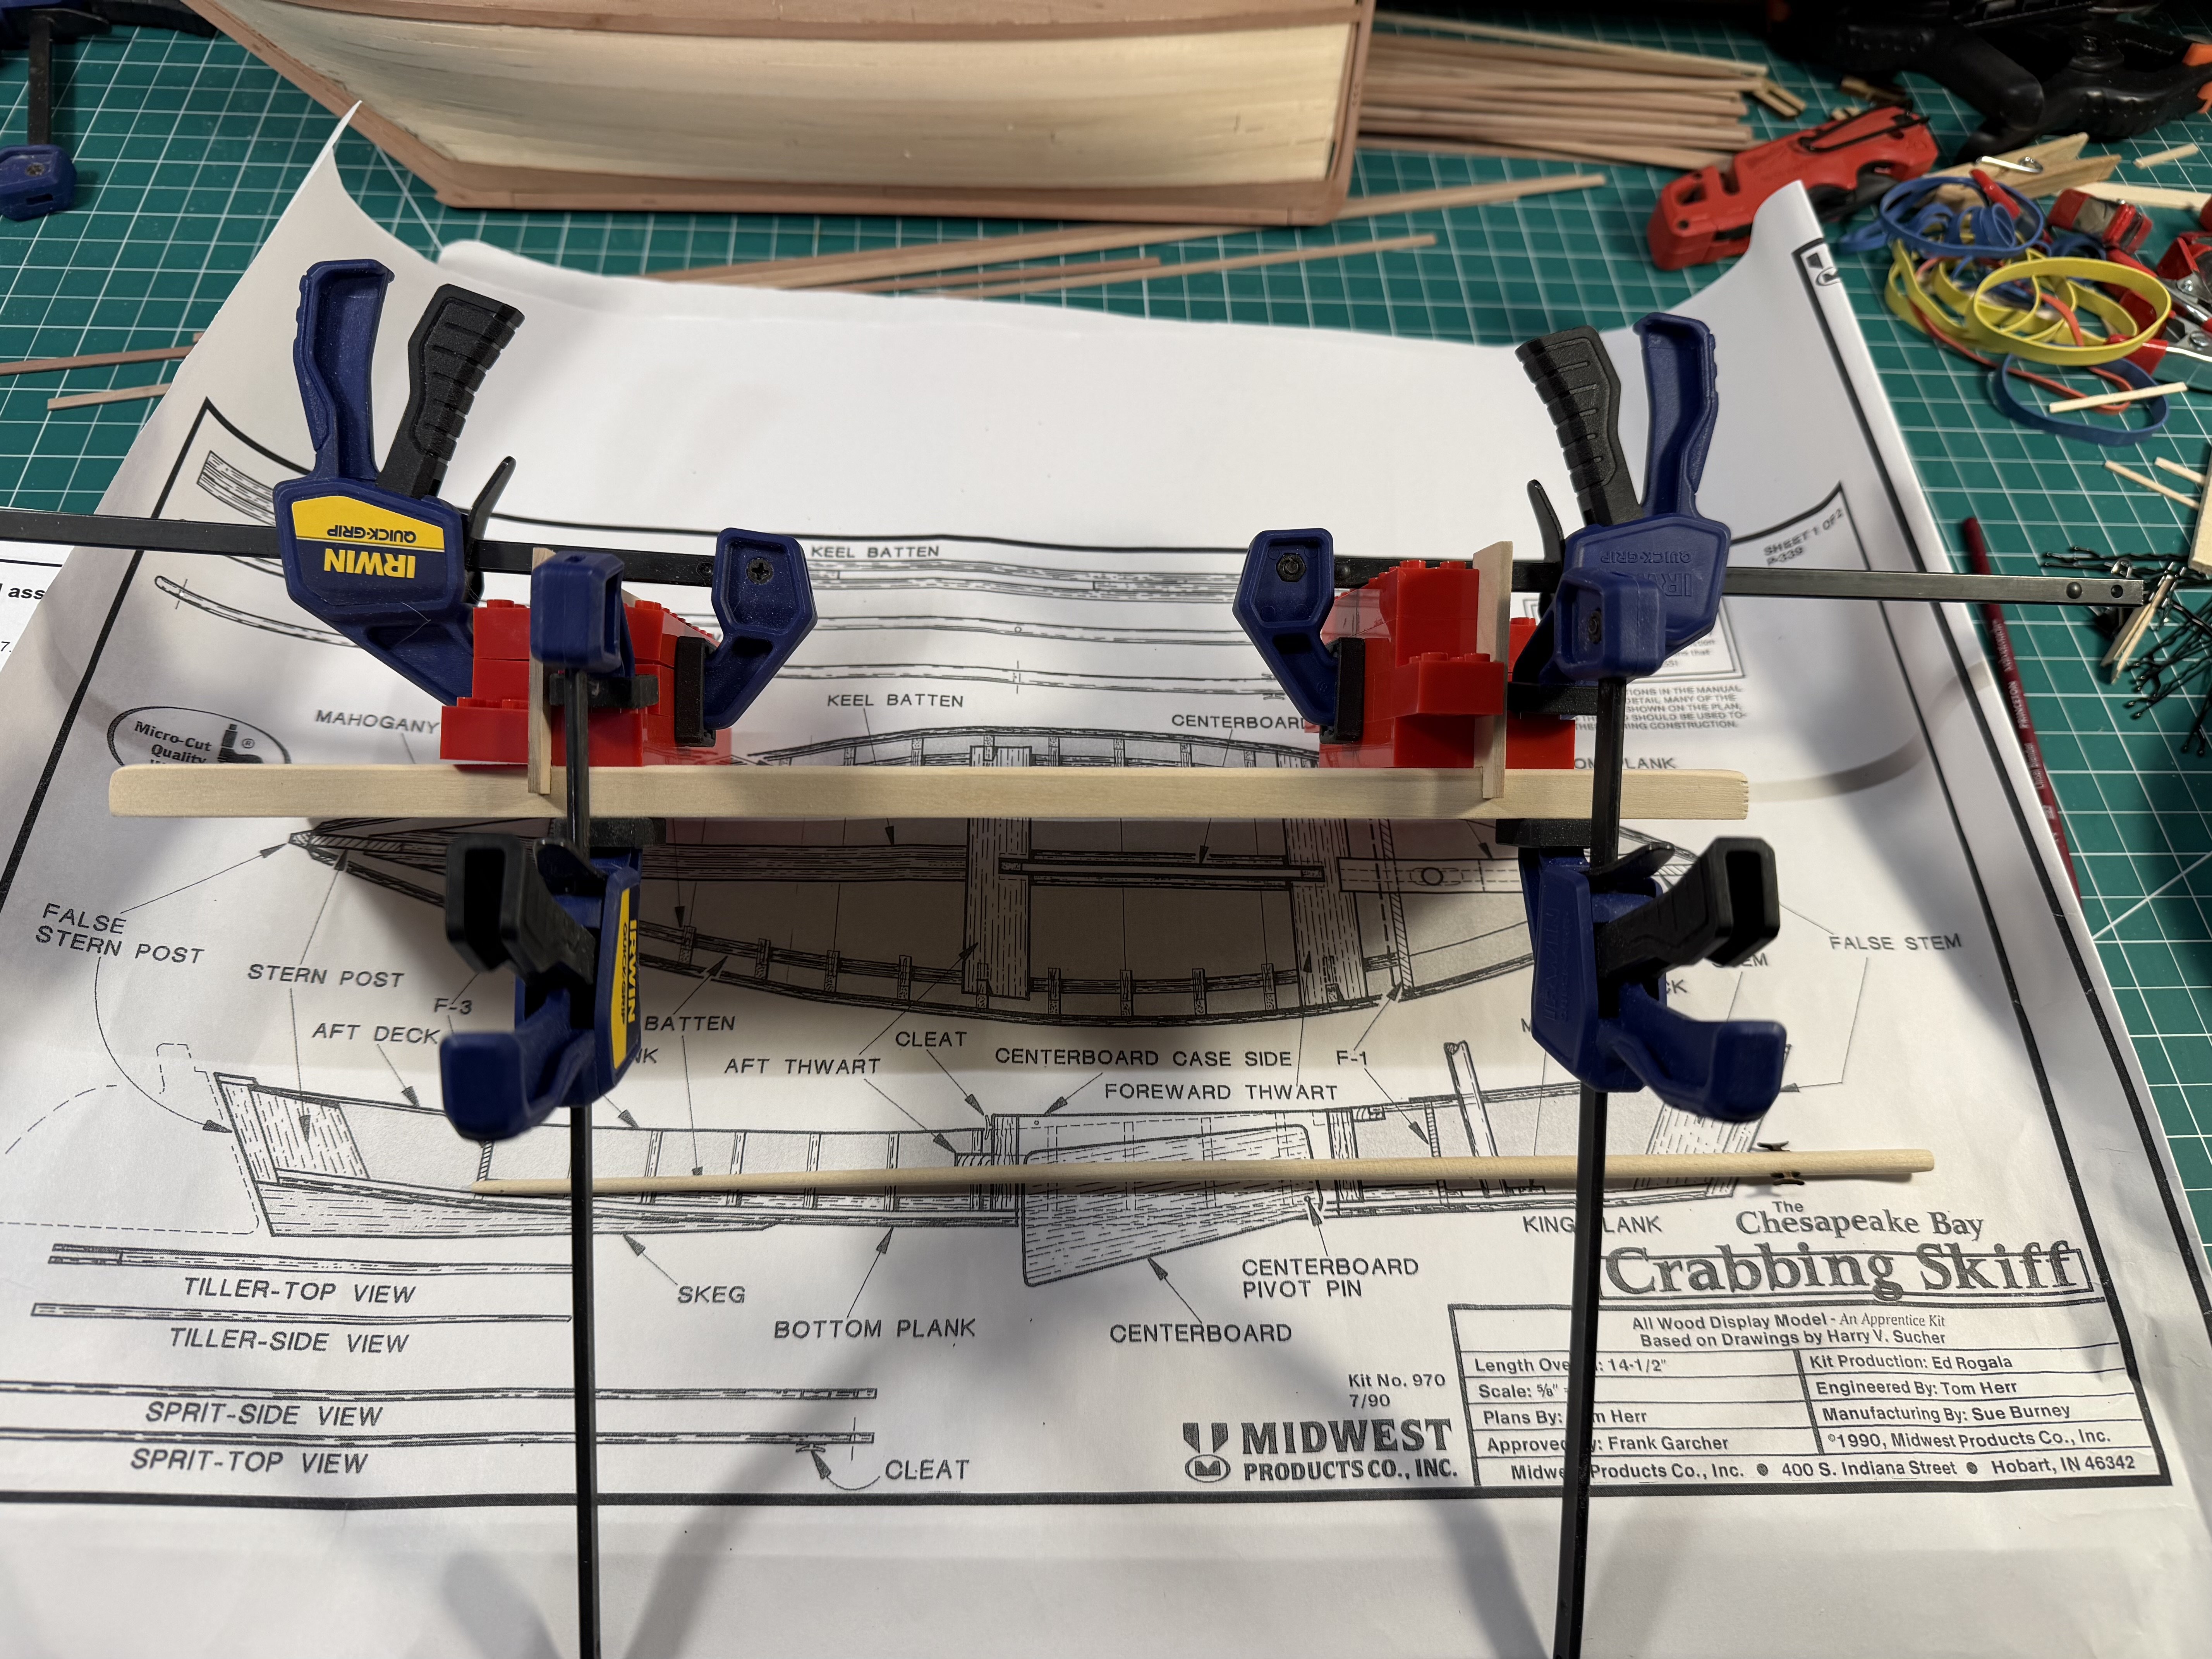
Squaring up the display stand and I shaped and added holes and cleats to the mast.

- 33 replies
-
- 2
-

-
- crabbing skiff
- Chesapeake Bay crabbing skiff
- (and 1 more)
-
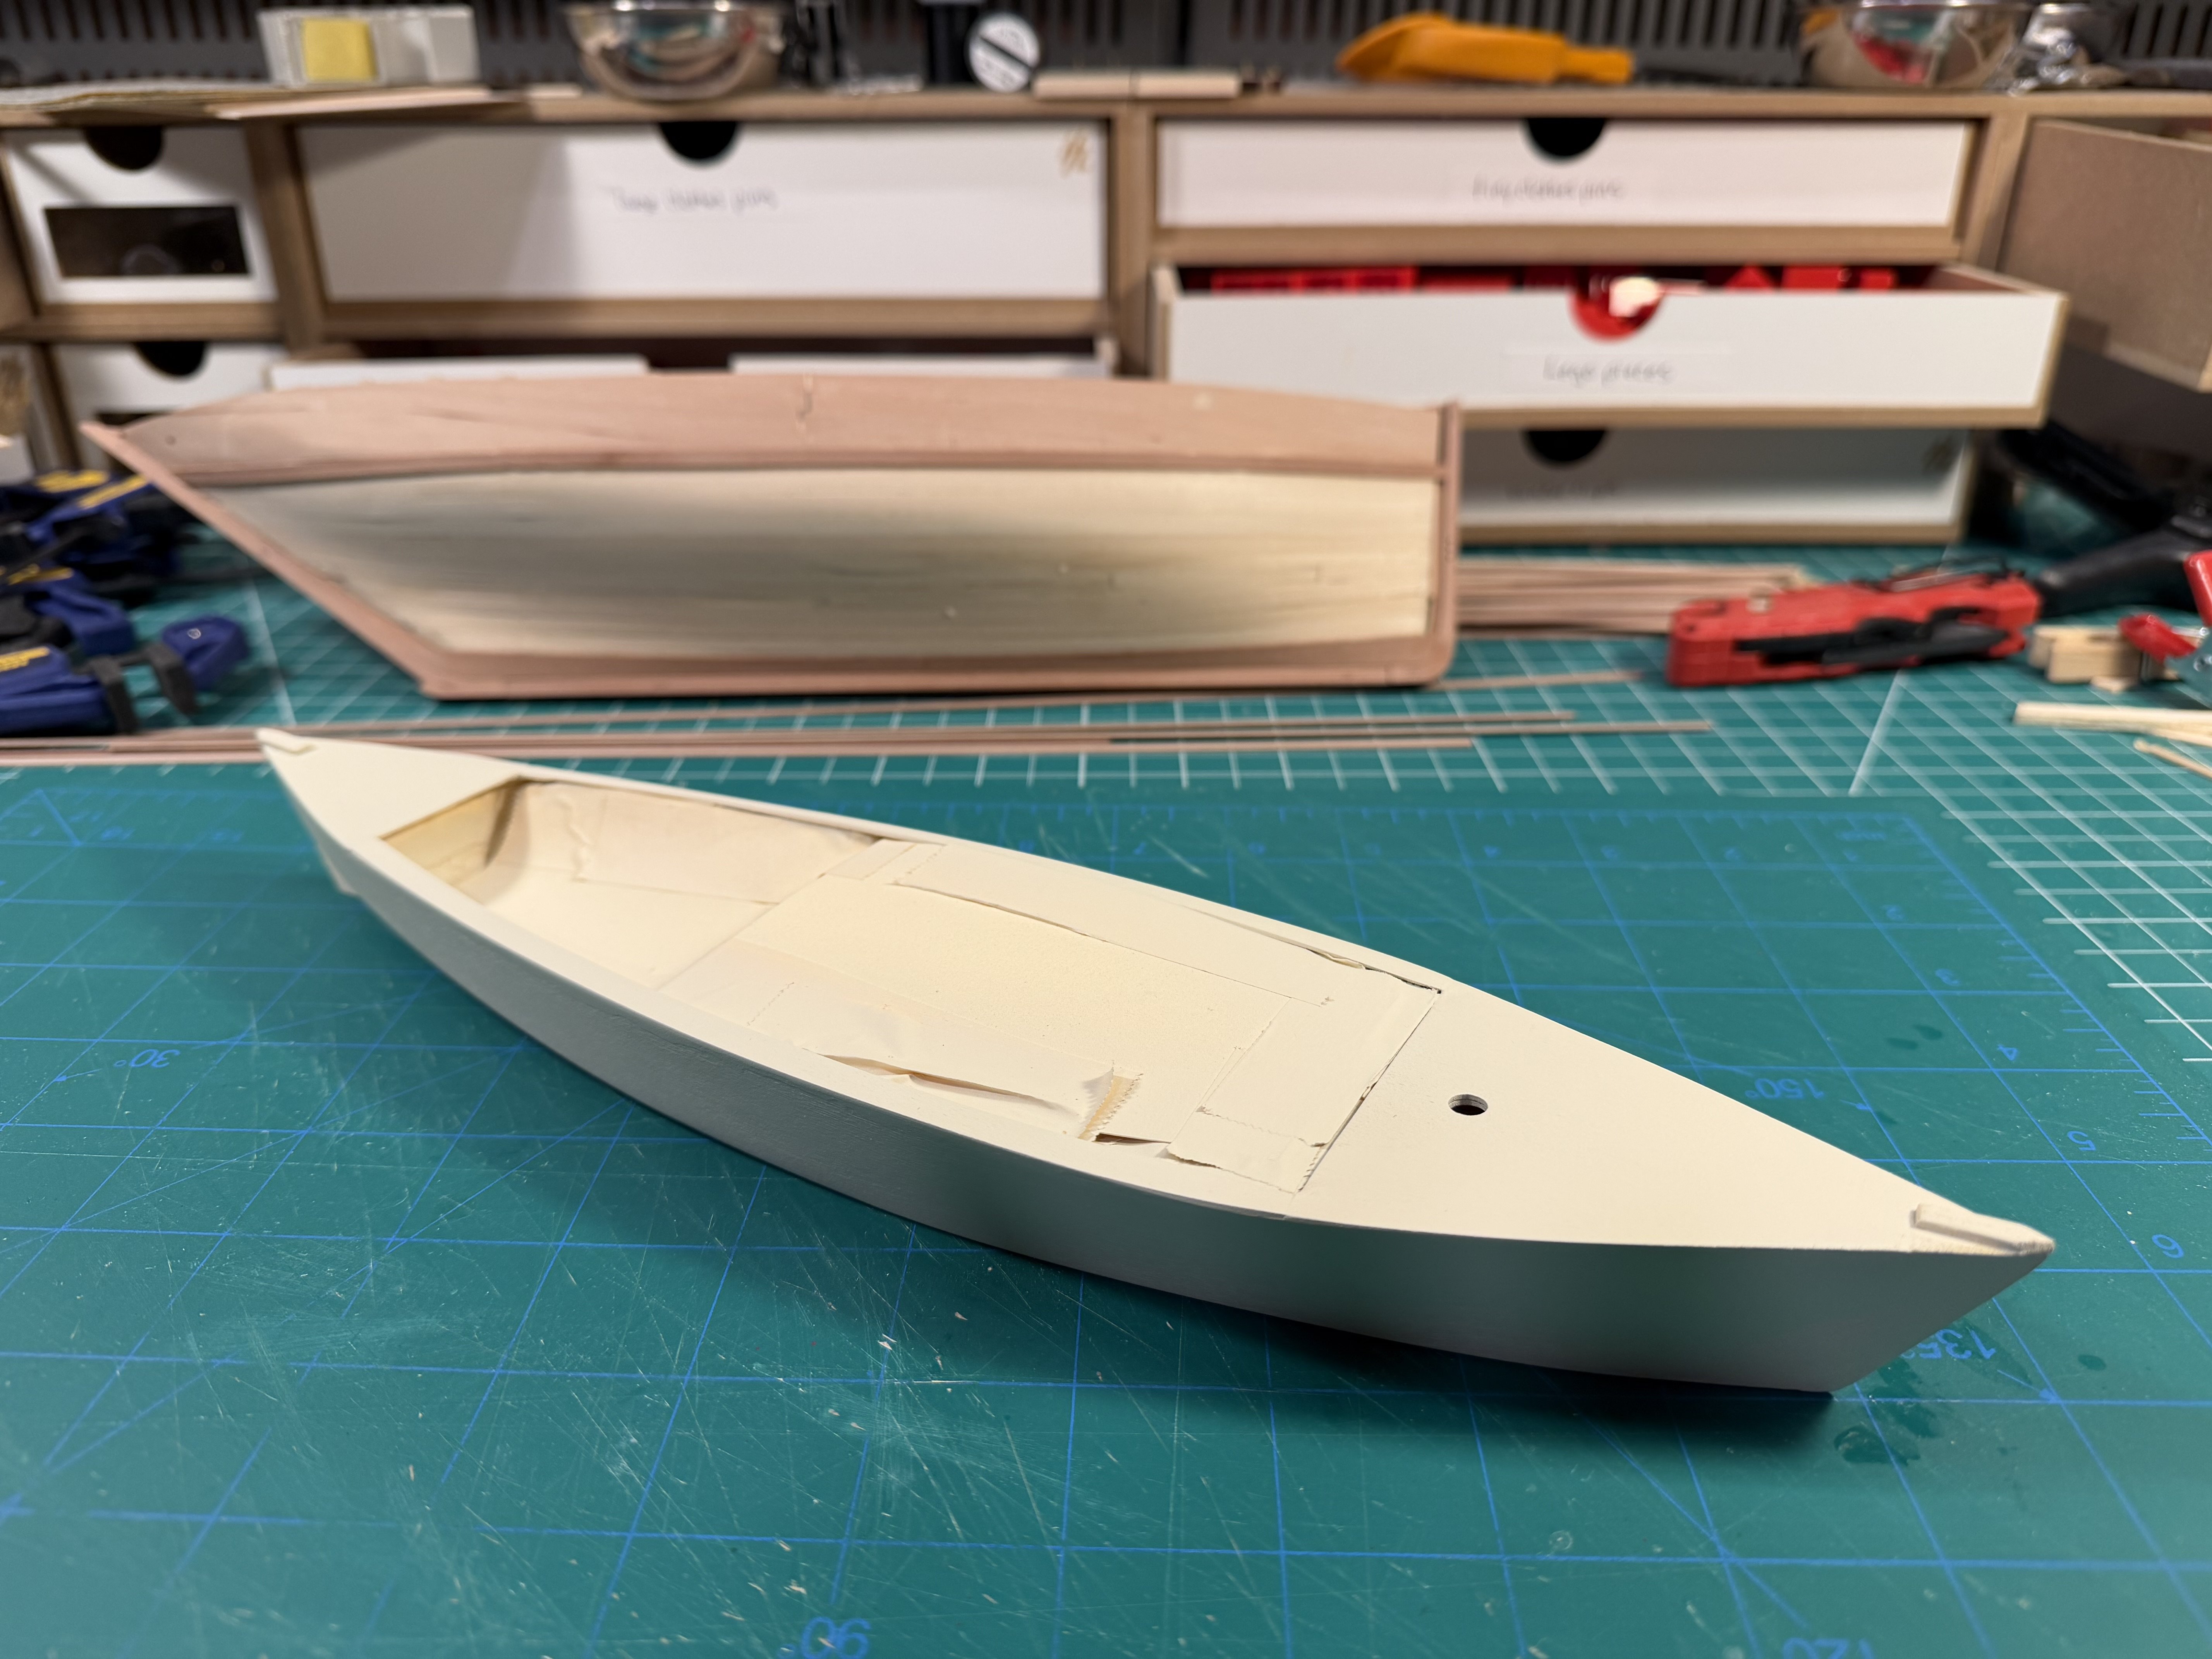
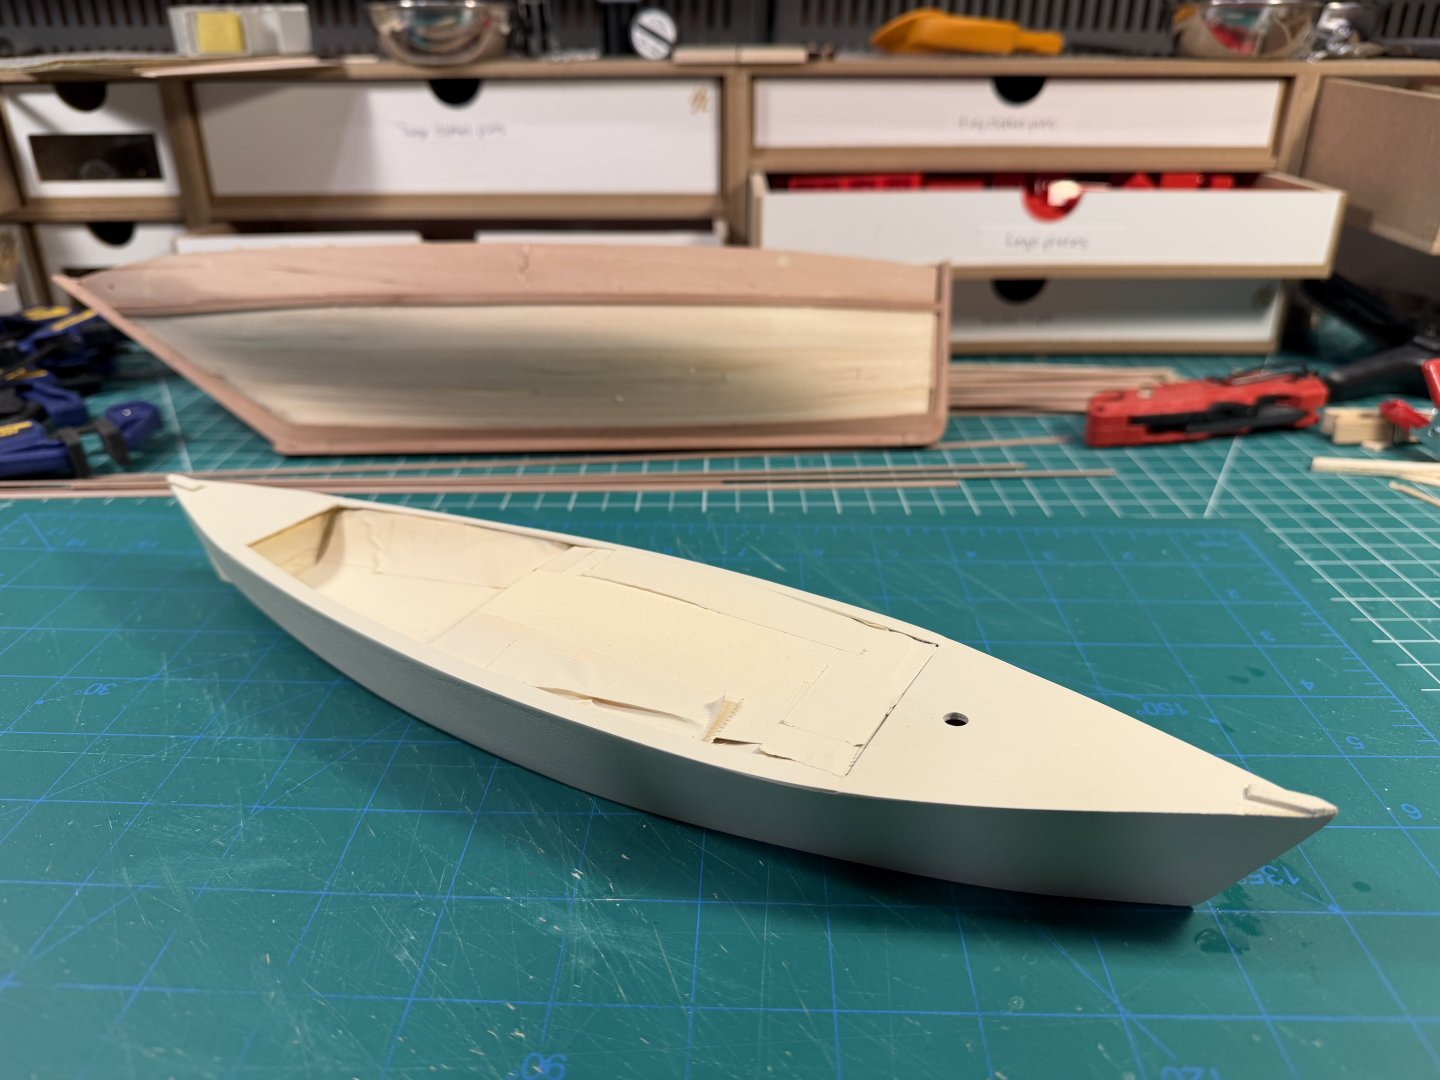
Been painting this one (while also painting my Scow Schooner). I’m doing the deck and upper sides a simple Off-White (Vallejo Air 71.270). Probably doing the bottom and bottom half of the sides a red shade, which I have not yet chosen. I might do a custom blend for that. The inside is largely done - with a few coats of Zinsser Amber Shellac - but it’s masked off.
- 33 replies
-
- 3
-
-
- crabbing skiff
- Chesapeake Bay crabbing skiff
- (and 1 more)
-
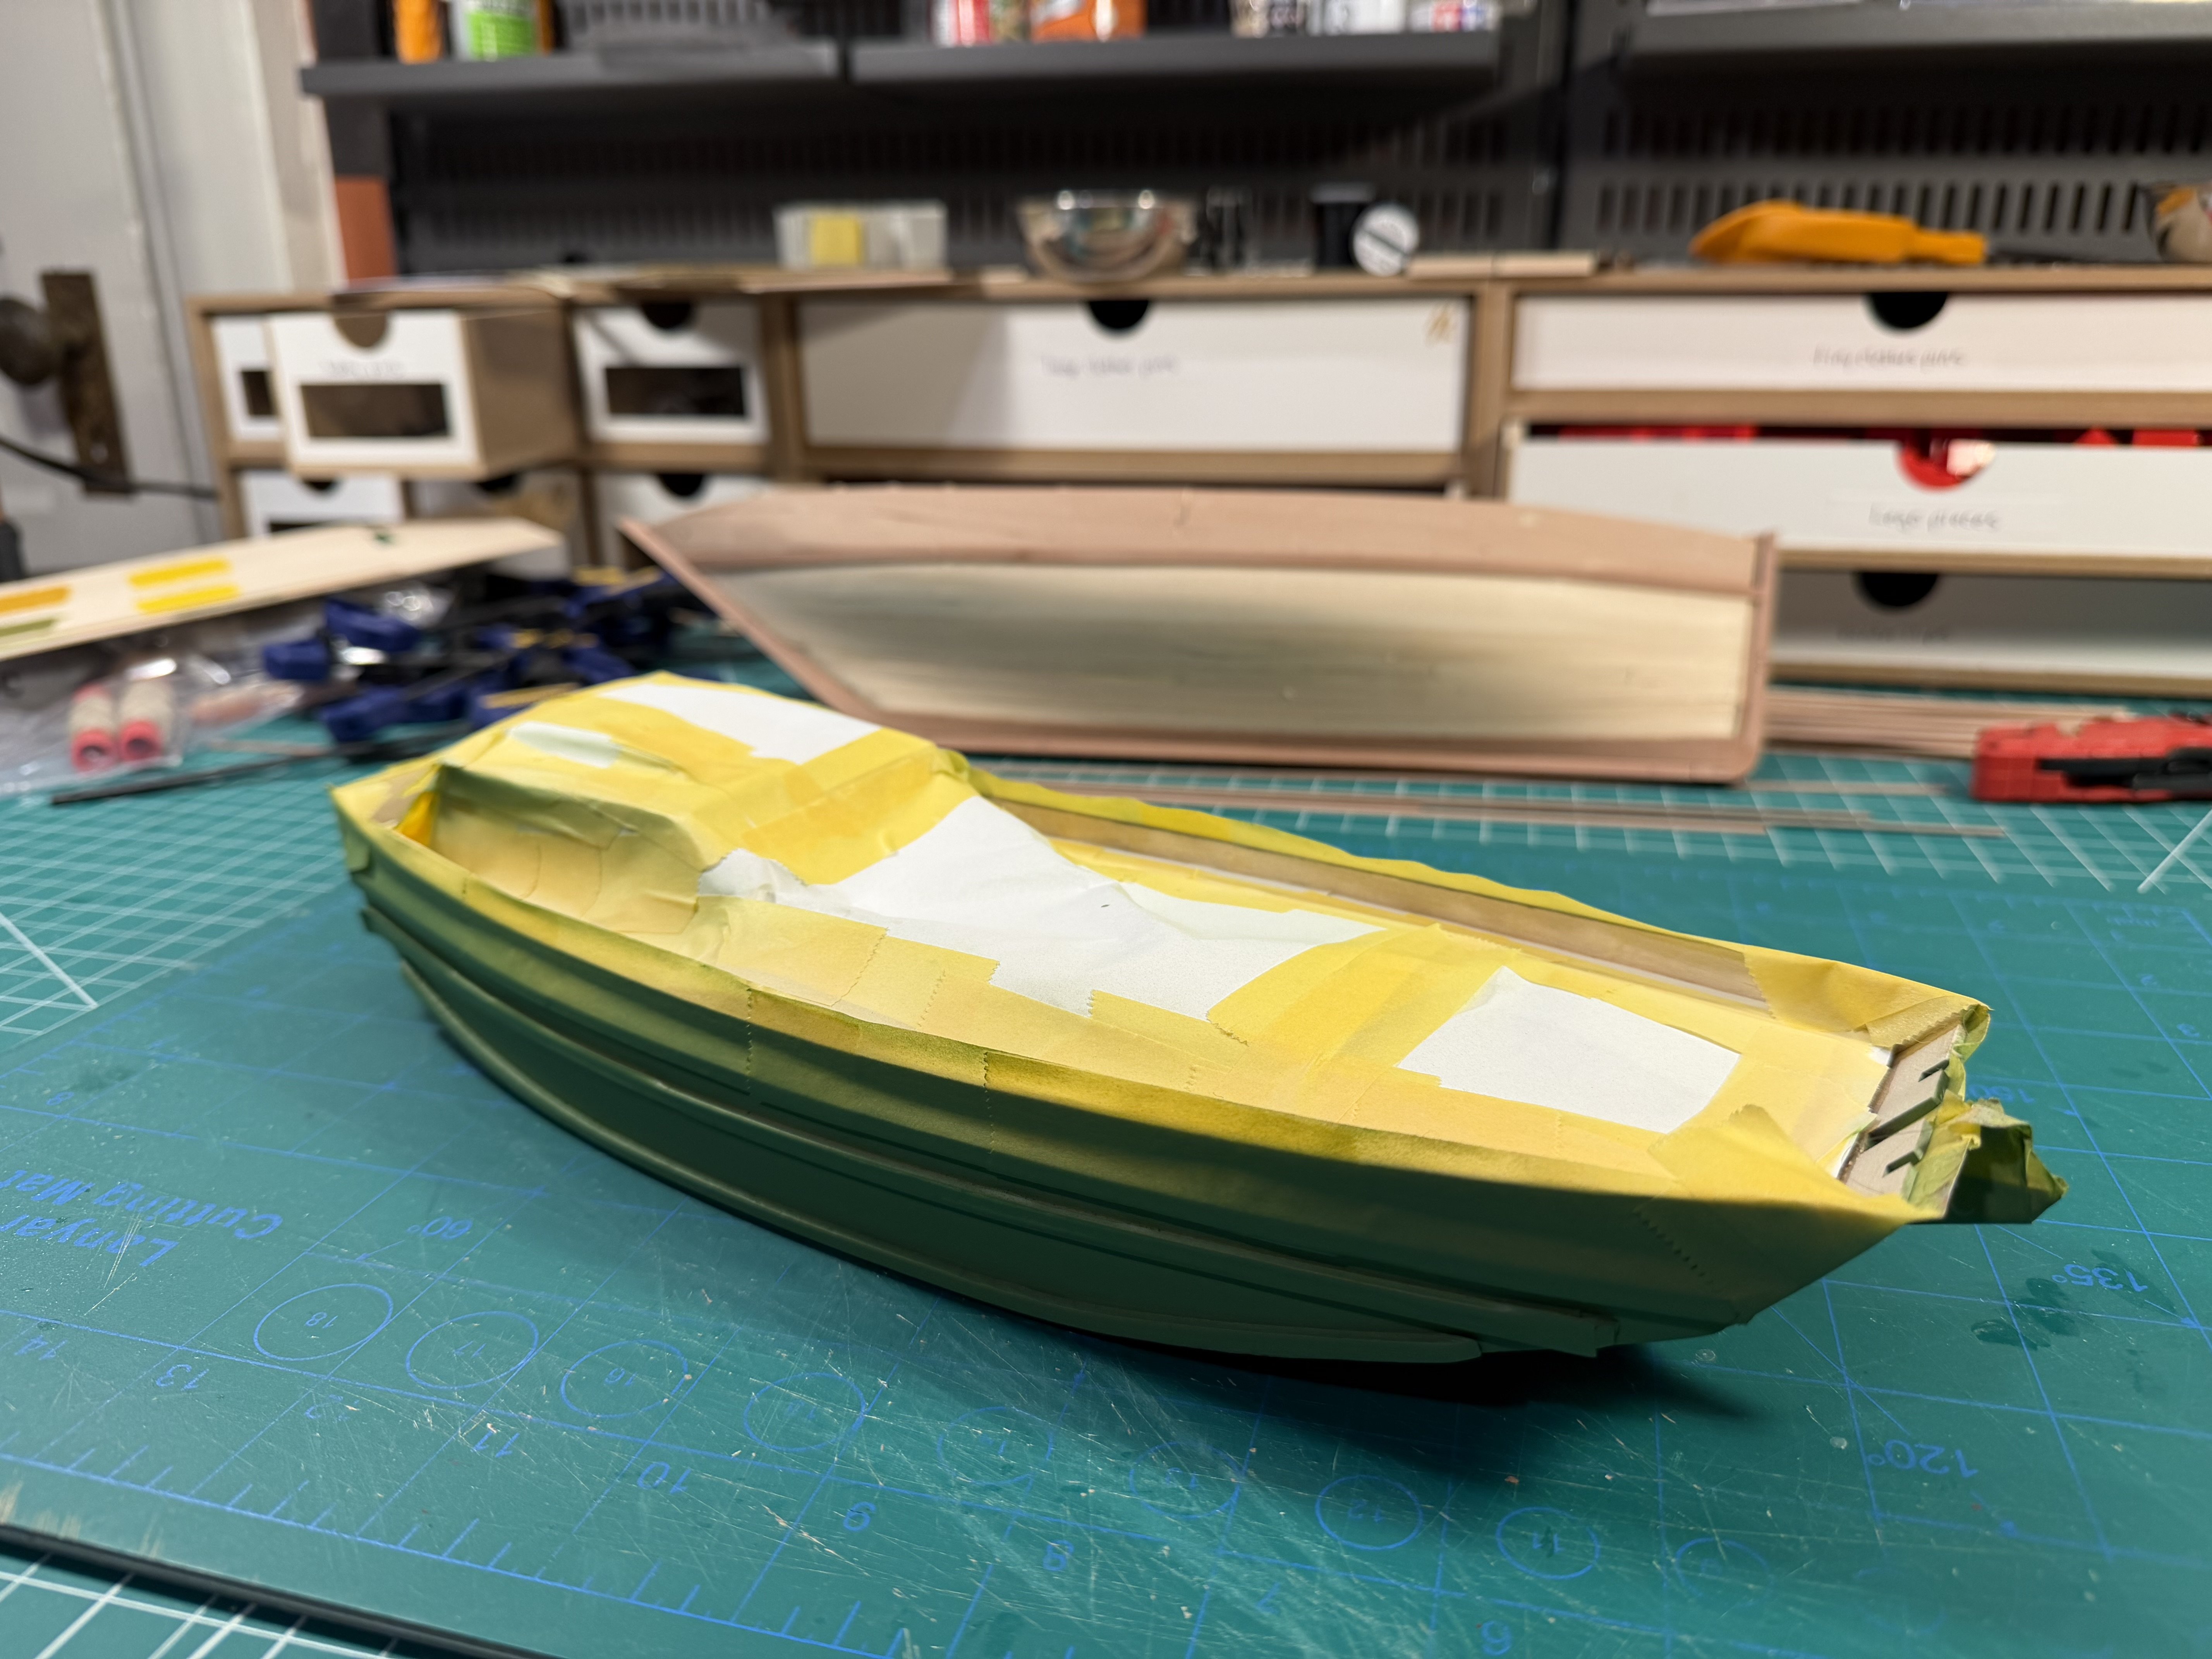
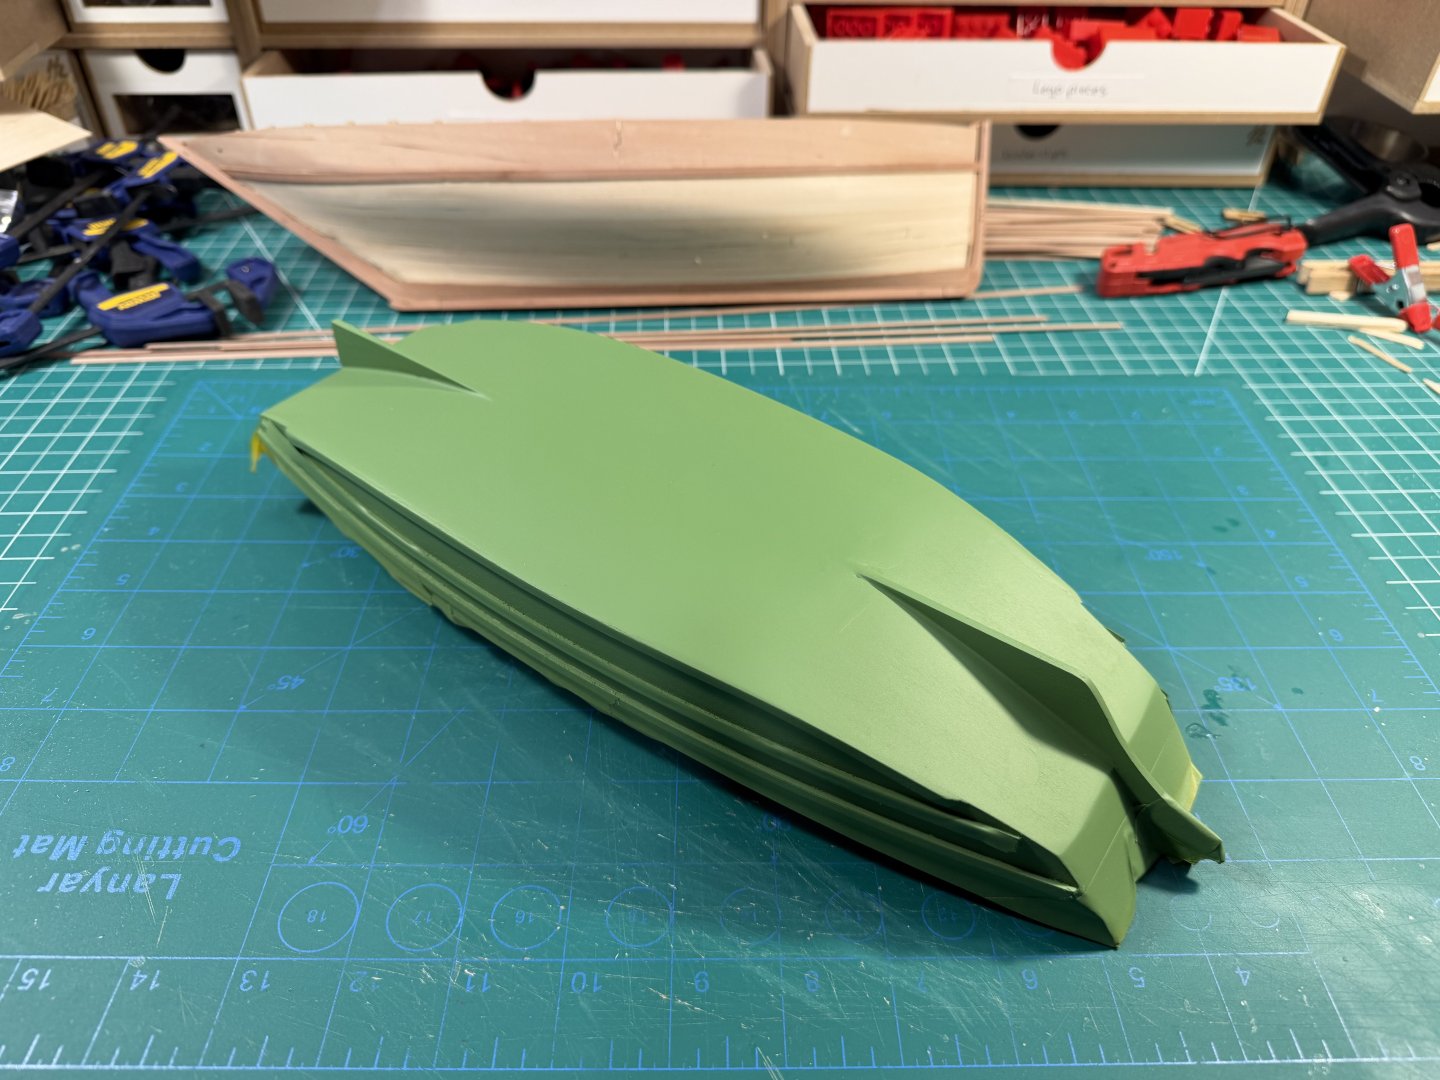
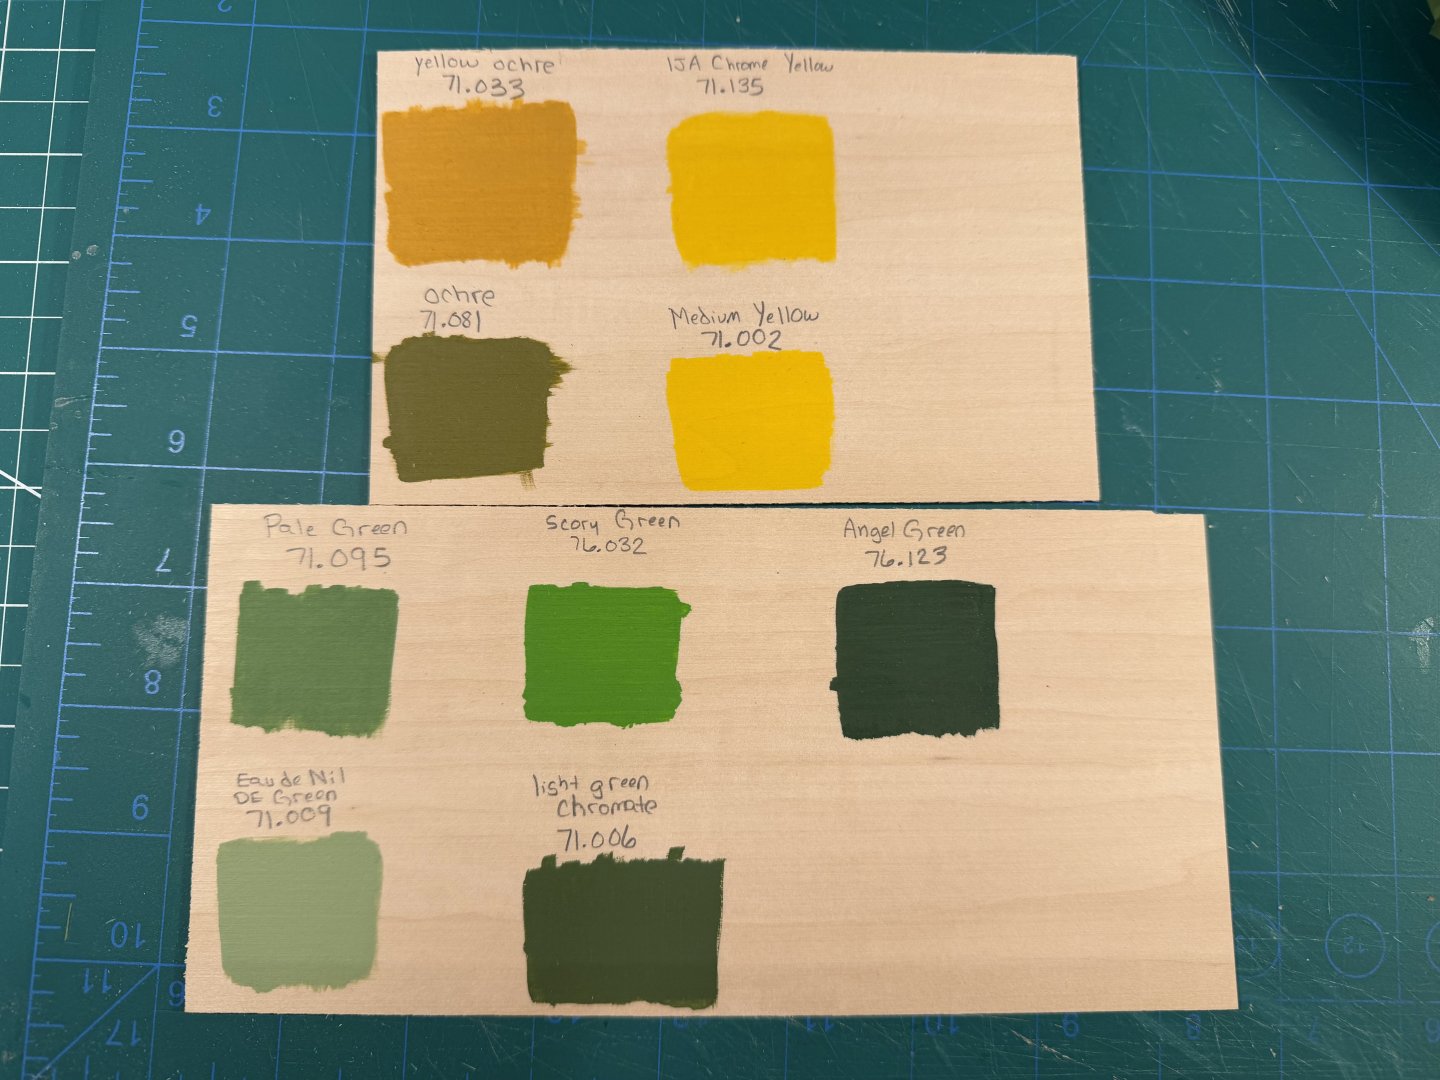
I’ve been making a bit of slow progress on this model, even if I haven’t added any posts. I added the cabin - which you can’t see because I have it and the desk masked off - and doing some painting of the hull. A couple more airbrushed coats to go. For the hull I chose a Vallejo Model Air Pale Green 71.095. It looked nice with the Vallejo Model Air Yellow Ochre 71.033 that will be used in various other places. Other colors will be some Off-White 71.270 and Black 71.057, maybe a couple others.

- 37 replies
-
- 2
-
-
- San Francisco Bay Scow Schooner
- Scow Scooner
- (and 1 more)
-
The half hull is probably (?) a quicker build, if that's a factor in the decision. Doing the half hull really did help me understand the proper shapes of planks you're trying to achieve when you need to do edge bending. The half hull is a bit "weird" in the sense that you don't use planks, like 95% of kits use, but cut planks out from flat sheets of basswood from templates you draw out using tape or tag board applied to the model. I guess in that sense doing this makes it even more obvious what kind of share you're trying to achieve when you have planks and need to do edge bending.
- 206 replies
-
- 1
-
-
- Endurance
- Shackleton
- (and 2 more)
-
Note for other builders: 1-2-3 block make for great weights like this. Just note that when new they often are well-oiled to prevent rusting and even if you clean off the outside, oil can still seep out from the holes in the blocks and stain wood. Thankfully for me I learned that when building a Syren serving machine, not a model.
-
Right. That's why I have several models I'm working on at once - I now have five, which is probably too many. I can do something on one model - and let it sit, say waiting for planks to dry while shaping, paint to dry, glue to dry - and move on to something else on another model. I know there are ways to speed up all these things and maybe rush and not negatively impact the build, but having multiple models at once for me has let me be impatient because I can just set one model aside and move on to another one.
-
Loose Planks
palmerit replied to Rich Sloop's topic in Building, Framing, Planking and plating a ships hull and deck
Didn't think of that and I can't remember the building steps. My bet is that the subfloor planking is in the way and will not permit gluing from the front, but I could be wrong. -
Loose Planks
palmerit replied to Rich Sloop's topic in Building, Framing, Planking and plating a ships hull and deck
Did you try using a super thin CA (super) glue? It can wick into narrow seams and you can push down with something other than your fingers. Not regular CA glue. Bob Smith is a recommended brand and they make super thin varieties, some of which are specifically designed to wick like that. ZAP also makes a thin CA glue. I never knew there was such thing as a super thin CA glue until I started building wooden ship models. I tend to avoid CA glue and prefer wood glue, but the super thin certainly has its uses (and CA glue or epoxy is needed to glue things other than wood). Depending on how wide the gap is, you can also dab a very thin piece of wire or a very thin pin into the thin CA glue - it'll wick to the metal - and use that to "inject" the CA glue into the gap. You'll certainly need to do some additional coats of paint after you make the repair.