Piet
-
Posts
3,568 -
Joined
-
Last visited
Content Type
Profiles
Forums
Gallery
Events
Everything posted by Piet
-
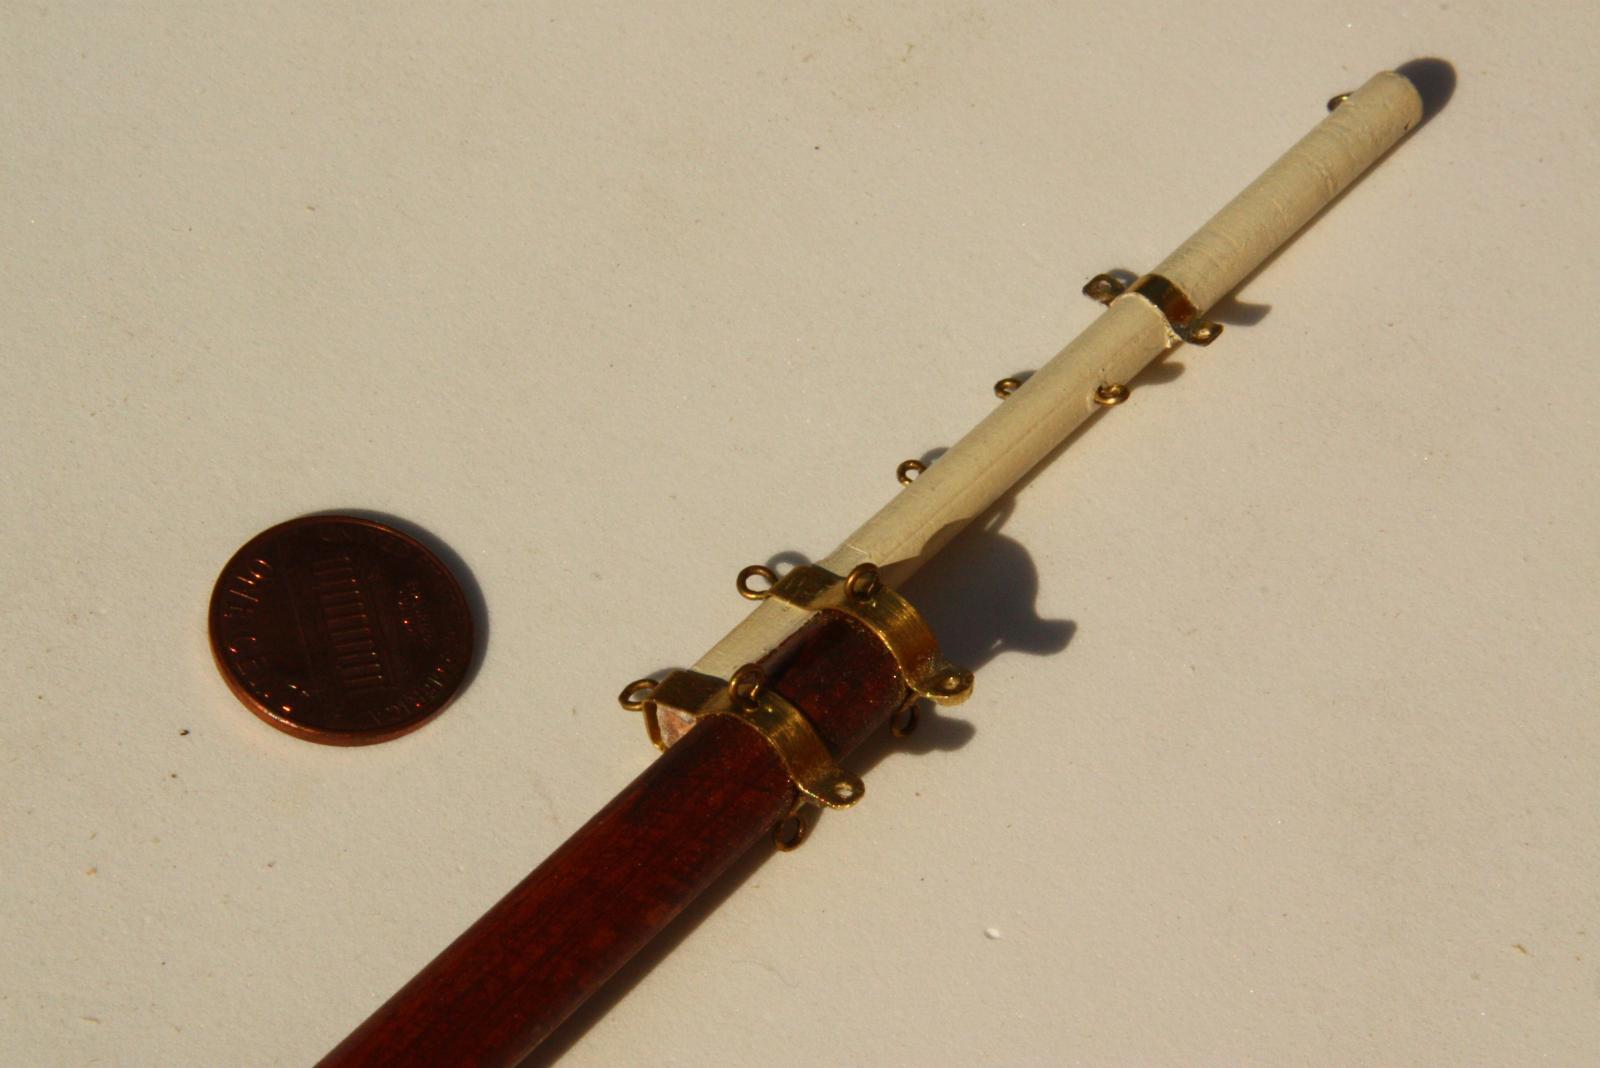
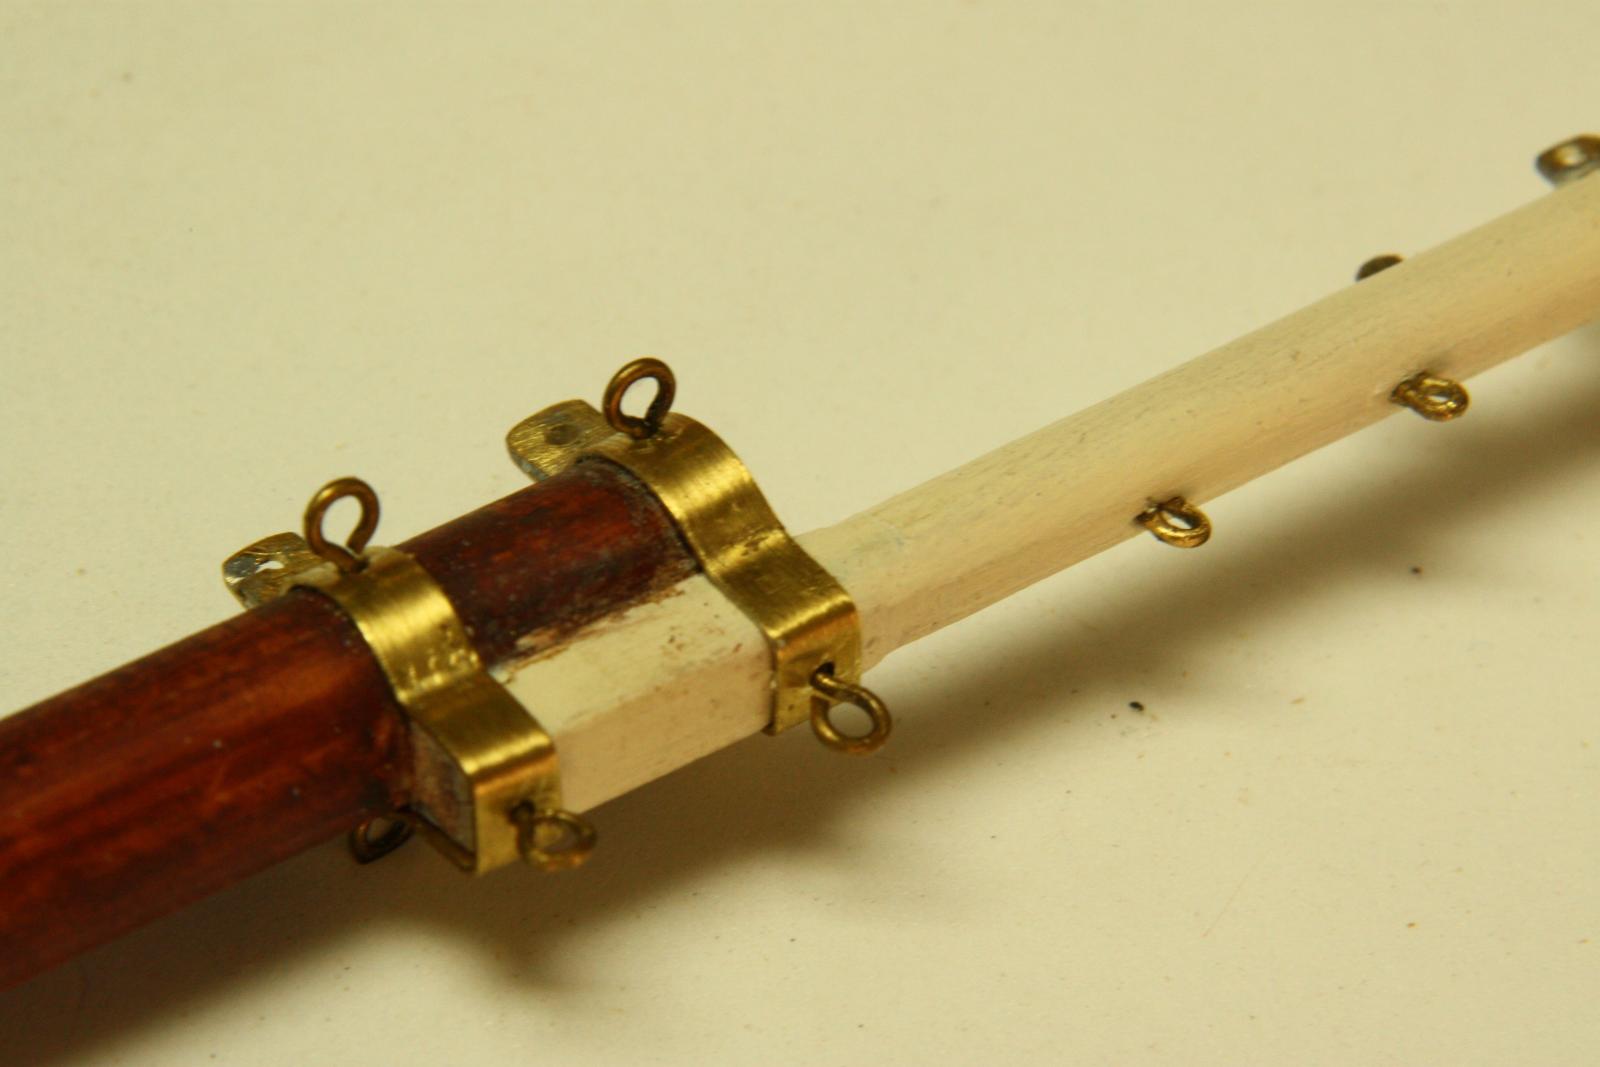
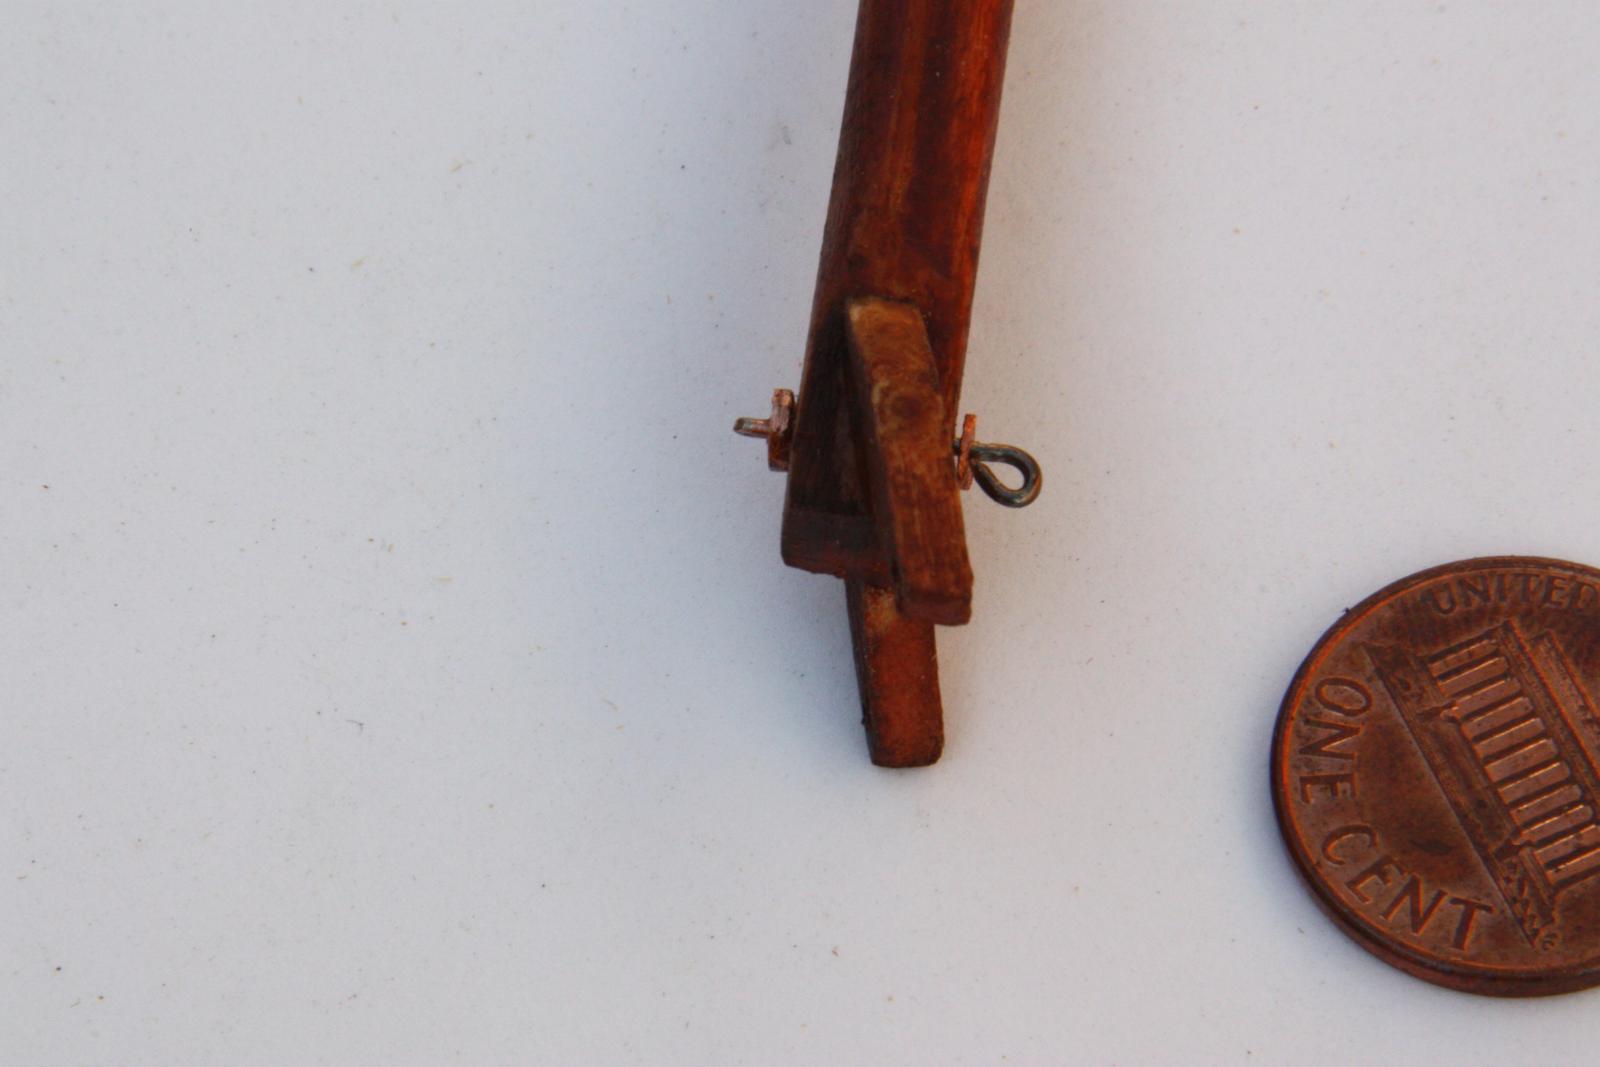
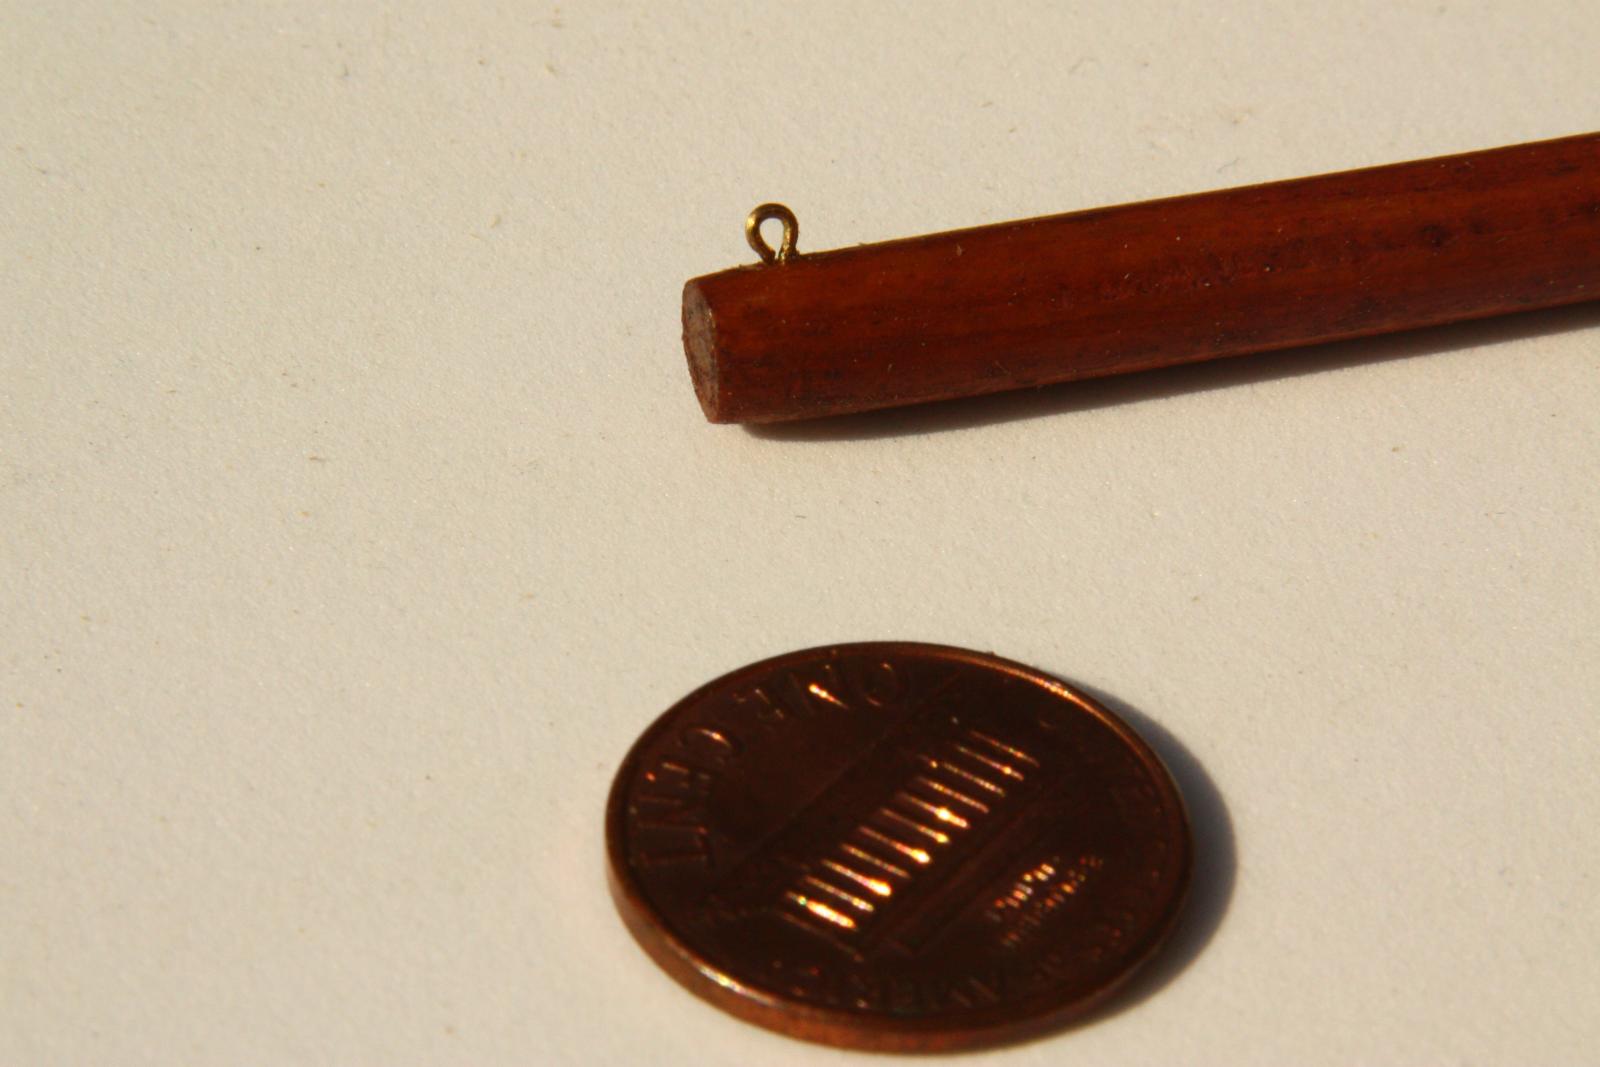
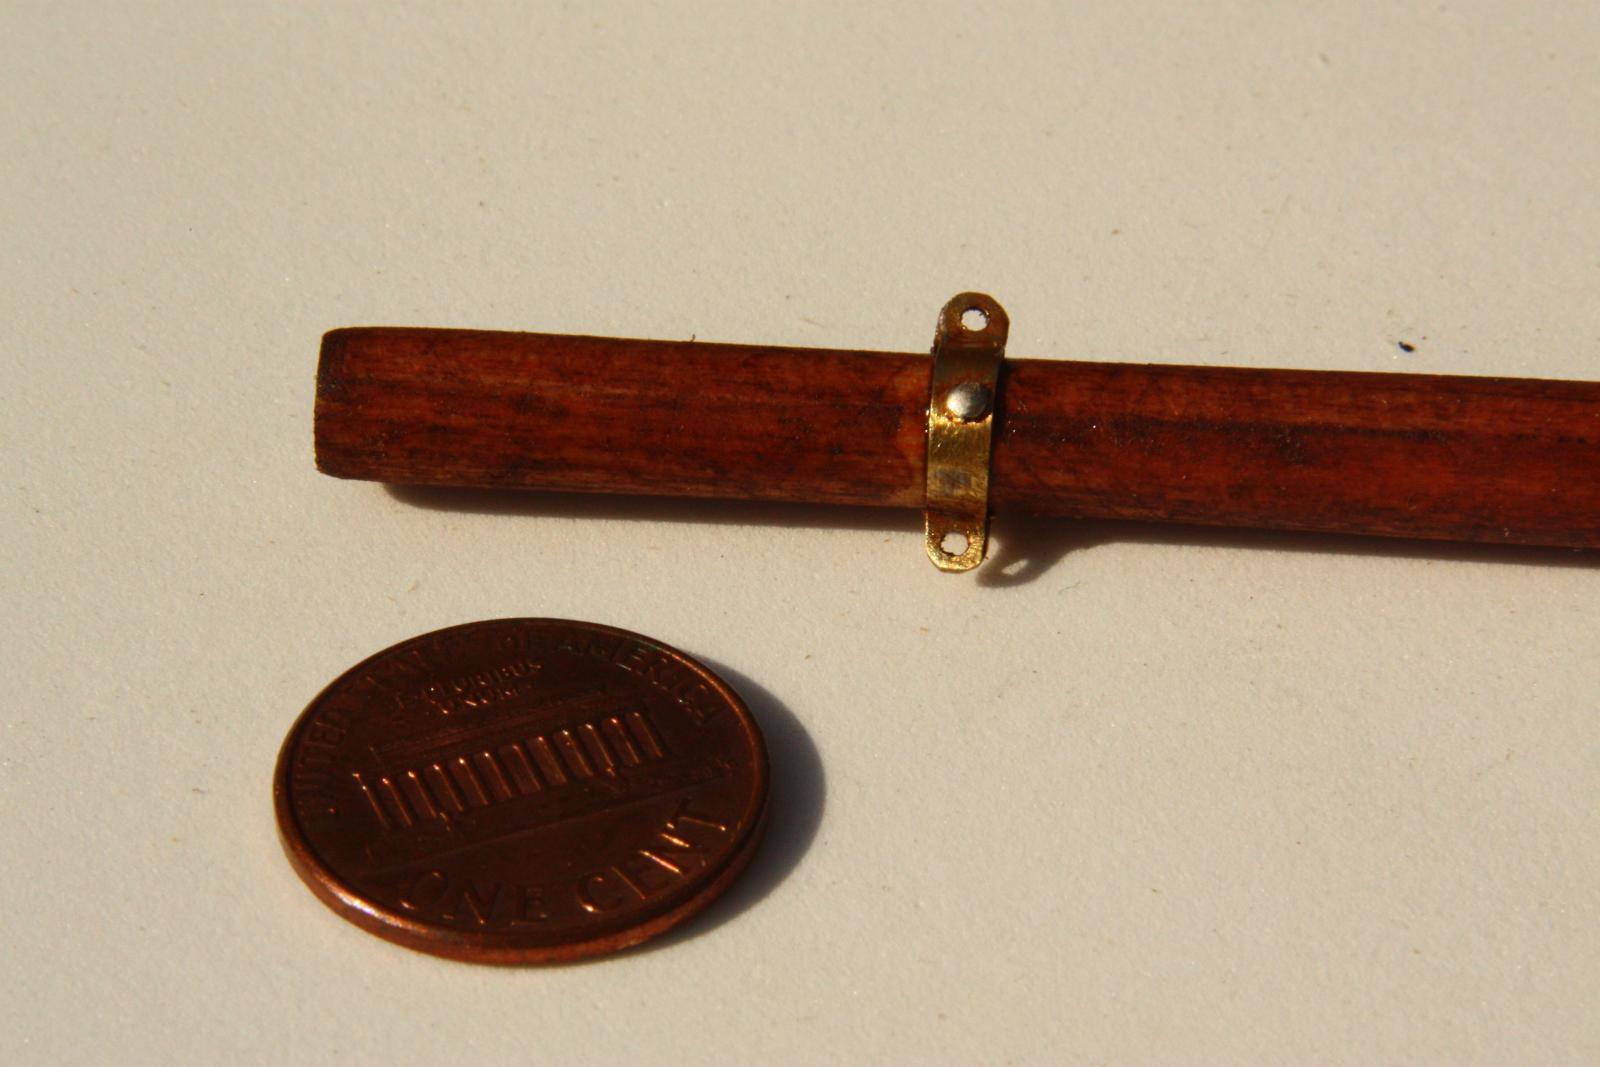
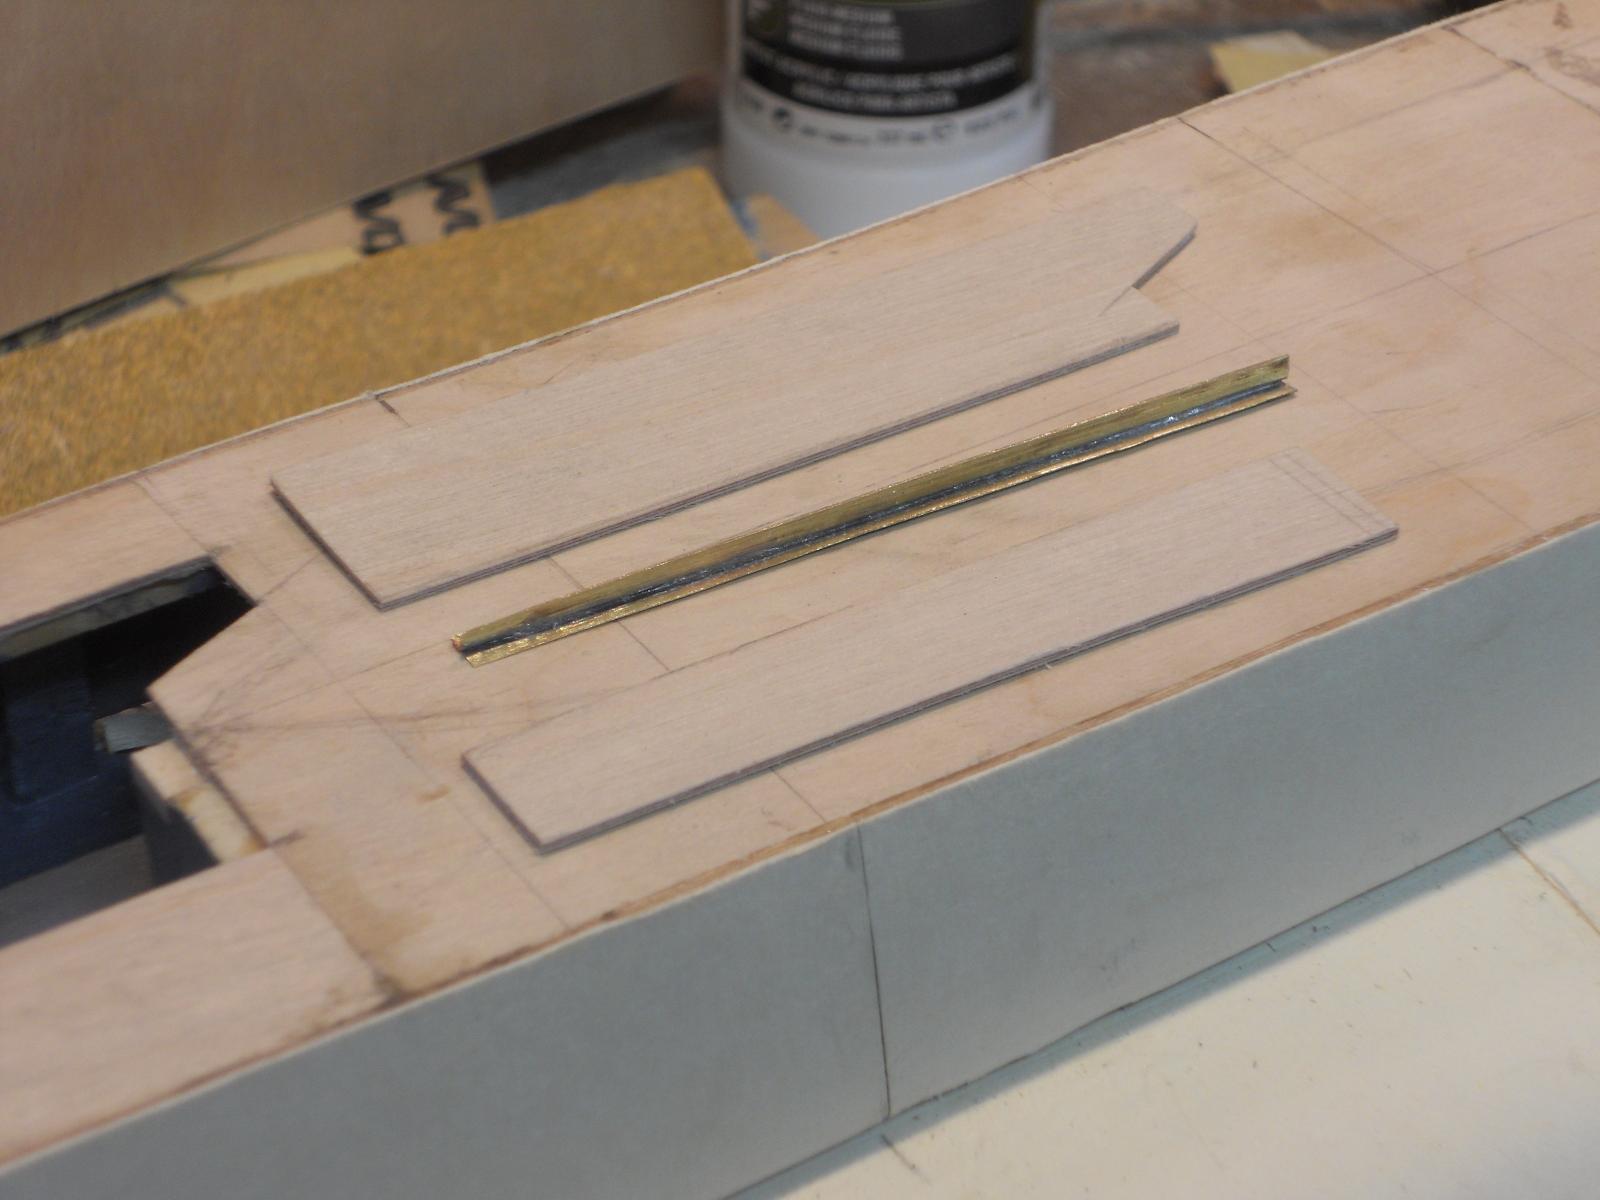
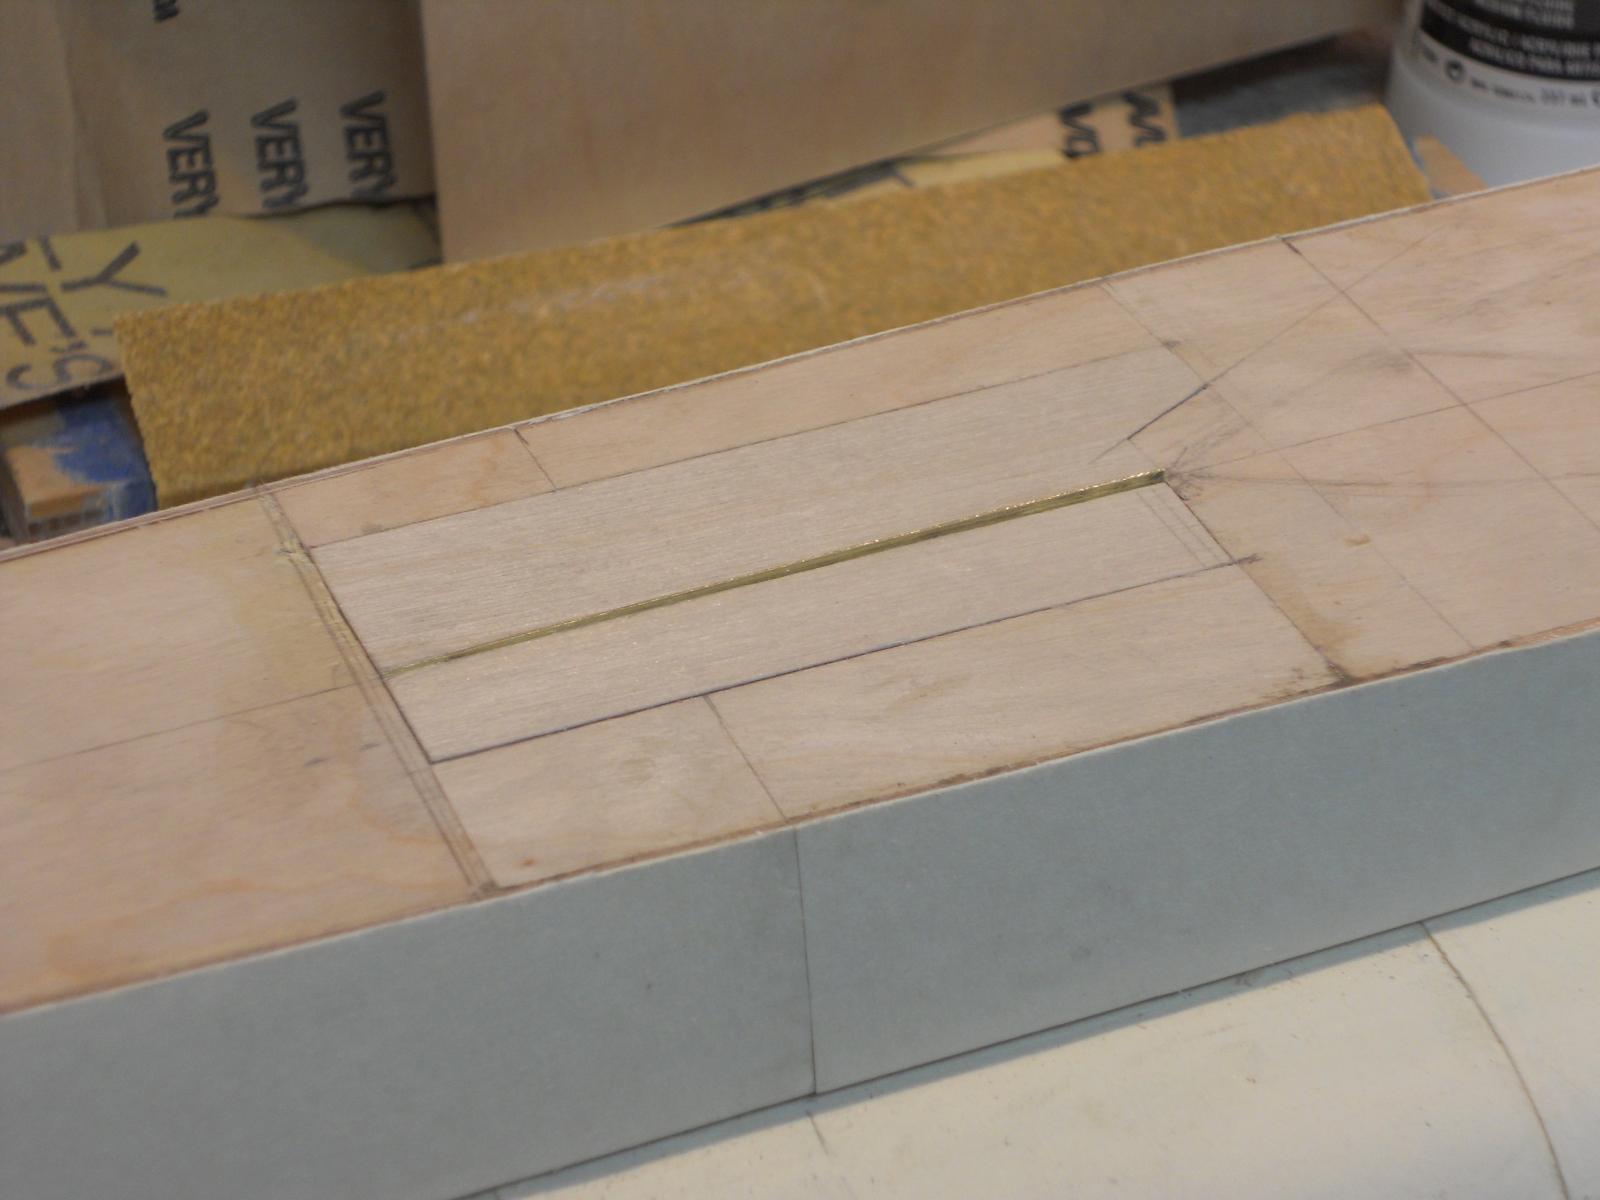
 We are here about ten days later in the build. I made most of the hardware for the mainmast here and installed it. I used brass sheet stock and brass rod. The soldering is done with soft solder. I believe that I already mentioned some time ago that I build-up all my round stock for the mast, gaff, boom and bowsprit from square pieces of poplar wood, glued together to form one square dowel. I did this to prevent warping, which is what if was afraid of when using regular round dowel material. The process of making them round is straight forward. I made a jig so I can shave them first to eight sided, then to 16 sided and finished it off in the drill press with sandpaper. They are stained with maple and then sealed with Minwax poly. This is the mainsail boom pivot hardware. Used brass sheet stock with brass nails to simulate lag screws. As you can see I used copper tubing for pivot pin and the bearing. Top mast attachment to main mast, includes rigging hardware. Top mast detail. Gaff with lift hardware. The tip of the gaff with hardware. Main sail boom outer end with hardware. Cheers,
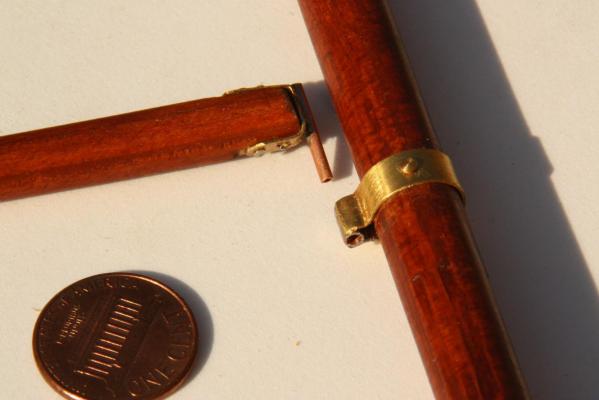


-
Thanks everyone for your "likes." Mark and Michael, you are the greatest! You know how to make a guy feel good . Yes, mark, I treated that penny with Preparation H, it shrunk. Bwaaa haaa haa, oh man, I crack me up Michael, at my scale that works out to an 18 inch turnbuckle hmmmm kinda over kill. But hey, on the finished model they really don't look all that bad Cheers,
-
Thanks John, I knew I can count on you Cheers,
-
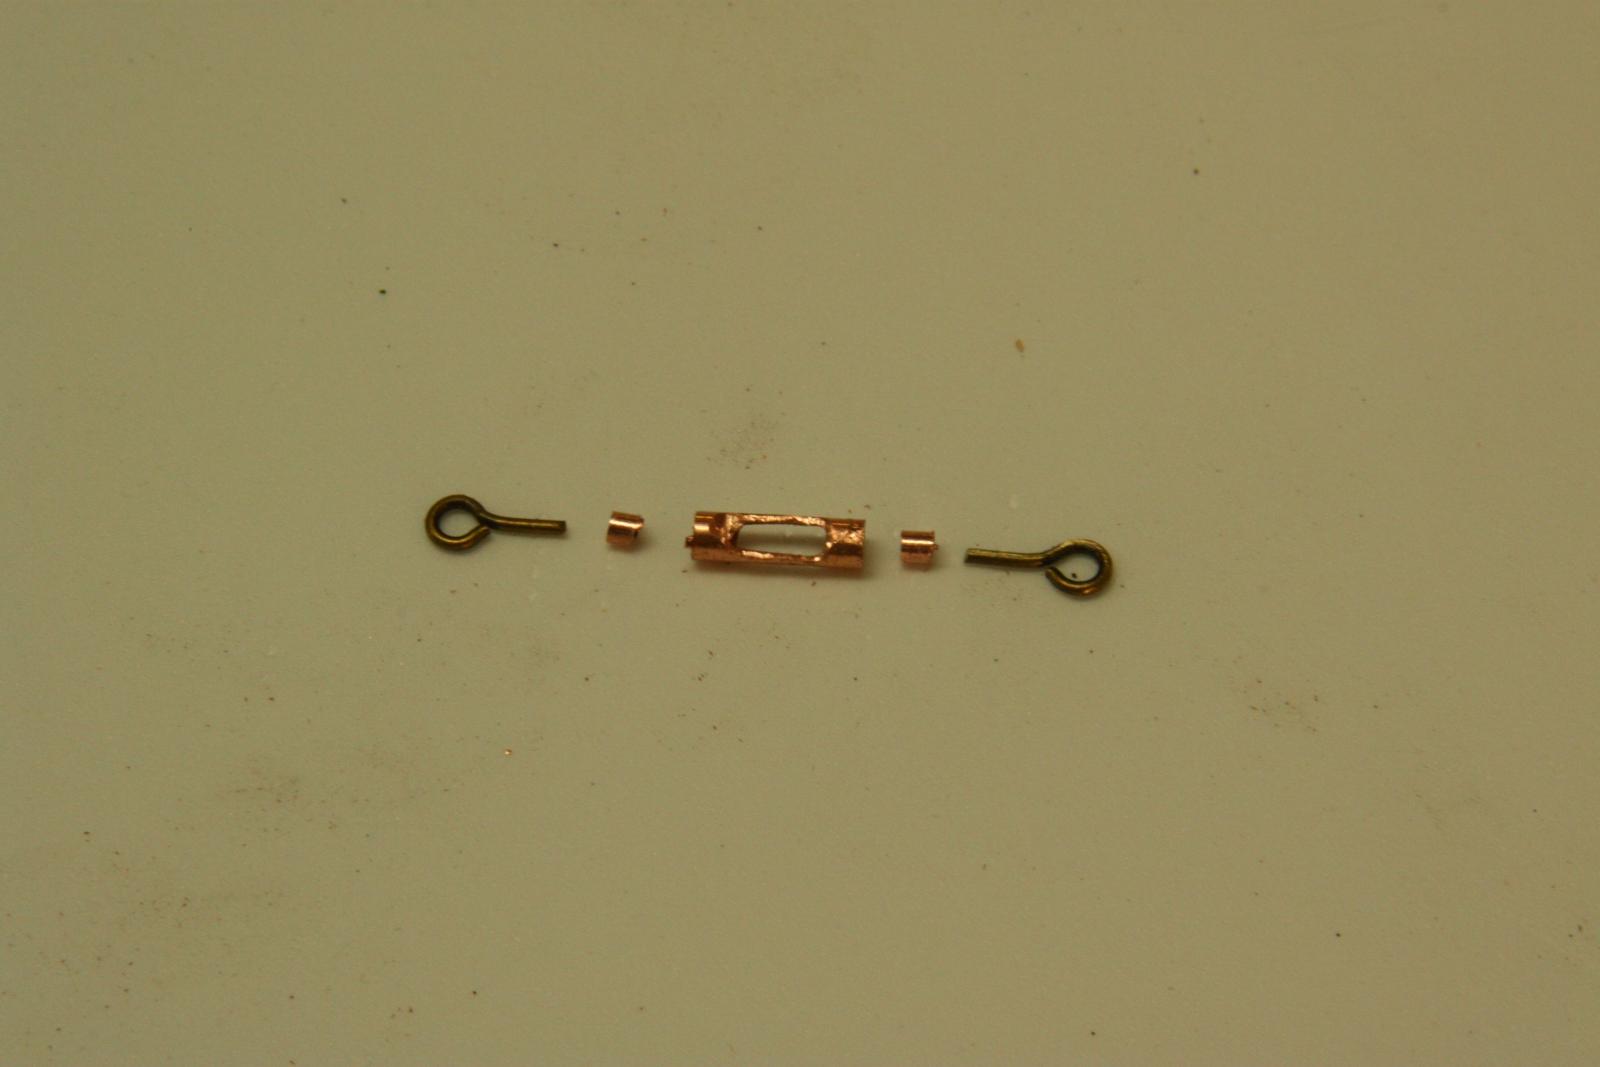
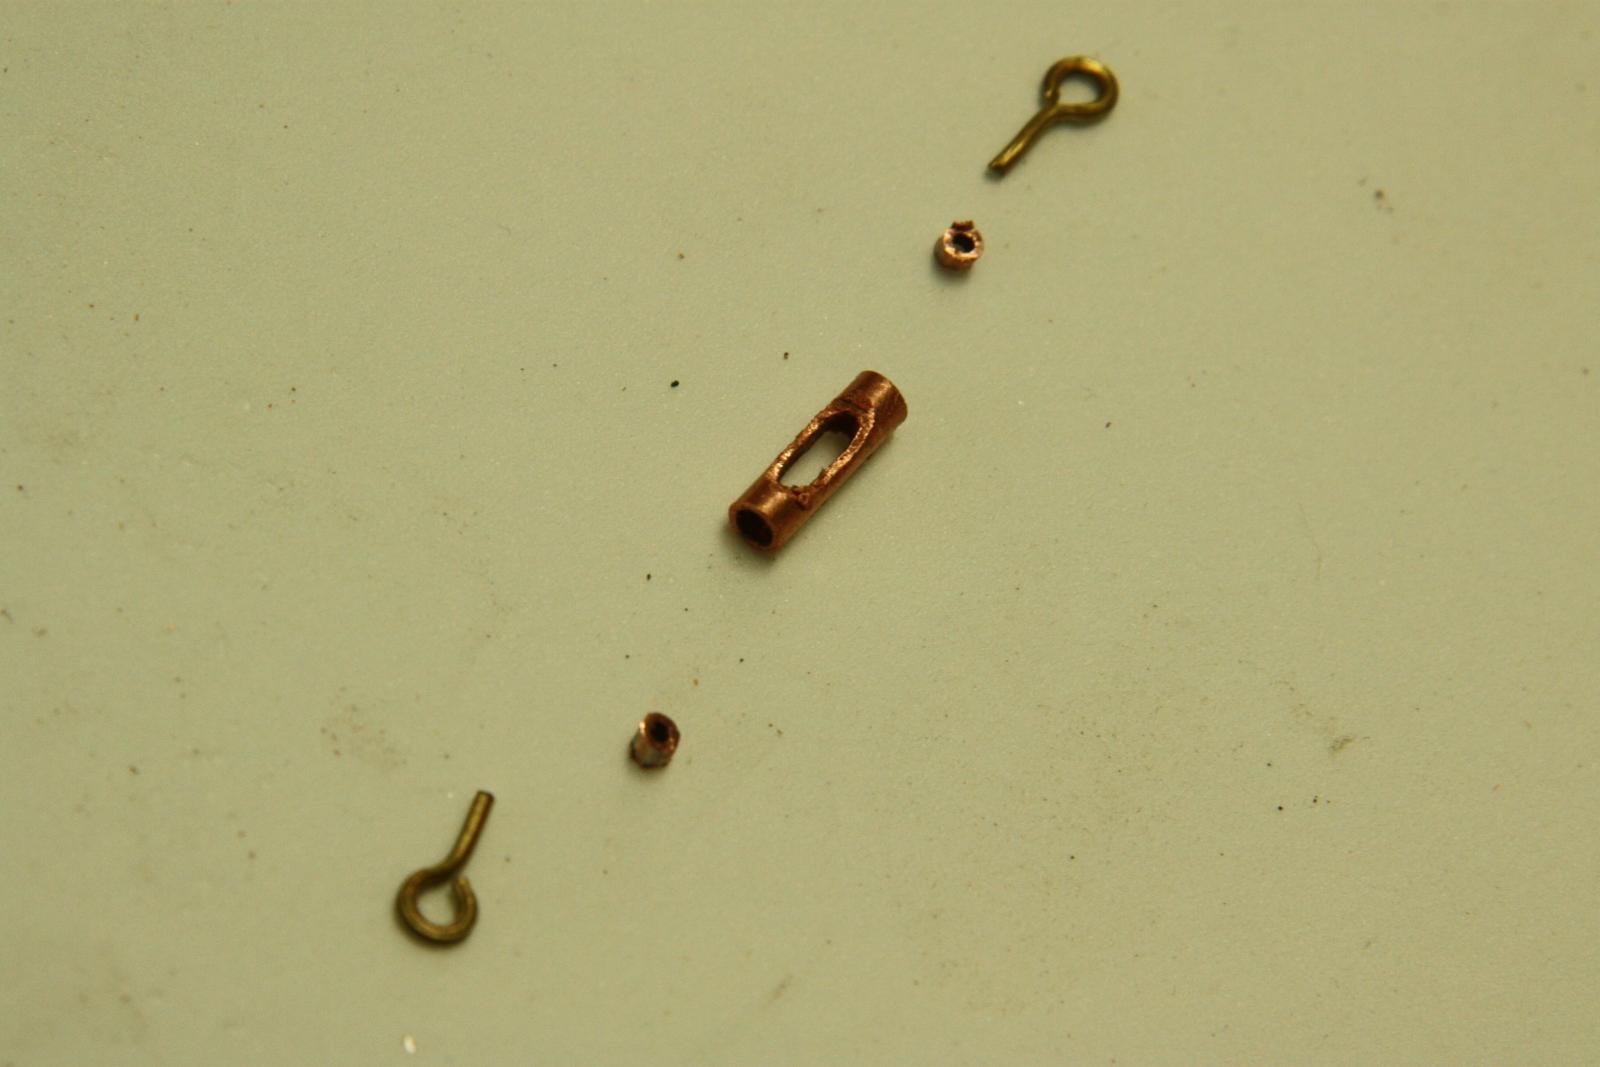
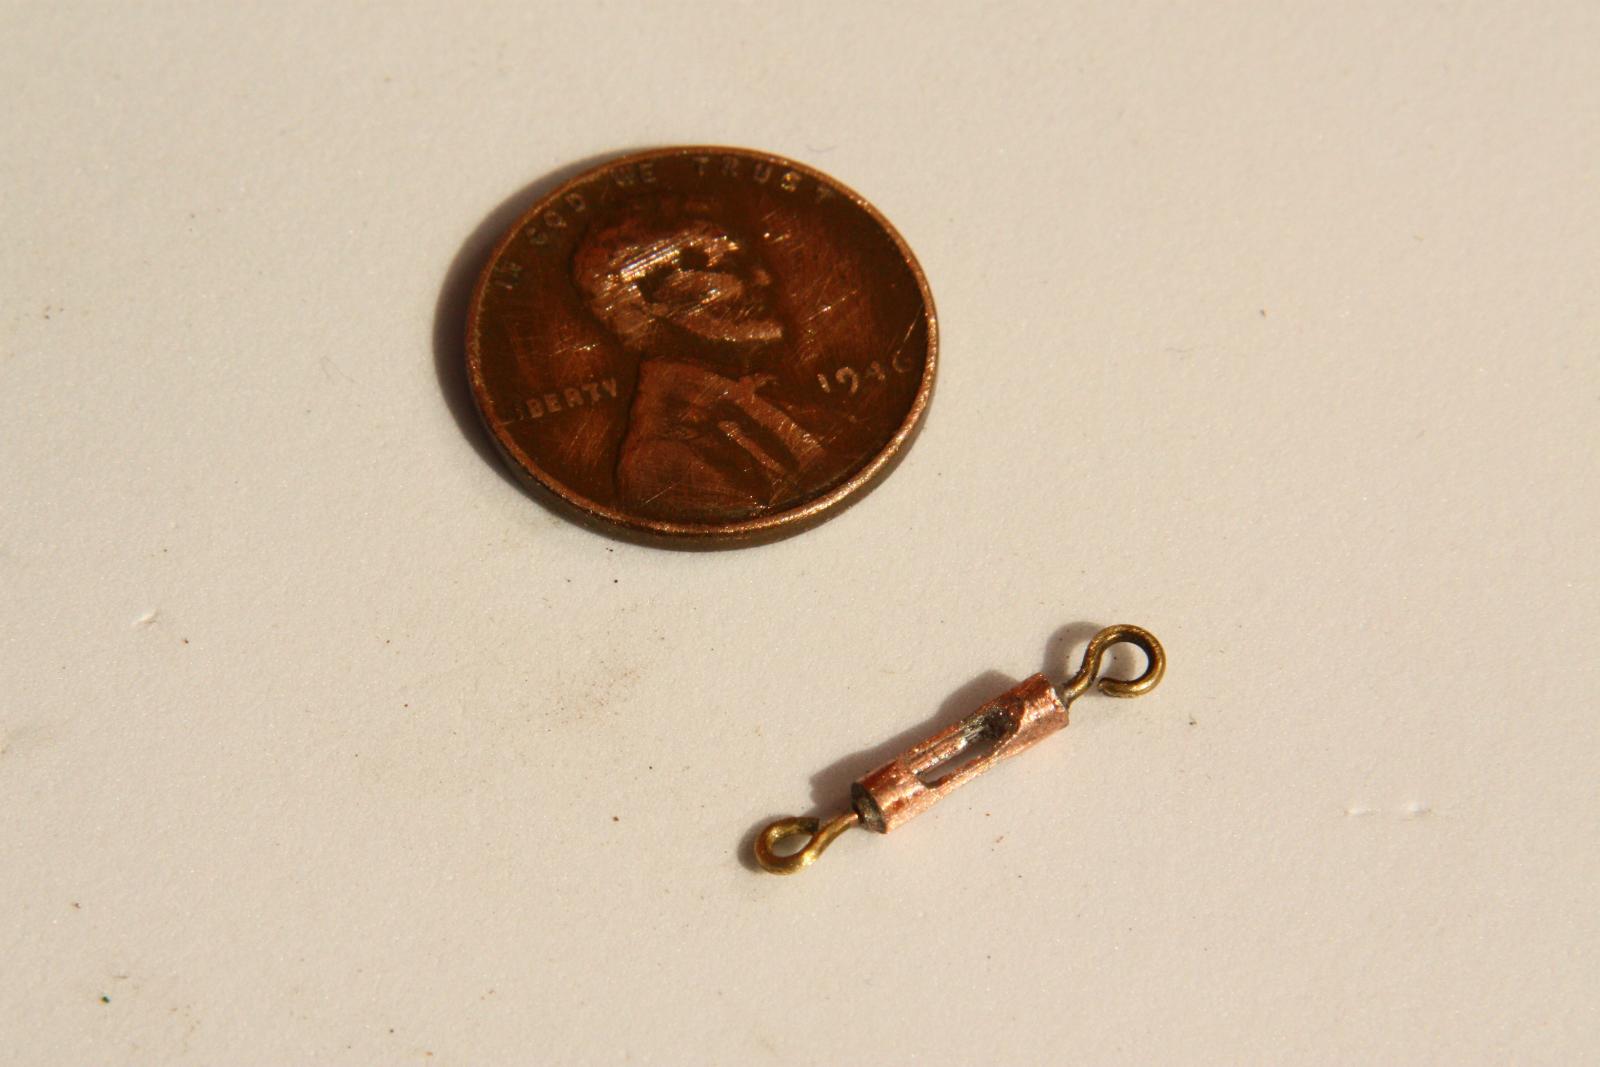
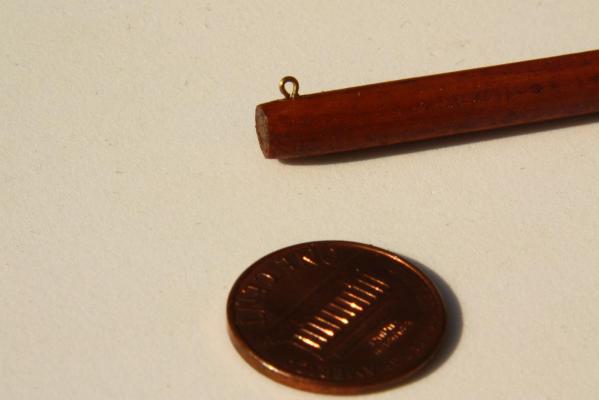
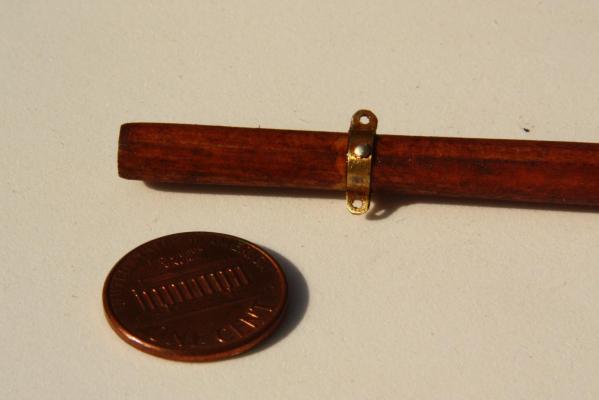
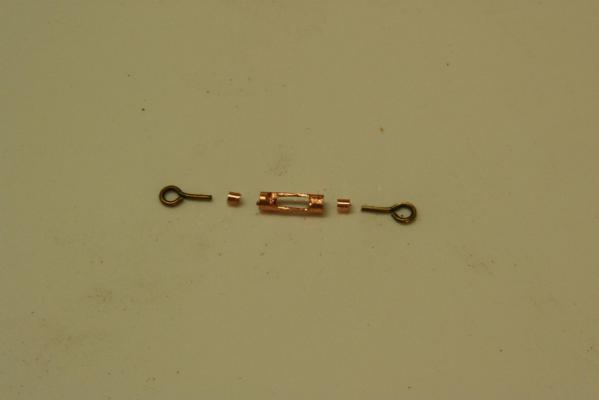
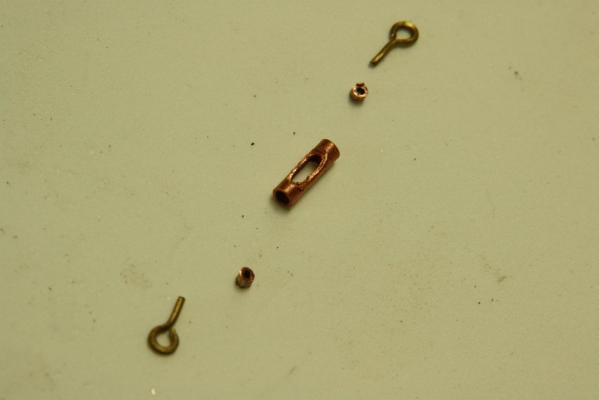
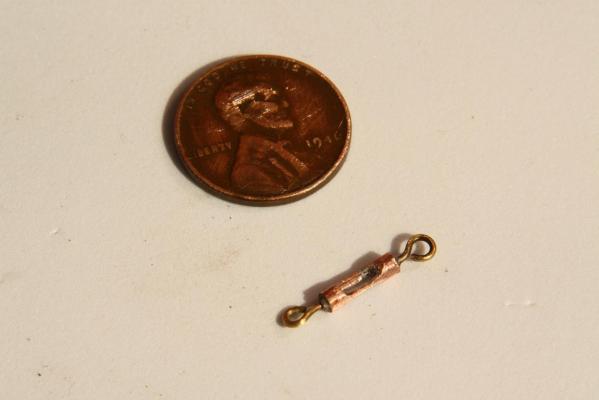
Thank you all for your kind comments, really appreciate it. On this particular day I managed to make only the four needed shroud turnbuckles. They are a little out of scale but don't tell anyone I used some copper tubing and brass rod as shown in the photos below. It doesn't seem like much but it was slow going and tedious work. Yes, I should have used the smaller tubing and thinner brass rod but at the time I didn't realize it. Oh well, next sloop model better. So far no one has noticed except me and you wont tell I used a small piece of copper tubing and filed some metal away to leave just a thin portion holding both ends. Then i cut two small pieces of copper tubing to fit inside as a reducer and bend two eyebolts to fit inside the smaller reducer bushings. All this will be soldered together to make one part. This shows another position of the same parts. This is the completed turnbuckle. The US penny is 19 mm in diameter. Cheers,
-
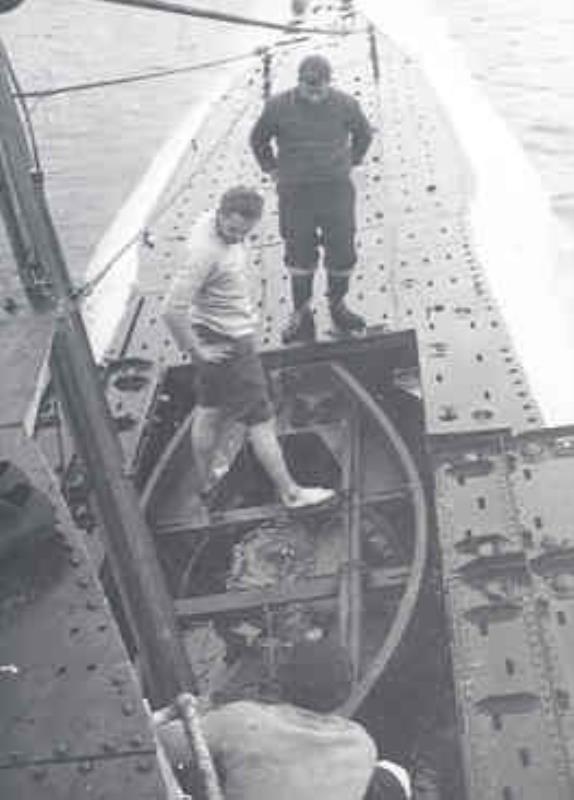
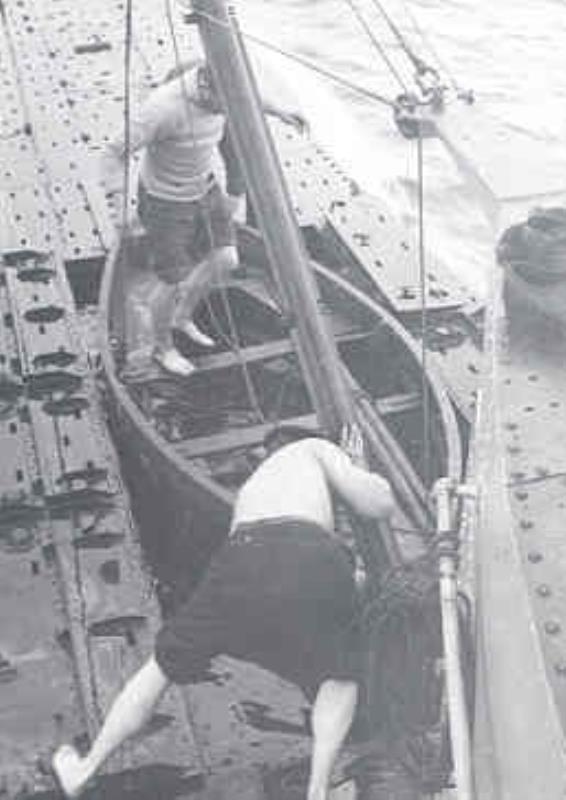
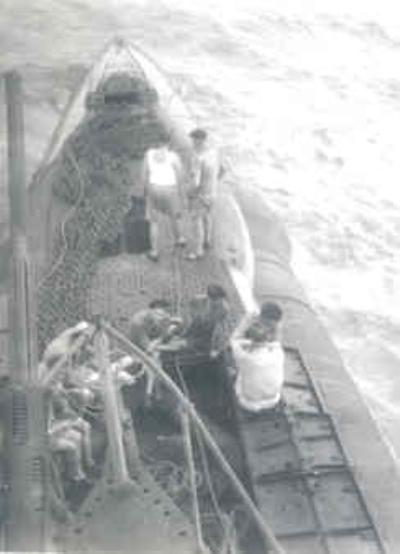
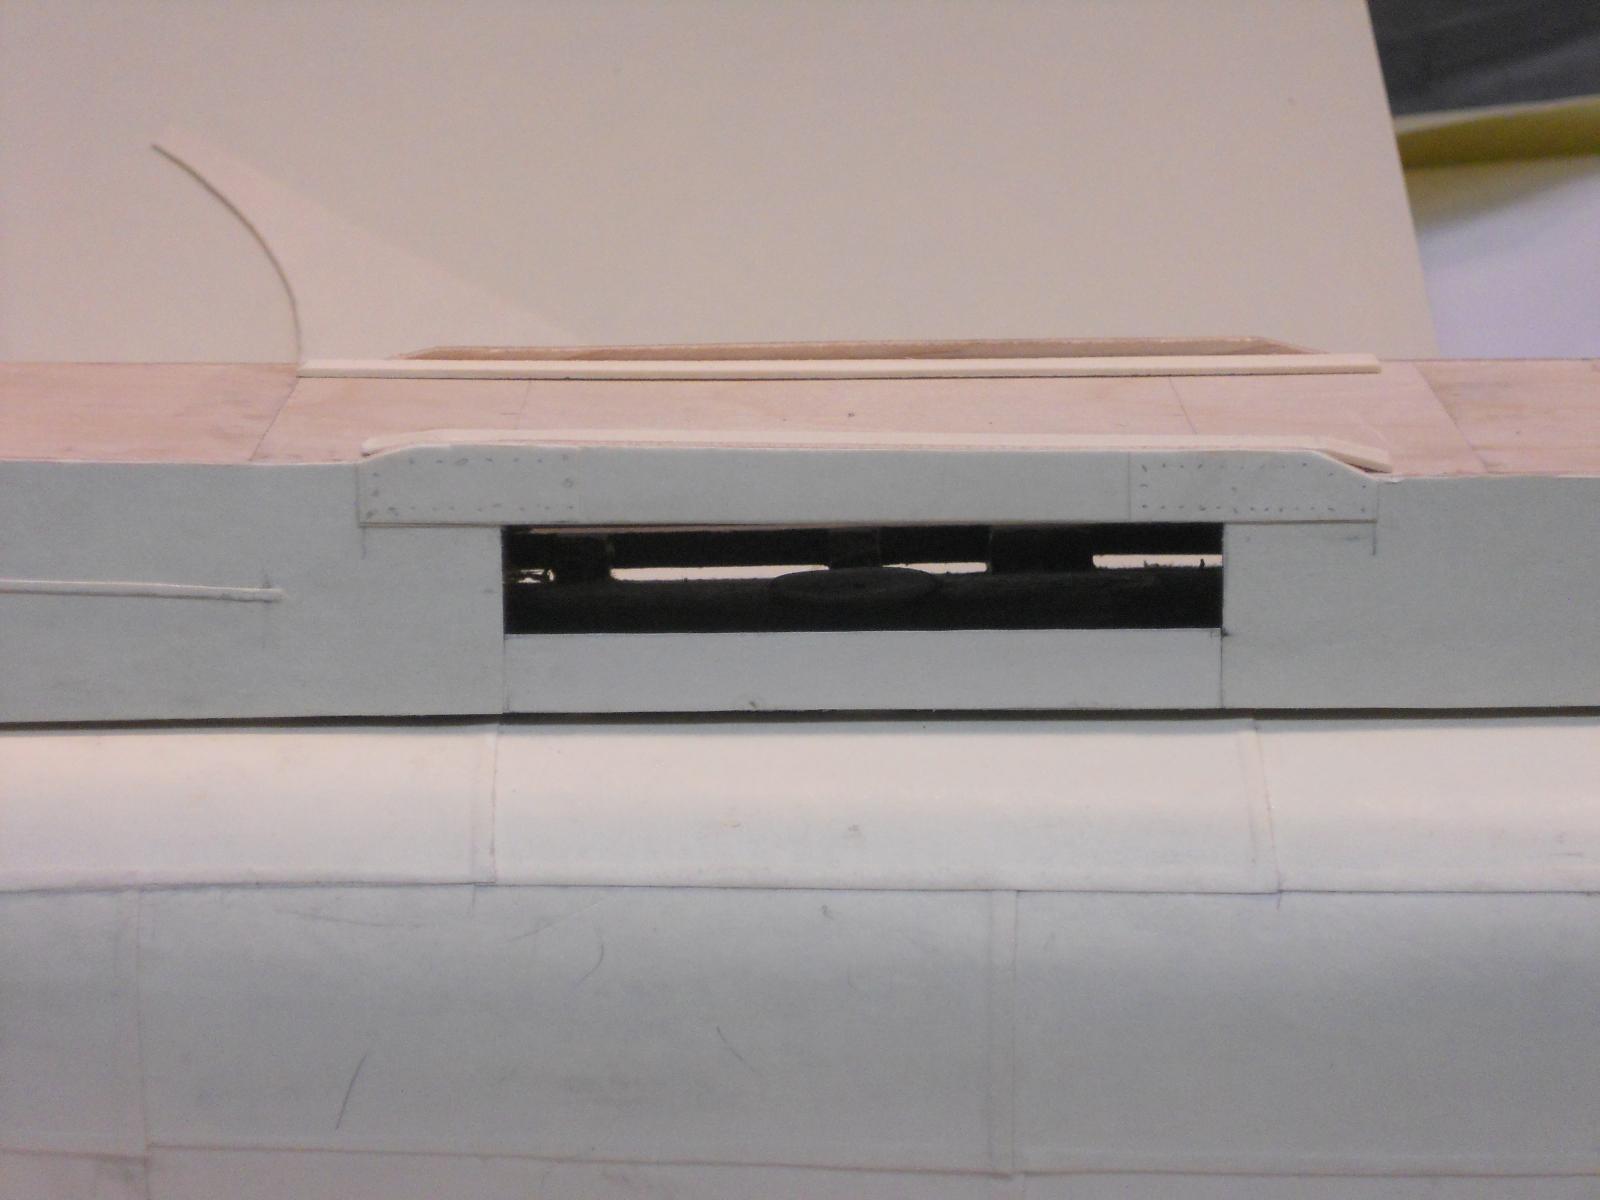
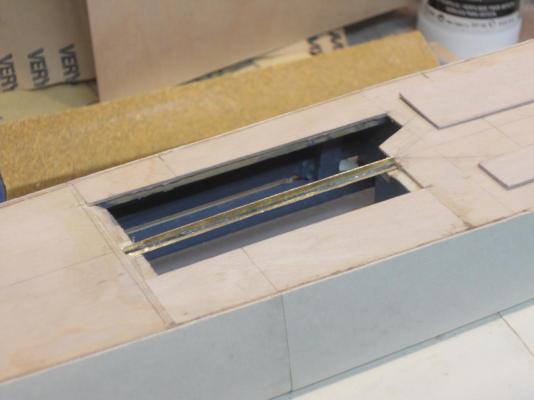
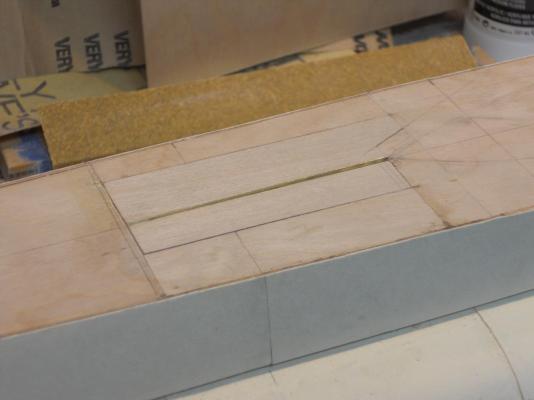
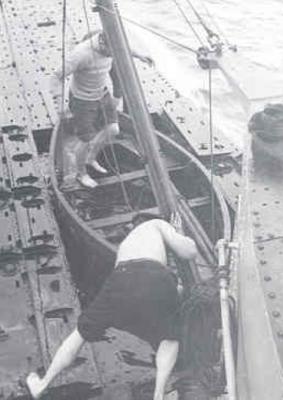
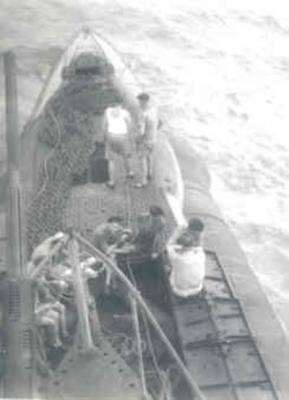
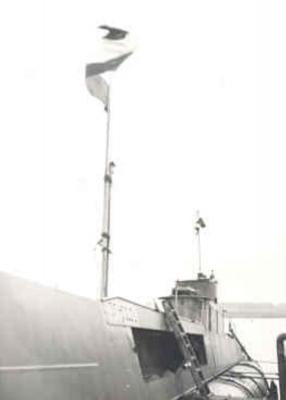
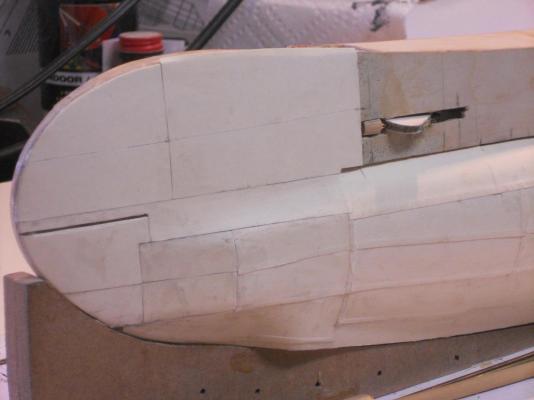
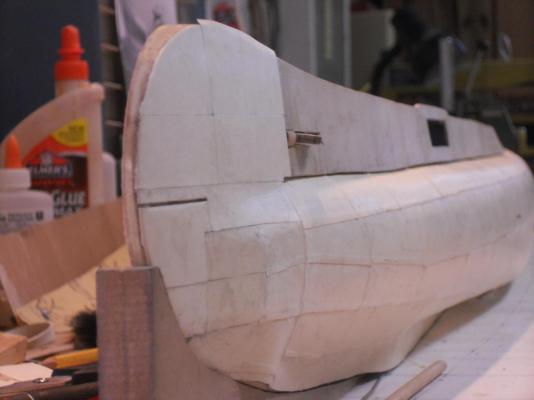
Well, hurray. Been out of the dock yard for a few days but could spend some time this morning on the build. I had to redo the top sides of the deck torpedo compartment. I didn't like the looks of it, the front part of the opening was larger then the aft part. But that's all part of building a model from scratch. It's the end result what counts. In the meantime as the glue sets for the new side panels I made an angle piece from brass stock for the brace and loading boom for the dingy compartment. I immagine it used to be a T iron that runs across the opening that houses the boat's dingy. I also think that it functions as the loading boom for the dingy. It's hinged forward of the opening at the bottom of the aft end of the conning tower. From an engineering point of view It seems to make sense. I did plan to make the dingy and show the loading boom rigged as if removing the dingy. At least that's the plan for now. I also made both the port and starboard dingy compartment cover doors. I have not permanently installed anything yet. There is still some trimming to be done, and hatch cover rests to be made and hinges of course. A lot of time consuming tedious work. T bar support still needing dressing and additional brackets to mount it to the conning tower structure as a hinge point. Both the port and starboard dingy hatch covers are made with the T bar support in between. Here is the T bar loosely laid across the opening on the center line of the hull. I still need to make the hinge brackets that attaches it to the bottom of conning tower. also brackets at at the aft end for the pulley tackle. The port side hatch cover loosely laid in on top of the T bar. both the port and starboard dingy hatch covers are placed on the T bar support, closing off the dingy storage area. This is a pic of the O 21 dungy storage area. The T bar support is hinged up and temporarily secured at the top. Here we see the dingy being removed from it's storage area. We see the T bar/loading boom in action. This pic shows the O 19's dingy storage area with the hatch covers folded over and laying on the deck. This pic was taken when the O 19 ran onto Ladd Reef in July, 1945. The boat had to be scuttled because all attempts failed in pulling her off the reef. Cheers,


-
Hoi Sjors, Oooooooooh, look at all those beautiful shrouds with the mouselines, uh - - - - I mean ratlines You have done an outstanding job my friend. Cheers,
-
Hoi Adriaan, Nice work my friend! Keep it up like that, slow and easy. Cheers,
-
Hoi Remco, Good to see you back at the KF again! Hey, a little diversion is always good but the calling of the wood was greater that the plastic Cheers,
-
Thanks Popeye, yes, she's coming along okay. Almost done with the starboard side and then to doing what? Hmmm, probably back to the tail end, um I mean the stern end Hello Ian, soldering Al ? Hmmmm, I used structural adhesive myself or some very good epoxy adhesive Just watch out for stuff that attacks aluminum though. Cheers,
-
Hello Paul, Thank you very much for your encouraging comments, really appreciated. No, I'm beyond the concern state of the hull plating thickness, it'll have to be as you see it and I am quite happy with it. Steel ships are not foreign to me either because I started out studying for ship's engineer in the early fifties. So, I have a slight understanding of steel ships and what makes them go But fortunately I switched to aircraft design and maintenance. Been involved eith them from 1954 on till I retired from Government service a 4 years ago. Needles to say I am more comfortable with airplanes and aluminum but have also extensive background in metallurgy thus steel and iron are not totally foreign to me. There is obviously much more not being said about all my education op to where I am now Display, actually I had a real crazy idea about the display but that'll add quite a bit of time. I like to have it as have to as my father knew her. I also like the idea of having her displayed on the slipway on the day she was launched. This would really not be accurate because there were things not yet completed on the boat when she slid down into the river. And yes, I am quite familiar with slipways and launching ships. I don't know yet, I need some time to think about it. According to Gino den Ridder the colors of the boat at that time were dark green and a dark red. So, that'll most likely be the color scheme, strange as it sounds. We would expect a grey but apparently the Koninklijke Marine (Royal Navy) had other ideas about colors. Well, the starboard side is half way completed with the plating. Making good progress, even in between house chores. Please stay tuned. Cheers,
-
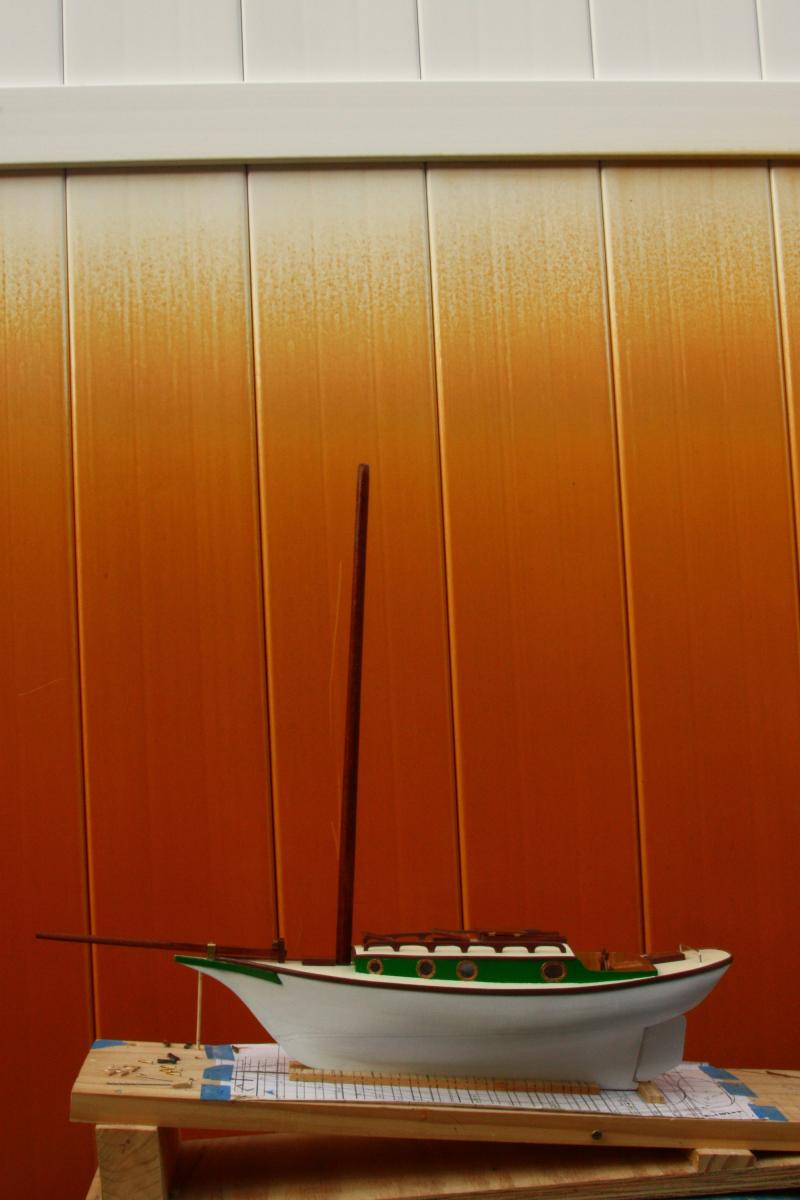
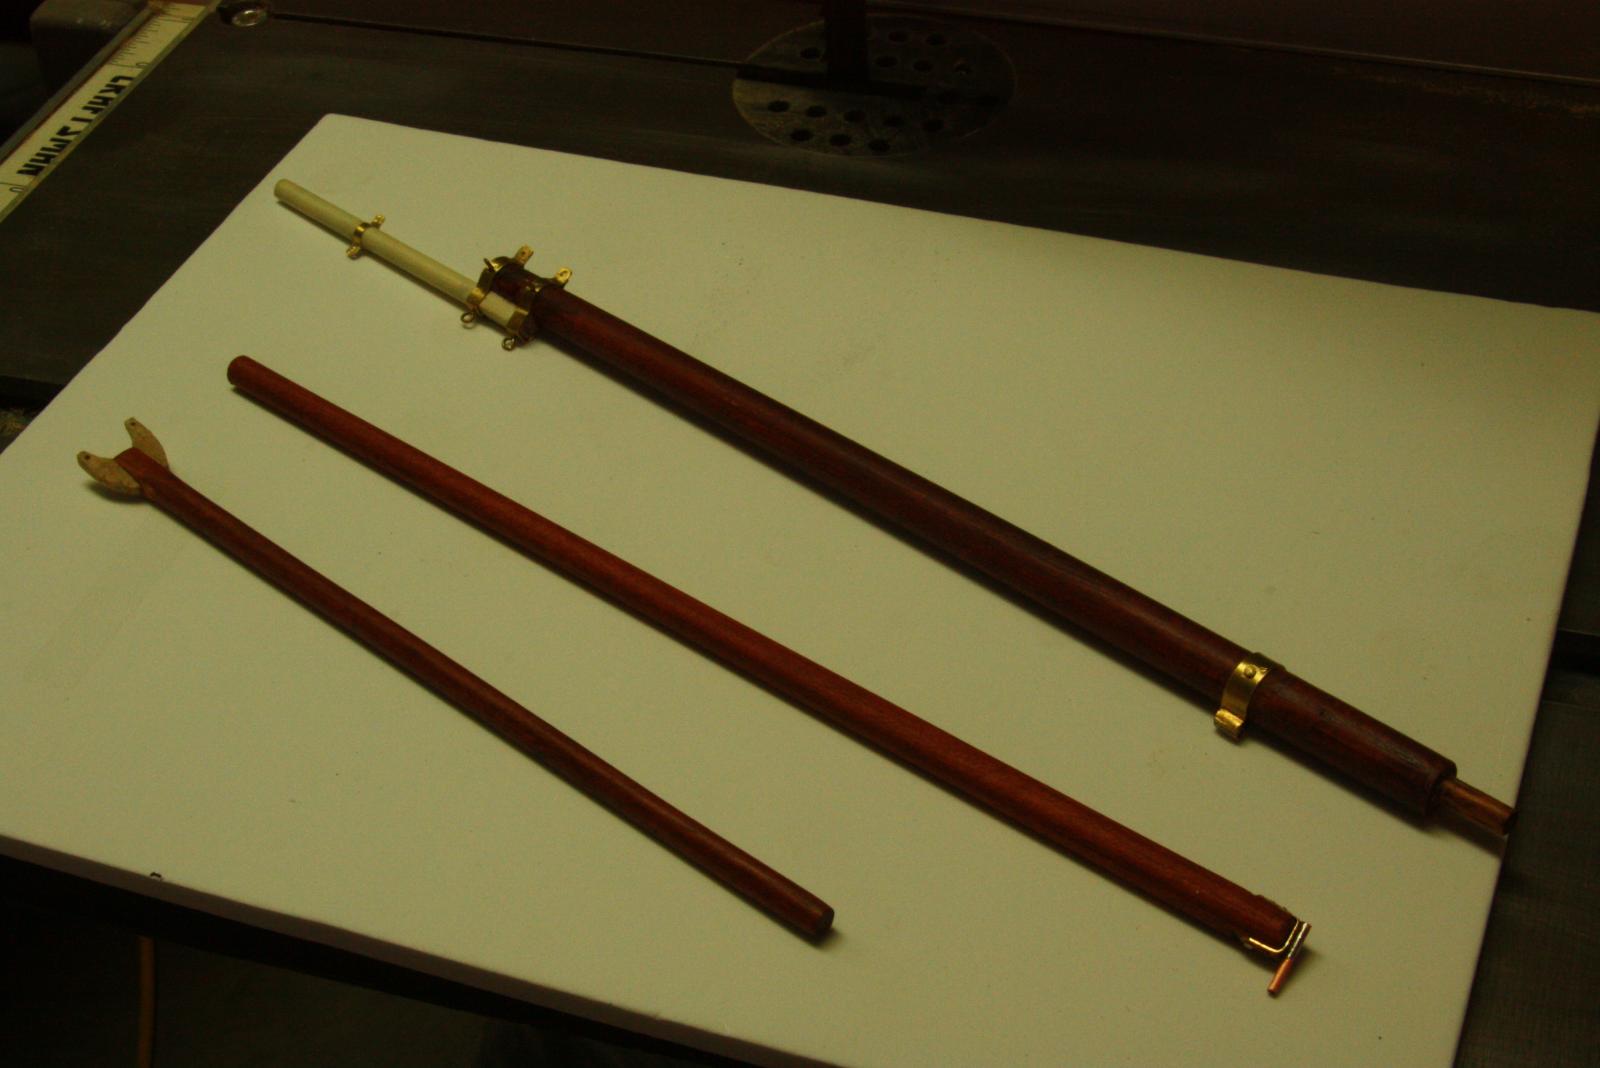
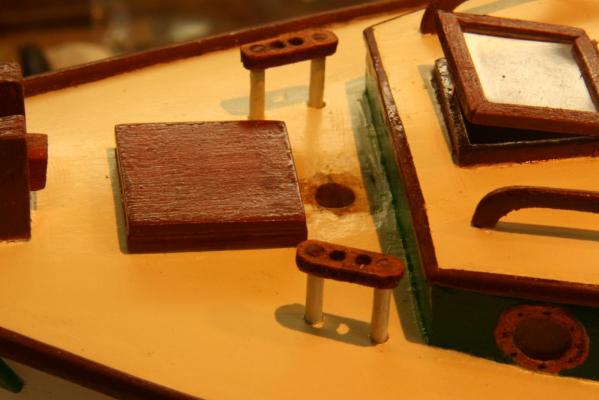
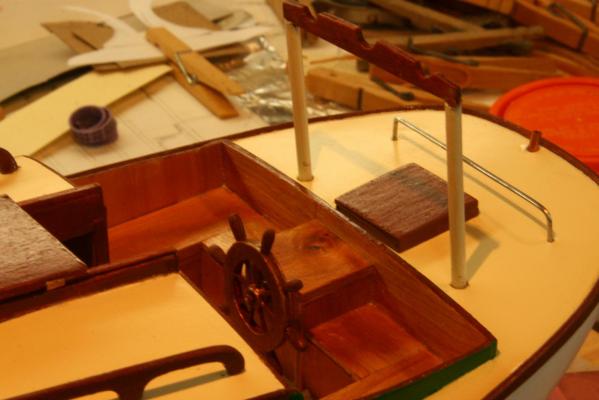
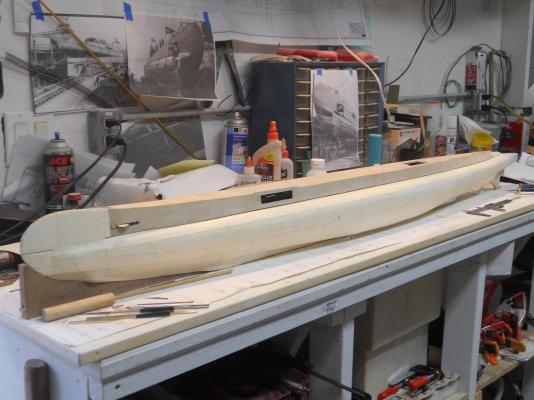
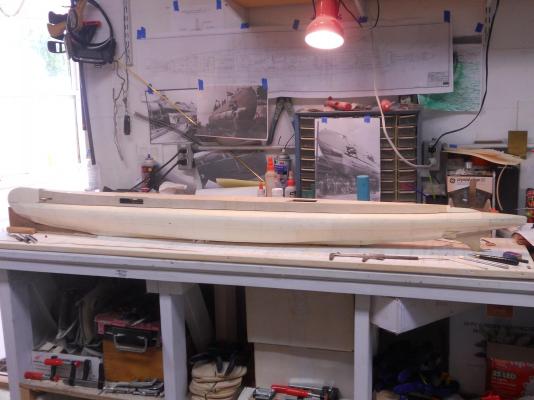
Okay, the next series of episodes are about the rigging. I made the mast, gaff, boom and bowsprit out of three rather small pieces of small square stock of poplar glued together to form a squarish stick to prevent warping. I purposely didn't want to use dowels for that reason. Shaping of all the round work was straight forward as is explained in several tutorials and here in MSW 2. Shaved from 4 sided to 8 sided to 16 sided and finishing in the drill press with sandpaper. Much later in the build I realized that I made the mast too small. Not a big problem because I replaced the top mast with a longer one Well, I say not a big problem but I had to undo a lot of stuff and make also a new mainsail. Yeah, I didn't like to looks of the squad looking mainsail and then measured the mast Oh well, "stuff" happens but I couldn't possibly leave it like that. I also made belaying pin-rails and the mainsail boom rest. I thought that would add to the overall appeal of my little boat. I have seen photos of Freedom sloops with them. This seems like not much work but it was all very time consuming when youa dd all the hardware into the equation. The lower mast is stepped for a test. Stained in cherry and sealed with MinWax Polyurethane. Here are the mast, gaff and boom. You can see that much of the hardware has been made and installed. This picture shows the belaying pin-rails. The head skylight is not opaque, it's the the glare of the sun. I made the mainsail boom rest, thinking it would be great for stowing the boom when docked. Cheers,


-
Hey Adriaan, good to hear from you and welcome in the dockyard. Yes, it's a viable thought and is up front for consideration, thanks for reminding me. Love your model, been visiting - - - quietly. Cheers,
-
Thanks to everyone for your like votes, much appreciated. Well, I'm busy "plating" the starboard side now and making good progress. I'll wait with posting pics when it's done, it's exactly the same process as the port side @ Mark, I guess there are several methods for simulating rivets or tapping in sewing pins. Anthony suggested that and it would work great if I had made the model with all the frames. however, I used the "plank on bulkhead" method thus doing the pin method doesn't really work that great. Besides, as you can see on the builder pics, the frames for the ballast tank area are rather close together. I think it may look very crowded with a gezillion pin heads Remember that is what we see on the original boat and the model, we don't see the pressure hull. The same result would be with stick-ons and the pounce wheel method or any other method. All the frames need to be marked and "pounced" from the reverse side to create the rivet head bumps. Now about the stick-on rivets, I think it will also make it look very crowded but may still be the only viable method. The drawings I have do tell me where the ballast tank frames are and can then be located on the model. next question is, what size rivets did they use? 1/4 inch (6.4 mm)? 3/8 inch (9.5 mm)? or 1/2 inch (12.7 mm) ? That ranges from 0.12 mm to 0.25 mm in my scale. I guess that using a .2 mm stick-on would work best. But - - - this issue really needs a lot of thinking and pondering and your comment about visibility is well put. The model is for me not for a museum, at least not at this moment. When it's my time to go to "Davy Jones' locker" and my grandson doesn't want it the model can always go to one of the interested places in the Netherlands. So, for now I'll leave it undecided. I may purchase one strip of .2 mm rivets to try it out for looks. Your comment on treenails is also right on the mark. That's why I did not treenail my VOC ship, it would have been a daunting task and it would most likely look like having the measles @ John and Ian, thanks for your encouraging words. Yes, I'm very fortunate in having these photos. Remco was the first one directing me to a Dutch website where I found a few. Then Gino den Ridder send me a whole bunch great pics, even a few with my father on it. I also downloaded a short movie taken on board Hr. Ms. Java where I saw my father. I'm thrilled to pieces. Ian, indeed the outside framing for the ballast tanks do look rather flimsy but when the steel plates are riveted on it it becomes pretty stiff. Remember that there is no pressure differential, it's just to gave the boat a hydrodynamic shape for submerged cruising. If you think these frames look skinny for an ocean going vessel then you should look at commercial aircraft frames, or perhaps not - - - - - you may not want to fly anymore. Well, that's all for now and Cheers
-
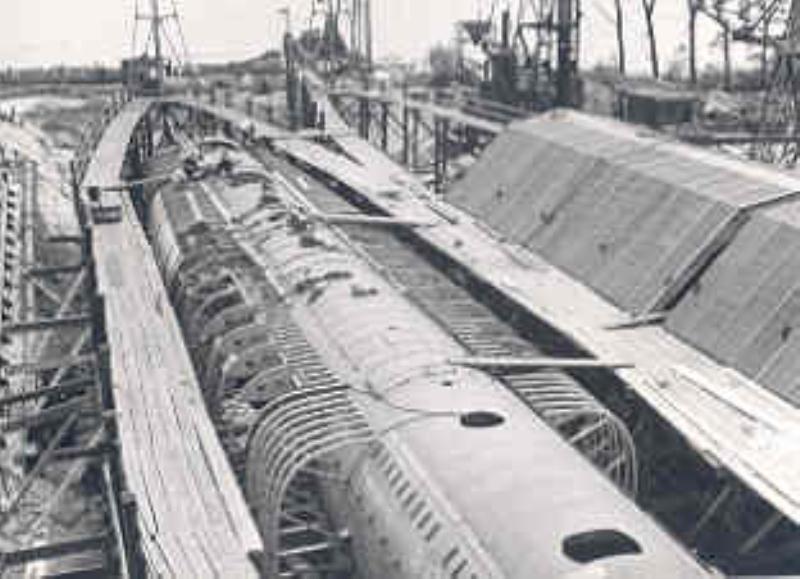
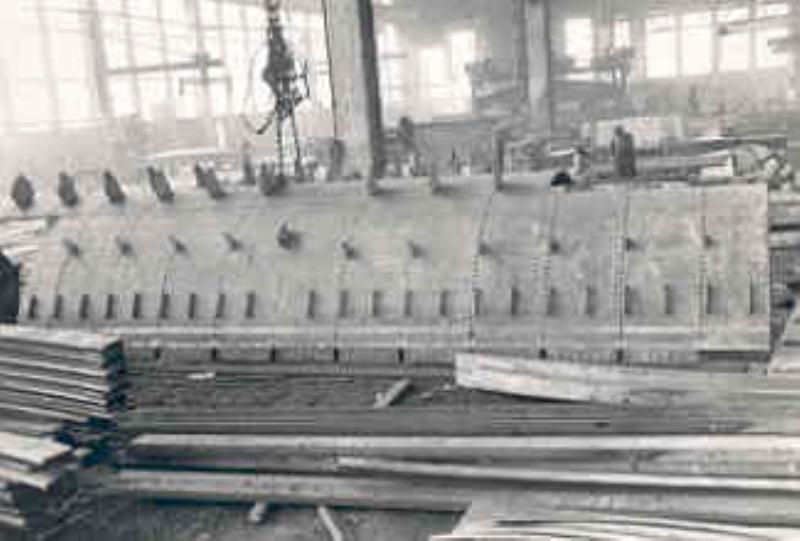
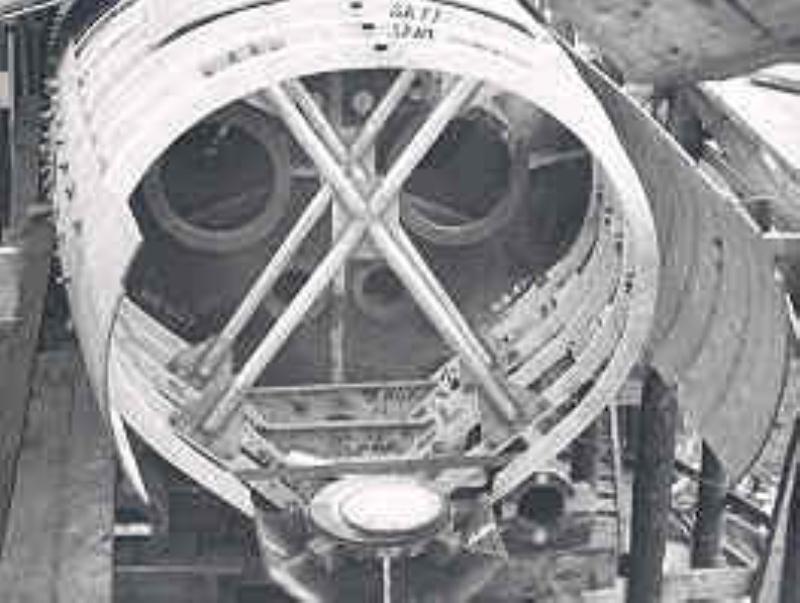
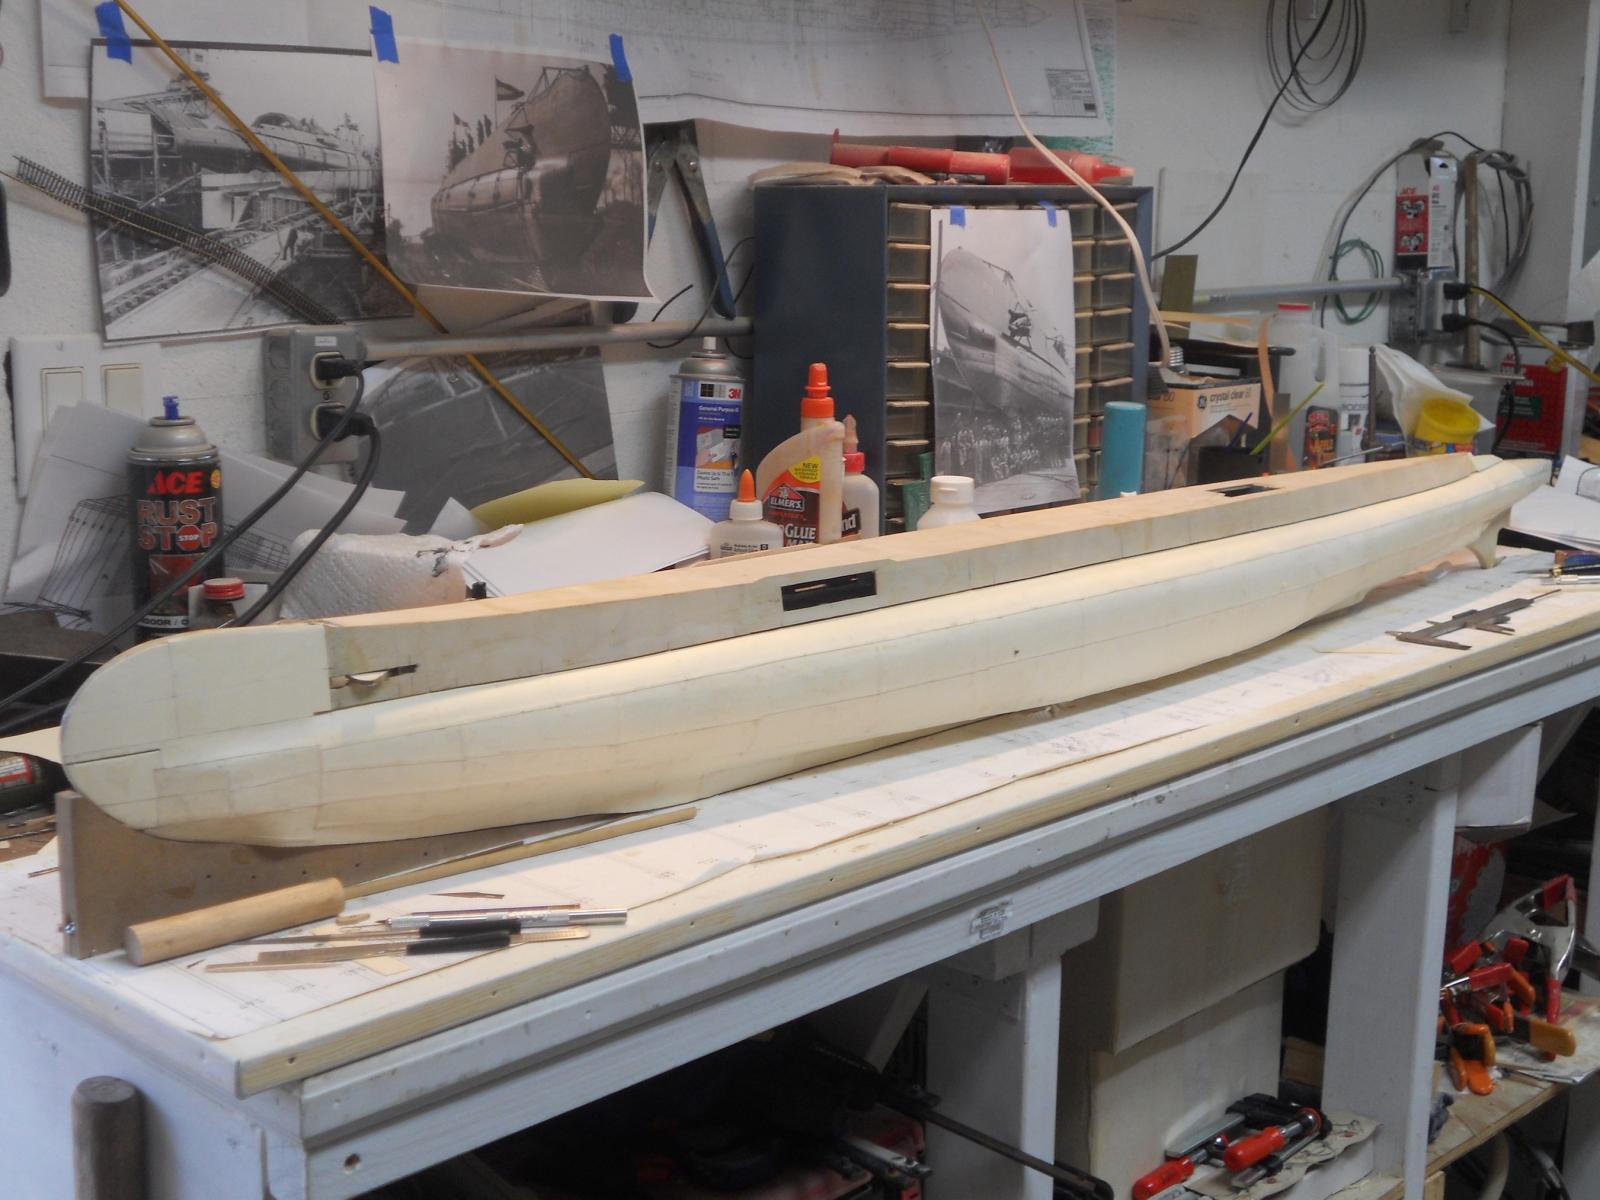
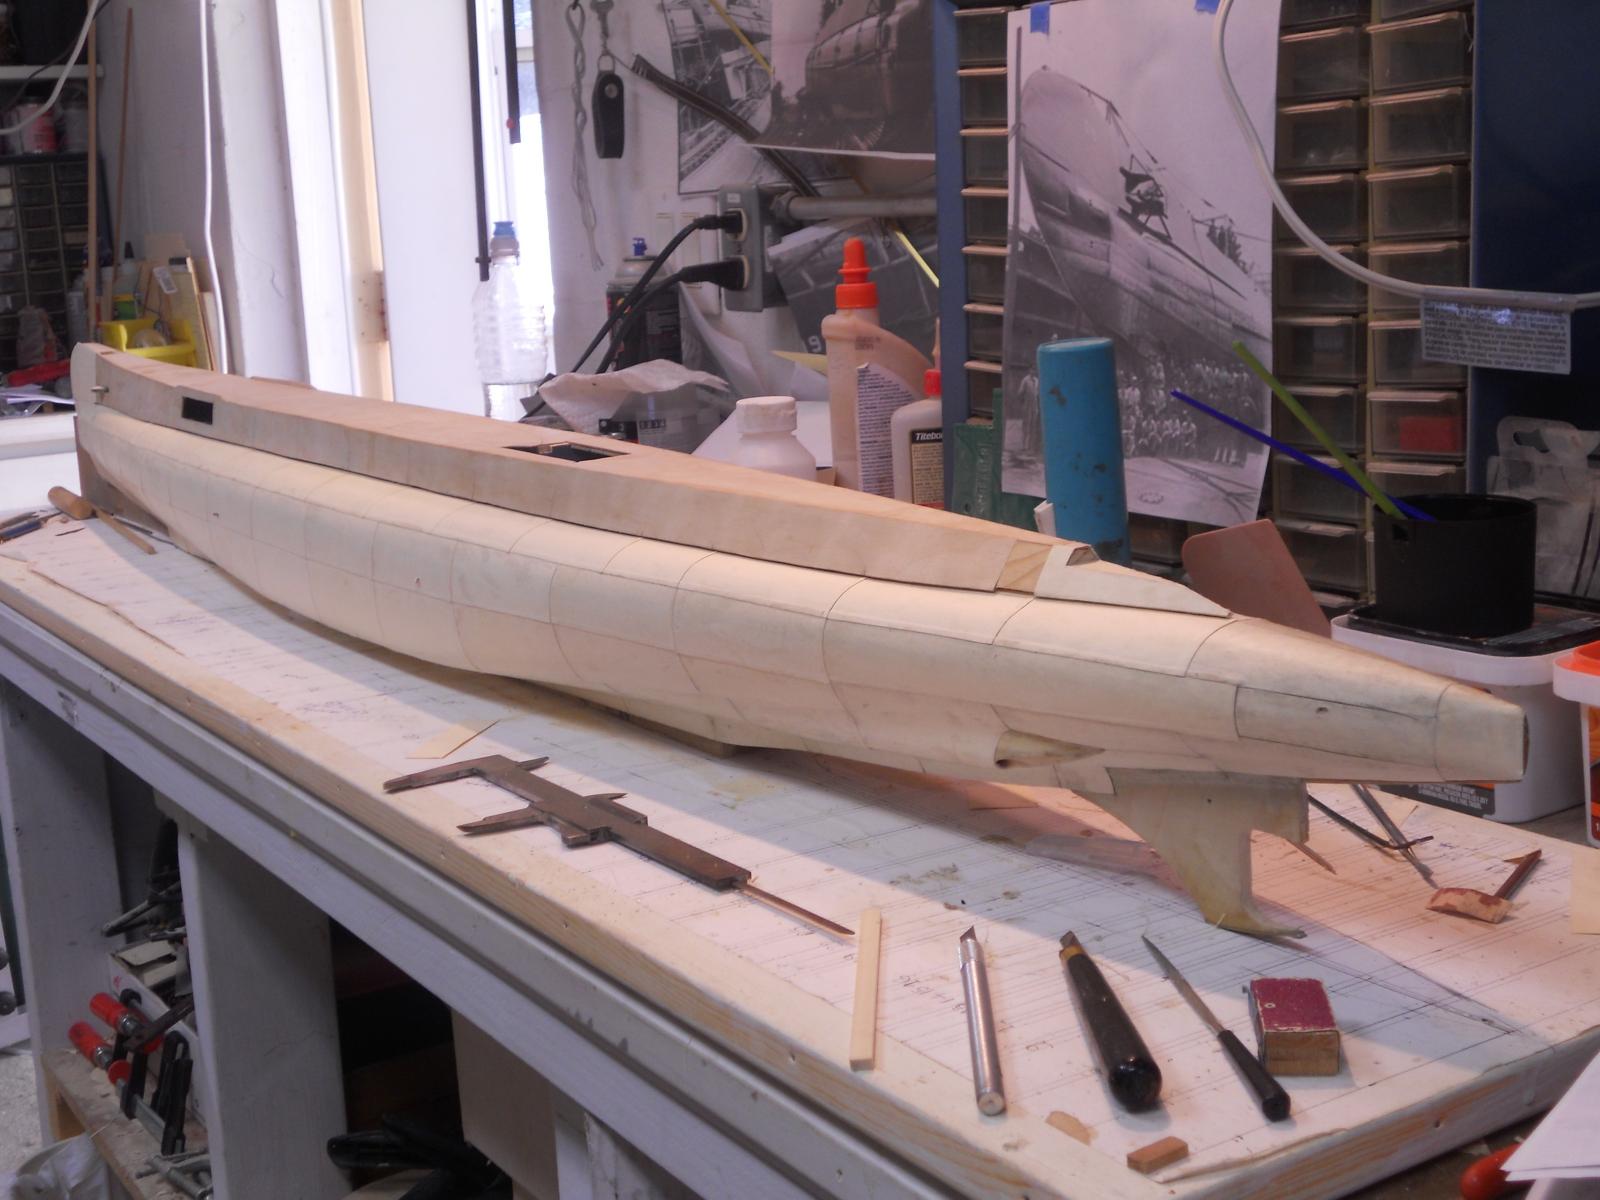
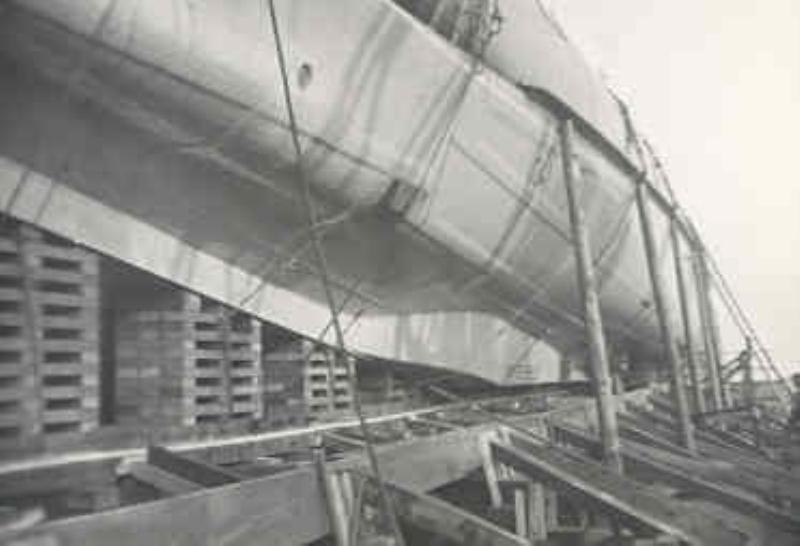
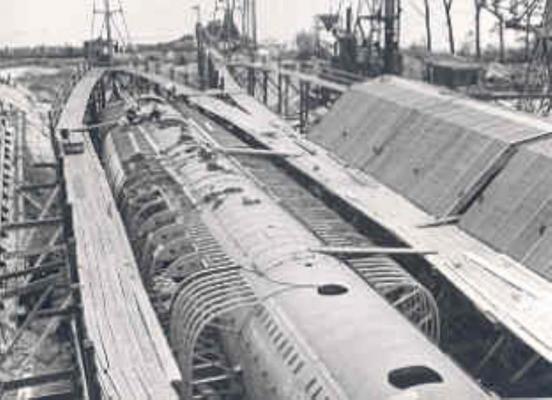
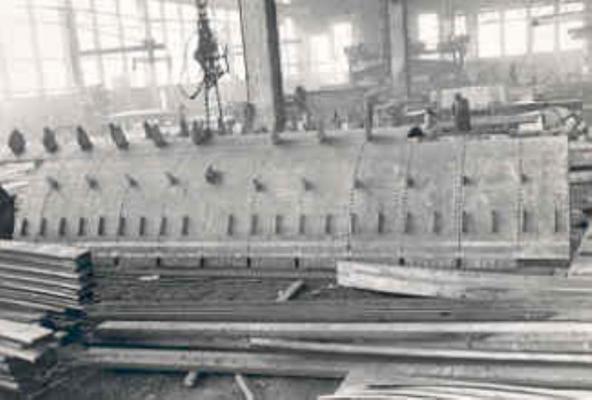
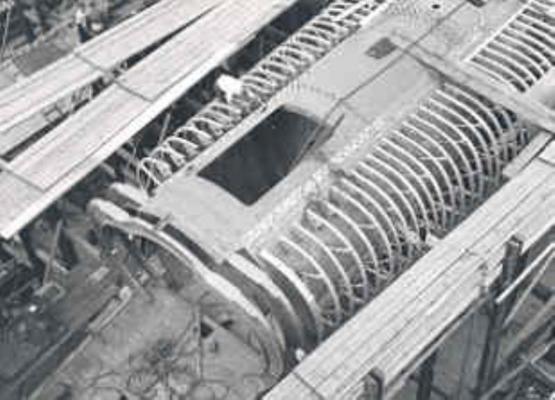
After spending some time on my previous post I'm running late for my beauty sleep In any case, I like to report that I managed to plate the port side deck structure. Took me about four hours though. Here are the pics with a few from the original build of the real boat. Forward part. I even added a strip between the dive planes and the deck torpedo door opening as shown in one of the pics in a previous post. I had to remove a piece of the plating on the bow. I forgot that I still needed to replace some decking plywood that I had to remove in order to install the dive planes. Well, that's done and the glue is curing. A close up of the torpedo door opening with the deck top reenforcement. I followed a photo from the boatbuilder. This is the boat builder's photo I used to mimic the top of the torp opening. A stern view of the plated deck structure. This construction picture shows how the ballast tank and mine compartment frames look like. They are bolted to steel clips that are fastened to the pressure hull skin plates. I don't know if they are welded on or riveted when the skin was riveted on. The deck structure frames are also fastened in like fashion to these clips, This is a pic of a pressure hull skin assembly. Here you can see the rivet patterns to parts of the hull frames and the clips for the ballast tank frames. A top view of the center of the pressure hull. Rivet patterns are clearly visible here. You can also see that the ballast tank frames are rather skinny. This is a photo of the stern area showing the stern torpedo tubes. But note the pressure hull skin plates being fastened with temporary holders ready to be riveted to the frames. Cheers,

-
Thank you fellows for dropping in and your comments and inquiries. @ Johnb, yes indeed it's great progress even having to redo a few. @ Ian, the photography makes it a little difficult to see all the rivets and the way certain joints are made. Most are lap joints but the deck structure seems to be mainly but joints. @ Jan, great question and it would seem advantageous to weld. But even at that time the science of welding and welding technique was not as advanced as we may think. No matter whether it was arc welding or with oxy-aceteleen. The problem was in weld-seem embrittlement. Then how would they have welded the hull plates to the frames. With structures such as subs welding 22 mm steel plates to heavy steel frames was still a very difficult if not impossible process and would be very slow. All the photos made by Wilton Feyenoord I have show exclusive riveting. Many sections of the pressure hull were made inside the assembly hall as subassemblies and all show riveting. Even the USS Cod, a Gato Class sub of the US Navy made during the early part of WW II, has an all riveted pressure hull. There is really nothing wrong with using rivets for these boats because they spend most of their time on the surface. Their max diving depth is listed at 100 meters or 328 feet. They did obviously go deeper when pressed but what we should remember is that rivets are strongest in sheer, not tension. With subs the pressure is inwards thus actually aiding in keeping the hull skin tight to the frames with zero tension on the rivet heads. In aircraft it's just reversed due the pressurized hull and with a normal cabin pressure differential of 1 : 8 there is tons of pressure per square inch. It's actually the size and type of rivet used is crucial. It's the size and spacing of the frames and the thickness of the skin that's important. Also, what we see on the pictures and my model is actually the non pressurized part of the hull, i.e. the ballast tanks and are constructed quite light. The lap joints show a double row of rivets with a single row in the between frames. The deck structure is also very light, all it needs to do is carry the weight of crew and occasionally a torpedo or two and perhaps cases of ammo when loading them onboard. The pressure hull is another story In my following post I'll add a few pics of the O 19 being build that'll show the riveting. Now, I am an Aircraft engineer and repairer, besides many other trades, with welding among them, but the construction and assembling methods and techniques are very similar to submarines. After studying all the photos and books on the subject this is what I am basing it on. Welding of submarines did not get really going till they started to build the nuclear subs. At one time in my career I got involved with General Dynamics, the same company that builds nuclear subs, in their non destructive testing technique on subs that they wanted to use and have approved on aircraft wings. My involvement was in the approval process as the representative of the FAA (Federal Aviation Administration). Long but interesting story I won't go into here. @ Mark, yes, I have read about people using tiny dabs of glue and I was thinking about it but have you taken a look at the drawings of this boat? There must be millions of them. I definitely need another life time doing that Even gluing decals or strips of actual river heads on all the frames and seems is a time consuming job. But - - - - - I'm moving into the positive direction though and with what system is still up in the air. Cheers,
-
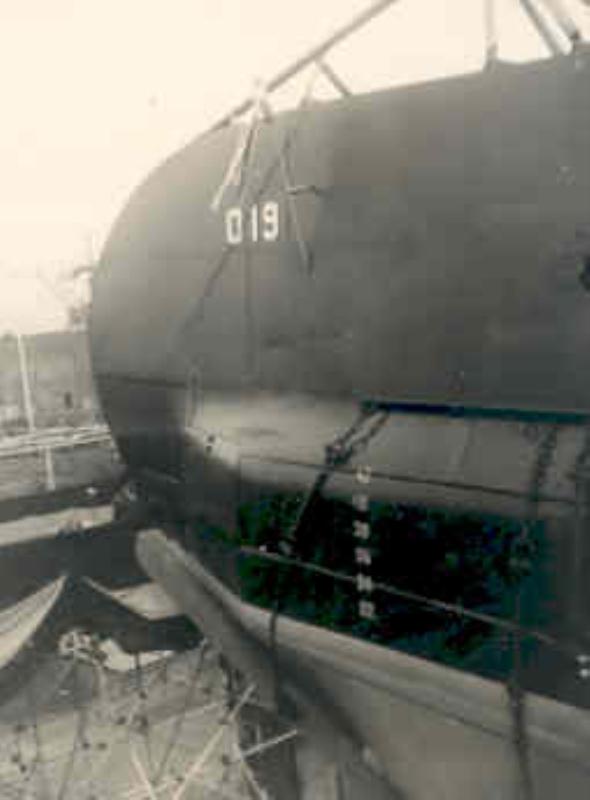
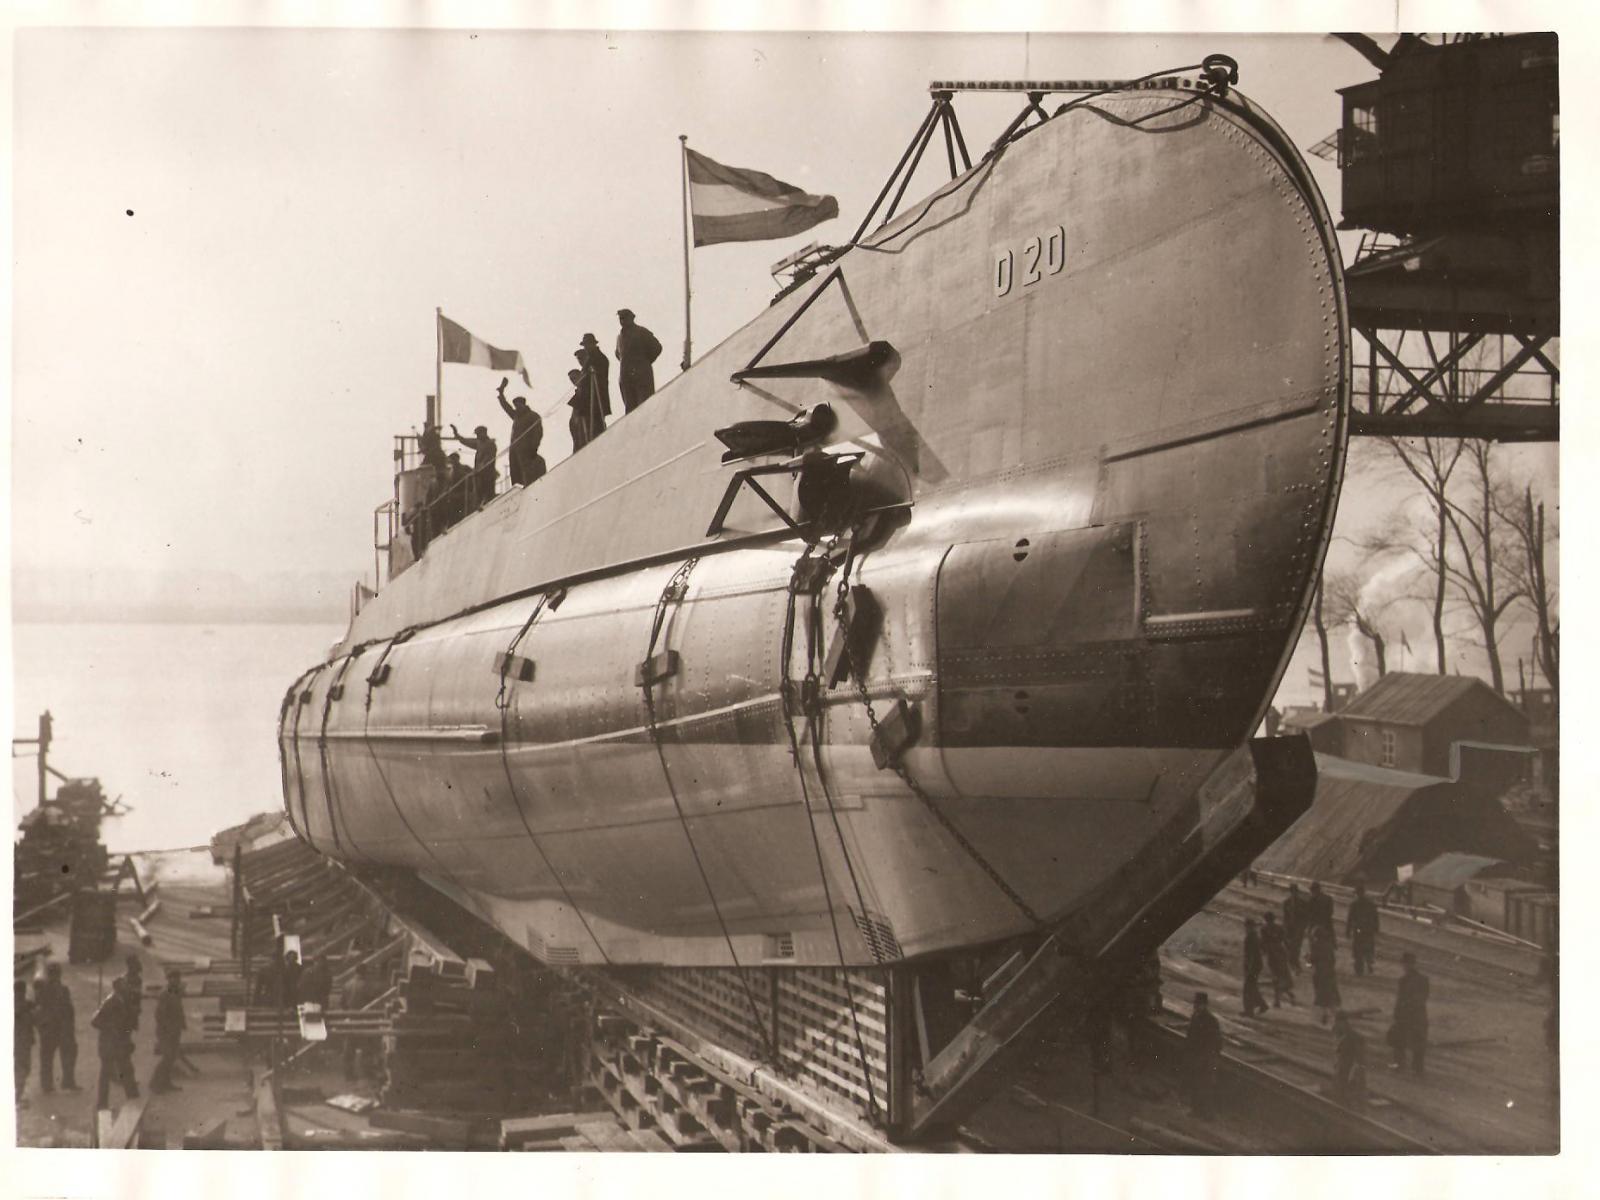
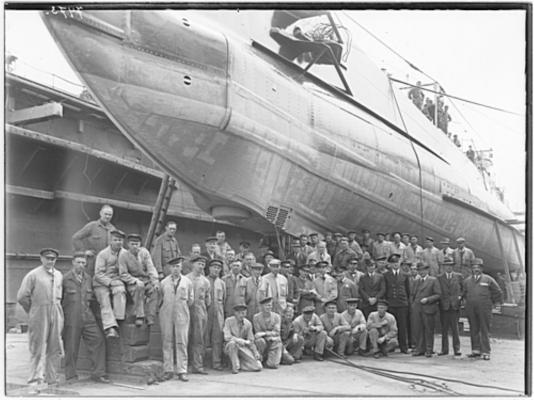
I had to take a few days away from the ship yard but had already a few pics made of the progress on the port side. I'm ready to plate the side of the deck structure and hopefully can complete the port side in the next few days. Looking at the attached photos from the original shipyard pics, the rivets do look pretty good. Perhaps the smaller size may look okay on the boat. I may just have to order a gezillion of them 3/4 side view port side. Close-up view of the port bow. Comparing this with some of the original factory shots I think I'm close with the pattern of the plates. There is still some detail work to be added. 3/4 stern view looking forward Bow view port side. I had to make the water drainage slit in the forward bow, just above and forward of the torpedo doors, came out quite nice. A profile pic, ready for Ken's profile section. Bow shot just before her launch in 1938. A great help for detail work. A photo of the crew in front of the bow at the dockyard. My father is on it. Ready for the launch, 1938. Good pic to help me in the hull plate pattern and rivets. Great shot from the stern, ready for the launch, 1938. A shame it's so small and the protective steel girders around the dive planes and rudder. Well, they needed to protect all that during the launch but it's not much help to me in looking for the details. This is the O 20 just before her launch. The O 20 is the sister of the O 19. I like this shot for the excellent detail of the hull plating and rivets. At least it's large enough to really see the details. Cheers,


-
Thank you guys for the rivet info. Certainly something to be considered. Fortunately I don't have to make a decision on it till later it seems. Also, it appears that the deck plates may be welded with a few rivets here and there and they are but joints. Cheers,
-
Hi Anthony, thanks for your encouraging words! Hey, that's part of my theme song, "Home, home on the range - - - " Oh, my kids used to hate it when i started that song, they cringed Actually, I look younger then my age and can still run circles around people half my age. Talking about standing on my feet, when I'm working on the sub model I have to stand and move from one end to the other. Cannot sit, impossible to work on her. Most of the time it's three hours in the morning and three in the afternoon with chores in between. Guess I'm giving that pink wabbit a run for it's money You also hang in there and btw, I like all the great pics you come up with. Cheers,
-
Hello Paul, thanks for dropping in! I have been thinking about you, did you receive a telepathic message to stop by? Yes, I have heard about some company making rivets, I think it was Kreek, a Dutch guy who build a RC model of the K 18. At this stage of the game I was not really contemplating of adding rivets. It's tempting though but - - - Even if the heads are 30 mm it would only be 0.6 mm in my scale and then cementing a gezillion of them, hmmm, I'll need another life Well, with all the things I still want to do I definitely do need another life For the plating I am using tan colored file folders. It works okay but it makes the lap joints a little bulky. I'll send you a PM with a few questions. Cheers,
-
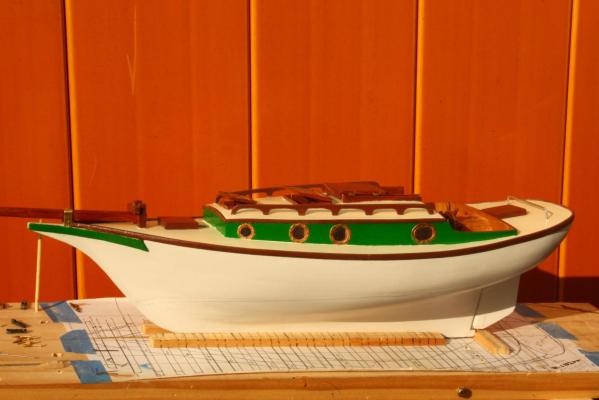
Thank you everyone for your like votes, I'm overwhelmed! @ Anthony: Yes, she will be fully rigged and that too will all work. The next episodes will go into that part. Gwen, my Admiral, and I made plans to build a 1 to 1 sloop in simplified format. I believe i mentioned that in my intro post 1. However, due to circumstances we had to abandon that idea and these circumstances have not changed. Oh, the desire is there alright but alas, we must make do with models. Besides, I'm pushing 80 and a full scale build would take the rest of my life, when would I be able to sail her, oh I forgot, in my next life I do expect you to help me build her I let you know @ John: Thanks John for your comment. Yes, the hull will remain white. Perhaps you have seen the pencil line on the hull for the waterline? I thought of painting the bottom a different color but decided against it. I'll just have to haul her out of the water and trailer her home so I can clean her up I wanted to use green to remind us of the old houses and windmills in Holland, a very popular color there. I used the same green for my VOC ship model, that's been gathering dust in favor for building my father's sub, the O 19. @ Bob: Tank you Bob, and yes, she is meant to be a nice comfy cruising sailer for 4 people. Cheers to all
-
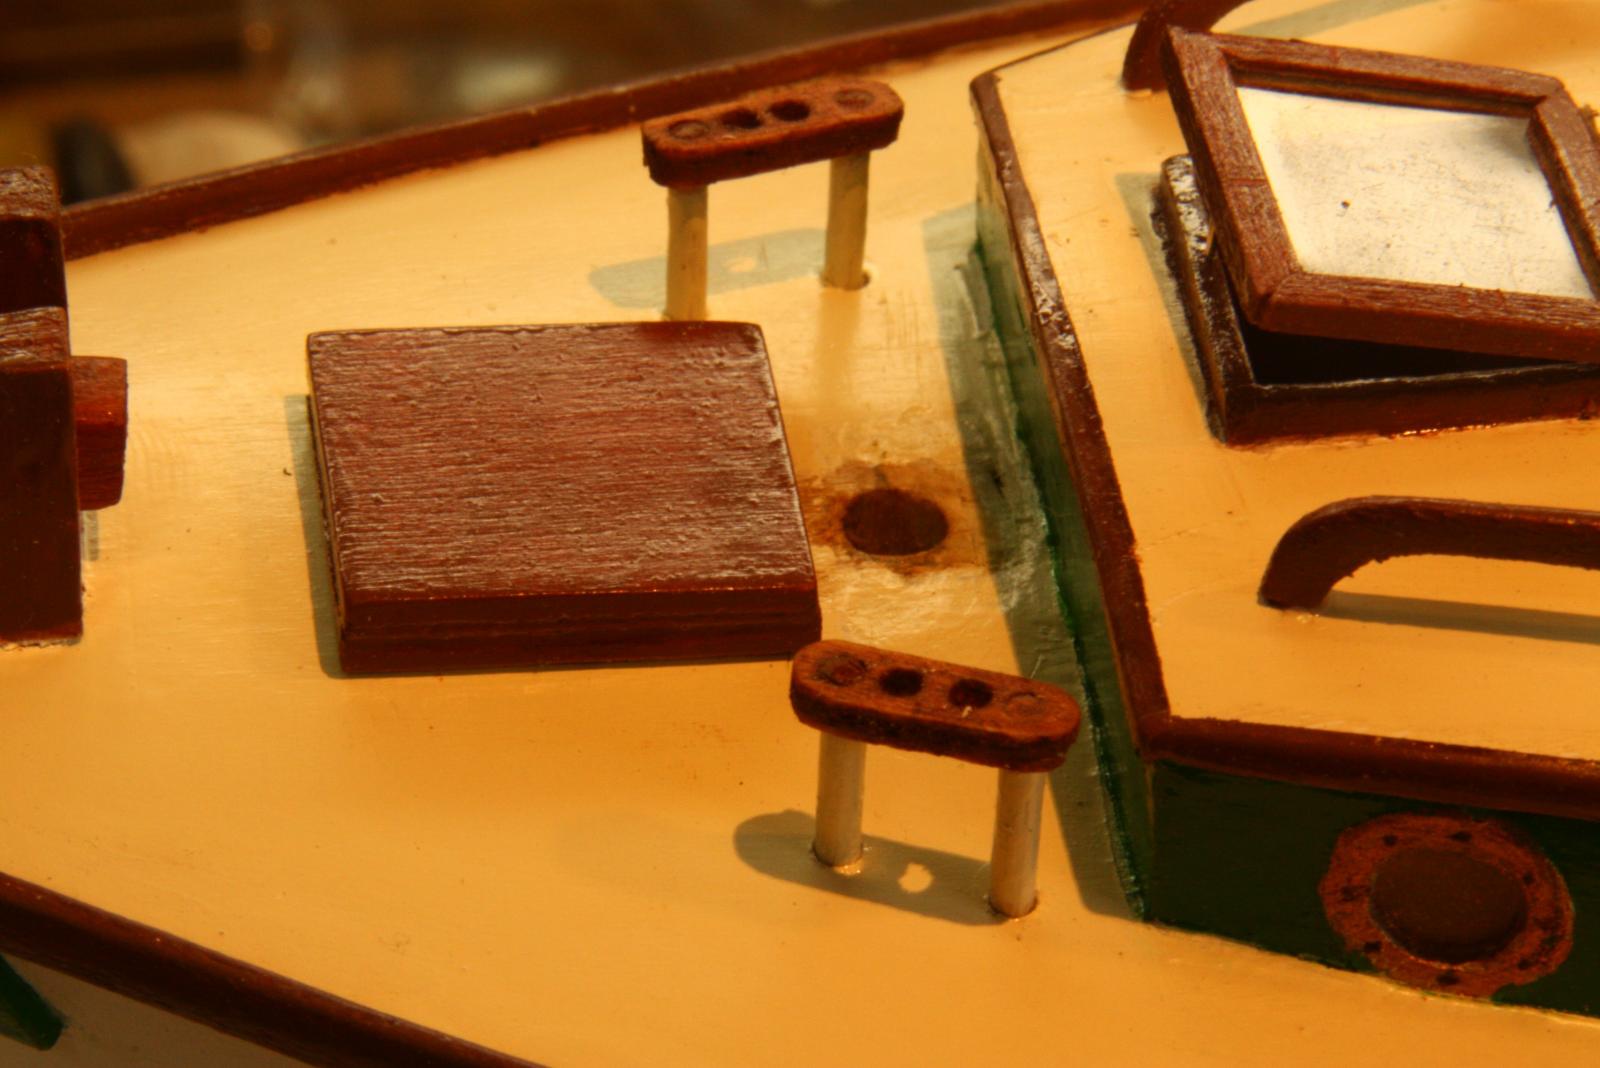
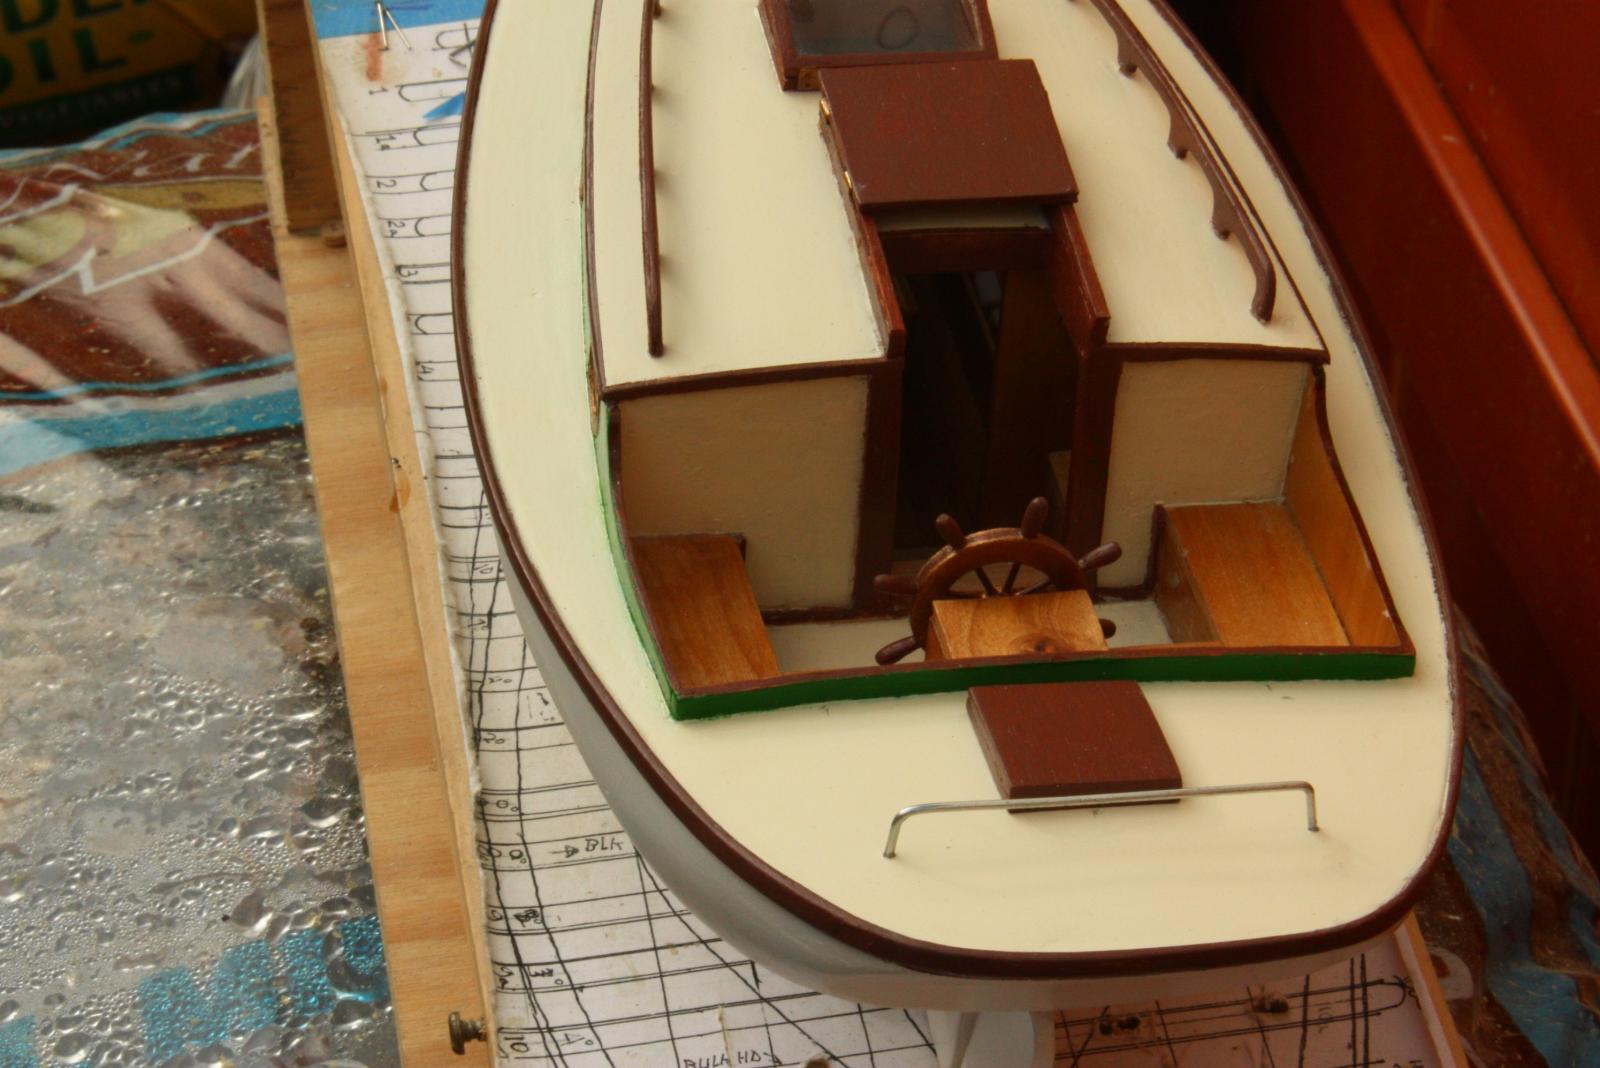
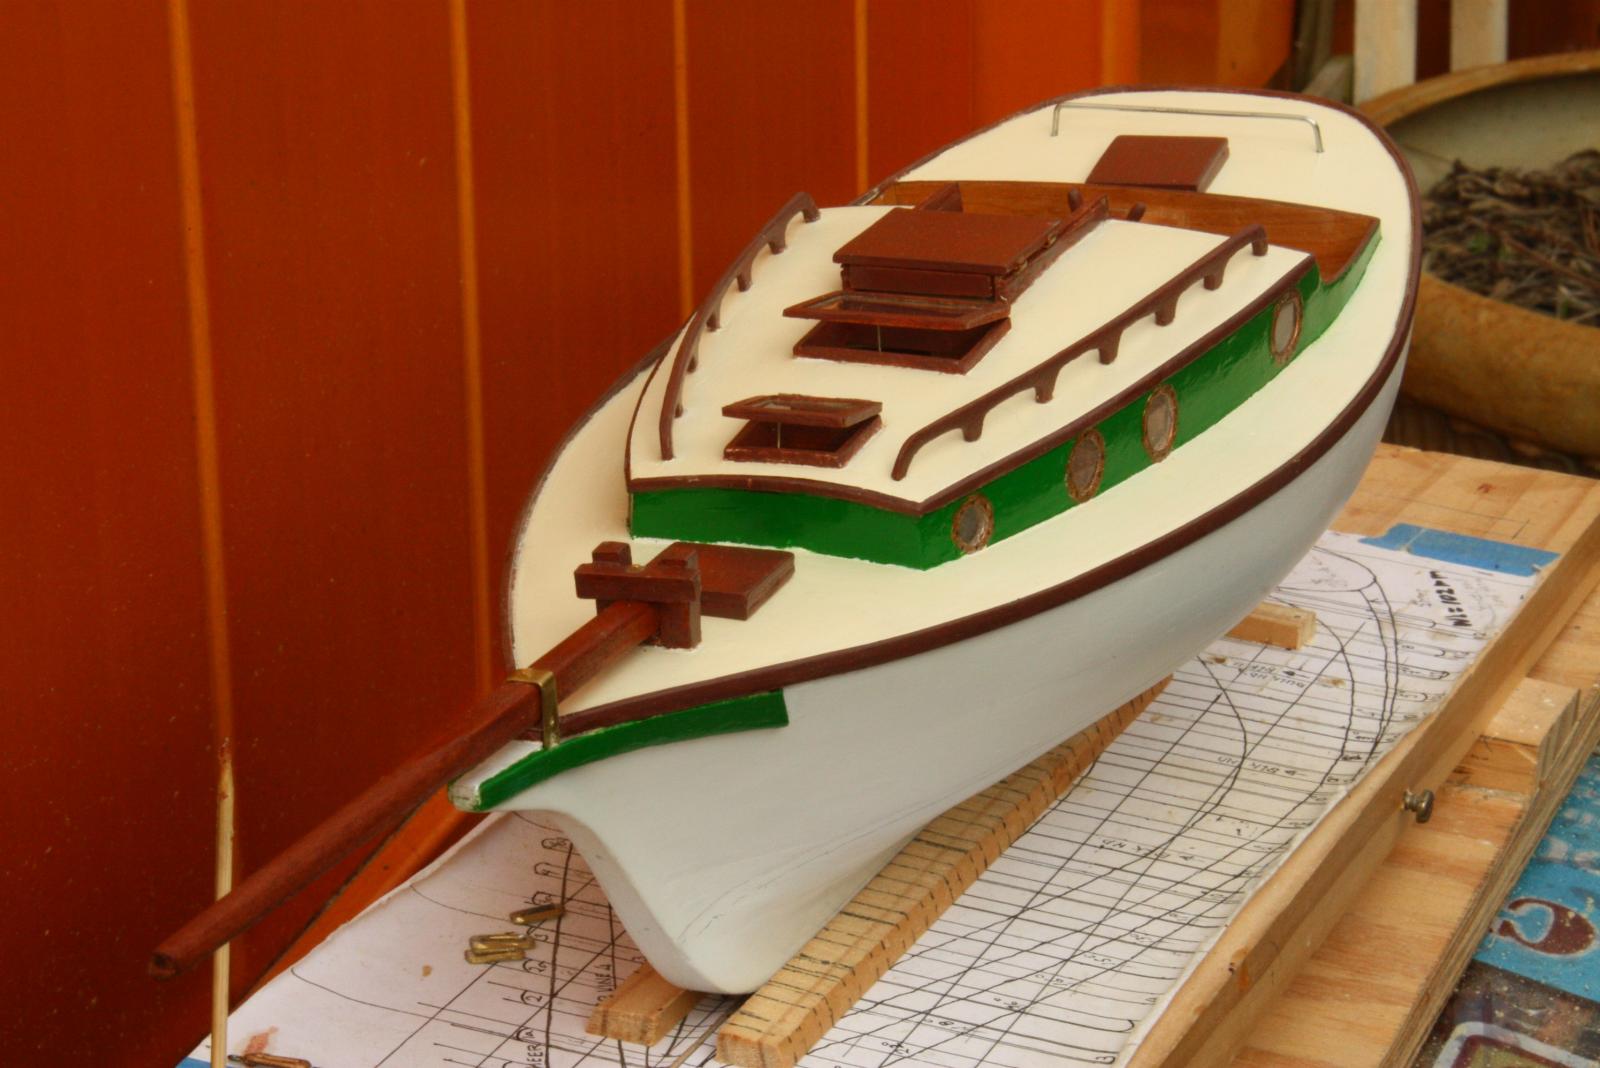
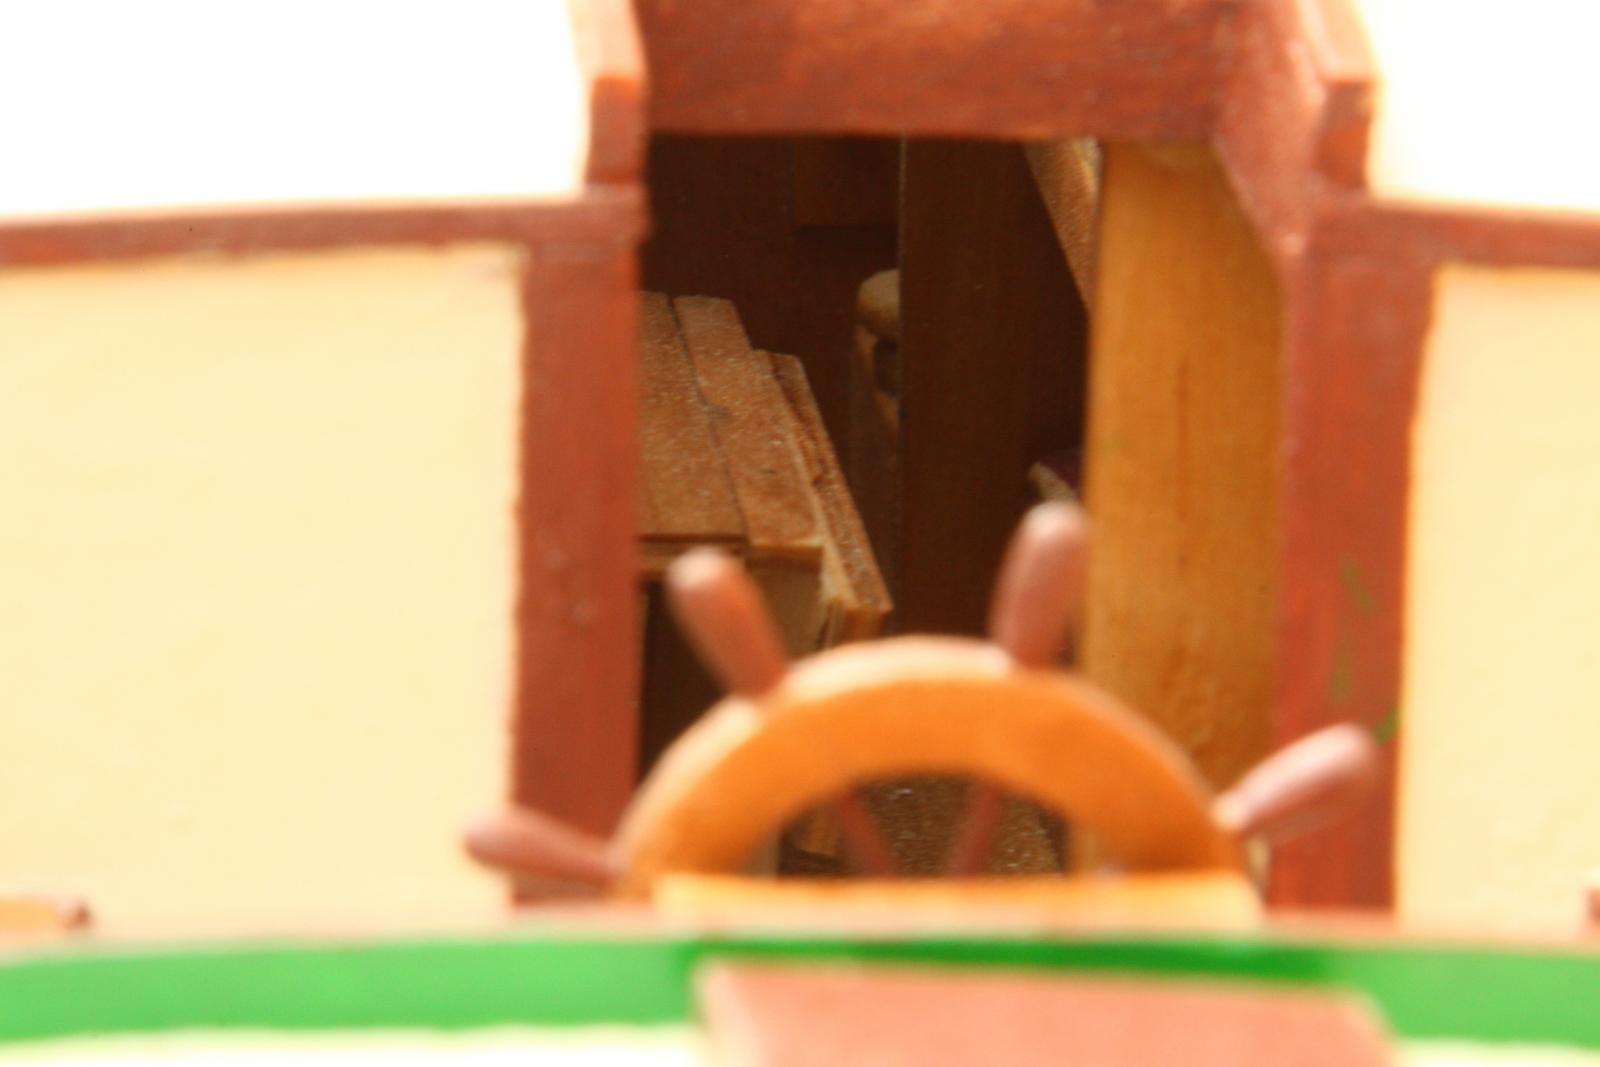
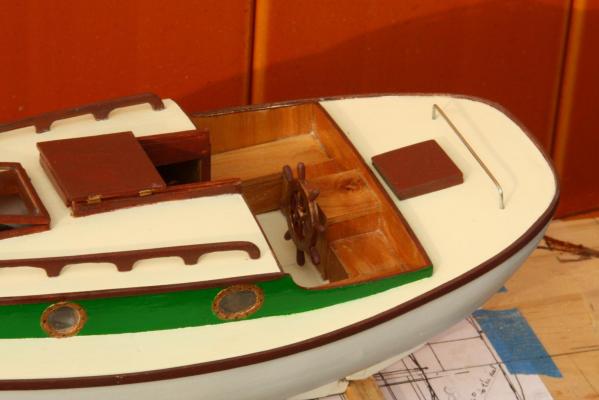
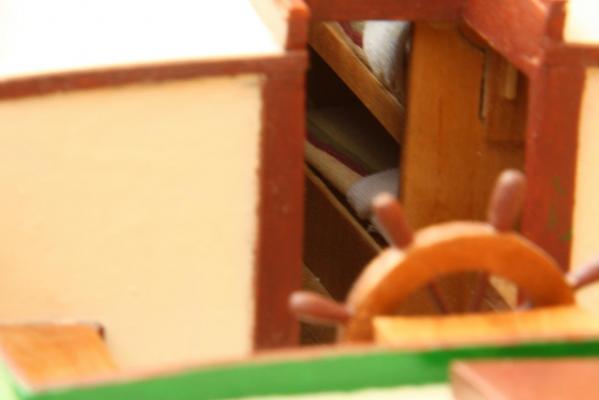
Hello friends, I have made no pics between those shown in my previous episode post and these. A lot of work was done and here is the result. In this episode I have completed the cabin roof, made and installed the handholds on the roof, the cabin skylights and sliding entry hatch. I also finished painting her and stained the exposed woodwork. I made the bowsprit attaching hardware and installed those. The bowsprit can be removed when needed for repair. Actually, everything on the model works like a real sloop. There is still the need for paint touch up in places. Additional comments are given with the photos. Oh, Anthony, here you can see that all the interior work is visible, even to the head and washroom. When you peak through the skylights more is visible. Profile view. The handhold on the cabin roof was made from my own made plywood as are the skylight frames, hatch covers and name board on the bow. I stained then in cherry and finished with Minwax Poly Urethane semi-gloss. The porthole frames are file folder card and painted with bronze paint. The "glass" for the port holes and skylights ate cut from cold-cut tubs out of the grocery store. The bowsprit slides into a frame and is pinned with a brass bolt. It rests on a block at the bow and is secured with a brass U channel that is bolted to the bow frame with brass bolts. It can actually be removed. A close-up of the aft end of the sloop. I made four angle brackets from brass sheet stock for the sliding entry hatch. They are bolted to the sides of the hatch with two sewing pins for each as bolts. They slide in groves I made in the hatch sides. The handholds are cut out of a narrow piece of plywood using my old and trusty jeweler's coping saw. They are epoxy glued and pinned to the cabin roof. A view from above the stern, looking into the cabin area and the cockpit. Unfortunately, the light inside the cabin area is rather dim to see any detail. A view from the bow. The skylights hinge and can be closed. I have opened and secured them with a latch. If need be they can be hinged fully open. They are actually weather proof. Yes, she is in need of some paint touch-up at this stage. A telephoto shot of the interior. We cab see the galley cupboard and the made-up bunks. Another telephoto shot into the cabin area. You can see the potty lid of the commode, the cabin table with the starboard lid folded down. Cheers,


-
Willem Barentsz by ceestoorn - FINISHED
Piet replied to ceestoorn's topic in - Build logs for subjects built 1501 - 1750
Hoi Cees, thank you for looking at my builds. Roden eh? What a coincidence, my Admiral, my dear wife's brother in-law lives in Roden. Many, many years ago on one of our visits to see family we stayed with him and his wife, Gwen's oldest sister. Gwen's sister died a several years ago though. I doubt that we will be visiting family in Holland again, but one never knows what the future brings. His name is Henk Kars and lives at Staten Laan 57. 9301RJ. If and when you see him say hi from me Henk is a retired trade school teacher and director, he is good with tools and how to handle them. Hnady to have as a friend Have you started cutting wood yet? Am very anxious in following your build. Right now my VOC ship seems to be on hold in favor for my father's submarine, the O 19. Groetjes, -
Thanks to all for your "like" votes. @ Anthony, Interesting thought of a clear Plexiglas roof but hold your horses my friend A little later in the build you can see that everything of the interior is visible. The skylights are glazed with clear plastic "glass" and the entry way gives us a clear shot to the inside of the cabin. I can even open the sky lights more and manipulate the upper bunks , the table, closet and cupboard doors! All this must be done very carefully with tweezers or small wire hooks though, my fingers may be thin but not thin enough I could still make the missing cooking burners for the galley and put that on the burner counter. I was seriously considering of making the roof detachable but this works quite well also. @ John, thank you John for visiting, appreciate it very much! Cheers,
-
Willem Barentsz by ceestoorn - FINISHED
Piet replied to ceestoorn's topic in - Build logs for subjects built 1501 - 1750
Hoi Cees, Good to see another Dutch ship being build. I'll be following your efforts. Where in the Netherlands do you live? Groetjes, -
Hey Anthony, thank you for your very quick "like". How do you do it so fast? Yeah man, I really liked building that little sloop. Wish it was the real size. Cheers my friend,