Piet
-
Posts
3,568 -
Joined
-
Last visited
Content Type
Profiles
Forums
Gallery
Events
Everything posted by Piet
-
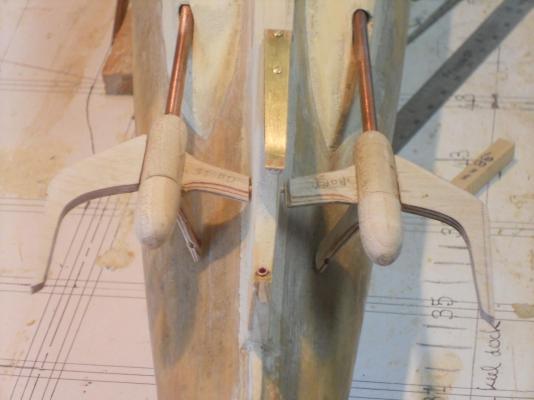
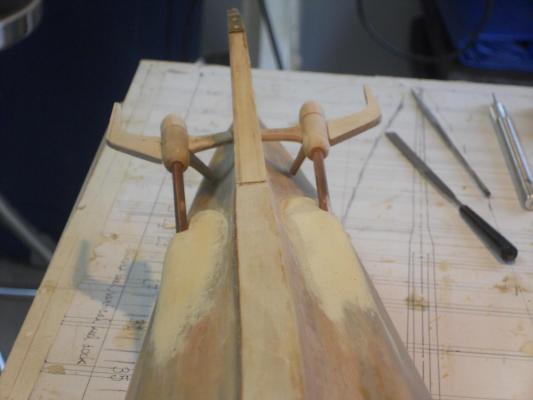
 Thank you all for hitting the like button, it's good to know you like what I have done! John and Bob, thanks for stopping buy and your kind words. I have been plugging along at my O 19 submarine and many chores around the house but I can at least show a few more pics of the Friendship sloop. I made the cabin roof from my home-build plywood. The pics show that I also made two skylights and the entry hatch slide rails. Some explanation will be added below the pics. As mentioned in a previous post, I glued-up the veneer for the plywood on a formed piece of hard foam. It worked like a charm and fit just nice. At this stage of the game it was ready to be primed. What is not seen are additional support beams for the cabin roof. The entry hatch slides in grooves I carved in the rails. I made 4 brass sliders bend 90 degrees and fastened to the sides of the hatch. There was enough thickness to the plywood where I could use regular sewing pins as nails in addition to CA cement. I also made and glued trim slats to the edges of the roof, except for the front edge. Another view from starboard looking forward. A view looking aft from starboard. The bowsprit is already made and fitted but the attaching hardware must still be made.. It's just resting now, you can see it laying on the build dock. There is also some hardware laying on the build dock I was playing with. Port side view looking aft. Cheers,
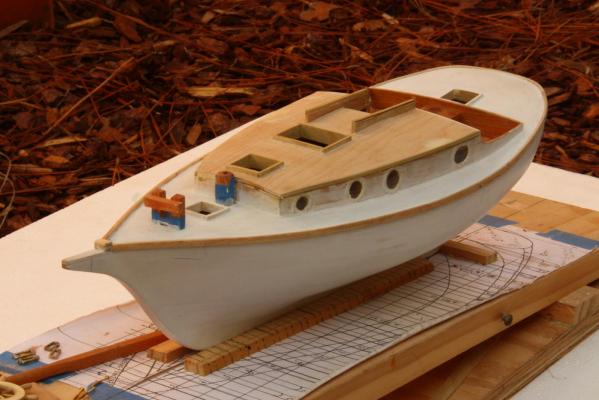
-
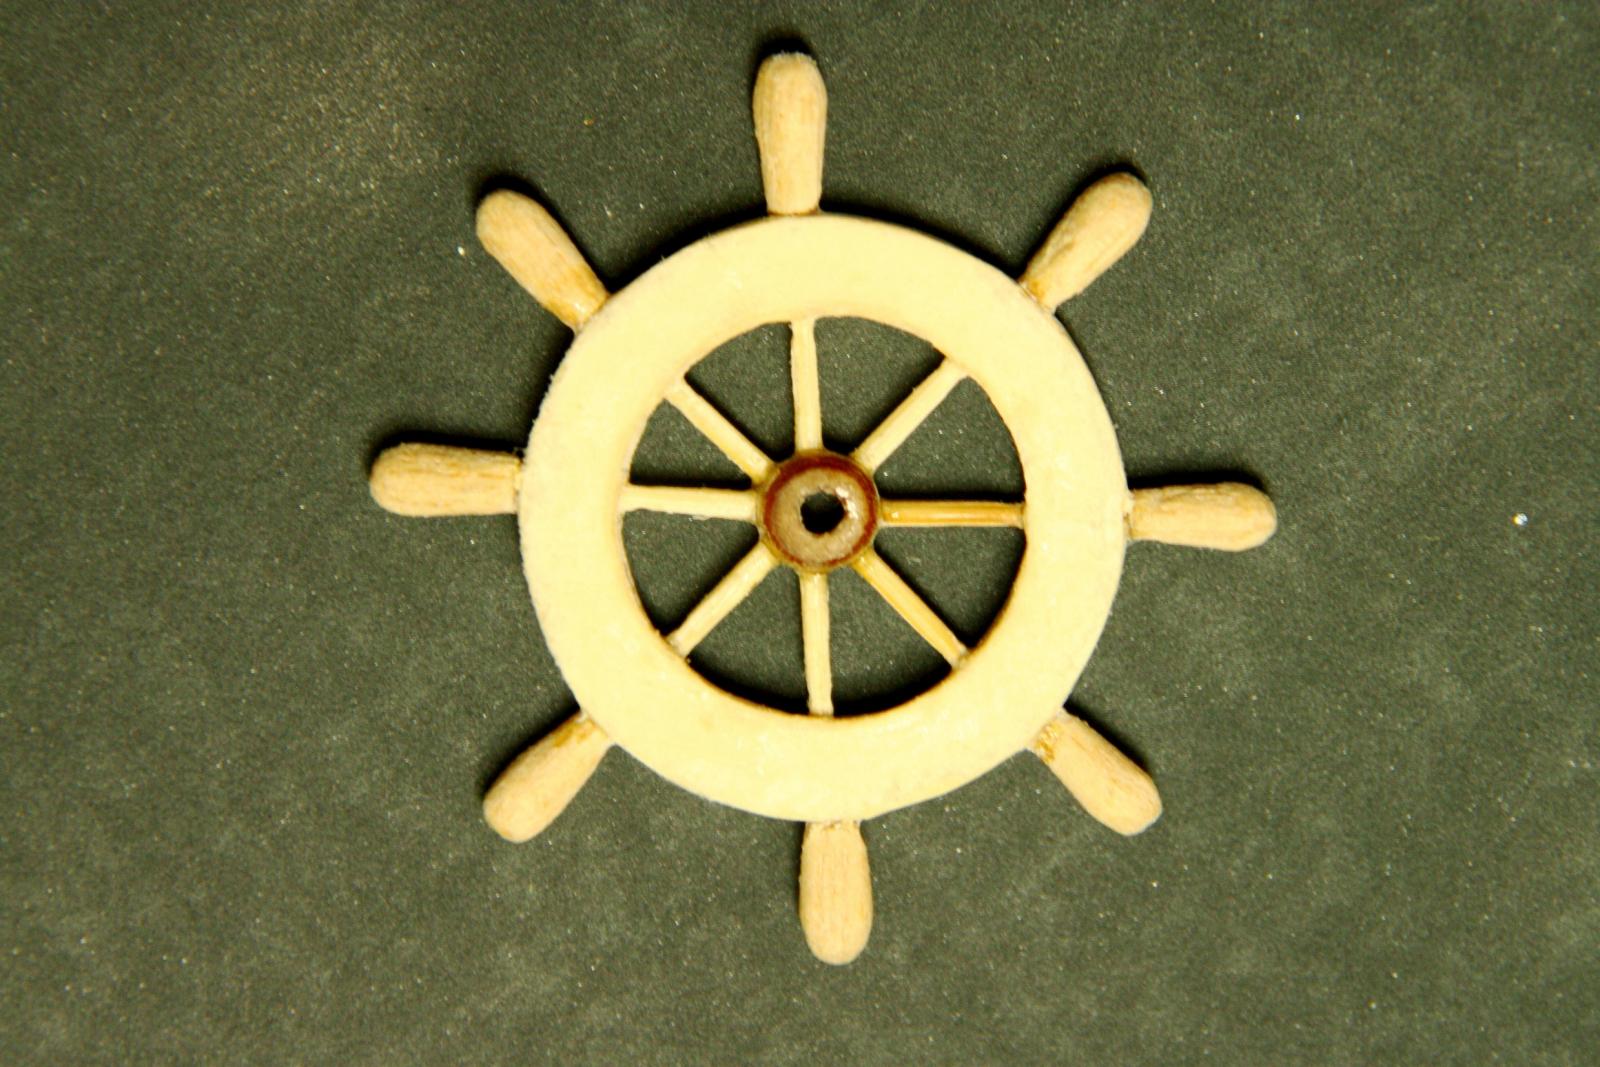
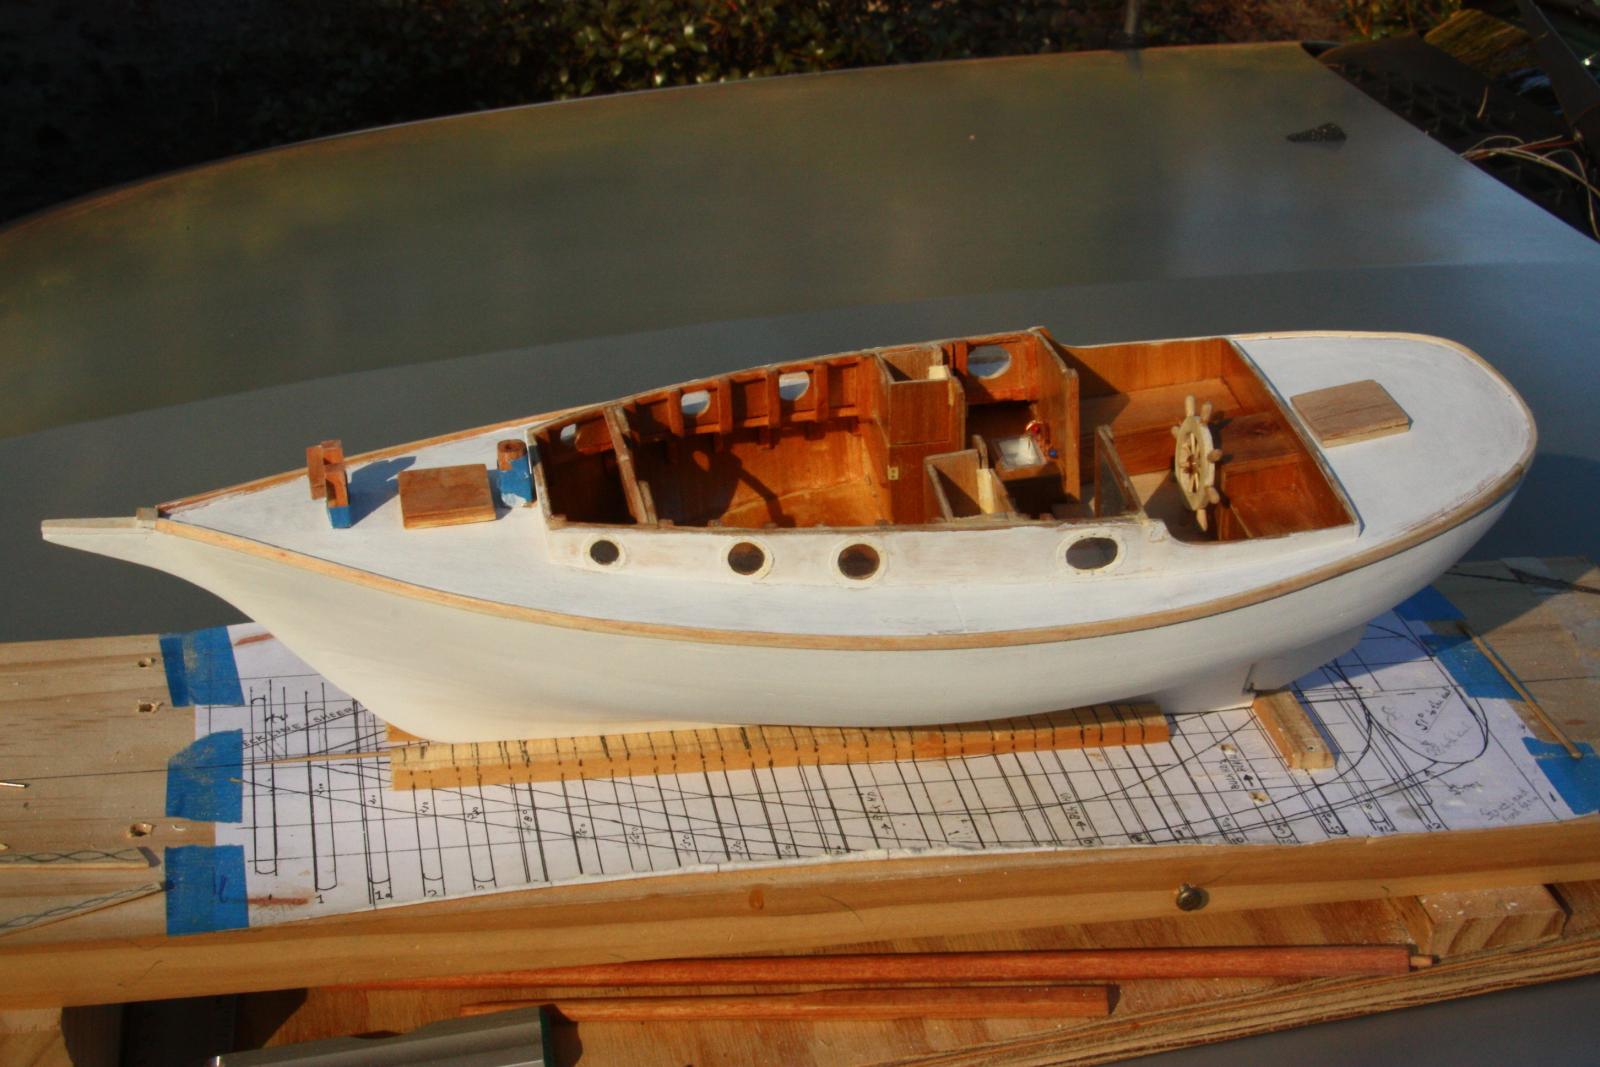
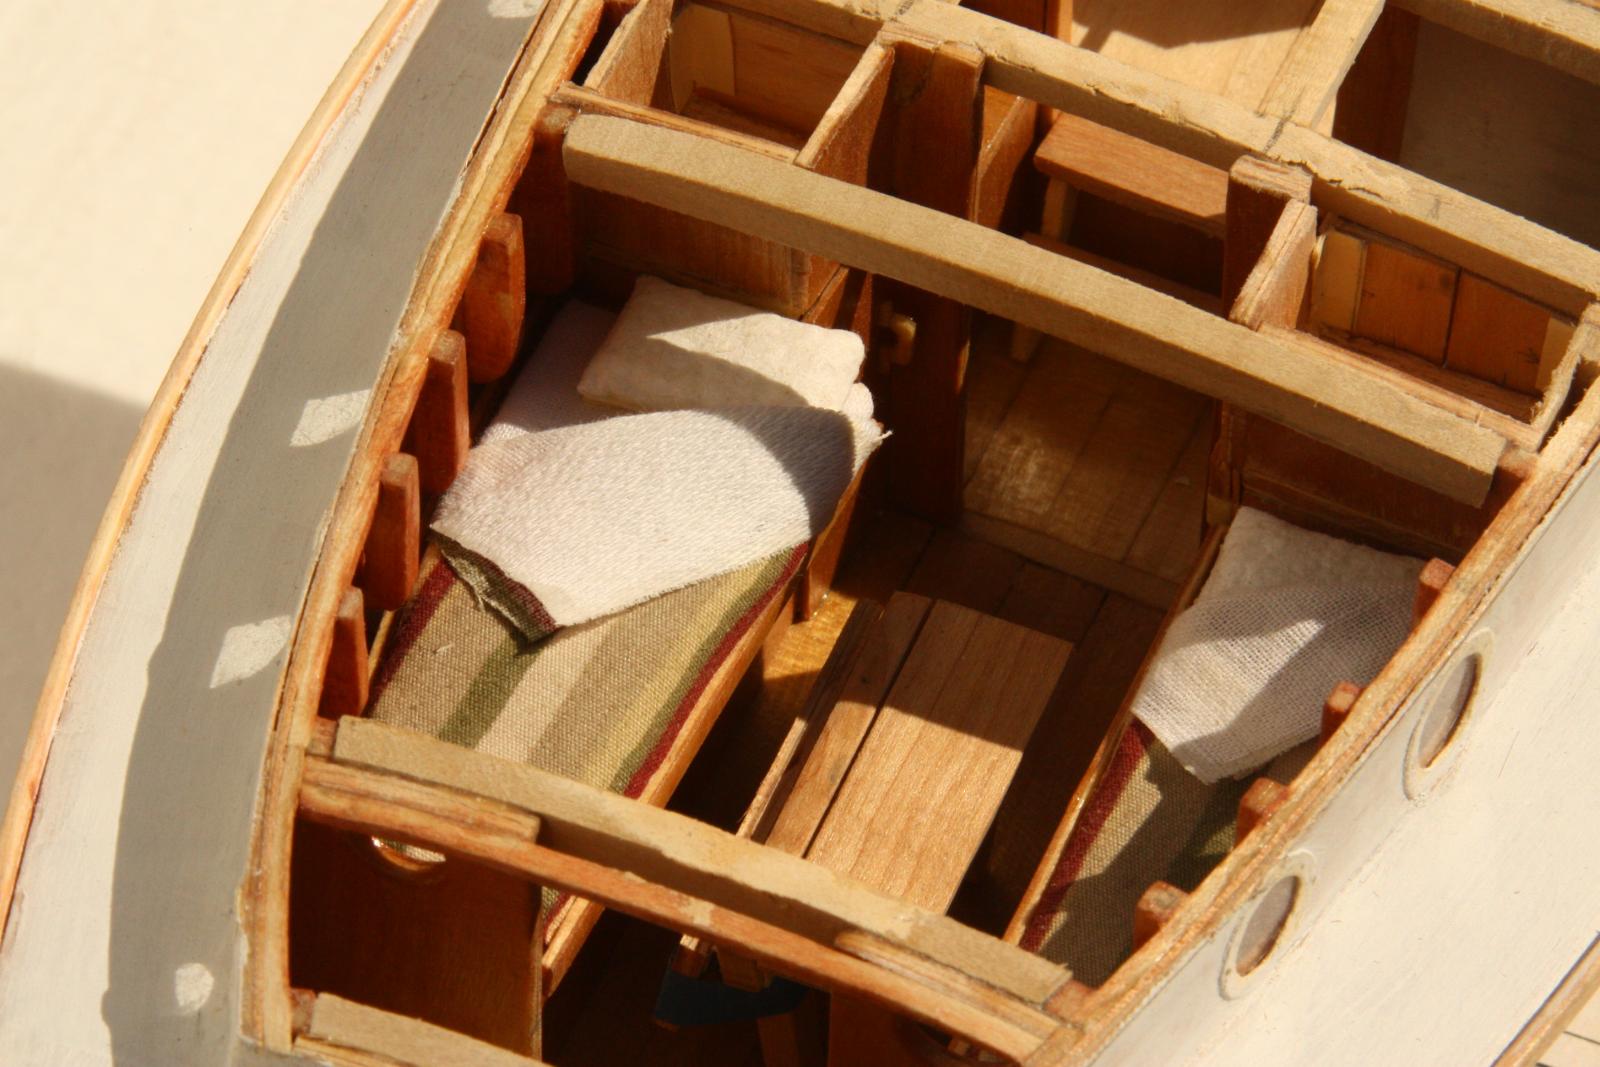
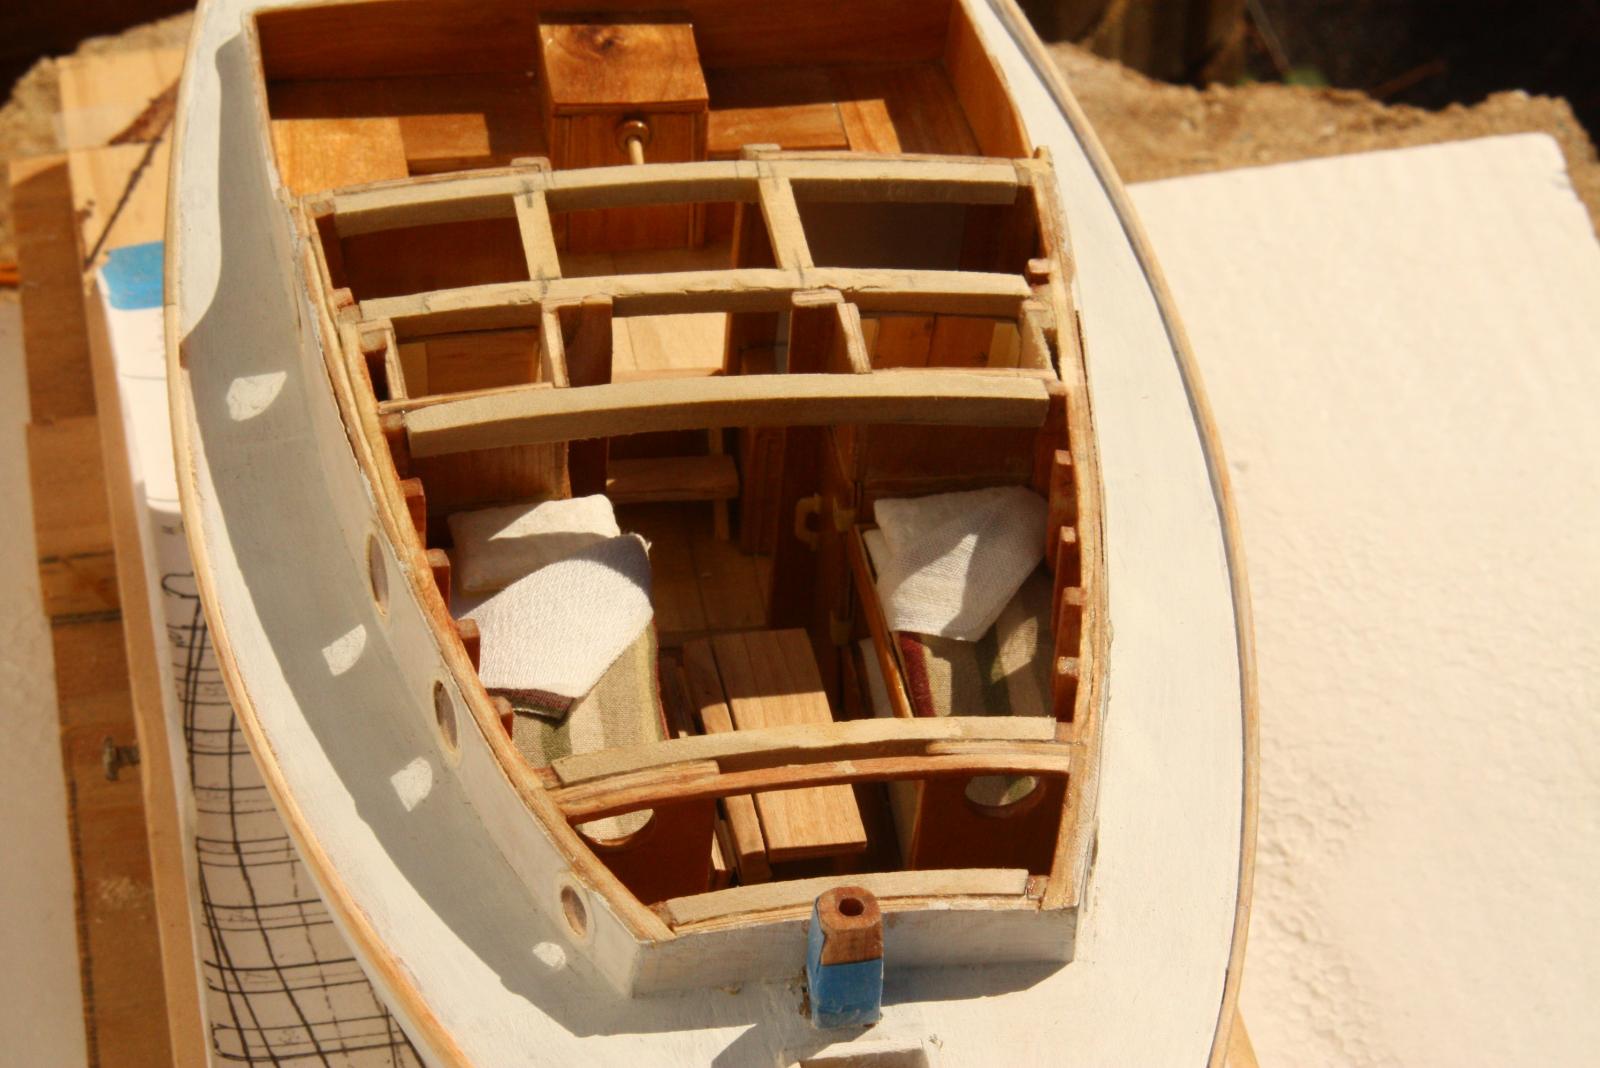
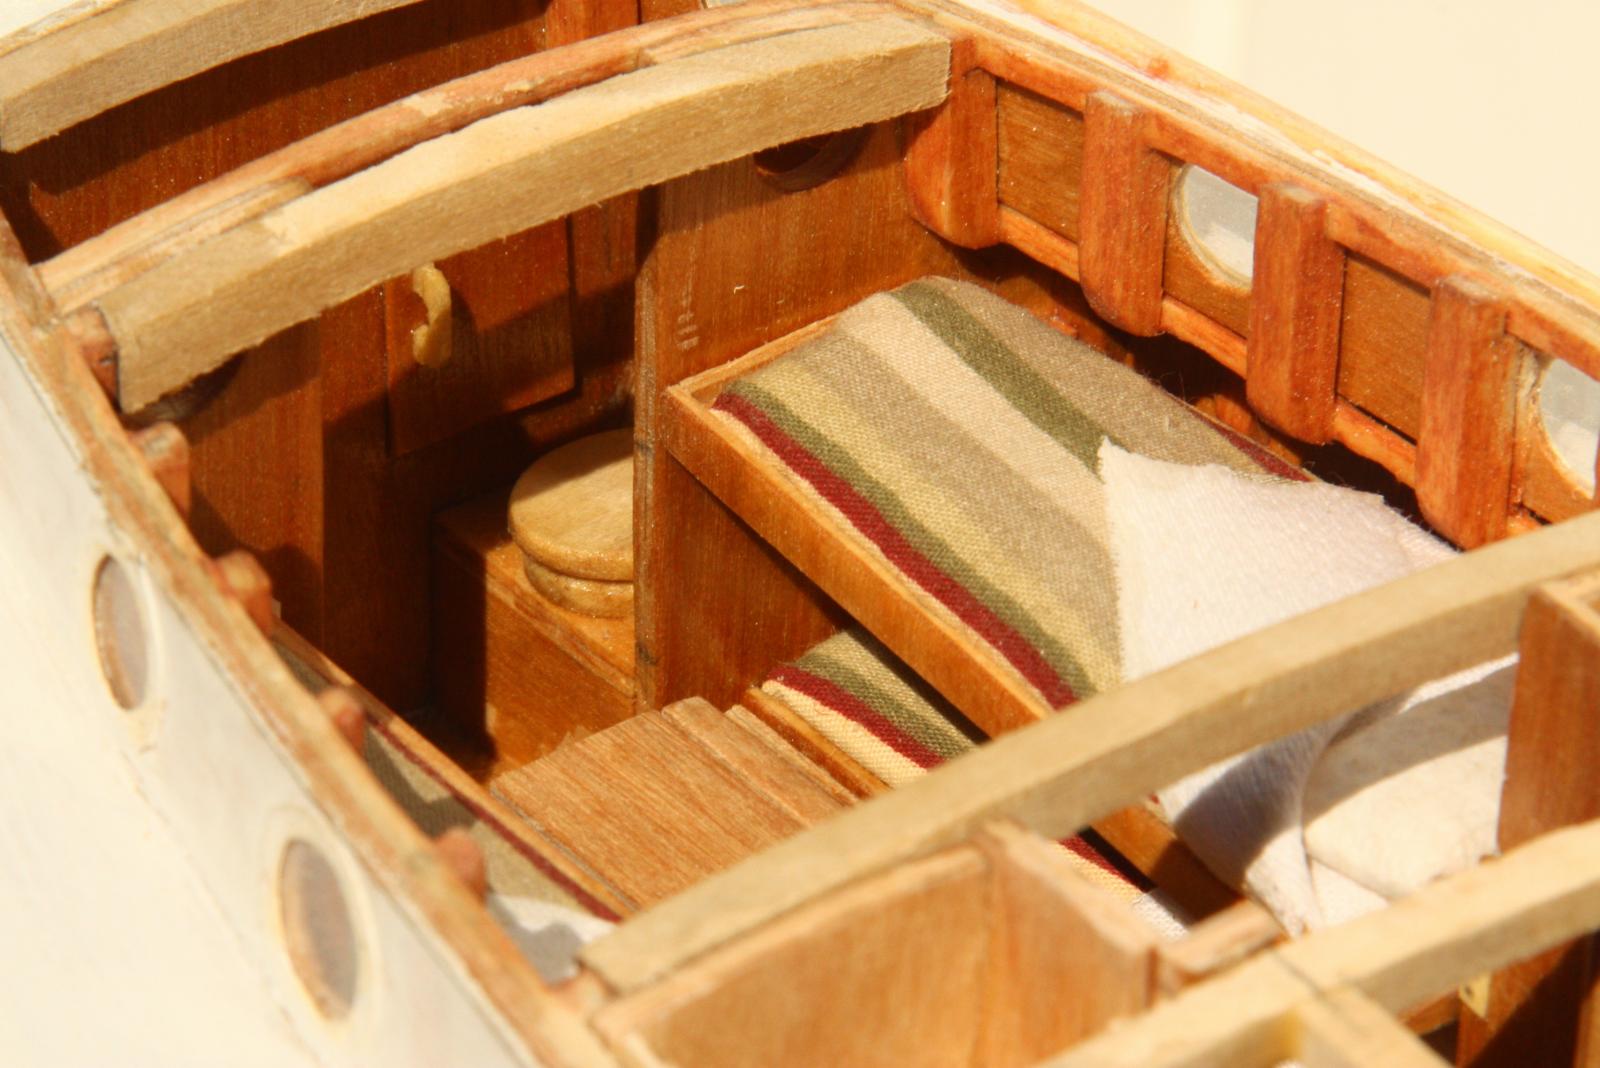
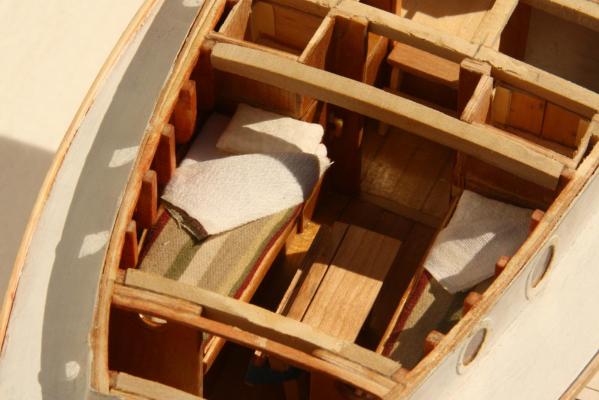
In this episode we have progressed a little further. I got to the point of setting the boat in primer. I used a good indoor/outdoor primer I still had on the shelf from another project. I also made the helm and the bedding. I used thin sheets of Styrofoam for the mattresses, an old dishtowel for the blankets and tissue paper for the sheets. Here are few pics of the sloop. The helm, still in the rough. The diameter is 45 mm, the spokes are toothpicks, the spoke handles are epoxy wood filler and the rims are file folder paper. The hub is a modified wooden bead. The finished helm will be shown in a later issue. The primed hull. I stuck the helm on temporarily and made and installed the forecastle and stern deck hatch covers. Looking aft with the bunks dressed up. I pulled the starboard bunk out ready to climb in for a nap. The table top on that side is folded down get access. Oh yes, I also made the pillows and the pillow cases. Another view looking towards the stern. I removed the helm to show the helm shaft and the stop. There are two, one on each side of the steering box, that way the shaft is not going anywhere. A close-up look of the aft part of the cabin with the head. I finished the little locker in the head for the typical supplies one needs in that area. Cheers,


-
Thanks to everyone for your likes! @ Remco, Minwax wipe on poly? Yes, I have heard about this stuff but never used it. Sounds like a doable thing. I don't even know where to buy it locally. But there is always Internet May have to buy a small can and give it a try. I have some time yet. @ Jan, hello and good to hear from you. Good idea to contact Paul and see what he uses. Tanks for the hint @ Freek, also good to hear from you and the info on all them rivets. Hey, I know all about "tjetten", old Dutch spelling though, in Bahasa Indonesia it is now "cat." In my aircraft repair business I was "orang tjet." Which is actually "pelukis." Nah, I'm not going into that kind of detail to put a gezillion rivets on this thing. I'm looking forward to the video on the torpedo launch Just watched the World Cup qualifying match between USA and Mexico. USA won 2 to 0 I'm plugging along with the plating between outside chores, the Admiral is getting antsy to get the mildew of the house, walkways and the fence. Then there are the weeds, weeds and more weeds But I still manage to place a few plates on the boat. Cheers,
-
Jerry, it's the electronics my friend - - - just out of reach. I fully understand the frugal part, Dutch, Jewish and English blood. It's said that the Dutch are even more "frugal" then the Scotts My kids call me cheap, cheap, CHEAP. I would love to build a RC airplane but all that expensive electronic stuff, and time, keeps me from it. I'll just watch your build and sail her from here and continue with my dad's sub and the VOC ship. Cheers,
-
What a fantastic project Jerry! A real working model of a great ship and with RC no less. Way beyond my capabilities and pocketbook I'm afraid. I have to stick with static models. I'll be following your build my friend, she's looking great already! Cheers,
-
Hey Popeye, thanks for dropping in, and for your kind words. I thought making and glueing on the simulated steel plates would be a piece of cake but it's more involved then anticipated. Have to spend a lot of time looking at old photographs that don't show much details and then guess as to how large these plates are and where fastened to the frames. From what I see most are lap joints with some but joints. It'll have to be an educated guess for some of it. I doubt that anyone will chide me for not being accurate to the n'th degree. Who is still around that can still remember it? I have also been thinking about what to seal the paper with. Here I go, doing something very dangerous, thinking, it usually gets me into trouble My original idea was to cover everything with the Liquitex polymer glazing medium I used when painting wit acrylic paints. When I thin it a little it'll only penetrate one layer of the paper and it doesn't make the paper hard. It also remains somewhat sticky and pliable, which is not bad but may become a problem in handling the model. It doesn't sand easy, which I need to do in some areas. So, I thought about epoxy resin. It also penetrates the paper and it dries rock hard, which is what I'm really after. It sands easily and when cutting the paper with an exacto knife it cuts clean whereas with the polymer it tends to leave some fuzz from the center of the paper. Hmmm, am I leaning toward the epoxy resin? I'll do some experimenting first before I'm ready to seal the entire boat. All y'all can chime in with past experience you may have had or other ideas. So far, all the paper is laying down real nice and smooth, even the lap joints. But - - - - there is always that gnawing but. Cheers,
-
Thanks to everyone who hit the "like" button, much appreciated. @ John, well, I figured that when scratch building a ship or boat then I might as well scratch build everything, including the design and drawings. I wanted to try my hand at it after having worked with metals all my life. Not that I am not acquainted with wood, far from that, but this is a whole different thing. No worry about some more material for heat shield/backsplash, I usually have a good Belgian brew, very tasty stuff @ Bob, thanks for the compliment, it means a lot to me. Yes, she turned out very nice and I'm sure she would be a great joy to sail. I'm anxiously waiting for you making sawdust for your tug Cheers,
-
Hello friends, Thank you all for the likes We have progressed a little further in this episode. I had to make another piece of plywood for the aft deck and make the steering mechanism. Unfortunately I didn't make any pictures of it but it is the standard design. A spool on the steering wheel shaft with a rope wound around it that run through single blocks to the tiller arm and yes it works. To make the curved deck I glued up the pieces of veneer on a preformed block of Styrofoam. I did the same with the cabin roof. That method worked great, I didn't have to worry about cold or wet bending. The deck is still not glued down at this stage because of the steering mechanism work. There is some detail to be seen in the pics below. Quarter stern view. New rear deck piece loosely laid on the stern frames. There is obviously a lot of time involved in making the plywood but again it was a lot of fun doing it and a challenge. Quarter bow view. All the pictures were taken outside the garage for better light. Here you can see the steering wheel hole I had to "worry" through due to lack of space for tools.. This too was a challenge. A close-up of the galley. I made steps and installed them. Actually, behind the steps is a small removable panel for access below the cockpit deck for extra storage and the propane gas bottle. Again, the propane cooking burners unit heat shield and backsplash are made from aluminum beer cans A close-up view of the entire cabin area. You can see here the hanging closet door hinges and handles. As well as the galley cupboard hinges and handles. Cheers
-
Hello everyone, and thank you all for the likes, so may of yuns, wow. @ Jay, thank you Jay, yeah, she's coming along okay. @ Hi Mark, yes, I was very surprised but pleased that this file folder paper shaped itself to compound curves. As long as it's not too much. With the Liquitex medium it wets the paper enough to make it comply. It stretches a little and also shrinks a little with some careful coaching with the back of my finger nails. @ Kevin, thanks for stopping by. Hmmm, yes, I started to do that but then got so busy that I forgot to do the rest. But, it's not too difficult to duplicate it. I just cut a piece close to it and lay it on top of the already glued on one and come to a close fit. I'll go to the port side now and catch-up first before continuing with the starboard side. Then make duplicates. "Stupid is as stupid does." @ WackoWolf, thanks for stopping buy and yes, I'll try to make more pics as I go along. @ Ian, thank you for your comment, it's good to hear from all yuns that it looks a little like steel plating. Well, looks like us in the colonies have the same expression. My grandson called me the "lean, mean fighting machine" I used to spar with him doing karate and taught him a few tricks the Jap guard taught me when I was in POW camp . Actually, of the many trade certificates I have are - - - boiler maker and steel plate worker. But never had to earn my living with it. Instead I became a master aircraft mechanic and engineer, all in aluminum though. This is a fun project. Cheers
-
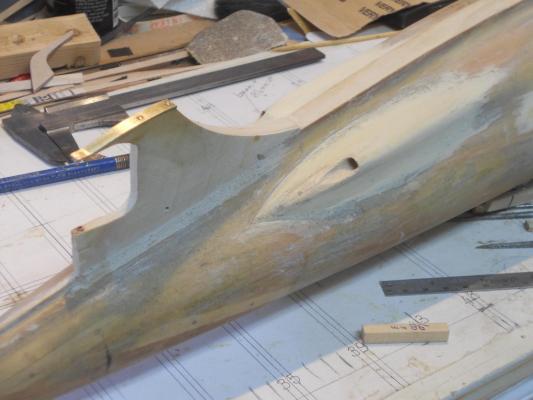
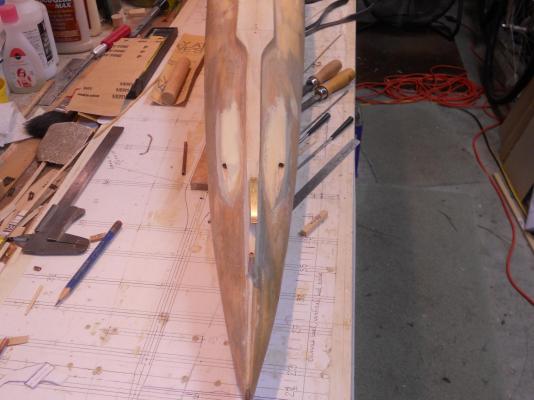
Hello friends, and thank you all for the likes, wow! really appreciate the encouragement it gives me. Today, after I mowed the back yard, I did some more "steel plating" on the sub. Tedious work but I think it's beginning to look more like a steel boat. So, I'll share a few pics of the difficult area, the stern end. I had to stick the prop shaft assembly back on for the picture, looks better I think I try to follow the layout of the steel plates as much as possible from the photos I have. These plates are all in not pressure sensitive area, i.e. they are not the pressure hull. The plate with the oval thingy is the stern torpedo door. That "thingy" looks like a hand-hold or to assist in closing the door manually. A straight side shot. I may or may not cement paper to the rudder/keel brace. I also don't know yet how to finish the aft end of the prop shaft tear drop thingy. Well, does it look like steel plates now? Looking towards the stern. Looking down on the hull. I am concentrating on the starboard side and do that first. I'll have to mirror the port side to it. The difficult part is from what you see here towards the stern but the bottom is done upside down. The rest is on the build dock, it's steady that way. Cheers


-
Hoi Sjors, You and not saying much is an oxymoron. Are you sure you are all right? Still some fever perhaps??? Well, it's good to hear from you and that you are on the mend. Back to work soon I guess? If I put three masts on this thing and shrouds with rat lines then you'll be more familiar with it, what'dya think? I'm having a ball and am neglecting the VOC ship Cheers,
-
Thank you John and Popeye and everyone who voted "like." This morning I actually started with laying on the "steel" hull plates. Instead of using my heavy drawing paper I decided to use regular tan file folders. They are a little thinner and smooth. I'm using Liquitex glazing medium for cement, it penetrates into the paper and sticks it nicely to the hull. What surprised me is that the paper will form a compound curve! That was a pleasant surprise, I was worried having to cut slits in the paper and then somehow make them disappear. I'll give her another coat of this stuff after all the plates are on. I'll most likely use acrylic paint for the finishing paint job. That'll give me the chance to use my airbrush outfit and acrylics are easy on the spray gun and for cleanup. I'll be looking for semigloss or satin. I'm not going to mimic the rivets though, that would be one monumental task and in the end may not even that visible. Sorry no pics yet, perhaps tomorrow. Cheers,
-
Hoi Adriaan, glad you are okay, that's paramount. Seems like an open and shut case you got from the Oz rules. But then again, there may be a yah but - - - from the judge. Good luck with the fight. Your build is really looking great! Cheers,
-
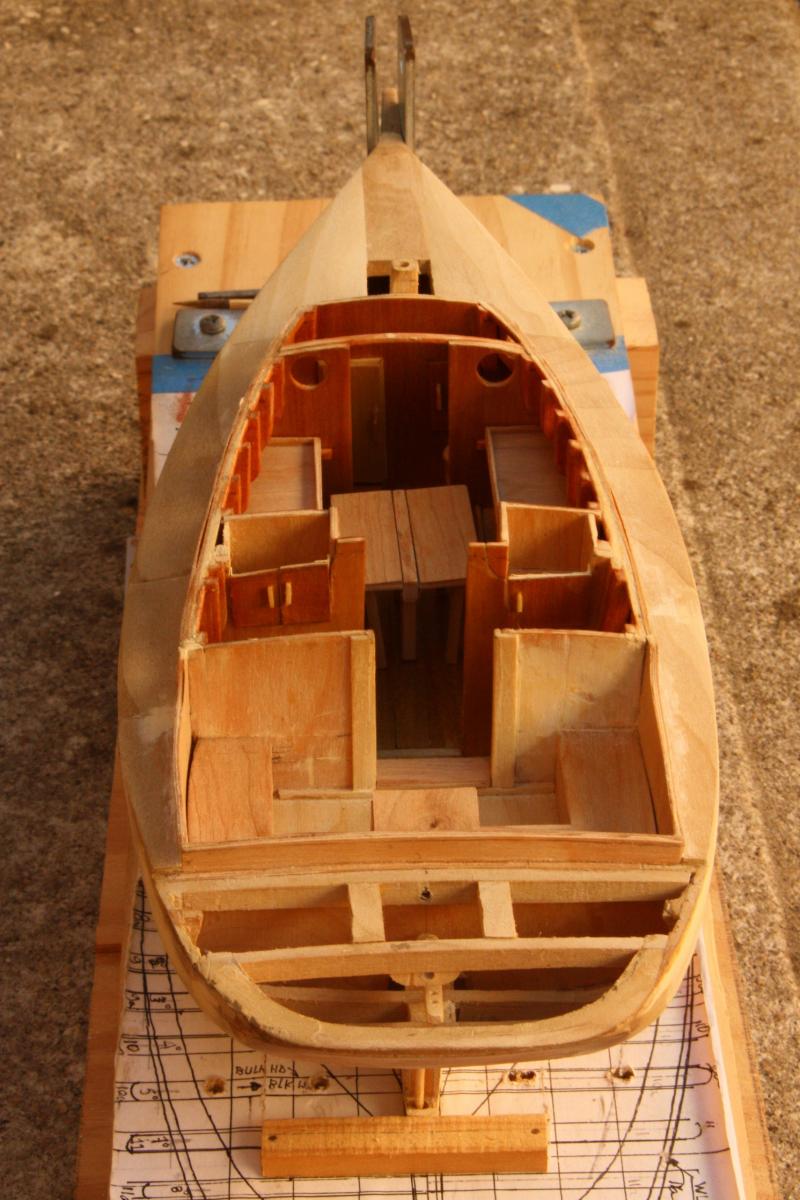
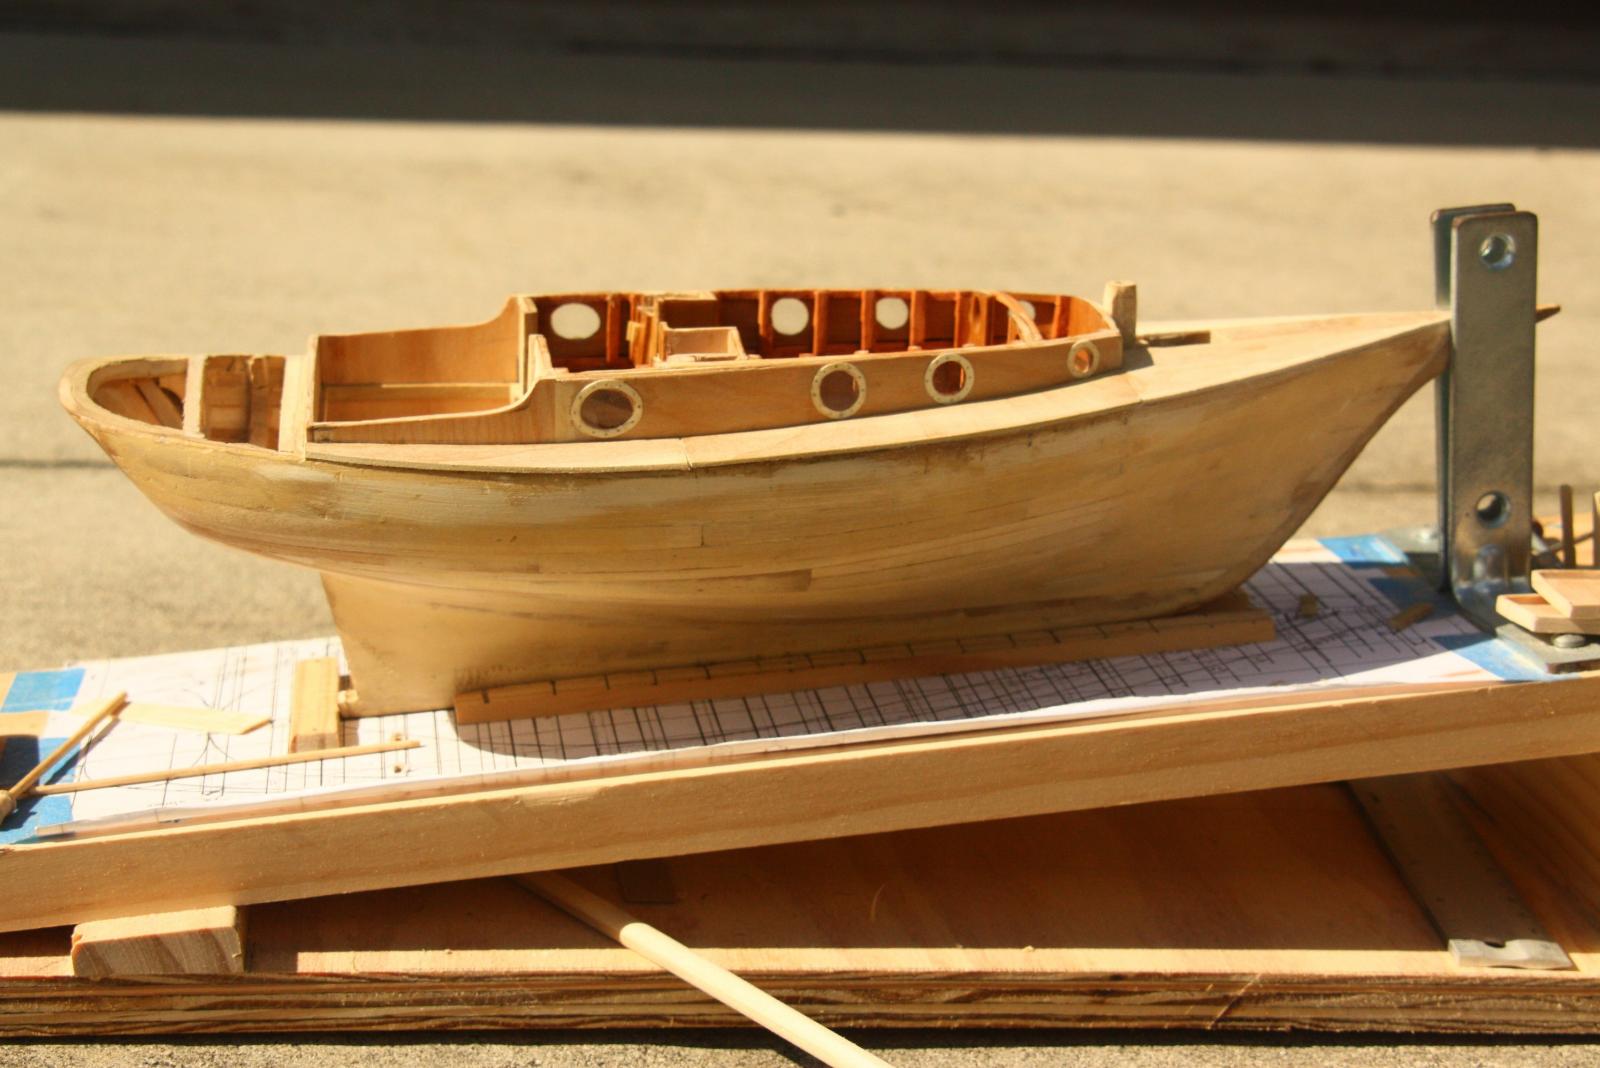
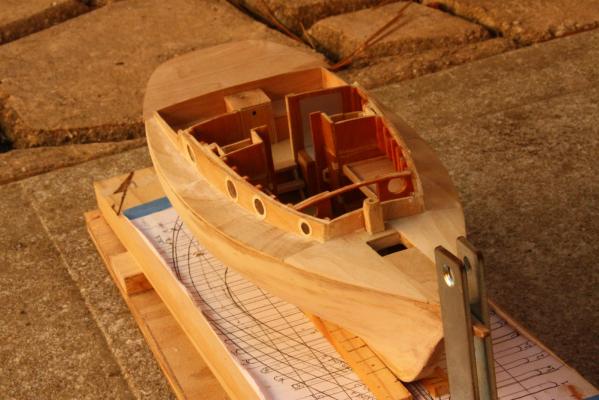
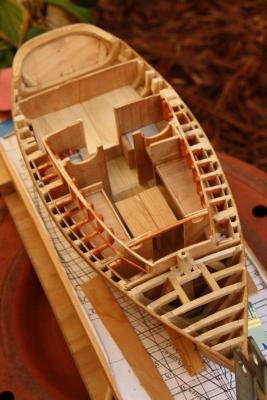
Hello friends, and thank you all for the likes! Not much progress to sow but there was still a lot of detail work involved to reach this stage. Again, I have not made pics of all that detail work but I'll try to describe it with the below picture. I started to make the cockpit benches and are here loosely laid in to check for fit. The deck forward of the cockpit is now planked. The rudder tiller arm is attached to the rudder hinge shaft and what is not seen here is the steering wheel shaft holes towards the stern. Looking forward with the cockpit bench seats loosely in place. Here the rudder tiller arm can be seen with the holes for the steering tackle. Also the steering wheel shaft holes I had a hard time drilling in. Hmmm, the wide angle lens distorts things a bit. Cheers,

-
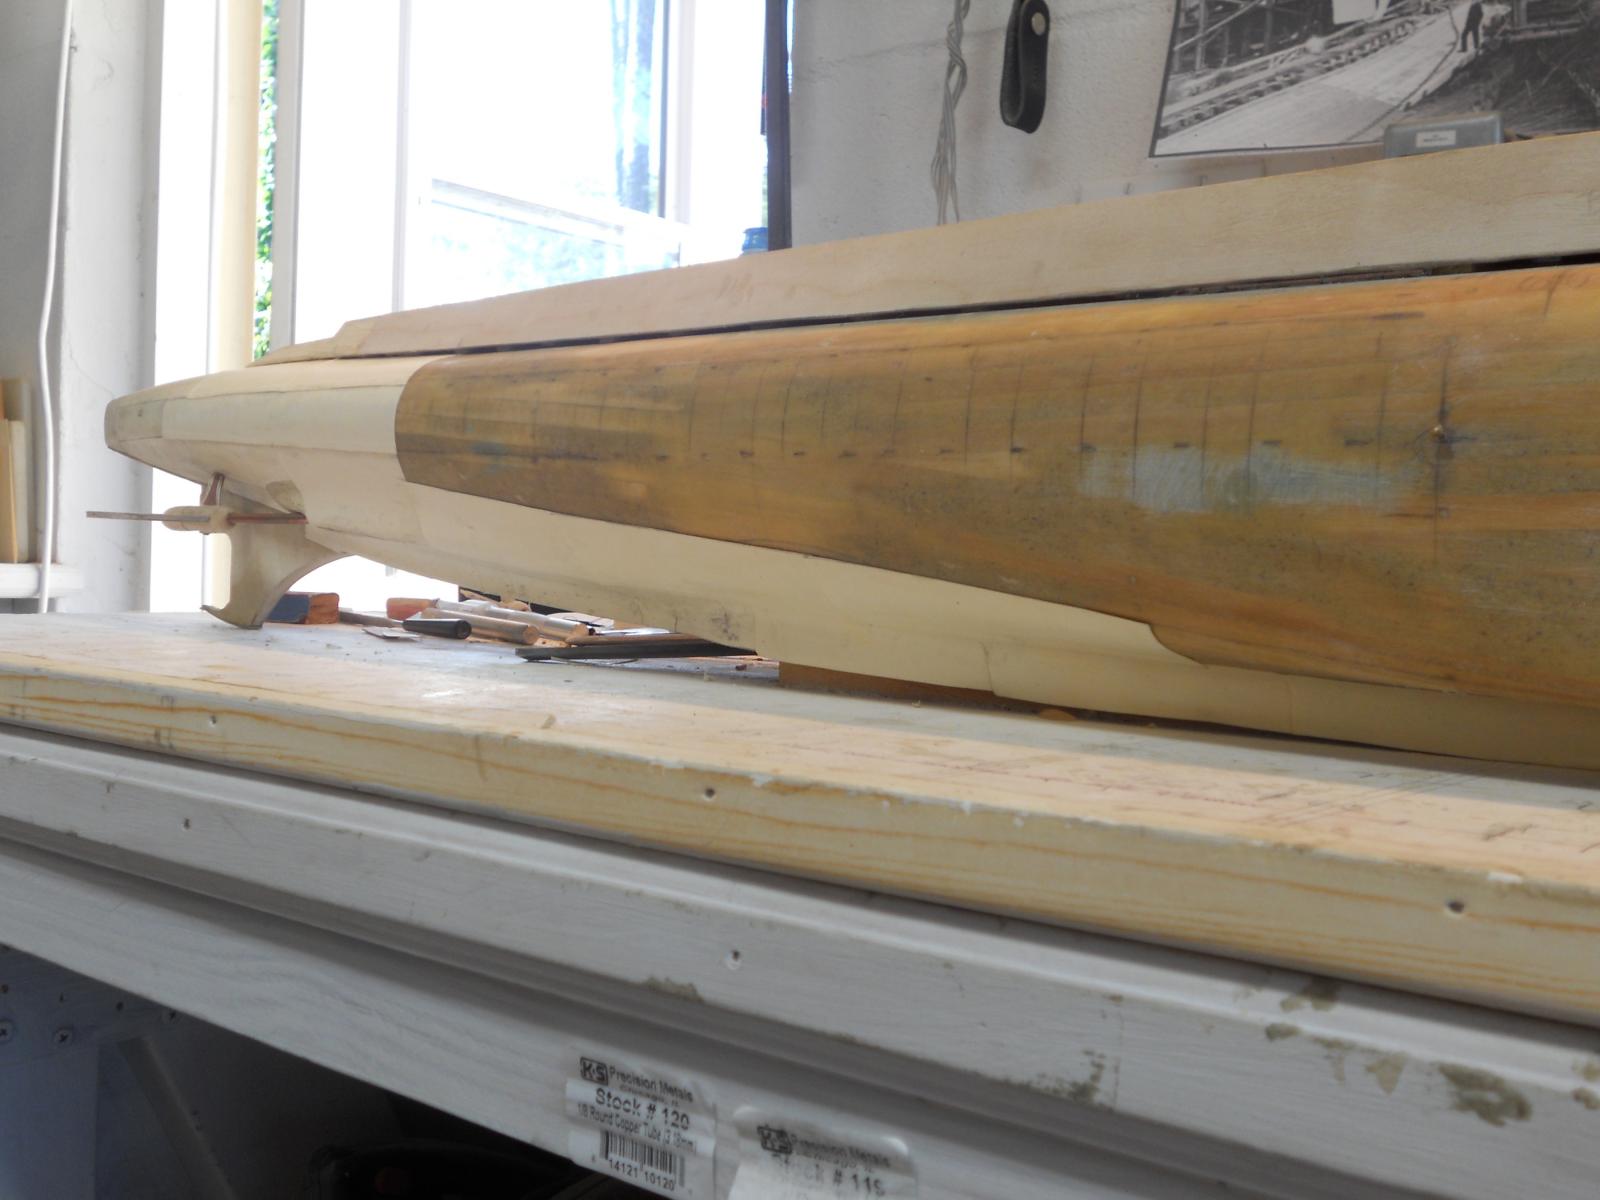
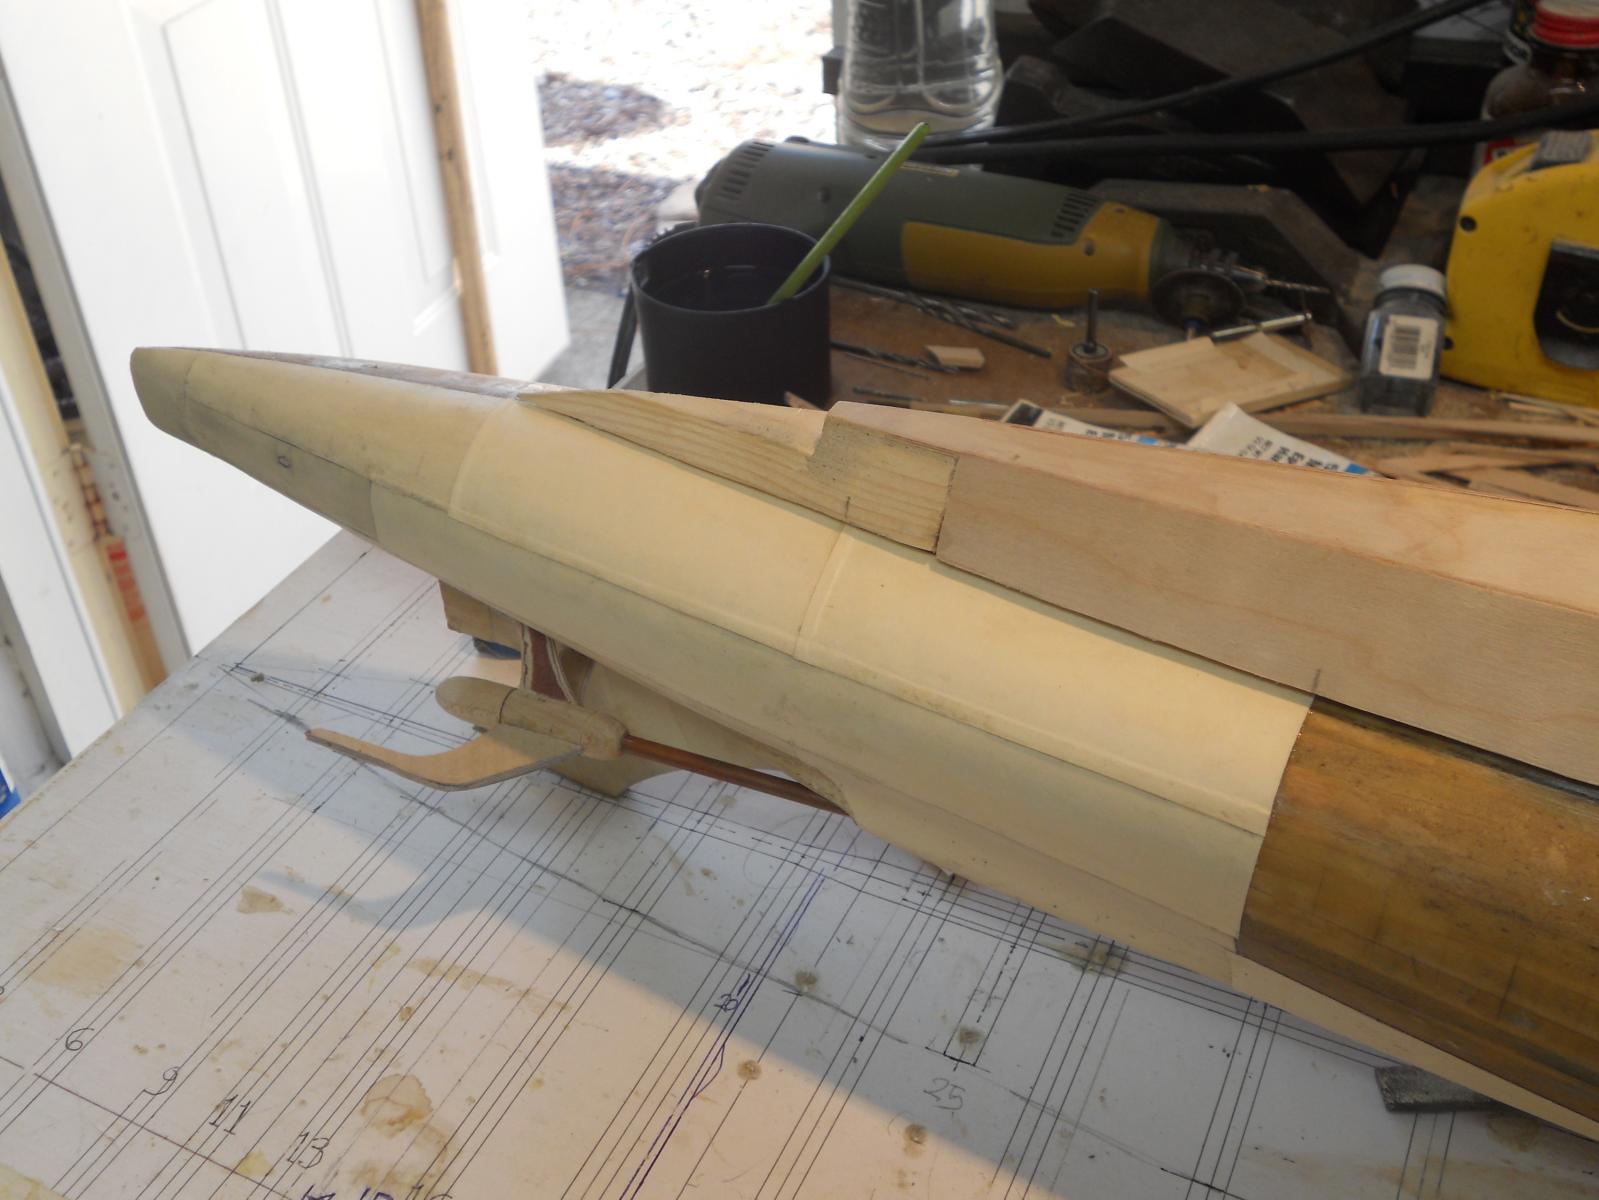
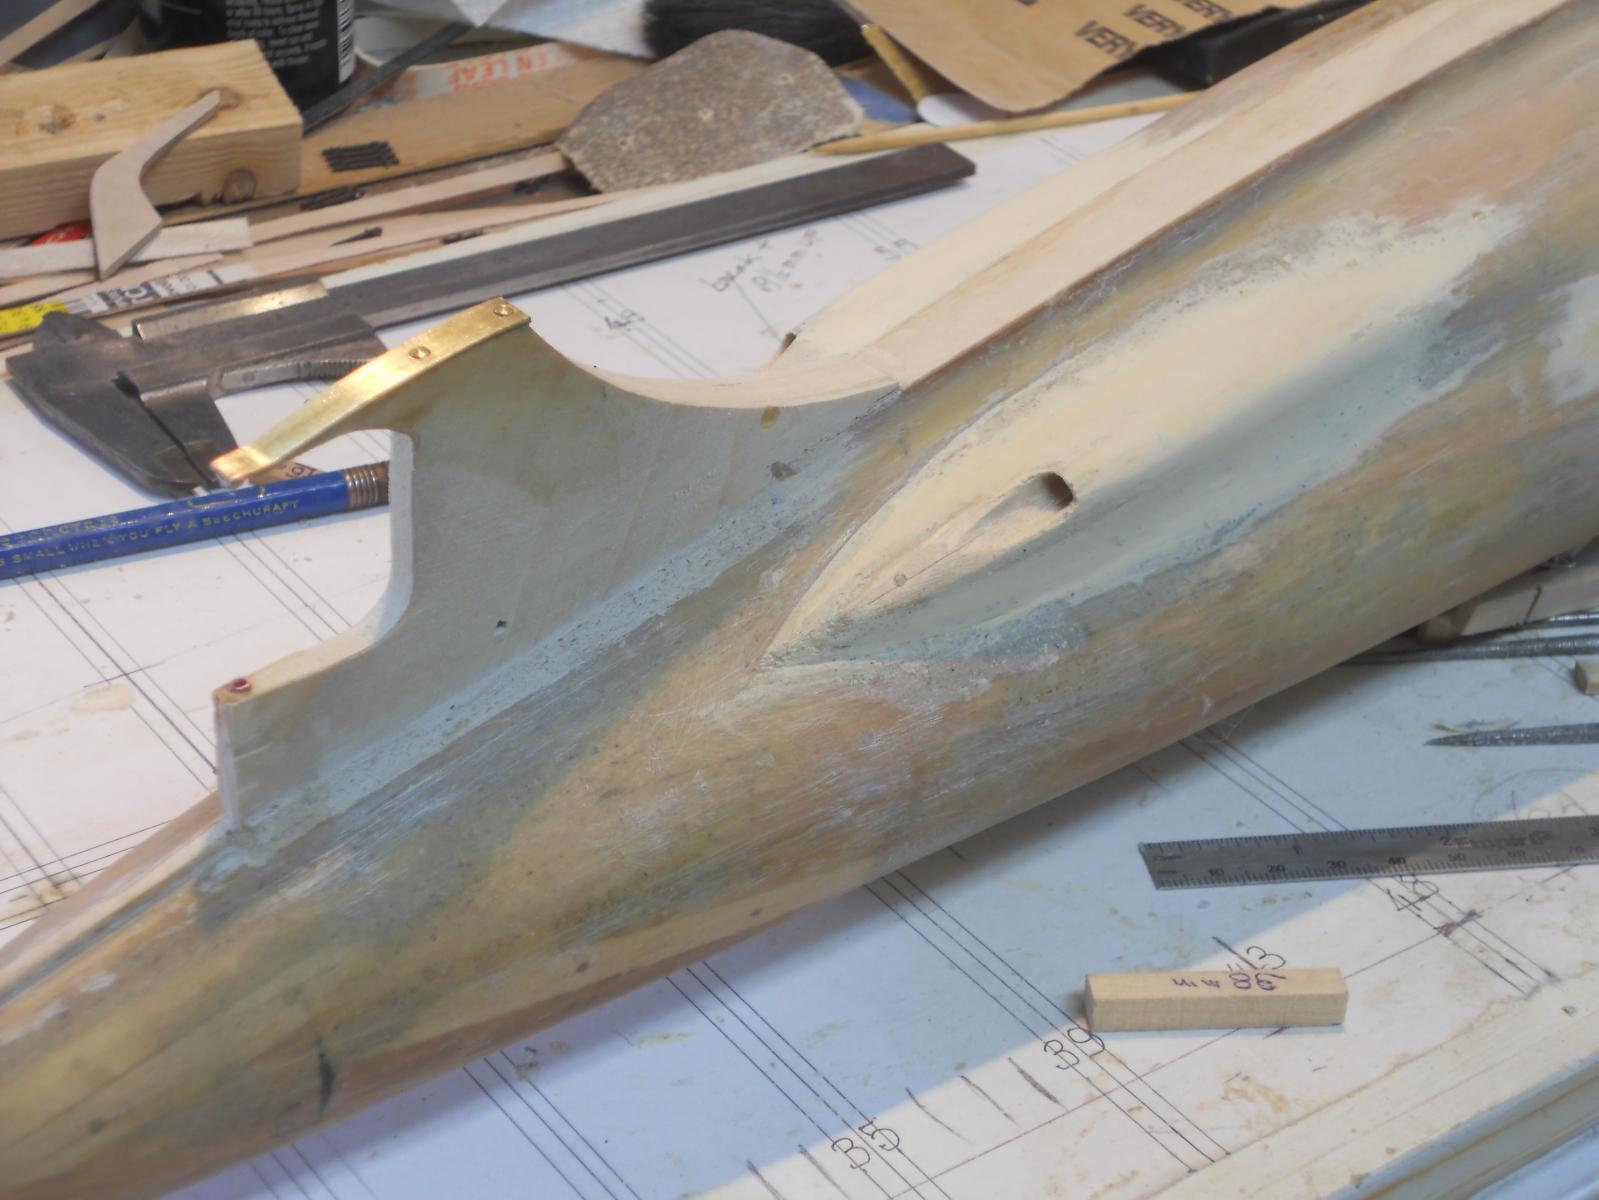
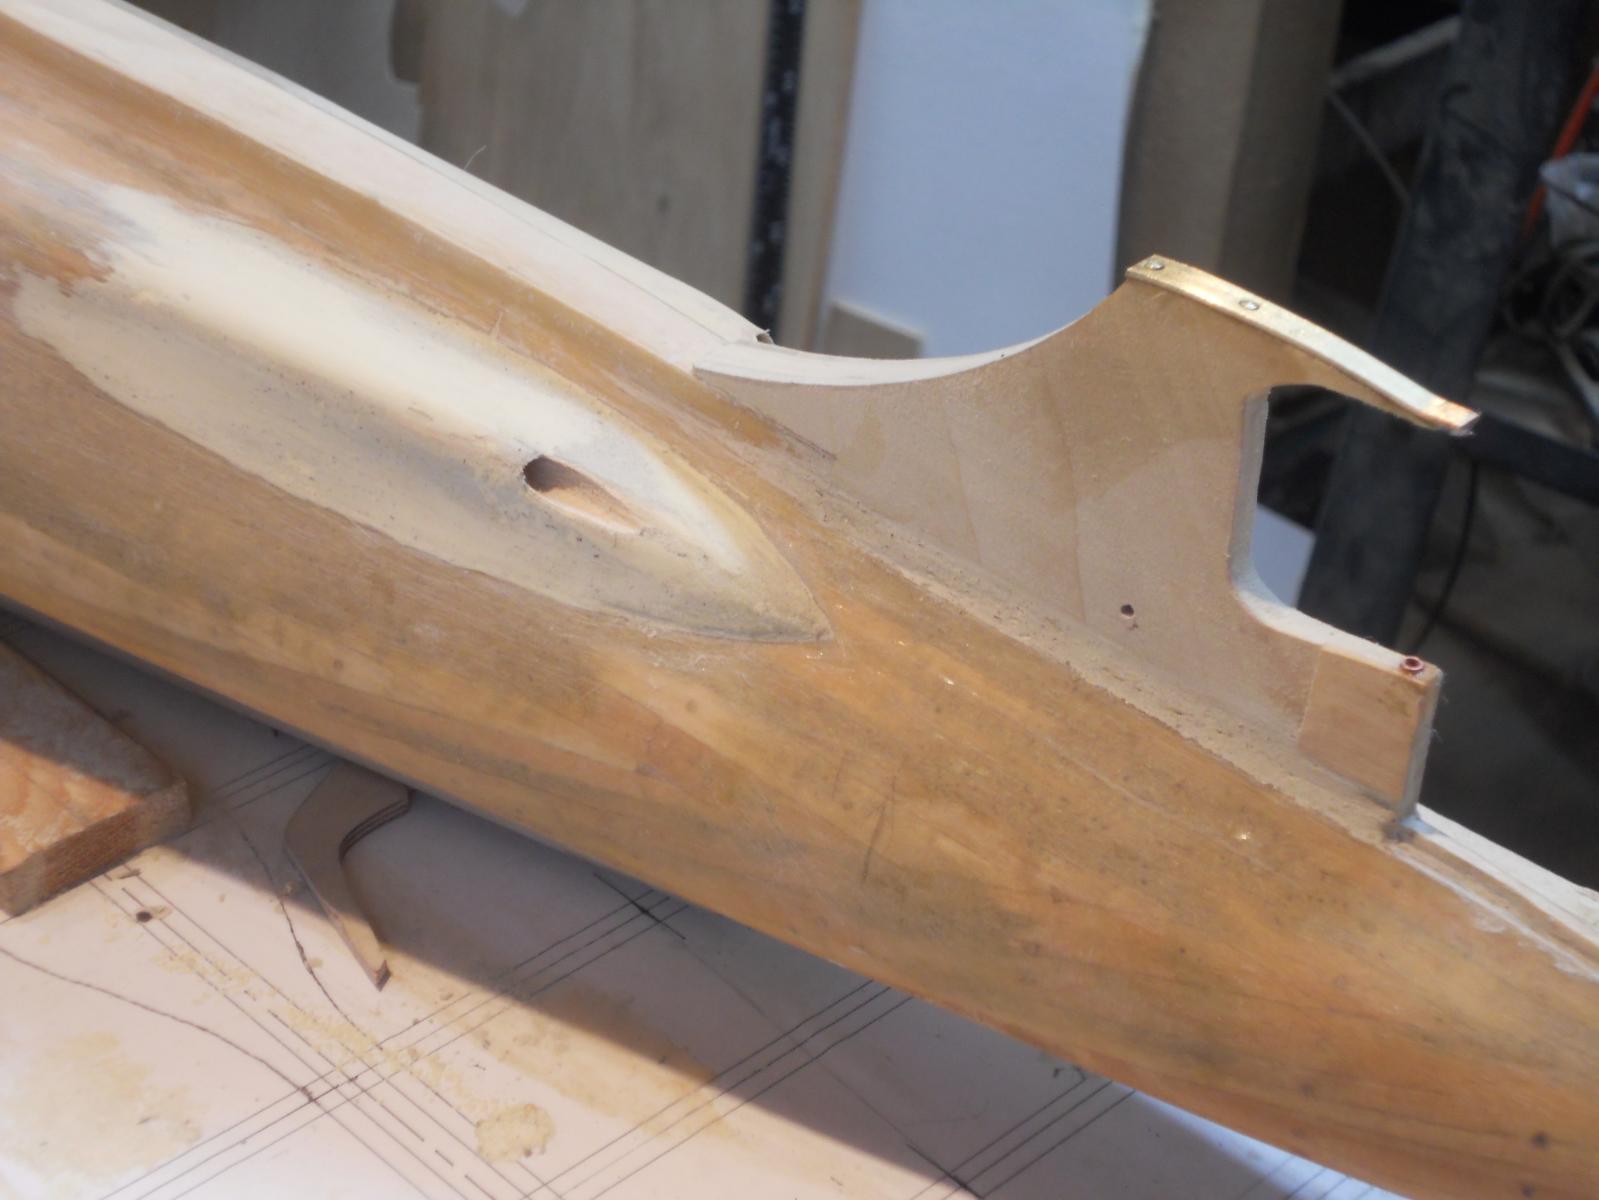
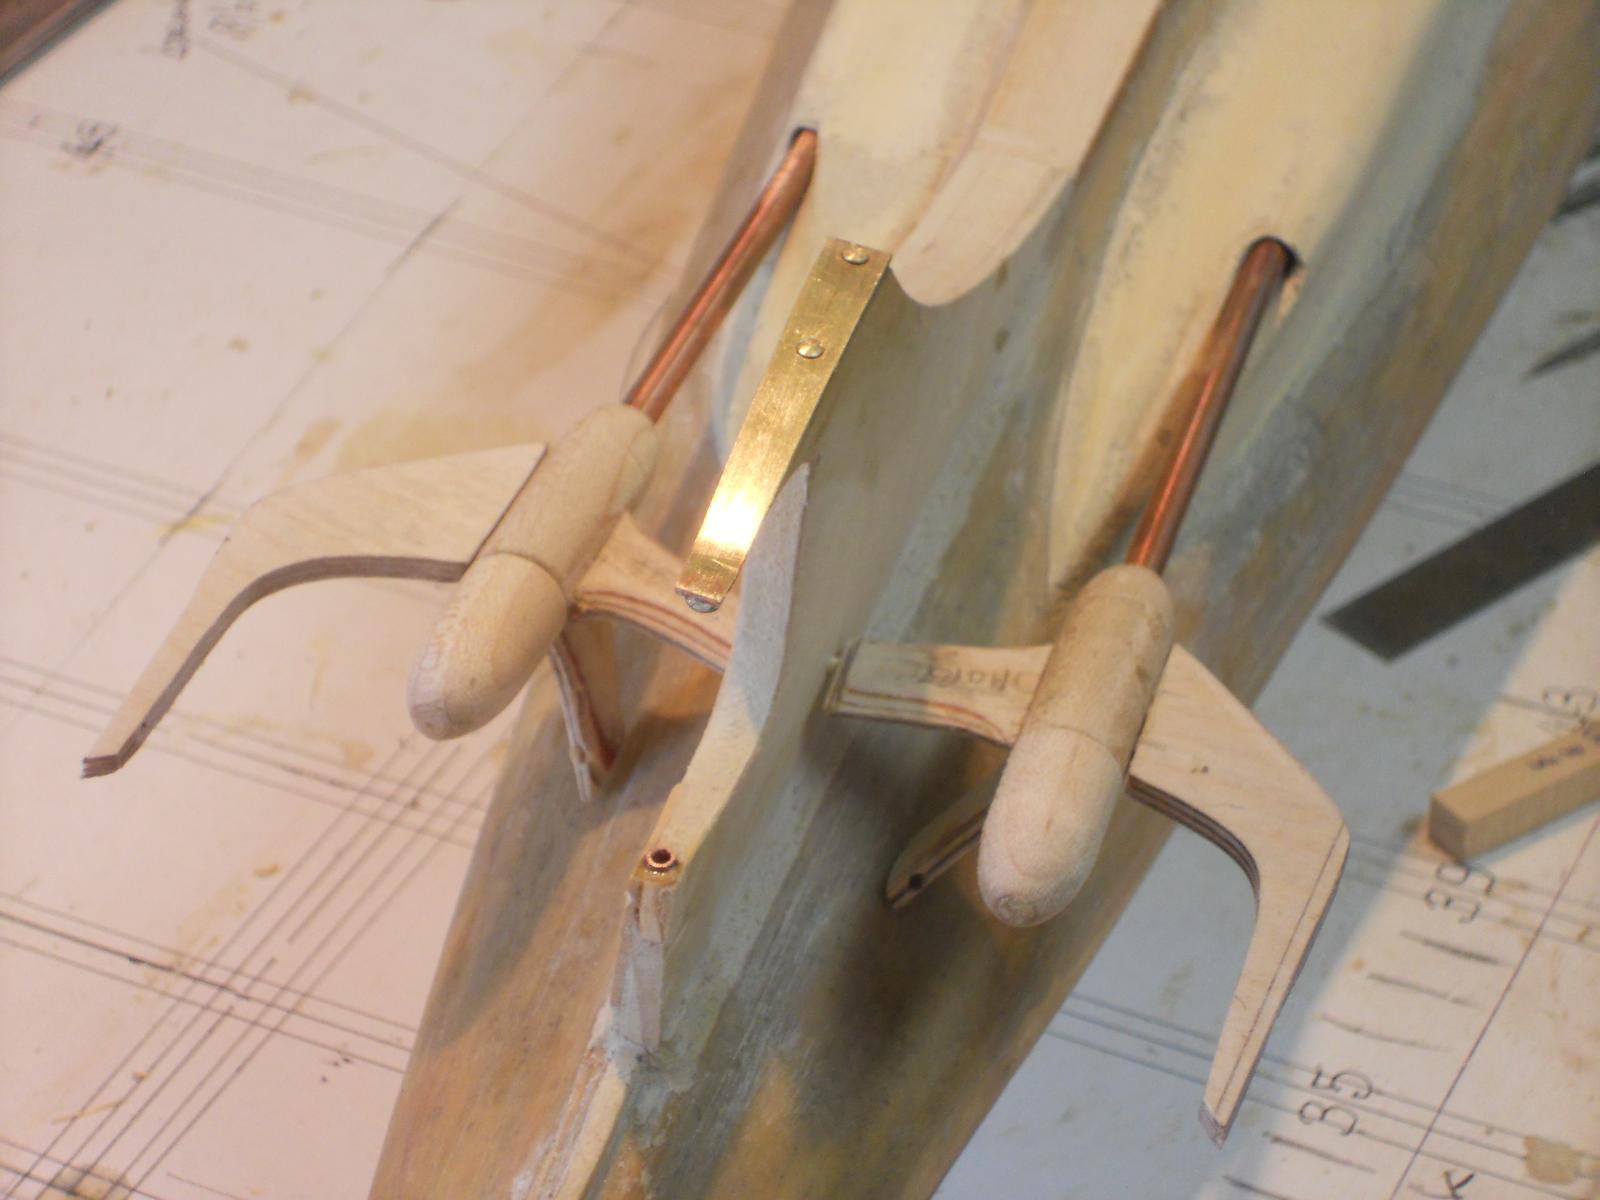
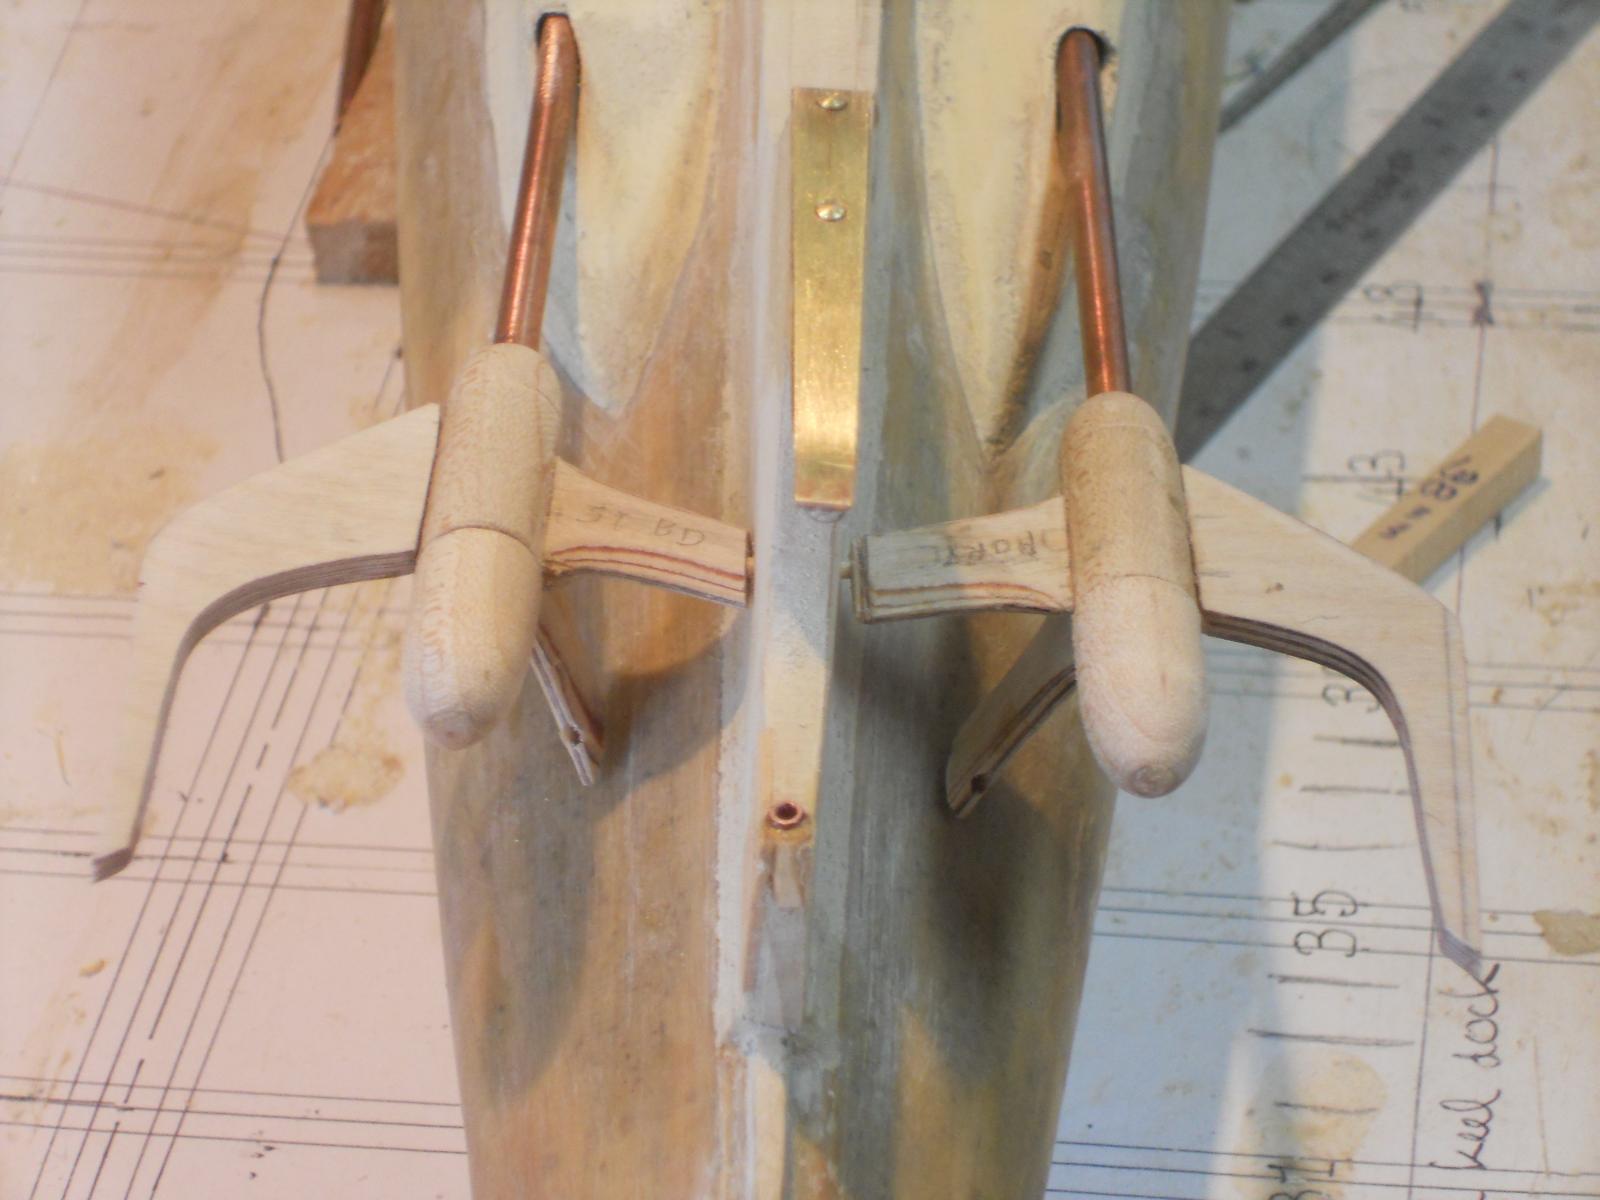
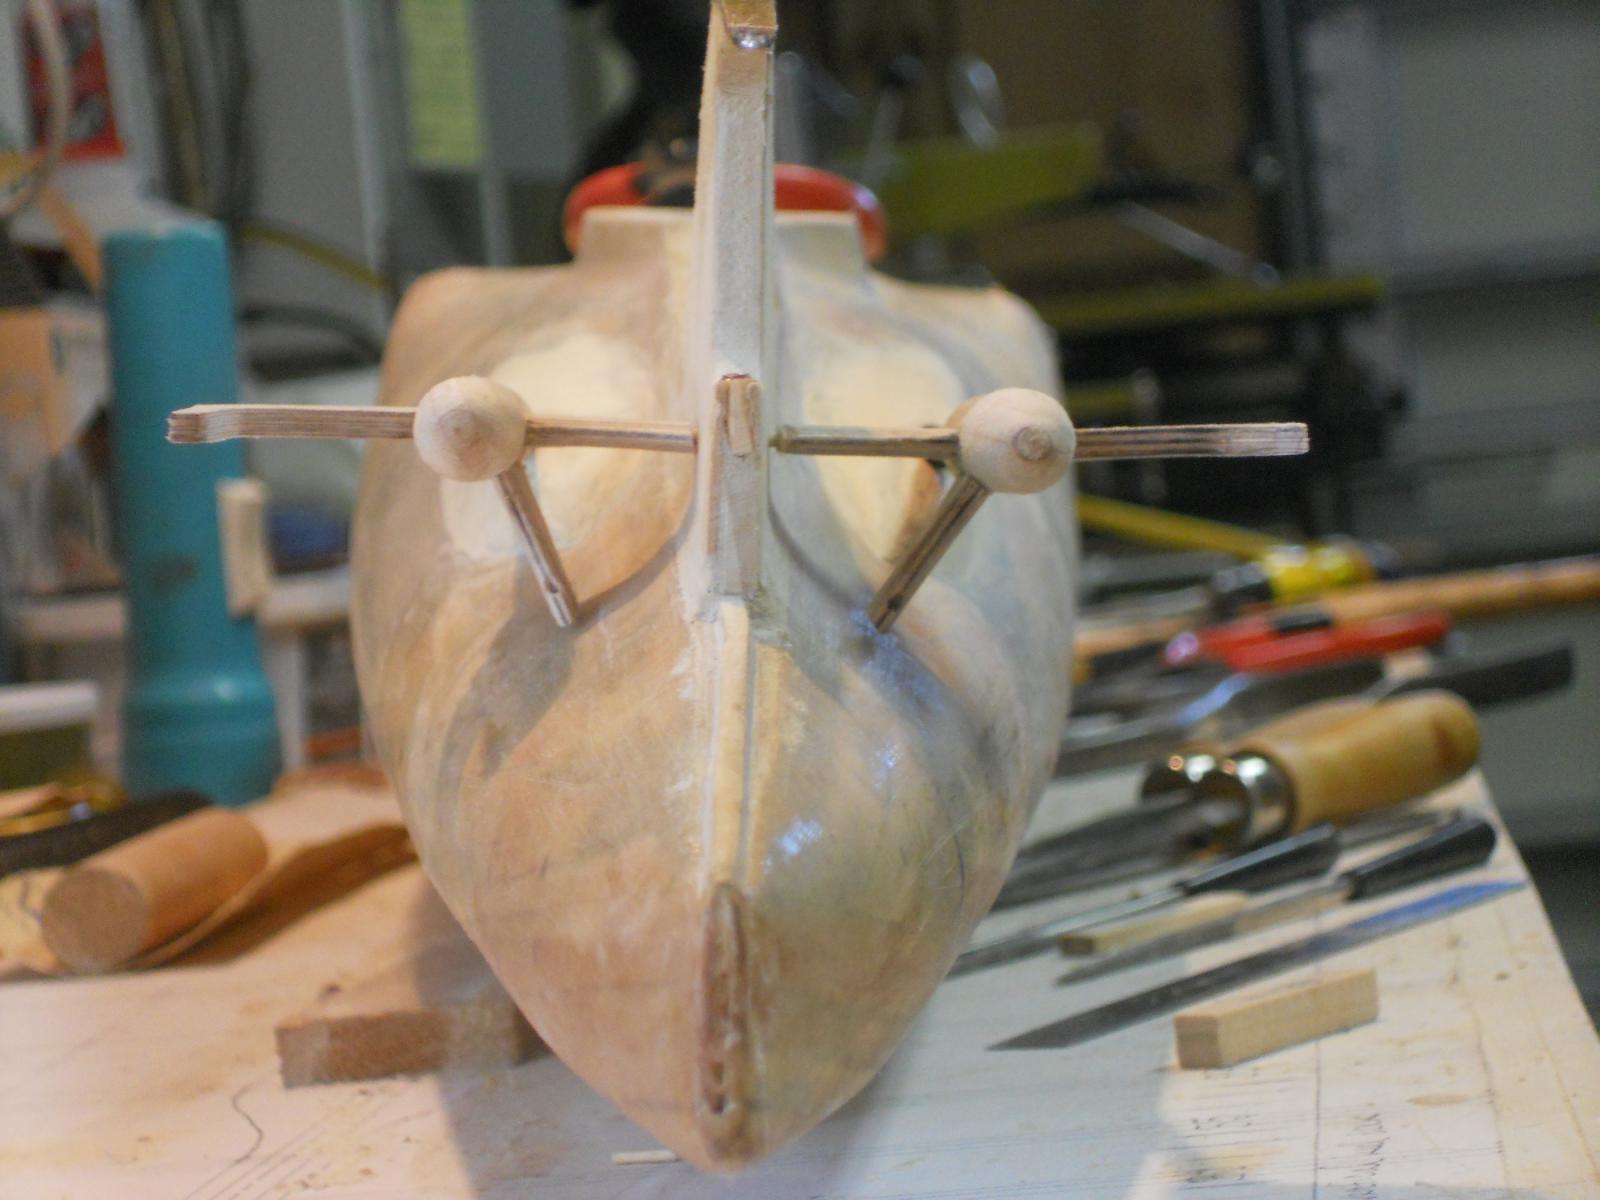
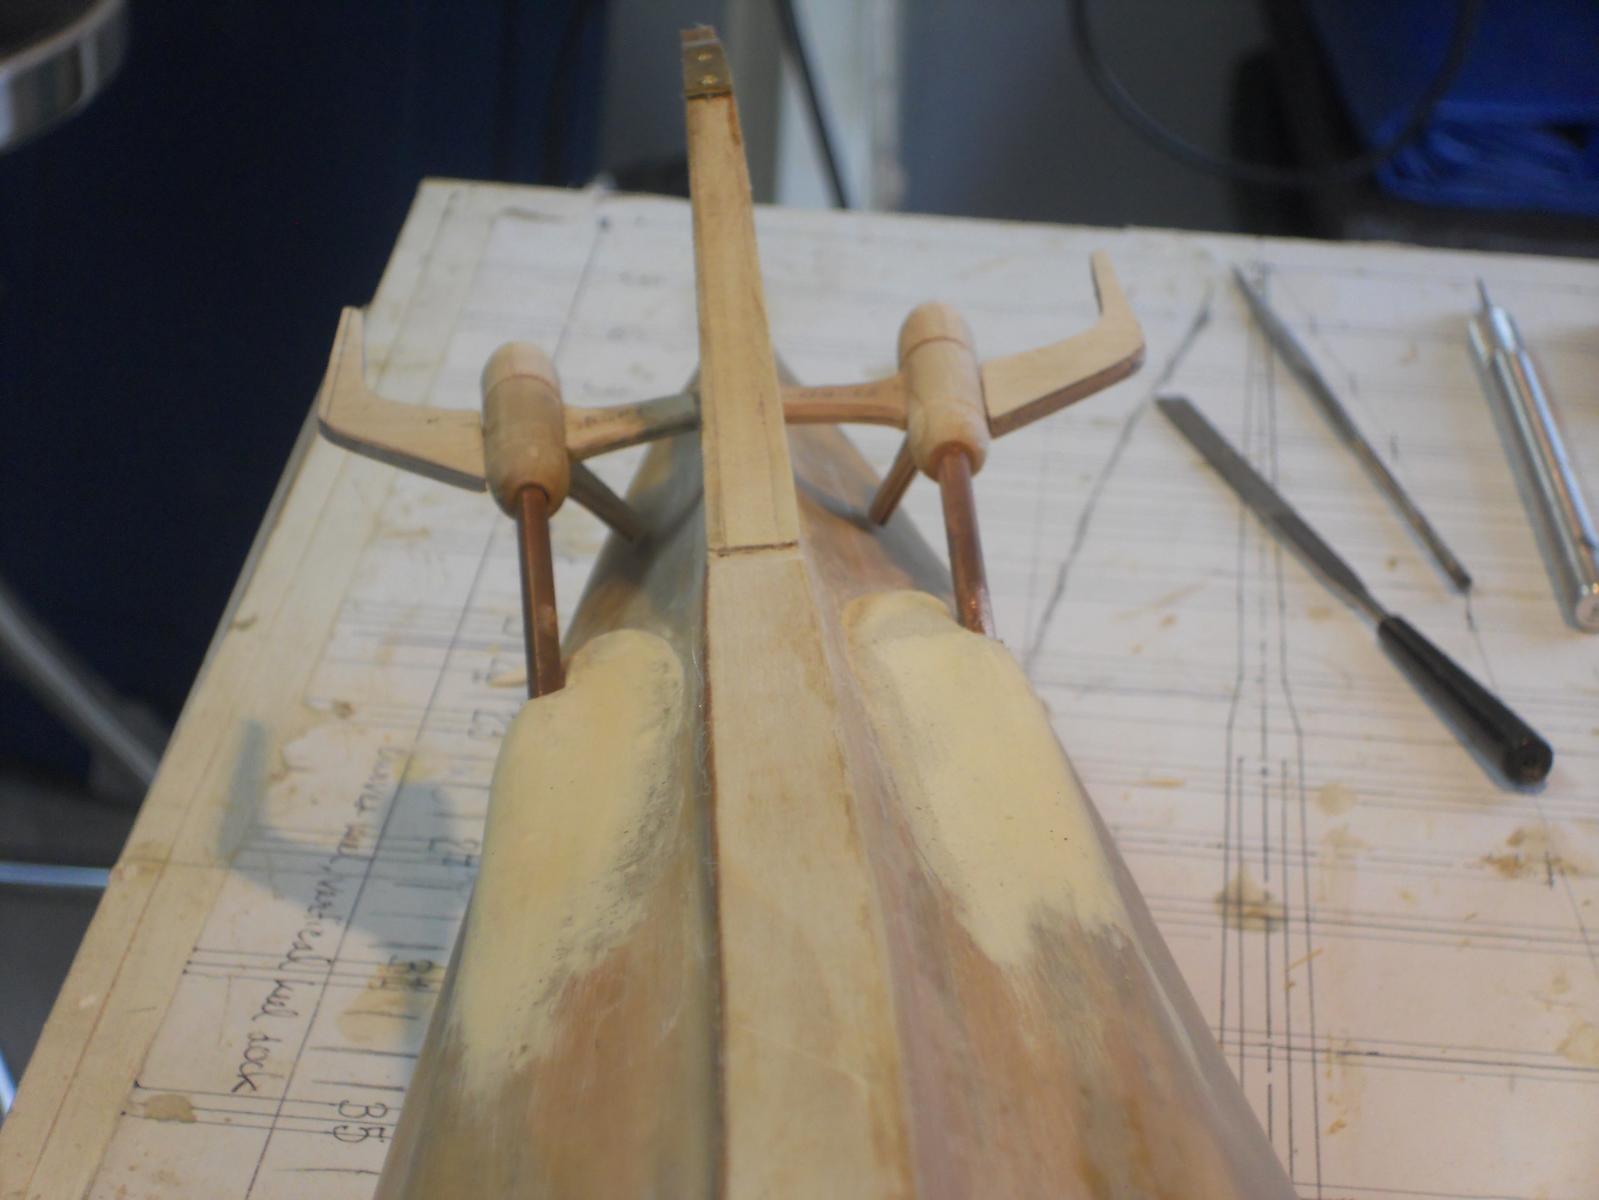
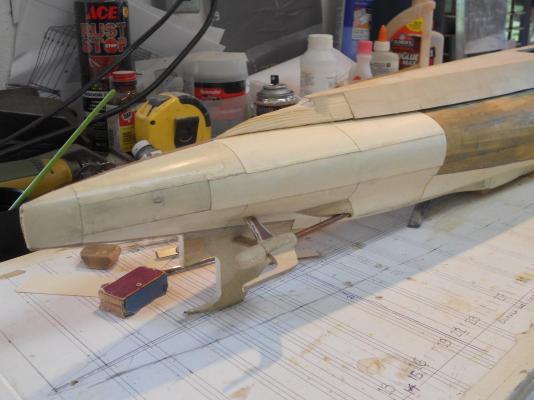
Hello friends, and thank you all for the likes, really appreciate your votes of confidence. Well, in the meantime I have started with the prop shaft fairings. I made them from basswood. I forgot again to make a few pics of them before glueing them to the hull, for shame. I had to guess at where to drill the holes for the prop shafts but by carefully eyeballing it they came out right on the money, lucky me To ensure their proper location I cemented them to the hull with the prop shaft assemblies installed and pinned to the rudder hinge brace/keel with two-way epoxy cement with three dowel pins. After the cement was cured I faired them in with the hull using wood filler and after that was cured overnight I sanded everything into the proper shape. Hurray for wood filler/putty. So, now I am at the spot where I have to glue the paper hull plates on. I can't install the prop shaft bearing housing/dive plane braces until that area is plated. This requires me to look at a bunch of old photos of the O 19 and O 20 to see where the seems are so I can at least come close to the actual boat. I think this phase of the build will be a lot of fun to finally cover the "ugly" outside and actually see the real boat emerge. The Admiral (Gwen) asked me when I was going to put the conning tower on. I think after all the below the deck area is completed. I need to have the model off the build board and upside down for most of that work and the con will be in the way. Okay, I took a few pics of the prop shaft fairings. Port view of the completed prop shaft fairing piece. I also made the bottom rudder hinge bracket and epoxy cemented that to the rudder hinge/keel with two brass nails for good measure I'm happy with the results. Starboard view of prop shaft fairing piece. Top view of prop shaft fairing pieces. Both prop shaft assemblies temporarily installed to check for fit. There is some additional trimming and shimming needed but that'll come after the "steel" hull plates are glued on. I also installed a small piece of copper tubing in the rudder hinge/keel for the rudder hinge pin. Hmmm, that'll be fun project A close-up look of the prop shaft assembly loosely installed. Head on view. As you can see there is some adjusting and shimming needed. A shot looking aft. Cheers


-
Hey Harvey, you are too much, love the humor. Yup, a full scale sub and then hijack a cruse liner and rob the rich and famous No, it's my father's sub at a scale of 1:50. She was 76 meters long. Well, since my wife and I could not build a 1:1 sloop I wanted to present her with a model but then she wanted it fully equipped and ready to sail. You know that she actually asked me if I was going to put a turd in the commode but that would stink up the boat too much Yeah, I could have bought one of them cheapy black plastic toilet seats and then treat it with Preparation H to shrink it but -- - -- - ah, no. So I made it from wood and no doo doo in the bowl. Actually a dry chem doesn't have a bowl, "stuff"drops right down into the holding tank, kinda. I told her to let her imagination go wild. You should have seen the look she gave me Thanks for stopping by, Cheers,
-
Hello Ed, a fantastic choice, I like Webb's designs too. In the early to mid 70's I started research to draw the plans for Donald McKay's ship "Flying Cloud" but due to running an aircraft repair business I just had no time. Now however I'm retired and busy with two models but my heart is still with an extreme clipper. I have had a litho of Samue Hanscom's Nightingale on the wall of my studio and that's the ship I will build - - - someday. Her speed has never been equaled in all the days of these ships. What a beautiful ship she was. I'll be following along with your build, thanks again for the choice. Cheers,
-
Wow, thank you all for the likes, i'm overwhelmed and humbled by your show of support. Hi John, thank you for stopping by. Yes, I had a real ball building this little sloop and learned a lot. There are a few rough spots in her but they are not noticeable in the finished product. Still thinking of building another one but bigger and in a bigger scale too. But first I need to finish my dad's sub and the VOC ship. Cheers,
-
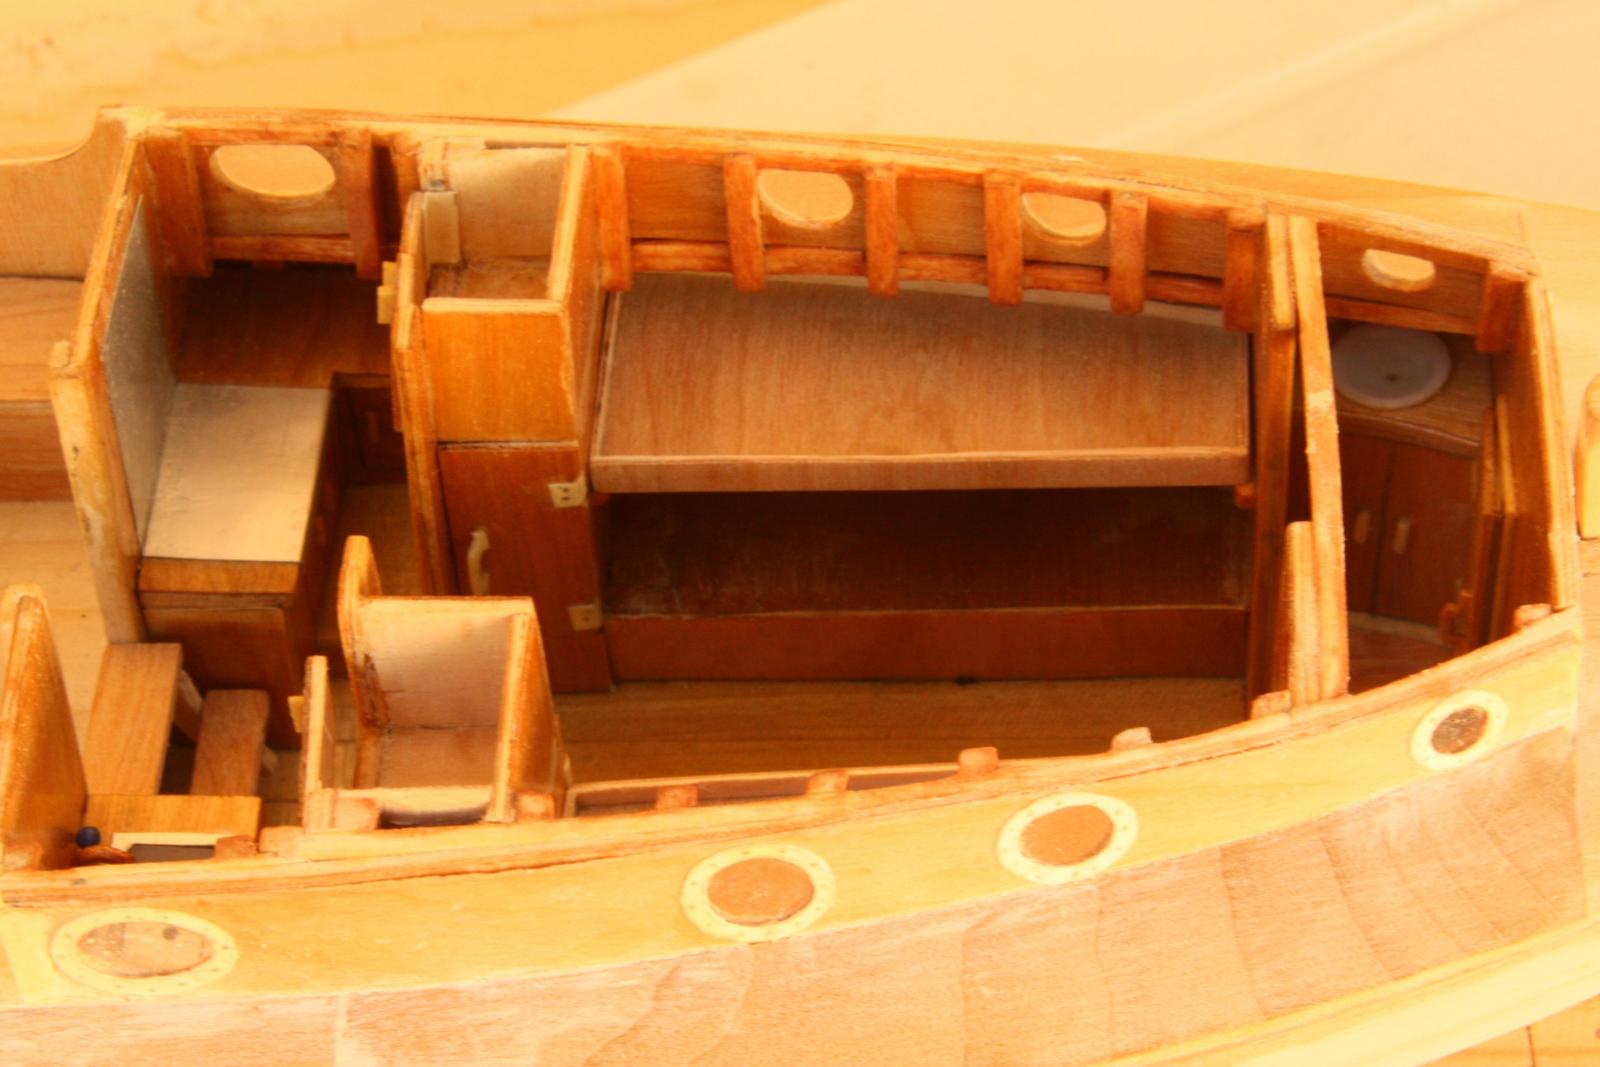
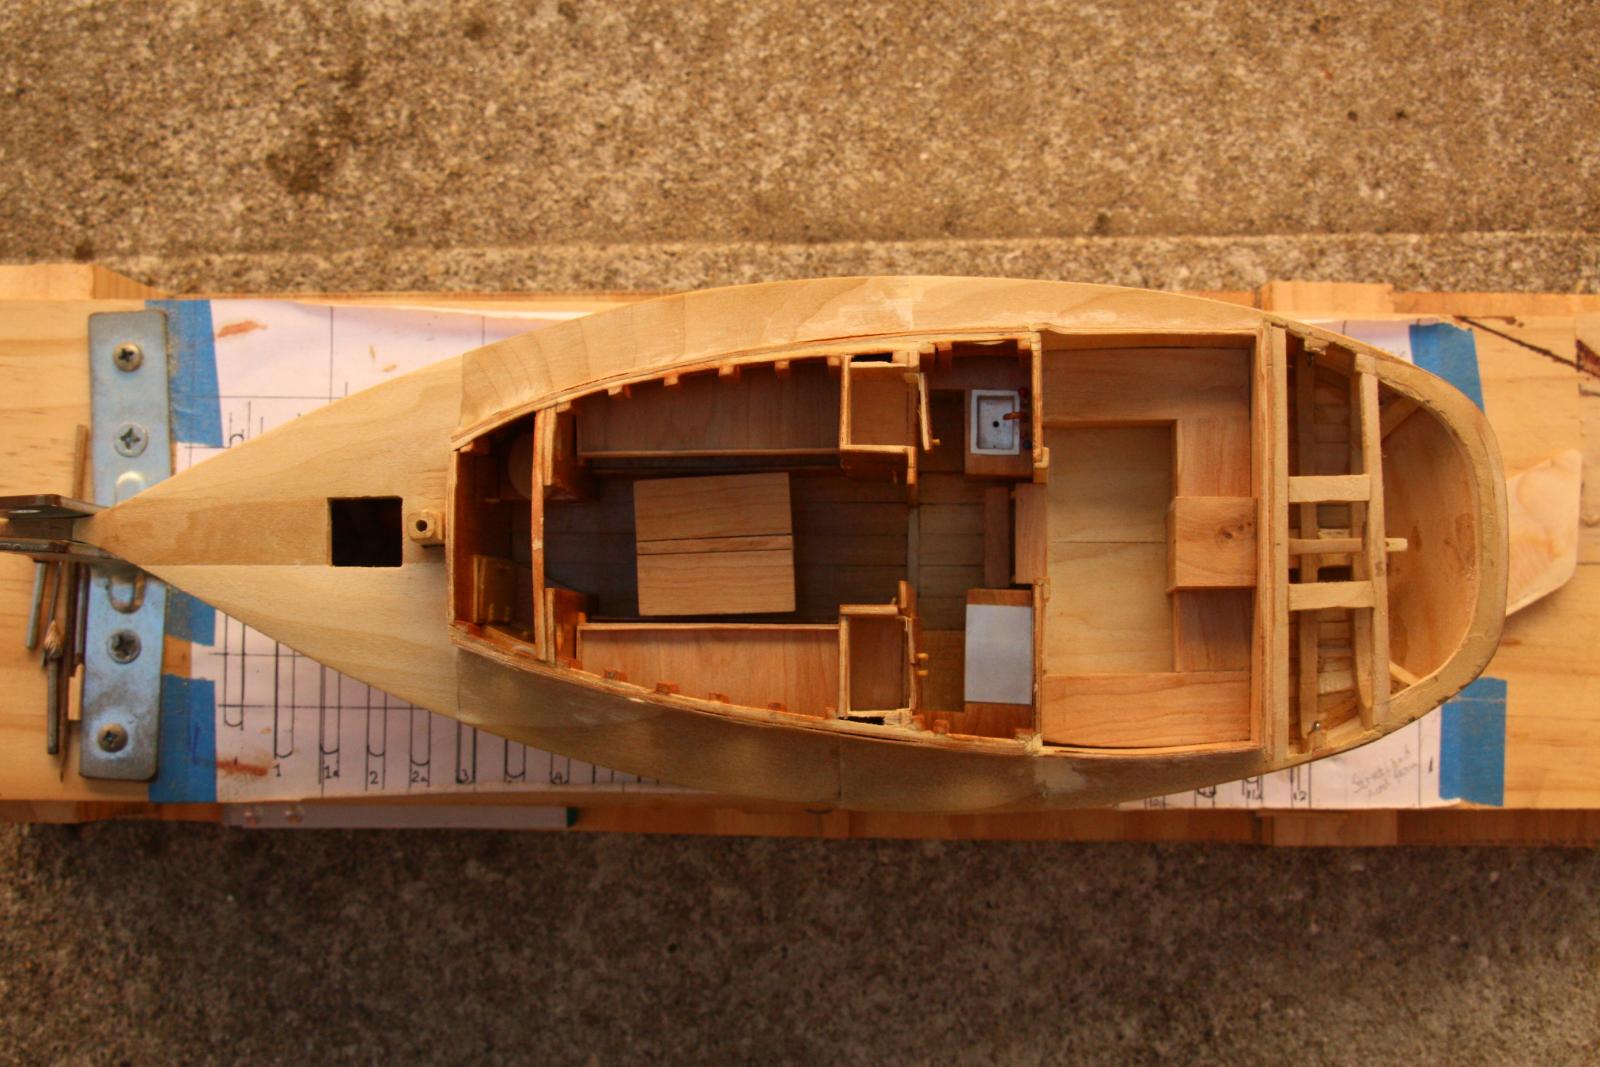
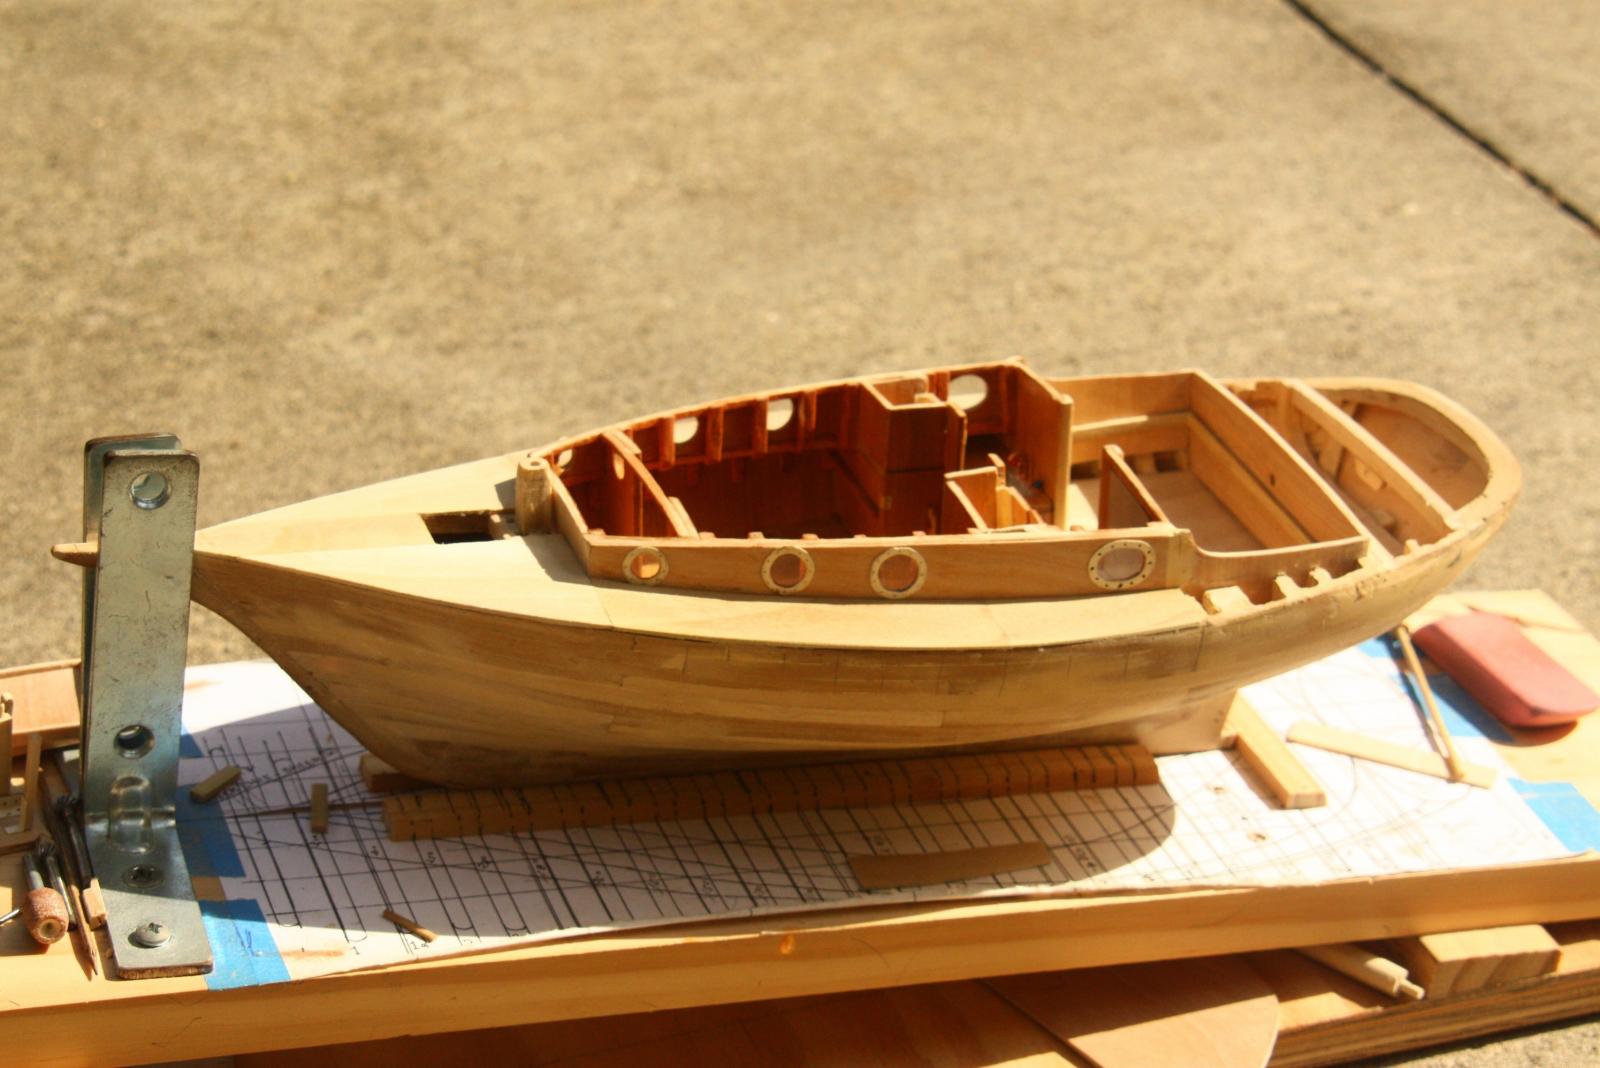
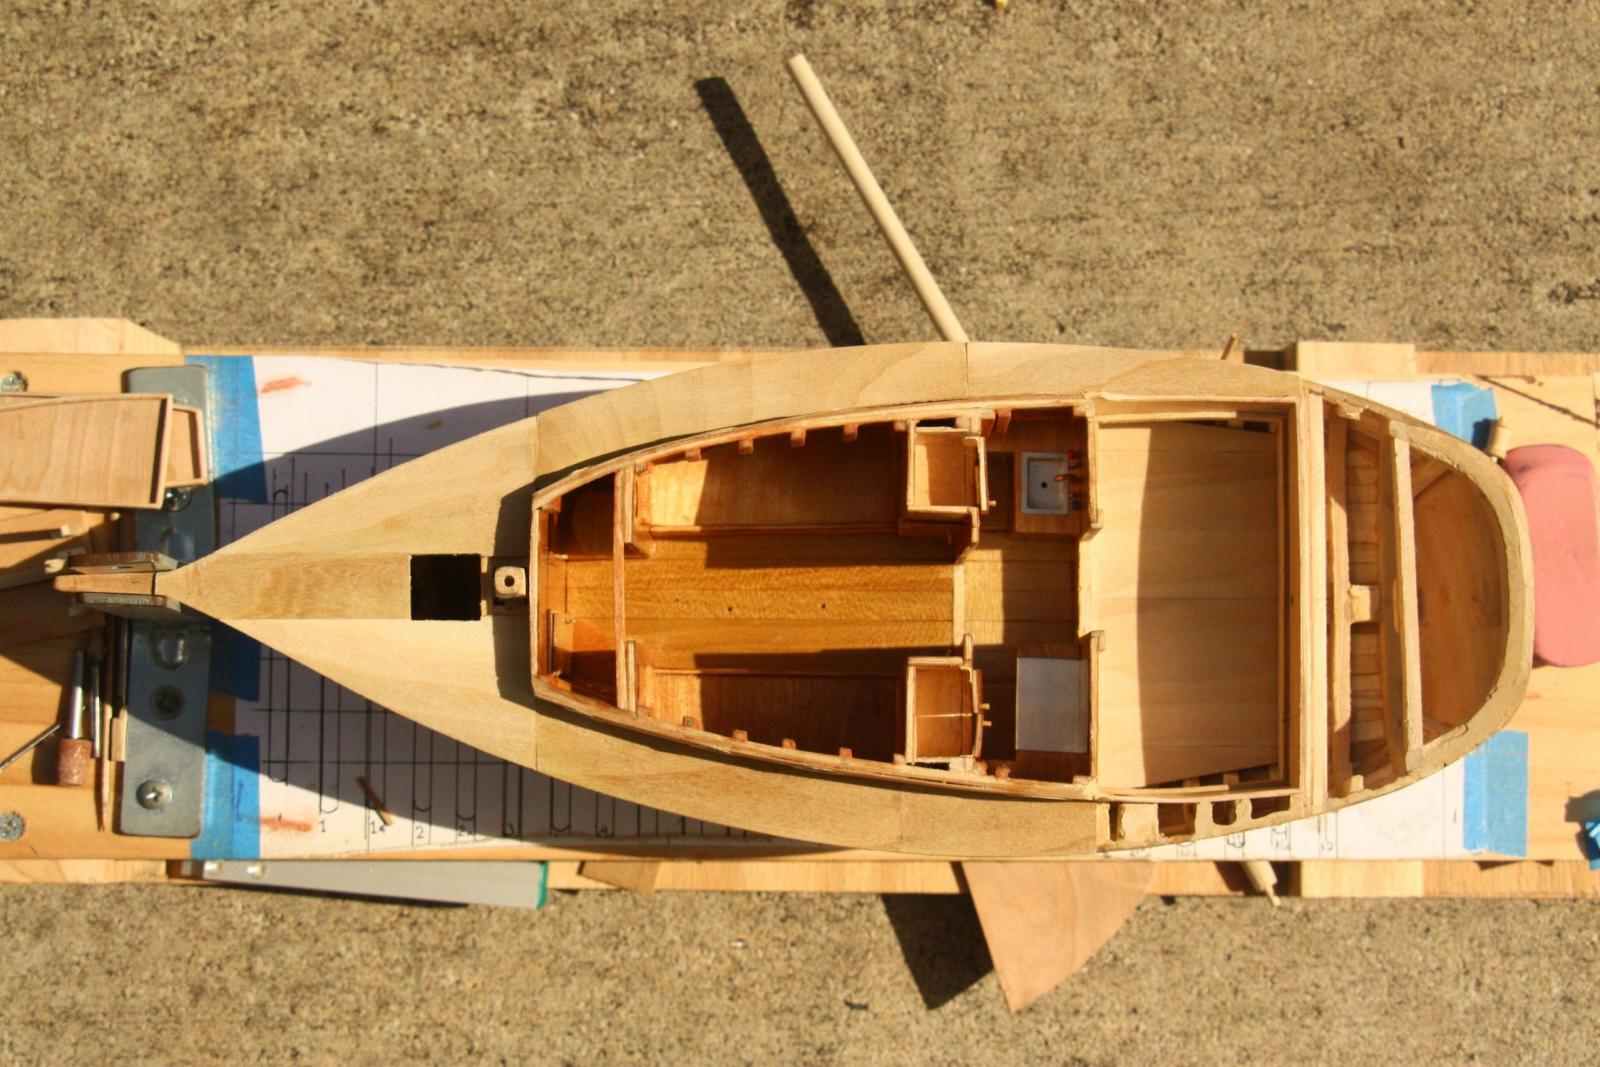
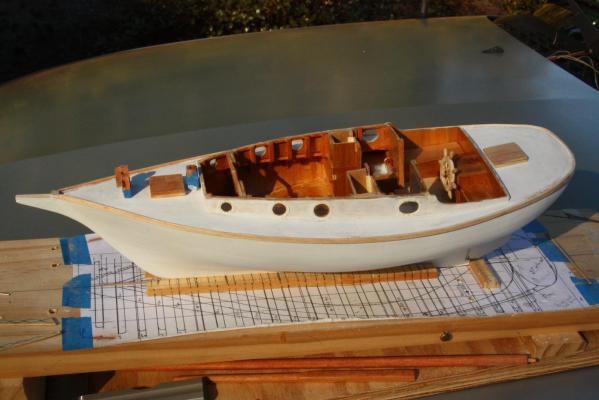
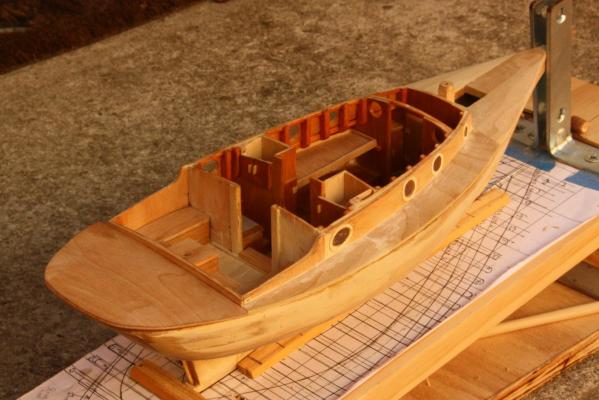
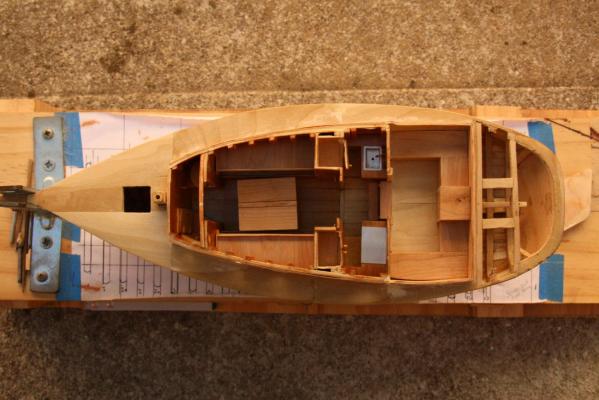
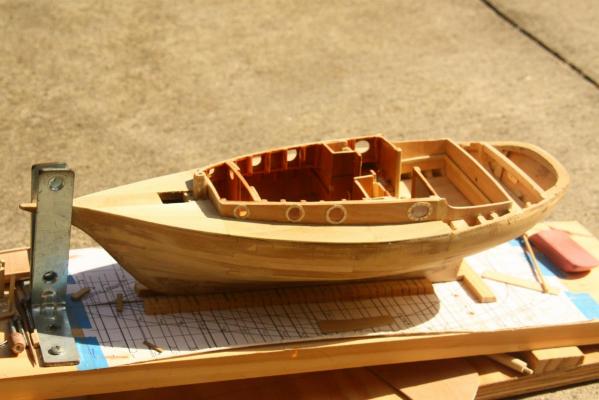
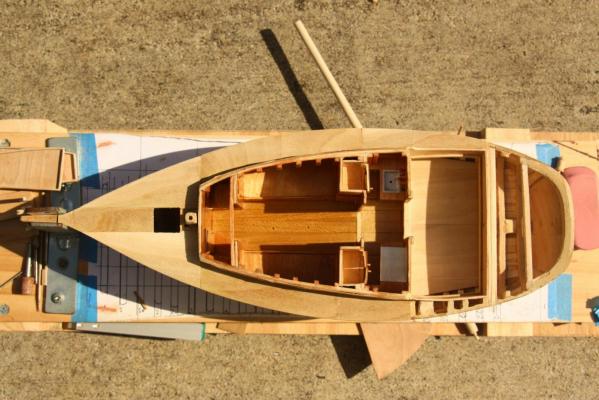
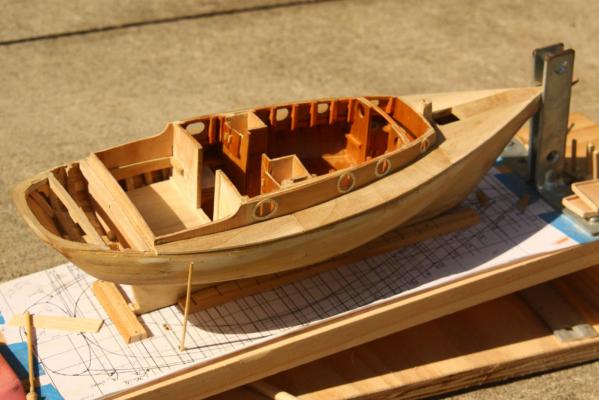
Hello Friends, Thank you all for your "likes", really appreciated. A few things happened in the progress of this build in this installment. I started the deck planking here and made my own plywood again. I decided to use plywood instead of planks. for a small boat it seemed logical and easier. In real life we would use marine grade plywood but here I used my own method of making plywood. The deck was going to be painted anyhow with non-skid paint. I also "planked' the vertical sides of the cabin above the deck and cut the portholes in it. I used file folder paper for the portholes and clear plastic from small food packaging trays from the supermarket. I also finished the galley cupboards and made the doors for them as well as doors for the hanging closets in the cabin. I also installed the seat supports in the cockpit and drilled the hole for the helm shaft. A tricky one because the largest collet for the flex attachment did not go up to the drill size I needed. So I had to drill the final hole by twisting the drill bit with my fingers. Attached are four pictures that'll tell the story better. I had to remove the table and top bunks to give me some space for the Proxxon flex extension. I also poly urethane the cabin and galley. The deck is partially covered and is still a little too large but over all it fits nicely. This is my own made plywood and is about 2 mm thick. I forgot how I clamped the side deck pieces. In this picture you can hardly see the top bunk tracks. The galley cupboard doors are also made and hung. I made two doors on the port side and the cupboard is also a bit larger then the starboard one. A top port side view. I made a hatch opening for the forecastle/sail locker/appliance compartment. The mast stump is only a temporary thing. Here you can see the cockpit seat supports and the helm shaft hole. The cabin upper sides are also made from home made plywood. It was a fun experiment but too time consuming. It would be better to buy 1 and 2 mm plywood in the hobby store. That's what I have done for the O 19 sub I'm building. I have glued 2, 3 and 4 layers of 1 mm ply together to get the thickness I needed. It's very strong and can be shaped into an airfoil when needed and won't twist or warp!. Starboard top side view. Here you can see the top bunk tracks and the galley cupboard doors. Yes, they do also have handles on them and work. Here you can also see the hanging closet doors, they too have handles on them and work. btw the hinges are made from file folder paper. The stick stuck in a hole in the build board is what I have used to apply small daubs of glue, mainly for the hinges and door handles. Side view, starboard side. Not much else to add except that the deck still needs to be trimmed. Looking at it now I could have made the cabin just a smidgin higher but when she is in the water she seems to exude speed this way. I thought of making the forward end bowed but that would have taken away a lot of headroom in the head and washroom. I had to use very little wood filler on the model but only where needed to hide the plank seems when painted. I was pretty successful in achieving a nice smooth finish. Cheers

-
I'm late, I'm late for a happy birthday wish but still in time! Happy birthday Popeye, many more Cheers,
-
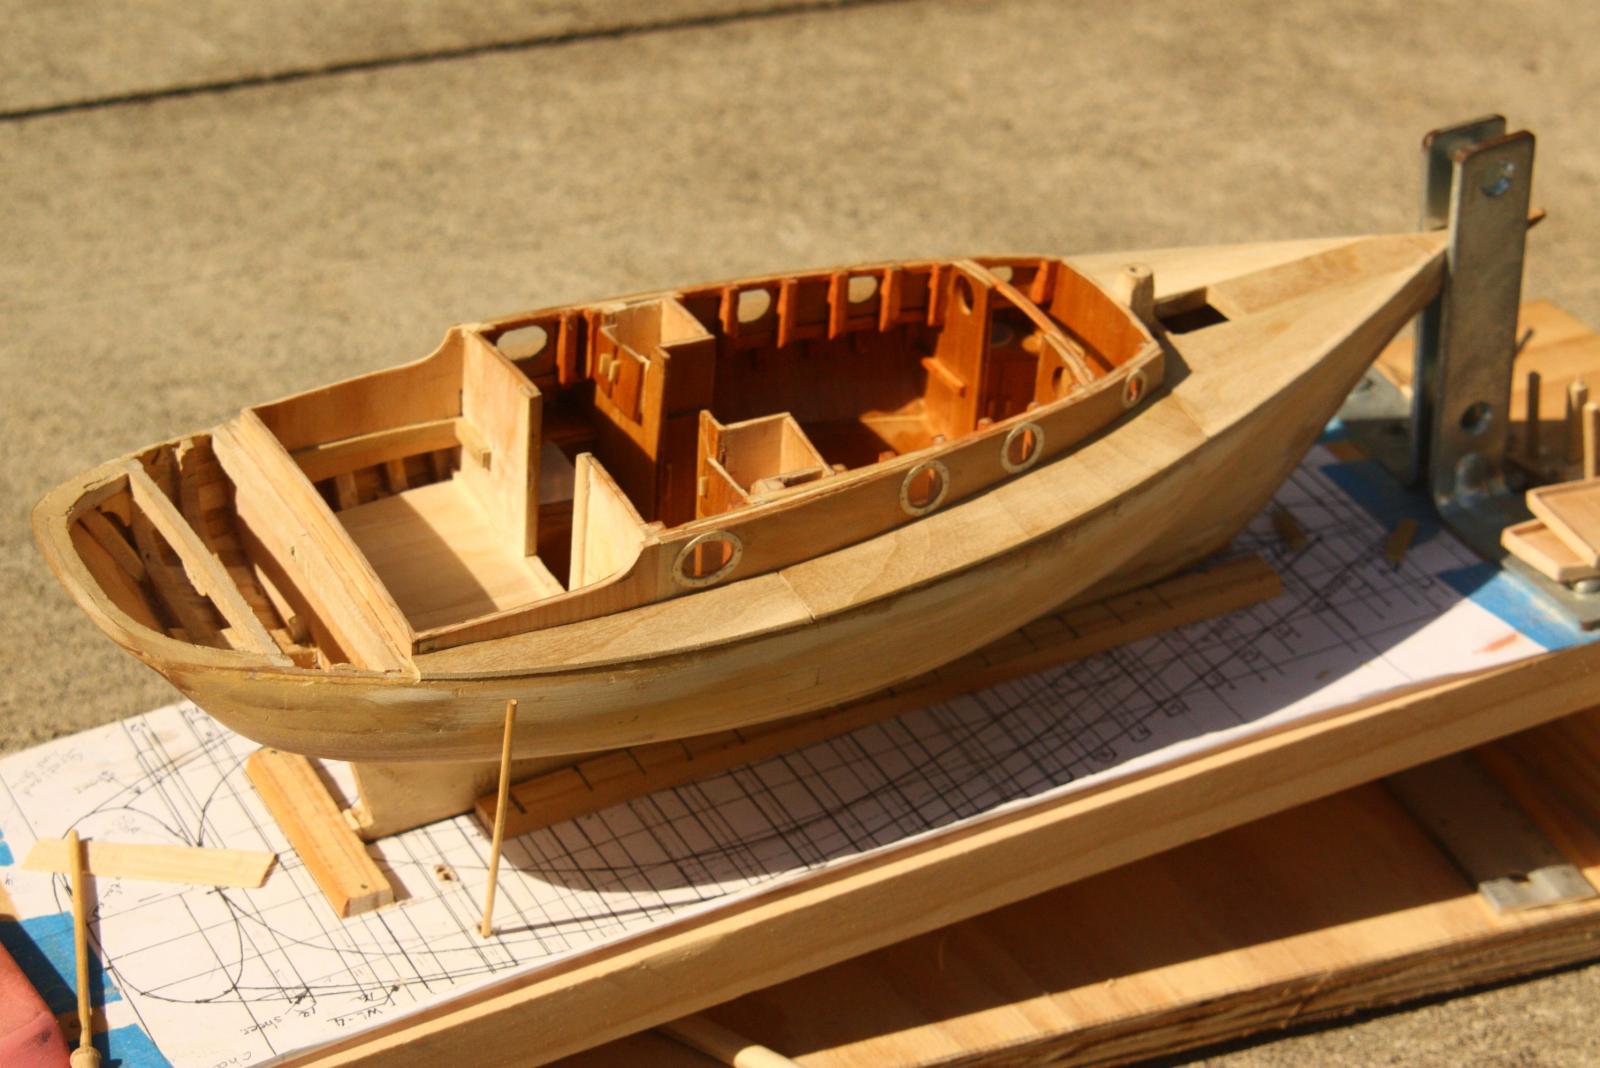
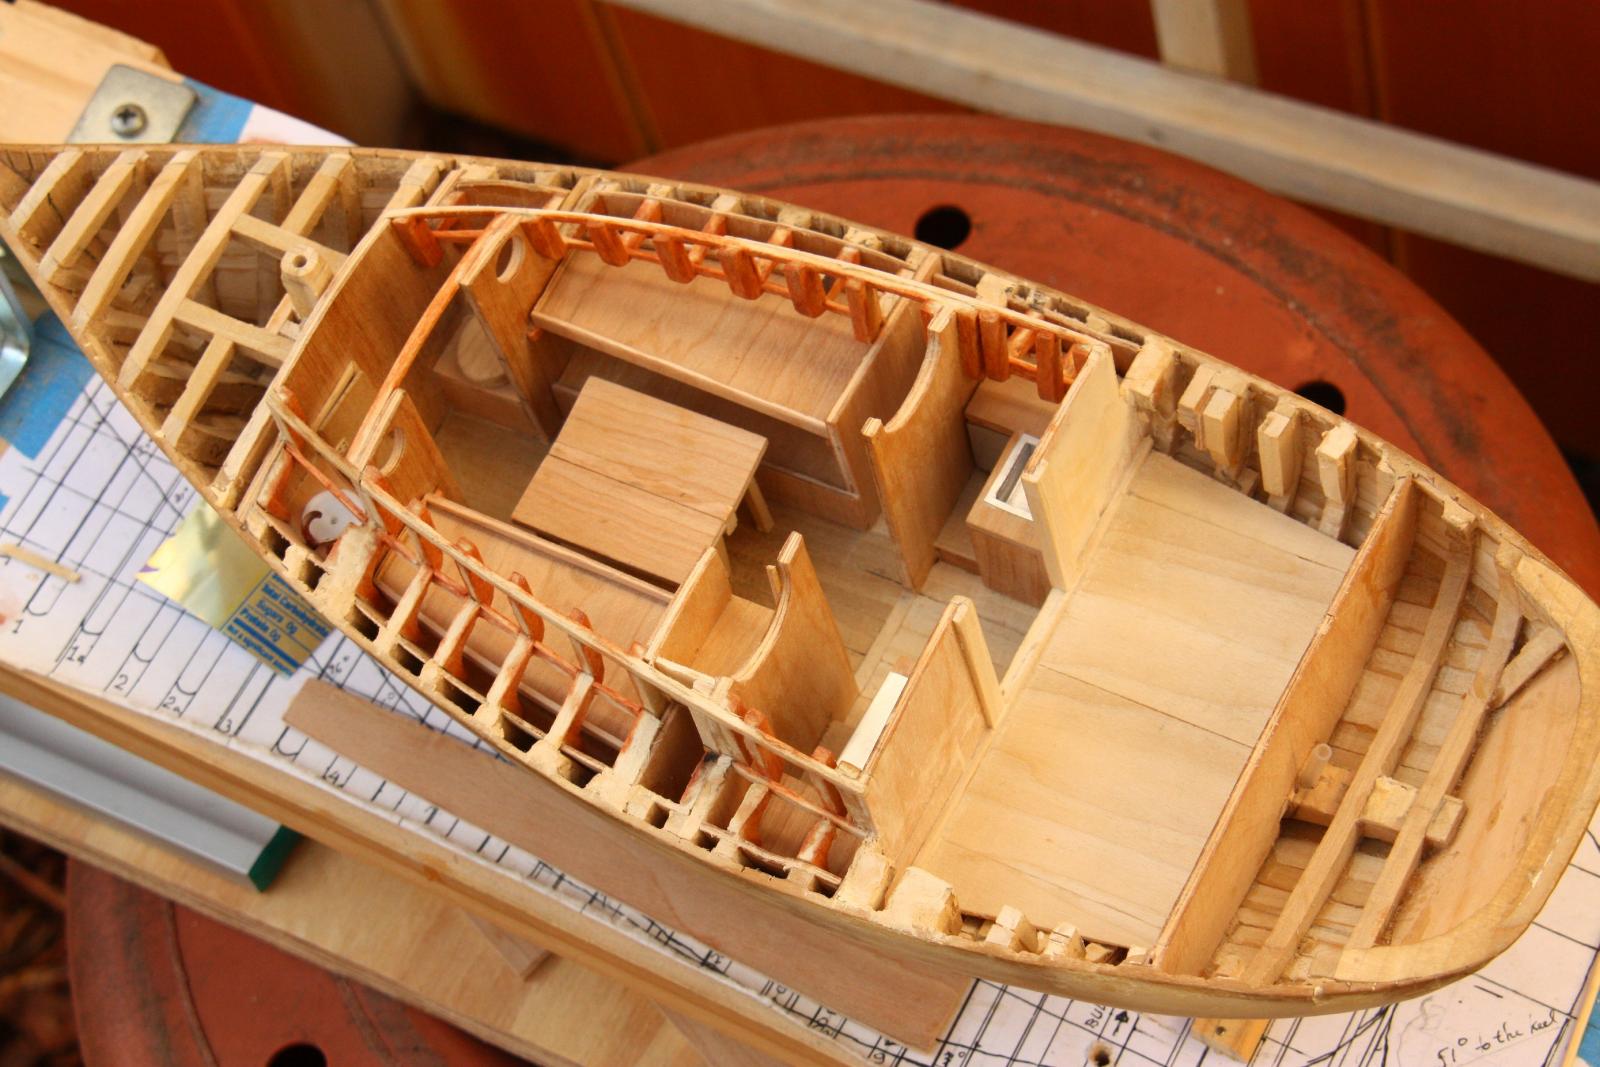
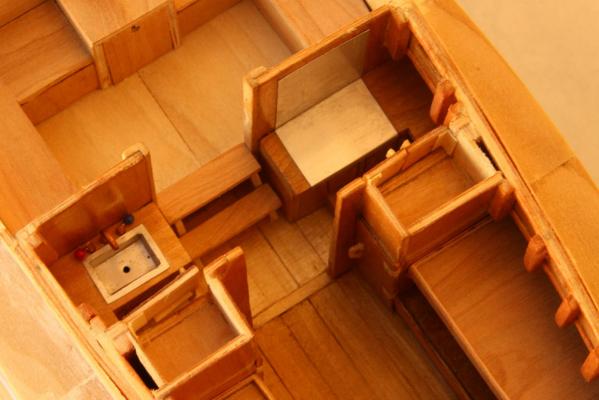
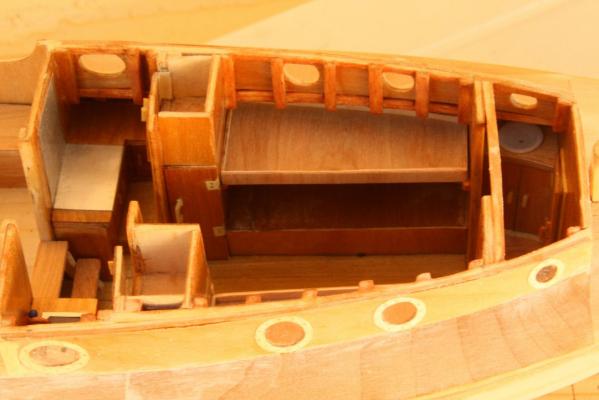
Hello friends, A lot of things have happened between the last post and this one. Thinking back now, I am sorry for not making more pictures of the different steps involved in the building phase. In this episode I'll try to describe what was done in some detail. Dialog has to suffice with the lack of pics of each step but let your imagination go then you'll see the picture appear in your mind This picture was taken outside due to better light for a slow camera lens It shows a side view forward. Starting at the front, I added and installed a roof beam over the opening to the head. I stained most of the cabin with cherry except the new top bunks and the table. These bunks are like dresser drawers and "roll" on tracks fastened to the bulkheads. No, in the model they slide on small strips of wood that are glued to the bulkheads. The bunks were also made with my home made plywood. Reason for making the top bunks movable is that the deck knees makes the space a little cramped, not much headroom. Just imagine having a ladder that hooks over the edge to climb on them I made a table with foldable side blades. The legs also fold in against the bottom of the table blades. The table has two sturdy legs that are pinned to the deck to make the table removable. When it is time to crawl into the bunks the table will be folded in and the top bunks pulled out. I added a shelf in the port side hanging closet for the galley cupboard, the starboard side followed. Top view looking aft. Continue from the bunks, I added partitions on the top of the hanging closets to make the small cupboards for the galley above them. A lot of small strips of wood for the framing involved. The galley was also semi completed here. On the port side is the counter with a stainless steel top and a stainless steel backsplash is yet to be installed. I made these from an empty beer can. There are of course a few doors below for access to storage. I neglected to make a propane burner unit of three burners. Was going to but just forgot. On the starboard side are the counters for the sink and food prep. The sink is also made from an empty beer can. It has spigots for hot and cold running water! These are made from copper electrical wire and the faucet is from copper tubing. There is a small fridge as well and more storage. Yes, there is a small electric hot water heater! Later on in the build I made a few changes to the bulkhead with the half moon shapes. I also installed the cockpit deck (floor). Okay, that raps it up for now. As a note of interest, that spindly deck framing over the bunks are surprisingly strong. Hmmm, how do I know More to come in the next episode. Cheers,

-
Hello Mark, so sorry to read about the loss of your dear four legged friend. I understand how you feel. Your repair of the keel is looking good, with the planking in place it'll be unnoticeable. Great job! 61 more days eh, hang in. It'll be there sooner then you think. Make it a great rest of the day. Cheers,
-
Hello mark, good to hear from you! No sooner did I send a thank you post on John's and S.Coleman's kind words then I get one from you, my cup runneth over Thank you Mark for your comment, yes, all that work was a little challenging but it's working okay. I also shortened the prop hubs a little, see how they'll fit. Cheers,
-
Thank you John and S.Coleman for your kind and encouraging words. Mister Coleman what does the S stand for? Inquiring minds and all that A master piece? Now I'm blushing but nice to hear She's coming along okay I would say, even when looking at it close buy. Cheers,
-
Ho Bob, yeah, well, I was imagining building a real 30 foot sloop and wanted as many of the amenities on board as I could possible cram into this small model. I need space for four, the Admiral, the daughter and grandson and then me, the skipper I really enjoyed doing the extras and it worked out okay, at least the Admiral is happy with it. Cheers,