HOLIDAY DONATION DRIVE - SUPPORT MSW - DO YOUR PART TO KEEP THIS GREAT FORUM GOING! (Only 27 donations so far out of 49,000 members - C'mon guys!)
×


Piet
-
Posts
3,568 -
Joined
-
Last visited
Content Type
Profiles
Forums
Gallery
Events
Everything posted by Piet
-
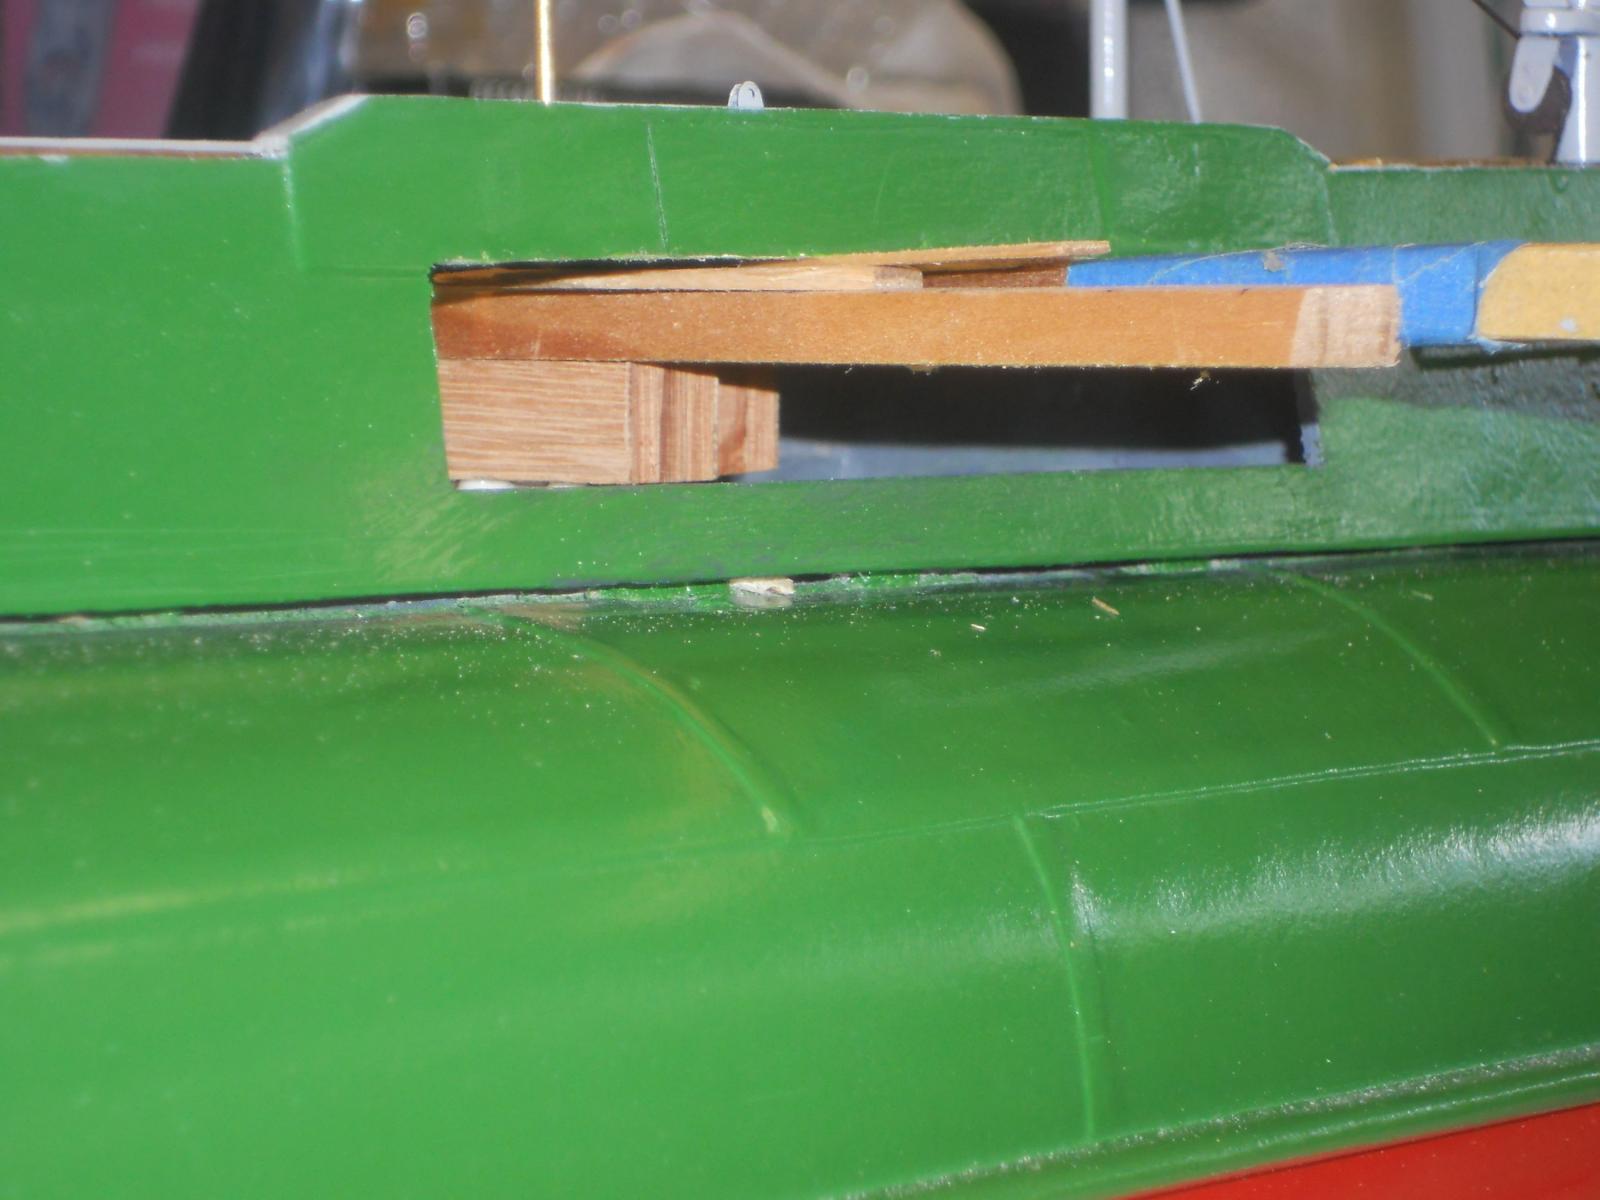
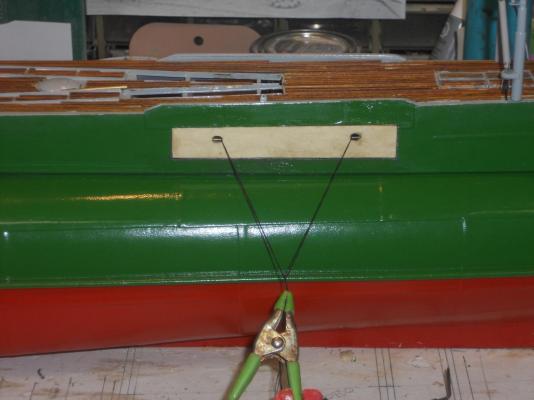
 Thanks everyone for visiting and your likes!! Today was not as productive as I would have liked it. First of all it was my fourth visit at the Urology Clinic for the BCGI treatment and for some reason the side effects are much more bothersome. In addition the temp in the garage was over 96 F and even with the doors open and the fan going full blast it was still HOT. I was just moving hot air. I like it hot but when you have a splitting headache, tired and drowsy feeling it's no longer fun. In any case, the port door worked as advertised but - - - when I tried to install the launcher it would not go in. That extra disc I glued on the bottom was too much. So I "un-glued" it and cemented it to the fixed rotating plate that sits on top of the pressure hull. I should have done that in the first place, domkop me But - - - all that time was not lost because I could now sand this disc to about 1 mm thickness that would have been more difficult by doing it in my hand or inside the boat. I removed the door so I can glue the card hinges to it and permanently affix it to the bottom stringer below the door opening. I'm going to be positive in that the launcher will fit okay, after all, I did try it. While the glue was curing I started to model two torpedoes for the launcher. I made three propellers from some thin brass shim material and the fins for one. Hopefully I can finish these two torpedoes tomorrow, or whenever. So you see that I was not letting the discomfort get in te way until later in the afternoon. Here are two pics that show how I jury rigged a clamping system to clam the thin spacer disk. Perhaps not clear by what I'm doing here, the next pic shows better. I used a piece of brass tubing to center the disk over the existing turning plate. Dabbed some TiteBond on it and then two small oak blocks I had laying around from making the VOC ship hull planking jigs. Then two wooden sicks on top of the oak blocks and used wedged between them and the top of the door opening. You get a better idea with this picture. This clamping rig is nice and tight and the disc should be well cemented. Cheers,
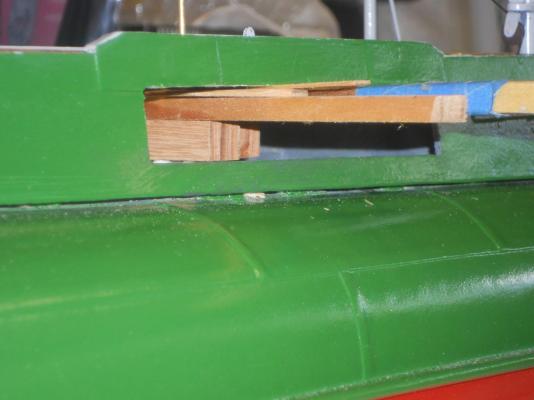
-
Thanks Pete for looking in. Yeah, I think / hope that everything will come out okay. Cheers,
-
Hello everyone and thanks to all for dropping by and your like votes. I did manage a few hours in the shipyard today. Did some futz'n with the doors to make them fit a little nicer. Then I figured that to be on the sage side I added a thin disc of wood under the launcher plate to raise it up a hair for a little more clearance over the folded doors. I decided to glue two strips of card stock to the port door for the trial hinges and when the glue had dried enough during lunch I glued the door in place. Then it was time to go with Gwen for some grocery shopping. I needed some more ingredients for a few dishes I want to make - - - asparagus with a Brie sauce - - how's that sound??? We'll have to wait till tomorrow for the results of how the door works and that the launcher can still rotate over it. We'll keep our fingers crossed. I also started to make two more torpedoes to put inside the launcher. I only made on picture for my archive but will make a few more when I'm glueing the final hinges to the door. Not much to see but this is the port door being held in place with some string and a weight. I put the card strips just to the inside of the "handhold" like thingies. Everything looks kinda rough yet but I'm happy that I didn't do more damage to the deck sides. Spray-paint touch up will fix all that and no one will ever know what we had to go through - - - other then all yuns following my build Cheers,
-
Thanks Michael, there is a lot of thinking, looking at things, trying things and hopefully everything will work out. Yes, we try to keep busy otherwise life would be so boring
-
Hey Dave, if I lighten up more I'll be floating Maybe that's the reason why all the nurses at the hospital are in stitches when I come. Hello all, couldn't do anything on the O19 today, too many chores around the house. Hopefully tomorrow, I keep my fingers crossed. All y'all have a great rest of the day and keep safe and in good health,
-
Hoi Freek, so sorry to hear that Fred Huygen has passed away. He was a great help to me with some detail issues. Your 0 1 is looking great in the tub, hope your larger dive bag will fit. Fantastic shots of the subs at your meet. Cheers,
-
Hi Dave, negative on I-95. For our route up north we take I-95 - I-26 then I-77 through Charlotte and through Virginia, West Virginia, Rt 19, and I-79 direction PIT. Great job with your culinary prowess Dave, I'm proud of you man My wive loves Fire Hous subs - - - at least I can stay on subject When she doesn't want to prepare a meal she either orders Chinese, Pizza or those yemonges subs. btw, the brisket is marinading in some dark ale (Turbo Dog) as we speak. Tomorrow i have to put a rub on it and the roast that sucker. Cheers,
-
Great looking model Pete! I just marvel at the engineering behind this type of boat. Wonder how this would work for larger vessels with more masts. Cargo hauling? Cheers,
- 220 replies
-
- 1
-

-
- finished
- volvo open 70
- (and 1 more)
-
Thanks everyone for visiting and your likes. Hi Dave, yeah, it turned out to be less of a problem then I thought. We'll see how it'll work out when the doors are hinged. Regarding the galley issue, well, some people like to cook and learned how, others not so much. For me it was a necessity for when I came to these United States as an immigrant. I stayed a bachelor for 6 years and didn't make much money so home cooking was a necessity to keep eating costs down. My dear bride of 52 years is a great cook but doesn't like to do it anymore. She'll also getting carpel tunnel operations very soon on both hands so I'll be doing the cooking then. Fortunately she likes all kinds of foods from around the world and our most favorite is Indonesian and other asian dishes. Okay, enough of the food talk and back to business or the lack thereof. I could not spend even one minute in the shipyard today. First I had to drive down to Ormond Beach for my cancer treatment but we decided to postpone it till my urine sample was analyzed due to an unexpected situation that developed over the last week. Then I decided to make a few more dishes for the next few days so both of us can relax and perhaps give me some time to work on the O19. Gwen is on her way but called when fueling up in Columbia, North Carolina, that it was slow going and she is tired. I suggested for her to just stay overnight in a motel and rest up. There is no rush and why jeopardise your health and safety. I wish all y'll a great weekend with great modeling and I'll be soon back in the shipyard. Cheers,
-
Wow Pete, your planking looks awesome. I can see that you like planking, it shows. Cheers.
- 220 replies
-
- 1
-
-
- finished
- volvo open 70
- (and 1 more)
-
ROYAL CAROLINE 1749 by Doris - 1:40 - CARD
Piet replied to DORIS's topic in - Build logs for subjects built 1501 - 1750
Fantastic work Doris and all of us are quite familiar with redoing things because we are not satisfied with "good enough." Cheers,- 883 replies
-
- 2
-
-
- royal caroline
- ship of the line
- (and 1 more)
-
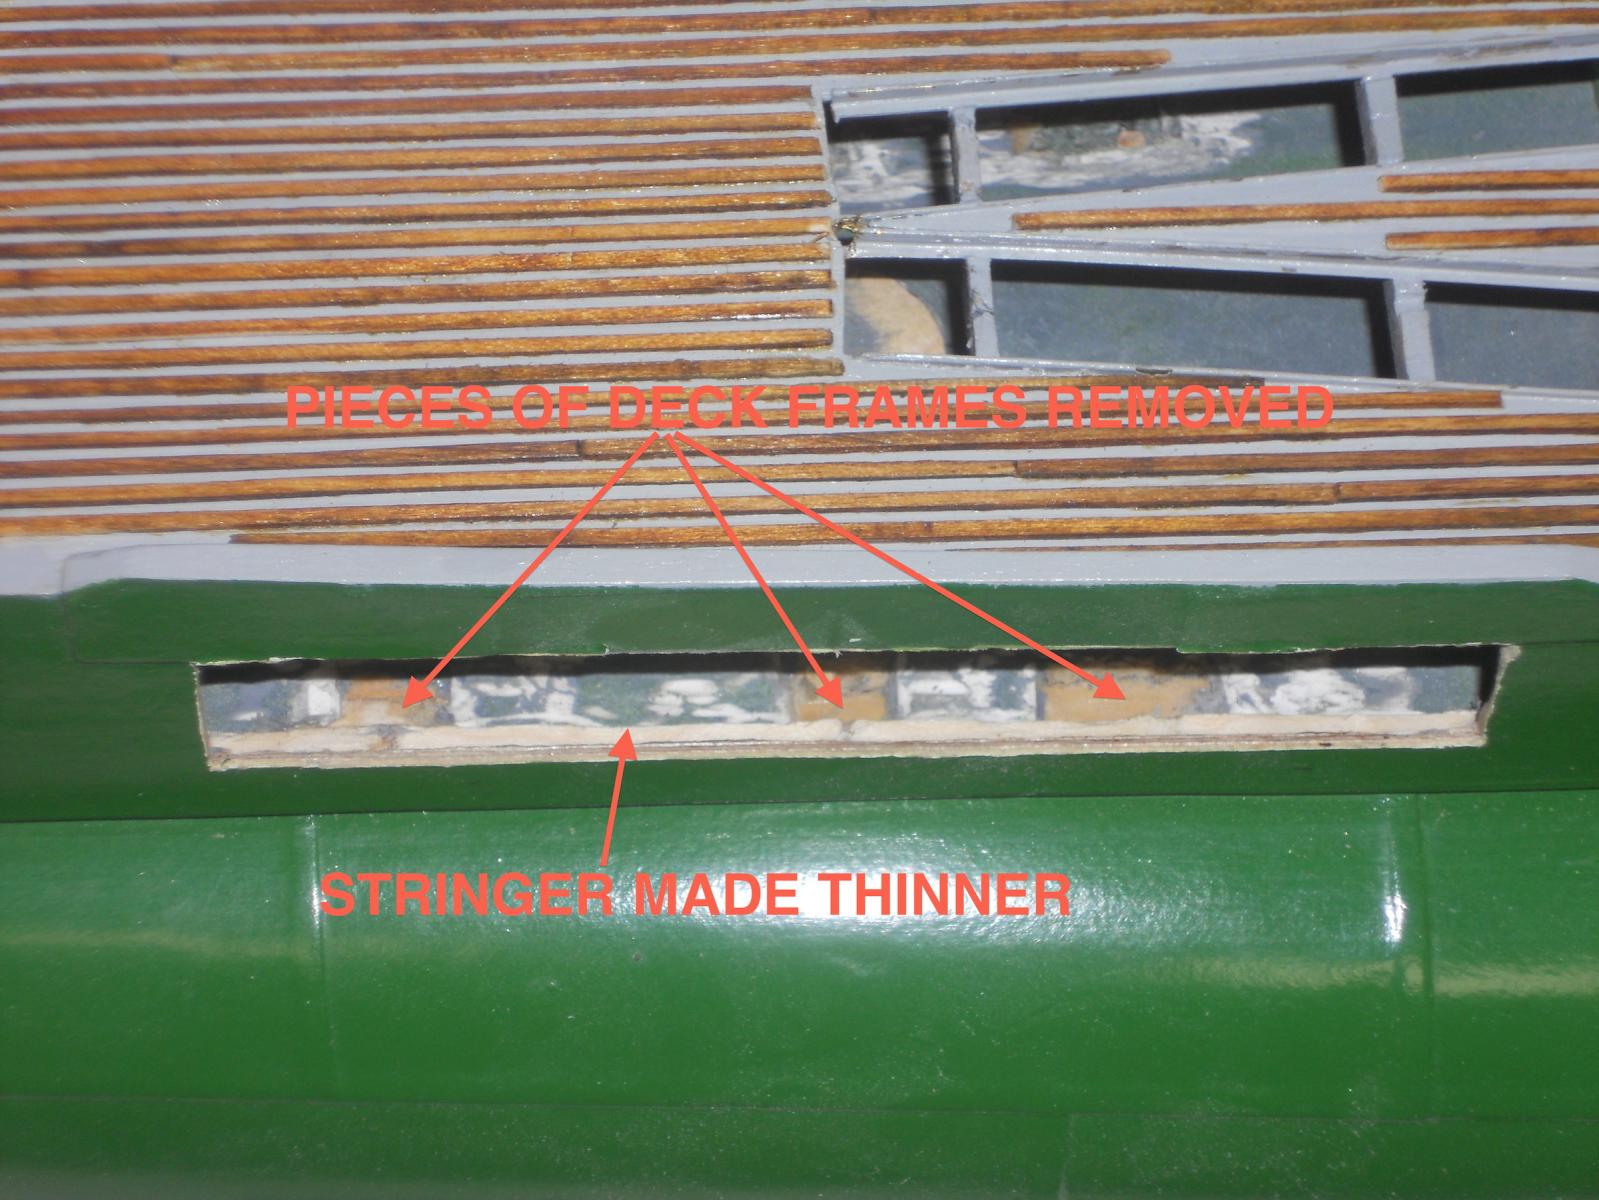
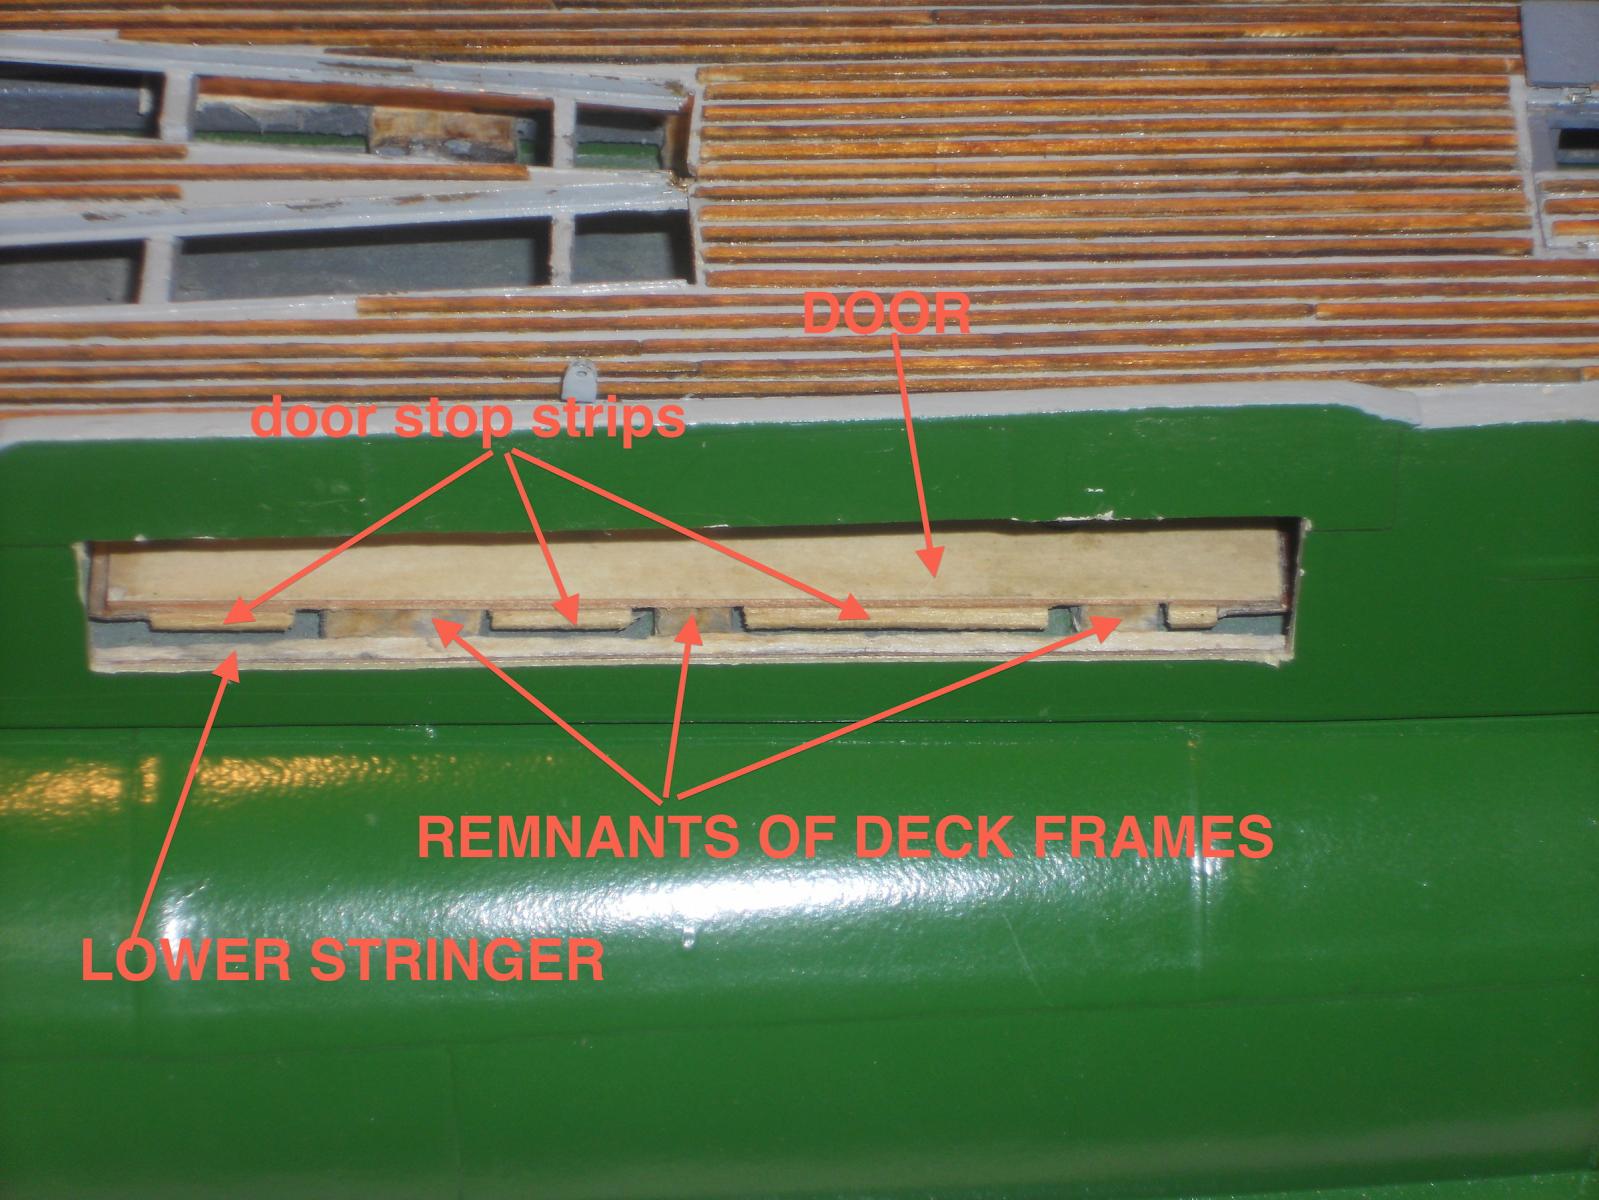
Okay, I'm back. I couldn't do much today and doubt very much of doing anything tomorrow. First thing in the morning I mowed the front yard before the afternoon T-storms come rolling in, then did some more shopping for a few items i forgot and cook a few dishes for this weekend so Gwen doesn't have to "work" after her 900 mile drive from Pittsburgh, PA. What a guy - - - the best husband she ever had Well okay, I did venture into the garage with my late morning coffee and an apple to see what to do and where to start with the door problem. Obviously I started by attempting to remove the three left over pieces of the original deck side frames. I remembered that I nailed the lower side stringer to these frames in addition to glue, so using chisels or knives was not an option. I kinda "worried" enough of the wood away to expose the nails and could extract them. Then it was an easy case of prying them loose and out. It's also fortunate that there is no appreciable movement in the bottom area! Great, so far so good. Now I had to reduce the thickness of the stringer to match the thickness of the doors. Using chisels and knives would not work but I had a small Dremmel like cut-off disc in my Poxxon hand tool and tried to remove wood with the side of this disc. Well, it kinda did work and it left a fairly smooth side on the inside of the stringer. I ban always dress it it some more with a small sanding block. I tried to fit the doors and see how it looked at the inside for the paper hinges. I think it'll work, all I can do is try to glue two hinges on for a test. I have been able to do very little damage to the sides of the deck, just a little superficial scrapes on the paint, nothing that some careful dressing up and paint can't fix. All in all I'm quite happy with the way things are turning out with the door rework and glad I don't have to remove any of the side plating. I don't know when I can get back to this project though. Tomorrow morning I have to get my fourth BCGI treatment that'll lock me close to the "tinkeltarium" for the rest of the day and Gwen'll be coming home too. I also need to make a few other dishes for her that she likes. How about Bavarian sauer kraut? Okay, here is one picture after I removed the frame pieces and "machined" the stringer a little thinner. This shows that the frame pieces have been removed but you'll have to take my word for it that the stringer has been thinned enough to the thickness of the doors. Before I can actually install the doors permanently I want to try it first with two paper hinges at the ends of the door. When I'm sure the door will open and lay flat enough for the launcher to pass over it unhindered then I have to paint the inside of the launcher compartment in dark grey. No one will ever know what "heart-ship" and "trauma" I had to go through to achieve this I'm kidding of course. So far it has gone easier and faster then I figured. So much for worrying. Cheers,

-
My thanks to all who dropped by and left me a like, Thank you Pete, John, Mark and Dave for your very encouraging words. Much appreciated. @ Pete, hmmm - - the sucker in the bag eh, well I'm certainly going to try to bag this one but it's like changing a piston through the muffler Taking pics of the demolition and rework is difficult to do when I'm the only one home. Oh, I could put my Cannon on a tripod and then push the self timer but I am in too big a rush to get started that I plumb forgot. I'll try to simulate some of it tomrrow or whenever. It has to come out out okay, that's an order! @ John, thanks for visiting and I'll try to do my best. @ Mark, yeah, and it's all because of most are after thoughts when the basic hull was already completed. Originally I was not going into any detail but then "stuff" happened and one thing lead to another. I was not going to build a model of the launcher like I did. Remember that I ripped the deck off for another redesign? Then I figured, or guessed, that some sort of launcher would be okay. well, you get the picture that this is to be expected when prior planning is not involved. This model seems yo have gotten a life of its own and things just evolved. But - - - I have absolutely no regrets of doing all the re-engineering and do-overs, no matter of the difficulties I encountered without doing any damage to the hull. Just a lot of head scratching and loosing some hairs from my already thinned head. Bottom line is, I'm having fun with these challenges and solving them. @ David, yep, so true. The challenge is how to do it with limited tools and not having to dismantle half the model. All yuns stay tuned for the continuation of the re-design and functionality of the torpedo launcher doors Cheers to all,
-
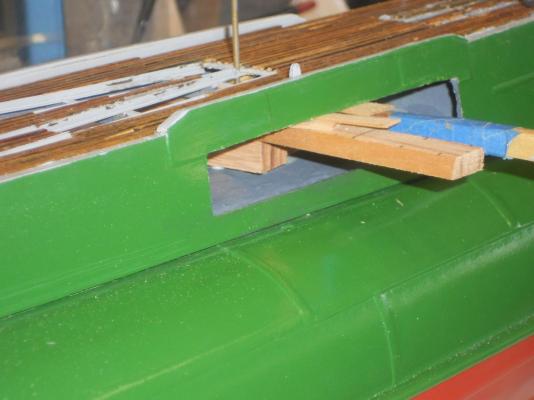
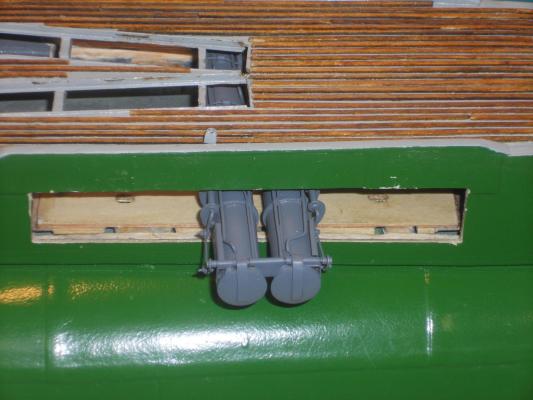
Thanks again to all who dropped in and clicked on like, it's much appreciated. Well, as I mentioned to Pete in my previous post, I ran into a snag with not having enough space between the launcher and the doors when they are in the open position. I miss 1.5 mm! Even a gnat's eye lash would be too much so I have to do some thinking in how to solve this problem AND make the doors work on hinges. I think that I have to remove the three pieces of deck frames and then also the stringer where the side deck panel is glued to. This may involve removing the portion below the door opening, that way I have better access to the sides to remove small portions of the stringer so that I can glue a new but thinner stringer it its place. The door must hinge in such a way to allow it to fold even with the bottom of the door opening. The paper hinge must be glued straight down from the back of the door to the back of the stringer, that way it will do that. I'll most likely have to remove the lower stop strips on the doors and perhaps even shaving some off to make it a tad thinner. I may have to make some more plywood or if I can carefully cut the small part below the door opening I may even be able to reuse it. A little filler in the seam and a fresh coat of paint will do the trick. This is actually not a redo but more a re-engineering project. Okay, I made two pics to show yuns what I see and how to best tackle this minor problem. I have annotated the photo so you can follow my reasoning. First I must remove the three left over pieces of the deck framing. Next i must either make the stringer thinner with a rotary saw blade or cut-off disc or just remove it. I'll most likely have to remove the section of side panel below the door opening and install a new but thinner stringer. The thickness of the side panel with stringer must be the same as the total thickness of the door. The portion I marked as door stops must also be removed, that's an easy one. The way the door is situated on this photo is exactly where it should be and with the plan I have right now it should work. This shows how the launcher rotates nicely with the door flush with the lower sill of the opening. Now I have to get to work and make it work. I must remember taking a few pics of the surgery and hopefully a successful completion. Cheers,

-
Thanks Pete and Popeye for dropping by, it's always great seeing yuns in the shipyard. Yeah Pete, especially the file folder card stock seems to be layered and even when you soak it as much as you dare with either the glue or poly it still tends to flake off when sanding or scraping. Any thin poly or two part epoxy for fiber glassing should work okay, it should penetrate the paper to make it more like wood. Yeah, the doors are okay but I'm having a snag with not enough space for the launcher to swivel out over them. See next post for explanation. Hey Popeye, I know what you mean. Life gets in the way of fun - - sometimes. Cheers,
-
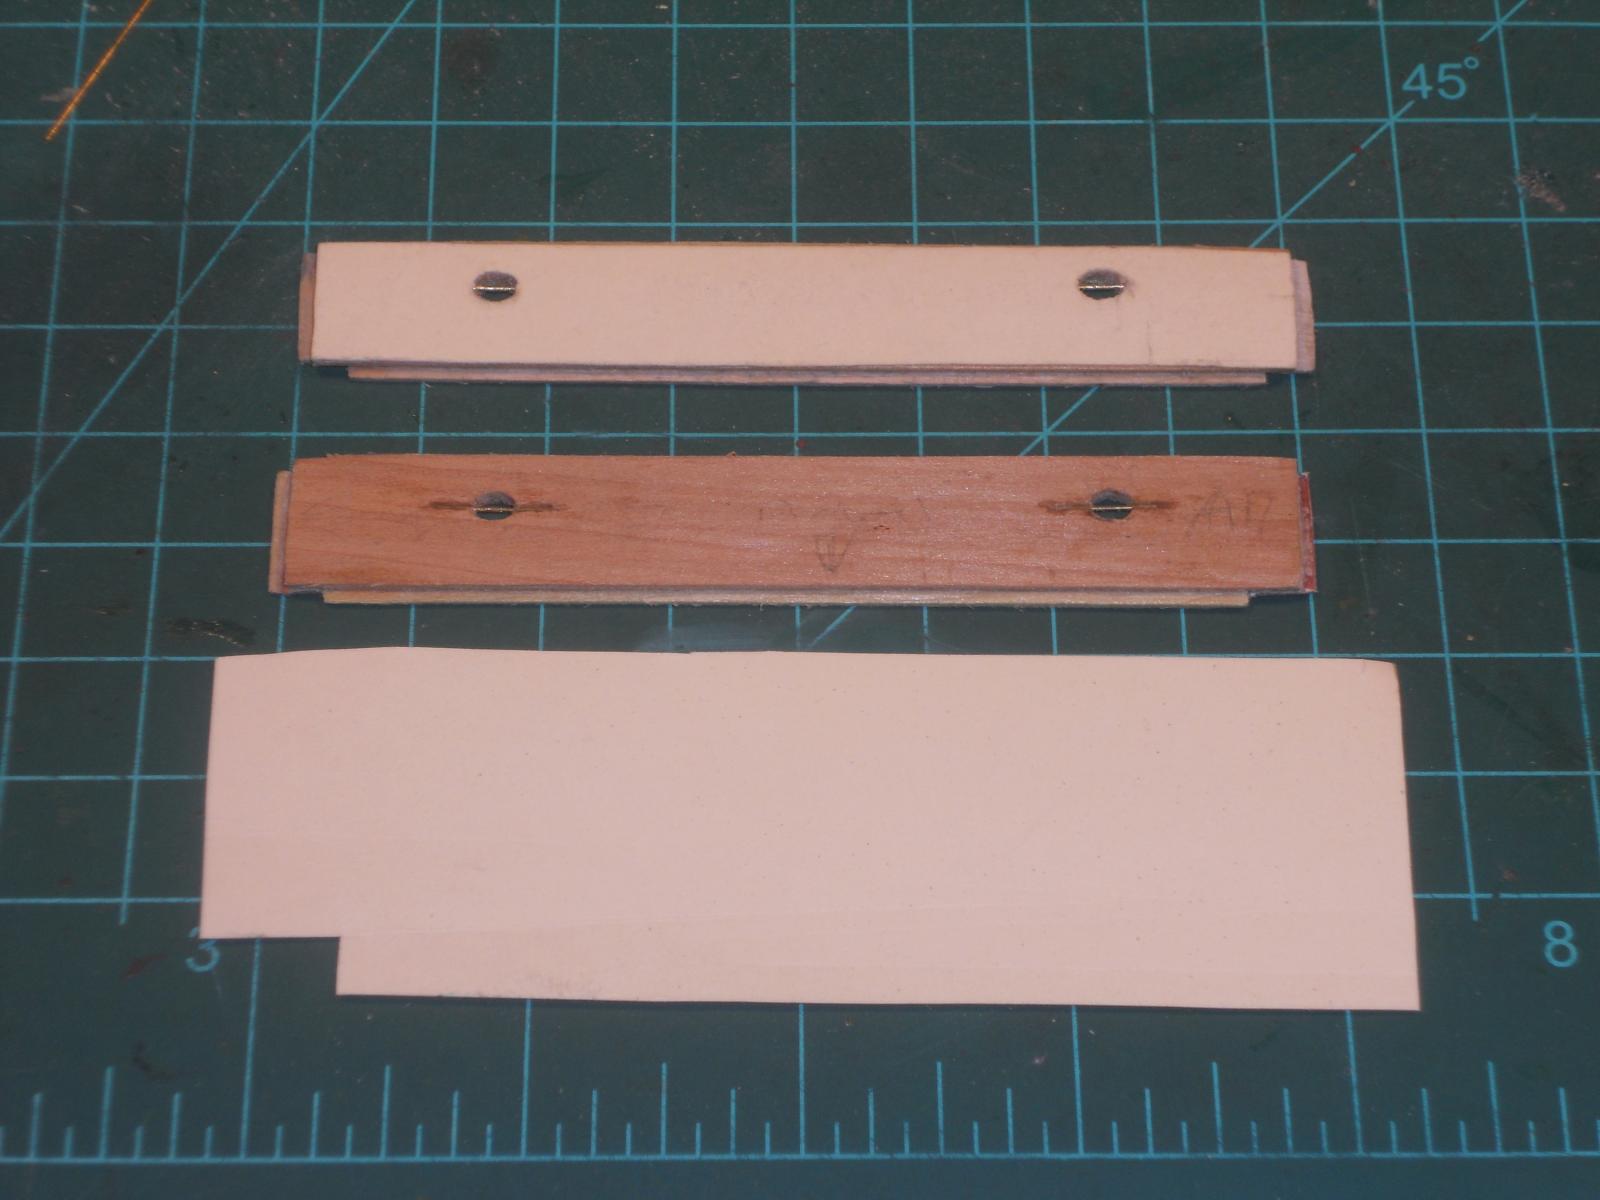
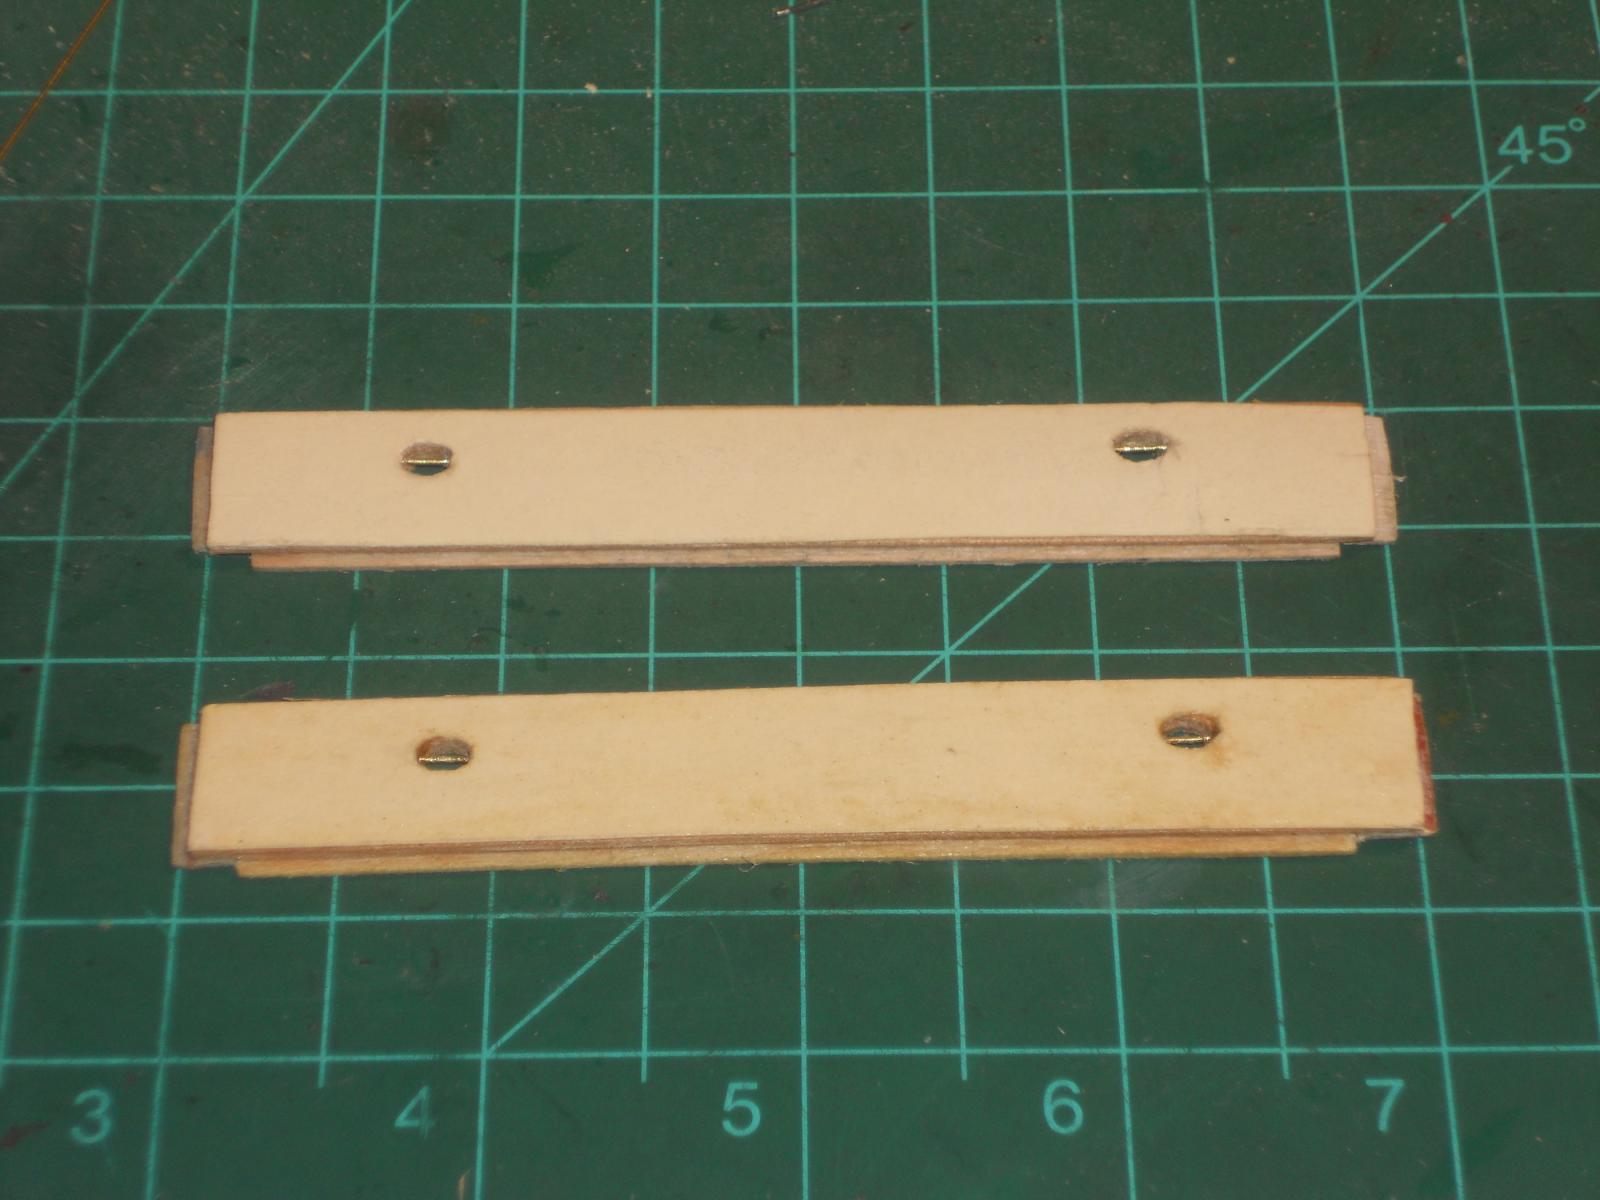
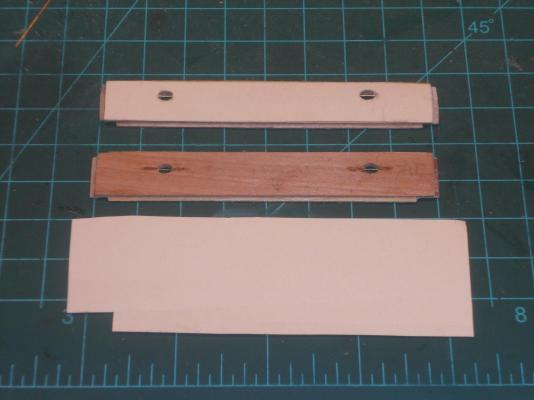
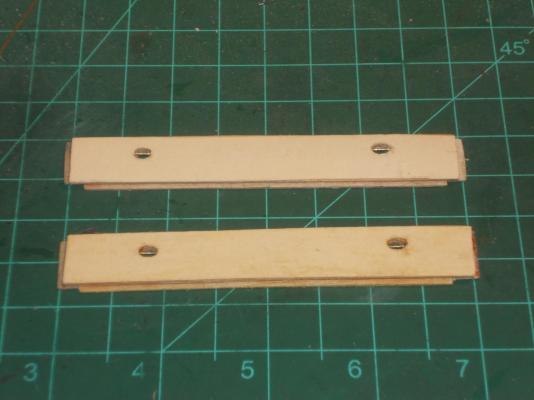
In case yuns think I have been sitting on my hands I can assure you that I have been very busy - - - not so much with the O19 but playing "home maker" is a very tough job With Gwen being away for two weeks I have to do laundry, ironing, vacuuming, washing windows, cooking meals etc. Oh, I forgot shopping for fittels - - - a man's got to eat Well actually I did some house work and yard work and yesterday and today planning a menu for the weekend when Gwen'll be coming home. That'll give her a reprieve from cooking. She likes my cooking and kinda complains that I don't do it often enough. However - - - I managed to make both side doors in the deck to fit and have glued the back-up strips to the back of the doors, the handholds and the "steel" plating. Next will be the hinges. I still plan on making the hinges from card stock. There is no way to make them from metal at this stage of the game. I just hope they'll fold down enough so that the launcher can rotate over them - - - keep my fingers crossed and hope I luck out. Well, here are two pics from my archive to show the progress to date. This shows both doors in the stage of receiving the "steel" plating. The top door has the hand-holds and the card stock cemented to the wooden door. The bottom door is ready for the card stock to be cemented on. The card stock is just from an ordinary file folder. I have sealed the top of the card with clear poly. That way I can safely sand it smooth without it unraveling and for a smooth paint lay-up. Here are both doors completed and ready for paint and the installation of the card stock hinges. Cheers,
-
Thanks to all for following and your likes. Hey Popeye, great to see you again - - thought you may have fallen off the cliff. Thank you my friend for your compliments and yes, the launcher was a challenge but a lot of fun doing. Yep, making plywood for such small pieces seems logical but time consuming. Just remember to place the grain of the center piece 90 degrees to the others Working with metal is no different then paper or styrene, just a little harder material Cheers,
-
Sad news Sjors, I really feel for you - - - I know from personal experience. So, why should I be the only one who must do frequent re-do's, eh? Join the crowd of the redo-ers The redone plates will be perfect and you'll be a happy camper. Keep a stiff upper lip my friend but watch out for that scotch, it'll kick you in the hiny when least expected Cheers,
- 1,616 replies
-
- 2
-
-
- caldercraft
- agamemnon
- (and 1 more)
-
Wow, that's raw power Pete! It'll be interesting how your model will do. Safe me a seat, okay? You certainly do some amazing things with your models! Cheers,
- 220 replies
-
- 1
-
-
- finished
- volvo open 70
- (and 1 more)
-
A day late and a dollar short on my response to you Mark Saturday was my day of rest and today I had to first chase electrons and after I found them decided to pull a bunch of weeds from the side yard - - - in the rain. We had a T-storm move through yesterday evening and I thought it fried the wireless router power supply. Come to find out that all it did was trip the ground-fault braker for the unit Okay, I'm back in business. Yep, most of the work on that door is done, still a little tight but that's a good thing. Next will be the added reinforcements to the back of the door, shaping it to the same contour as the deck side and the other small stuff and hinges. Oh yeah, then the starboard side yet. Cheers
-
Not fair Nenad - - - here we are drooling and we can't even have a smell, let alone a taste of those beautiful steaks Well deserved my friend, hope you and your family enjoyed it! Cheers,
- 4,152 replies
-
- 1
-
-
- cutty sark
- tehnodidakta
- (and 1 more)
-
Holy chiwawa Freek, that's a lot of cannon balls! Sjors, Mobbsy and Kevin may want to abscond with some of them Better hide them quick I'm looking forward to the test report! btw, 3.2 kg = 7.055 lbs; 3.8 kg = 8.38 lbs and 200 gram = 7.05 oz. That's a lot of weight! Cheers,