Louie da fly
-
Posts
7,989 -
Joined
-
Last visited
Content Type
Profiles
Forums
Gallery
Events
Everything posted by Louie da fly
-
 Thanks Christos for the explanation. You don't have to apologise at all - Ancient Greek (and Mediaeval Greek even more so) are obsessions of mine as well. I'm returning to university next year (doing history, with a mediaeval/Byzantine emphasis) and this time I intend to master Greek properly, so I can read it without needing Google . . .😁 Looking again at the inscription above, I believe you're right - it must originally have said ΑΛΕΞΑΝΔΡΟΣ ΑΛΕΞΑΝΔΡΟΥ ΜΙΛΗΣΙΟΣ - Alexander, son of Alexander from Miletus - the remains of the "missing" letters ΔΡ and Σ can be seen now that I've looked more carefully. And I'd like to thank Dick for posting that picture. The best evidence available at the time Age of the Dromon was published (admittedly that's 13 years old now) was a "probable" lateen dated if I recall correctly to the 6th century. But this is a definite lateen, not a "maybe it's a lateen if you look at it the right way", and moves the origin of the Mediterranean lateen back several centuries. Here in Ballarat it's rained all day with no let-up at all. The puddle we normally get in the back yard in heavy rain has become a lake. I'm stuck in the house with the cats (my wife's in warm sunny Brisbane visiting rels), so I've watched Sink The Bismark,The Dam Busters (hey, it's got water in it!) and The Emperor's New Clothes with Ian Holm (if you haven't seen it I'd highly recommend it - a wonderful, funny, inspiring alternative history about Napoleon). I don't know whether I'll watch Good Will Hunting next or The Right Stuff. I know I should probably be "boating" (as my family call it) but I'm having a very lazy day off, not even shipbuilding. Steven
 -
Dick, I've checked whether the yard can be slung around the foremast and it can - just. It looks like the crutch won't be an issue. However, I might have to support the yard from a bit forrard of centre, as there's a bit of clearance problem with the forecastle, despite all my calculations. I'd rather support it in the centre, as almost all the pictures I've seen, both contemporary and modern, show it supported that way. But the only way to do that is to shorten the yard, which I'm loath to do. I'd never seen that second century representation before. Very interesting. It certainly pretty much demolishes the "Arab" origin for the the lateen sail. The inscription appears to say αλεξαν αλεξανδρου μιλησιος, which according to Google means "the Milesian Alexandros" - which I think means Alexander of Milesia (or possibly in/at Milesia?). I don't think I can accept the alternative translation - "they chose the skeleton" Steven
-
Thanks for the comments and likes. Dick, I've certainly thought long and hard about these issues. You may be right about the crutch, but as the final position of the yard has yet to be determined, I think I can position it so there won't be any problems. Similarly with the forecastle. On the other hand, the captain of the caravel reconstruction Notorious told me he follows the Arabs in not bothering to move the yard across the mast, but just keeps it on the same "tack" with the wind blowing from the other side. This of course blows the sail against the mast, but apparently it makes very little difference. I've looked at the idea of putting the masts and yards on the crutches but there are enough accounts of galleys being both rowed and sailed simultaneously for me to feel justified in portraying the dromon that way. Of course, as dromons are pretty easily capsized by side winds, I intend to show her sailing with the wind aft, with the two sails on opposite tacks, so she's "goose-winged". Steven.
-
What is the purpose of these holes in this block?
Louie da fly replied to Louie da fly's topic in Masting, rigging and sails
Thanks again everybody for all the input. Lehmann, I take your comments on board, and they certainly provide food for thought. regarding your points above, 1. However, lacking a metal reinforcement I can't see how the end grain pulling out could be avoided. Certainly there's no evidence of grooves for a rope strop running around the end, either. 2. It certainly seems that way, doesn't it? 3. Both points taken and they certainly look valid. 4. Yes. 5. Possible, but I'll have to give that one some more thought. 6. Yes. It's quite possible that the theoretical reconstruction is incorrect in several ways, particularly in assuming symmetry where the evidence for it is at the very least equivocal. Further speculation may be served by adding the opposite side view and the end view of the block, including a black mass I take to be a cross section about halfway along, perhaps level with the hole for the sheave axle (I'm finding it difficult to get my head around that bit, I have to admit). I think overall that I should leave this block off my model, at least till I can work out better what if any function it might serve. Fascinating stuff, though. Steven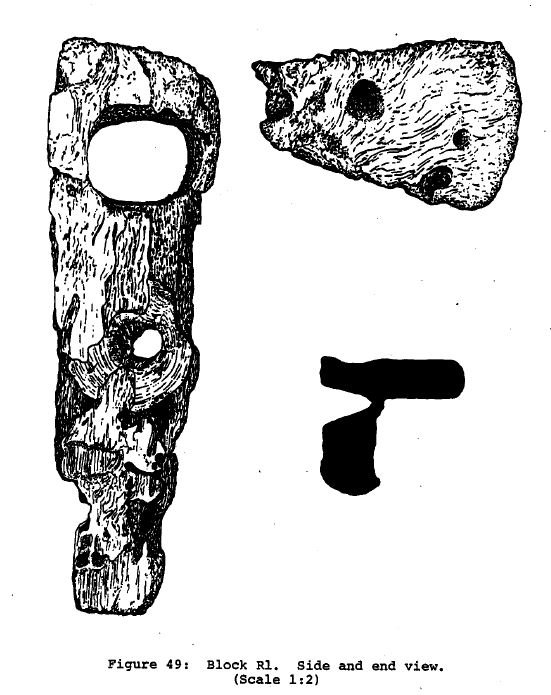
-
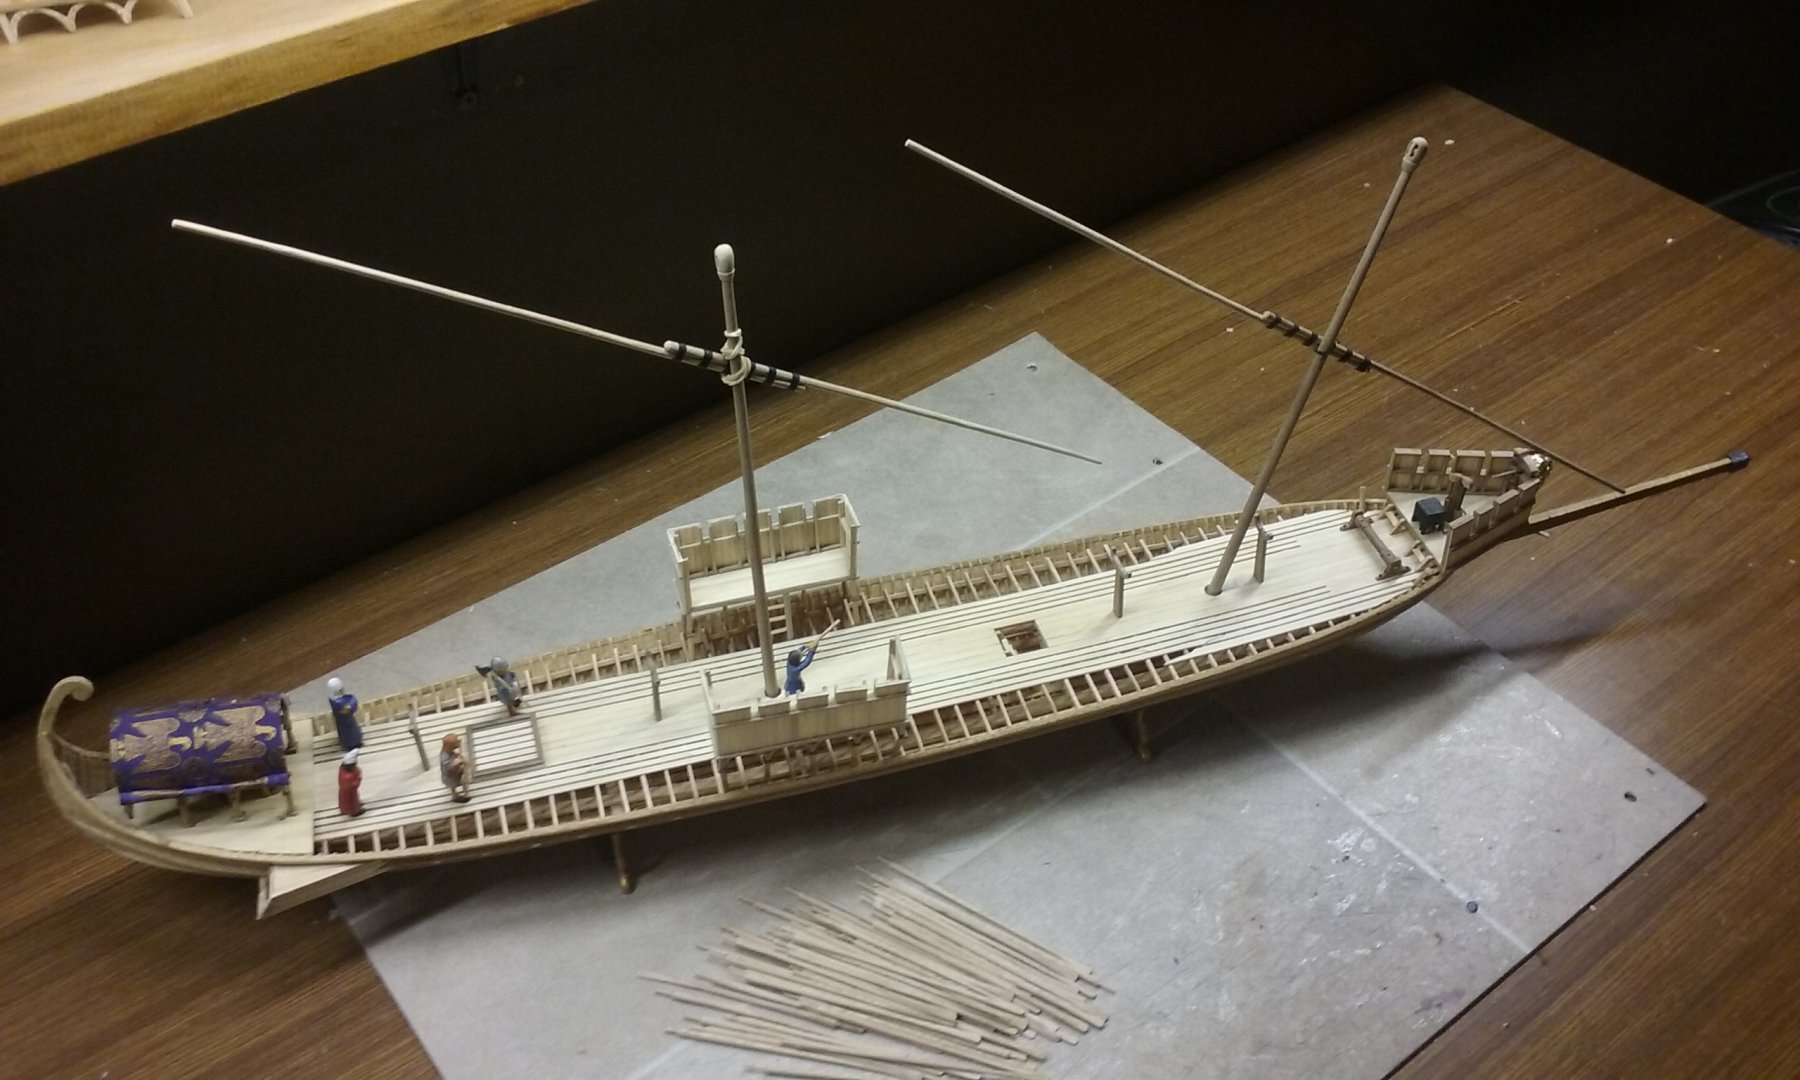
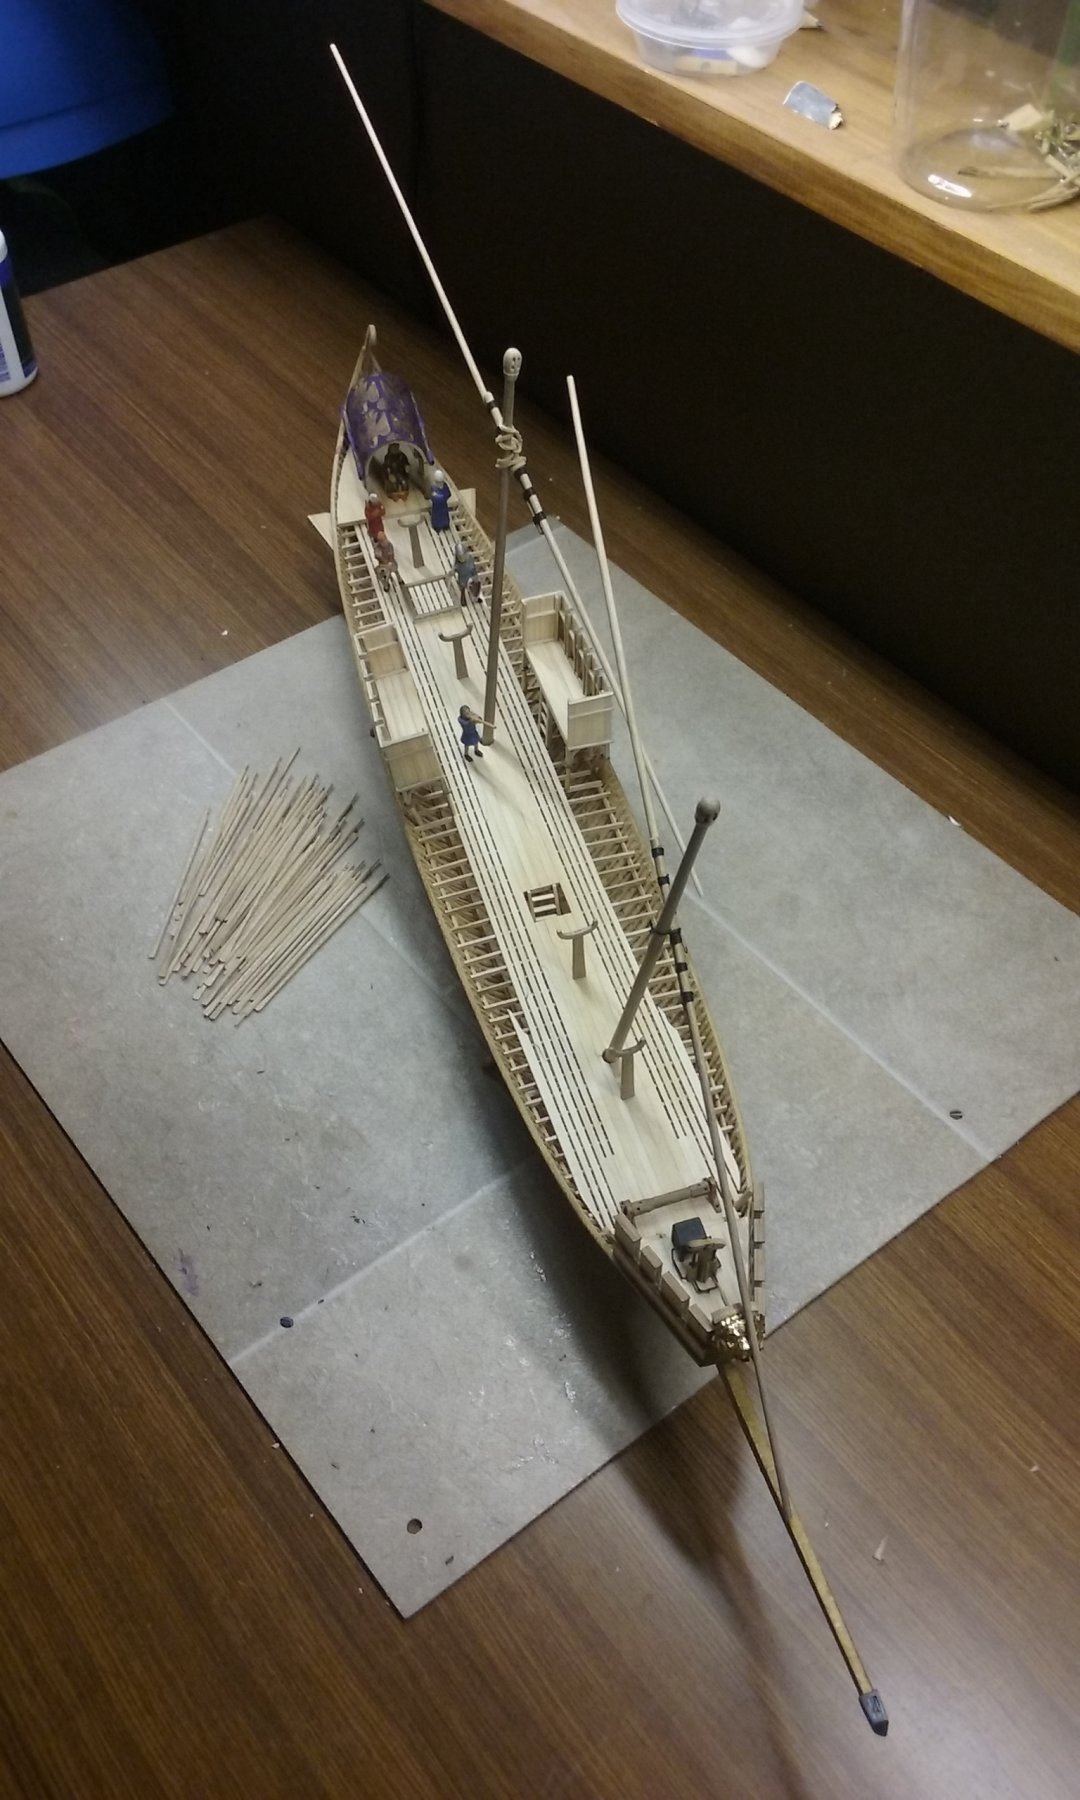
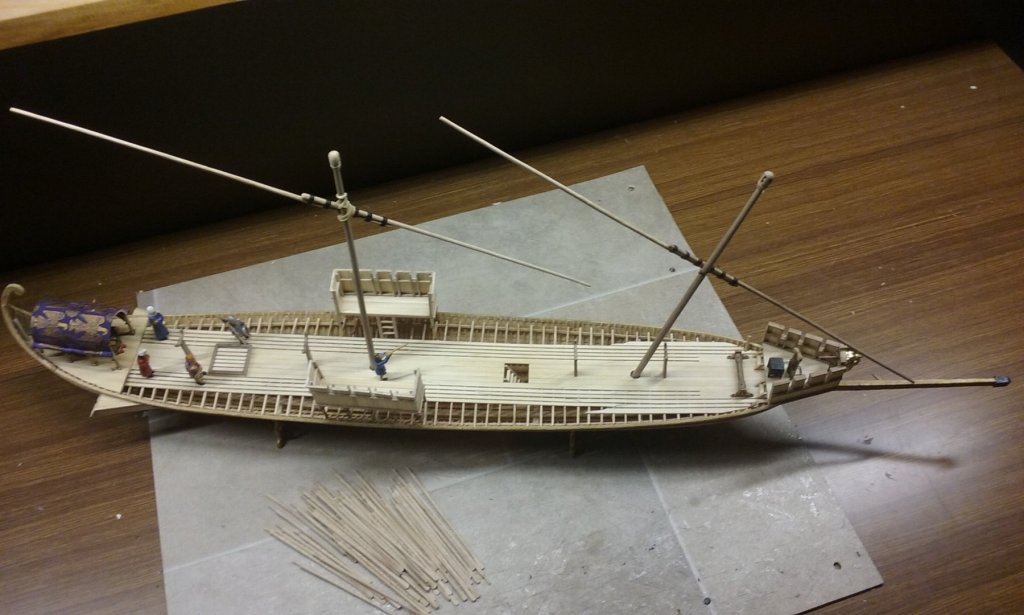
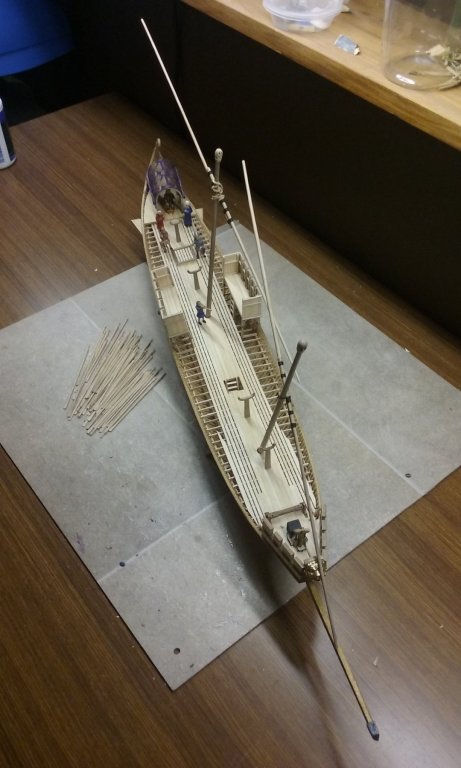
Just thought I'd update the record for the full vessel: Here it is with just about everything on board that I've done to date, though quite a few of them are only temporarily in place for the photos. A lot of things "on hold" till other things get done. The big one is being ready to put the lower oars in place. Once that's done, a lot of other things can be finalised and many things already made can be put in place permanently. Steven PS: That's only half the oars - the others are made but they have the inboard end "bodged" so I can fit them on the ship without having to make lower deck oarsmen.

-
A truly magnificent job. You can be justly proud of her. Steven
- 53 replies
-
- 3
-

-
- clipper
- restoration
- (and 1 more)
-
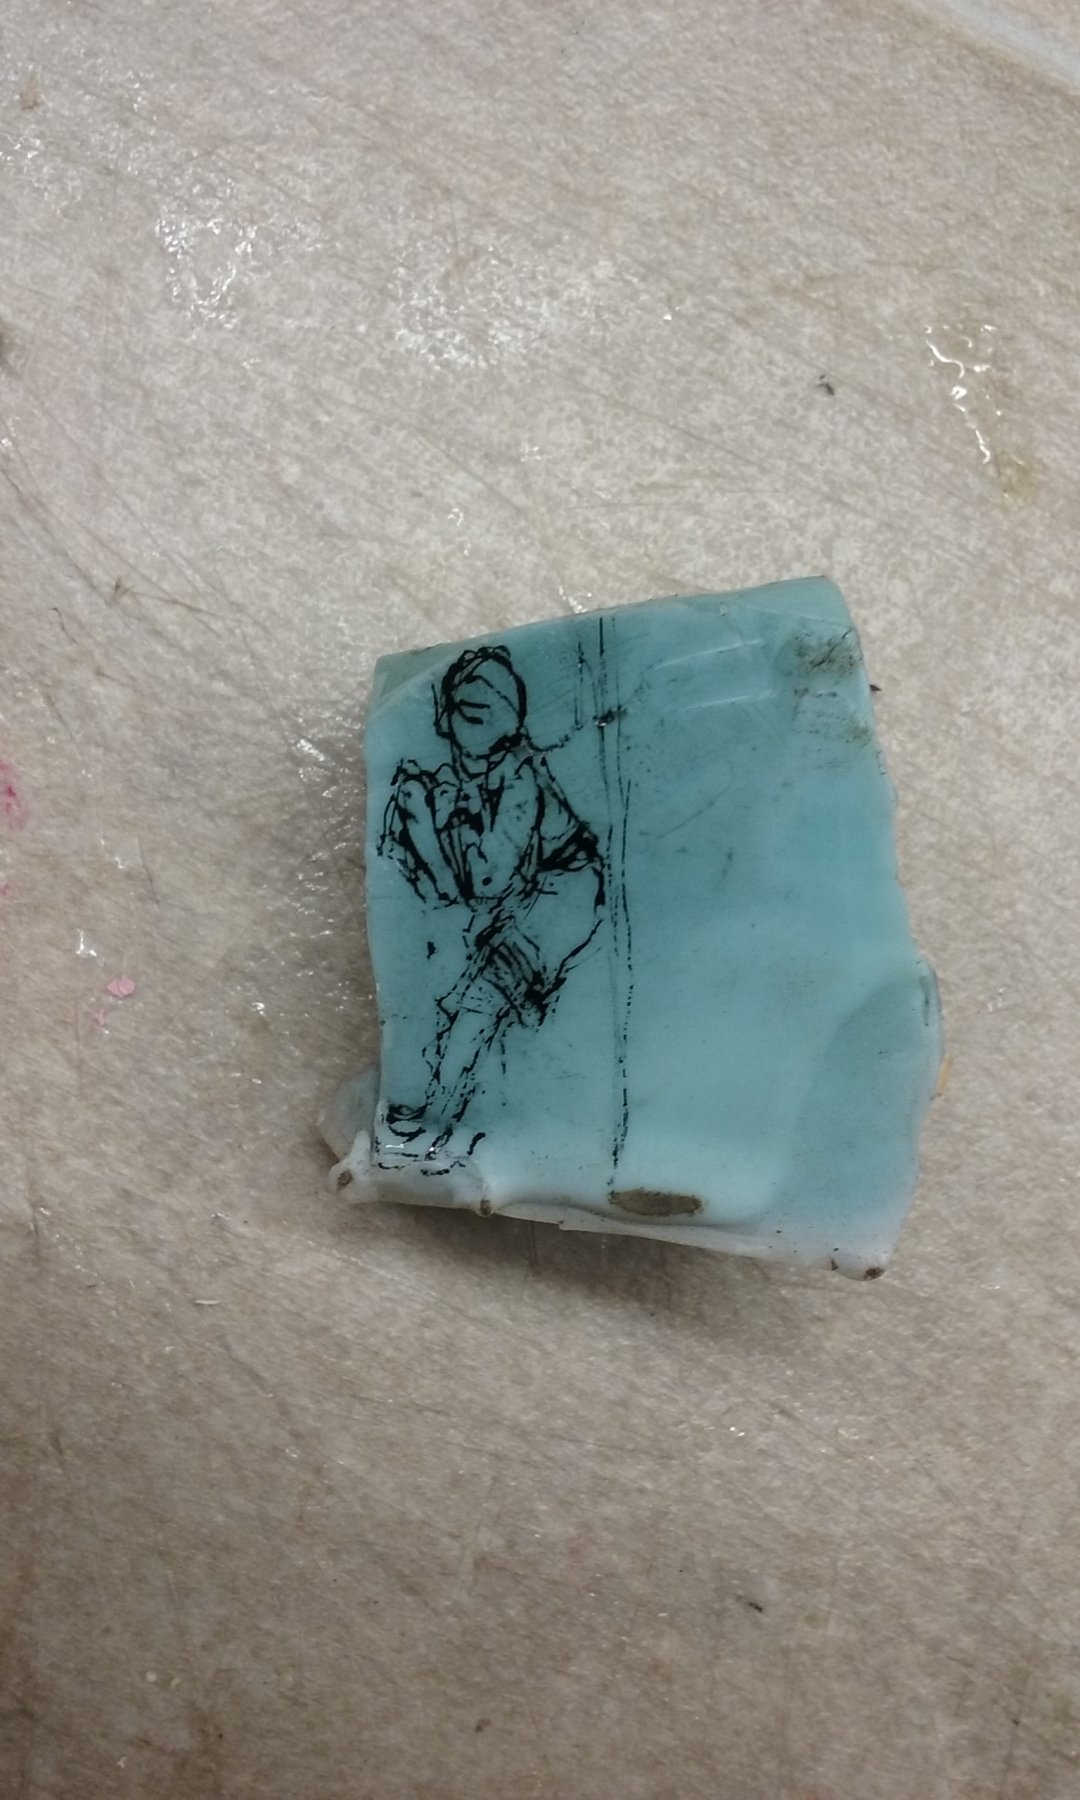
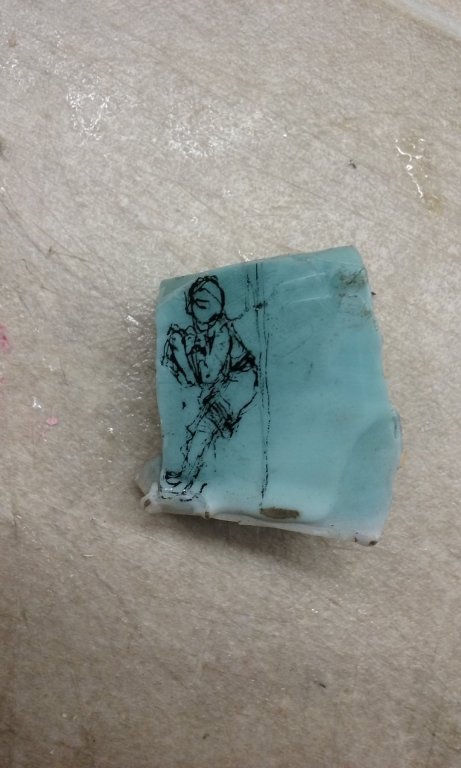
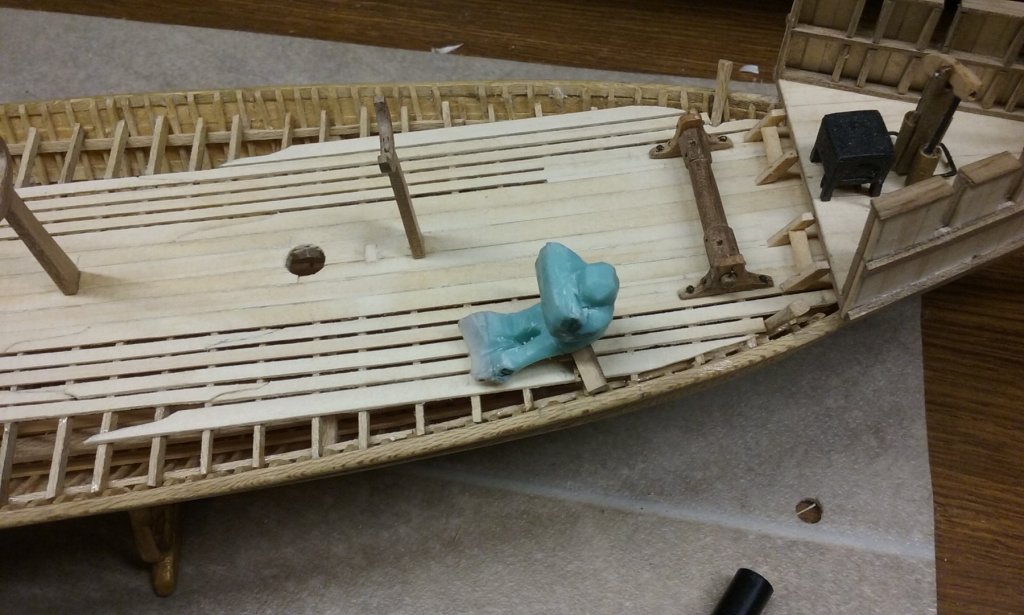
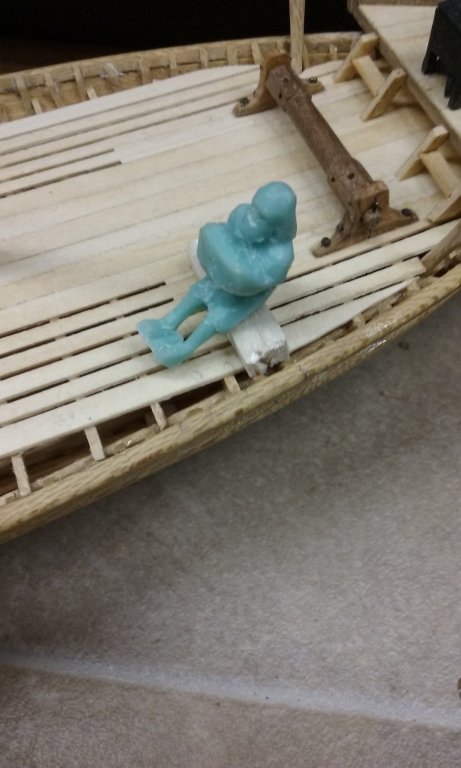
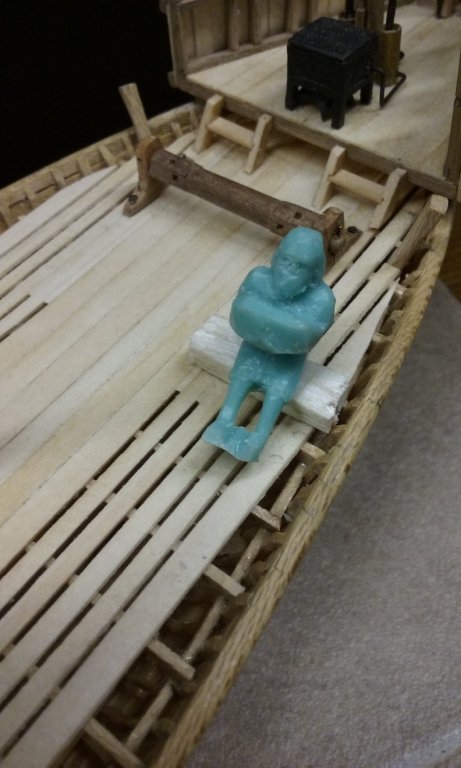
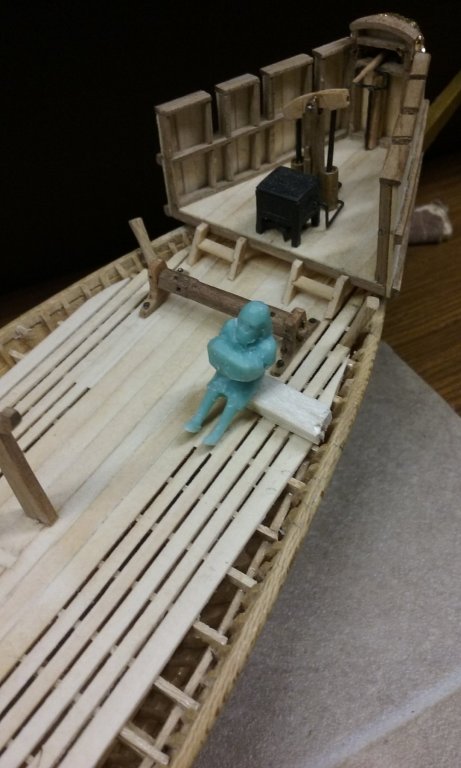
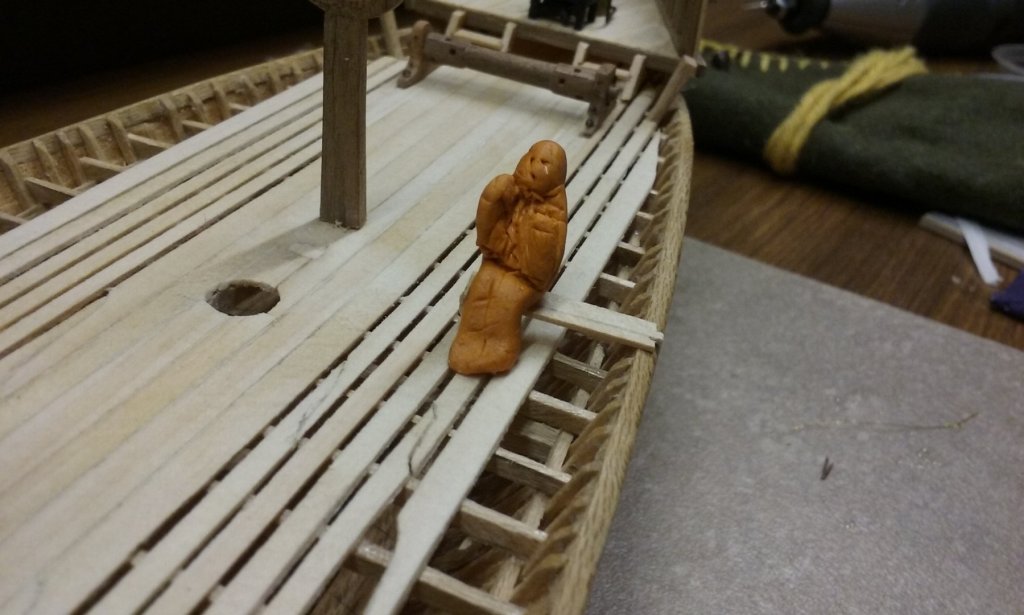
I've got two pics of this block. I'll have to scan the pictures in and post them. They are from the Yenikapi finds. In the meantime, here's the current progress on the pattern for the oarsmen to be cast from, based on the Olympias photos above. It's carved from casting wax which is very good for this purpose. I'm planning to make silicone moulds and cast the figures in resin. But half of them are on the starboard side, half on the port, so their arms will be mirror images of each other. I've held back from carving the arms except in broad outline that allows for both configurations. What I intend to do is cast two wax models from the silicone then trim the arms to shape - one port and one starboard. Here the guy is drawn on a bit of wax. Part way through - pretty rough at the moment Finer And pretty much finished. I've given the fellow long hair and a beard because I'm also thinking of making several pattern originals for each side, with different hair styles, bearded or clean shaven etc. I've never tried silicone and resin moulding before, so I'm not sure how this will work out. But there's a very good tutorial on Youtube - I think it's produced by the people who make the product, but it's very instructive. I still have to find out where I can get silicone and resin and preferably some knowledgeable advice, in Ballarat - wish me luck! Steven

-
Modeling hove-to, main topsail aback
Louie da fly replied to Srodbro's topic in Masting, rigging and sails
That's a really nice result, Steve. Just like the painting! Steven -
What is the purpose of these holes in this block?
Louie da fly replied to Louie da fly's topic in Masting, rigging and sails
Thanks Ron, Bruce and Pat. I'm going to have to sit and ponder all this, particularly all the points in Bruce's reply, which I've only had time to skim over briefly so far. I'm not very good with visualising pulley systems, and I have to go forward one step at a time, with halts in between to digest the information. Ron, that occurred to me last night. I hadn't realised that was a "thing" in combining blocks into a system until I did an image search for blocks and tackle. Pat, the archaeological report says "This block was found concreted to the downslope arm of the ship's forward port bower anchor." That's it, I'm afraid. Doesn't tell all that much, does it? Steven -
Hmm, I might have the answer regarding the holes in the block. Look at the top block in the gun tackle, the twofold purchase and the threefold purchase - or the bottom block in the single luff and gyn tackles - each is attached at both top and bottom, either to the other block or to the load. So both the transverse hole and the three smaller holes could have a function. I'm afraid my brain overheats when I look at these diagrams, but I think the Serce Limani block must work rather like the threefold purchase. Perhaps to raise the yard? As my own model has only two sheaves at the top of the mast, I don't think I'd be using that particular block. Need to do some more thinking . . . Wait till you see the other Byzantine block I'm looking at - with sheaves at right angles to each other . . . hope my brain doesn't explode. Steven

-
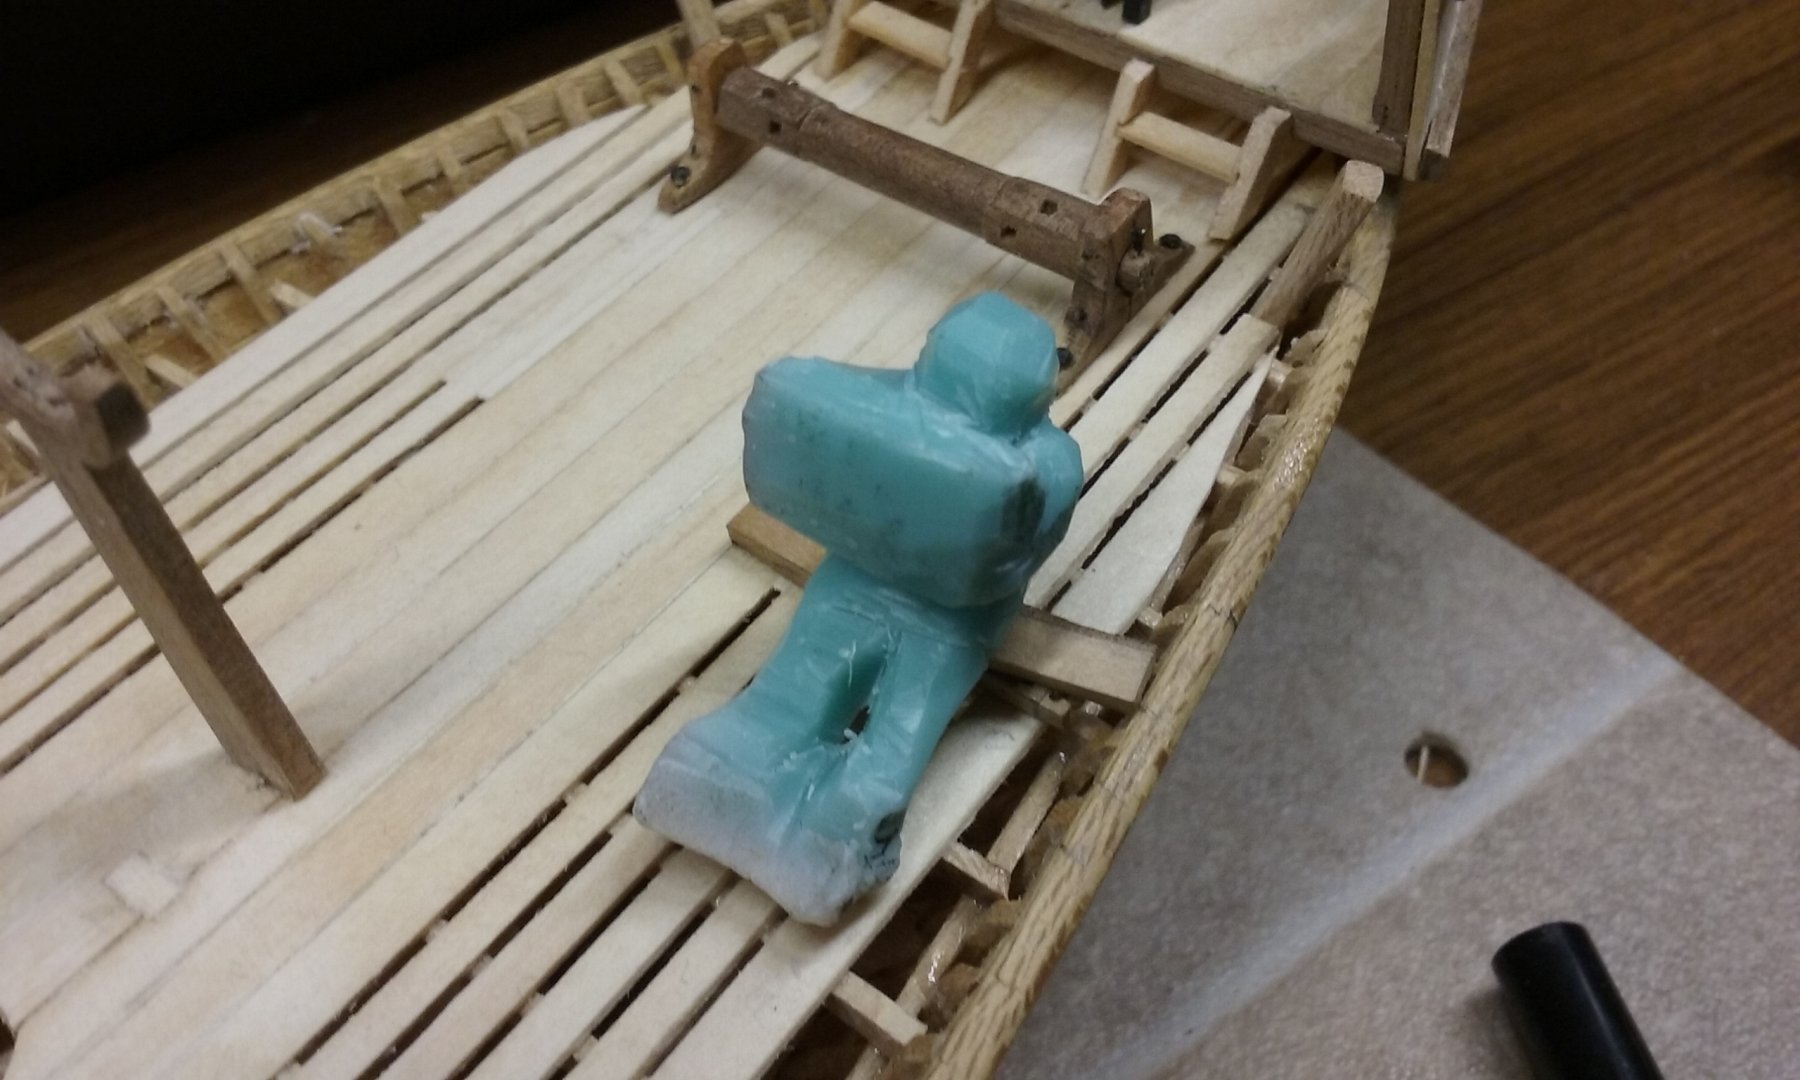
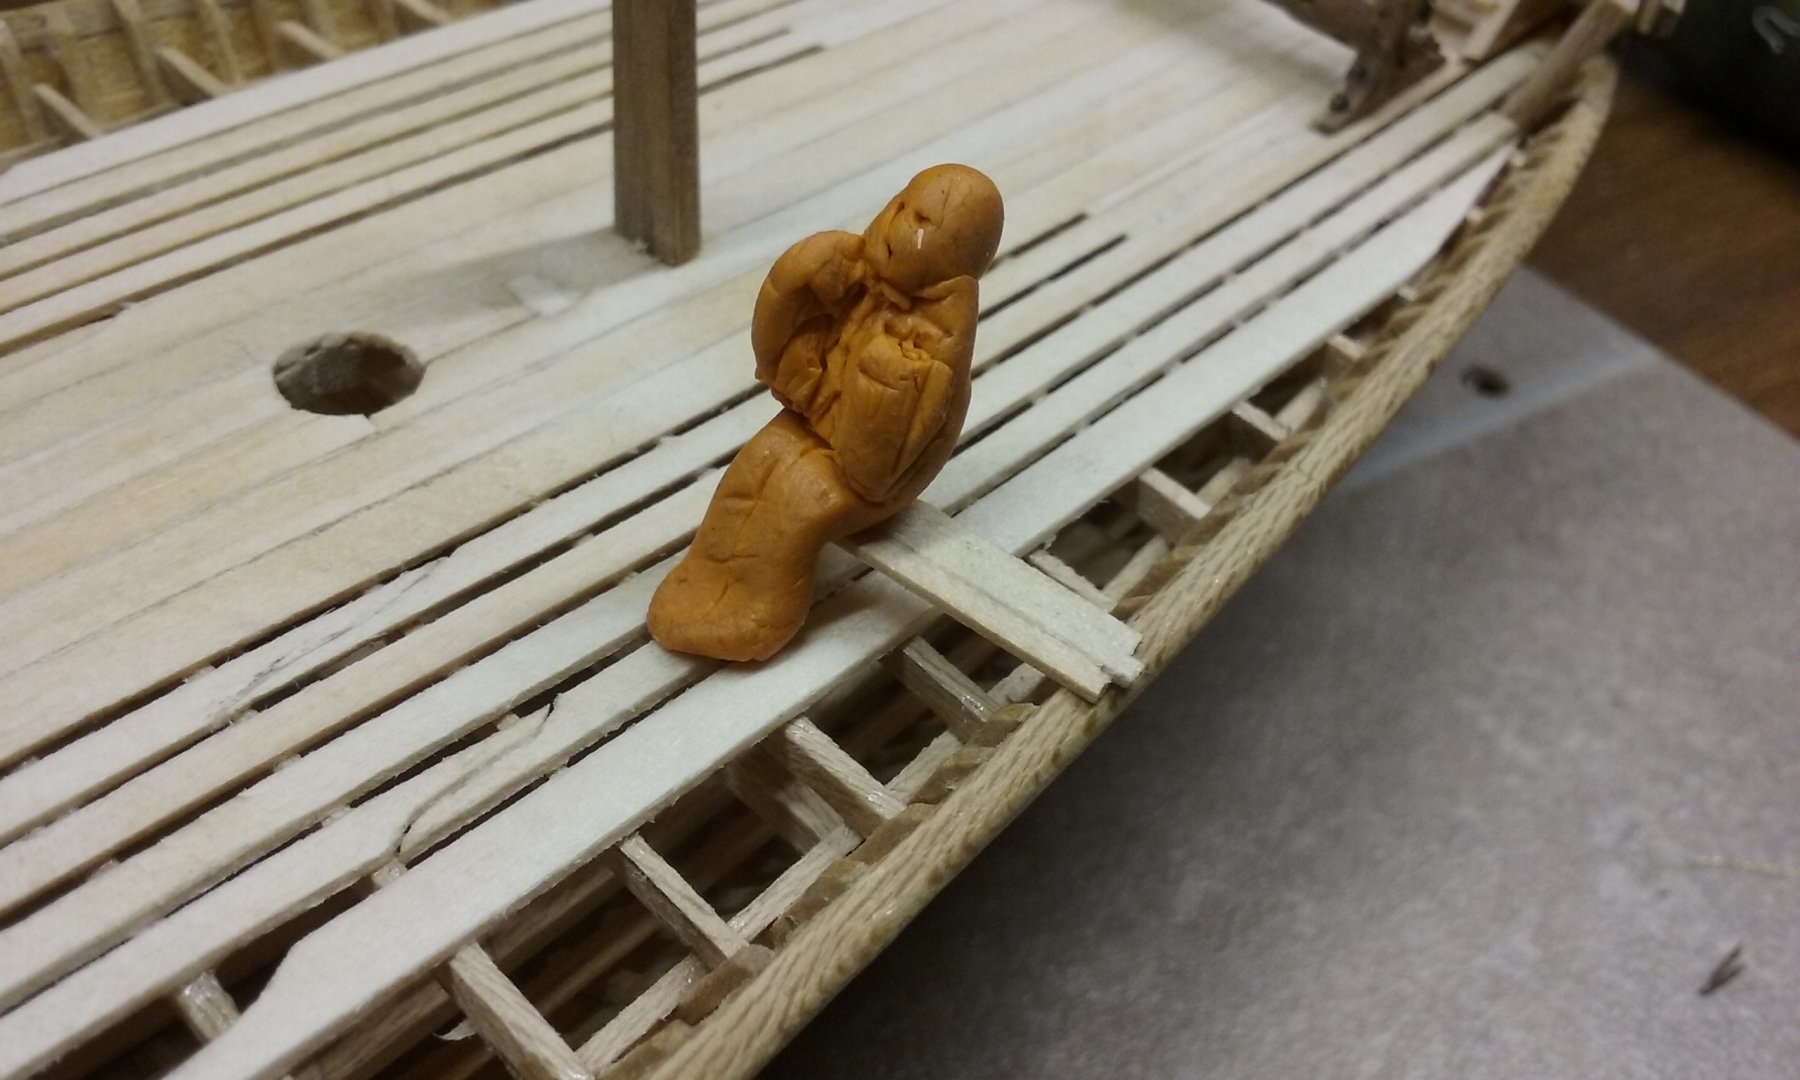
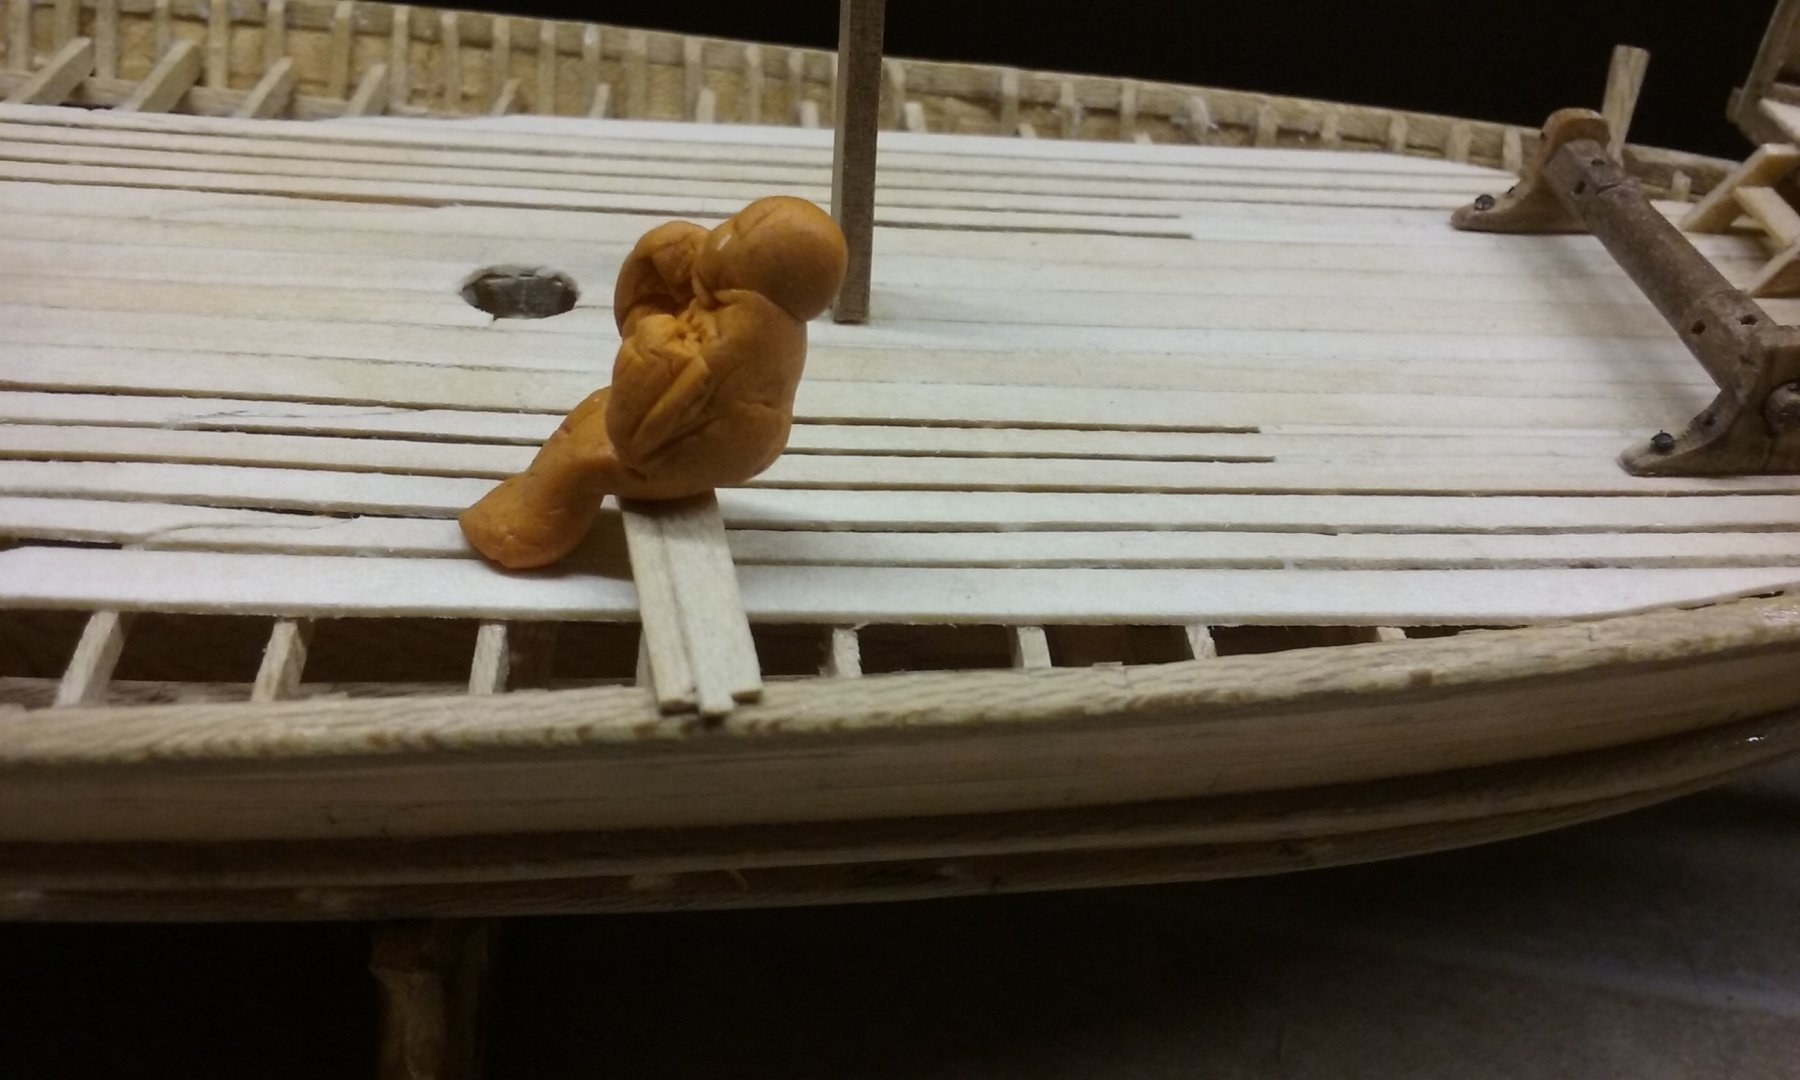
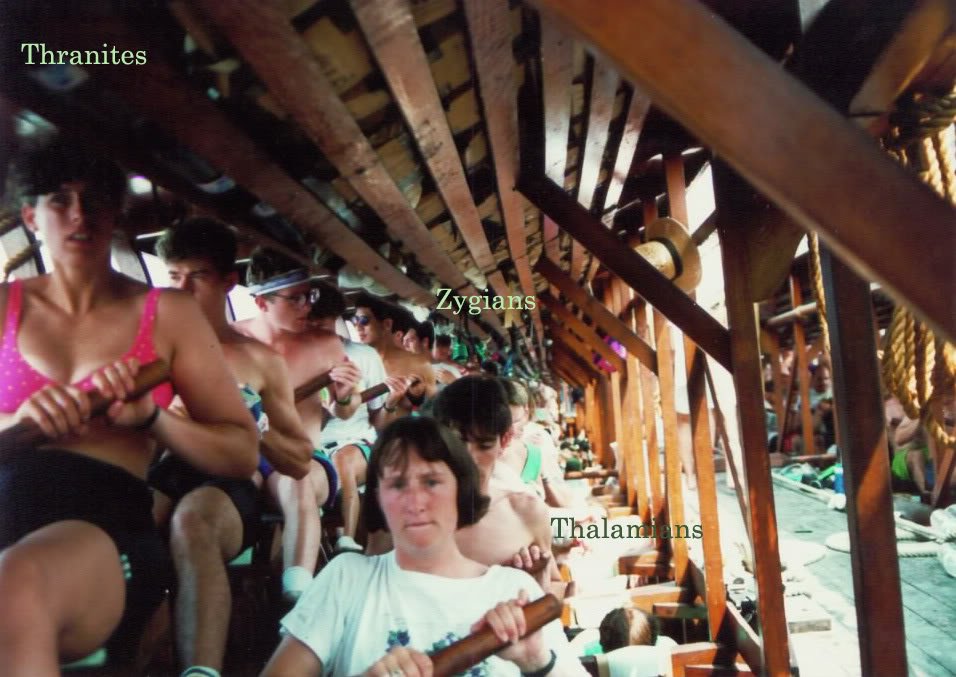
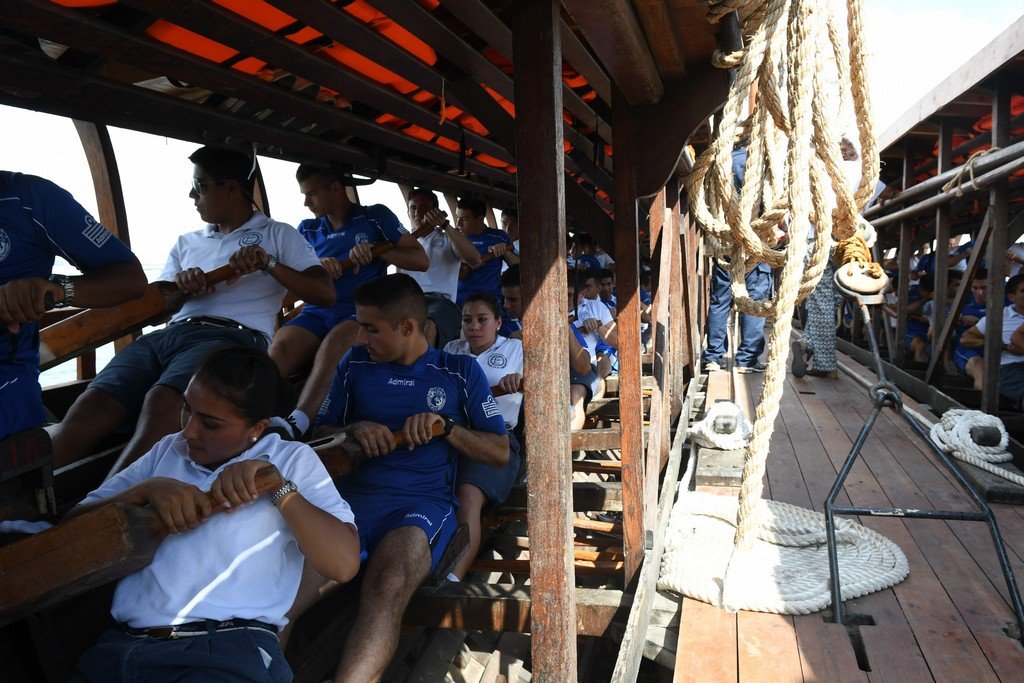
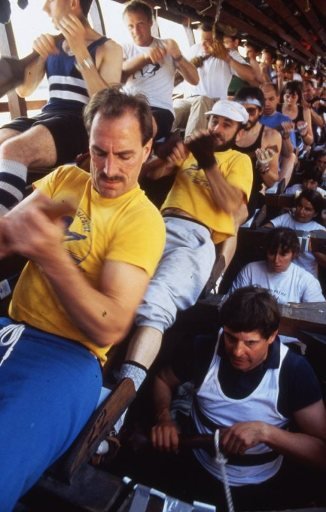
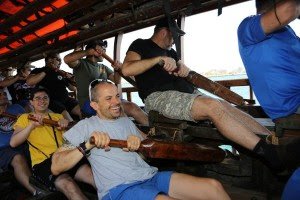
Thanks, Mark. That makes sense - except the lateral hole is there in the original, as well as the two/three smaller holes. As I see it, the ship would use either one or the other, but not both. I was thinking to take all that load as you say, the lateral hole would have a fairly hefty rope through it. Still trying to figure it out . . . In the meantime, here's some pics of the crew of the Olympias trireme in action. Most modern oarspeople (gender equality nowadays) sit as close to the surface of the water as possible, to maximise the efficiency of their oars. The higher above the water, the more wasted effort. However, this is not possible with a multi-banked galley. As the three banks in a trireme are offset by half a person's height, the guys at the very top (the thranites) are sitting above the heads of the lowest guys (the thalamians). This would probably be as far above the water as the upper oarsmen of a dromon, so they would be holding their oars at pretty much the same angle, all other things being equal. These are experienced oarsmen (apart from the Greek navy people) and I was particularly interested in how they would hold their oars this high above the water. Note that there are various ways of holding the oar handles, and also the angle of the thranite oars seems to differ from one photo to another - perhaps Olympias was riding higher in the water at different times? Note also that their legs are almost straight, with their feet pushing against the back of the bench in front. I decided to model the oarsmen at the end of their stroke, mostly because it would be easier to model and cast with the arms close in to the body. And here's the plasticiene oarsman based on these. I've tried to base his arms as closely as possible on those of the Olympias thranites. He's obviously a newbie and feeling very out of his depth. The oarbench is a little higher in practice than in my original drawings - I was planning to have the tenon on the end of the bench slot into the top wale, but it hasn't turned out that way and I need to do some thinking about what to do about it. More in due course. Steven


-
What is the purpose of these holes in this block?
Louie da fly replied to Louie da fly's topic in Masting, rigging and sails
Certainly there's got to be another half to this block system - whether it's another three-sheave block or perhaps a calcet (the integral block at the top of the mast). No problem there. But those holes are like a fifth wheel - they don't seem to have a function. However, one thing that has occurred to me is that they are in a "tenon" (see the reconstruction drawing). Maybe the block slots into a mortise and the holes are for fixing the two structures together? But the large through-hole is so obviously for a rope as in my model, which would suggest the ropes in the sheaves would run in the direction opposite to that. Which leaves another question - what does the tenon slot into? And why? Still confused . . . Steven -
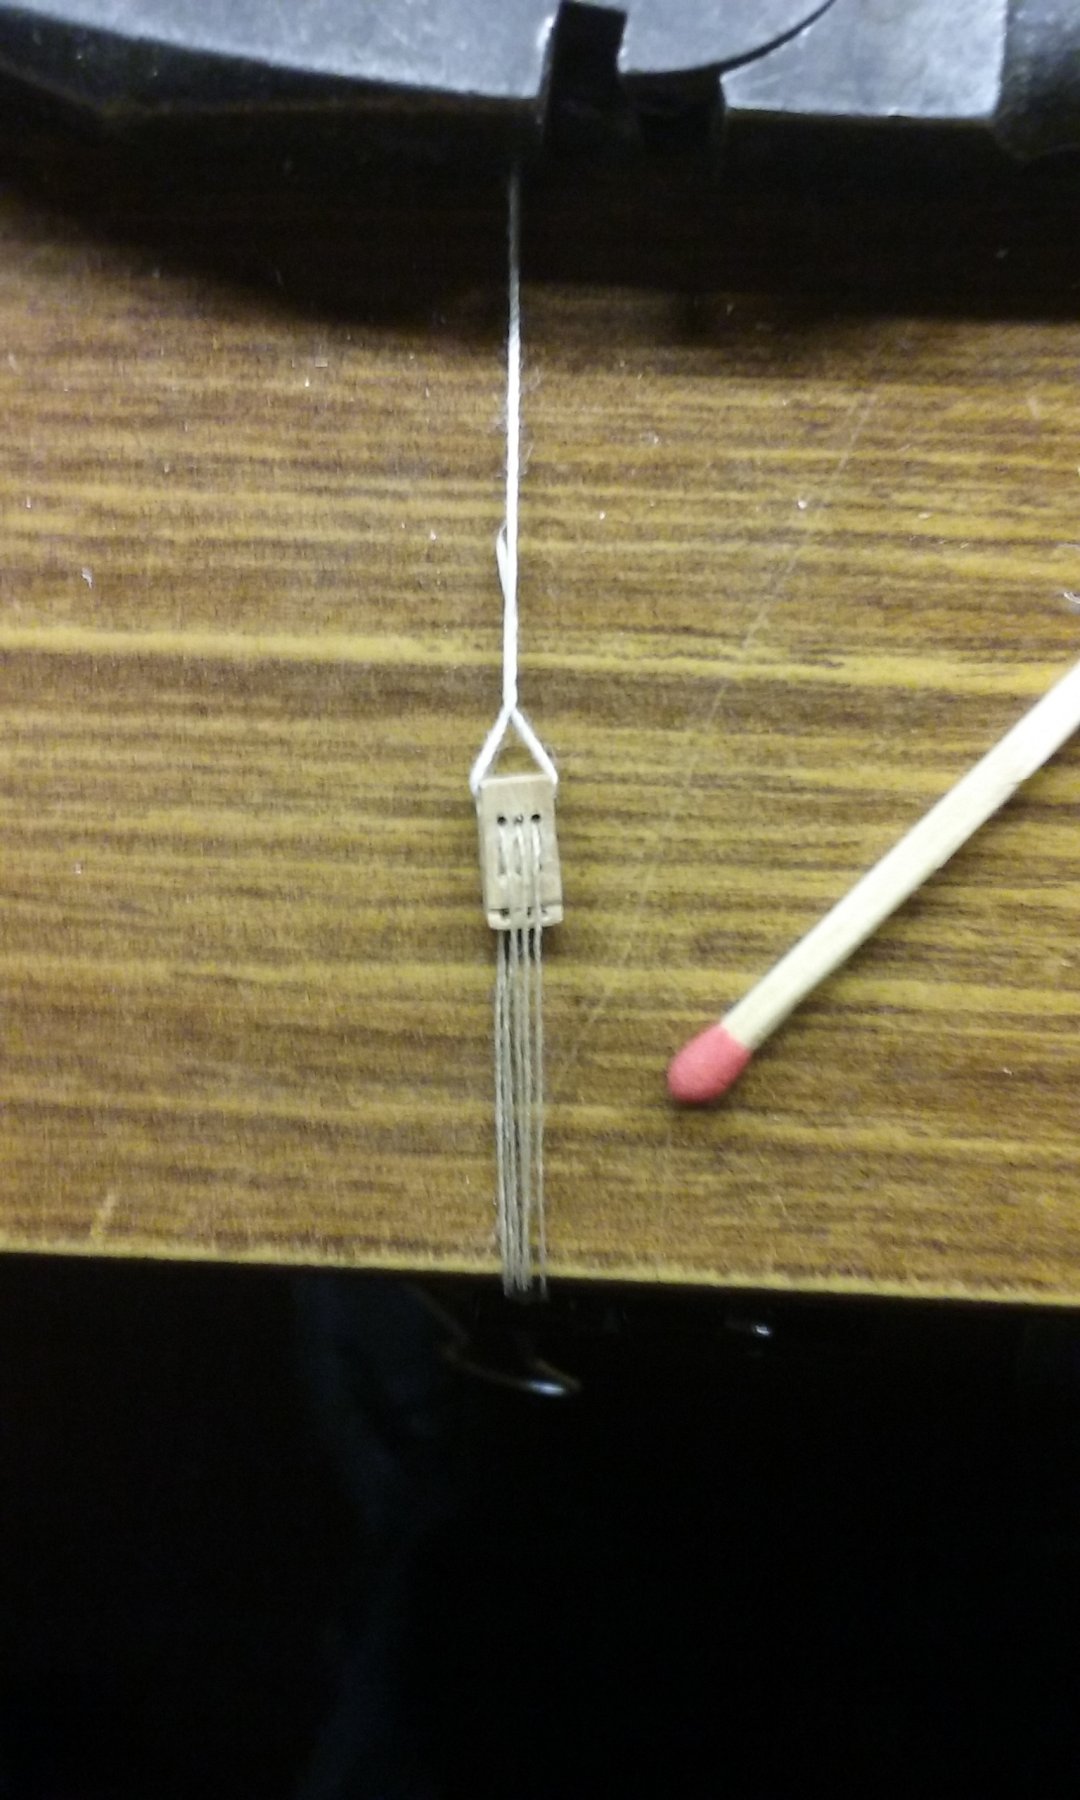
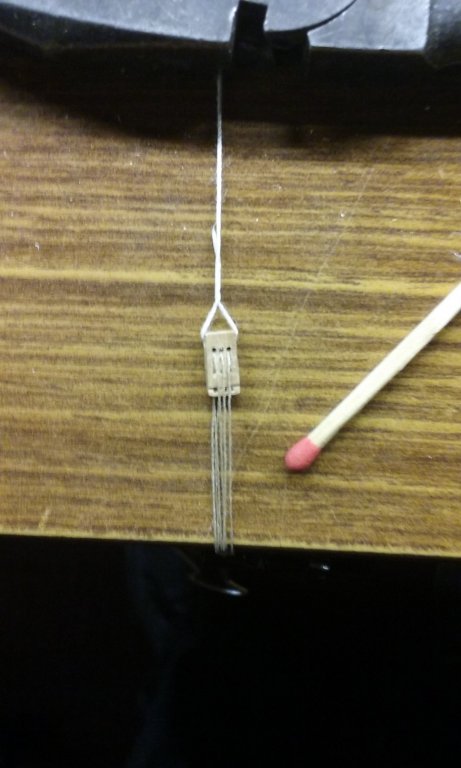
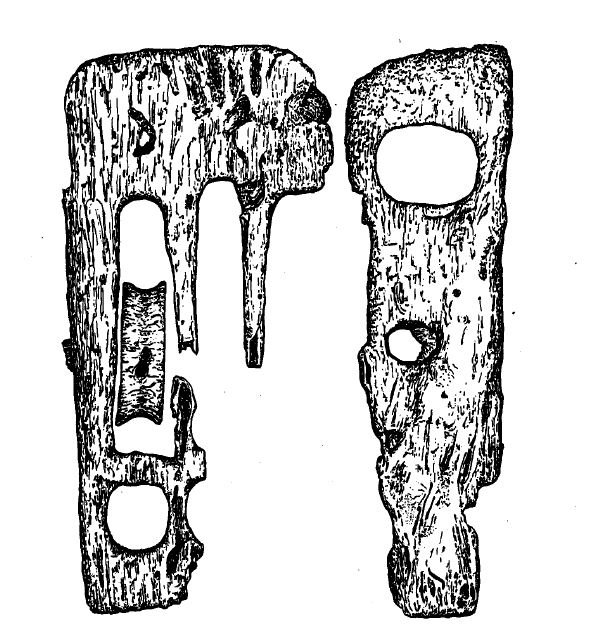
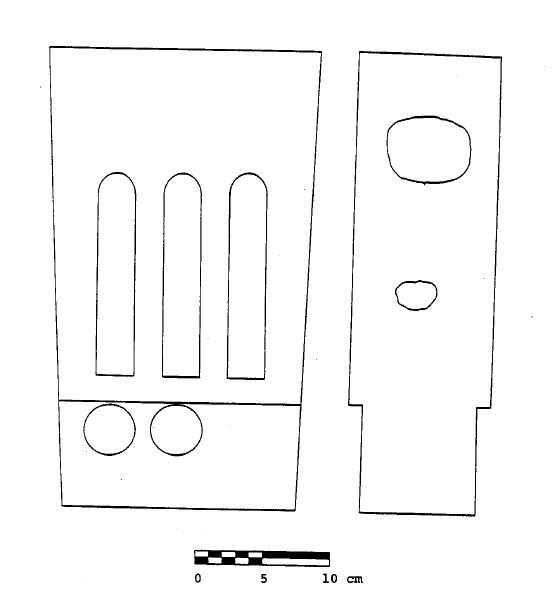
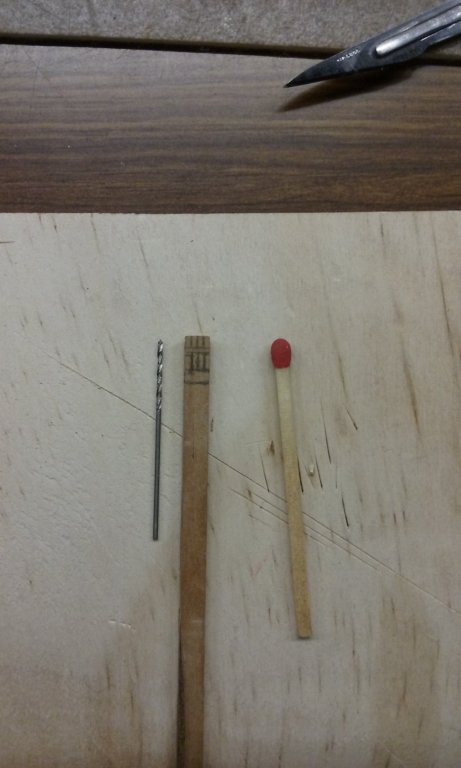
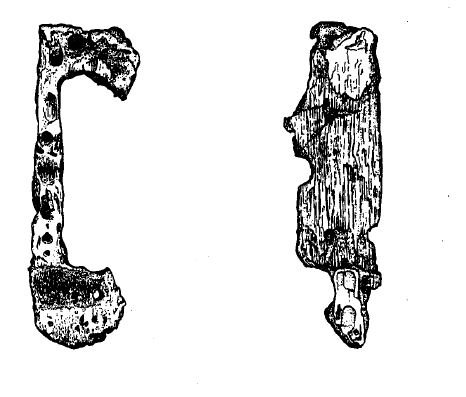
I'm working away at my dromon model and have hit a question that has me stumped. Here are drawings of a three sheave block (the block as found and a reconstruction drawing) found on the c. 1025 AD Serce Limani wreck off the southern coast of what is now Turkey. Most of it makes sense, but what are the holes at the bottom for? I made a model of the block, but three holes instead of two as I believe that for symmetry the original must have had them, but I really can't figure out what they do. Can anybody enlighten me? Steven
-
The praise is much appreciated, Jonathan. I believe there are many among the fraternity who put in that extra bit of effort into researching for their models - I can probably think of a dozen off the top of my head whose detailed research, even with much more modern vessels, is awestriking. The difference with mediaeval vessels is that there's a lot more guesswork in the major bits because the information is so sparse in comparison with later ones. At the moment I'm still trying to work out what those three holes at the bottom of the block are for. The rest of it, no problem - all makes sense, but I can't for the life of me figure out what those three holes are supposed to do. Anybody have any ideas? They just seem superfluous to me. Steven
-
Thanks, Chris. I did a search for Nina build logs, and though I couldn't find anything on the Mantua one, there seem to be a few from other companies - https://modelshipworld.com/search/?q=nina - which may be of help to you in your build. You might also be interested in http://nautarch.tamu.edu/shiplab/01George/index.htm which has links to pages that outline just about all the information known of caravels to date, and https://www.amazon.com/Portuguese-caravel-European-shipbuilding-development/dp/B0007BPCV4 - I haven't read this book, so I can't comment on whether it's any good or not. There's also a very good website on the development of caravels that I thought I had bookmarked, but can't find at the moment. If I can locate it, I'll send you the link. OMG! I just realised you're a fellow Ballarat resident! Steven
-
For example, see https://modelshipworld.com/topic/10190-archaeological-studies-on-carrack-wrecks/ Steven
-
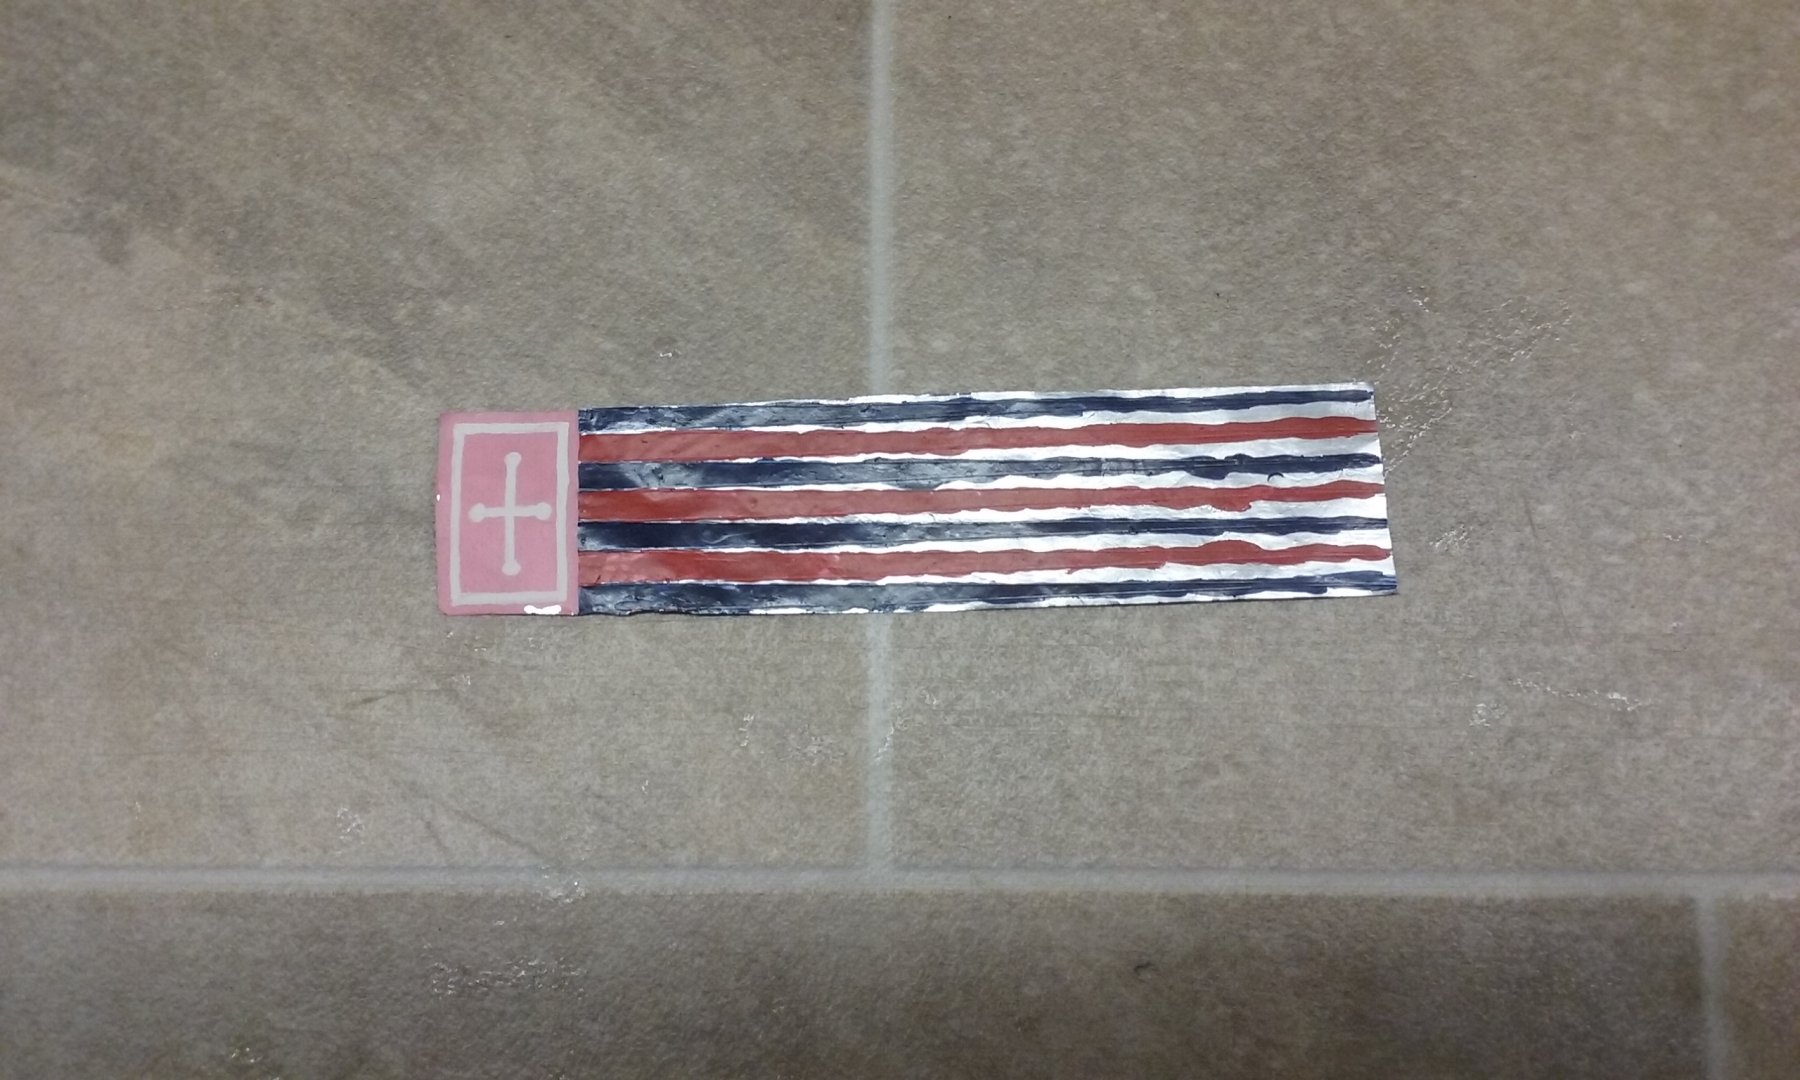
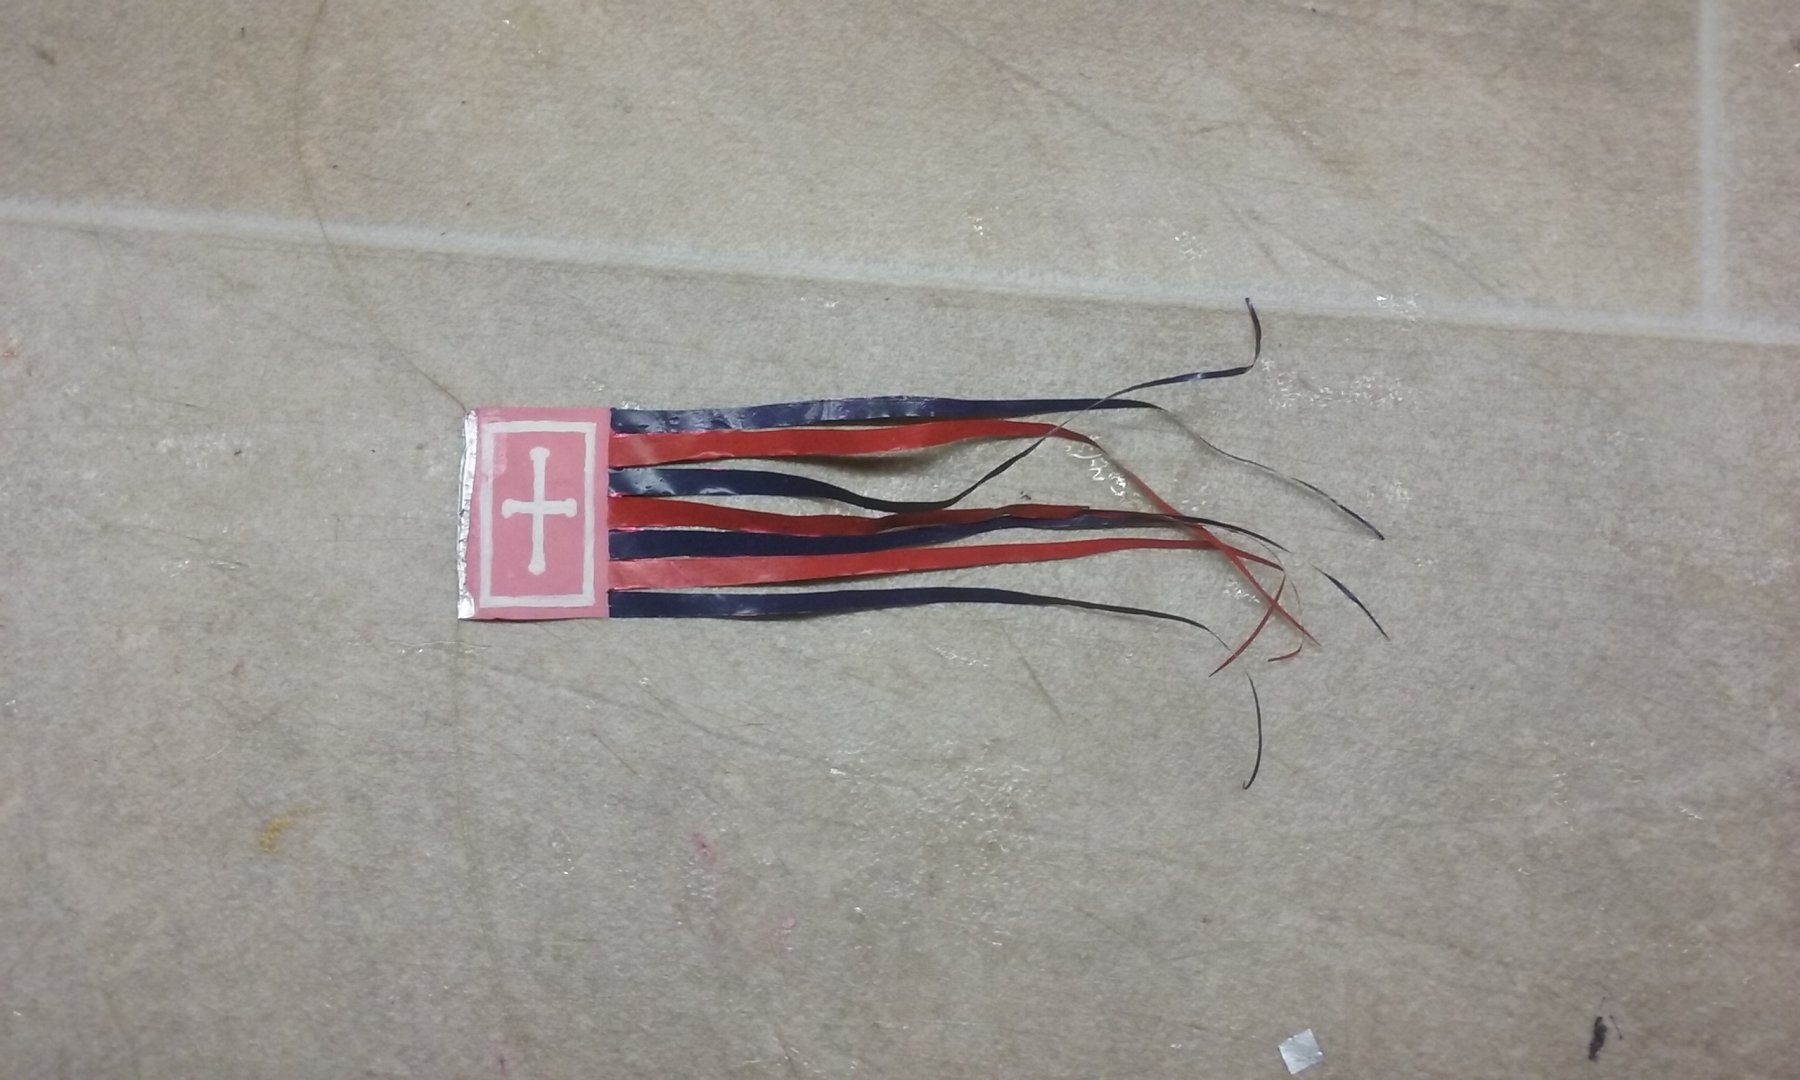
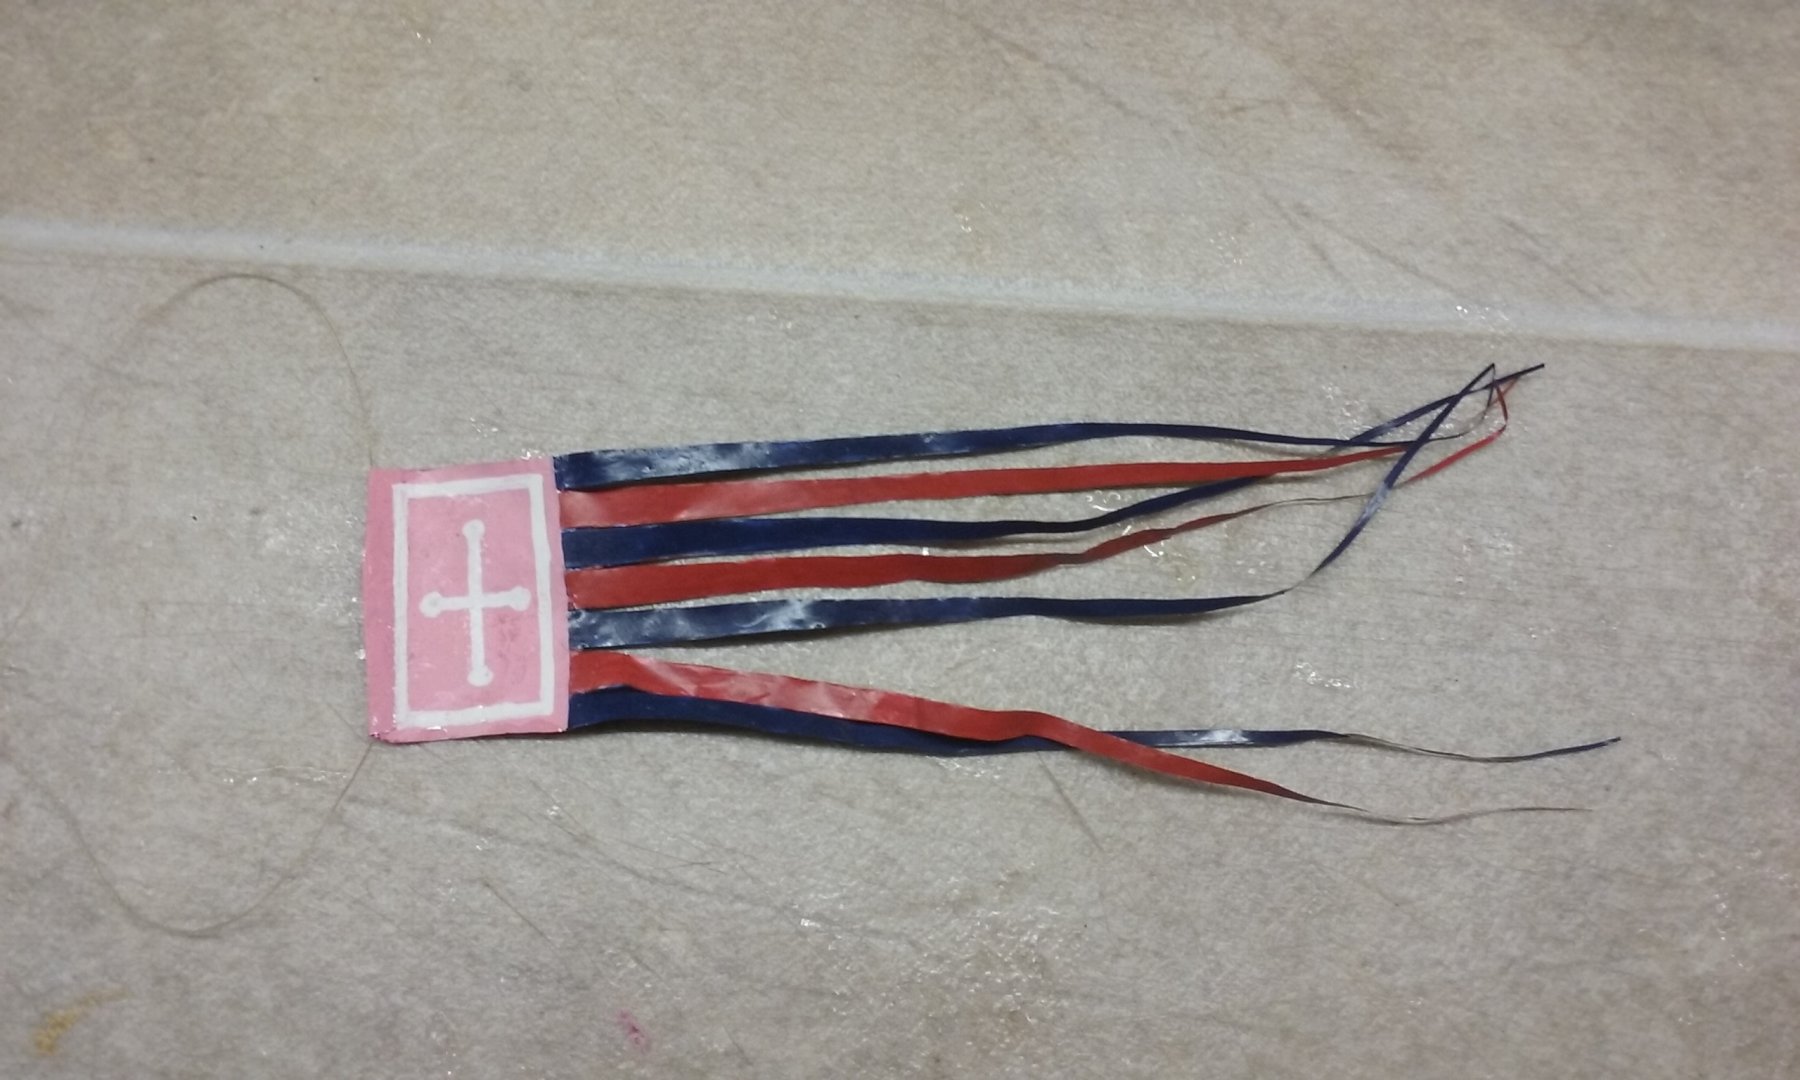
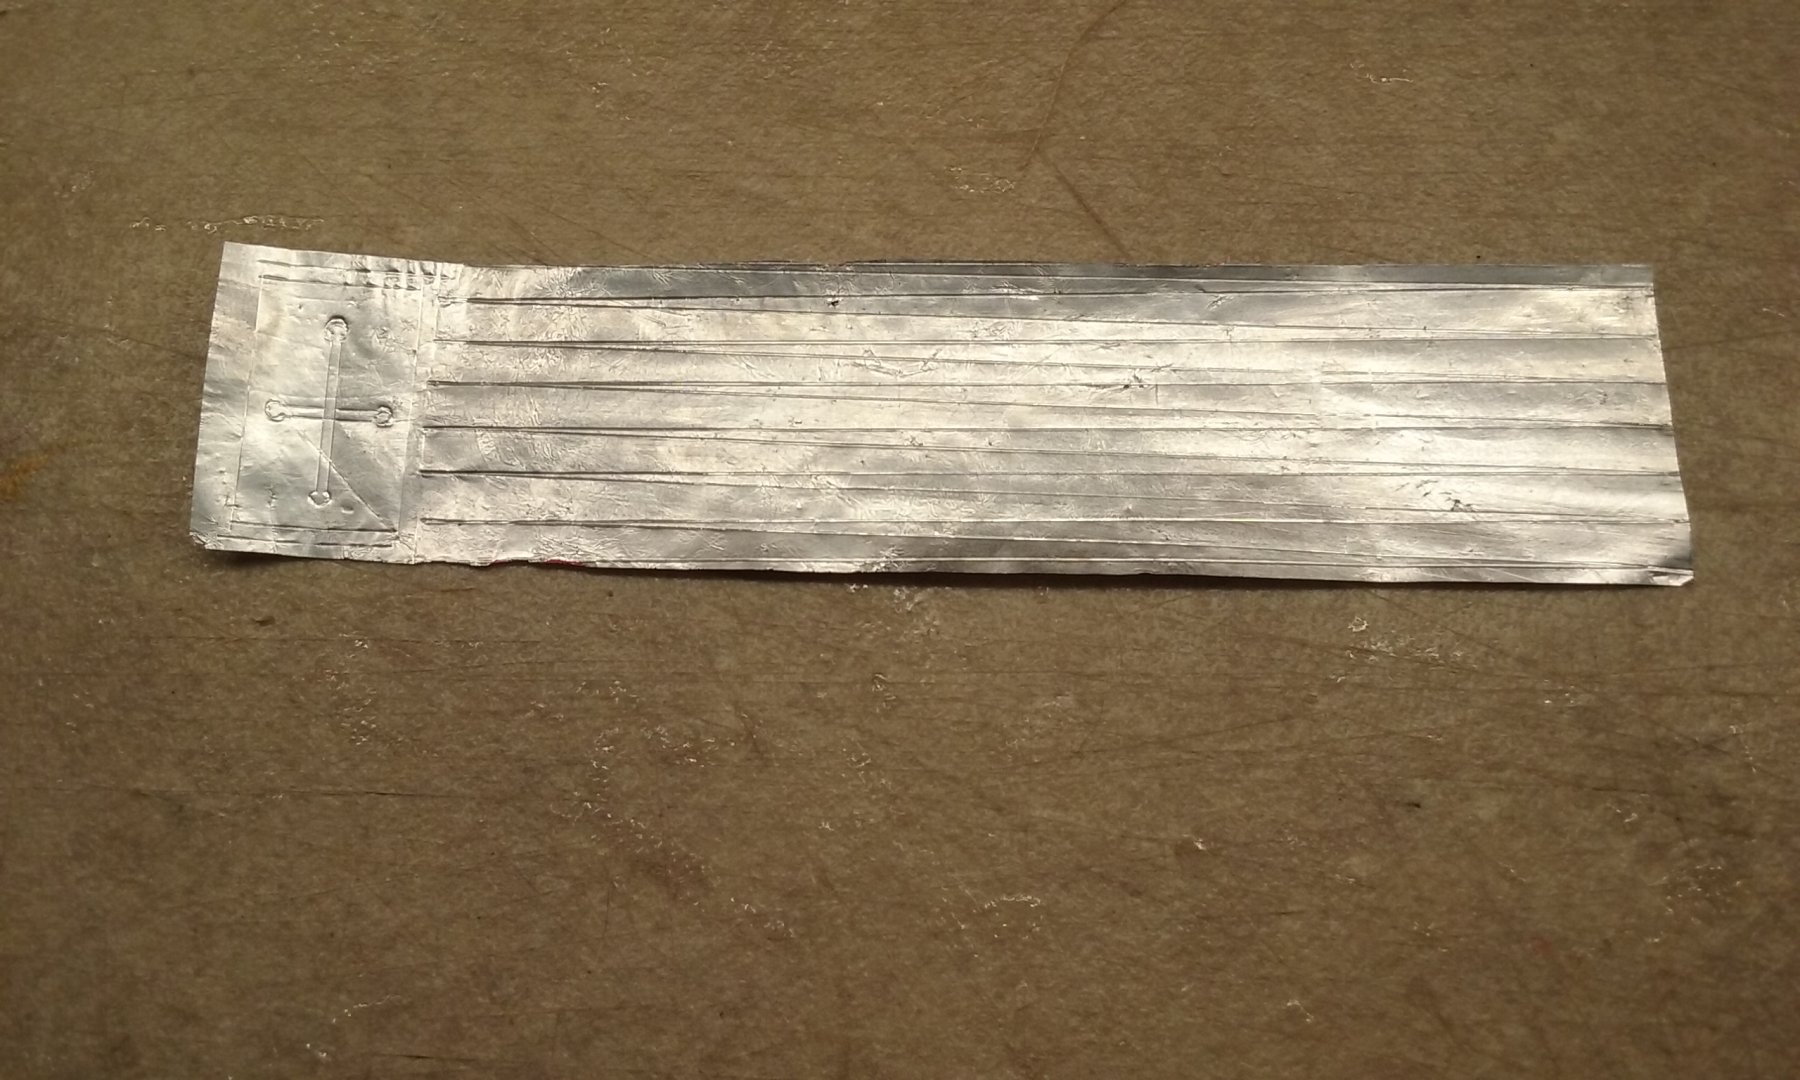
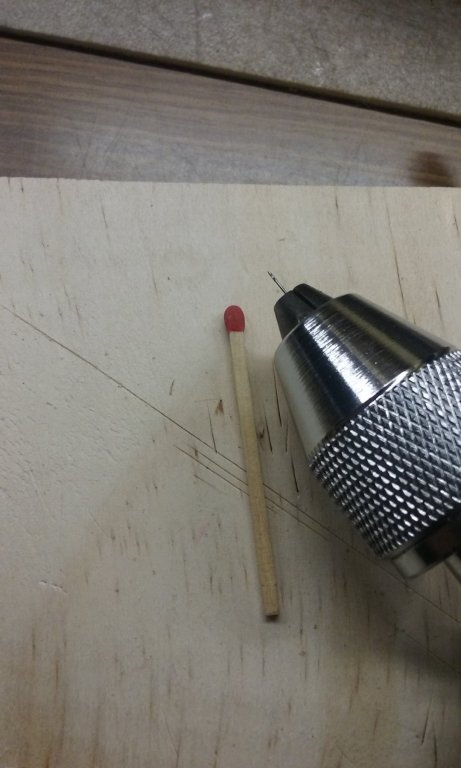
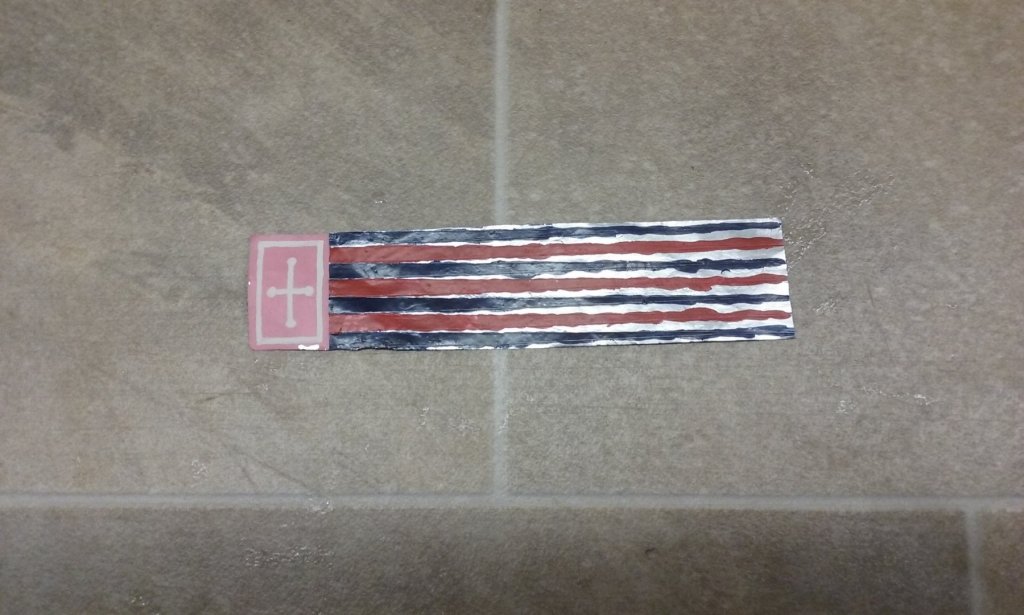
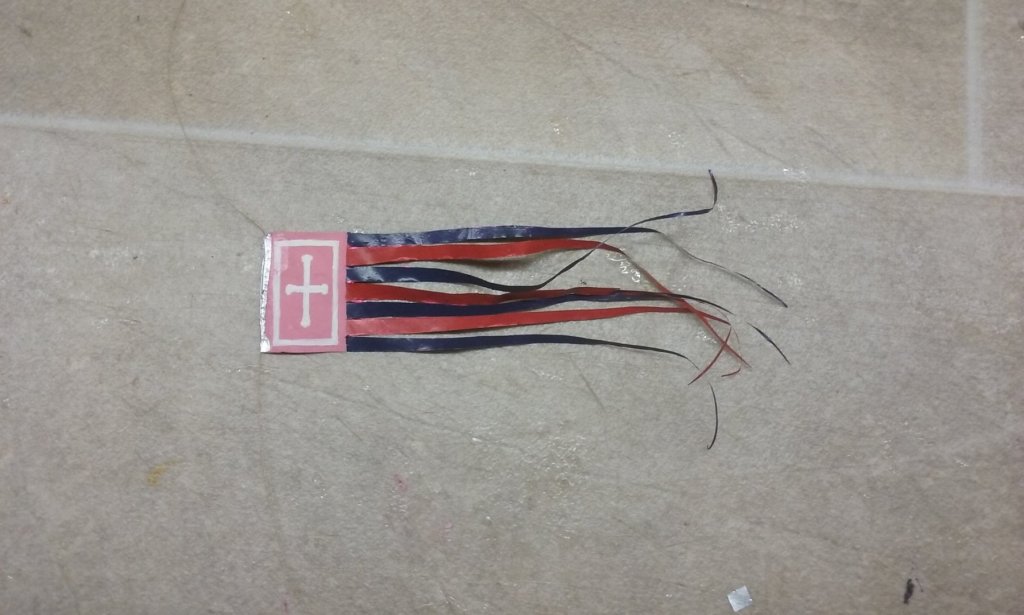
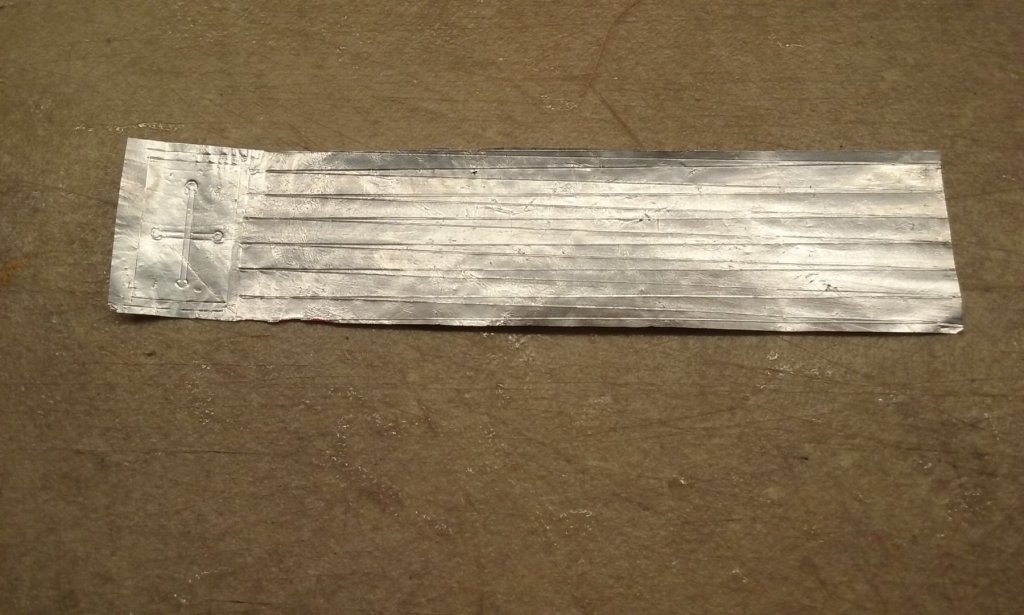
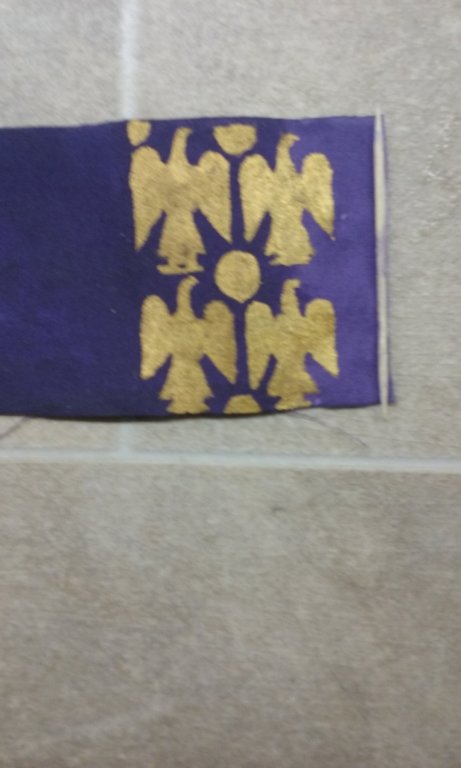
Thanks again for the comments and likes. Nikiphoros, that's the labarum, isn't it? Maybe one day I'll do a fourth century ship and use it, but I've got too many on my wish list already . . . I've finished the banner. The first thing I did (after flattening the foil out and removing all the crinkles) was score the surface of the foil with the pattern I proposed to paint. Then I put the paint on with a fine watercolour paintbrush, one colour at a time with drying time between colours. I wasn't too careful about staying within the borders of the "tails" because I was going to cut them out later. I realised I'd forgotten to allow enough "fabric" at the hoist so I could add the halyard, so I had to ad some more foil with CA. Unfortunately, wherever this touched the paint it messed it up and I had to re-do it in several places. And here's the finished Imperial banner. I'm pretty happy with it; the enamel paint sticks to the foil very well, and the foil is so light it supports itself while looking like the tails are moving in the wind. Another thing I've been playing with - getting a bit ahead of myself, but I tend to do that - is making a three-sheaved block based on one from the Serce Limani wreck of c. 1025 AD. Here's the block as found, plus a reconstruction drawing, from the 1983 thesis of Sheila Diane Mathews for a Master of Arts with Texas A&M University. I've differed slightly with her interpretation - I think for symmetry of forces there should be three holes at the base, not two. I've no idea if I'll be able to use this on the dromon model - I'm not all that good at visualising how blocks and tackle work together, and I'm going to have to do a lot of figuring out of just what fits where - but it was just fun to do, even if I never use it. There's also a single sheaved block from Serce Limani, and I think I'll be much more likely to find a use for this one. However, I haven't made it yet. Here's the "blank" I made it from. I think it's plum wood, but I've got a bit disorganised with my wood pile. This was version 1. I discovered that the drill I had (0.6mm) was too big, so I had to go down to what I think is 0.2mm. That worked a treat, though very exacting doing such tiny work (and without a drill press - I really must get myself one sometime soon). So there it is. My next projects will be making the chain pump and trying out my design for the upper oarbenches. I've already made (gasp!) the first upper oarsman roughly in plasticiene (modelling clay) and got his approximate shape. Now I'll have to do it more exactly in wax to see how he fits with the bench and the oar. Steven


-
Unfortunately, too often the case with people who pioneer new designs. The designer of the turret ship HMS Captain comes to mind - lost with the whole crew when the ship turned turtle in a mild gale in the Bay of Biscay. I'm looking forward to progress with this build. Looks really good, and your problem solving is fascinating. Steven
- 12 replies
-
- 2
-
-
- what is it
- torpedo
- (and 1 more)
-
A fascinating project. New and bizarre inventions are really interesting, even if they never came to anything. So - what happened to the inventor (I shudder to ask!) Steven
- 12 replies
-
- 4
-
-
- what is it
- torpedo
- (and 1 more)
-
(Blush). Gee, you guys!😁 The comments are greatly appreciated and very welcome. But without (too much) false modesty I think the result justifies all the extra work I put into it to get it the way I wanted it. I have to say, though, that when I was more than 3/4 of the way through, the devil came to me and said "Maybe it would look better if you throw that one away and start all over again, this time with the eagles vertical on each side of the awning . . .". But that way lies madness . . . Druxey, thanks for the suggestion. I'm currently using enamel paint on the foil; it's drying at the moment, so I'll see how it turns out. I'm hoping it doesn't all just flake off when I start to put the "flutter" in the banner. Steven
-
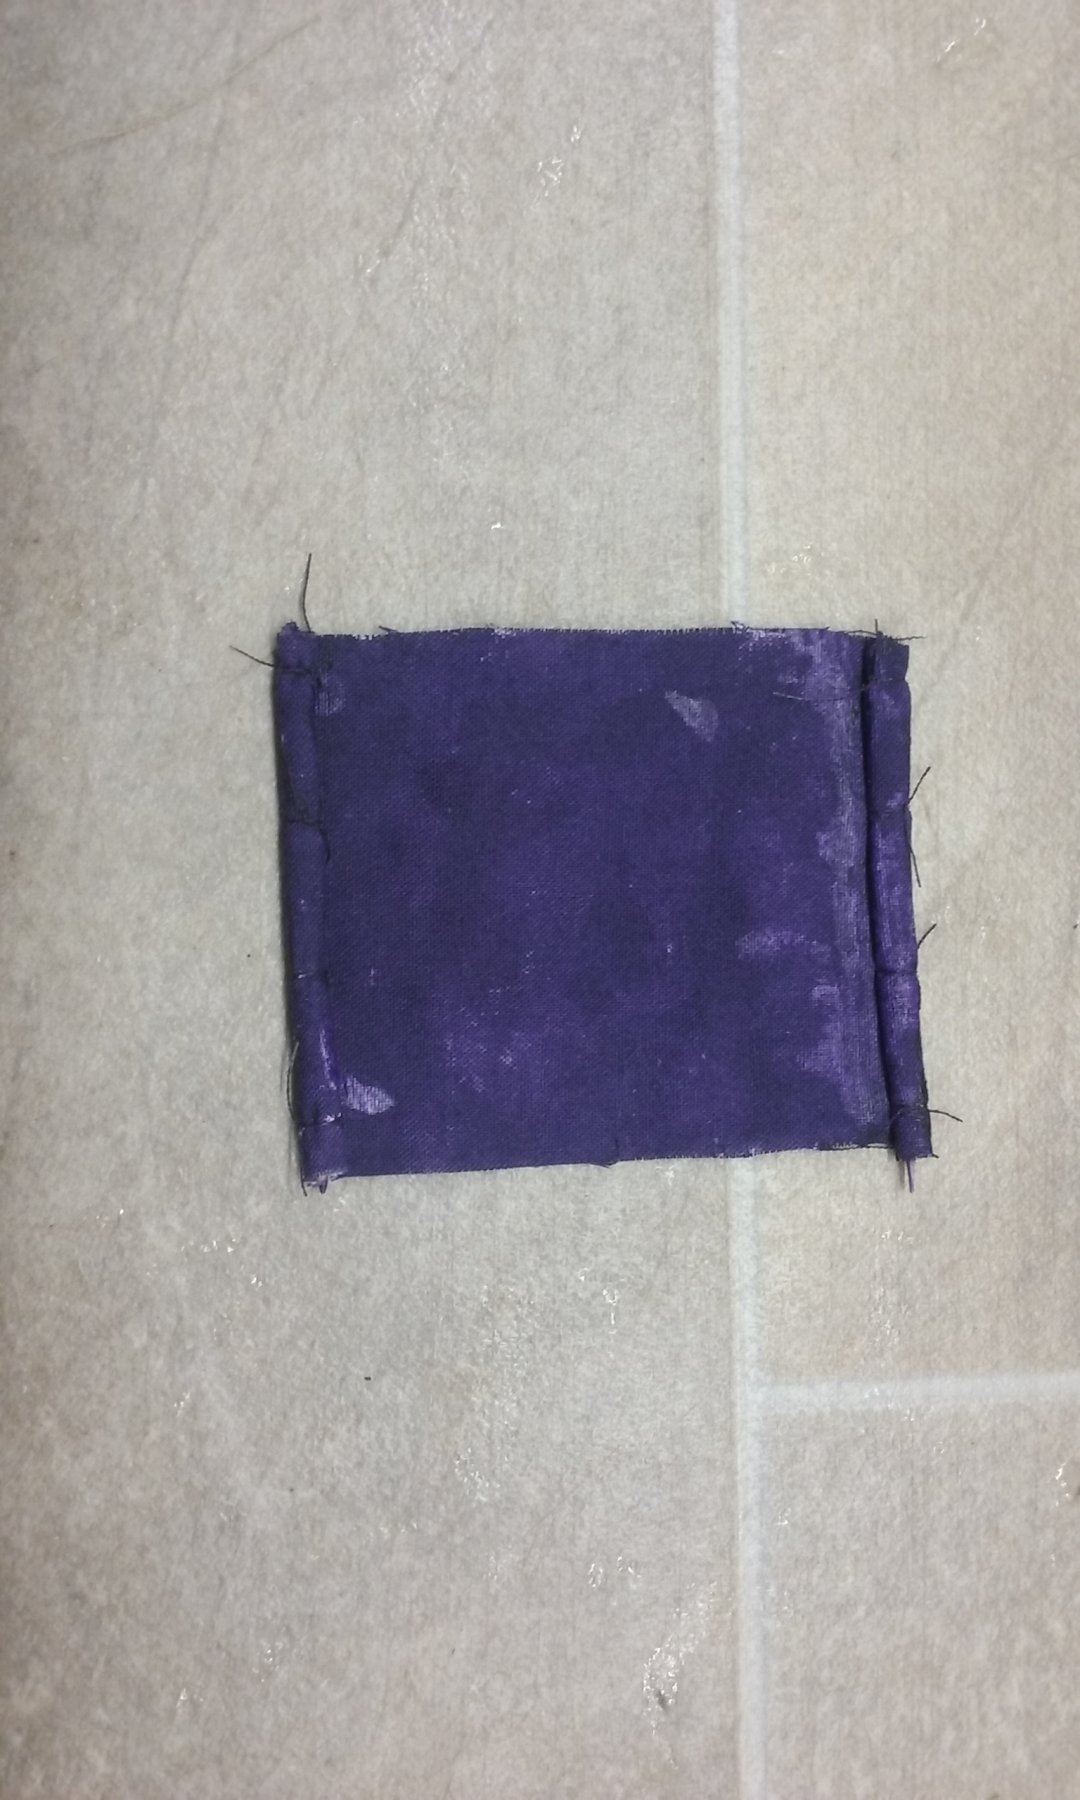
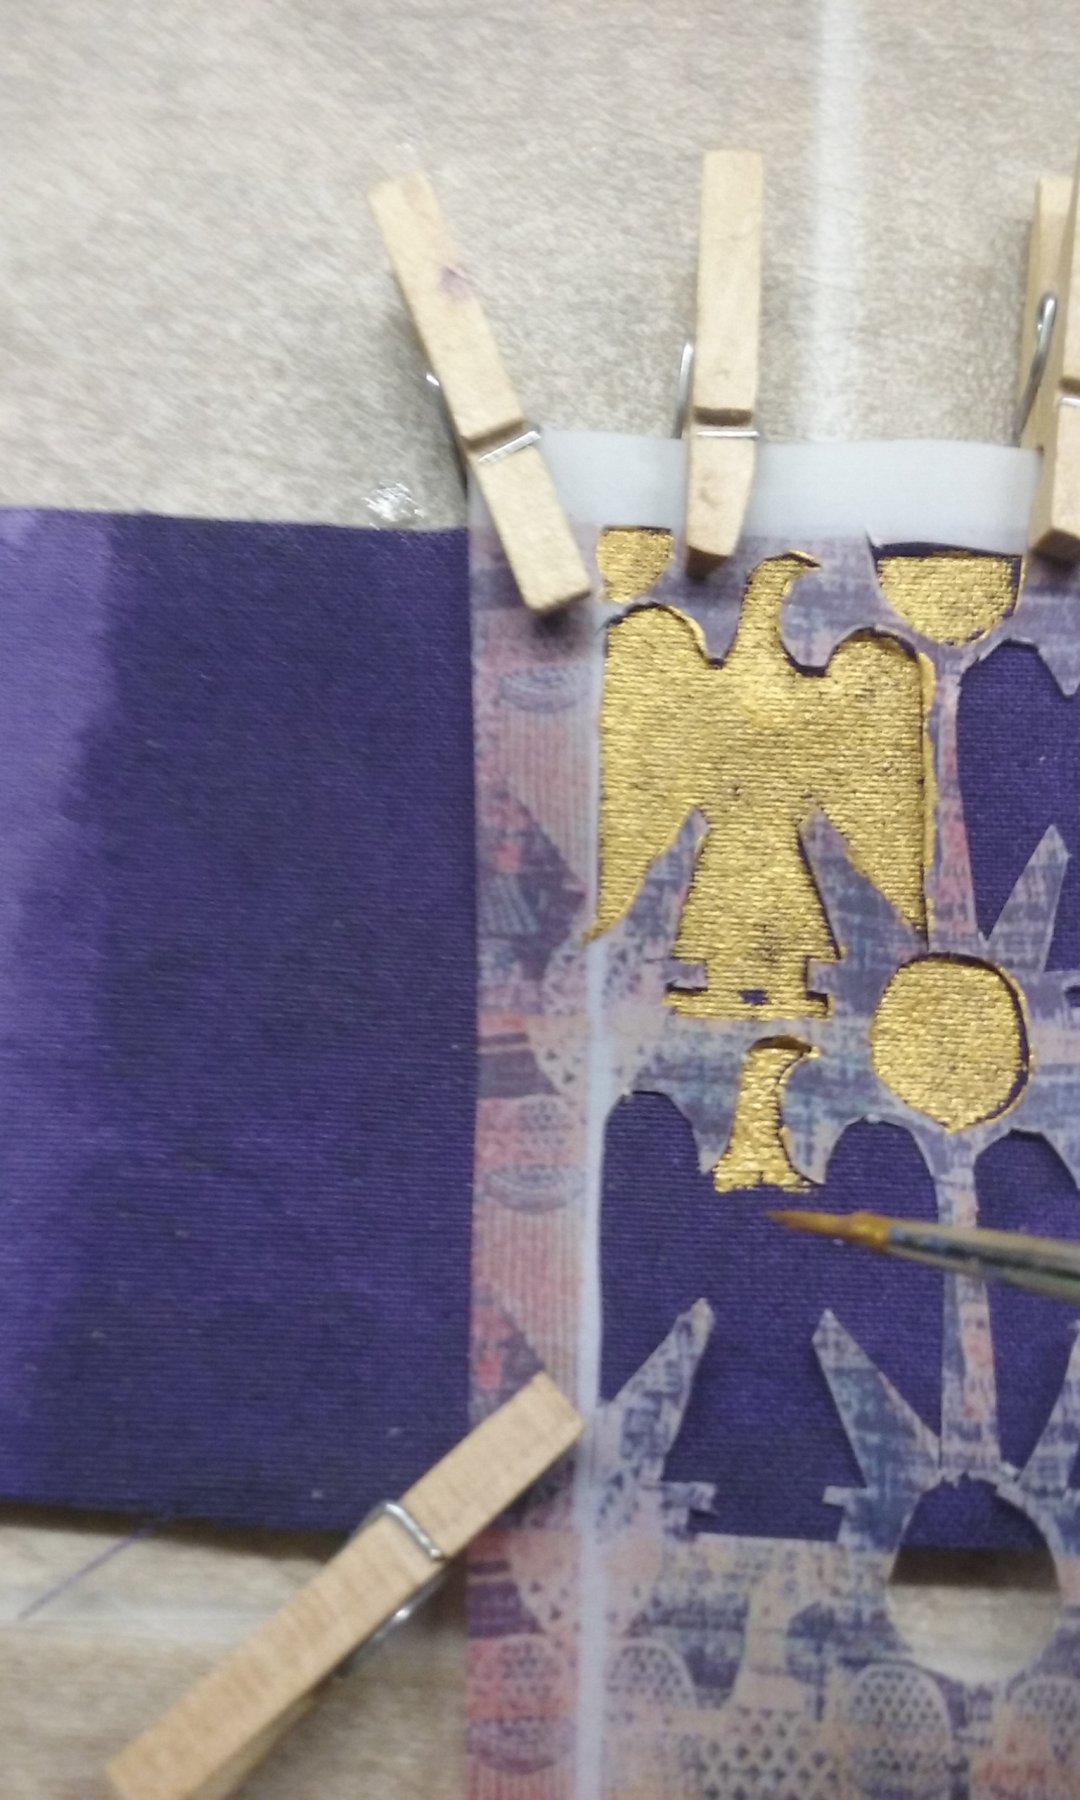
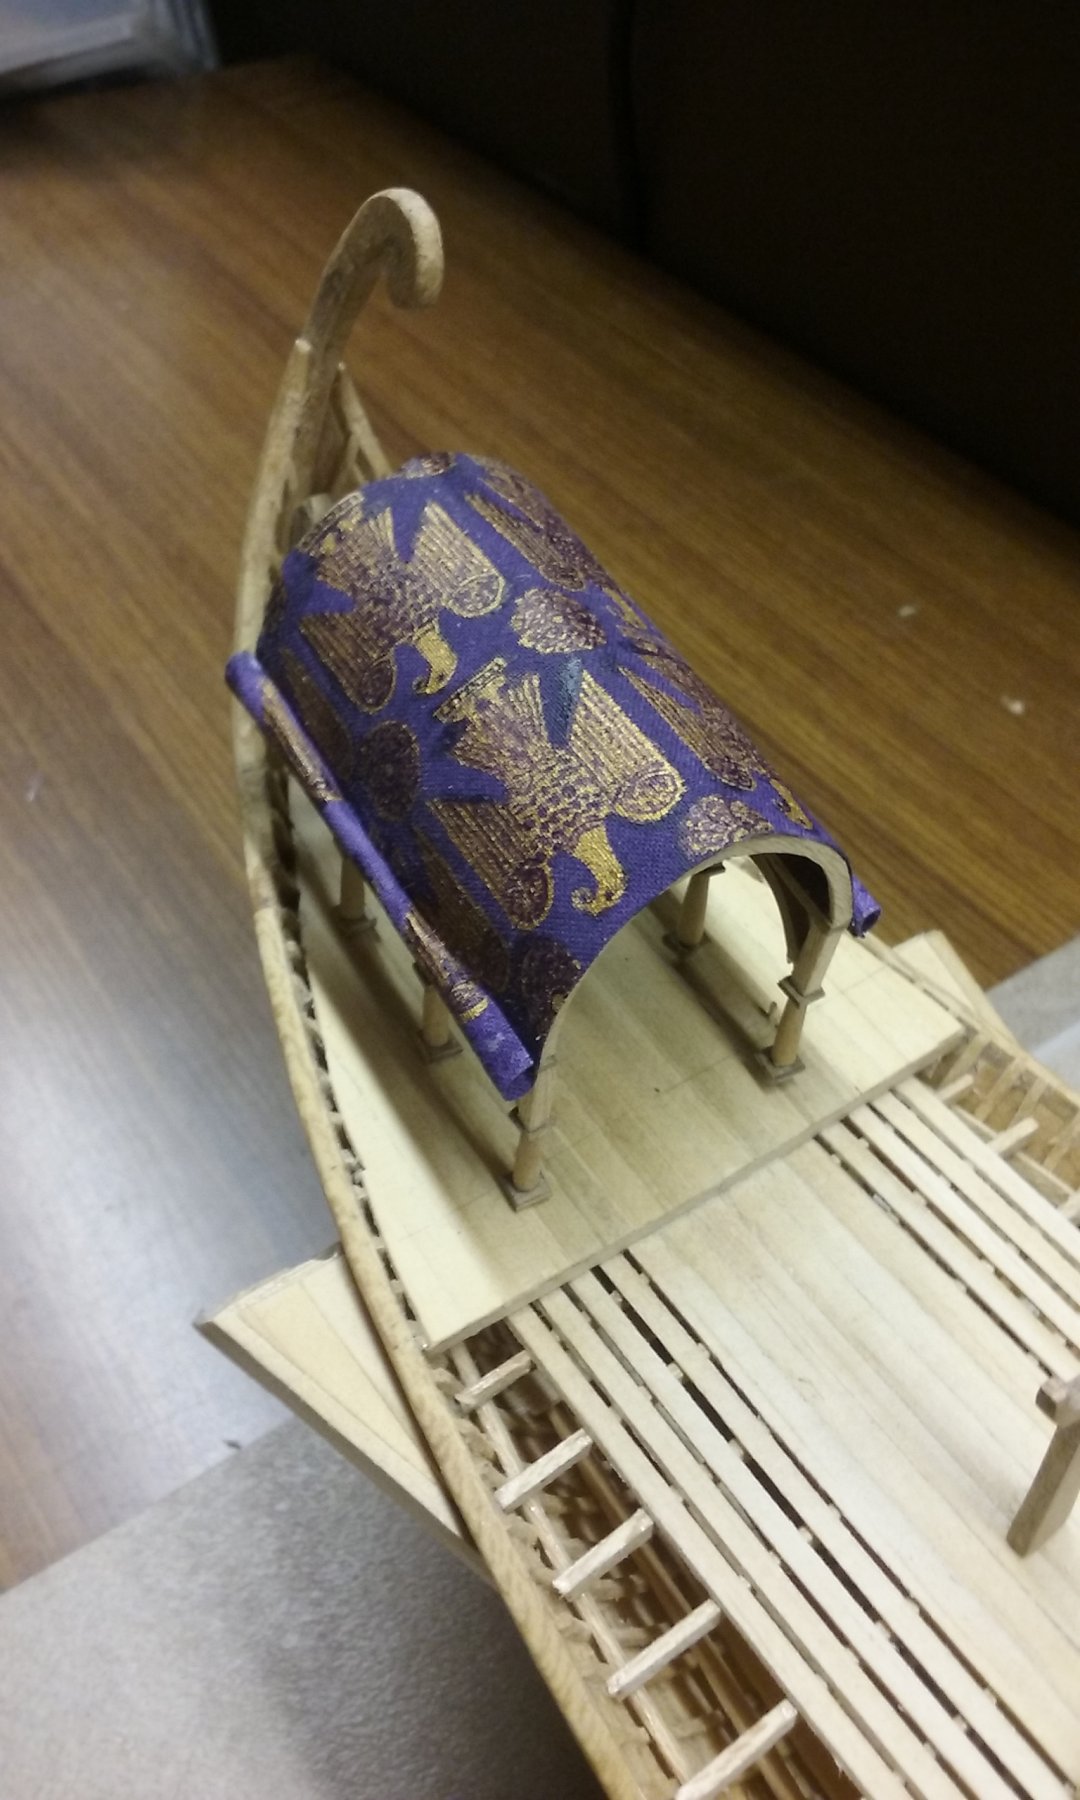
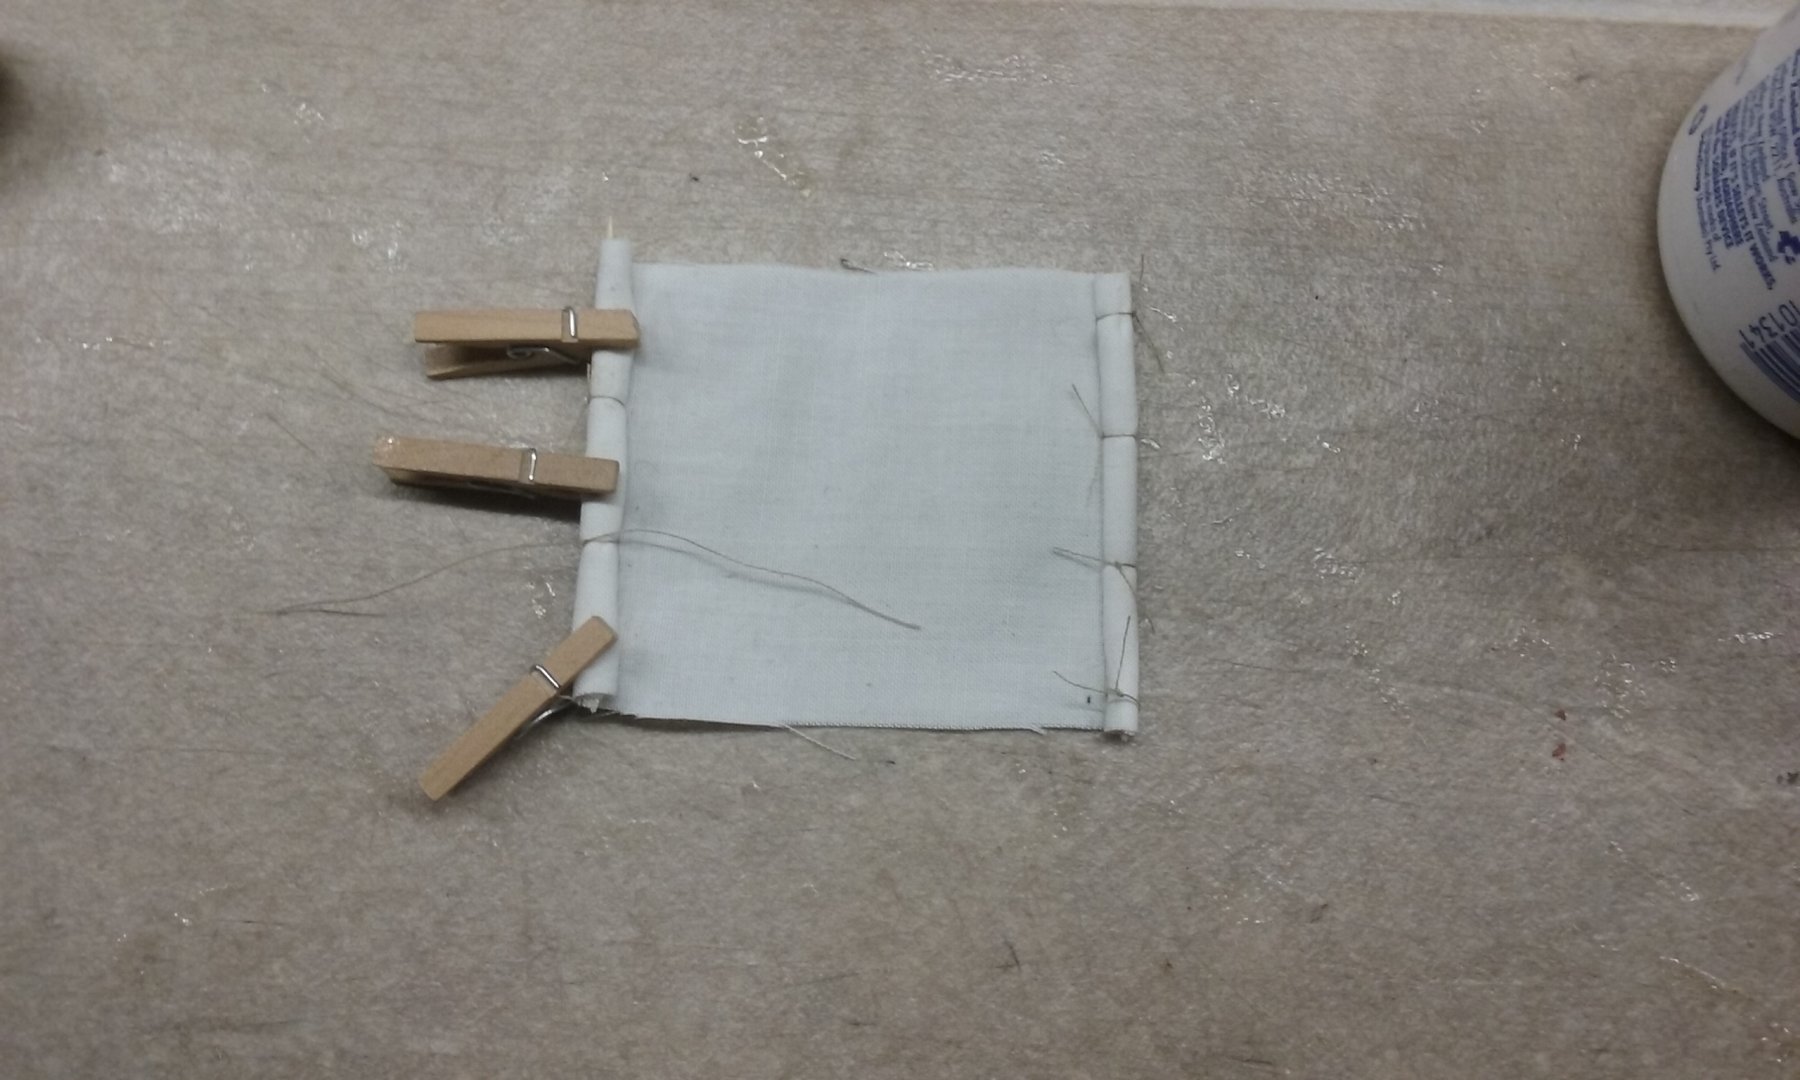
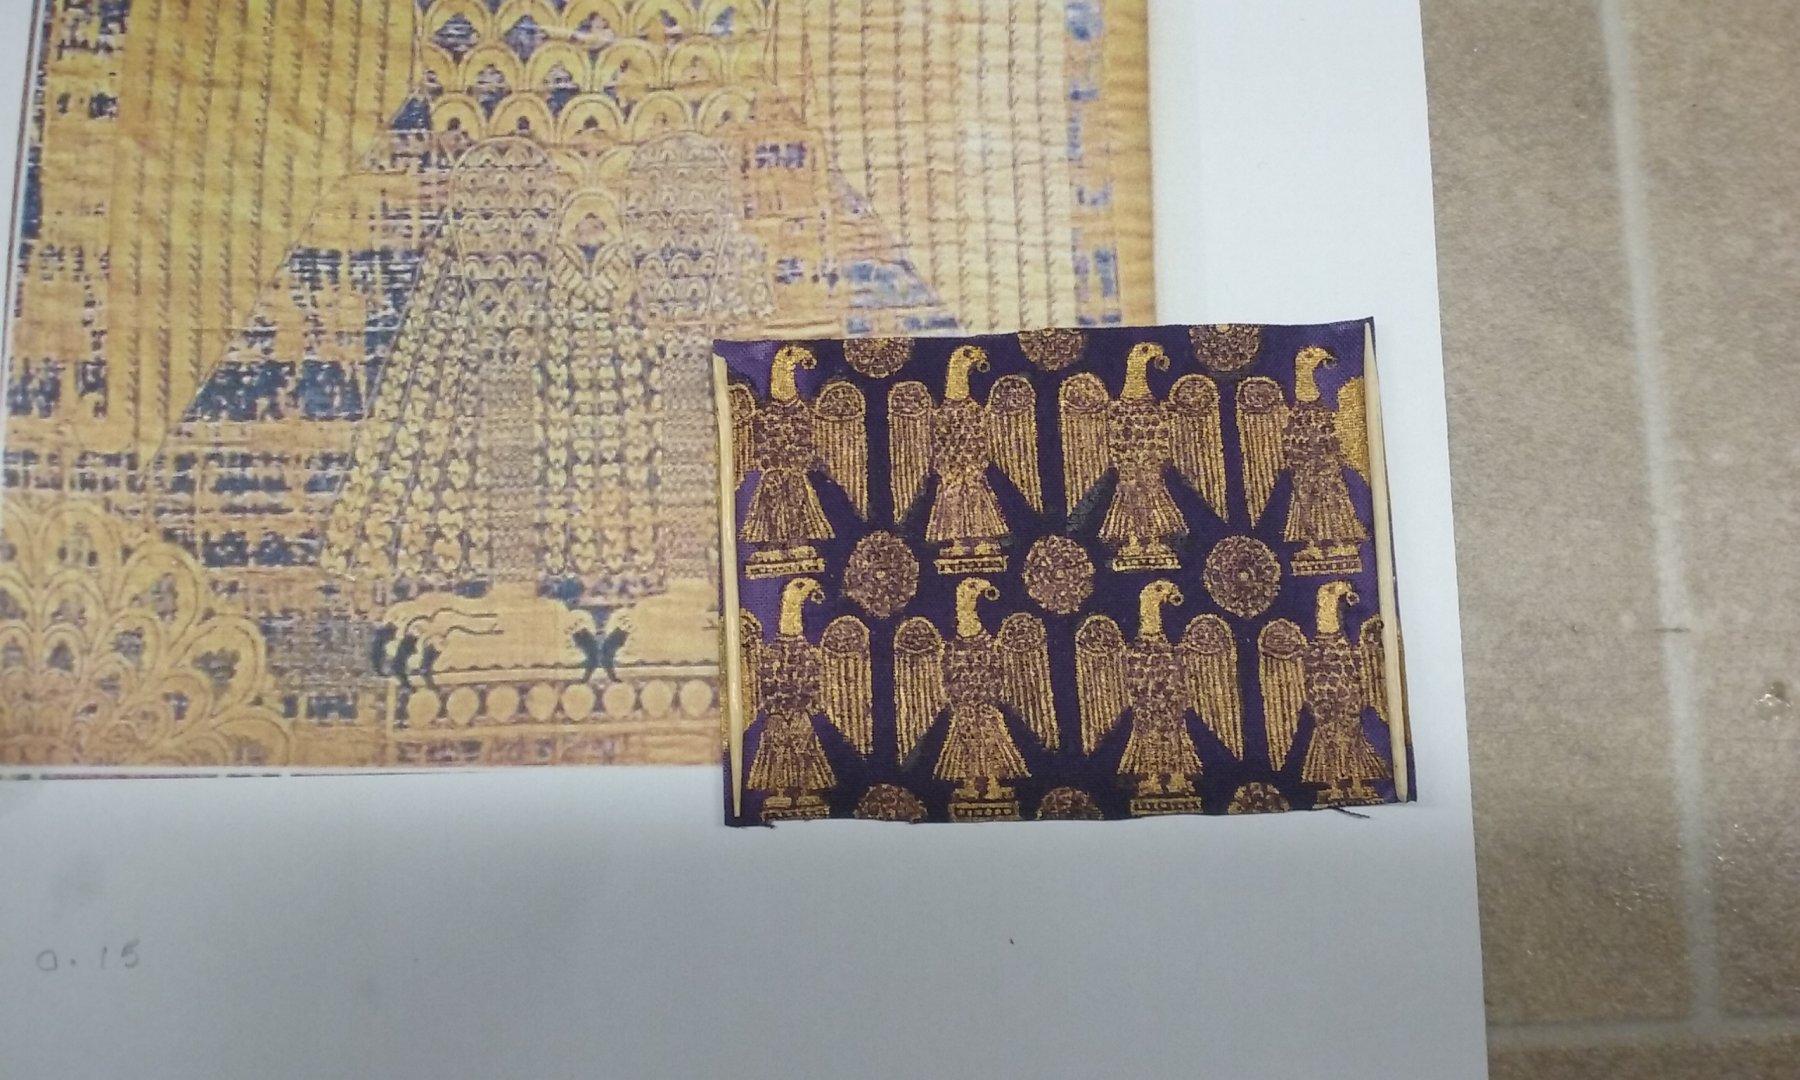
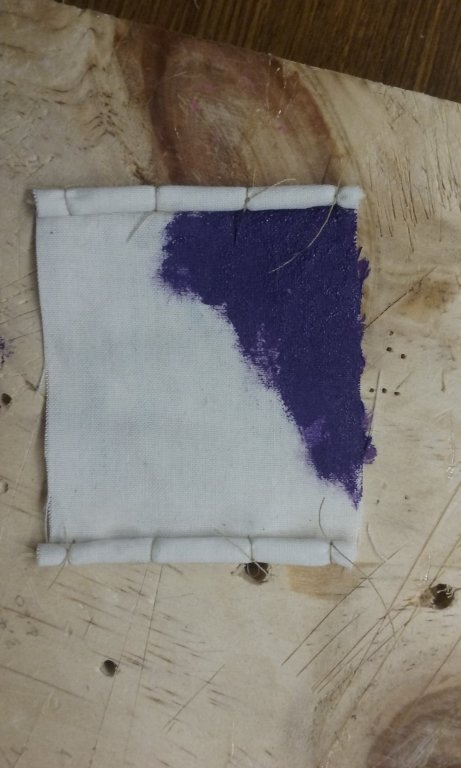
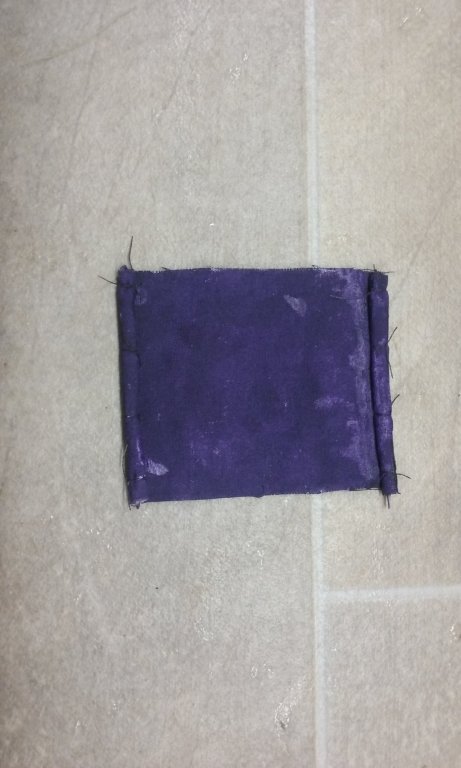
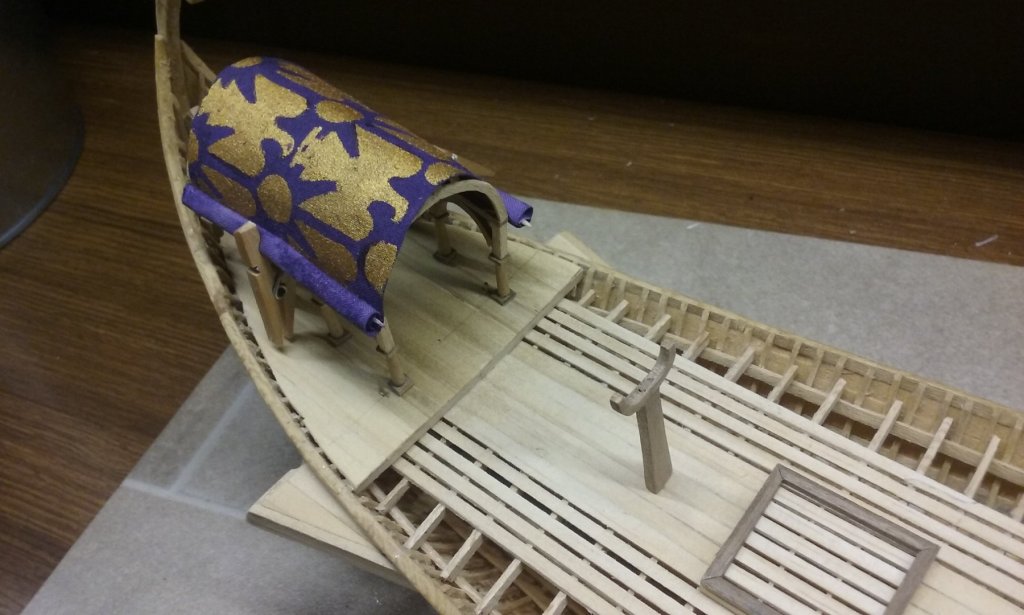
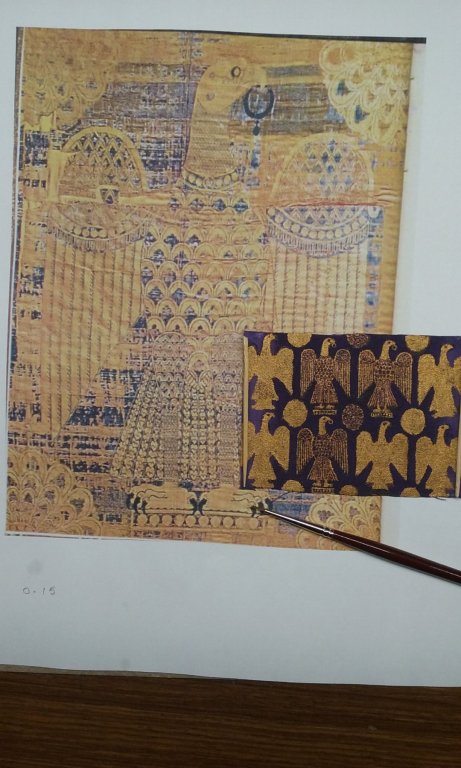
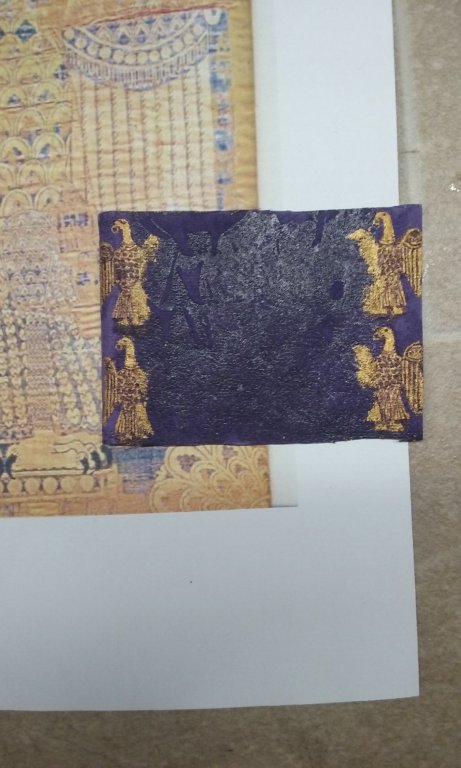
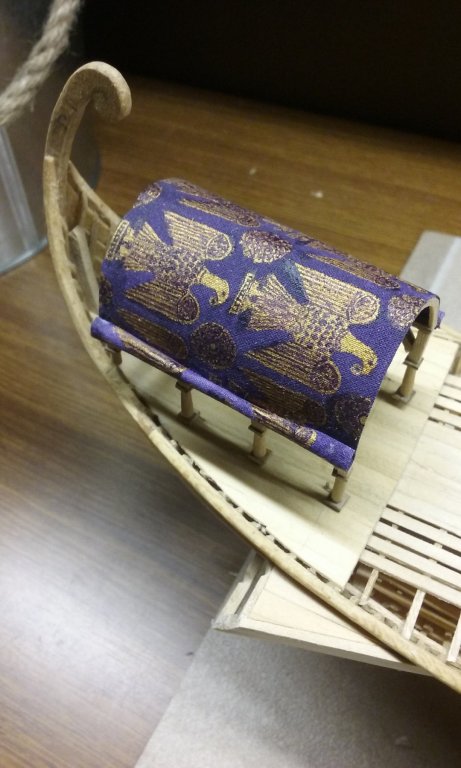
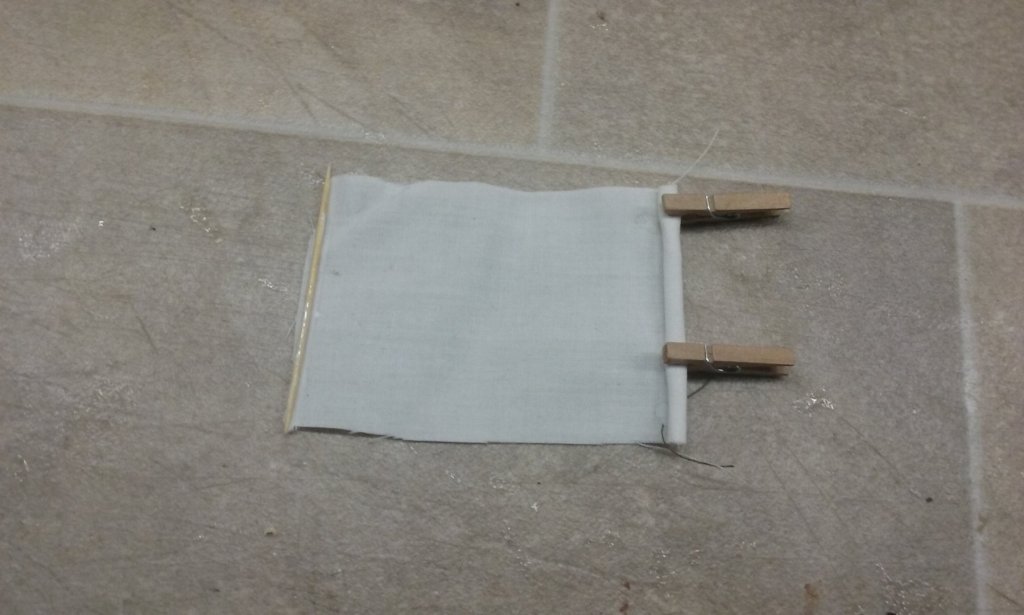
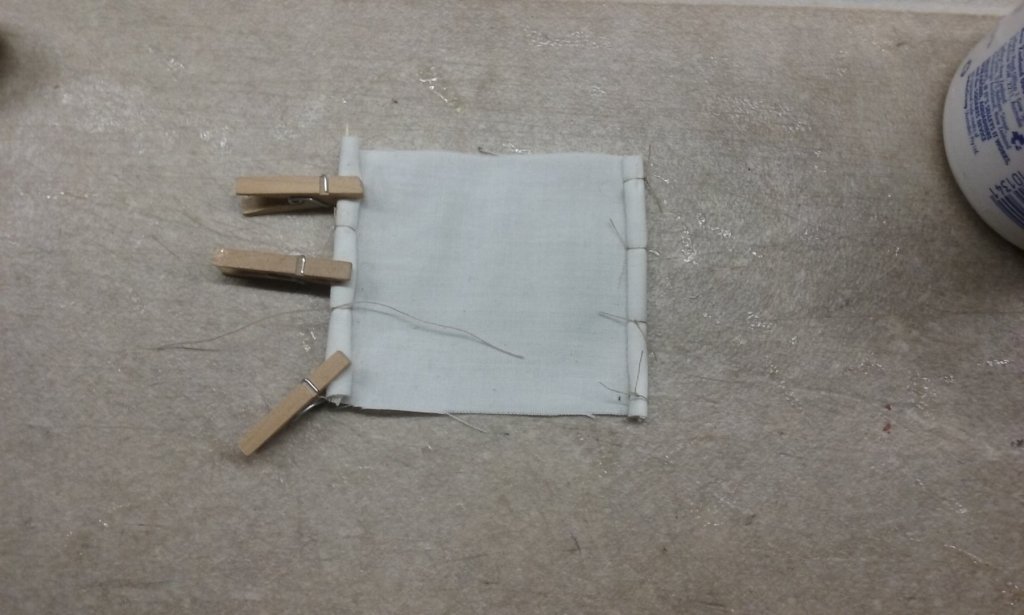
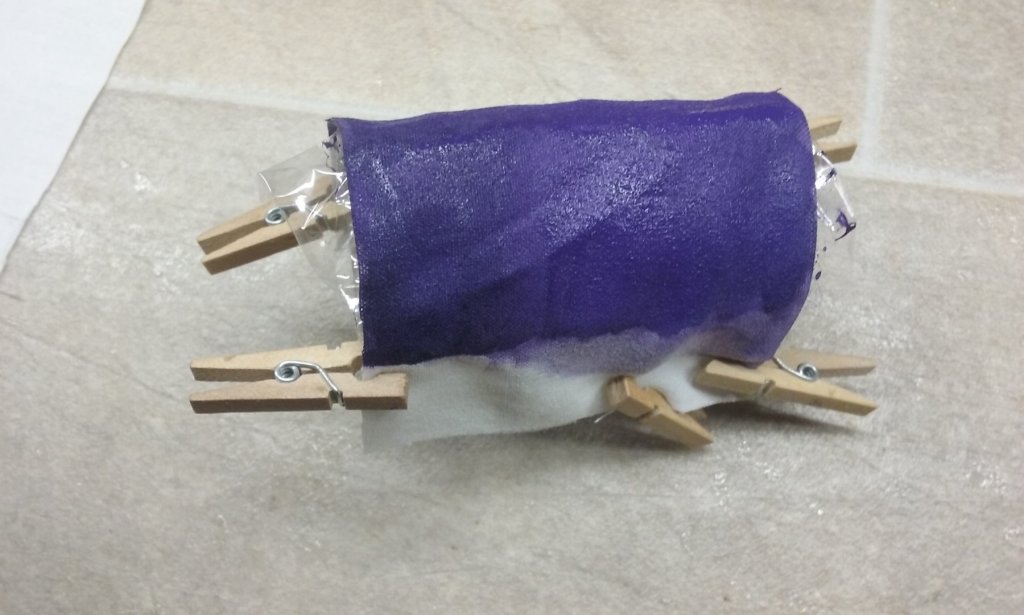
The awning for the poop, with the Imperial eagles as a pattern in the fabric. First I cut a piece from an old pillow case (the finest weave fabric I've been able to get hold of easily). The idea was to have the awning long enough to form side walls, but have the walls rolled up. I used a toothpick to roll the fabric around. Then paint the base colour of imperial purple: I used the acrylic paint full strength. Unfortunately, it made the fabric stiff. Also I got a bit of PVA glue on the fabric and it made the paint blotchy. So on to version 2. Using several thin washes of acrylic I got the colour right and the fabric was somewhat more flexible. A layer of cling wrap between the awning and the structure to keep the paint from bleeding though onto the wood. But the fabric had a fold in it that wouldn't come out: So onto version 3. First I painted it purple (again), then I made a stencil by reducing the photo of the original fabric on the photocopier, rubbing it with olive oil to resist the water-based paint - made it quite card-like - then cutting it out with a scalpel. Next, checking it for fit against the awning structure. And filling in the detail with a fine water-colour paint brush - the longest and most labour-intensive part. And painting the reverse side so the pattern would show on the rolled up part. And the finished item. I think I need to tighten the roll a bit, and perhaps put ties around it to complete the picture. Steven


-
Looking very good, and the wood colours are very attractive. The sources you've used are all from before the Mary Rose was raised in 1971, so it's not surprising they show a later type of windlass. As far as I am aware no other windlass has been found from such an early time - unless among the new discoveries in the Black Sea. It would be very good to see some more. Steven
- 197 replies
-
- 1
-
-
- santa maria
- carrack
- (and 1 more)
-
When I first looked at your log I thought you were doing a longboat (the Vikings did have them - a four-oar one was known as a faering) but having checked Artesania Latina's site I see what you're building is in fact a long ship, a much more ambitious project. There are quite a few build logs here of viking longships, which should help you with your own - they're often well worth referring to. In the meantime, just jump in and get started. Of course you'll make mistakes, but each mistake is a learning experience and (hopefully) you won't repeat that mistake in your next build. I say hopefully, because in my own experience I have repeated mistakes far too many times despite having vowed I wouldn't - very embarrassing. But that's part of the process as well. And yes, have fun. That's why we do this. And you'll find as you gain experience your quality improves and you open up new and wondrous opportunities for much better mistakes 😁. Just kidding. Take lots of photos. You'll find everybody is very supportive - and very happy to answer what may seem to you to be "dumb" questions, but are also part of the learning process. Steven
-
Looking very good, Luponero. The windlass (winch) is a beautiful piece of work, though it didn't really need to be quite so complex - the windlass of the Mary Rose from over 50 years later was a lot more basic; it had had no ribs or pawl (the mechanism to stop it winding backwards), so presumably the Santa Maria's windlass would have been just as simple - see post #732 in my own build at Not that I claim to be an expert in these things - I was referred to the site that contains this information when I was looking for something else. But that having been said, that's a beautiful windlass (much more beautiful than mine!) , and the ship's boats are beautiful as well. Steven
- 197 replies
-
- 2
-
-
- santa maria
- carrack
- (and 1 more)