Ryland Craze
-
Posts
1,569 -
Joined
-
Last visited
Content Type
Profiles
Forums
Gallery
Events
Everything posted by Ryland Craze
-
 Julian, I think you can correct this by adding some scrap wood to the top edge of the outer gun port pattern to match the inner gun port pattern. Then you can add some scrap wood to the bottom of the outer gun port openings and cut the upper edge of the outer gun port opening to match the opening in the inner gun port pattern. Basically, you will rework the outer gun port pattern to match the inner gun port pattern. I think it is essential that everything matches the inner gun port pattern. When you install the second layer of planking on the outside of the gun port pattern, no one will know of the modifications that you made. Many builders of this kit have had the same problem. Maybe someone else will have another solution. Glad to see that you are making progress on this kit and I am sure that the gun port issue will be only a minor set back for you.
 -
Plank edge sanding
Ryland Craze replied to rebekb's topic in Building, Framing, Planking and plating a ships hull and deck
I agree with Cap'n'Bob's method. By doing this, you eliminate rounding the edges. I use the sanding sticks used for filing your nails. These sanding sticks can be purchased from a Beauty Supply store or at Walmart. -
You have done a great job on your Longboat. I enjoy your updates.
-
Thanks everyone for the comments and the interest in my AVS. I have a few more items to do and then I will update my log.
-
Hi Ben, I am a big fan of your builds. It is nice that all of the Longboats are grouped into one Forum. There are a couple of Longboats that are nearing completion and I find myself looking at these builds as I plan my next steps on my Longboat.
-
Tim, You are making good progress on this kit. I have to agree with all of the other comments that this is a very interesting kit. Your detailed build log shows us what can be done with a solid hull kit as most builds on MSW are either plank on bulkhead or plank on frame. Thanks for sharing this build with us.
-
Bob, this turned out to be a beautiful model. Speaking from experience, I am sure Model Expo has sold many of these kits because of your fine work. I cannot wait until the day that I start mine.
- 103 replies
-
- 1
-

-
- picket boat
- model shipways
- (and 1 more)
-
Hi Richard, For your first build, you are really doing a great job. It is a shame that a lot of the details of this kit get covered up. I am also a member of the Hampton Roads Ship Model Society that Tim spoke of and several of our members are building this model or have built it. In fact, our Club held an auction this past Saturday and I was the high bidder for this kit. The member that I was bidding against wanted this kit badly, so I let him have it after the auction had ended. He will do a good job on building this model. I look forward to following your build and welcome to Model Ship World.
-
Ben, I cannot wait to see pictures of your Longboat with the mast stepped and rigged. Chuck moved all of the Longboat build logs into the Club Build log Forum and renamed it MSW Group Build of an 18th Century Longboat. This way all of the Longboat Build Logs will be in the same Forum.
-
Nice job Rich. The newer Enterprise kit has many improvements over the older version. The rudder install and the head rails look really nice.
- 85 replies
-
- 1
-
-
- enterprise
- constructo
- (and 1 more)
-
Jason, Your Longboat is coming along nicely. I really like the photo above that shows an overhead shot of the interior. You can see the many small details you made, when added together, make a very nice impression. Keep up the good work.
-
You are making good progress on your Granado. The mortar housing units look like a lot of fun to build. This kit gives you many options on how to display the mortars. I have seen the housing closed, opened and some in between. I hope your plywood false deck comes in soon so that we can see more progress.
-
You are making good progress. It looks great and keep up the good work.
-
Bob, I am enjoying this build as I have a lot of interest in the Civil War. Because of your build, I purchased this kit and have it on the shelf to build. I hope to get to it in the near future, but I will continue to learn from your build.
-
Dave and Marty, thanks for your comments. I have done some additional work that I need to update this log. Marty, I am glad you liked the pictures of the IPMS show in Richmond. There must have been over 500 models on display and everyone did a fantastic job on building their models. I only included ship models on the post I made but the armor, airplane, figures and other types of models were a real joy to look at. Modeling has come a long way over the years.
-
Jason, You are making good progress on your long boat. Your planking looks great, especially where the planks meet the rabbet joint at the stem. It sounds like the top of the stem above the cap rail is very fragil. I know other builders of this kit have had the same problem with it snapping off. Also, thanks for the tip on the placement of the forward edge of the garboard plank. I am ready to do that step on my build. Keep up the good work.
-
Thanks Tim. Your comments about my photography, with you being a retired Navy Photographer, are real gratifying. There are a lot of things that I need to learn about my new camera. They just do not make simple cameras any more.
-
Thanks everyone for the comments. This is a nice kit and I am looking forward to continuing the build. Chuck, thanks for opening up this forum to all of us that are building the longboat. This feels like the right place for this build log. I am looking forward to seeing more of the Club members posting their builds. It will be good to see the techniques used by others.
-
Yikes! That was a good one.
-
Thanks Tim. I need to get back to this build but my problem is I spend way too much time in front of my computer.
-
Guys, Thanks for the kind remarks. The AVS builds into a fine model as evidenced by all of the great builds that I have seen over the years. And Alistair, I am so glad that your AVS pictures were posted on MSW before your computer crashed. They will be a great reference for both present and future AVS builders.
-
Jason, Your Long Boat keel looks great. I forgot about that step when I did my build log. Also, the squares on your cutting mat can be used to line up your bulkheads when you glue them to the keel. This was told to me by a master ship modeler and it worked when I loosened some when I was doing the fairing process. I will be following your build.
- 58 replies
-
- 1
-
-
- model shipways
- 18th century longboat
- (and 2 more)
-
Augie, Thanks for looking in. Chuck's plans and instruction manual are excellent as well as all of his kit designs. I have been watching your Syren build and it is a masterpice. You have done a beautiful job on building this kit and I know you can attest to Chuck's plans and instructions. I have the Syren kit, but I want to work on getting my skills to the level that I can do a good job on building it.
-
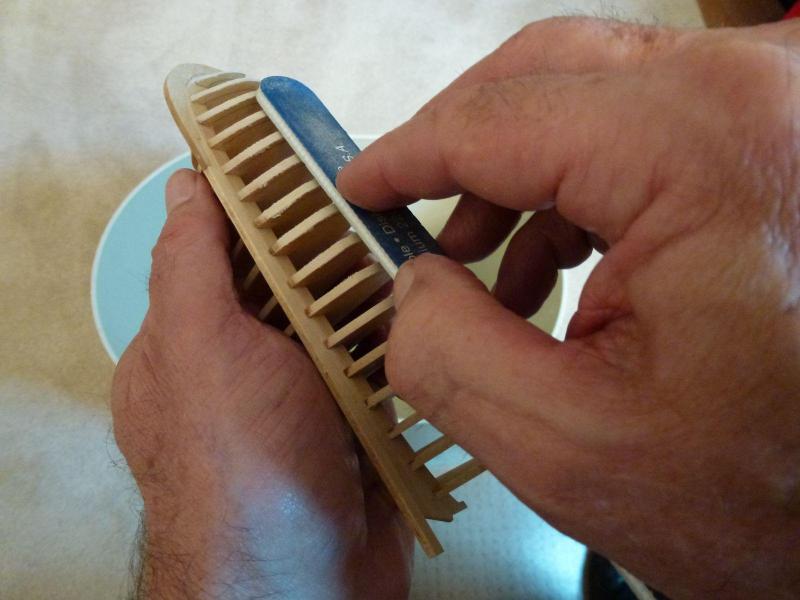
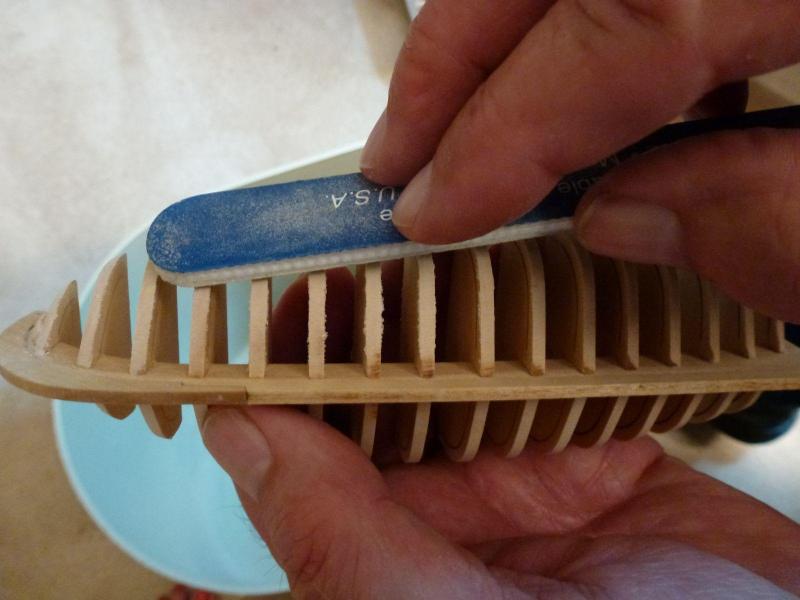
After all of the bulkheads were installed, it was time to fair them. I used sanding sticks that I purchased from a beauty supply shop. You have to use a light touch to do the fairing or you will loosen up some of the bulkheads. I actually loosened up several of the bulkheads, but it was an easy fix to reglue them. Here are some pictures of the fairing process and the sanding sticks that I used. Next step is to start the planking.
-
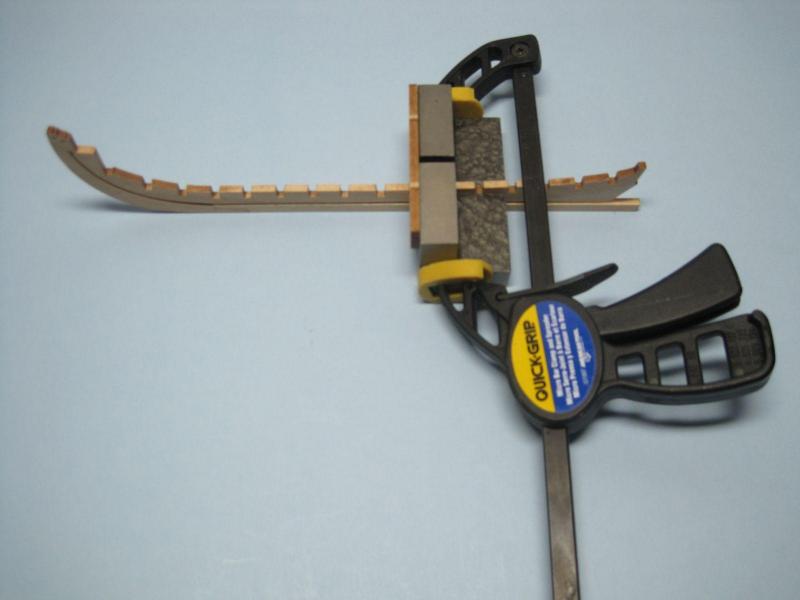
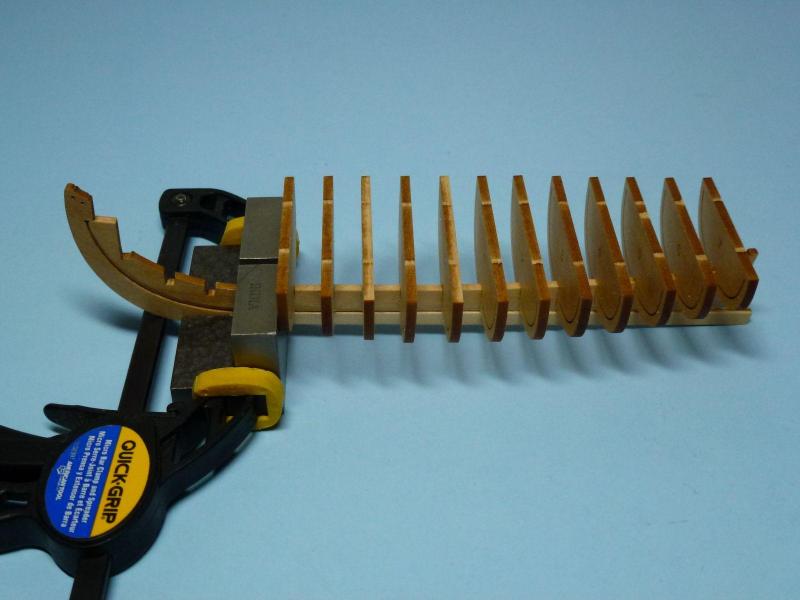
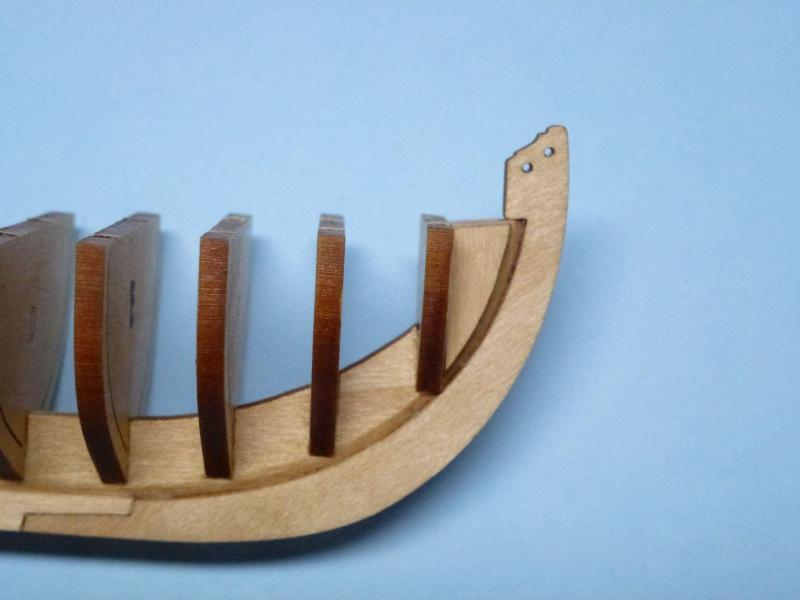
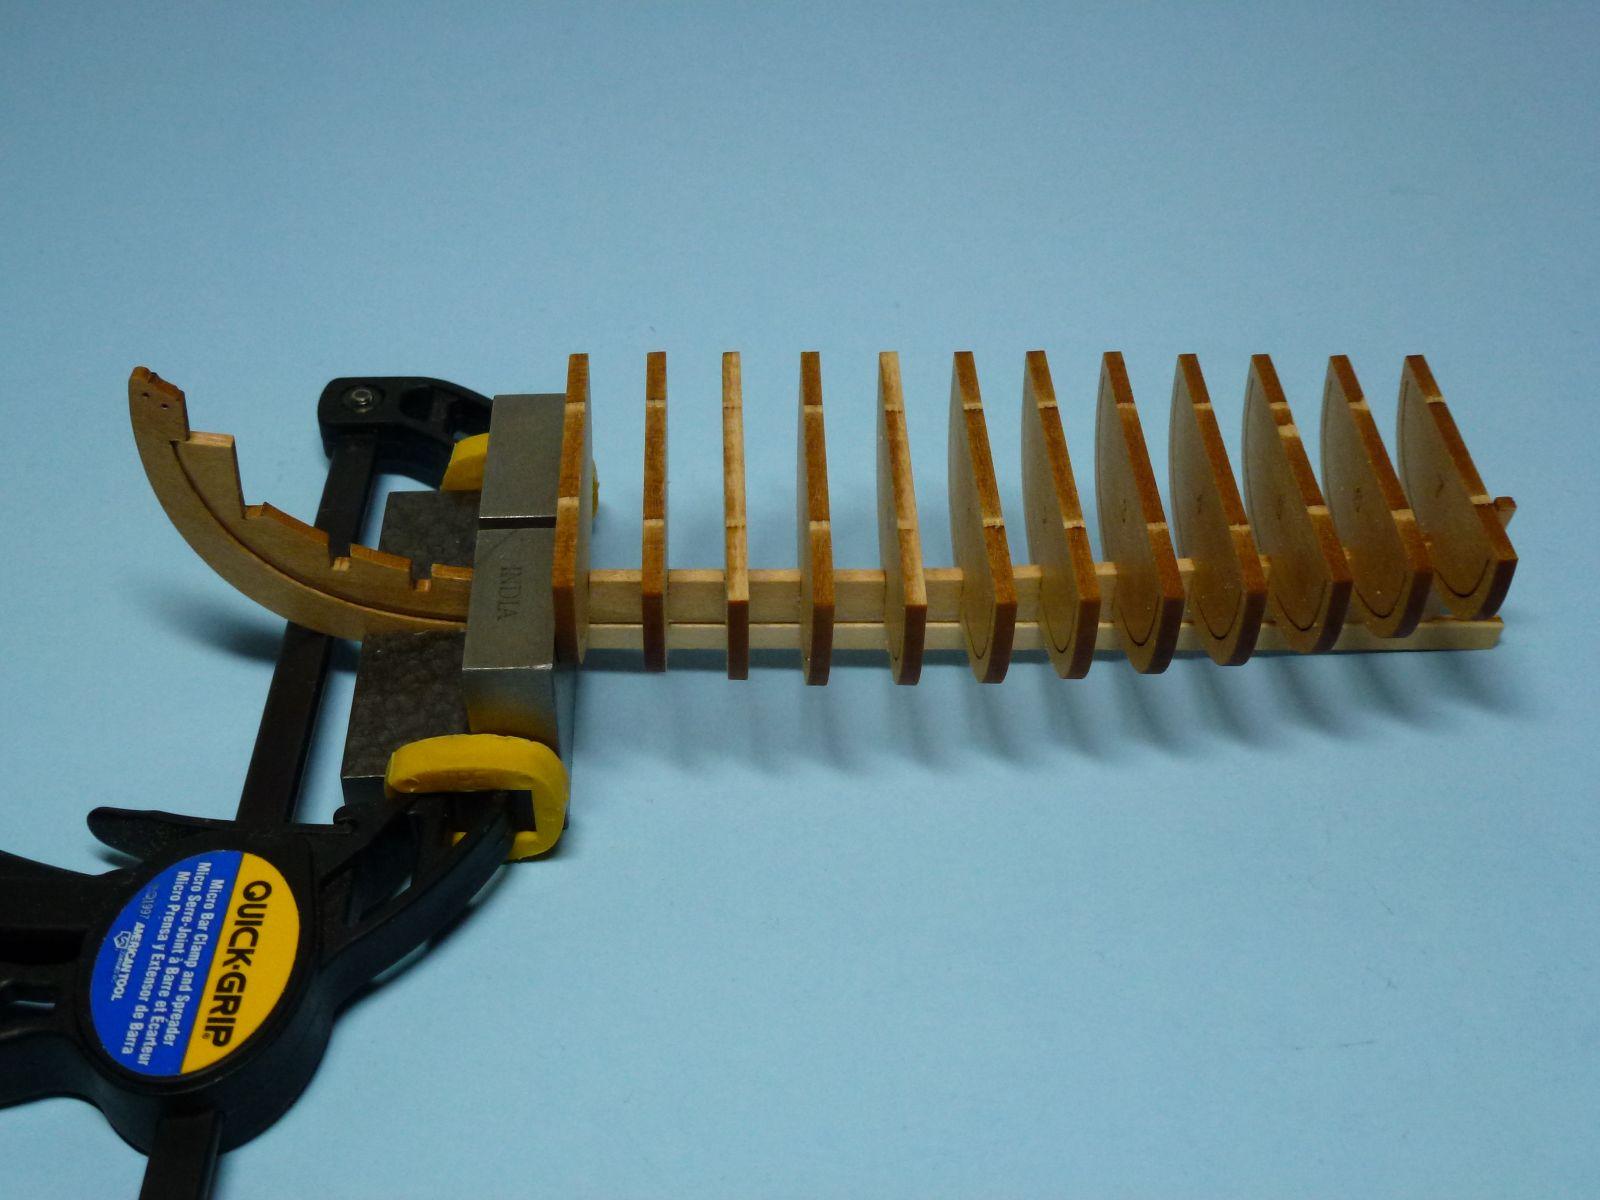
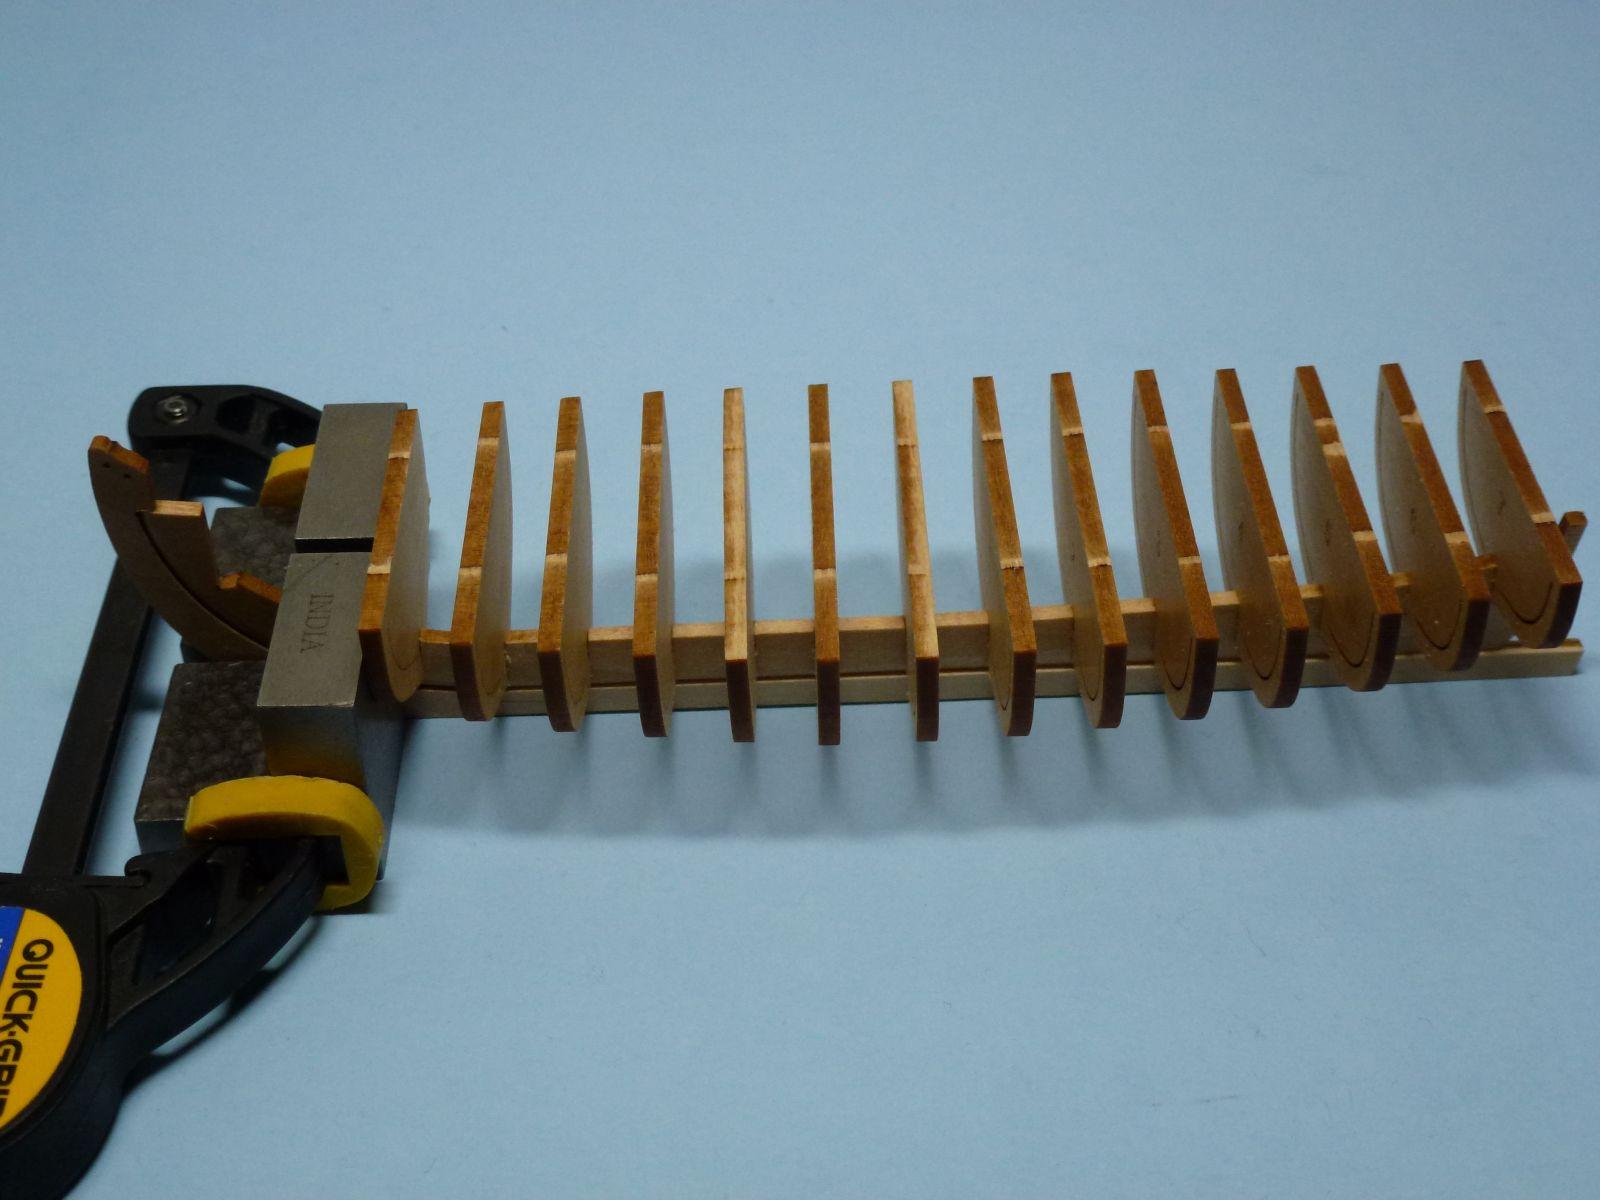
Now the fun part starts to happen. I am finally starting to assemble the kit. I used some one inch "L" blocks to keep my frames square and at right angles to the keel. These pictures show how I assembled the bulkheads to the keel. Here you can see the bow filler blocks that I installed per the instructions. One good thing about this build is my old camera gave out. I had pictures of each bulkhead being installed but they were blurred. They said that my sensors had given out in the old camera, so I bought a new one. The last three photos were taken by the new camera.