


Keith_W
-
Posts
1,145 -
Joined
-
Last visited
Reputation Activity
-

 Keith_W reacted to pirozzi in Royal William by pirozzi - FINISHED - Euromodels - 1/70
Hi Brian,
Thanks. I am planning to paint the bulwarks red as was customary for warships of that era.
Vince
-
Keith_W reacted to DRW-FJ40 in Snipe by DRW-FJ40 - FINISHED - Dumas - Small - 4th in my intro to ship modeling
We are our own worst critics, aren't we. I think I may make a fitting of some sort to cover it up. I thought about a light but it doesn't seem like a small sailboat like this would have lights.
Anyway, I finished sanding and trimmed out the cockpit area, applied natural stain & I must say I'm pleased with the basswood. You expect cherry to look nice with stain but I was pleasantly surprised with the grain in the basswood. after the stain dried, I start brushing on coats of finishing resin.
-
 Keith_W got a reaction from GrandpaPhil in Impressive non-ship models
OK I know this is a ship model forum but surely most of us can appreciate other models as well
I thought I would post a link to this site: http://www.armortek.co.uk/index.html
Armortek makes 1/6 scale model tanks, fabricated from metal. Unfortunately, their production goes in runs, so once a kit is out of production, it is out of production. They are currently selling a British Mk. IV WW1 tank. Very impressive, but not as impressive as this:
... a 1/6 scale King Tiger, measuring 1.2m long and weighing 60kg. Here is a video of it in action. Note the realistic engine sound (which is computer controlled and responds to revs):
-
 Keith_W got a reaction from Bill Morrison in HMS Royal William by KeithW - Euromodel - 1/72
INDEX OF PLANS
Sheet 1: Overview of ship
Sheet 2: Masts and Yards
Sheet 3: Decorations
Sheets 4, 5, 6, 7: General construction details
Sheet 8: Longitudinal and Cross section (for scratch builders)
Sheets 9, 10: Deck furniture
Sheets 11, 12: Standing rigging
Sheets 13, 14, 15: Running rigging
Sheet 16: Mast and yard details
Sheet 17: Ships plan
-
Keith_W reacted to pirozzi in Royal William by pirozzi - FINISHED - Euromodels - 1/70
Hi Keith,
I am planning to add another layer of first planking and the inner finish layer. Since both Julier and Pete suggest not applying the second outer layer of finish planking to the areas covered by the metal ornamental siding, this will give 3 layers in all and will not intrude too far into the inner spaces of the main deck, which will cause issues with the bulkheads and other fixtures. I believe this is the way to go.
As far as keeping the bulwark planks straight, mine are pretty straight but not perfect. When placing each one. I applied tension lengthwise and glued each piece on the edge first about 1/2" at a time with CA glue and a hair drier. When the second layer is added they can be clamped with strips of thick hard wood (plywood cutout scaprs) to make them really staight before the glue dries.
Vince P.
-
 Keith_W got a reaction from NAZGÛL in Wasan 1628 by Nazgul - FINISHED - Billing Boats Vasa 1:75
Very nice! Perhaps you could do them all at once by inserting wires through the hole and binding the deadeyes together? The irregular drilling of the holes will see to it that each deadeye is slightly different, since that's the look you are going for?
-
Keith_W reacted to jack.aubrey in Le Soleil Royal by jack.aubrey - FINISHED - De Agostini - Scale 1:70
Monday, July 14th, 2014
. . new pictures coming . . included a positioning simulation of some quarterdeck guns . . the spare parts of the guns are 80% ready. Bye, Jack.
01 CAM00253.jpg
02 CAM00254.jpg
03 CAM00255.jpg
03 CAM00256.jpg
-
Keith_W reacted to jack.aubrey in Le Soleil Royal by jack.aubrey - FINISHED - De Agostini - Scale 1:70
Friday, July 11th, 2014
Having nothing new to show, while I'm preparing the single elements needed to install the guns on the deck, I propose you new images of the model . . be patient.
01 P1090865.jpg
02 P1090867.jpg
03 P1090868.jpg
04 P1090869.jpg
05 P1090870.jpg
Regards, Jack
Post Scriptum: thanks to all for the positive comments.
-
Keith_W reacted to DRW-FJ40 in Snipe by DRW-FJ40 - FINISHED - Dumas - Small - 4th in my intro to ship modeling
I finished up the planking last night. Did a little rough sanding but still need to work on that & trim out the cockpit.
-
 Keith_W got a reaction from riverboat in Wasan 1628 by Nazgul - FINISHED - Billing Boats Vasa 1:75
Matti do you ever get tired of reading all this praise for your build? I hope not, because i'm only going to add to the chorus of praise for the work you have done. She looks superb. In fact I think your ship looks nicer than the one in the museum, it just seems more human.
-
 Keith_W got a reaction from CaptainSteve in HMS Royal William by KeithW - Euromodel - 1/72
Thanks for all the likes, everyone! It's a nice feeling to have more likes than posts Anyway, work continues.
As per other build logs, I installed some nails into the keel to keep it stable because a great heavy mass of metal decorations will be cantilevered off the beakhead.
The keel is also attached to the false keel by means of wooden dowels. Even with no glue, the whole shebang is rock solid!
Planking has now proceeded to below the level of the wales, and up to the second deck. Not shown are the blocks to support the dummy guns. These things are virtually impossible to photograph, because they are painted black against the entire lower deck, which has also been painted black. This is a good thing, because I don't want to see the dummy blocks. It IS a bit difficult trying to locate the holes for installation of the dummy guns when everything is black though.
BTW, the second deck fit perfectly a few weeks ago when I was fettling it. Now, with all the planks in place, somehow the deck won't fit! After quite a bit of cursing and a lot of anxiety (did I somehow distort the shape of the ship when I planked it?) ... it all measures correctly. Phew.
As you can see, the second deck is also painted black. The rear section has been covered with foil for lighting.
I was not sure how to route power into the ship. You can see a little excavation which I dug out on the false keel because I was planning to put a connector there. Then I hit upon a simple idea - why not simply electrify the support rods that I was planning to install anyway? I soldered the wire unto a nut and installed it.
We have no lights ...
AND NOW WE HAVE LIGHTS! EUREKA!! The idea worked!!!
As you can see, the LED's are SMD's (surface mount diodes) which are absolutely tiny. I glued them to a block of wood and then angled them outwards slightly. Yes, I know that Euromodel supply metal plates in place of windows, so you will never see the LED's if you build the ship as per the kit. However, I plan to fabricate my own replacement windows. I'm not sure how i'm going to do that, given that I have never made windows as small as this before, but time will tell ... I'll think of something! I hope!
That's it for now. I will install the garboard planks and then work the planking upwards to close the gap.
-
 Keith_W got a reaction from Salty Sea Dog in Wasan 1628 by Nazgul - FINISHED - Billing Boats Vasa 1:75
Matti do you ever get tired of reading all this praise for your build? I hope not, because i'm only going to add to the chorus of praise for the work you have done. She looks superb. In fact I think your ship looks nicer than the one in the museum, it just seems more human.
-
Keith_W got a reaction from Bill Morrison in HMS Royal William by KeithW - Euromodel - 1/72
Here are a couple more minor kit issues.
The middle gun deck is supplied pre-cut with a rounded bow section. However, as you can see, the rounded bow section will clash with the front bow filler block. The solution is to simply cut the deck and discard the piece.
The keel describes a sloppy fit with the false keel. After checking with the plans, and confirming that the top of the keel is supposed to rise to the level of the main deck (if the bowsprit wasn't in the way), I shaved away the area painted in red. I now have a perfectly fitting keel.
The kit doesn't include a mizzenmast support, so I fabricated one and installed it.
My wife returned from a day of shopping to find that I had turned nearly every spare inch of floor space into reading space for Royal William plans! She was not very impressed, especially since I had not kept the modelling door closed and the dust was in the main living area. I had to put a stop to my modelling and vacuum the house.
-
Keith_W got a reaction from Bill Morrison in HMS Royal William by KeithW - Euromodel - 1/72
My kit room has been tidied and prepared for the new build. It won't look as neat as this for another three years. Let's go!!!
The room has been re-arranged with the power tool bench behind me, and the main modelling table in front of me. All I need to do is turn around to have access to power tools. The desk by the window is where I will do all the Dremelling. Not pictured is my new shelving unit where all my tools, paints, and glues are neatly stowed away. Also not pictured is the clipboard where the plans will be displayed.
The main modelling table with the modelling lamp. You can also see my handheld vacuum which is vital for keeping the peace in the household.
The tool bench, from (L-R): Sherline 4410 Lathe, Byrnes Disc Sander, Proxxon MF70 mill.
-
 Keith_W got a reaction from dave teel in HMS Royal William by KeithW - Euromodel - 1/72
INDEX OF PLANS
Sheet 1: Overview of ship
Sheet 2: Masts and Yards
Sheet 3: Decorations
Sheets 4, 5, 6, 7: General construction details
Sheet 8: Longitudinal and Cross section (for scratch builders)
Sheets 9, 10: Deck furniture
Sheets 11, 12: Standing rigging
Sheets 13, 14, 15: Running rigging
Sheet 16: Mast and yard details
Sheet 17: Ships plan
-
 Keith_W got a reaction from clearway in HMS Royal William by KeithW - Euromodel - 1/72
Thanks for all the likes, everyone! It's a nice feeling to have more likes than posts Anyway, work continues.
As per other build logs, I installed some nails into the keel to keep it stable because a great heavy mass of metal decorations will be cantilevered off the beakhead.
The keel is also attached to the false keel by means of wooden dowels. Even with no glue, the whole shebang is rock solid!
Planking has now proceeded to below the level of the wales, and up to the second deck. Not shown are the blocks to support the dummy guns. These things are virtually impossible to photograph, because they are painted black against the entire lower deck, which has also been painted black. This is a good thing, because I don't want to see the dummy blocks. It IS a bit difficult trying to locate the holes for installation of the dummy guns when everything is black though.
BTW, the second deck fit perfectly a few weeks ago when I was fettling it. Now, with all the planks in place, somehow the deck won't fit! After quite a bit of cursing and a lot of anxiety (did I somehow distort the shape of the ship when I planked it?) ... it all measures correctly. Phew.
As you can see, the second deck is also painted black. The rear section has been covered with foil for lighting.
I was not sure how to route power into the ship. You can see a little excavation which I dug out on the false keel because I was planning to put a connector there. Then I hit upon a simple idea - why not simply electrify the support rods that I was planning to install anyway? I soldered the wire unto a nut and installed it.
We have no lights ...
AND NOW WE HAVE LIGHTS! EUREKA!! The idea worked!!!
As you can see, the LED's are SMD's (surface mount diodes) which are absolutely tiny. I glued them to a block of wood and then angled them outwards slightly. Yes, I know that Euromodel supply metal plates in place of windows, so you will never see the LED's if you build the ship as per the kit. However, I plan to fabricate my own replacement windows. I'm not sure how i'm going to do that, given that I have never made windows as small as this before, but time will tell ... I'll think of something! I hope!
That's it for now. I will install the garboard planks and then work the planking upwards to close the gap.
-
 Keith_W got a reaction from Bindy in HMS Royal William by KeithW - Euromodel - 1/72
Thanks for all the likes, everyone! It's a nice feeling to have more likes than posts Anyway, work continues.
As per other build logs, I installed some nails into the keel to keep it stable because a great heavy mass of metal decorations will be cantilevered off the beakhead.
The keel is also attached to the false keel by means of wooden dowels. Even with no glue, the whole shebang is rock solid!
Planking has now proceeded to below the level of the wales, and up to the second deck. Not shown are the blocks to support the dummy guns. These things are virtually impossible to photograph, because they are painted black against the entire lower deck, which has also been painted black. This is a good thing, because I don't want to see the dummy blocks. It IS a bit difficult trying to locate the holes for installation of the dummy guns when everything is black though.
BTW, the second deck fit perfectly a few weeks ago when I was fettling it. Now, with all the planks in place, somehow the deck won't fit! After quite a bit of cursing and a lot of anxiety (did I somehow distort the shape of the ship when I planked it?) ... it all measures correctly. Phew.
As you can see, the second deck is also painted black. The rear section has been covered with foil for lighting.
I was not sure how to route power into the ship. You can see a little excavation which I dug out on the false keel because I was planning to put a connector there. Then I hit upon a simple idea - why not simply electrify the support rods that I was planning to install anyway? I soldered the wire unto a nut and installed it.
We have no lights ...
AND NOW WE HAVE LIGHTS! EUREKA!! The idea worked!!!
As you can see, the LED's are SMD's (surface mount diodes) which are absolutely tiny. I glued them to a block of wood and then angled them outwards slightly. Yes, I know that Euromodel supply metal plates in place of windows, so you will never see the LED's if you build the ship as per the kit. However, I plan to fabricate my own replacement windows. I'm not sure how i'm going to do that, given that I have never made windows as small as this before, but time will tell ... I'll think of something! I hope!
That's it for now. I will install the garboard planks and then work the planking upwards to close the gap.
-
 Keith_W got a reaction from Ray1981 in HMS Royal William by KeithW - Euromodel - 1/72
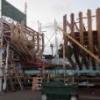
Time for an update, as well as a few other notes on building this magnificent ship.
The bow filler blocks were a real pain to fabricate. To help get the correct contour, I photocopied the plans and cut out guides to check the shape at different levels. It really helps that Euromodel's plans are so detailed - by far the best I have ever seen. It more than makes up for the scanty instructions.
Completed bow filler block (left). The one on the right was roughly shaped with a belt sander.
I used my Proxxon MF70 mill to shape the keel so that they fit together.
Start of planking! I decided to start at the lower gun deck and go both upwards and downwards. As you can see I managed to get a really tight bend at the stern.
The bow, with the bow filler blocks installed. The plans are rather sketchy regarding how they should be placed, but it made sense to bring them up to the level of the main deck. If you do so, there will be a gap in the middle because the false keel does not rise high enough. I installed a block (arrowed) to help support the main deck which will be installed later.
I then started tracing the gunport pattern out onto some tracing paper.
Note that there are FOUR different sizes of gunports. Interestingly, none of the other build logs mention this. Pete's Interpretive Info on the Euromodel website suggests that only TWO different gunport sizes are present (14mm x 14mm, and 13mm x 13mm). The gunport sizes I measured out were:
14mm x 13mm <-- lower gun deck
13mm x 12mm <-- middle gun deck
11mm x 10mm <-- main deck
9mm x 9mm <-- hindcastle
Perhaps Pete would like to check his plans (I used Plan sheet #7) and amend his I-I accordingly?
I have now installed five planks on the lower gun deck, all without tapering. This weekend I will cut out the gunports.
I also took some measurements of the bulkheads below the lower gun deck - these will all have to be tapered.I used these measurements to calculate how wide each plank should be at each bulkhead. Disappointingly, the lower graph (a graphical representation of the shape of the plank) suggests that shaping these planks won't be so easy!
-
Keith_W got a reaction from Bindy in US Brig Syren by kscadman - Model Shipways - Scale 1:64 - first wooden ship build
Amazing effort if this is your first wooden ship! I have made quite a few and my models don't turn out as nice as yours!
-
Keith_W reacted to gjdale in straight mill vs. mill/drill combo.
Richard,
If you go with the Sherline mill, one of the accessories you can buy is called a "sensitive drilling attachment". This would overcome your issue as you simply pull down on the attachment to drill. It's designed to take very small drill bits. Here's a link:
http://www.sherline.com/1012pg.htm
The Sherline is a top notch machine and highly regarded by many modellers. I have one and love it. Hope this helps.
-
 Keith_W got a reaction from CaptMorgan in US Brig Syren by kscadman - Model Shipways - Scale 1:64 - first wooden ship build
Amazing effort if this is your first wooden ship! I have made quite a few and my models don't turn out as nice as yours!
-
 Keith_W got a reaction from pete48 in KA-6 Australia II 1983 by pete48 - 3/16" = 1' - SMALL
Keep going! I'd like to see how you make the winged keel
-
 Keith_W got a reaction from kscadman in US Brig Syren by kscadman - Model Shipways - Scale 1:64 - first wooden ship build
Amazing effort if this is your first wooden ship! I have made quite a few and my models don't turn out as nice as yours!
-
 Keith_W got a reaction from Mirabell61 in KA-6 Australia II 1983 by pete48 - 3/16" = 1' - SMALL
Keep going! I'd like to see how you make the winged keel
-
Keith_W reacted to pete48 in KA-6 Australia II 1983 by pete48 - 3/16" = 1' - SMALL
Here she is upside down, Next will be the Famous Winged Keel