wyz
-
Posts
411 -
Joined
-
Last visited
Content Type
Profiles
Forums
Gallery
Events
Everything posted by wyz
-
 LOL Mike, from watching my build you're going to learn that my method takes FOREVER just to shape the hull, and that you need to get used to seeing sawdust EVERYWHERE in my home.
 -
Wow! What a beautiful model you have. Recently I read through your Winnie build log from start to finish, and then read through it again. It's easy to see why you are getting so many accolades for your workmanship. It's precise in ways you don't see in many other models. Your planking and joinery is, no doubt, the envy of your fellow model builders. We really shouldn't be surprised that your Winnie is turning out so well because the other models you've worked on exhibit those same qualities. Tom
- 607 replies
-
- 4
-

-
- winchelsea
- Syren Ship Model Company
- (and 1 more)
-
Christian, there is so much preparation work it's enough to drive you crazy. 🤪 All the preliminary work has me very anxious to start this build. Tom
-
Thanks H's H. It's good to get the preconstruction stuff behind me. Lord knows it took long enough to get that done. I've been looking forward to starting actual construction of the model for quite a while. Like you, I love this ship's lines. It's a beauty from bow to stern. Thanks for wishing me well with my health. It's everything. Tom
-
I'm happy to share with you Ron, and I'm glad you're enjoying it. Now the fun starts for me, the actual model construction. Choosing which pieces of wood goes to a specific template is next. Then it's tracing the lift shape on the chosen piece of wood and cutting it out on the bandsaw. Gluing the half lifts together follows the sawing, and after that I start the gluing the whole lifts together. The hellishly protracted part of this build will, no doubt, be the template shaping a little ways down the road.
-
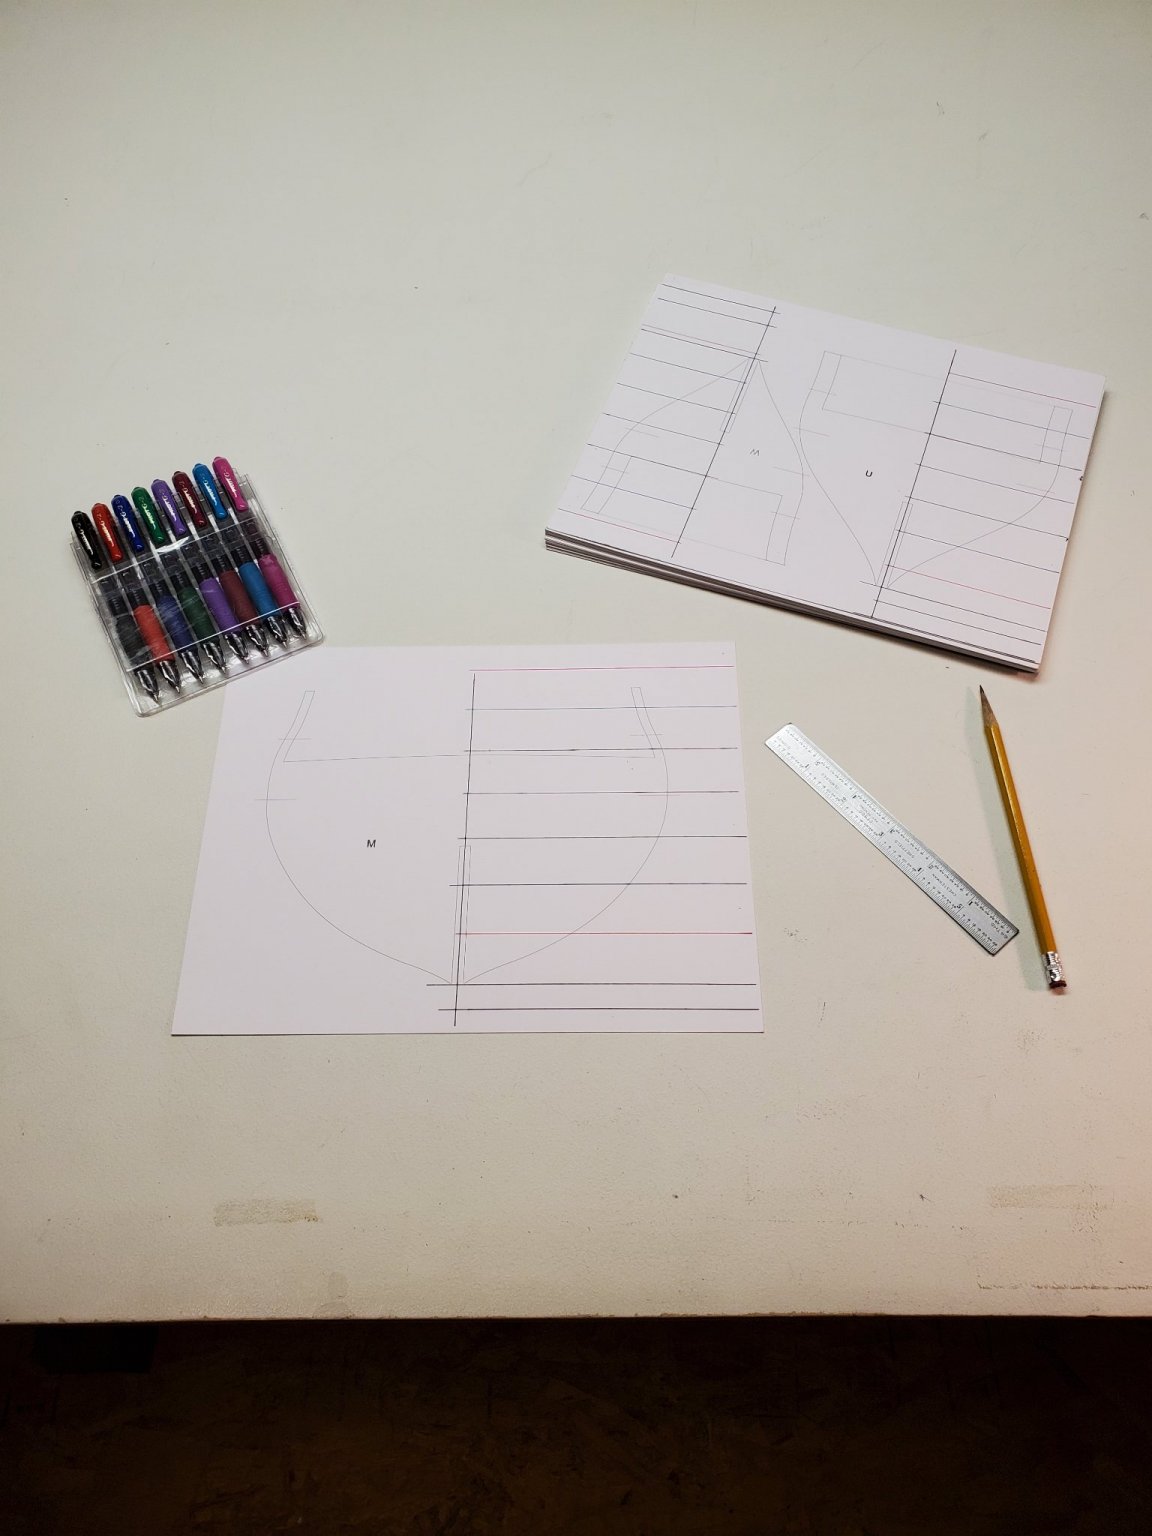
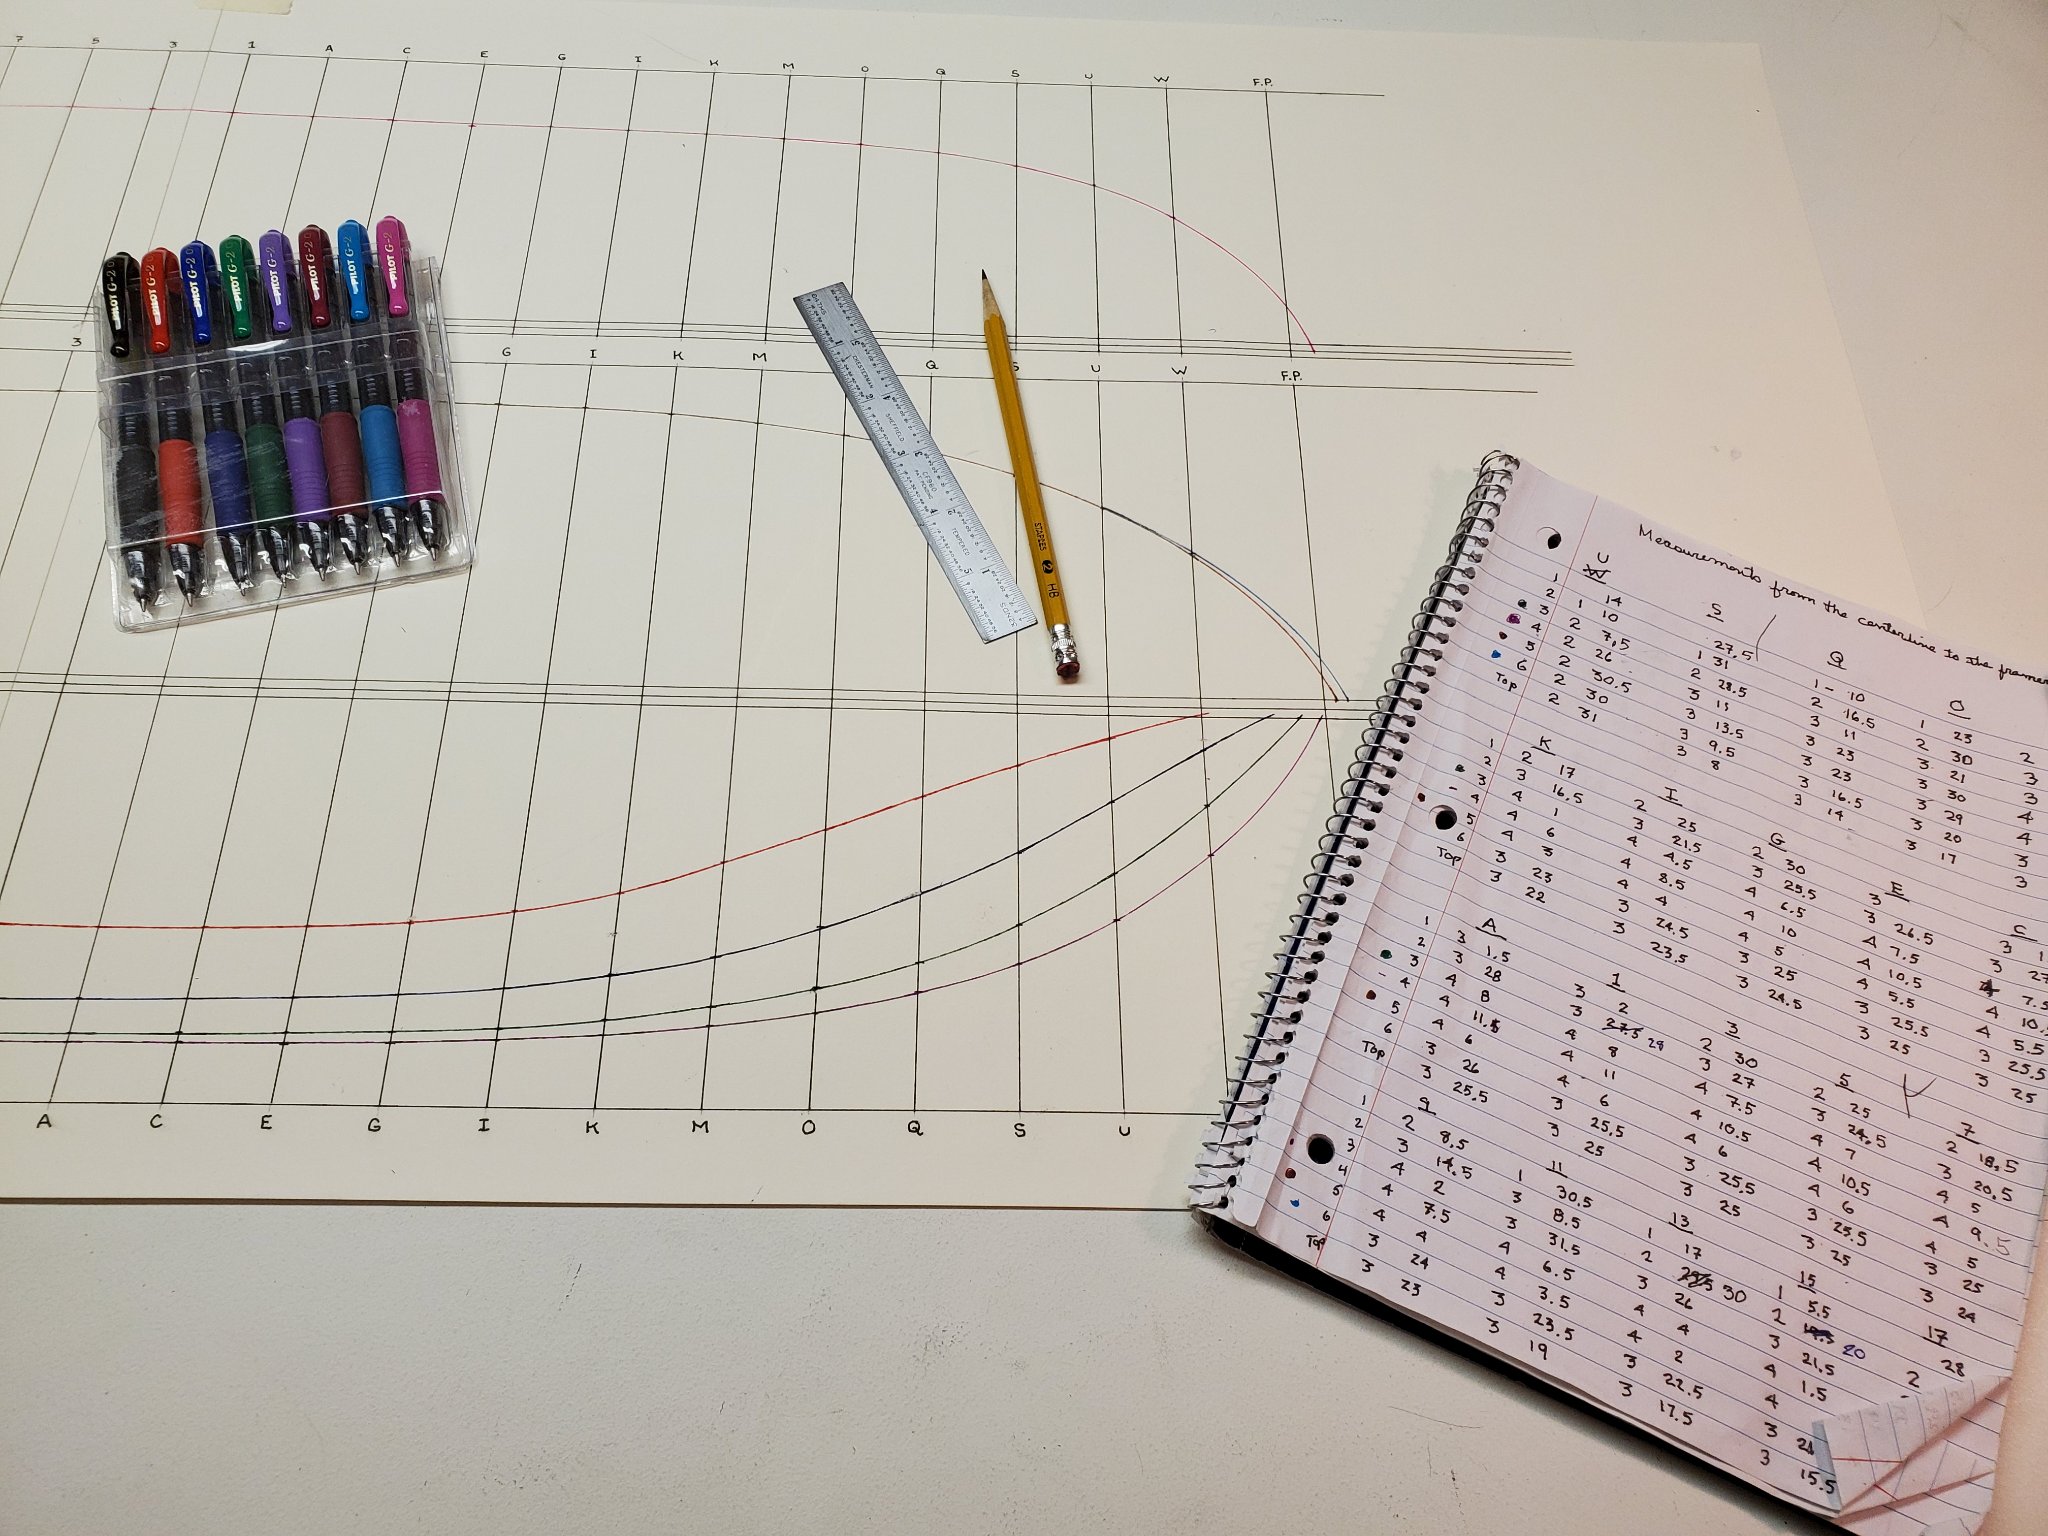
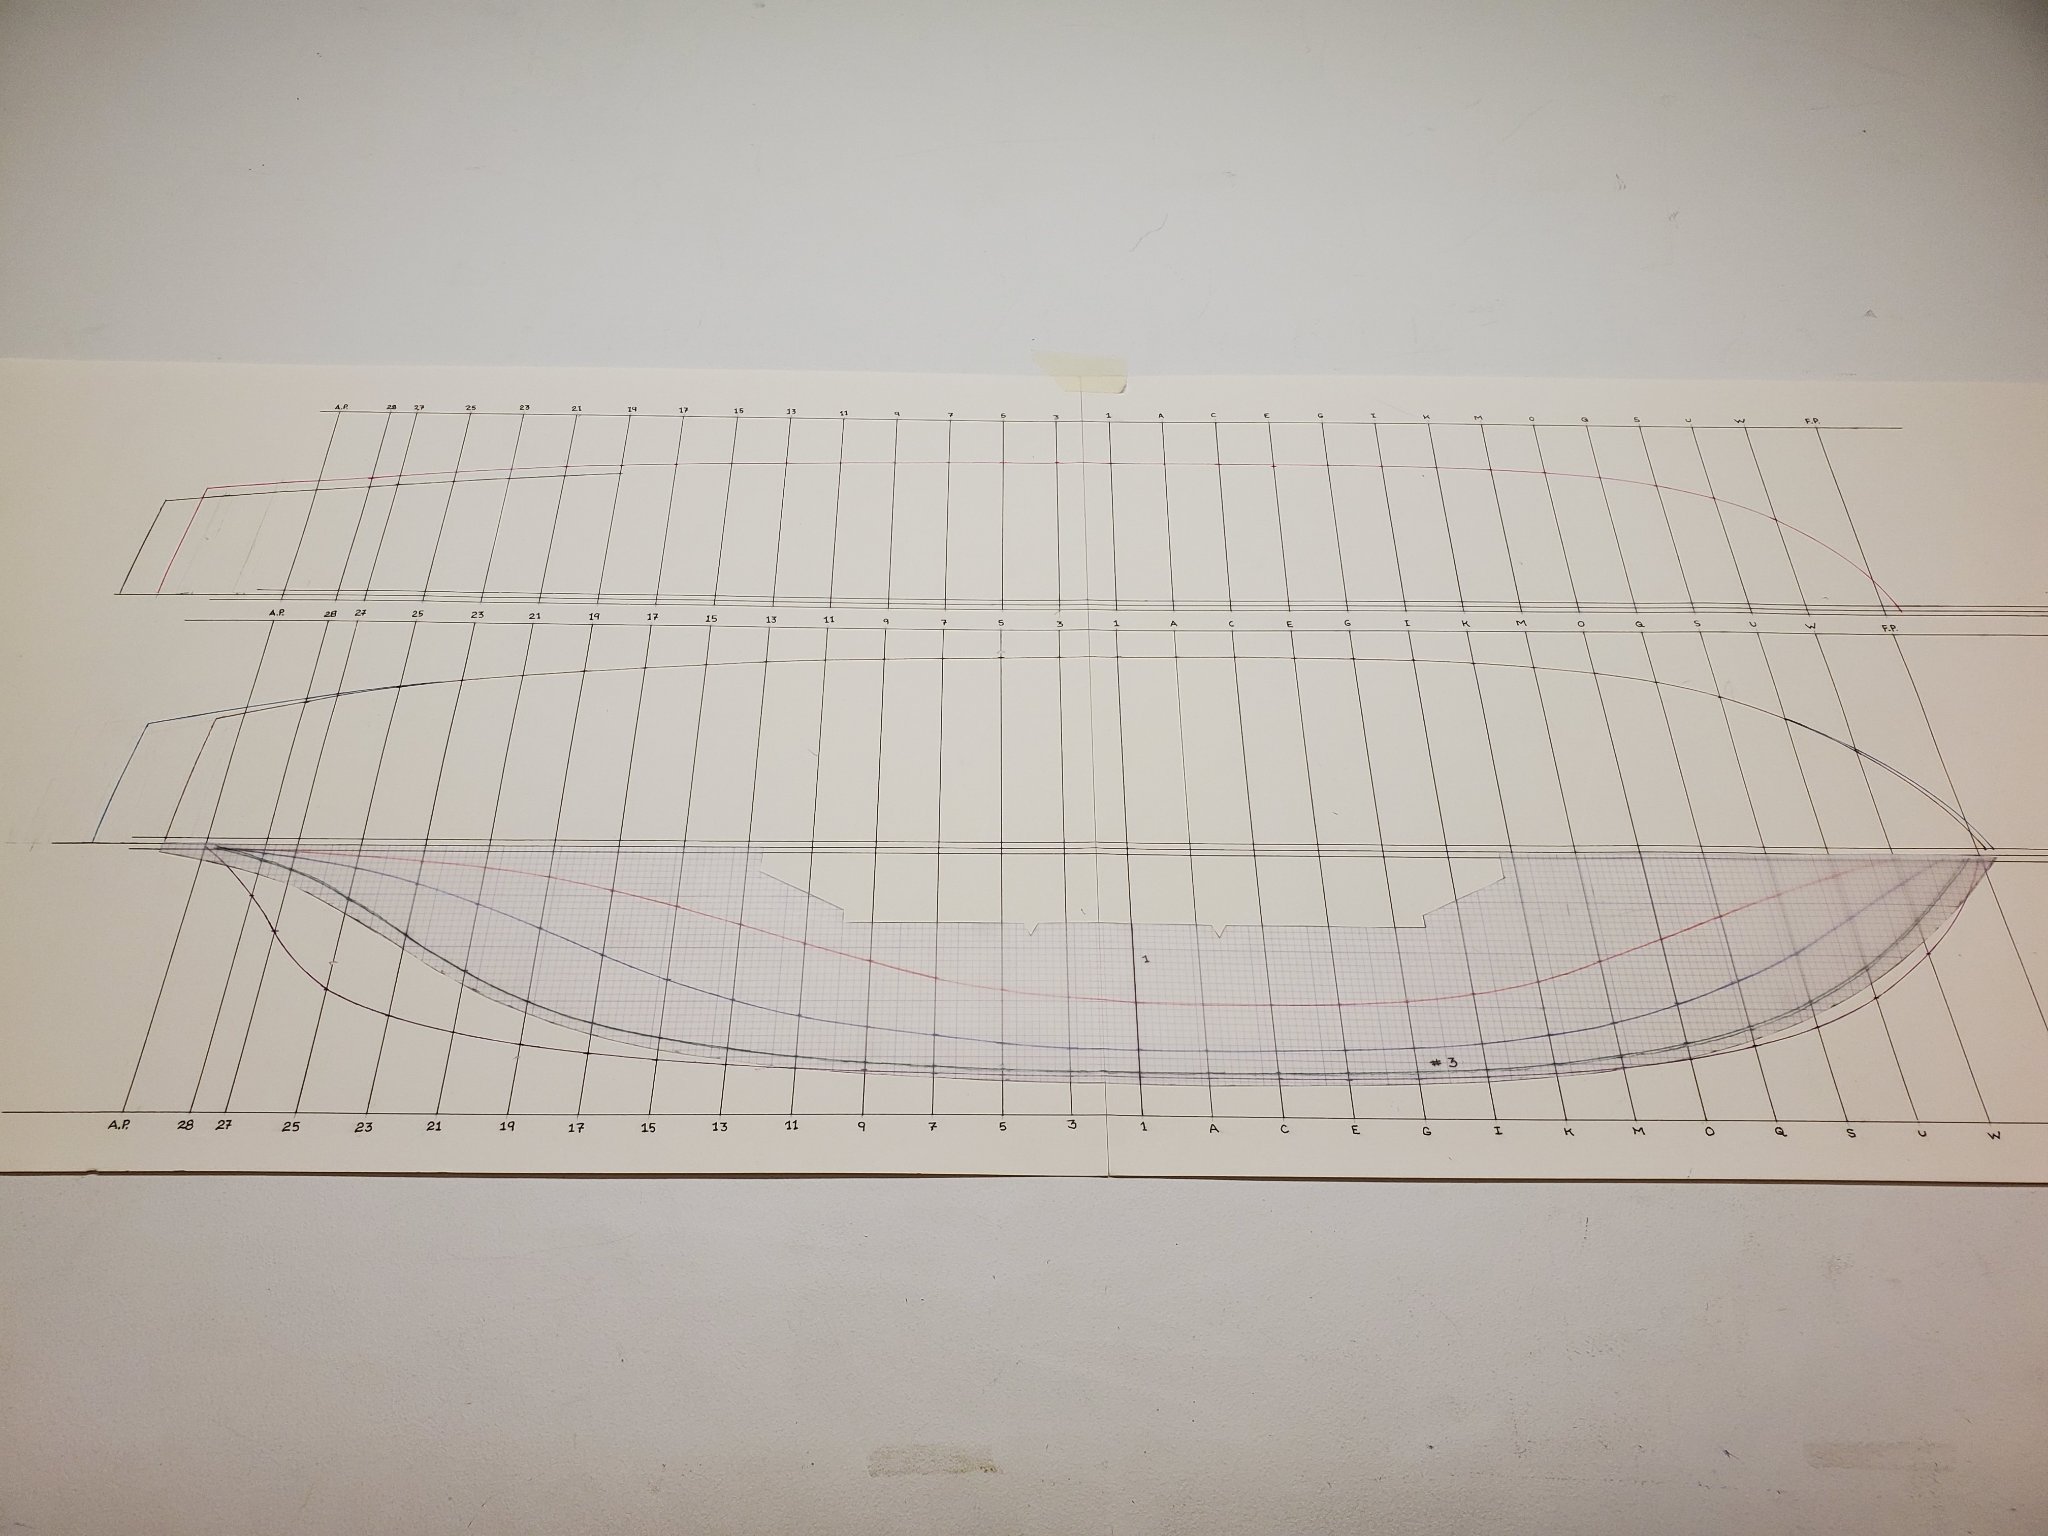
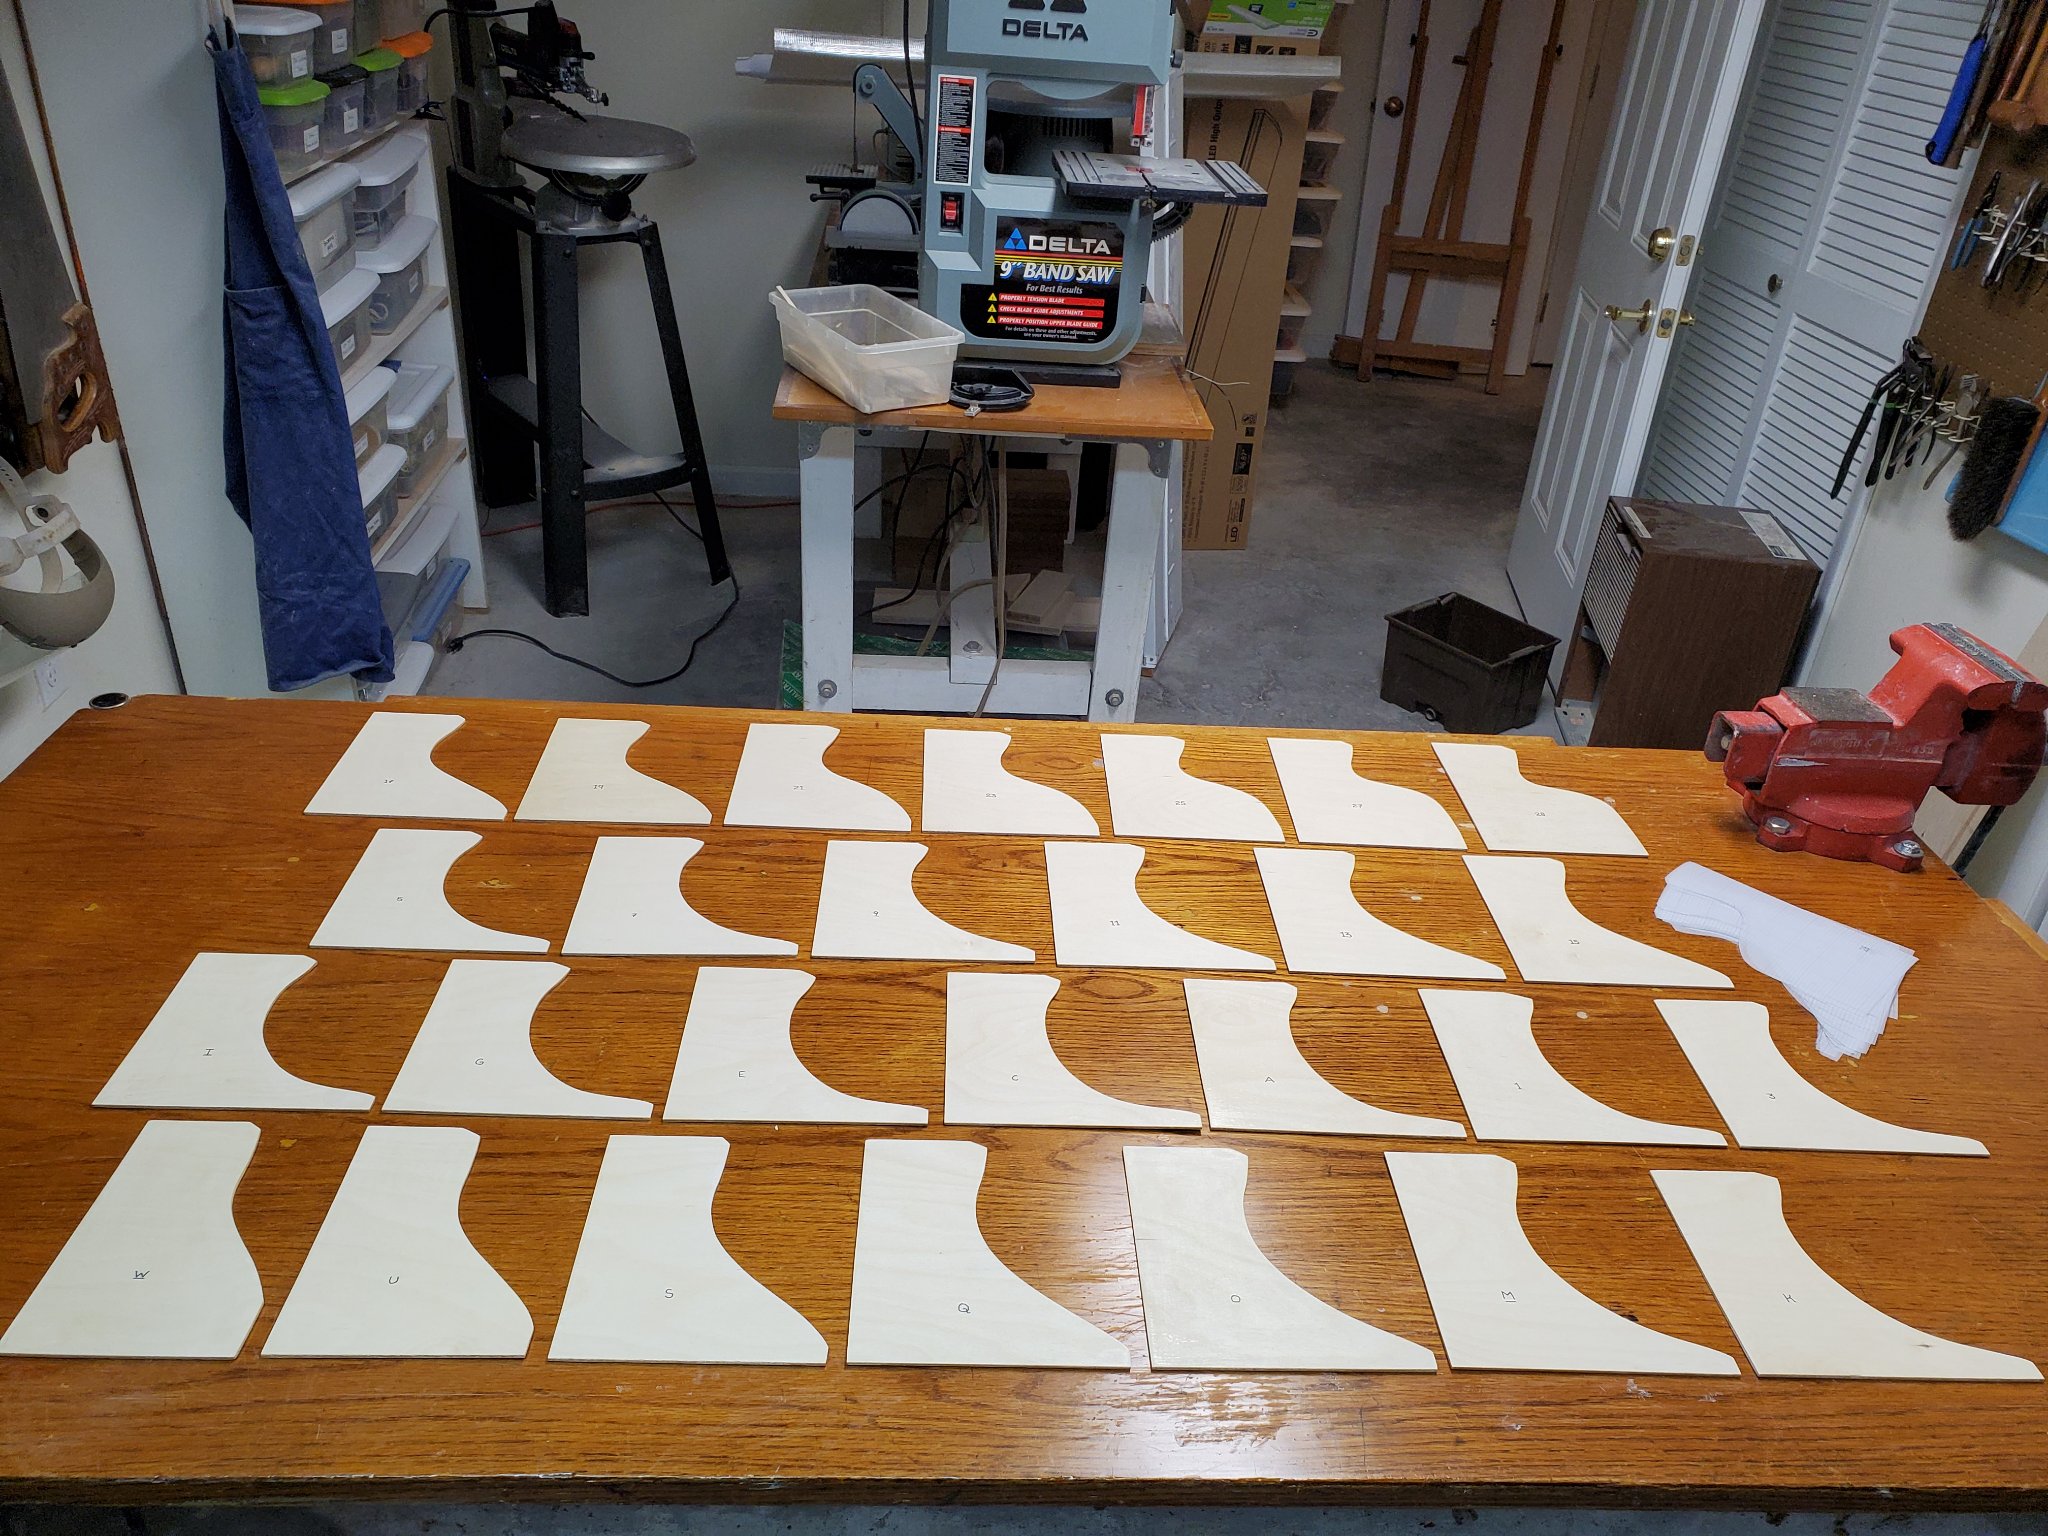
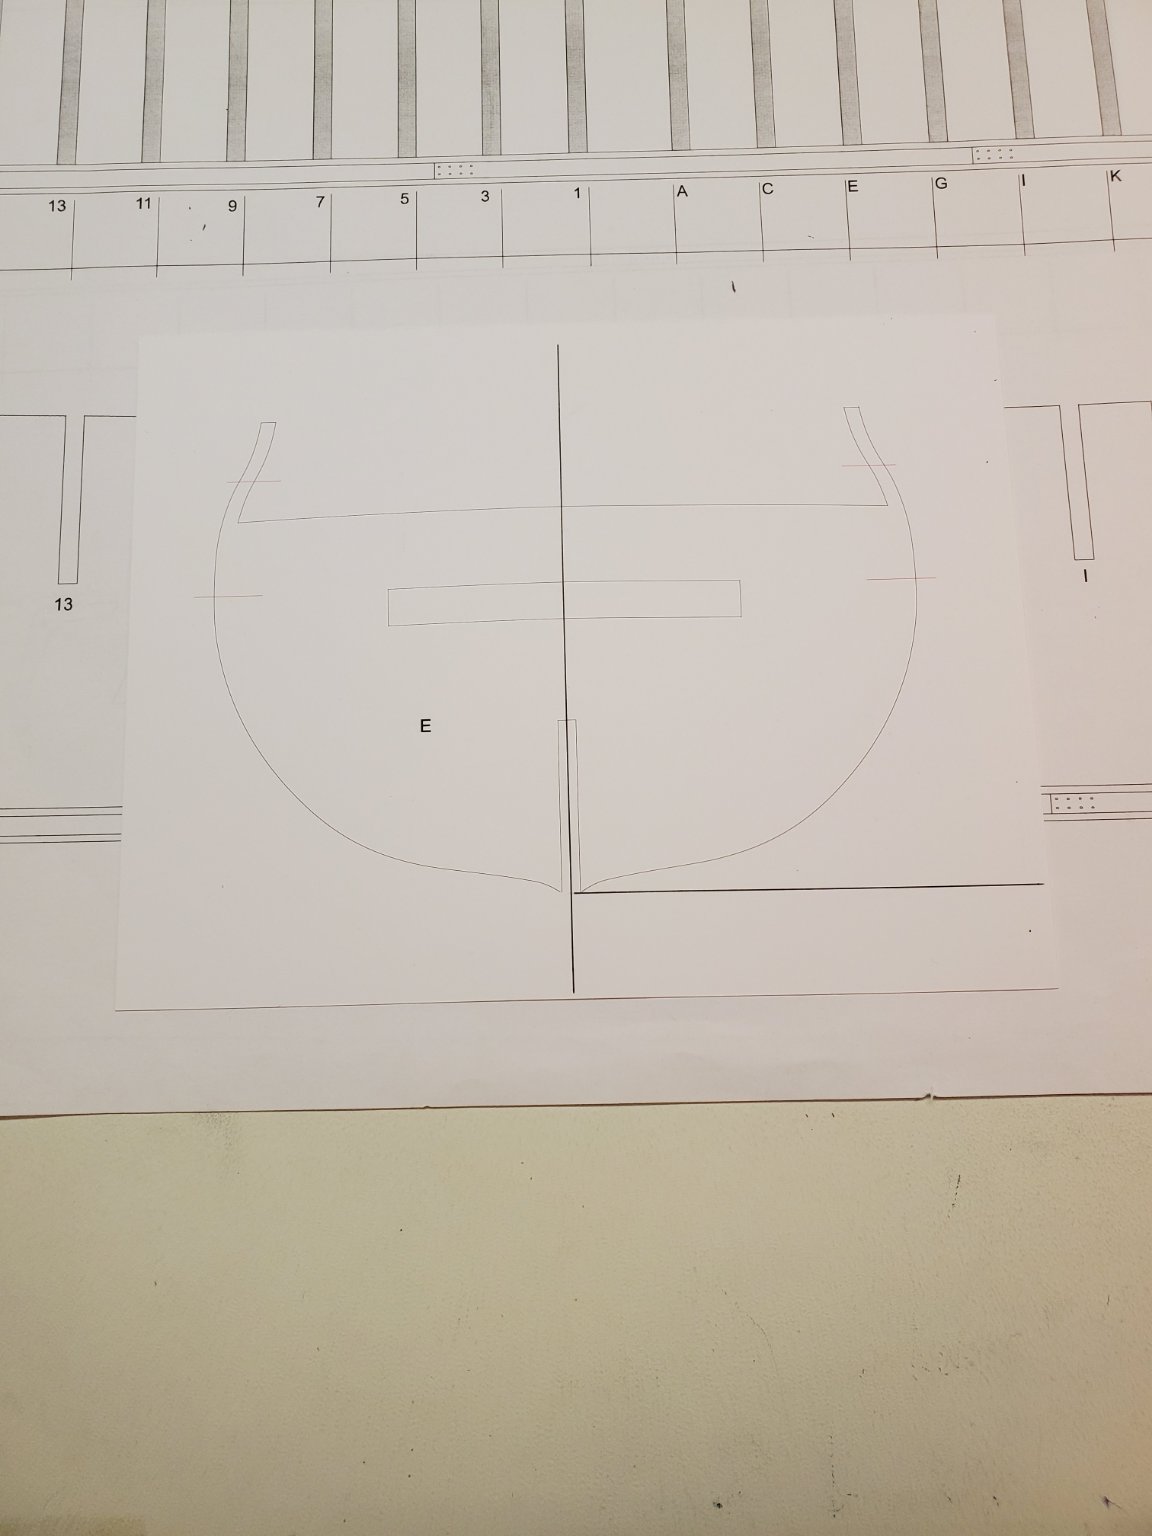
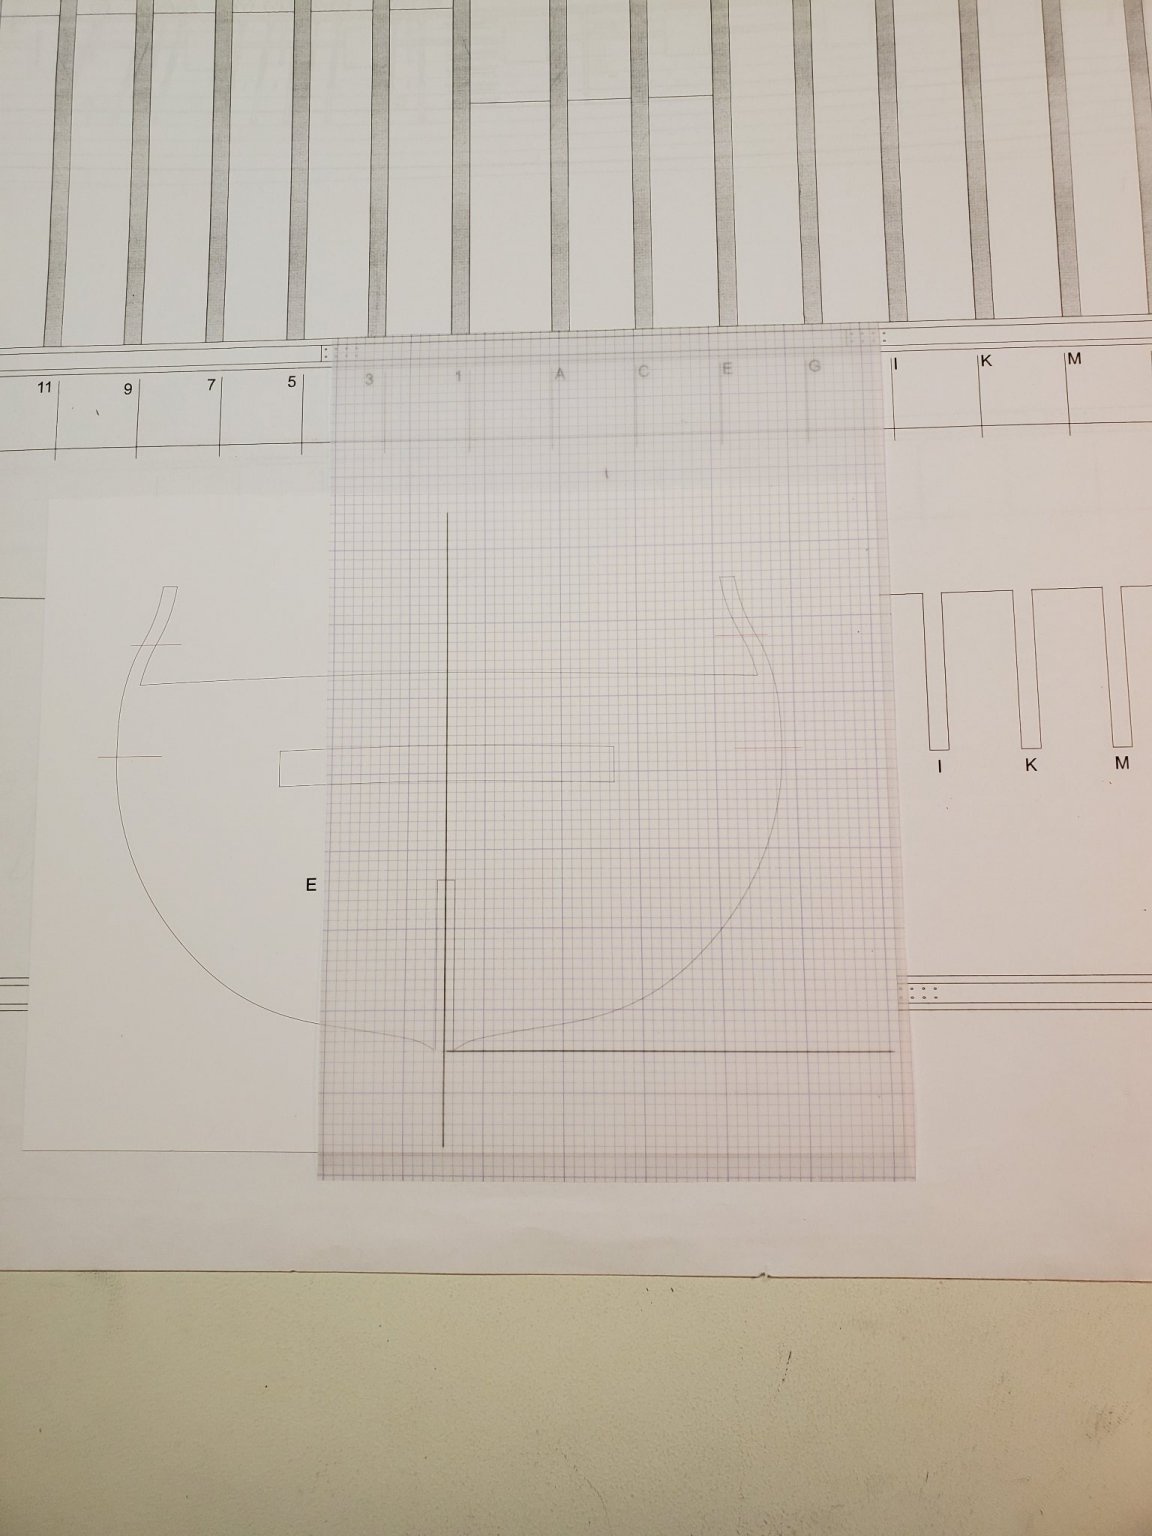
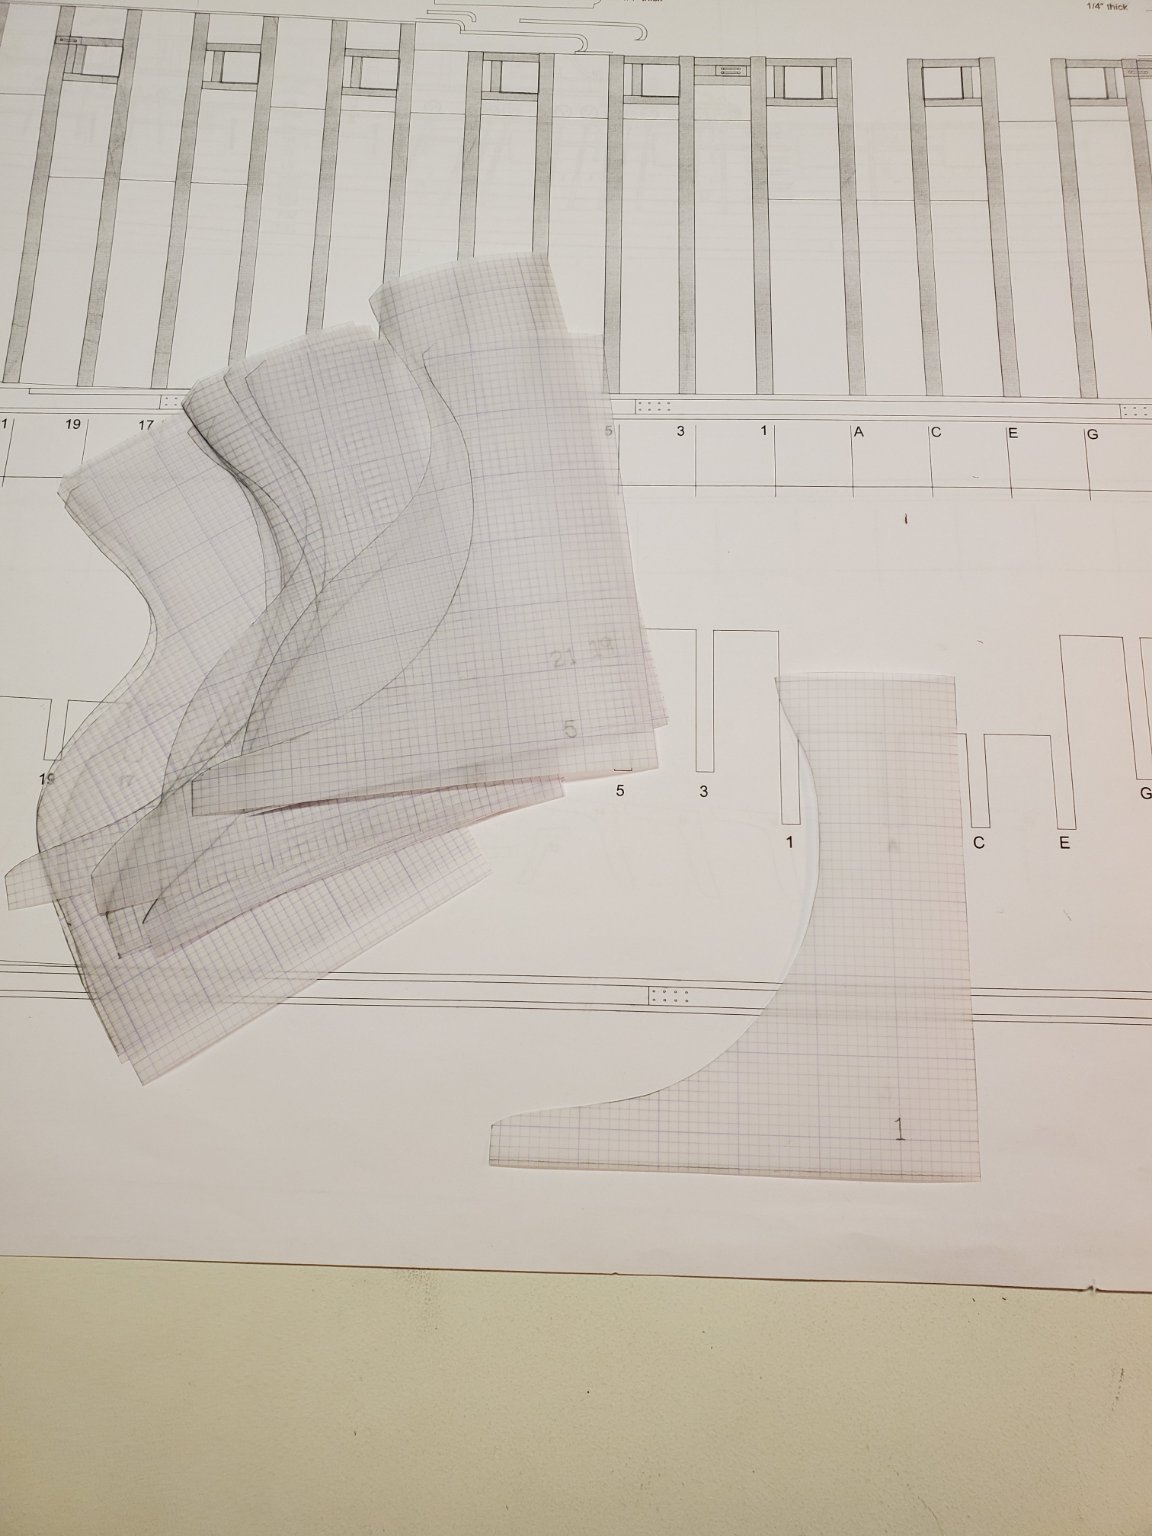
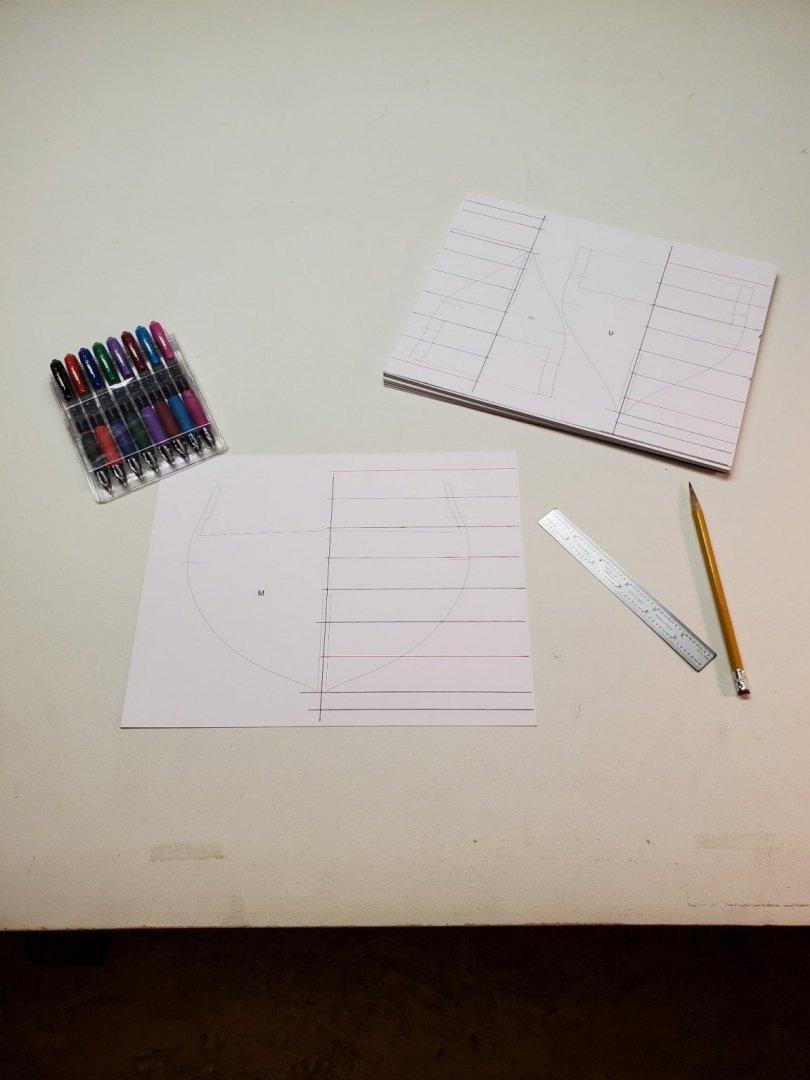
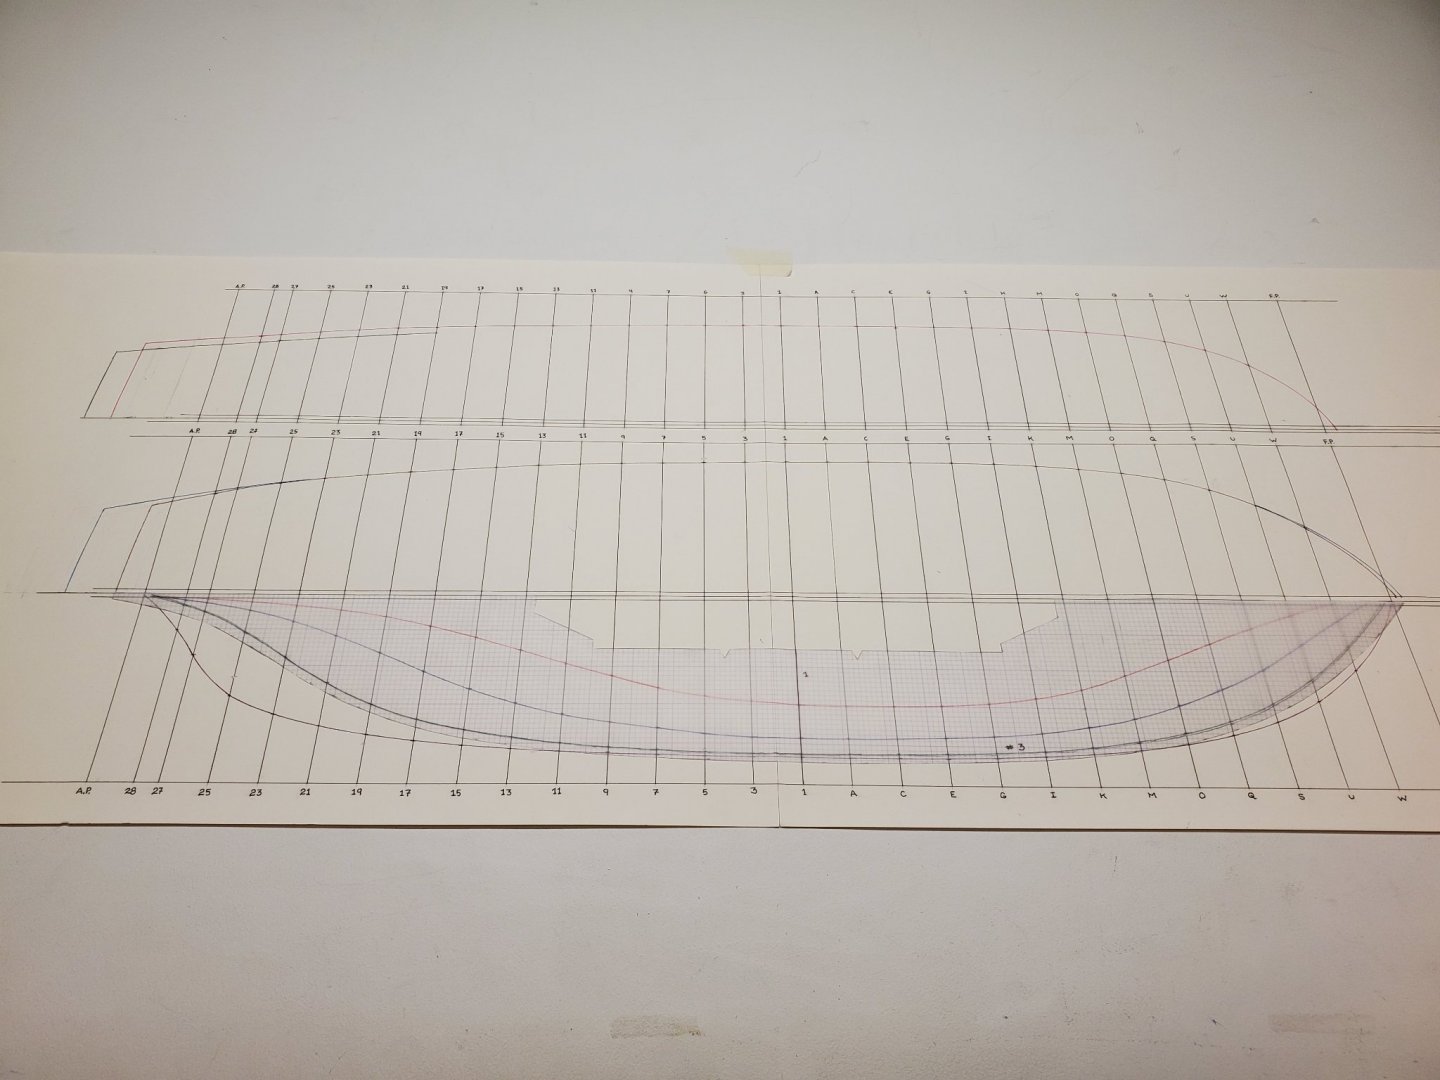
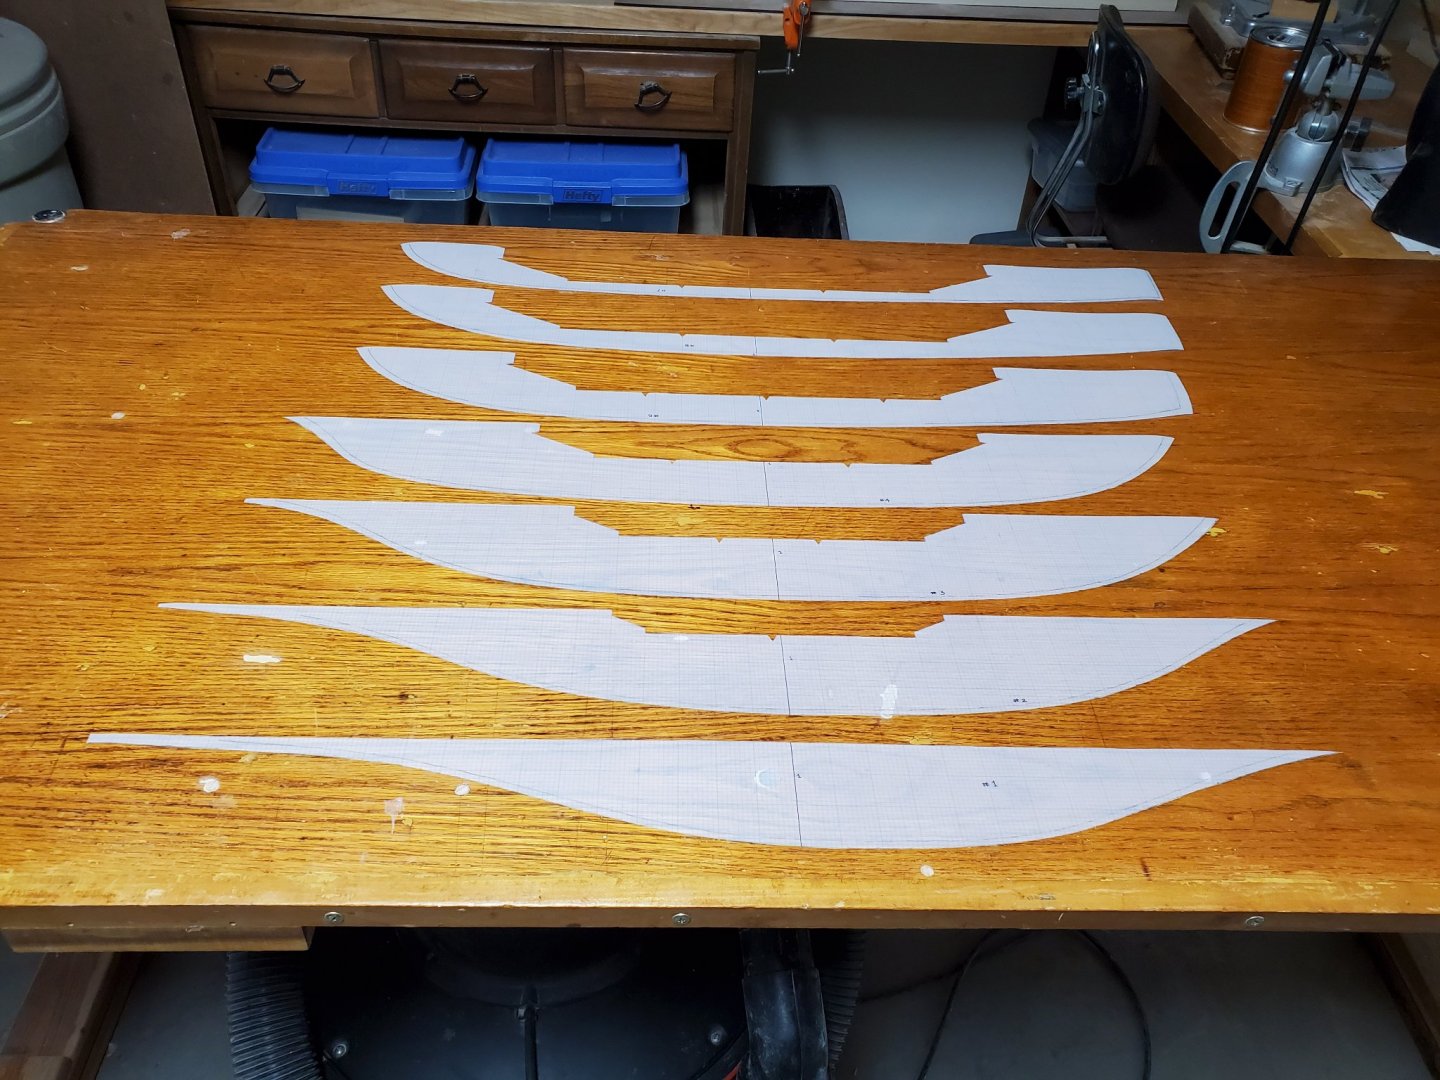
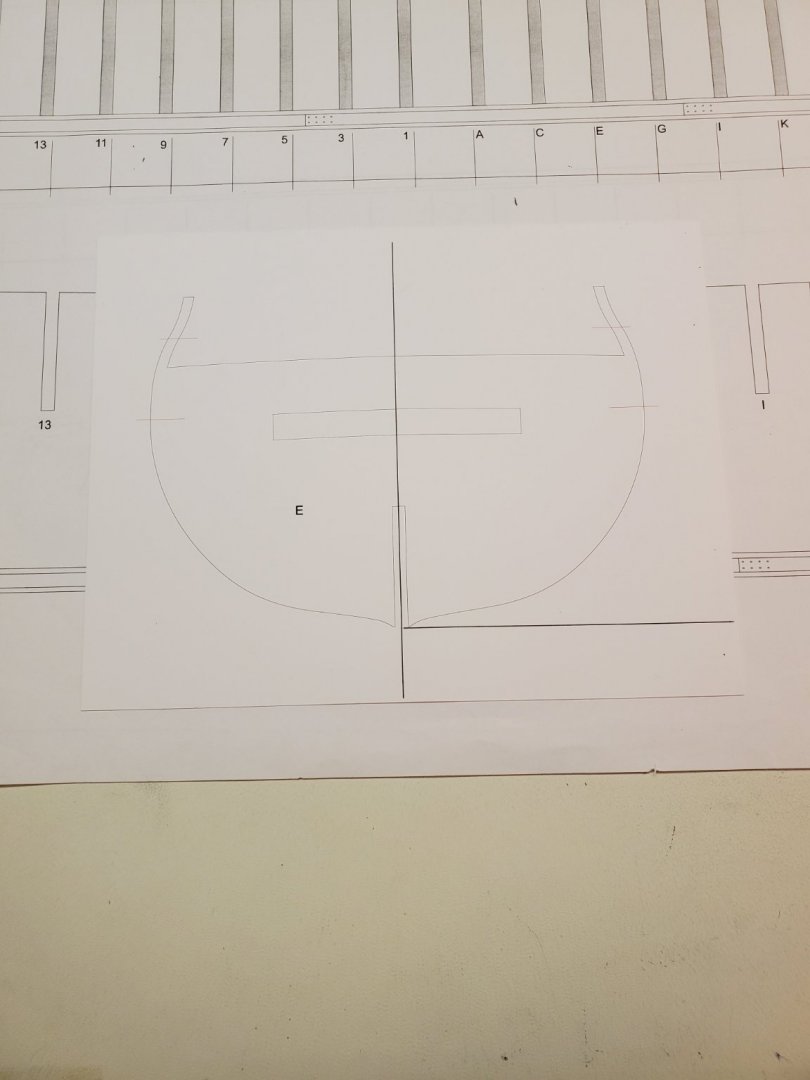
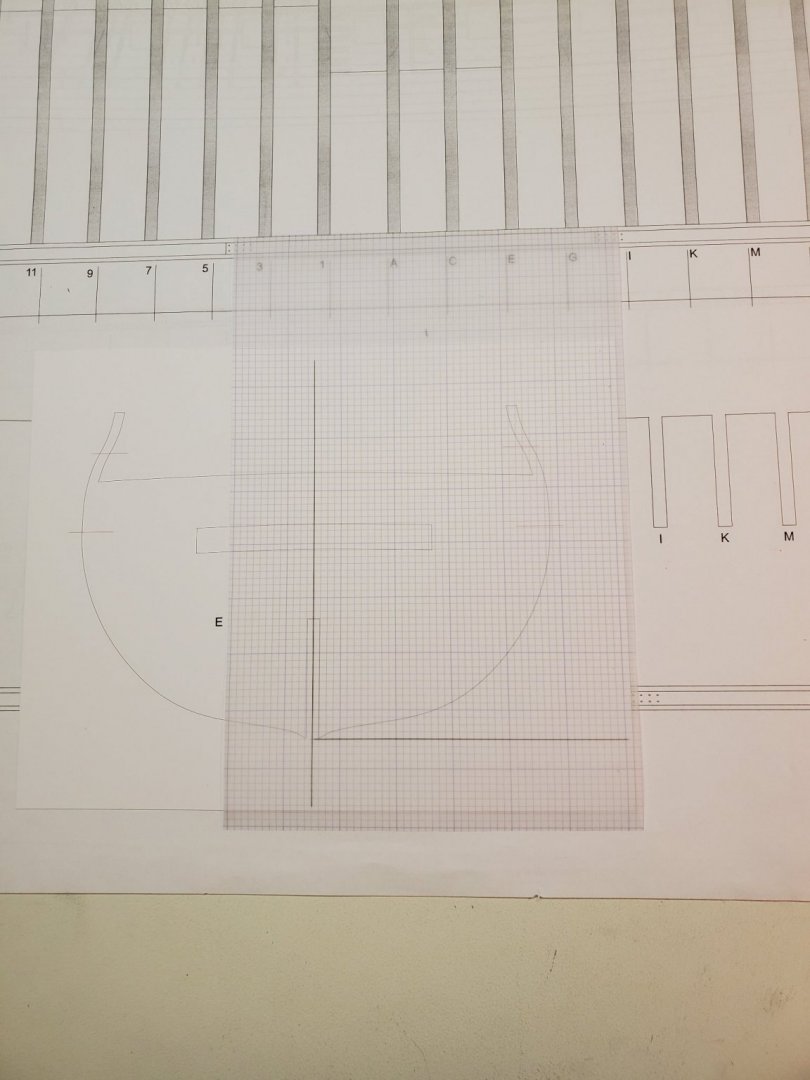
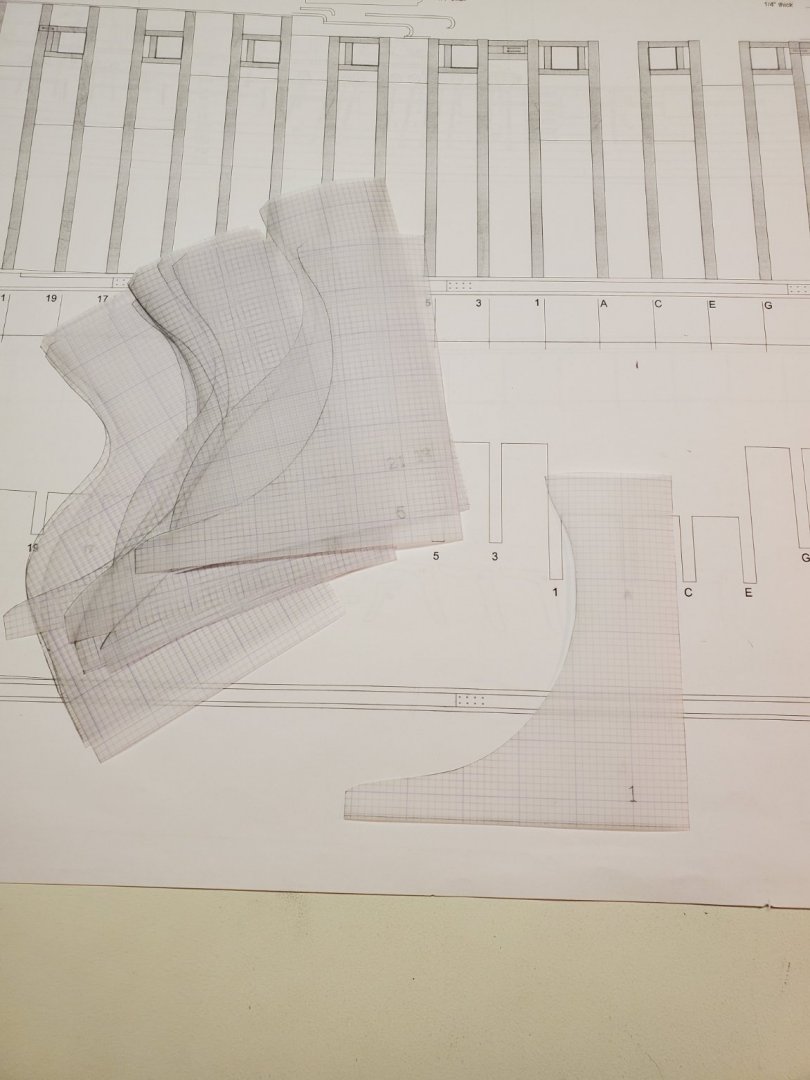
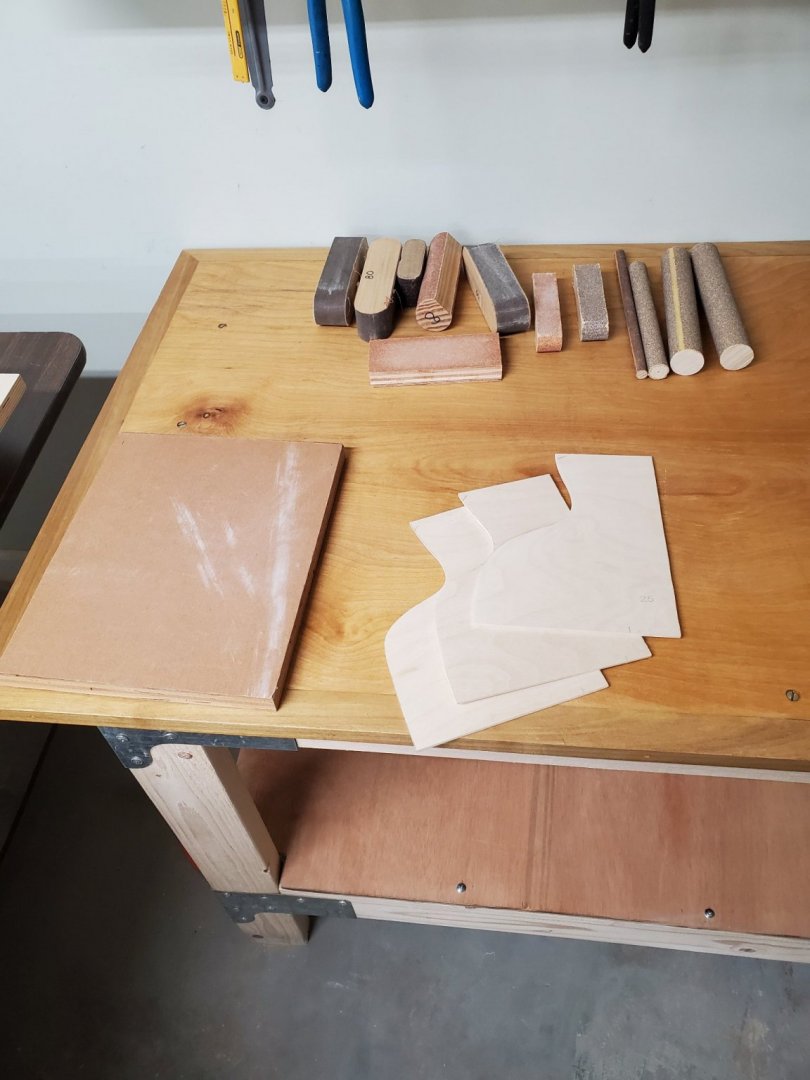
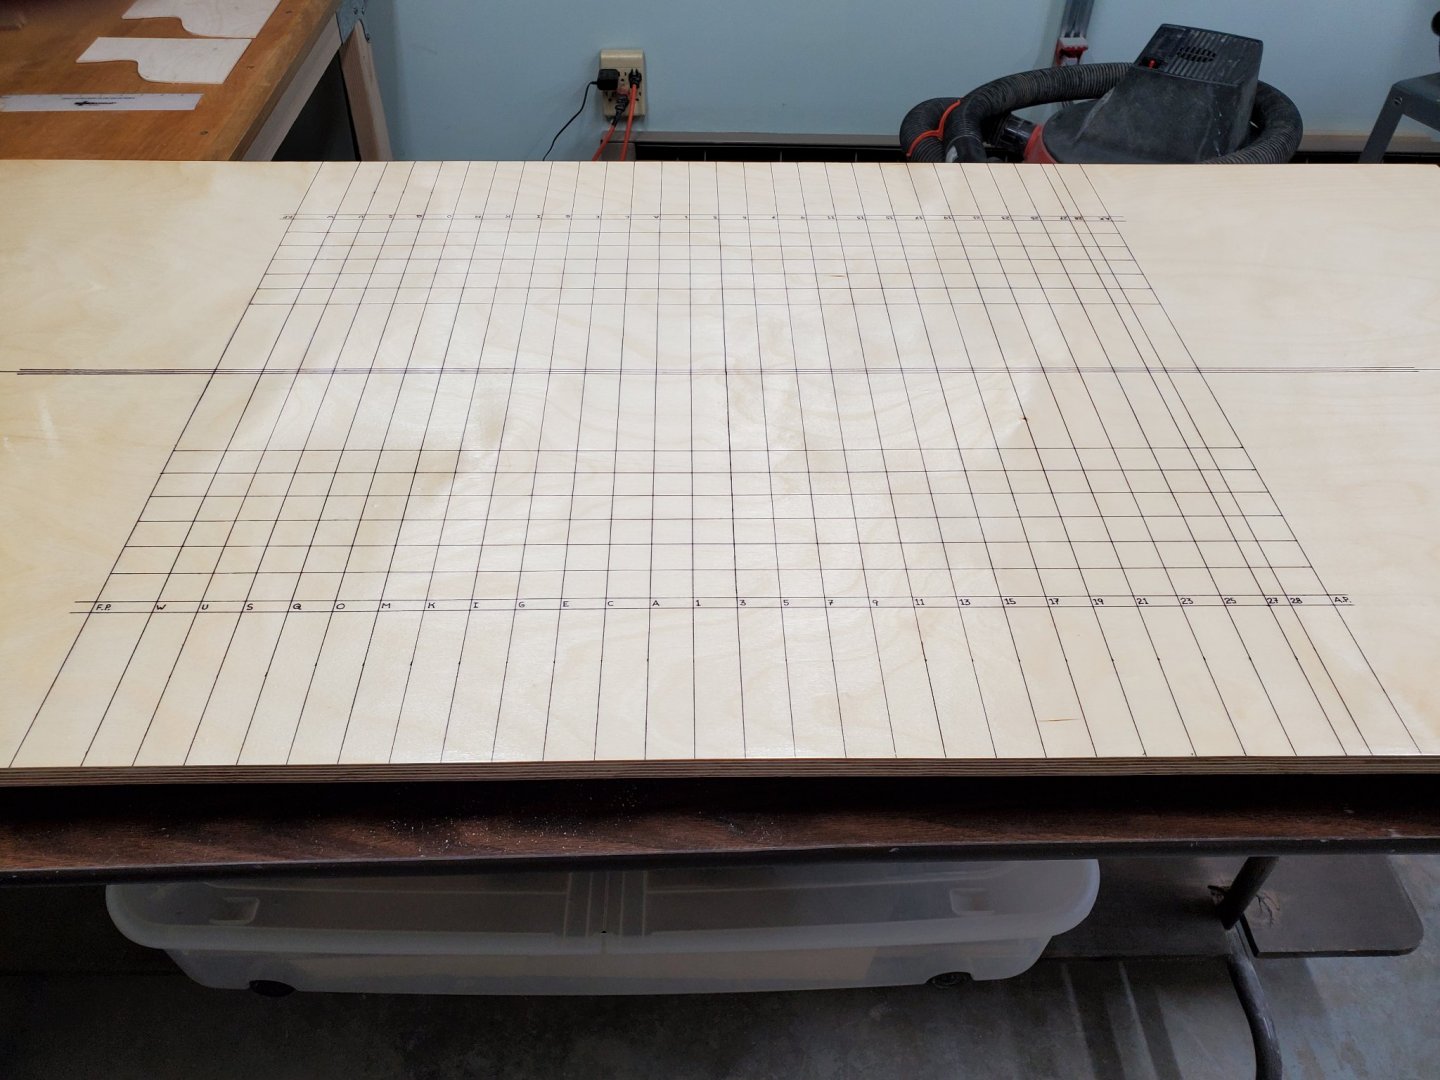
Lift Template Construction With the completion of these lift templates I will, at last, be ready to begin construction of the model. To make these templates I start with the 28 station line drawings of the body plan and carefully draw a vertical centerline. Then I draw a horizontal line that marks the bottom of the keel. That line includes the 1/16" I add for elevating the keel above the building board. I draw another horizontal showing where the top of the keel is. This line is also the bottom of the first lift. Next, starting from that line, I draw horizontal lines, 1" apart going up. These are the lift lines looking end on. Each line is drawn using a different color. I bought an eight color set of Pilot gel pens that worked quite well. After these lines were drawn I measured from the centerline outward to the line that delineated the shape of the hull. I did this for all lift lines on all 28 station line drawings. There were over 190 measurements. Now I had to plot these on a half breadth plan. Actually it was a hybrid plan I made using three half breadths. It was just easier for me to see the lines this way. Photos 3 and 4 show this. It is VERY IMPORTANT to plot the widest measurement of each lift. As you go up the widest mark will be on the top of the first several lifts. When you get to the tumblehome the widest measurement will be on the bottom of the lift. Always check because any mistake can lead to wood cut to the wrong dimensions. After all these lift template lines were plotted it was time to trace their shape on the 8 grids per inch Mylar. I ALWAYS allow for an extra 3/16" to 1/4" for much of the lift, and as much as 3/8" or more to the bow and stern. You really don't want to be too short or too narrow. Excess wood can be easily removed, but the other way around can cost you wood, or worse, force you to start over again. Care with drawing the Mylar templates is an absolute necessity! Photo 4 shows a completed template, cut inside and out, over the half breadth drawing. One of the things I've done to help me in this layout work is to draw the lift lines on a copy of Chuck's external sheer drawing. Photo 6 shows the completed set of lift templates. This marks the end of my preconstruction work, so now it's time to make some sawdust.


-
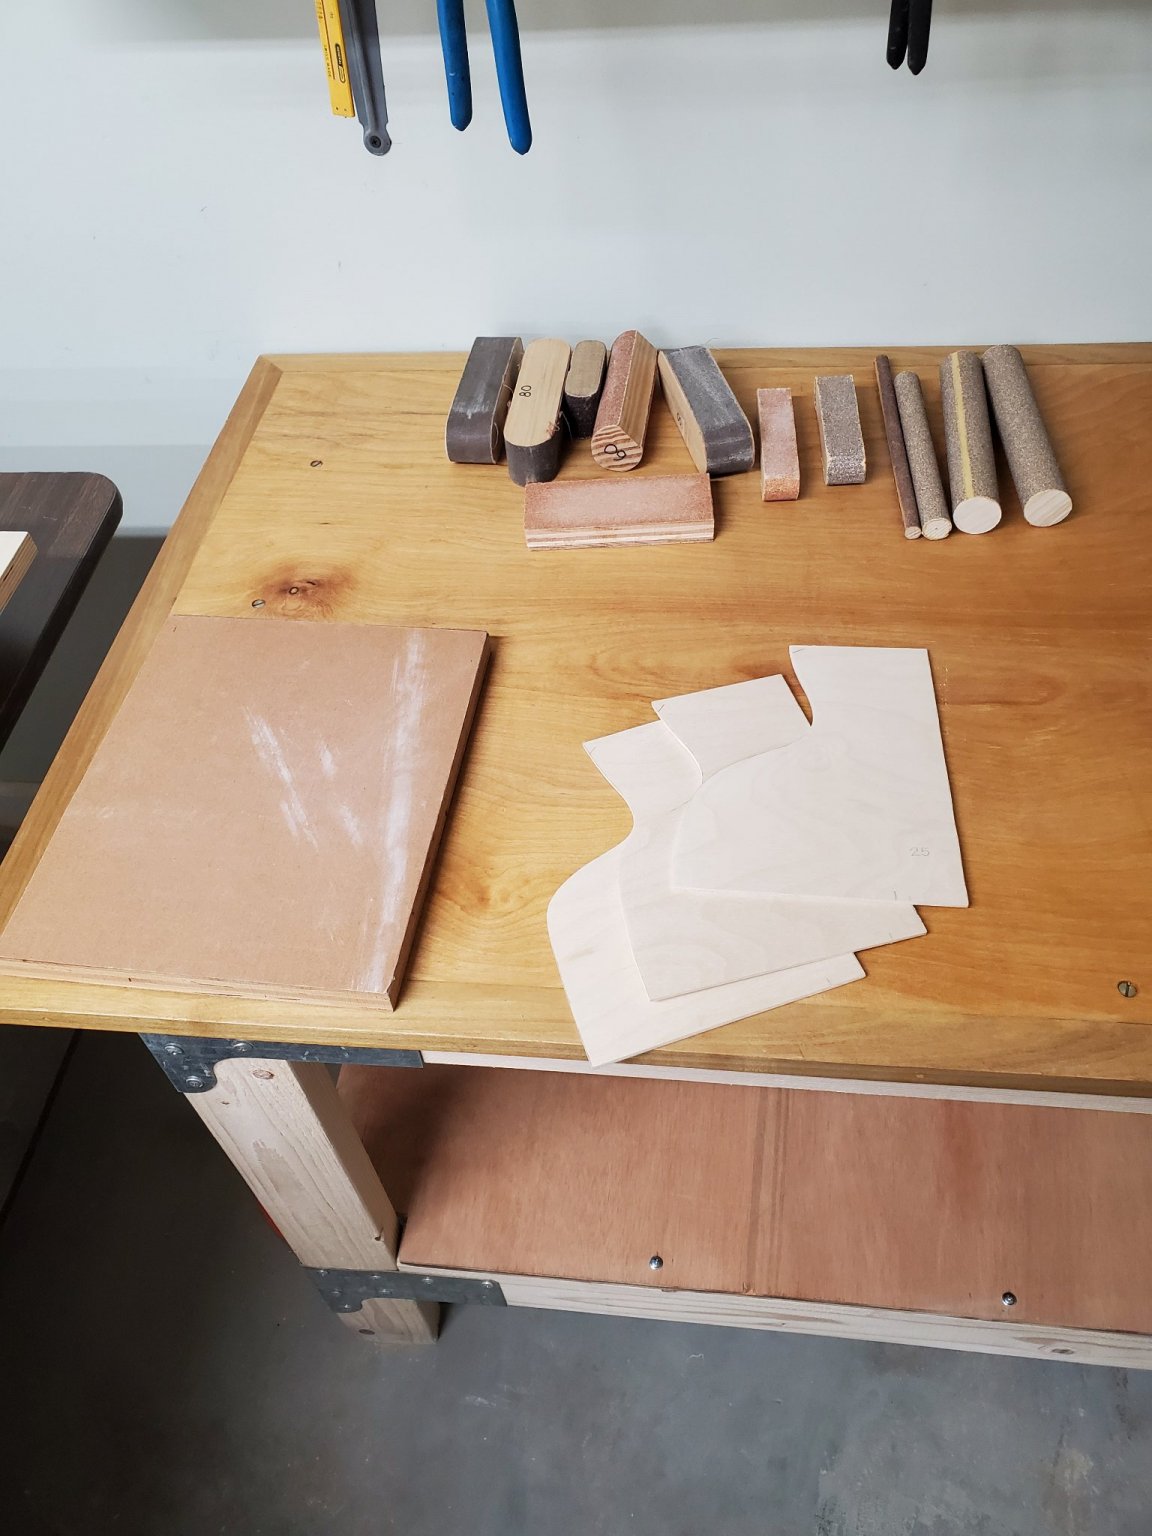
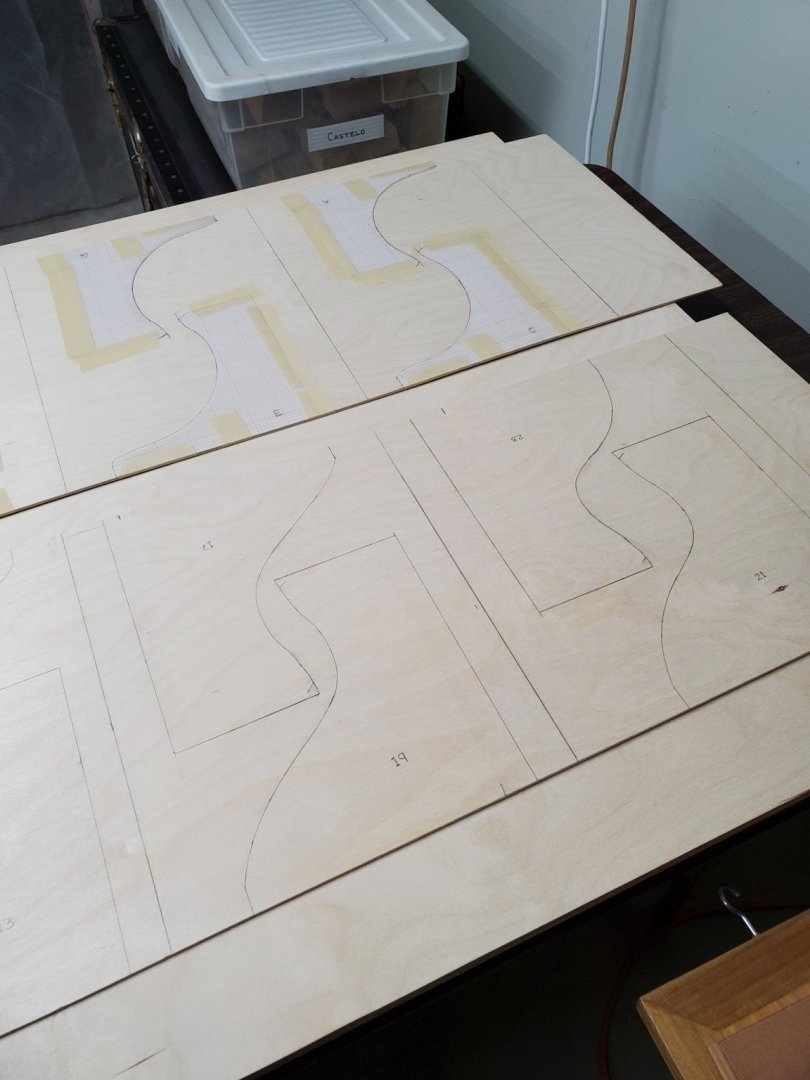
It took a while, but I finally completed the templates. There was a lot of work to get them just right. I had to check them and recheck against the Mylar cutouts, and then see how they looked next to the adjacent templates. Once I was satisfied they were accurate I then proceeded to finish them with three coats of polyurethane and a final 220 grit sanding. I seal the templates with polyurethane to prevent moisture absorption that might warp them, and to make it much easier to clean pencil lead from them.

-
You bring up an interesting question Christian. Exactly what did the Winchelsea look like later in her service. When were major changes done to the ship, especially rigging and armament? I would be very interested to hear what my fellow model builders know about this. Perhaps Chuck might want to respond to this query.
-
Welcome to the group Frank, and have fun with this new project. Should you run into any problems there are a lot of fine model builders here to help you out. Just ask.
-
It's 30 minutes before the New Year starts and I'm so tired I doubt I'll see it in awake. Before drifting off to dreamland I want to wish all my fellow model builders only the best for 2021. Lord knows this last year is one to forget. Work hard on your model, be happy, and stay safe. Don't let your guard down with the Covid-19 virus. Yes, a vaccine is coming, and we can see the end of the tunnel. Let's not have a pile-up before we exit it.
-
I took the time to read through your build log for the first time, and am I ever impressed. Rusty, you have one beautiful build going. It's gorgeous!
- 642 replies
-
- 2
-
-
- winchelsea
- Syren Ship Model Company
- (and 1 more)
-
Christian, the reason this method isn't popular in Germany, or just about anywhere else, is because it takes a VERY LONG time to accurately form the hull using templates, and it creates a mountain of dust in doing so. You absolutely need to use a canister mask in an air filtered shop room, away from your living area, if you are to attempt such a project. This method of construction causes couples to divorce. Also, there is an enormous amount of prep work required of the model builder before actual construction begins. Right now I'm sanding the many templates needed and drawing the shape of the lifts on Mylar. Only after these things are done can I begin my Winchelsea build. I'm already light-years behind every other model builder in the group. Despite the negative reasons one might consider making a solid hull ship model, it has, for me, a very special appeal. I just love the physical nature of this build method. Taking the very rough shaped hull of laminated lifts and carving it to shape with mallet and chisel (and just about any other power tool you can think of) gets me off. When I look at that glued together block of wood I will see the smooth lines of the Winchelsea just waiting to be freed from its wooden prison. It is, in some weird way, similar to how Michelangelo must have felt when looking at that giant slab of marble, knowing that David was within. Tom
-
Your Winnie is coming along nicely. This will be a fun build to follow.😉 Tom
-
You may have gotten off to a rocky start on this project, but you're making steady progress now.
-
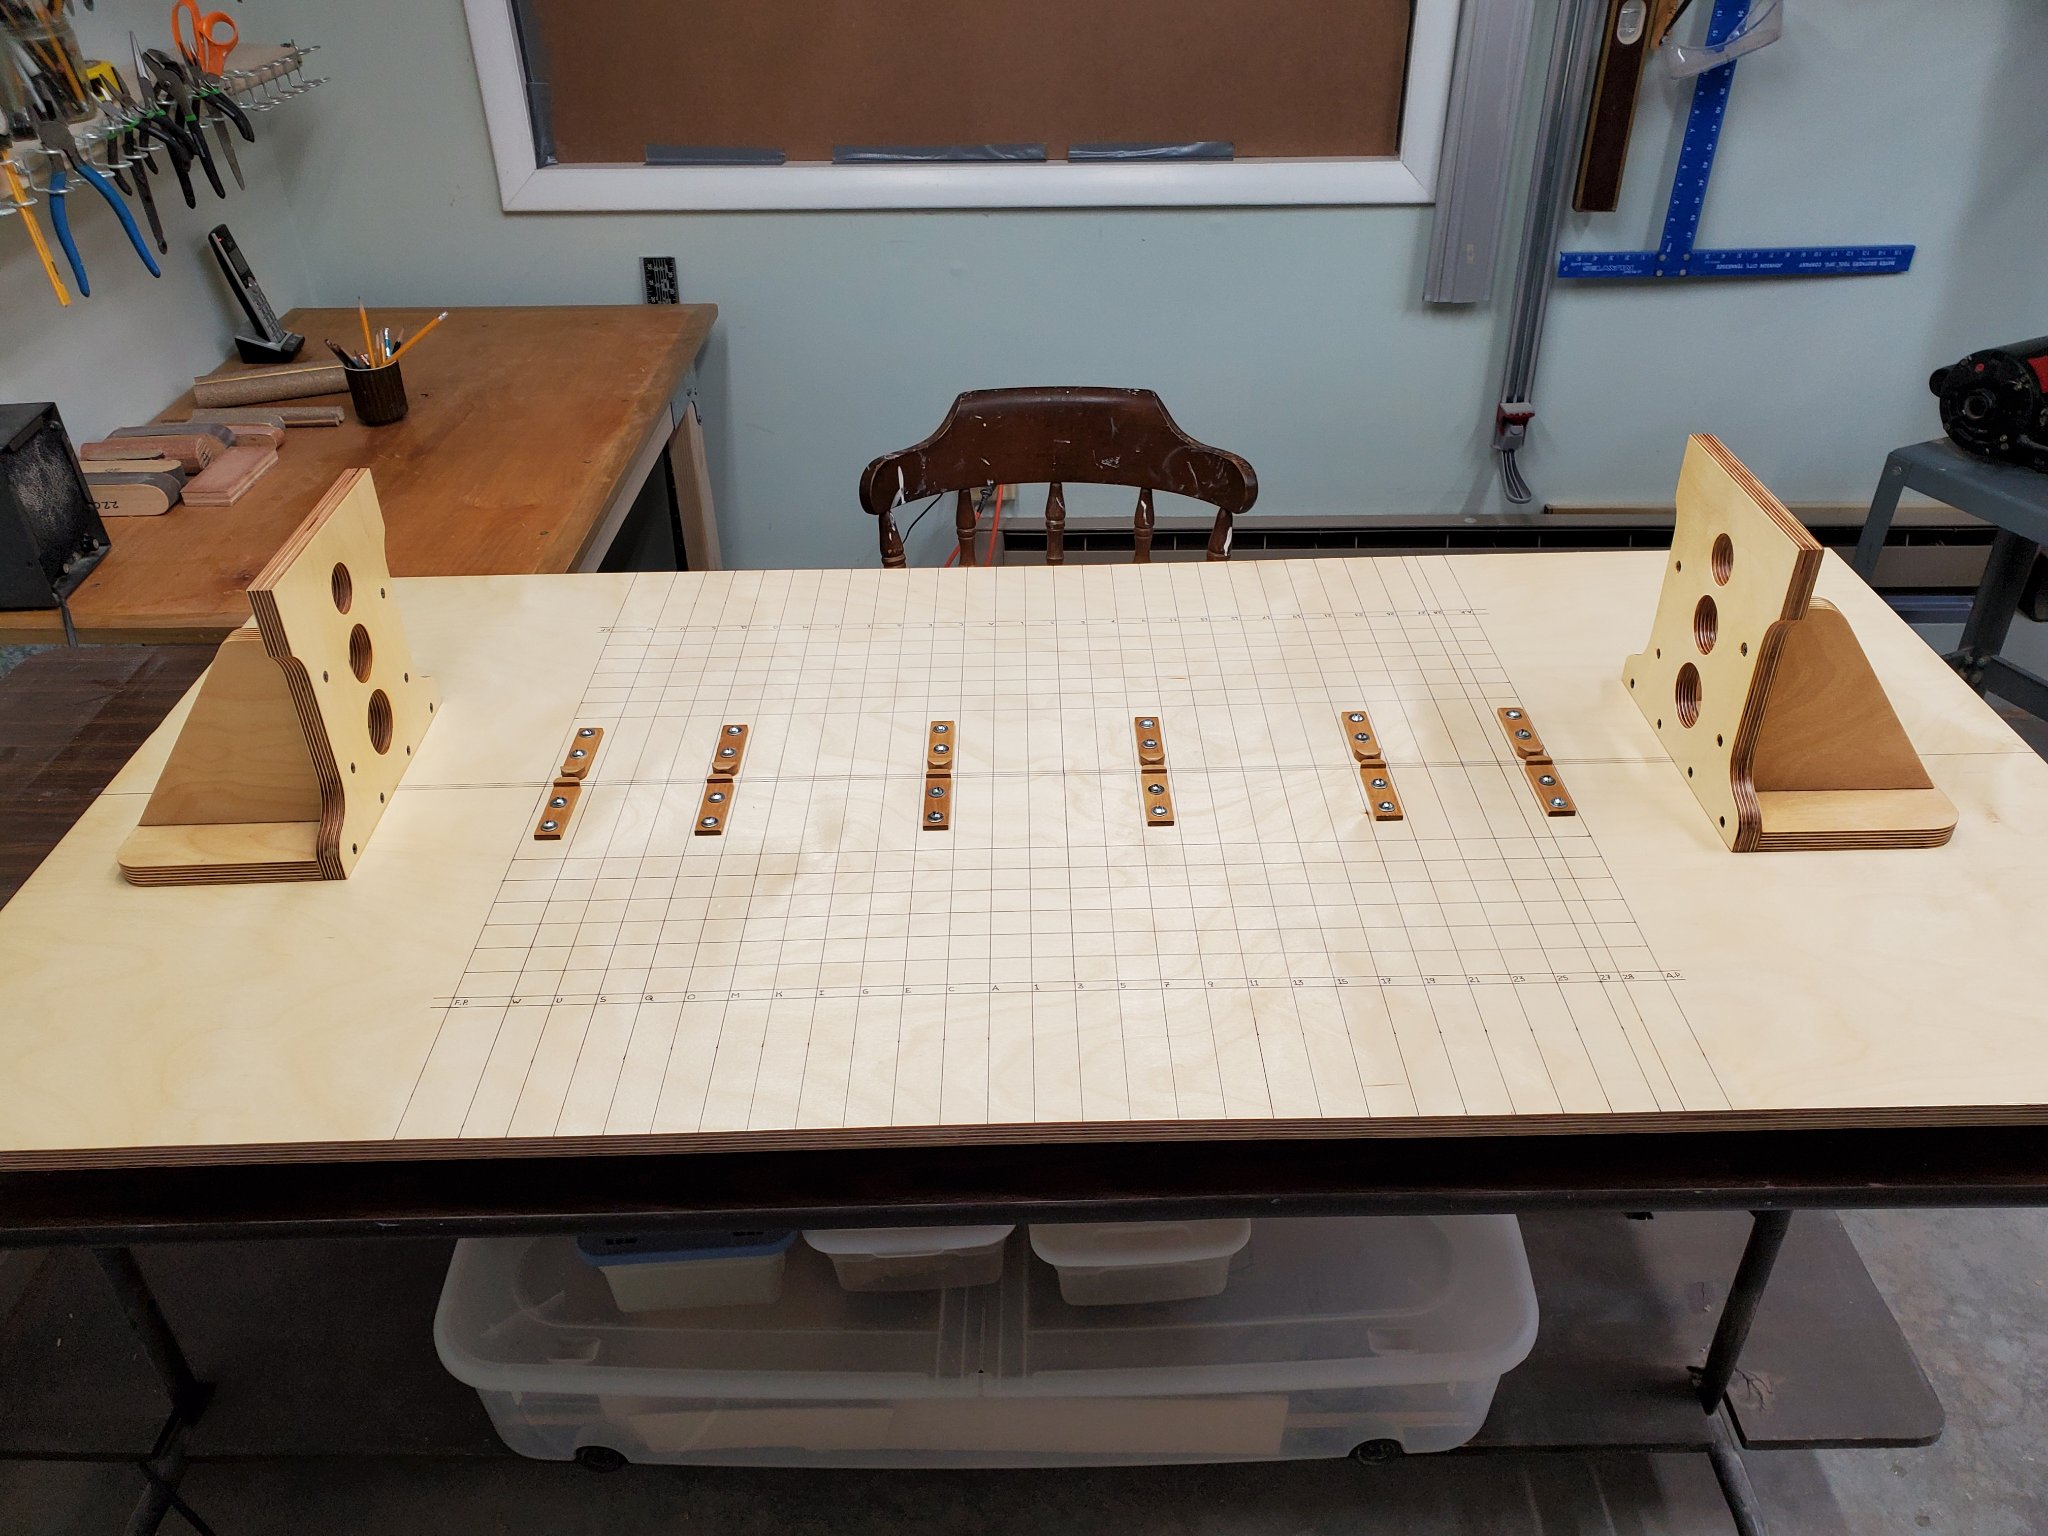
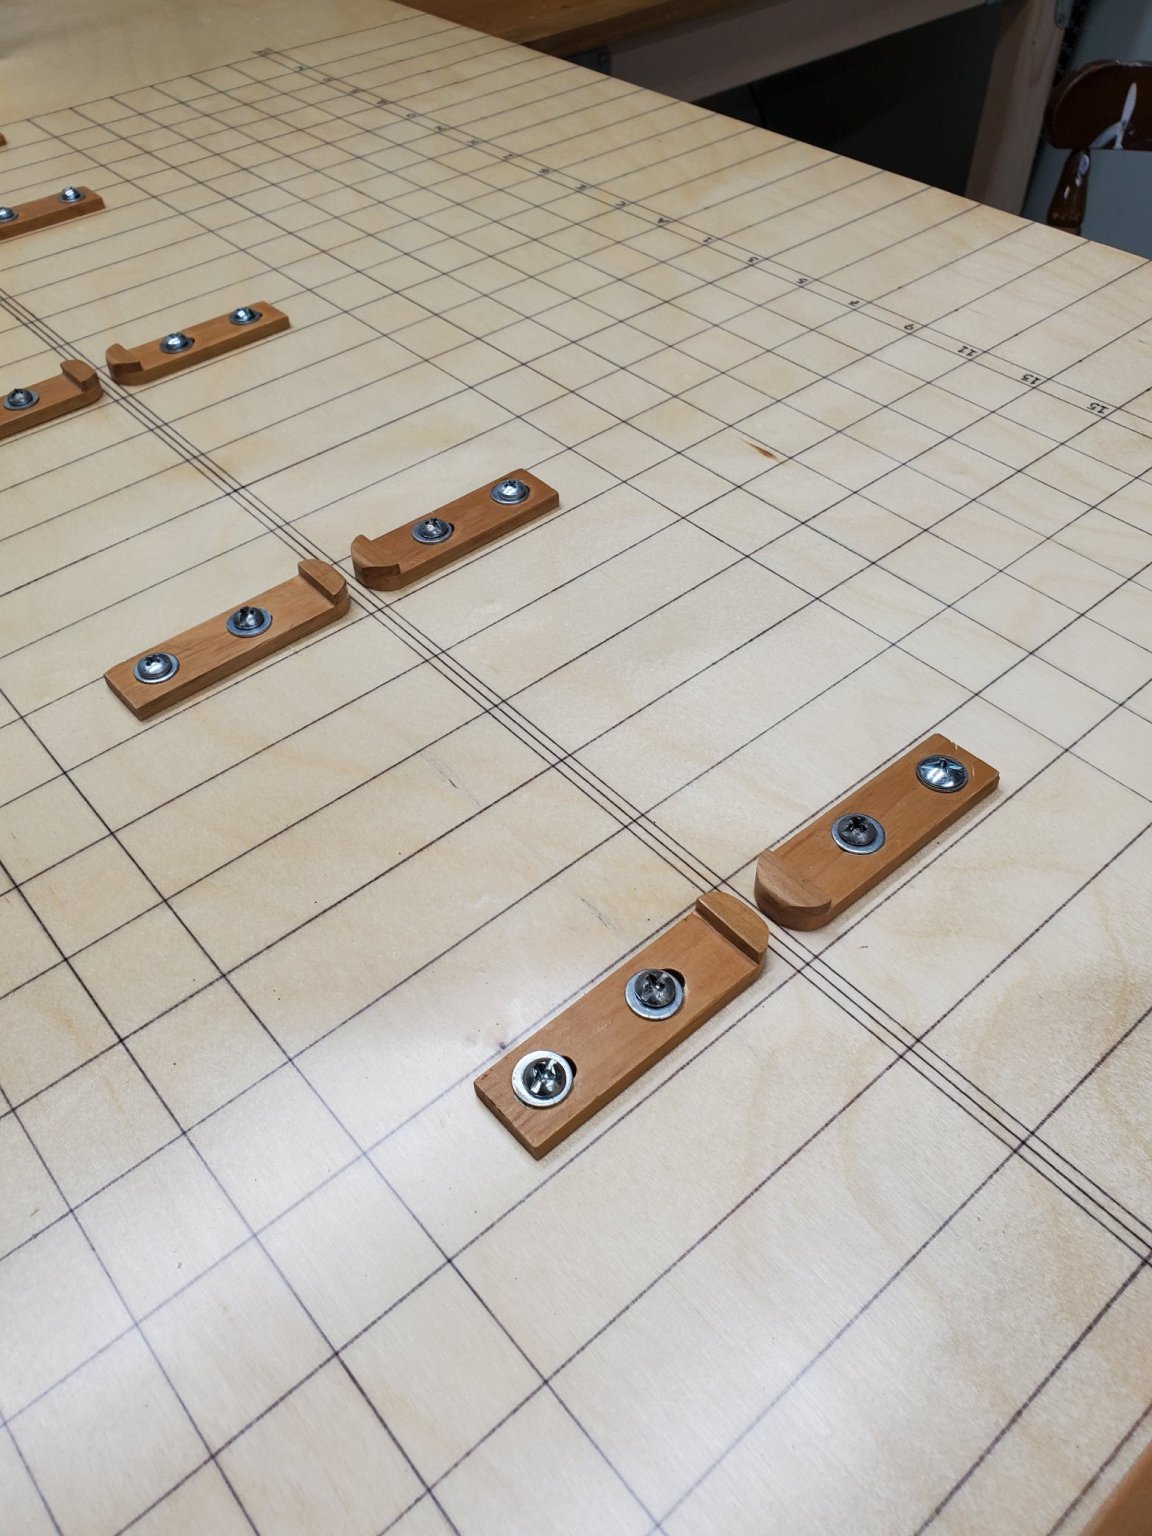
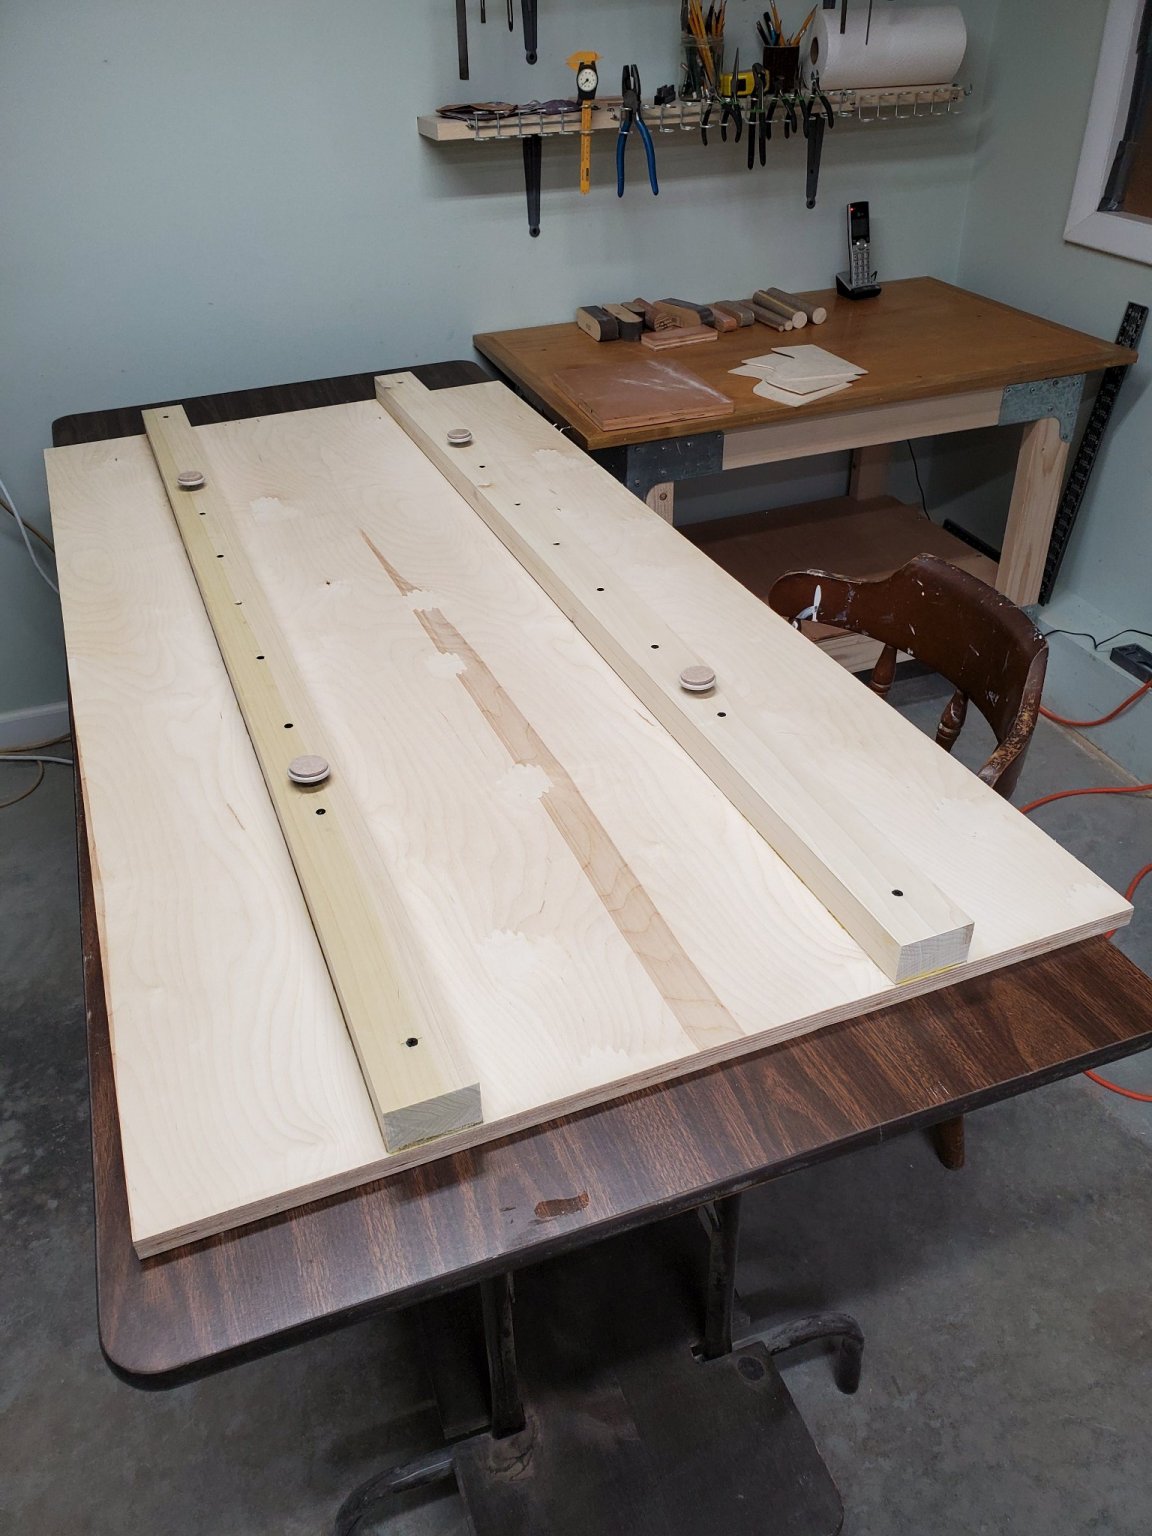
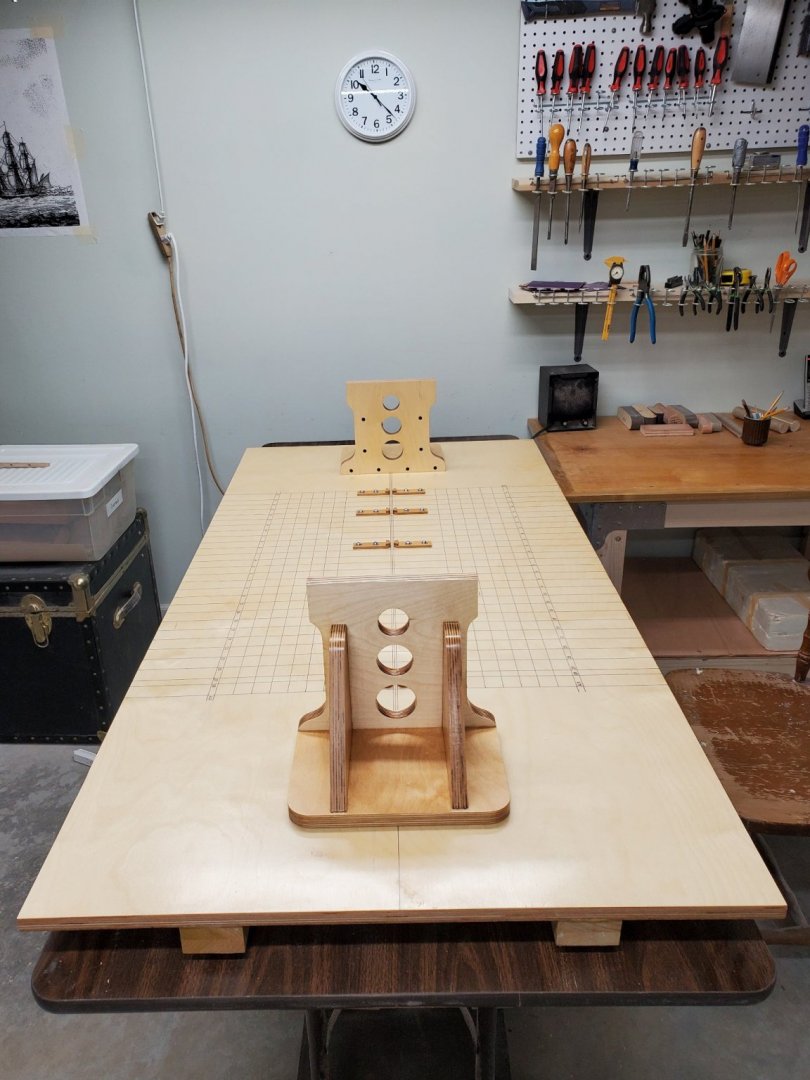
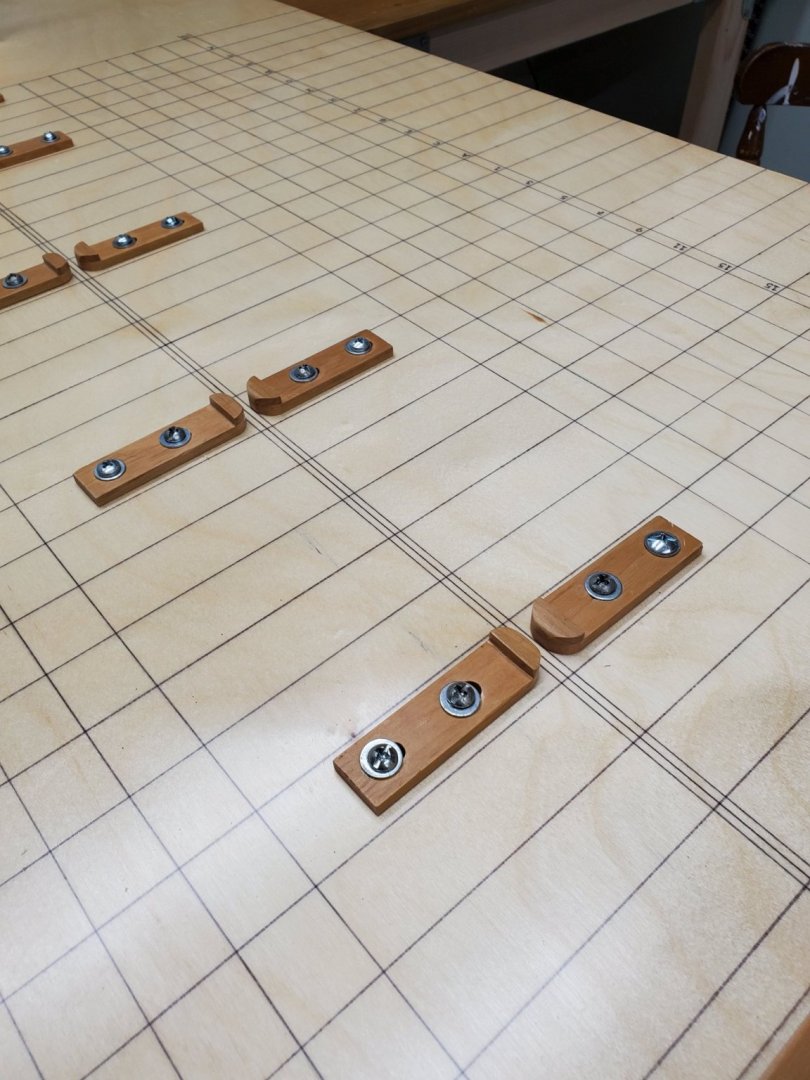
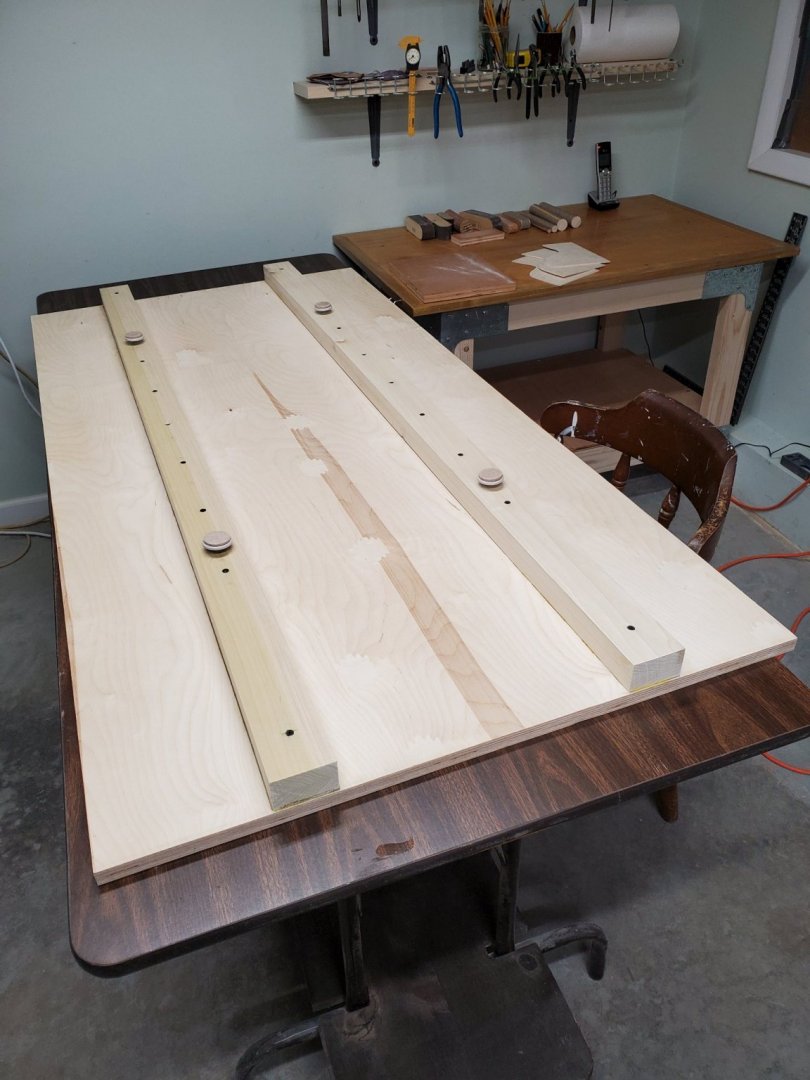
Today I finished the building board, at least the construction part of it. I ended up putting seven coats of polyurethane on it, five on the top and two on the underside. The only things left to do are to 1. drill some holes in the vertical supports and the board and secure them with bolts. That will be done when all the lifts are glued together and I have a better idea of their exact locations. 2. The height of the vertical supports will, no doubt, need some fine adjustment. I also drilled 1/4" diam. holes in the board and attached the keel blocks with 3/16" bolts and washers for some wiggle room.

-
Welcome to the Winchelsea build group Christian. I too am relatively new, within the past three weeks. Unlike most of my fellow model builders I've decided to make my Winchelsea using the bread & butter method (Georgian style). Right now I' doing all the prep work necessary for that kind of build. (constructing a building board, making templates to shape the hull, drawing and cutting out the shape of the lifts......) One of these days I'll get to the starting line. Like you, I am also contemplating rigging the model. We chose a great ship to model. I'm excited about getting the CNC carving set available for this ship. Happy modeling. Tom
-
Vlad, tedious is a gross understatement. 🙄 It's fortunate I have the patience of Job. Tom
-
Chuck, I don't worry about the green, brown, purple or red streaks you occasionally see in the heartwood of yellow poplar because I plank over it with other hardwoods. Tom
-
Don't be envious Rusty. It's not the shop that makes a great model.... it only helps a bit. I'm starting to wonder if I'm the only one in this build group who is constructing Winchelsea using an alternative method. Well, dancing to a different drumbeat is the story of my life. Regardless of the method, I'm sure all of us will learn from one another. I'm incredibly excited to build this model and think about it all the time. Having Chuck as a mentor and being around so many other experienced model builders should help me from making any outrageous mistakes on Winnie, and give me lots of ideas on materials and methods. To build a Georgian style solid hull model, using my particular method, there is just so much work to do before you can even begin to think of making sawdust. Right now I'm making the building board, working on the templates, constructing the vertical supports and drawing the shape of the lifts on the Mylar. LOL It's no wonder no one else is building their model this way. I hope and pray I live long enough to see this project to fruition. Enjoy the holiday season Rusty .... and stay safe (Covid-19) Tom
-
Thank you, Bradley. I've been slowly building my shop since my late twenties, a little over forty years.
-
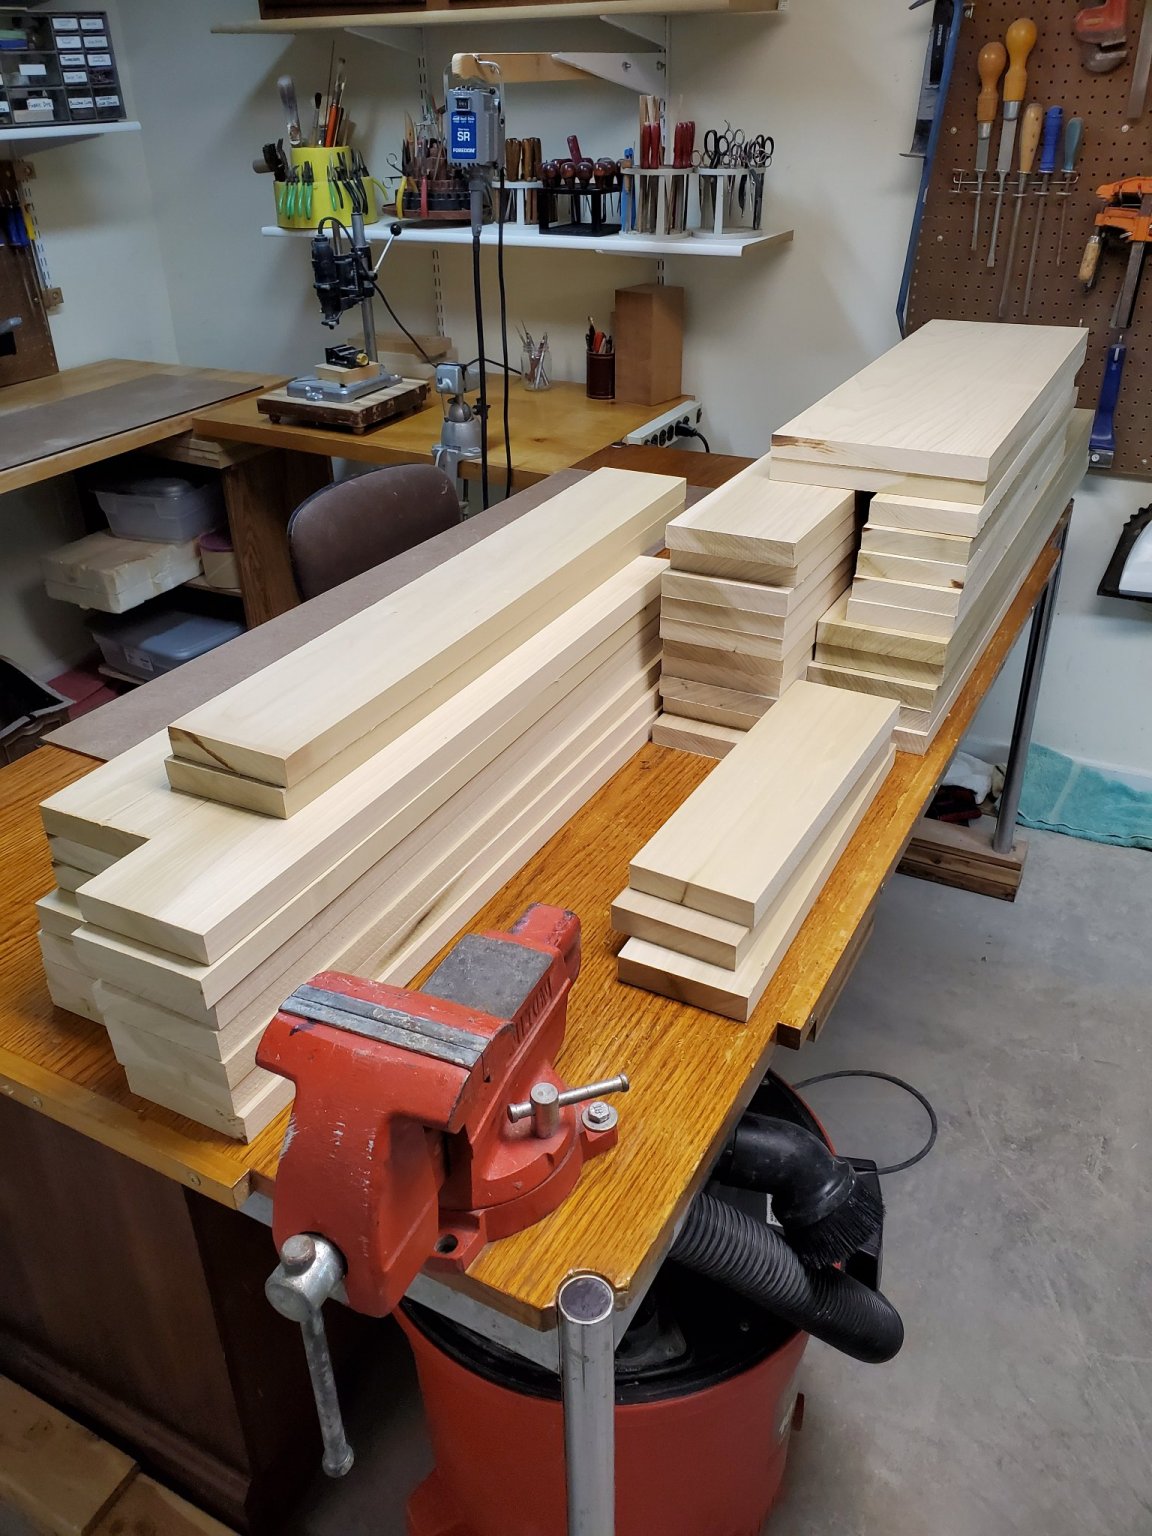
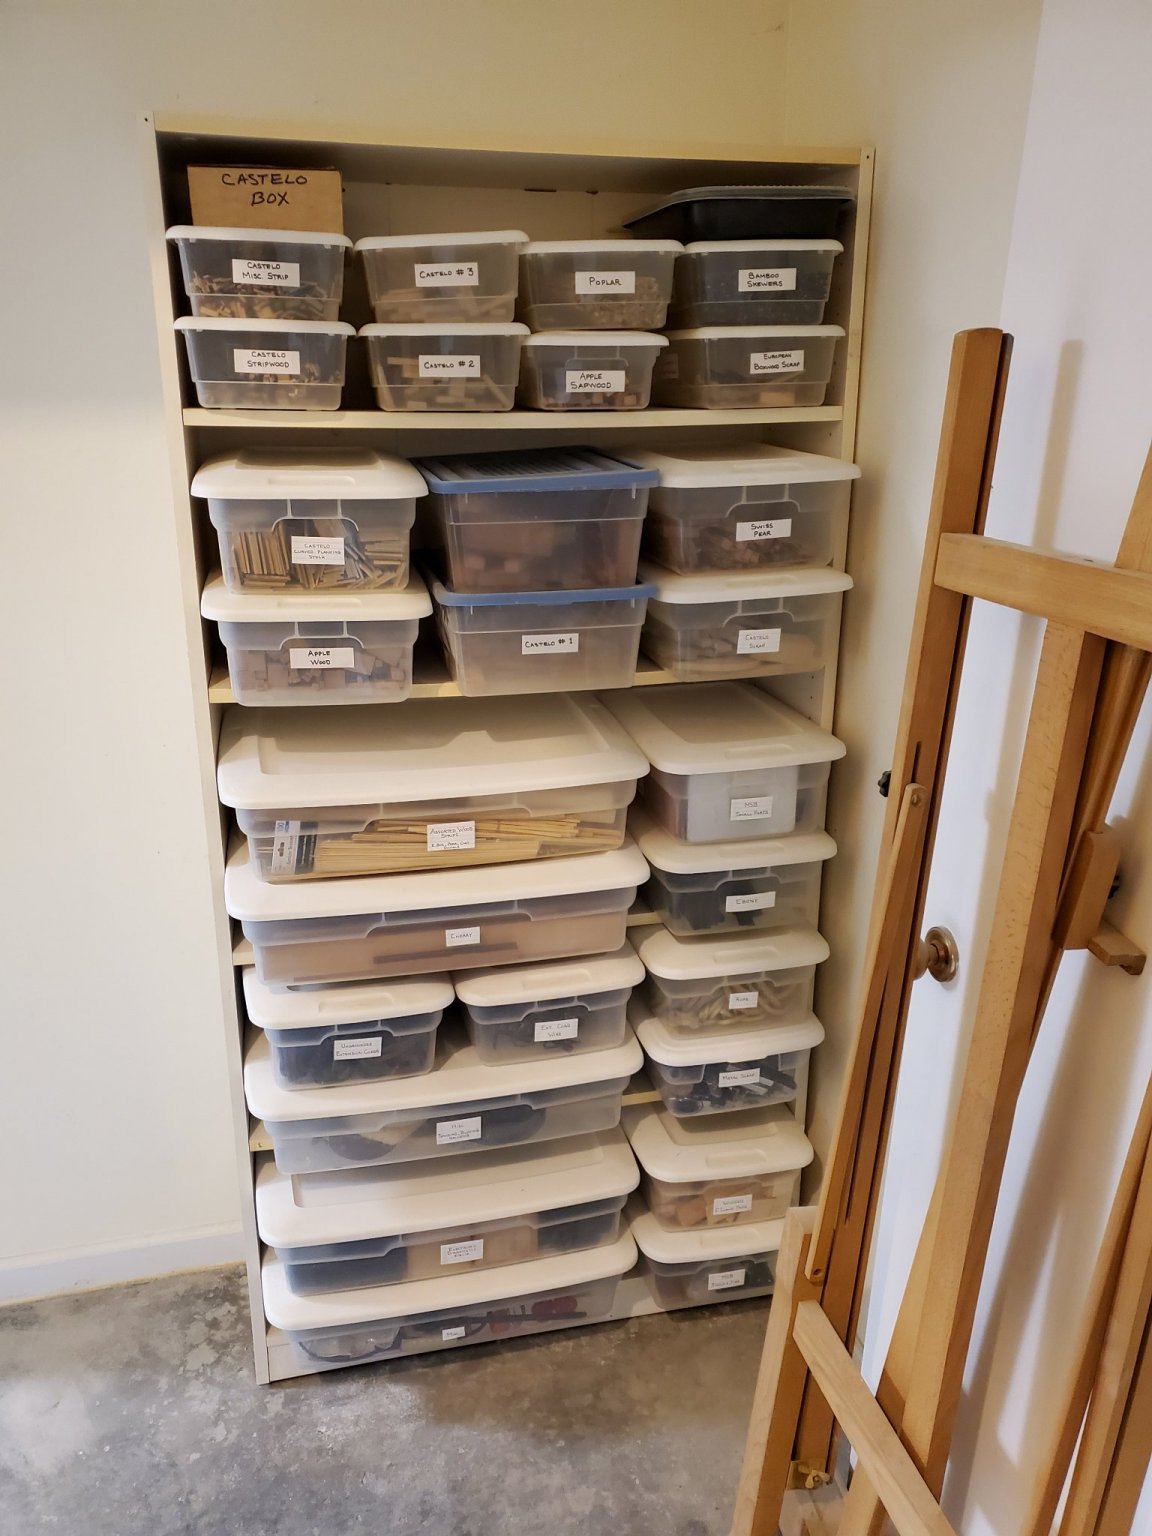
The Wood In all my years of building solid hull models I've never gone into a project with more and better yellow poplar than I have right now. Some of it has been aging for a long time while other pieces are much newer. Whether new or old it's all first class wood. I buy my lumber from M. L. Condon Co. in White Plains, New York, and the fellow who mills my wood does a 1st class job for me. All pieces are dressed nicely on six sides. I always slip him $ extra for the fine job he does. The first photo shows the yellow poplar I will use to form the hull's shape. I have so much of the wood I shouldn't have any trouble finding stock with the perfect grain orientation. Number two photo shows a bookshelf with plastic containers full of milled stock of various hardwoods. In the basement I have footlockers full of various domestic and exotic hardwoods. When you have been building models for as long as I have you accumulate a lot of wood. I also have a goodly amount of Baltic plywood in 1/8", 1/4", and 3/4" thicknesses.


-
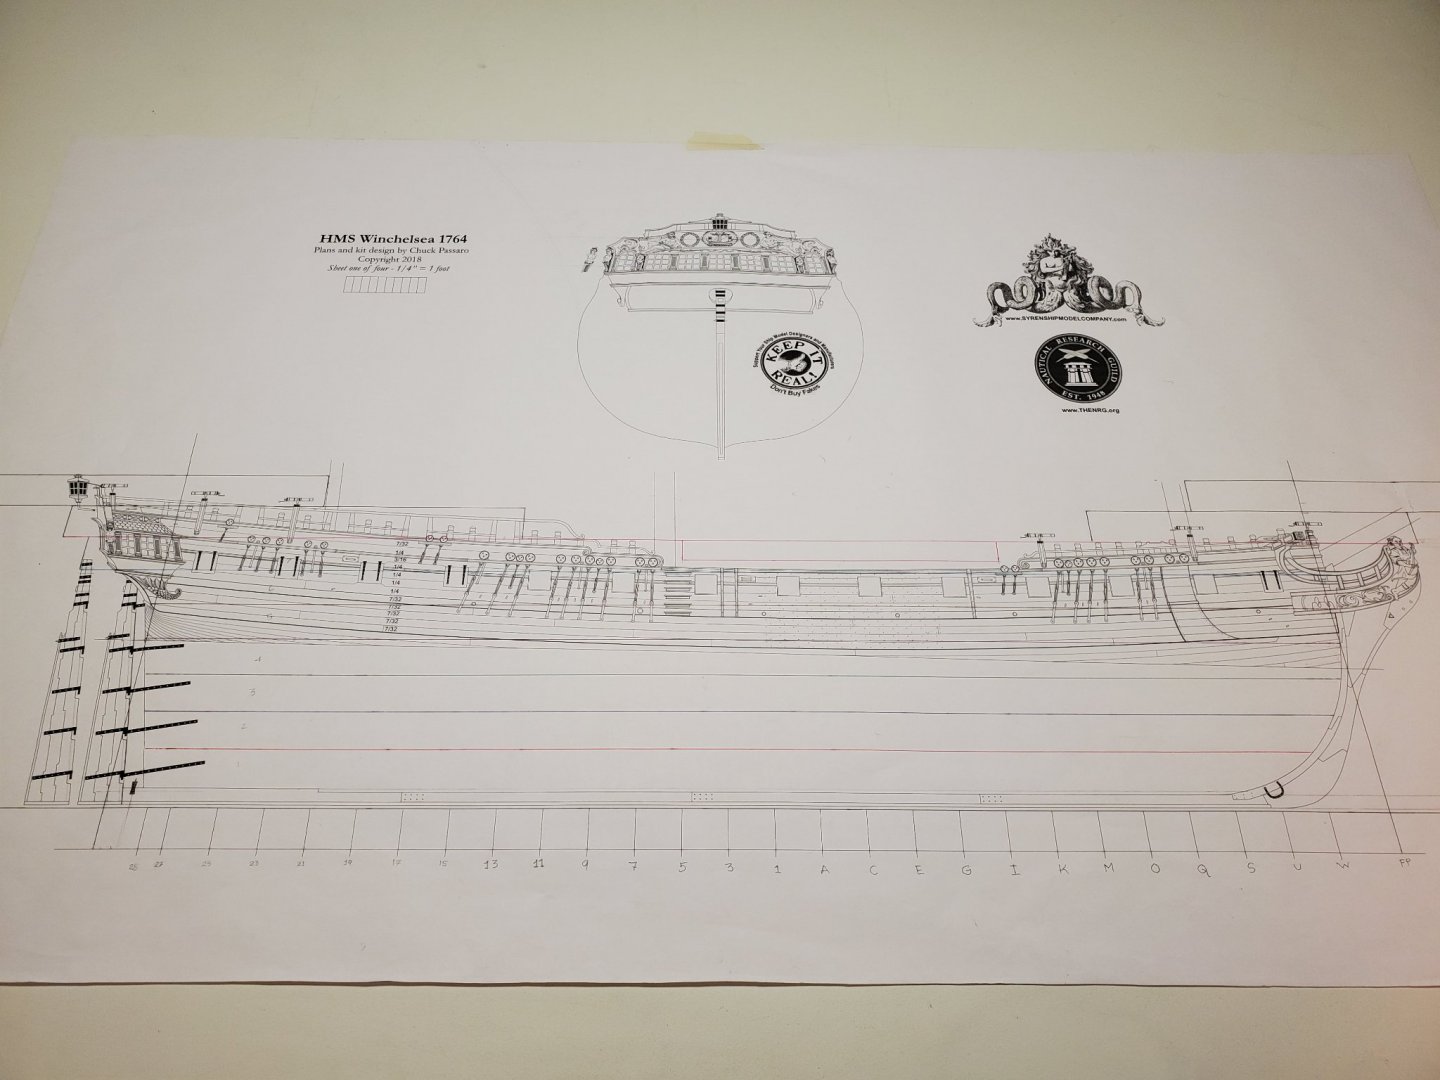
Templates To shape a bread and butter construction hull you need to make a set of rigid templates. Years ago I used to make them from 3/32" 5 ply aircraft grade plywood but that wood has become expensive today. With my last model I used some cheap 1/8" birch plywood and, sadly, regretted it. The templates warped and twisted on me something awful. What I did for this Winchelsea build was to go to a local cabinetmaker and buy a 5'x5' sheet of furniture grade 1/8" Baltic plywood. Before I can actually start construction of the model I needed to download Chuck's plans for the Winchelsea. That's done. I got those a few weeks ago. When I printed these plans I had the hull shapes for each station line done on card stock, not paper. The extra rigidity helped. I have to say it was mega-helpful to have 8 grids per inch Mylar to trace the hull shapes on. First I draw a center line, and then, using a square, draw a perpendicular at the bottom of the drawing. I then carefully lay a piece of Mylar over it, lining it up with centerline and the perpendicular. With great care I then trace the hull's shape and cut it out. Remember to draw the keel in the right location and to add 1/16" more to its height. This is for the distance the hull is elevated off the building board. The Mylar cutouts are then taped to the plywood. Carefully draw the outline of the frame on it, remove the taped Mylar and then proceed cut out and sand the plywood template to shape. It's very important to be extremely meticulous in each step of the template making process! There are 27 station lines so pace yourself and don't rush.
-
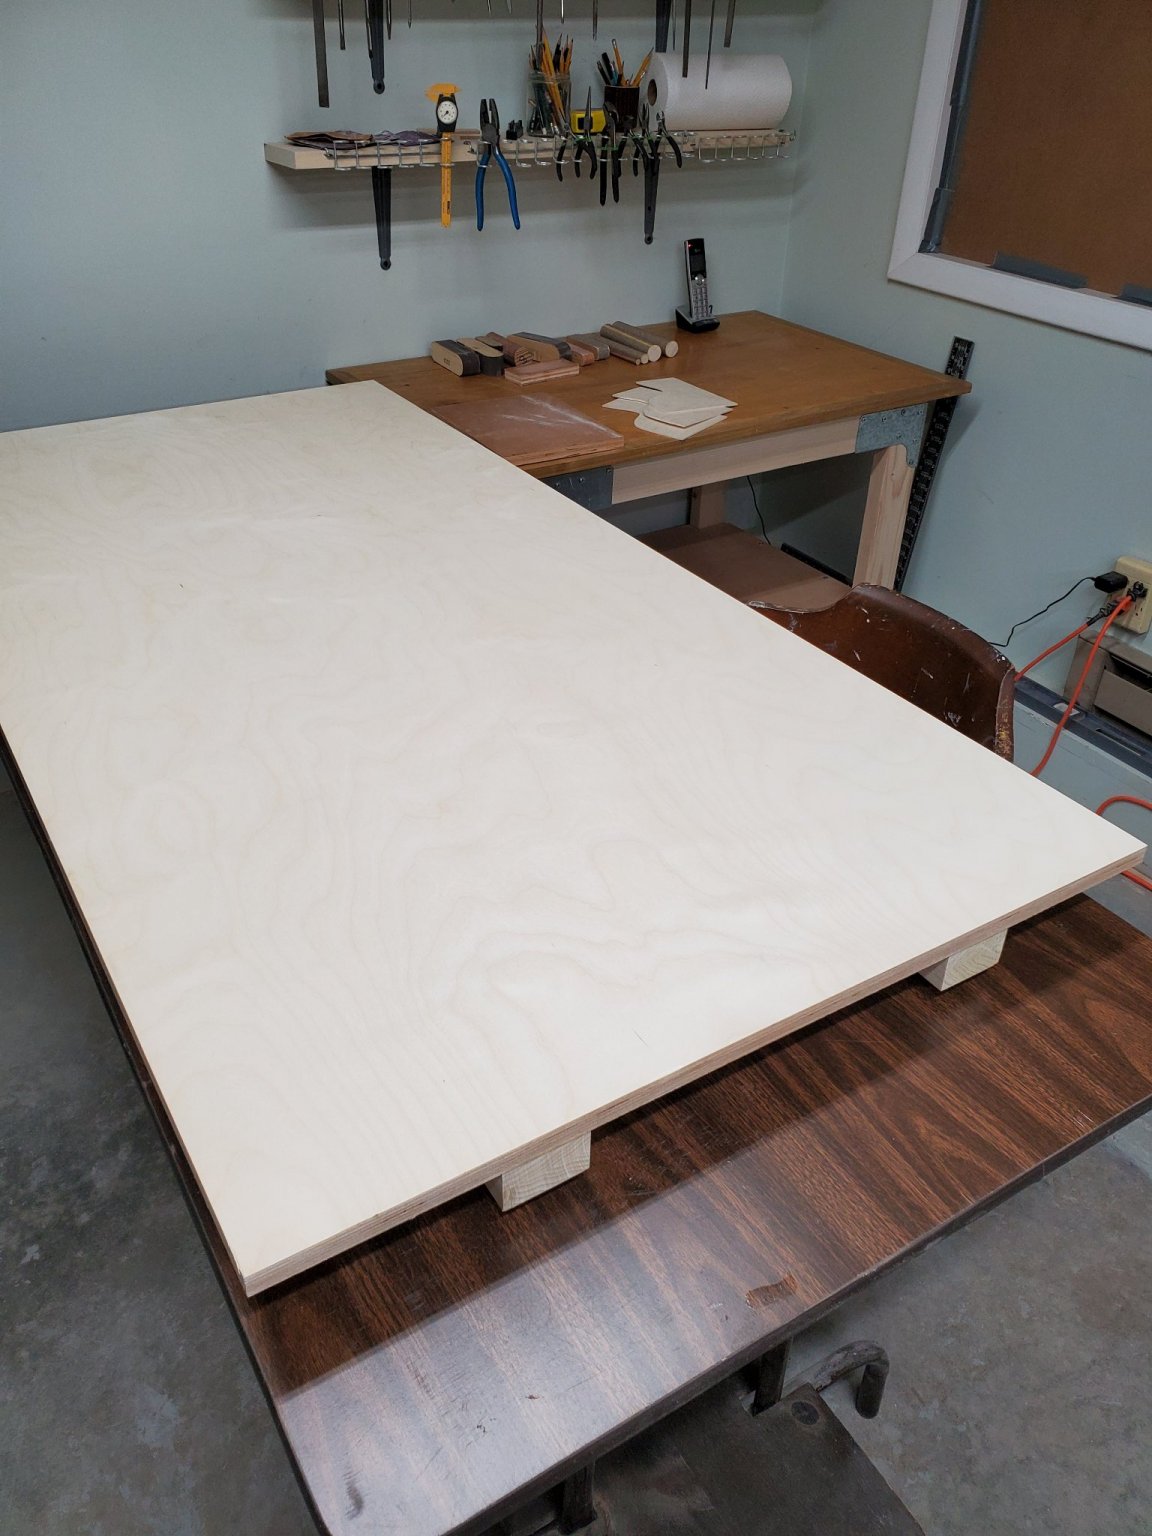
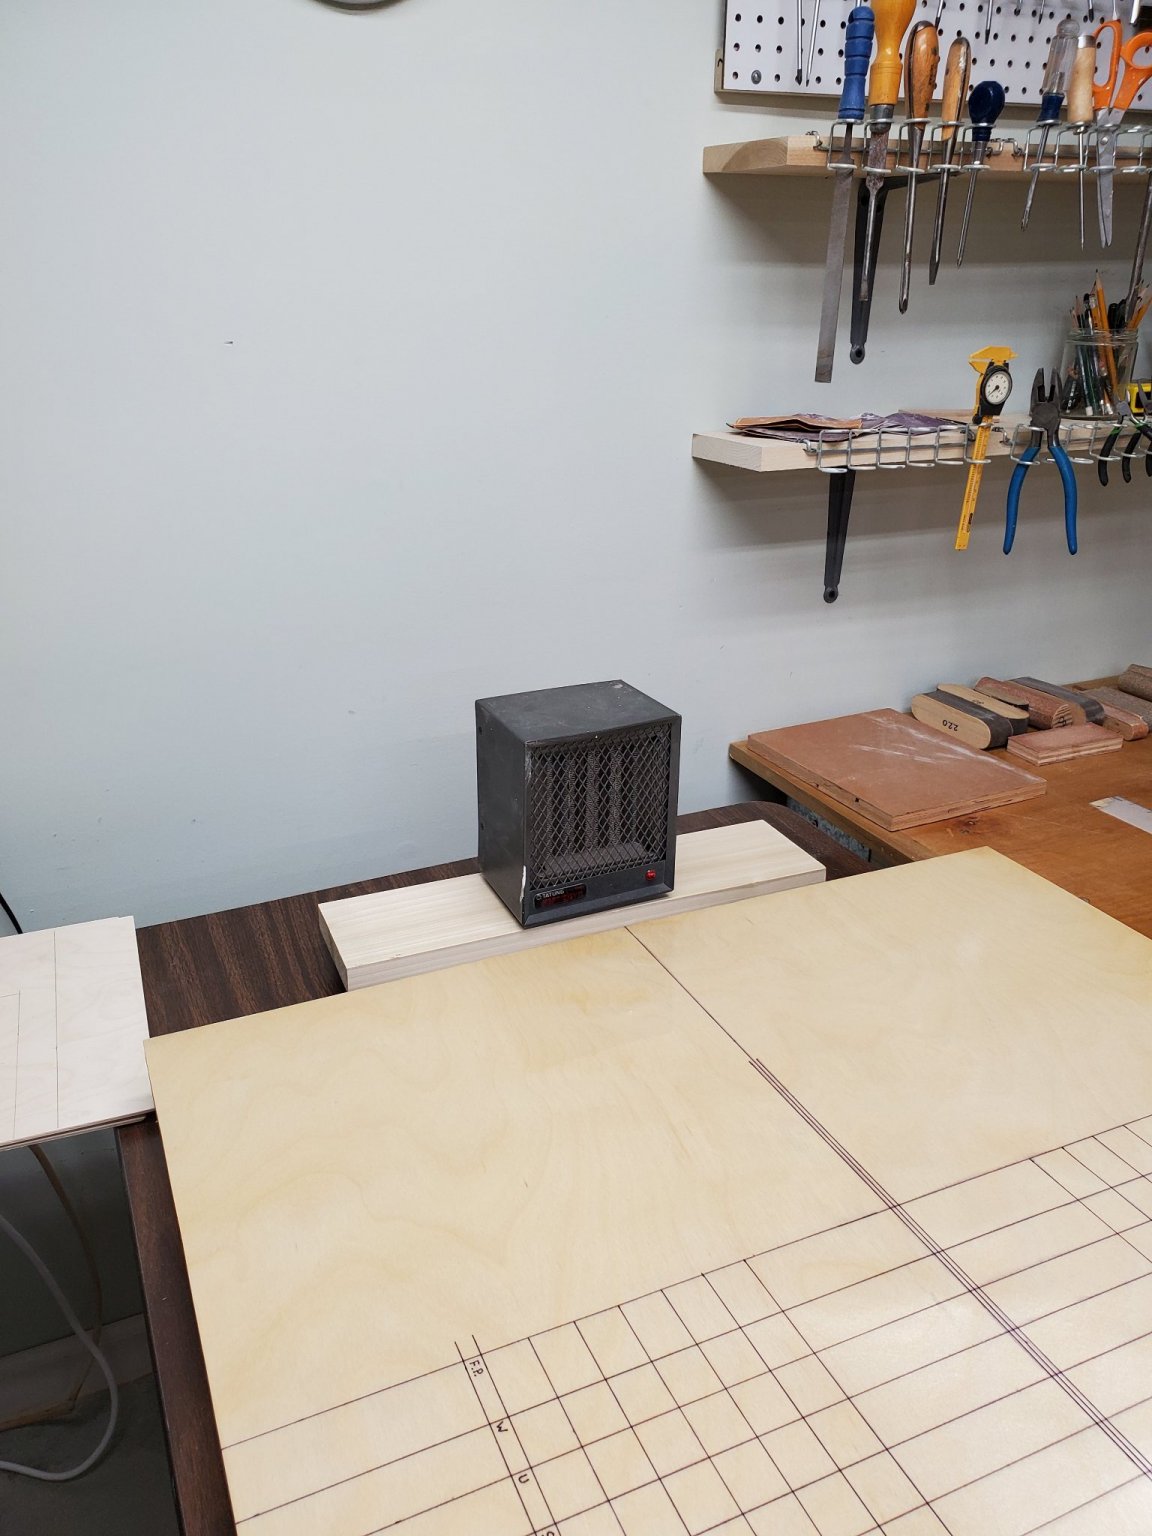
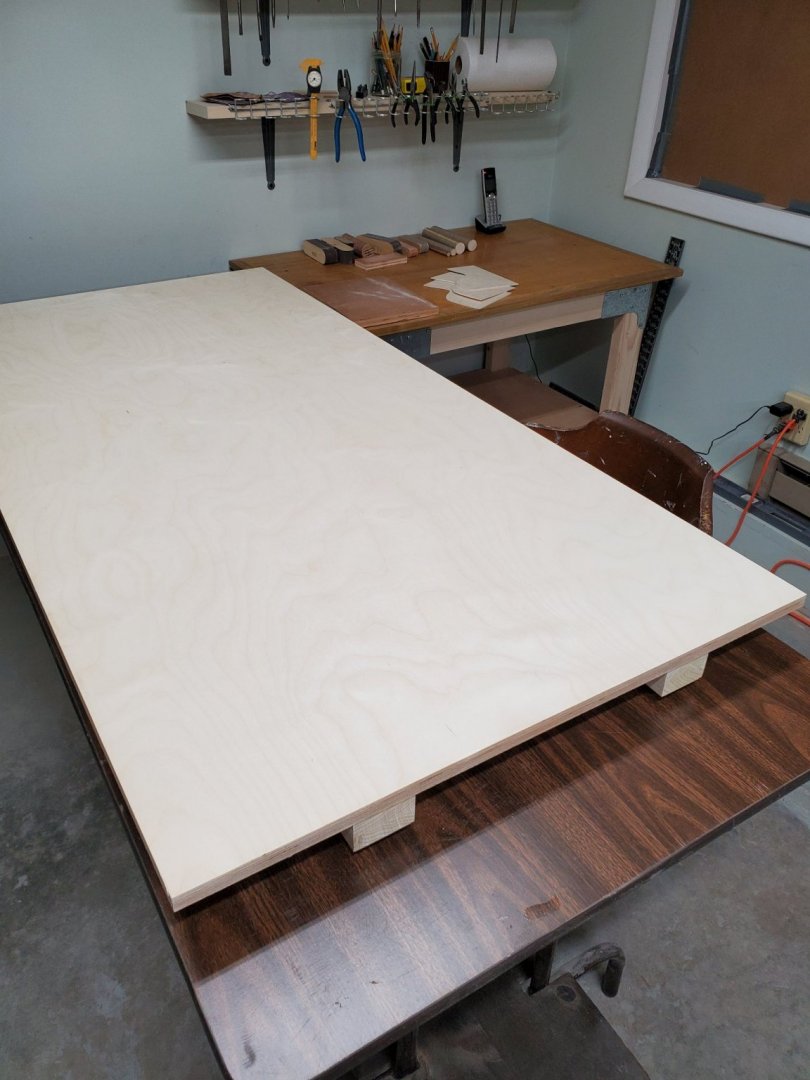
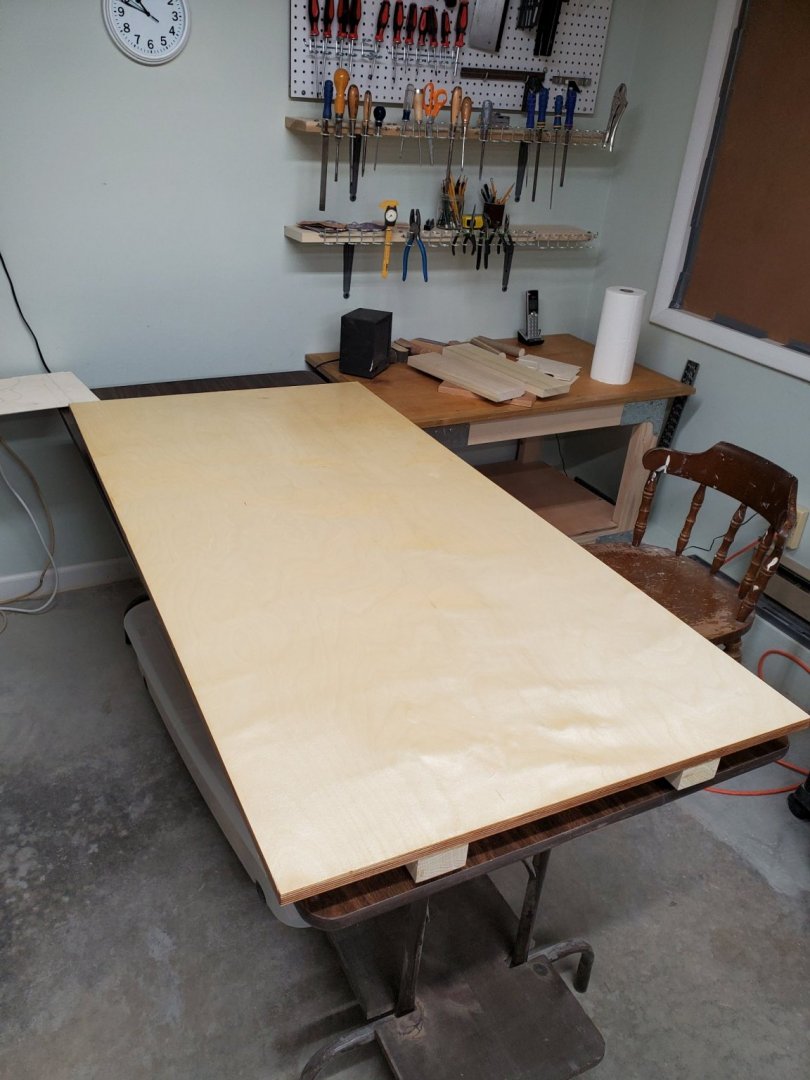
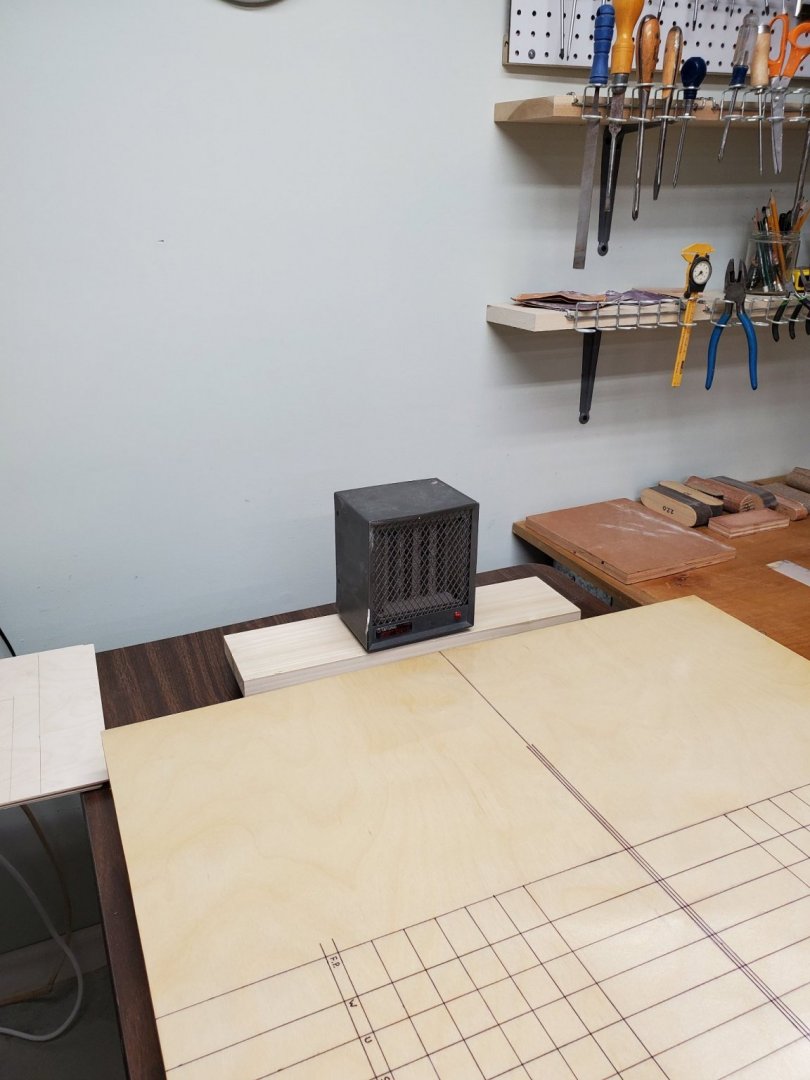
The Building Board To make this model I'm going to need a really flat surface for the construction templates. I went out and purchased a 4'x8'x3/4" sheet of furniture grade Baltic birch plywood. Oh, it's really nice stuff. I started building the board by cutting it to 30"x5' and adding two pieces of wooden reinforcement (2 1/2"x 1 1/2") that run the length of the board. Four adjustable, felt bottom feet were also added. After I did that I applied two coats of polyurethane to the board. When completely dry tomorrow I will lightly sand with 220 grit sandpaper and then draw the station lines on the surface. After they get put on I will apply another 3 coats of polyurethane over them. The 5th building board photo shows the small heater I use to help dry the polyurethane. I swing the board around 180 degrees every hour. When the last coat of polyurethane has been applied to the top surface of the board I turn it over and do the bottom. This is to seal the underside from any moisture absorption that might warp the board. The next step will be to align and drill the holes for the small wooden pieces that press against the ship's keel to hold it steady.
-
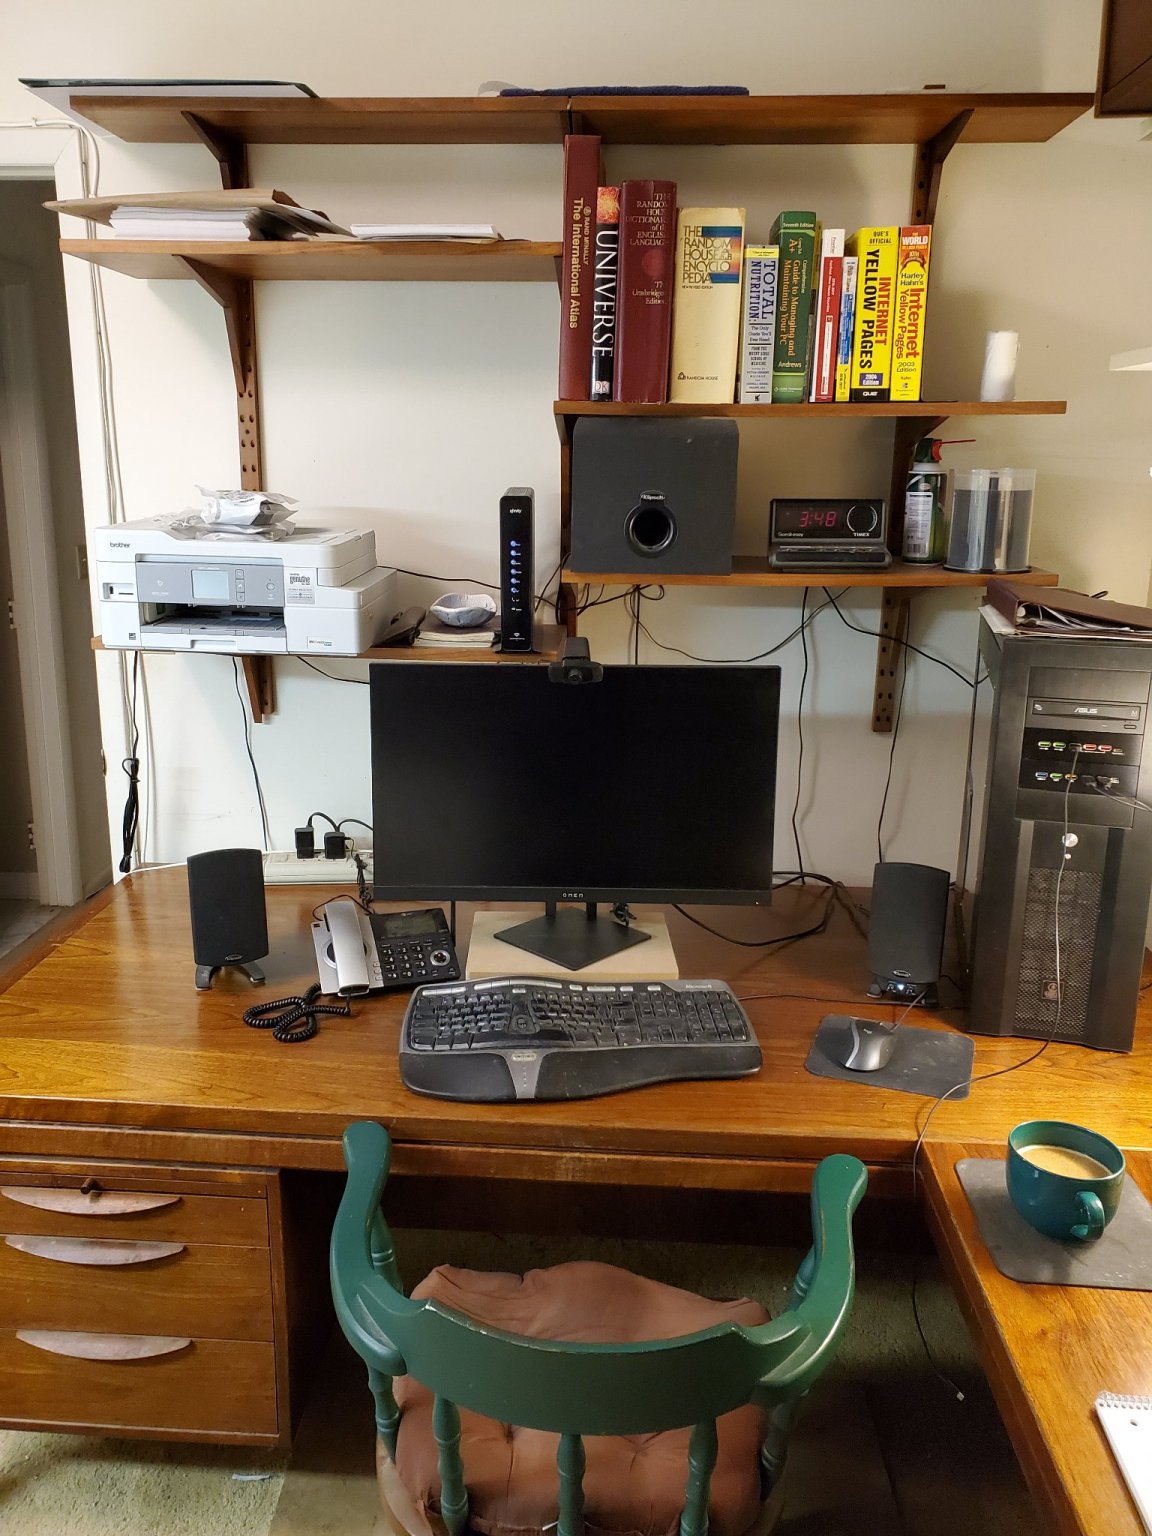
I've always had a pretty nice shop area but over the past few months I've put some serious money into making improvements. It's to make up for those years when I was having health issues and putting no money into it. The back room got a new slider because the old one was leaking water into the room. I replaced all the old florescence shop lights with bright and quiet LED ones. To better confine dust I framed off a small area behind plastic in the back shop. I also built two new work benches for that room and put up two new peg boards. As a 70-year-old I got tired of running up and down the stairs to answer the telephone. Now I have a phone in every room in the house. These improvements pale by comparison to all the new tools I purchased. To say Santa Claus was good to me this year would be a gross understatement. He gave me darn near EVERYTHING on my list. I got a Jim Byrnes saw with all the accessories, a Jim Byrnes thickness sander (back shop photo #6), a Delta scroll saw, a Foredom flexshaft, a 1 H.P 12" diameter bench sander and a 1/2 H.P bench grinder with wire brushes. He also gave me a number of nice hand power tools: a Dewalt jig saw, a reciprocating saw, an orbital sander, a multi-tool, a 4 1/2" angle grinder and a hot air gun. Recently I dropped my block plane onto the cement floor and did irreparable damage to it, so I went out and purchased a Veritas standard block plane to replace it. I also bought a Lie Nielsen #101 violin maker's plane. Those are two very nice hand tools, and I'm sure they will see a lot of use in this Winchelsea build. How lucky was I this year? It's hard to believe Santa thought I was that "nice". With all these new tools I'm anxious to not only get this model started but also tackle a number of household jobs I had been putting off.
-
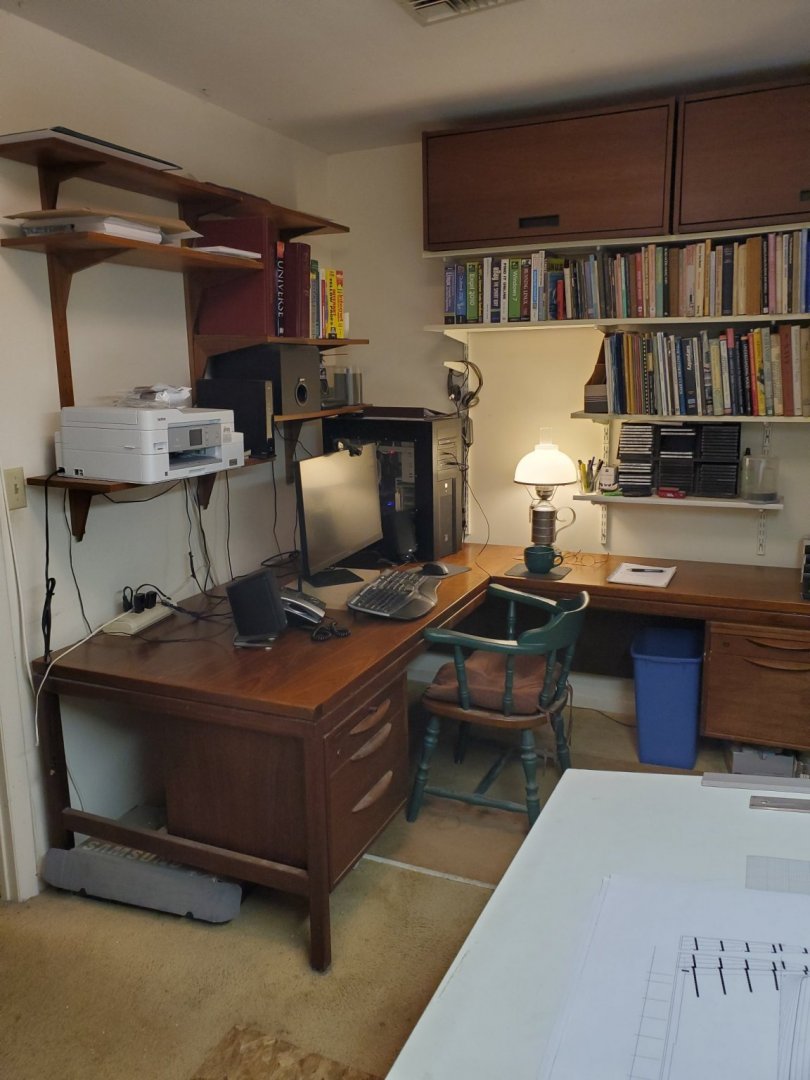
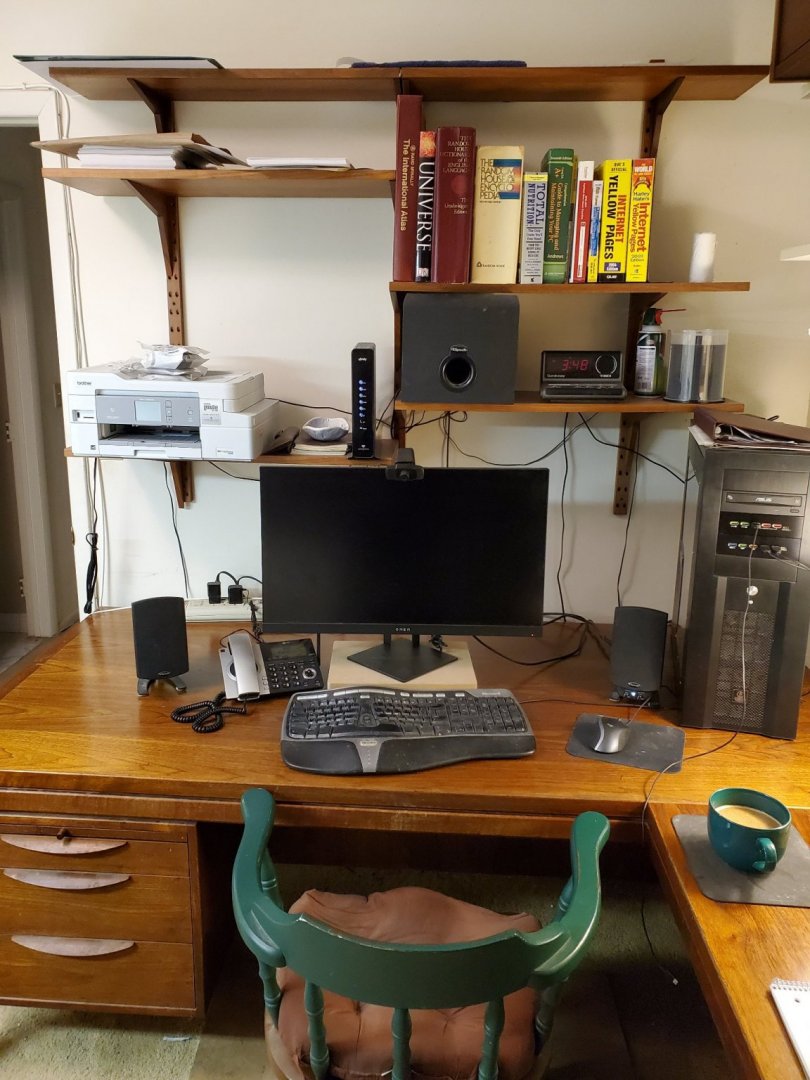
The Den When I'm not in my shops I'm often in my den. Many years back I built a 4'x6' drafting table and have used it quite often in my model ship building. All of my reference books on the subject are housed in this room.