


jbelwood
-
Posts
217 -
Joined
-
Last visited
Reputation Activity
-

 jbelwood got a reaction from mtaylor in Portland by jbelwood and norm1116 - BlueJacket Shipcrafters - abandoned
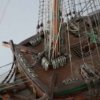
Over the centuries many thousands of ship modelers have had to step many masts. There must be endless
ways of doing this. I my case this is a first. As a life long model railroader I have few tools to address this. I
do however have a 50 year old Dremmel drill press. I had to step the mast atop the skylight at 90 degrees
to the deck and raked back at 5 degrees.
I first cut a piece of black foam core to a 5 degree angle and used it as reference to afix a piece of scrap wood
to the drill press base. I slid a piece of scrap under that to get the proper angle. Then held it in place by hand
and drilled a few holes until I got it right.
Then inserted the 1/8" dowel to determine if my measurements were correct. They apparently were.
The next step was a challenge. Took me an hour to clamp the skylight to the base correctly so that the
bit wouldn't wander. Had to be correct at first shot.
The end result was perfect. The mast lined up exactly with the center line of the ship.
John Elwood
Stratford, CT
-
 jbelwood got a reaction from Jack12477 in Portland by jbelwood and norm1116 - BlueJacket Shipcrafters - abandoned
Well, this blasted COVID19 got me back to the Portland again. I decided to tackle the skylight after agonizing about it
for some time. We start out with a 1/2 x 3 x 10 inch piece of basswood. I first roughly cut out the top view contour with
my bench saw and then finished the outline with my Allwin Disc/Belt Sander. Next you cut a 3/16 high x 1/8 deep
rabbet completely around the entire structure. Not having a router, I was able to adjust my bench saw to do the same
thing. Cleaned up the curf marks with a sanding stick.
Contouring the the roof with gentle curves is not adequately discussed in the instructions. Their instruction manual from
the original kit is much more specific. I quote "Draw a centerline on top of the skylight. Measure up 1/16"from the top of
the rabbet. Draw a line from the side of the skylight at its widest point (just before the forward curve) to the centerline 1-1/2"
from the front edge. Draw another line from the narrowest point of the side (just before the after curve) to the centerline 1-1/4"
from the after edge. This double "Y" is the shape of the ridge line. Carve the roof using these lines to the line 1/16" above the
rabbet". Page 14 of the new manual give you a sketch of what they are talking about. NOTE: Instead of carving I used 1" wide
sanding sticks to create the roof contour.
Have yet to figure out how I want to do the windows. My next post will show how I installed the aft mast atop the skylight.
John Elwood
-
 jbelwood got a reaction from GrandpaPhil in Portland by jbelwood and norm1116 - BlueJacket Shipcrafters - abandoned
Well, this blasted COVID19 got me back to the Portland again. I decided to tackle the skylight after agonizing about it
for some time. We start out with a 1/2 x 3 x 10 inch piece of basswood. I first roughly cut out the top view contour with
my bench saw and then finished the outline with my Allwin Disc/Belt Sander. Next you cut a 3/16 high x 1/8 deep
rabbet completely around the entire structure. Not having a router, I was able to adjust my bench saw to do the same
thing. Cleaned up the curf marks with a sanding stick.
Contouring the the roof with gentle curves is not adequately discussed in the instructions. Their instruction manual from
the original kit is much more specific. I quote "Draw a centerline on top of the skylight. Measure up 1/16"from the top of
the rabbet. Draw a line from the side of the skylight at its widest point (just before the forward curve) to the centerline 1-1/2"
from the front edge. Draw another line from the narrowest point of the side (just before the after curve) to the centerline 1-1/4"
from the after edge. This double "Y" is the shape of the ridge line. Carve the roof using these lines to the line 1/16" above the
rabbet". Page 14 of the new manual give you a sketch of what they are talking about. NOTE: Instead of carving I used 1" wide
sanding sticks to create the roof contour.
Have yet to figure out how I want to do the windows. My next post will show how I installed the aft mast atop the skylight.
John Elwood
-
 jbelwood got a reaction from coxswain in Portland by jbelwood and norm1116 - BlueJacket Shipcrafters - abandoned
Well, this blasted COVID19 got me back to the Portland again. I decided to tackle the skylight after agonizing about it
for some time. We start out with a 1/2 x 3 x 10 inch piece of basswood. I first roughly cut out the top view contour with
my bench saw and then finished the outline with my Allwin Disc/Belt Sander. Next you cut a 3/16 high x 1/8 deep
rabbet completely around the entire structure. Not having a router, I was able to adjust my bench saw to do the same
thing. Cleaned up the curf marks with a sanding stick.
Contouring the the roof with gentle curves is not adequately discussed in the instructions. Their instruction manual from
the original kit is much more specific. I quote "Draw a centerline on top of the skylight. Measure up 1/16"from the top of
the rabbet. Draw a line from the side of the skylight at its widest point (just before the forward curve) to the centerline 1-1/2"
from the front edge. Draw another line from the narrowest point of the side (just before the after curve) to the centerline 1-1/4"
from the after edge. This double "Y" is the shape of the ridge line. Carve the roof using these lines to the line 1/16" above the
rabbet". Page 14 of the new manual give you a sketch of what they are talking about. NOTE: Instead of carving I used 1" wide
sanding sticks to create the roof contour.
Have yet to figure out how I want to do the windows. My next post will show how I installed the aft mast atop the skylight.
John Elwood
-
.thumb.jpeg.fc5d633a7b34428fcf19419a73d56d55.jpeg) jbelwood got a reaction from EricWilliamMarshall in Taurus by Duanelaker - Model Shipways - Scale 1:96 - Steam Towboat
jbelwood got a reaction from EricWilliamMarshall in Taurus by Duanelaker - Model Shipways - Scale 1:96 - Steam Towboat
OK...here's a few for you. Camera shots, unfortunately, show a few years of dust. Oh well. Looking back I probably used Titebond and ACC.
John Elwood
-
jbelwood got a reaction from EricWilliamMarshall in Taurus by Duanelaker - Model Shipways - Scale 1:96 - Steam Towboat
Hi Duanelaker,
I've built four of these over the past 40 years. Original list price was $13.00.
Shaping the interior of the hull never got easier as I always struggled using a chisel.
My latest build, somewhat modified, sits in a river scene on my model railroad.
I believe the latest issue of the Taurus has an etched brass pilot and deck house.
That sure would make the build much easier and quicker.
Will follow you along to see what additional ideas you might come up with. I love
these little tugs as they add greatly to a maritime theme if in a diorama.
John Elwood
-
 jbelwood got a reaction from lmagna in Taurus by Duanelaker - Model Shipways - Scale 1:96 - Steam Towboat
OK...here's a few for you. Camera shots, unfortunately, show a few years of dust. Oh well. Looking back I probably used Titebond and ACC.
John Elwood
-
 jbelwood got a reaction from hexnut in Taurus by Duanelaker - Model Shipways - Scale 1:96 - Steam Towboat
OK...here's a few for you. Camera shots, unfortunately, show a few years of dust. Oh well. Looking back I probably used Titebond and ACC.
John Elwood
-
 jbelwood got a reaction from Duanelaker in Taurus by Duanelaker - Model Shipways - Scale 1:96 - Steam Towboat
OK...here's a few for you. Camera shots, unfortunately, show a few years of dust. Oh well. Looking back I probably used Titebond and ACC.
John Elwood
-
jbelwood got a reaction from GrandpaPhil in Taurus by Duanelaker - Model Shipways - Scale 1:96 - Steam Towboat
OK...here's a few for you. Camera shots, unfortunately, show a few years of dust. Oh well. Looking back I probably used Titebond and ACC.
John Elwood
-
 jbelwood got a reaction from Canute in Taurus by Duanelaker - Model Shipways - Scale 1:96 - Steam Towboat
OK...here's a few for you. Camera shots, unfortunately, show a few years of dust. Oh well. Looking back I probably used Titebond and ACC.
John Elwood
-
 jbelwood got a reaction from Papa in Taurus by Duanelaker - Model Shipways - Scale 1:96 - Steam Towboat
OK...here's a few for you. Camera shots, unfortunately, show a few years of dust. Oh well. Looking back I probably used Titebond and ACC.
John Elwood
-
jbelwood got a reaction from Duanelaker in Taurus by Duanelaker - Model Shipways - Scale 1:96 - Steam Towboat
Hi Duanelaker,
I've built four of these over the past 40 years. Original list price was $13.00.
Shaping the interior of the hull never got easier as I always struggled using a chisel.
My latest build, somewhat modified, sits in a river scene on my model railroad.
I believe the latest issue of the Taurus has an etched brass pilot and deck house.
That sure would make the build much easier and quicker.
Will follow you along to see what additional ideas you might come up with. I love
these little tugs as they add greatly to a maritime theme if in a diorama.
John Elwood
-
jbelwood got a reaction from Canute in Taurus by Duanelaker - Model Shipways - Scale 1:96 - Steam Towboat
Hi Duanelaker,
I've built four of these over the past 40 years. Original list price was $13.00.
Shaping the interior of the hull never got easier as I always struggled using a chisel.
My latest build, somewhat modified, sits in a river scene on my model railroad.
I believe the latest issue of the Taurus has an etched brass pilot and deck house.
That sure would make the build much easier and quicker.
Will follow you along to see what additional ideas you might come up with. I love
these little tugs as they add greatly to a maritime theme if in a diorama.
John Elwood
-
 jbelwood got a reaction from etubino in Portland by jbelwood and norm1116 - BlueJacket Shipcrafters - abandoned
Just thought I'd throw this photo in for something different. Perhaps the most
photographed scene on my layout.
John Elwood
-
jbelwood got a reaction from etubino in Portland by jbelwood and norm1116 - BlueJacket Shipcrafters - abandoned
Hi there Norm,
Thanks for all those photos. I've heard many very positive comments about the museum from fellow modelers
who have visited there. From your many photos, I can see why.
I have yet to get back to the Portland. My overall health has slipped to a point where the passion to build has
diminished considerably. I did finish the trestle however.
Although it doesn't show, there are 374 pieces in this model, all cut from sprues. I estimate 70+ hours of work. It is to
be installed on a friends Northern Pacific layout over Elwood Gulch. You couldn't pay me to build another one.
John Elwood
-
jbelwood got a reaction from coxswain in Portland by jbelwood and norm1116 - BlueJacket Shipcrafters - abandoned
Just thought I'd throw this photo in for something different. Perhaps the most
photographed scene on my layout.
John Elwood
-
jbelwood got a reaction from coxswain in Portland by jbelwood and norm1116 - BlueJacket Shipcrafters - abandoned
Hi there Norm,
Thanks for all those photos. I've heard many very positive comments about the museum from fellow modelers
who have visited there. From your many photos, I can see why.
I have yet to get back to the Portland. My overall health has slipped to a point where the passion to build has
diminished considerably. I did finish the trestle however.
Although it doesn't show, there are 374 pieces in this model, all cut from sprues. I estimate 70+ hours of work. It is to
be installed on a friends Northern Pacific layout over Elwood Gulch. You couldn't pay me to build another one.
John Elwood
-
jbelwood got a reaction from GrandpaPhil in Portland by jbelwood and norm1116 - BlueJacket Shipcrafters - abandoned
Just thought I'd throw this photo in for something different. Perhaps the most
photographed scene on my layout.
John Elwood
-
 jbelwood got a reaction from RFP in Portland by jbelwood and norm1116 - BlueJacket Shipcrafters - abandoned
Just thought I'd throw this photo in for something different. Perhaps the most
photographed scene on my layout.
John Elwood
-
jbelwood got a reaction from GrandpaPhil in Portland by jbelwood and norm1116 - BlueJacket Shipcrafters - abandoned
Hi there Norm,
Thanks for all those photos. I've heard many very positive comments about the museum from fellow modelers
who have visited there. From your many photos, I can see why.
I have yet to get back to the Portland. My overall health has slipped to a point where the passion to build has
diminished considerably. I did finish the trestle however.
Although it doesn't show, there are 374 pieces in this model, all cut from sprues. I estimate 70+ hours of work. It is to
be installed on a friends Northern Pacific layout over Elwood Gulch. You couldn't pay me to build another one.
John Elwood
-
 jbelwood got a reaction from SigEp Ziggy in Portland by jbelwood and norm1116 - BlueJacket Shipcrafters - abandoned
Here is the final finish on the hull. The photos speak for themselves. I forget
what I used for the bottom color. Again, large rattle can.
The last photo gives away a secret. Yes, I am also a model railroader, have been
for more than 40 years. The two on the left display cover articles that I had in
Model Railroader magazine and Railroad Model Craftsman more than a decade
ago. The layout itself has more than twelve feet of maritime scenes.
John Elwood
-
jbelwood got a reaction from etubino in Portland by jbelwood and norm1116 - BlueJacket Shipcrafters - abandoned
My current project brings me back to my first love of model railroading. The below image shows an HO scale steel trestle
and scenery that I built for a client some 15 years ago. I am currently building the same trestle kit (Micro Scale Models) but
in a longer (270') and higher (87') version for a close friend. Scenery to be added is yet another story. Quite a departure from
the Portland, I'd say.
John Elwood
-
jbelwood got a reaction from hexnut in Portland by jbelwood and norm1116 - BlueJacket Shipcrafters - abandoned
My current project brings me back to my first love of model railroading. The below image shows an HO scale steel trestle
and scenery that I built for a client some 15 years ago. I am currently building the same trestle kit (Micro Scale Models) but
in a longer (270') and higher (87') version for a close friend. Scenery to be added is yet another story. Quite a departure from
the Portland, I'd say.
John Elwood
-
 jbelwood got a reaction from norm1116 in Portland by jbelwood and norm1116 - BlueJacket Shipcrafters - abandoned
My current project brings me back to my first love of model railroading. The below image shows an HO scale steel trestle
and scenery that I built for a client some 15 years ago. I am currently building the same trestle kit (Micro Scale Models) but
in a longer (270') and higher (87') version for a close friend. Scenery to be added is yet another story. Quite a departure from
the Portland, I'd say.
John Elwood