


NMBROOK
-
Posts
2,305 -
Joined
-
Last visited
Reputation Activity
-

 NMBROOK got a reaction from tarbrush in MORDAUNT 1681 by NMBROOK - Euromodel - 1:60 - Beyond Bashed
Now as promised,a picture walkthrough of the steps involved milling the 'grating' with backing spacer.
First a safepark position was created with the mill,a slot around 2mm to 3mm wide 5mm deep(the sheet is 6mm thick)All work is done with a 1mm milling cutter
Step two was to machine 1.5mm slots 1.5mm deep that will form the grouves for the battens to lay in.
Step three was to mill 1.5mm slots 5mm deep perpendicular to the batten slots.These are the gaps between the ledges.All slots had 1.5mm of material inbetween them i.e. the centre to centre distance is 3mm.
Finally the sections at each end were cut off to enable easy fitting of the overlength battens.Now also in this pic,because I was determined to have a go with this method to produce a finer pattern grating,is one with 1mm holes and 1mm ledges and battens.This was a complete success,not one chip to any of the nibs,although removing the sawdust was a very careful job with a soft brush.I think this is the way forward for Mordaunt's gratings although 1mm pear sheet for the battens will have to wait as my supplier of this is currently on their holidays
Kind Regards
Nigel
-
 NMBROOK got a reaction from cog in MORDAUNT 1681 by NMBROOK - Euromodel - 1:60 - Beyond Bashed
As I am not working this weekend for a change,I have decided to concentrate on big structural stuff and leave the gratings for the limited time I have on weeknights.
After a thorough rub down of the poly on deck spirketing and gunports I have made a start on the deck beams.Incidentally,the varnished areas have now had nine coats of poly,'knocked back' every three coats.There will be another coat applied before using whichever treenailing method I employ,if any,flatted again and then the final coat.
For the deck beams,I have borrowed a method from Russian master Dimitry Shevelev.The beams slot through the sides of the hull.This allows the beams to be adjusted by shimming to ensure perfect deck alignment in relation to the gunports.Any adjustments become invisible when the final covering is applied inside and out.In addition to this,the deck structure can be built inside the hull and fine adjustment can be carried out to the hull sides before the beams are glued to the hull sides.
The plan is that all the plain beams are dry fitted,then removed to allow the deck clamps to be fitted inside the hull.The beam slots are then extended through the deck clamps to allow refitting of the beams.I know this joint will be historically incorrect,but would look identical from the outside although this area will be nigh on invisible on the assembled model.
I do anticipate that these beams will be fitted dry and removed several times,to allow the joints to be cut in them and to allow varnishing of the undersides before finally gluing in place.
Kind Regards
Nigel
-
NMBROOK got a reaction from tarbrush in MORDAUNT 1681 by NMBROOK - Euromodel - 1:60 - Beyond Bashed
Grating construction pt2
I next glued battens into the notches in the ledges.The height of the battens was oversize as the tops would be milled off.I used aliphatic,with a drop in each joint rather than using dilute PVA,
When set,the top face of the gratings was faced of again with the miller,but still above finished level.Whilst on the mill bench,I trimmed the ends of the battens flush with the end ledges.
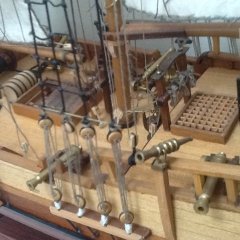
I have made the decision to carry out representation of all fastenings with copper.This was my original intention at the start and I have decided to stick to it.So now to the grating nailing.I have started drilling two holes at each intersection 0.3mm diameter.Unfortunately this must be done manually with a pin vise.Due to the drill diameter,I was unable to find anything adequately concentric and small enough to hold the drill in the mill or rotary tool.Into the holes I am bonding with CA 0.27mm copper wire.I have made a start in the pics,but you can appreciate it may be a little while before part 3 .The top face still has around 0.4mm of material to be removed so this should eradicate the glue residue.
Kind Regards
Nigel
-
 NMBROOK got a reaction from md1400cs in MORDAUNT 1681 by NMBROOK - Euromodel - 1:60 - Beyond Bashed
Now as promised,a picture walkthrough of the steps involved milling the 'grating' with backing spacer.
First a safepark position was created with the mill,a slot around 2mm to 3mm wide 5mm deep(the sheet is 6mm thick)All work is done with a 1mm milling cutter
Step two was to machine 1.5mm slots 1.5mm deep that will form the grouves for the battens to lay in.
Step three was to mill 1.5mm slots 5mm deep perpendicular to the batten slots.These are the gaps between the ledges.All slots had 1.5mm of material inbetween them i.e. the centre to centre distance is 3mm.
Finally the sections at each end were cut off to enable easy fitting of the overlength battens.Now also in this pic,because I was determined to have a go with this method to produce a finer pattern grating,is one with 1mm holes and 1mm ledges and battens.This was a complete success,not one chip to any of the nibs,although removing the sawdust was a very careful job with a soft brush.I think this is the way forward for Mordaunt's gratings although 1mm pear sheet for the battens will have to wait as my supplier of this is currently on their holidays
Kind Regards
Nigel
-
 NMBROOK got a reaction from mtaylor in MORDAUNT 1681 by NMBROOK - Euromodel - 1:60 - Beyond Bashed
A valid point Brian,the main advantage to this method,aside from being authentic to the original is that you are only in effect producing half the number of necessary 'combs'.Trying to make crisp combs individually in Pearwood is virtually impossible,I did try,but the wood just chips away.
Kind Regards
Nigel
-
 NMBROOK got a reaction from janos in MORDAUNT 1681 by NMBROOK - Euromodel - 1:60 - Beyond Bashed
Now as promised,a picture walkthrough of the steps involved milling the 'grating' with backing spacer.
First a safepark position was created with the mill,a slot around 2mm to 3mm wide 5mm deep(the sheet is 6mm thick)All work is done with a 1mm milling cutter
Step two was to machine 1.5mm slots 1.5mm deep that will form the grouves for the battens to lay in.
Step three was to mill 1.5mm slots 5mm deep perpendicular to the batten slots.These are the gaps between the ledges.All slots had 1.5mm of material inbetween them i.e. the centre to centre distance is 3mm.
Finally the sections at each end were cut off to enable easy fitting of the overlength battens.Now also in this pic,because I was determined to have a go with this method to produce a finer pattern grating,is one with 1mm holes and 1mm ledges and battens.This was a complete success,not one chip to any of the nibs,although removing the sawdust was a very careful job with a soft brush.I think this is the way forward for Mordaunt's gratings although 1mm pear sheet for the battens will have to wait as my supplier of this is currently on their holidays
Kind Regards
Nigel
-
 NMBROOK got a reaction from Bill Hime in MORDAUNT 1681 by NMBROOK - Euromodel - 1:60 - Beyond Bashed
Thank you Nils,Bill and Matti
I was just thinking a similar thing yesterday Nils It kind of reminds me of tudor buildings,although the colour is wrong.
I am enjoying to able to spend some decent time in the shipyard Matti I agree the lines are fantastic,although there is still some refinement to do on the model,predominantly the stern which is still a plain block.I am deliberately leaving this until the counter timbers are in place which can only go in once this main gundeck is about complete.I could fit them earlier,but would make everything so much harder to access.
I have succumb to temptation and done a little treenailing.I have decided to stick to the original plan and go for unblackened copper.This decision is based on the 'Russian Palace' influence I have going on with this model and is a direction I have been moving toward.I have not ruled out doing the decorations in black As I have got further on in this pastime,my taste has changed somewhat and I prefer the darker muted aesthetics of this style to the gilded or carved boxwood ornamentation that is commonplace.
I have posted this link before,but for me personally this is THE model ship and one that has had the biggest influence on my future style of modelling,but I shall post it again for anyone unfamiliar with it;
http://www.shipmodels.com.ua/eng/models/elite/le_ambiteux/index.htm
Kind Regards
Nigel
-
NMBROOK got a reaction from Bill Hime in MORDAUNT 1681 by NMBROOK - Euromodel - 1:60 - Beyond Bashed
A valid point Brian,the main advantage to this method,aside from being authentic to the original is that you are only in effect producing half the number of necessary 'combs'.Trying to make crisp combs individually in Pearwood is virtually impossible,I did try,but the wood just chips away.
Kind Regards
Nigel
-
 NMBROOK reacted to GuntherMT in MORDAUNT 1681 by NMBROOK - Euromodel - 1:60 - Beyond Bashed
What is the advantage to this method over creating battens that just cross each other like most kits include, and trimming it to size?
-
 NMBROOK got a reaction from rtropp in MORDAUNT 1681 by NMBROOK - Euromodel - 1:60 - Beyond Bashed
Now as promised,a picture walkthrough of the steps involved milling the 'grating' with backing spacer.
First a safepark position was created with the mill,a slot around 2mm to 3mm wide 5mm deep(the sheet is 6mm thick)All work is done with a 1mm milling cutter
Step two was to machine 1.5mm slots 1.5mm deep that will form the grouves for the battens to lay in.
Step three was to mill 1.5mm slots 5mm deep perpendicular to the batten slots.These are the gaps between the ledges.All slots had 1.5mm of material inbetween them i.e. the centre to centre distance is 3mm.
Finally the sections at each end were cut off to enable easy fitting of the overlength battens.Now also in this pic,because I was determined to have a go with this method to produce a finer pattern grating,is one with 1mm holes and 1mm ledges and battens.This was a complete success,not one chip to any of the nibs,although removing the sawdust was a very careful job with a soft brush.I think this is the way forward for Mordaunt's gratings although 1mm pear sheet for the battens will have to wait as my supplier of this is currently on their holidays
Kind Regards
Nigel
-
NMBROOK got a reaction from md1400cs in Wasa by md1400cs - FINISHED - Corel - 1:75
Hi Michael
I would share if I still had any of the military stuff I used to make.I am going back 25 years and a messy divorce,plus many house moves.I did,may still have a Stug 4 somewhere in the loft but I am afraid that is about it If I still had it all now there would be no room for ships
Kind Regards
Nigel
-
 NMBROOK got a reaction from hexnut in MORDAUNT 1681 by NMBROOK - Euromodel - 1:60 - Beyond Bashed
Now as promised,a picture walkthrough of the steps involved milling the 'grating' with backing spacer.
First a safepark position was created with the mill,a slot around 2mm to 3mm wide 5mm deep(the sheet is 6mm thick)All work is done with a 1mm milling cutter
Step two was to machine 1.5mm slots 1.5mm deep that will form the grouves for the battens to lay in.
Step three was to mill 1.5mm slots 5mm deep perpendicular to the batten slots.These are the gaps between the ledges.All slots had 1.5mm of material inbetween them i.e. the centre to centre distance is 3mm.
Finally the sections at each end were cut off to enable easy fitting of the overlength battens.Now also in this pic,because I was determined to have a go with this method to produce a finer pattern grating,is one with 1mm holes and 1mm ledges and battens.This was a complete success,not one chip to any of the nibs,although removing the sawdust was a very careful job with a soft brush.I think this is the way forward for Mordaunt's gratings although 1mm pear sheet for the battens will have to wait as my supplier of this is currently on their holidays
Kind Regards
Nigel
-
 NMBROOK got a reaction from Sjors in MORDAUNT 1681 by NMBROOK - Euromodel - 1:60 - Beyond Bashed
Now as promised,a picture walkthrough of the steps involved milling the 'grating' with backing spacer.
First a safepark position was created with the mill,a slot around 2mm to 3mm wide 5mm deep(the sheet is 6mm thick)All work is done with a 1mm milling cutter
Step two was to machine 1.5mm slots 1.5mm deep that will form the grouves for the battens to lay in.
Step three was to mill 1.5mm slots 5mm deep perpendicular to the batten slots.These are the gaps between the ledges.All slots had 1.5mm of material inbetween them i.e. the centre to centre distance is 3mm.
Finally the sections at each end were cut off to enable easy fitting of the overlength battens.Now also in this pic,because I was determined to have a go with this method to produce a finer pattern grating,is one with 1mm holes and 1mm ledges and battens.This was a complete success,not one chip to any of the nibs,although removing the sawdust was a very careful job with a soft brush.I think this is the way forward for Mordaunt's gratings although 1mm pear sheet for the battens will have to wait as my supplier of this is currently on their holidays
Kind Regards
Nigel
-
NMBROOK reacted to NAZGÛL in MORDAUNT 1681 by NMBROOK - Euromodel - 1:60 - Beyond Bashed
Very nice walkthrough of your work, thanks for showing.
/Matti
-
NMBROOK got a reaction from Bill Hime in MORDAUNT 1681 by NMBROOK - Euromodel - 1:60 - Beyond Bashed
Now as promised,a picture walkthrough of the steps involved milling the 'grating' with backing spacer.
First a safepark position was created with the mill,a slot around 2mm to 3mm wide 5mm deep(the sheet is 6mm thick)All work is done with a 1mm milling cutter
Step two was to machine 1.5mm slots 1.5mm deep that will form the grouves for the battens to lay in.
Step three was to mill 1.5mm slots 5mm deep perpendicular to the batten slots.These are the gaps between the ledges.All slots had 1.5mm of material inbetween them i.e. the centre to centre distance is 3mm.
Finally the sections at each end were cut off to enable easy fitting of the overlength battens.Now also in this pic,because I was determined to have a go with this method to produce a finer pattern grating,is one with 1mm holes and 1mm ledges and battens.This was a complete success,not one chip to any of the nibs,although removing the sawdust was a very careful job with a soft brush.I think this is the way forward for Mordaunt's gratings although 1mm pear sheet for the battens will have to wait as my supplier of this is currently on their holidays
Kind Regards
Nigel
-
 NMBROOK got a reaction from Mirabell61 in MORDAUNT 1681 by NMBROOK - Euromodel - 1:60 - Beyond Bashed
Now as promised,a picture walkthrough of the steps involved milling the 'grating' with backing spacer.
First a safepark position was created with the mill,a slot around 2mm to 3mm wide 5mm deep(the sheet is 6mm thick)All work is done with a 1mm milling cutter
Step two was to machine 1.5mm slots 1.5mm deep that will form the grouves for the battens to lay in.
Step three was to mill 1.5mm slots 5mm deep perpendicular to the batten slots.These are the gaps between the ledges.All slots had 1.5mm of material inbetween them i.e. the centre to centre distance is 3mm.
Finally the sections at each end were cut off to enable easy fitting of the overlength battens.Now also in this pic,because I was determined to have a go with this method to produce a finer pattern grating,is one with 1mm holes and 1mm ledges and battens.This was a complete success,not one chip to any of the nibs,although removing the sawdust was a very careful job with a soft brush.I think this is the way forward for Mordaunt's gratings although 1mm pear sheet for the battens will have to wait as my supplier of this is currently on their holidays
Kind Regards
Nigel
-
NMBROOK reacted to mtaylor in Licorne 1755 by mtaylor - 3/16" scale - French Frigate - from Hahn plans - Version 2.0 - TERMINATED
Sam,
I think it's more of the spacers and the frames swelling or shrinking instead of moving when the humidity changes. This could pop the planks off or wreck some havoc with the keel. The spacers are there at this point, only to provide some rigidity while fairing. If I weren't planking completely, they would come out.
-
NMBROOK got a reaction from tarbrush in MORDAUNT 1681 by NMBROOK - Euromodel - 1:60 - Beyond Bashed
As I am not working this weekend for a change,I have decided to concentrate on big structural stuff and leave the gratings for the limited time I have on weeknights.
After a thorough rub down of the poly on deck spirketing and gunports I have made a start on the deck beams.Incidentally,the varnished areas have now had nine coats of poly,'knocked back' every three coats.There will be another coat applied before using whichever treenailing method I employ,if any,flatted again and then the final coat.
For the deck beams,I have borrowed a method from Russian master Dimitry Shevelev.The beams slot through the sides of the hull.This allows the beams to be adjusted by shimming to ensure perfect deck alignment in relation to the gunports.Any adjustments become invisible when the final covering is applied inside and out.In addition to this,the deck structure can be built inside the hull and fine adjustment can be carried out to the hull sides before the beams are glued to the hull sides.
The plan is that all the plain beams are dry fitted,then removed to allow the deck clamps to be fitted inside the hull.The beam slots are then extended through the deck clamps to allow refitting of the beams.I know this joint will be historically incorrect,but would look identical from the outside although this area will be nigh on invisible on the assembled model.
I do anticipate that these beams will be fitted dry and removed several times,to allow the joints to be cut in them and to allow varnishing of the undersides before finally gluing in place.
Kind Regards
Nigel
-
NMBROOK reacted to fnick in Le Mirage by fnick - Corel - 1:75 - wood
Hi all
Thanks for the likes!
Nigel: Thanks for the feedback. Good to know I'm on the right track. Cutting planks from sheet isn't that bad especially since I've taken a leaf out of your book (or your build log more specifically ) and have started using a scalpel. Much sharper and much easier than the X-Acto knife.
Sjors: Thanks for your comment. Too kind. Yes updates are slow. Too much to do during the day... I dont know who invented work but I think I need to have words...
Nick
-
NMBROOK got a reaction from tarbrush in MORDAUNT 1681 by NMBROOK - Euromodel - 1:60 - Beyond Bashed
I thought it was about time for an update as the last one was several months ago .
I have fitted the waterway and quickwork to the other internal hull face and completed the planking of the deck.I am currently completing the exposed frame finishing pieces and working on the deck finish.I anticipate many coats of poly rubbed down every three coats.This gives a glass like surface as whilst I wish to see joints in the woodwork,I don't want to be able to feel them.
I feel these pictures may be a little on the red side.The pear is definitely brown with no hint of red,trouble is outdoor daylight pics are hard to come by as its dark when at home during the week and we have had some awful weather on the weekends
Kind Regards
Nigel
-
 NMBROOK got a reaction from janet bode in MORDAUNT 1681 by NMBROOK - Euromodel - 1:60 - Beyond Bashed
As work is moving well on the construction of my Caroline build,preliminary work is now starting on my next'bill paying' project.This is based on the Euromodel kit,but it is my intention to push the boundaries of what can be achieved with a kit.I shall be using construction techniques for the hull that have been developed by myself,specifically for this build.The completed model shall include the following details;
1/hull planking in boxwood and ebony
2/hull planking omitted between the upper wales with false boxwood frames,this is a feature on quite a few Navy board models which I am quite fond of and an alternative from a fully framed build.
3/Full hull interior,lower gun deck upwards,with planking sections omitted on the upper decks for viewing the interior.
4/Remodelling of the stern to replicate the drawing by Van de Velde the Elder.
This project will be a 'slow burn' until Caroline is finished,but I am starting this log now to avoid missing anything as work progresses.I am trying to avoid starting another log with a planked hull
Some photos to wet your appetite
The box,rather heavy,given it's size
Mordaunt by Van de Velde the elder
Kind Regards Nigel
-
NMBROOK got a reaction from md1400cs in MORDAUNT 1681 by NMBROOK - Euromodel - 1:60 - Beyond Bashed
As I am not working this weekend for a change,I have decided to concentrate on big structural stuff and leave the gratings for the limited time I have on weeknights.
After a thorough rub down of the poly on deck spirketing and gunports I have made a start on the deck beams.Incidentally,the varnished areas have now had nine coats of poly,'knocked back' every three coats.There will be another coat applied before using whichever treenailing method I employ,if any,flatted again and then the final coat.
For the deck beams,I have borrowed a method from Russian master Dimitry Shevelev.The beams slot through the sides of the hull.This allows the beams to be adjusted by shimming to ensure perfect deck alignment in relation to the gunports.Any adjustments become invisible when the final covering is applied inside and out.In addition to this,the deck structure can be built inside the hull and fine adjustment can be carried out to the hull sides before the beams are glued to the hull sides.
The plan is that all the plain beams are dry fitted,then removed to allow the deck clamps to be fitted inside the hull.The beam slots are then extended through the deck clamps to allow refitting of the beams.I know this joint will be historically incorrect,but would look identical from the outside although this area will be nigh on invisible on the assembled model.
I do anticipate that these beams will be fitted dry and removed several times,to allow the joints to be cut in them and to allow varnishing of the undersides before finally gluing in place.
Kind Regards
Nigel
-
 NMBROOK got a reaction from cristikc in MORDAUNT 1681 by NMBROOK - Euromodel - 1:60 - Beyond Bashed
As I am not working this weekend for a change,I have decided to concentrate on big structural stuff and leave the gratings for the limited time I have on weeknights.
After a thorough rub down of the poly on deck spirketing and gunports I have made a start on the deck beams.Incidentally,the varnished areas have now had nine coats of poly,'knocked back' every three coats.There will be another coat applied before using whichever treenailing method I employ,if any,flatted again and then the final coat.
For the deck beams,I have borrowed a method from Russian master Dimitry Shevelev.The beams slot through the sides of the hull.This allows the beams to be adjusted by shimming to ensure perfect deck alignment in relation to the gunports.Any adjustments become invisible when the final covering is applied inside and out.In addition to this,the deck structure can be built inside the hull and fine adjustment can be carried out to the hull sides before the beams are glued to the hull sides.
The plan is that all the plain beams are dry fitted,then removed to allow the deck clamps to be fitted inside the hull.The beam slots are then extended through the deck clamps to allow refitting of the beams.I know this joint will be historically incorrect,but would look identical from the outside although this area will be nigh on invisible on the assembled model.
I do anticipate that these beams will be fitted dry and removed several times,to allow the joints to be cut in them and to allow varnishing of the undersides before finally gluing in place.
Kind Regards
Nigel
-
 NMBROOK got a reaction from Nirvana in Le Mirage by fnick - Corel - 1:75 - wood
Great job with the garboard Nick You have got a nice even band left to fill in which should make life a little easier(as easy as it can be cutting all the planks out of sheet).
Kind Regards
Nigel
-
NMBROOK got a reaction from cog in Licorne 1755 by mtaylor - 3/16" scale - French Frigate - from Hahn plans - Version 2.0 - TERMINATED
Leaving them in place makes a lot of sense Mark.The only thing worth considering is running the saw through three or four evenly spaced along the length of the hull immediately prior to planking.It would be insurance against any timber movement in the future which could result in the odd crack appearing.This can always be a problem when you have a long continuous 'stack' of timbers with the grain running vertically
Kind Regards
Nigel