


Cathead
-
Posts
3,550 -
Joined
-
Last visited
Content Type
Profiles
Forums
Gallery
Events
Everything posted by Cathead
-
 Yay, glad to have you back! I've been missing your crisp work as an inspiration for my own more thumb-sy skills. I, too, find it hard to balance lots of different interests.
 -
So Heroine had no Texas or equivalent skylights for the main cabin? That's interesting; it must have been gloomy inside. Capstan, stove, and everything else look great. Glad you're feeling better.
-
How frustrating. I've certainly found that a clear head, after taking a break, can come up with a solution more easily than a frustrated head. Good luck.
- 245 replies
-
- 1
-

-
- model shipways
- Finished
- (and 1 more)
-
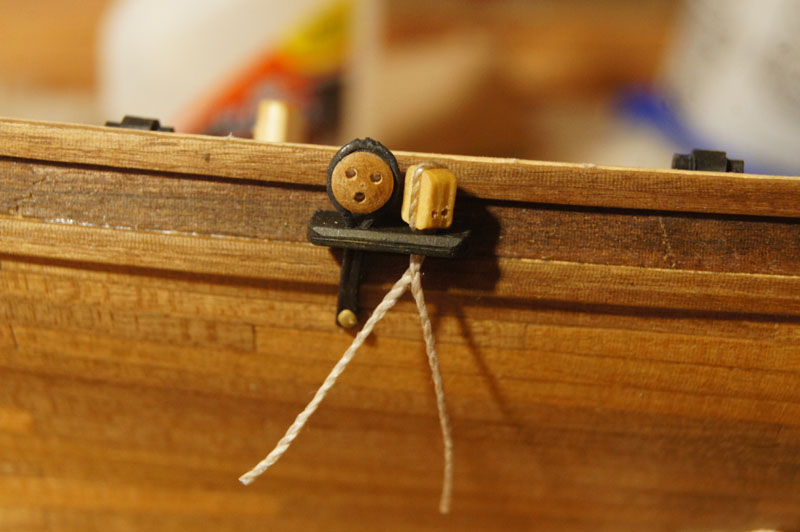
I've been working on rigging the first blocks to the deck fittings; I decided it would be better overall to do this before installing the rings. It's been easy to hold each ring in a clamp, tie the block on & glue it in place, then insert the ring into the deck. This way if I make a mistake it isn't already attached to the model. Below are the first six block/ring assemblies in place around the foremast's hole. These will be in tension vertically once rigged, so I don't care how they lay about for now. I also assembled and installed the channels, which led to an unresolved problem. Each channel has a regular deadeye attached to a chainplate, then a block that's supposed to be tied to the channel. See below. The problem is, the instructions just say to tie this block to the channel, and show what looks like some kind of small stopper knot beneath that would hold the block in place. But the hole in the channel is way too large for this; the size knot it would take to keep this block in place under tension would be almost as big as the block itself, and would look ridiculous. So my problem is, how do I fix this block in place? Do I somehow tie a small scrap of wood onto the line to act as a stopper? Do I try to CA the line to the underside of the channel? I've been having trouble searching for an answer to this on MSW and elsewhere, as the search terms are so vague. Any ideas?

- 96 replies
-
- 9
-
-
- topsail schooner
- revenue cutter
- (and 3 more)
-
Hey, Bruce, thanks for taking the time to write up your detailed observations. I don't know when or if I'll tackle a kit like this, but I learn just from reading others' work. It's appreciated. And, of course, nice work.
-
I certainly had a load of trouble drilling those bands. I'm quite curious to see how you did yours.
- 335 replies
-
- 3
-
-
- 18th century longboat
- Finished
- (and 1 more)
-
It's a lovely little model, and very creative. Congratulations on finishing!
- 31 replies
-
- 1
-
-
- sloop
- sloop of war
- (and 1 more)
-
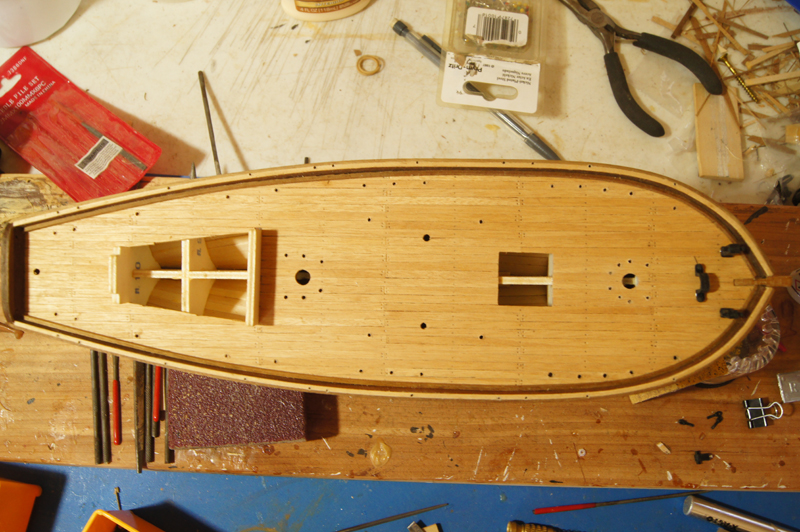
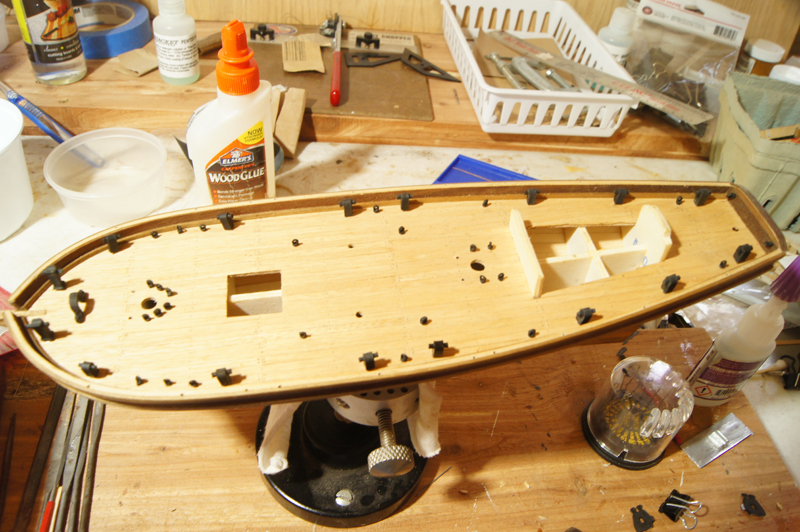
I have been working on the deck fittings.Below, you see the deck with all holes drilled for the metal fittings (rings, bits, etc.): And here you see most of the fittings test-placed (unglued) to get a sense of the deck's layout. Many of these will have small blocks; I'm trying to decide whether I should tie those in before gluing down the fittings, or afterward. Another source of annoyance in this kit: these metal fittings have "pins" meant to fit into the deck holes, but many of them are too thick or long. For example, the stanchions which will hold safety lines have pins nearly the width of the rails, as shown in the blurry photo below. I've drilled smaller pilots holes, but am reluctant to drill any wider for fear of splitting the rail. So I may have to file down all these tiny parts to fit proper holes. I've also had this problem with the plates and other hull fittings; their pins are so long that holes drilled in the rails would go right through. As it is, I've been desperately careful drilling pilot holes sideways through these rails without poking through. So I've been spending lots of time filing down the pins on these fittings to be narrower and pointier so I can drive them into the wood and have them hold more securely. It's been very fiddly work but I think it'll come out ok. As this is the first rigged ship I've ever attempted, I don't know if this kind of thing or normal, or unique to the Corel kit. Are there any thoughts on whether to pre-rig blocks to the rings, or do it after gluing the rings in? Anything else I should be considering at this stage?

- 96 replies
-
- 12
-
-
- topsail schooner
- revenue cutter
- (and 3 more)
-
For anyone in central Missouri, I will be displaying the Bertrand and several other models at the Tigercon 2016 model show in Columbia, Missouri tomorrow (Saturday November 5). I apologize for the very late warning, it somehow never occurred to me that it might be of interest to anyone here, but there are a few folks from Missouri on the forum so I thought I'd mention it.
-
Mike, you've done a fine job. I appreciate your build log, too, as it's helped me better understand a kit I may well want to build myself one day. One question, forgive me if I missed the answer earlier: did you treat the lines with anything to help keep them from sagging over time? Otherwise, hearty congratulations. I'll miss following along on this. I need to get moving on my current project so I can go back to another steamboat myself.
- 225 replies
-
- 5
-
-
- chaperon
- model shipways
- (and 1 more)
-
Kurt, I remember at some point you posting a great photo of a fire-bucket rack on a steamboat. Or was it someone else posted it, and you just explained it? Either way it was a really illustrative photo, if you know what I'm talking about and where to find it. Mike, I did something similar with the boats for Bertrand: I wasn't happy with hollow shells either, so added wooden thwarts, tillers, rudders, etc. I think both mine and yours gained a lot from the modifications.
- 225 replies
-
- 6
-
-
- chaperon
- model shipways
- (and 1 more)
-
Clarence, for whatever it's worth, that article lists the boat solely as the "Monroe" (not "City of"), and Way's Packet Directory also lists the "Monroe" as being a sternwheeler that operated on the Ouchita late in its life. Although, just to throw a little more fog into the mix, that online article claims that Ouchita-operating Monroe was built in Pittsburg (sic) while the Way's Monroe is listed as built in Wheeling. I think I'd trust the latter over the online article which may or may not know what it's talking about. I certainly don't think it affects your model's interest in any way, it'll be a really neat build no matter what. Given that Fryant himself lists his plans as being for a fictional boat, I'm not sure it's worth trying to tie them too strongly to any given prototype. As for the fuel, the Monroe in Way's was built 1886 and sank 1915, and certainly by the later end of that period I wouldn't be surprised if it had been converted to coal even if originally built for wood. Wood became a dear commodity along the rivers as the regions were deforested due to high demand, and coal was much more energy-dense (same reason railroads converted over). I don't think I can help you much on the small boats. My understanding was that most steamboats in the core riverboat era didn't carry "lifeboats" in the marine sense of the word, just a couple small yawls for general-purpose use. There was no direct provision for passenger safety. I don't know when/if that changed; I could see different practices developing as the 20th century got underway. I suspect Kurt or Captain Bob would know more.
- 69 replies
-
- 2
-
-
- city of monroe
- steamboat
- (and 1 more)
-
Erik, I lost my father the same way. It's wonderful that your models could be shared with him.
-
From Bob's link: That explains the discrepancy. This will be a neat project regardless, and I'm looking forward to it.
- 69 replies
-
- 2
-
-
- city of monroe
- steamboat
- (and 1 more)
-
I wonder if the Fryant plans are for one of the three "Monroe"s known to be built? One was a centerwheel ferry, one was a sidewheeler, but the third was a sternwheeler that operated on the Ouchita River, built in 1886. The photo in that link looks pretty similar to your plans.
- 69 replies
-
- 2
-
-
- city of monroe
- steamboat
- (and 1 more)
-
Steamboats and other rivercraft - general discussion
Cathead replied to Cathead's topic in Nautical/Naval History
Oops, I just posted the same link in Clarence's build log. Looks like his plans are for a different, sternwheel City of Monroe, though.- 281 replies
-
- 2
-
-
- Steamboats
- riverboats
- (and 3 more)
-
Oh, that's interesting, I thought you were building this one (a sidewheeler). It's the only City of Monroe listed in Way's Packet Directory. Do the plans give any information about their prototype?
- 69 replies
-
- 2
-
-
- city of monroe
- steamboat
- (and 1 more)
-
Yes, Carl, you're right; I bought the kit with the full intention of making do with what it contained, and learning what that was like. I think it's been a good experience teaching me more about different wood types and quality, which can only be learned by experience, really.
- 96 replies
-
- 5
-
-
- topsail schooner
- revenue cutter
- (and 3 more)
-
I did some quick research and she's a fine-looking boat. I'm looking forward to this. How did you choose this one in particular?
- 69 replies
-
- 3
-
-
- city of monroe
- steamboat
- (and 1 more)
-
Steamboats and other rivercraft - general discussion
Cathead replied to Cathead's topic in Nautical/Naval History
I don't think I have any specific advice or info to offer, but I'm looking forward to this!- 281 replies
-
- 2
-
-
- Steamboats
- riverboats
- (and 3 more)
-
Looking real nice, Mike. You should be very proud.
- 225 replies
-
- 3
-
-
- chaperon
- model shipways
- (and 1 more)
-
Many sympathies, but she's still looking great.
- 745 replies
-
- 2
-
-
- francis pritt
- mission ship
- (and 1 more)
-
Glenn, all the extra detail you put in is a great reference for future work. I'm already thinking ahead to a possible Arabia scratchbuild and this log is really helping me fill in some mental gaps in knowledge. Thanks so much for sharing.
-
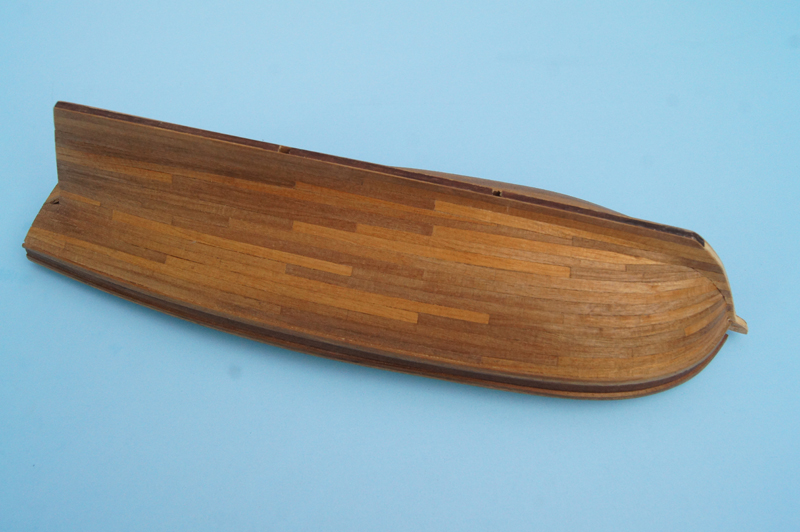
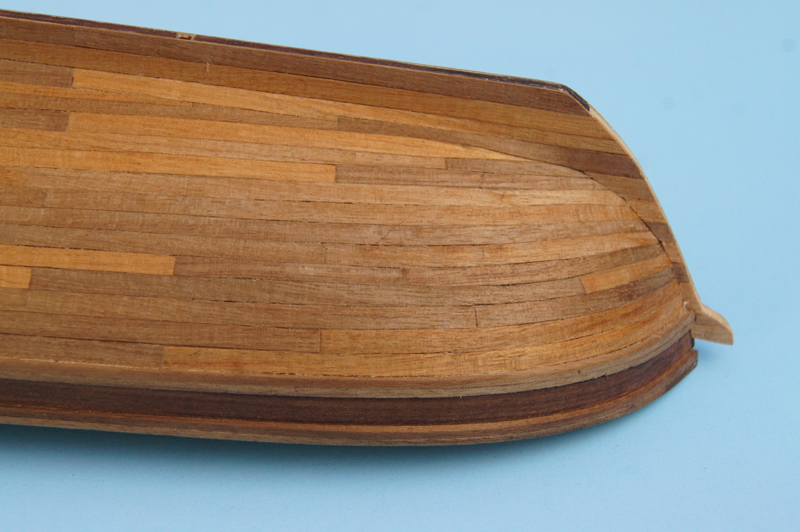
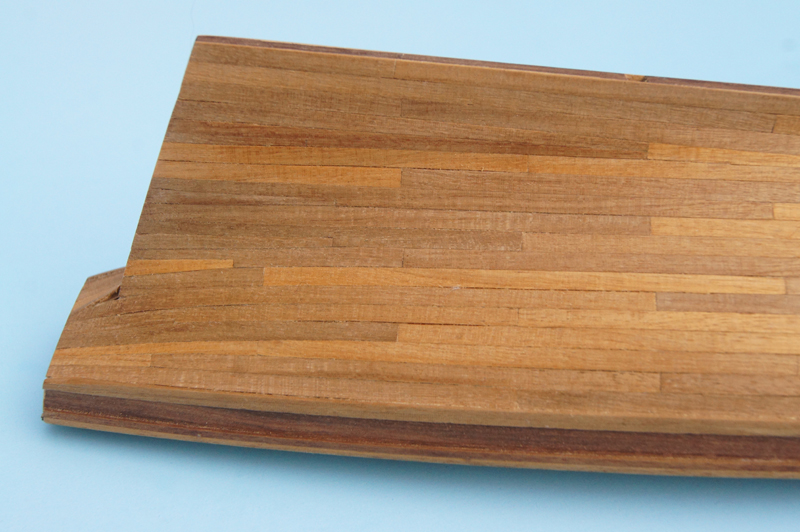
I've finally finished the hull planking, and am fairly pleased with the outcome. I decided to give "accurate" planking at the bow a shot after all, and with much trial and error produced an acceptable result: I really don't like the planking wood provided in this kit. I don't know what it is, I think something tropical, but it's very coarse-grained and splits really easily. It does not take bending well; over and over again as I tried to apply even a gentle edge-bend after thorough soaking, it split length-ways rather than take any curve. But I persevered and finished the hull with virtually no wood to spare. I had tried to apply Chuck's no-soak bending method, using a hair dryer, but this wood wouldn't take it. I had to soak each piece and gently bend it, often repeating this several times, to get the curve needed, and I think I broke two or three for every successful piece. But I really do think it came out reasonably: The stern was, of course, more straightforward, but I used this side to continue practicing proper stealer use. I kept all my joints on a strict pattern and restricted almost all of them to real bulkhead locations. The result is fairly pleasing to me. The camera, of course, highlights every slight gap between planks, but none of that is visible from more than 6" away in person. I've been working on this hull for so long now that it's going to feel strange to change focus and start on other aspects of the build. I'm hoping to start putting more time in again; the last few months have been especially busy between a vacation, the start of a new job, and the always-busy fall season on our farm. If winter ever arrives here in Missouri (it's still over 80 F), this build will start progressing again. Thanks for checking in on me.
- 96 replies
-
- 10
-
-
- topsail schooner
- revenue cutter
- (and 3 more)
-
Thanks, Glenn. I haven't stopped this build, I promise, it's just been a very busy stretch for me. I think I'll be able to post an update next weekend, showing what I've been up to on the port side planking.
- 96 replies
-
- 5
-
-
- topsail schooner
- revenue cutter
- (and 3 more)
