


thomaslambo
-
Posts
384 -
Joined
-
Last visited
Content Type
Profiles
Forums
Gallery
Events
Posts posted by thomaslambo
-
-
Hi Phill,
I'm a big fan of the Bounty myself and I see you have a copy of McKay's Anatomy book...worth it's weight in gold for anyone building this ship

Here's a link to the construction of a very nice set of Quarter Galleries (very helpful build log for people that like to upgrade their kit with custom details): http://modelshipworld.com/index.php/topic/230-hms-vulture-by-dan-vadas-1776-148-scale-16-gun-swan-class-sloop-from-tffm-plans-completed/page-49
And good luck with the build...you're off to a great start
- Phill Elston, robin b, Elijah and 1 other
-
 4
4
-
Hi Ken,
I found your build as a result of researching copper plating....your plating is superb along with the rest of your work
Excellent build logs like yours is what new builders like myself (and anyone else for that matter) needs...the in-depth tutorials along with supporting pictures clearly explain how you accomplish the superb work. This is why I came to MSW and will continue to learn from logs like yours.
Thanks much and keep up the great work
- mtaylor, GLakie, CaptainSteve and 3 others
-
6
-
Here is a link to the build log Captain Steve mentioned above...superb work and descriptions on the copper application (just page down a bit)
- Canute, mtaylor and CaptainSteve
-
3
-
Wow, nice effect...looks like a ghost ship out of Pirates of the Caribbean

-
-
-
-
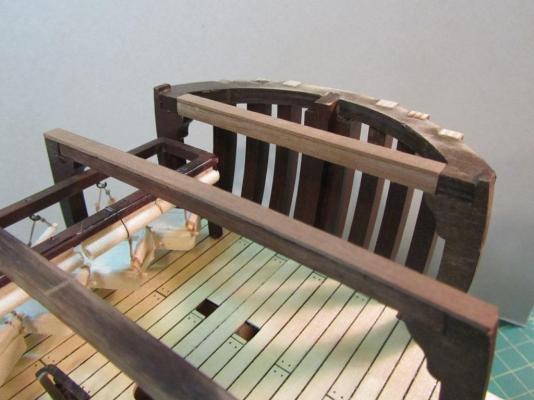
I have a small problem the part with the arrow in the picture is missing from my kit. As far as i can tell it's only there to stiffen up the aft section of the top deck because once the planking is on it will not be seen. If so i can just use some strips of plywood left over to stiffen the underside of the deck.
Am i right in presuming it is only a stiffener and serves no other purpose.
Yes, you are correct, use the plywood instead. Also, the notches only need to be the size of the small stanchion (I have no idea why they made those larger notches, totally unnecessary).
And as a matter of fact, I had to heavily file it down so it can't be seen through the open windows.
-
You have a fine eye for detail...see my above edit for another error
-
Yup, I used a 1 mm shim on the forward most beam (to accommodate the error you noted) and also used another shim on the beam behind it to ease the rather steep slop of the deck.
Edit: also take note of another error with the Samson posts length of 20 mm (part number 188). The length called for is way to long and should be much shorter as seen in picture book instruction 34 (which shows the correct size)....probably closer to 10 mm in length
-
-
-
Hi Bob,
Congrats on a great job of planking

- mattsayers148, Canute, Bobstrake and 1 other
-
4
-
Not to mention on the other bulkhead the door opens into a bilge pipe
-
I second Bob's comment
FYI - your build was a major incentive for me to build this kit....thanks much
-
Hi Chap,
Yup, am pleased that the fist cover is done.
Happy with the Keel also, I'll be able to do a wee Rebate and slot the second cover in.
I'll be using the Kit supplied 0.5mm Walnut. Already had a trial fitting and flows nicely around the curves.
(As I think I mentioned in the past, this is my first "Bluff" Bow Ship model, more used to pointy Bow Ships.)
Have a good rest of the weekend!!
Cheers....HOF.
Hi Harry,
Lucky you having 2 layers of planks...she's looking good
It looks like you're doing a great job smoothing out the first layer.
Just one thought, .5 mm thickness on the second layer doesn't give you much room for sanding. You might want to consider 1.0 mm, otherwise you better make it perfect my friend
-
Hi GG,
Yes, I've been very busy and haven't made much progress on my Bounty. Your moving along nicely with the build
I purchased replacement wood for all the mast parts (dowels were horribly warped). How do yours look?
-
In the other picture

Kidding aside, looks like page 96?, perhaps he didn't need it for that particular illustration, or could it be an error?
The following pages don't have it either, but the Mizzen Topgallant is addressed in the mast construction section.
-
-
-
Absolutely, I'll check it out....thanks much
-
Ok, if you have rats in the hold then you need to do something about it
- Mirabell61, Phill Elston, yvesvidal and 3 others
-
6
-
Bob,
I came accross these...., looks like this is a webshop..
http://www.fuhrmann-figuren-shop.de/KF-ANI-72001-Ratten
10 little rats cast in tin, in all positions. The man-figure does not belong to the group, for comparing size only.
trust the price is nice and low, so there would be no risk...
Nils
Leave it to you Nils...great find (I was ready to make my own)
-
I had to do the same with my Captains Dining Cabin furniture. No way I could glue it in after the main deck went on. I actually used pins and epoxy to hold the furniture in...so far so good
I have the cabin sealed shut with masking tape and used plastic wrap to cover the hammocks.
I can't believe the amount of dust generated by all the sanding required on the frames and planking.
Again, really nice details you put in the model as well as excellent placement


HMAV Bounty By cobra1951 - Artesania Latina - 1:48
in - Kit build logs for subjects built from 1751 - 1800
Posted · Edited by thomaslambo
Bob,
So sorry to hear this.
You won't believe this but I almost lost my Bounty to our new Pug Dog as well. I was thinking about it yesterday...how I need to be more careful where I leave it in the house. Then I read this post
Will you start another Bounty, or something else?