Moxis
-
Posts
314 -
Joined
-
Last visited
Content Type
Profiles
Forums
Gallery
Events
Everything posted by Moxis
-
Does anybody have any experience of this?
Moxis replied to Moxis's topic in CAD and 3D Modelling/Drafting Plans with Software
Thanks a lot for your opinions guys, this is what I thought too. A toy which doesn't perform satisfactorily any of the functions promised. So better to save one's hard earned cash and leave it to the shop. -
I found at facebook an interesting video about this machine. It does 3D printing, laser engraving and cnc carving, and price seems to be attractive too. But does it everything what it promises? https://www.solopopgo.com/products/all-metal-3d-printer
-
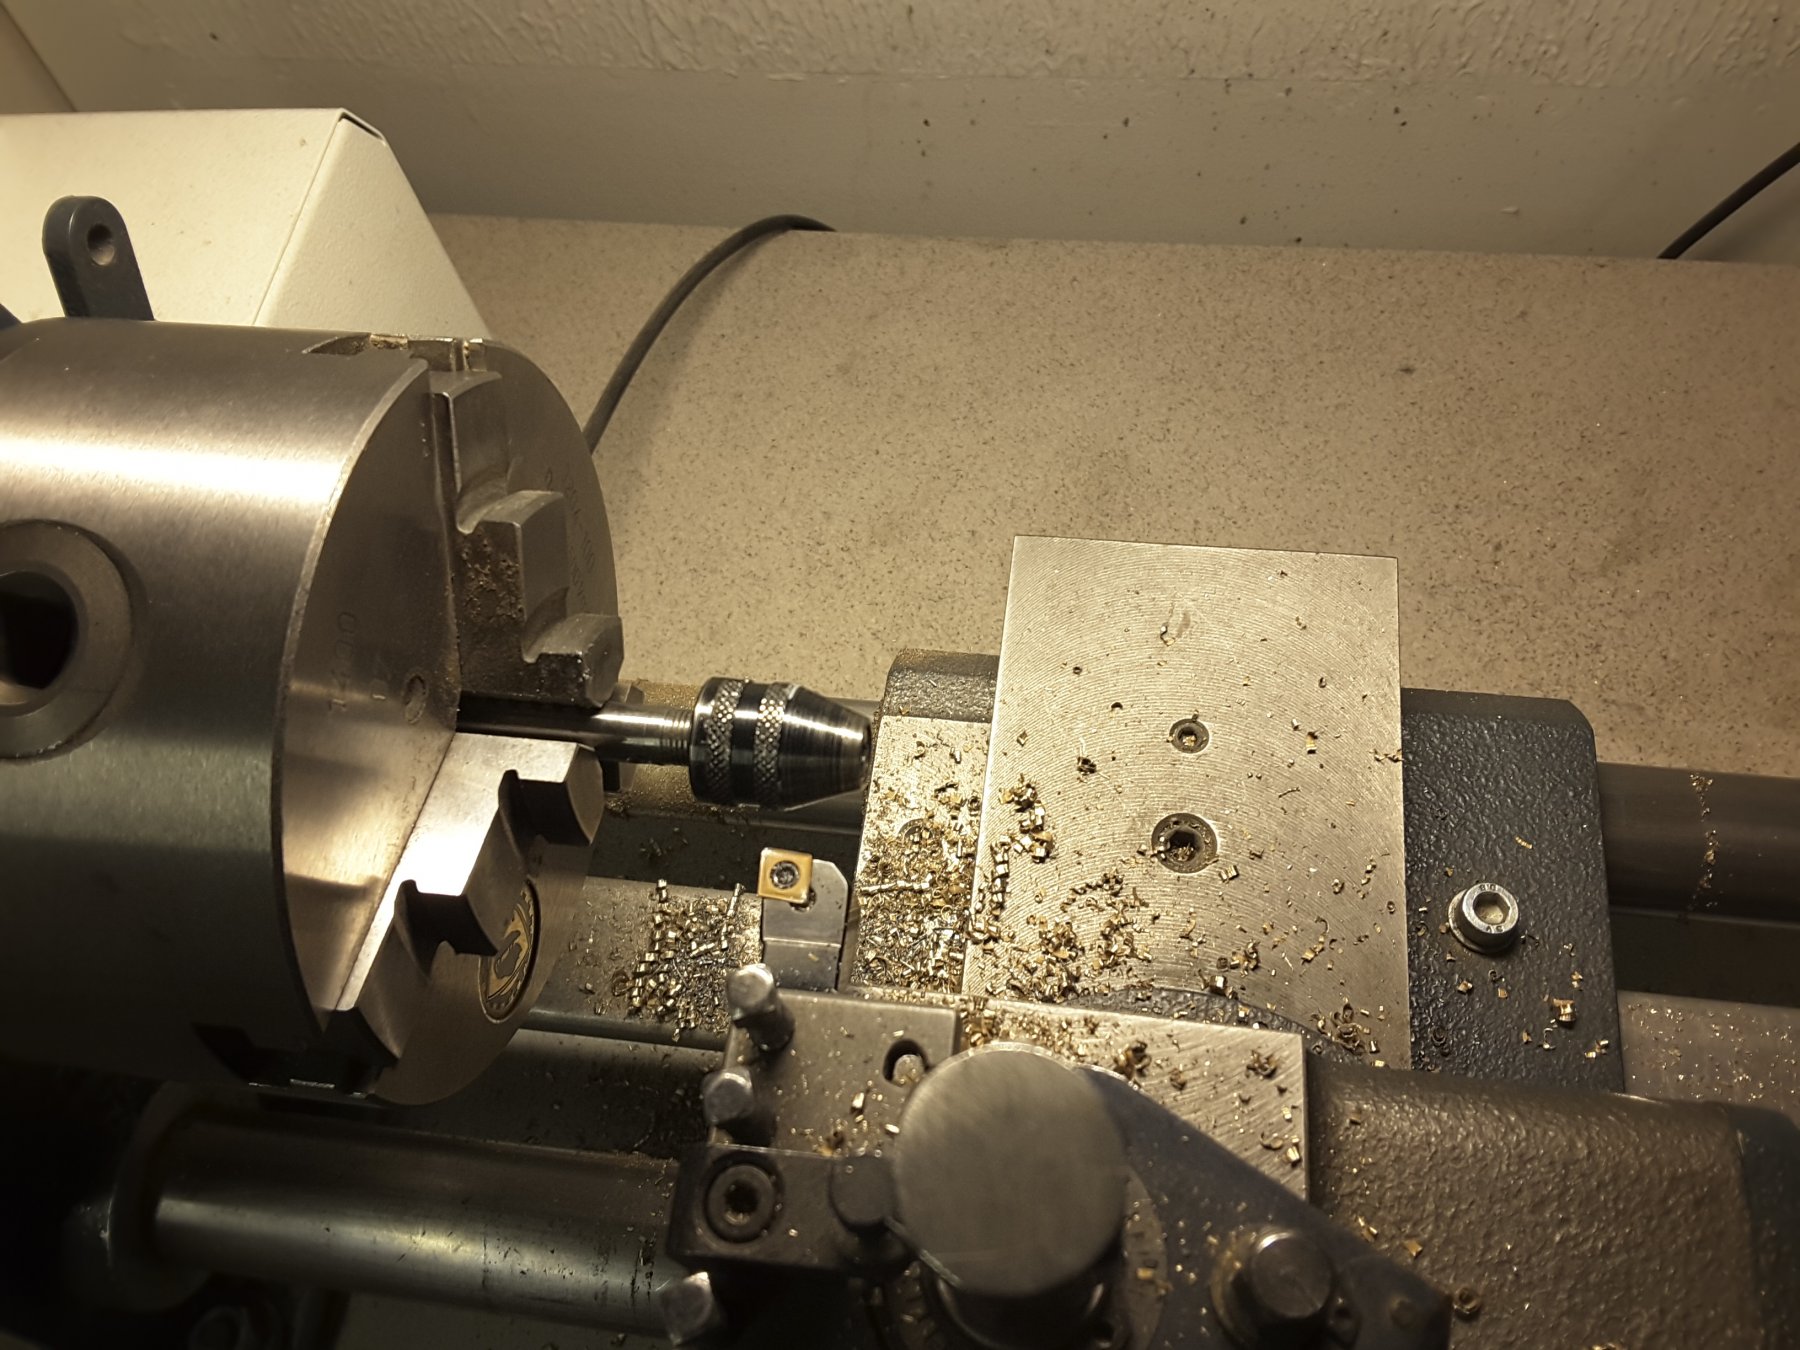
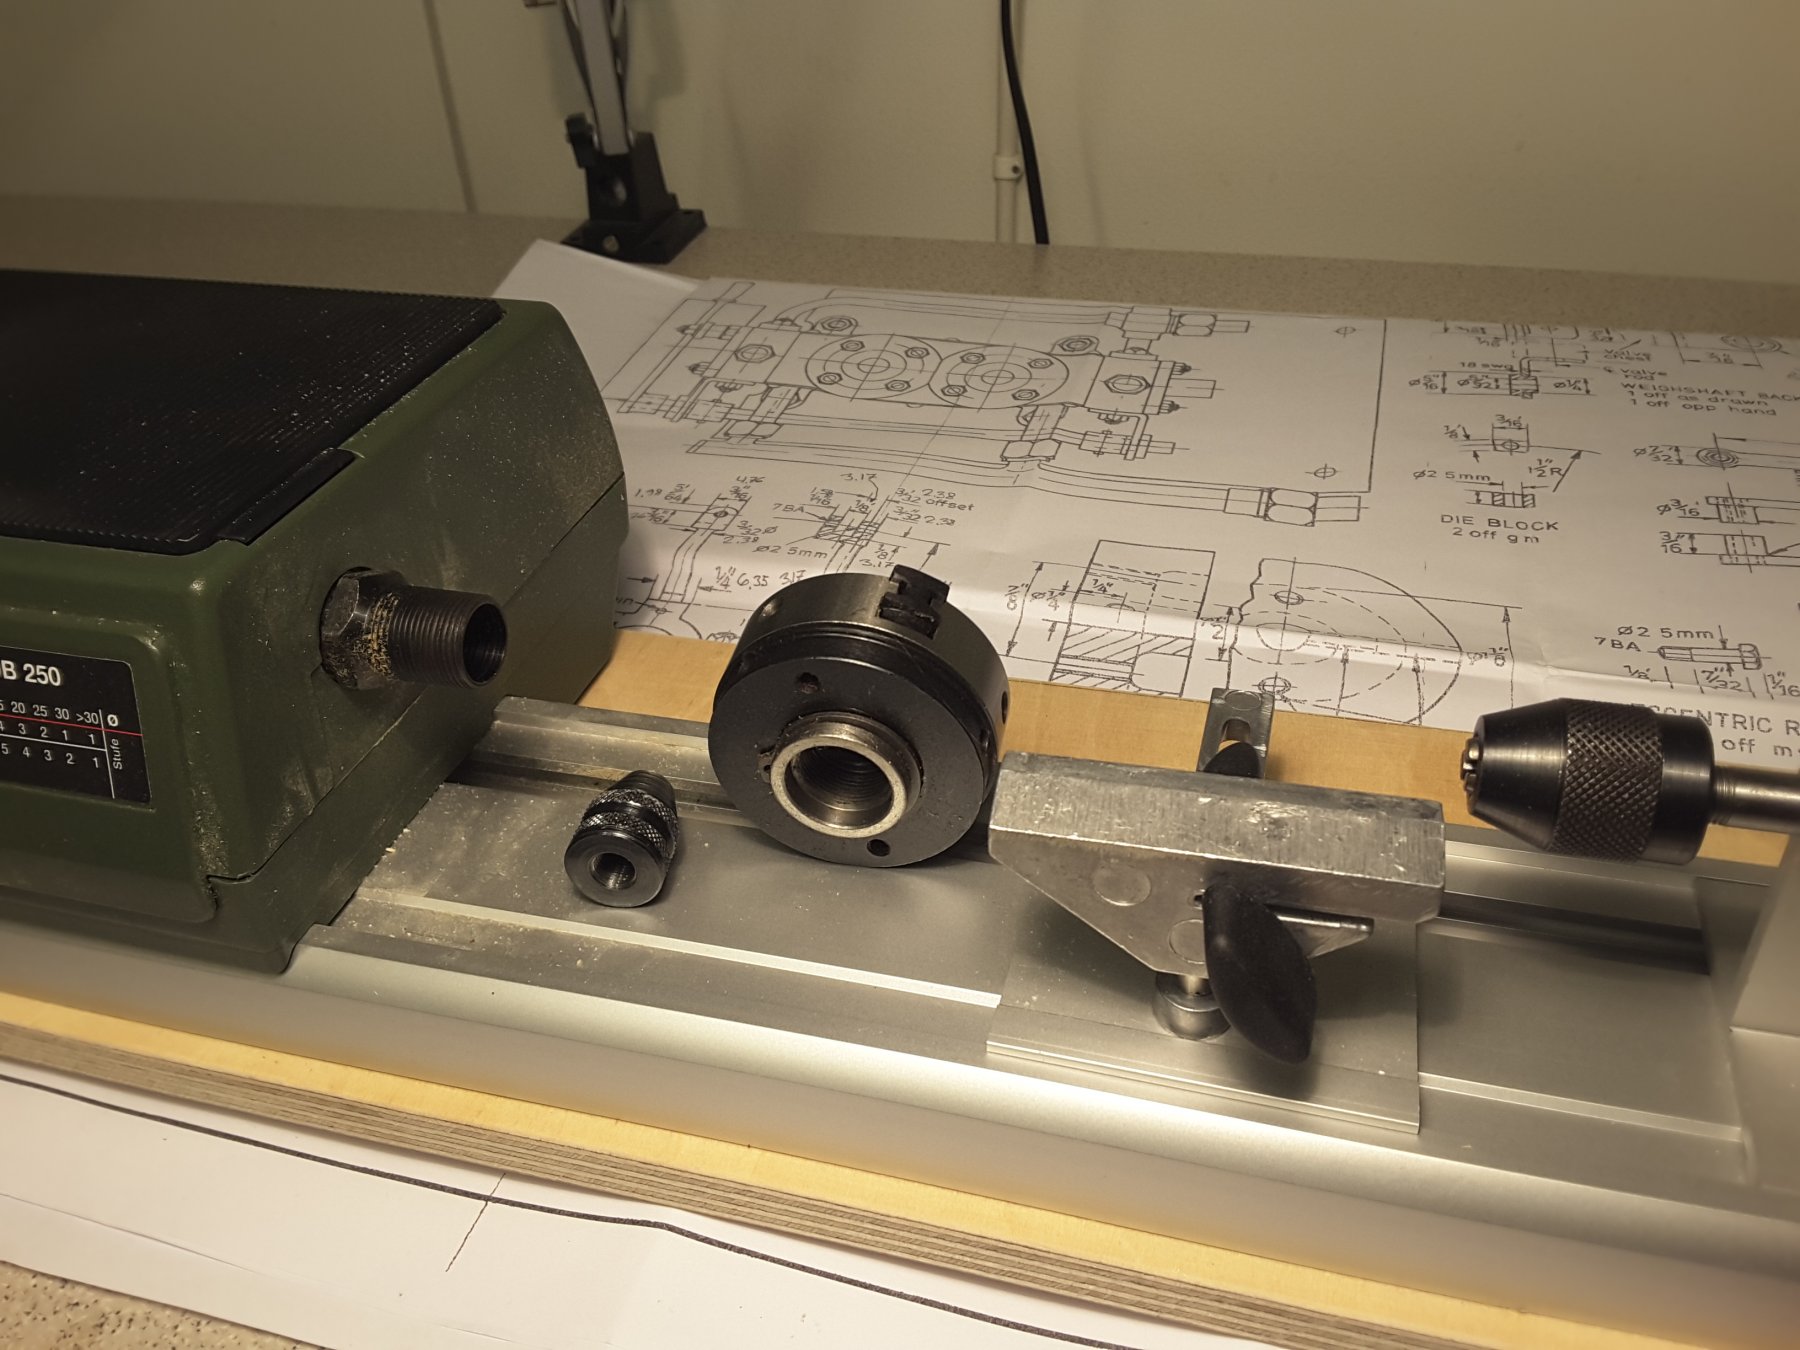
I have sometimes used the Proxxon drill chuck with a Proxxon arbor in a bigger lathe to turn very small parts which are not possible to attach in a big lathe 3 jaw chuck. The first picture is showing this: The second picture shows the size difference of Proxxon 3 jaw chuck and drill chuck on the bed of DB250 lathe together with lathe spindle thread. From this picture it is easy to see that the drill chuch does not fit on the lathe spindle thread:


-
Thanks a lot Rick for an interesting method. I have to try this when starting a new project. Very interesting feature is also to add more bulkheads if there are not enough them at the original plan. For this I should however get some sort of 3D cad and learn to use it, but that is another story. Interesting is also the fact that the bulkheads shown at the drawing represent the outer surface of the ship. And when you make the bulkheads after the drawing, you have to deduct the thickness of planking from them. I wonder how many of us are doing that. It is very difficult to redraw the bulkheads so that the outer form remains unchanged. So far I have made only 2 or 3 models and have made my bulkheads exactly as shown on drawing, so resulting to slightly larger hulls than they should be. But who will notice that? But you are right, when building a museum model, you should take also this fact in consideration.
-
Yes Bill, I have tried that. However the result was that there were so many rubbish pixels even in the drawing of one bulkhead which had to be cleaned one by one, so that it was not worth the work. So I did my bulkheads in the old school method by making first a template of all bulkhead halves, drew the complete bulkheads on plywood using those templates, and sawed the bulkheads away. Much faster than clean those rubbish pixels.
-
Thanks cog and amateur! I am working hard to produce the video that many people have wished. When I tested the rc equipment a few weeks ago, I noticed that the electronic speed control unit was dead. A new unit was ordered from China, and immediately when it arrives and is working correctly, I will make the video.
-
Plywood is very seldom straight enough to be used as a base. To eliminate that I have attached straight angle irons below the plywood with screws. That keeps the base straight and heavy enough for building the hull.
-
Nice work Aviaamator, you have a well equipped workshop to do what ever you like.
-
Thank you all very much for your kind words! The ship has been standing on her cradle for a while now, and I have kind of lost interest in her because of new projects. However now I have got back the lacking interest in her and have tried her in the bathtub to see if she will keep on surface, and in which position. She proved to be too light, so more weight must be added. Because of this I decided to install at least two loudspeakers with a sound unit and amplifier inside her, and have it programmed with sounds of engine, original steam whistle and telegraf bell. So hopefully there will still be a maiden voyage with a video in the future.
- 96 replies
-
- 10
-

-
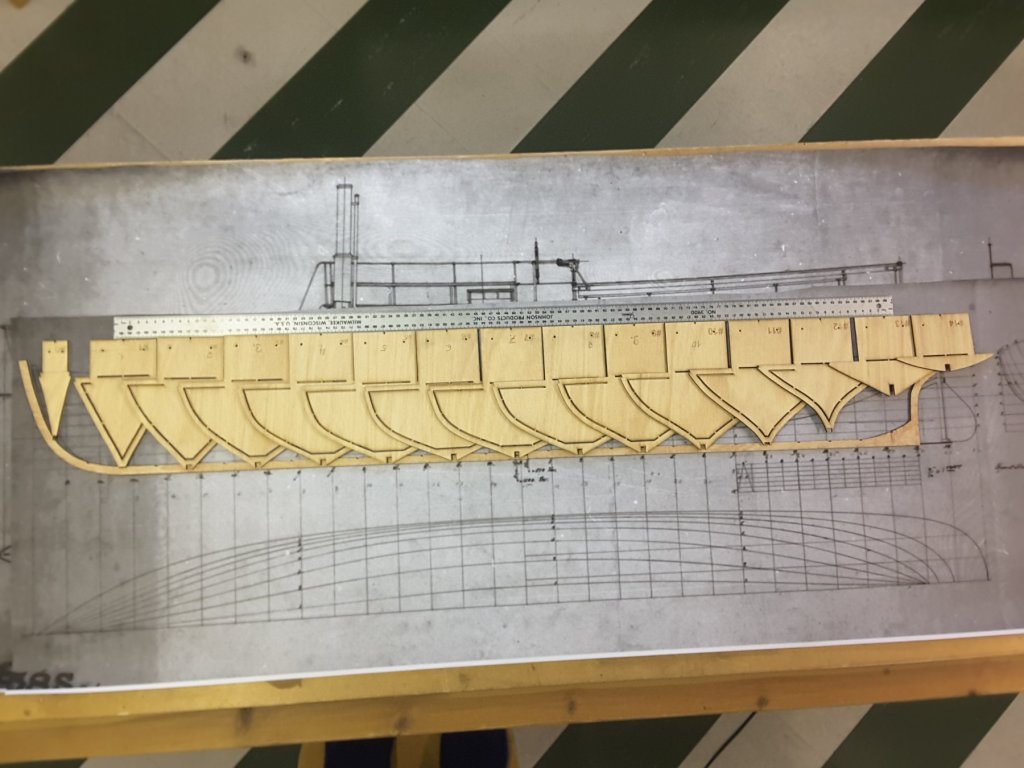
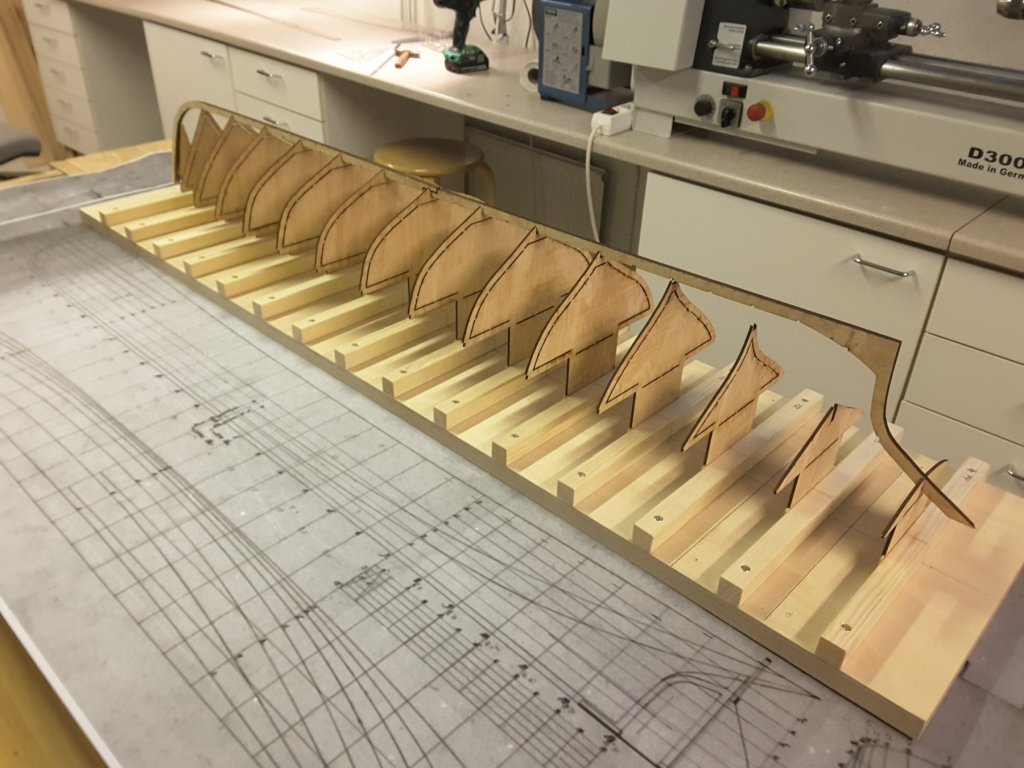
For our next project, a steam powered tug, made at Ahlstrom in 1877, we have made the keel and bulkheads drawing them on the original plan with Autocad and cutting with laser. So far the ptoject has started nicely. https://api.laivadata.fi/v1/attachments/58e2b648255dbc34a3a83ae0/data
-
Thanks a lot Wayne! Exactly what I was looking for, comparison of the various programs. So Fusion360 is my choice!
-
Hello Nils. You have exactly same problem than me, I really don't know where to put the Maaninka model now that it is completed. I have in my hobby room a T-26 tank, Unimog, Bugatti and few other quite large things, so soon there is no empty table any more to build models. My wife has suggested me the same as yours: not to build any more models. But I don't think I will obey her. On the contrary, we have today discussed with a couple of my friends to start to build not only one but three steam engine powered boats. We will see how this idea is progressing, me particularly would be very enthusiastic to start building my first steam engine.
- 692 replies
-
- 6
-
-
- eagle of algier
- chebec
- (and 2 more)
-
Others have already said everything about this magnificant project so that I just cannot say anything more but only agree those words. I think I know exactly your feelings now, on the other hand very satisfied to have the project finished, but on the other hand a bit empty feeling trying to decide what to build next. At least I have that kind of feelings at present.
- 692 replies
-
- 6
-
-
- eagle of algier
- chebec
- (and 2 more)
-
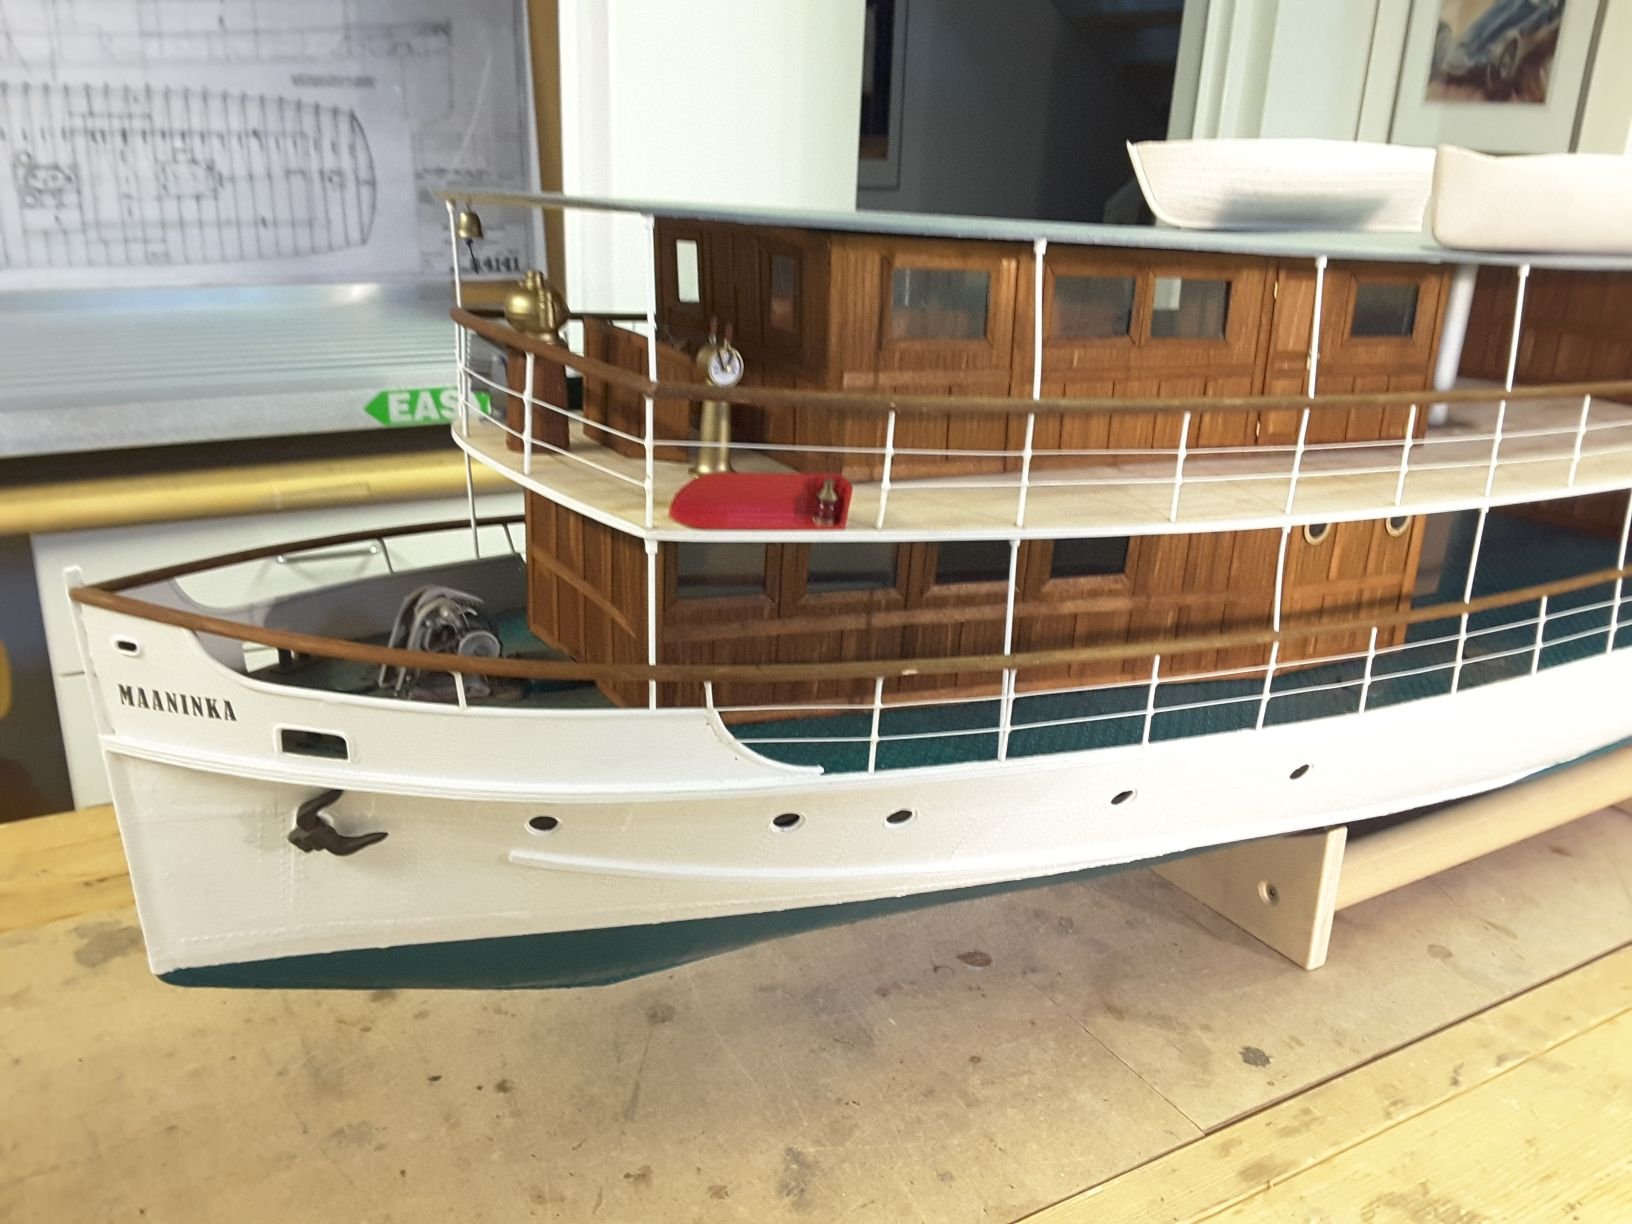
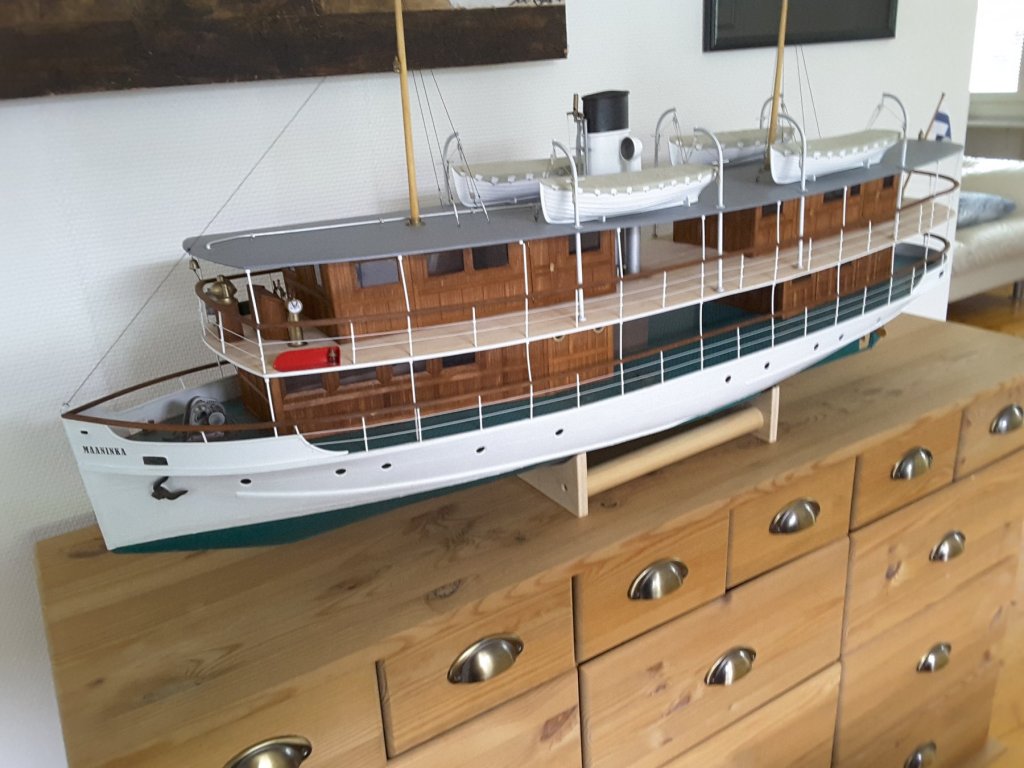
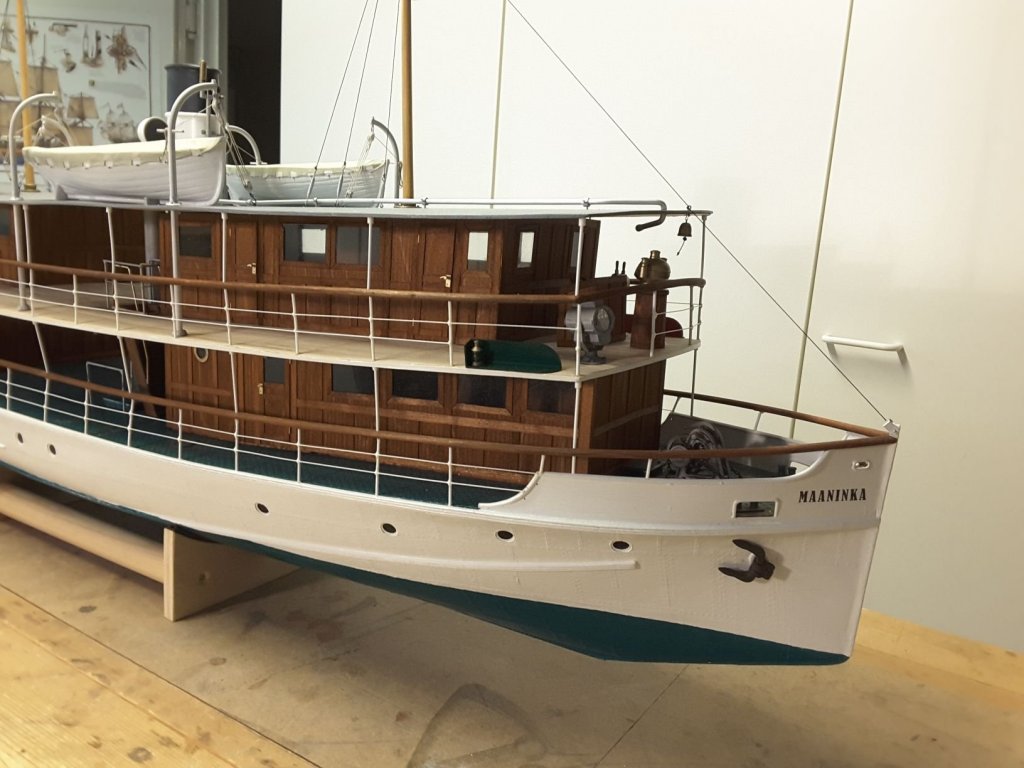
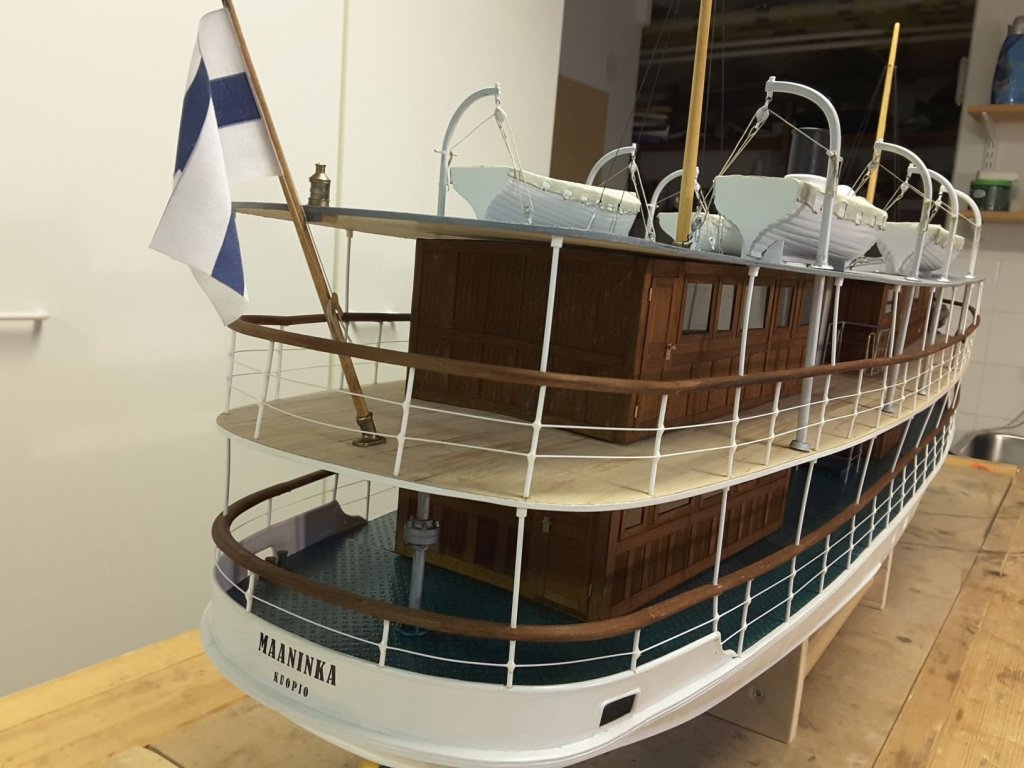
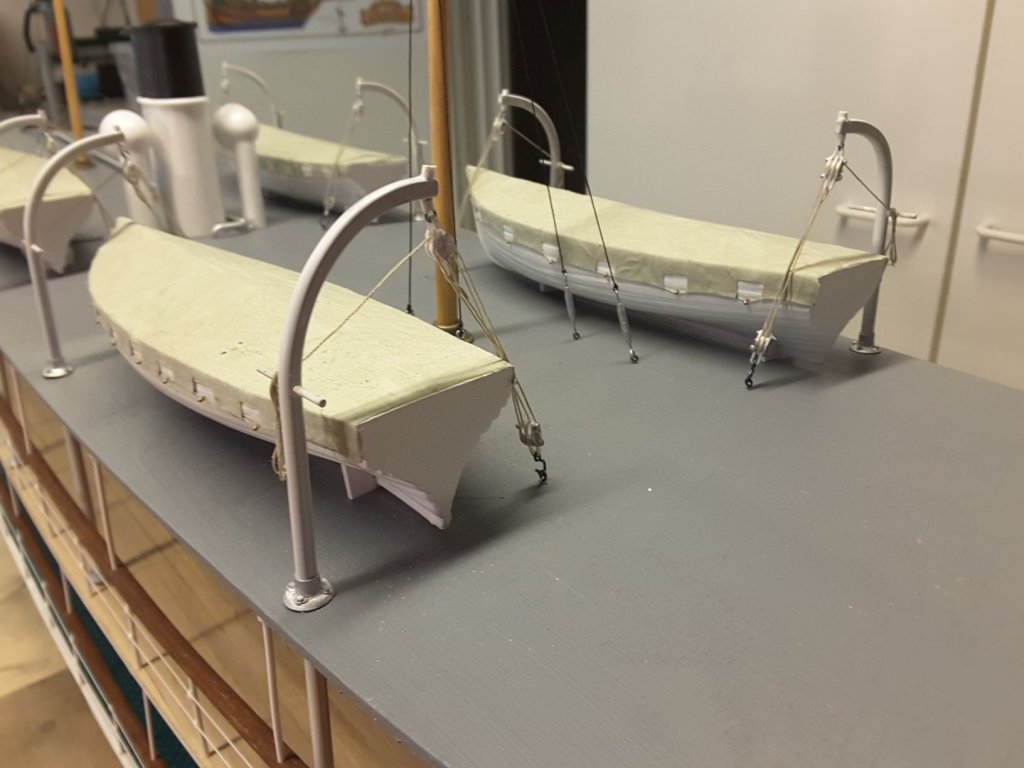
Thank you all for your kind words & likes. Very motivating to get feedback like this. Updating of the project has been a bit slow, due to nasty influenza, traveling in southern Europe and summer, which has finally arrived here. So there are a lot of other activities outside too, than sitting in the dark and dusty basement building the model. But finally I have made all the details on the boat deck too, like the funnel with steam pipes & whistle, lifeboats including davits, and masts with their simple rigging. So we could consider the model ready. What is still missing are the functional tests and maiden voyage. And if the model is sinking or captisizes immediately, let`s keep it as a static model. But if it behaves reasonably, it may offer nice moments when sailing at it`s own surroundings. A few words about the details on boat deck. The funnel has been made of solid balsa. Spark filter on top of it is made of admiral`s tea strainer. (please do not tell her about that). Lifeboats are made of solid balsa. First I thought to make them with POB method, but that would have taken too much work and time, and because they are covered with tarpaulin, nobody could see the inner parts of them. Davits are 4 mm round aluminium rod, bent and upper parts sanded flat. Blocks for davits are styrene. So here we are. The model is ready and I hope that it behaves nicely on water so that I can make a nice video of it soon. Because I think you all are waiting it very eagerly.


- 96 replies
-
- 10
-
-
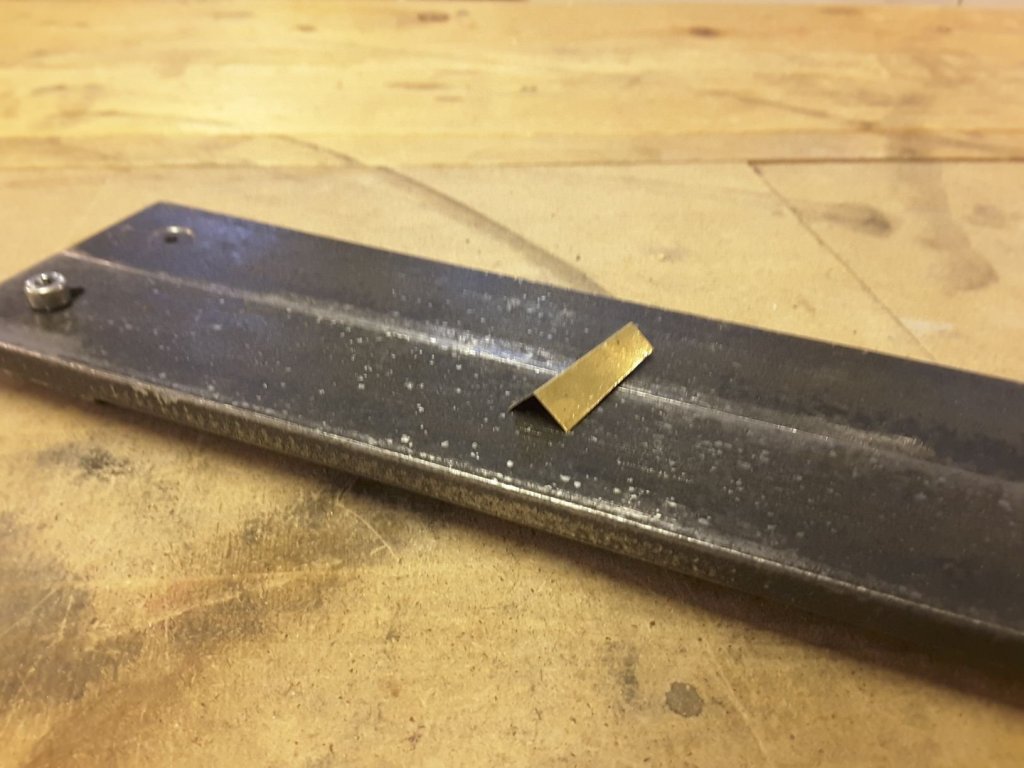
Bending sharp edges on brass strips
Moxis replied to Sandor Laza's topic in Metal Work, Soldering and Metal Fittings
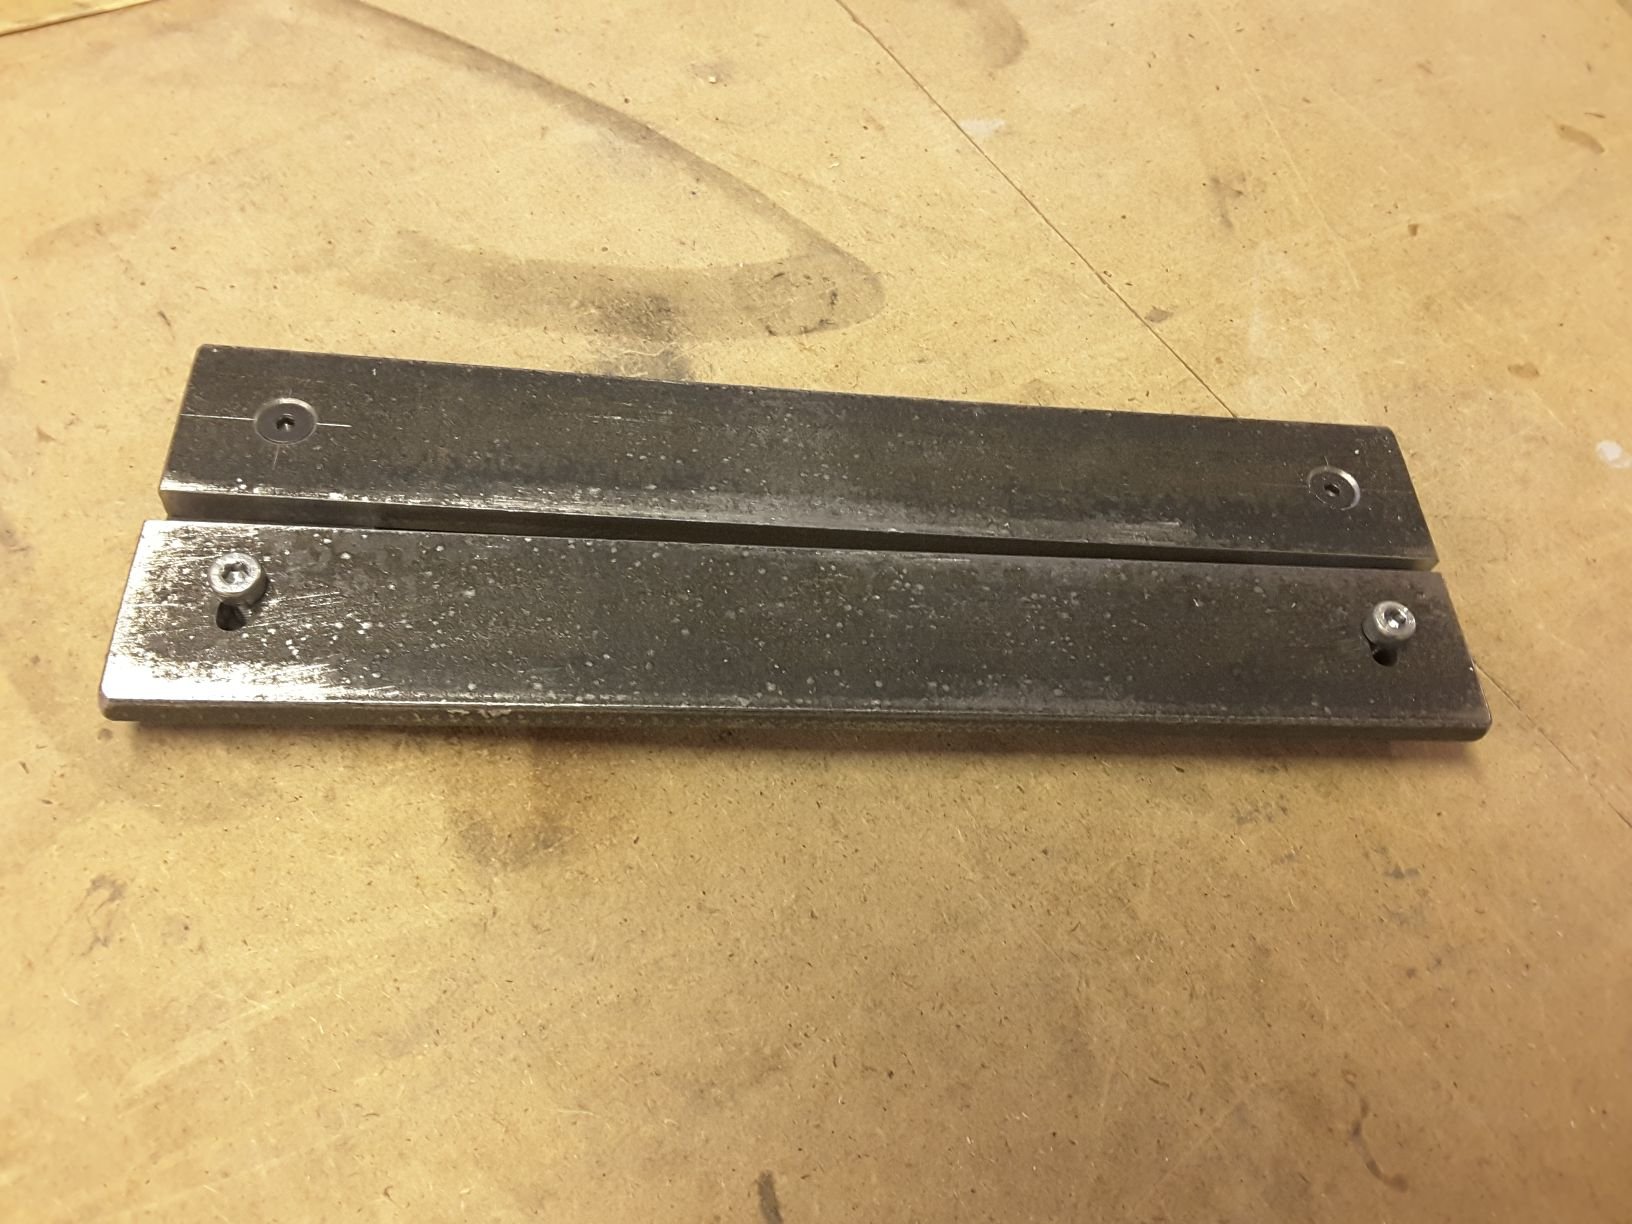
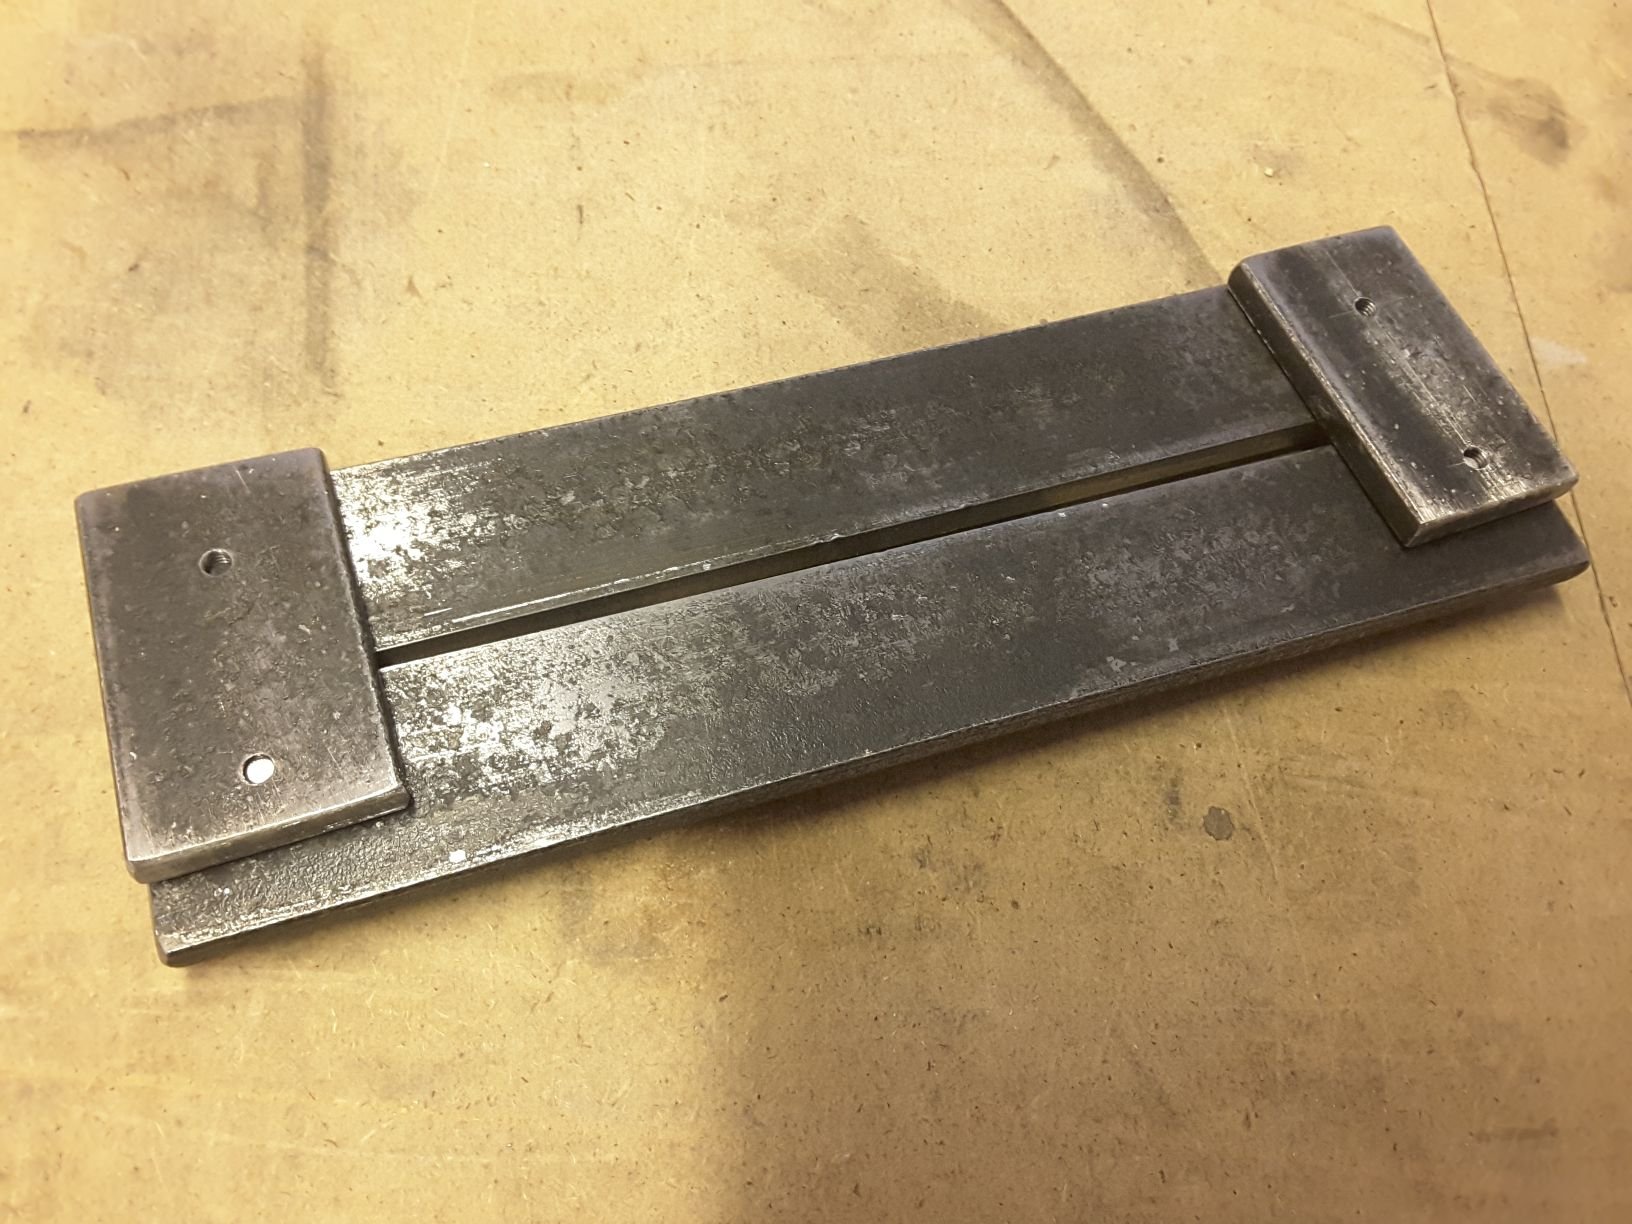
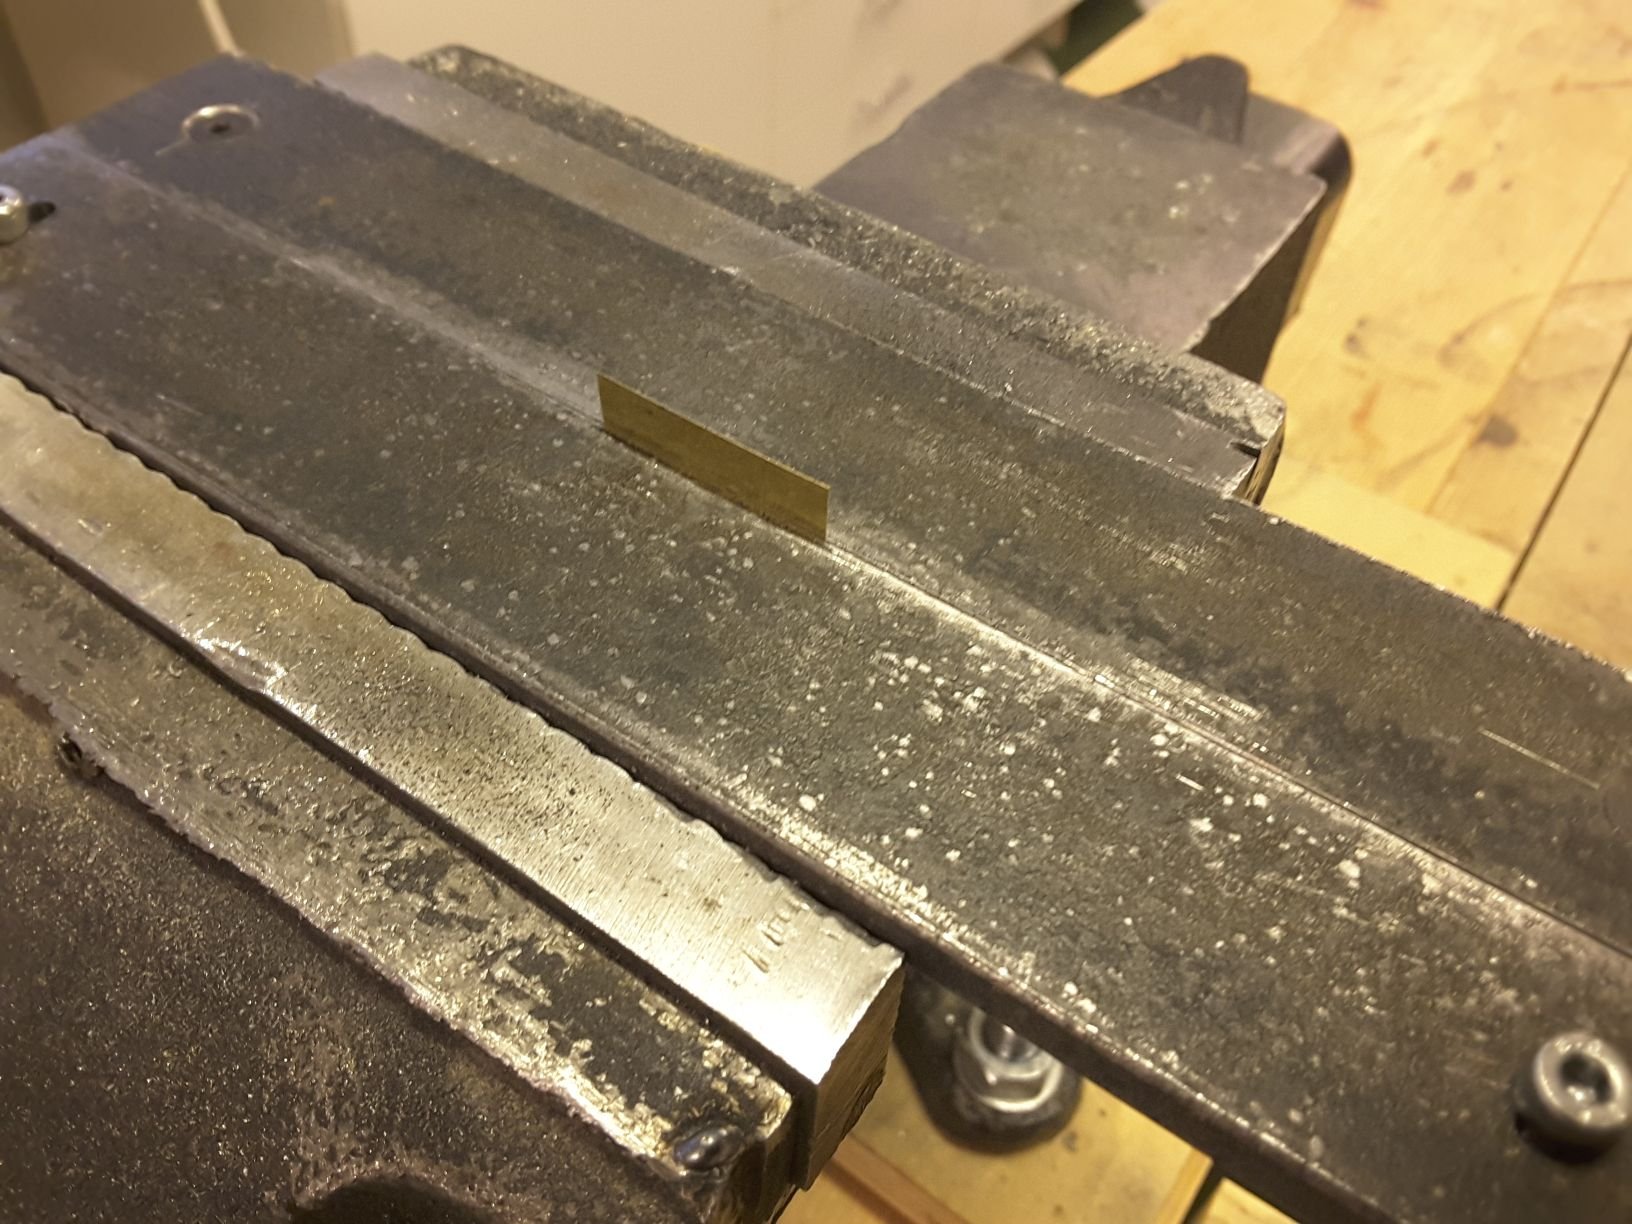
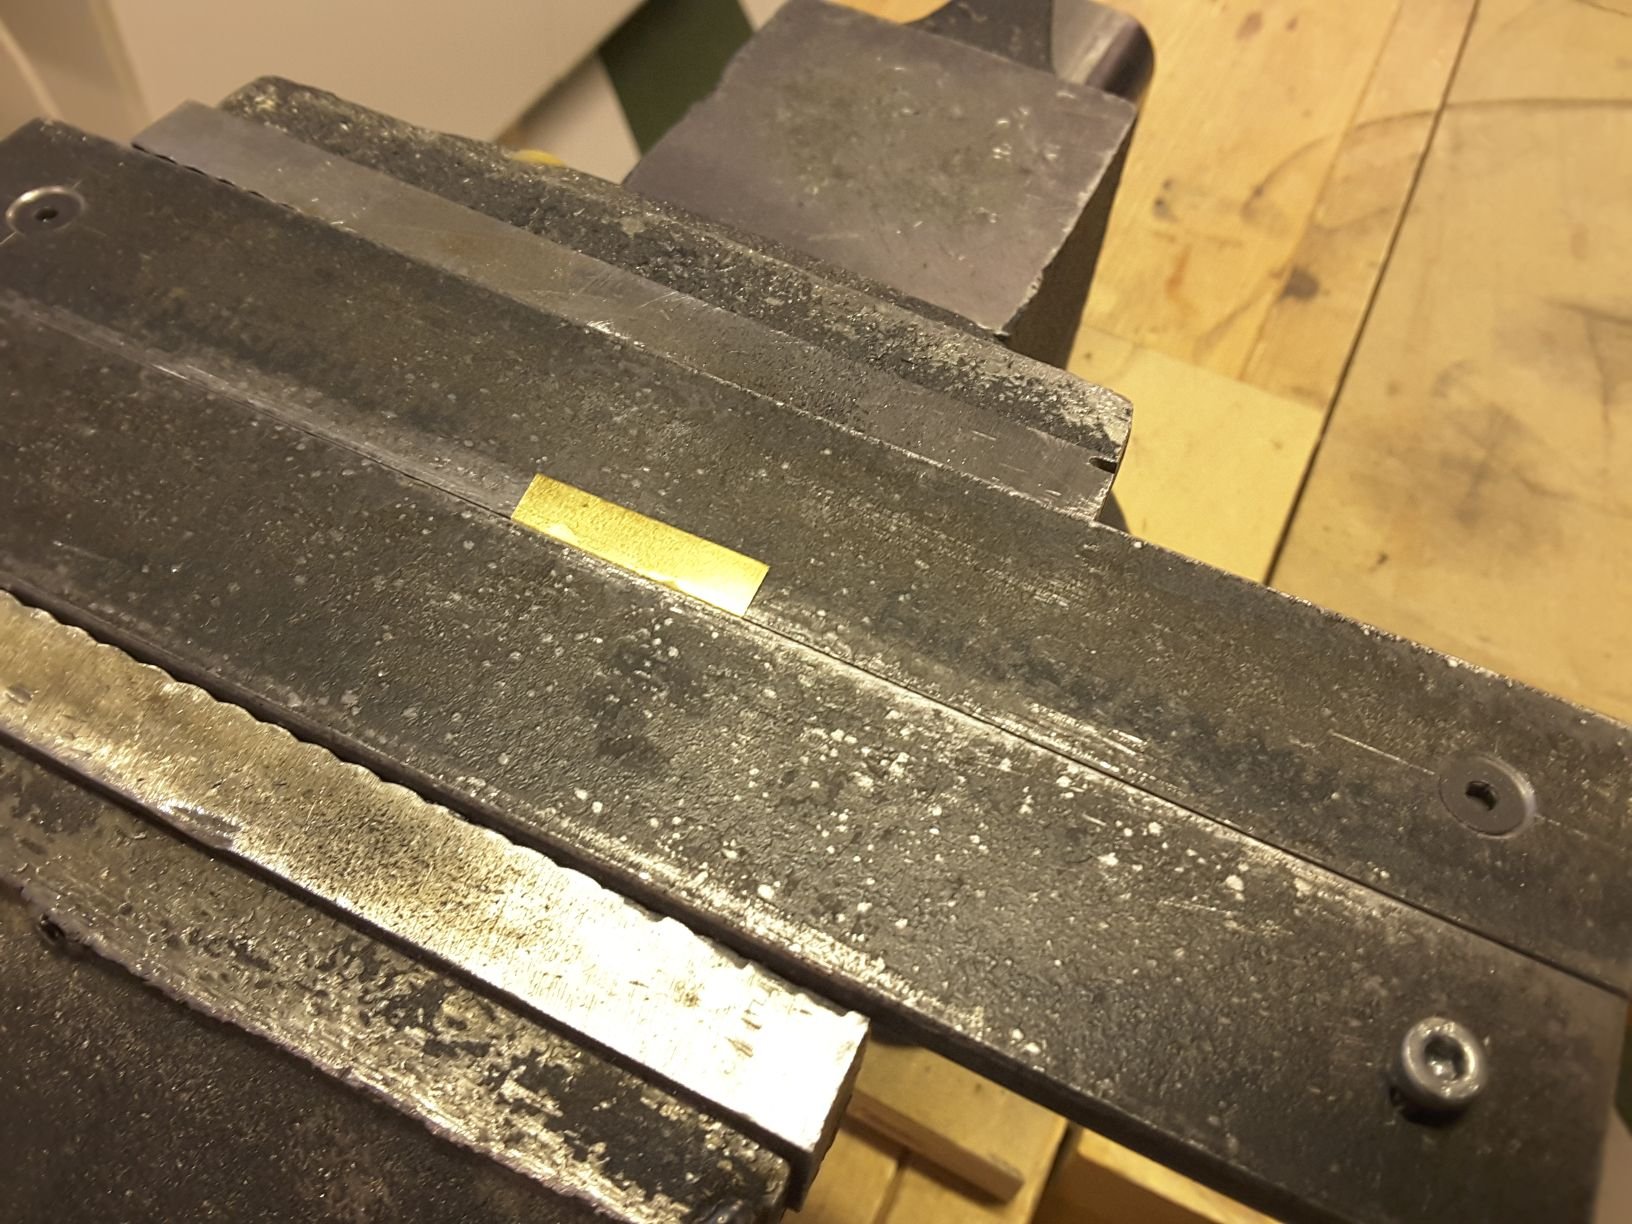
When I had to make sharp bends into thin brass sheet, I made a simple jig of 6x30 mm iron bar. First I cut suitable pieces of the bar, milled straight the two mating edges, made the holes and threads and screwed parts together so that the other jaw is fixed and the other can be moved a couple of millimeters: Then I was locating a piece of brass sheet between the "jaws", tightened the allen screws lightly and put the jig between the jaws of my workbench: Bent first the brass piece with fingers, and finally tapped it slightly with a hammer to get sharp bend: And voila, you have a rather sharp bend. This works with brass of thickness, say 0,1.....1,0 millimeters. And with this jig it is possible to make "angle iron" of brass sheet up to about 20 cm length:


-
Very nice work Nils, your sewing looks perfect. I was a bit more lucky with my sails because the Admiral made the sewing work for me. And I agree that shipbuilding gets a bit slower at the spring time because there are so many other activities that must be made after the long winter, especially to change the winter tires and clean the garden after the snow has melted.
- 692 replies
-
- 5
-
-
- eagle of algier
- chebec
- (and 2 more)
-
Very nice planking indeed Michael. I see that you have developed very nice new methods of shaping the planks and clamping them in place during glue drying. Thumbs up!
-
Does anybody have experience about both, the Onshape and Fusion free version (for a retired hobbyist)? I am considering to download the program, but don't know which one to choose.
-
Thank you Carl for your interest to my project, and all the "likes" as well. I am glad that people are reading my blog so that I am not writing this only for my own amusement. This gives me a lot of motivation to have the project finished, which seems to be more and more difficult when years go by.
-
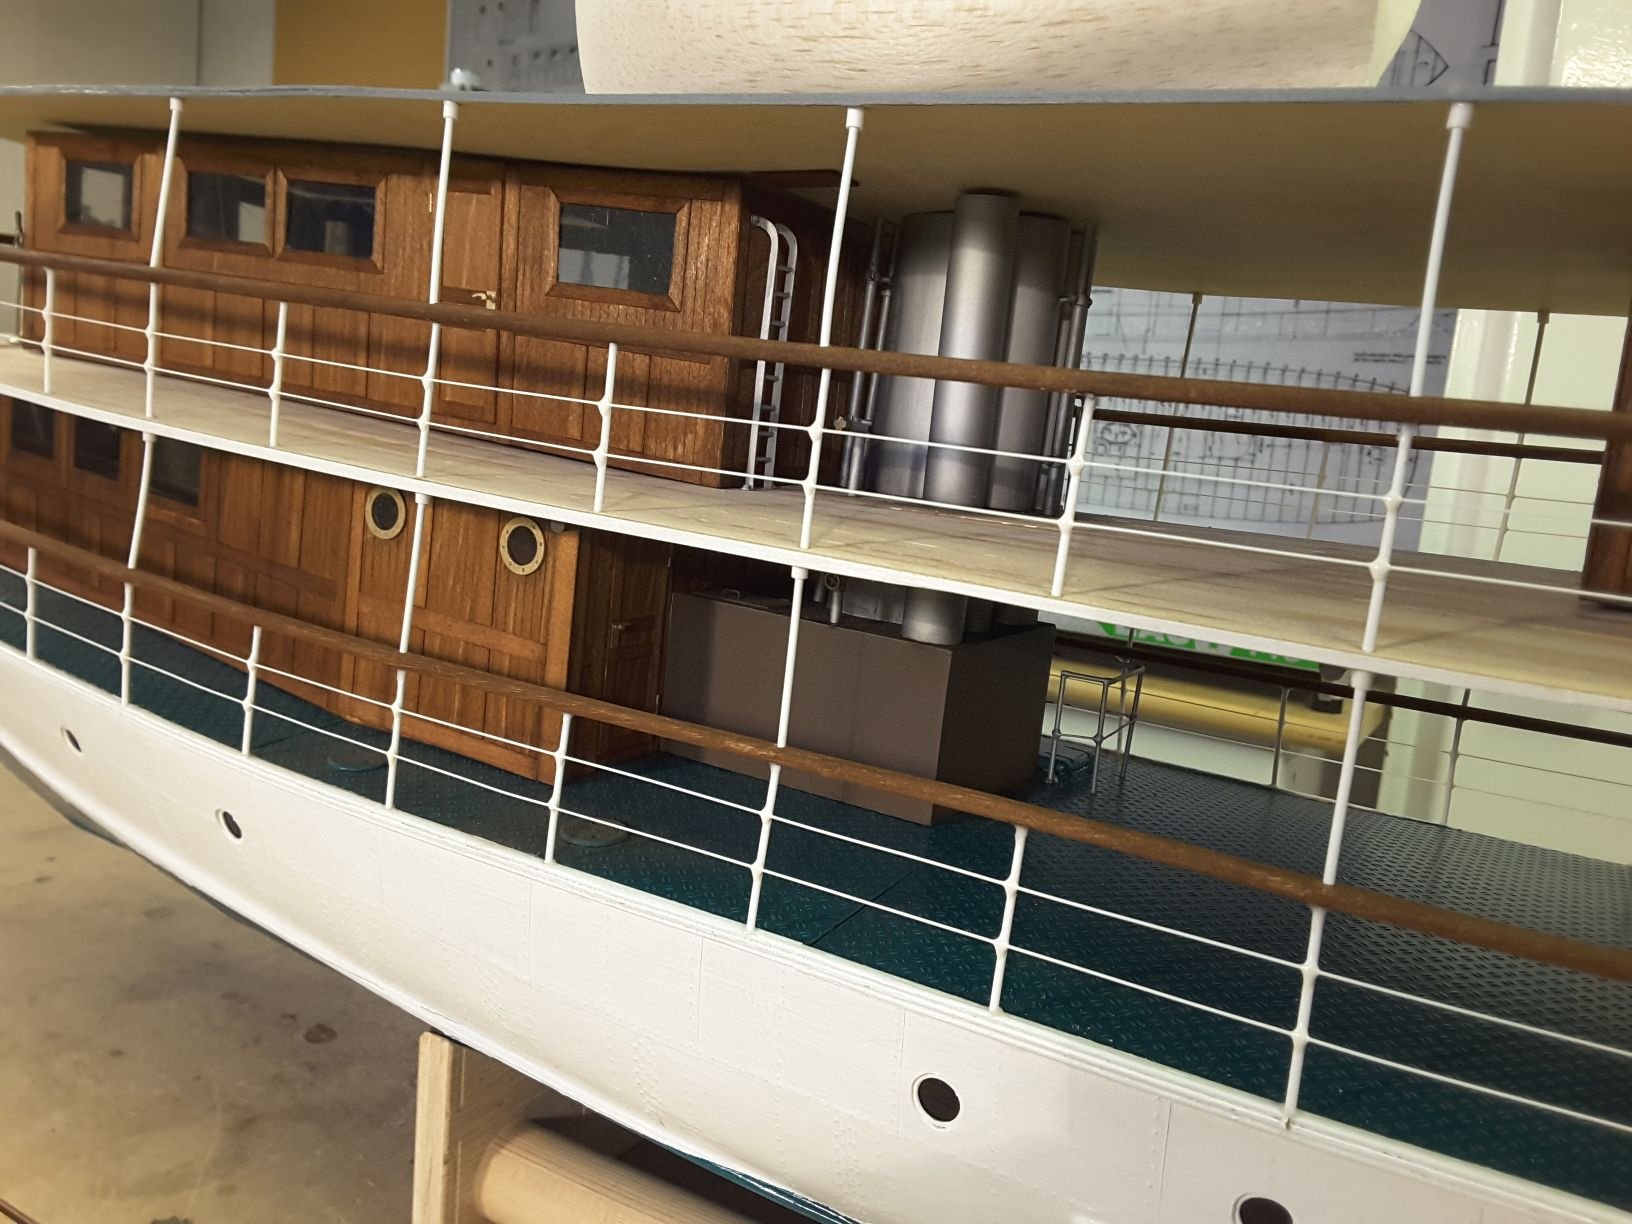
Project has been a bit slow, due to nasty influenza, which I have had for a couple of weeks. However some progress has been made, like self made ship`s name wet transfers on the bow, navigation lights, which are just mock-ups and not functional. Also the funnel between upper- and boat decks together with some steam pipes are made, and of course the flag with pole has been added to the stern. Now I have to concentrate into details on the boat deck like funnel, masts and lifeboats with davits, and then we could call this project as ready. Of course then starts the interesting part with functional tests like adding some ballast if necessary, and trimming of radio control equipment.


- 96 replies
-
- 14
-
-
Hello Albert, Nils and Aviaamator. I am very glad that you are interested in my blog and like it. Also thank you for all the likes as well, I appreciate them a lot too. Nils, concerning the lifeboats, my first idea was to build them with plank on bulkhead method, but because there are four of them, it would have ment a lot of work. So finally I decided to carve them from solid balsa, and because they are covered with tarpaulin, there is no need to show the inner parts. I have started to work with them already, and it seems that this continues very fast. The only problem is to show the clinker hull clean enough. Aviaamator, I am very glad that you are following my work and like it. I appreciate also your skills with your build and workshop machinery, like the milling machine that you have built. That could never have been made by me.
-
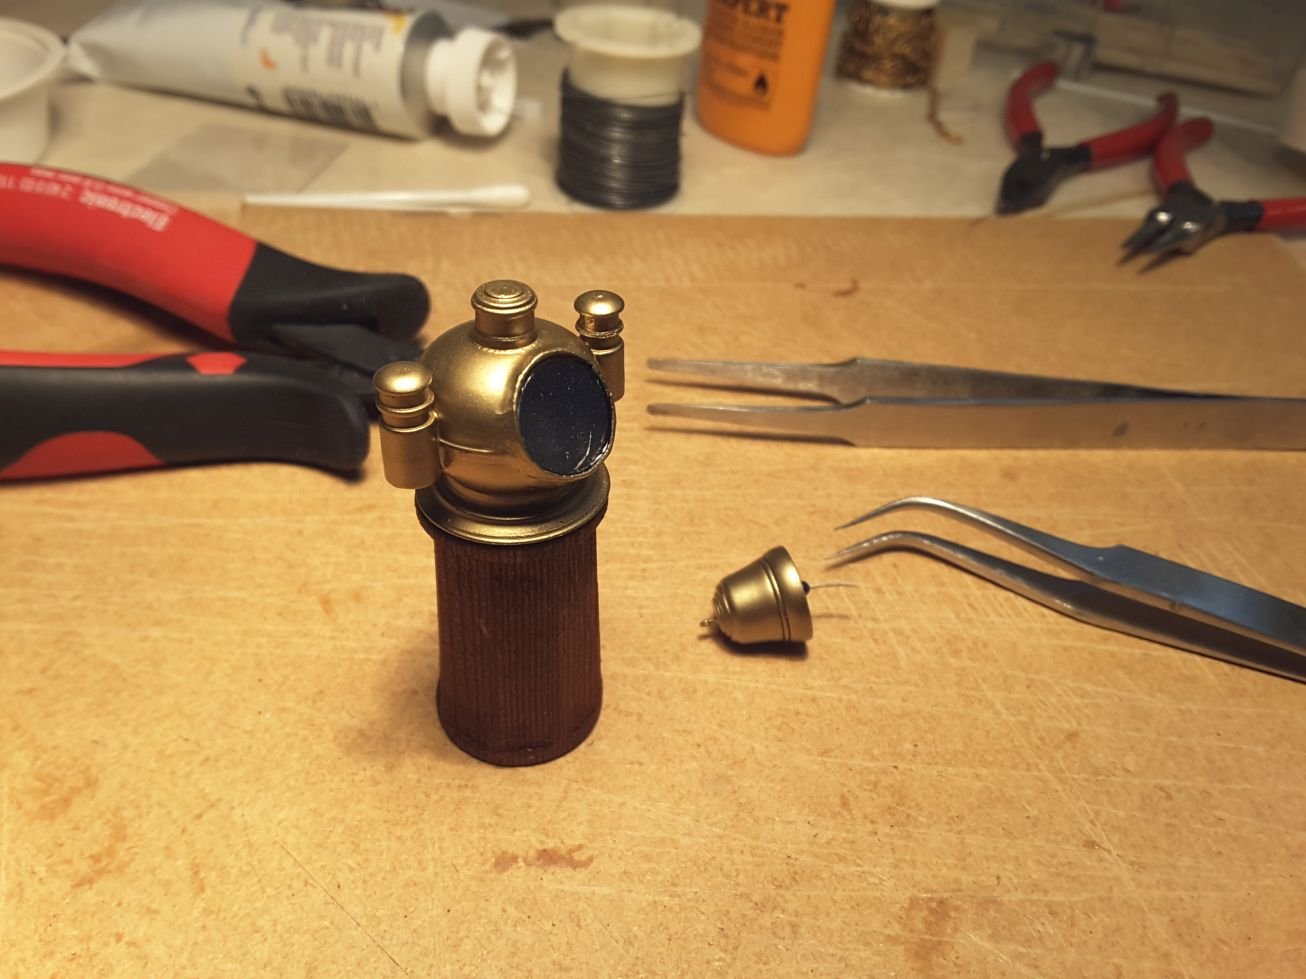
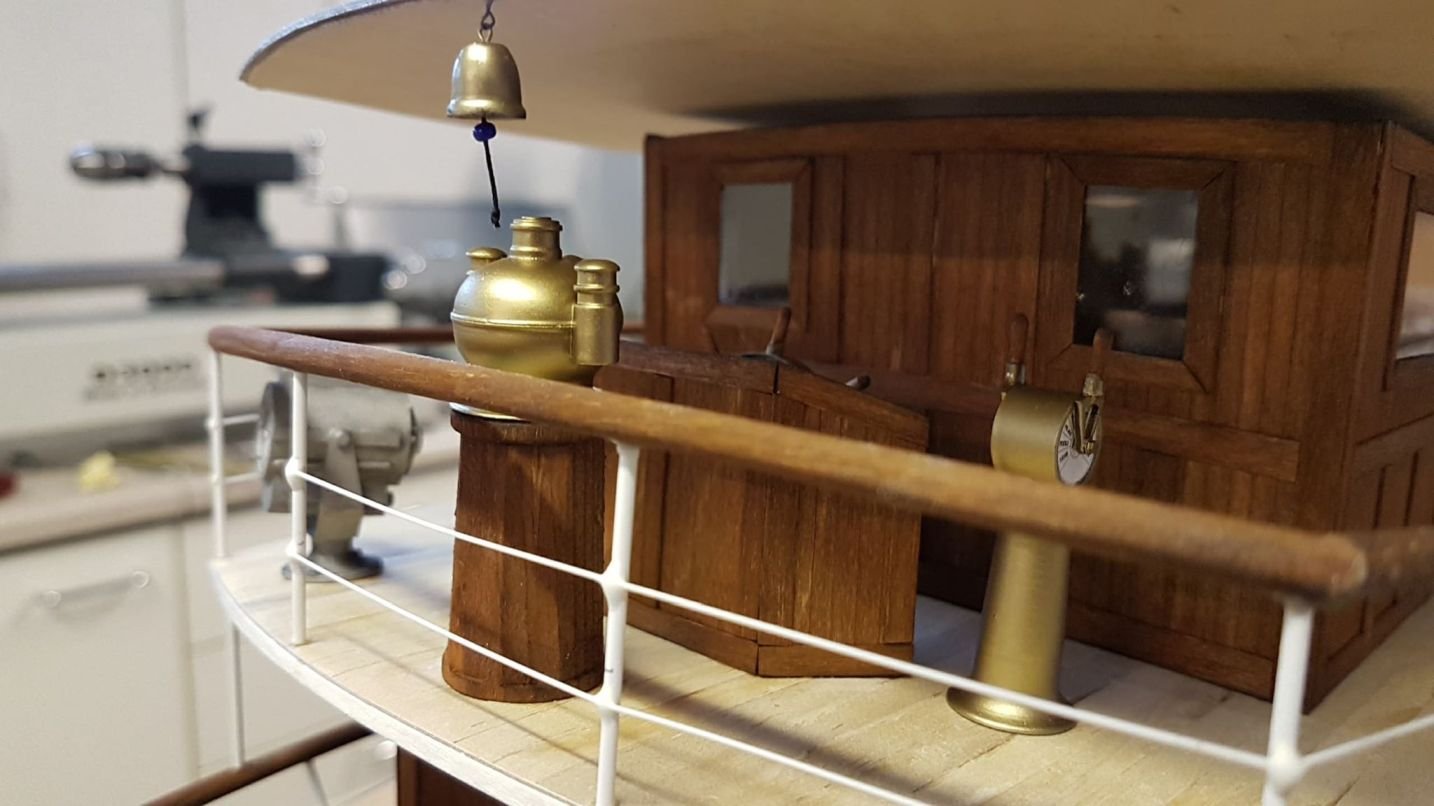
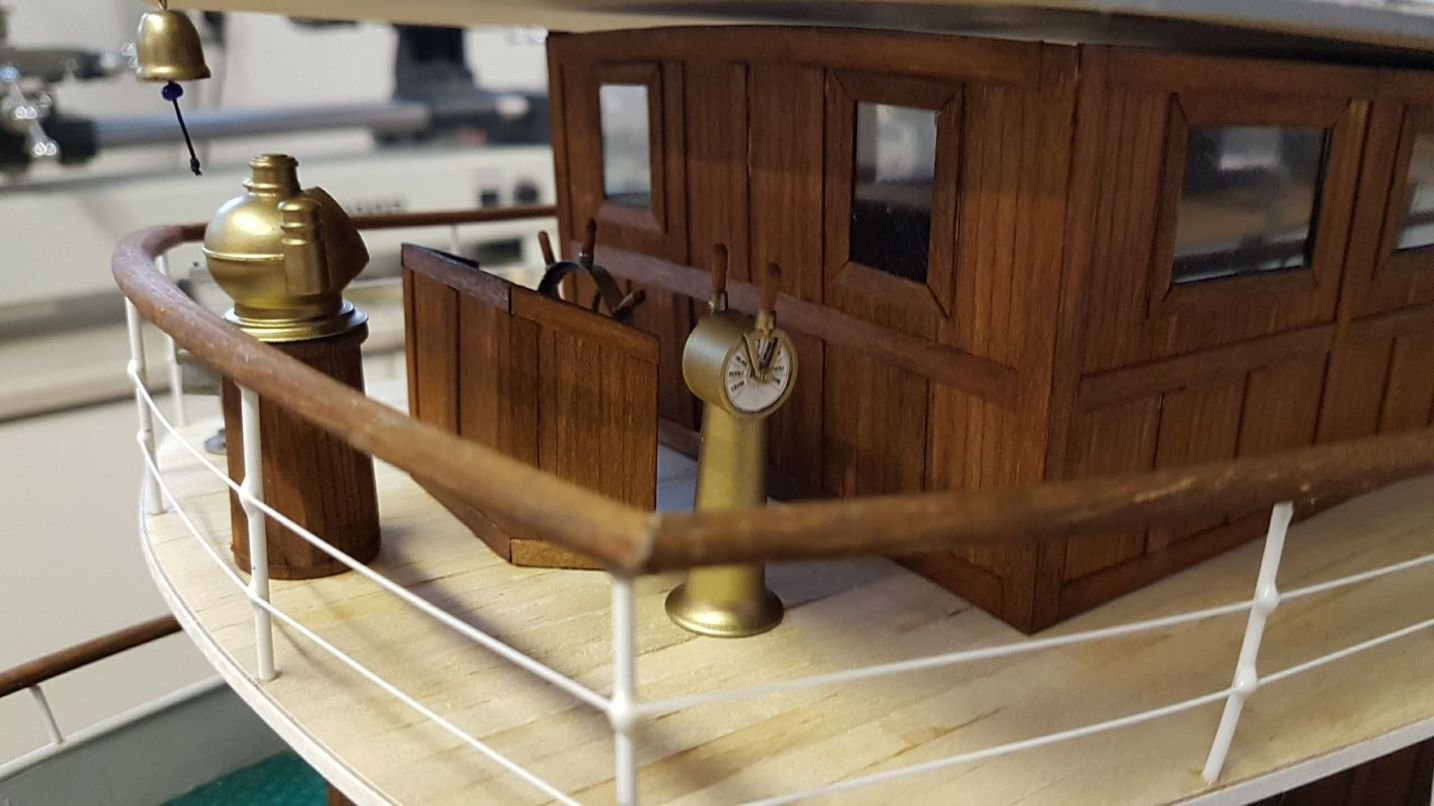
Small update for bridge equipment, a compass, telegraf and ship`s bell. All turned of Sikablock, airbrushed first with gloss black, and when dry, airbrushed with Alclad`s polished brass. Compass and bell under construction. Pedestal for compass milled octagonal. Components installed on the bridge. Dials for telegraf drawn with Corel Draw and printed on paper.
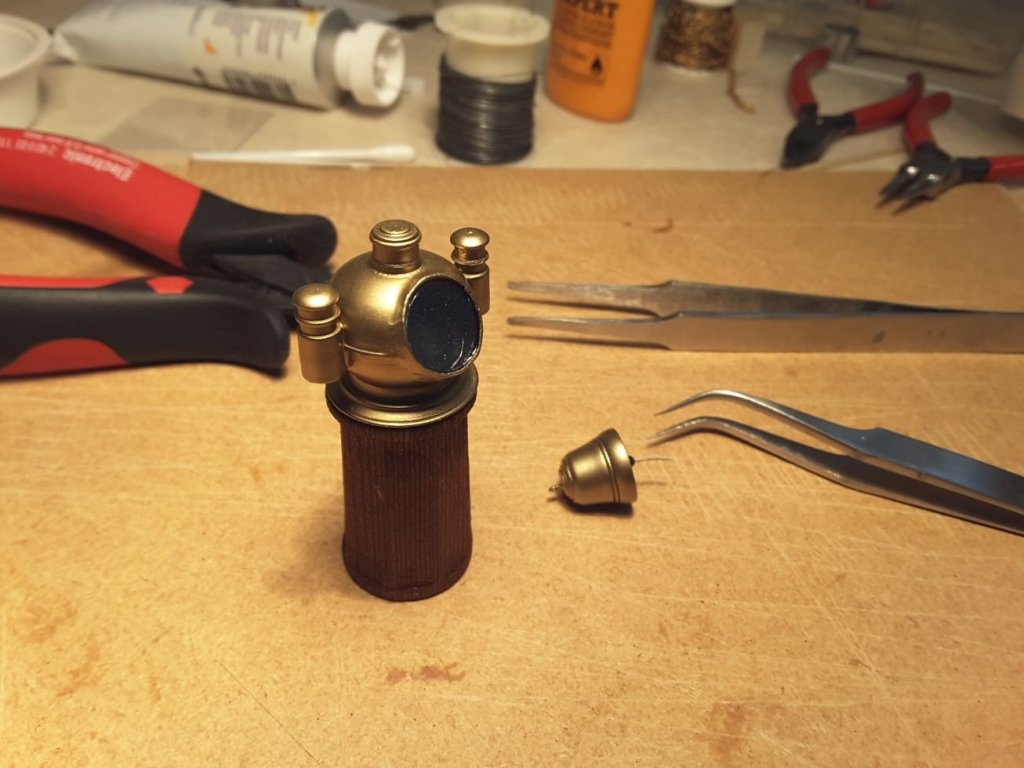


- 96 replies
-
- 15
-
-
Thank you all again for your kind words and likes! Keith, Sikablock is machinable polyurethane plastics. It is available in different hardnesses, some of them are like wood but without grain. Very easy to work with normal tools. It is sold with different names, I buy it from German company called Modulor: https://www.modulor.de/en/search/sikablock.html but I think it is available everywhere. Difficulty is only to find it in small quantities so that you have not to buy the whole big block.
-
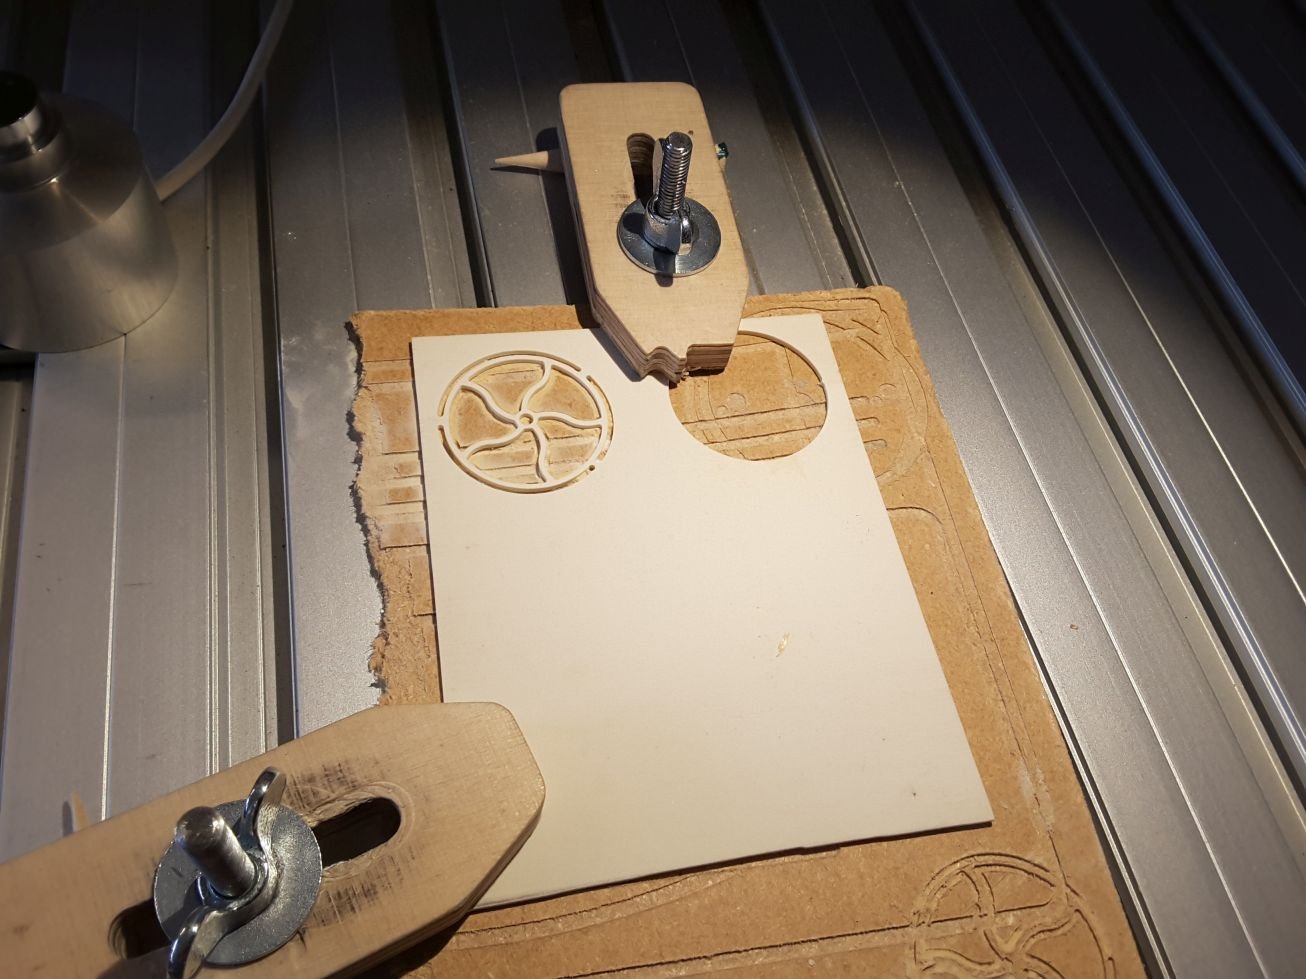
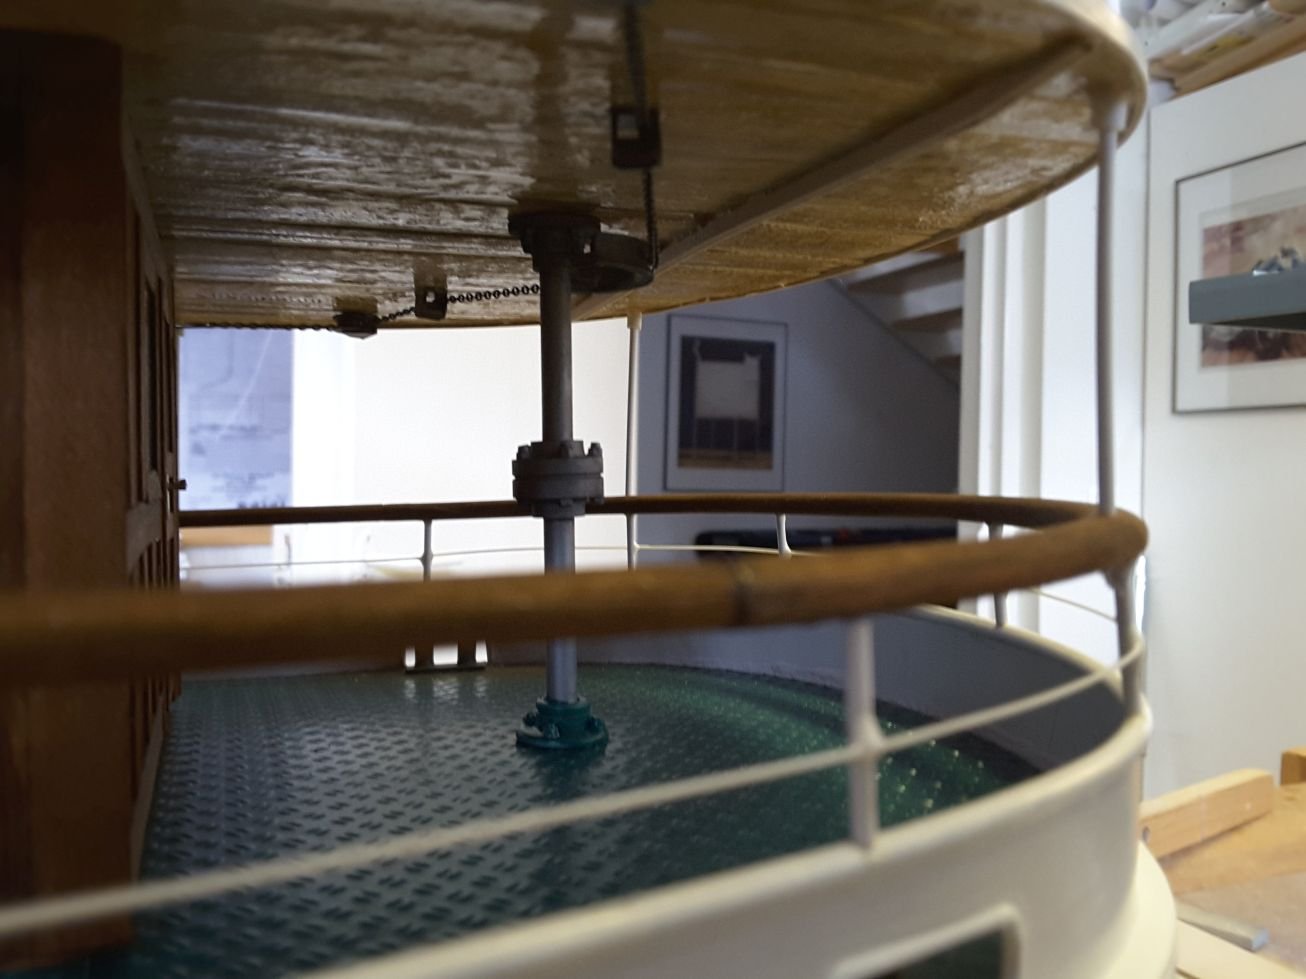
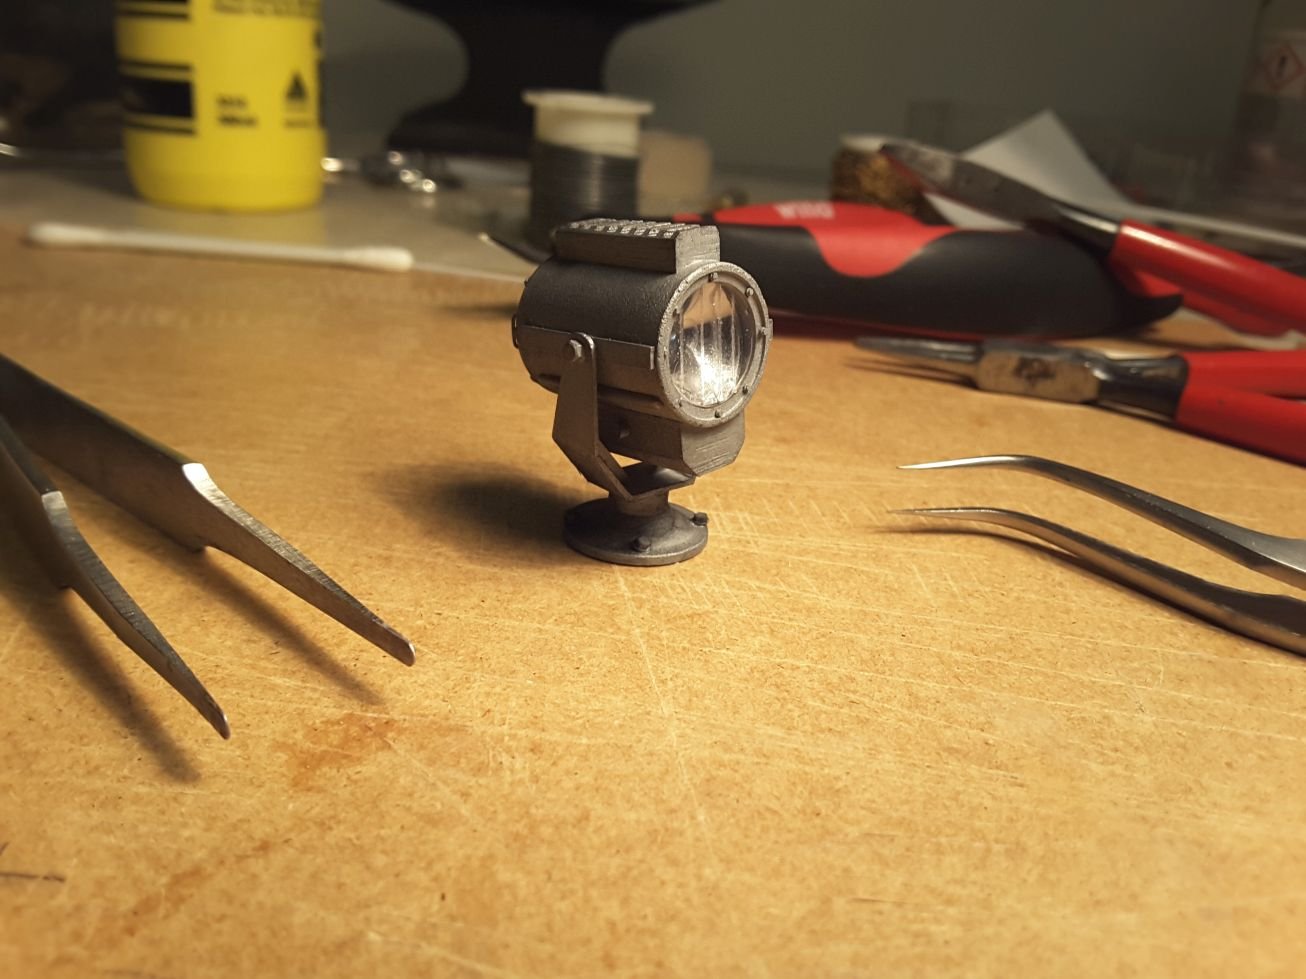
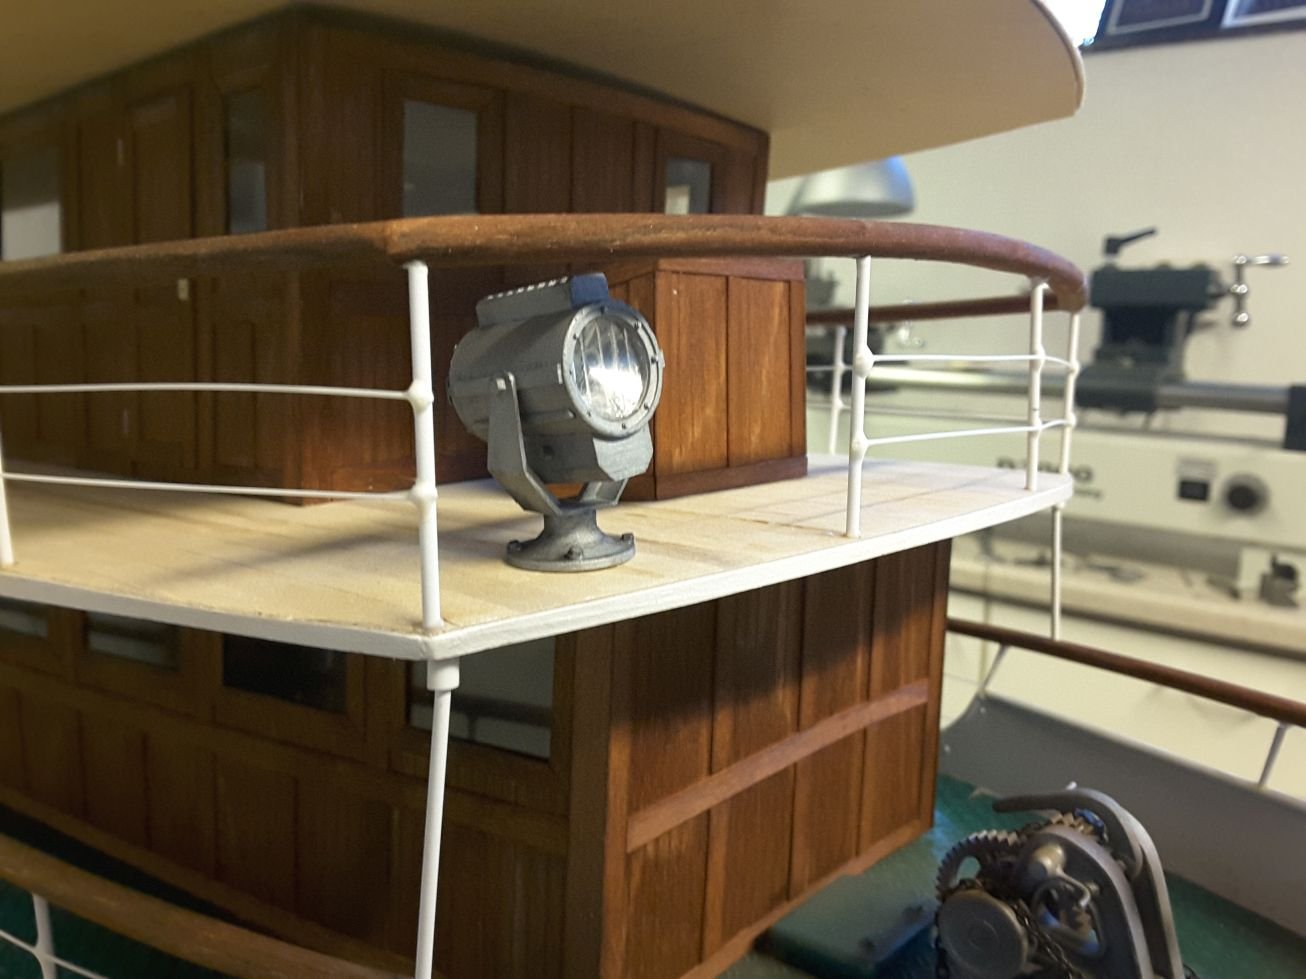
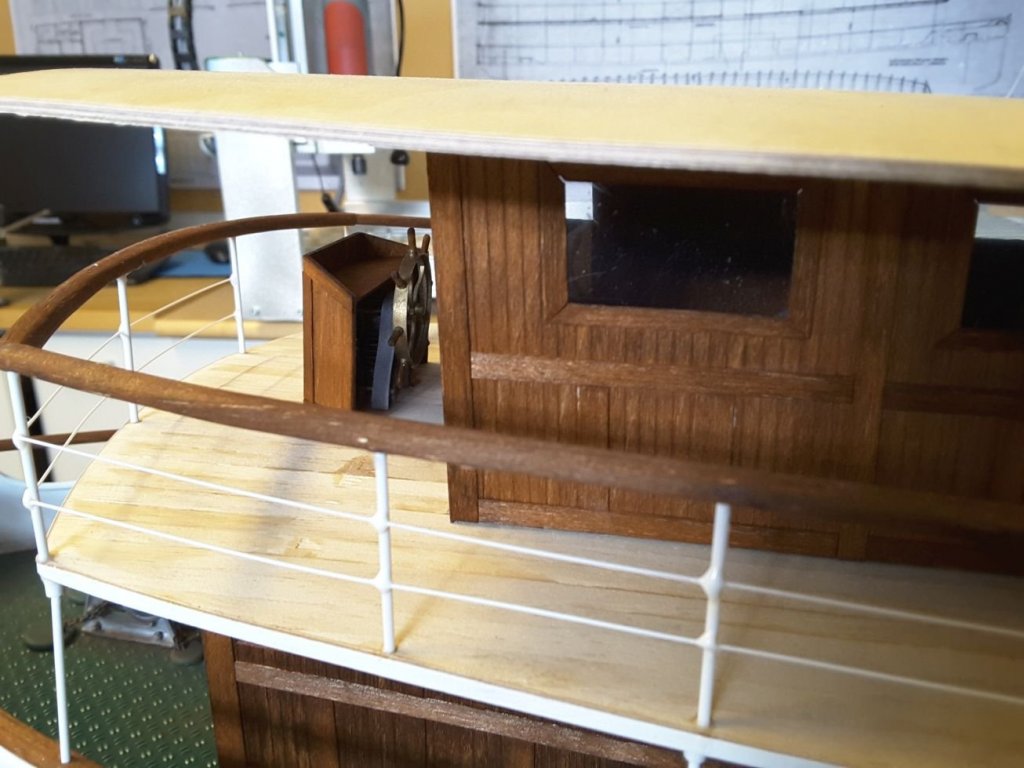
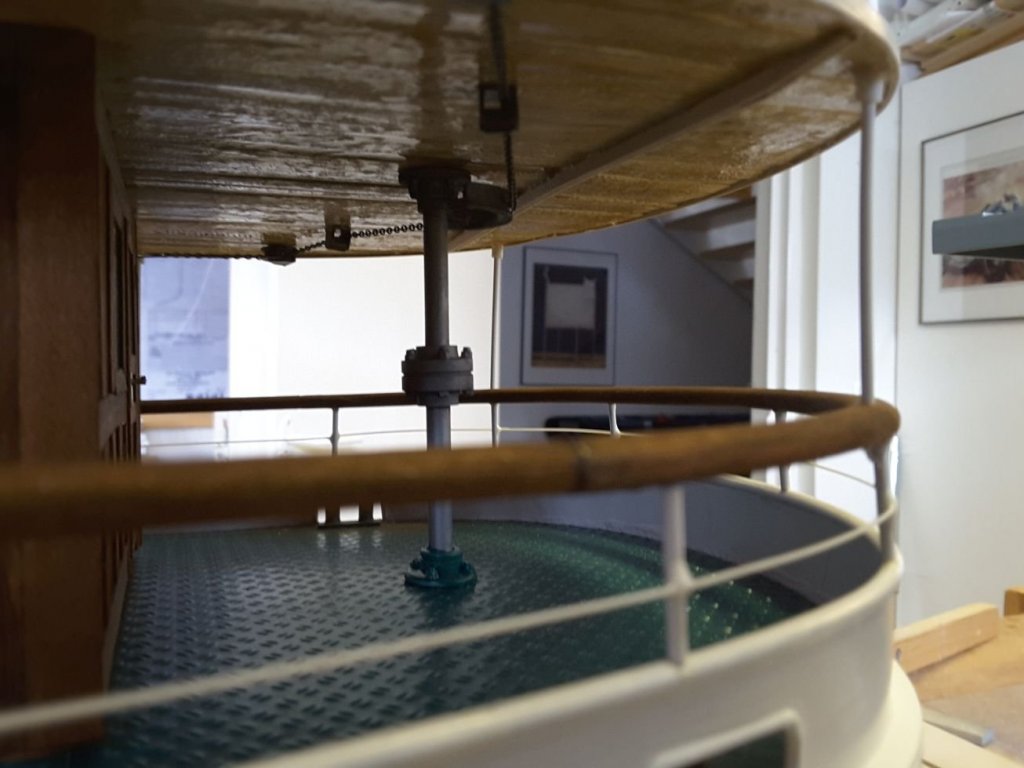
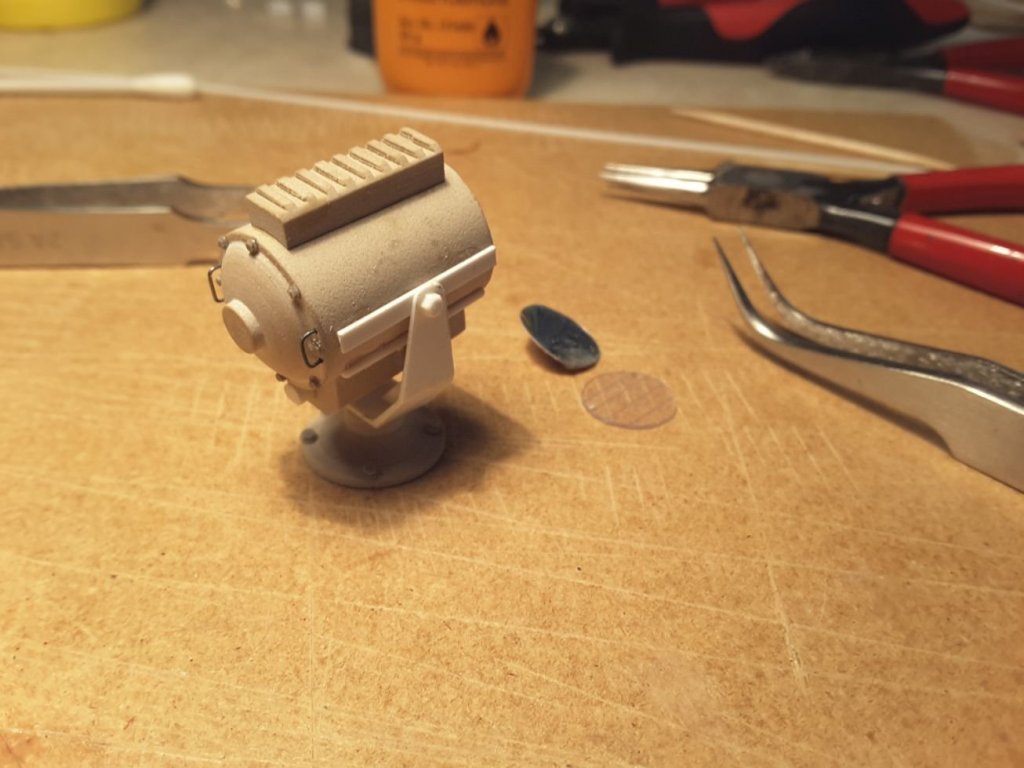
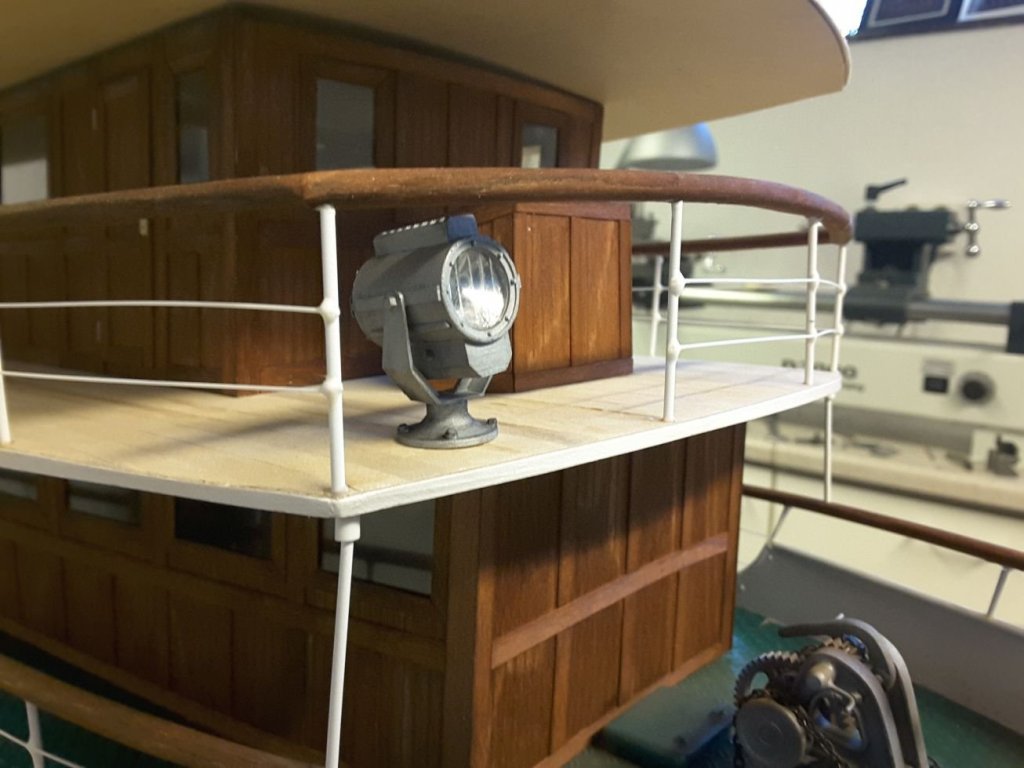
Next I was concentrating into bridge items. First the steering wheel & machinery, and it`s movement into rudder. Form of Steering wheel is quite complicated, so the best way to build it was to draw it with CAD and machine from 1 mm thick Sikablock material using cnc router and 0,6 mm dia milling cutter. After trial & error and one prototype here is a machined steering wheel: Steering mechanism was again build using a pair of module 0,5 gears and parts made of styrene & sikablock. On the top is the upper rudder shaft with middle flange and bearings. Below that the parts for rudder mechanism. Parts painted, weathered and waiting installation into ship: Steering wheel and mechanism with a protective desk installed on the bridge: Upper rudder shaft with bearings installed between main and upper decks. Movement of the steering wheel is transferred from steering mechanism using wires, rods and chains located underneath of upper deck. Chains are taken from a thin necklage and painted dark: Next item on the bridge was a searchlight. This was made using common materials styrene and sikablock. Here waiting paint: Painted and weathered: And installed onto bridge:
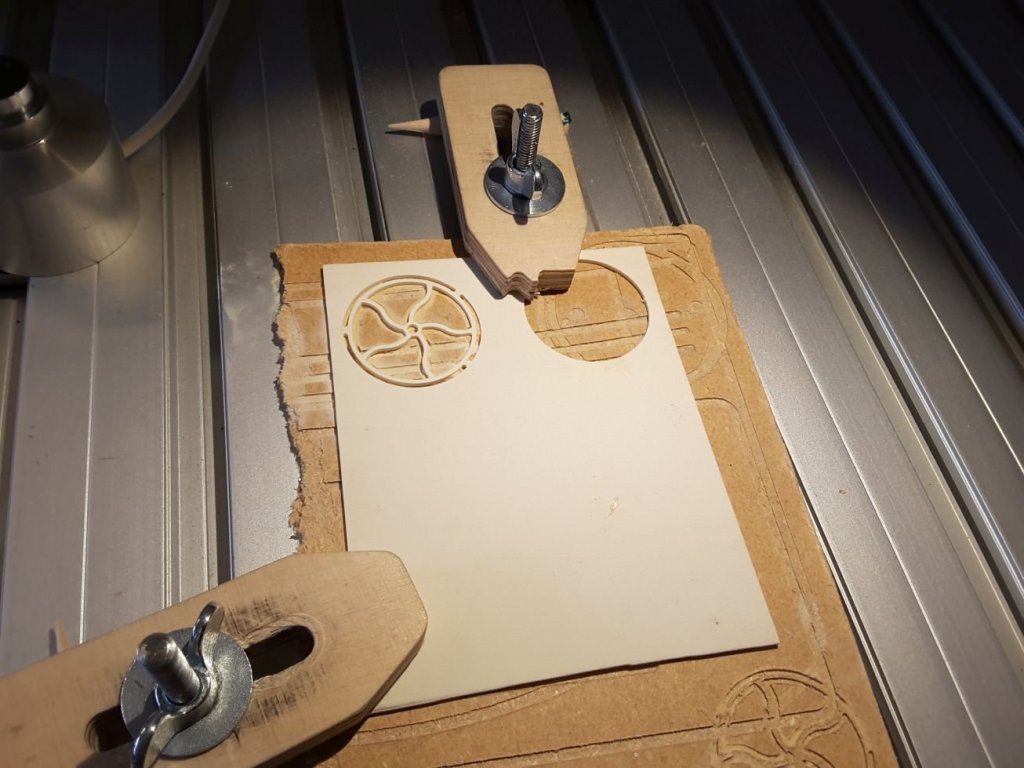
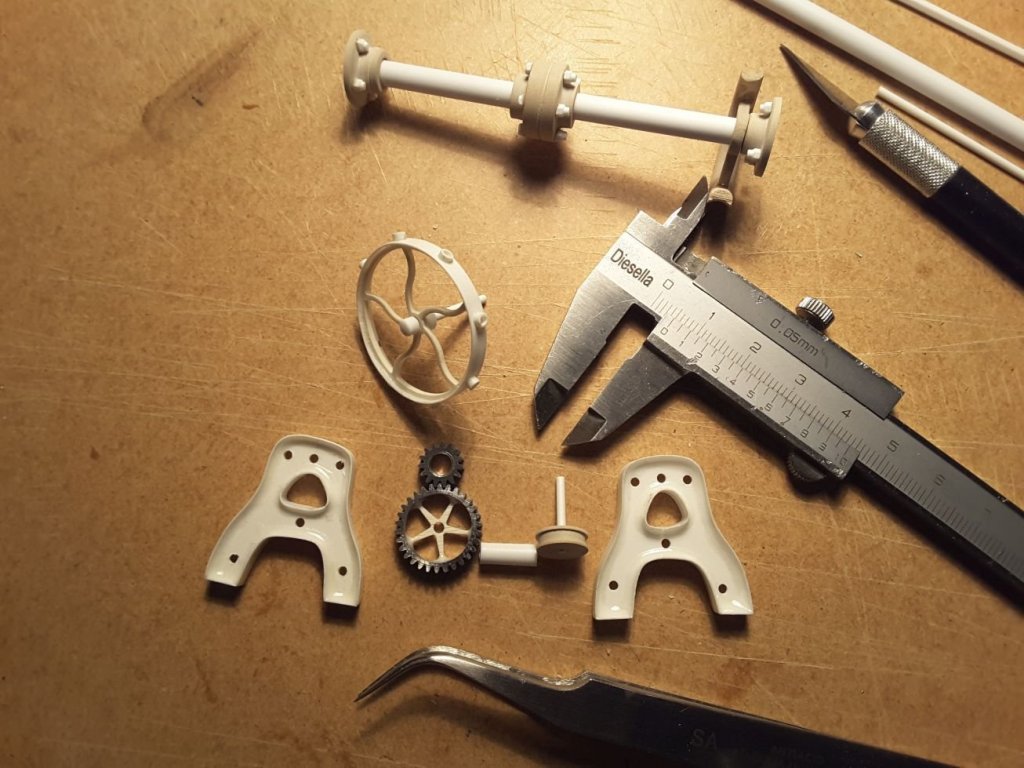
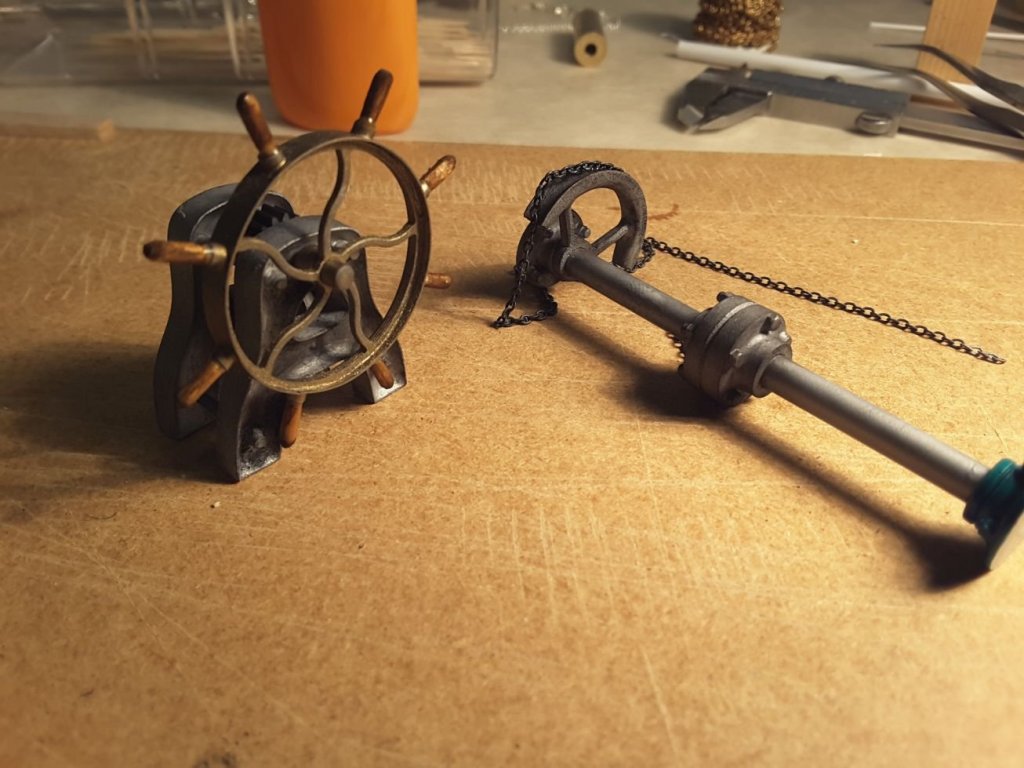

- 96 replies
-
- 13
-
-
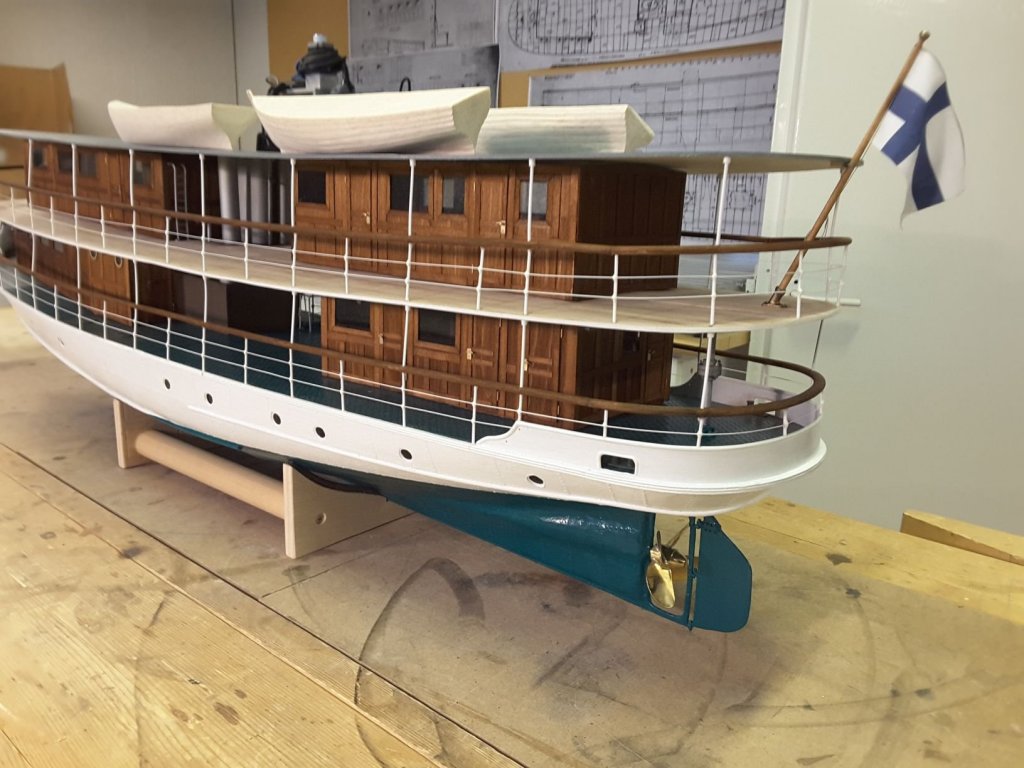
With my latest build S/S Maaninka I covered the hull with 0,05 mm thick aluminium plates. These were glued with long curing time epoxy made by Loctite. This gives you the possibility to fine tune the position of the plates, which contact cement doesn't. A messy work, but so far no disintegration has happened.