


kurtvd19
-
Posts
3,019 -
Joined
-
Last visited
Content Type
Profiles
Forums
Gallery
Events
Everything posted by kurtvd19
-

Airbrush tips
kurtvd19 replied to Airbrush Intraining's topic in Painting, finishing and weathering products and techniques
The name brand airbrushes have high quality control standards and a name to uphold while the no name or rip offs have zero to very little QC and are usually using cheap components. Good luck getting some help from them. Needle bushings are probably too tight if the needle isn't moving on a new brush. If it's a used brush it might be bushings but more likely dried paint.- 1 reply
-
- 3
-

-
June 2022 Nautical Research Journal
kurtvd19 replied to Roger Pellett's topic in NAUTICAL RESEARCH GUILD - News & Information
Roger: They have been m ailed but not until Thursday the 21st. Paper shortages and equipment issues contributed to the lateness of this issue. The paper shortages will probably continue for several more months - but our printer has been doing his best to get us good paper - within a system that has severe supply chain issues from production to shipping & delivery. -
NRG VIRTUAL WORKSHOP STRATEGIC DETAILING – PART TWO Saturday, July 23, 2021 10:30 AM CST. If you saw Part One, you don’t want to miss Part Two. Part One is currently available for viewing on the website PREREGISTRATION IS REQUIRED. REMEMBER YOU MUST BE LOGGED IN TO REGISTER OR VIEW VIDEOS Click HERE to register. Please do not call or email the office – we have automated the registration process. If you plan to attend you must register no later than 5:00 PM CST on July 22, 2021. All registrants will get an emailed invitation with the required link to attend on or about July 22. Please join the event with your video camera off and your microphone muted.
-
- 1
-

-
NRG SAW JIG Now Available
kurtvd19 replied to kurtvd19's topic in NAUTICAL RESEARCH GUILD - News & Information
Yes, that's a great video. Shows exactly how it works. I will keep the link so when I get asked how it works I can give the link to our members. Thanks for providing the link. Leave it to Woodpecker though to over engineer yet another tool to make it un-affordable to 90% of the population. I drool over how well made their stuff is and if money were no object would probably have a couple of their tools. The local Woodcraft store will order them for you but they don't stock any of their products because 90% of their customers look at them the same way I do - admire from a distance. -
tHANKS
-
Thanks Bruce.
-
Very nice model. Congratulations on a job well done.
-
Epoxy glue
kurtvd19 replied to mtaylor's topic in Painting, finishing and weathering products and techniques
Your hobby shop doesn't rebrand it. Smith does that for any store or business when they order the second time - they ask and if you want it the do it from then on. You will see that Model Expo and others use it too. -
Epoxy glue
kurtvd19 replied to mtaylor's topic in Painting, finishing and weathering products and techniques
You picked the absolute best brand of epoxy. I use only Bob Smith epoxies. I use 5, 15 and 30 minute. Bob Smith is the only brand of C/A that I use. -
Old NRG Article on Deck Plank Spacing
kurtvd19 replied to mikiek's topic in NAUTICAL RESEARCH GUILD - News & Information
It was actually posted on MSW and was moved to the NRG's website with other articles. When it was reviewed by staff it was deleted due to some inaccurate information and formatting issues. It will not be re-posted. There is a paper on planking now in progress that will be posted shortly. -
Thanks.
-
The Byrnes table saw and the old Preac table saw both have 1/2-inch wide slots. I would greatly appreciate it if anybody with other bands of small table saws would take the time to measure your saw's slots and reply to this with the width, depth and brand and model of the saw. I would like to add this information to our Thin Strip Jig ads and information in the NRG Store description of the Jig. Thanks, Kurt
-
NRG VIRTUAL WORKSHOP - INVITATION
kurtvd19 replied to kurtvd19's topic in NAUTICAL RESEARCH GUILD - News & Information
The video is posted now on the members side. Dave got to it quickly this time. It runs 1 hour and 37 minutes. Enjoy - I will be sending a group email to all NRG members tonight. -
NRG VIRTUAL WORKSHOP - INVITATION
kurtvd19 replied to kurtvd19's topic in NAUTICAL RESEARCH GUILD - News & Information
It will be posted but not immediately. The video needs to be edited as it starts when the zoom event starts - 45 minutes of people joining, etc before the speaker starts and putting it ontno the website can only be done by the one person so we work around his schedule (none of us gets paid). The last one got posted within 2 weeks. -
Old NRG Article on Deck Plank Spacing
kurtvd19 replied to mikiek's topic in NAUTICAL RESEARCH GUILD - News & Information
I am checking on this now. I have no idea why it was deleted unless the copy provided by markjay is what had been posted. Maybe a matter of having a clean copy. Anyway I am checking. -
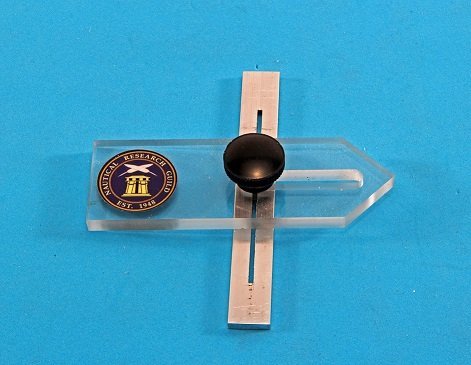
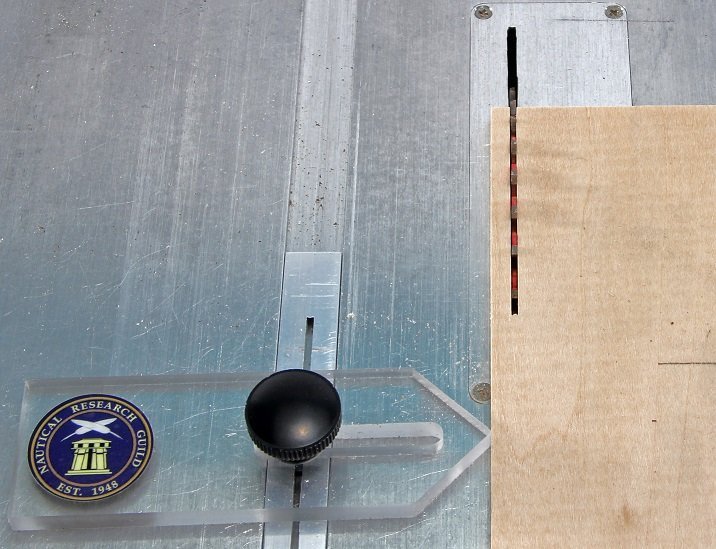
THE NRG THIN STRIP SAW JIG The Thin Strip Saw Jig shown in our December 2021 Virtual Workshop on Table Saw Use & Safety by Kurt Van Dahm is now available for purchase. This jig is usable on the Byrnes and Preac saws as well as any small table saw with a 1/2-inch-wide miter slot that is at least 1/8-inch-deep. EASY TO USE WHILE INCREASING SAFETY AND SAVING TIME The jig is designed to make cutting identical strips from a sheet of wood. Measure once and cut as many as needed without resetting the jig. Cutting the strips to the outside of the blade eliminates the risk of the strip being trapped between the blade and the fence and shot back at the saw operator. The jig saves time when making repeated cuts such as for deck planking and cutting your own strip wood from sheets. Once set the accuracy of the Thin Strip Jig cannot be equaled. JIG IN USE LEFTIES - PLEASE READ THIS If you are left-handed, please contact the NRG Office before you order your Thin Strip Saw Jig and let us know you are left-handed, we will install the logo on your jig, so it is right side up when in use. LIST PRICE IS ONLY $15.00 (US) DON'T FORGET NRG MEMBERS GET 20% OFF ON THIS AND MOST ITEMS SOLD IN OUR IN-LINE STORE – BUT YOU MUST USE THE DISCOUNT CODE. We are unable to refund the difference between the list price and the Member's price. ORDER HERE Type this in if link does not work https://thenrgstore.org/collections/guild-products/products/thin-strip-saw-jig
-
I was going to recommend Badger's Anti-Fouling Red Oxide (#16-401) in the Marine series or #16-14 in their Rail Road Colors - exact same paint. It comes from the same 5 gallon pail - they put one or the other label on it after bottling. I usually apply it over a black undercoat - STYNYLREZ works great for the this. You can use the black Stynylrez for the entire hull like I do since it's release. I like the black under the oxide red as it makes the red a bit more subdued.
-
Next NRG Conference
kurtvd19 replied to YankeeClipper's topic in NAUTICAL RESEARCH GUILD - News & Information
The new Director of the Channel Islands Museum has said the museum is too small for us to have our conference there so there will not be a conference there. The date/location of the next conference is unknown at this time. -
Replacement motor for Preac saw
kurtvd19 replied to Kevin Kenny's topic in Modeling tools and Workshop Equipment
The belt on my kit was great - smooth and flexible. Love the saw now - had it since 1994 and I feel it finally works as it should. -
Preac thickness sander
kurtvd19 replied to bushman32's topic in Modeling tools and Workshop Equipment
Having replaced several of these bearings over the years (had 6 sanders operating 5 days a week in a model shop in Manila) I can assure all that they are standard bearing sets available at McMaster-Carr and other places. Take the bad one out, measure it and match it up to a catalog listing - and by two the other one will go soon unless you caught the bad on soon after going bad. Kurt -
Also the parts need to be clean. No rust, scale, dirt, oil, etc.
-
Old NRG Article on Deck Plank Spacing
kurtvd19 replied to mikiek's topic in NAUTICAL RESEARCH GUILD - News & Information
No it was actually deleted from the MSW forum's how to articles quite some time ago. The same information is available elsewhere and this will not be re-posted. -
Off to the contest. Will be our biggest event in m y 20 years of chairing the contest. Hope anybody, not registered already, in the area will visit either Sat or Sun. Some great models. Half the entrants are NRG/MSW members. Hope to see you. Maybe we can get a MSW group photo. Kurt
-
Old NRG Article on Deck Plank Spacing
kurtvd19 replied to mikiek's topic in NAUTICAL RESEARCH GUILD - News & Information
We are checking with the author to see if he will OK the posting as his copyright is still valid.


