xken
-
Posts
841 -
Joined
-
Last visited
Content Type
Profiles
Forums
Gallery
Events
Everything posted by xken
-
 Still no power, projected restoration tonight at midnight. Just having fun with the granddaughters now. We are in one of the pockets in Morro Bay with no power. So far only 2.3 inches of rain but record winds, we may have to replace our roof about two dozen shingles scattered around the house. Our neighbor has a tile roof and lost several tiles as well. House across the street was a total mess with 25% of the roof gone. Locals are telling us this is the worst storm in decades and more to come. The ocean waves are 16 to 18 feet and real impressive; watched them while having breakfast this morning at the embarcadero.
- 162 replies
-
- 5
-

-
- dirty dozen
- fishing
- (and 2 more)
-
Roger, no commercial fishing on the central coast, but there is an abalone farm north of us. What i can tell from pictures they were just pulled off and put into a gathering basket. Some divers carried a sheathed knife; but in pictures I have seen the divers did not have them. At our daughter`s house since our power has been off 5 hours now, big storm coming through with strong winds and trees down everywhere; roads closed all around us. I will post a picture when I can. Steve, just a game change, diver might be more interesting to look at than an engine.
- 162 replies
-
- 7
-
-
- dirty dozen
- fishing
- (and 2 more)
-
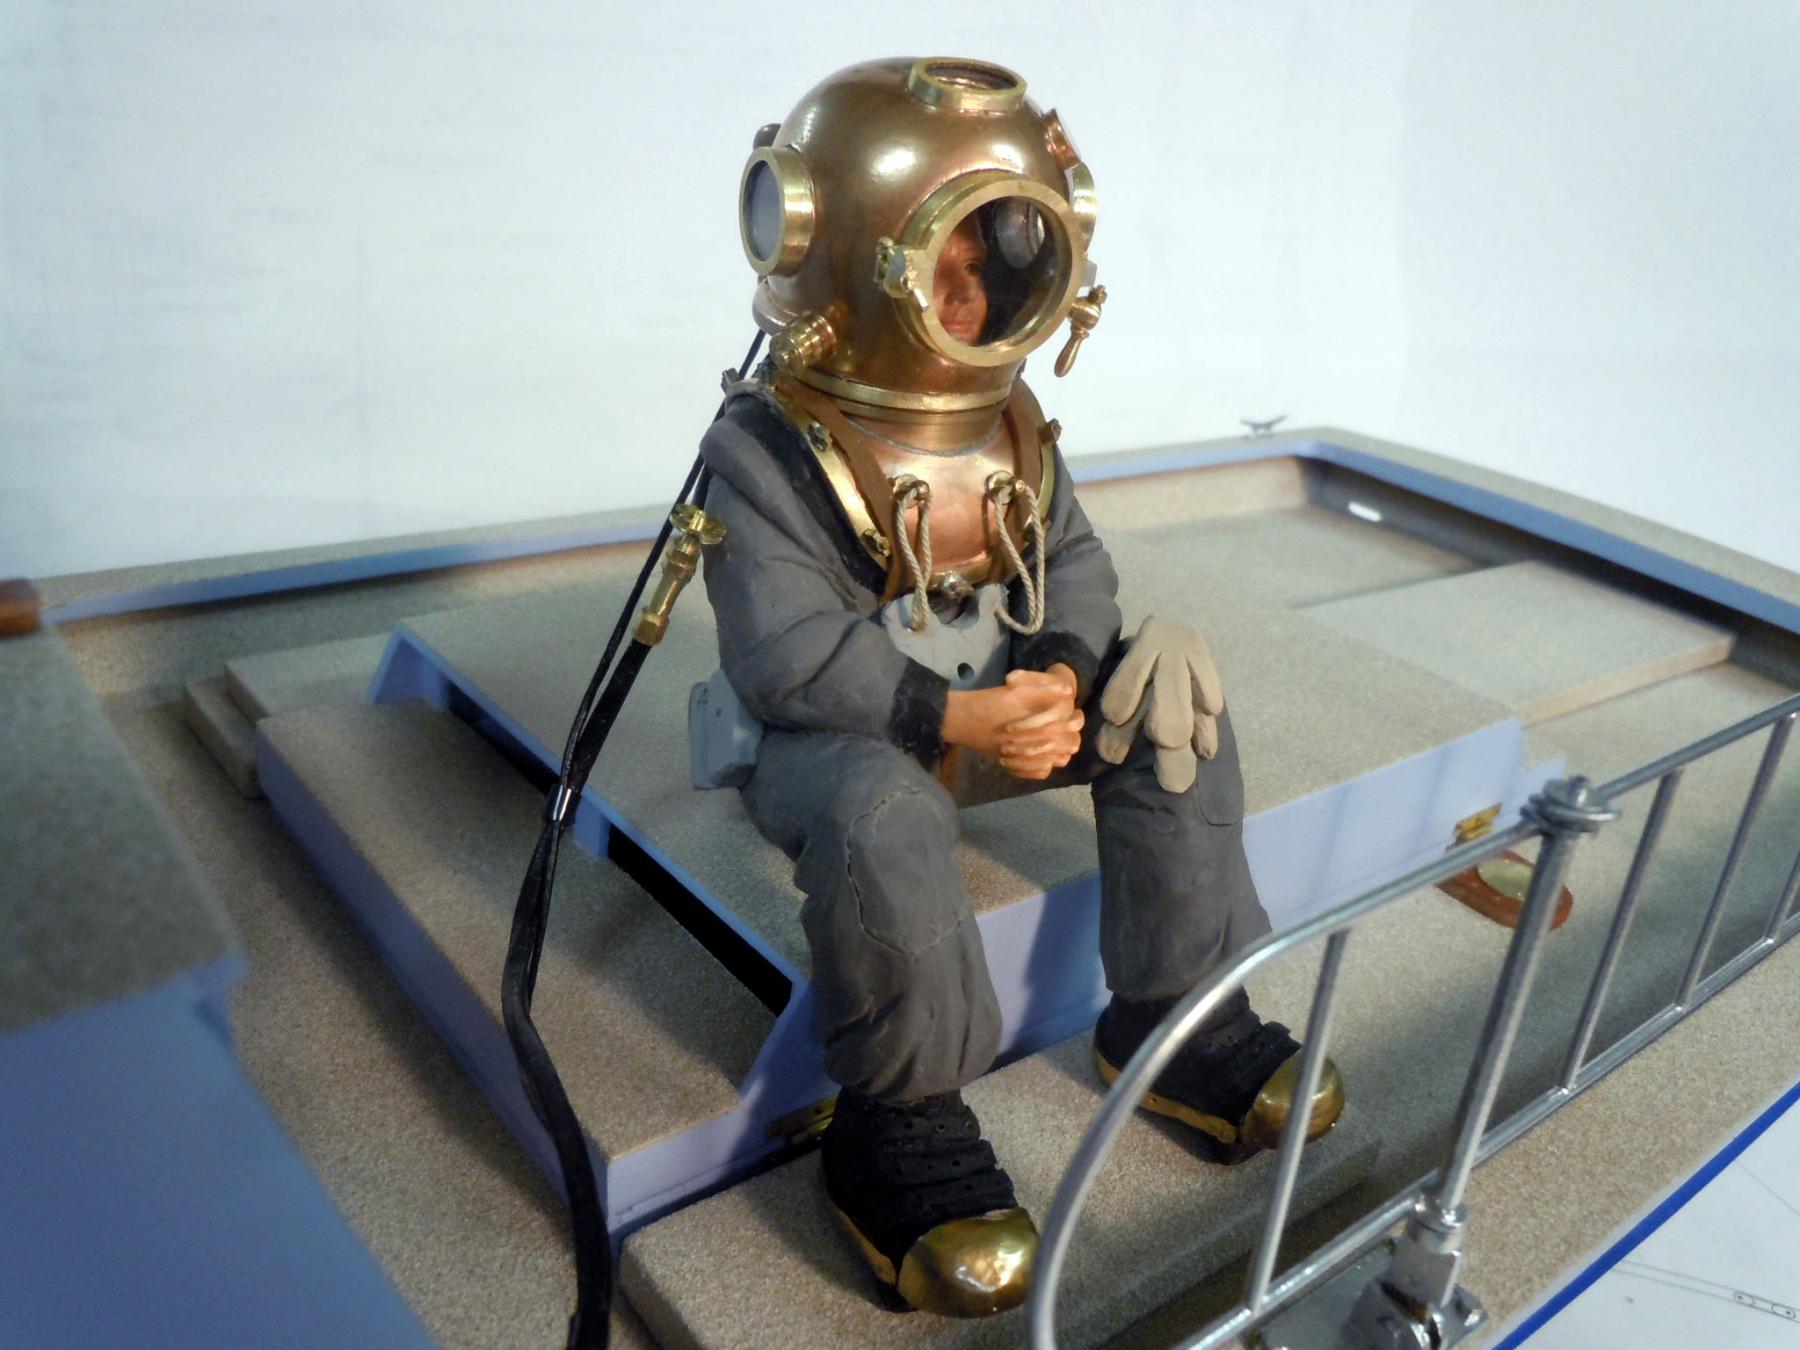
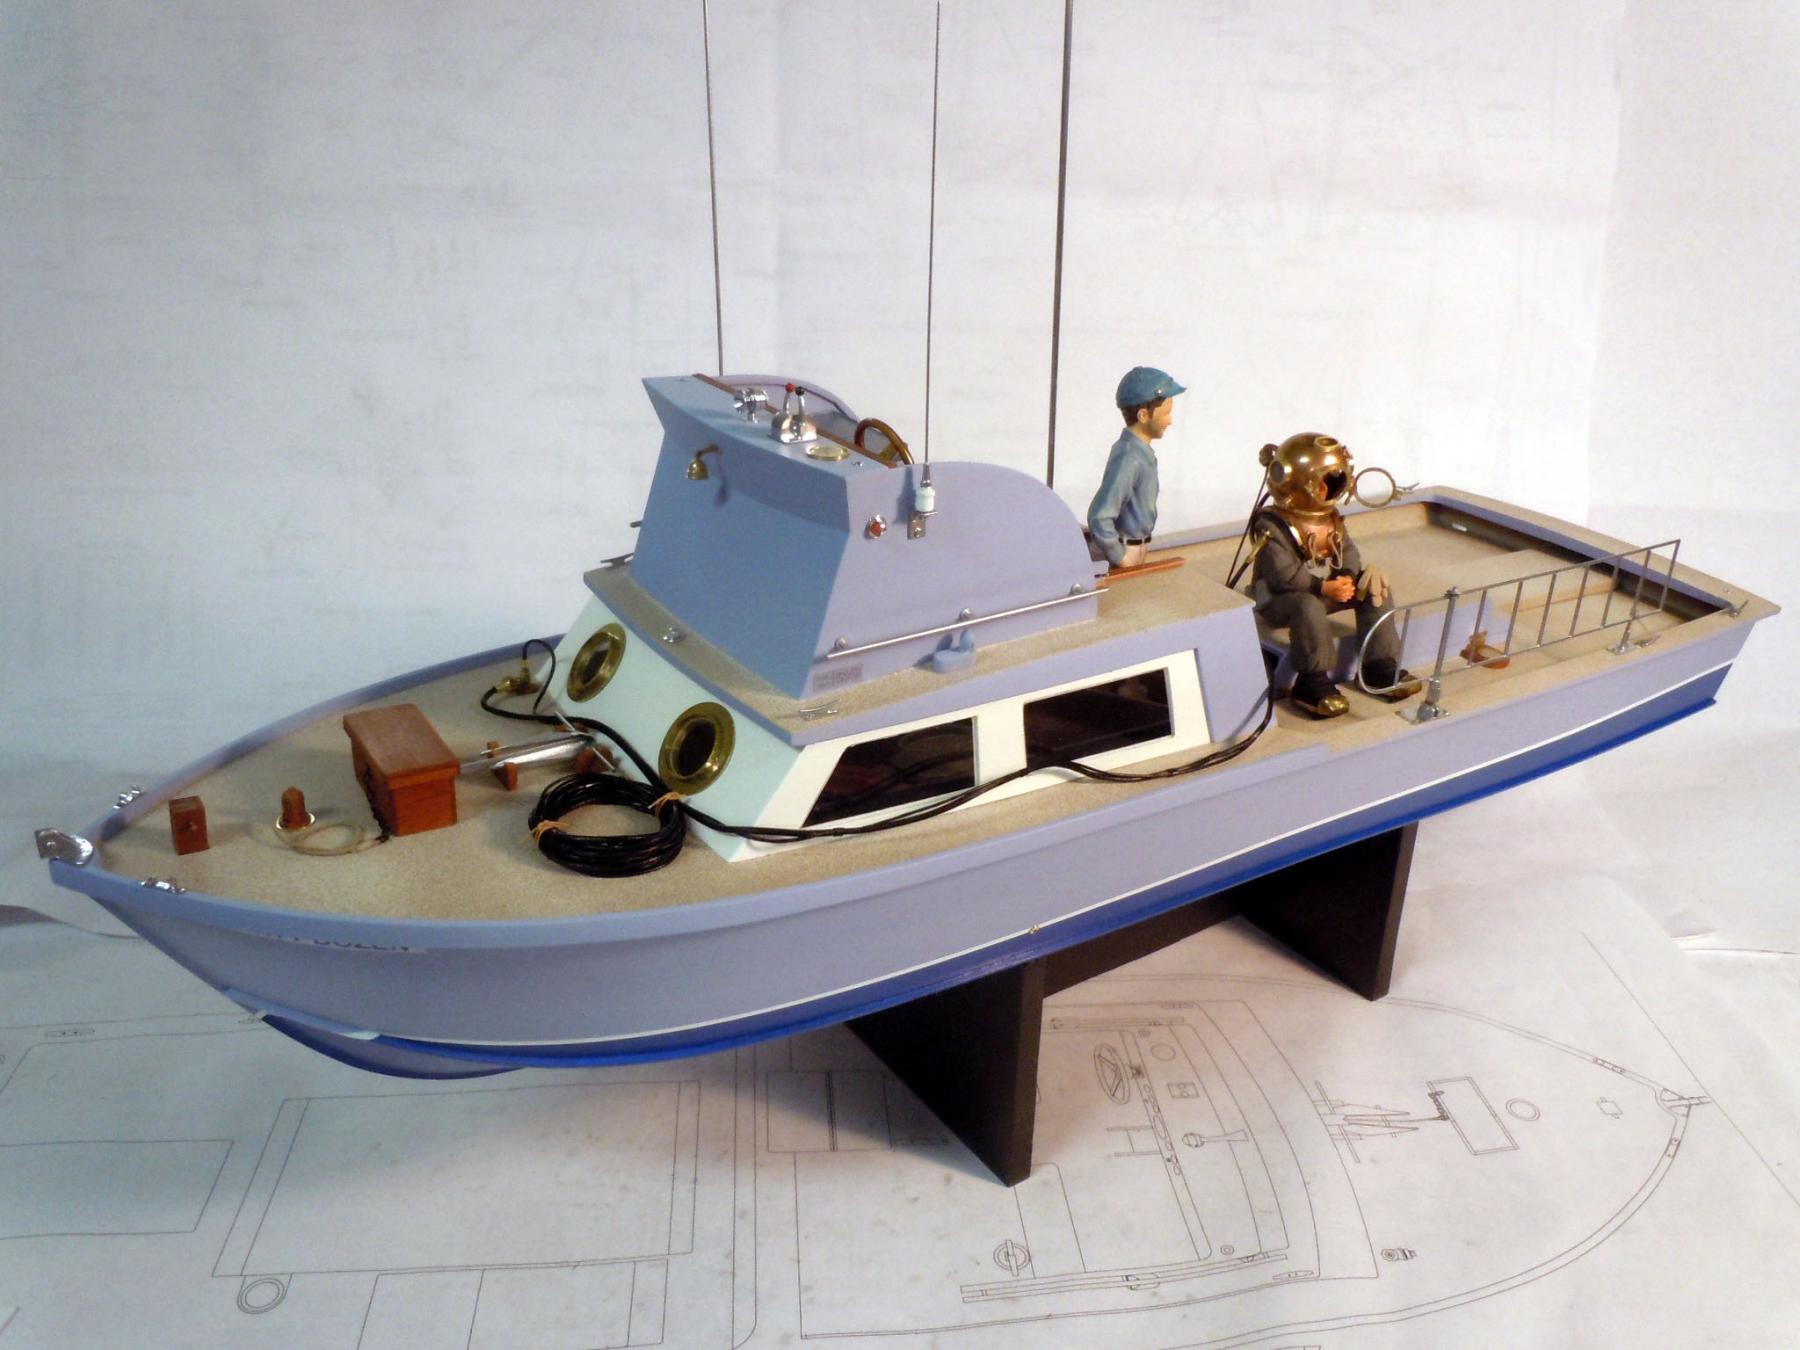
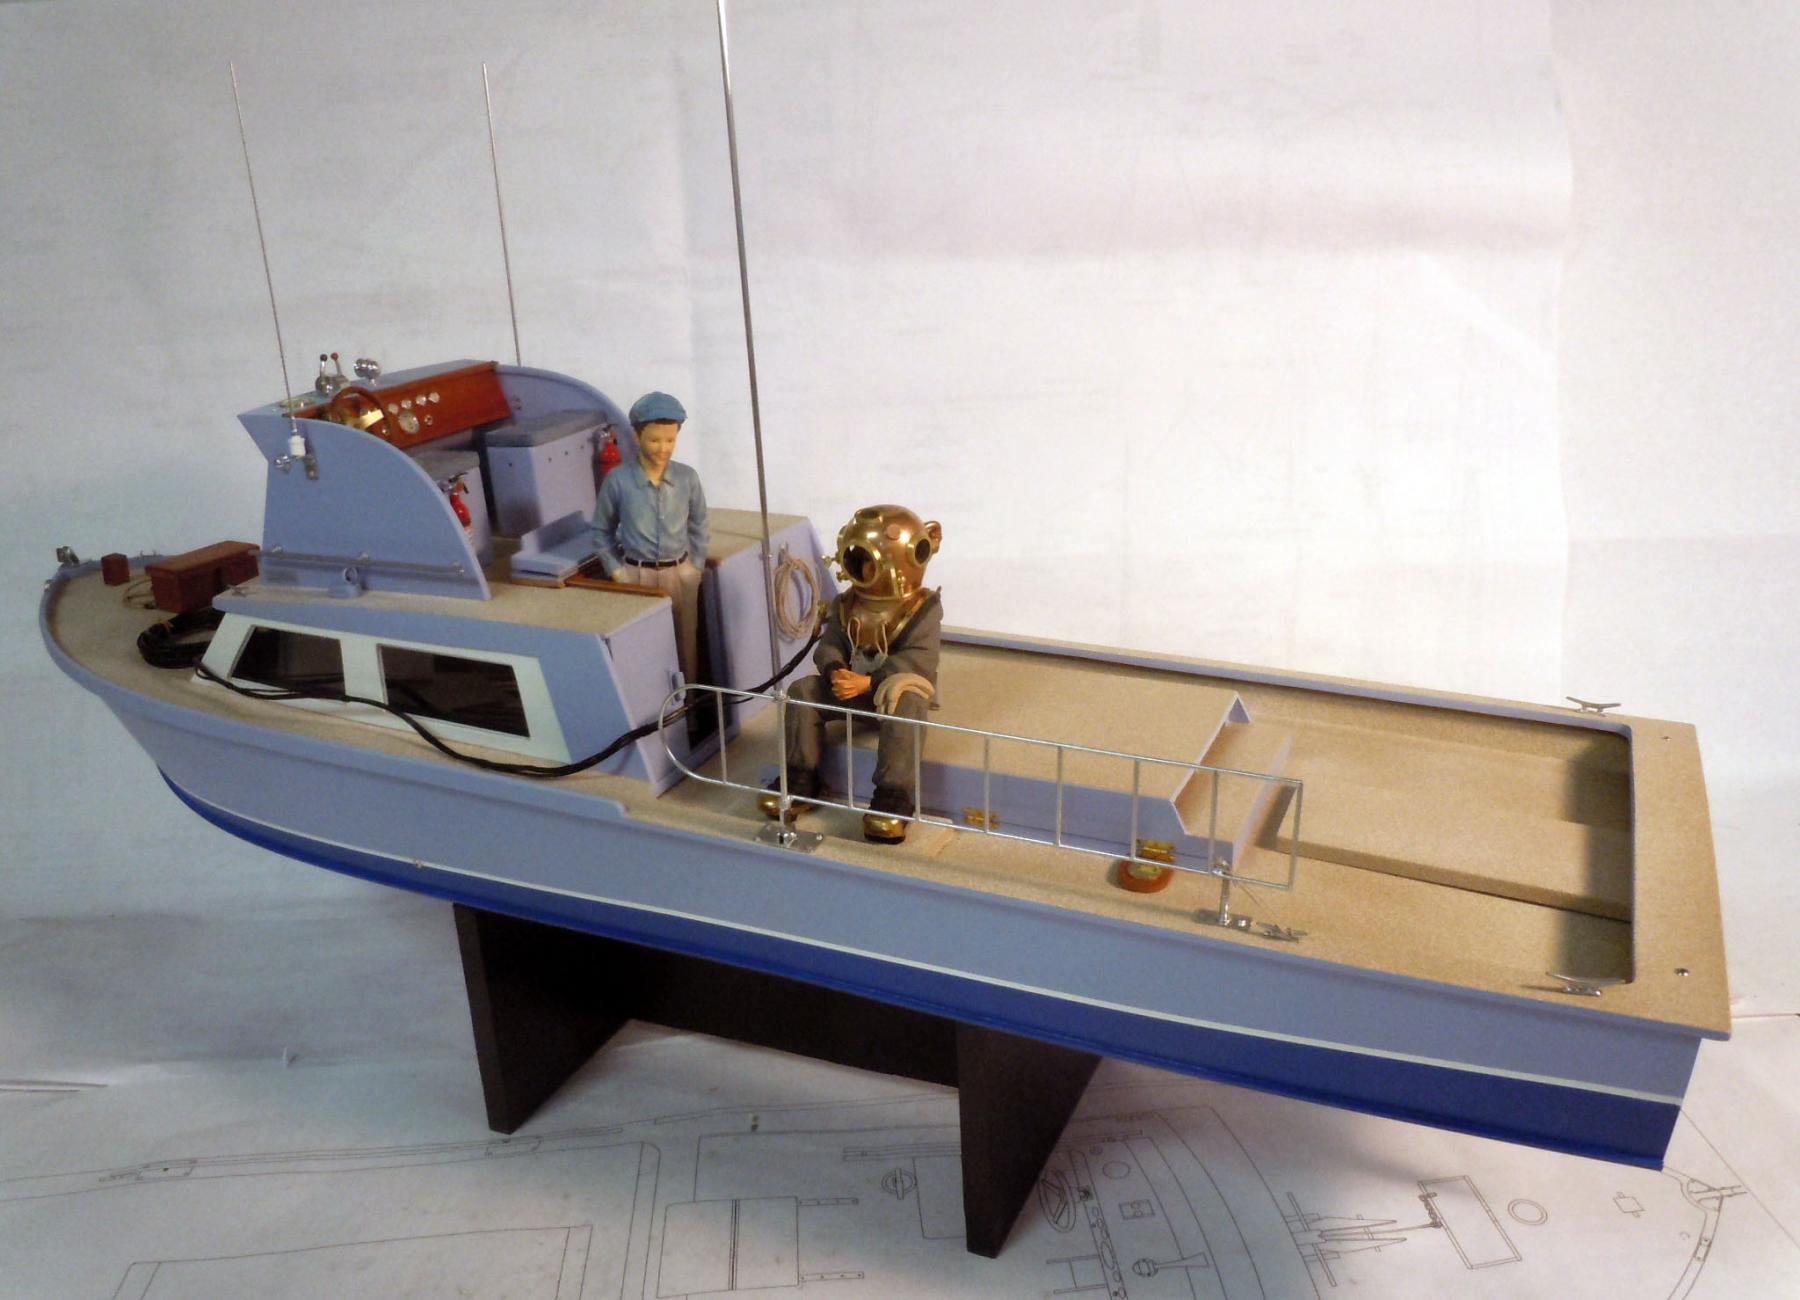
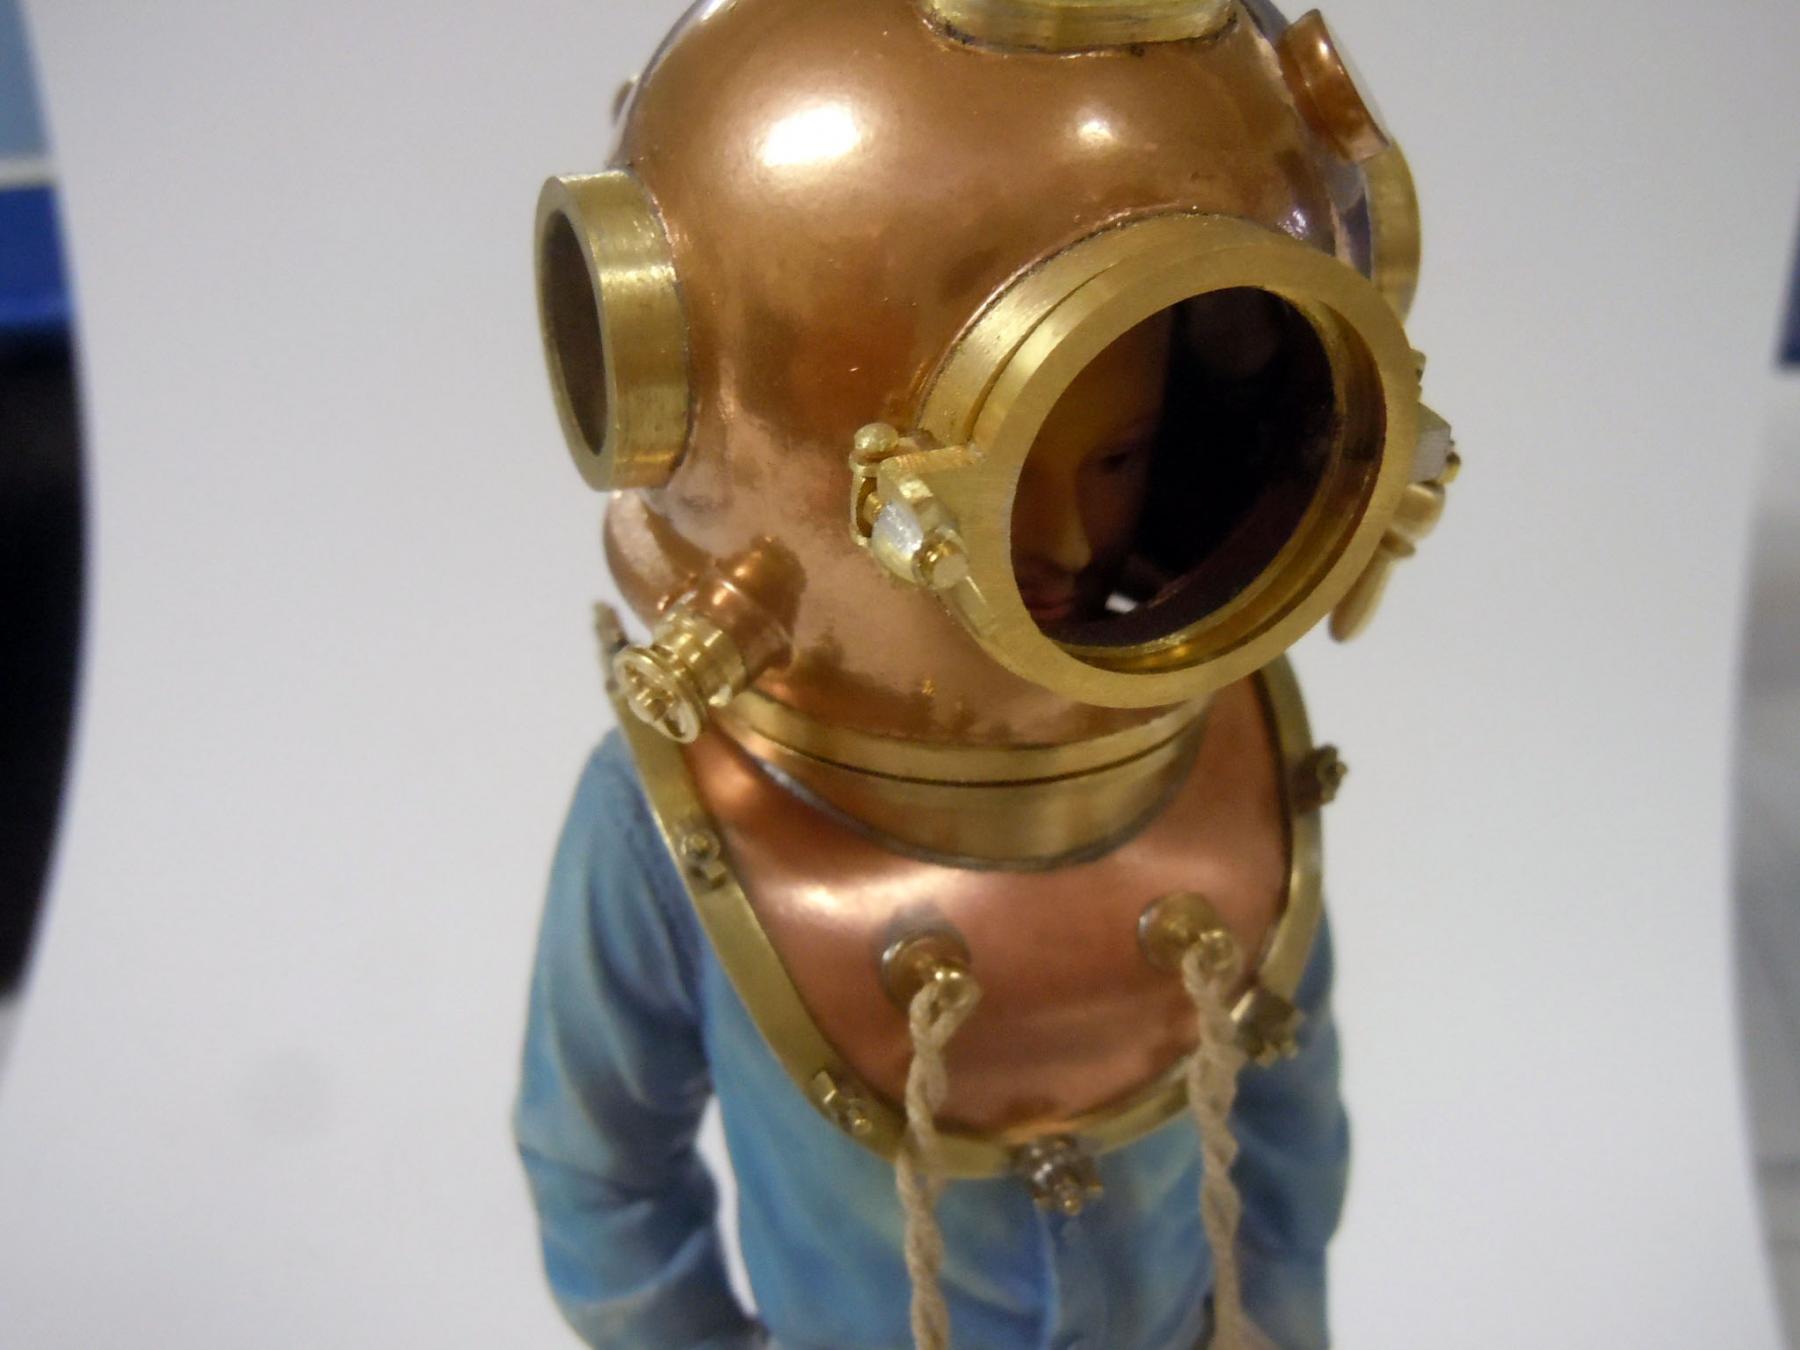
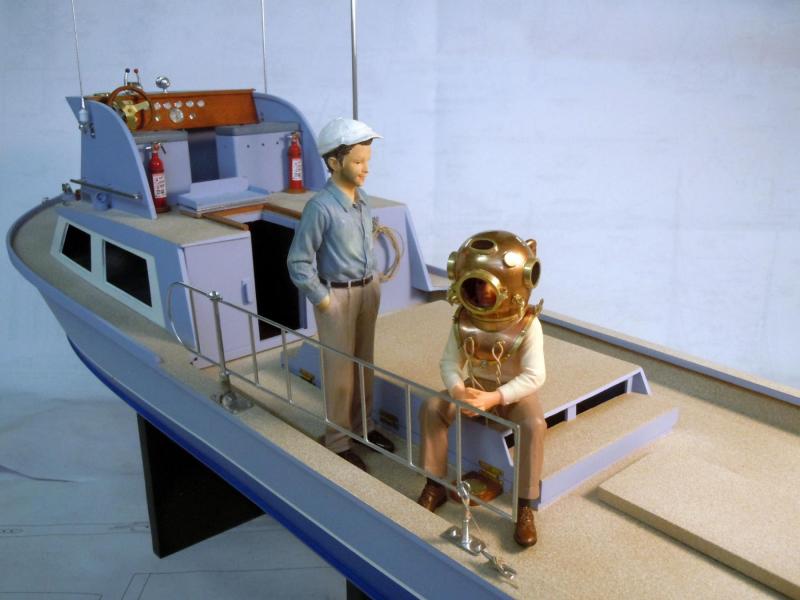
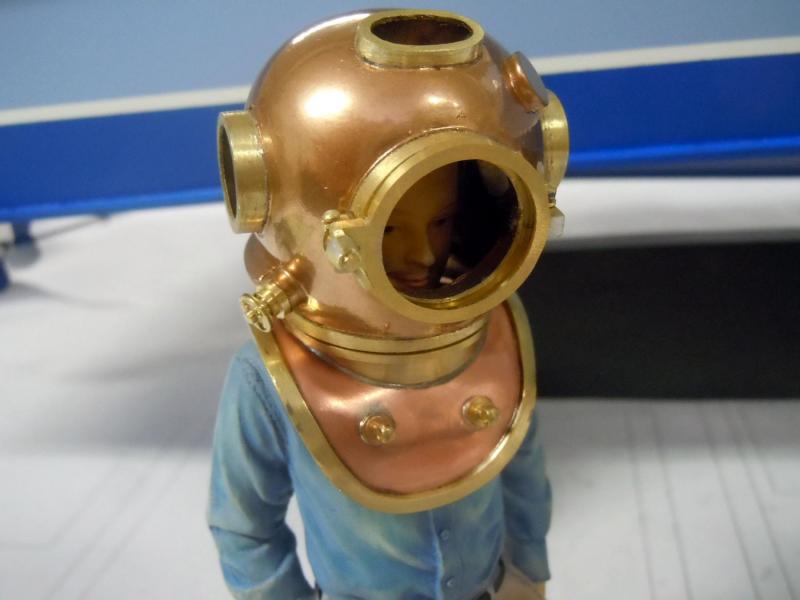
I have added the air and communication lines using beading strips of two different sizes. They are linked together every 3 inches with a piece of heat shrink tube that was shrunk with heat from the soldering iron barrel. I made the adjustment valve in the air line starting with hex bar and turning two parts that were soldered together and then added the knob on a locating pin. Lines were attached to the helmet and junction on fore deck. I talking with Chuck he stated that the main amount of work by the lineman was done on the fore deck when the diver was in the water. He said the boat was not anchored and that the diver at times would pull the boat to a new location. I also added the window glass to both the boat and the helmet, so look for reflections in the pictures. I used 1 mm acrylic sheet and cut each to fit. I laid the the clear acrylic over the plans and made each score with a Xacto blade and broke on the cut lines. Then the edges and corners were sanded to fit. For the helmet I used a circle guide to scribe a circle and then cut and sanded to fit each window. Here is a series of pictures, I am finished with the boat at this point unless I discover an additional detail that would further enhance the presentation. So far the only ones that comes to mind are a retrieval rope that attaches to the diver that is hanging on the cleat right now and a gathering net for the abalone. Now back to writing and the Constitution and wait to find out the next step for the Dirty Dozen with the Museum folks. My wife suggested that if the diver is displayed sitting on the engine compartment near the ladder there is no need to build an engine. This has been a fun build and I have learned a great deal about abalone fishing, boat building and added a new skill of working with Sculpty.


- 162 replies
-
- 16
-
-
- dirty dozen
- fishing
- (and 2 more)
-
Pat, Bob, Jack Thank you! Jack it is a polyester based cast part. The reason I suspect this is because back in college I use to take automotive body putty and thin it with Fiberglas resin and use the amount of the body putty hardener to set the cure rate based upon the mixed color. Also the viscosity can be adjusted by the amount of resin used to thin the body putty. One thing to also keep in mind is that the more resin the greater the shrink rate. Mold release is needed for mold material other than silicone. This was way before cast urethane materials. When sanding the fiquire it has the same polyester smell and feel as the parts I used to cast. The figures being cast in China this combination makes sense. With the numerous bakings at 275 degrees there was no perceivable impact on the cast figure.
- 162 replies
-
- 7
-
-
- dirty dozen
- fishing
- (and 2 more)
-
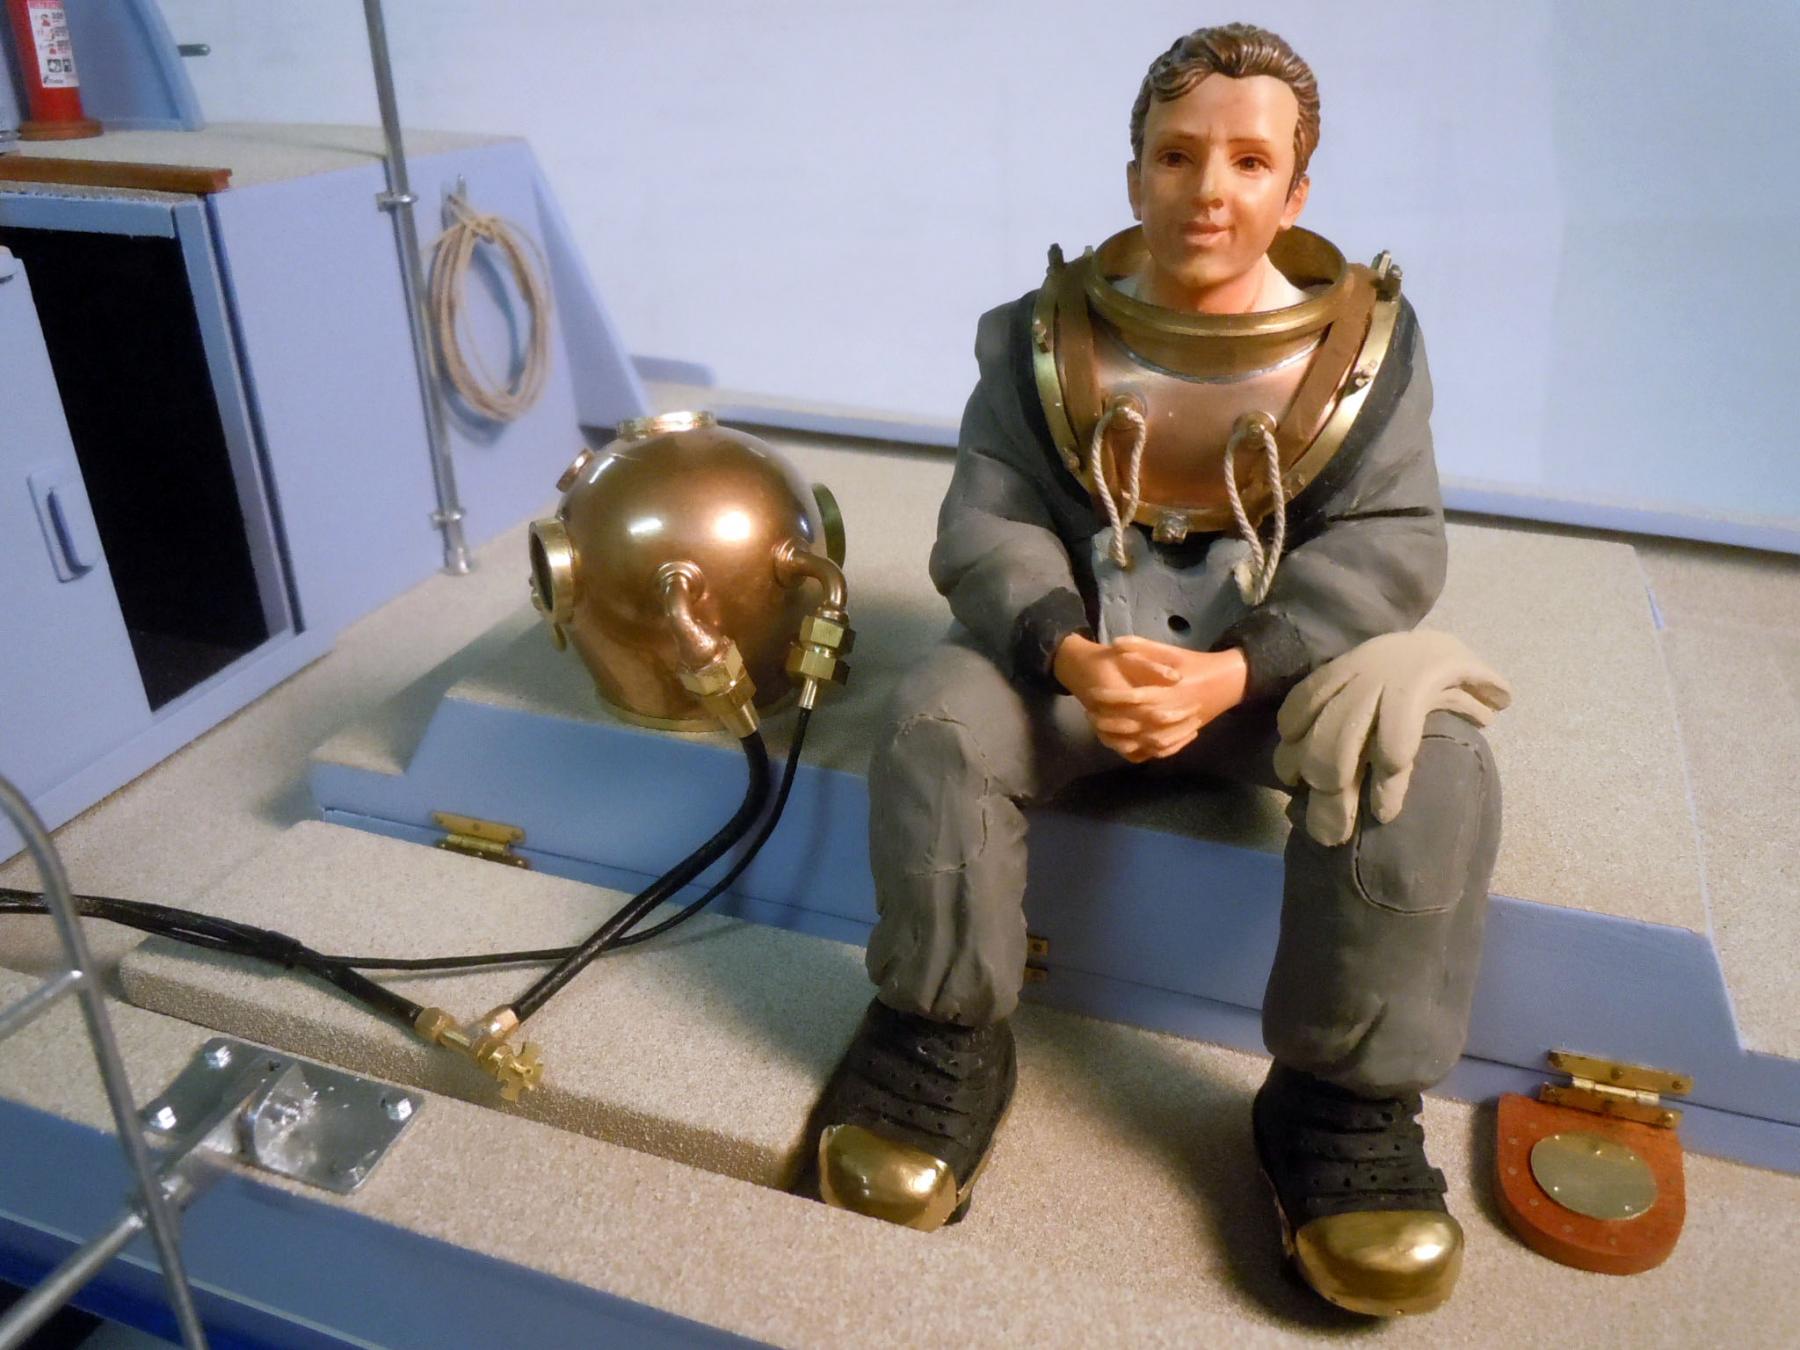
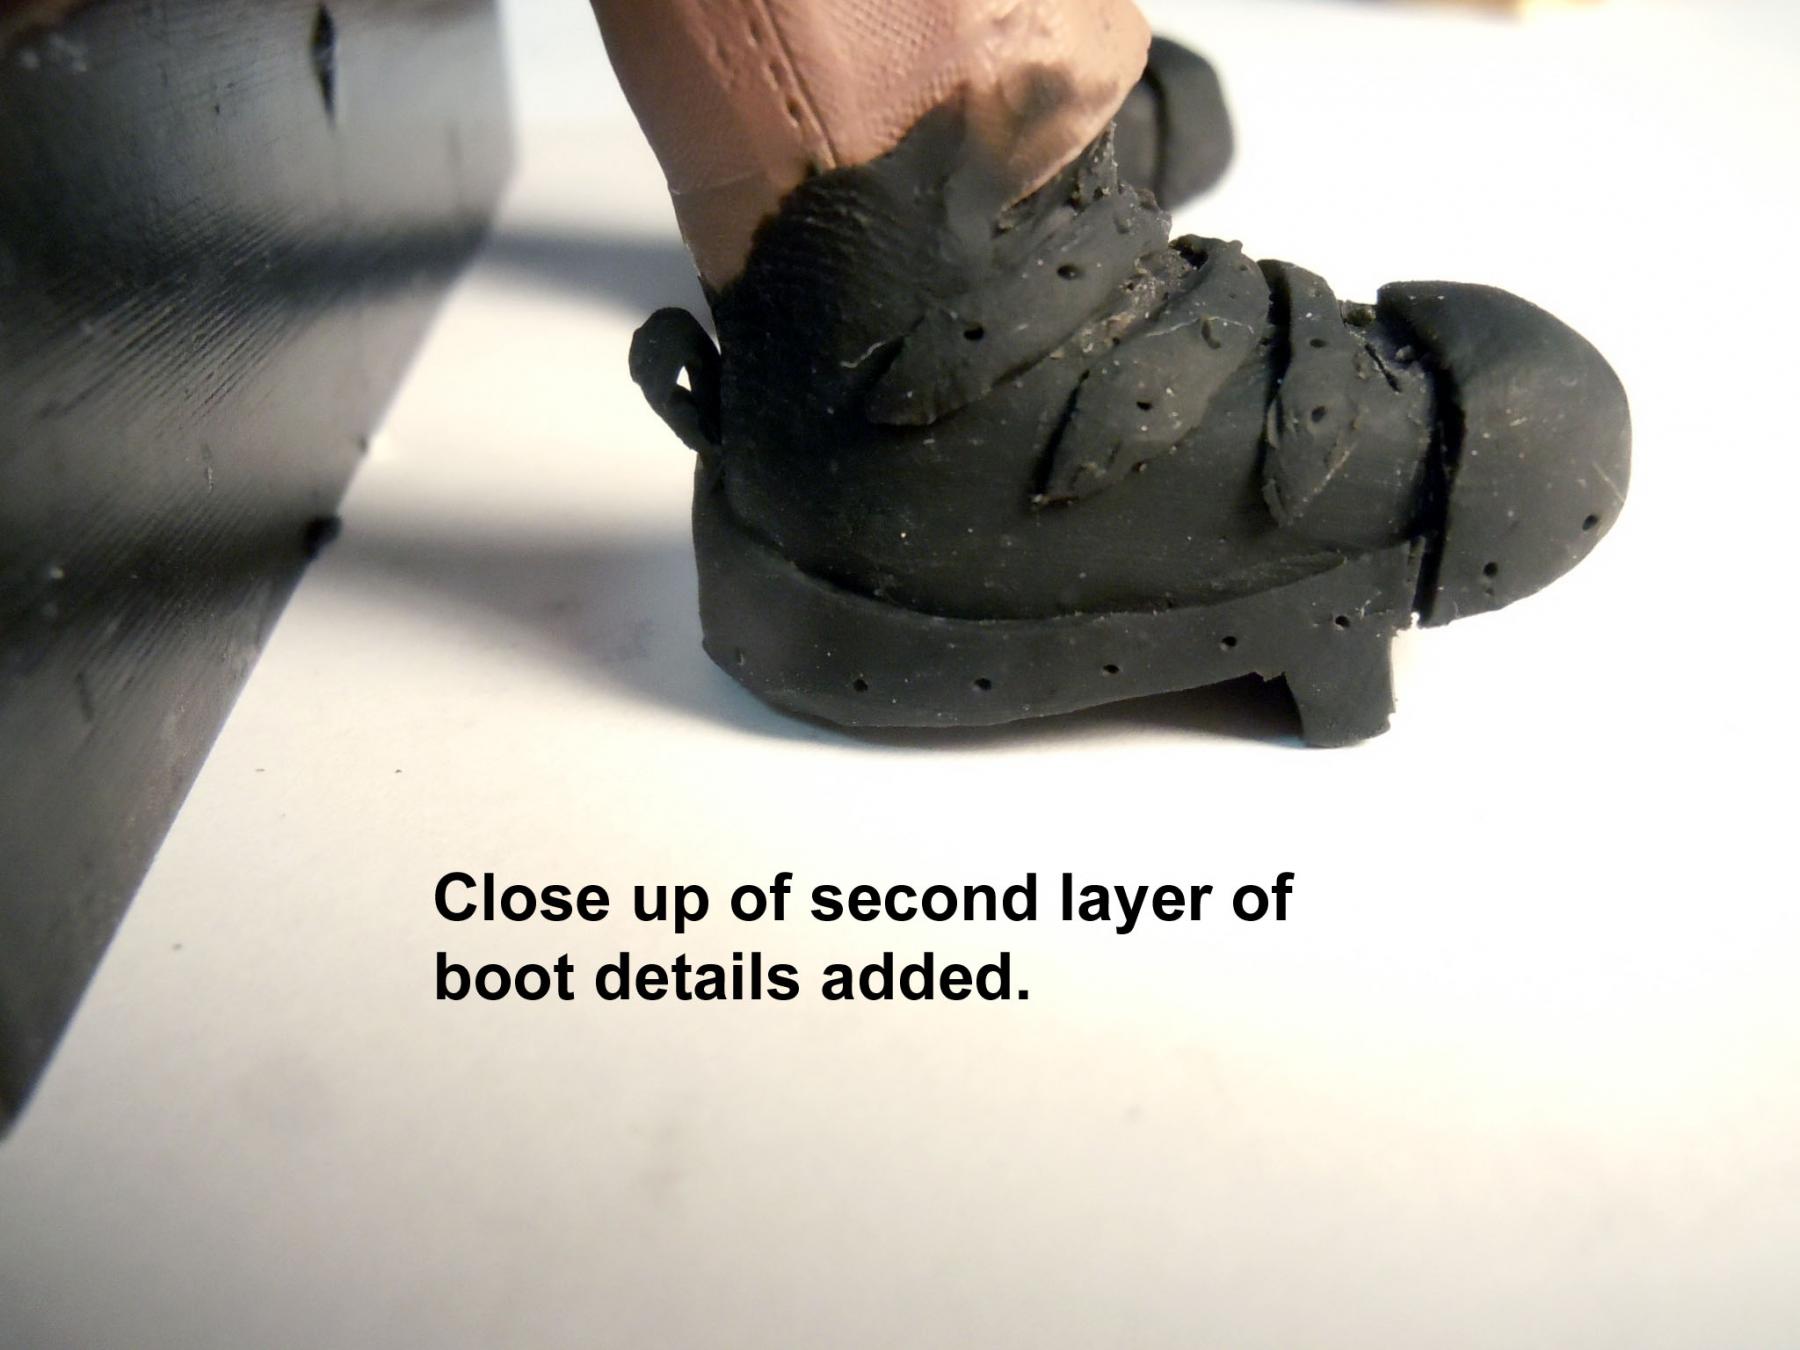
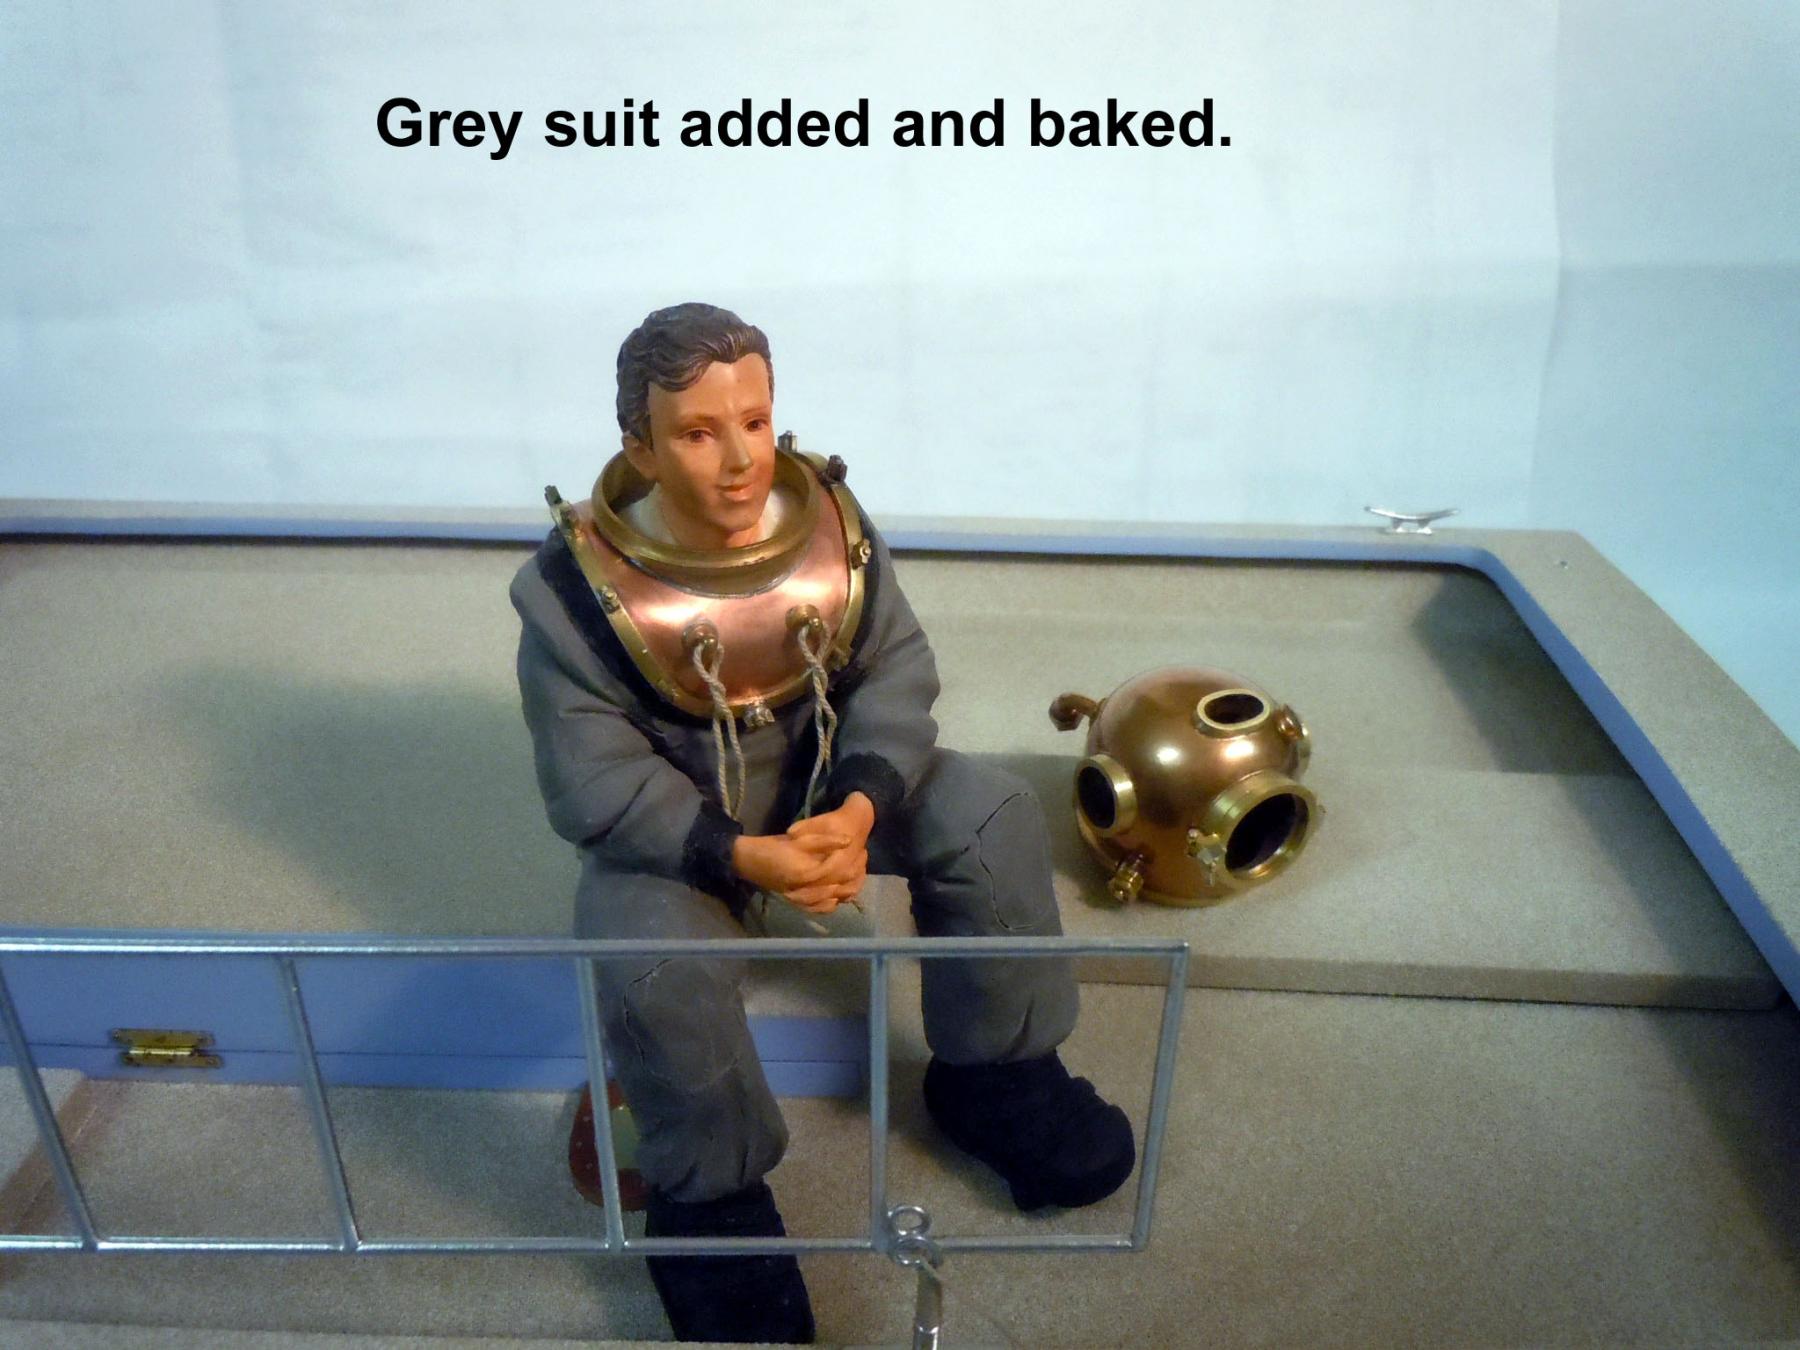
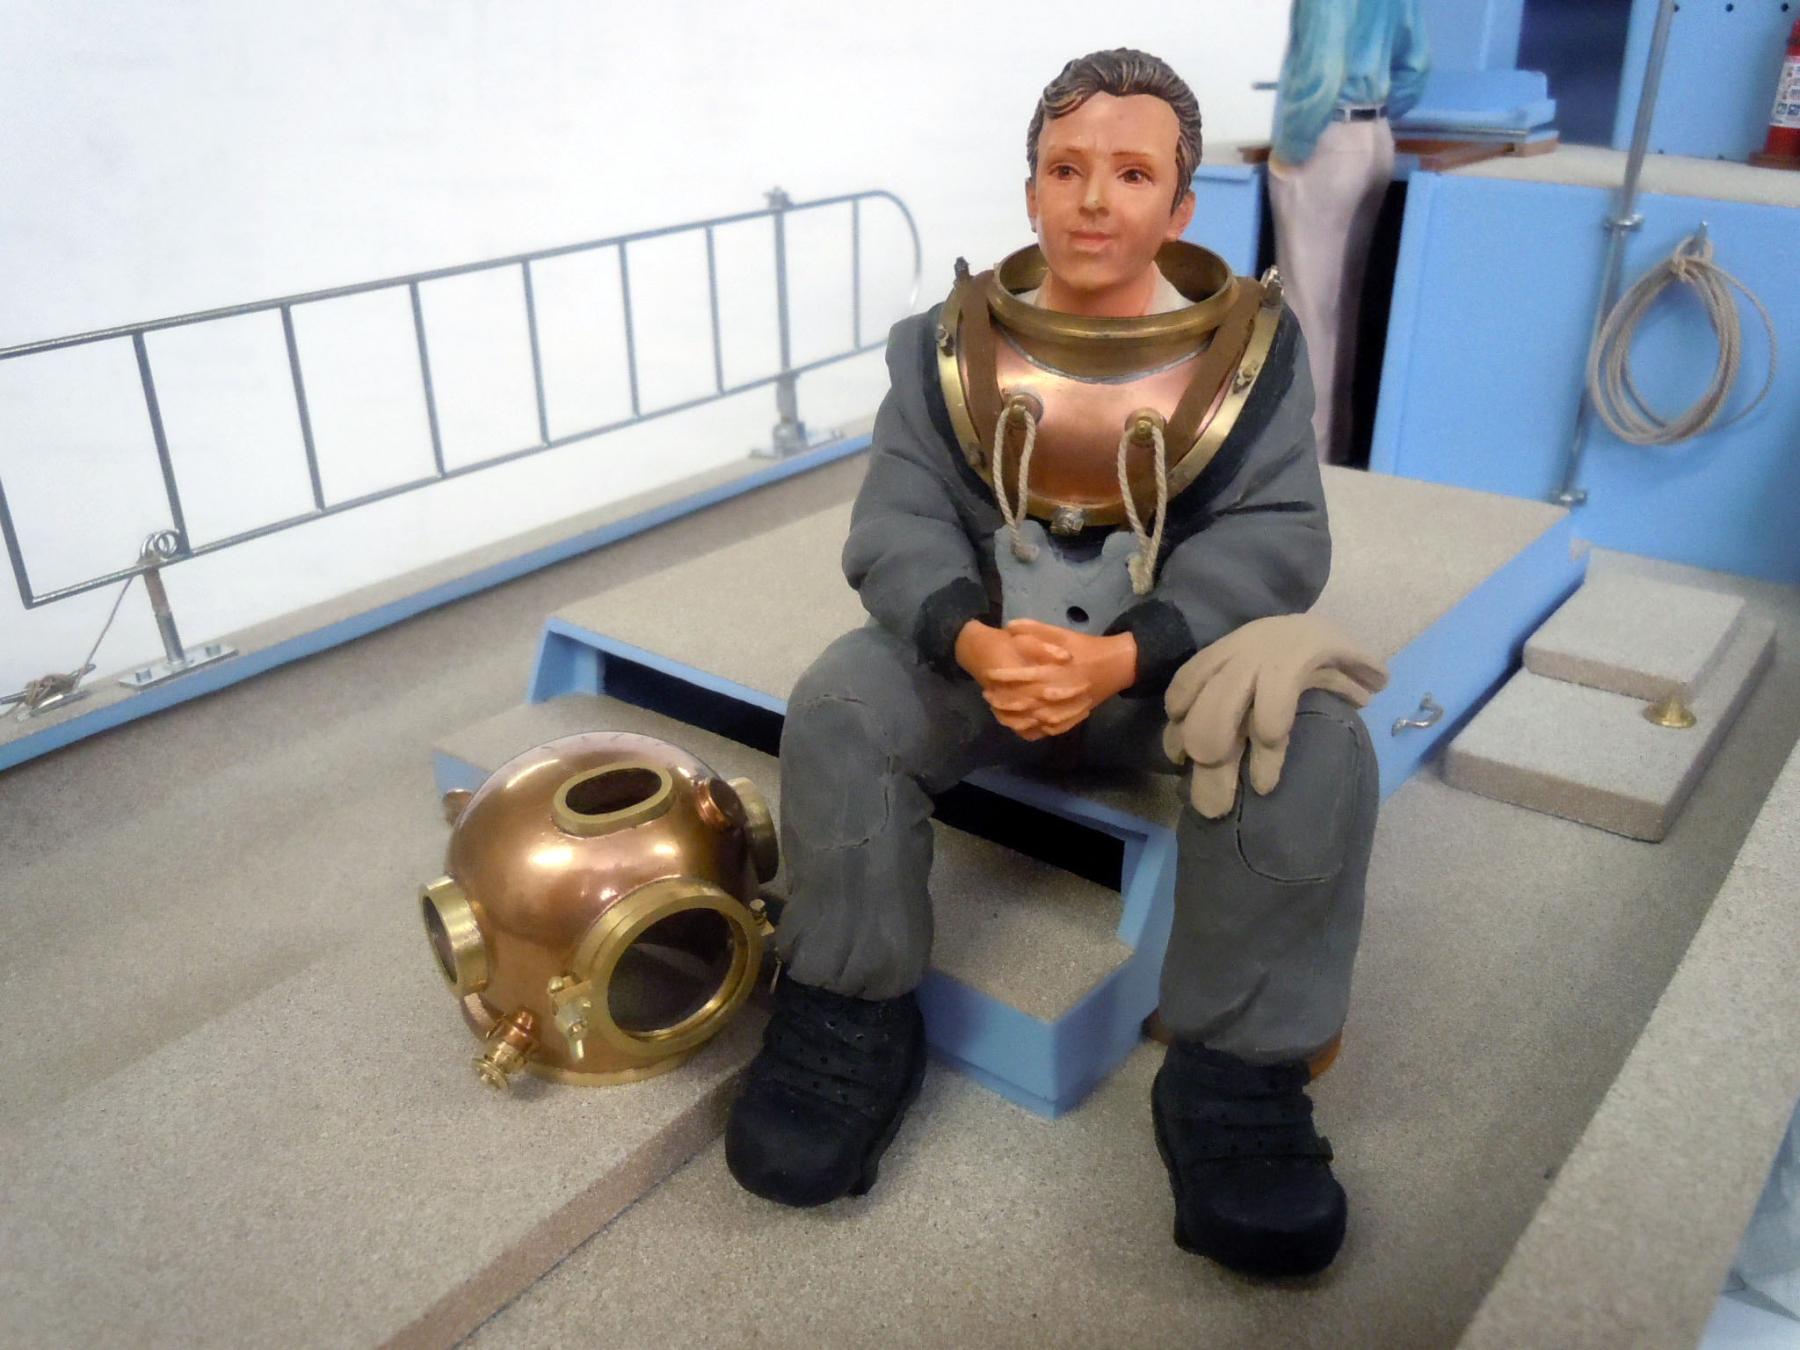
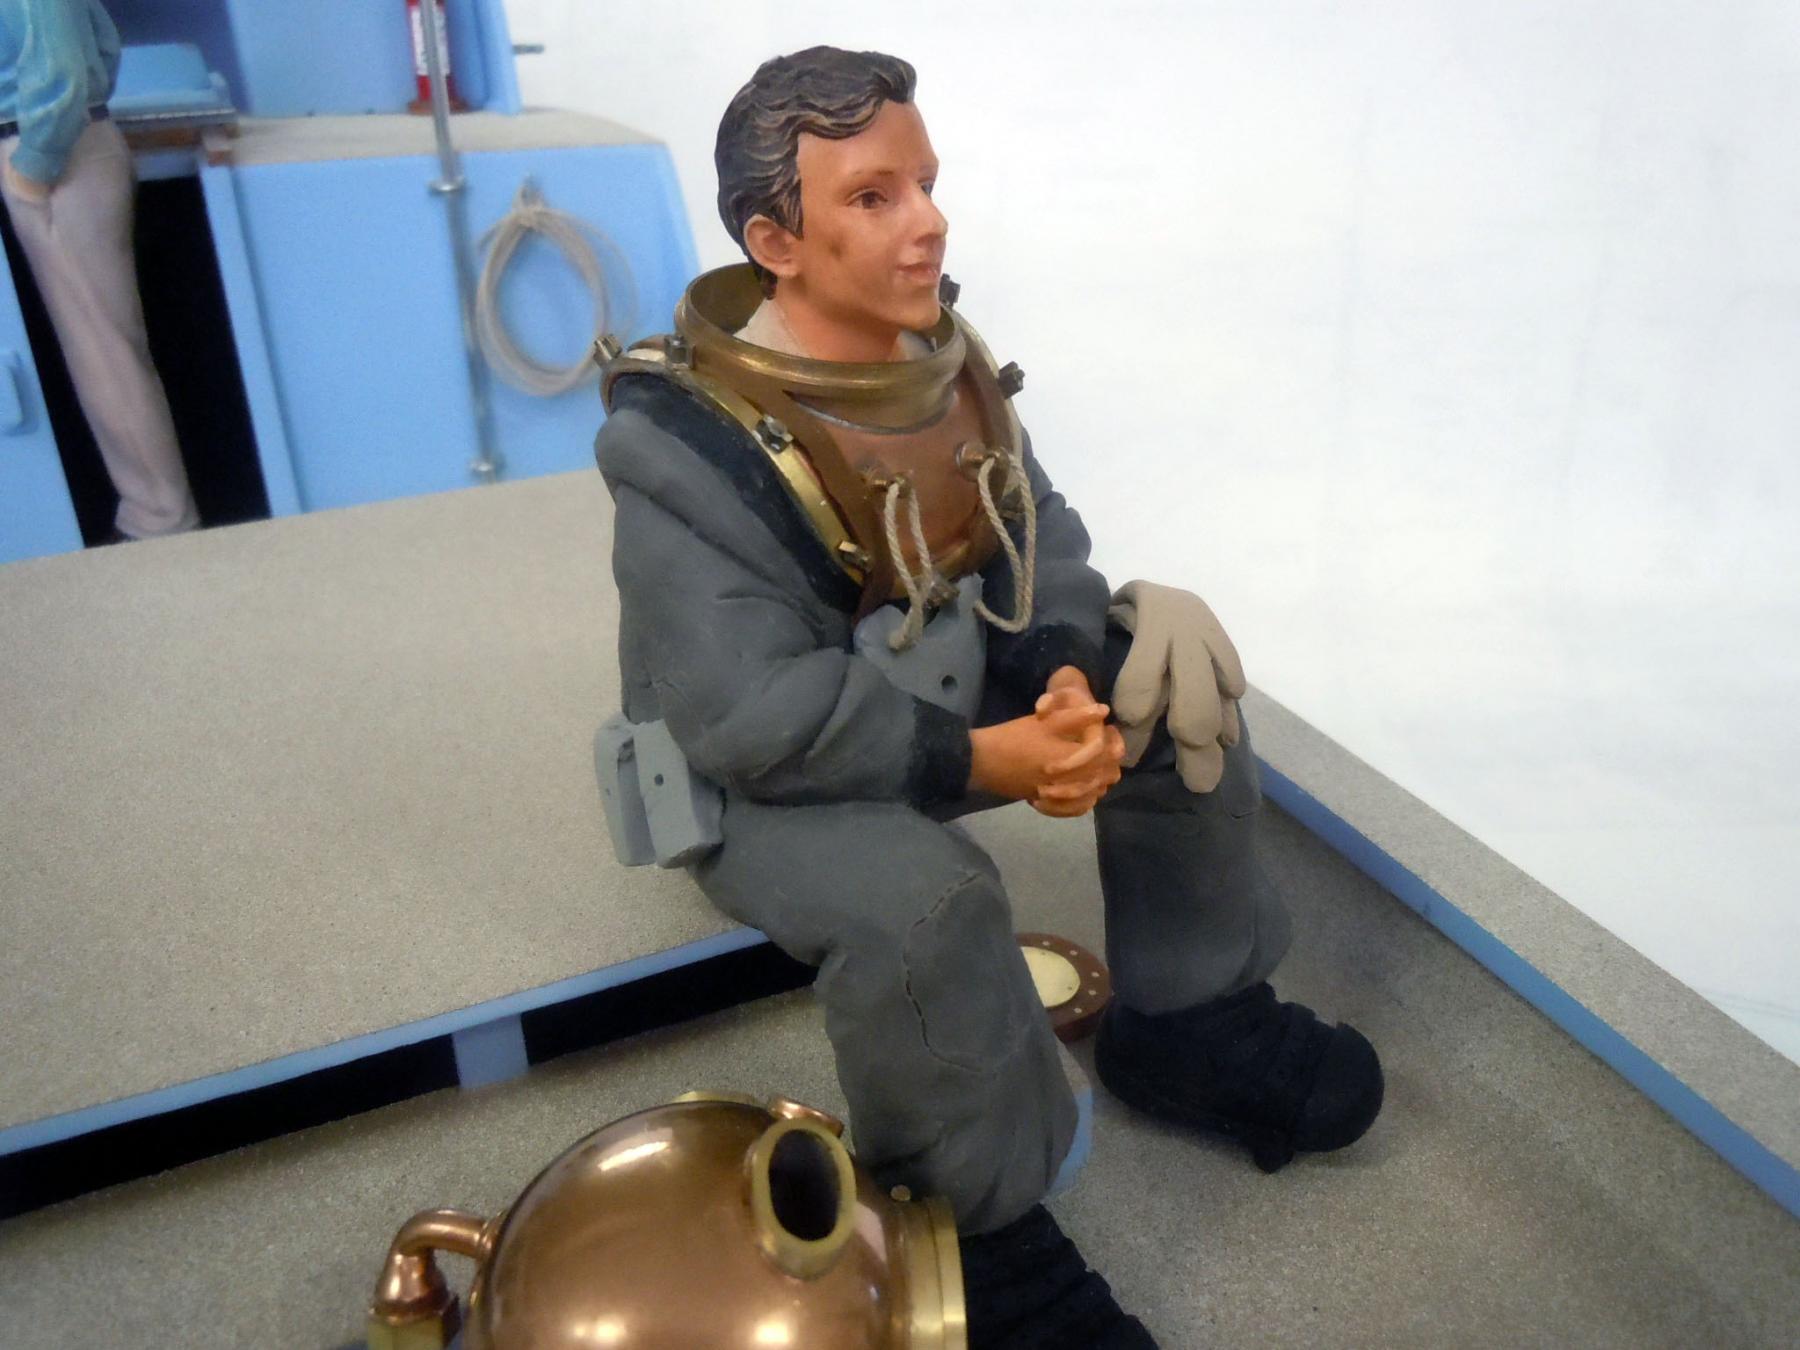
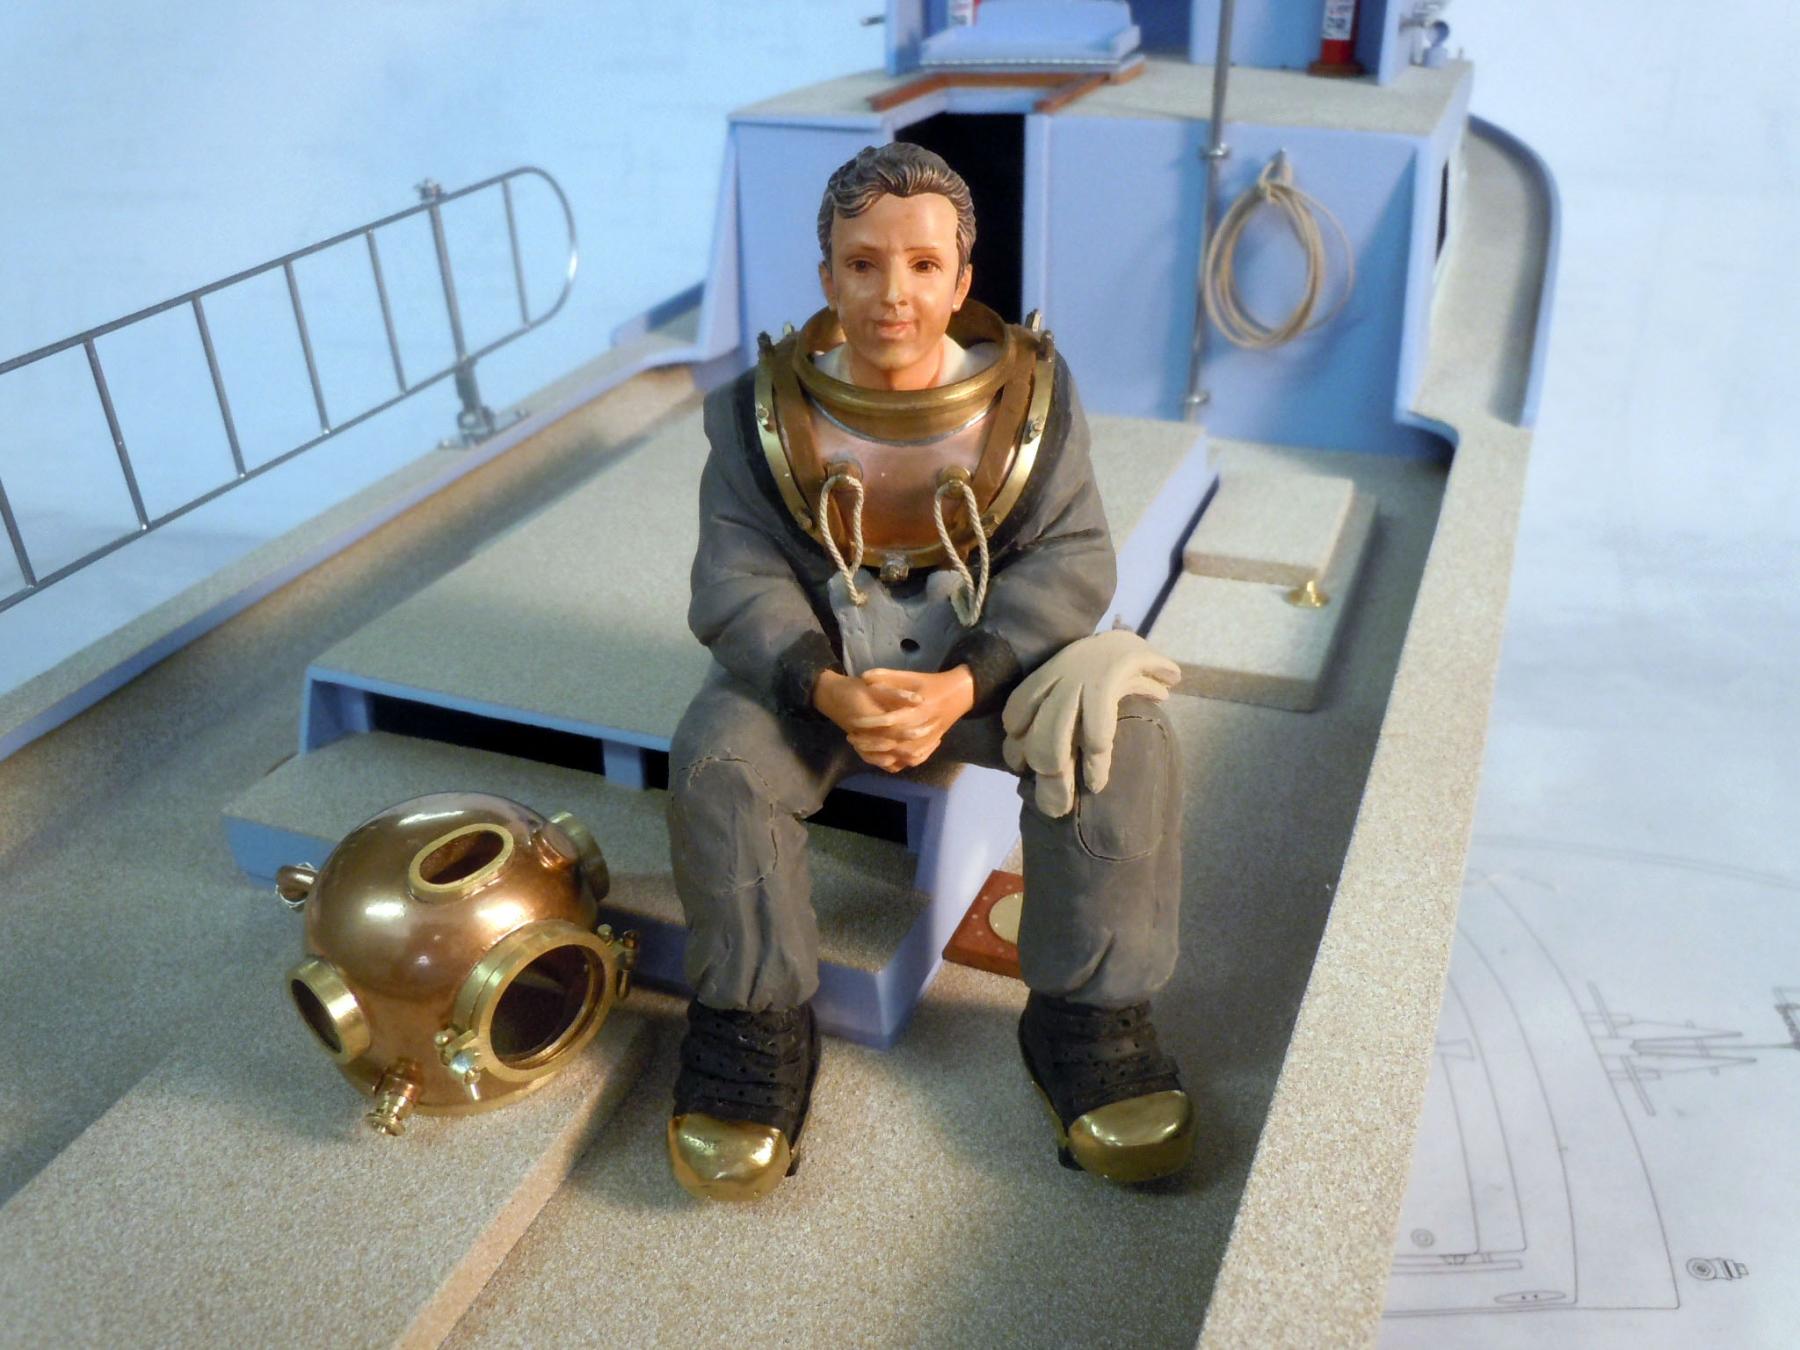
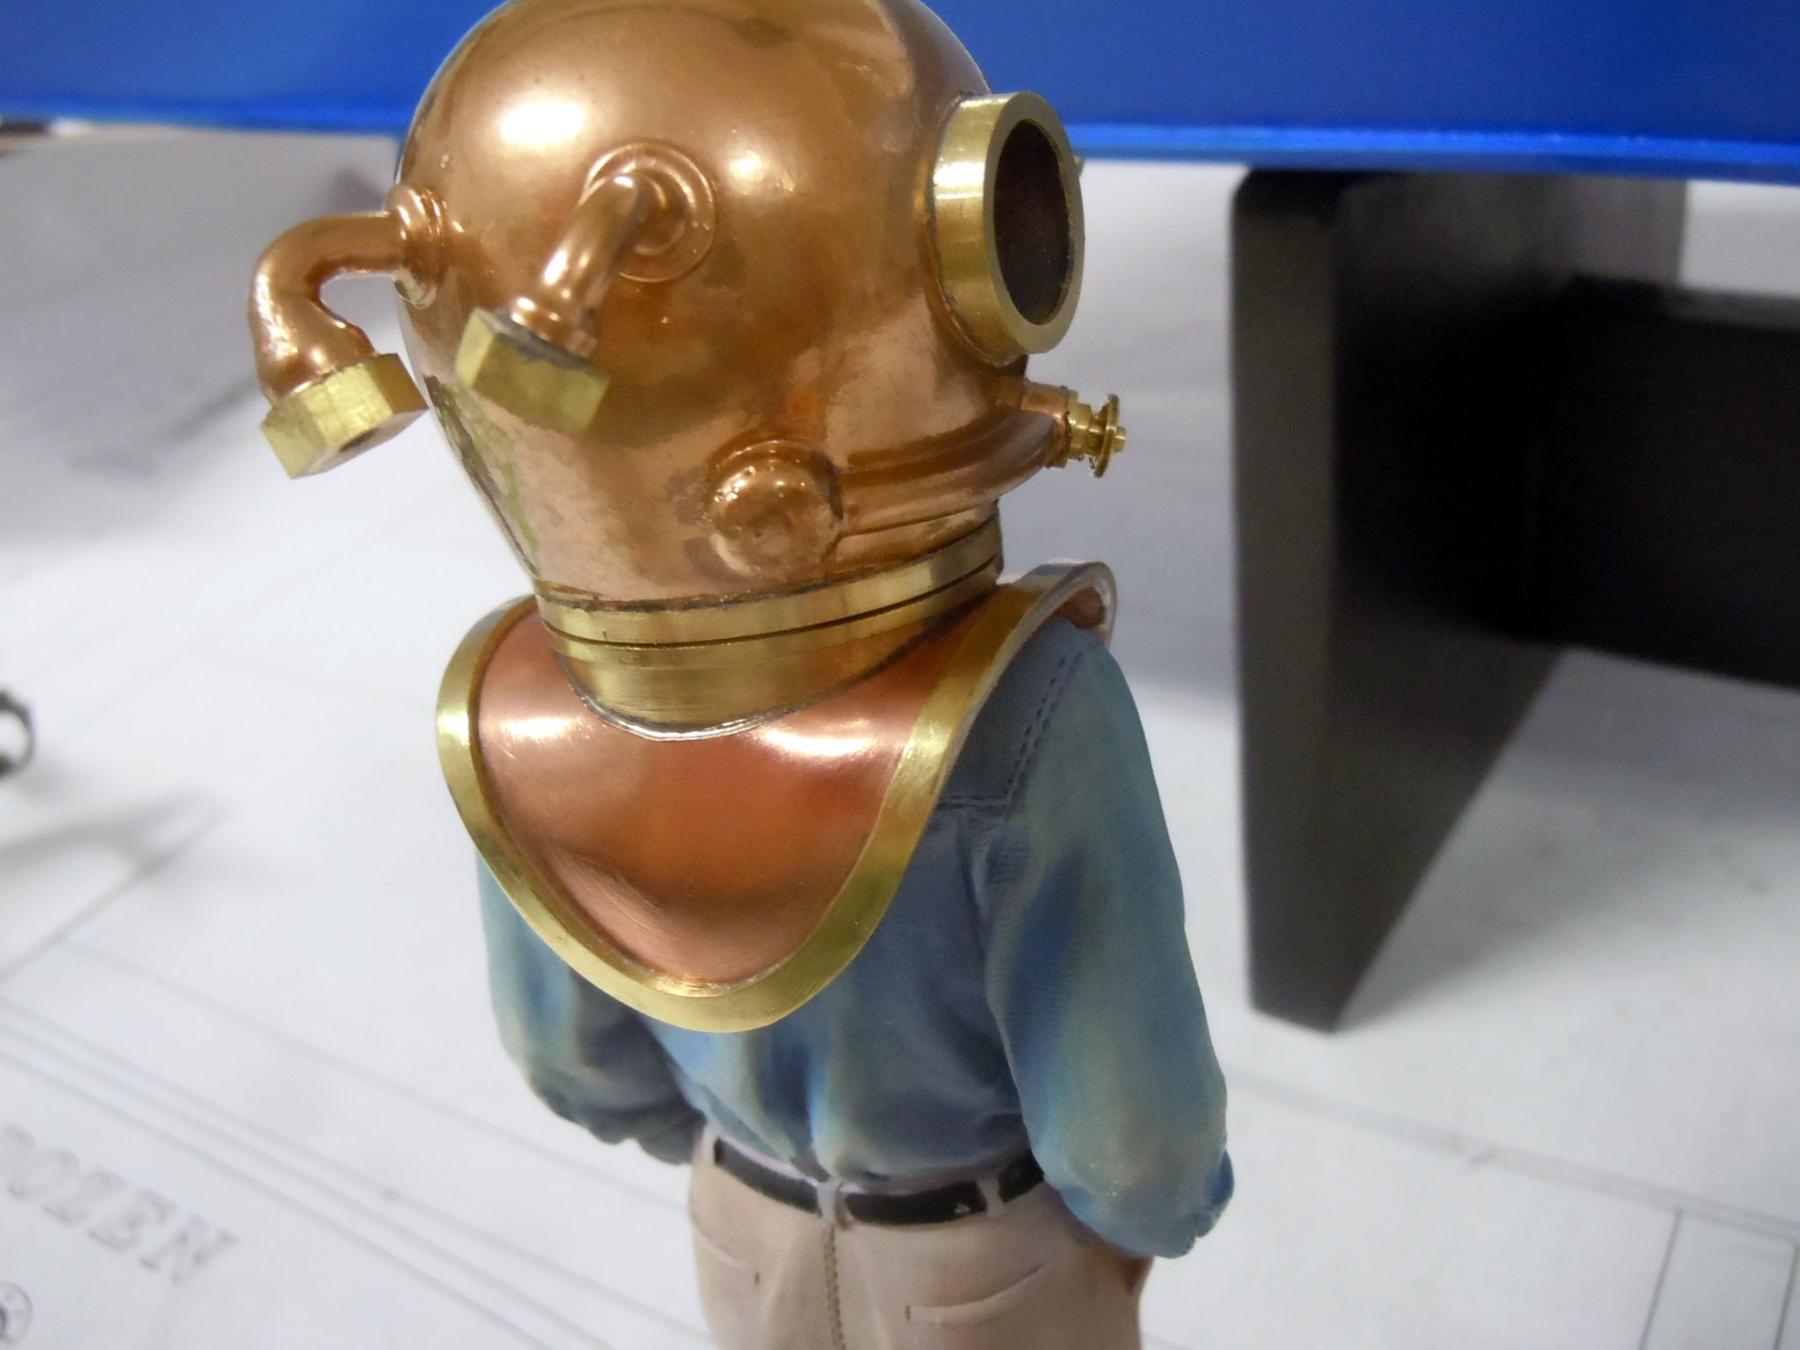
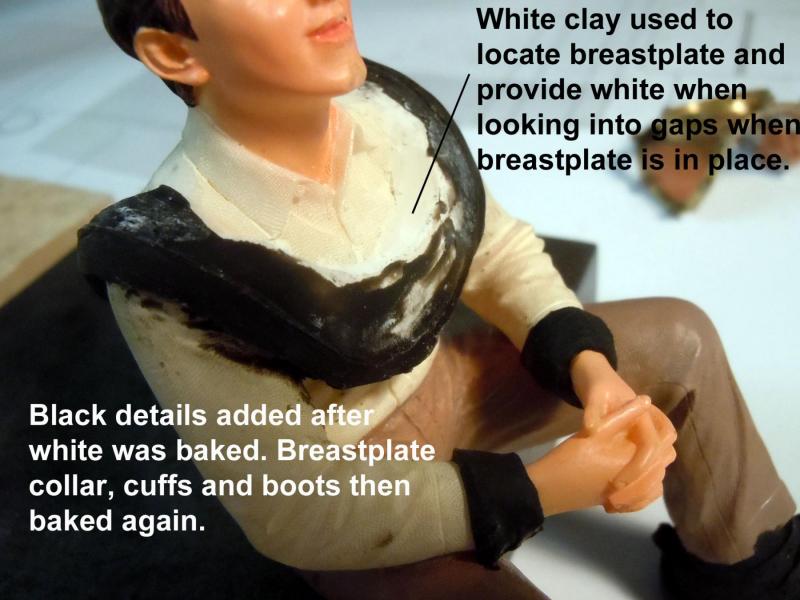
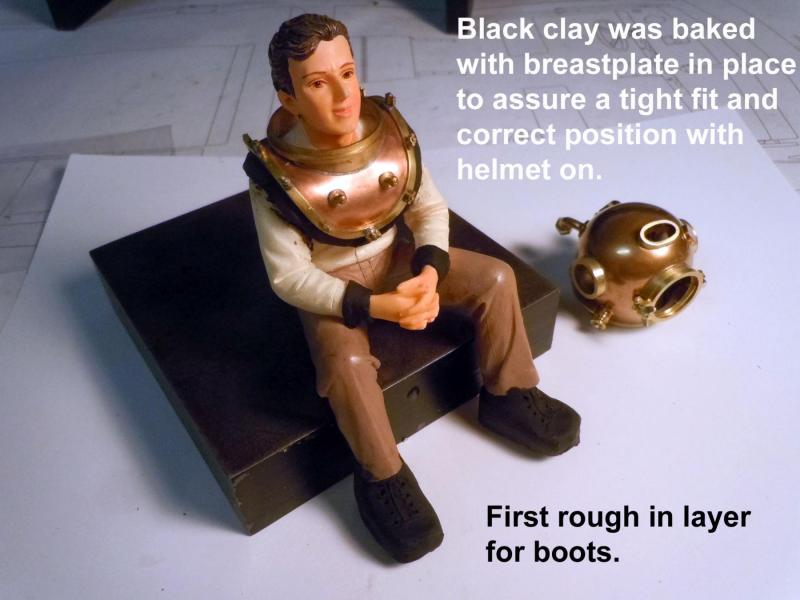
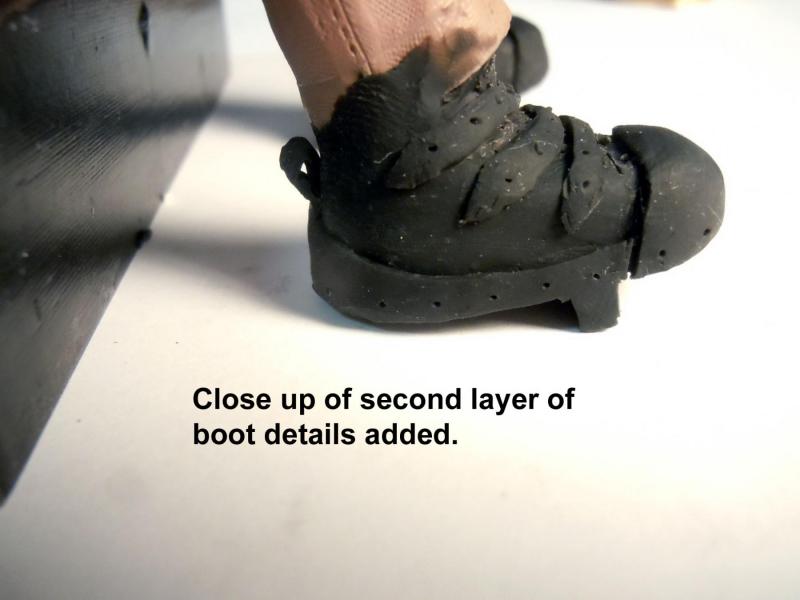
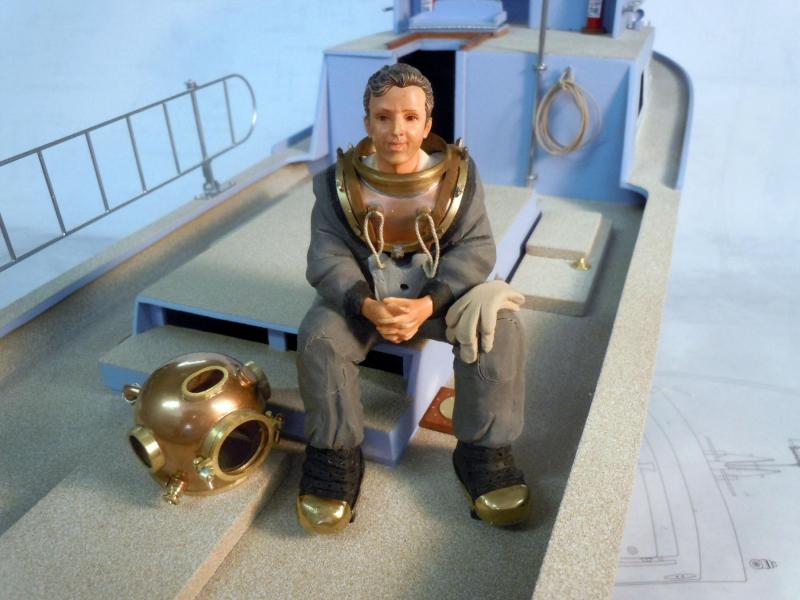
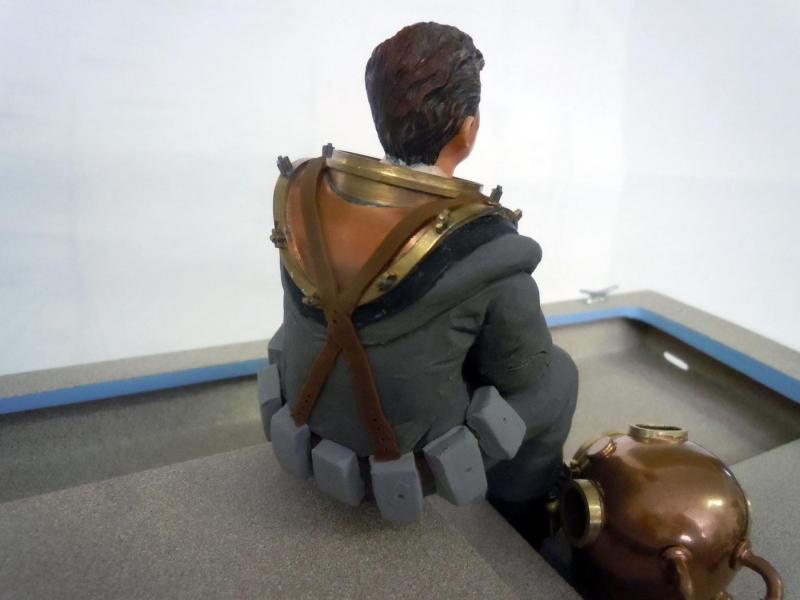
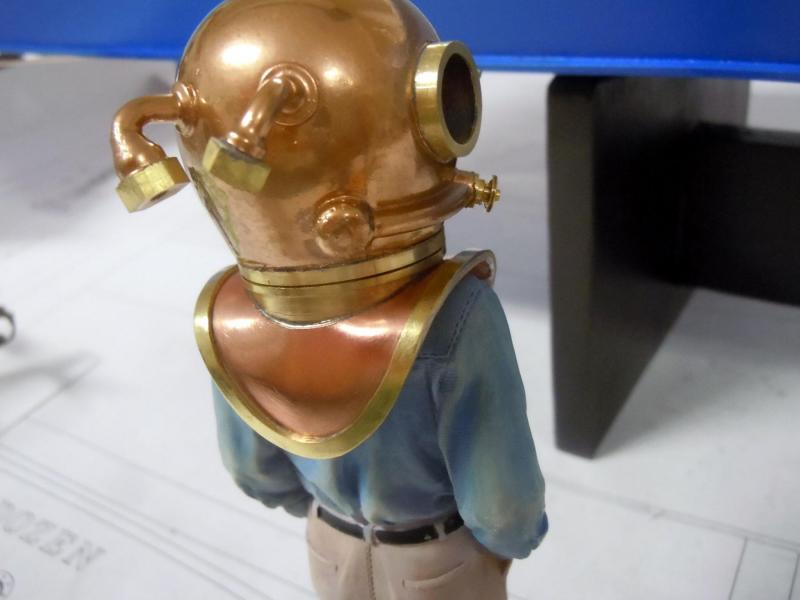
Frank, thanks and enamel paints work as well. Bob here is the finished figure with only the boot tips being painted all other colors are Sculpty colors either straight or mixed together. First after fitting the breastplate there was a good gap looking down around the neck so I used white to create the locator for the breastplate and baked it. I then added the black details and baked them with the breastplate in place to assure a tight fit once baked. Here is a close-up of the boot with the sole cleat, however I had to break the pull loops off when adding the suit. Here I have added the grey suit which required a bit of fussing to get the wrinkles right for rubber. The tools I ended up using were a wood blade cut with a taper shaping blade, a round tooth pick, a wet Q-tip and Xacto blade. I found that working and shaping require working with a small bowl of water to dip the tools in to keep a smooth blended surface. I baked the figure set in an aluminum pan in a sealed baking bag so as not to contaminate the admiral's oven with noxious fumes from the polyester baking off at a temperature 275 degrees for 15 minutes. This was done for each color or detail addition. Here is a following sequence showing the final bake with shoulder straps, chest weight, belt weights and gloves added with no paint to this point. Here is the final with the boots painted with Gold Foil that will tarnish over time to look like brass. I touched up his face with pencil and pastels on a Q-tip to be more life like. For my first attempt at Sculpty I am happy with the results and would encourage others to try there hand at it. Also keep in mind that they can be mixed together to make colors. The subject can be baked numerous times with no adverse effects as long as you stay within the suggested temperatures. I did by an oven thermometer to verify the temperatures. Next to work on the hoses that attach to the helmet and continue on writing.


- 162 replies
-
- 14
-
-
- dirty dozen
- fishing
- (and 2 more)
-
misery.jpg So far had to only break one ankle. I think I can compensate now with the boot material. Thanks for lending her to me!
- 162 replies
-
- 4
-
-
- dirty dozen
- fishing
- (and 2 more)
-
Bob, I am just learning about Sculpty myself, but I imagine it is to keep clean crisp color transitions as each color is bake on. Will keep you posted as I learn myself.
- 162 replies
-
- 5
-
-
- dirty dozen
- fishing
- (and 2 more)
-
Surprise, surprise look what just showed up in the mail! The sitting Joe figure. Even a blind pig gets lucky for they used the exact same head as the standing figure so the helmet and breastplate even fits Joe perfectly. I also tried my first hand at Sculpty and made a hat for Tim (standing figure) just to get a feel for using the material. Now I will have to put together my clay color list now to go purchase the colors of Sculpty that I will need to make the dive suit. I will have to break his ankles and re-glue them to match the deck surface.
- 162 replies
-
- 17
-
-
- dirty dozen
- fishing
- (and 2 more)
-
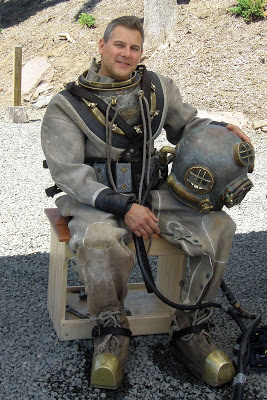
Jack, Patrick, thanks, and yes I plan to try and do a complete suit on the sitting figure I have ordered. It is amazing how much one learns when researching a subject to model. I have learned that there are many different styles of both helmets and suits. Here is a photograph that I will use a a guide. I have never used Sculpty Clay before so it looks like I will get to add another skill to the tool bag. Research and writing continues.
- 162 replies
-
- 6
-
-
- dirty dozen
- fishing
- (and 2 more)
-
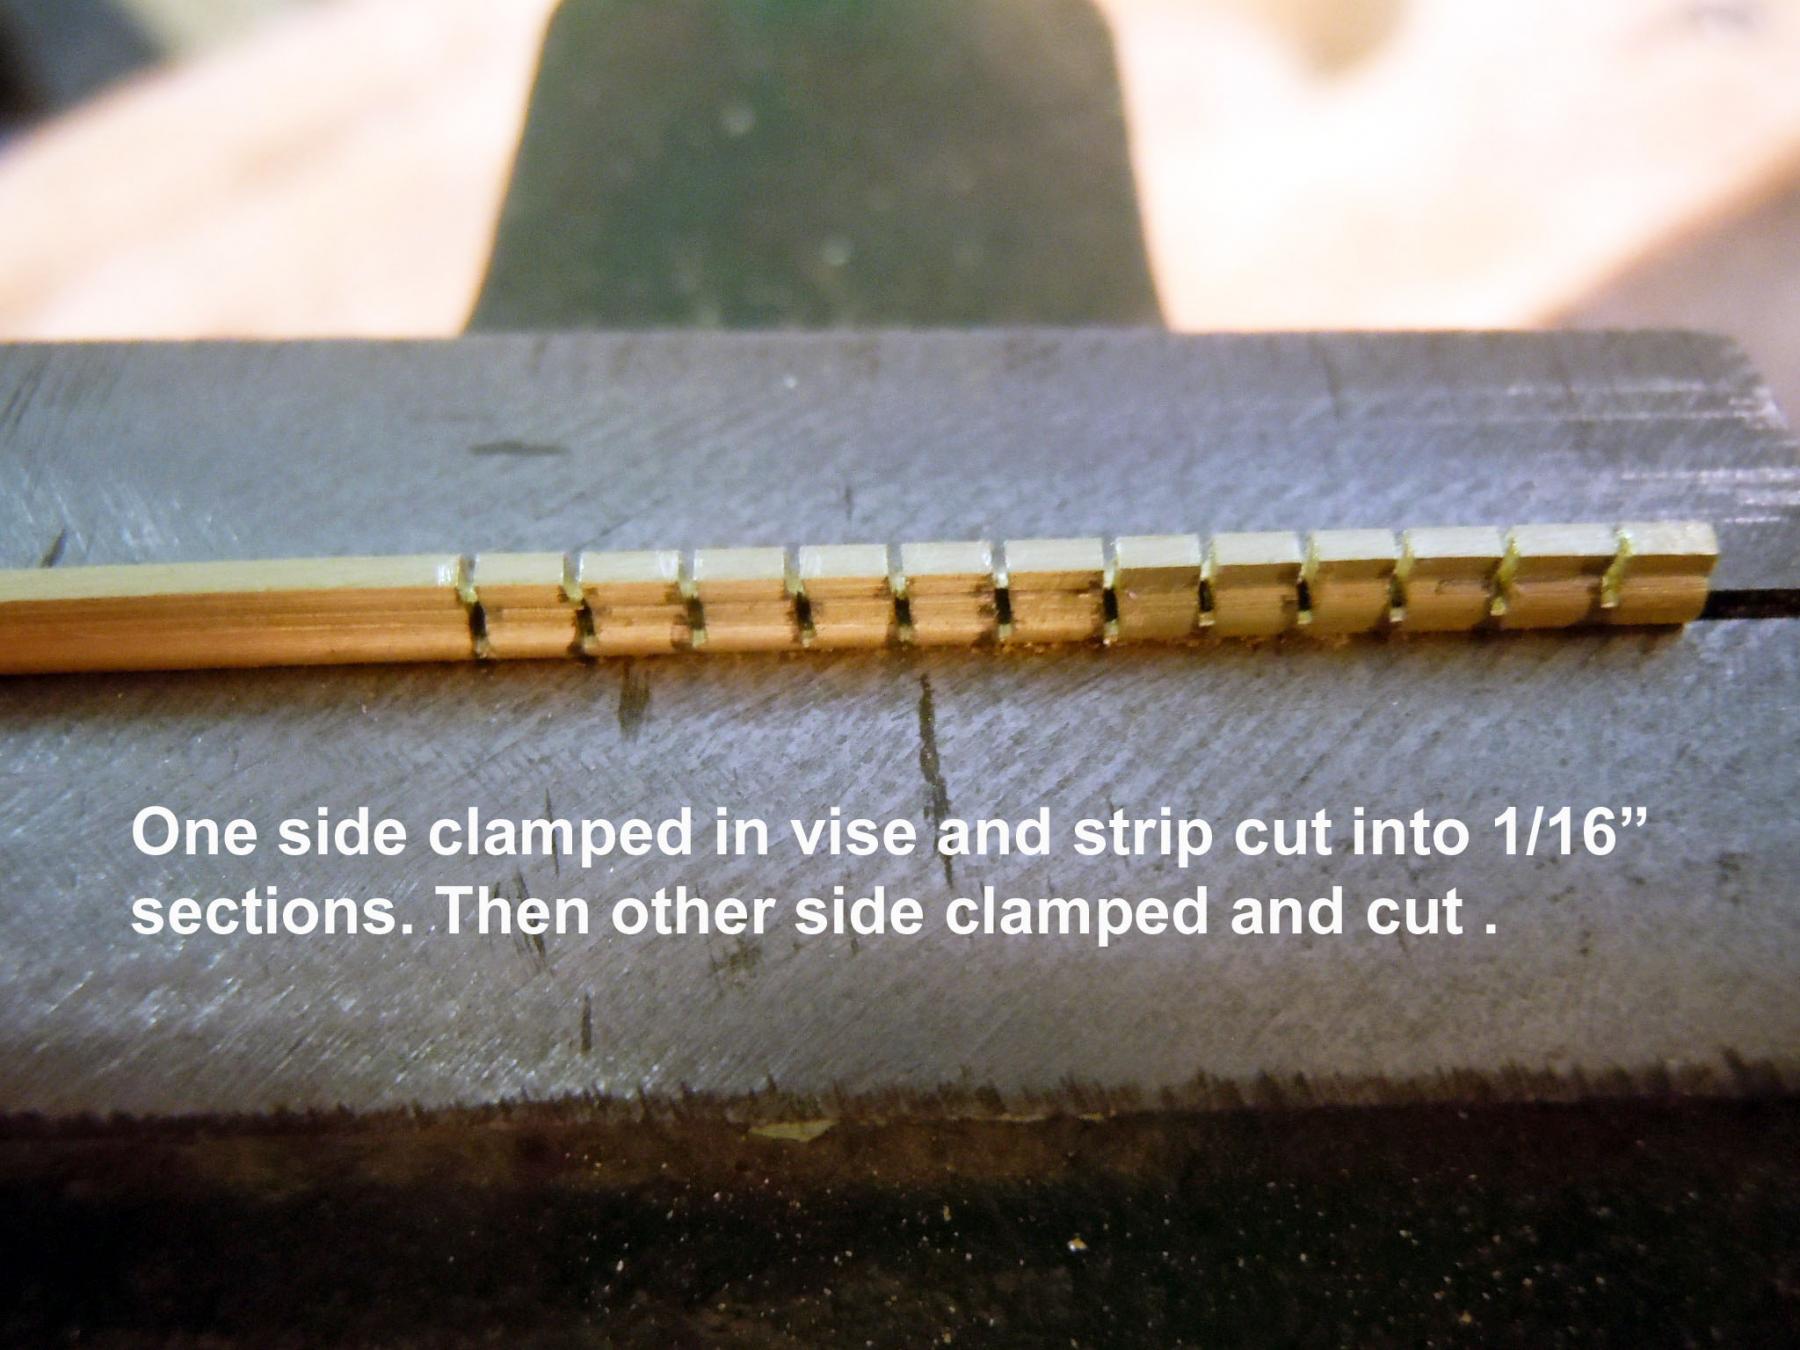
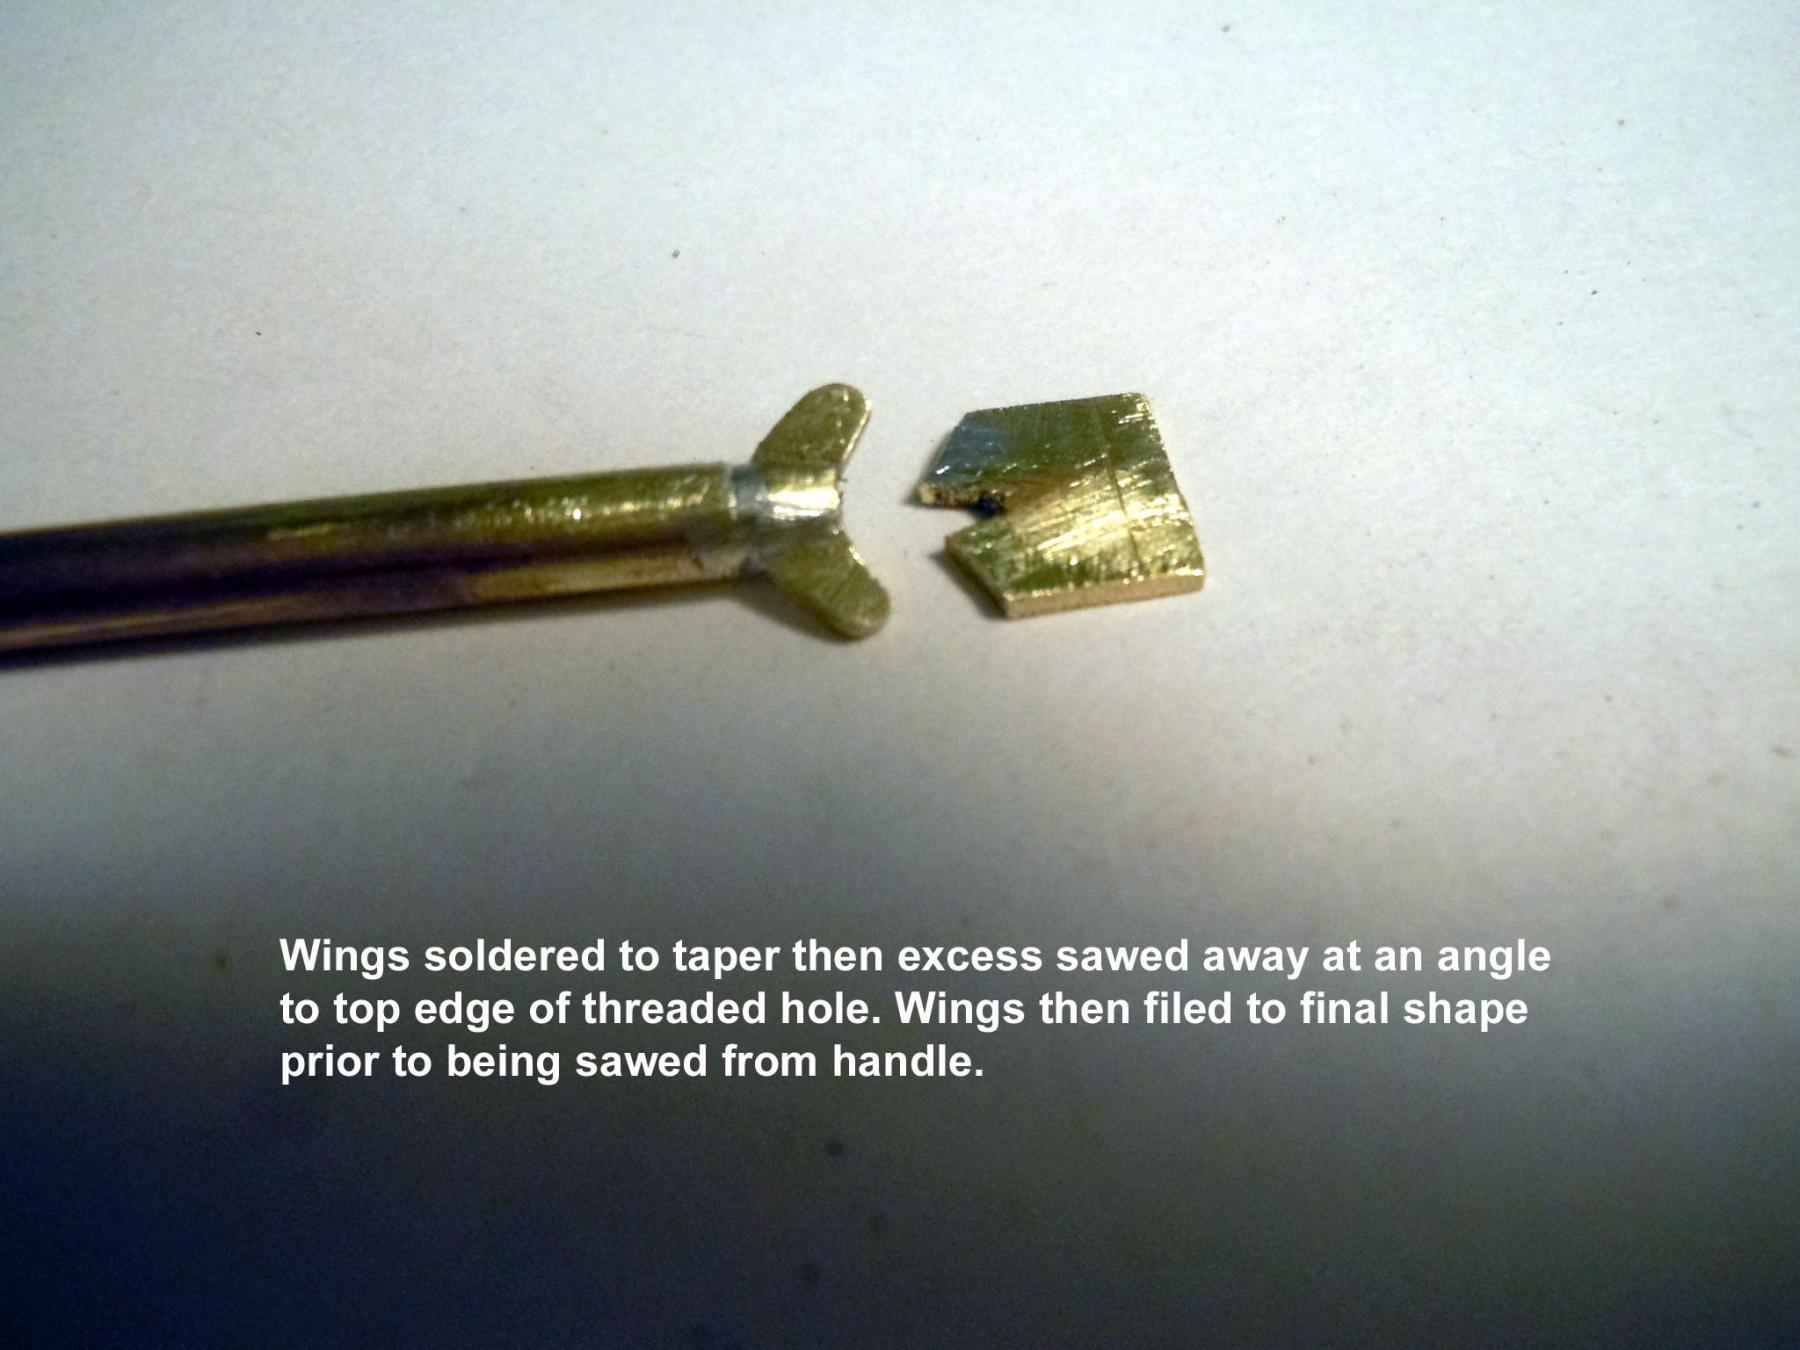
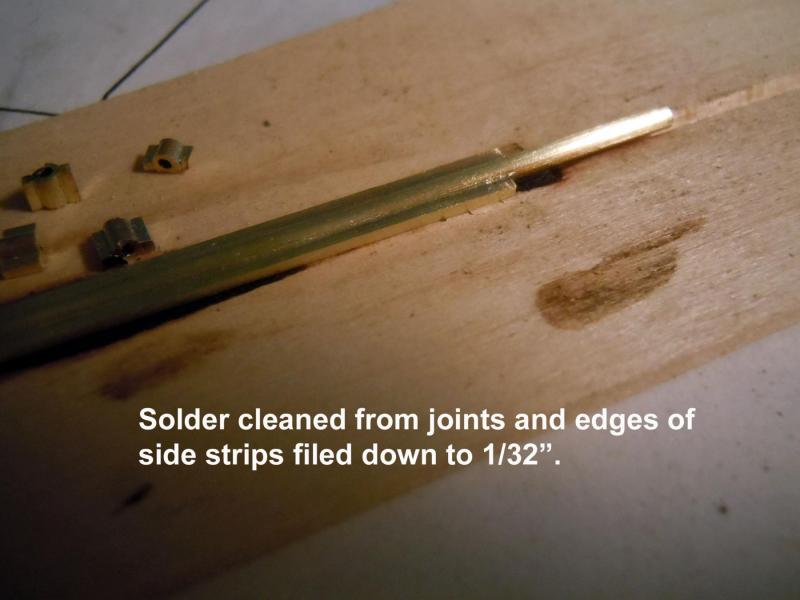
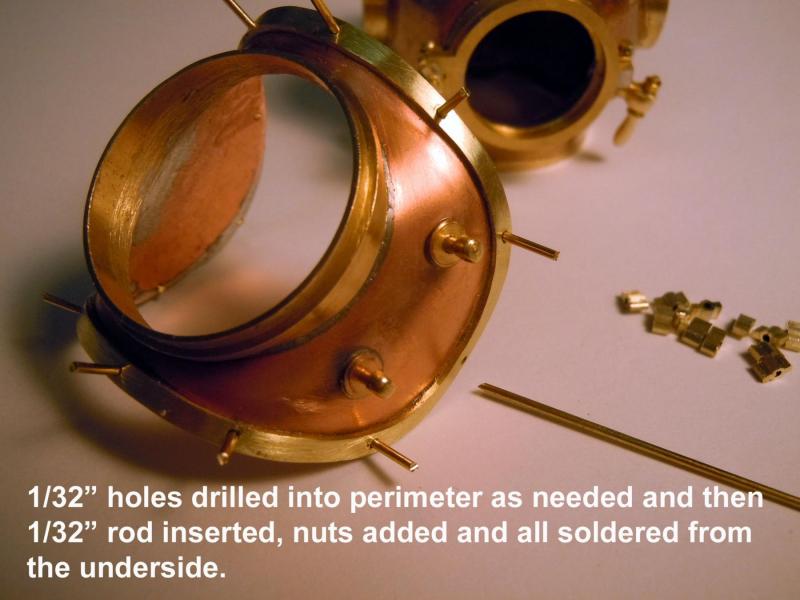
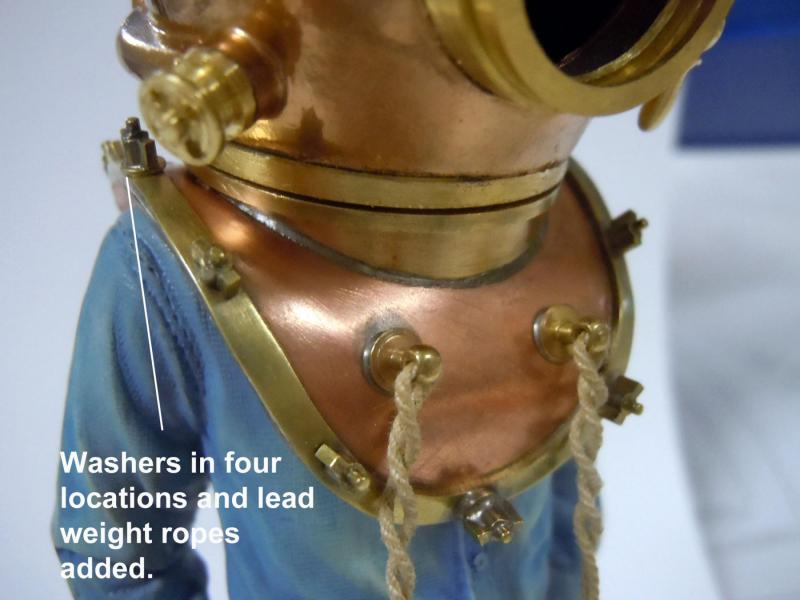
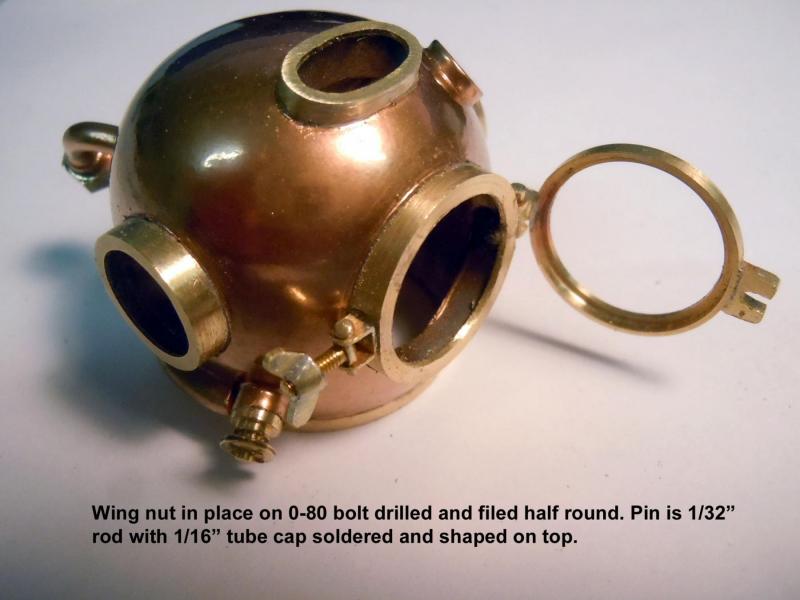
Michael, yes the Foil paints are great for metal finishes. Here is a link to there selections. http://www.krylon.com/products/premium-metallic/ I checked your build out and what a big model, I could not build anything that size in my workshop now. Great job and keep up the great work you are doing on it. I heard form the company and the sitting figure will not be here until the 14th so I am moving ahead on the breastplate for the helmet. Unlike the helmet the breastplate will be all metal both brass and copper per the original. First I developed a card stock pattern using the figure and then I formed the copper with a hole cut to match the shoulder ring and soldered them together. Once cooled and cleaned I final formed the copper shape to fit the figure. Next I used the card stock pattern and traced the outline to match the copper onto a 1/32" thick brass sheet and sawed out the shape. Using a small divider I traced the 3/32" inside edge and sawed it out. The brass ring was then annealed to soften and it was form fitted to match the copper and soldered in place. I turned and drilled the lead weight holders and soldered them to the front of the breastplate. Next came the more challenging parts, the small wing nuts to hold the breast plate to the suit. I cut a V groove into a scrap piece of wood, set a 1/16" tube with two strips to either side and soldered them in place. Once cleaned with acetone the excess solder was removed form the joints. The edges of the side strips were held in a vise and filed down to 1/32". Then while held in the vise one side was sawed into 1/16" sections then turned over in the vise and the other side sawed to release each wing nut. Next I drilled 1/32" holes where needed and added 1/32" rods, slipped the nuts on and soldered them in place from the underside. Trimmed the rod ends and cleaned the entire breastplate. Now back to more writing.


- 162 replies
-
- 15
-
-
- dirty dozen
- fishing
- (and 2 more)
-
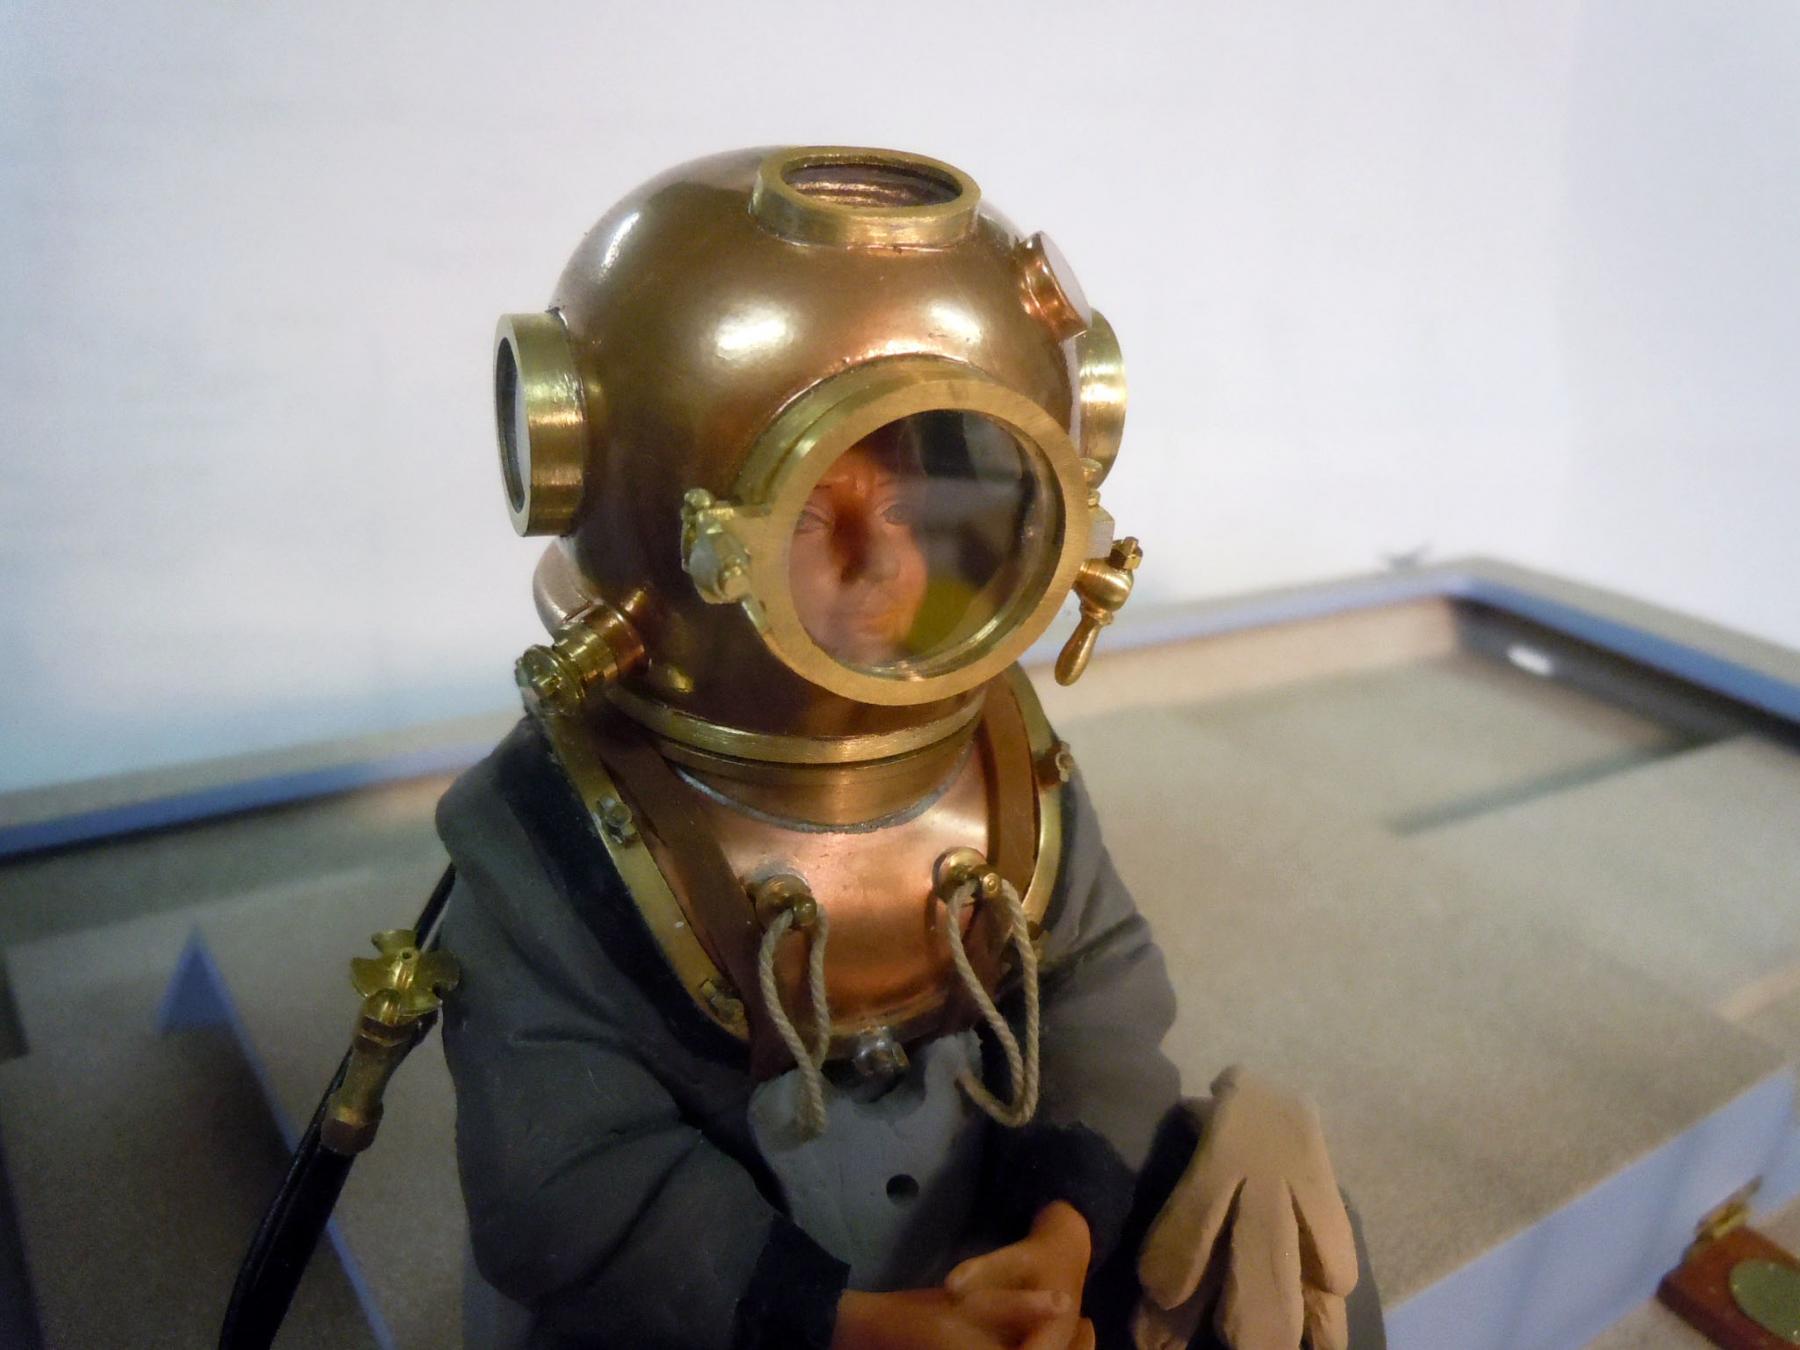
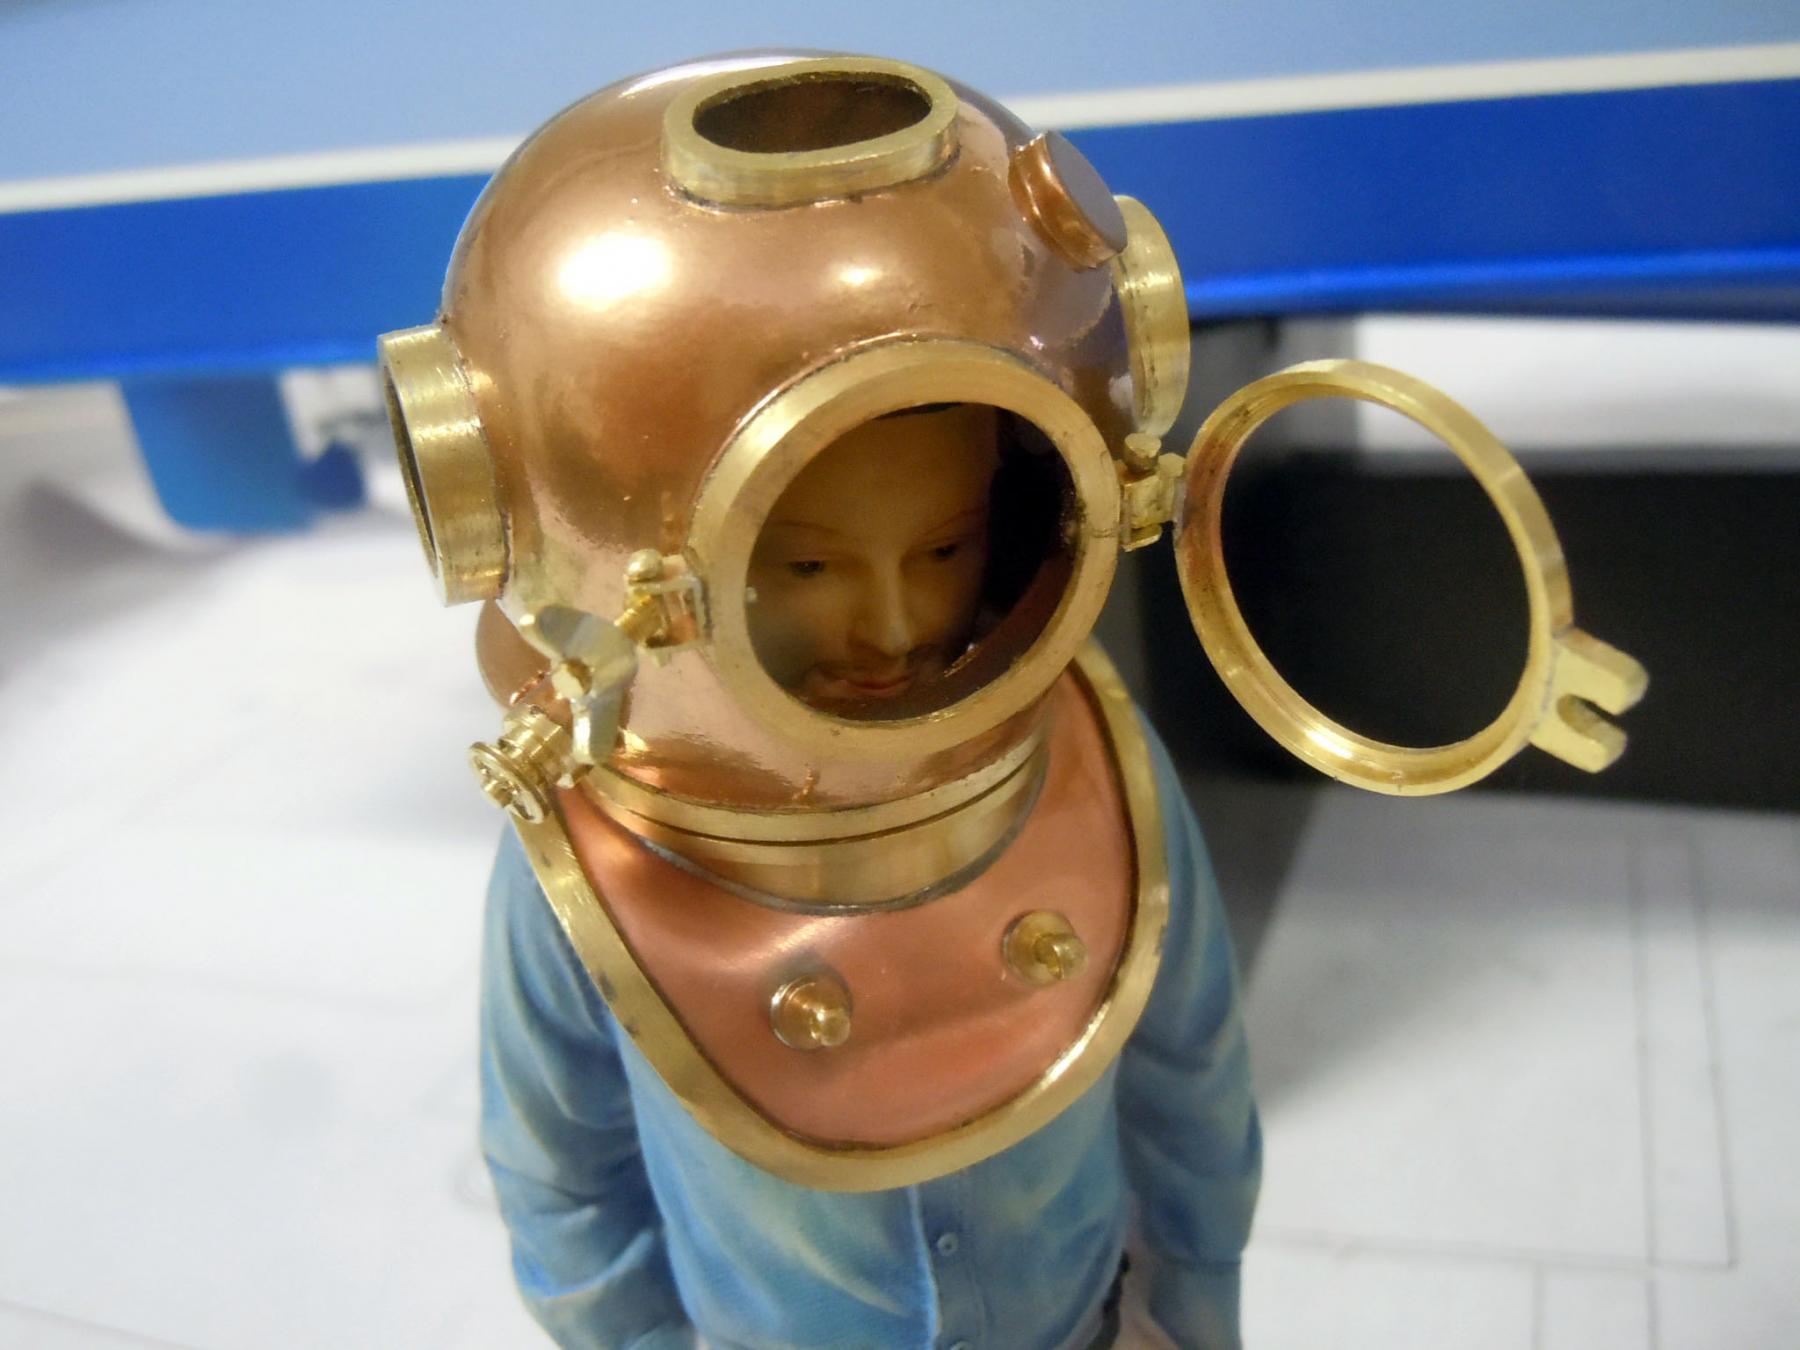
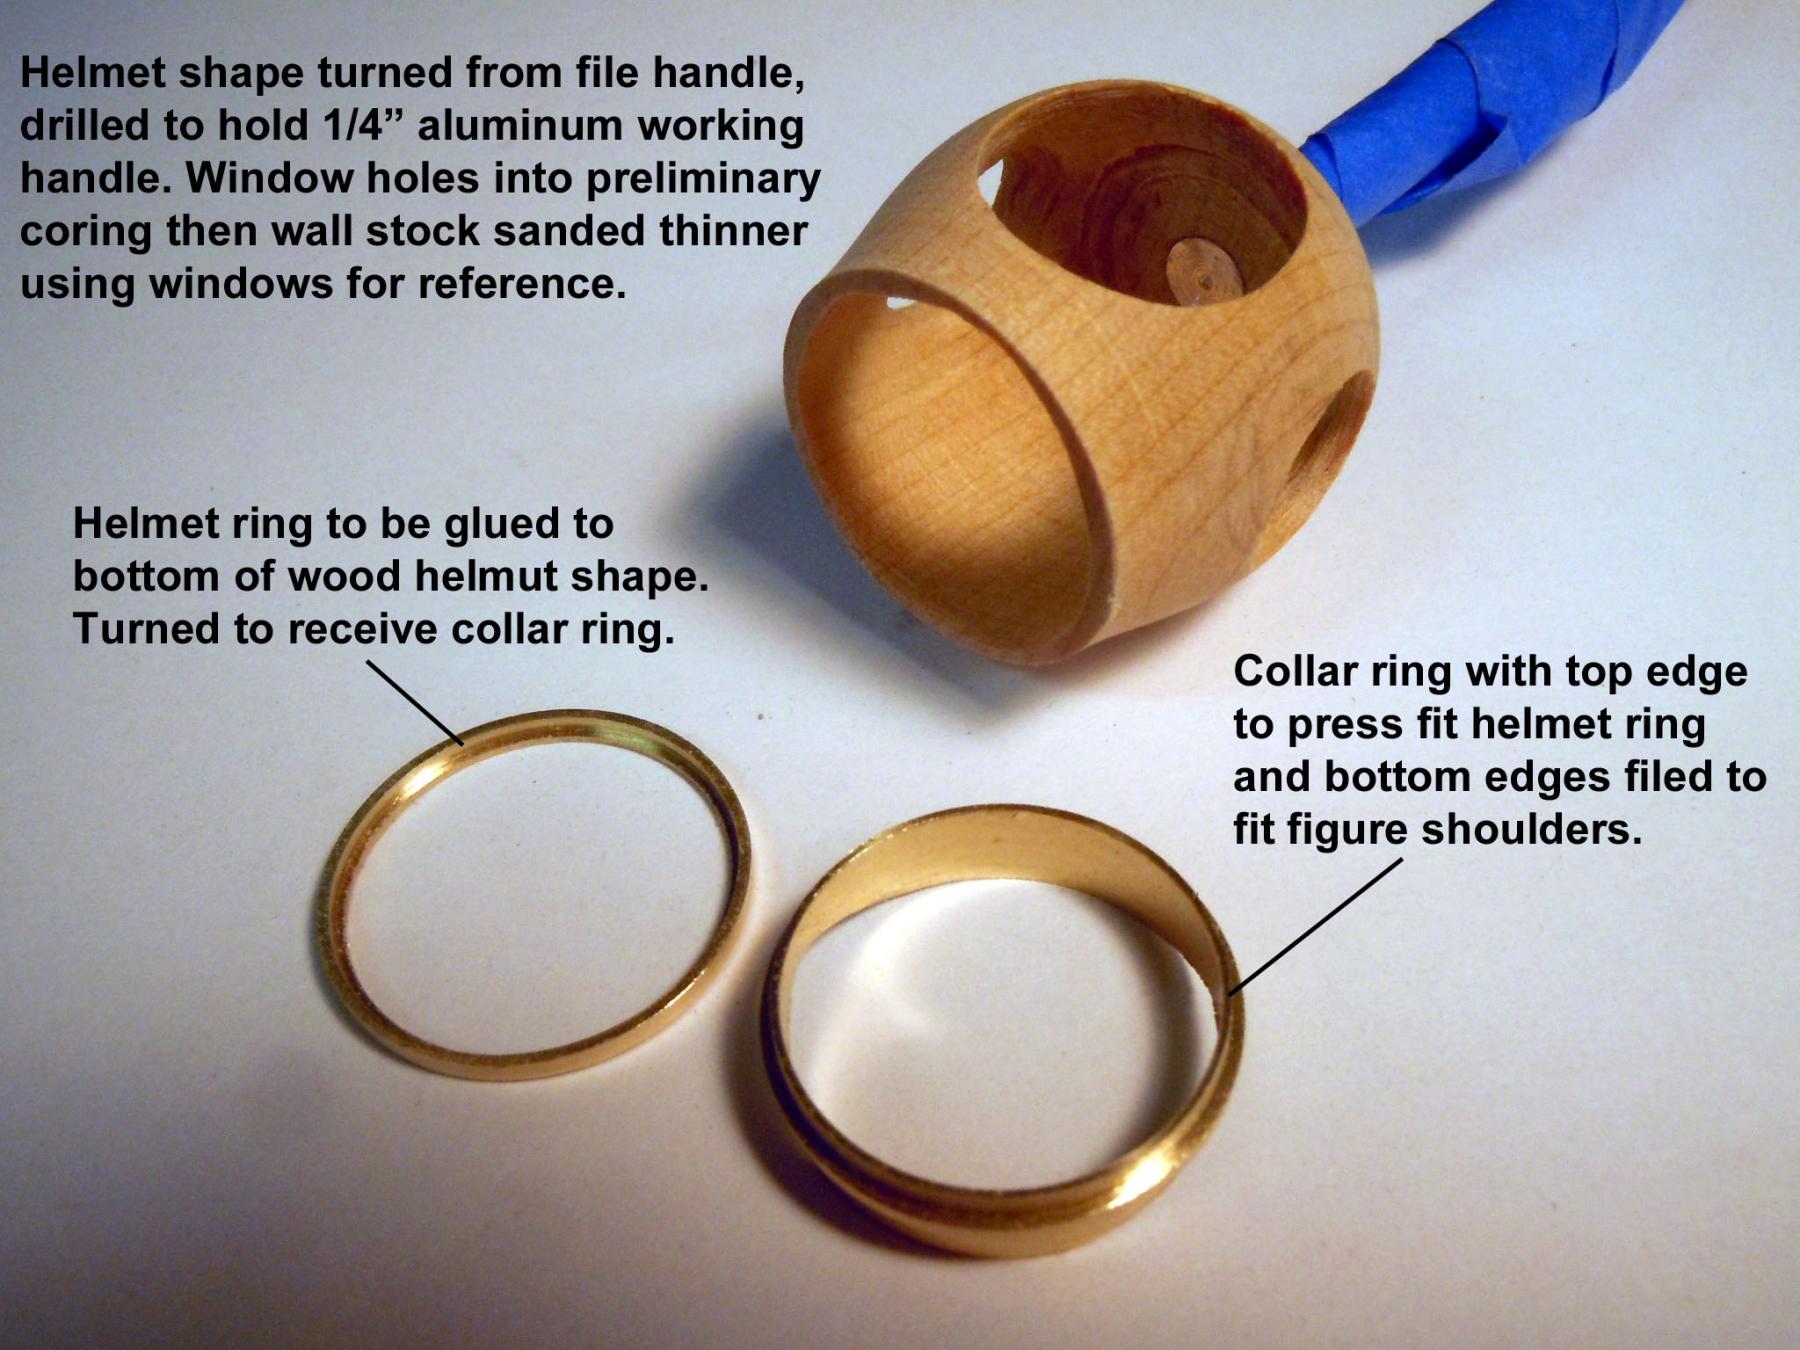
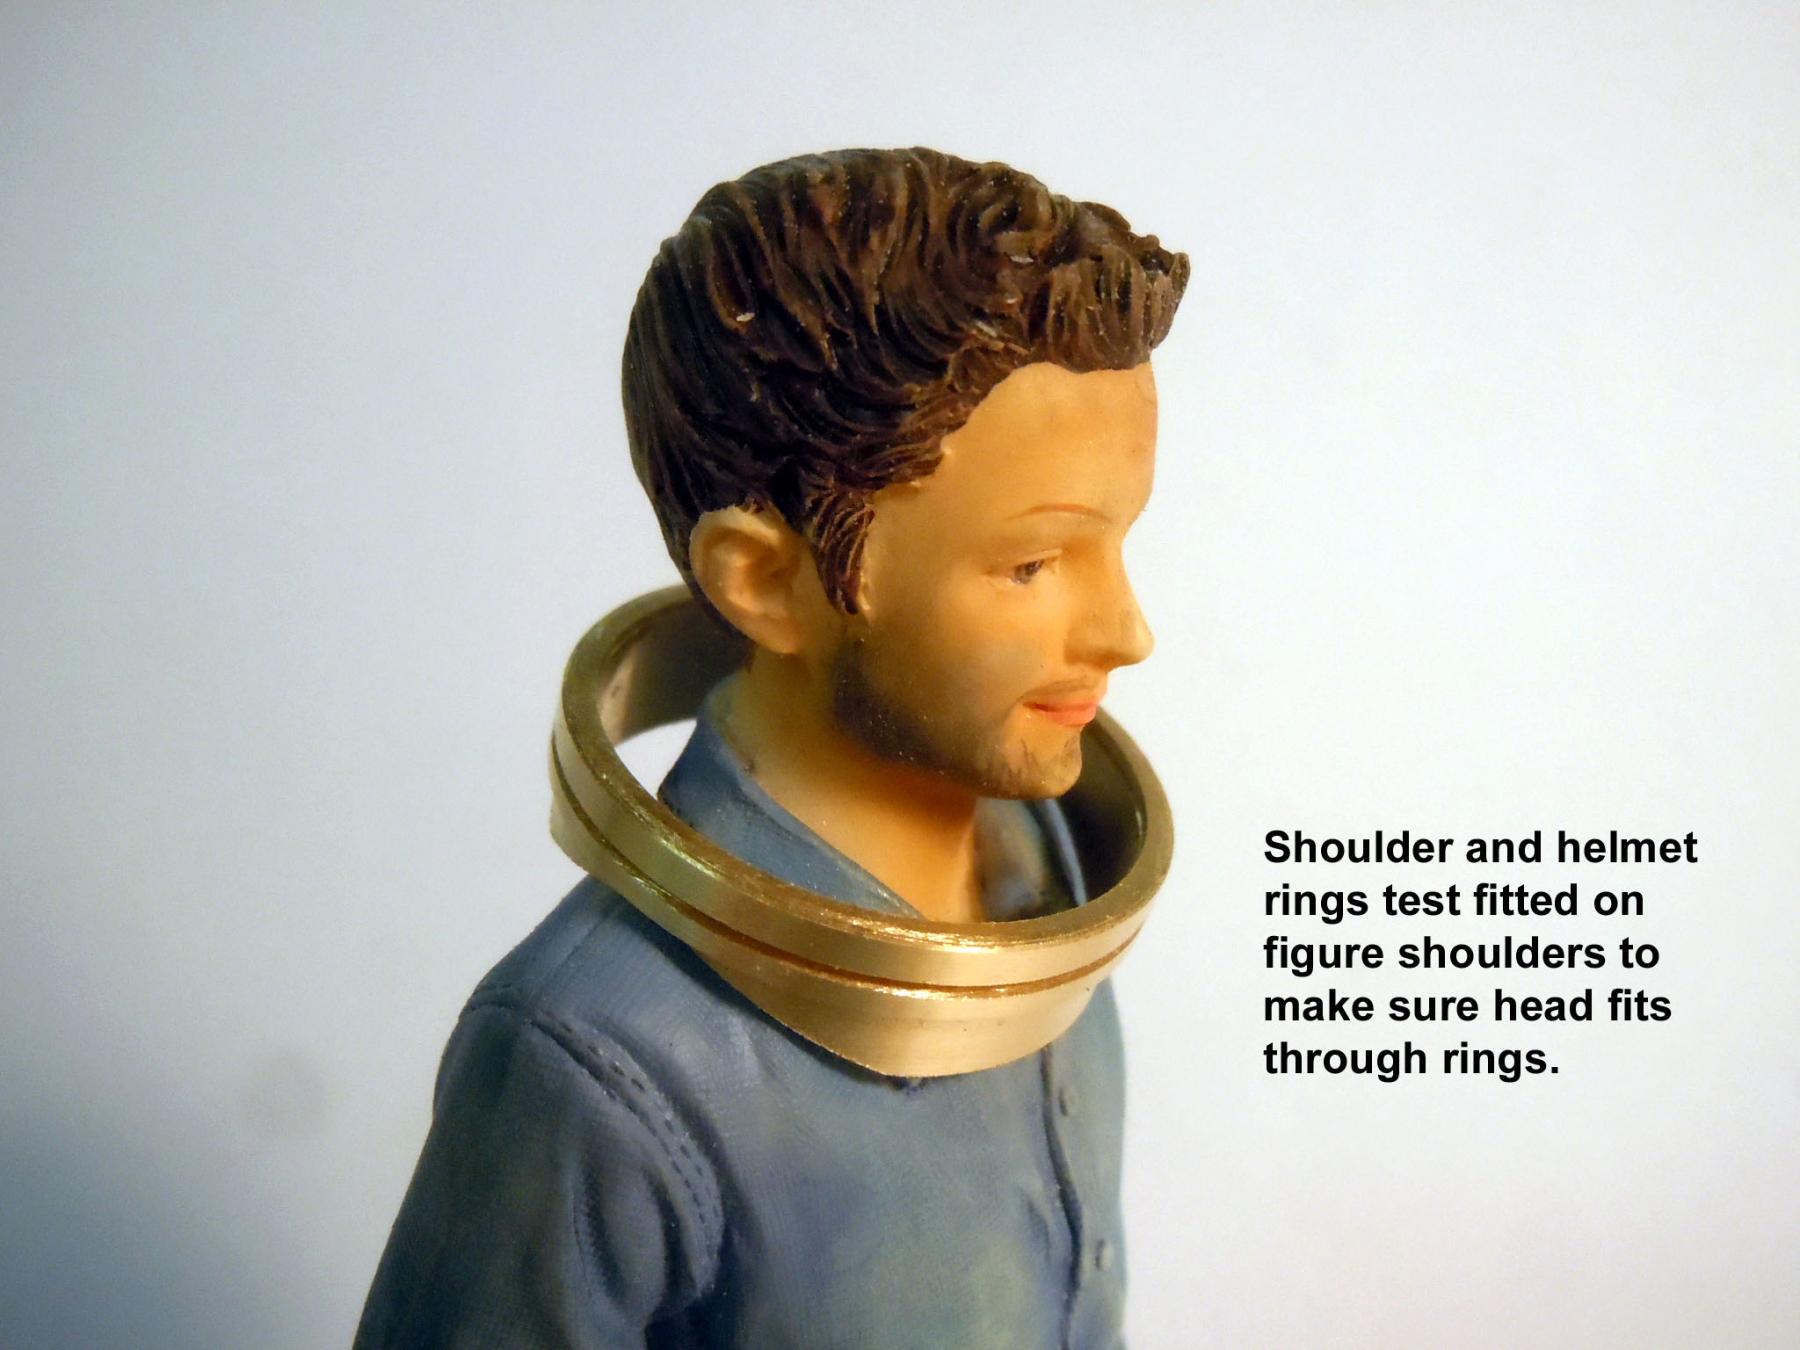
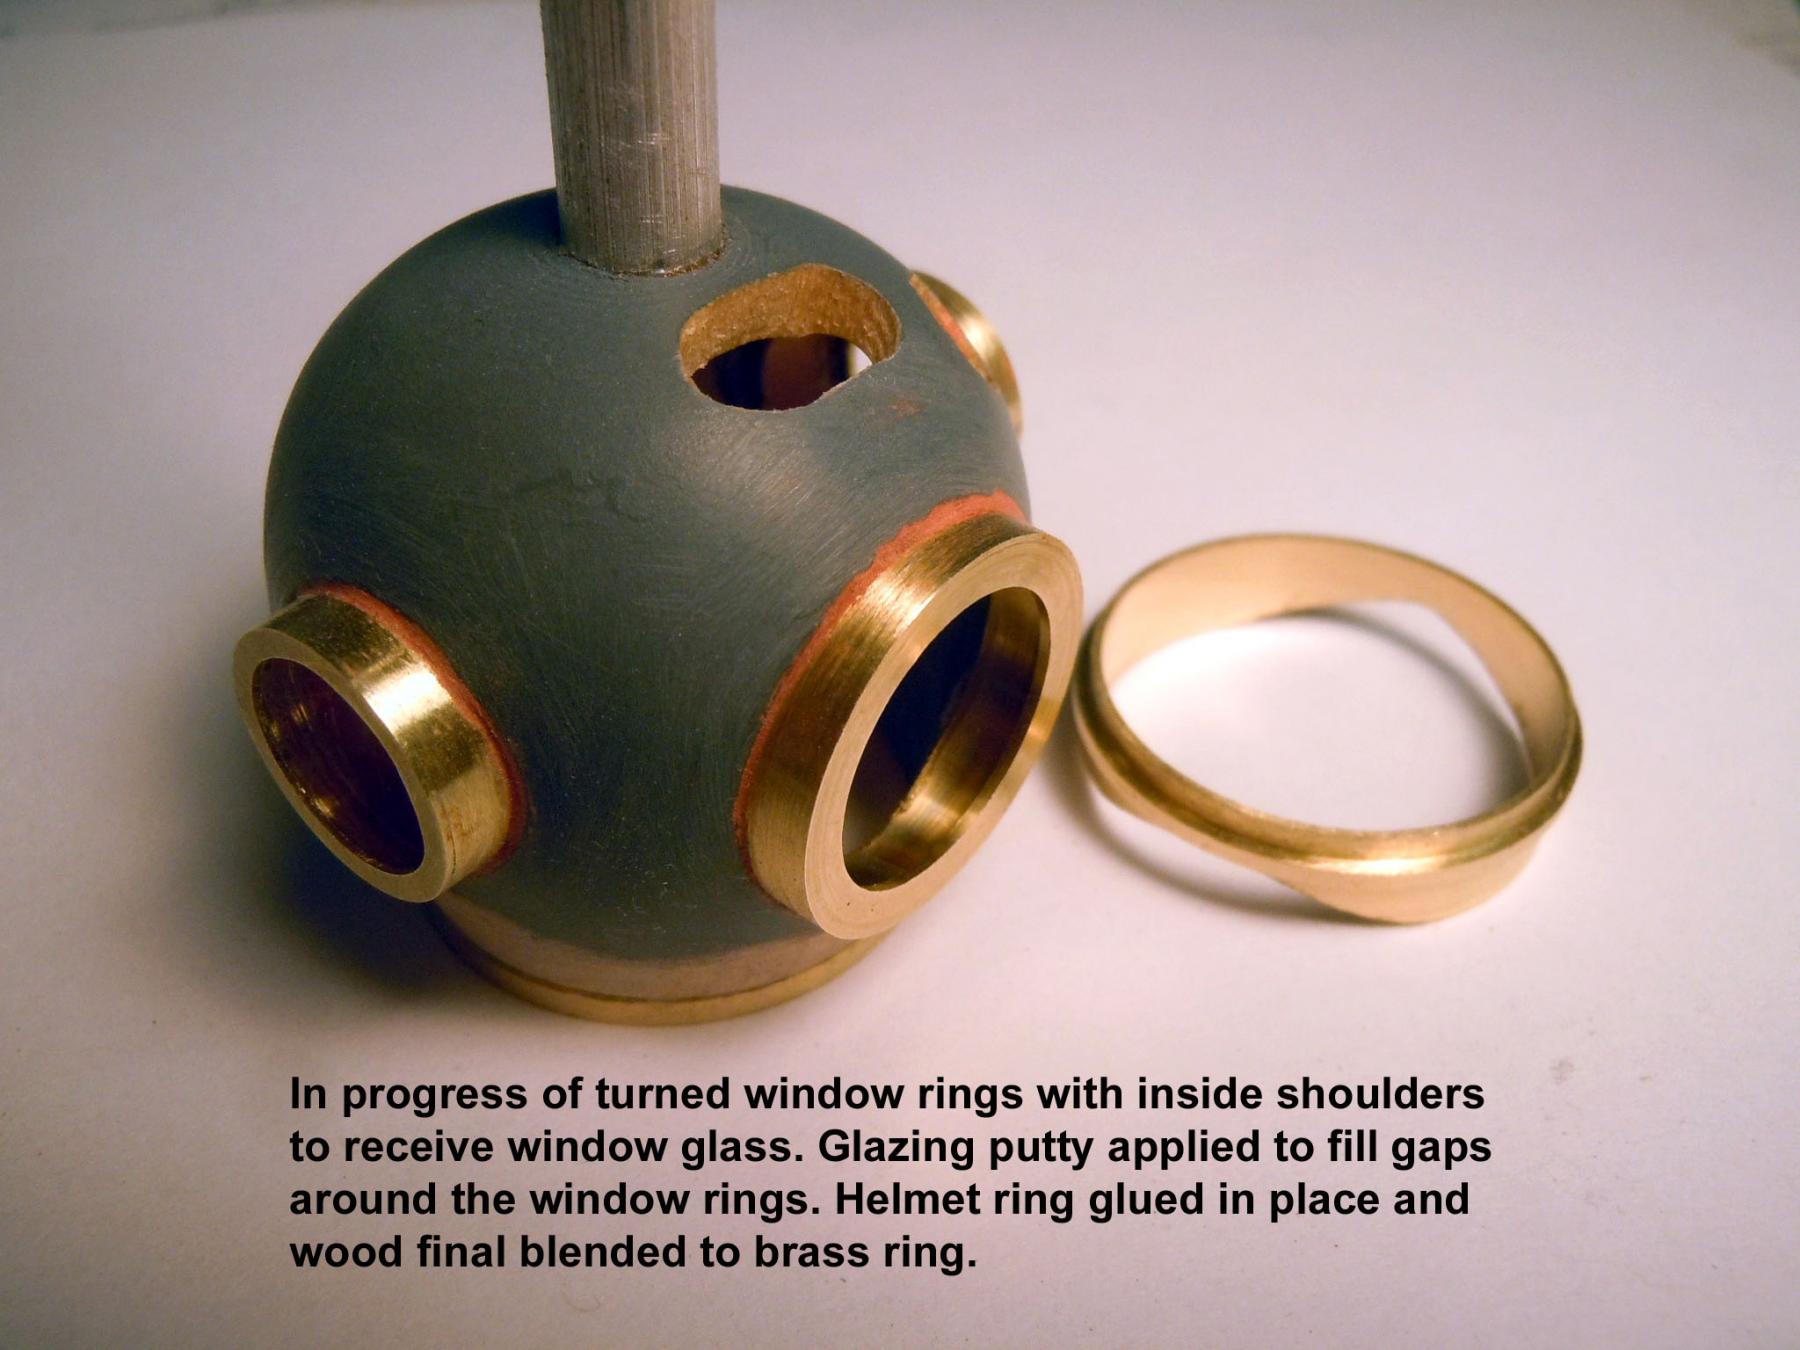
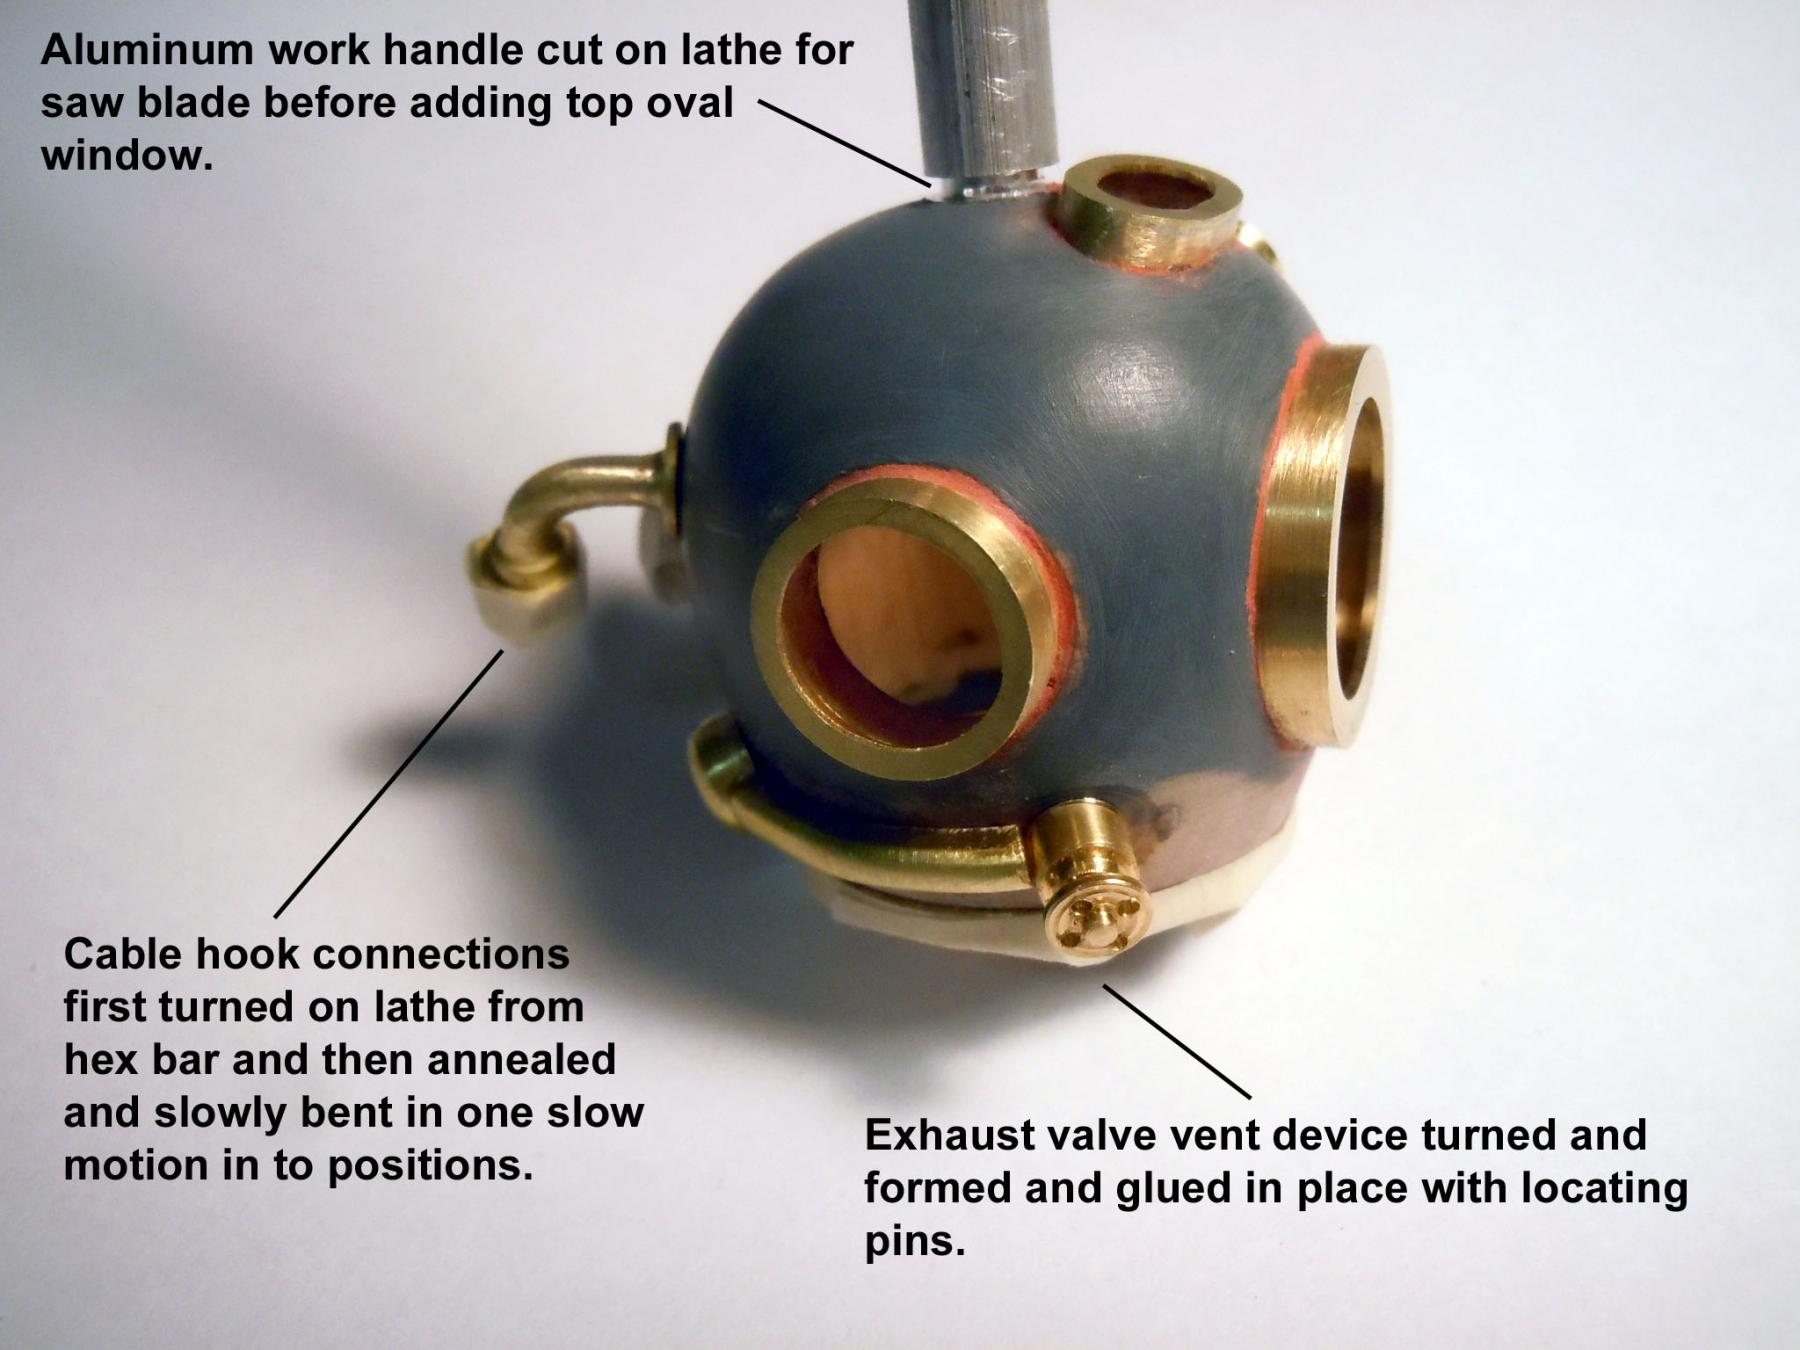
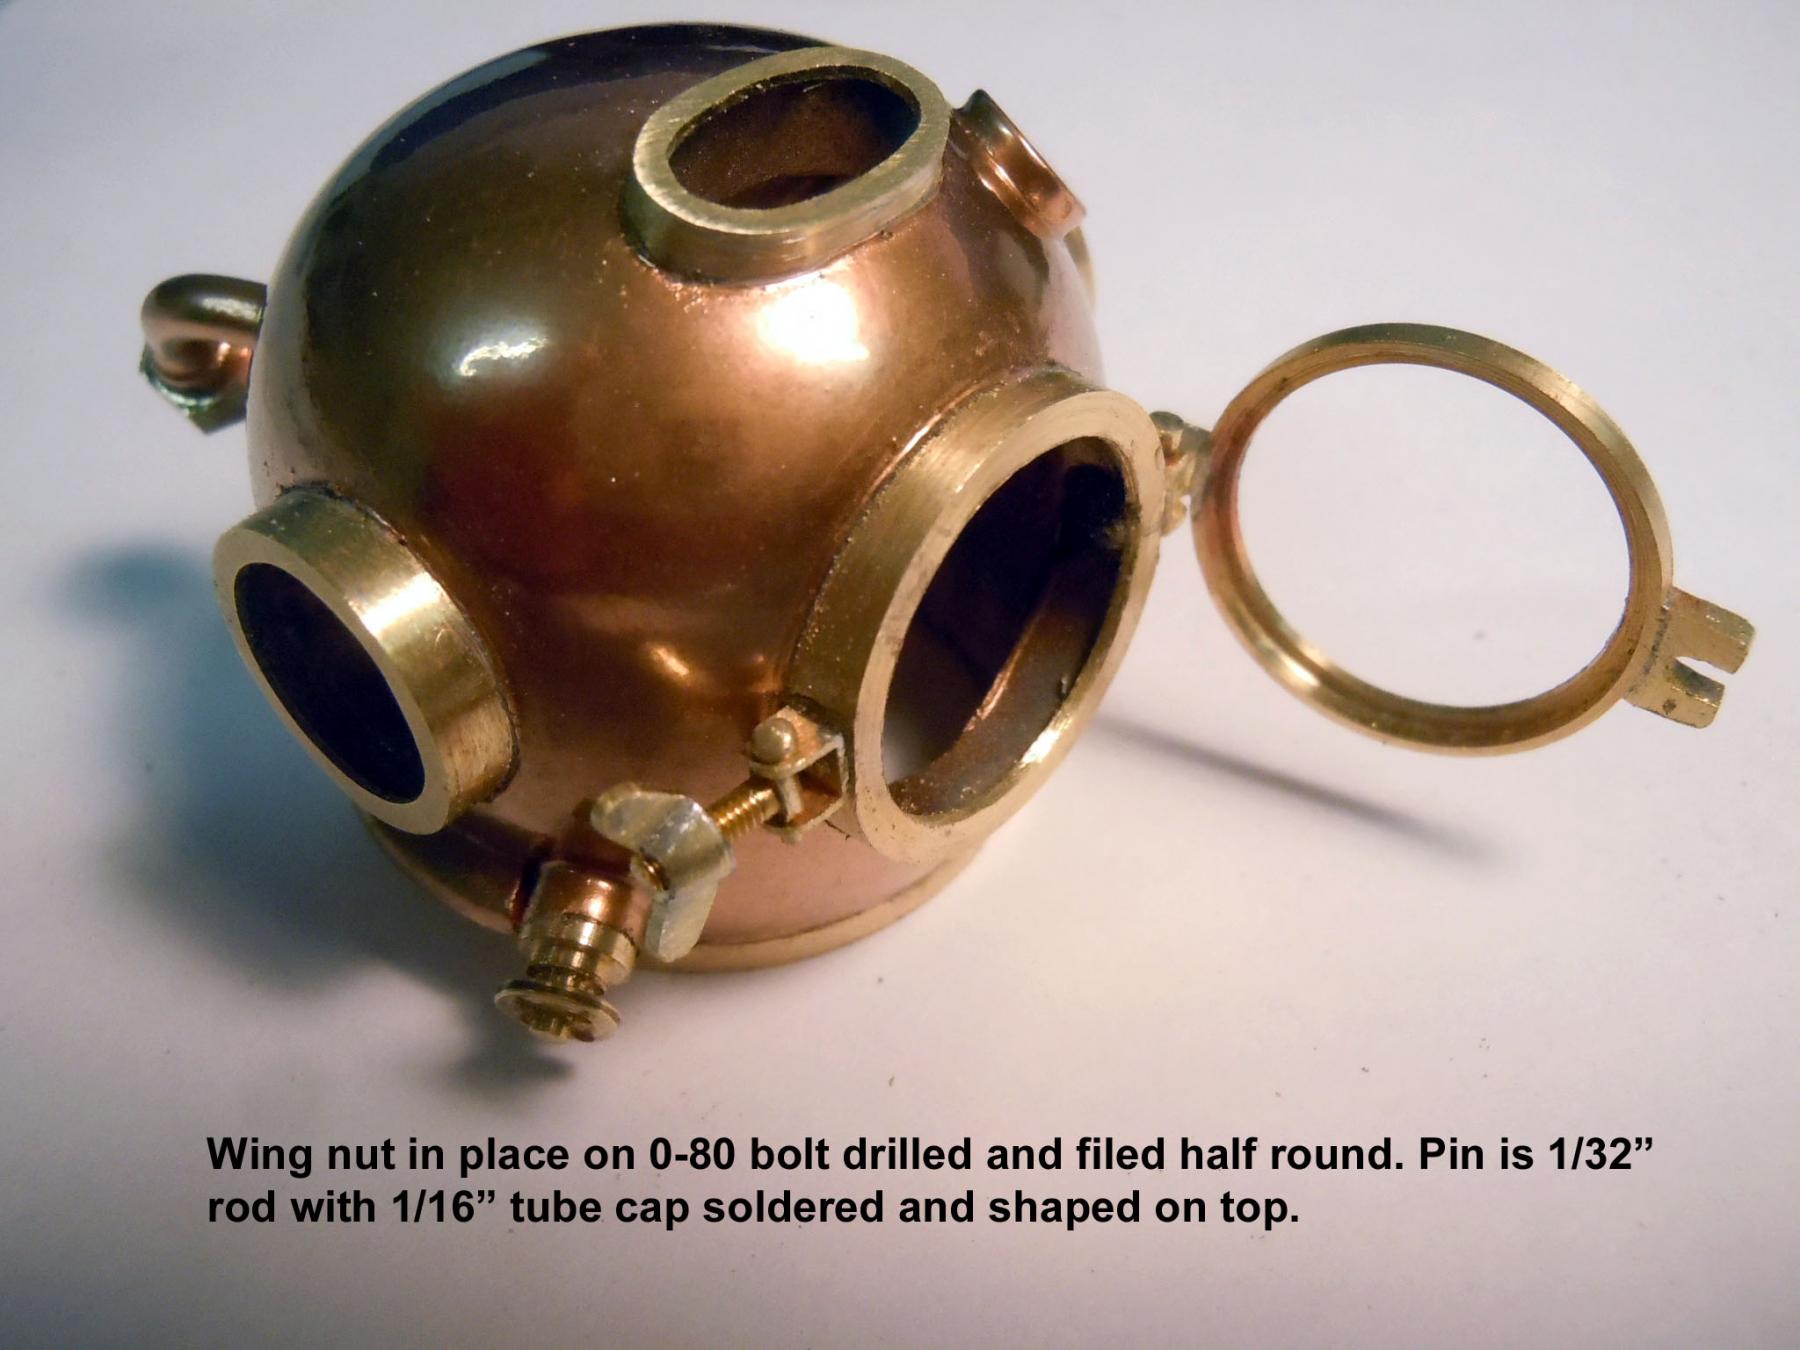
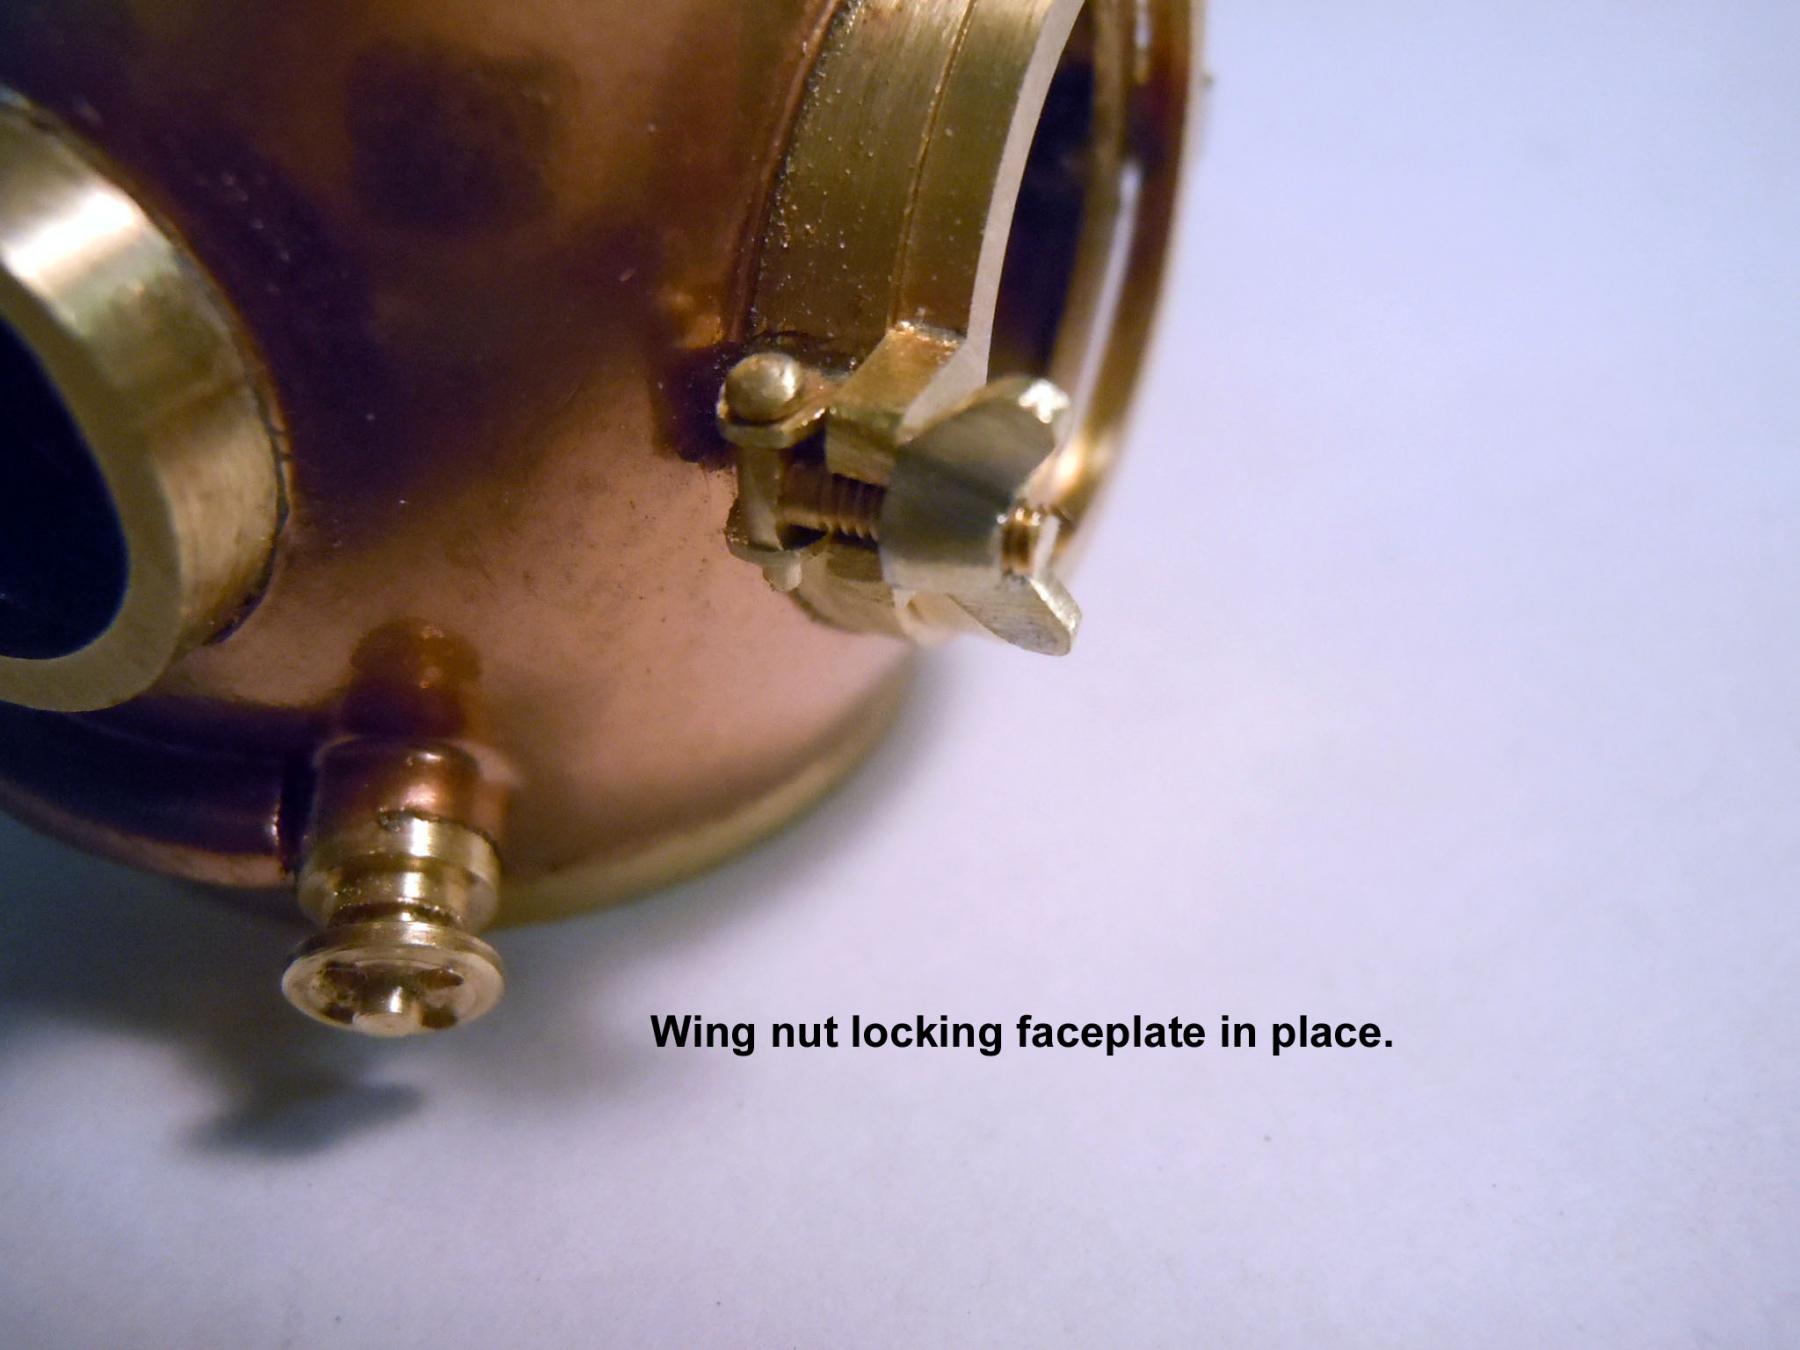
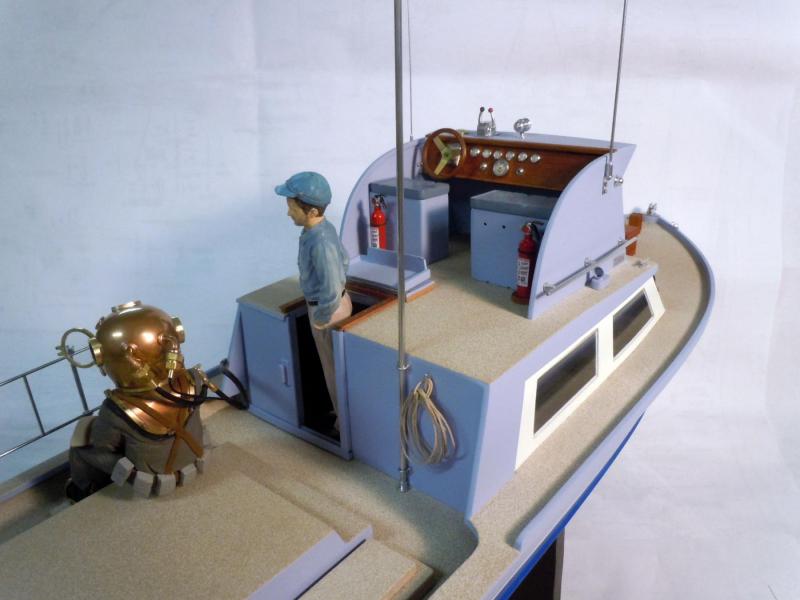
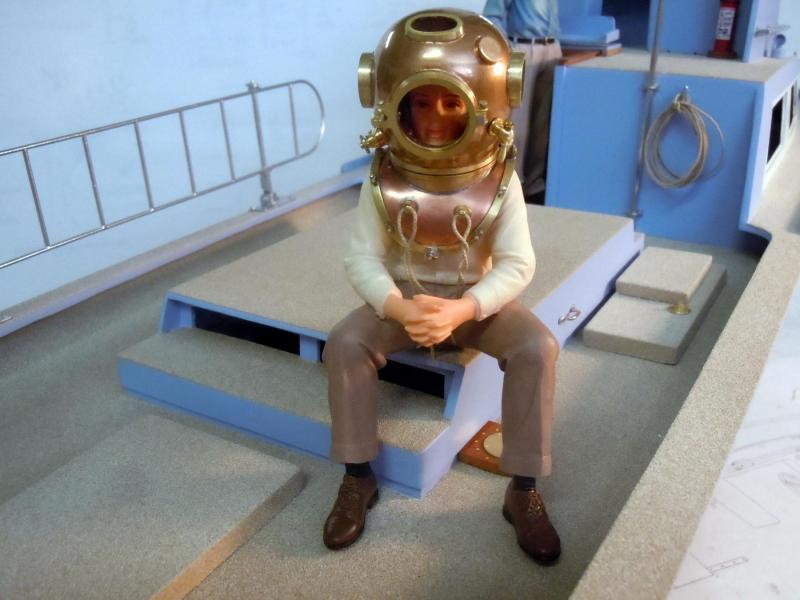
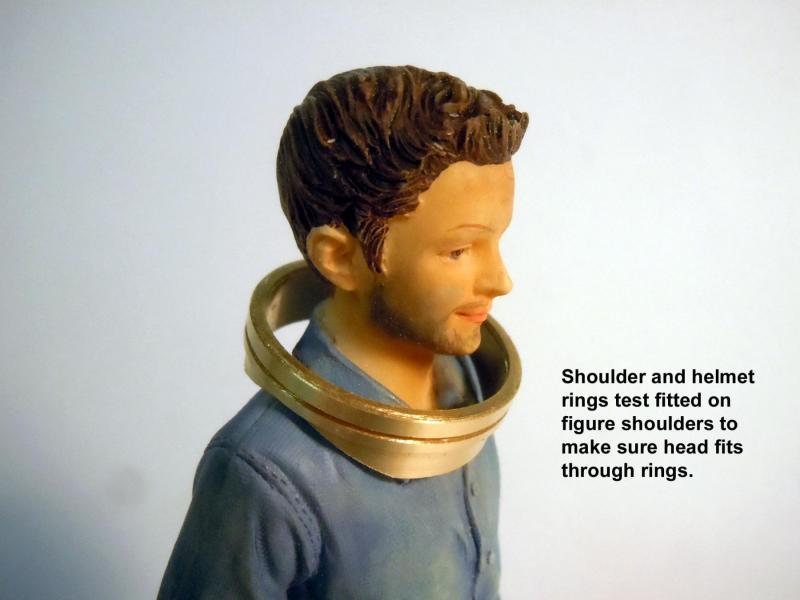
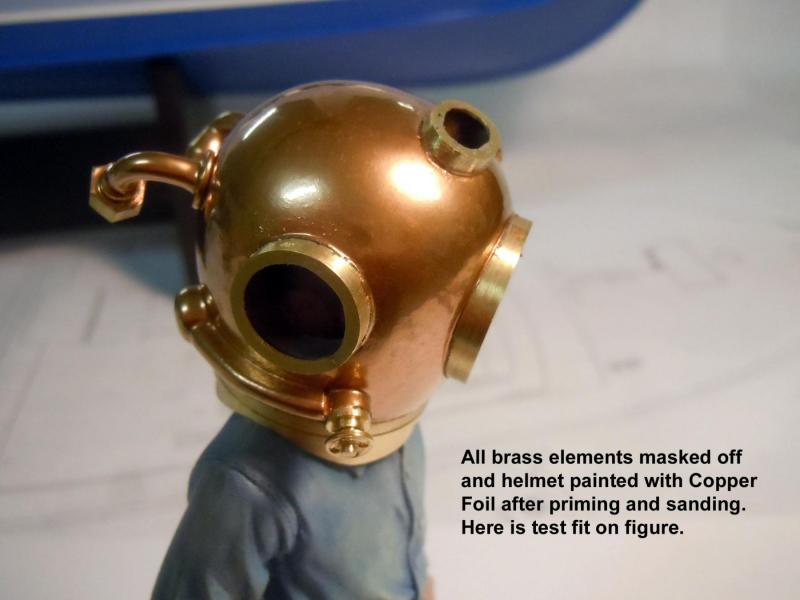
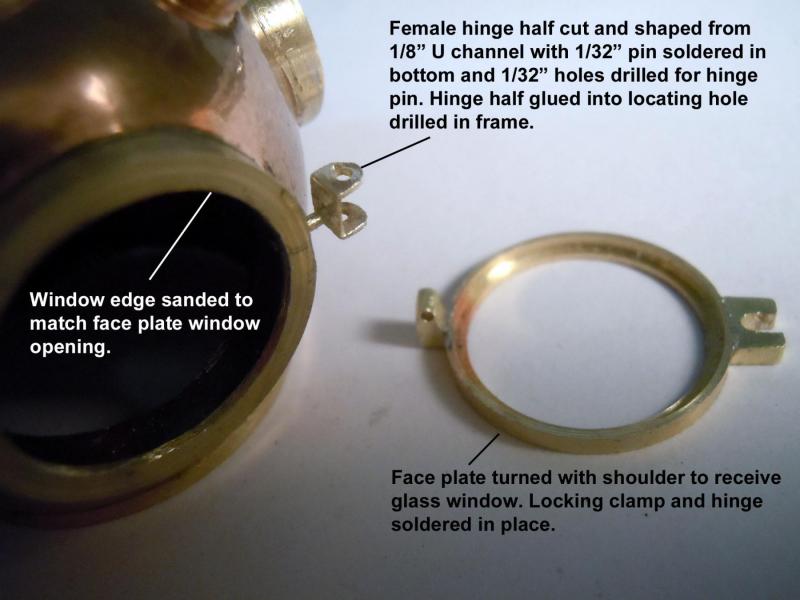
I took a break from writing and decided to start on the dive helmet and go the extra mile for the Maritime Museum adding the two figures but I am still waiting for the sitting one to arrive along with window glass for the boat. The sitting figure will have the suit on with the helmet perhaps sitting beside him. I studying pictures of the helmet shape and details it finally hit me where I had seen the kind of shape before; the end of file handles. I found an old file handle that was the perfect size and cut it to length after milling a 1/4" hole in the end to receive a 1/4" aluminum bar as a work handle for holding. Once the bar glue set I chucked it in the lathe and stated to core the inside out down to the end of the aluminum bar. I then located all the window holes drilled and sanded them to each size and then finished the coring process using the window edge thicknesses for reference. The wood shape was then finished up smooth with sanding and filing. I then turned the helmet ring and shoulder ring to index into each other and test fitted them over the standing figure I have. Next I cut all the window frames with an inside shoulder to hold the window glass. Next I added the exhaust valve device with turned and formed parts. Next I painted the helmet with Copper Foil paint having masked off all the brass elements. Next came the faceplate again turned with a shoulder to receive glass like the windows and offset hinge drilled for a 1/32" pin and locking receiver. Here the hinge half is test fitted into window frame. Following is a series on fabricating the wing nut to lock the faceplate against the frame. Here is the helmet finished to this point and awaiting the glass to show up as well as the sitting figure. Then to try my hand at working Sculpty over the resin figure with a dive suit. Now back to writing.


- 162 replies
-
- 15
-
-
- dirty dozen
- fishing
- (and 2 more)
-
Greg, next I need to update my book with a chapter on using brass in ship building and then after that back to the Constitution.
- 162 replies
-
- 5
-
-
- dirty dozen
- fishing
- (and 2 more)
-
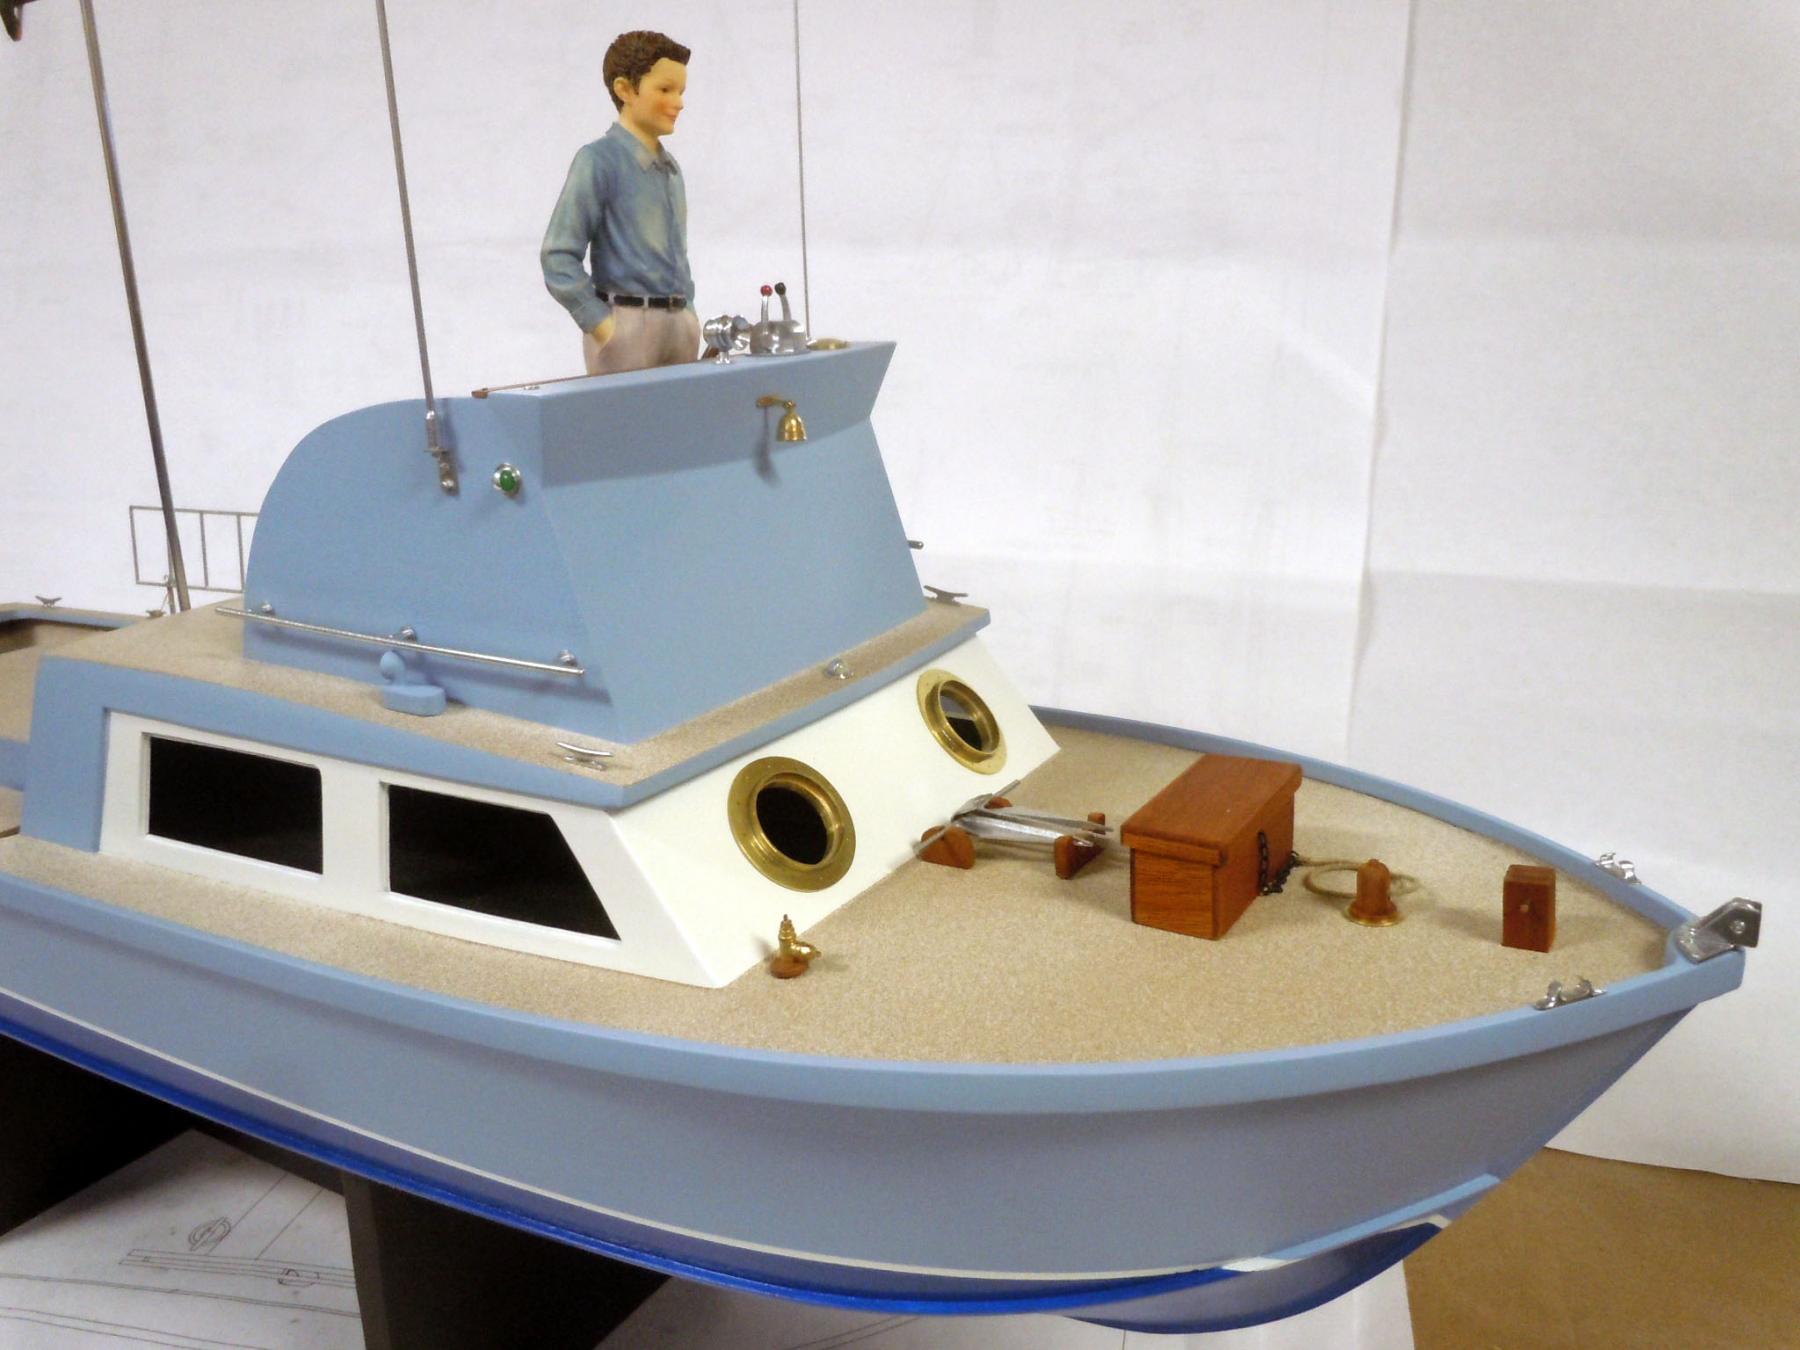
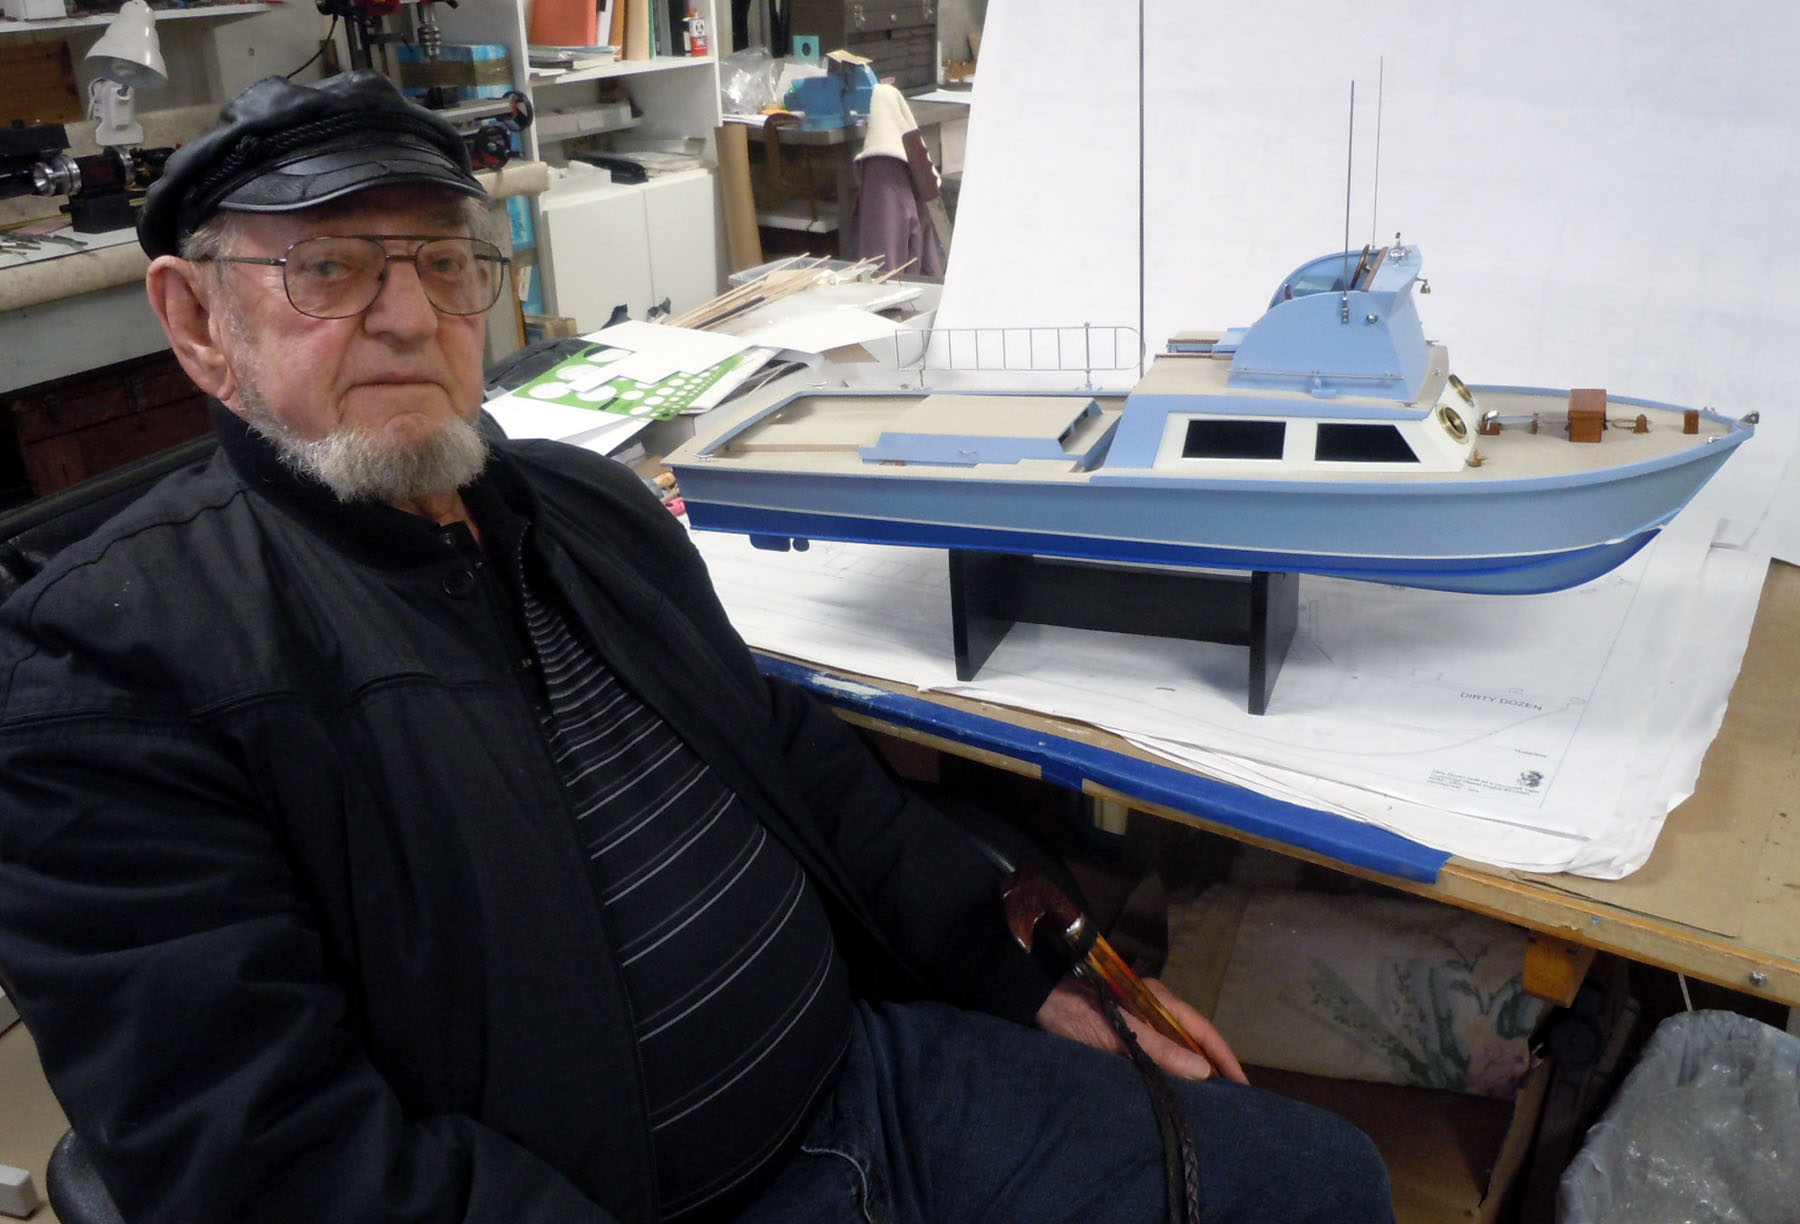
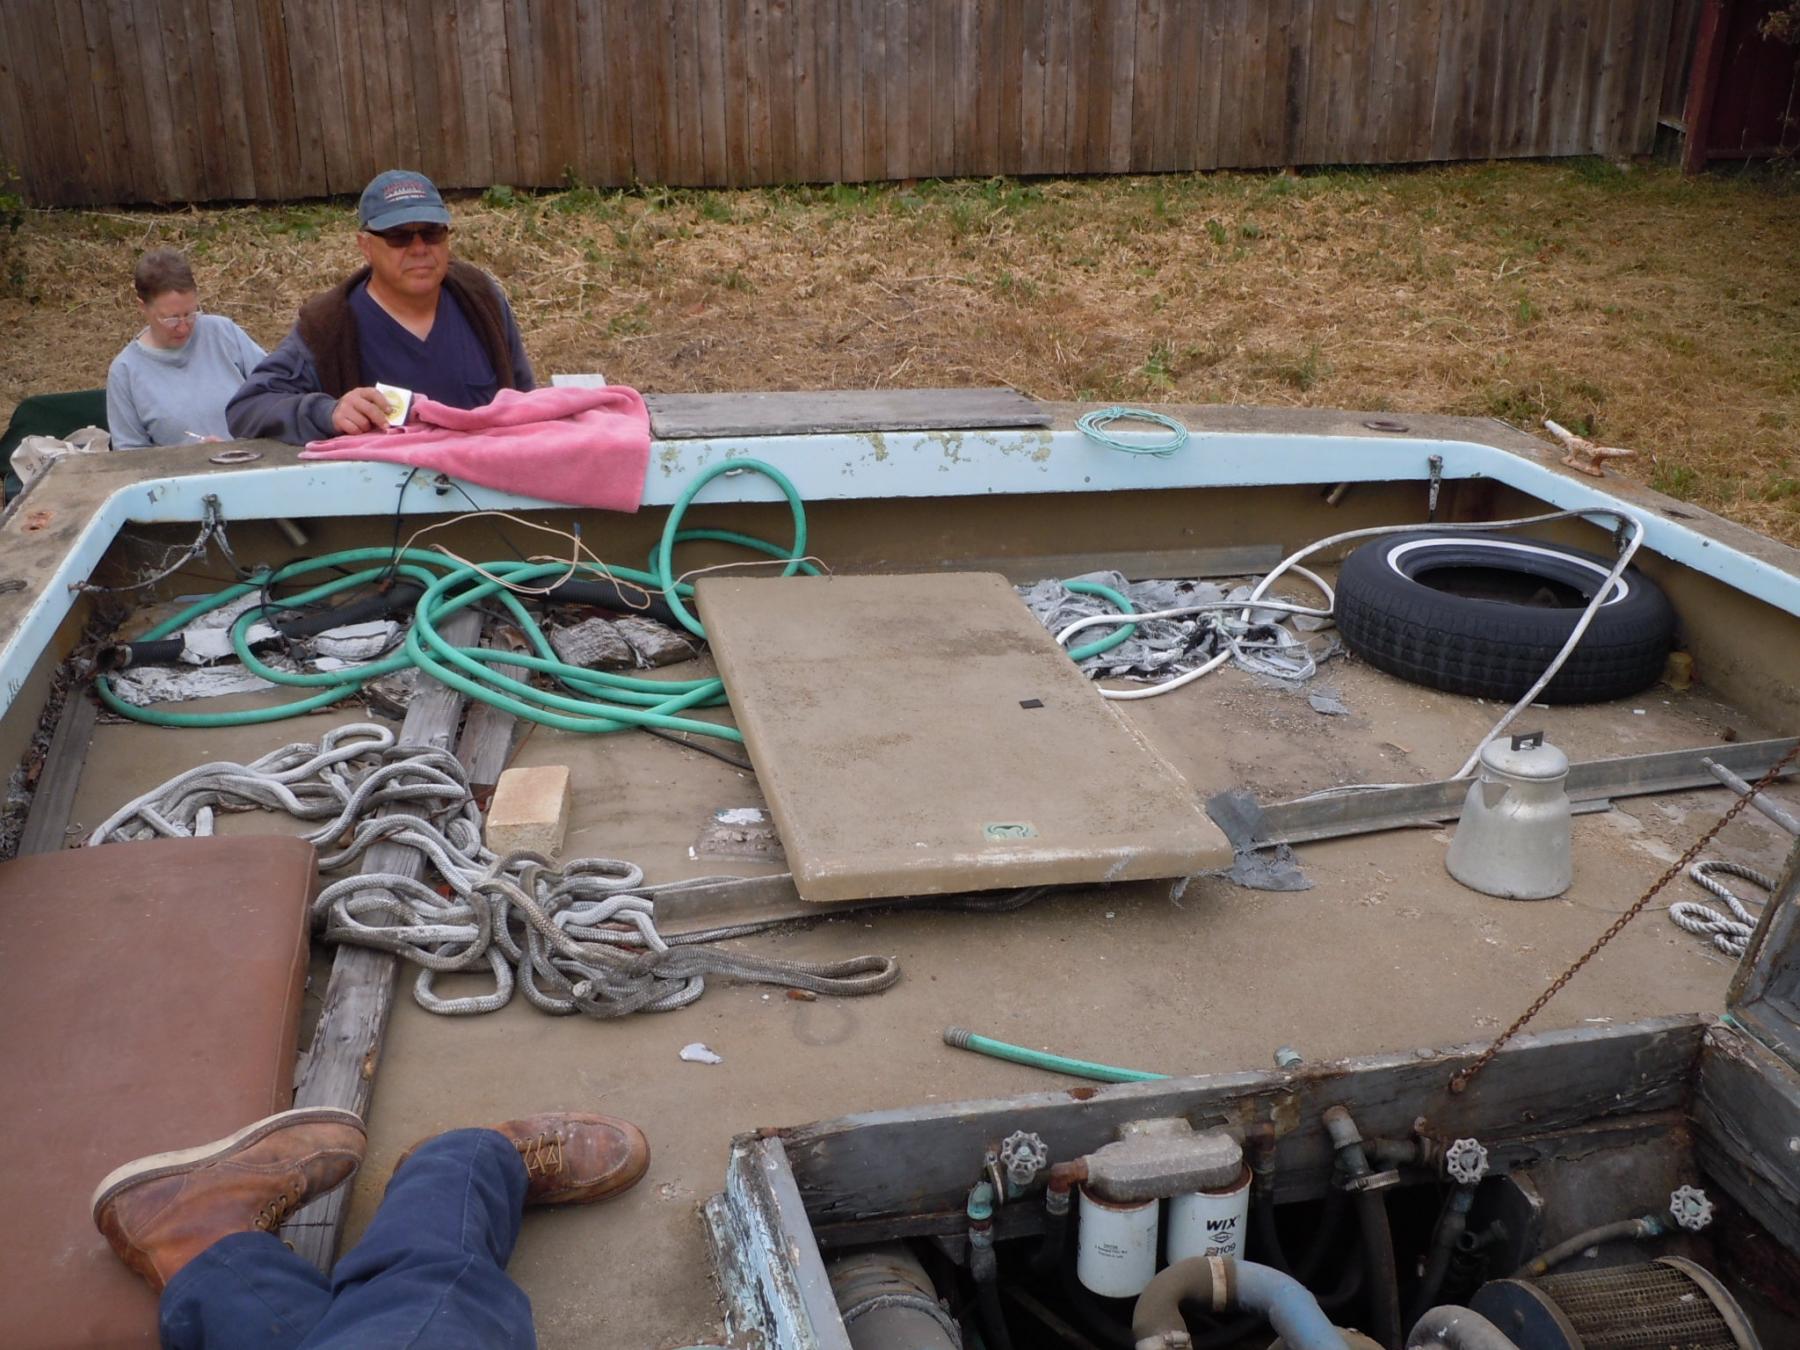
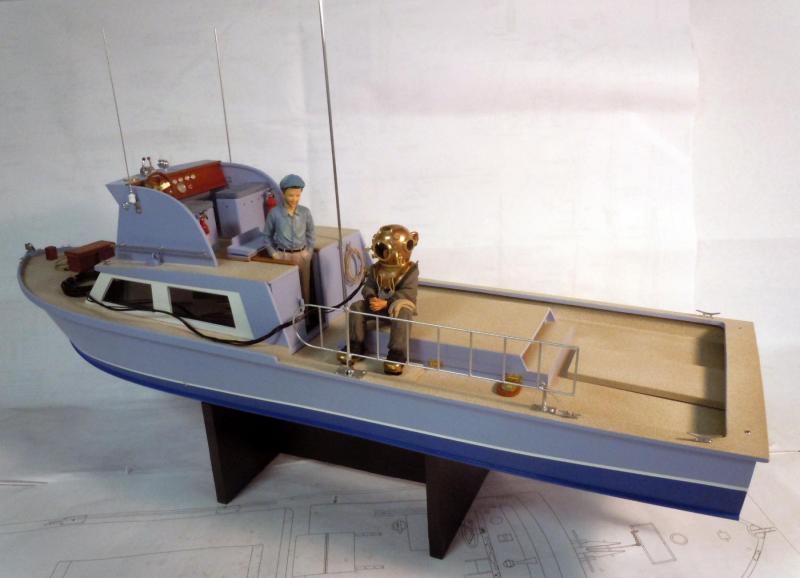
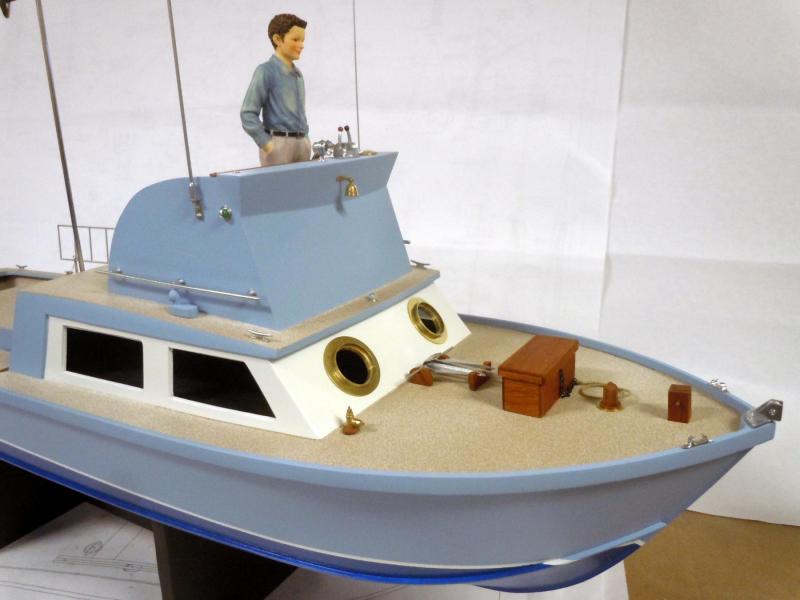
I received only one of the two figures I ordered today. I also wanted a sitting figure which I guess is out of stock. Communicating with the company now for options. Anyway here is the standing figure which will need a little scruffing up to make a fisherman but it now gives the boat a sense of scale. He is painted good colors to go with the boat but needs a salty hat. I also finally connected with the actual boat builder who built the boat in 1967. We had a great conversation about the boat and it's details and he really enjoyed it. He is also a wealth of information on the local history and boat building. He related that be built 12 abalone fishing boats and that this was one of the last ones built. I have arranged that he and the president of the maritime museum meet and have him relate the oral history for the museum before all the information is lost. He moved here in 1948 and his father and he built fishing boats. No plans were ever used started only with length, width and height and purpose of the boat. They used 2 layers of 1/4" marine grade plywood glued together with staggered joints that were glued and nailed with copper nails peened like rivets to secure the joints. The hull was laid up upside down and covered with Fiberglas then turned over and inner hull built up. No two boats were ever the same but a few were similar in design. I think we both had a great time talking about the boat and boat building in general. It also turns out his sister married a guy named Dick Foran from Oregon which is where they live. My last name is Foran, what are the odds? He also lives only three streets away from me in the same housing track only down the hill from me. Here is a picture of him with the model.

- 162 replies
-
- 15
-
-
- dirty dozen
- fishing
- (and 2 more)
-
Sounds Great just glad I could be of some help. I know what schedules are all about; have a great day! Ken
- 162 replies
-
- 3
-
-
- dirty dozen
- fishing
- (and 2 more)
-
Bob, I just got back from having a chat with the owner of the WindWalker, his last name Gillespie. He shared that it was a Grand Banks Schooner modeled after the Merganser; not sure if that is a name of a schooner or a class. He suggested a book by Chappel about schooners with a great deal of drawings. Her length on deck is 66' 6"; width is 18' with 9' draught. She is now an albacore fishing boat and will be heading out when the season opens. He said it is a dream to sail on the open ocean; "you can walk away from the wheel come back in fifteen minutes and only need a very slight adjustment to be back on course." Could not spend a whole lot of time since he was having breakfast; but he did inquire if I was the guy that took a lot of pictures a while back and I replied that I probably was. Apparently, the Harbor Master showed him security camera footage of me in action. Let me know if you need anything else.
- 162 replies
-
- 5
-
-
- dirty dozen
- fishing
- (and 2 more)
-
Bob, no annealing would make it softer and more difficult to cut. It is cleaner cutting when left half hard and also easier filing the edges as well.
- 162 replies
-
- 4
-
-
- dirty dozen
- fishing
- (and 2 more)
-
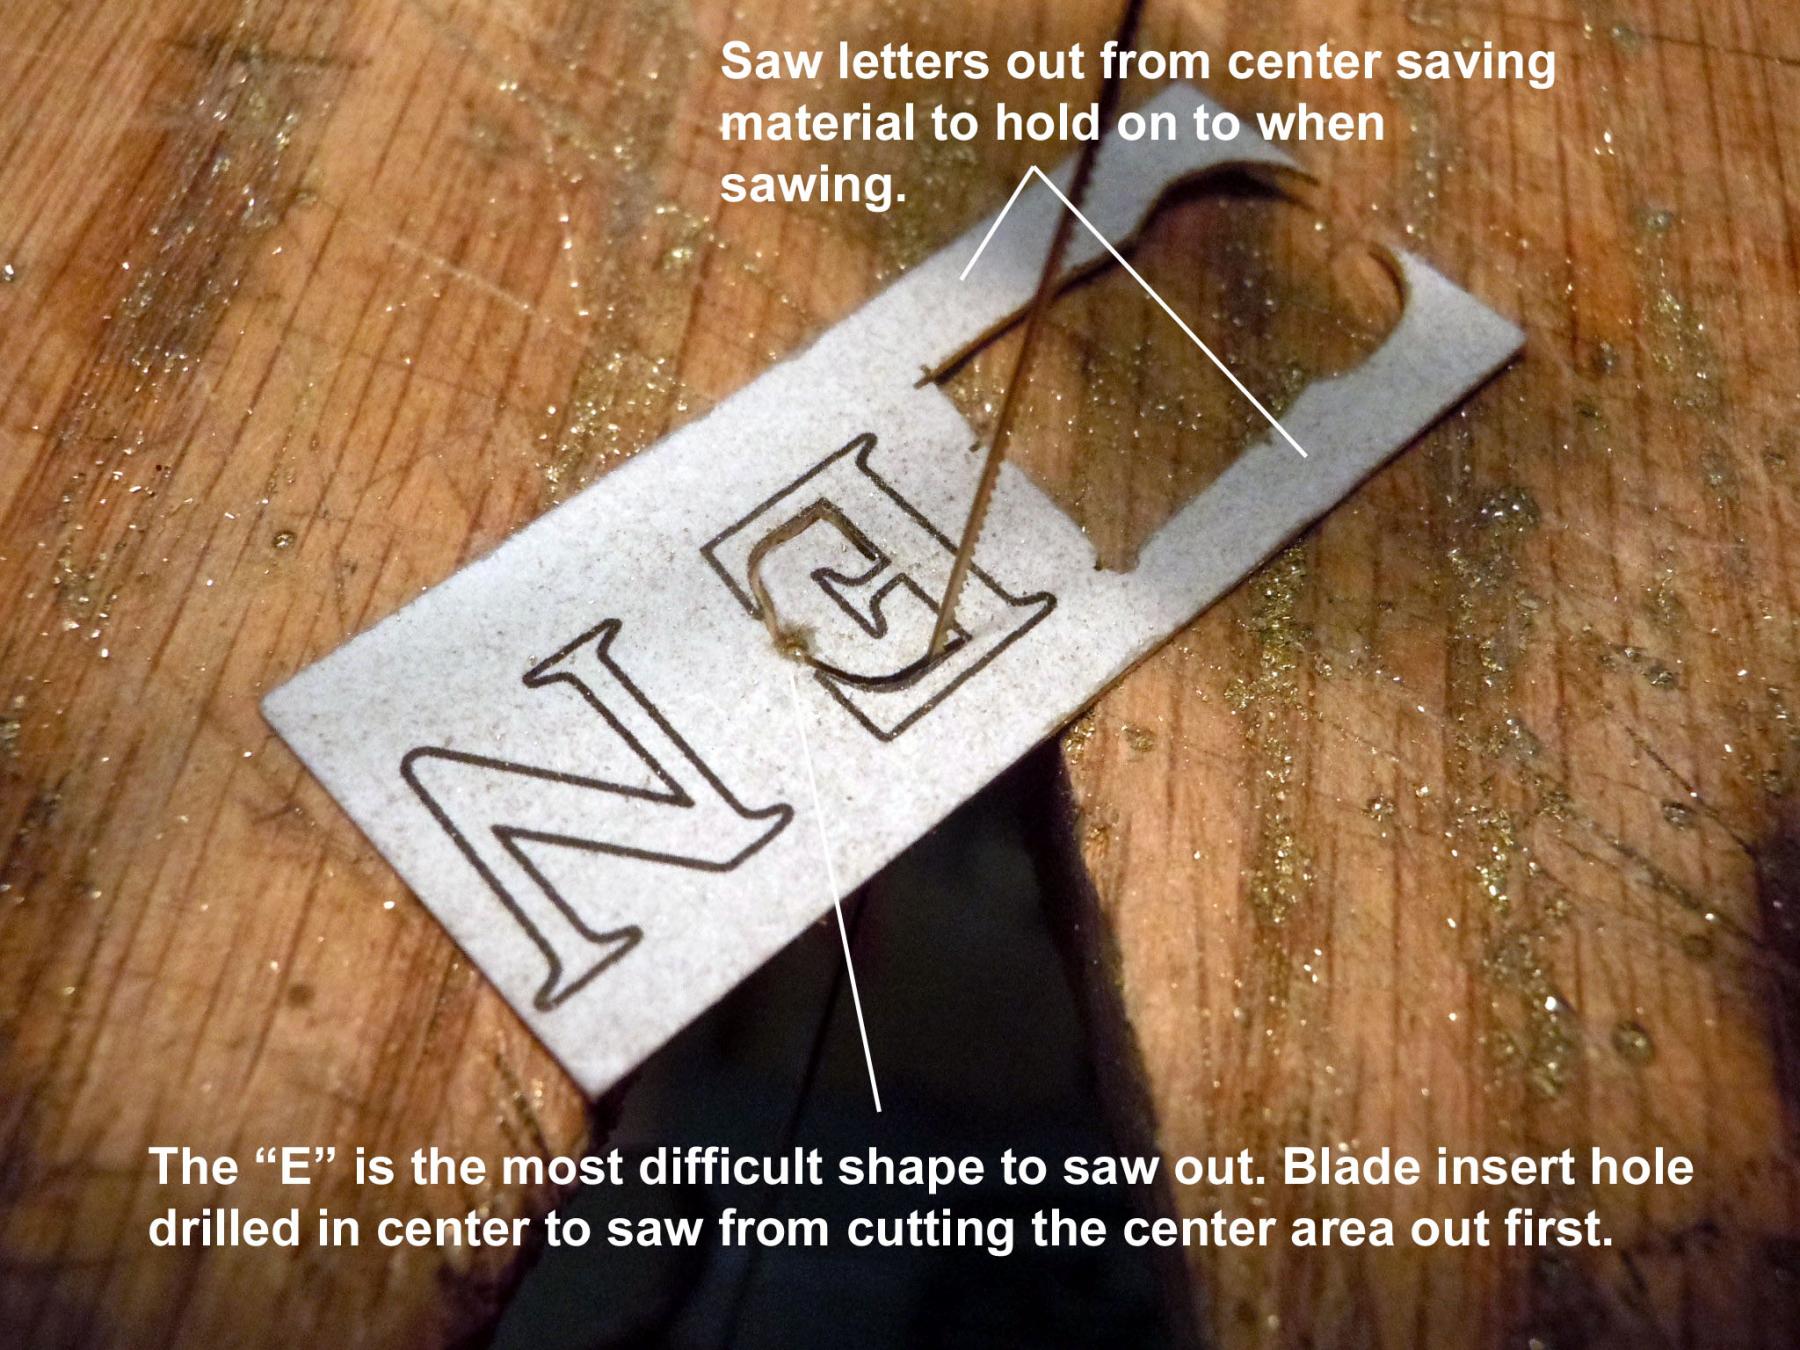
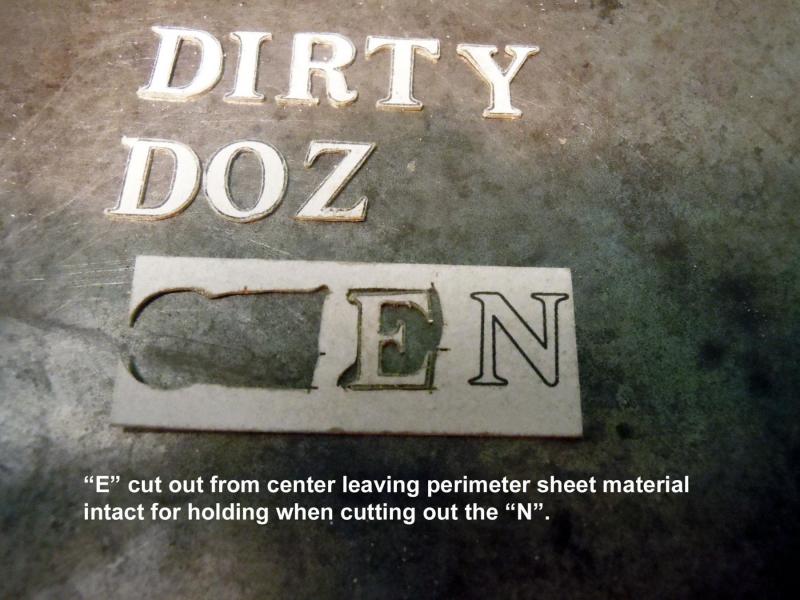
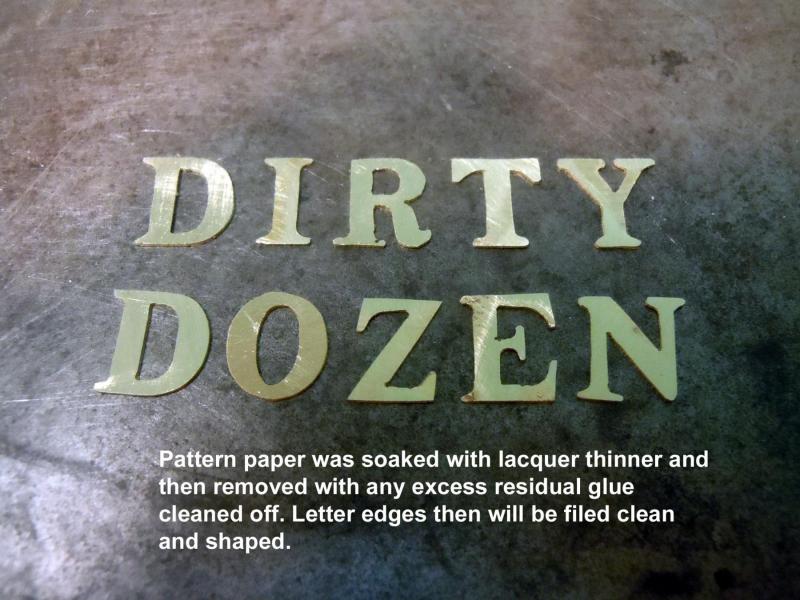
Bob, the issue was one of strength, I was concerned about the web in the center of the "E" breaking with another material. If you look close the width of the web is very near the same width as the saw blade. As for the aluminum I initially was going to use polished aluminum; but after cutting out the letters I could not get an even finish so I just ended up painting them. Even with the softer aluminum I had to glue the sheet material to plywood for extra strength when sawing.
- 162 replies
-
- 4
-
-
- dirty dozen
- fishing
- (and 2 more)
-
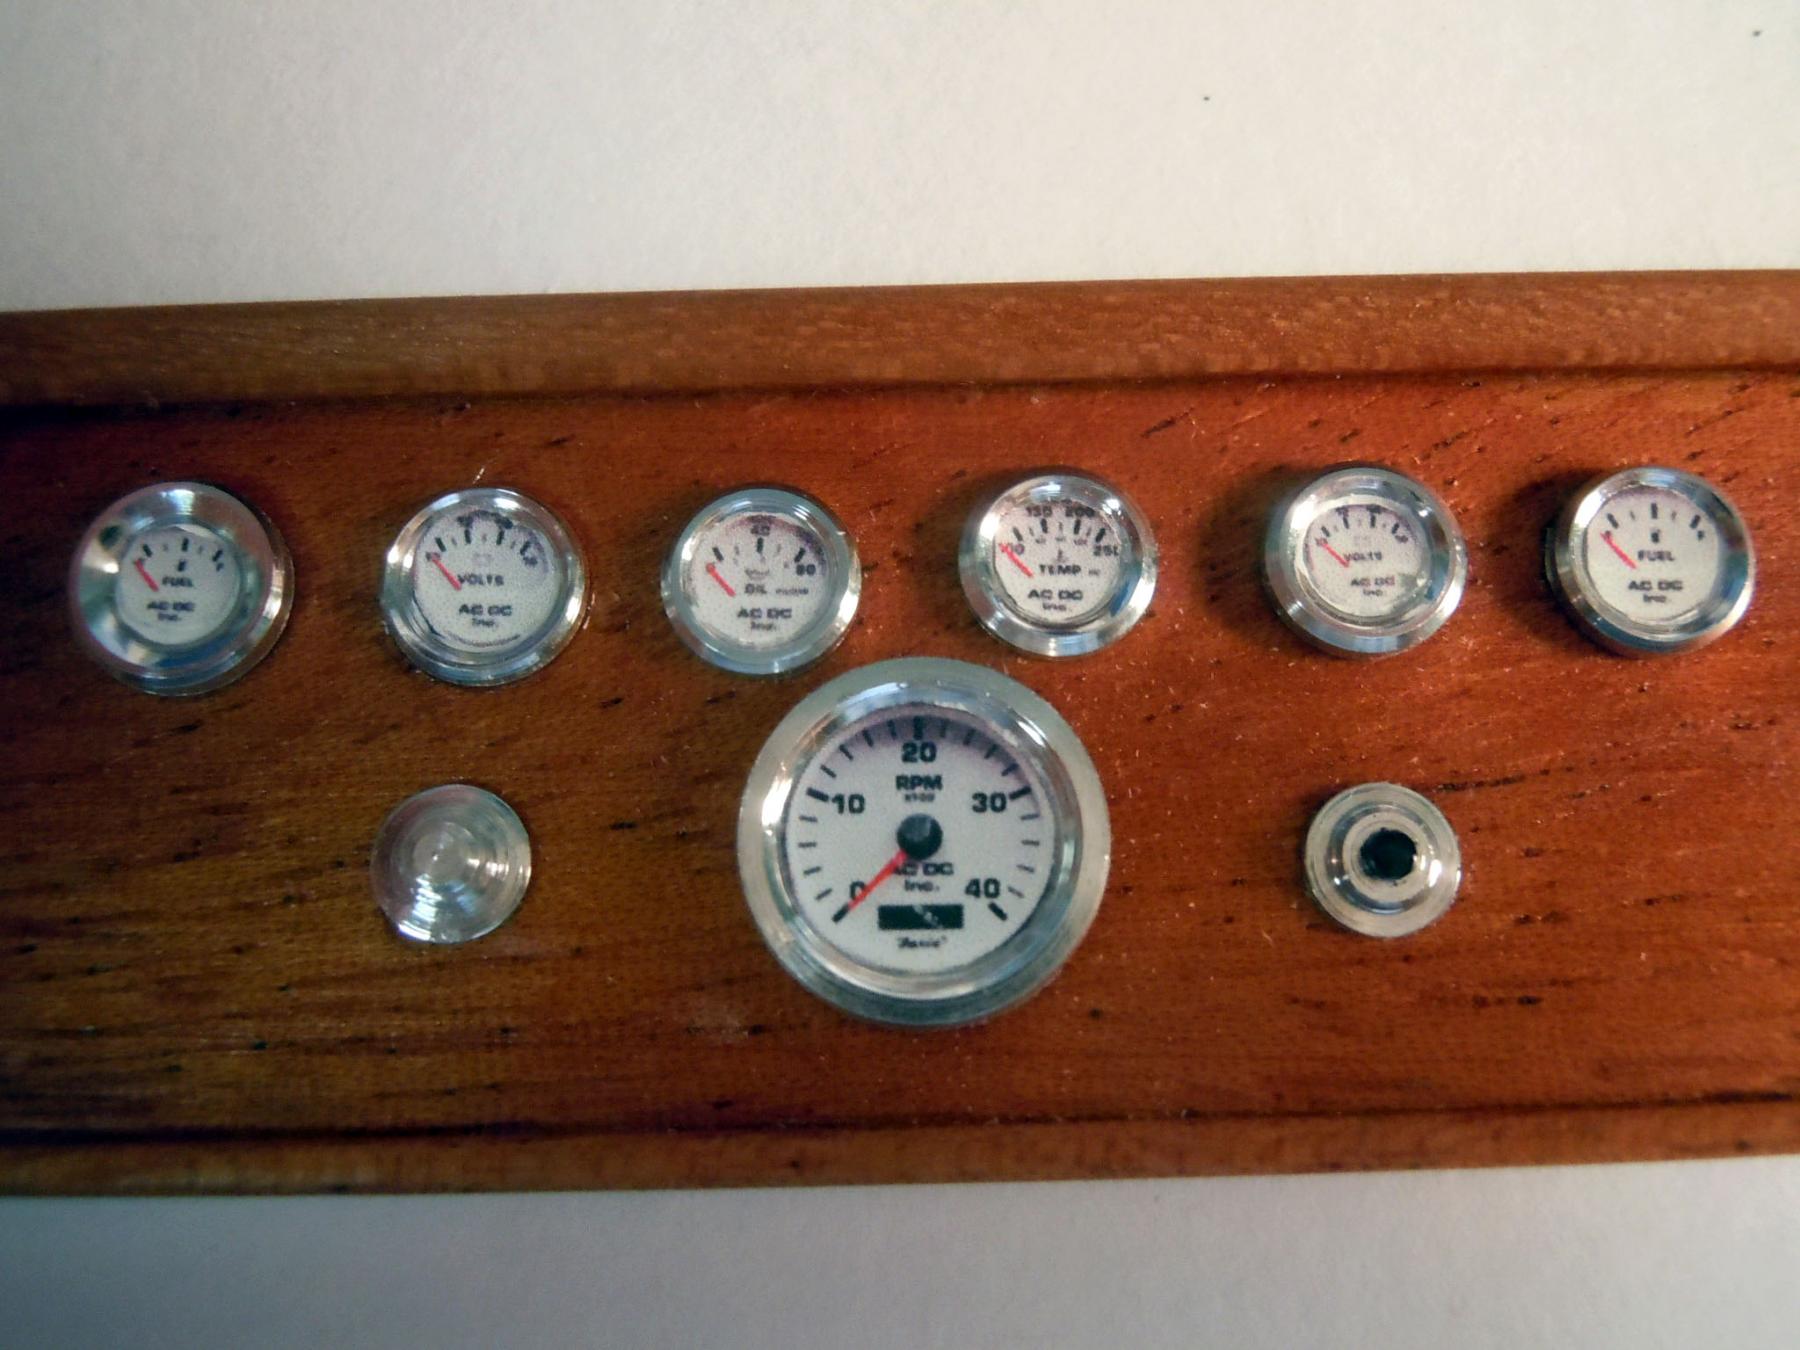
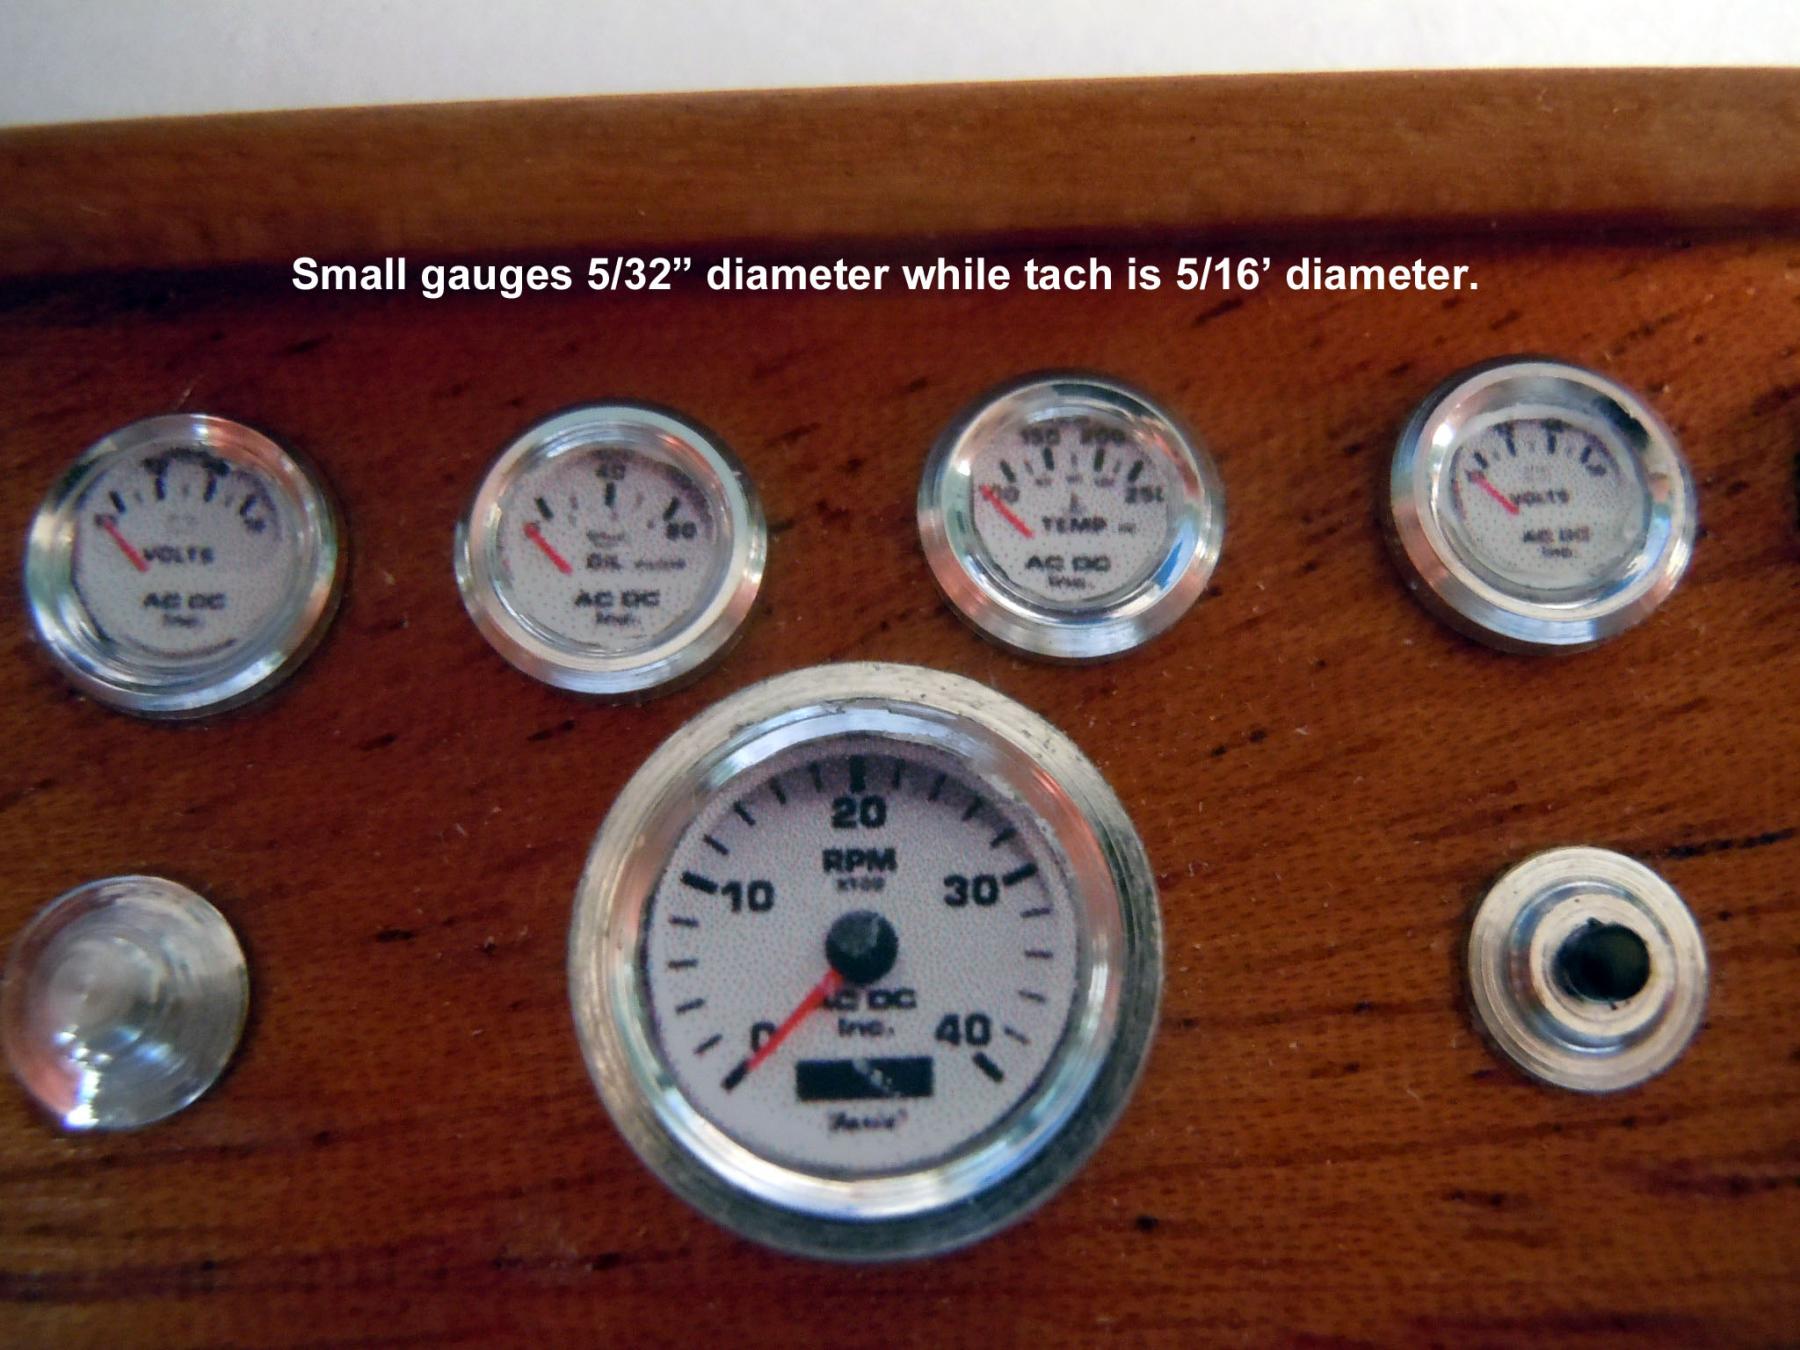
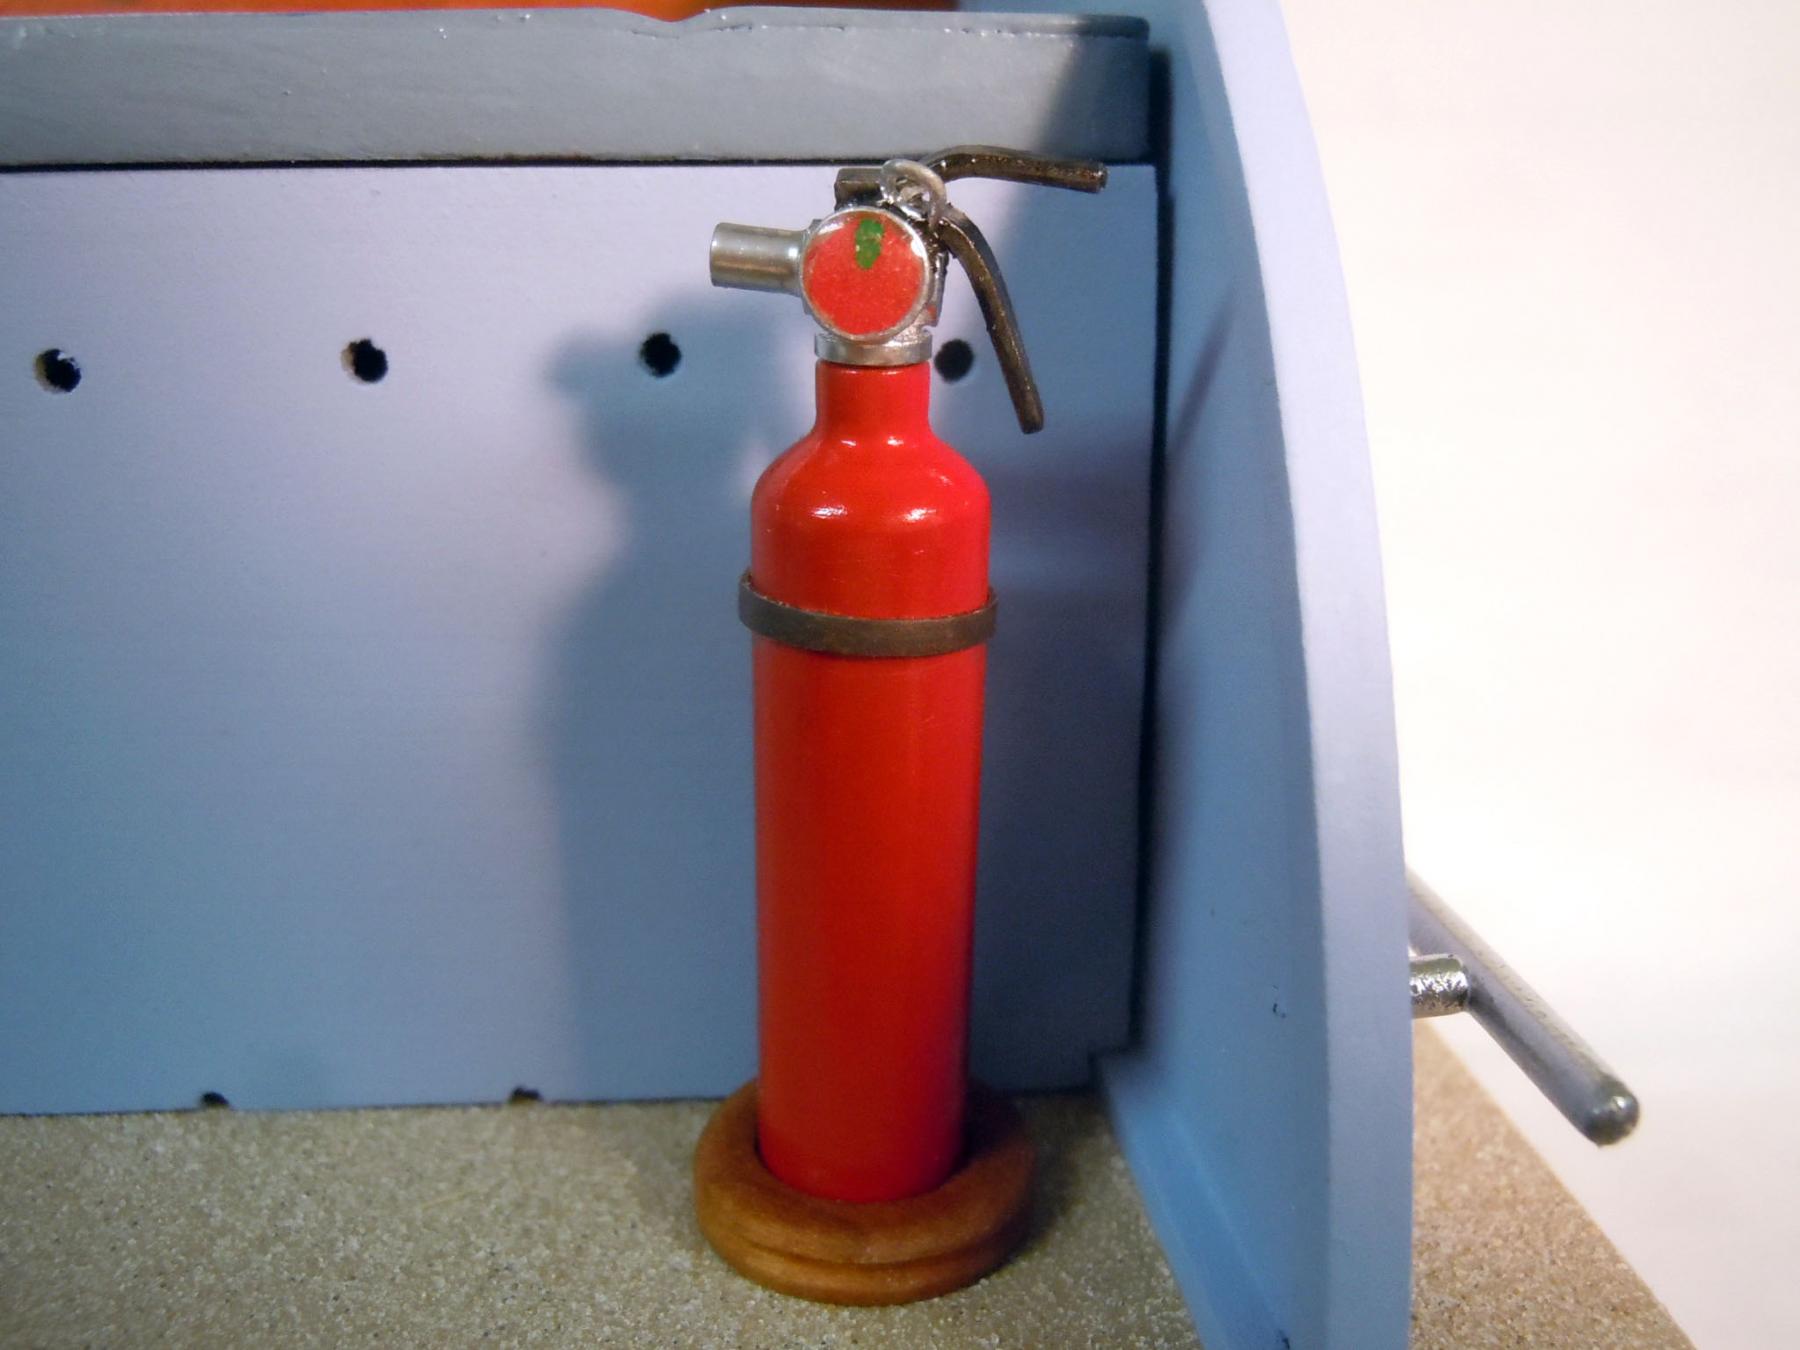
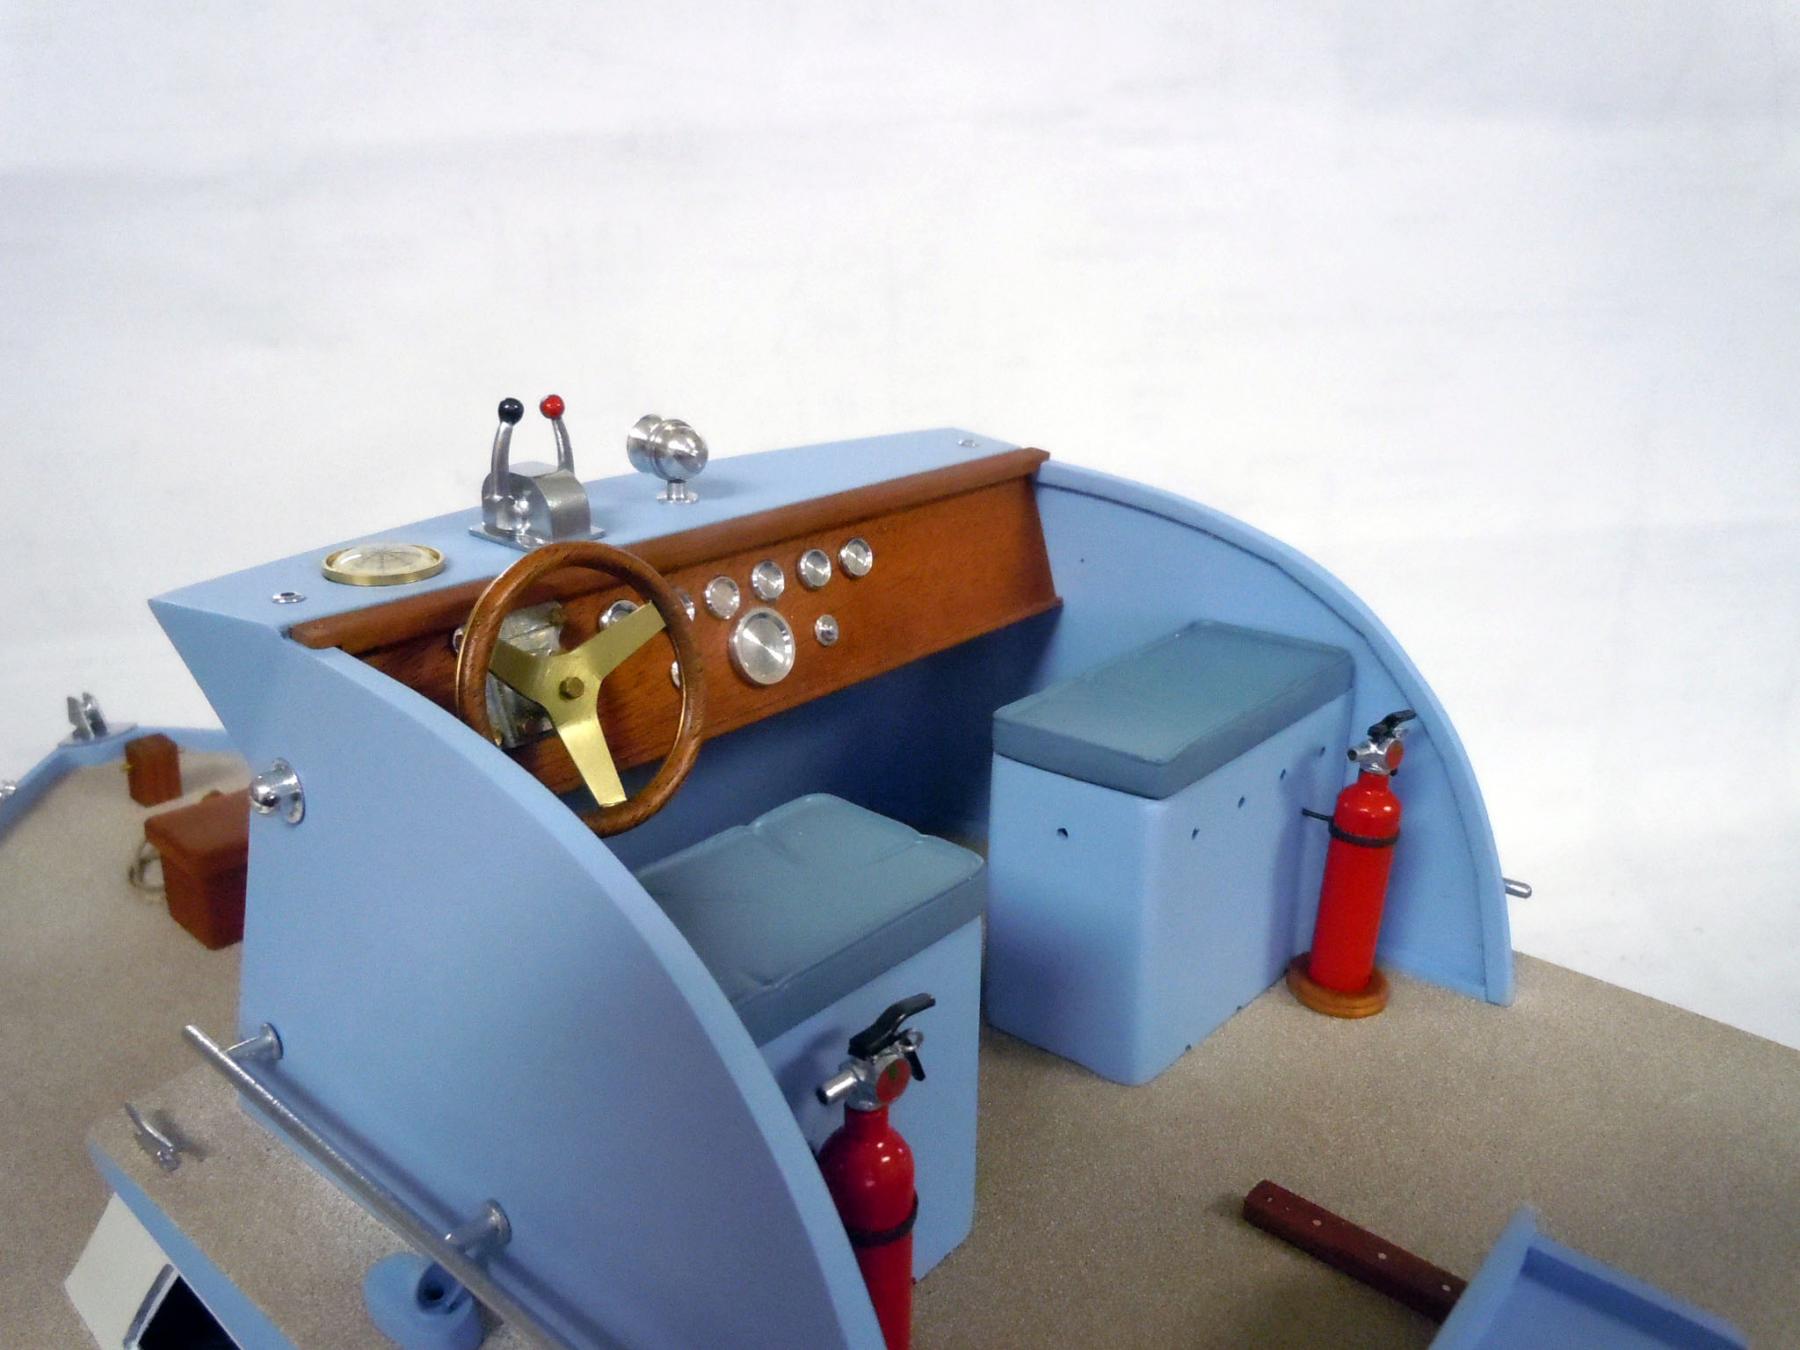
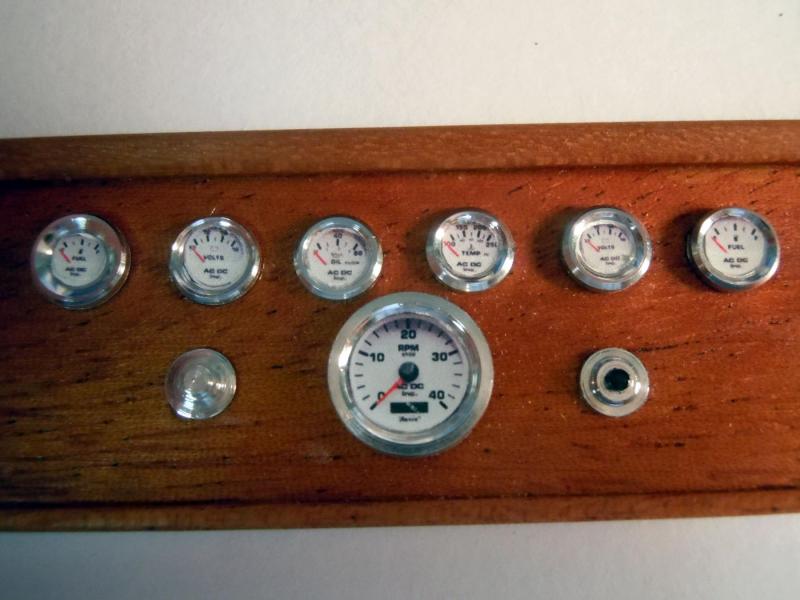
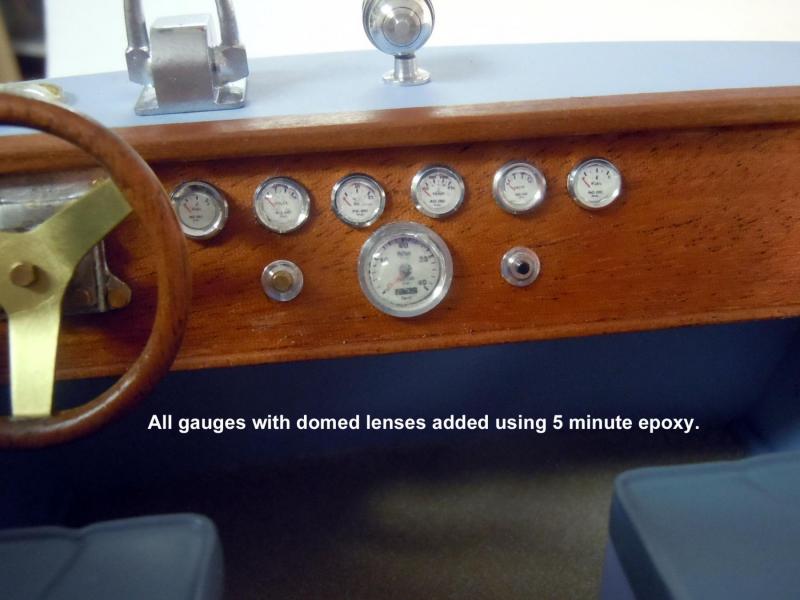
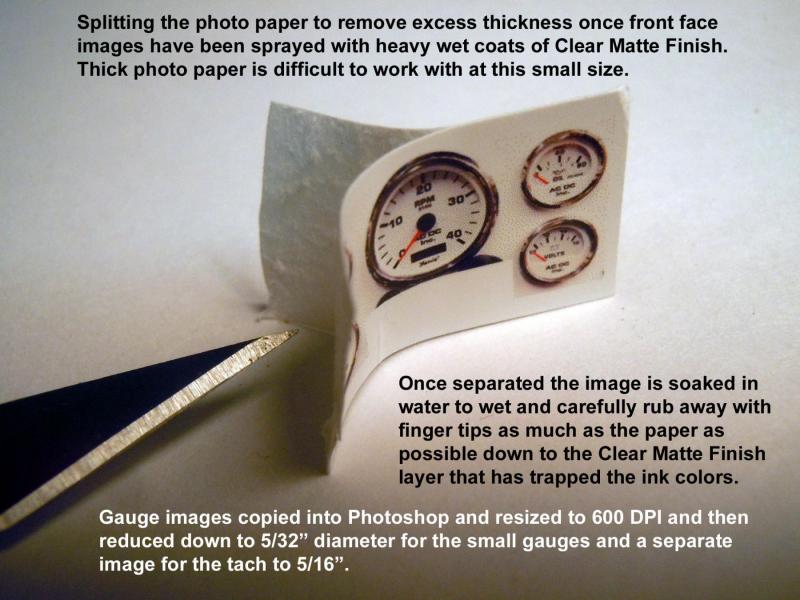
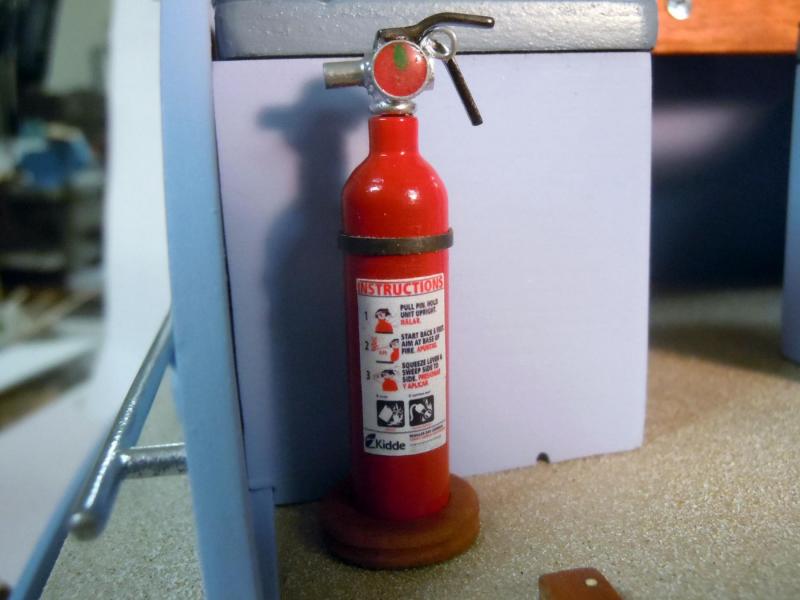
I downloaded images of gauges and in Photoshop re-sized them to 600 DPI and then reduced to the sizes needed. I then printed them out on Photo paper the cut a group of gauges and skived the paper in half to have thinner material to work with once the wet coats of Matte Finish dryed. I then cut and fitted each gauge image to a bezel. I then added white paint very carefully to the bezel and used the wet paint as an adhesive to hold the gauge image in place. The image was pressed into the paint once placed with tweezers using a damp Q-tip and pressing straight down making sure all edges were flat and in place. Here is a close up. Once the gauges were set I added 5 minute epoxy to form lenses as I did with the compass. Just a little twinkle for the eyes. John, here are the fire extinguisher labels for you. With a magnifying glass you can read the instructions. The artwork was made as described above. I received 4 beautiful abalone shells for the base so I will order some decal material to make the names for the bow and work on the base until it arrives. Soon I will be splitting my time between building and book writing.


- 162 replies
-
- 12
-
-
- dirty dozen
- fishing
- (and 2 more)
-
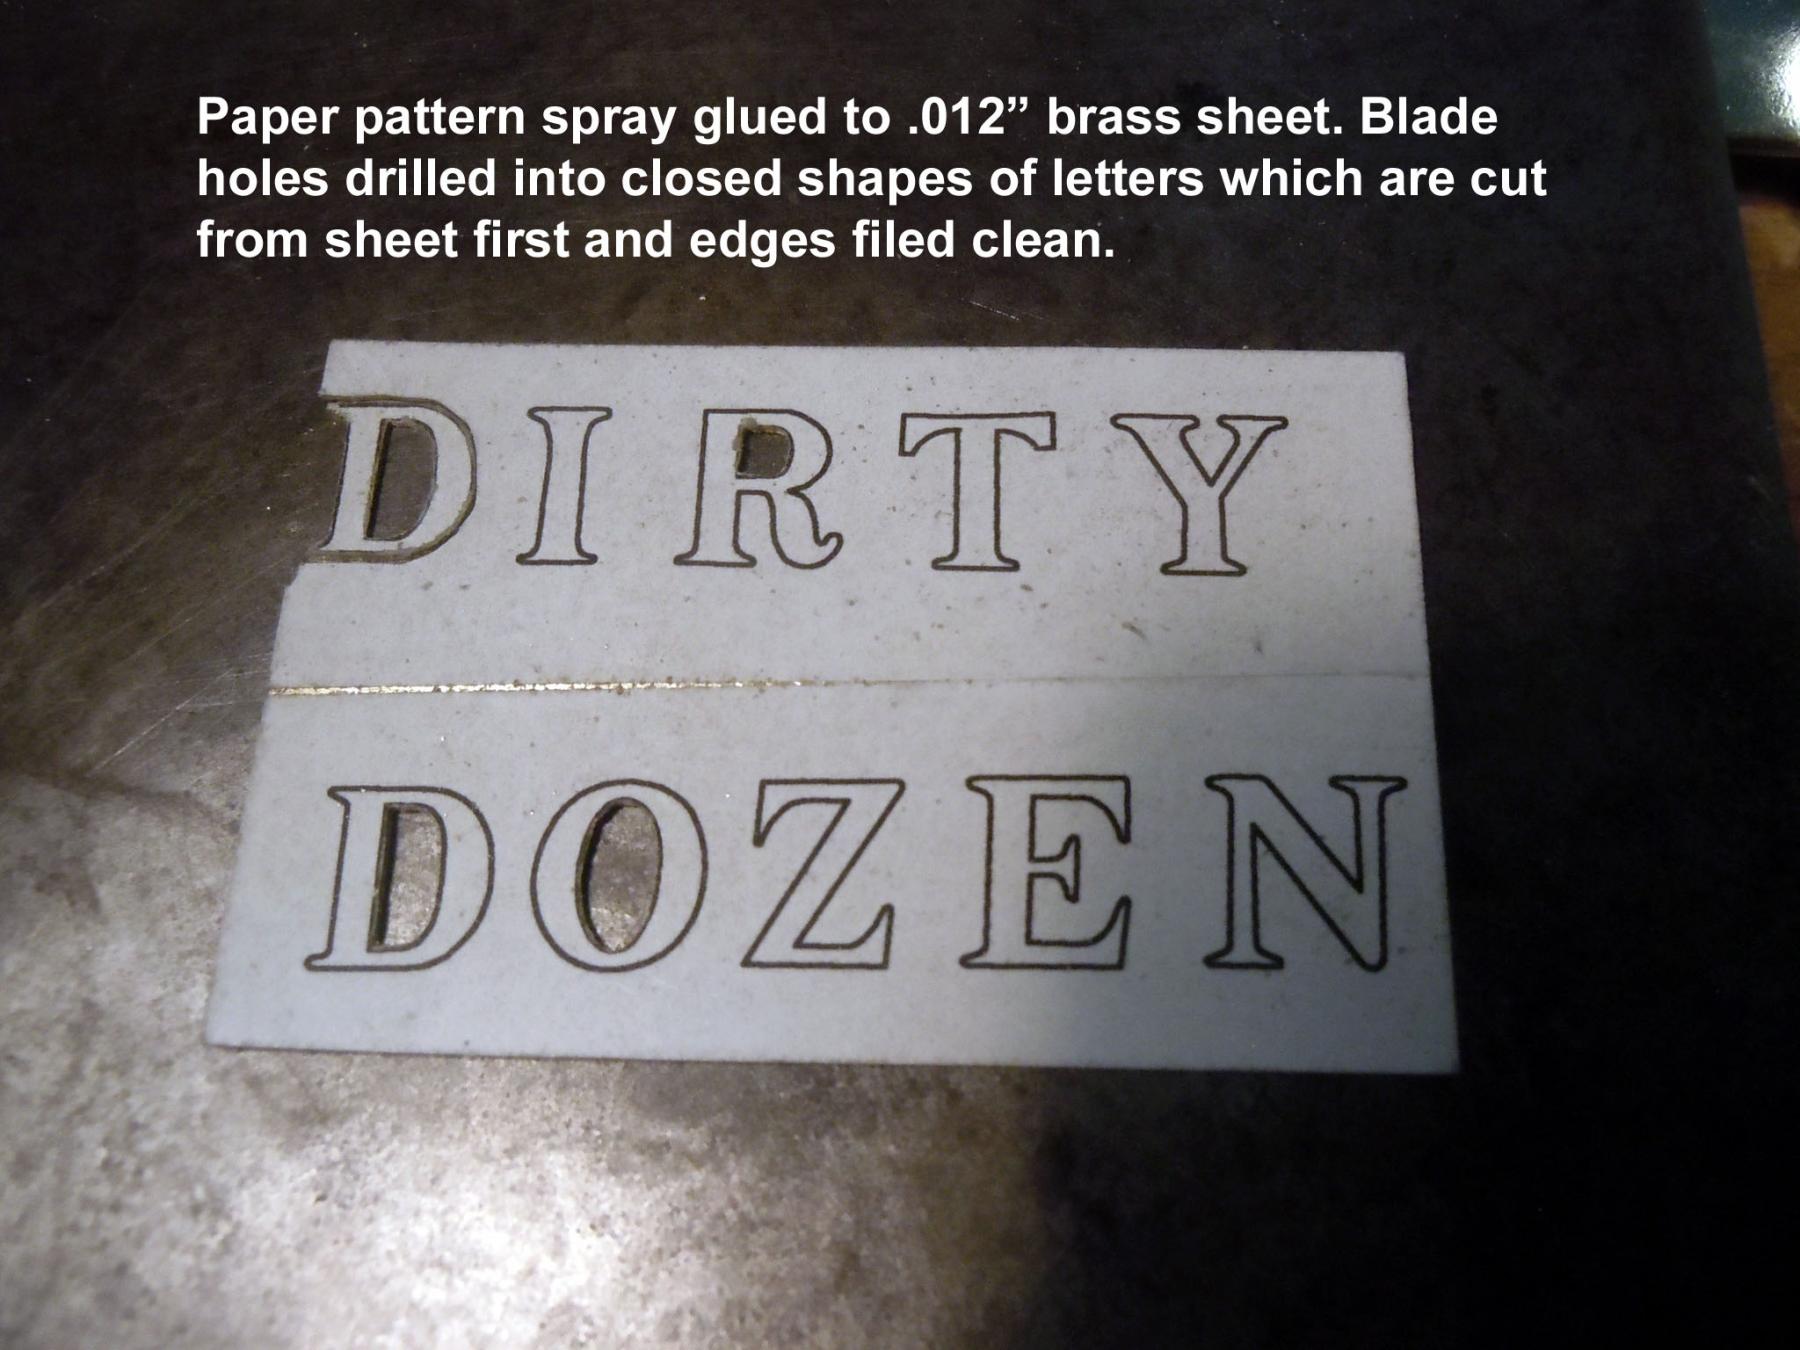
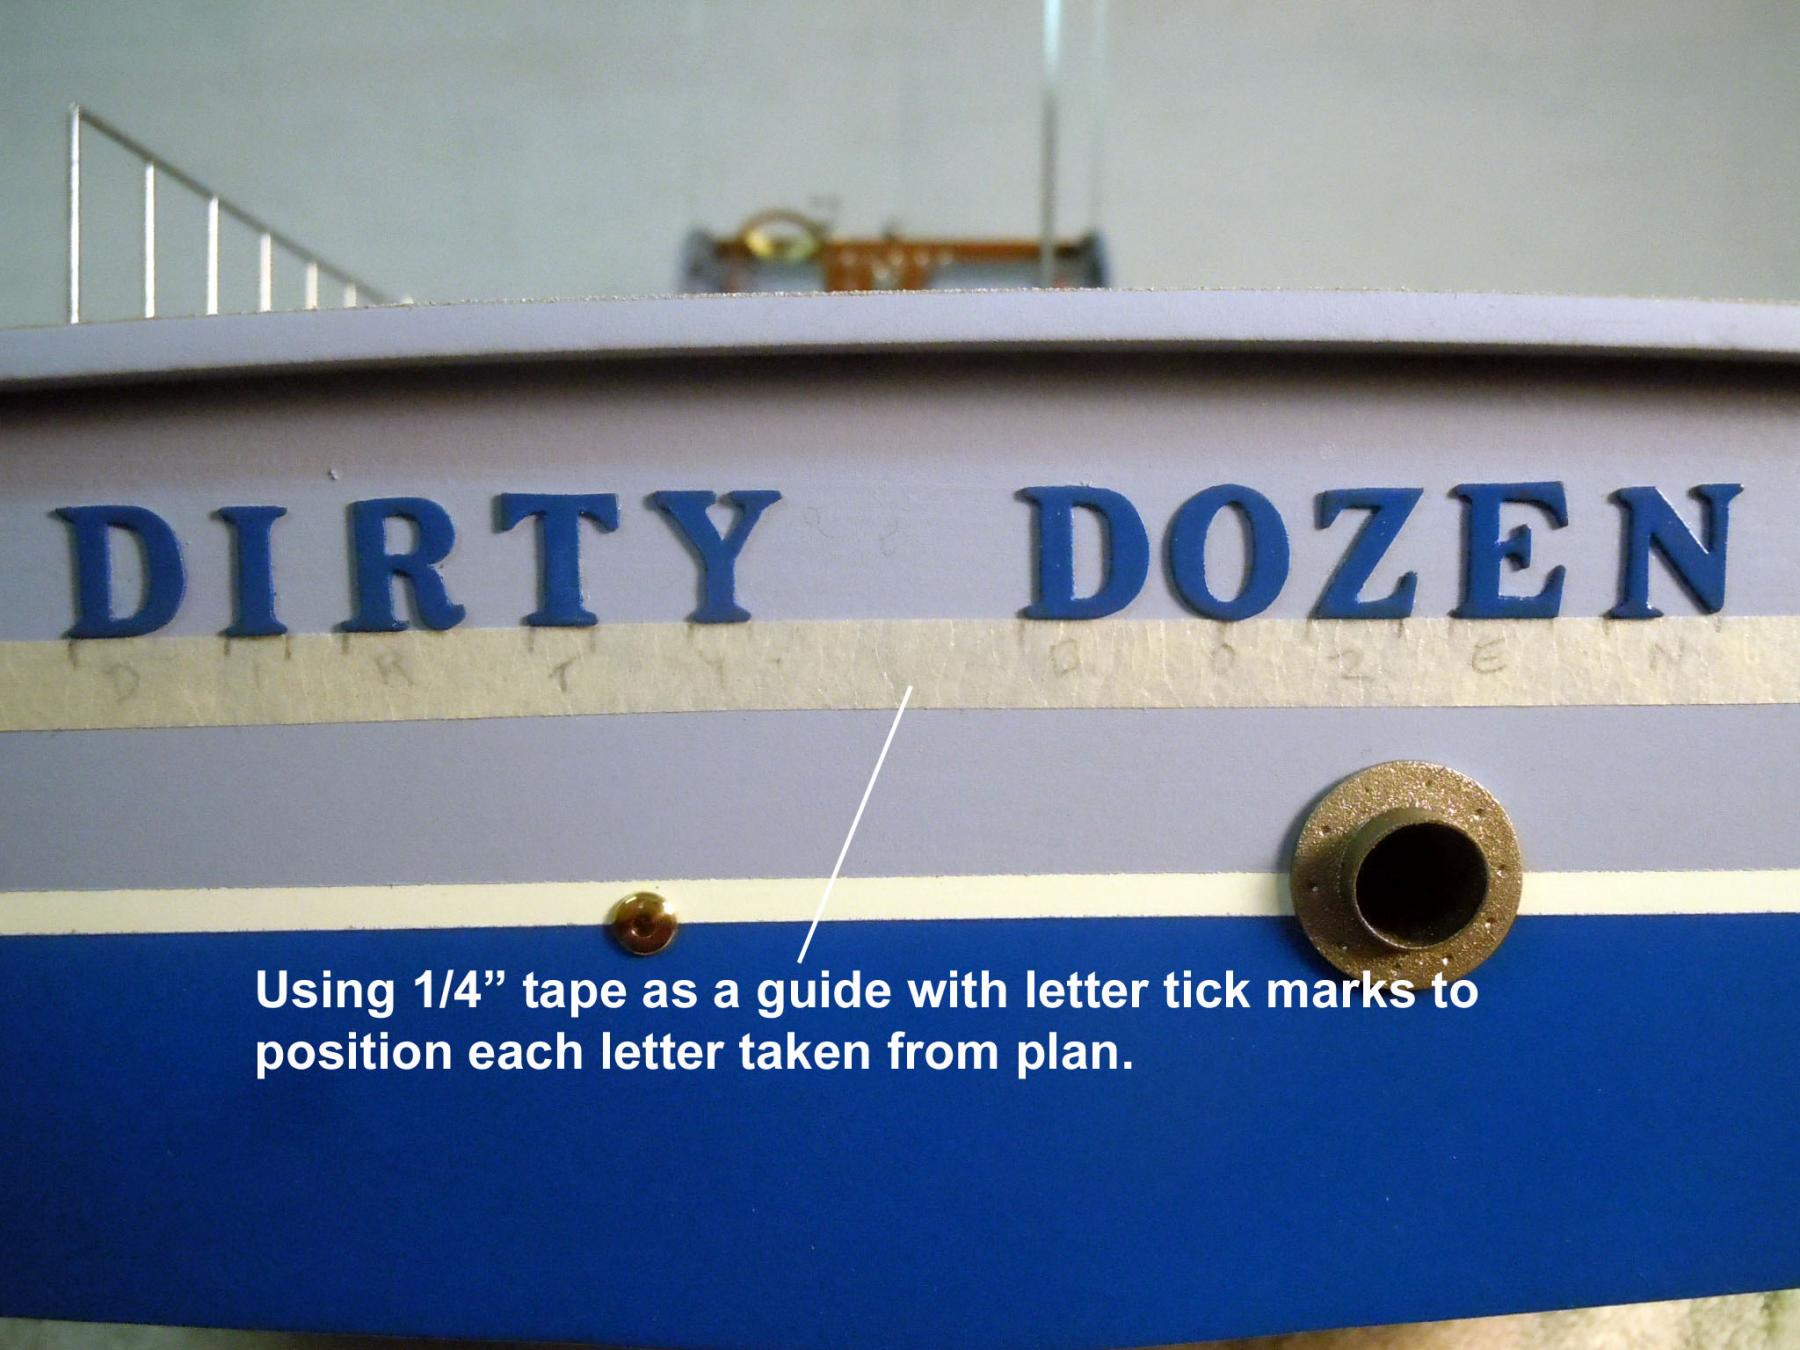
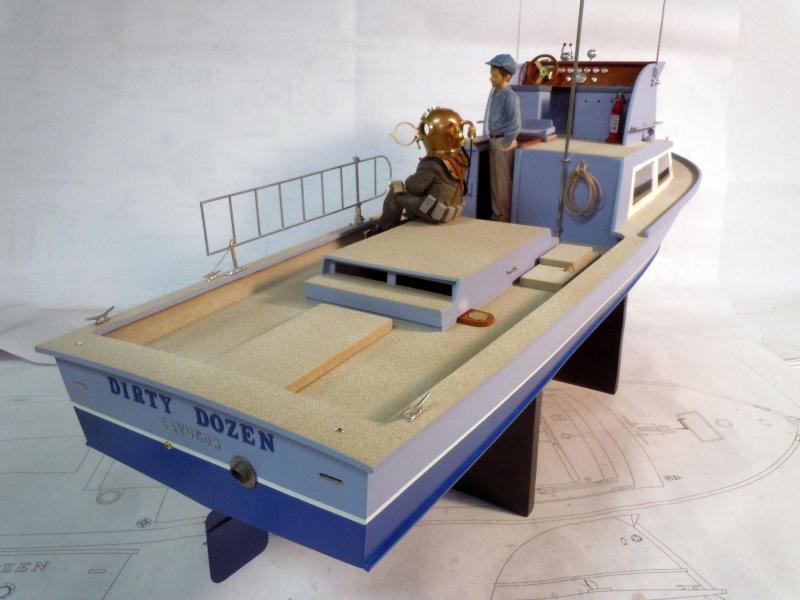
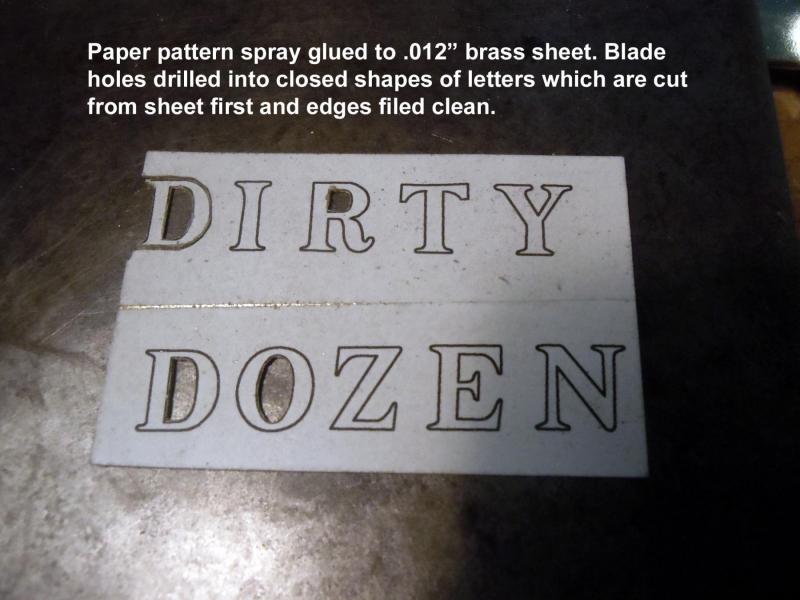
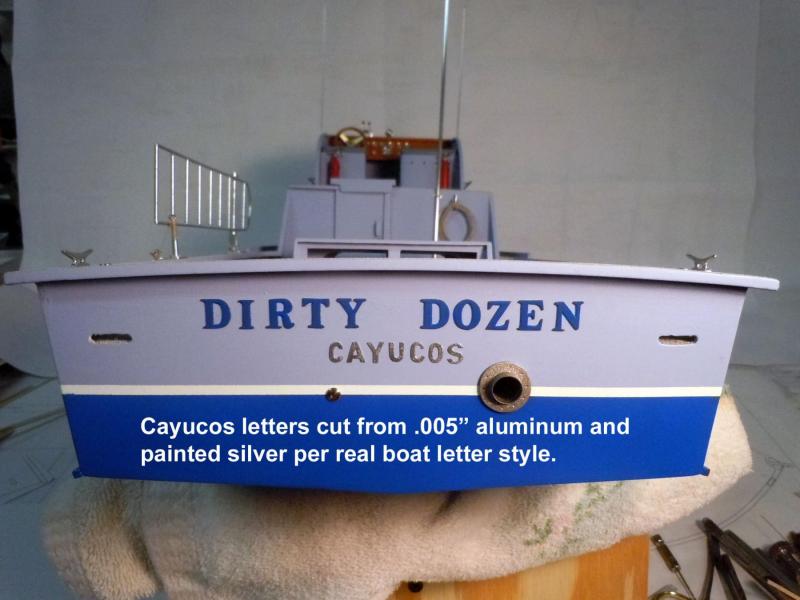
I finally decided to saw out the letters for the name after being unable to locate a suitable alternative for both "DIRTY DOZEN" and home port "CAYUCOS". First I printed a paper pattern via the plans and spray glued it to .012" brass sheet. Following is a long sequence of cutting them out. This is where a bench pin, magnification and thinking ahead to cut the letters out. I used a 0000 size saw blade and drilled holes when needed. This shows the hardest letter to cut out and using the parent material and drilled hole to your advantage to be able to hold and rotate while sawing. Once the letters are cut out each must have all the edges cleaned up with a file. Once the paper is removed the front face and edges need to be cleaned up with the files again. Here they are primed and painted ready to apply to the transom. I used 1/4" tape lightly tacked to the plans and added tick marks on the tape for each letter. I then applied the marked up tape correctly located on the transom at the proper dimension down and centered left to right. Here the home port letters were cut from .005" aluminum that was spray glued to 1/64" plywood for support while sawing out. These letters are 1/4" high. Here is the finished names in place. They came out much better than I was anticipating. I hope this helps others when they get into a situation like I did not being able to find letters with a little thickness. The bow names and fire extinguishers will be done with decals once I get the paper. Next to do the instrument gauge faces.


- 162 replies
-
- 14
-
-
- dirty dozen
- fishing
- (and 2 more)
-
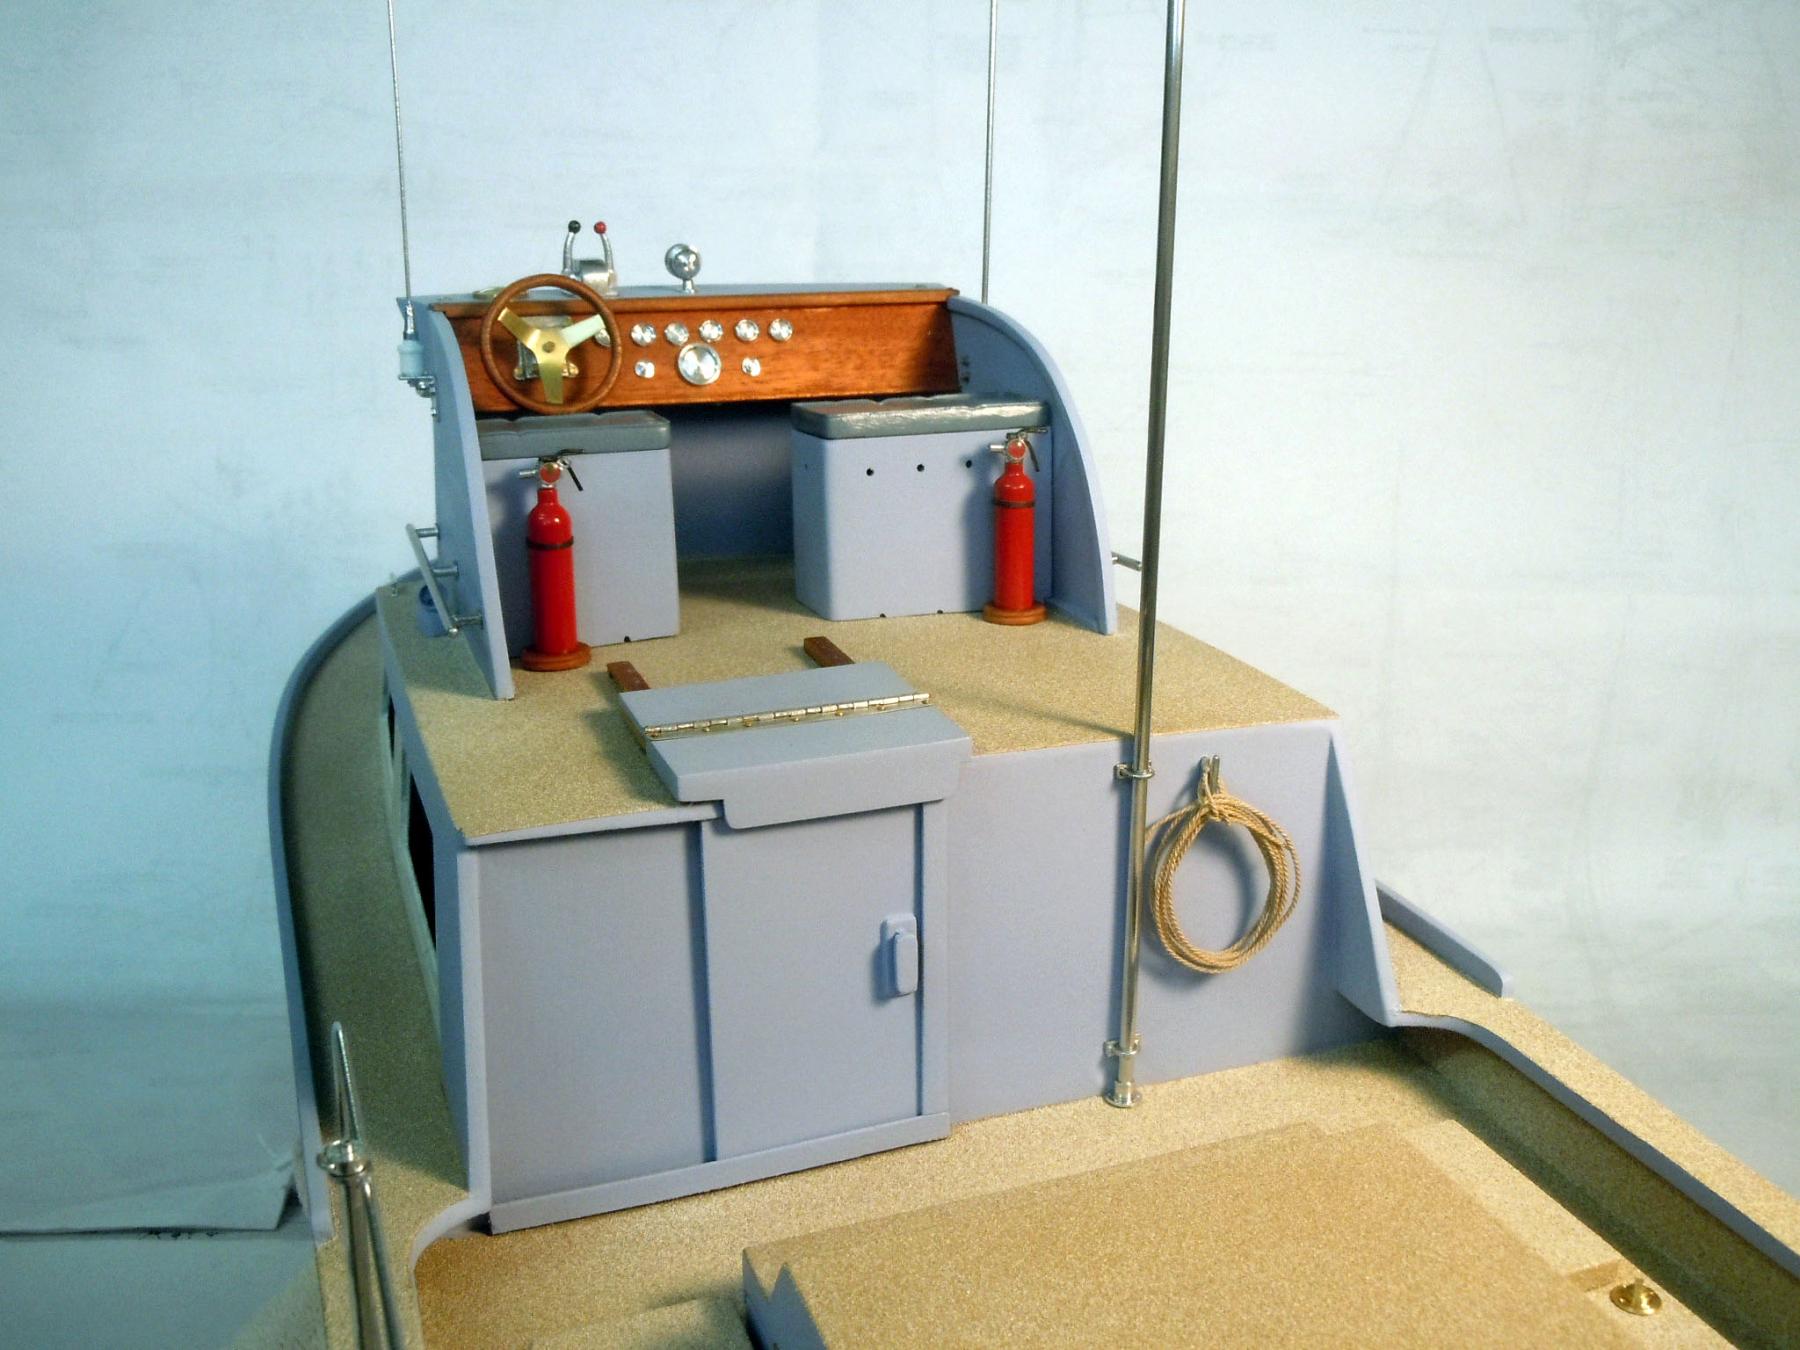
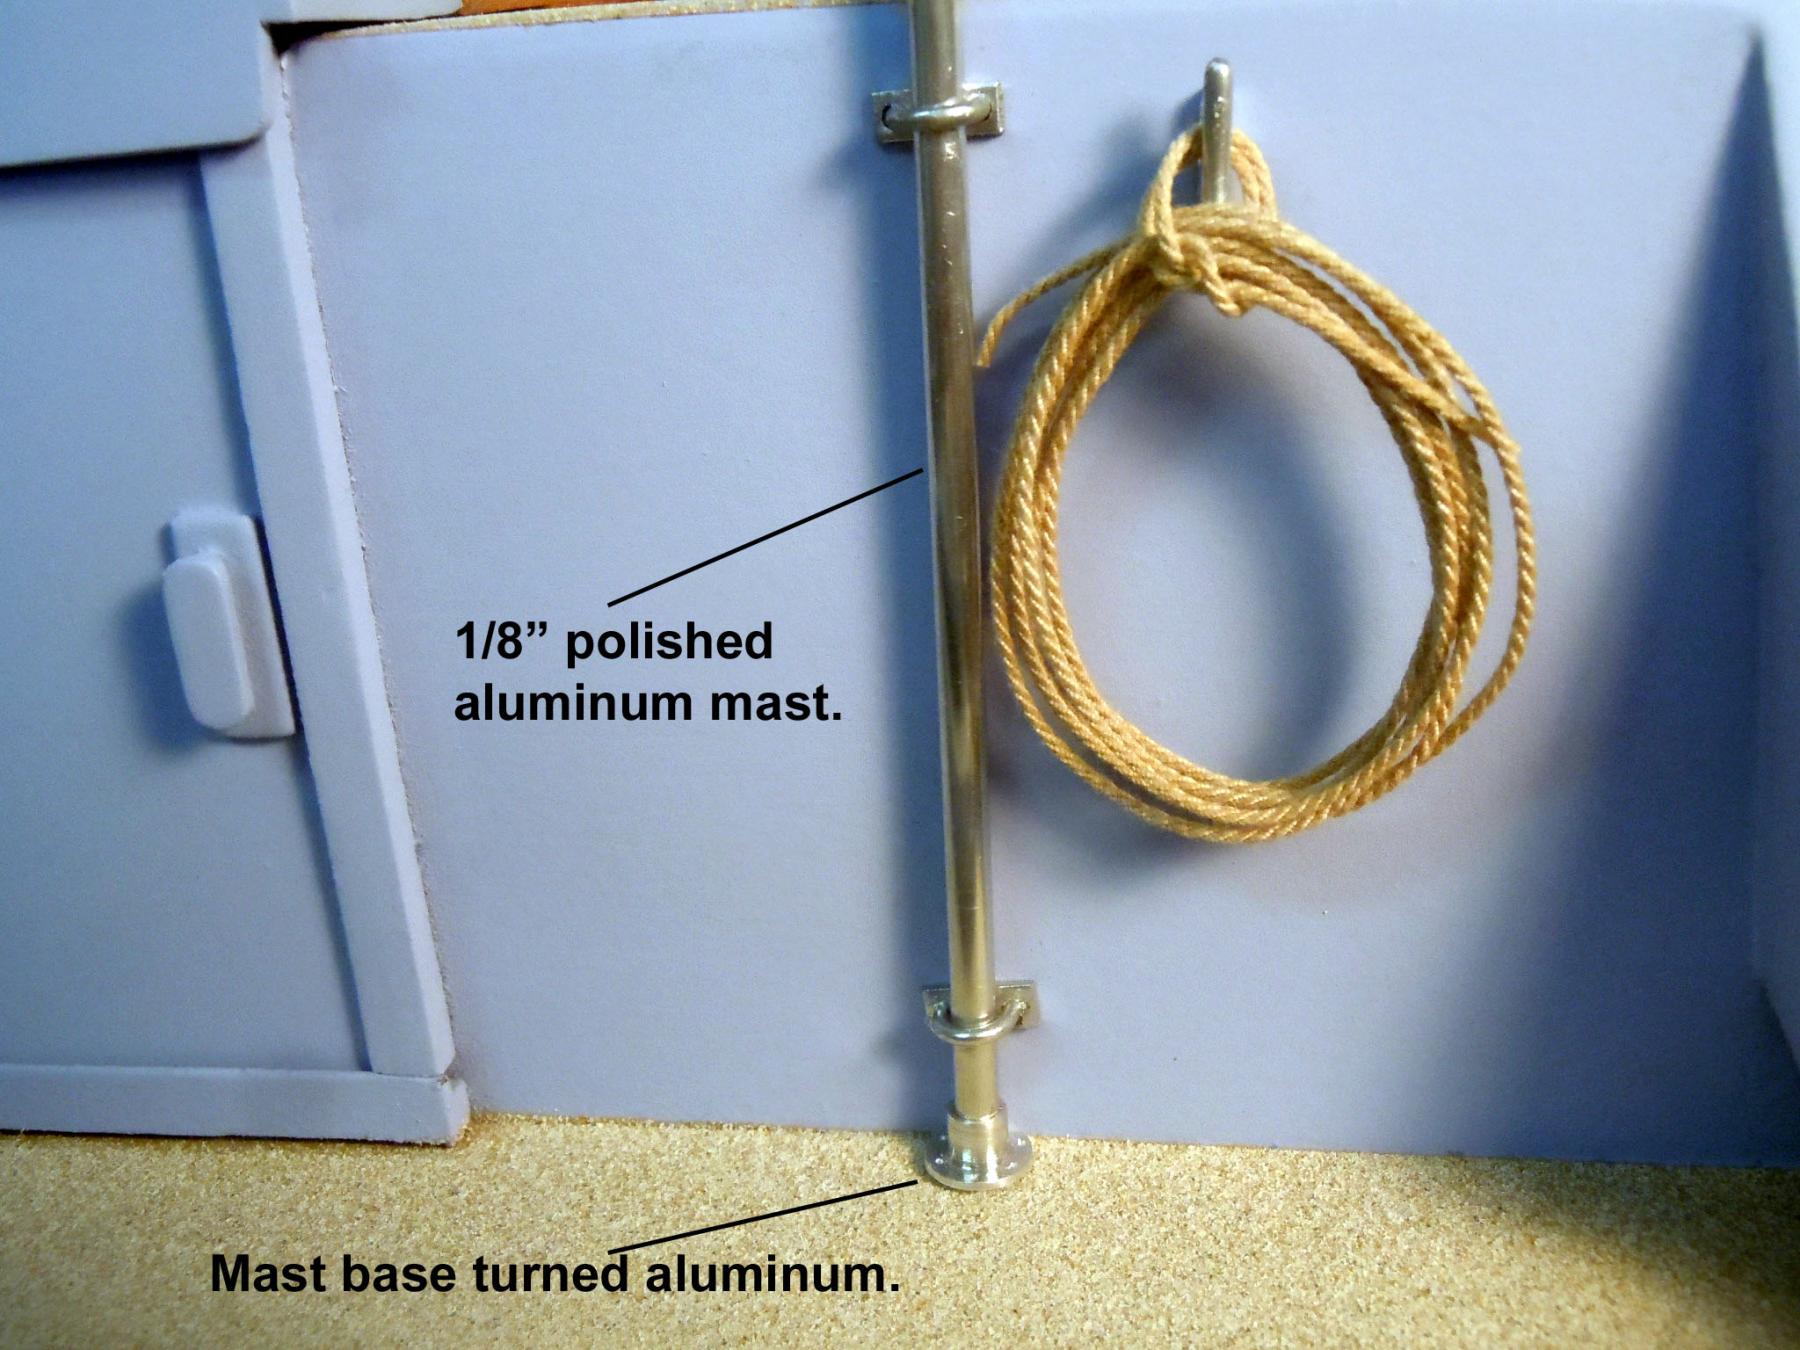
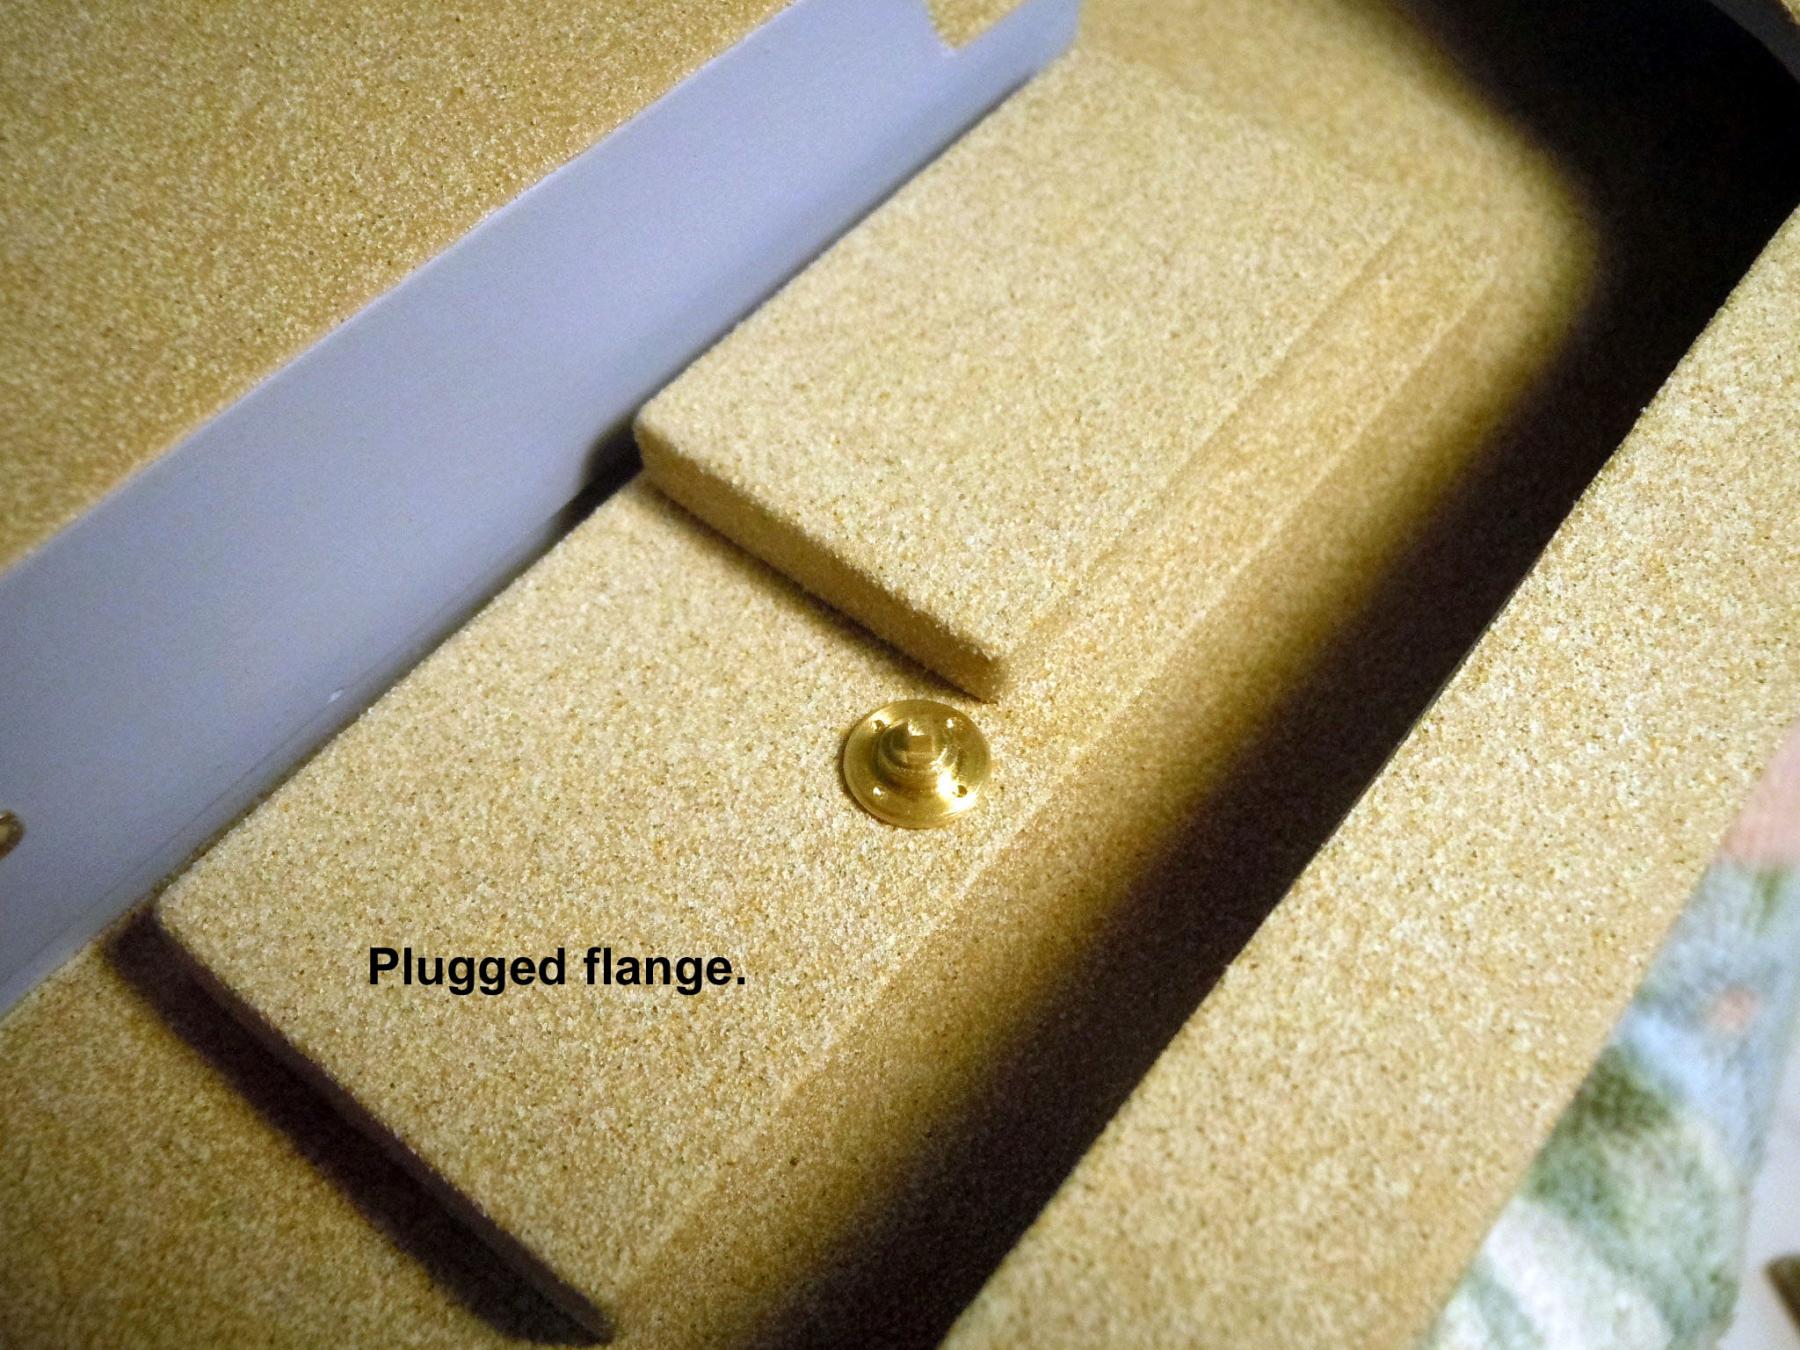
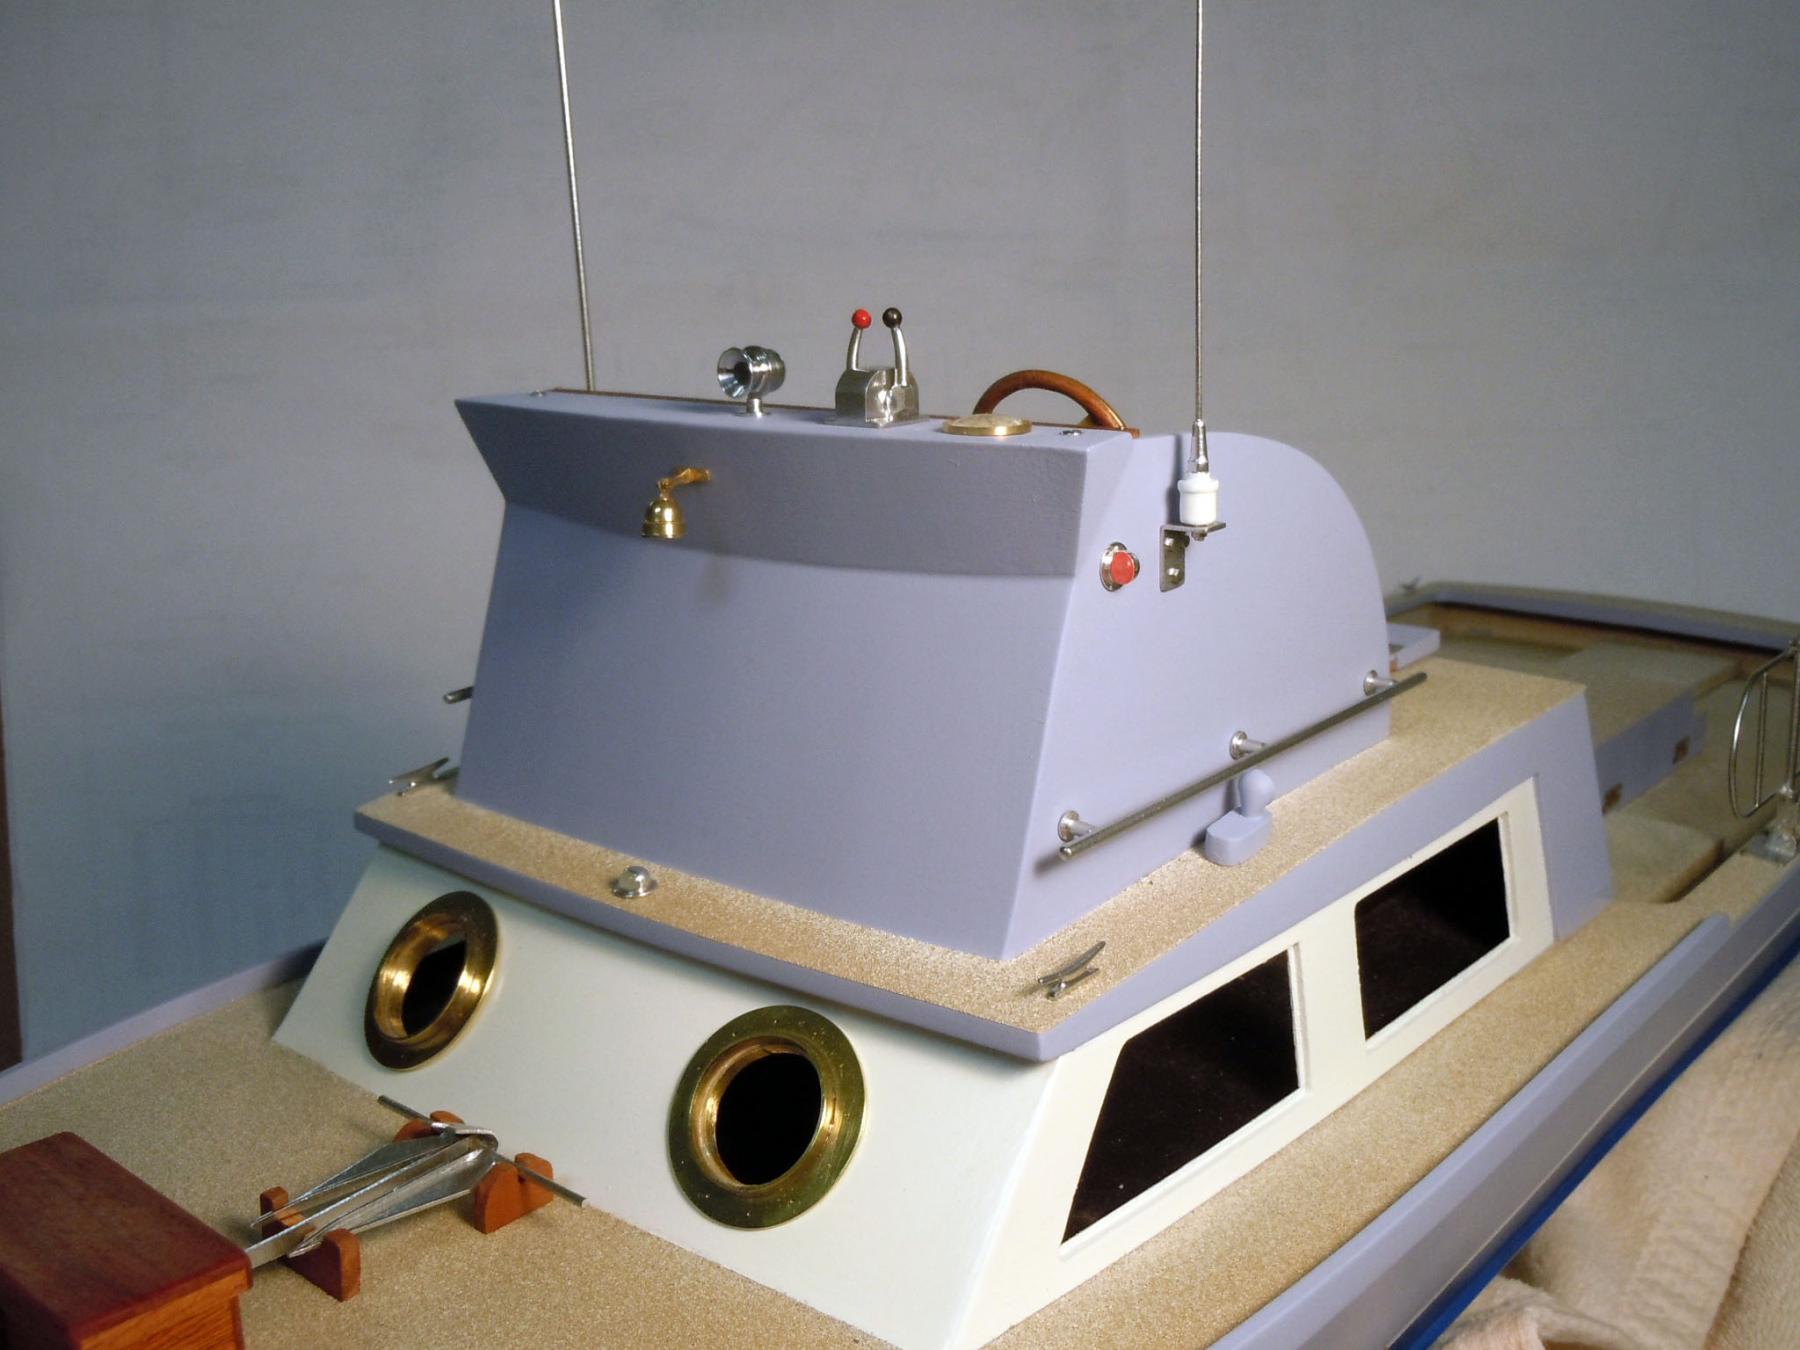
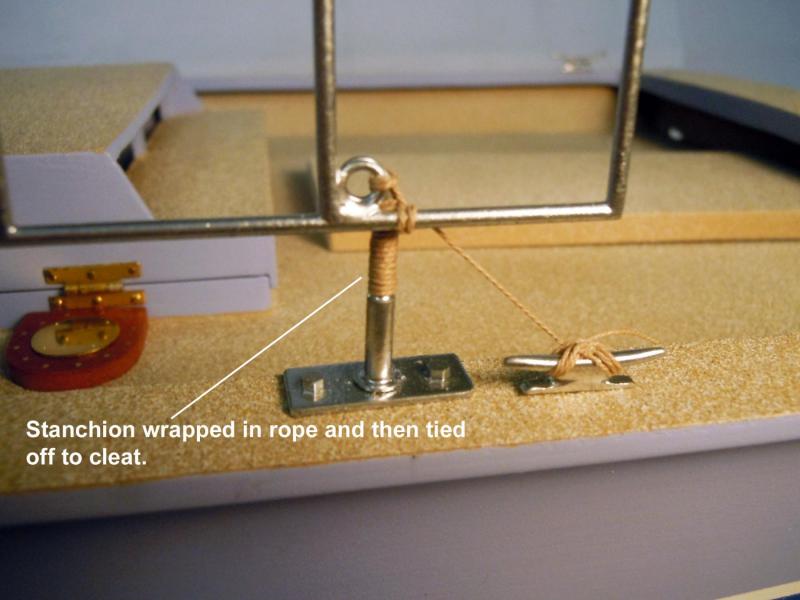
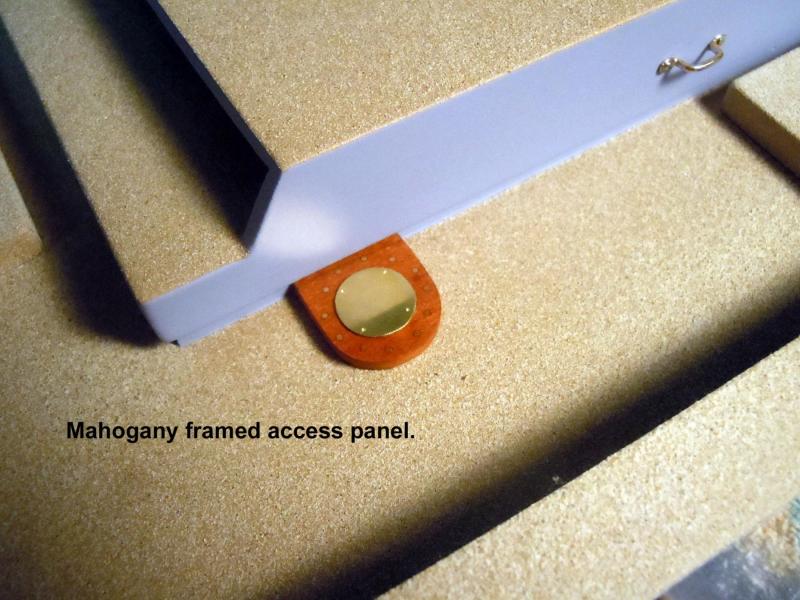
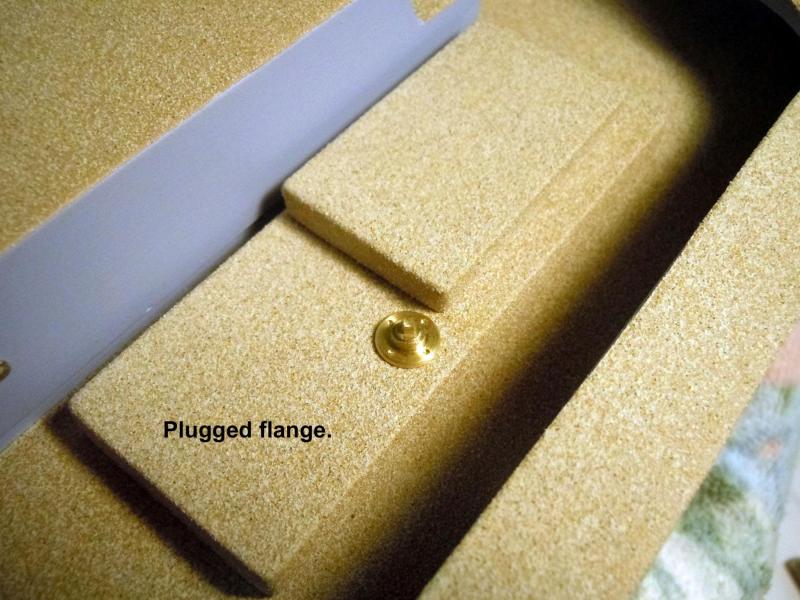
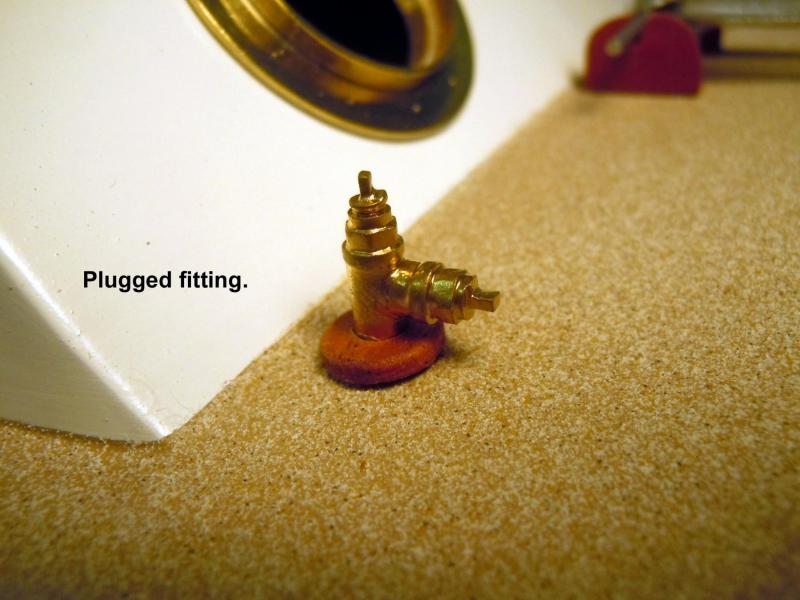
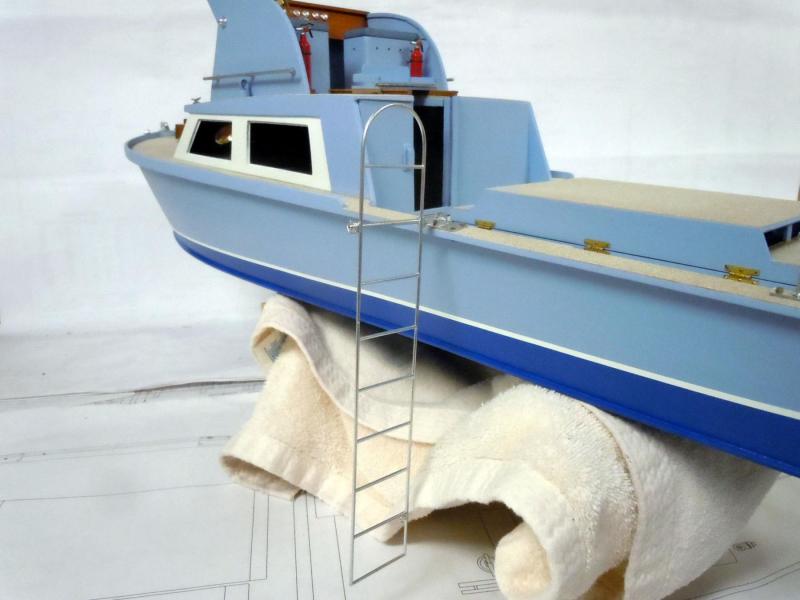
I added the mast using 1/8" aluminum tube that was polished up. I also turned a base that the mast indexed into and the "U" clamps to hold it in place. The cleat was then added to it with a rope hanging on the cleat that was seen in a screen capture from the movie. Next I wrapped the ladder stanchion with rope which was seized at the top with a clove hitch and the excess end used for lashing and seizing to the cleat. I think the rope was used as sound deadening to avoid steel banging on steel. These are two access panel, one each on either end of the engine compartment. The use unknown to me, but may have allowed an arm in with a tool to work on the engine. Also here is a flange that was plugged. Up front on the fore deck is this pipe fitting with plugs in place. Here is a bow view where you can see the details. Next to address the transom letters for the name that I have to saw out of sheet brass.


- 162 replies
-
- 12
-
-
- dirty dozen
- fishing
- (and 2 more)
-
John, yes they will have labels along with the instruments. I will try and make all decals at one time once I get the artwork done. I will have to saw out the Dirty Dozen name on the back as well. DVM27 all the horizontal surfaces were painted with an anti skid texture; could have been crushed abalone shells mix in the paint. Here is a picture from the real boat. Pat my mother was born in Moncton and my father in New Castle on the Mirmiachi River. Jack, Steve thanks again!

- 162 replies
-
- 7
-
-
- dirty dozen
- fishing
- (and 2 more)
-
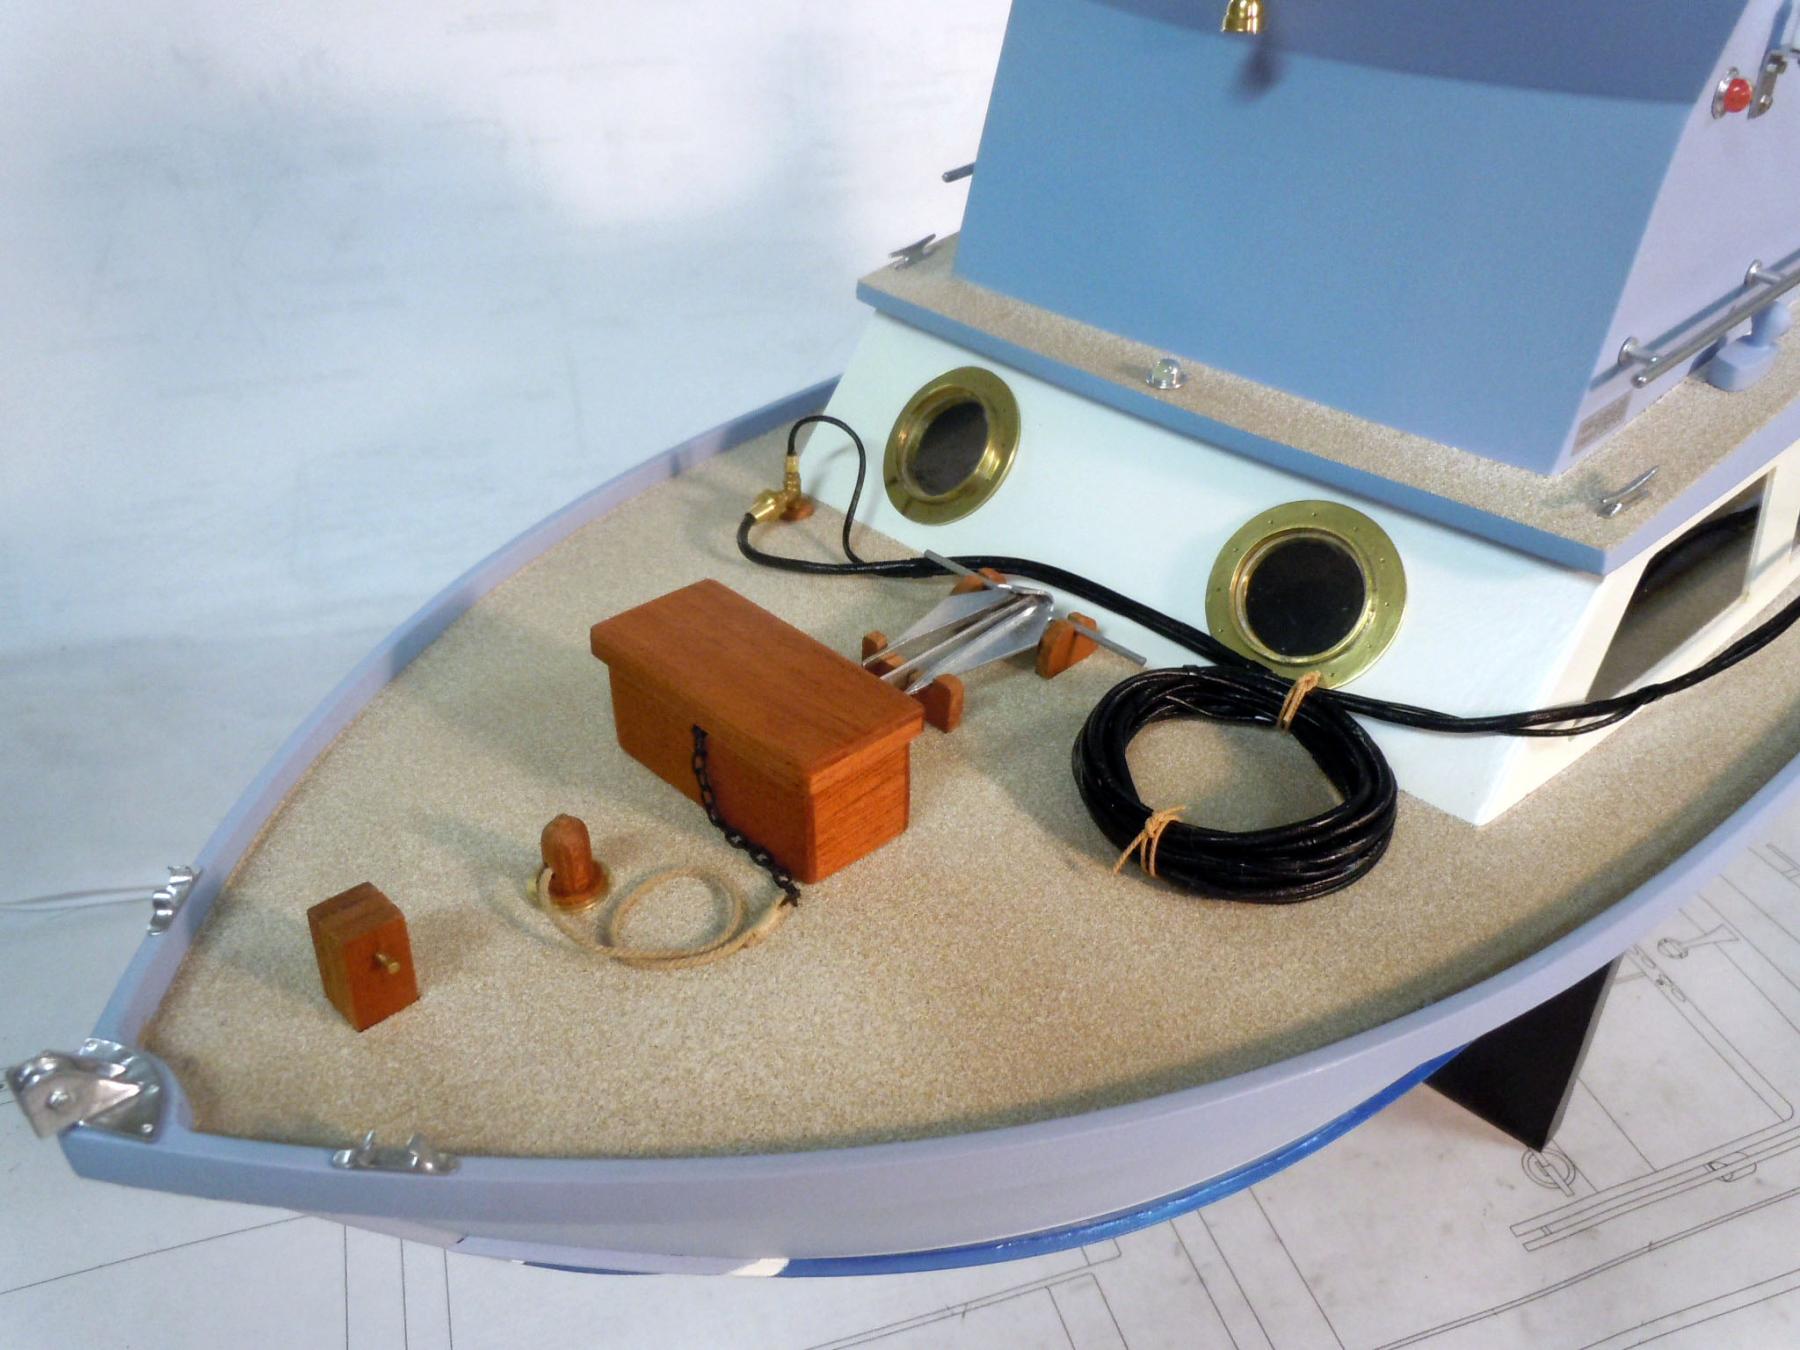
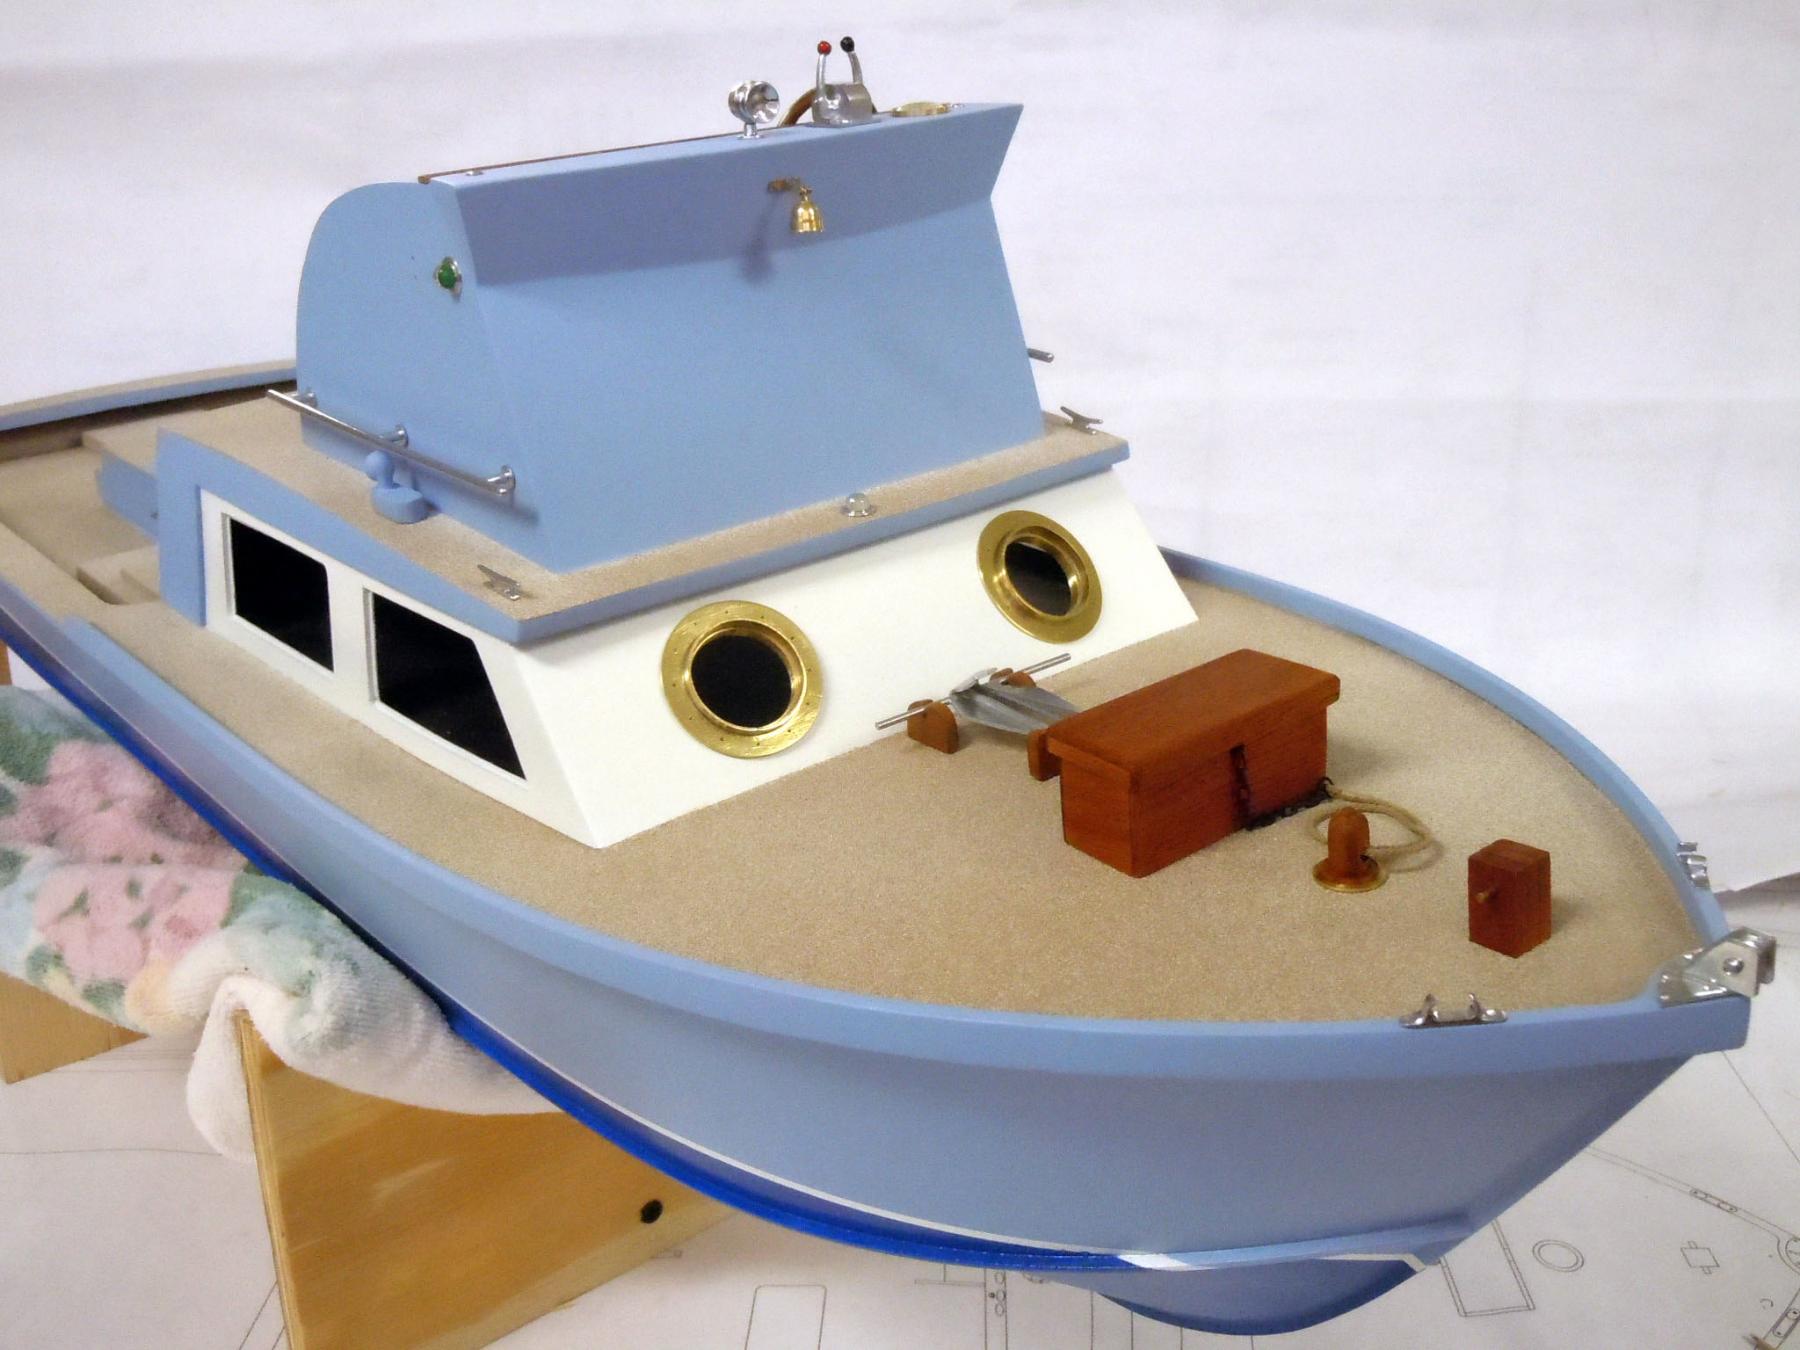
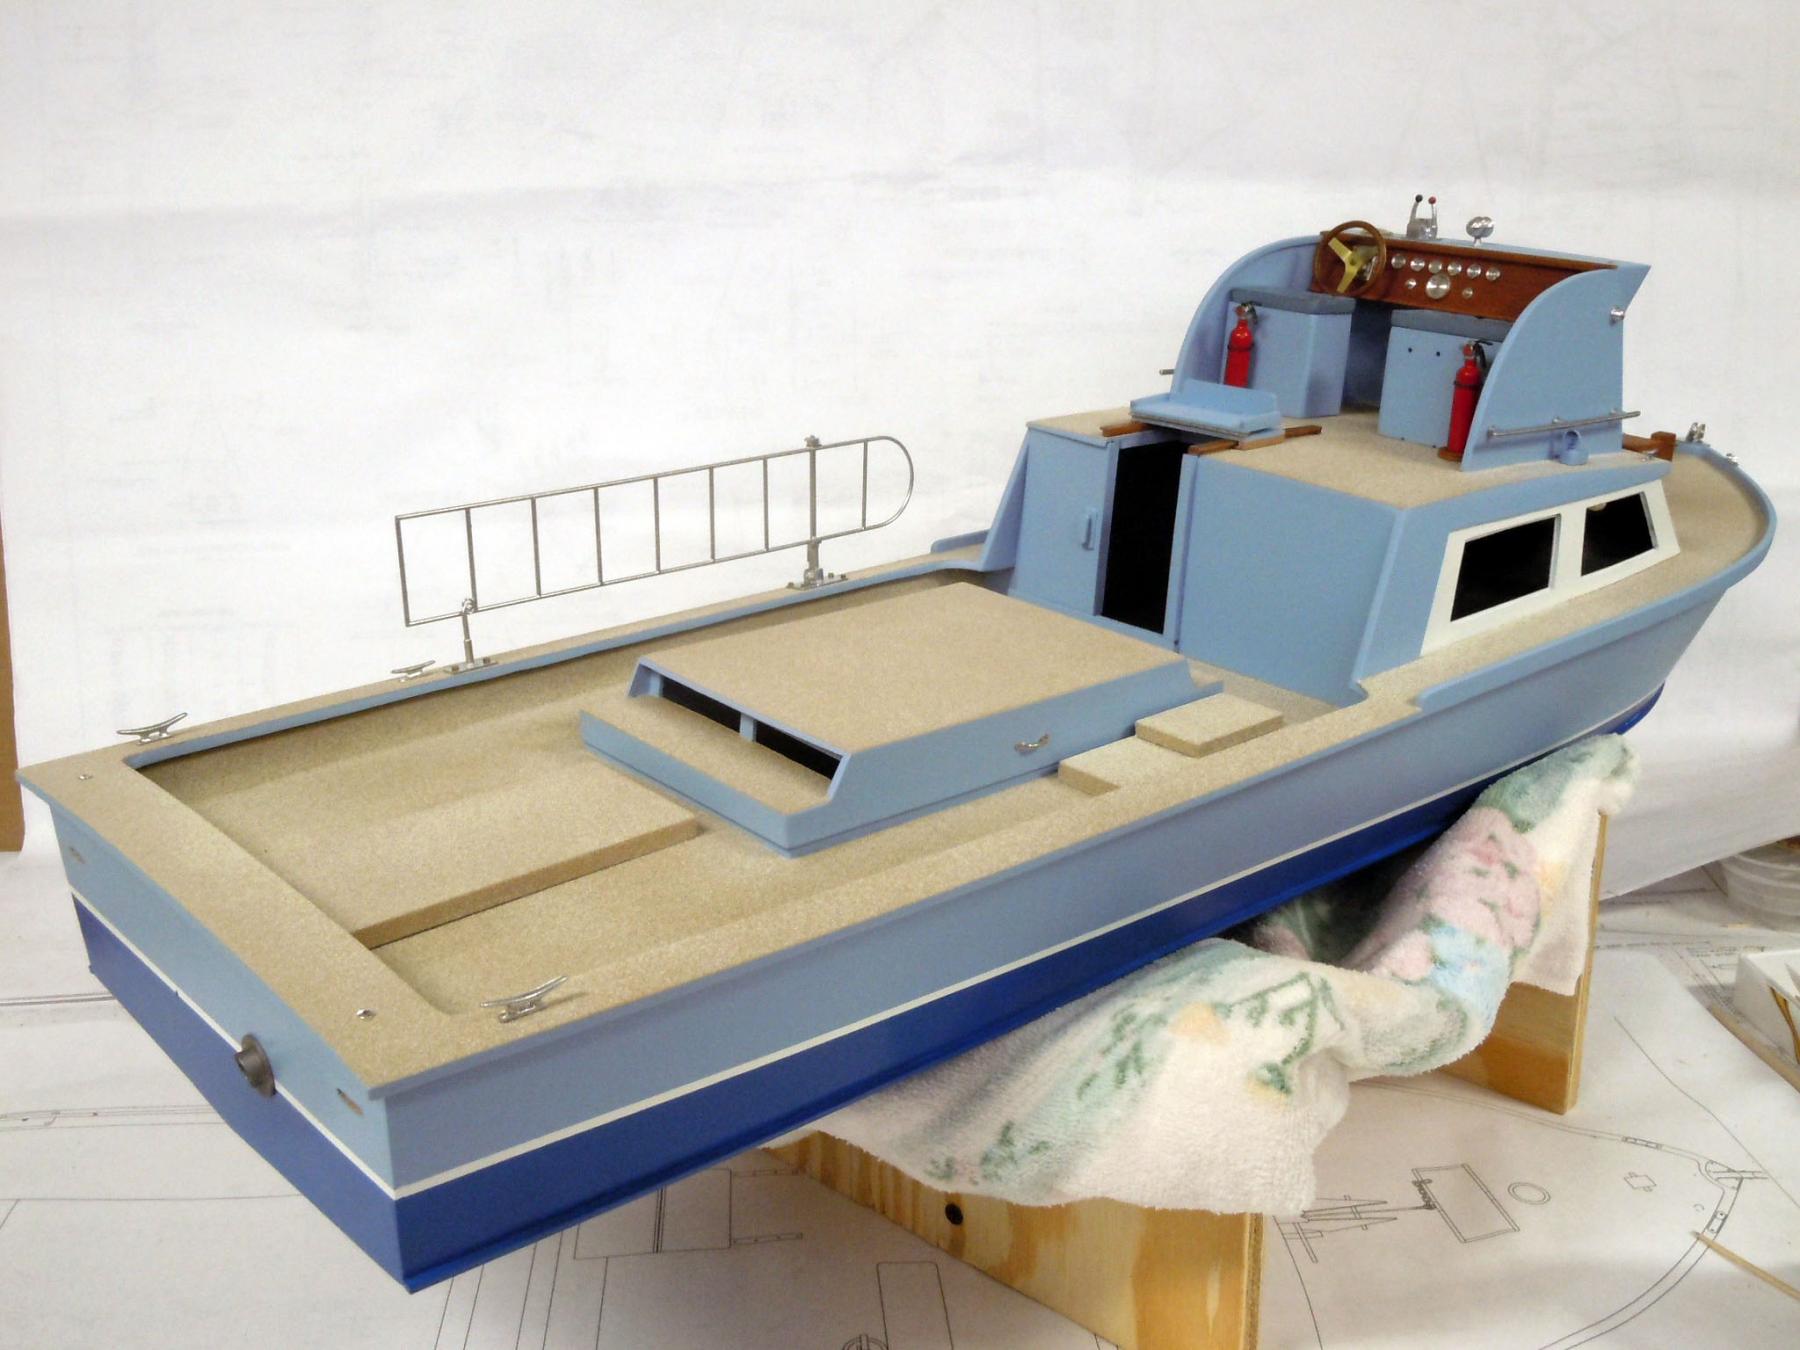
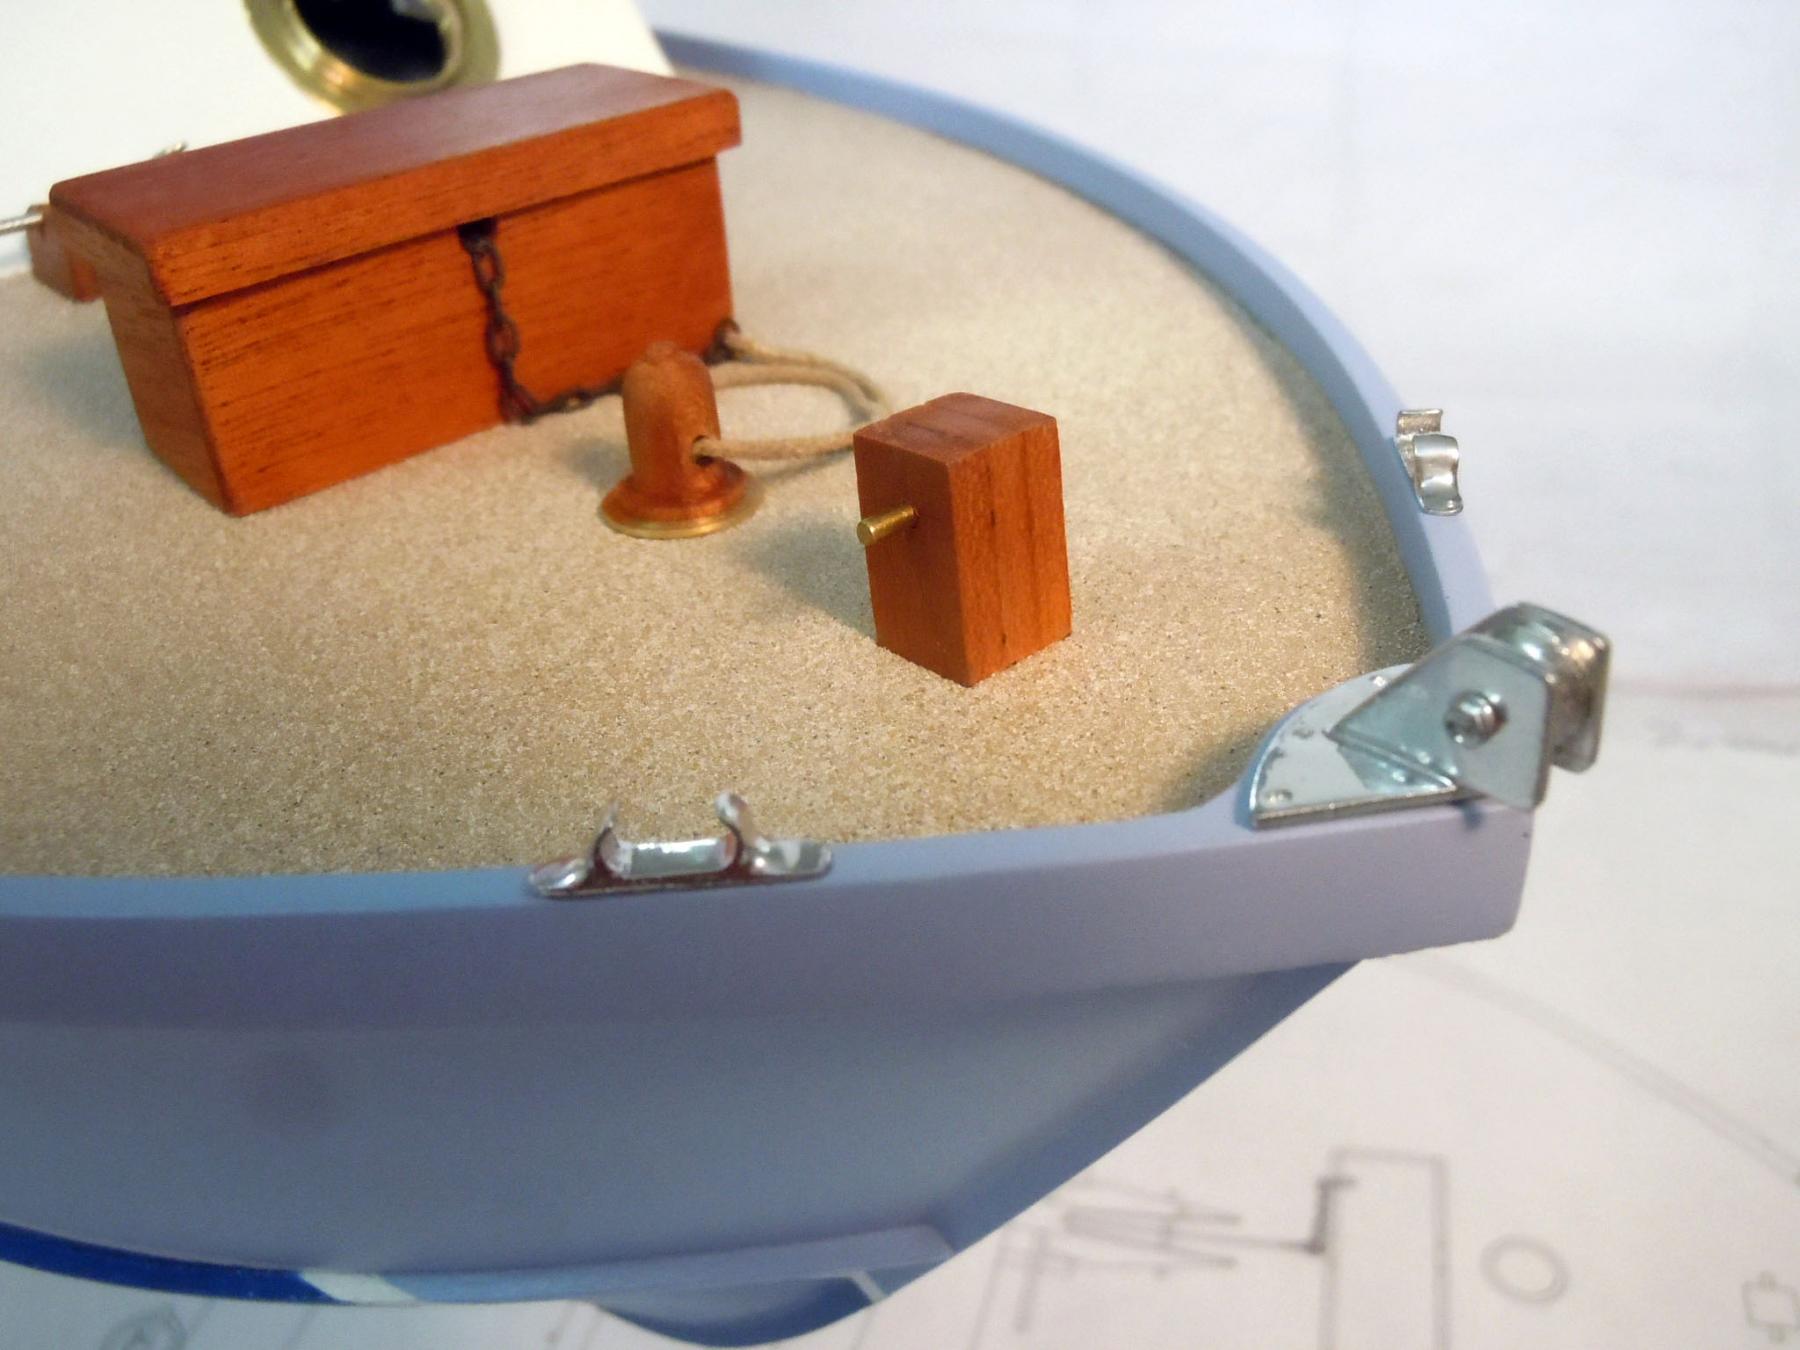
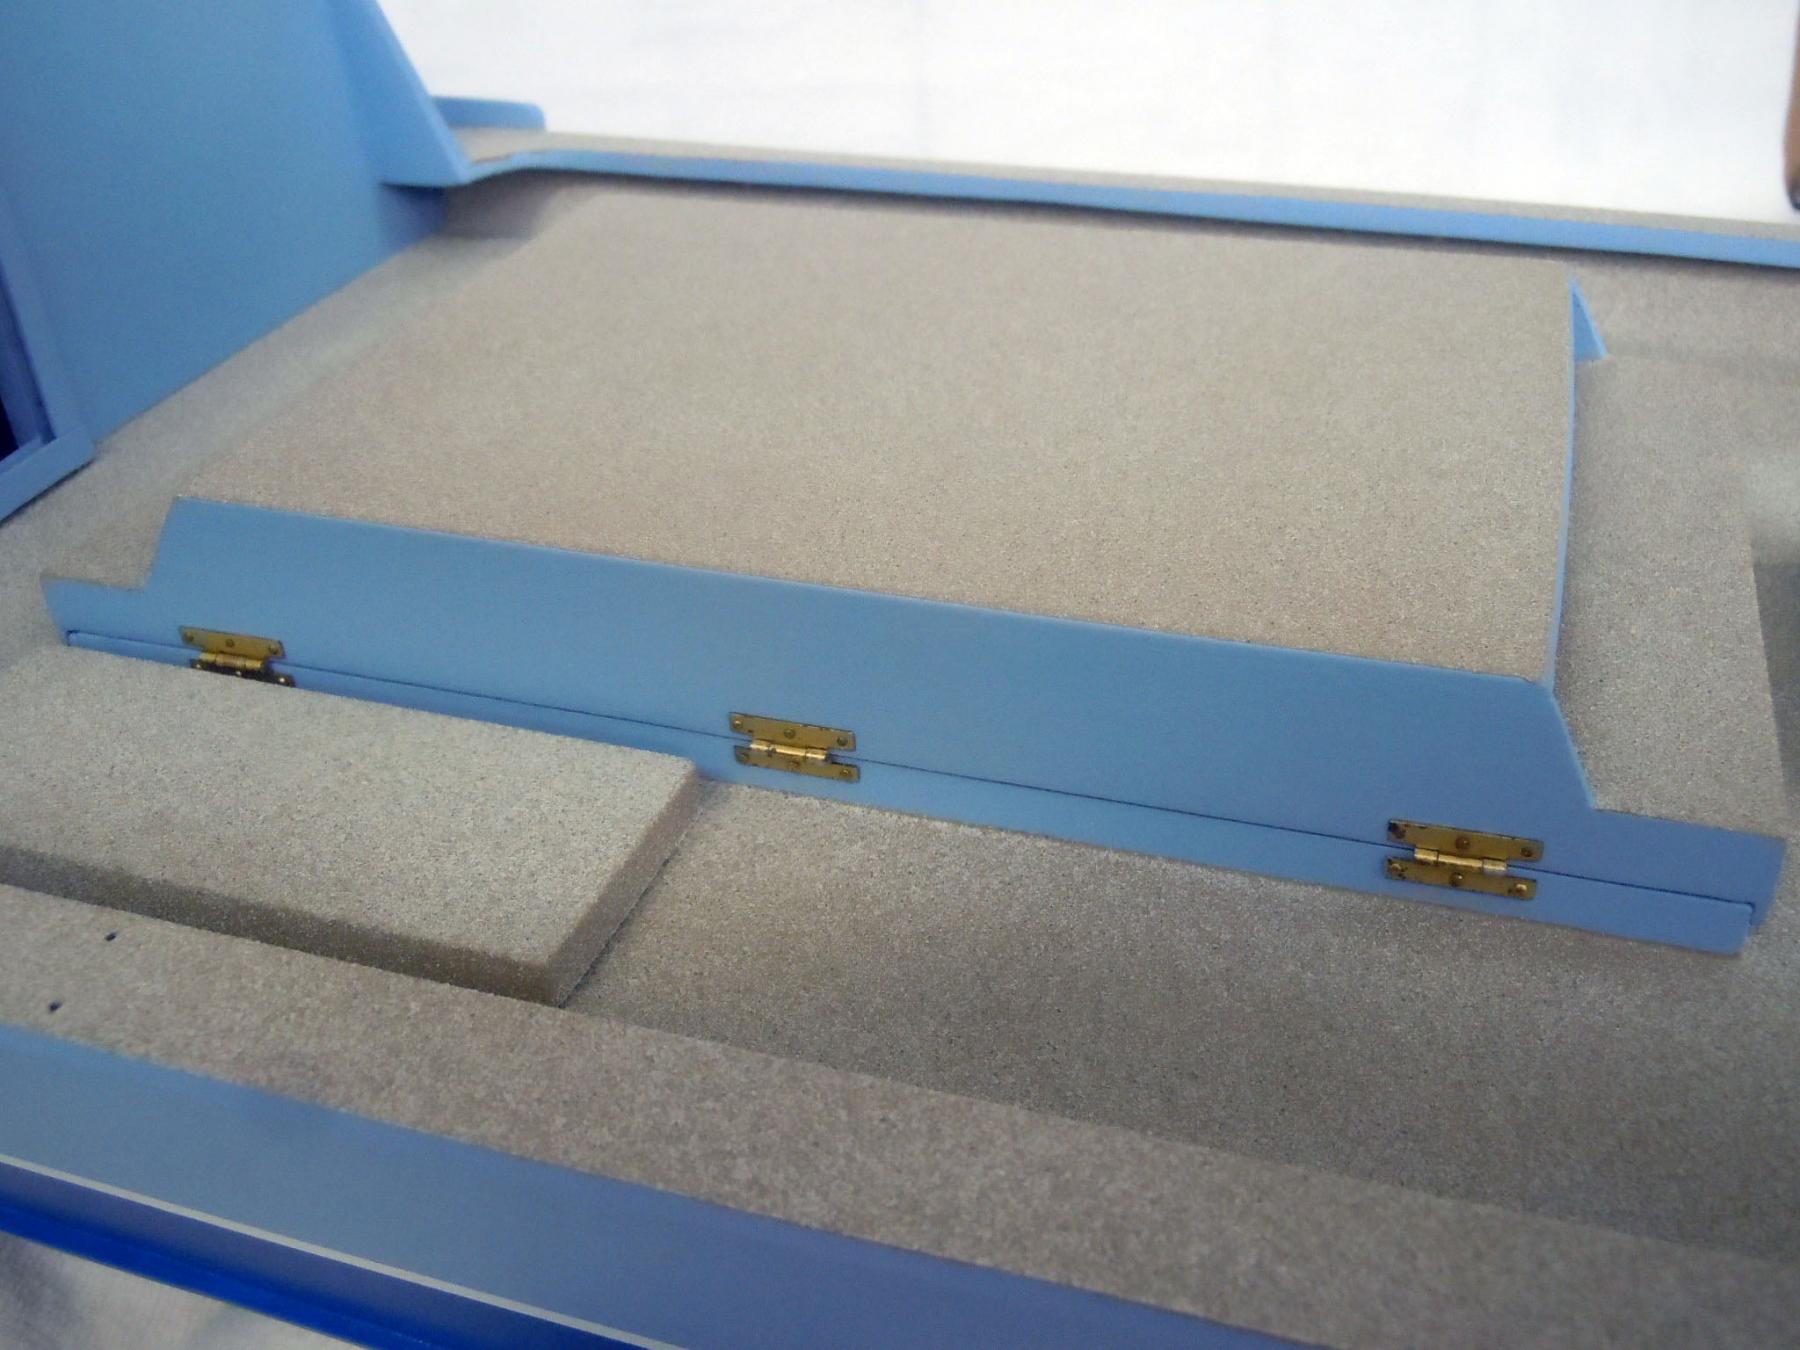
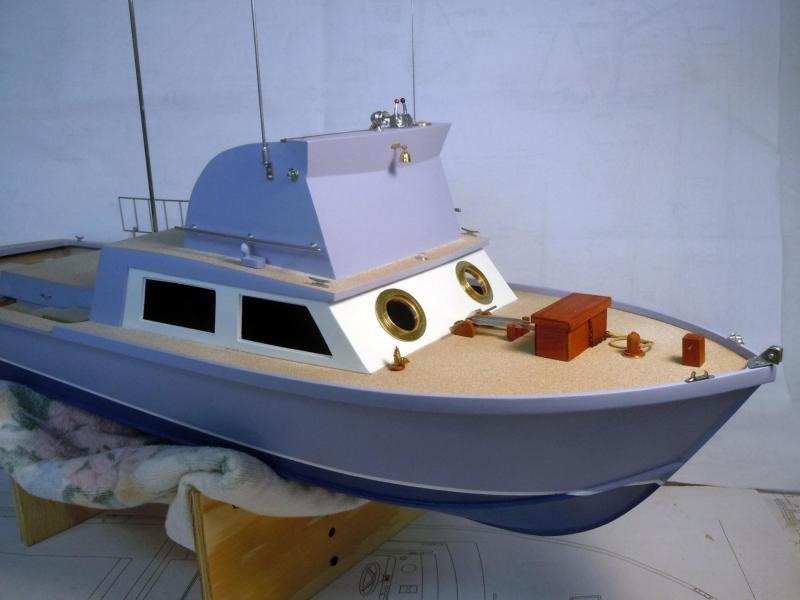
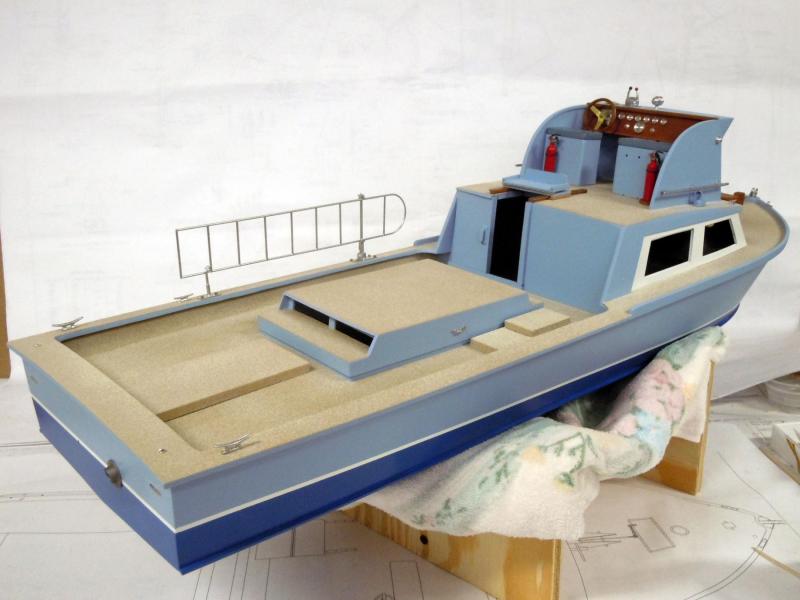
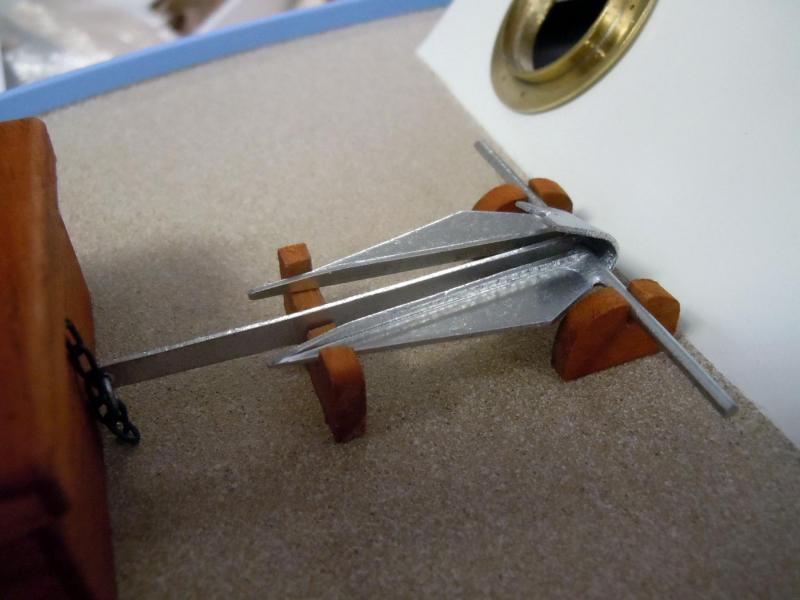
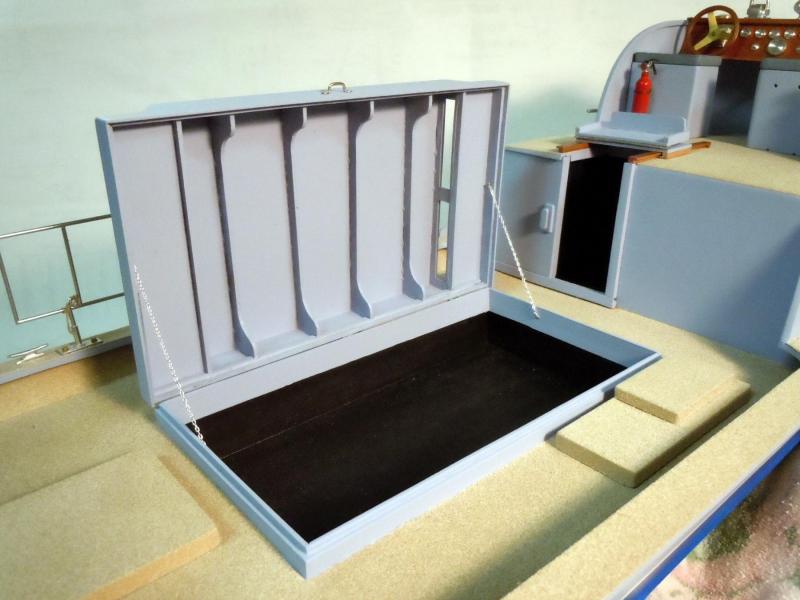
Just working away on adding all the detailed fittings and goodies that make up a boat. Here are examples and it is starting to look like a finished boat. I used real mahogany for the chain box, bit and anchor supports. Here is the ladder in the down position as it would be for the diver to climb down. The museum will have the salvaged ladder as part of the final exhibit. Here is a close up of the fire extinguisher. Here are the two antennas on each side of the bridge. Wiring will be added later coming out of the bottom of each; holes were drilled to index the wires. Here are the three hinges for the engine cover. I found the tiniest looped chain for the retraining chains for the engine cover when open. Down the road the black hole will be filled with a engine components. Still trying to locate more images of the engine. Now to add one more cleat and mast to the aft cabin wall.


- 162 replies
-
- 14
-
-
- dirty dozen
- fishing
- (and 2 more)
-
Professor, yes they will eventually offer the entire line that Scale Hardware had. The smallest rivet size is .5mm which would work great assuming one would stay sane while doing it.
-
Professor, they have rivet sizes even smaller than this, i will check to see if they plan to offer those as well. I know some were .4mm that magnification would be needed to work with. Stay tuned.
-
Greg, ModelMotorCars purchased Scale Hardware and plan to offer their products on their website over time. Scale Hardware just retired without notice and MMC bought all the inventory so keep checking back time to time as items are added to their website.
- 162 replies
-
- 7
-
-
- dirty dozen
- fishing
- (and 2 more)