xken
-
Posts
841 -
Joined
-
Last visited
Content Type
Profiles
Forums
Gallery
Events
Everything posted by xken
-
 Neal, it looks like the site is down for maintenance. Keep checking back, they do have a fantastic selection of hardware.
 -
Congratulations on your well deserved awards! I love the detailing and your efforts have paid off. Also here is a link for hardware either to finish this build or for the next one. They have a great selection of threaded as well as simulated and a great selection of rivets. http://www.scalehardware.com
-
Jon, I think Darrel may already have a better handle on using them, perhaps he could post how he uses the ones he has. Also if any other builders have experience with them they could share as well.
-
Just thought I would share this link. A neighbor stopped by and checked out my build and after seeing what I was doing with the carronade rigging said I could make money tying fishing flies. He shared this link and they have some interesting tools and I will be buying some myself that will help in rigging. Here is the link http://www.orvis.com/fly-tying-tools
-
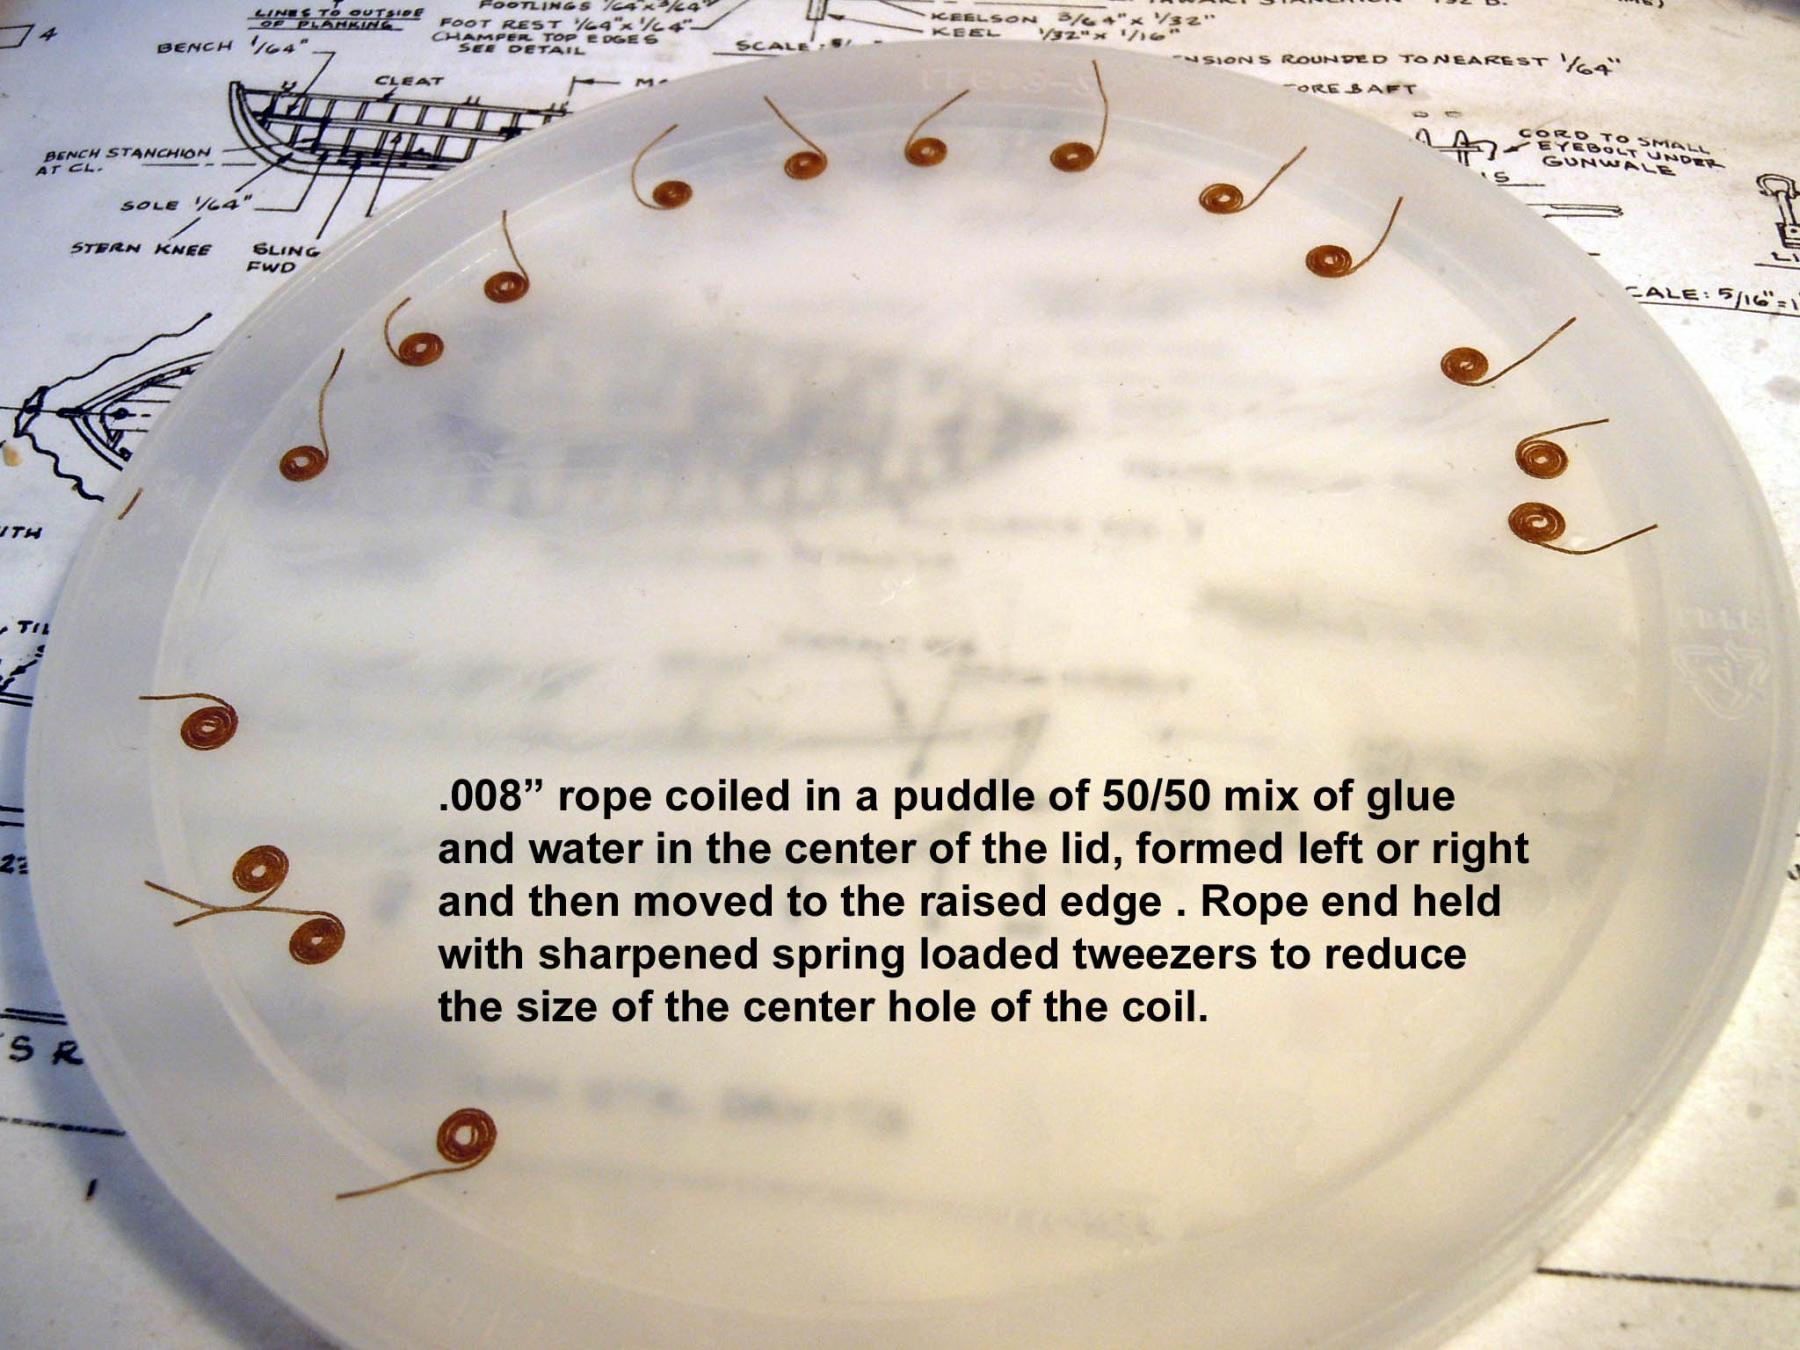
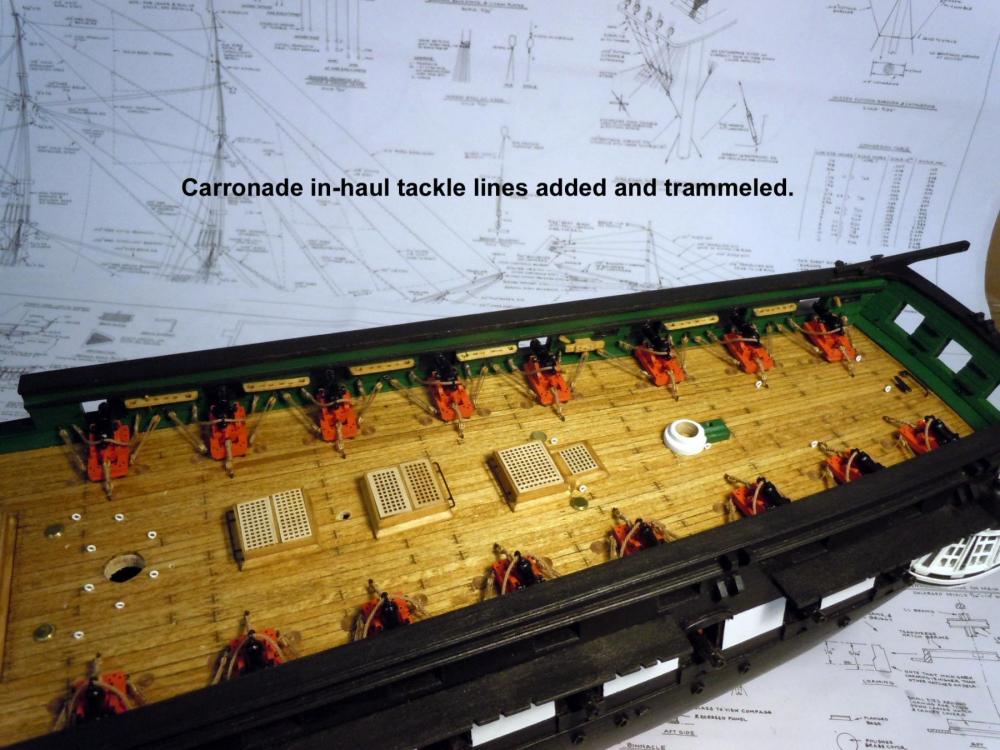
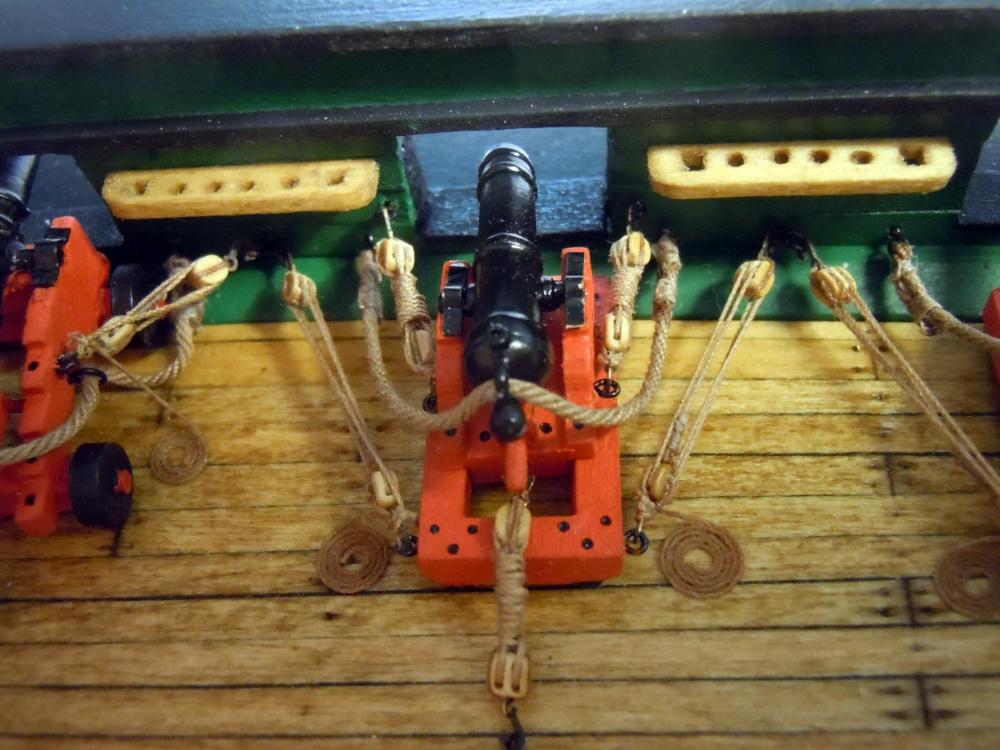
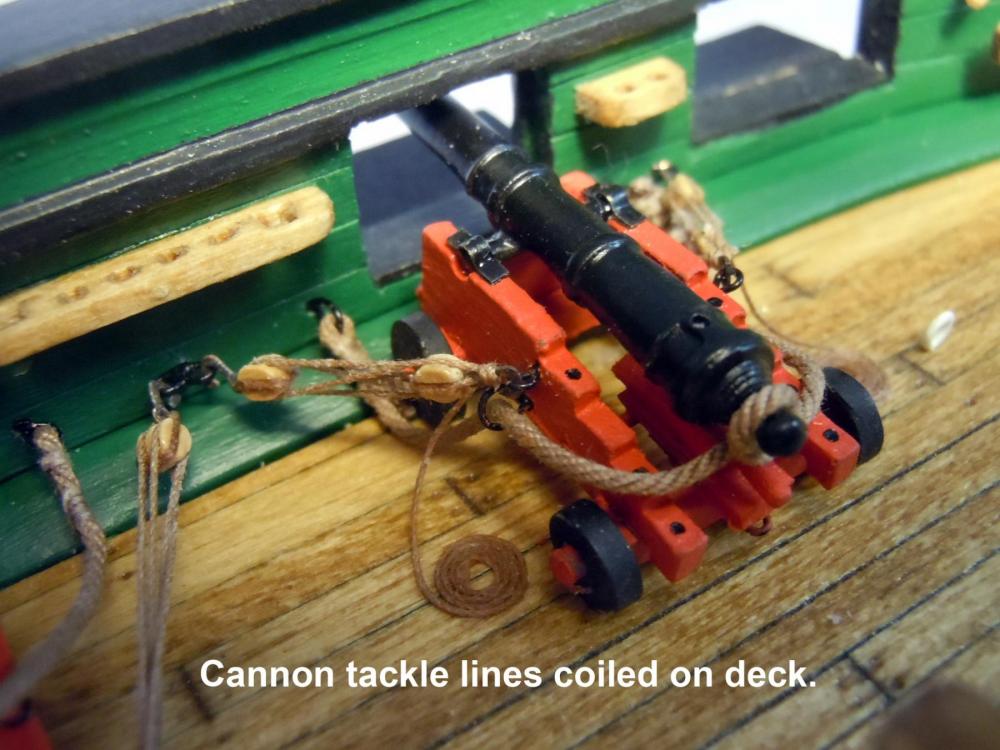
Yes the coils were a bit of a challenge in doing them. I found it best to pinch one end and drag the rope through the glue and out of the glue puddle to a flat near the edge and then start the twist and if the center bunches up a slight untwist to flatten again. There is a fine line in being wet enough and too wet and when too wet twisting gets a little more difficult. Also a small flat eyeglass screwdriver helps adjusting and flattening any coil rope and the tip needs to stay wet or it will pull the rope up. I use the polyethylene coffee can lid for two reasons- one nothing sticks to it; and it has the raised edge to start the rope end up with a clean joint transition when it dries. Here is a quick in-progress with all the in-haul lines now added and trammeled. The effect is very nice and worth the effort in the end. The side tackle lines will just add more eye candy; like the cherry on the top of a sundae. One thing I did was to file down the tips of the tweezers to be as narrow as possible with the ends being square. This is a must for doing the coils; and also helps adding the hooks to the eyebolts below the quoins. The in place trammeling is a bit tedious but the lines I am using are 6" long which really helps when wrapping. Now to start the 38 side tackle lines.
-
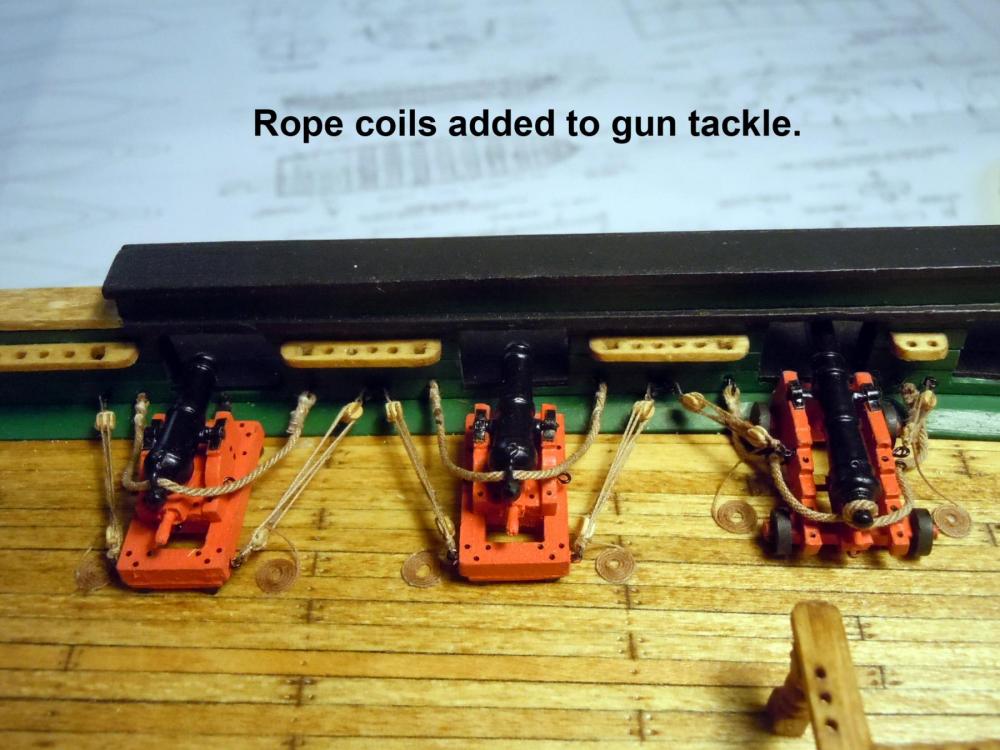
While waiting for Chuck's order to arrive I finished up all the rope coils needed and glued them to the deck locations. Here is a picture showing the coffee can lid I used to form them. Keep in mind left and right's are needed. I also used a Q-tip to wipe away excess glue once located at the rim, this needs to be done carefully to reduce the glue flange at the bottom of the rope when dried overnight. The glue does not adhere to the plastic polyethylene, a blade tip at the junction where the raised rope meets the coil is the best place to pop it loose. This glue flange is easily trimmed away with small scissors against a dark background and good lighting. Here are a couple of pictures showing both the trammeled in-haul lines and the coils glued to the deck. I like the effect of the tackle trammeling versus another coil on the deck. The real trick is to glue the raised end to the tackle knot first and allow to dry completely. Then glue was carefully applied to the underside of the coil and set in place and adjusted as needed. Make sure the bottom is completely covered with glue or the coil can curl. Don't ask how I know this. I also worked on my presentation for the Annual Conference in San Diego. I have a great deal to share and only 45 minutes to do it so will be moving fast with lots of pictures. Chuck's order arrived so back to rigging gun tackle.


-
gluing pre-stained wood
xken replied to a topic in Painting, finishing and weathering products and techniques
My experience is that solvent based stains result in weaker joints over extended time. I have had great results using a water based with strong joints with both the PVA glues as well as super glue. Also a quicker assembly time due to quicker drying timers of the water based stains. Just my two cents. -
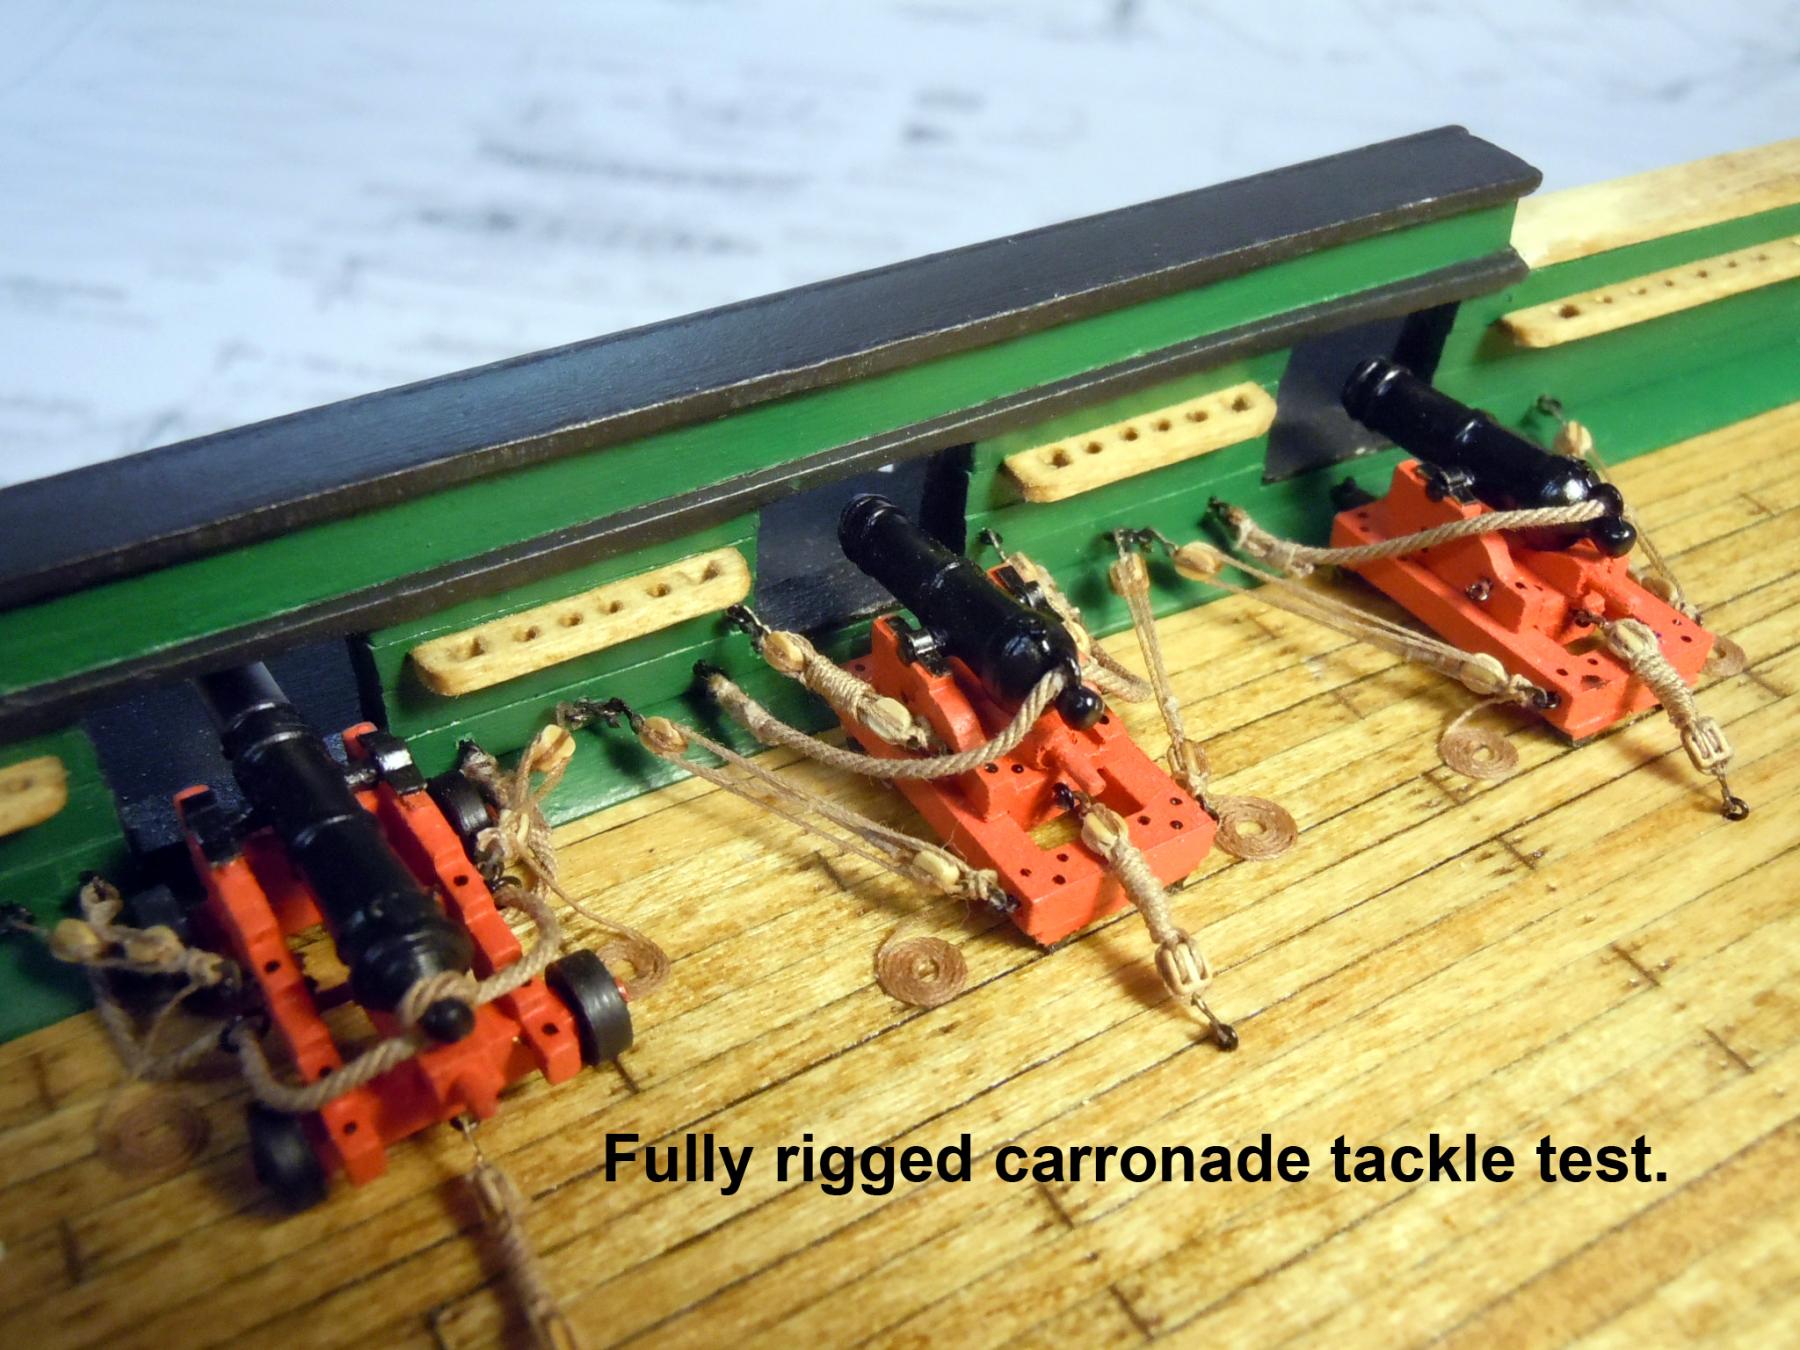
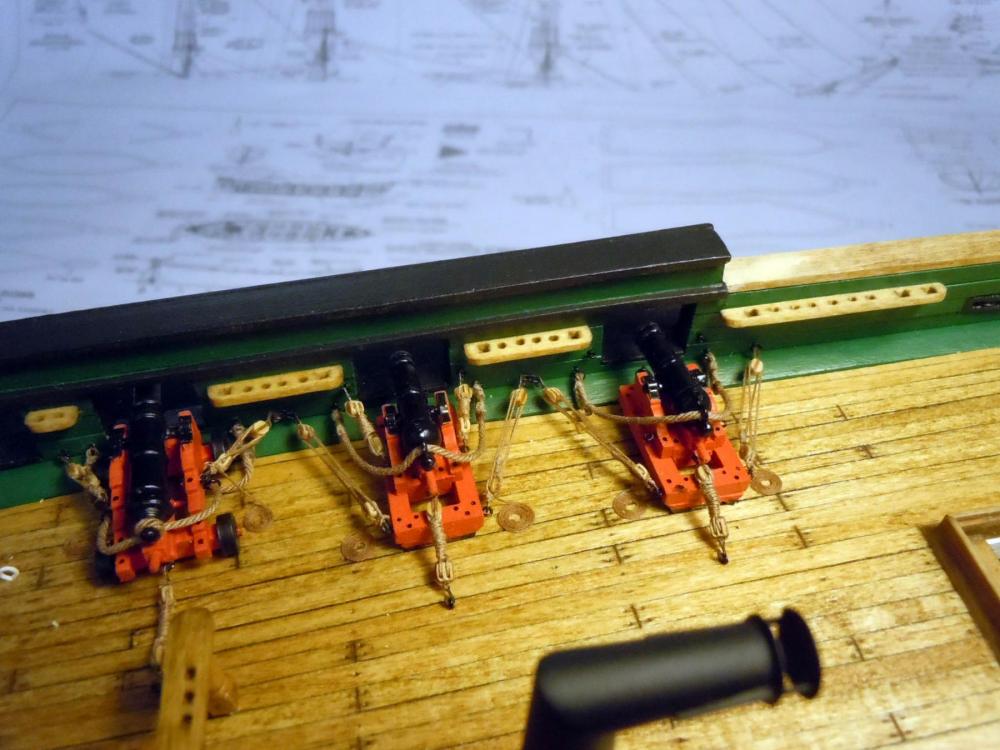
Finished up making the rope coils for all the rest of the carronades and as the glue set overnight I decided to do a test of a fully rigged tackle for the carronade by adding the side and in haul lines. The side line can be seen in the photo above and thanks to Jon I now know where the eyebolts on the deck are located for the in haul line. I also decided to trammel the in haul line like the side lines which would eliminate coils on the deck that would have got in the way, and makes them more visible. As I was adding them I was glad I did not glue all the deck structures in place as I trammeled the lines in place using .008" rope after being hooked to the eyebolts. I started out using 5" rope lengths and these need to be just a little longer for easier knotting once wrapped. Once rigged I sat back and pondered the results of the finished test. I decided that it looked a great deal more finished and complete looking than just a breech and side line. This also means a great deal more tedious work but I results will be fantastic. I started this ship for my son and it will now be for him and his new twin boys. Here is a close up showing the trammeled lines. Ran out of blocks after the adjacent in haul line. A rear view. Placed an order with Chuck for more hooks, blocks and .008 Lt. Brown rope. I will add the balance of the rope coils while waiting for the order to arrive.


-
Darrel, for a separate set of tackle lines that are used to pull the sled forward once reloaded. The ring on the end of the sled is used to pull the sled back for loading the first time and the line is hooked to the ring in the deck. Jon's drawing above shows how it is rigged. I will try and find and post a picture. Here is a picture.
-
Steve thanks! The plywood in the kit was very dry and brittle so Ii used the instant (thin) CA to soak the plywood and make it stronger. Soak down below the joint as well adding to the edges of the plywood. I hope this helps.
-
Jon, perfect that shows the exact locations I am looking for thanks again for your help with details! Ken
-
Jon, thanks! That shows the coil clearer. Do you have any references to the in haul tackle and the location of the rings on the deck?On the restored one no in haul tackle due to visitor foot traffic. So far in looking around I have not found anything yet.
-
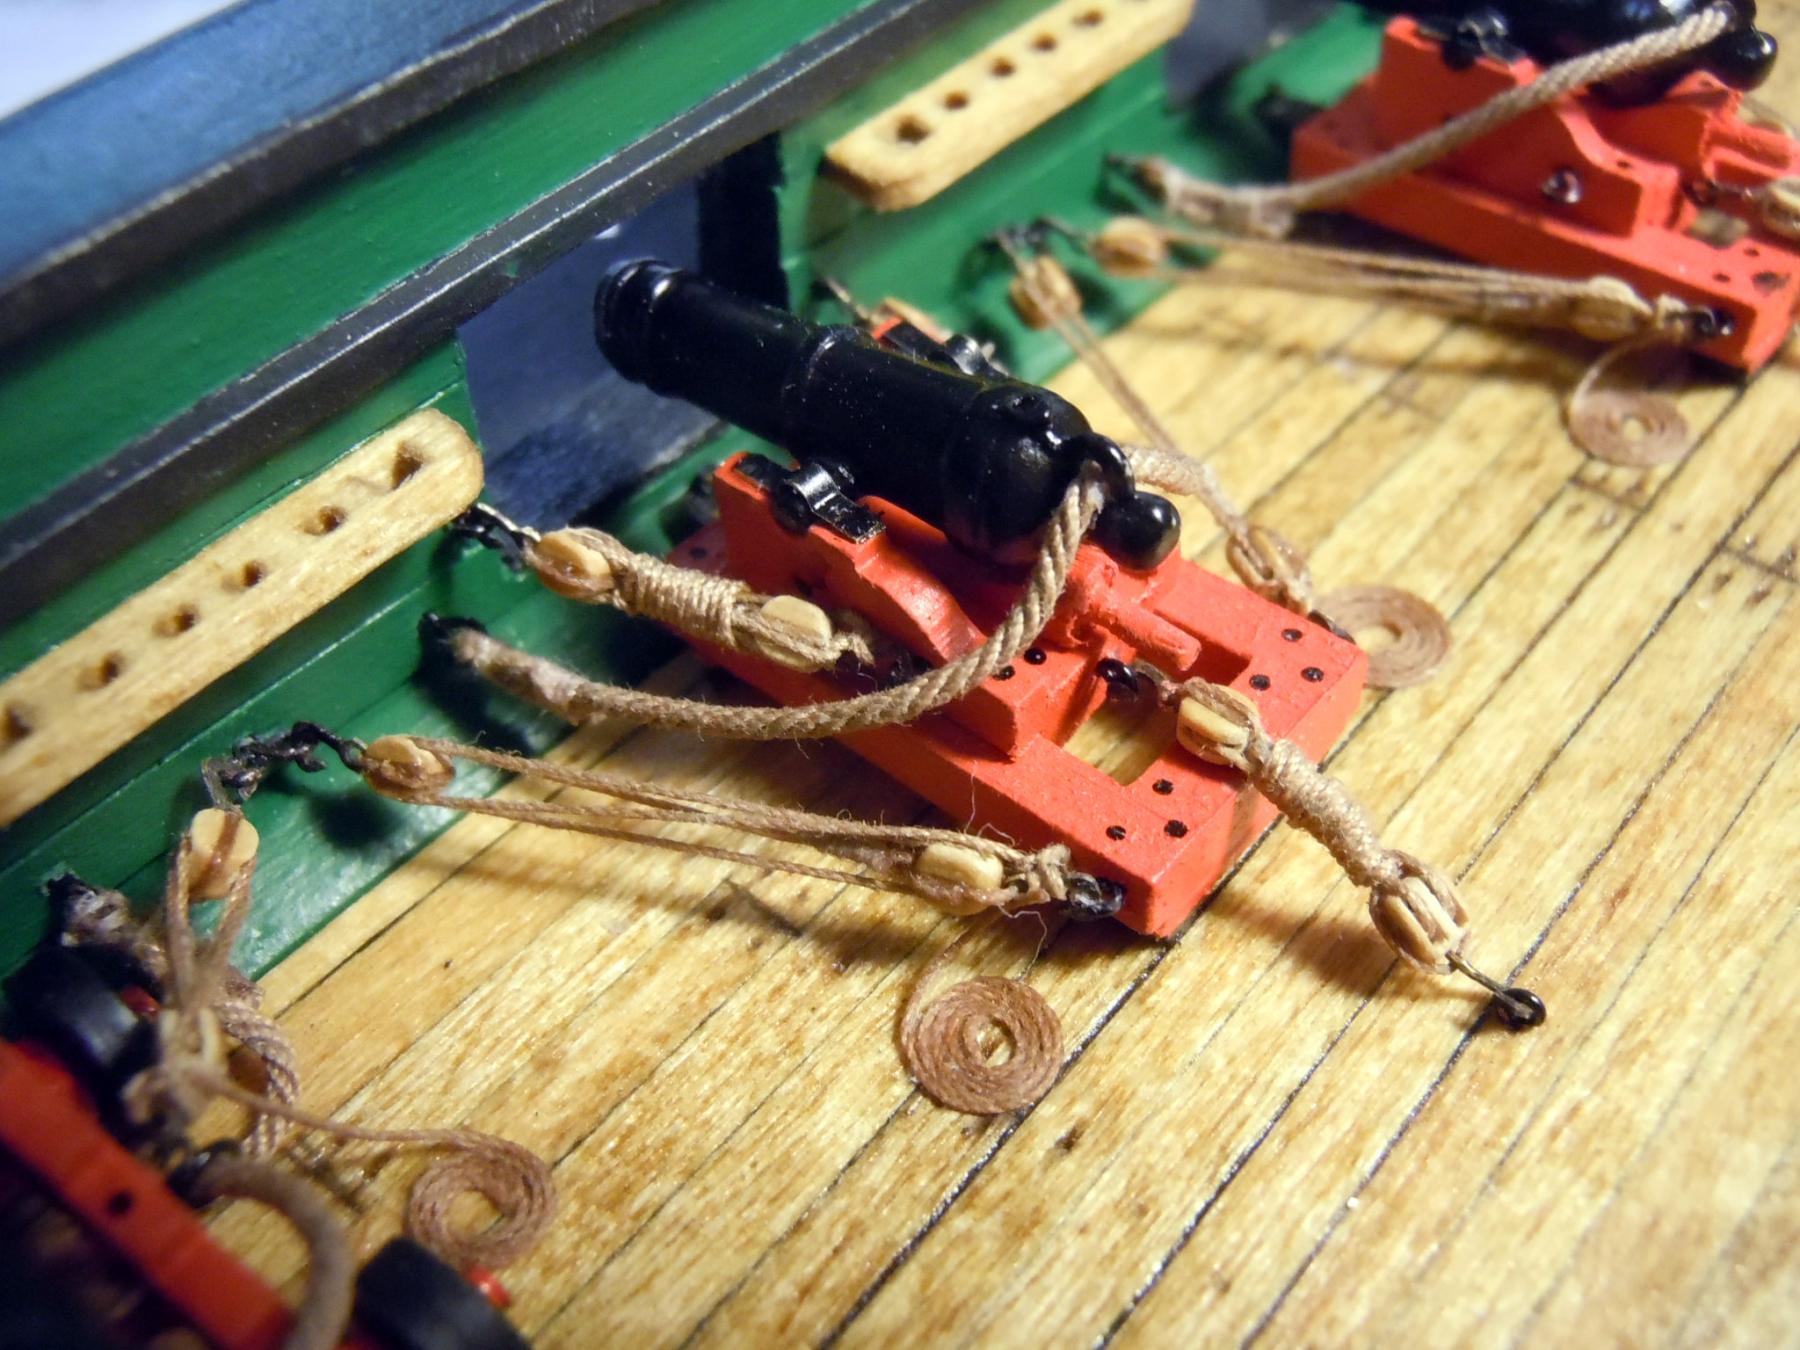
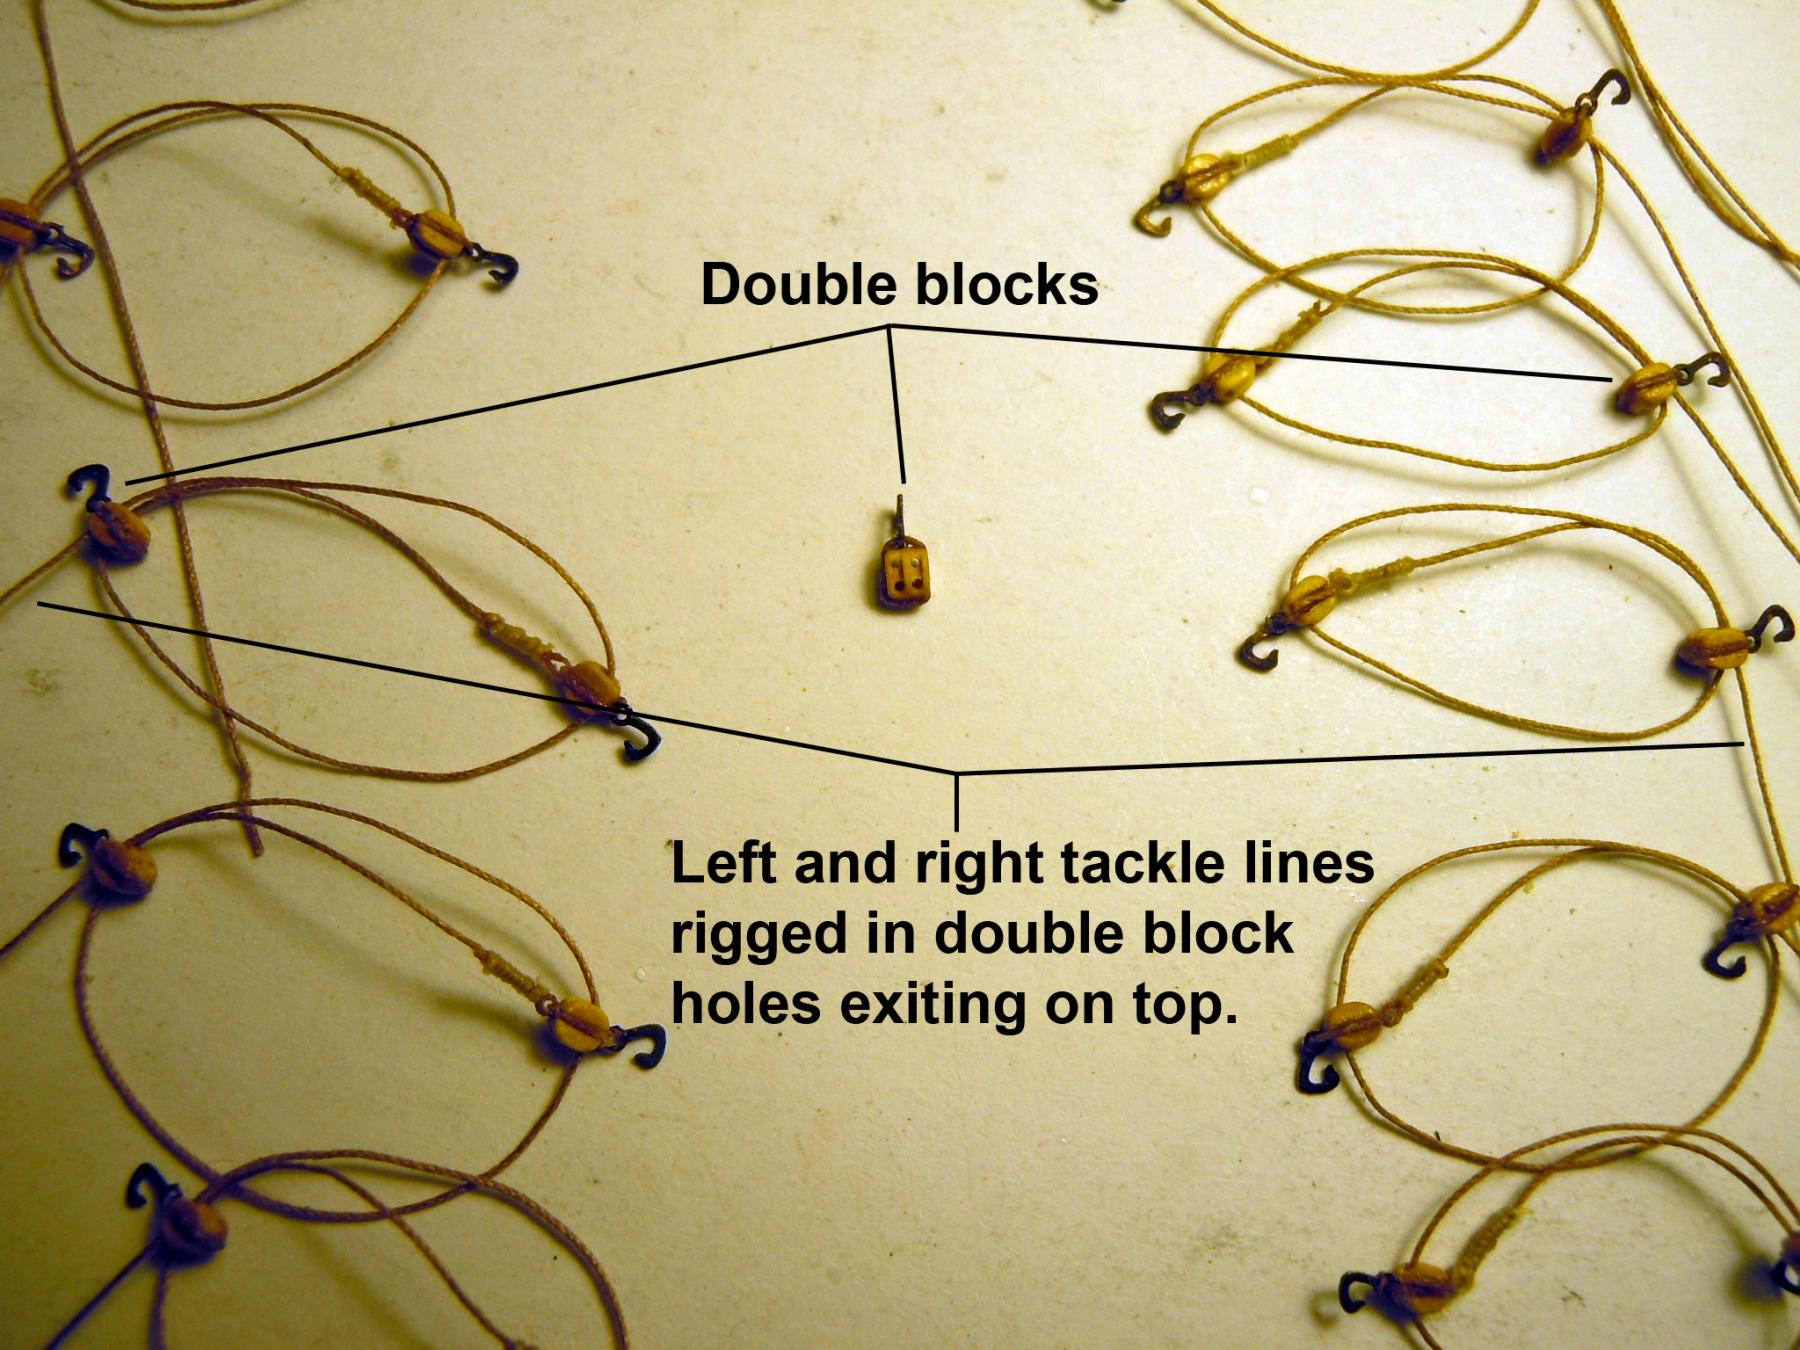
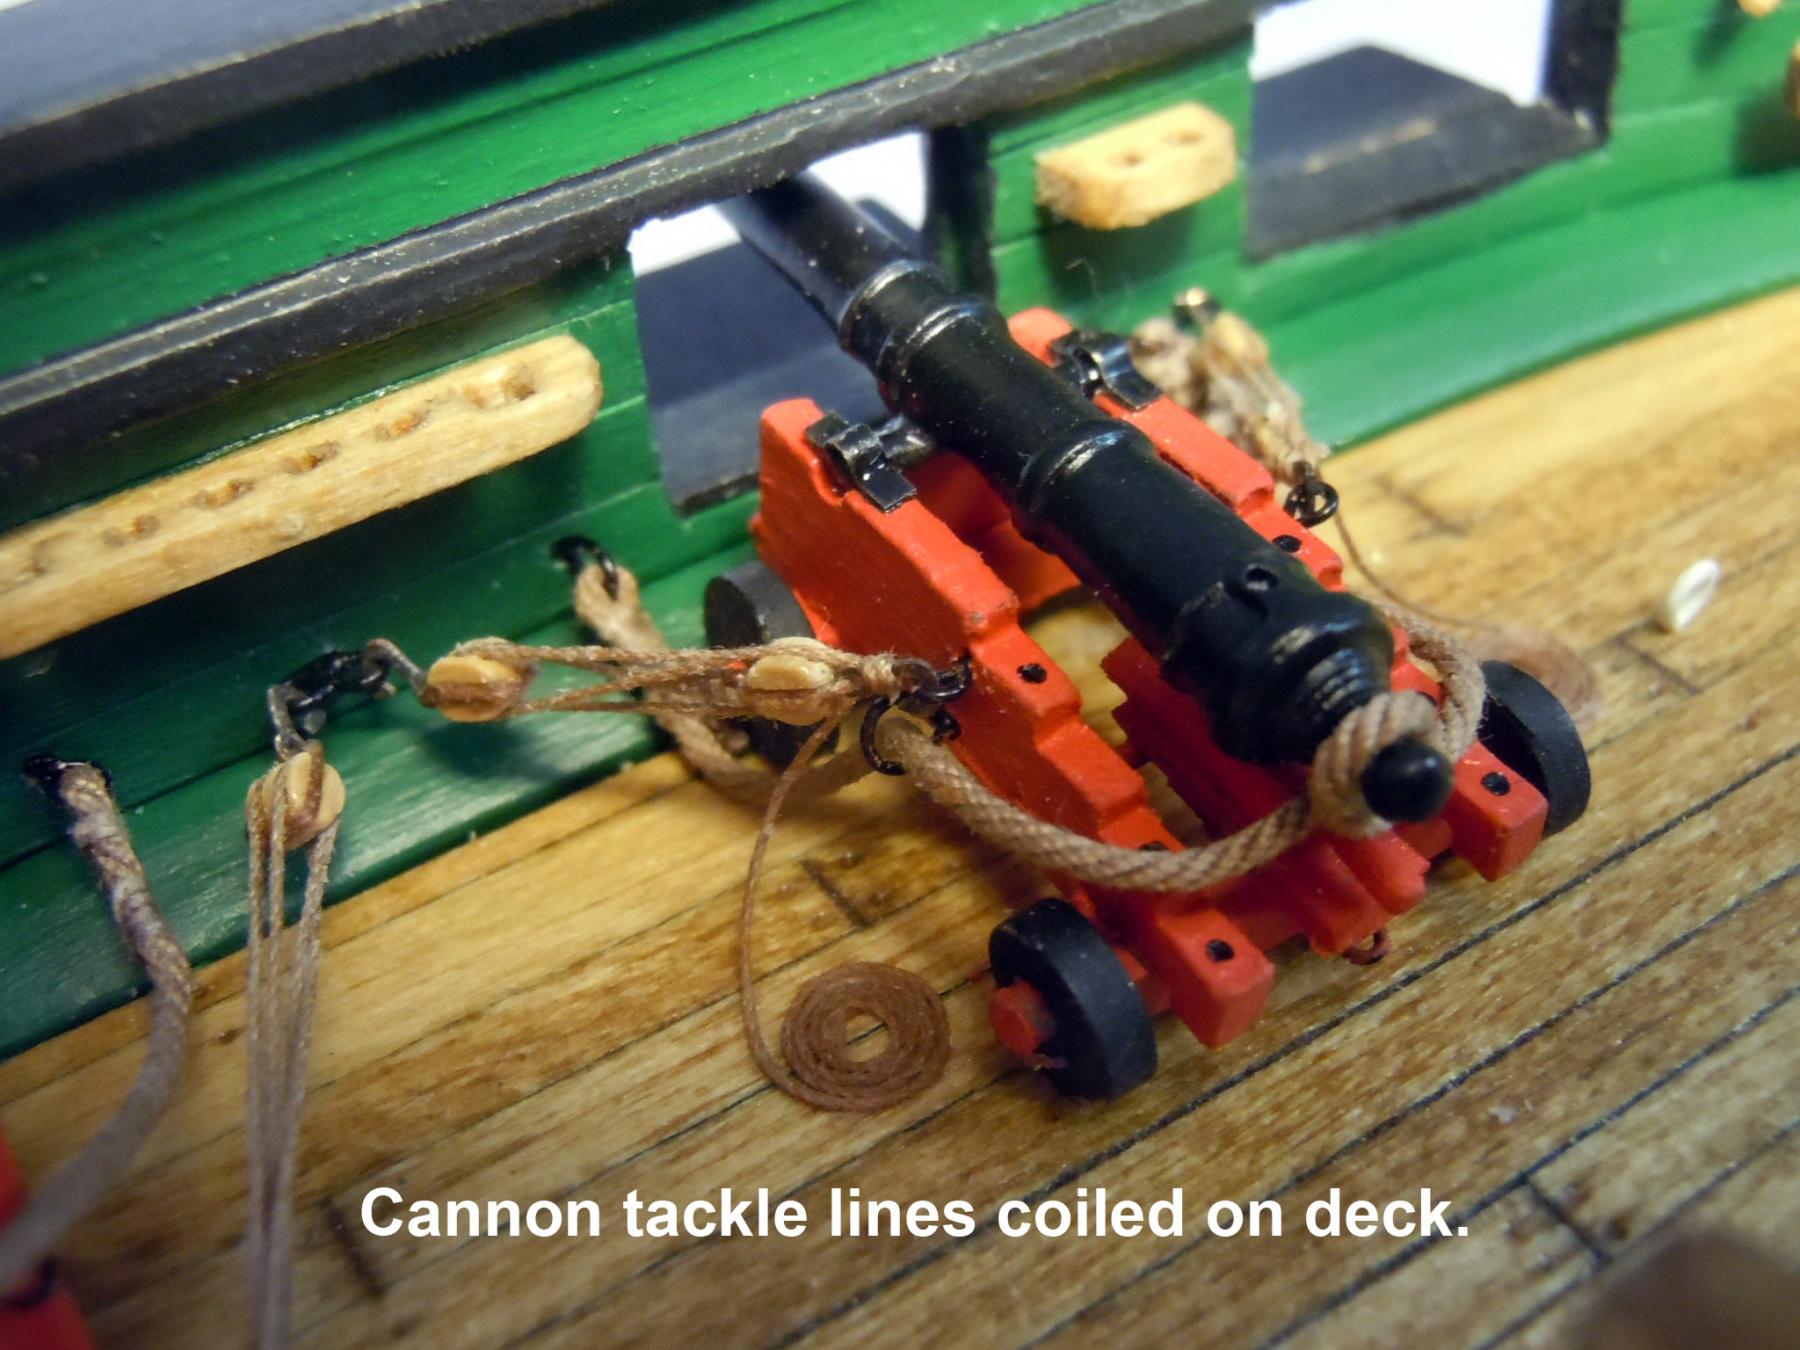
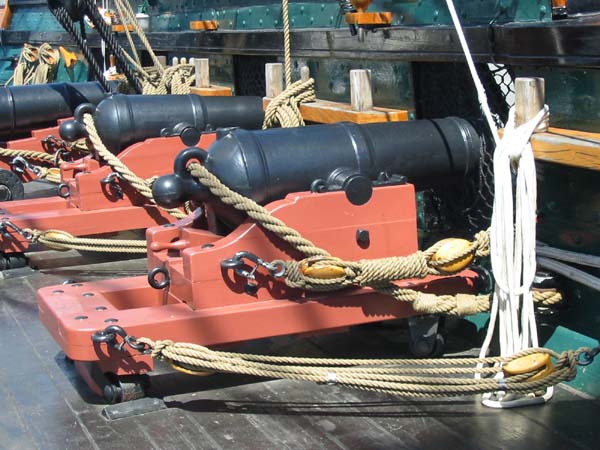
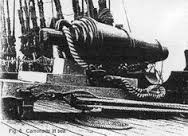
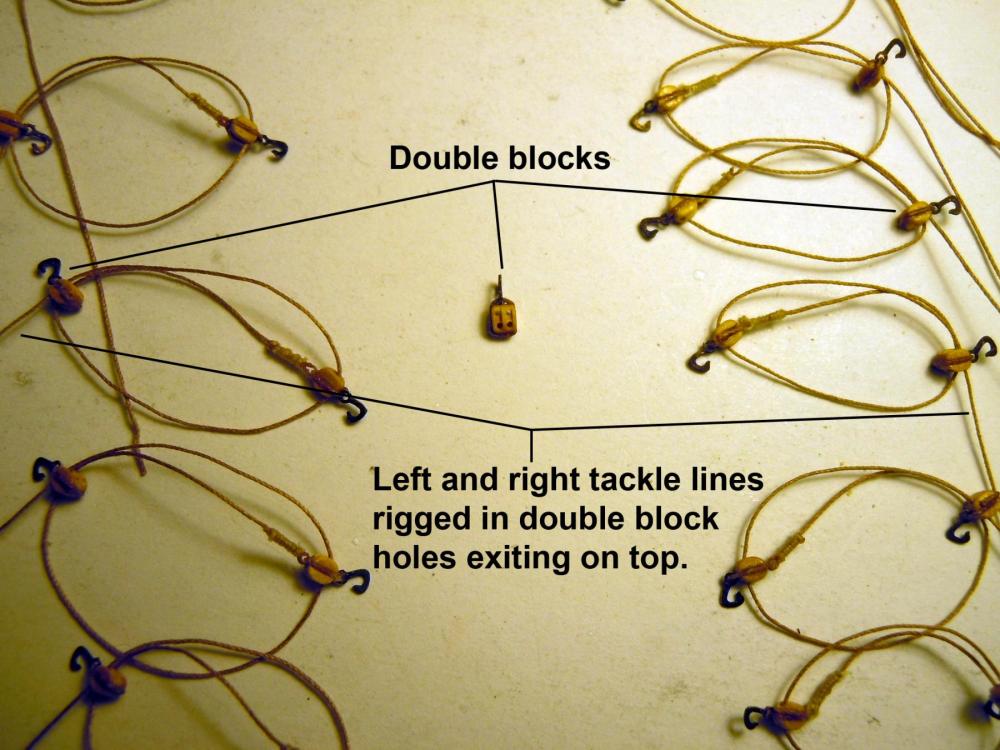
In my last post on carronade tackle I forgot to mention that when rigging the blocks there needs to be a left and right return line coming out of the double block. Also the hooks should face down when properly rigged. In deciding about the whether or not coils for the carronades I searched around for a reference on how they might have been done and found this one picture that shows them on the deck adjacent to the block at the end of the sled. This made sense to me in that if inboard there would be no room for two and they would have to be stacked on on top of the other. It looks like the pull line is seized on the hook at the single block and then coiled. Interestingly the pictures shows a double block rather than a single. This is the original size of the picture. This shows all the guns with breech and tackle lines in place. I then made coils using the 50/50 glue process which is a real challenge with .008" rope. I ended up filing down my spring loaded tweezers to more of a point to reduce the size of the hole in the center of the coil. The rope length for the coil is 2" with the ends touched with CA and the center end cut down as much as possible and still hold the end from fraying. The end of the rope is held with the tip of the tweezers and soaked in the 50/50 glue mixture and then slowly wound left or right as needed and the free end and carefully moved out of the puddle to the edge of the plastic lid to dry. I am using a coffee can lid and the free end is up on the edge to raise it in the air. When dry the free end is then glued at the seized knot and allowed to dry before gluing the coil to the deck. There are pictures of this in my Niagara build. Here is how the long gun is rigged. Here is the start of the carronades having the coils added; this will be a long and tedious process requiring patience. Back to making carronade coils.
-
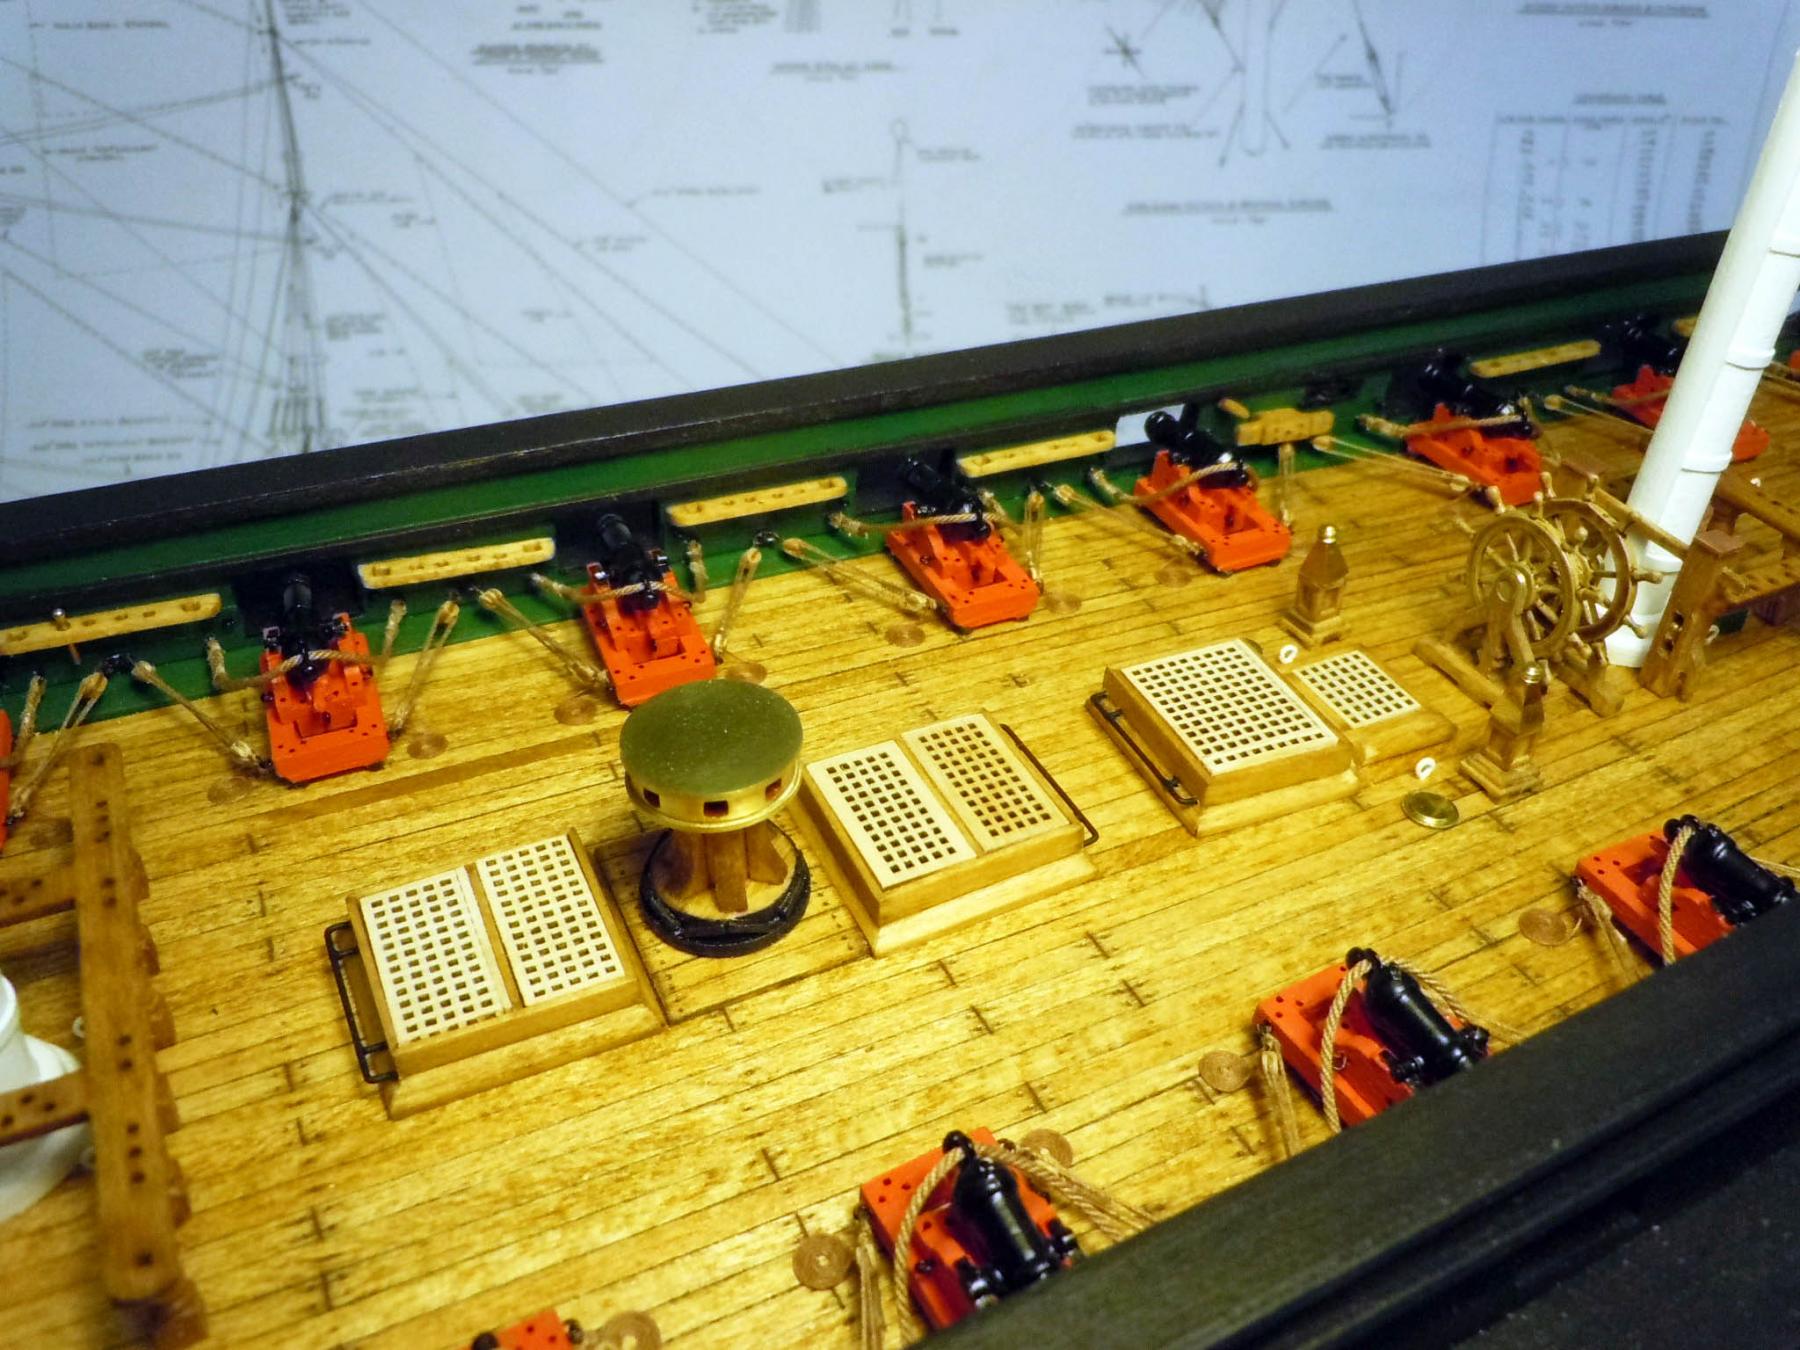
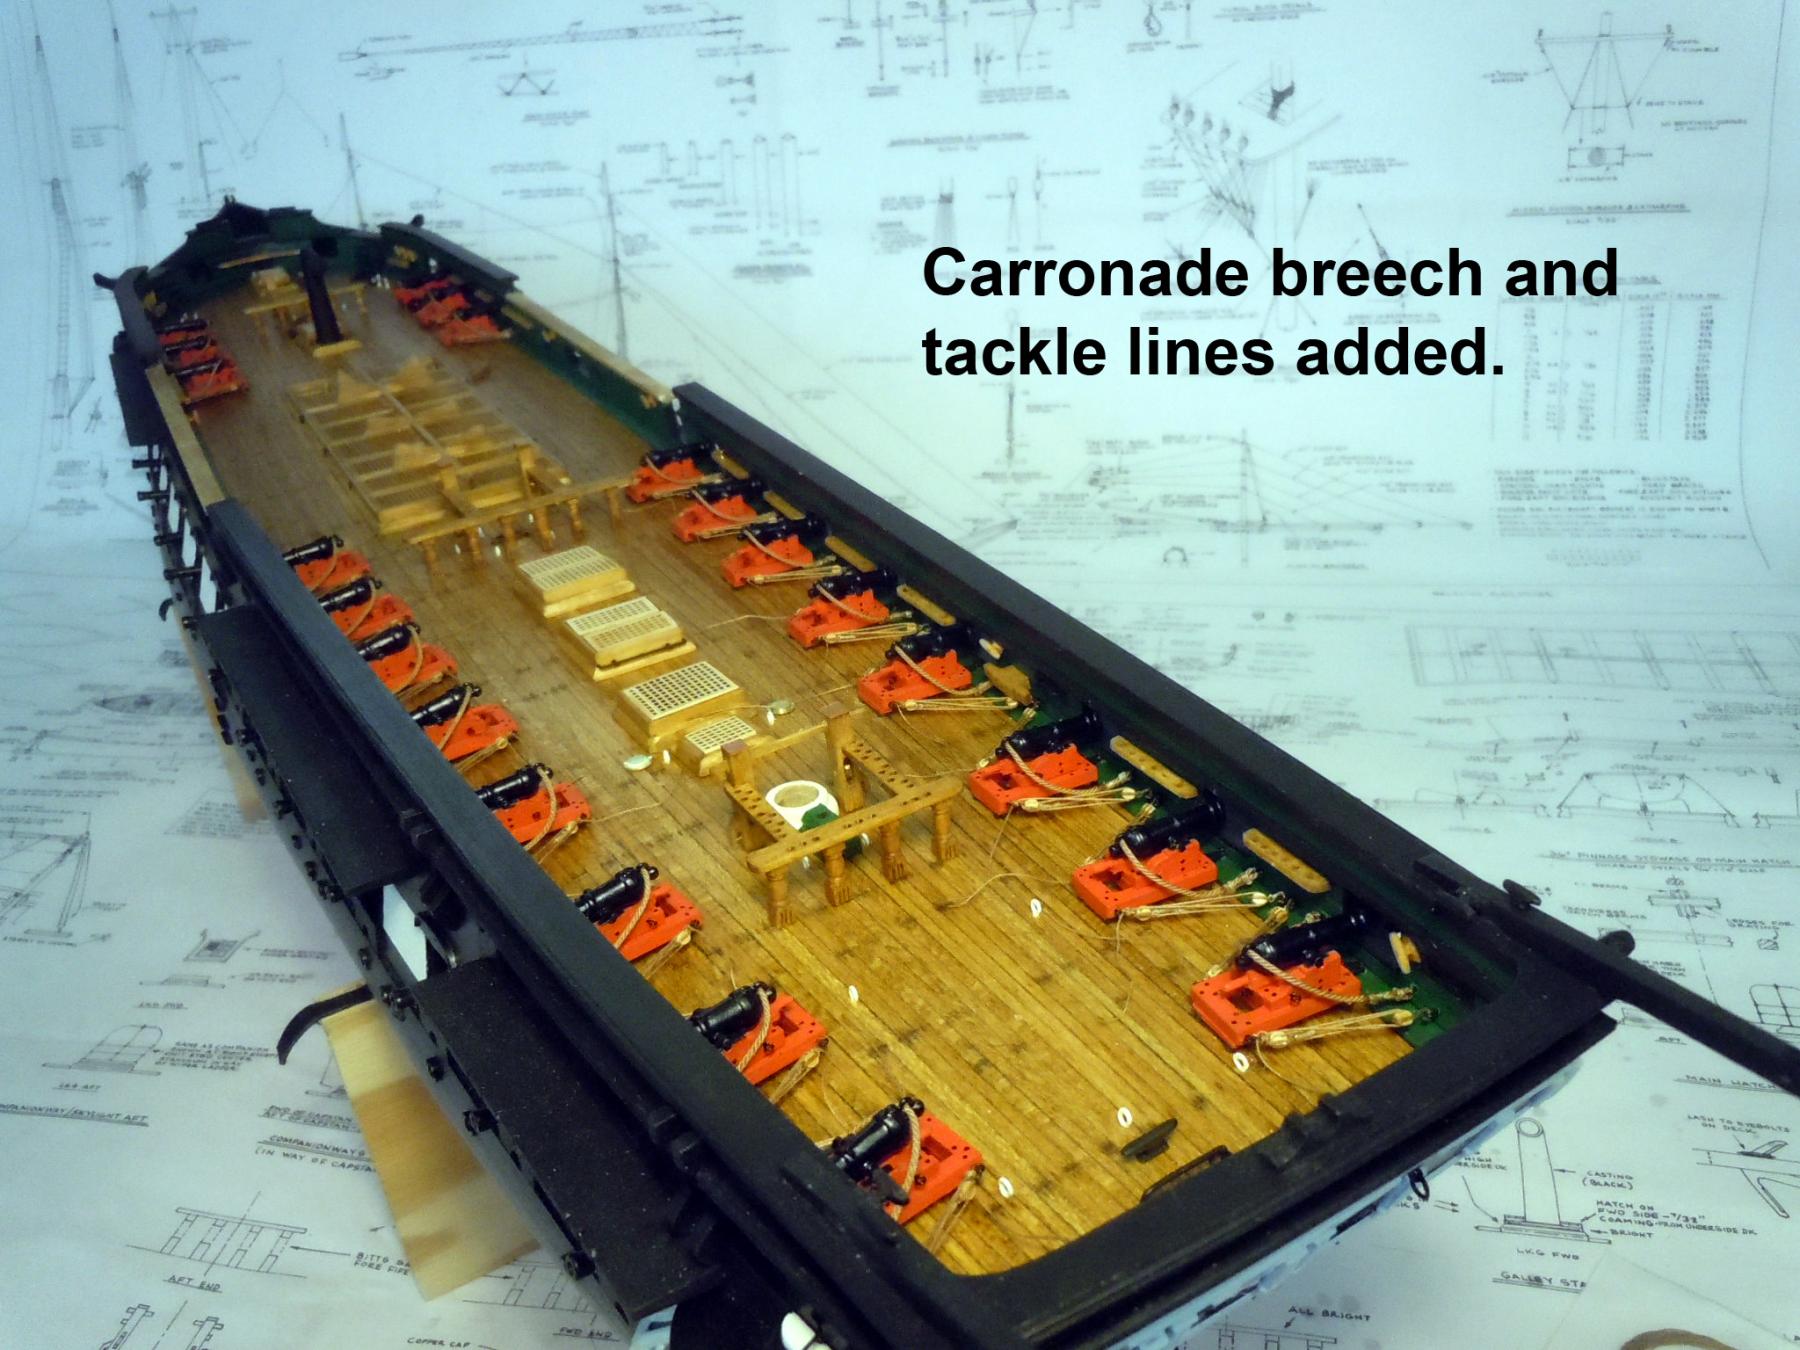
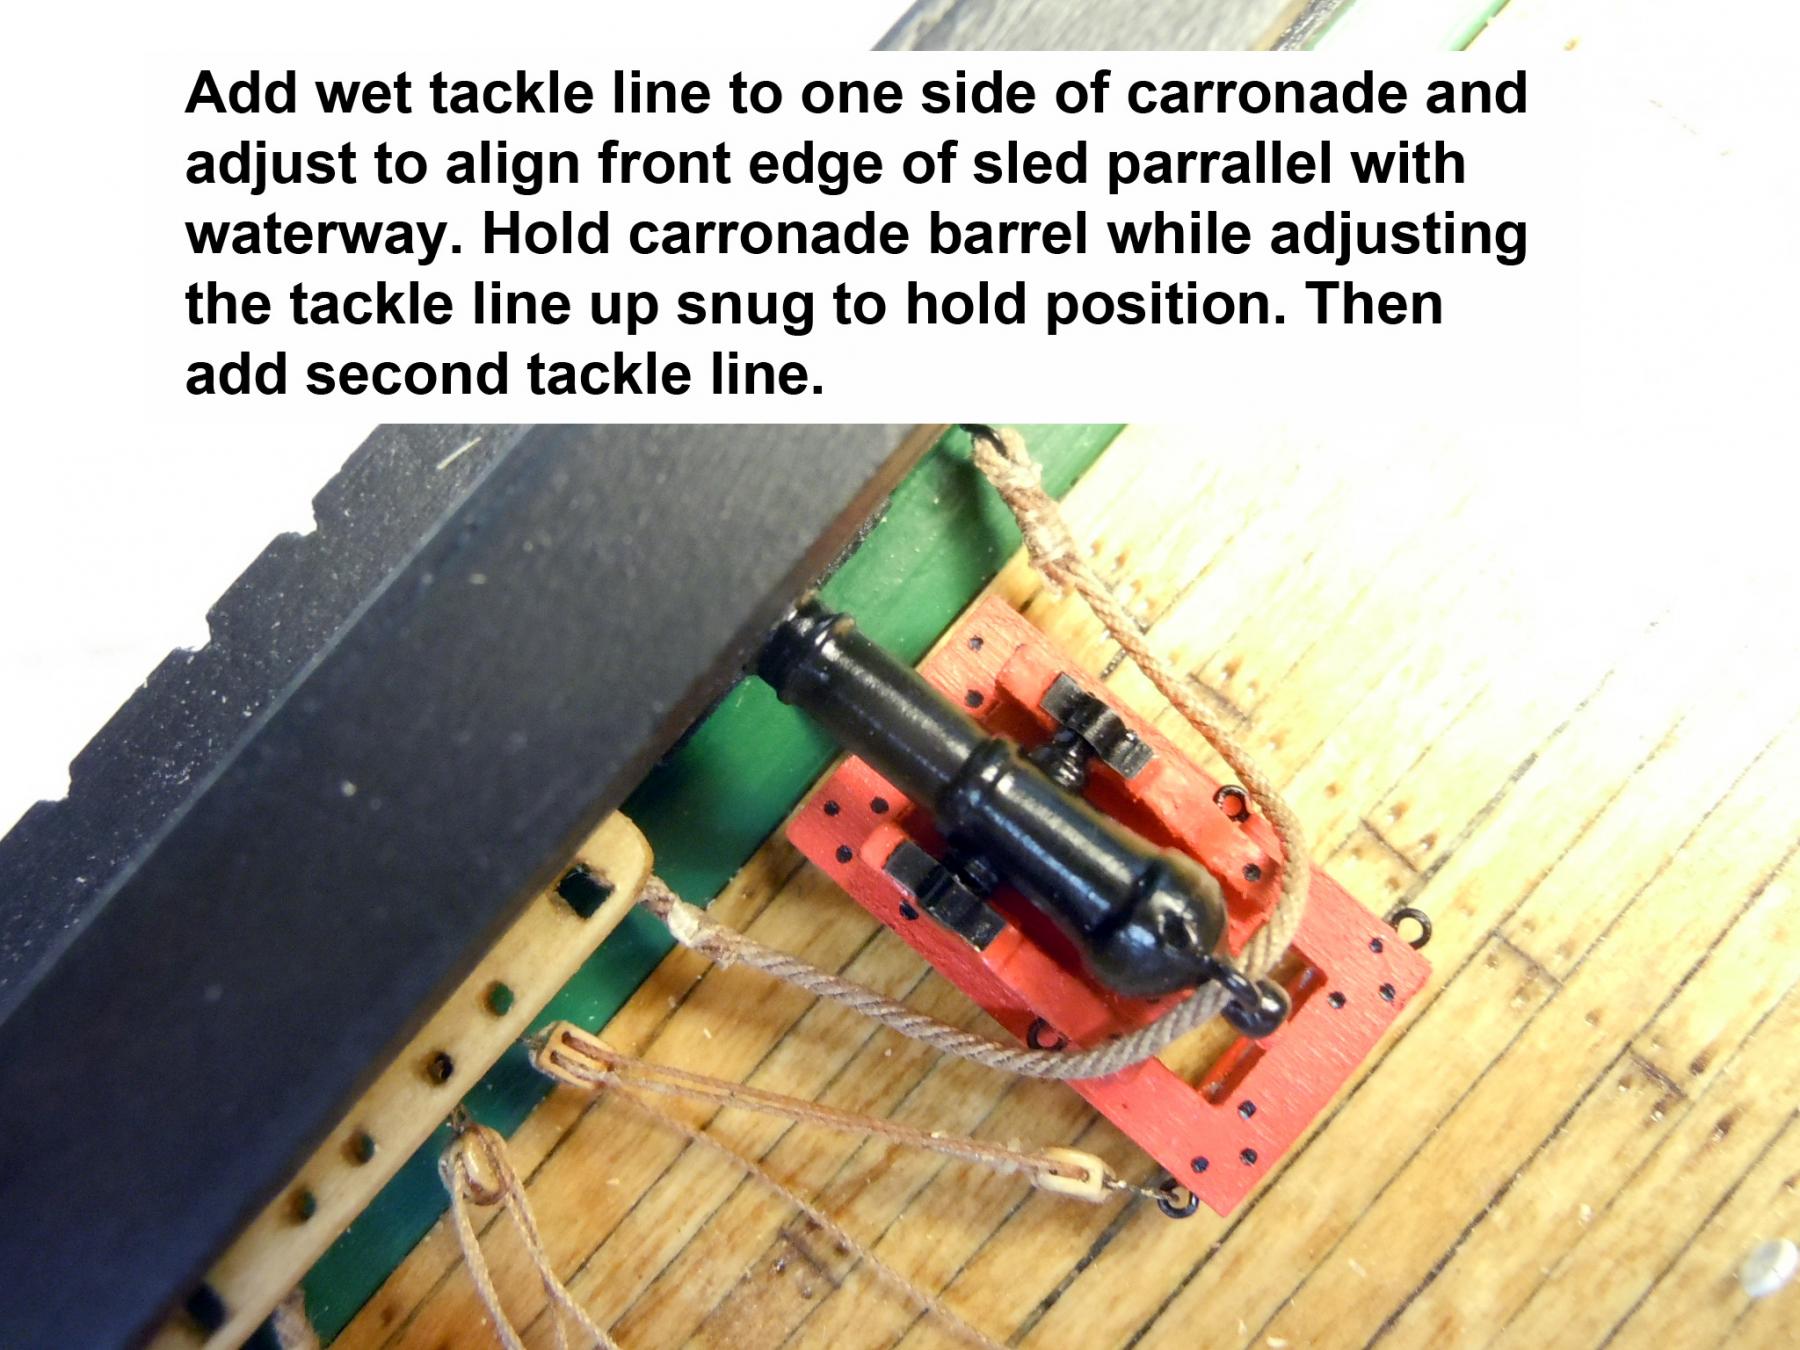
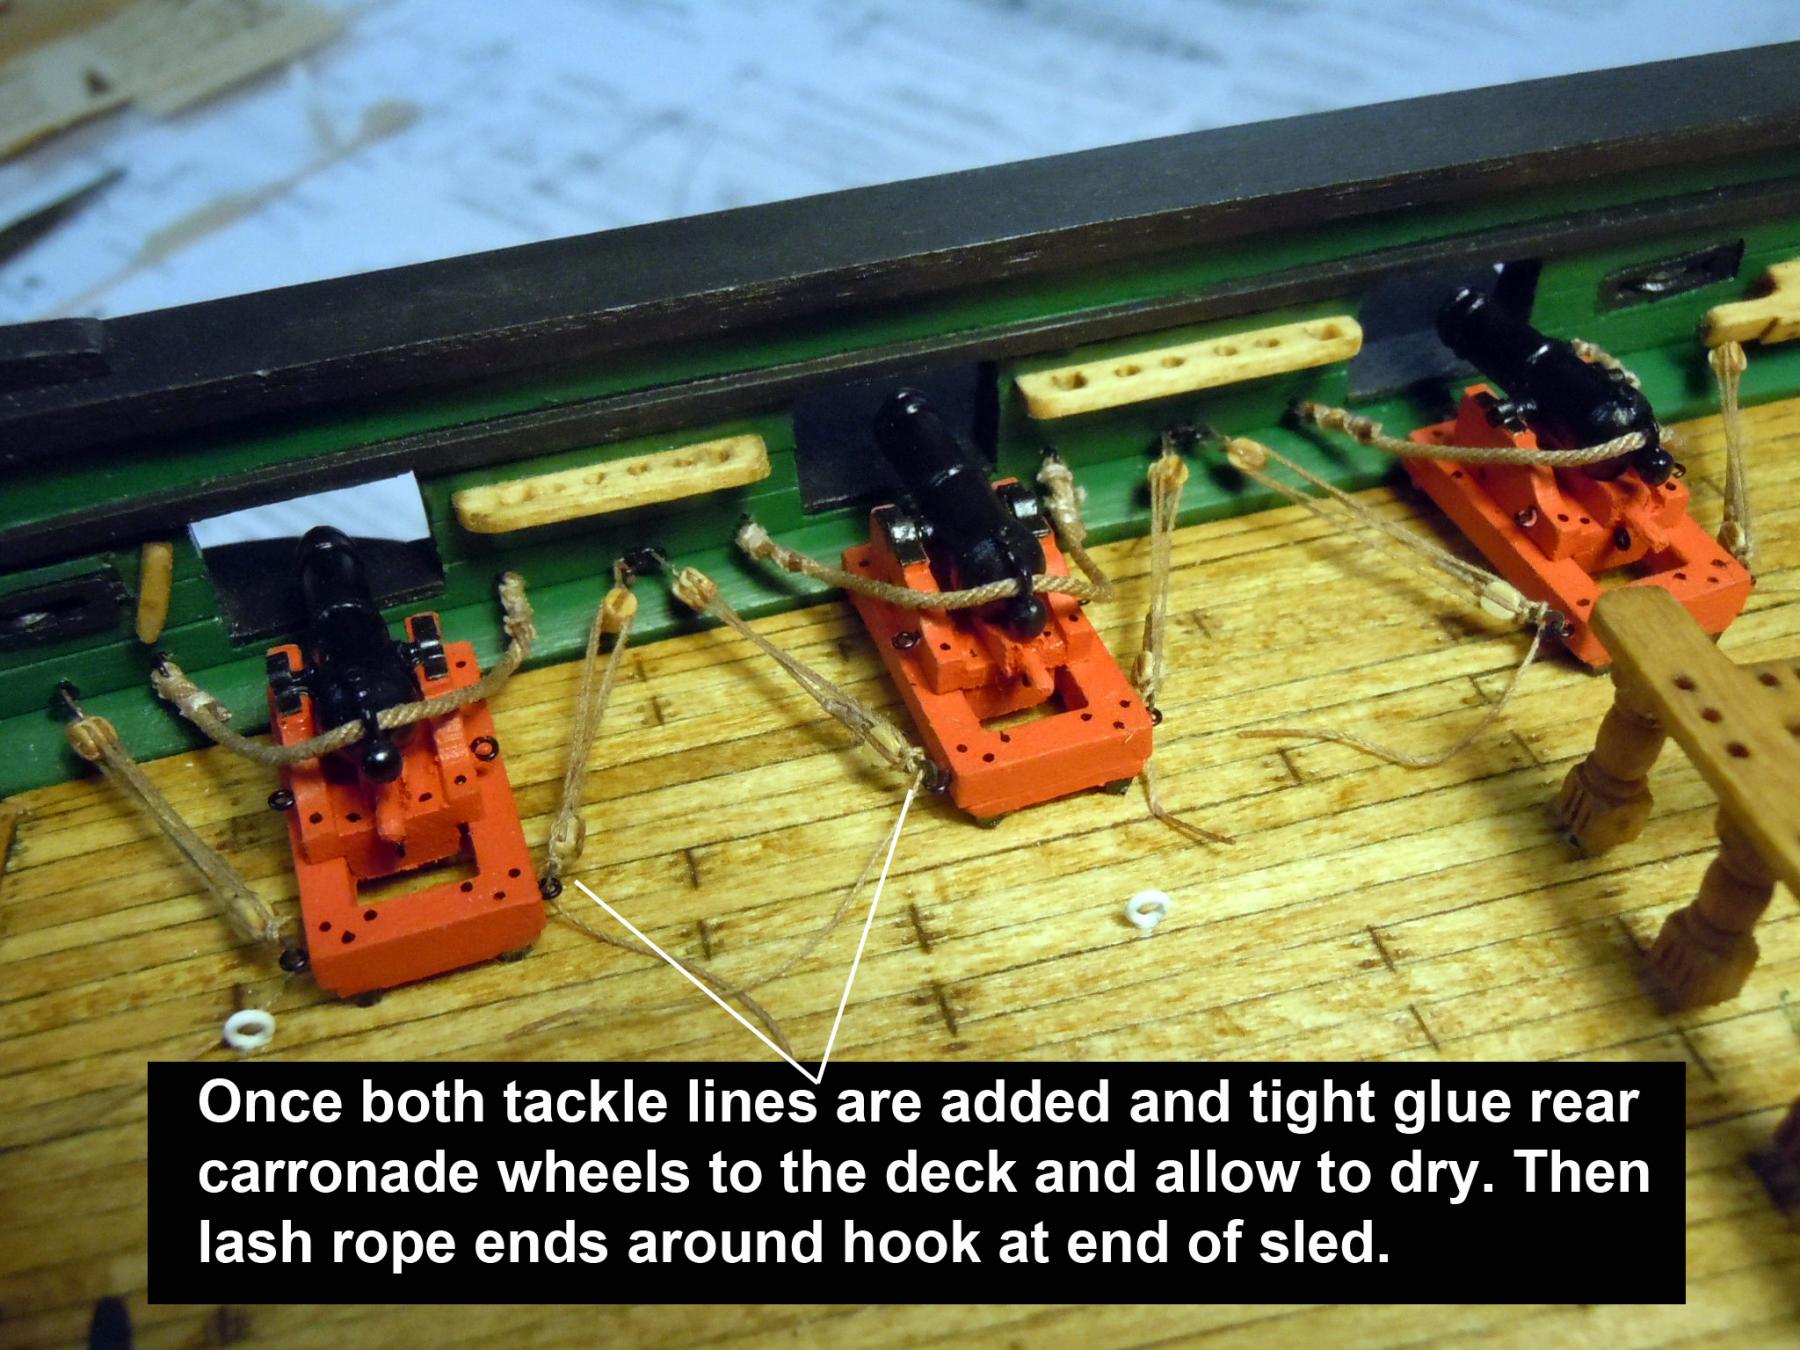
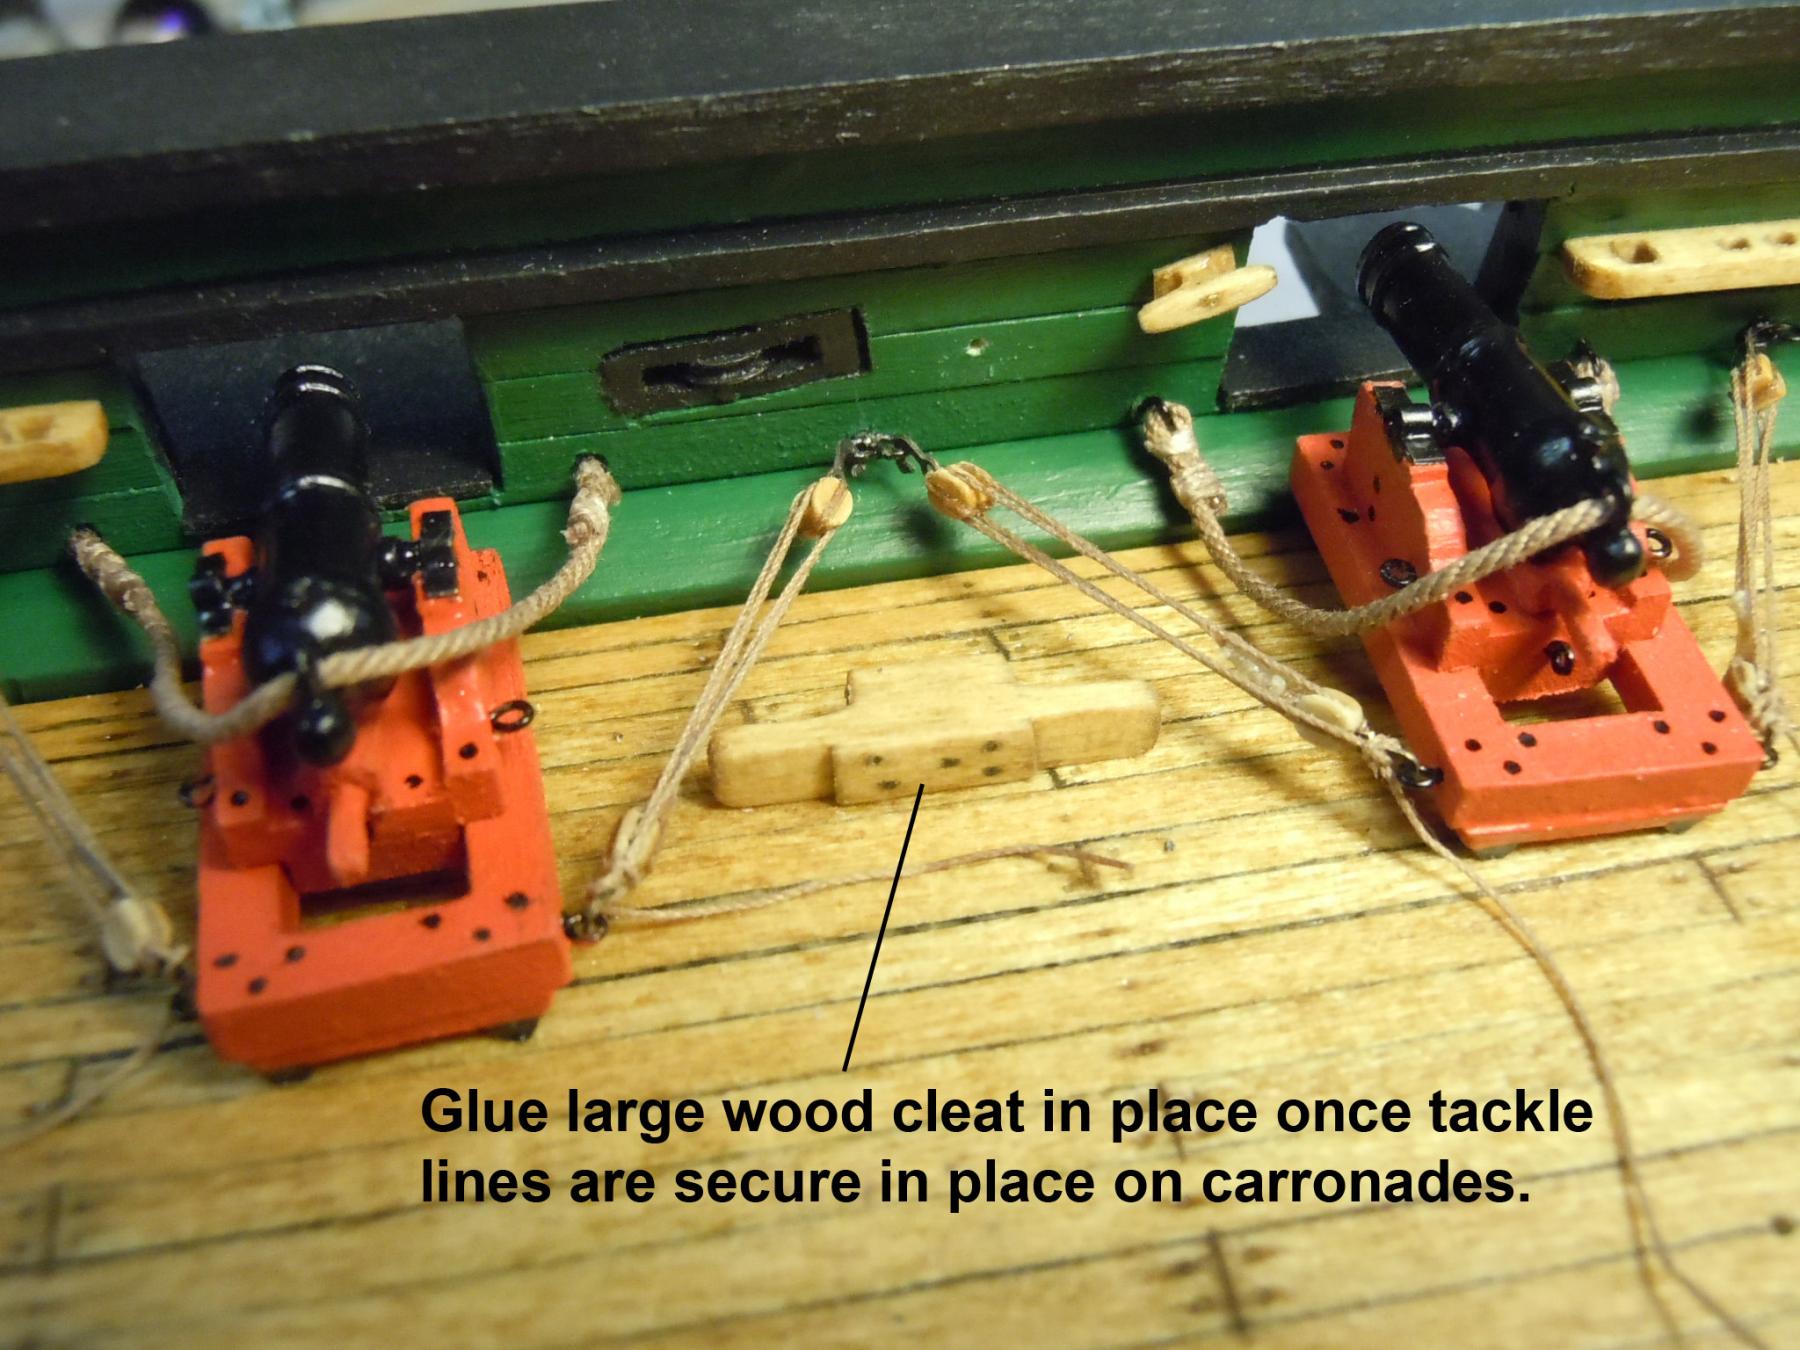
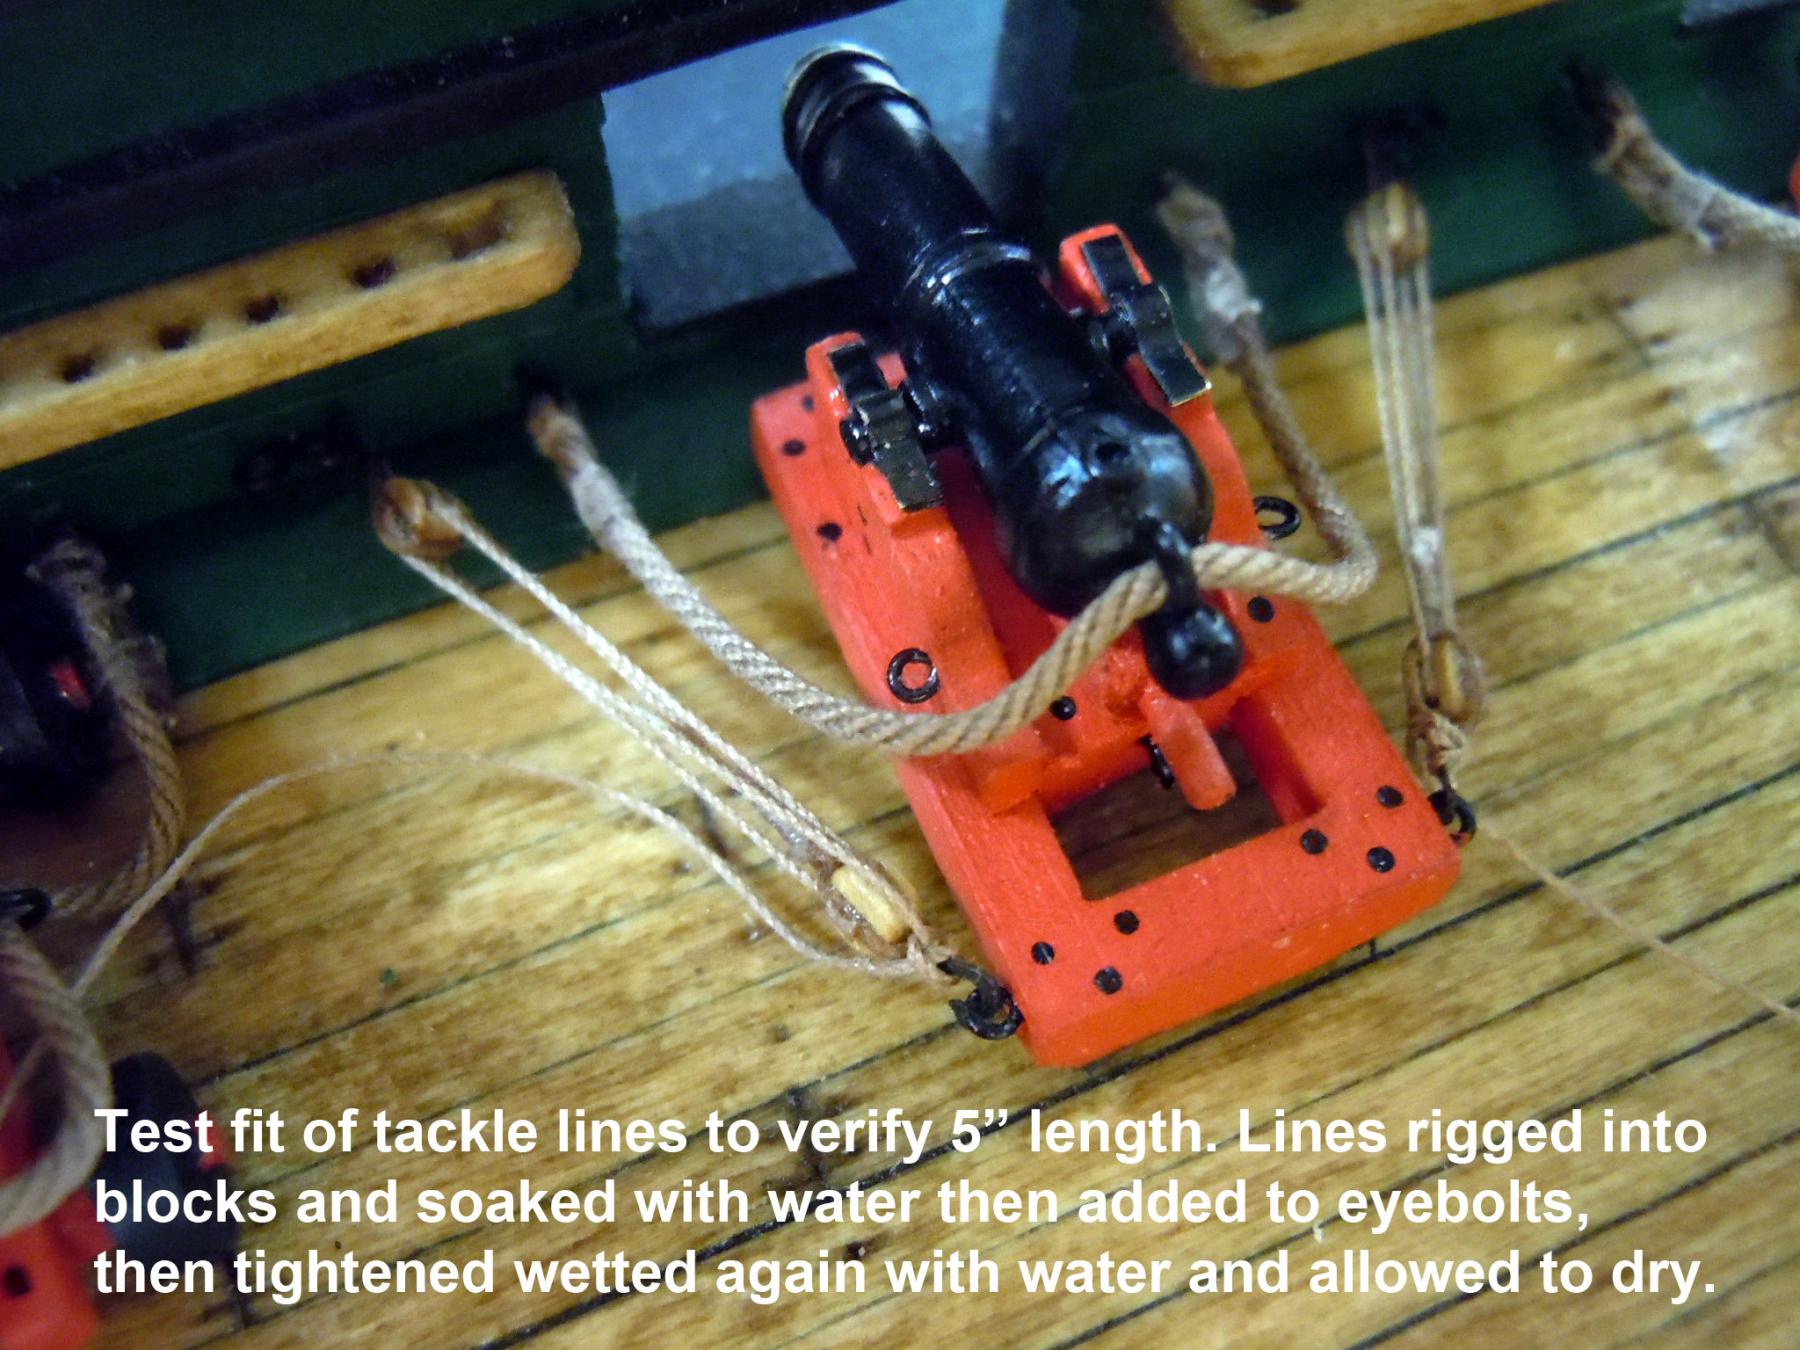
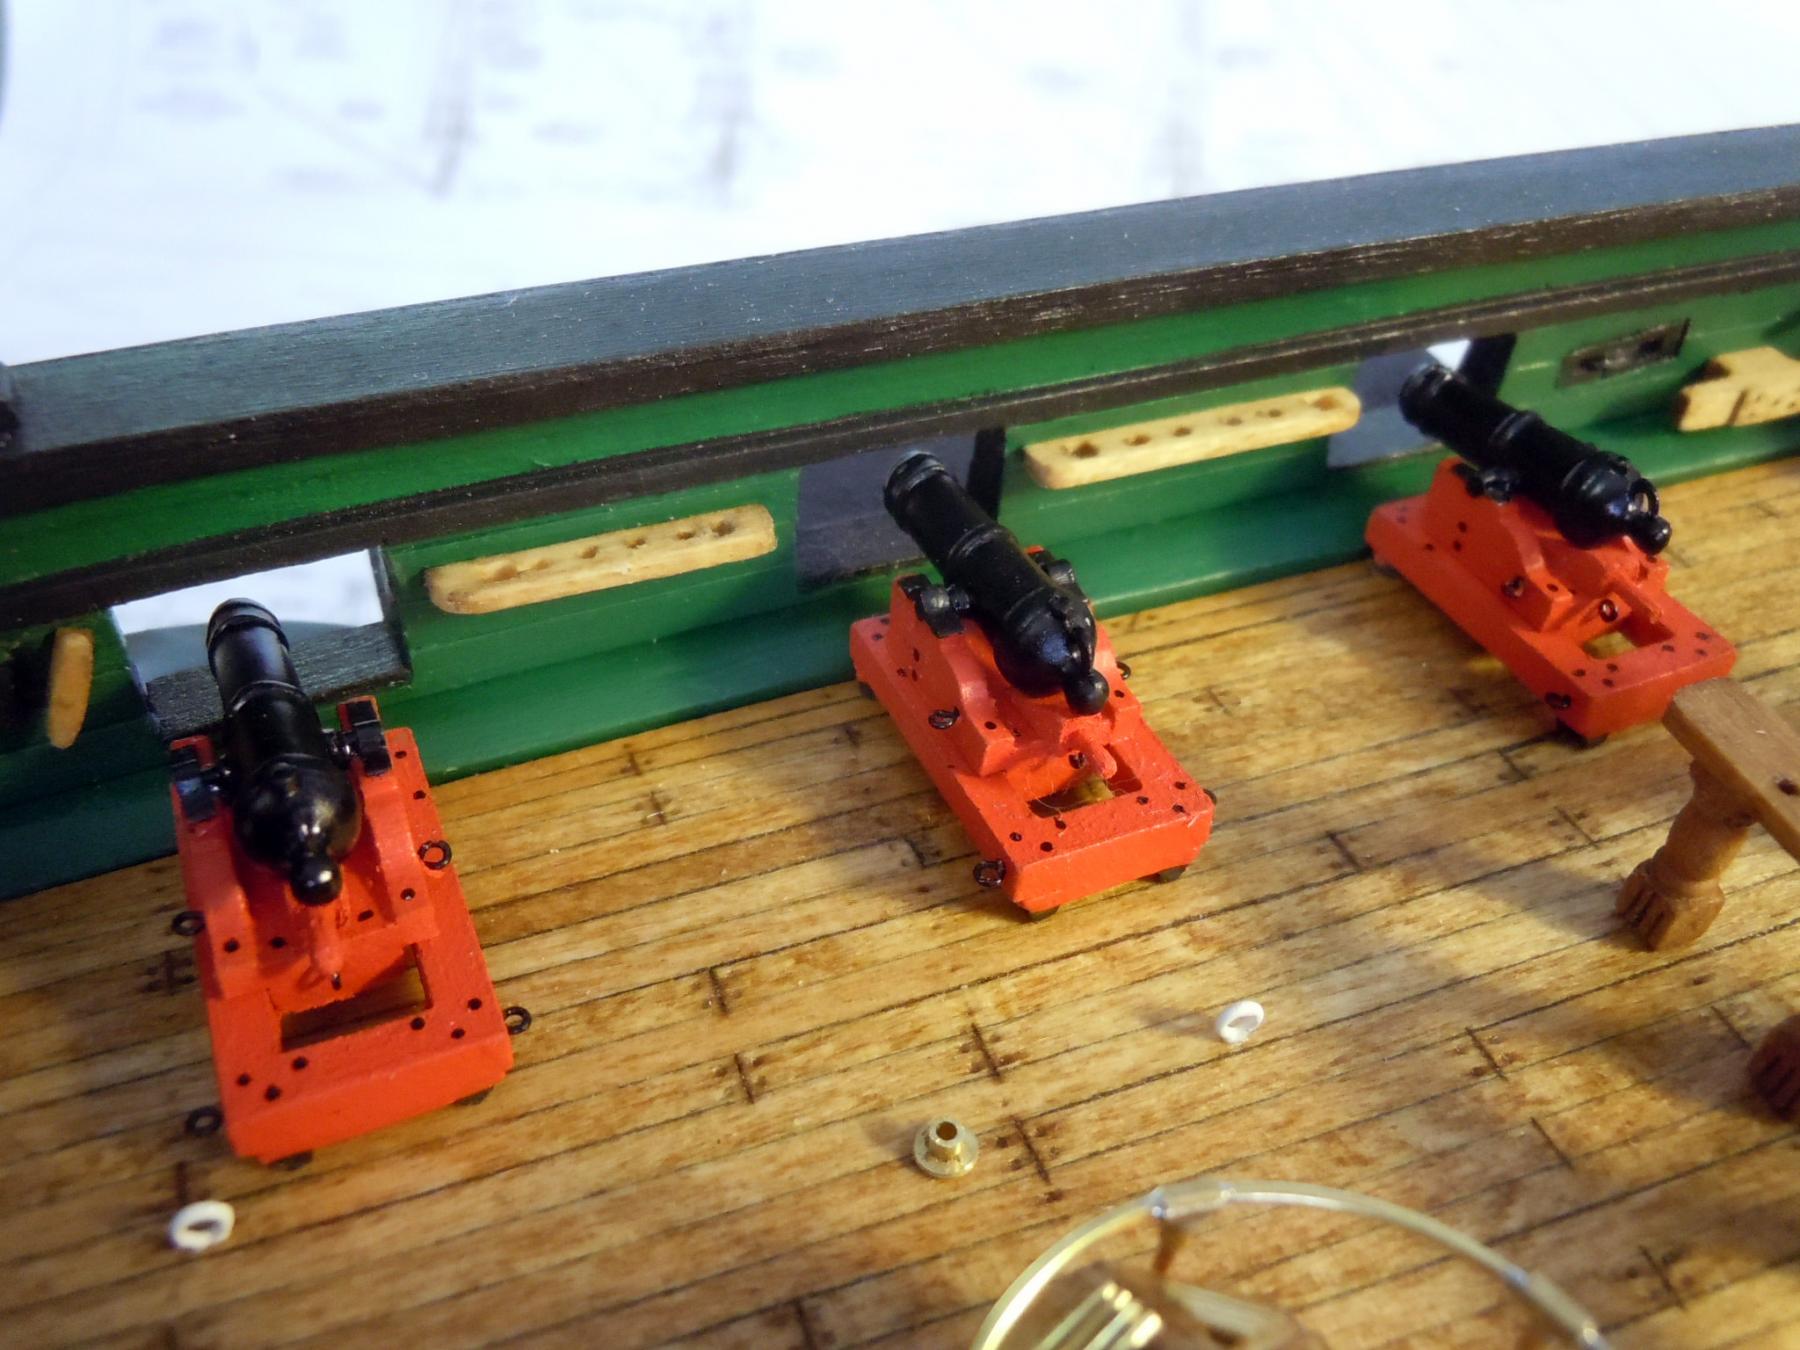
Just finished up rigging the carronades on the port side and several on the starboard and thought I would share a couple of lessons I have learned in the process. One is to make sure the tackle lines are wet before adding them. This does two things: reduces the friction in the blocks while adjusting them and neutralizes the sizing in the rope and allows them to take a better set when dry. Add the wet tackle rope to one side and adjust the slack out of the lines. Then align edge of sled to waterway edge and hold barrel for final adjustment of tackle line. Next add second wet tackle line and adjust to final position while holding barrel and make sure both lines are tight. Then glue carronade wheels to deck and allow the CA to dry. Then lash tackle rope ends around hooks at the sled end tucking the rope down the inside of the hook to lay on the deck. This is just a suggestion to not glue the large wood cleats in place until the tackle lines are added first. Just six more carronades to rig and then to sort out the coils for the excess rope.


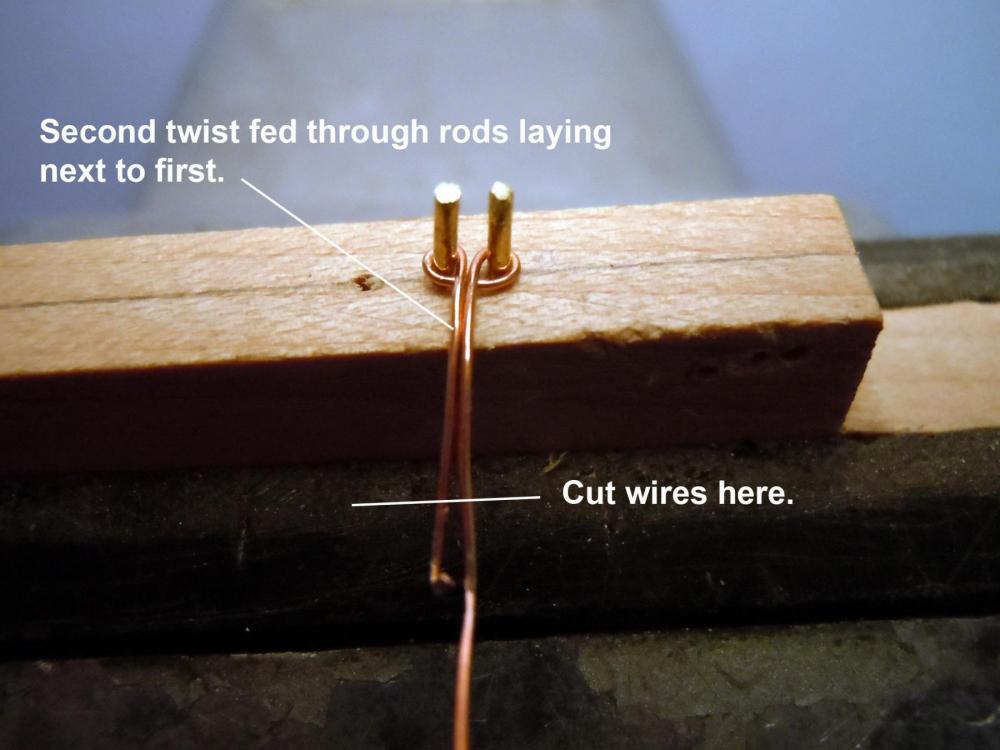
-
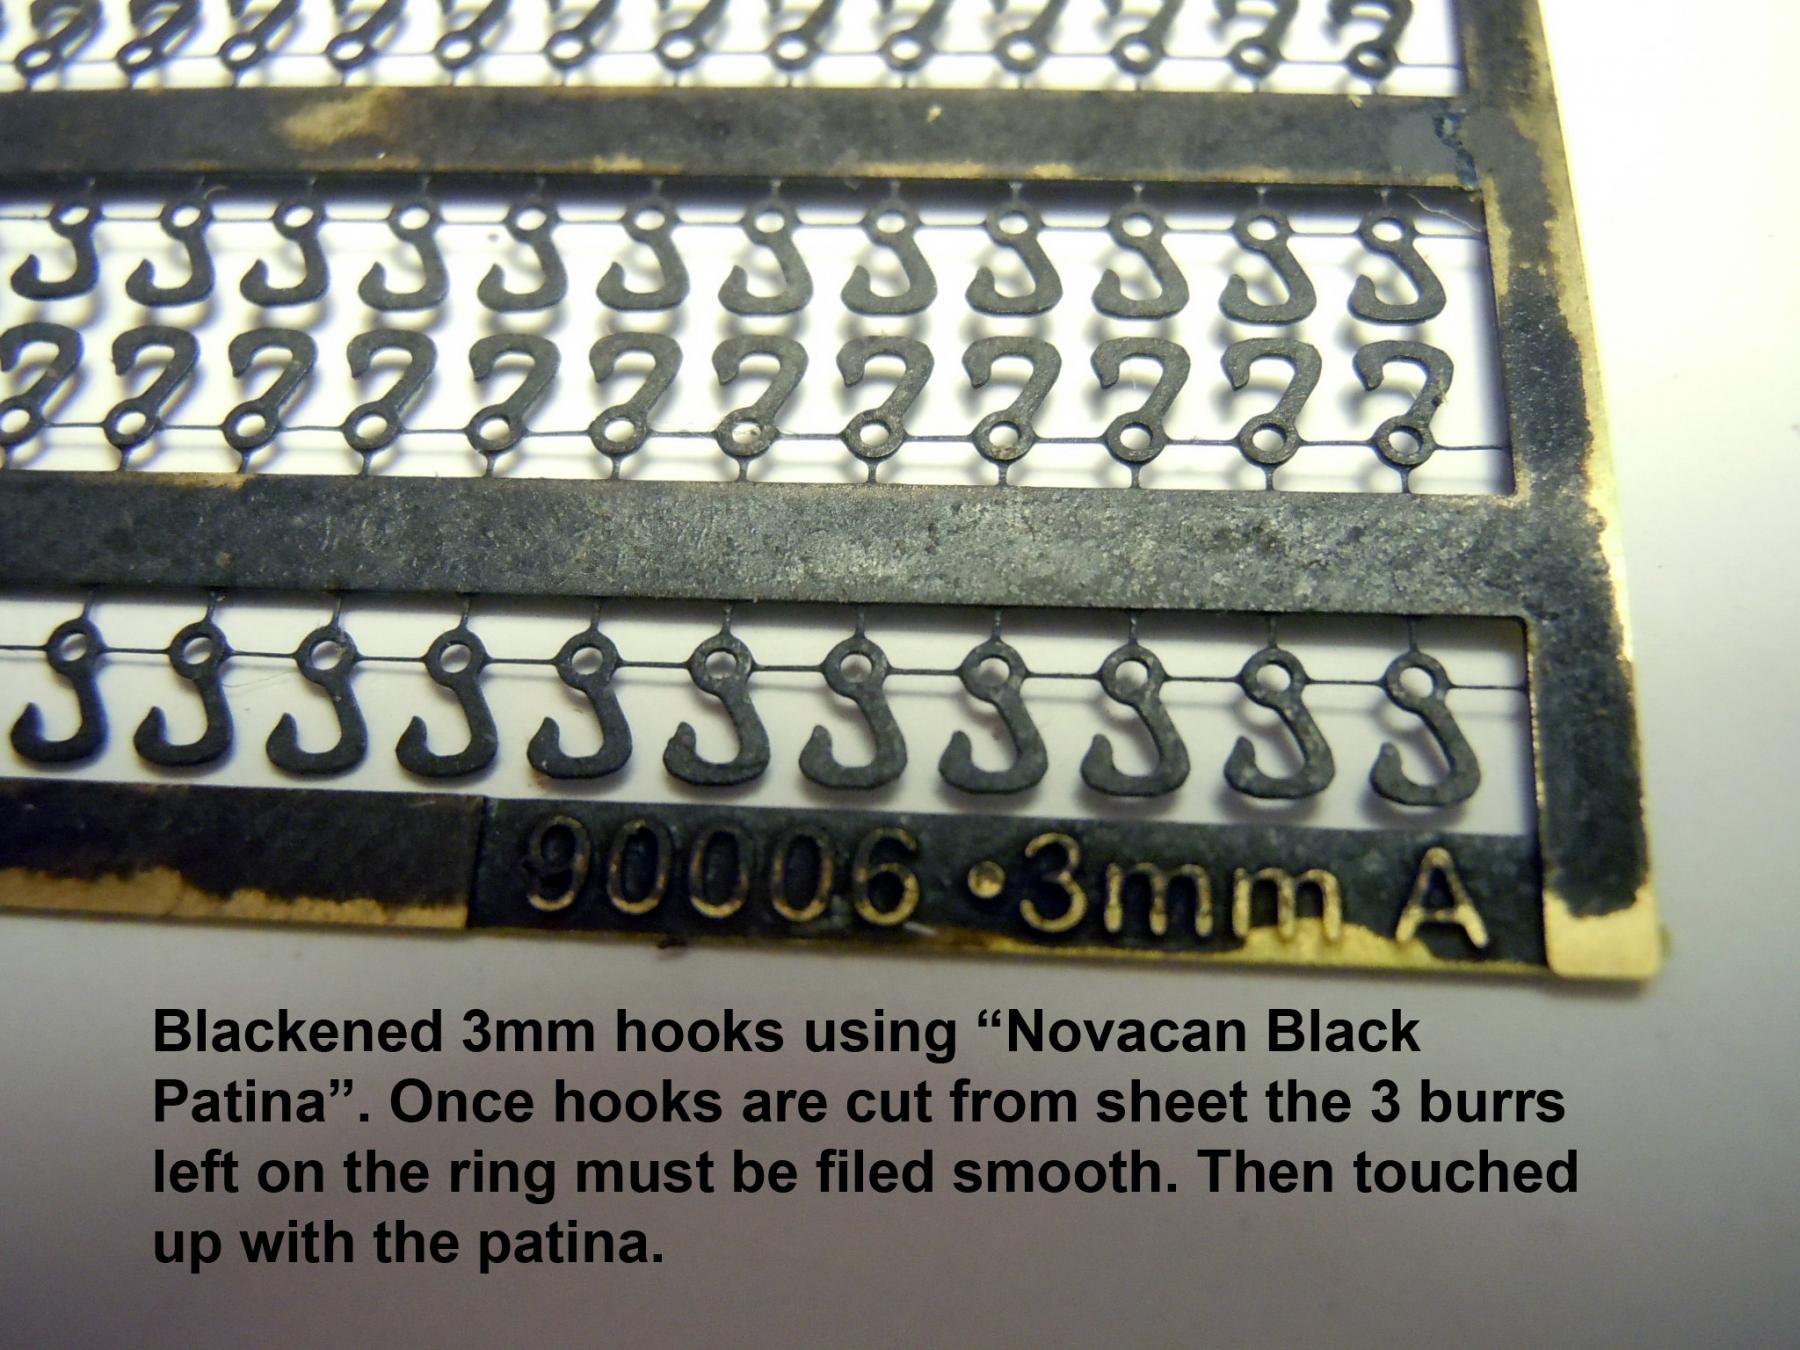
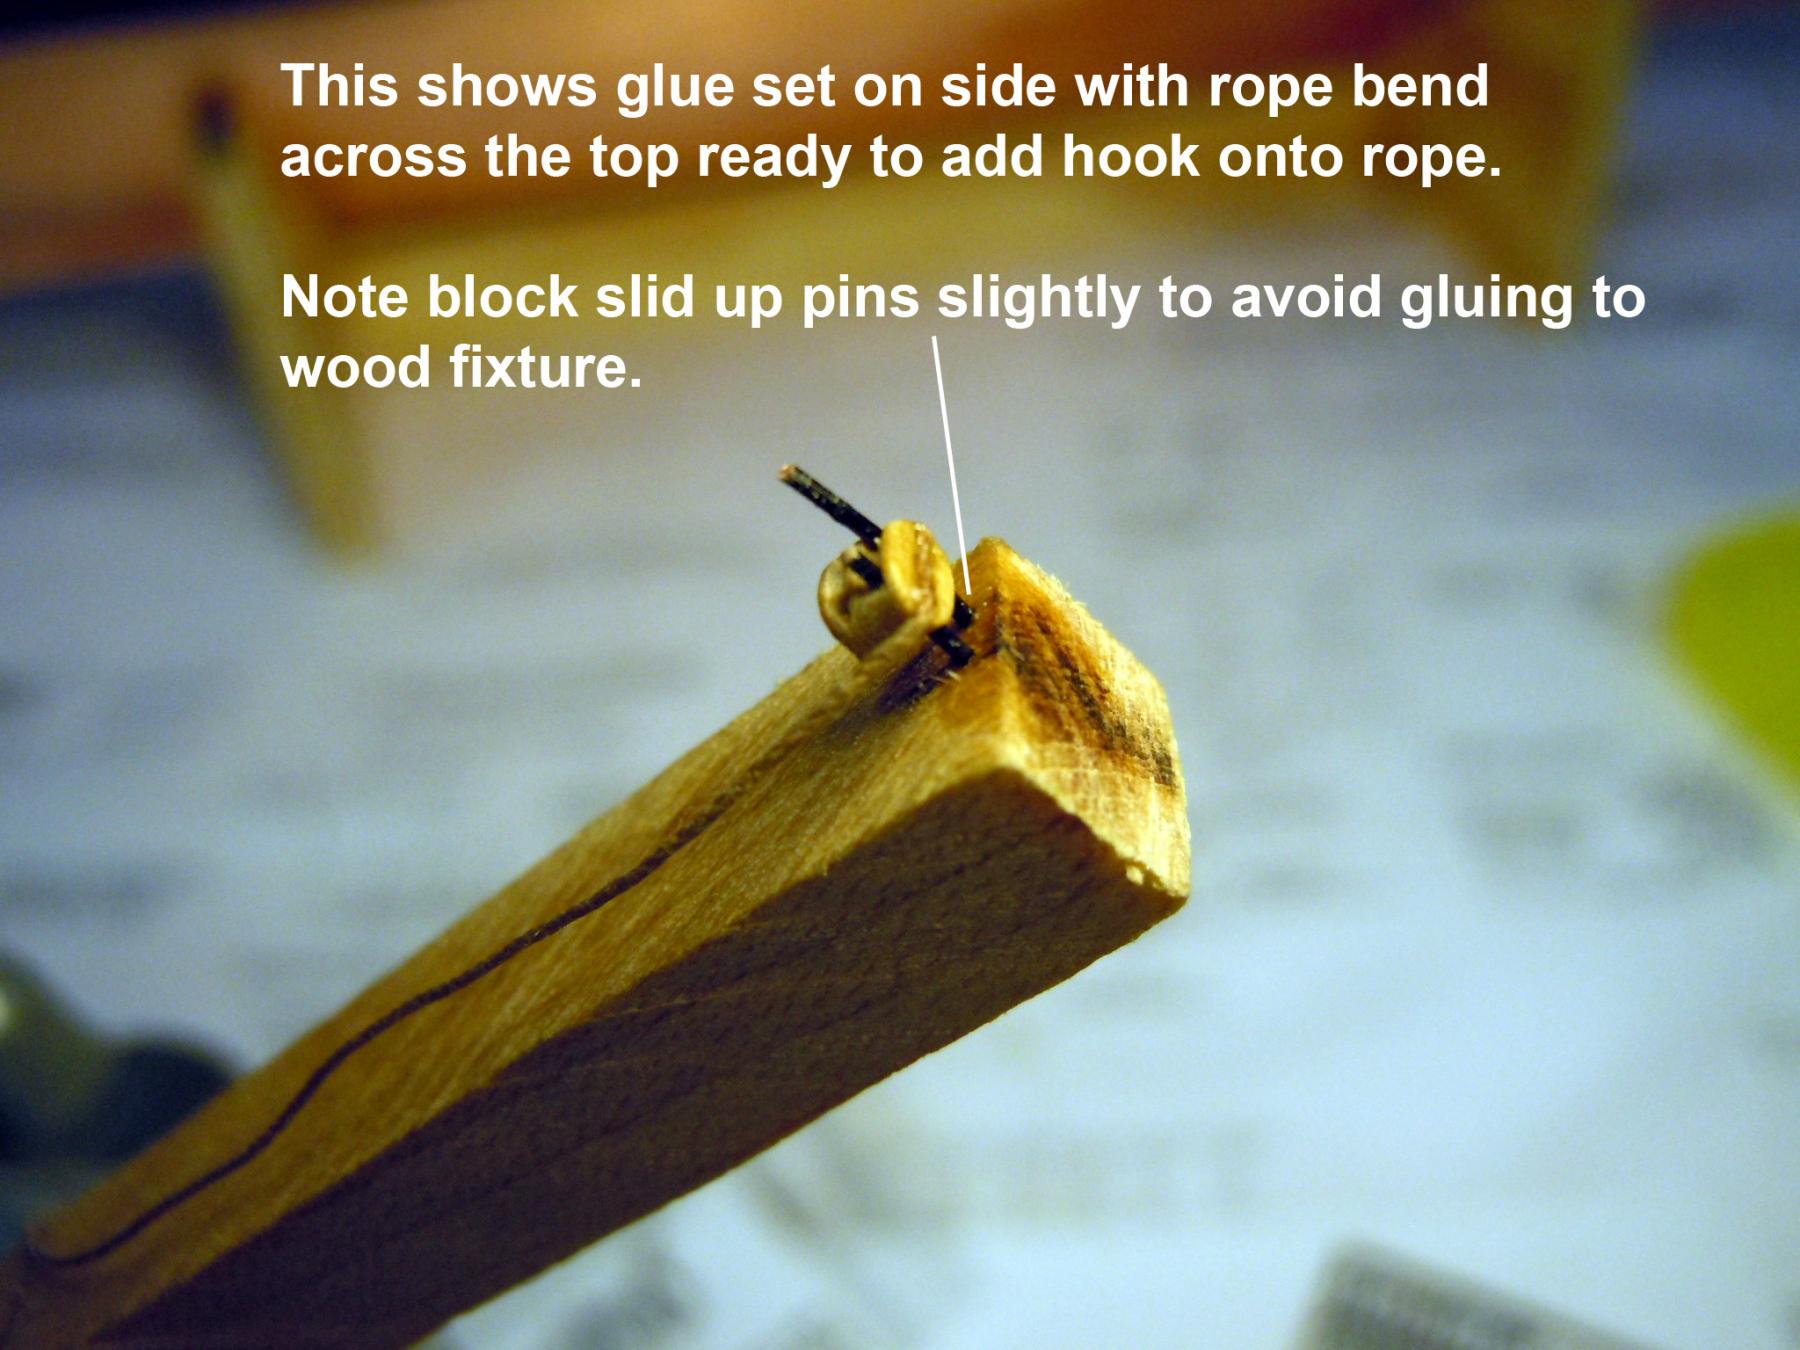
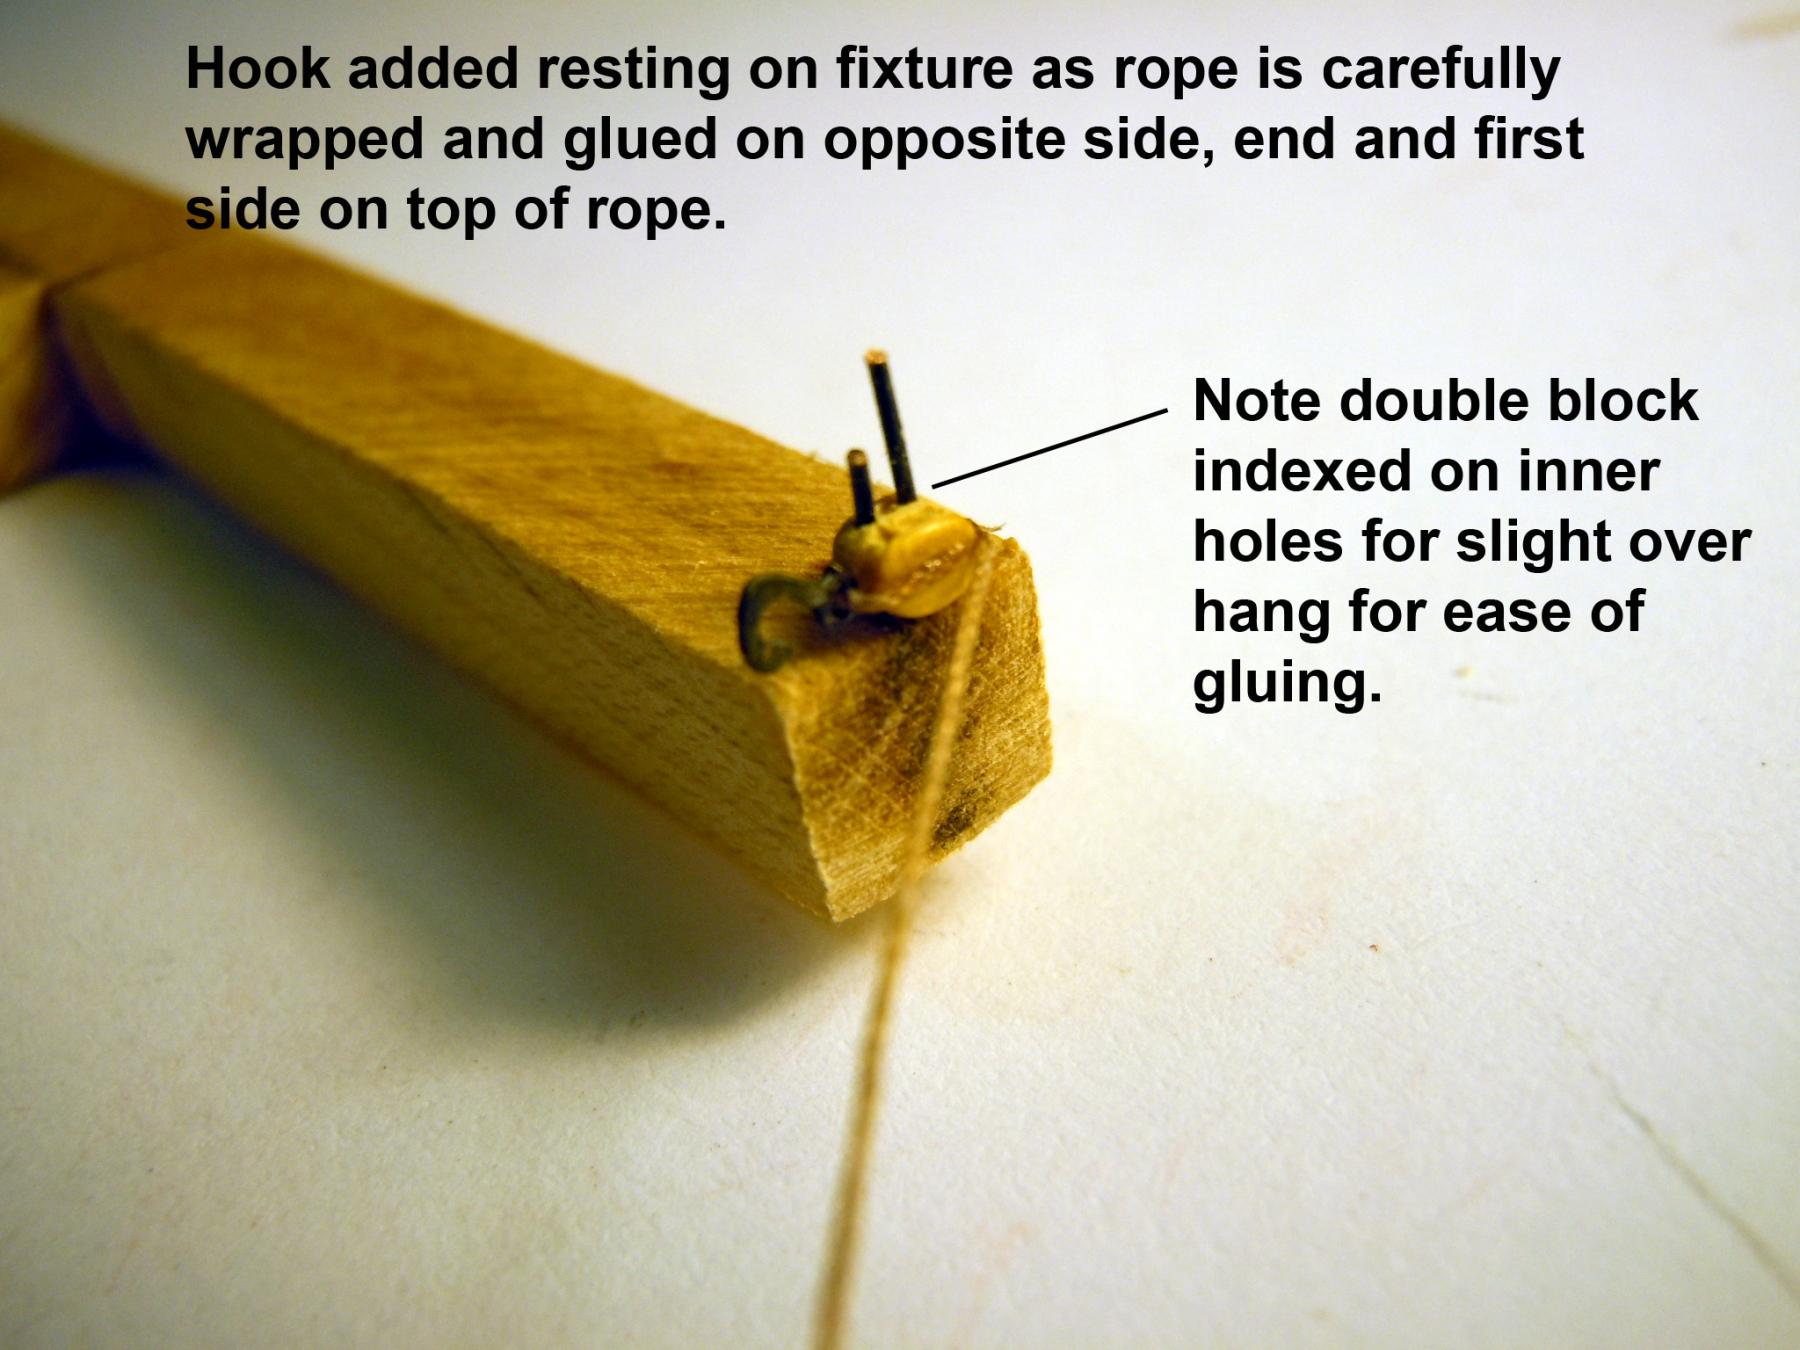
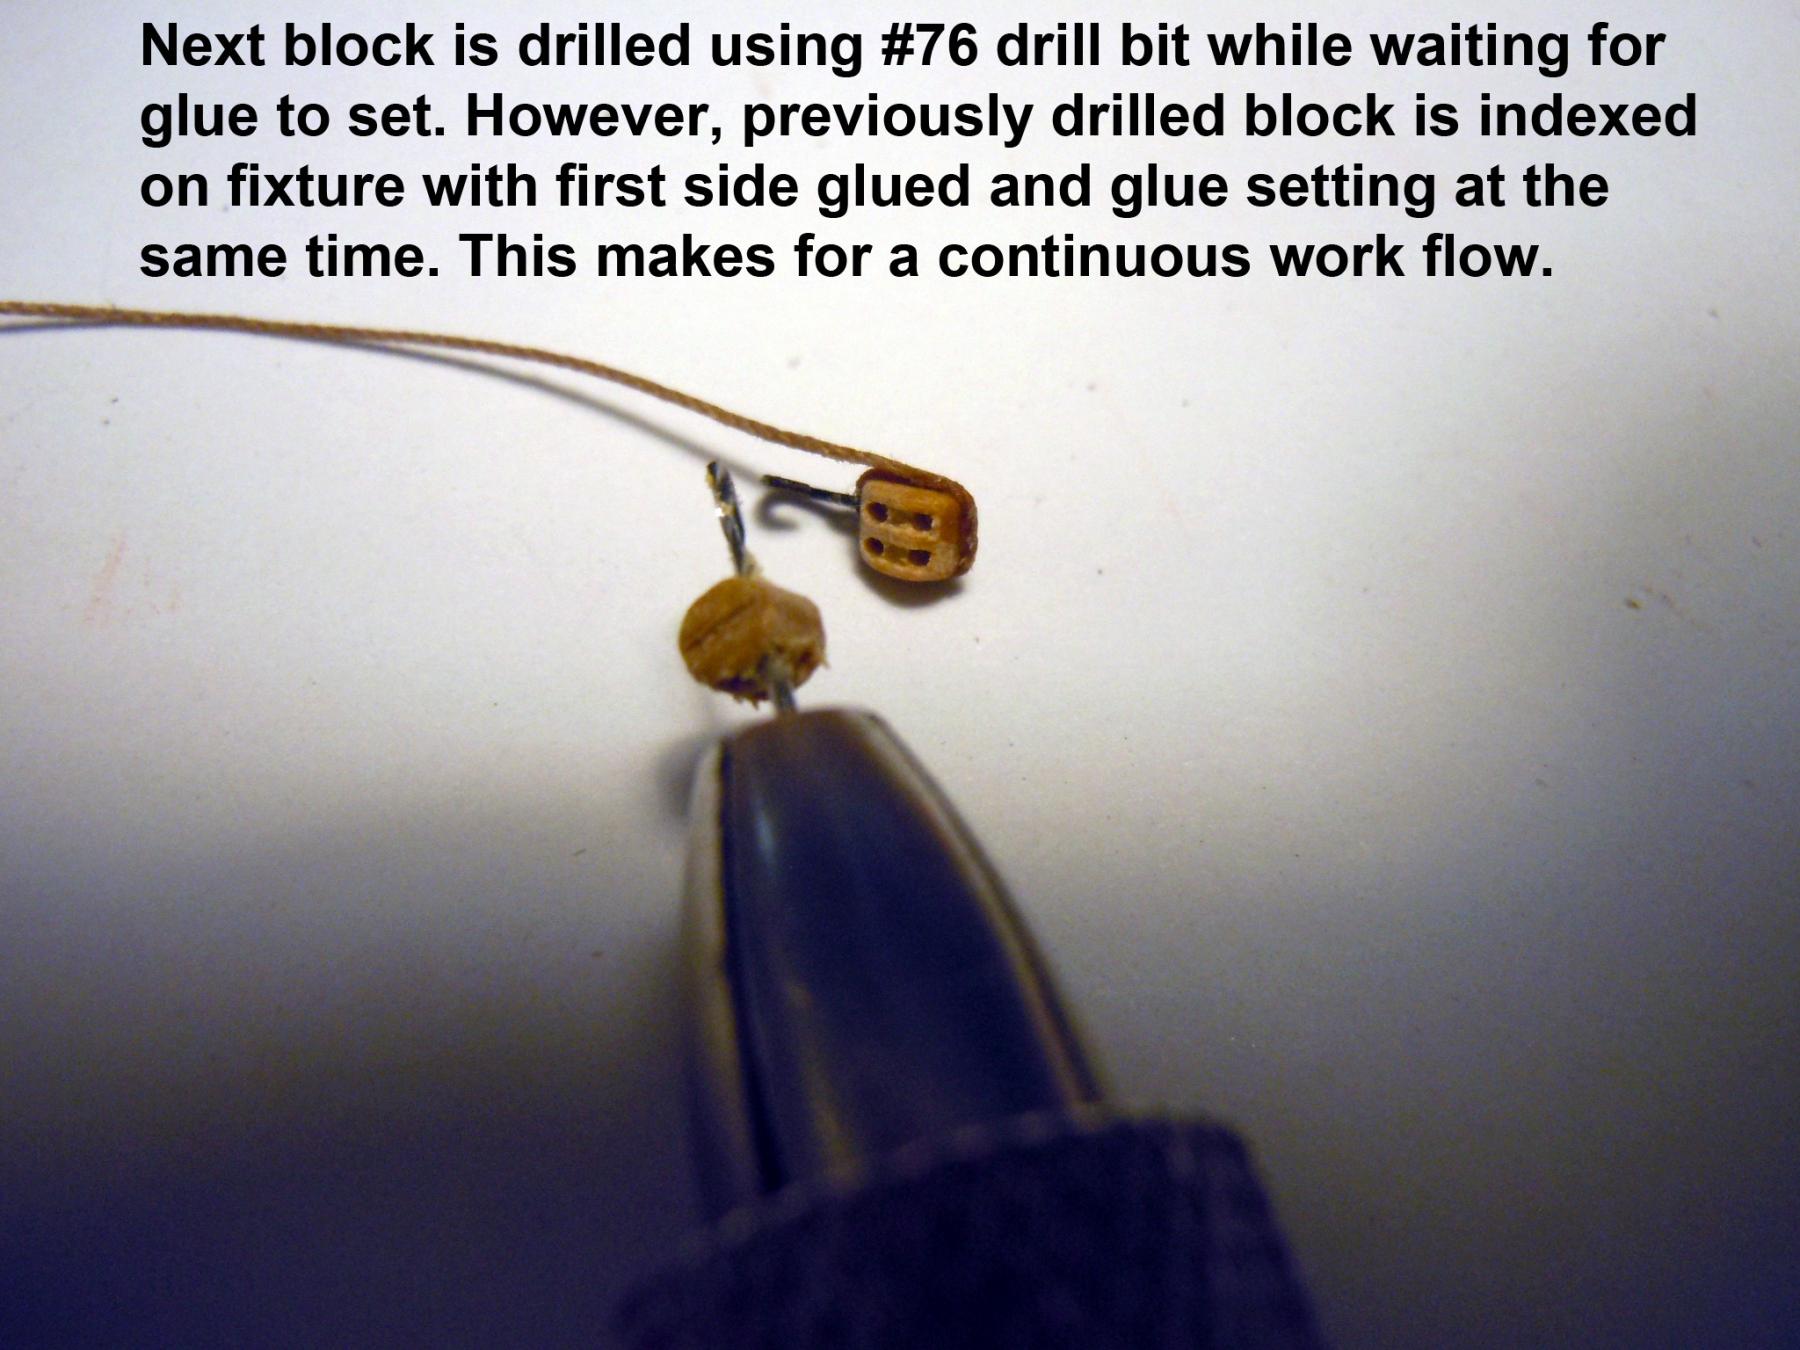
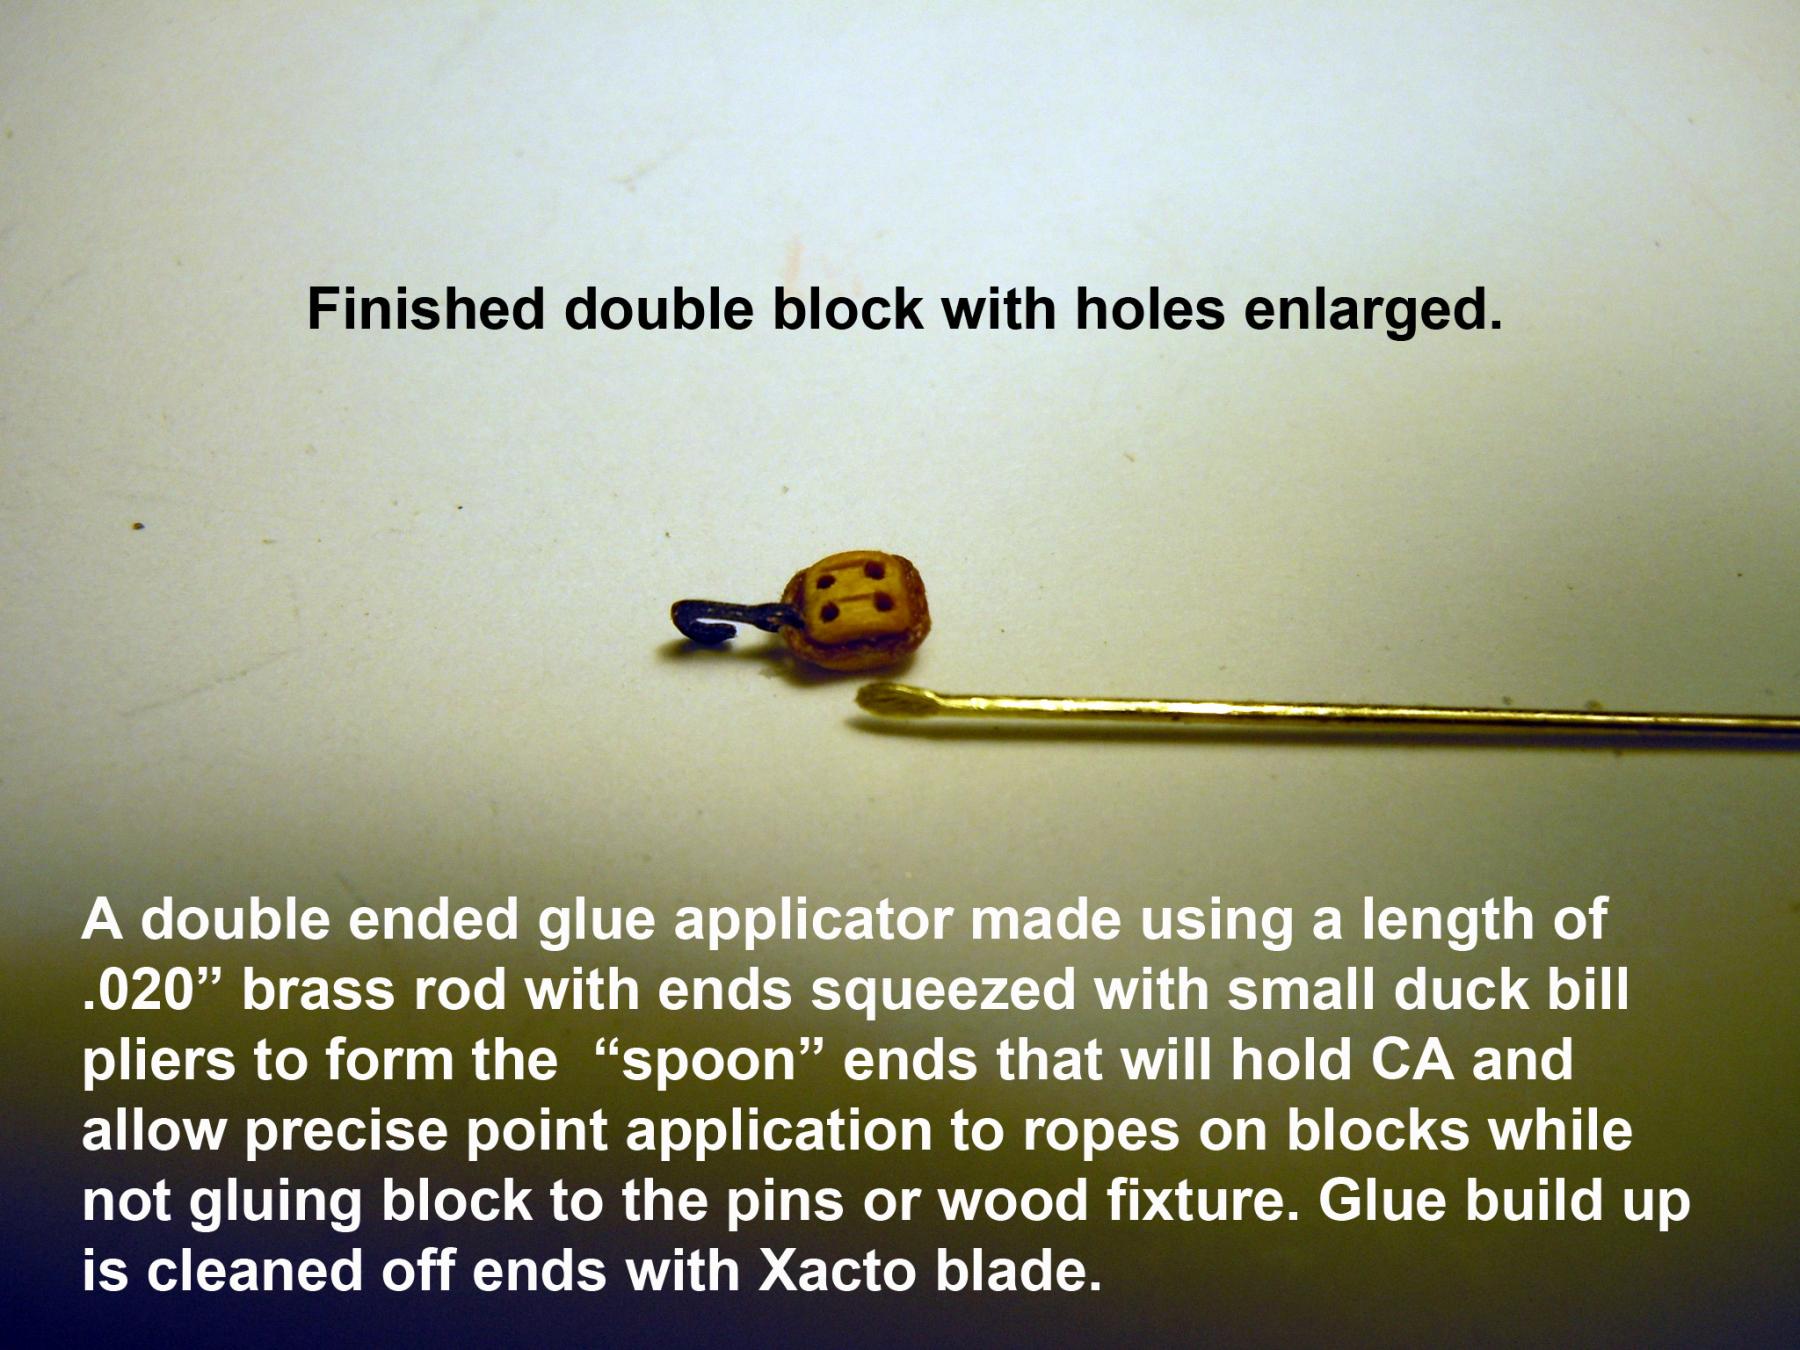
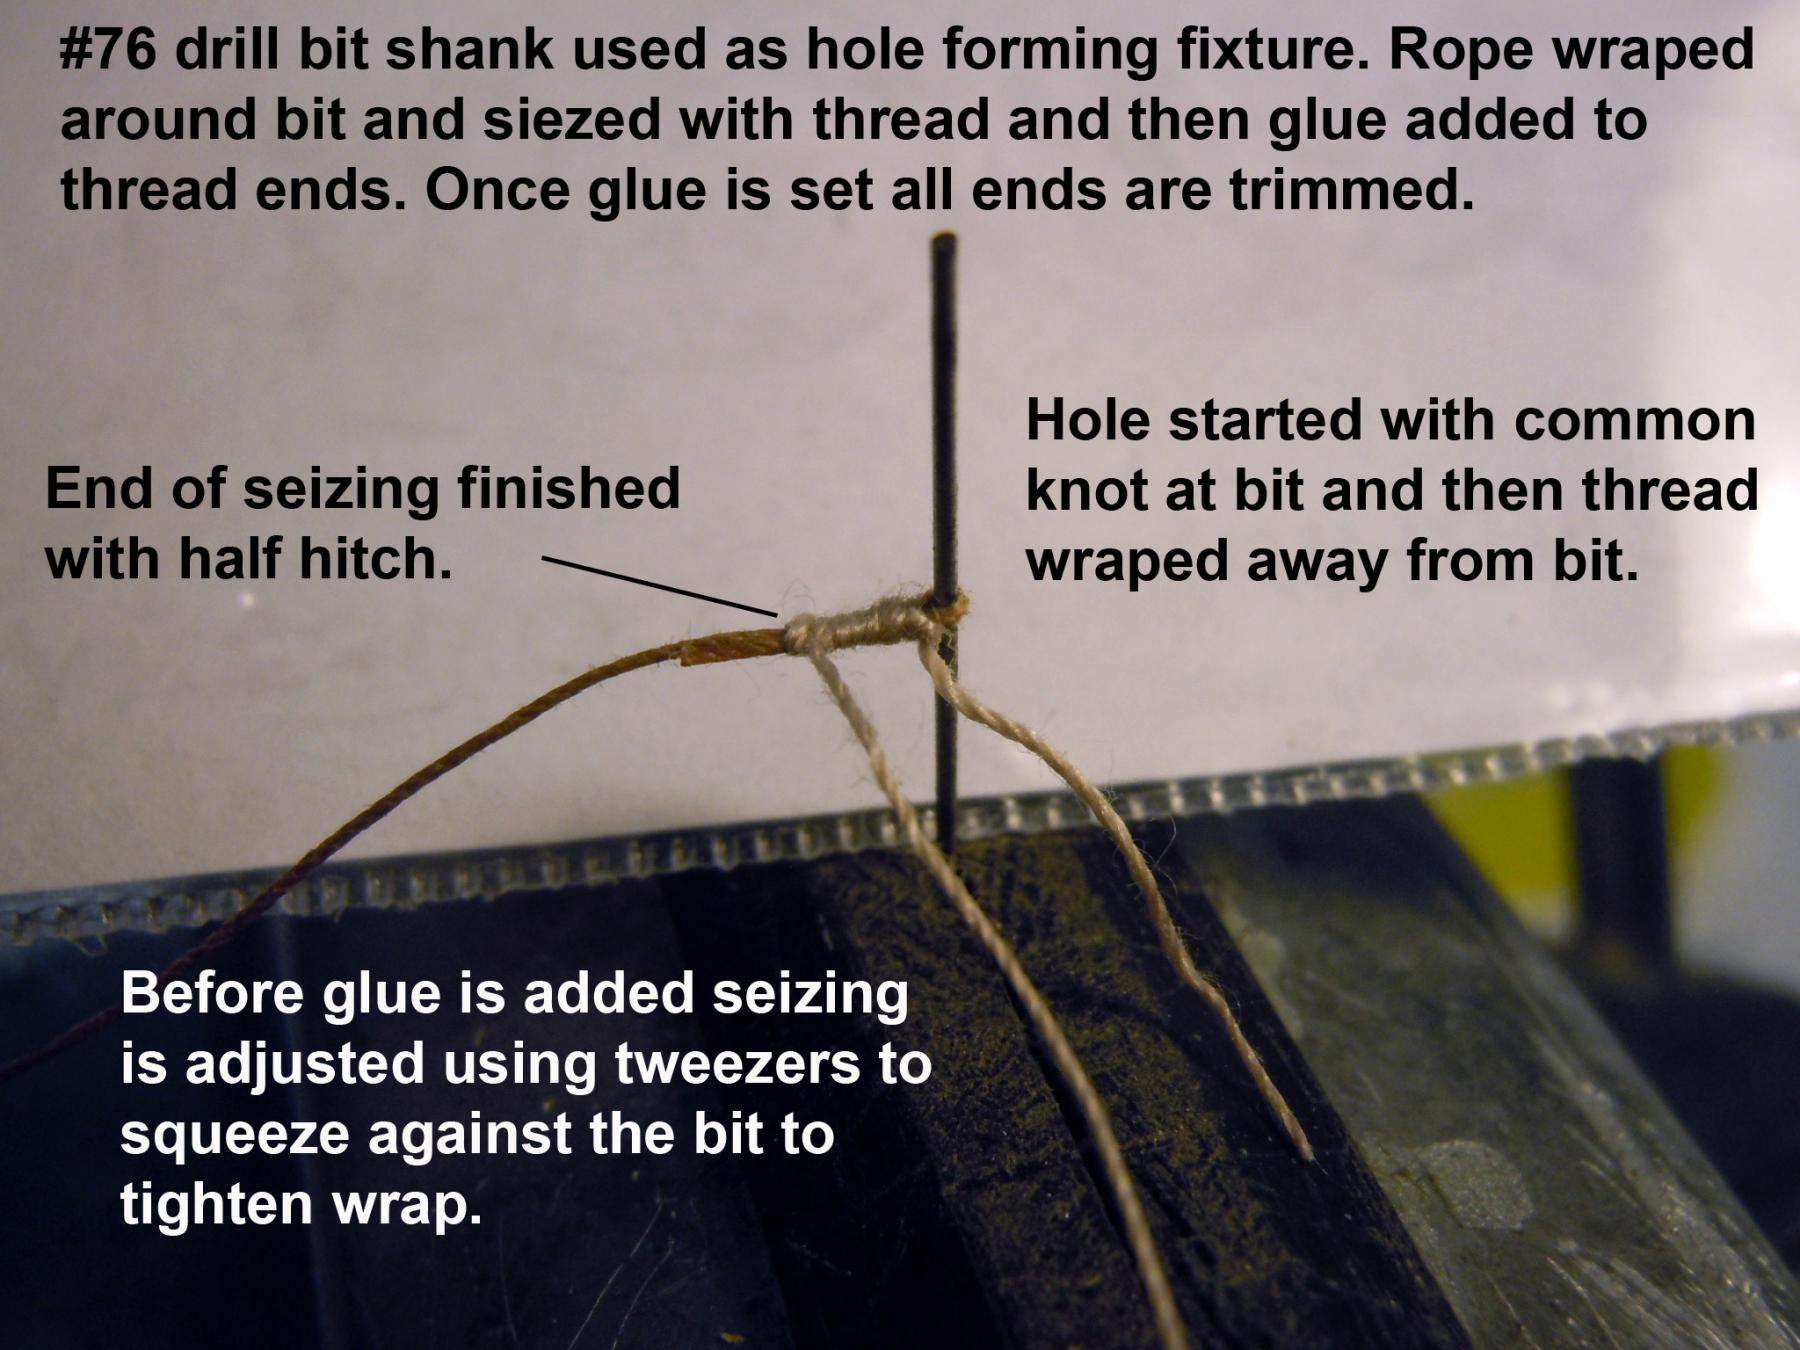
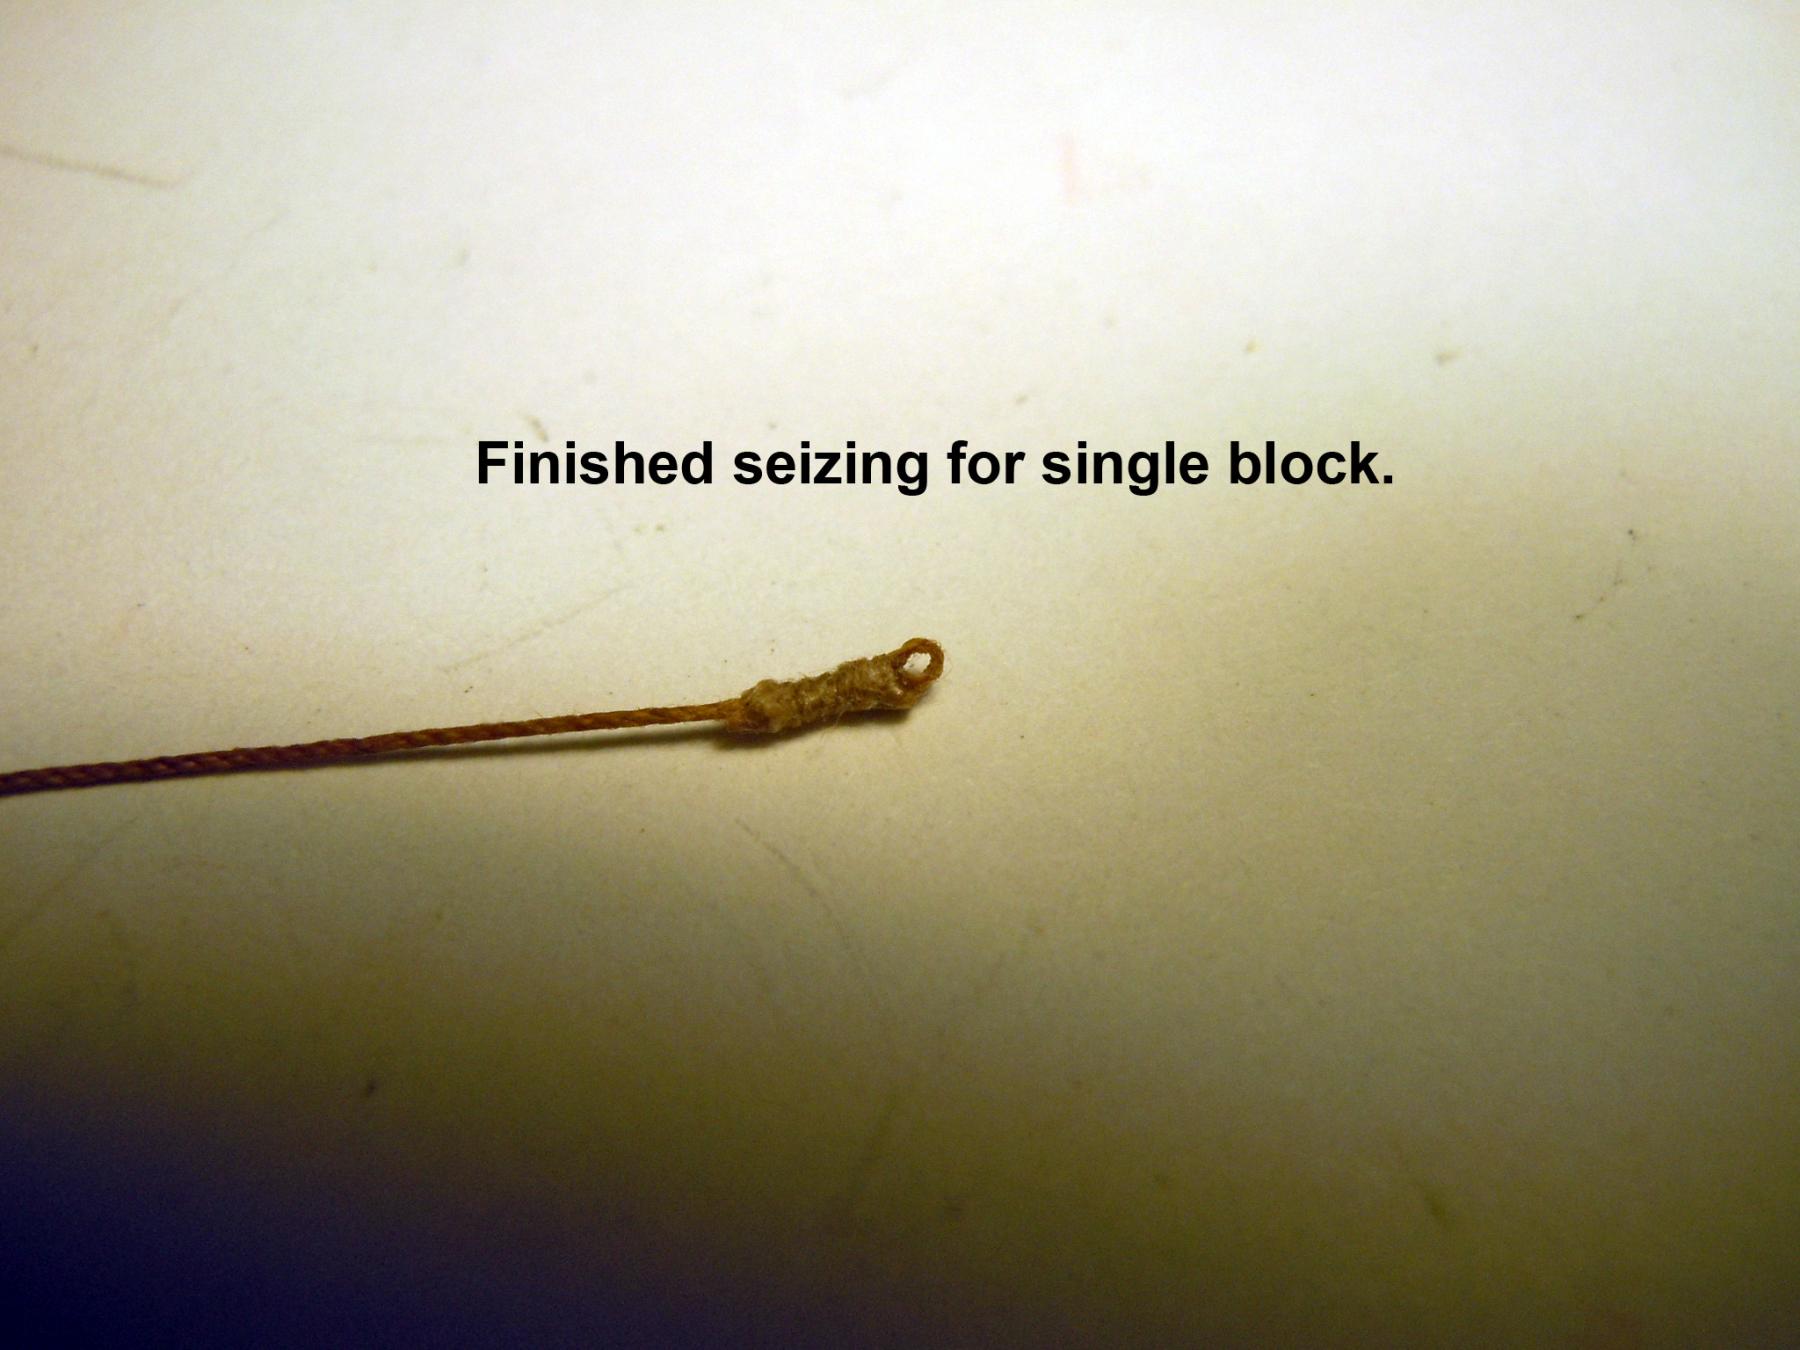
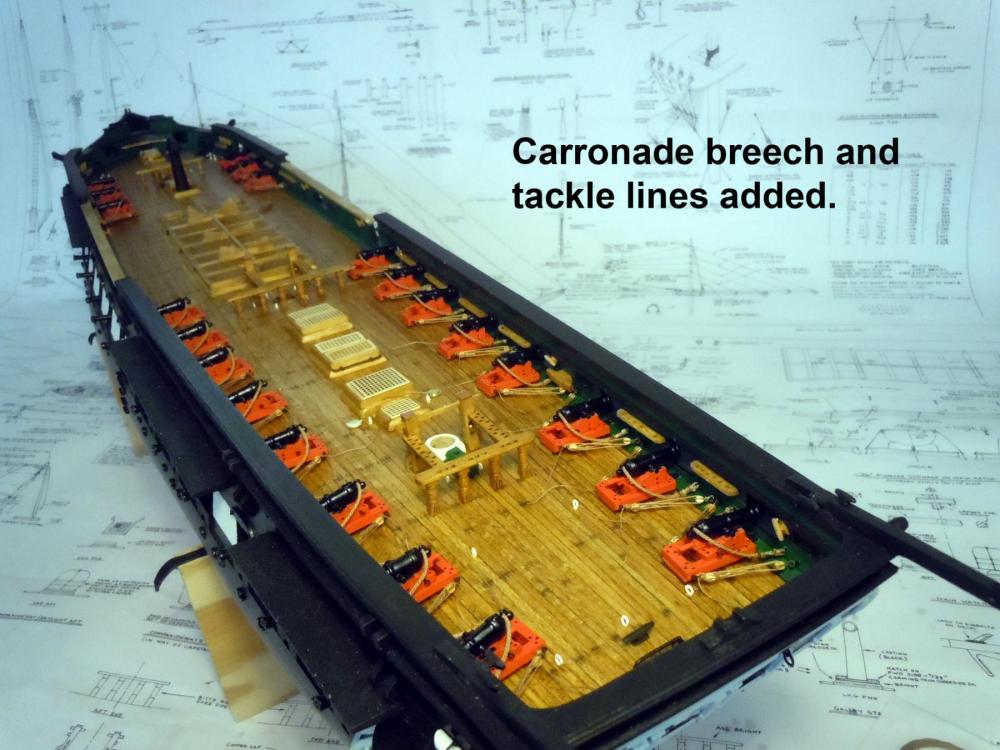
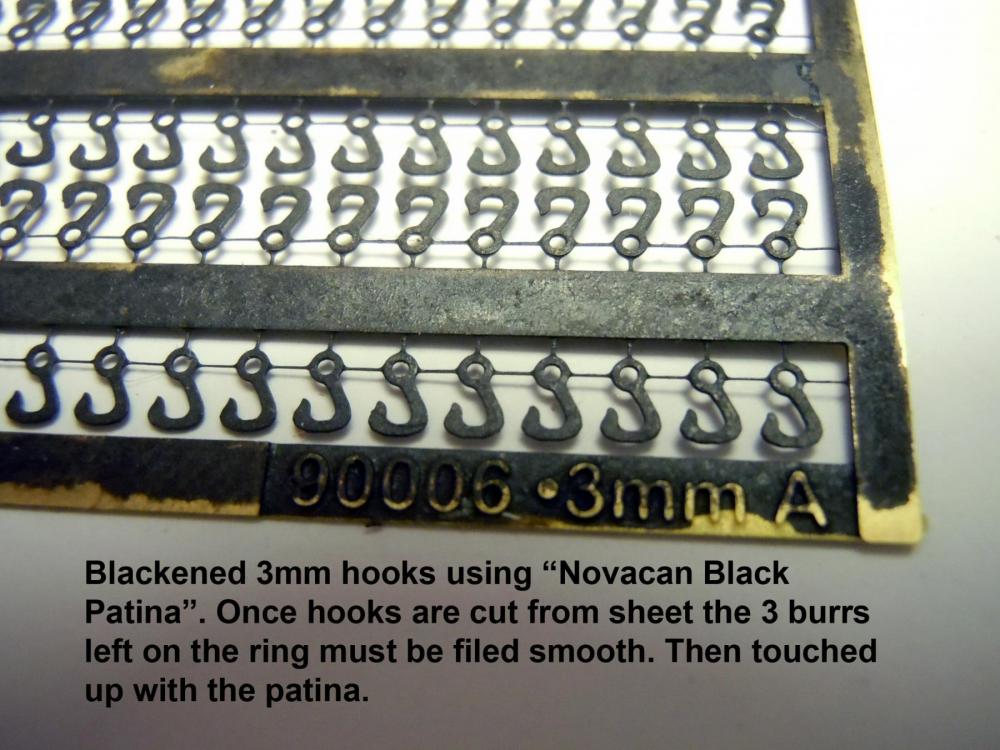
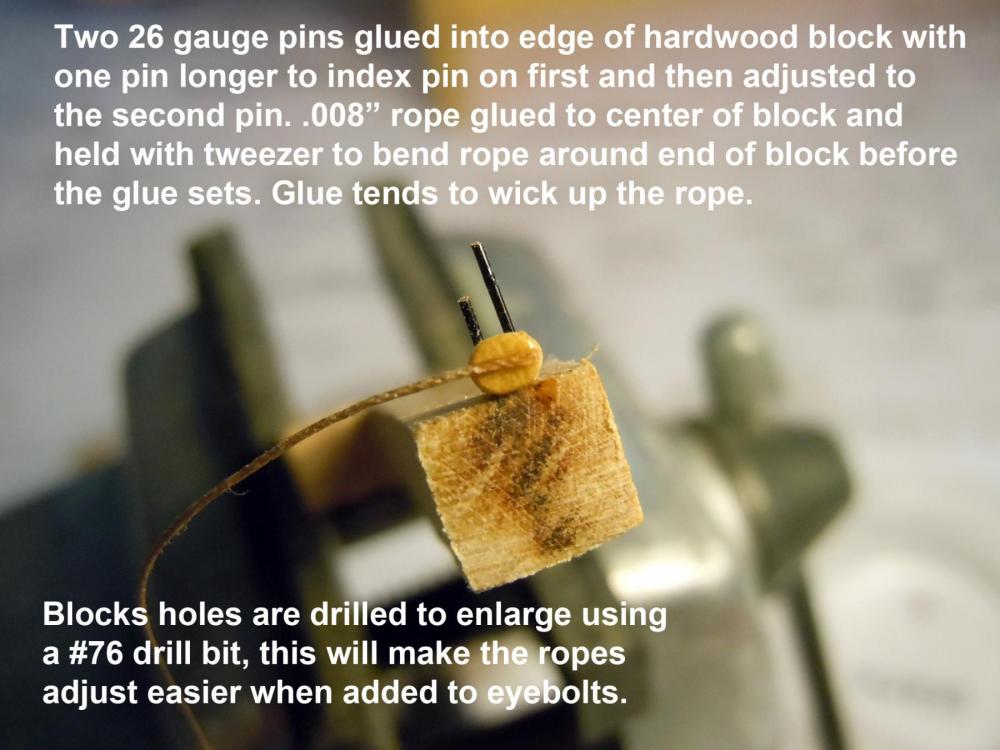
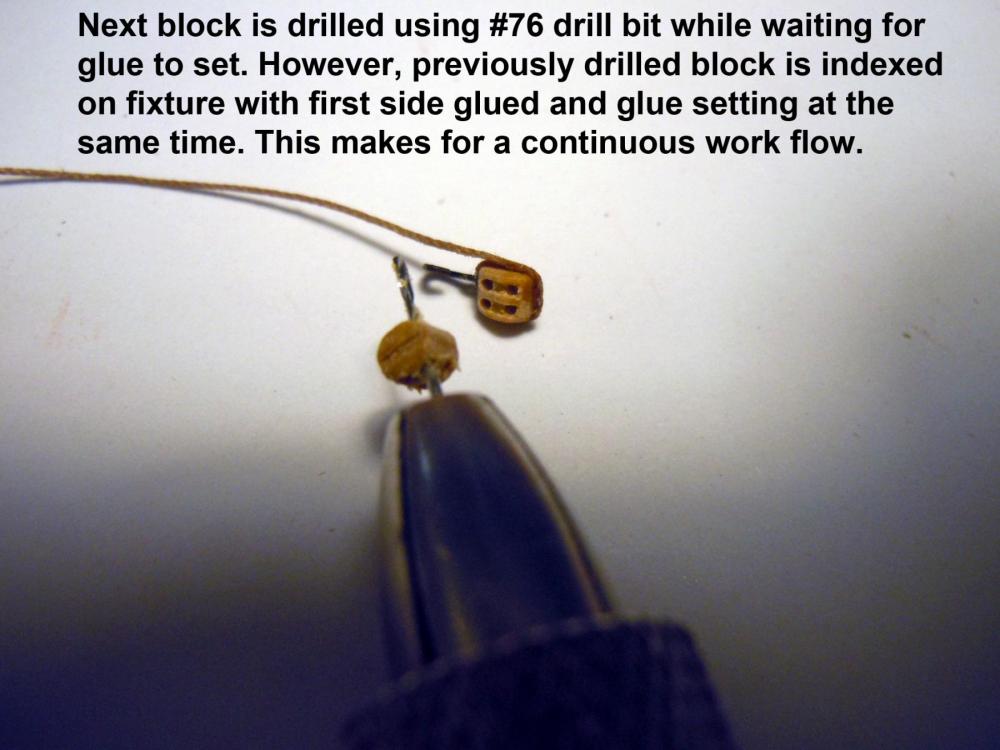
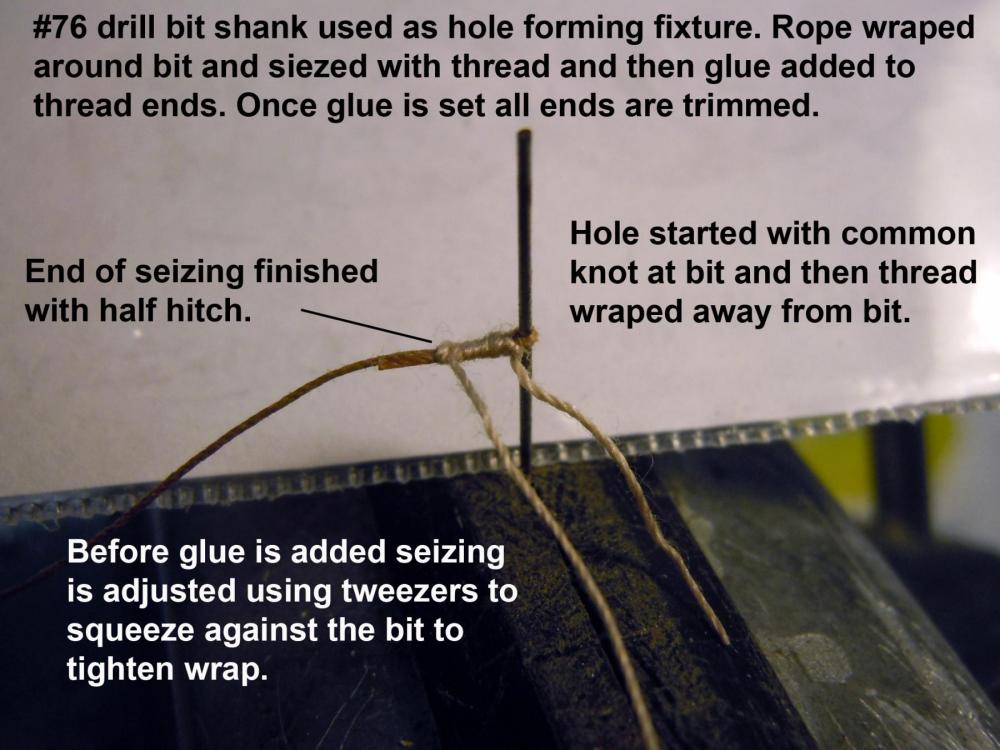
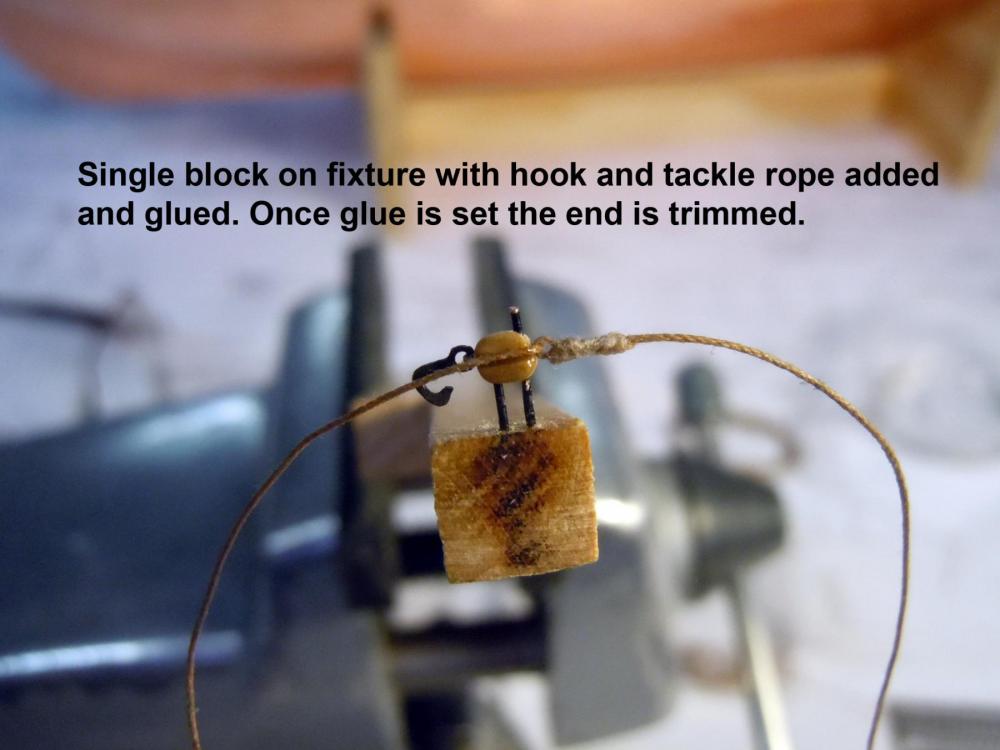
Now that all the breech lines are fitted but not glued in place and all holes for the tackle lines drilled I have moved on to the rigging of the tackle blocks using the 3 mm hooks, 3/32" single and double blocks and .008" light brown rope, all from Syren and again Chuck is to be complimented on his quick order fulfillment. Now onto the tedious, slow and eye straining work. First I blackened the hooks while still attached to the master carrier sheet using "Novacan Black Patina". One tip for blackening is to heat the cleaned brass sheet under a light bulb and then add the patina to both sides using a brush or Q-tip and may require up to two or three applications to attain the depth of color. Next I made a fixture to hold the tiny blocks by gluing two lengths of 26 gauge wire into the edge of a piece of hardwood spaced apart the same distance as the holes in the blocks. One is longer than the other by the thickness of the block which makes it much easier to index one hole at a time rather than two. The hardwood strip is held at a 45 degree angle in a panavise to add the first end of the stropping rope. Next each of the block holes were enlarged using #76 drill bit, this makes it easier to add to the fixture and insert the rope ends into while rigging the blocks and also smoother to adjust in the final adjustment. I did the double blocks first to develop the technique and these were the easier to do since they only need the hook to be added. One thing to note is when gluing the first end pinch the block and glued rope end and bend the rope at 90 degrees while the glue is still wicking in the rope; this will make it easier to add the hook. Also avoid gluing the block to the fixture wires and hardwood. Next the hook is added and centered on the end and the rope carefully wrapped around the complete block and glued in place and set aside. The excess end of the rope should be trimmed once the glue has set. While waiting for the glue to set drill the holes in the next double block. Here is the finished double block and also how I made a double ended CA glue applicator to carefully add the CA without gluing the block to the fixture. The CA will build up over time on the ends and they are easily cleaned with an Xacto blade Next can the single blocks which required not only the hook but the tackle line as well. I held a #76 drill bit in the jaws of a Panavise with the smooth shank end up to form the rope hole. I wet the end of the rope with water and bent the end and inserted the bent end through the loop formed by tying a common knot in small whipping thread. The two were then set on the end of the shank and the thread knot carefully tightened against the shank. The a half hitch can the be tied to hold the rope in place while whipping the rope end in place. The end is tied off again with a half hitch. CA is then carefully added to the whipping thread and short end of the rope (bend end away from tackle rope first) and the hole end around the drill shank last and move the rope back and forth to prevent the CA from setting on the shank. Just FYI I started with a 5" length of rope this may be able to be shortened to 4". Here is the rope end with formed hole. Next the single block is rigged with the hook and then the rope is added with the stropping end inserted into the rope hole and then wrapped around to the last side and glued in place. The assembly is removed from the fixture wires and set aside to allow the glue to set before trimming the end off. Note that the hook and rope hole need to be centered on their respective ends of the block when wrapping the stropping rope. The hook should be able to move while the rope will glue in place. Here are the first two tackle ropes in place. The were completely soaked with water before adding to the eyebolts and once added the tackle was pulled tight on each side centering the carronade in the middle of the gunport. Water can be added to both once set in place and be careful not to drip water on the deck and allow the ropes to dry in place and take a set. The end of the rope was tied off at the sled eyebolt per the reference of photos of the restored ship. It looks like a length went back to the waterway eyebolt after being tied and lashed to a rope. I am assuming that in a real scenario a rope coil was in place on the deck adjacent to the eyebolt on the sled end. Can anyone verify this assumption? Now back to tying holes in tackle ropes and adding to the single blocks. Glad I only have 42 more to do.


-
Darrel, thanks I suspected that but just wanted to verify.
-
Darrel, yes working that tiny does have challenges. I will need to make a fixture to hold the blocks similiar to what you did. I will be using the 3mm hooks and .008" light brown line and 3mm single and double blocks all from Syren. One question, did you paint or stain your hooks?
-
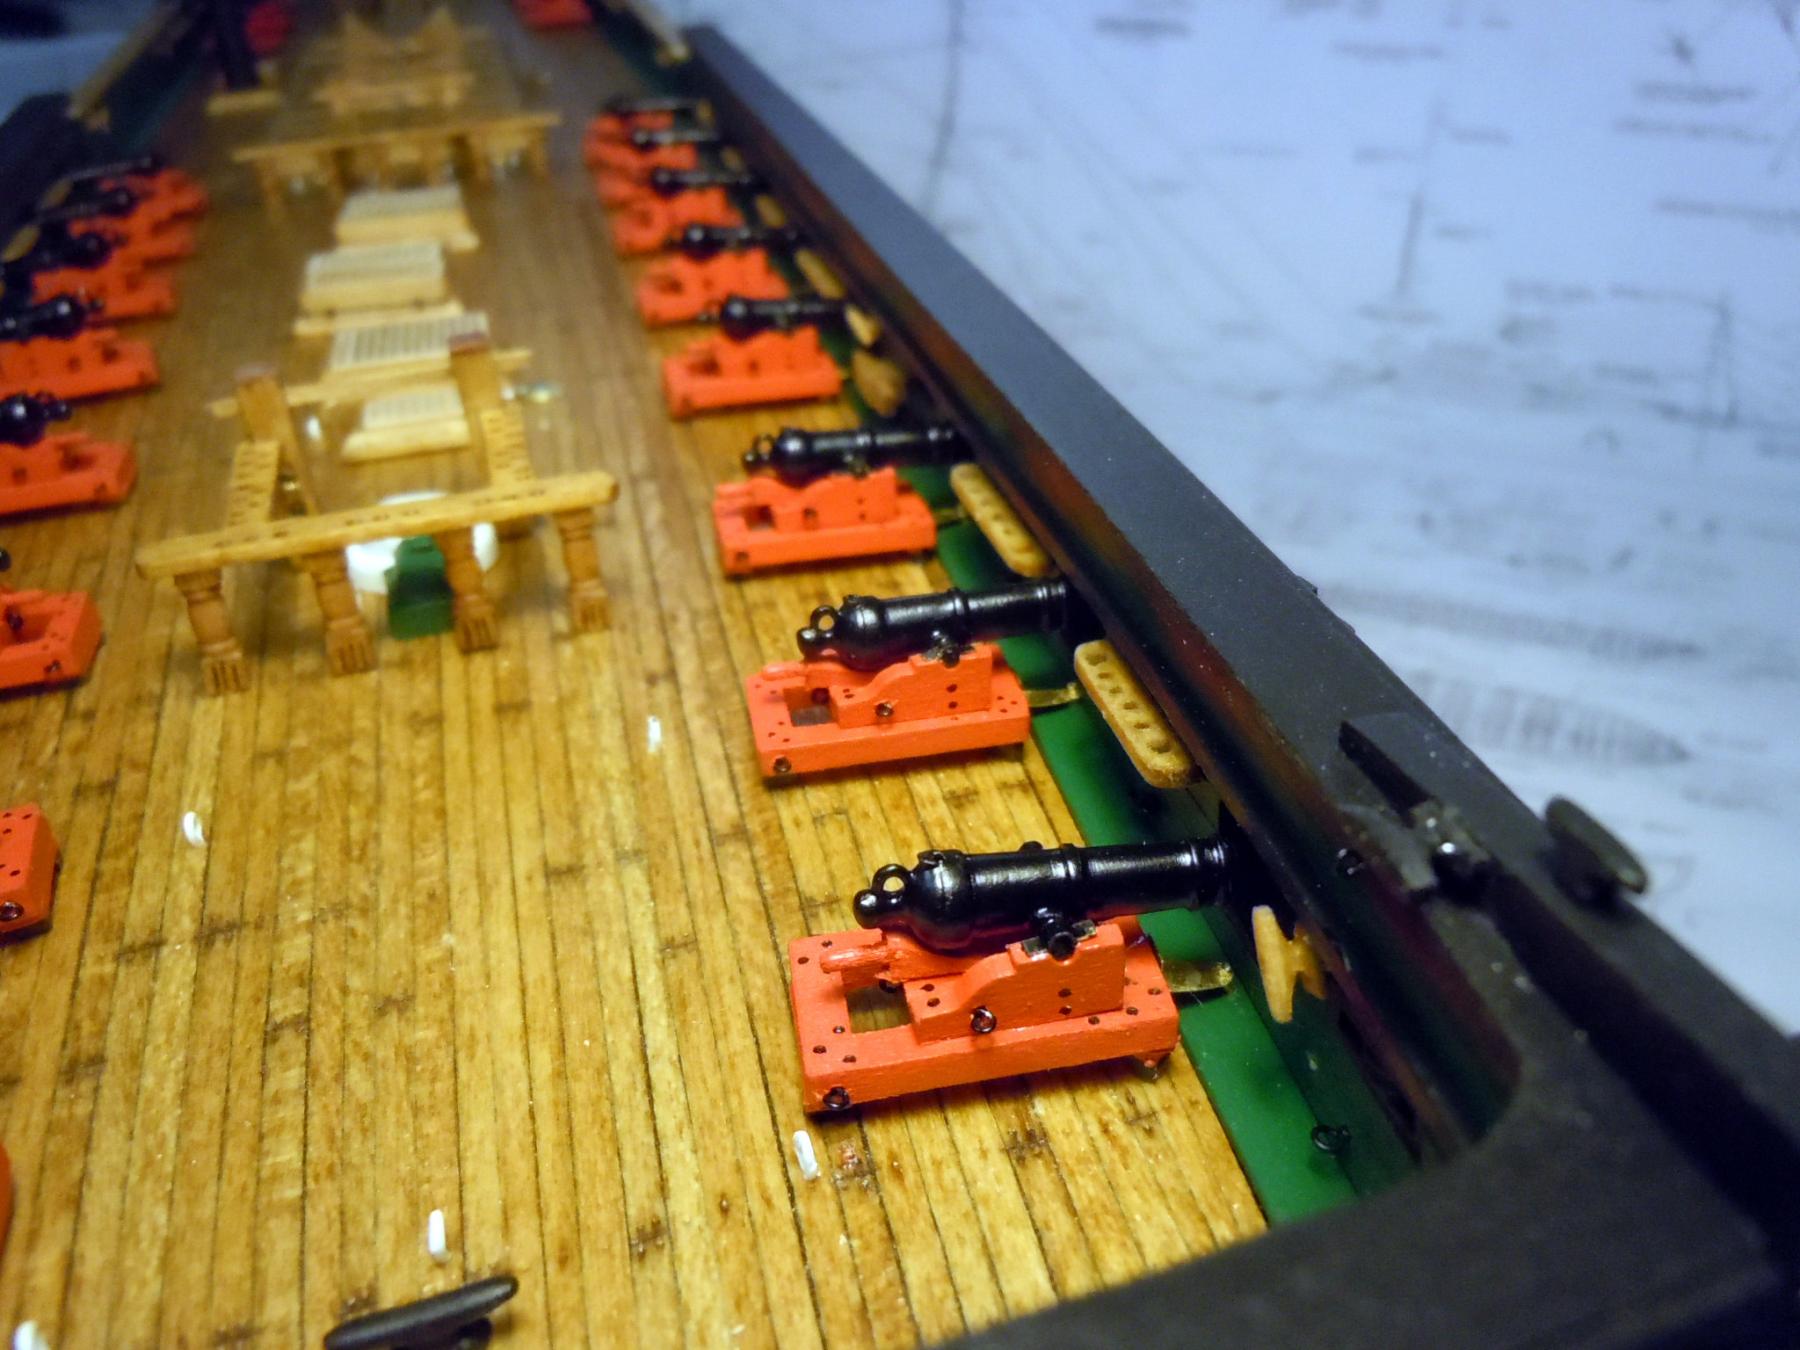
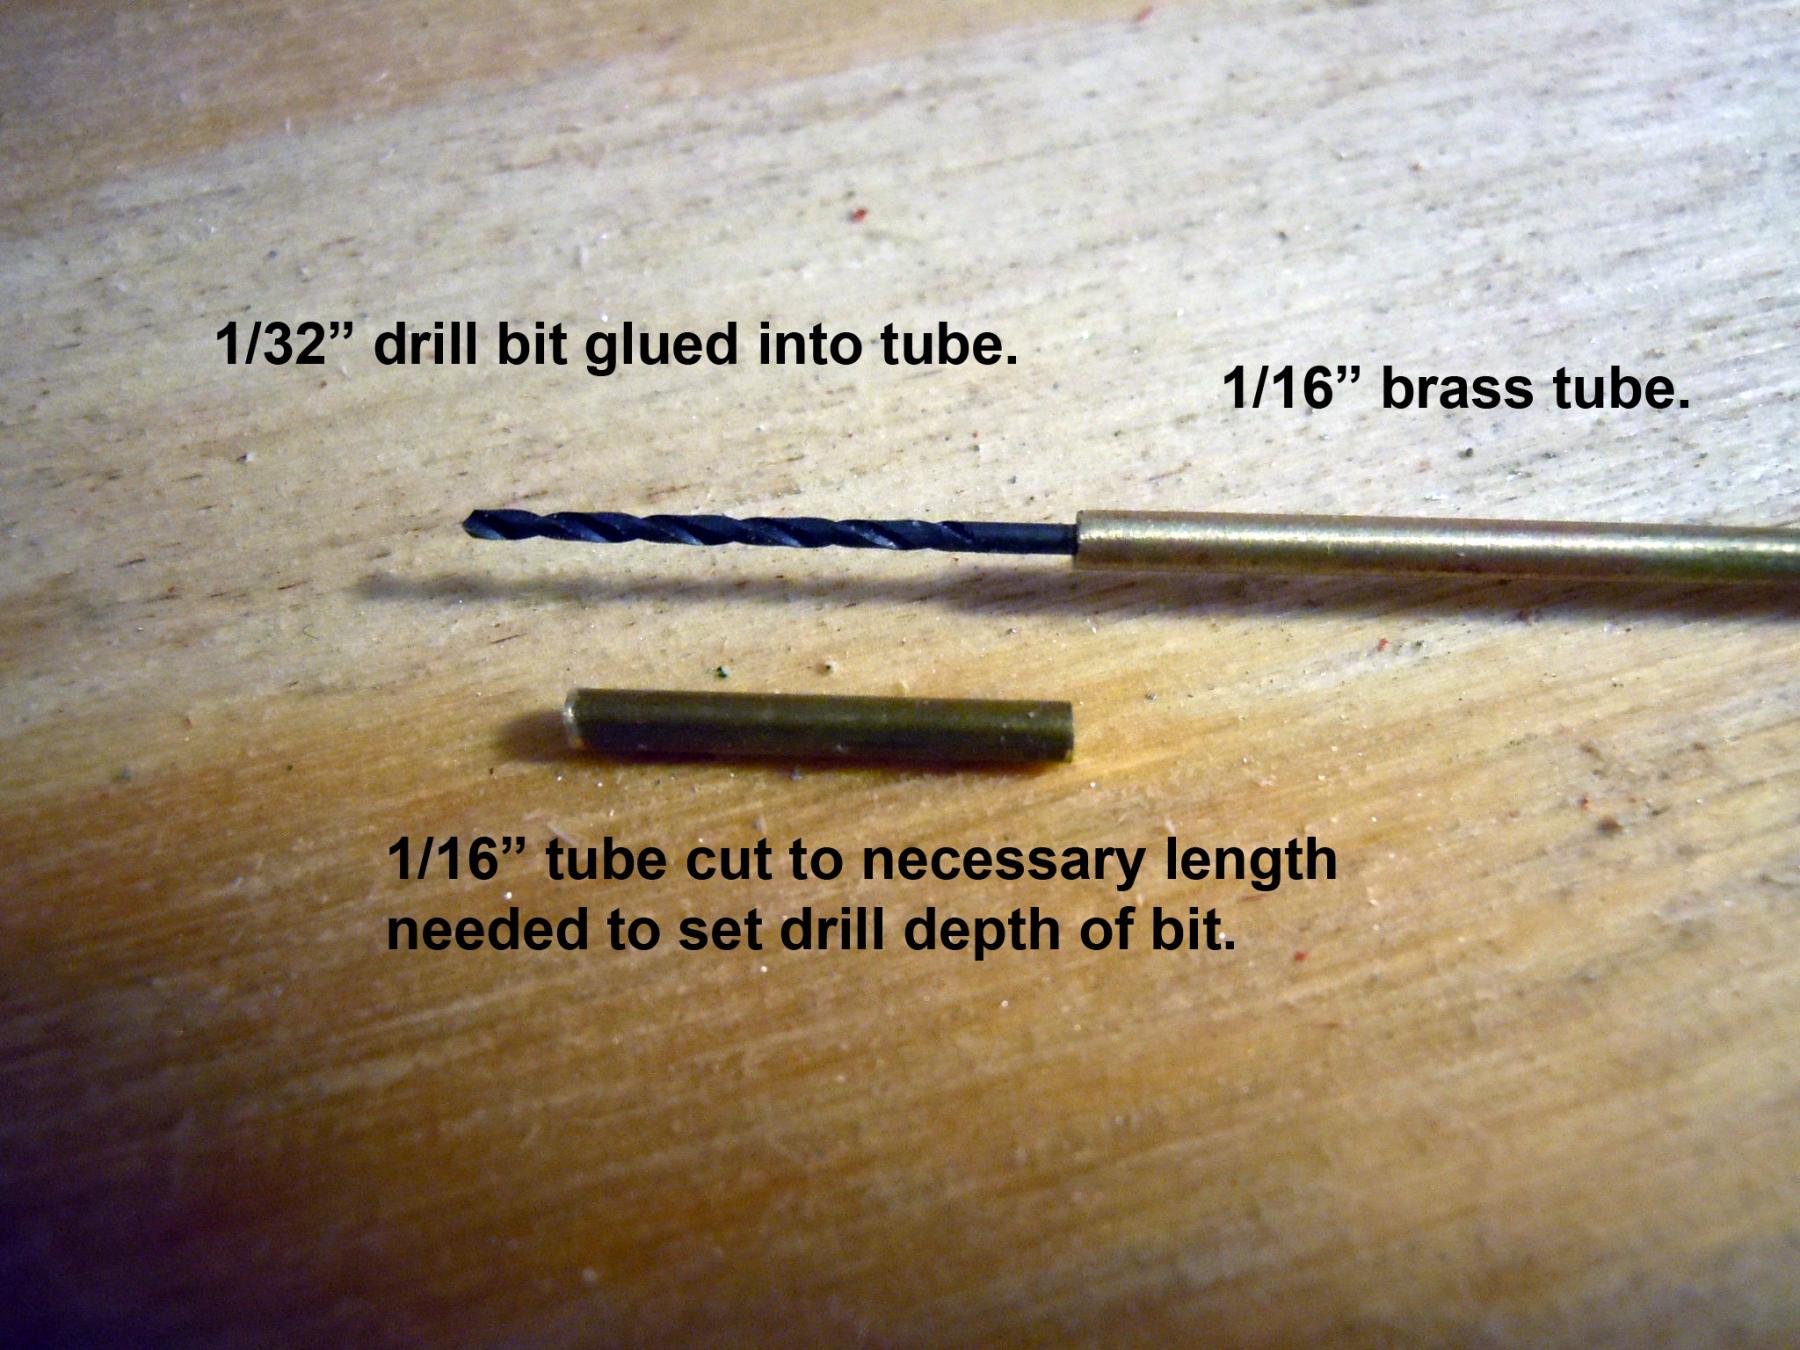
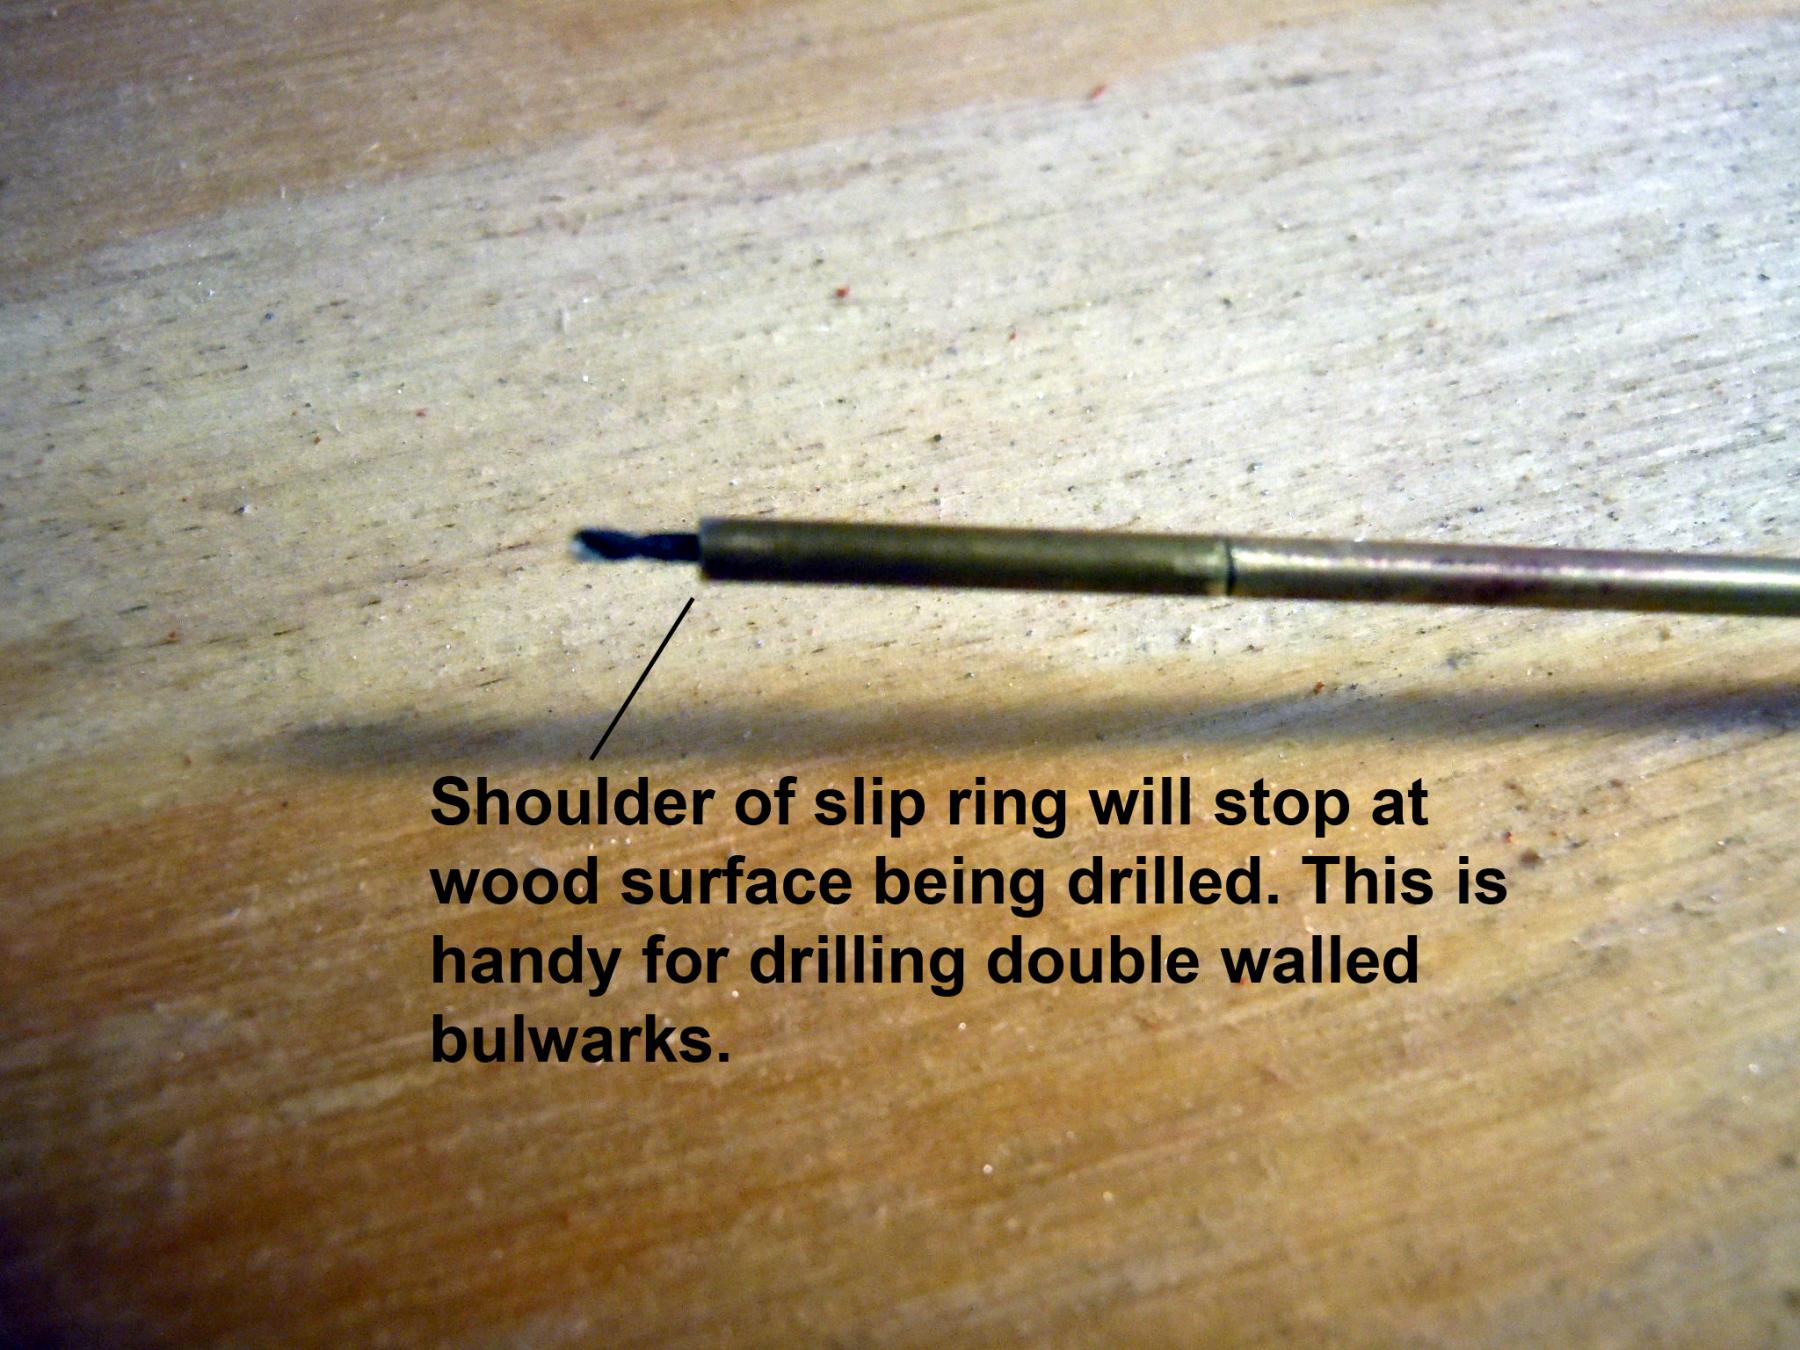
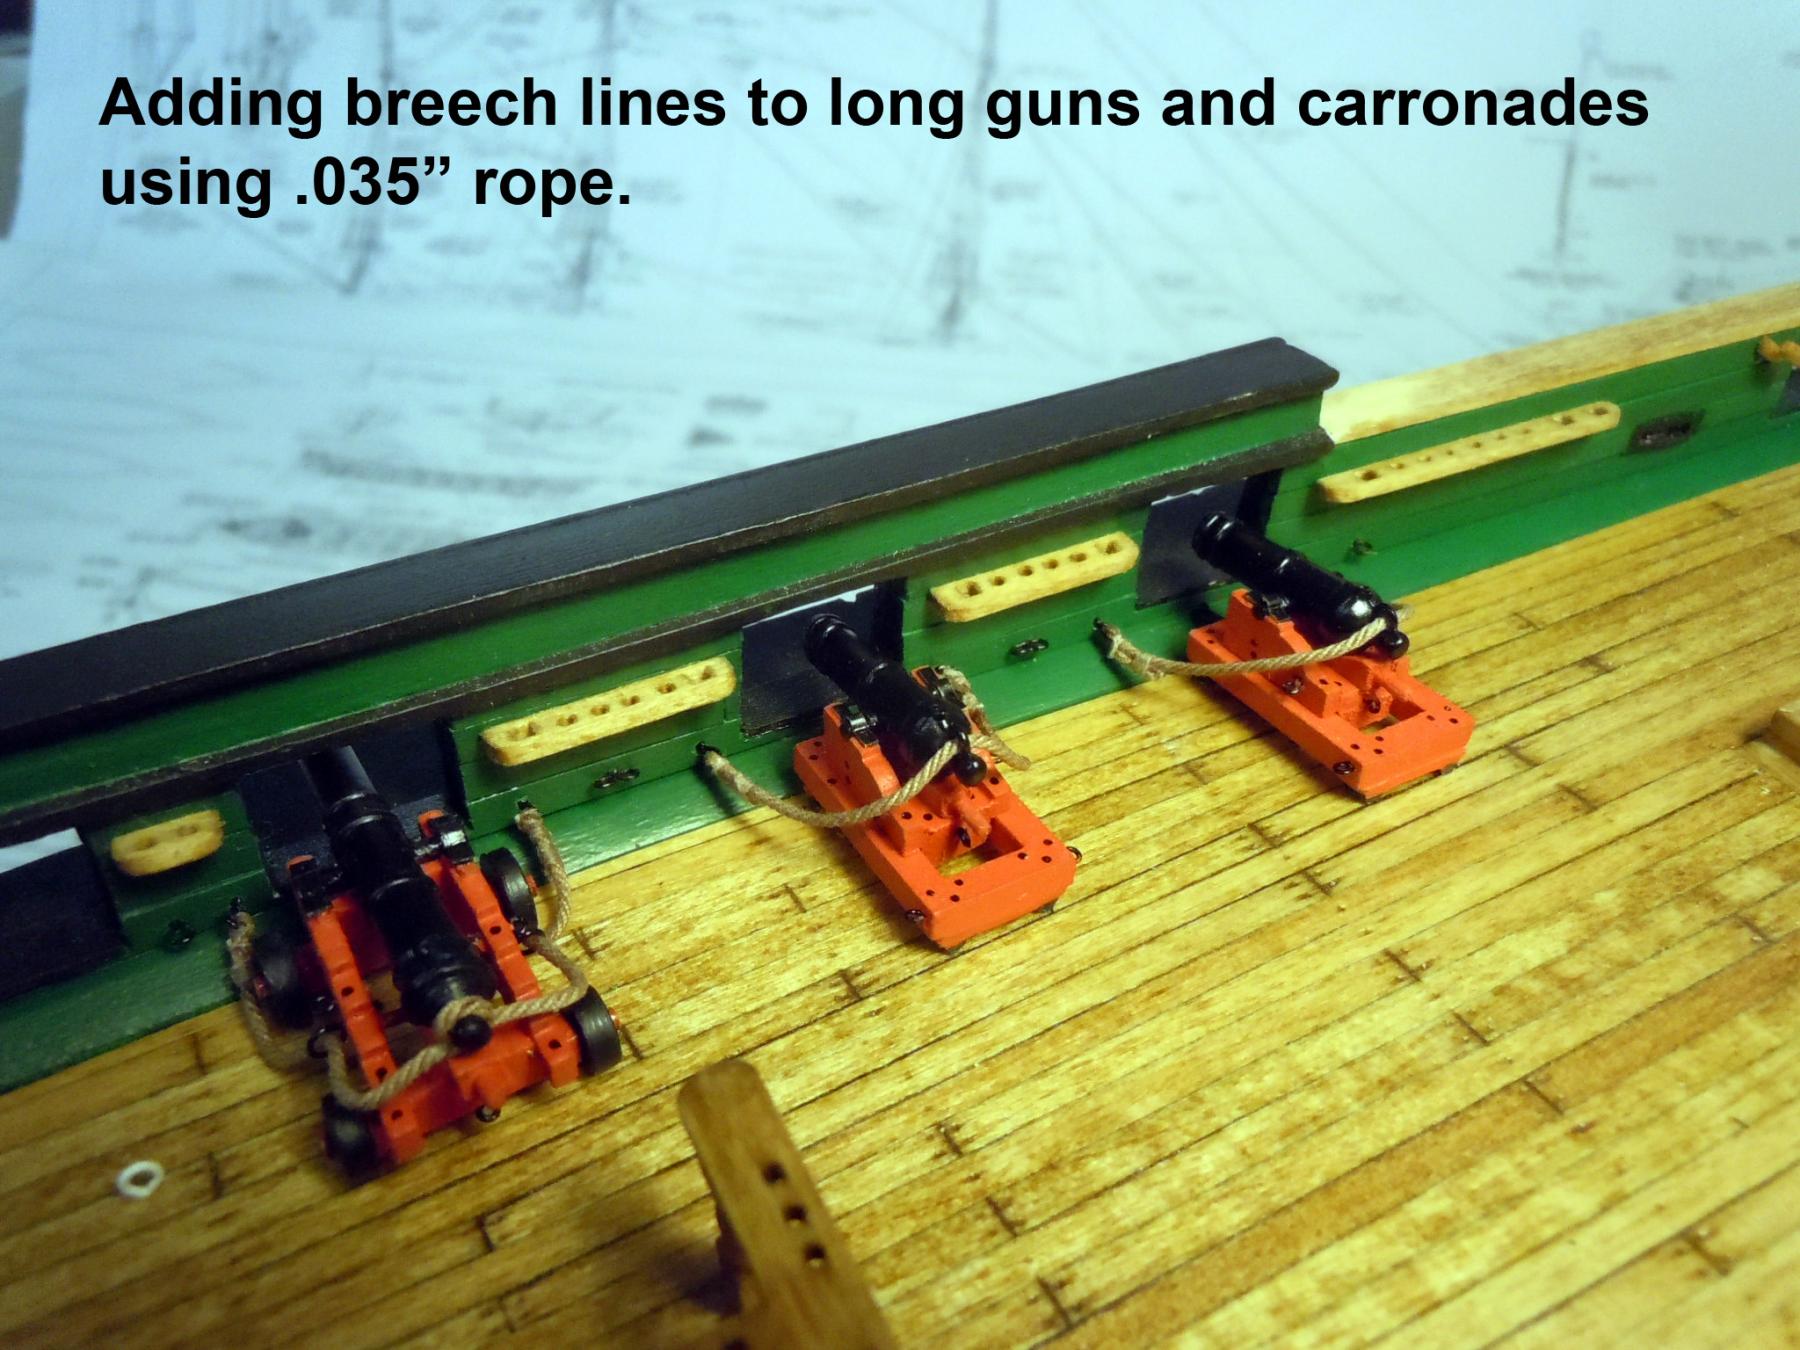
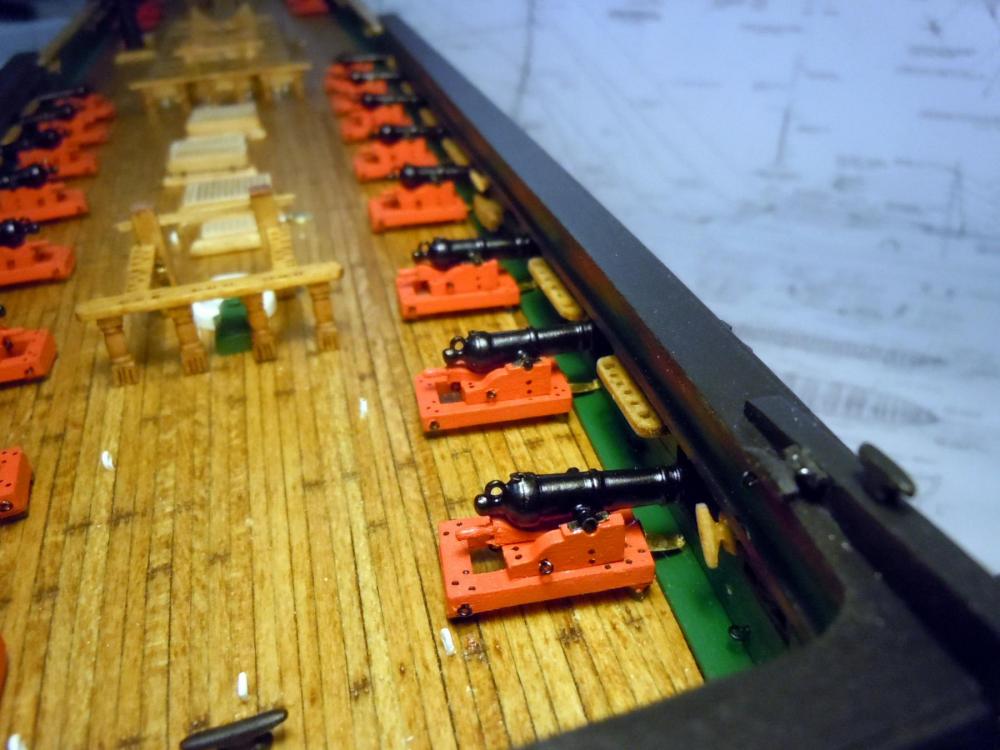
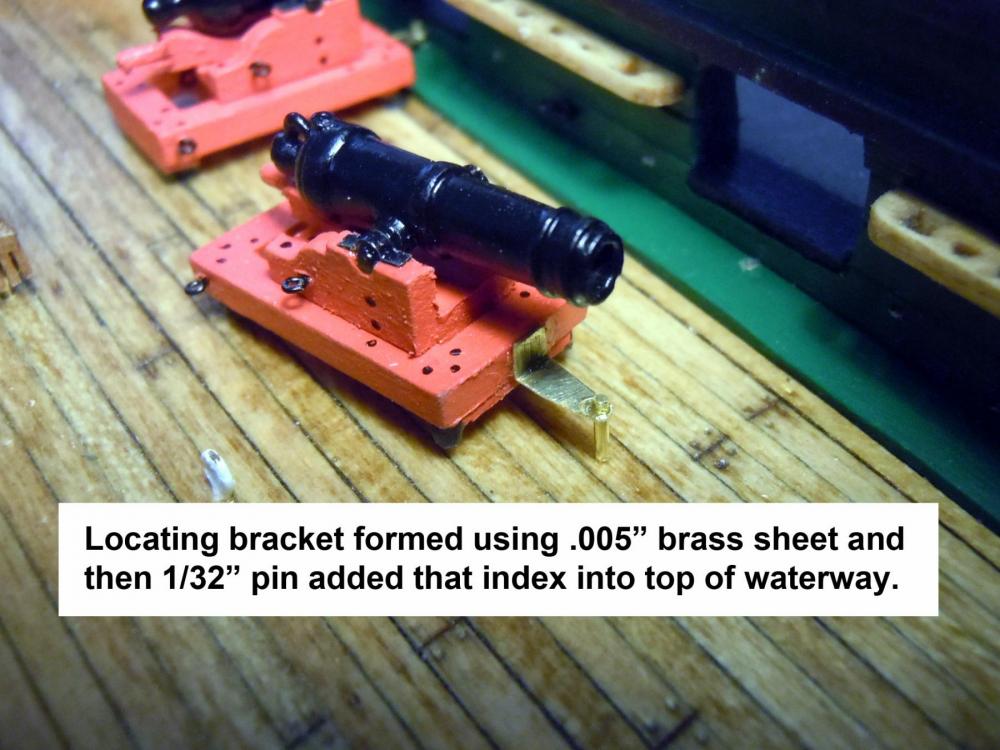
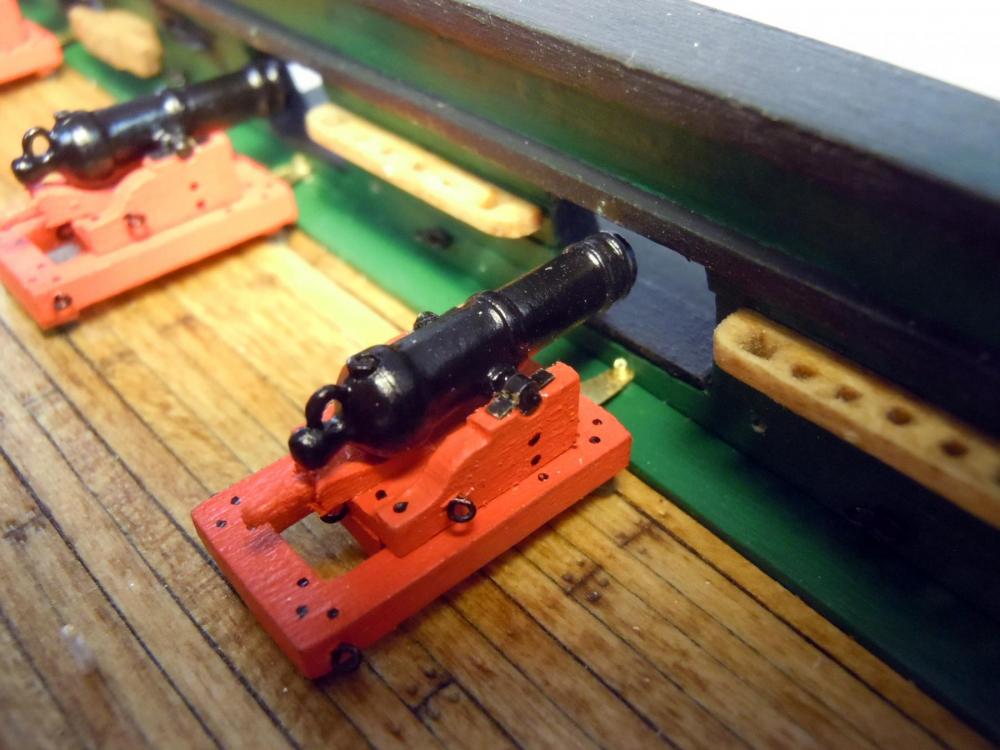
Thank you for your kind compliments! Once all the carronades were assembled and reviewed both plans and real photos I realized that I needed to be able to attach the carronades before rigging them with tackle and breech lines. The plan drawings must be for some other ship because the sizes do not match each other in relation to the attaching brackets and the planksheer. This is where assembly drawings would have shown the issue. So I devised my own brackets that required drilling an index hole into the top of the waterway that will suggest an attaching bracket which is visible both looking down as well as through the gun ports. Here is a closeup front view. Once the brackets were in place the breech lines could be added. Here I am using .035" light brown left over from my Niagara build. I also realized that the tackle blocks provided in the kit were way too large. I then ordered both single and double 3/32" blocks and .008" light brown line to fit the blocks. These will be much closer to scale once rigged. These were ordered from Syren on Thursday afternoon and arrived today (Monday) Chuck is to be complimented on his customer service focus and quick turnaround! I will now be continuing on rigging the carronades without missing a beat. Here is a suggestion to make a drill bit depth gauge which enables drilling holes for eyebolts in the ceiling walls without drilling through the outer wall accidentally. Also in this case the 1/32" drill bit is glued into a 1/16" brass tube long enough to reach across the width of the deck. Now back to more breech lines and then block and tackle which I will be at for awhile.


-
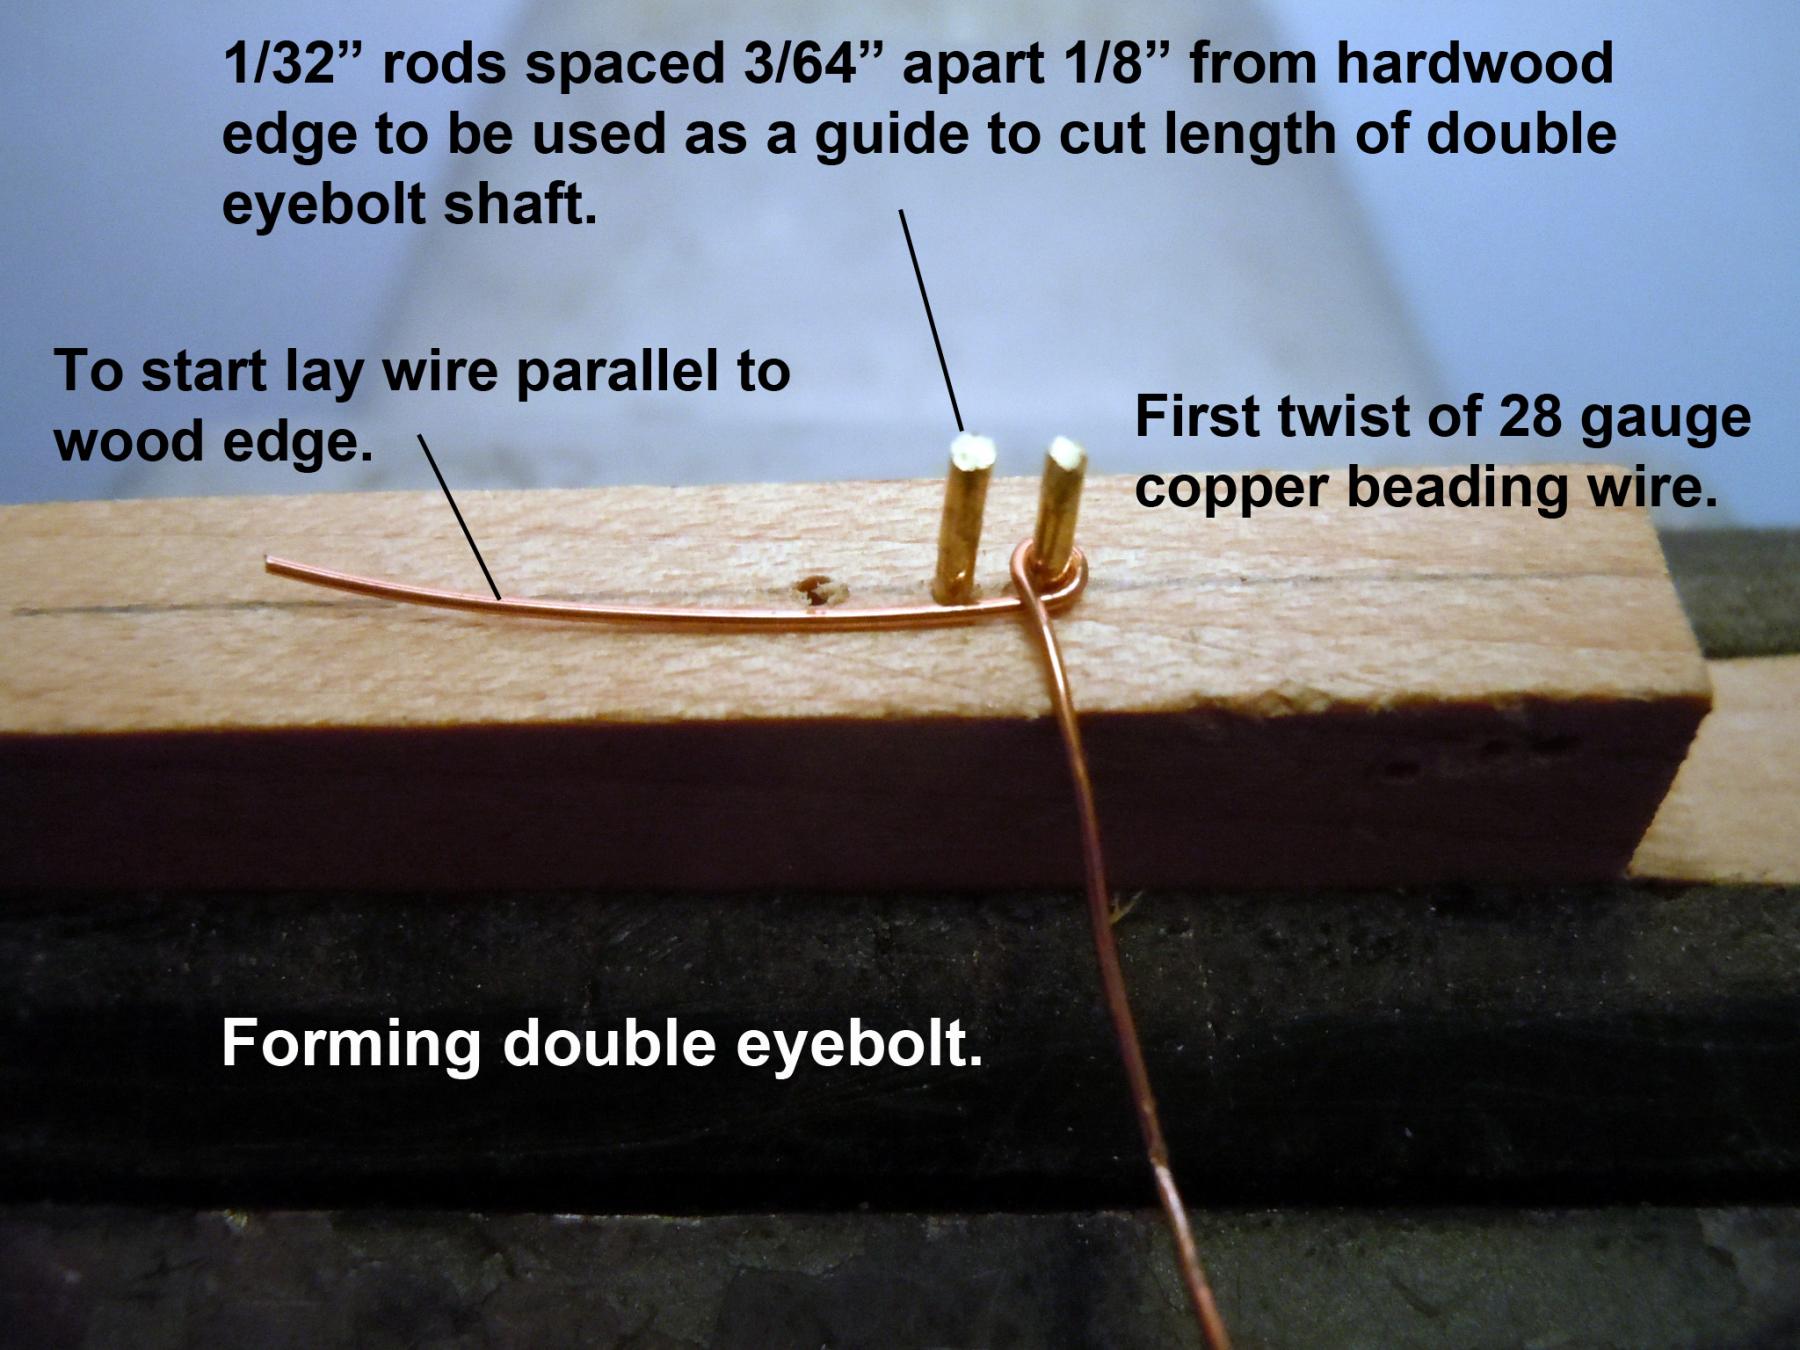
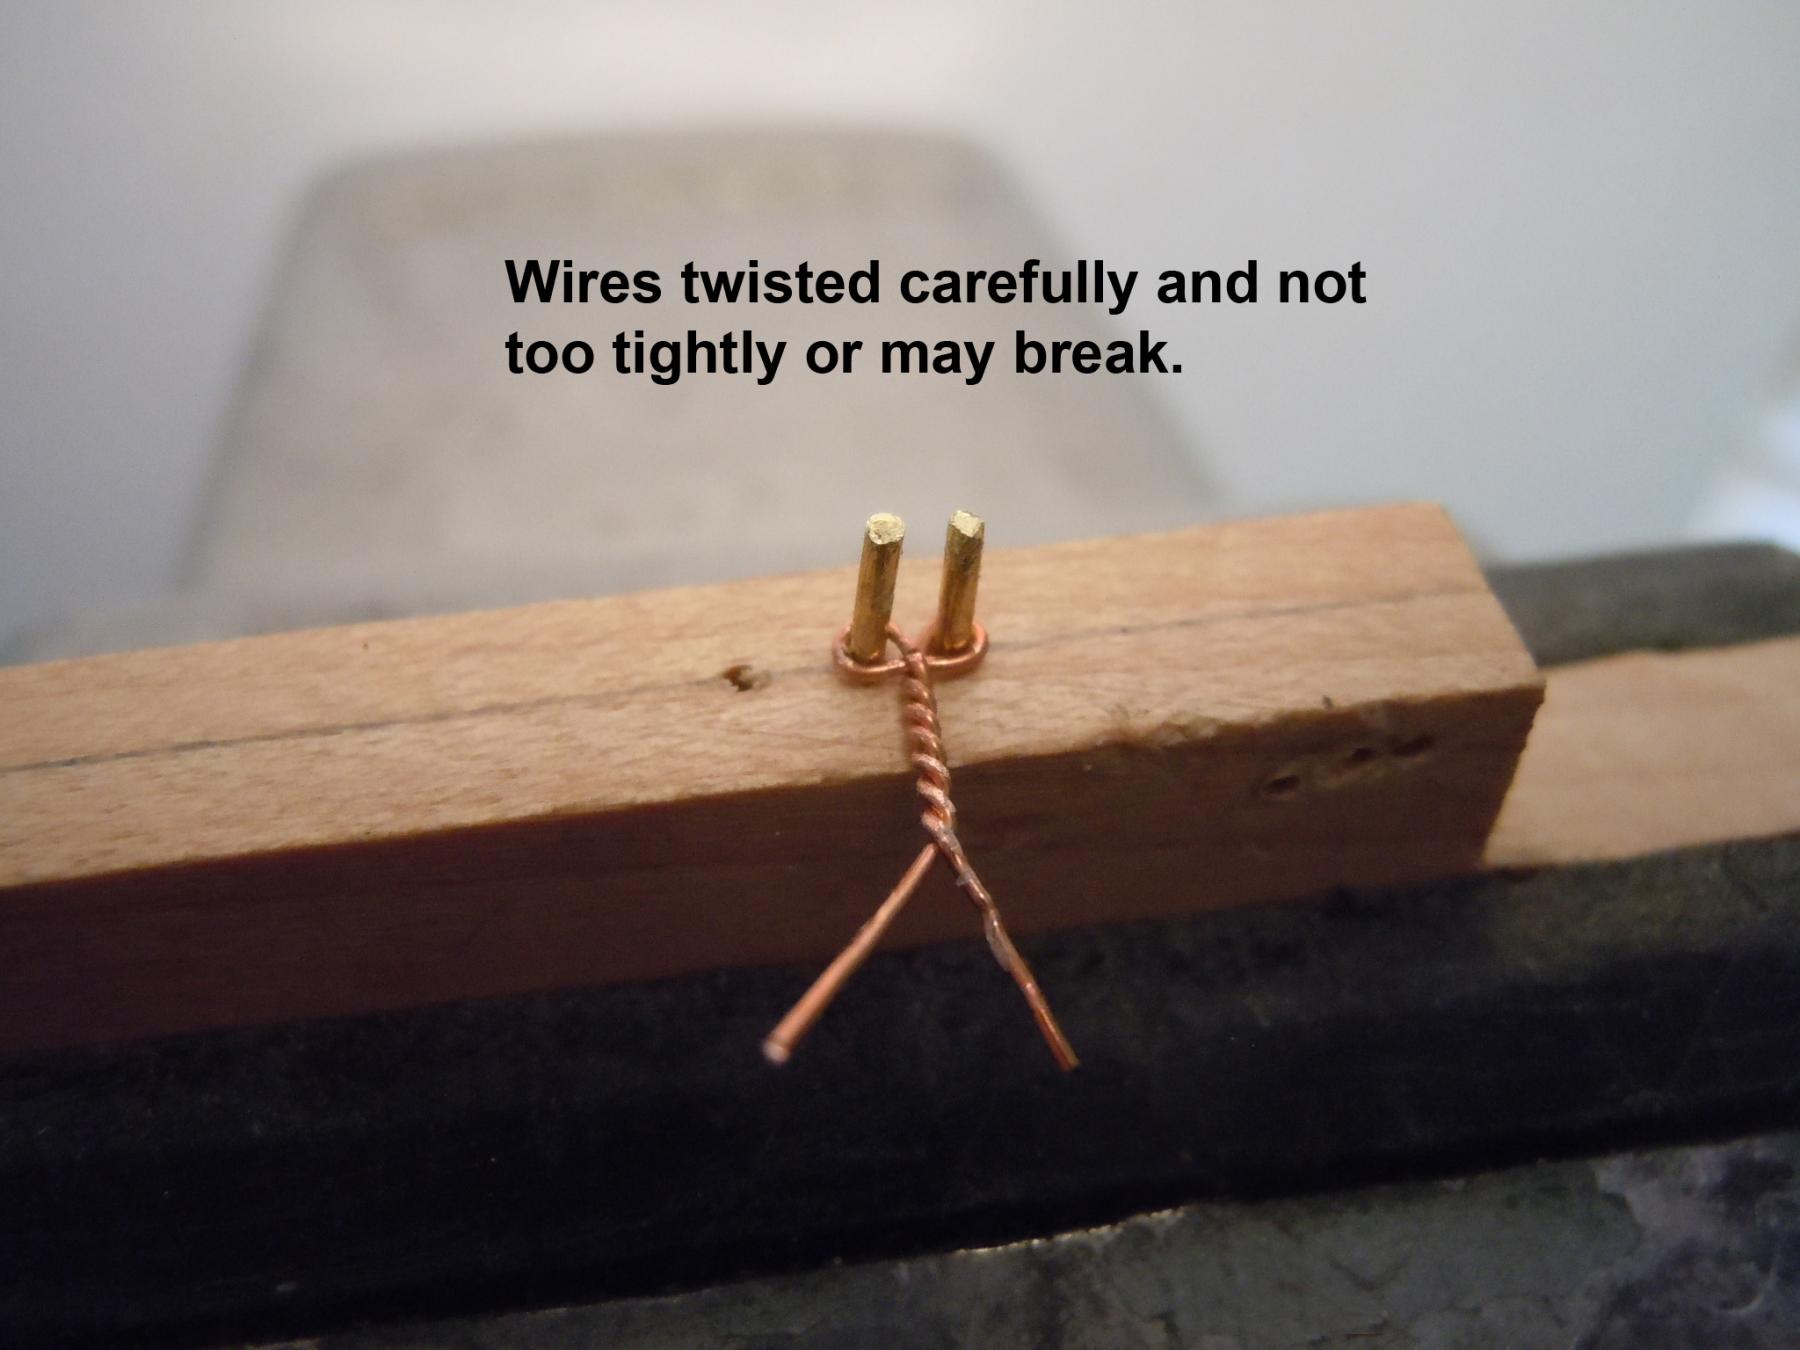
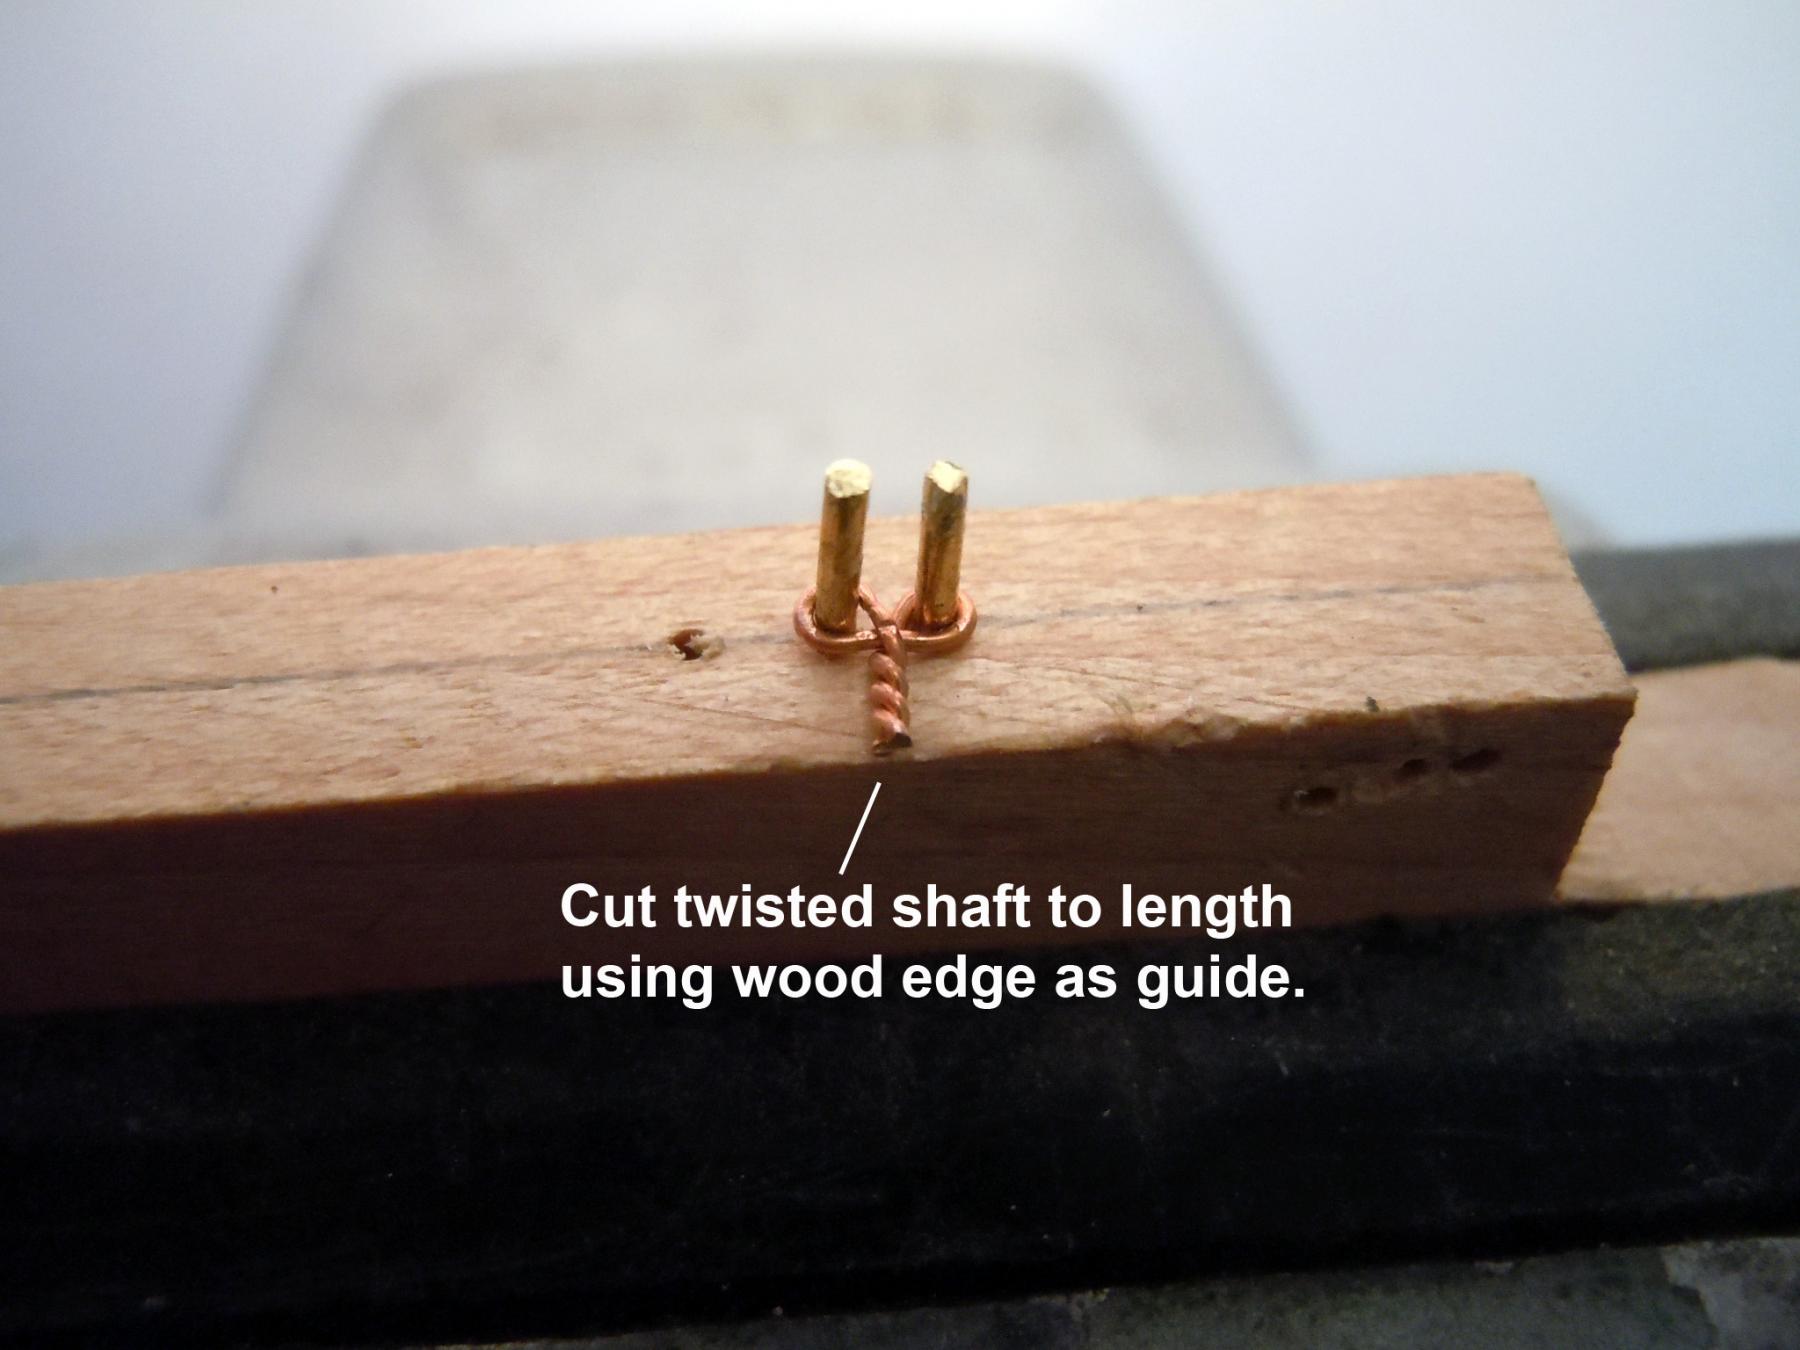
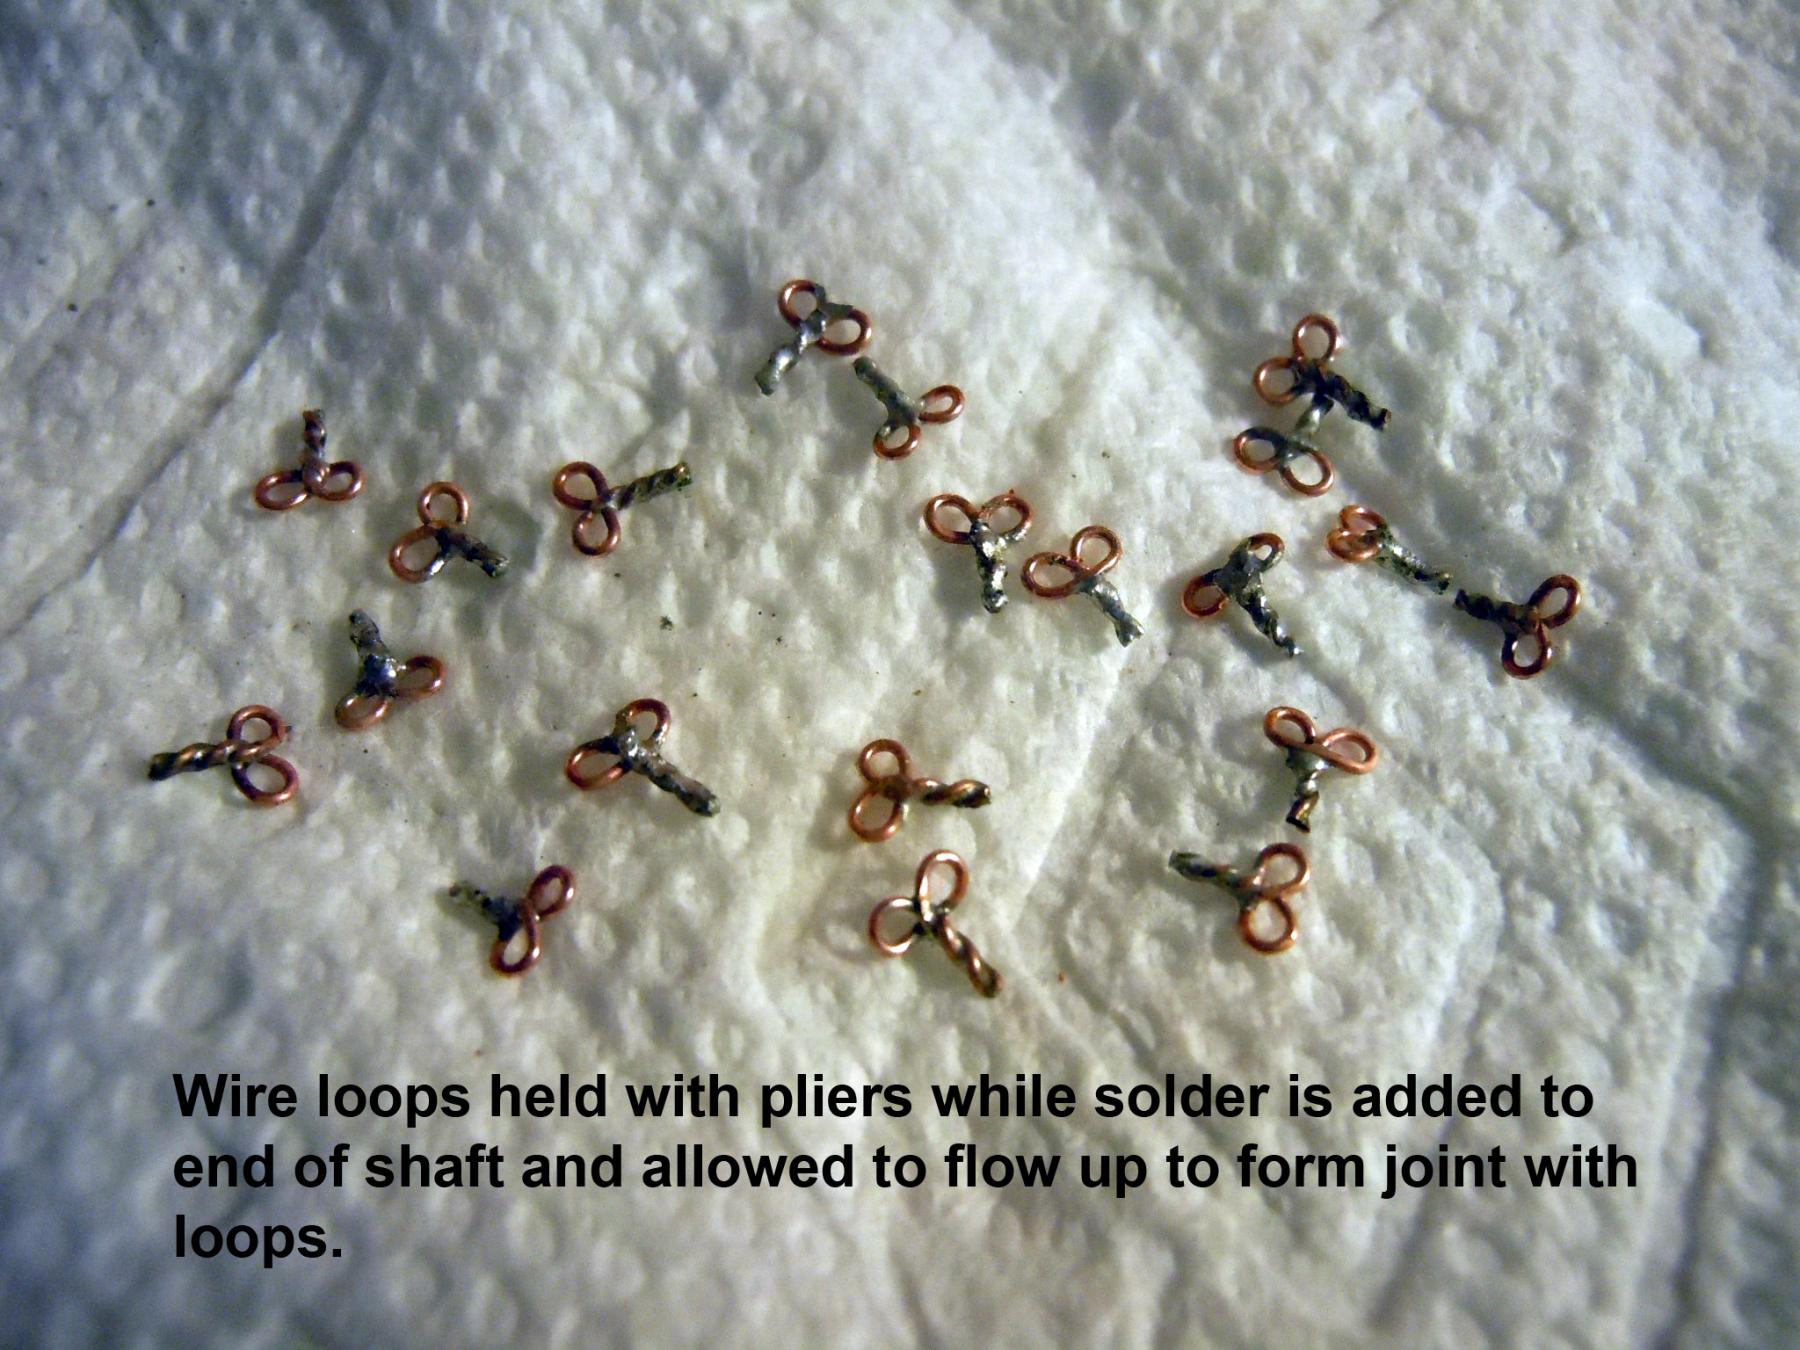
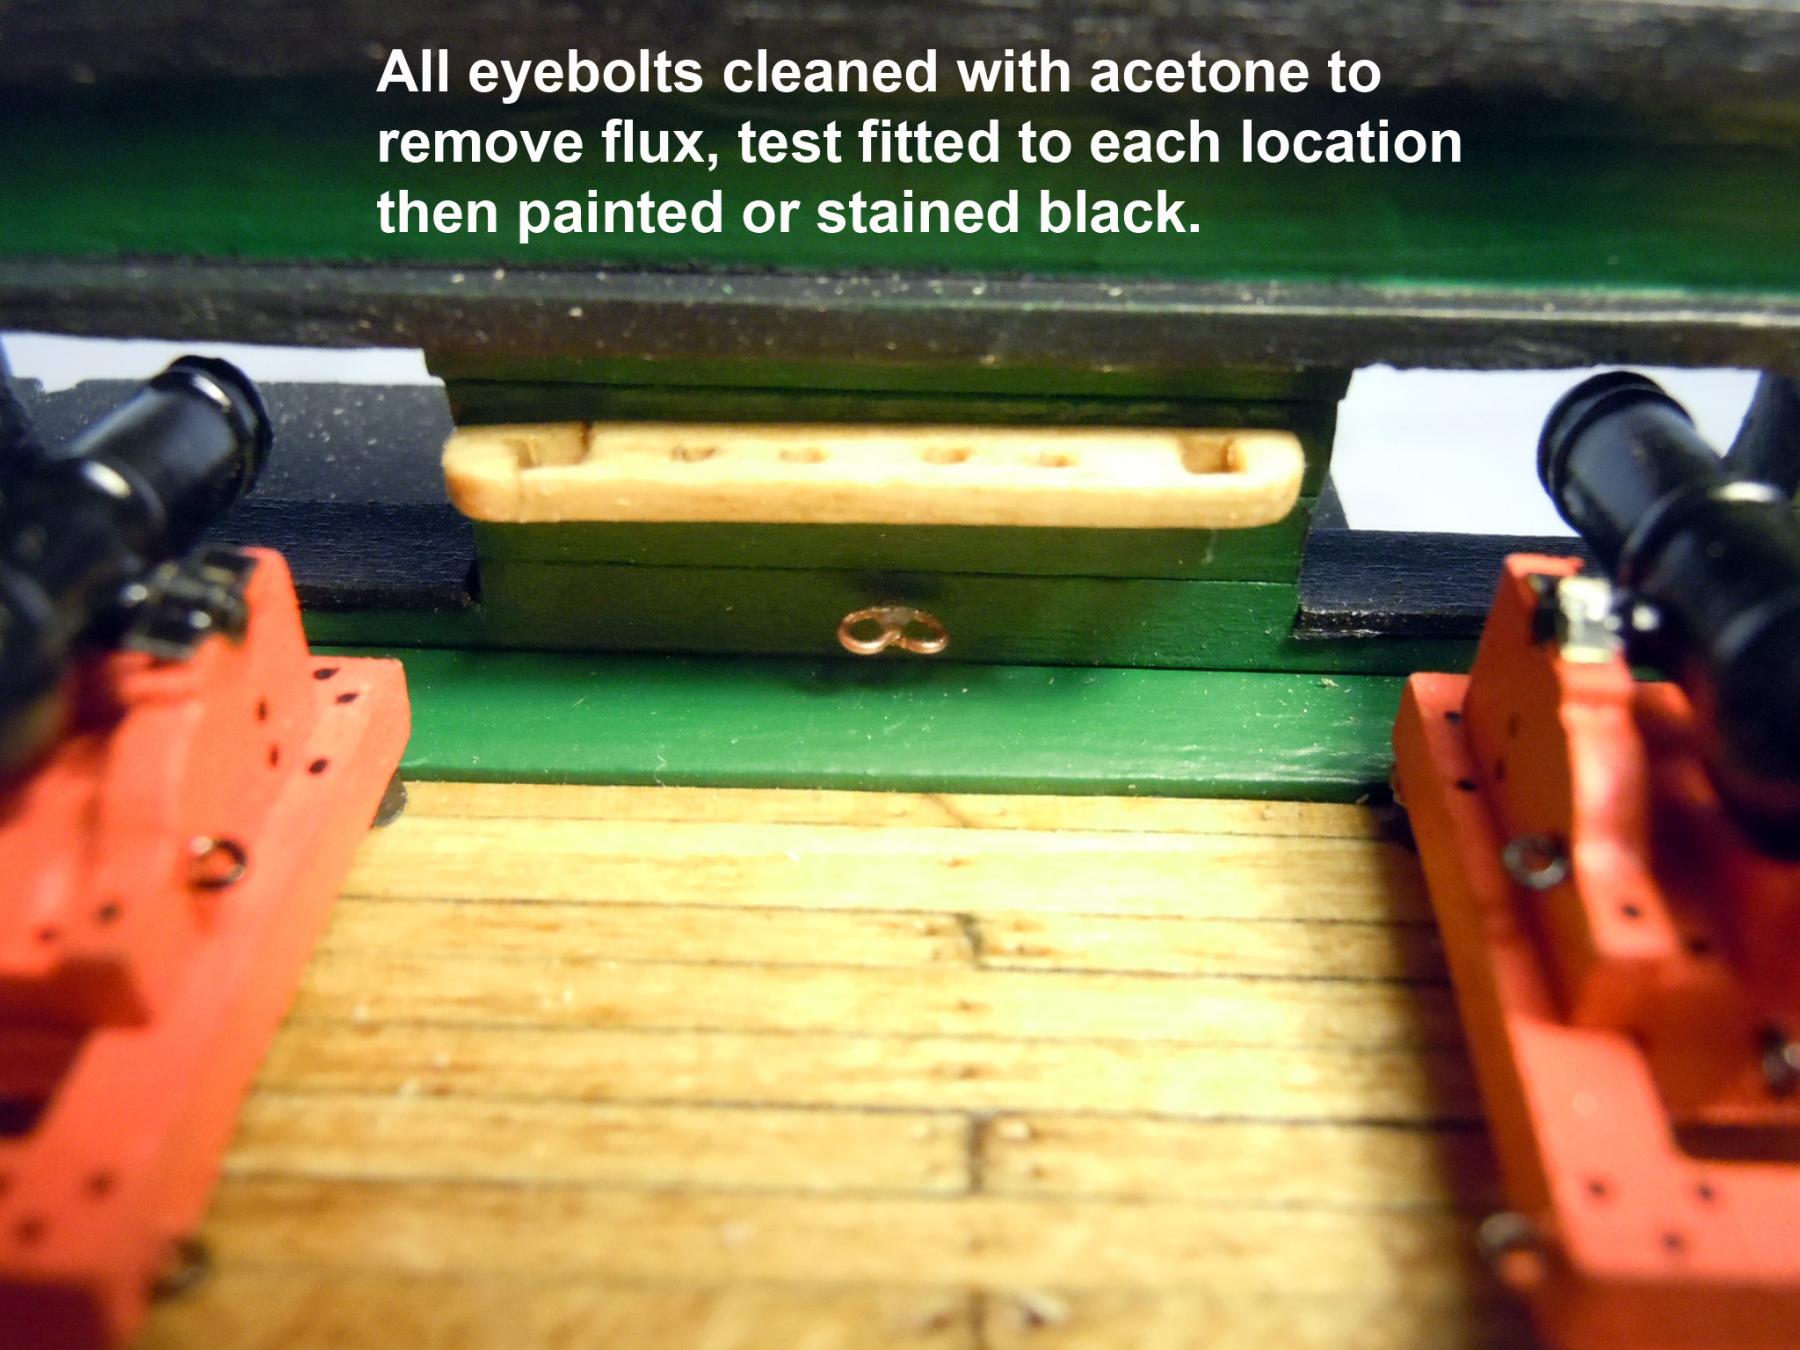
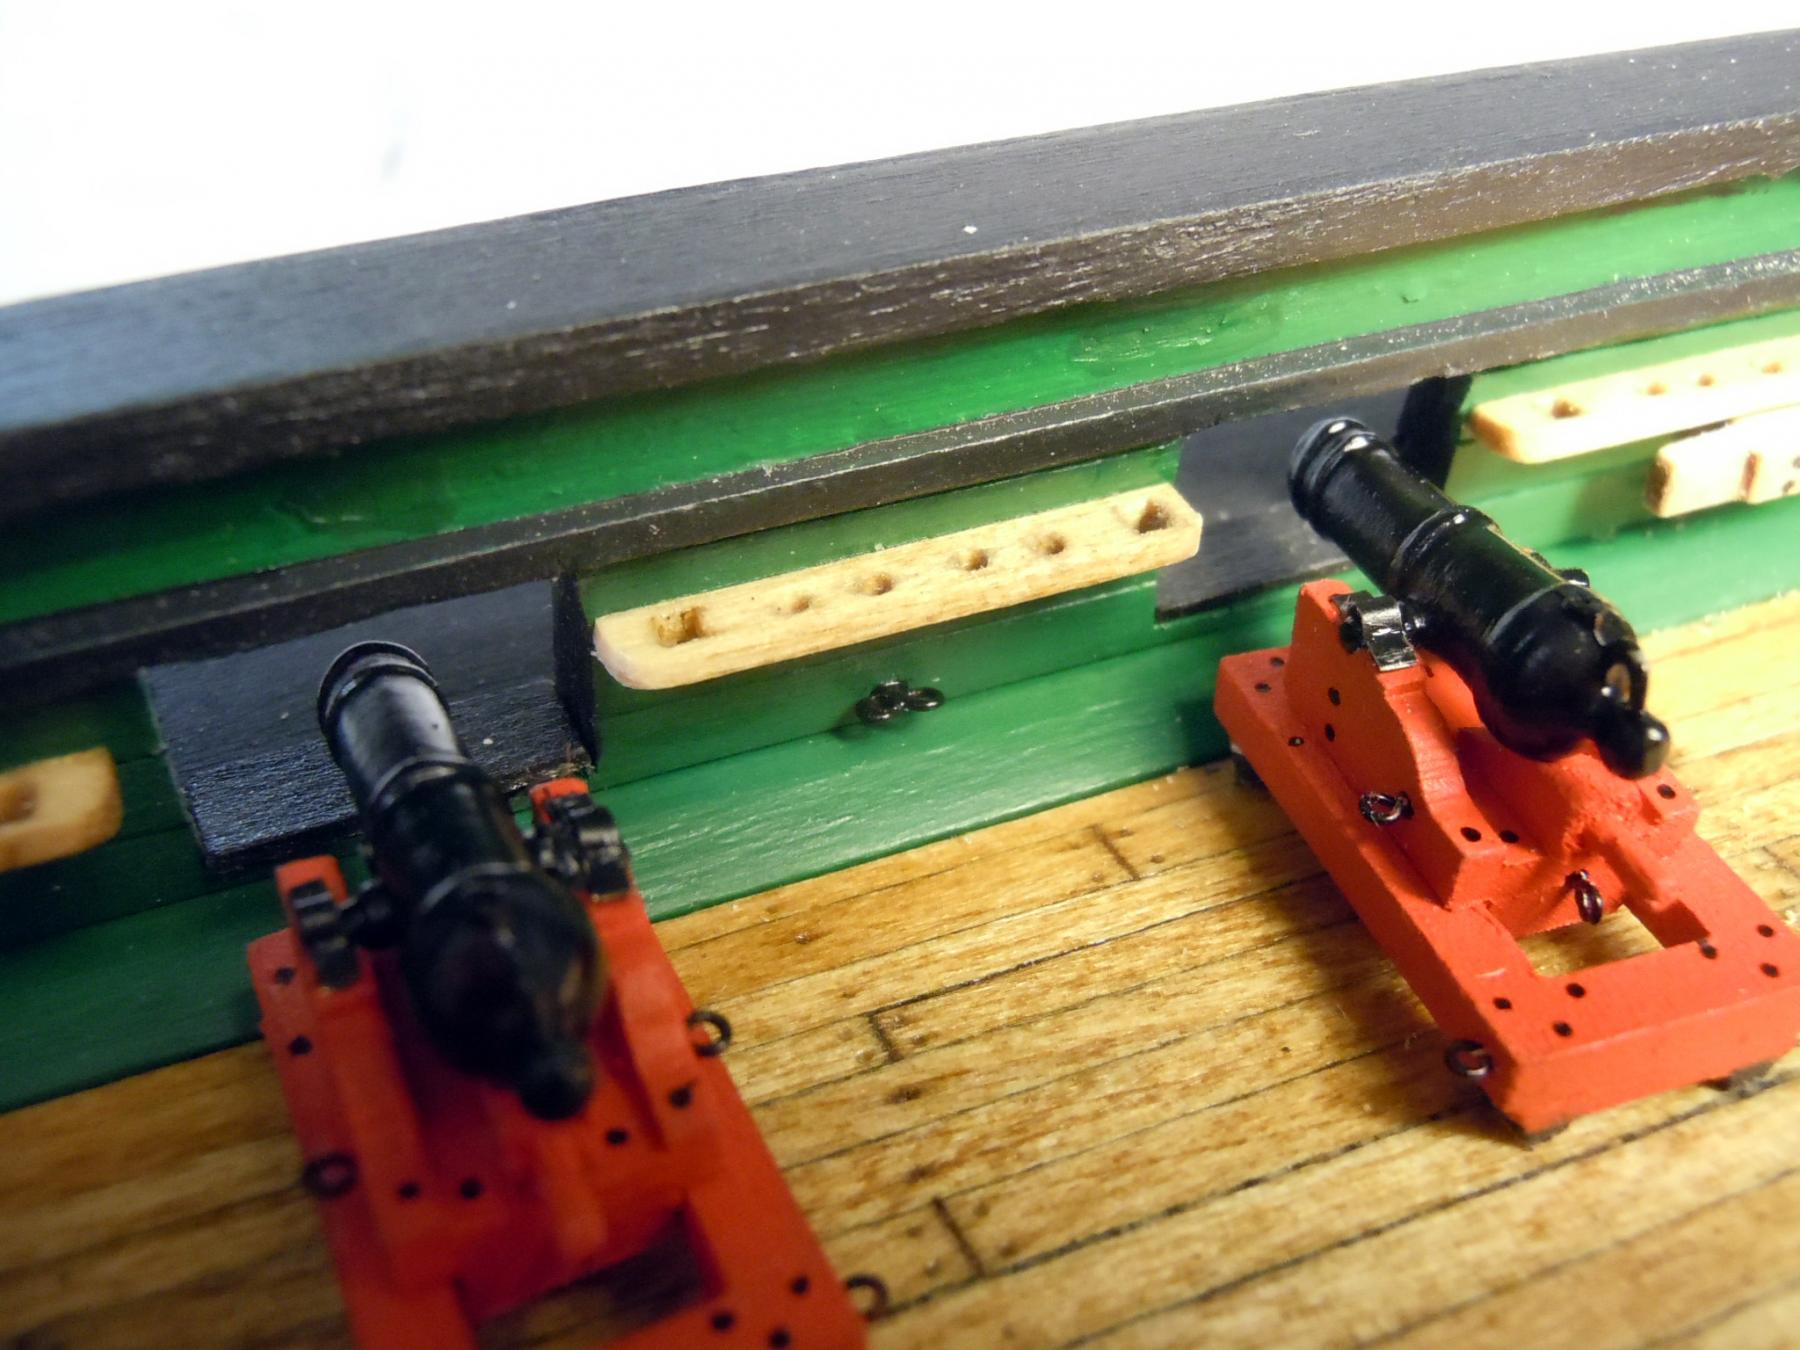
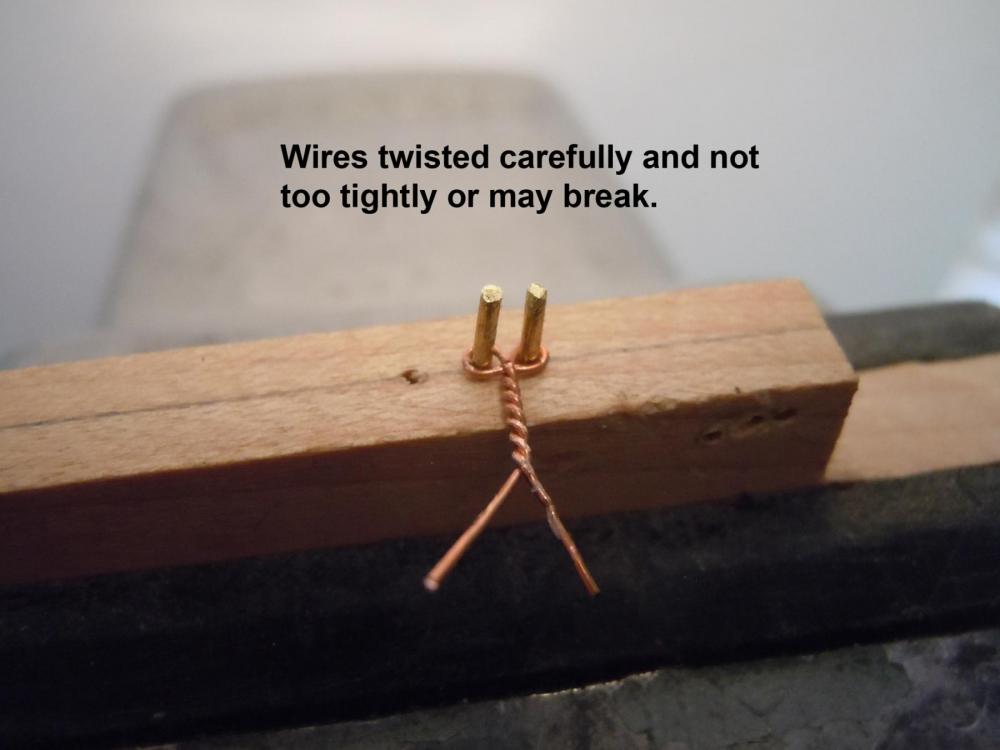
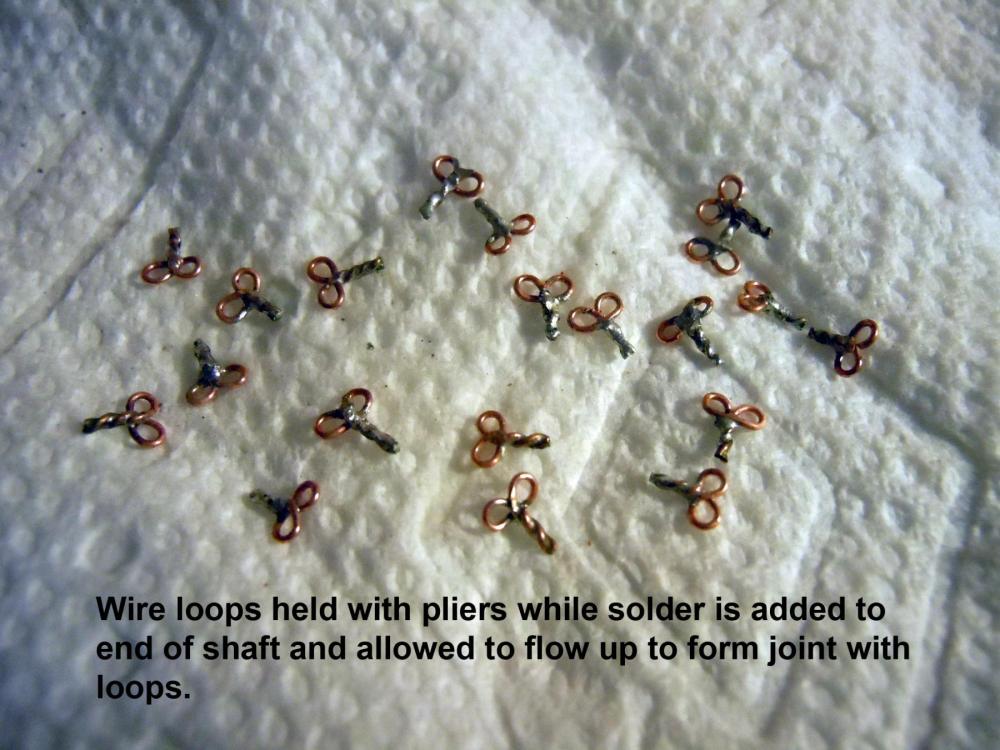
The two long guns and carronades are finished, now I started adding all the eyebolts to the bulwarks for the cannons. The single eyebolts are easy but just a bunch of them. Then I saw the double eyebolt and thought I would share how I fabricated these using 28 gauge copper wire which is softer and more flexible than brass and once formed the shaft was soldered to join the it with the loops for strength. Test fit of soldered and cleaned eyebolt. Finished double eyebolt in place centered between carronades. Next to drill the hole locations for the single eyebolts adjacent to the lower gunport openings.


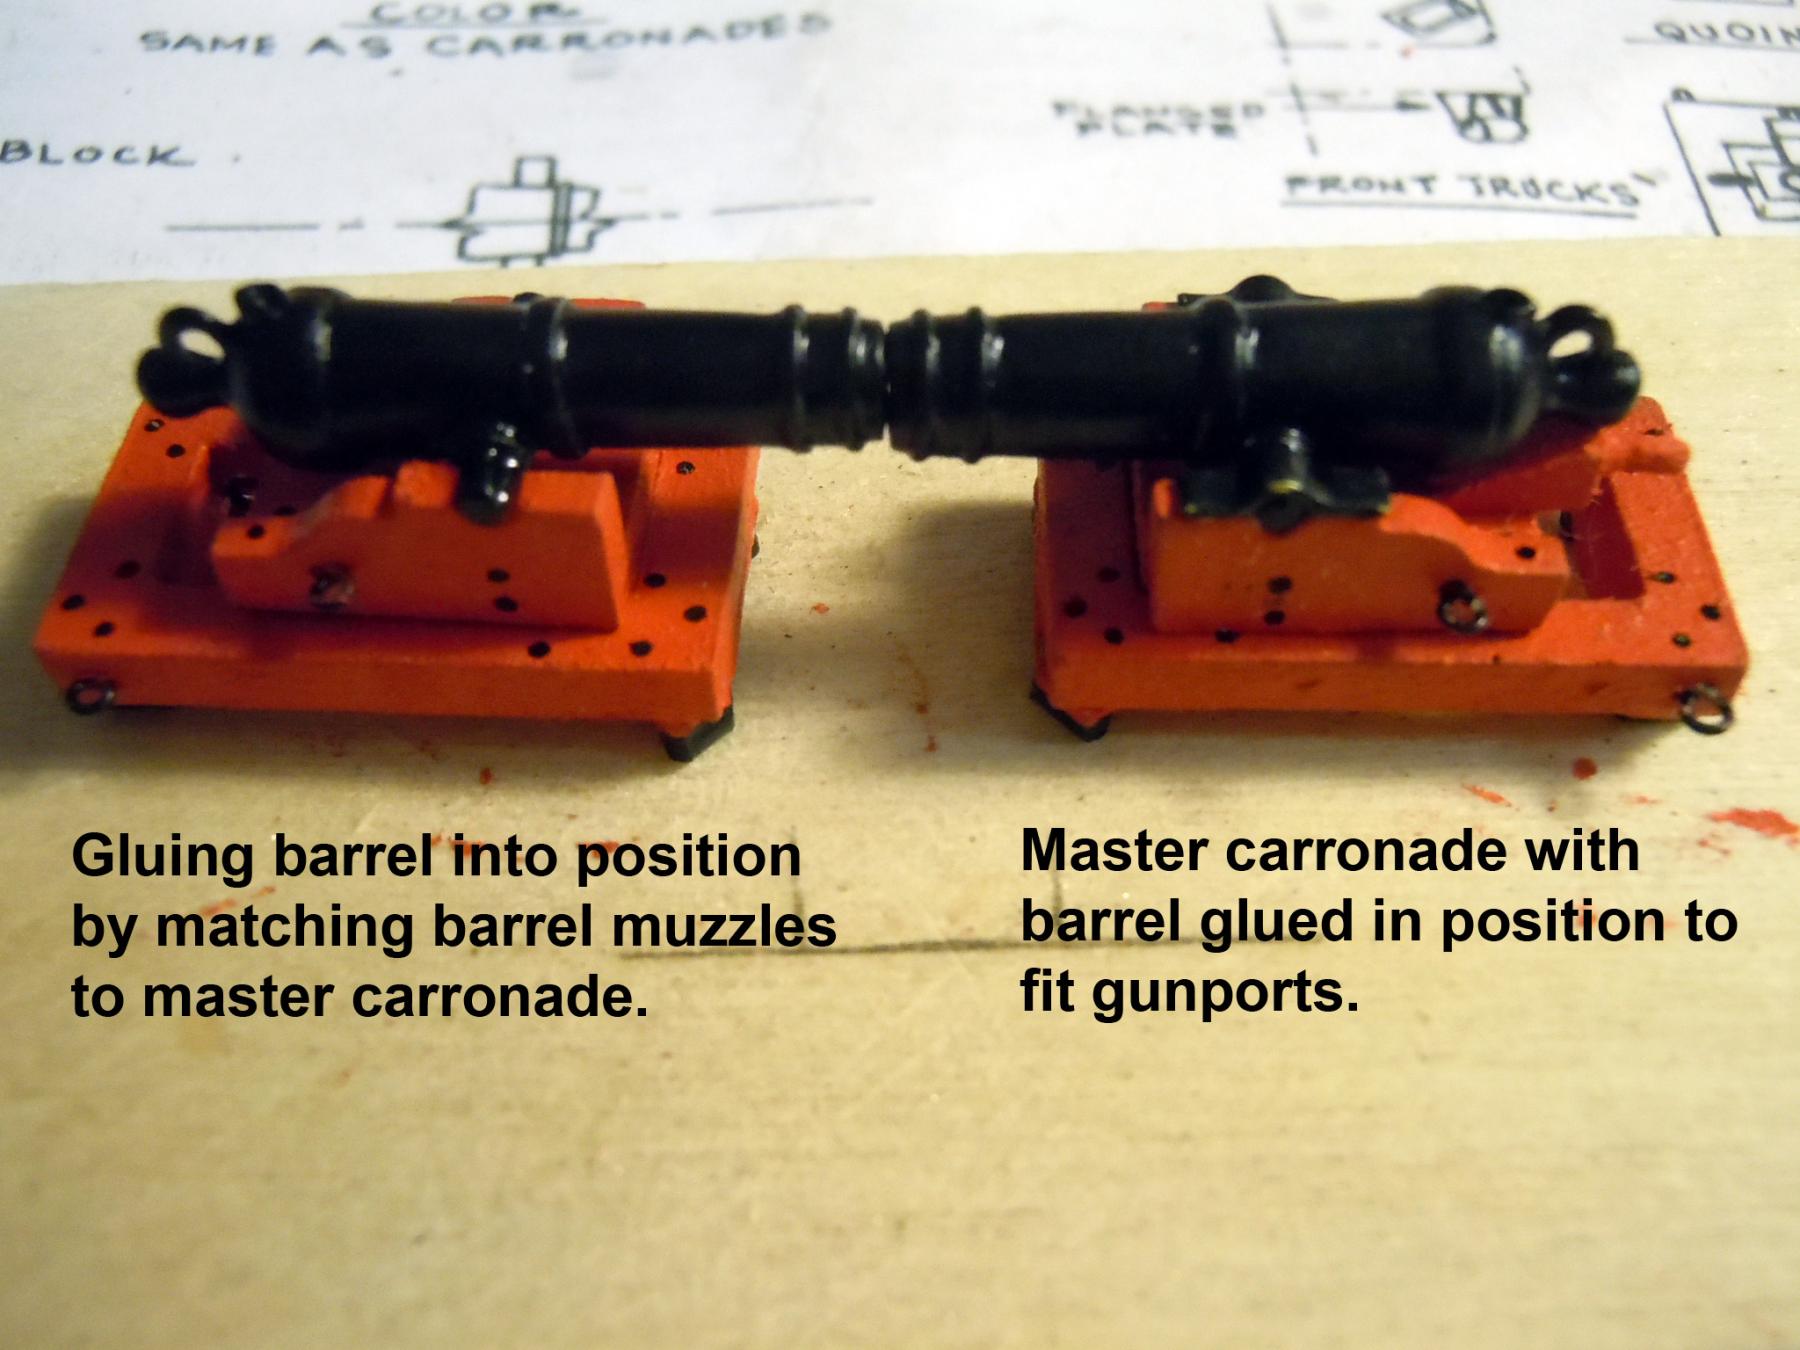
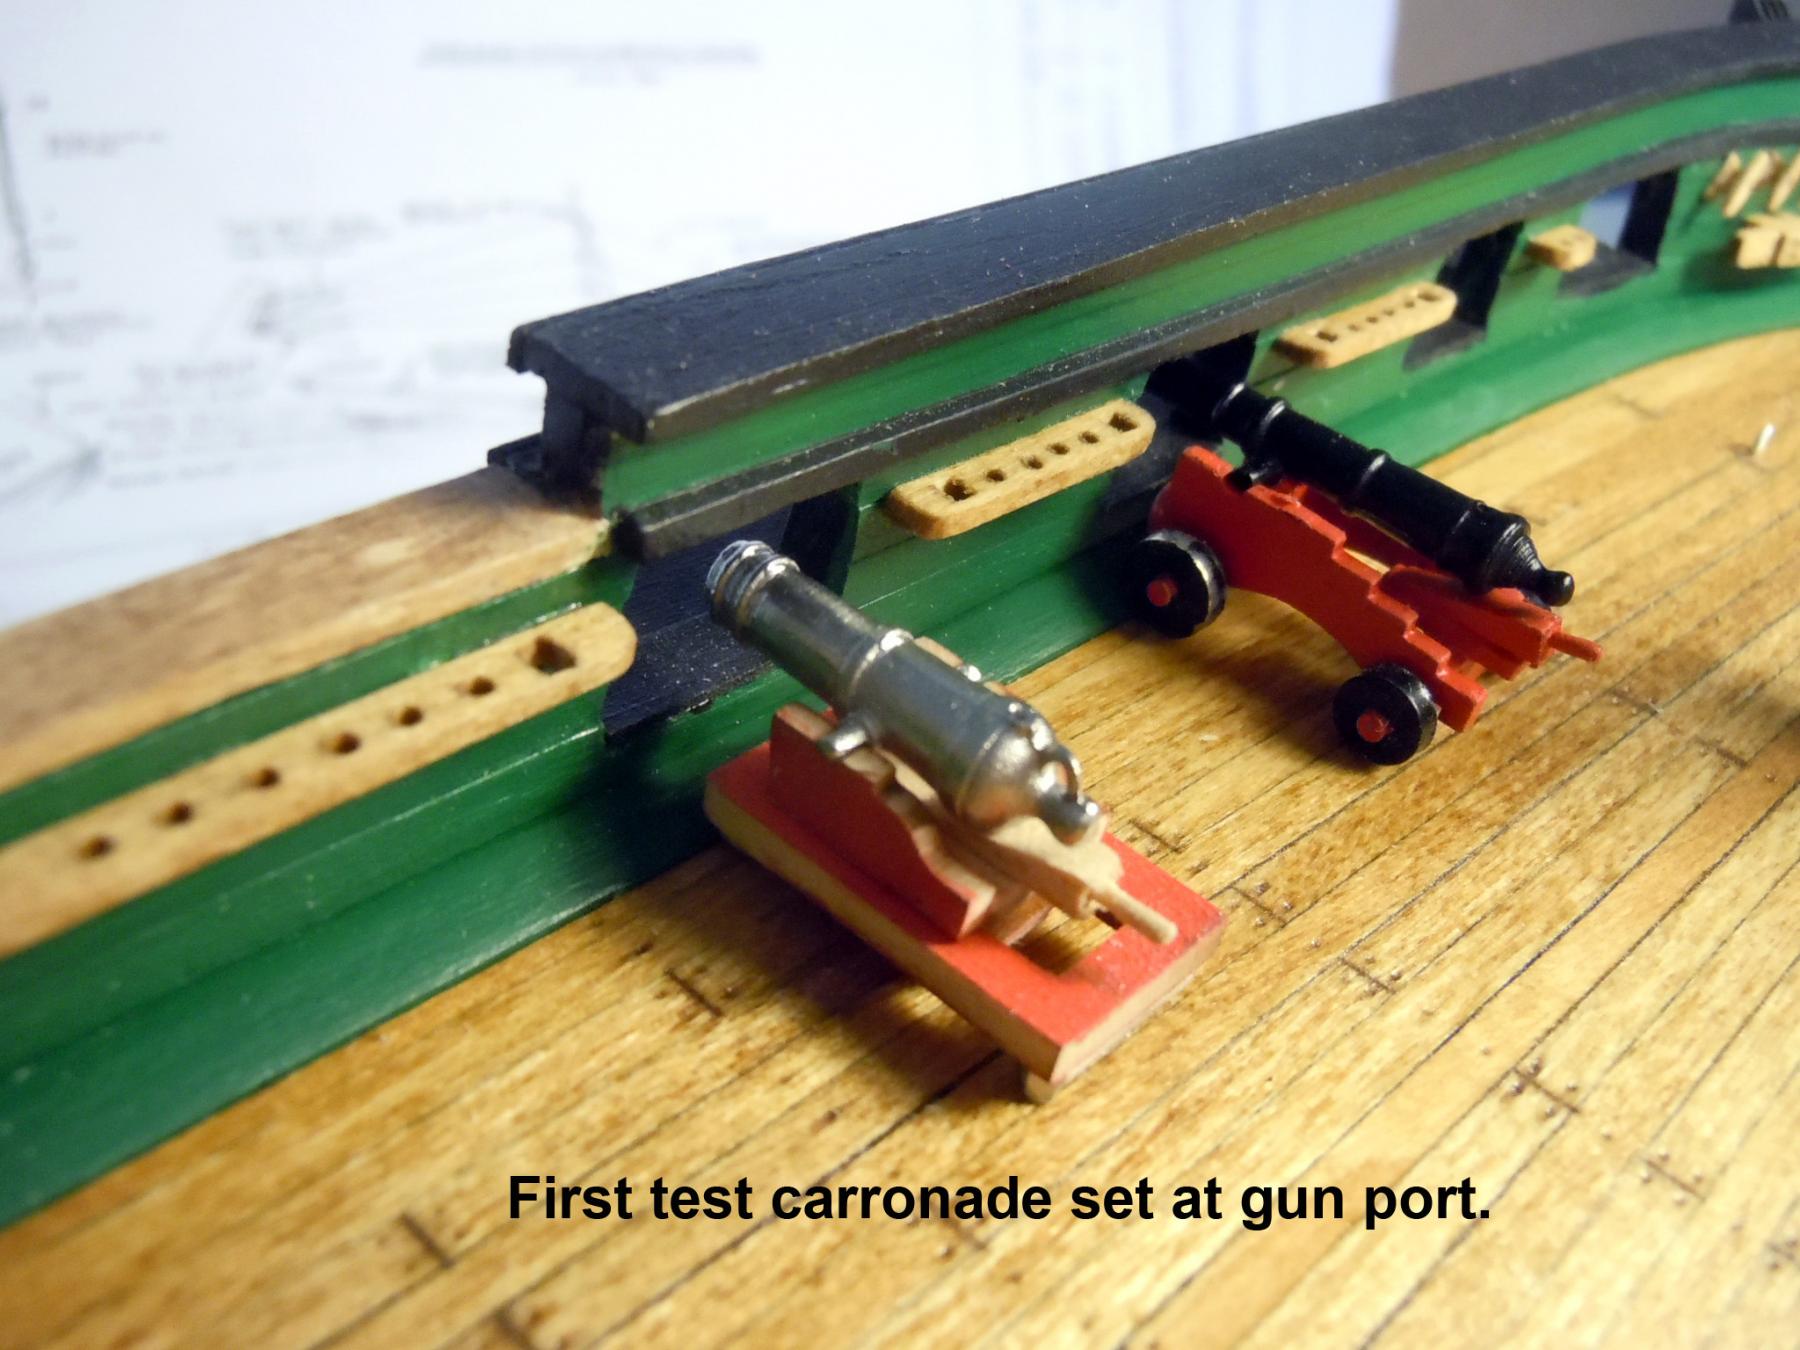
-
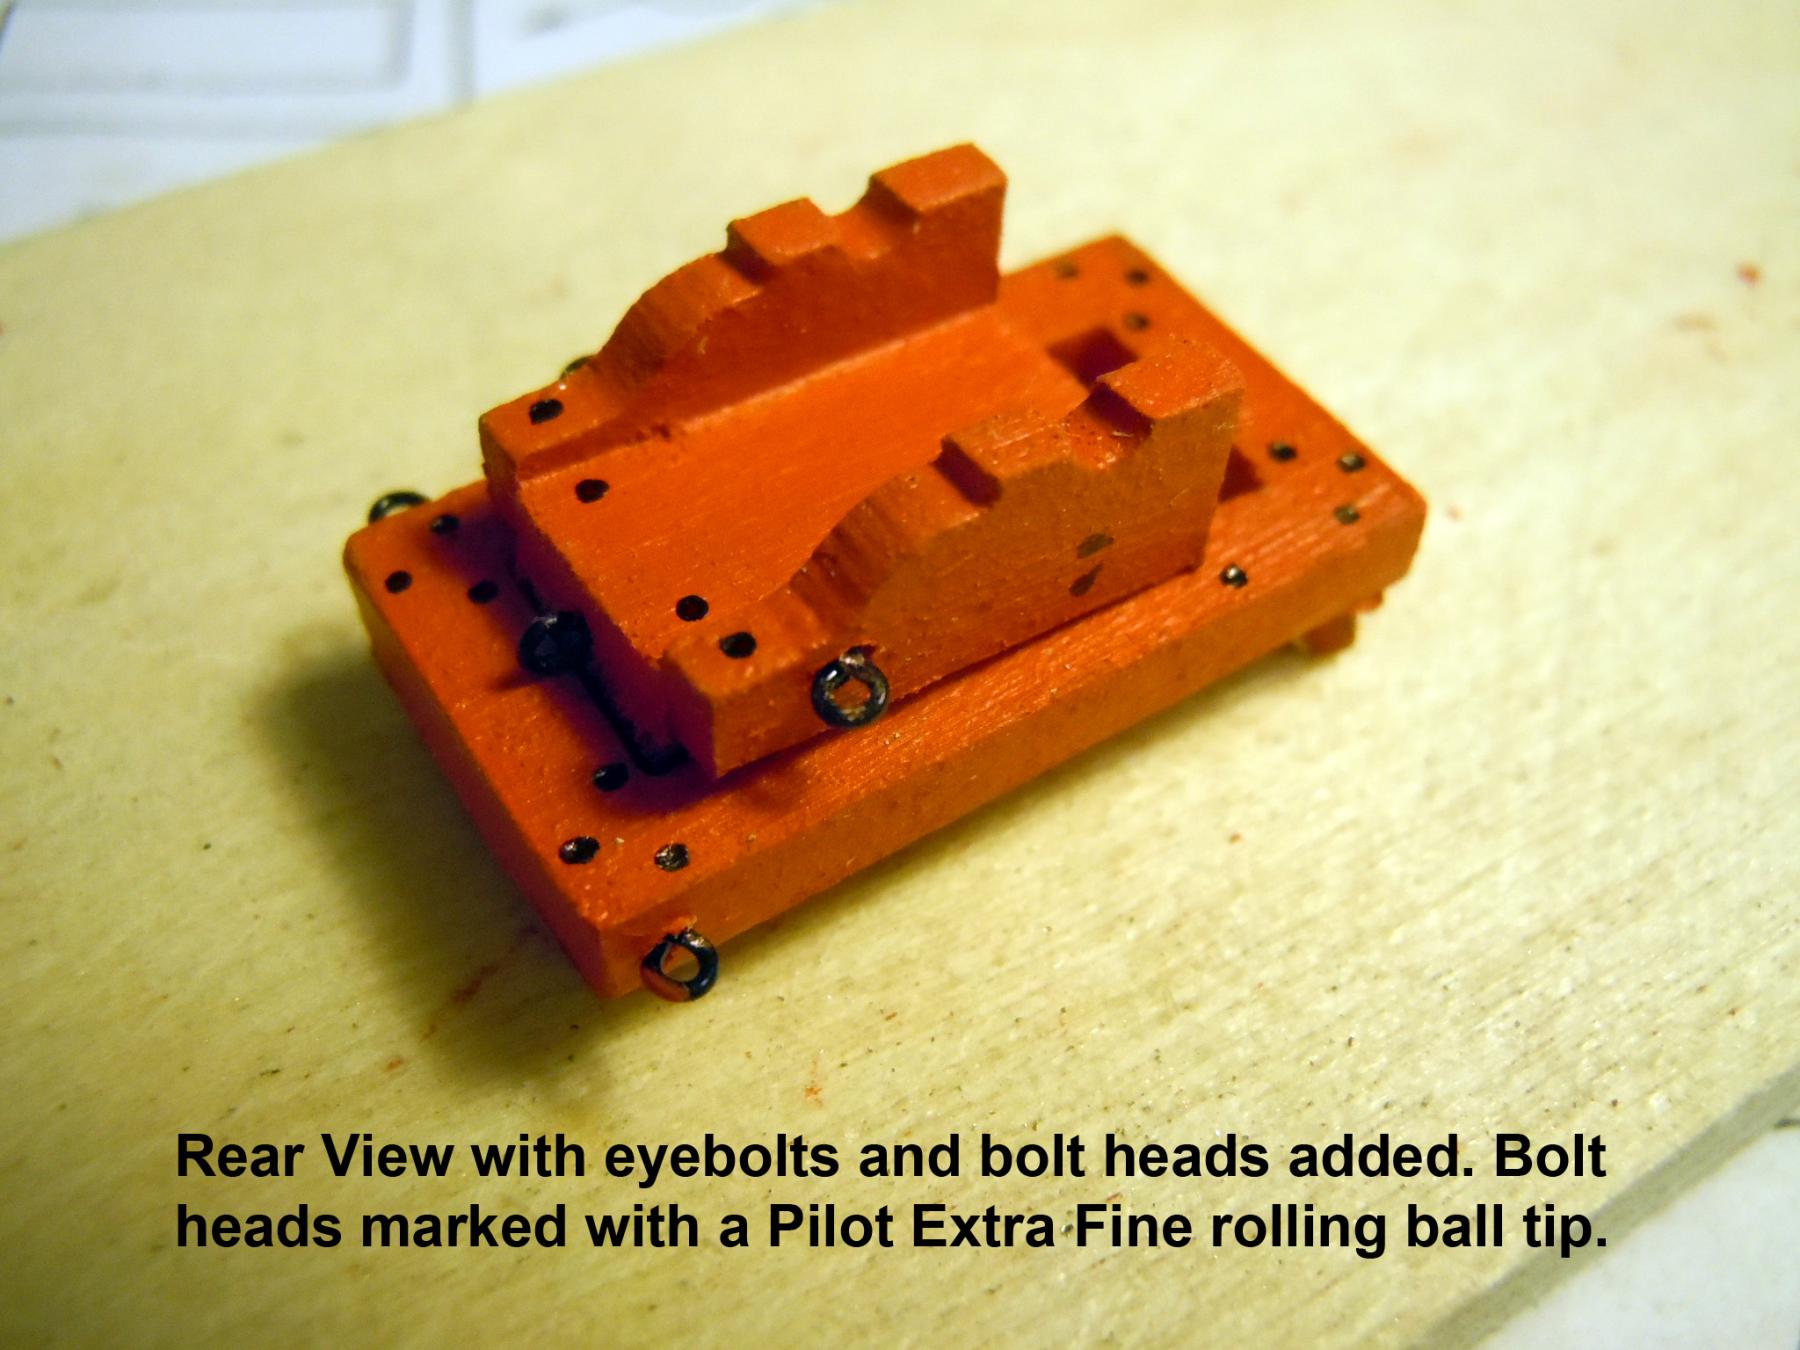
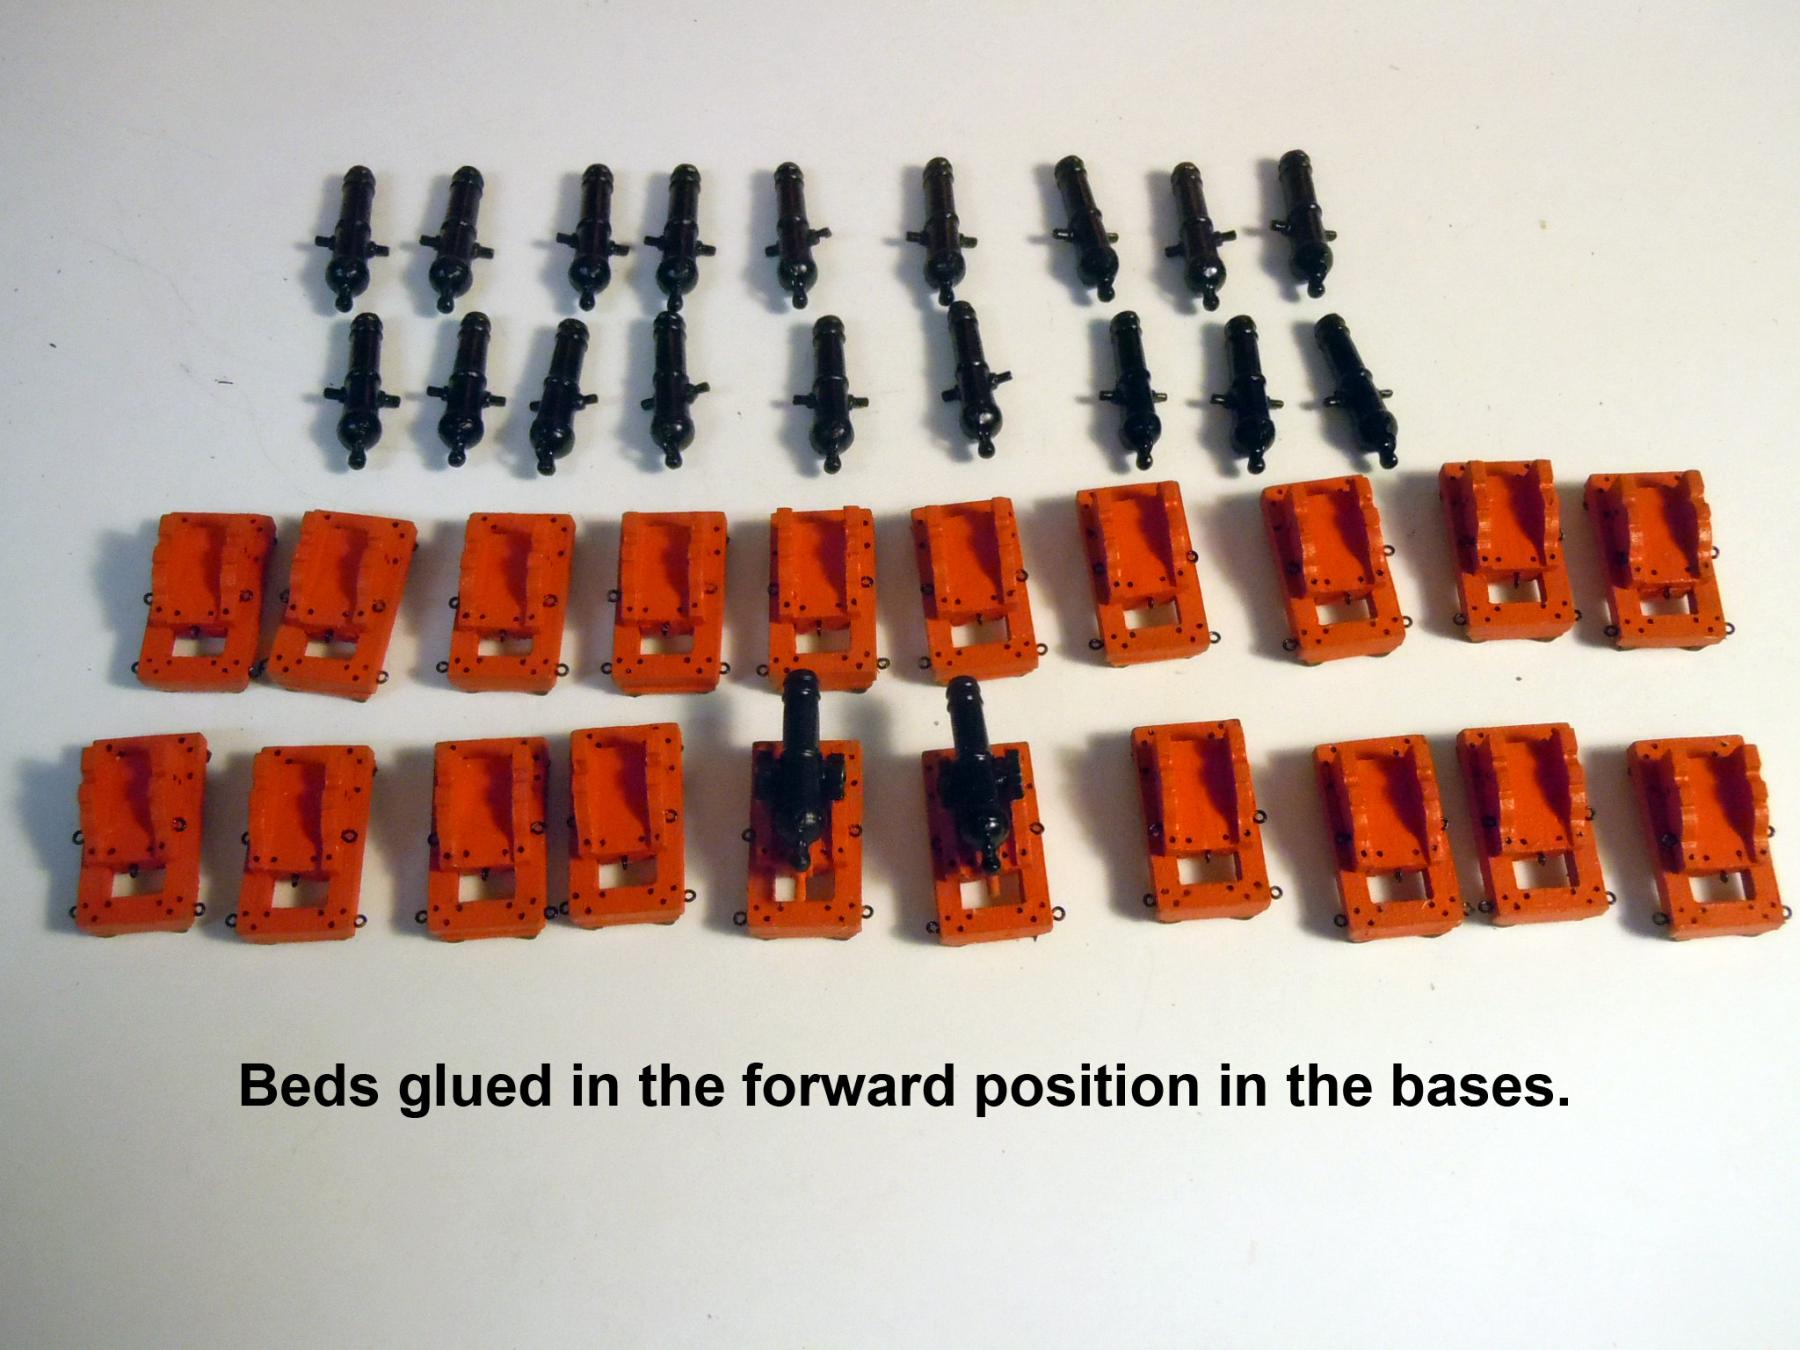
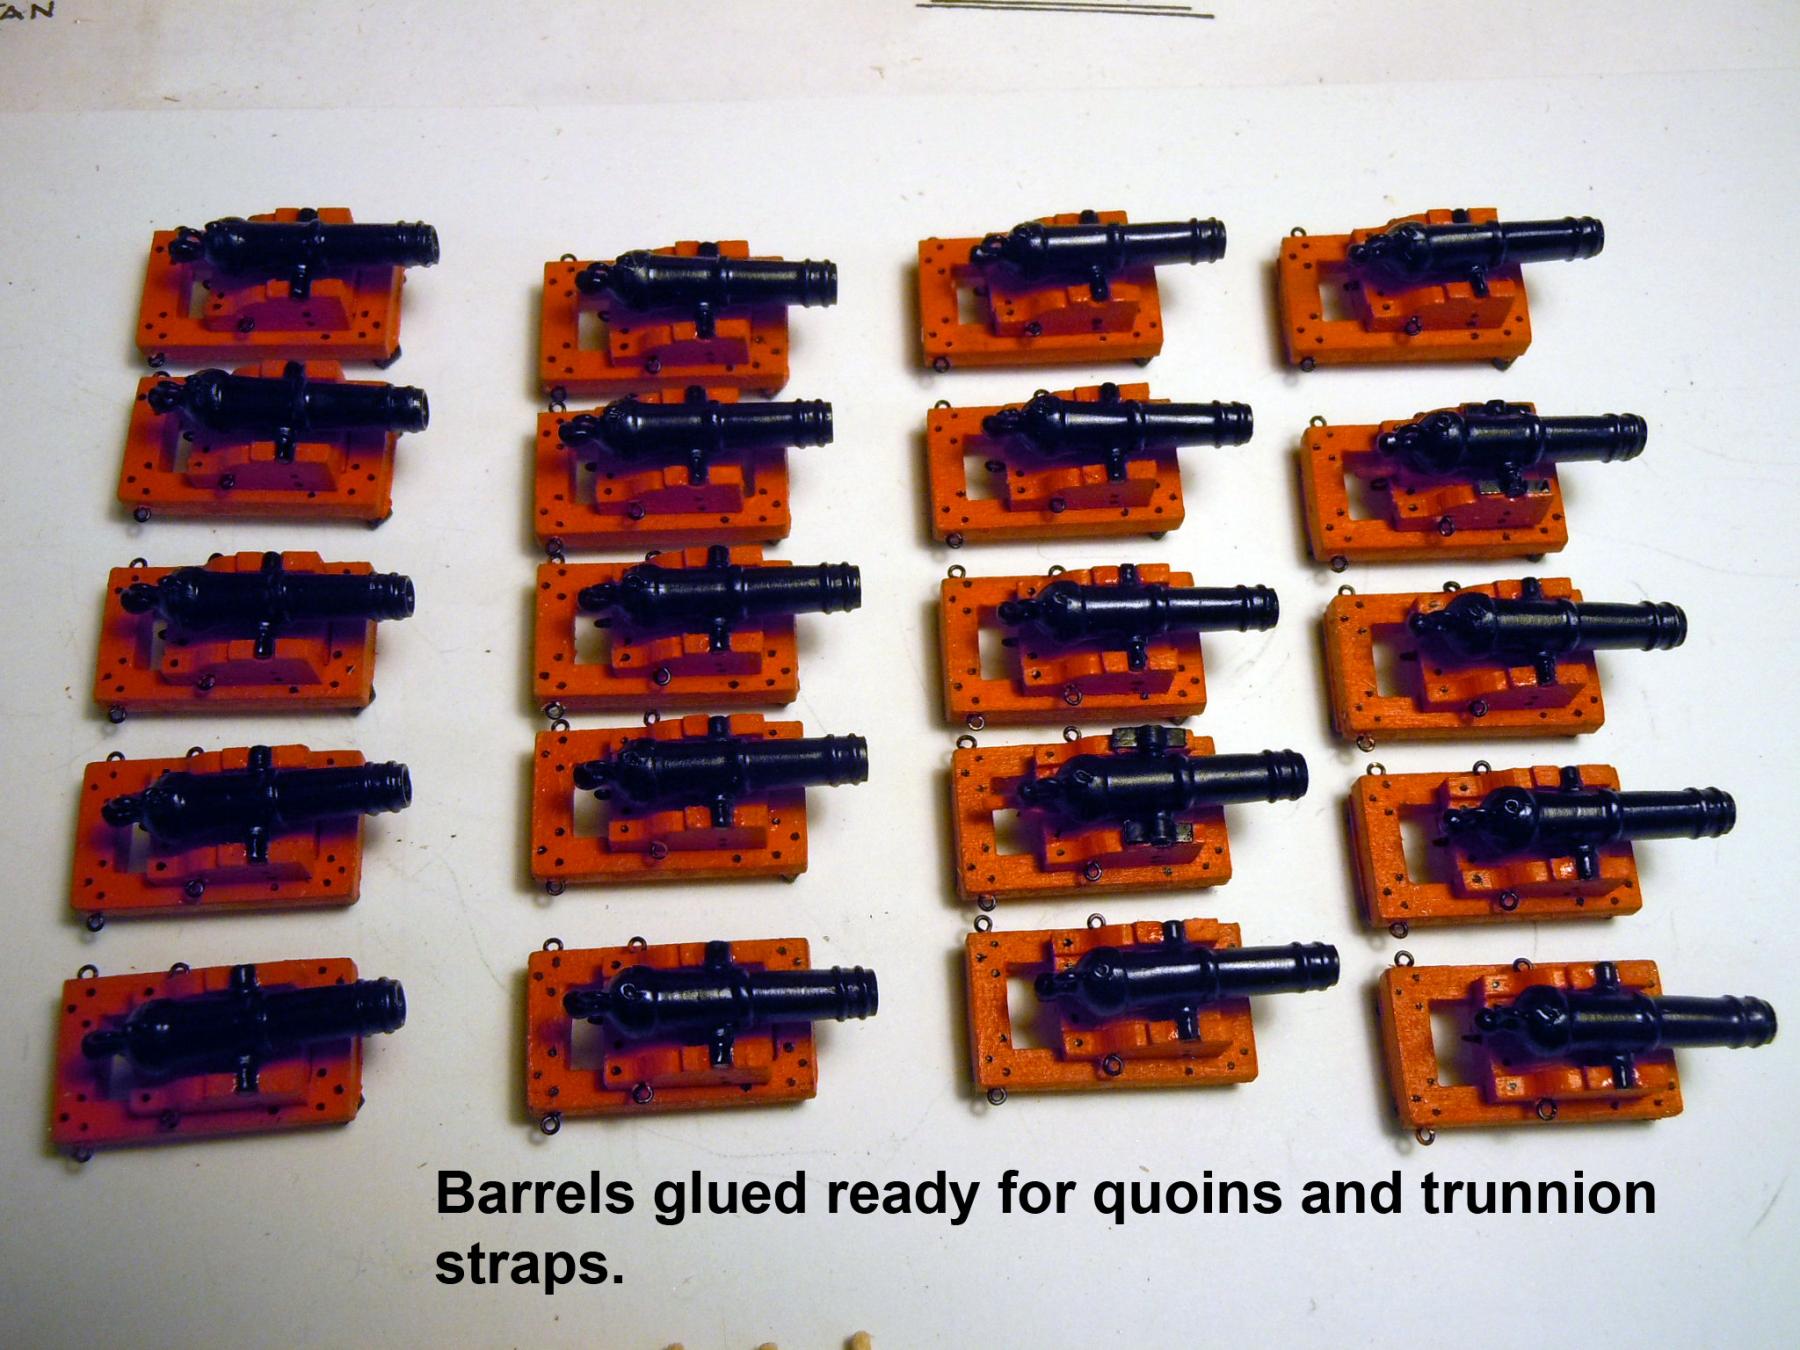
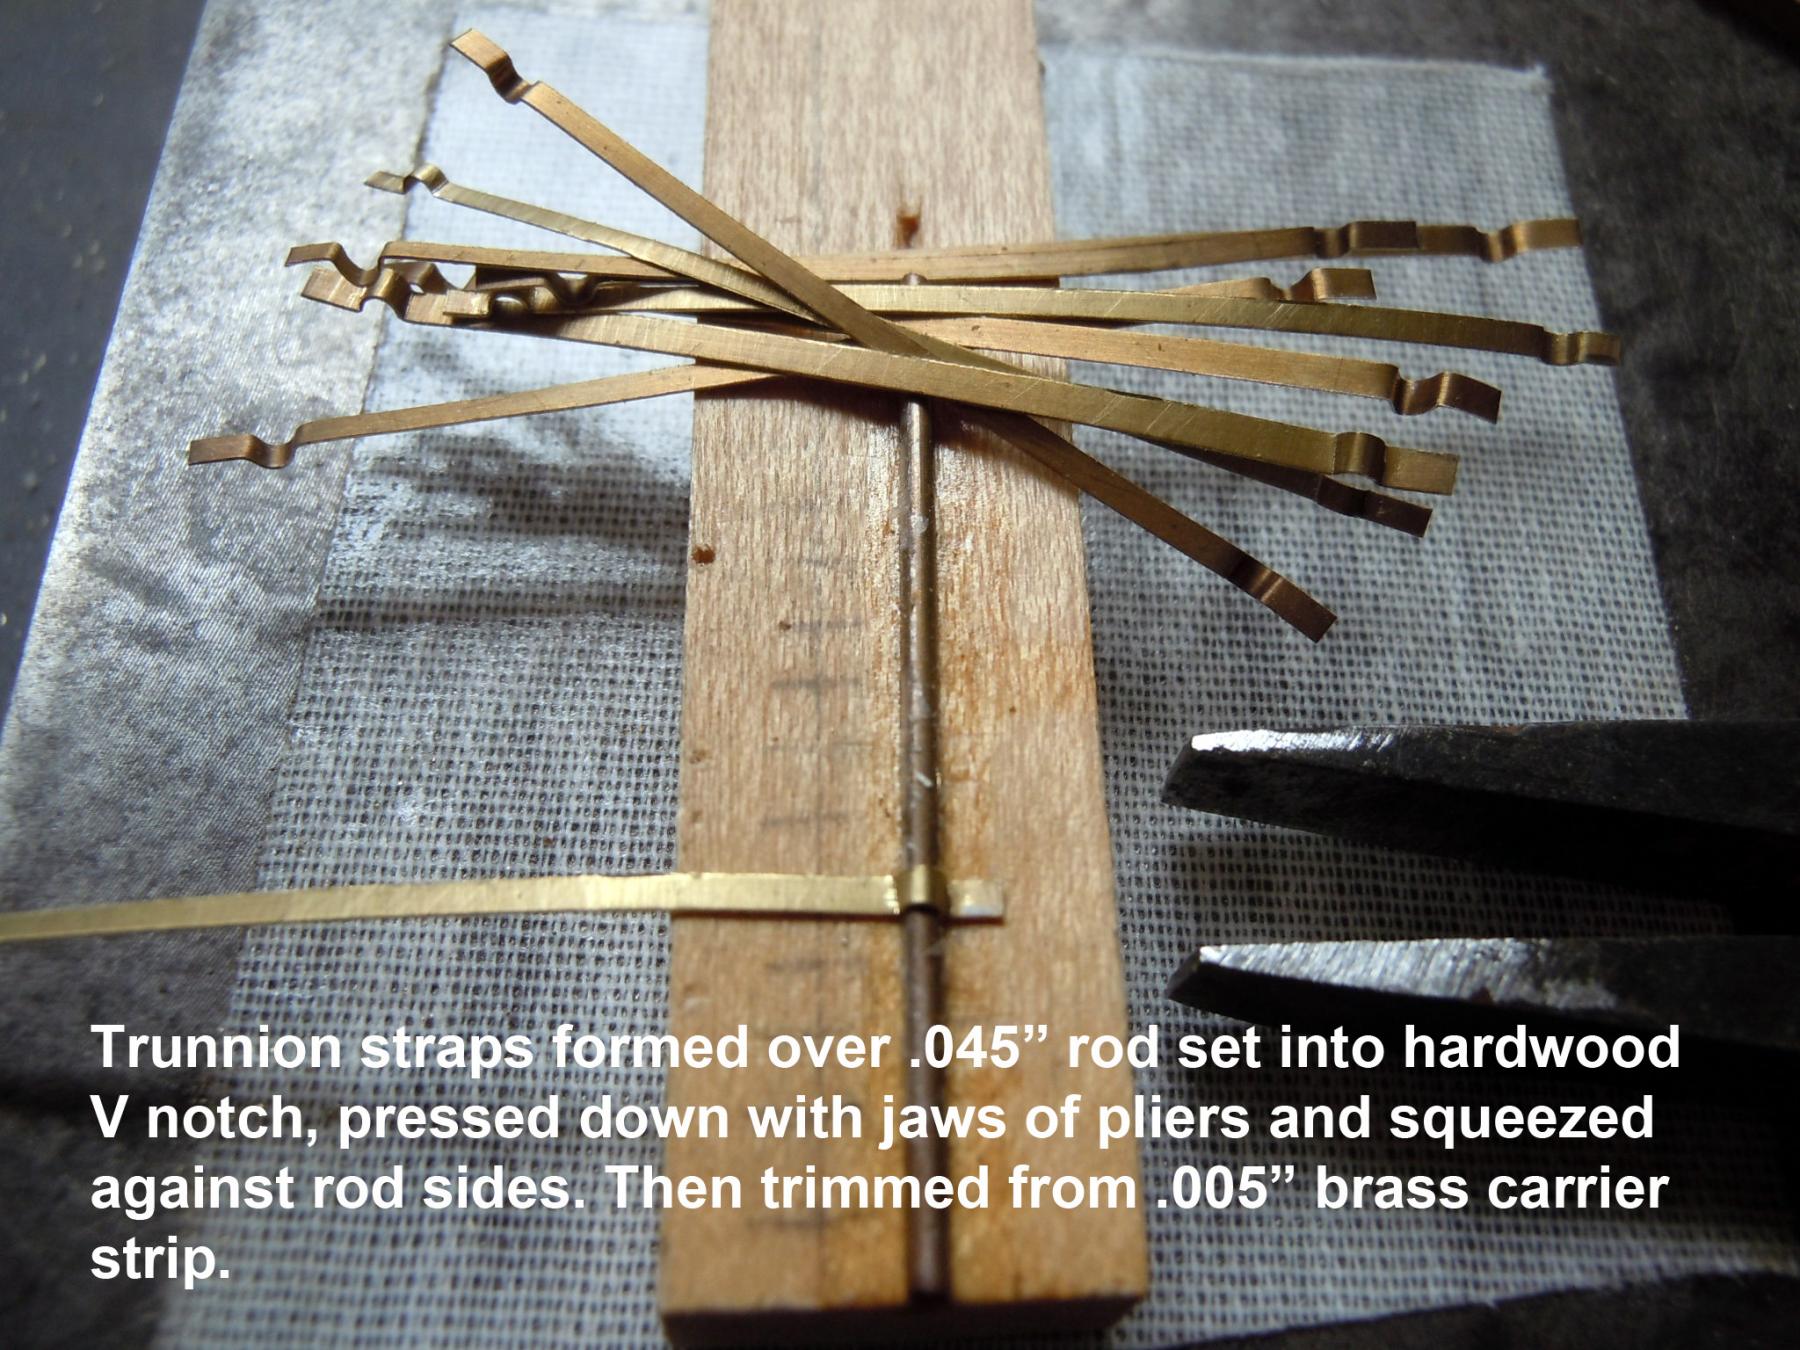
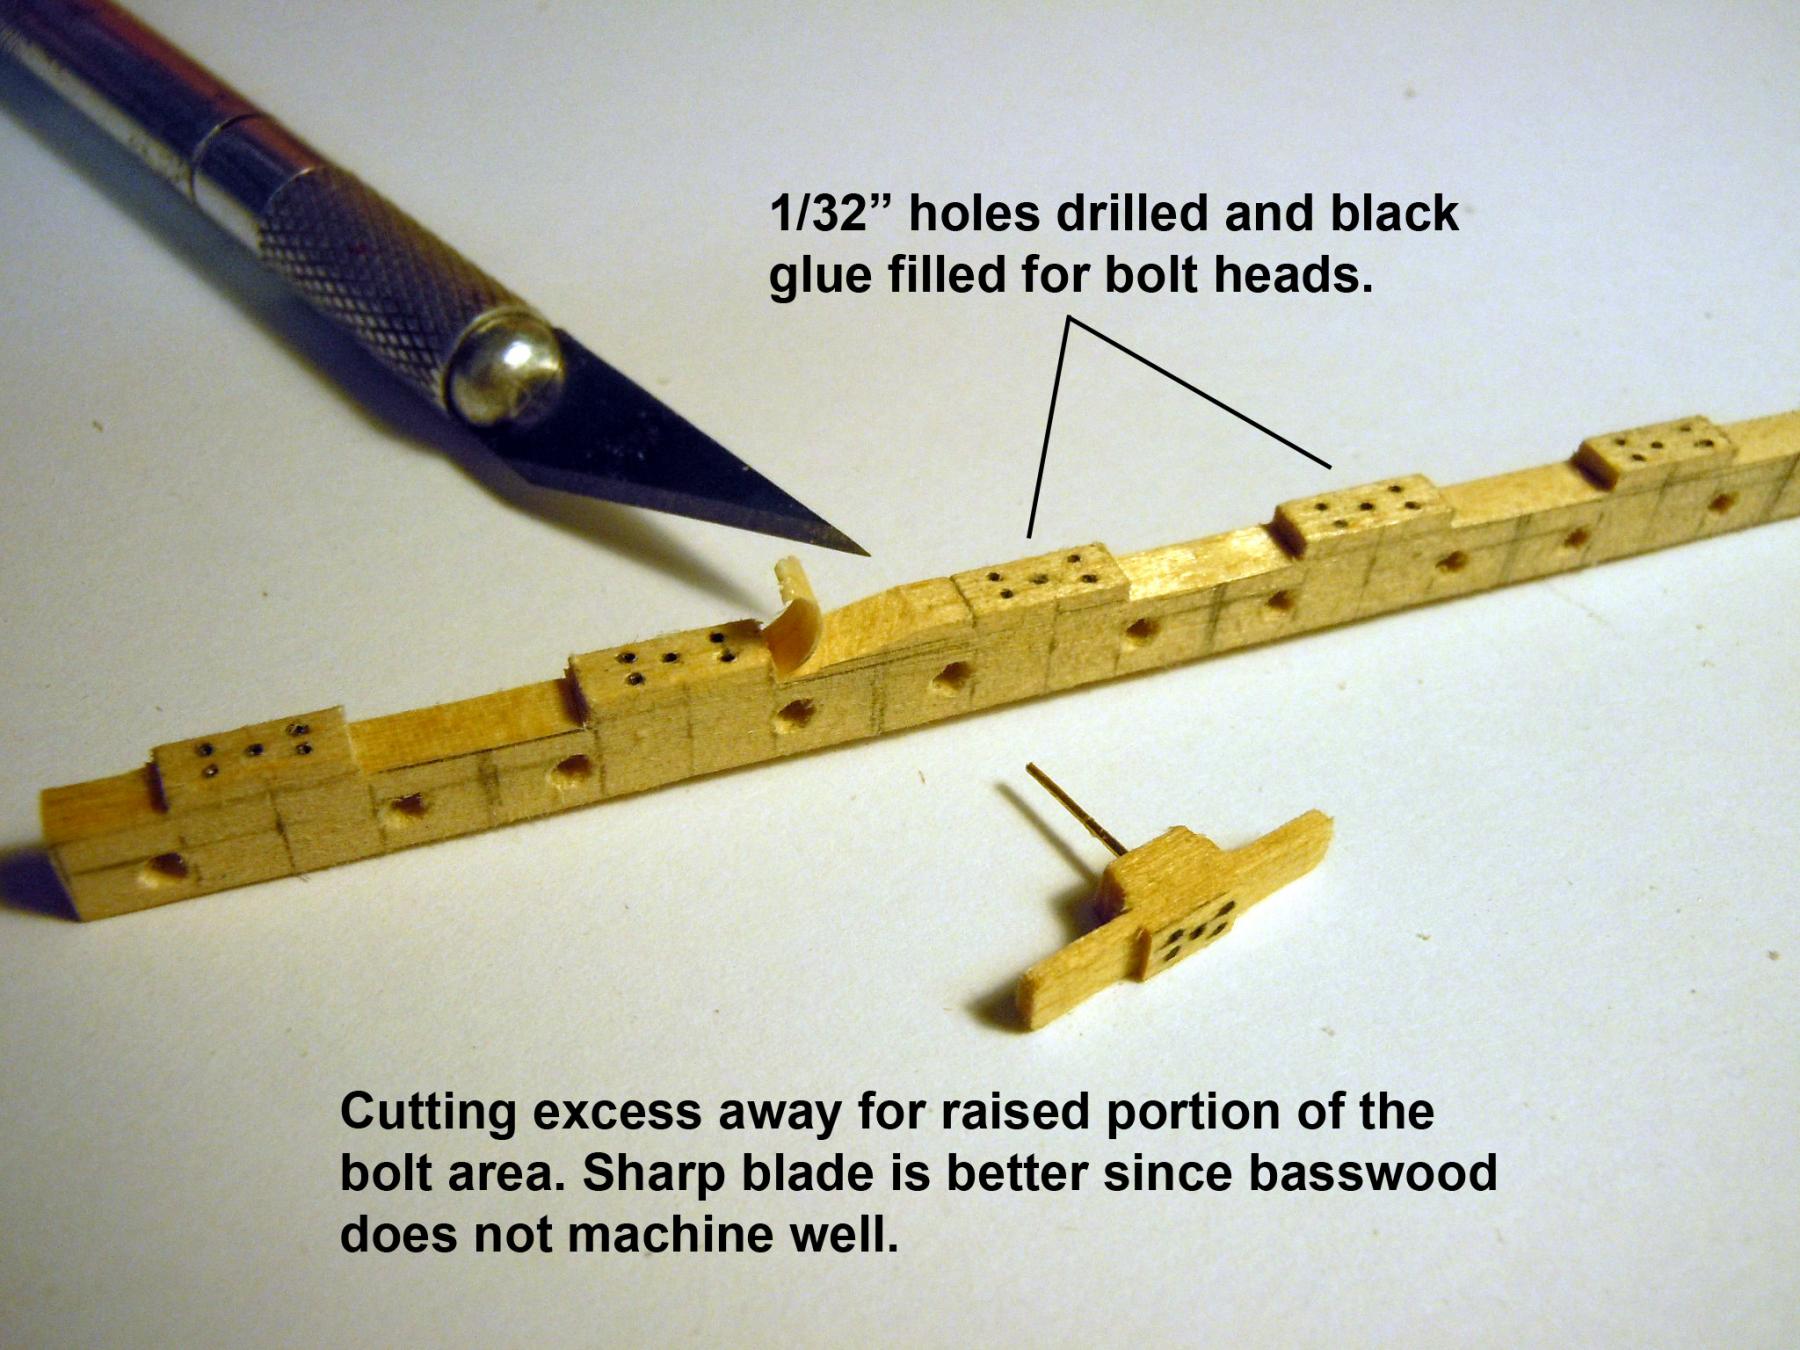
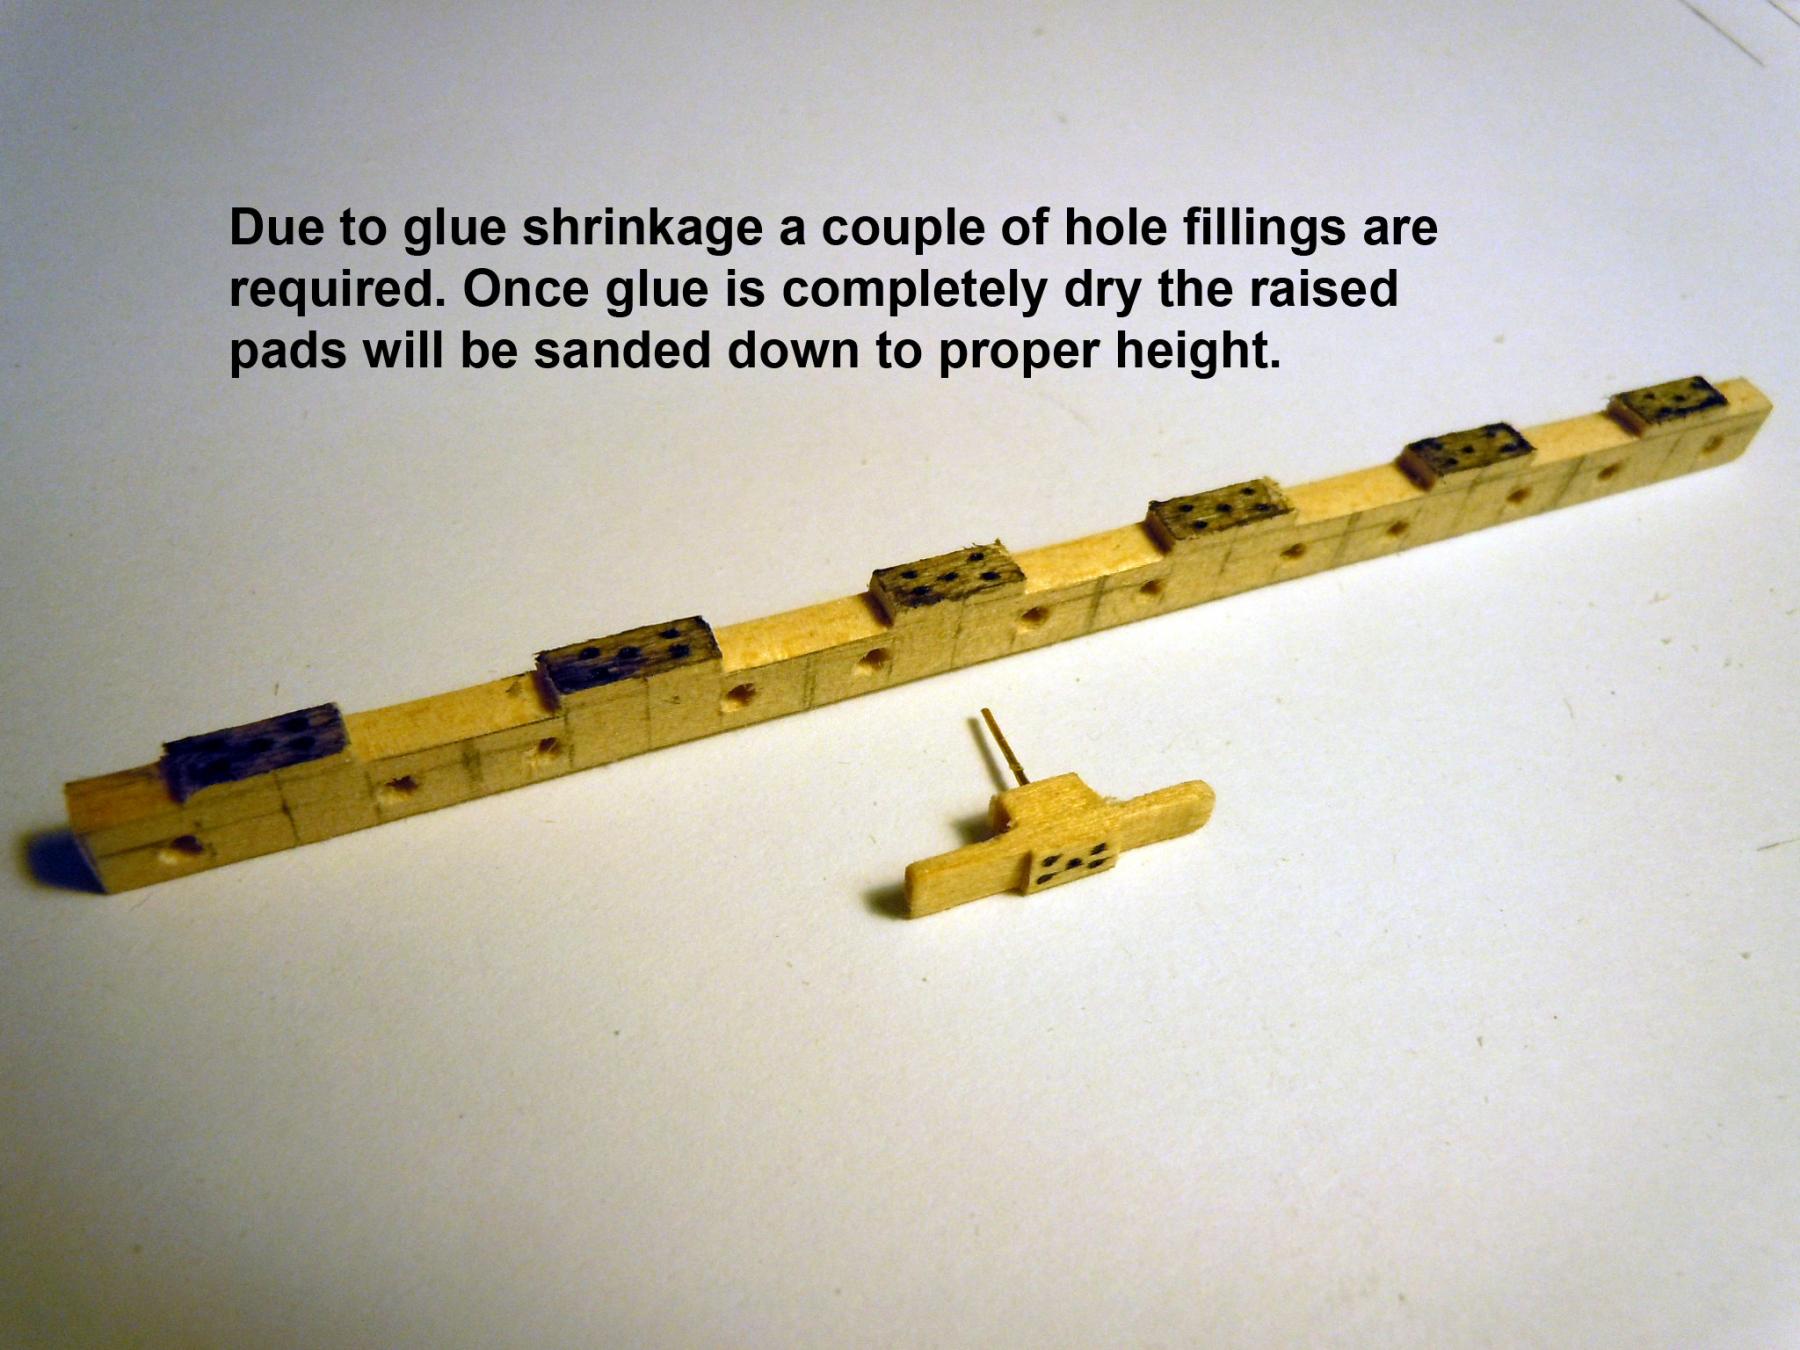
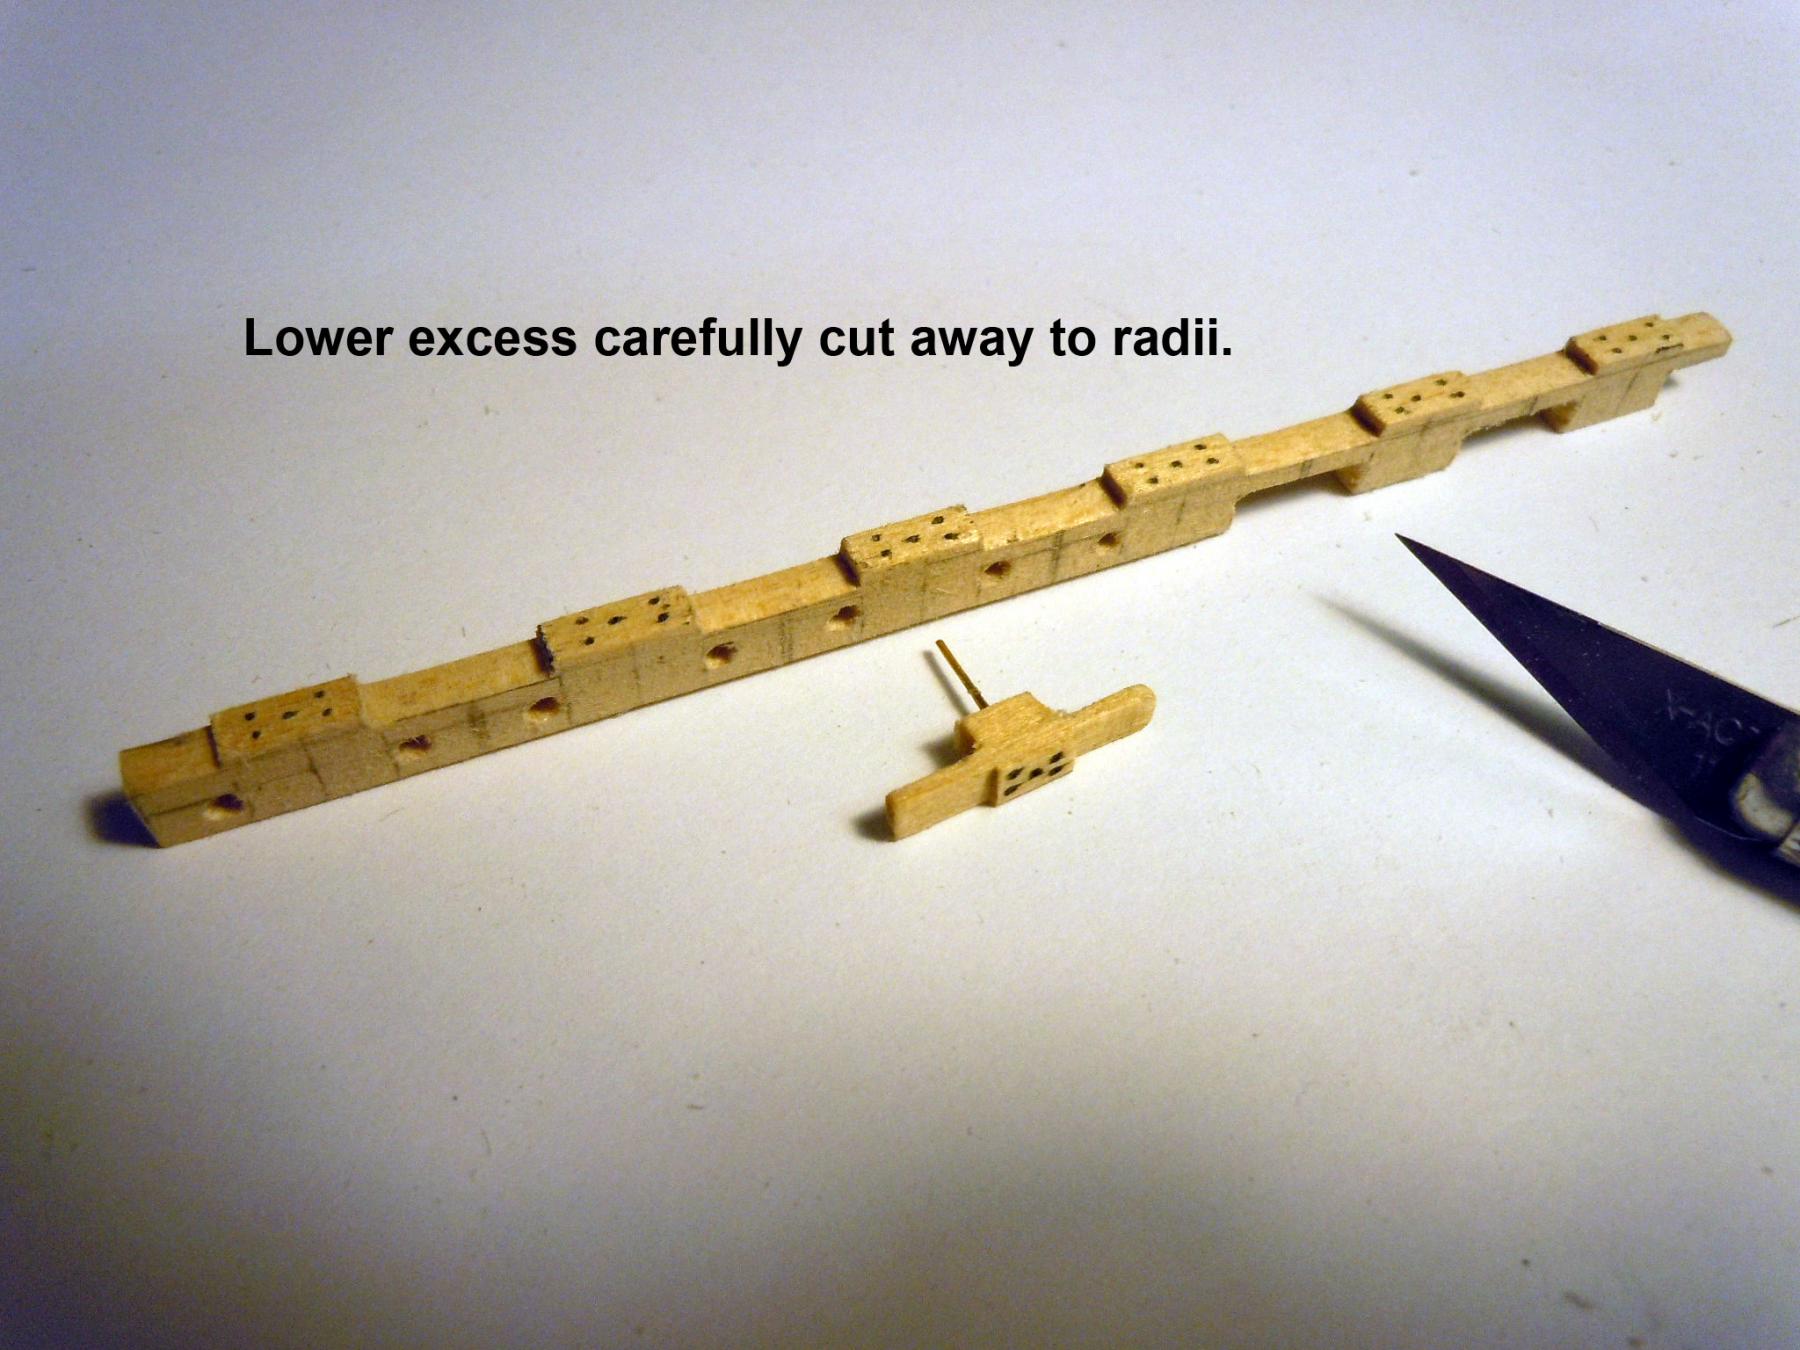
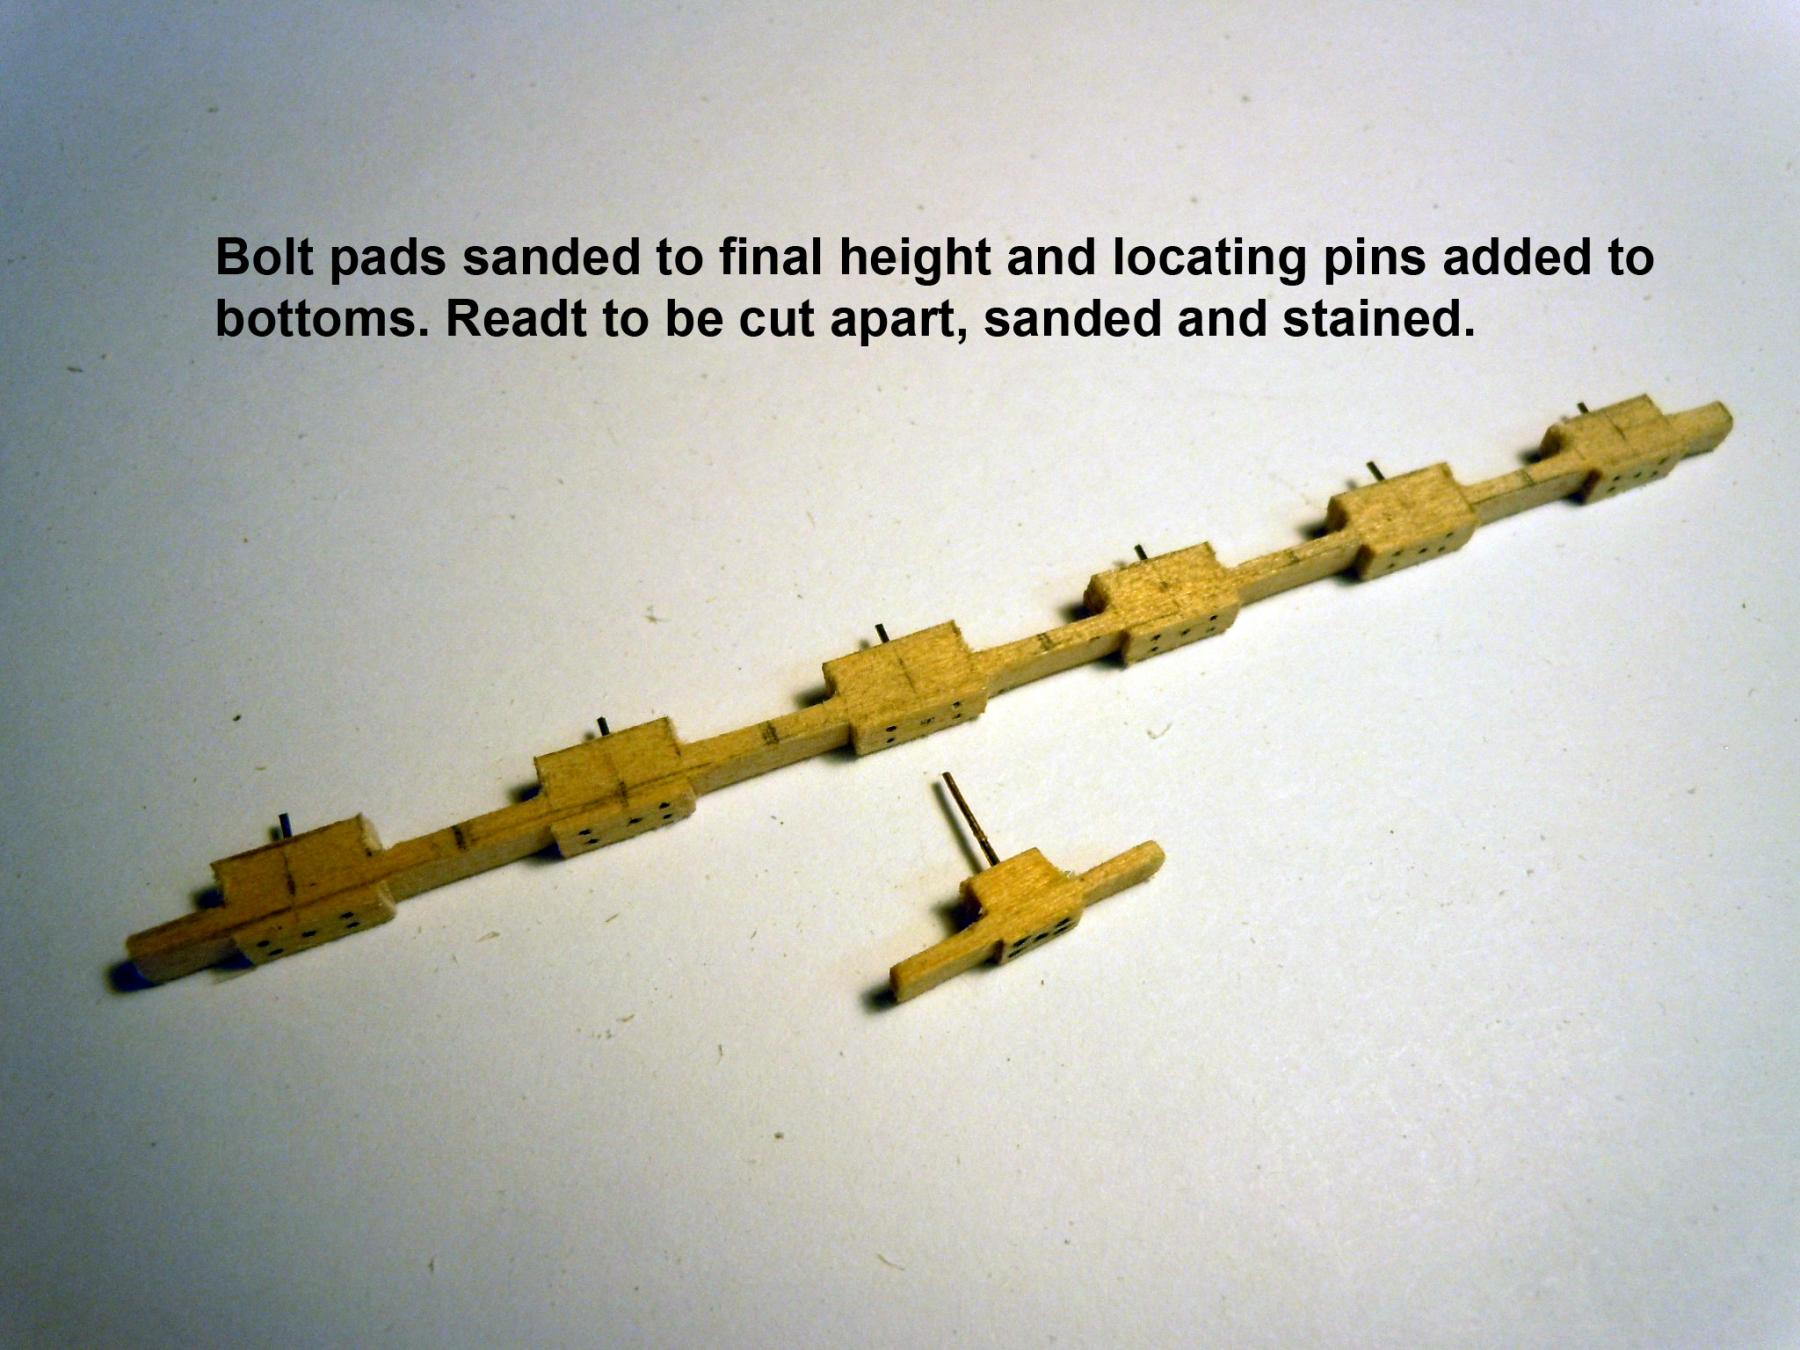
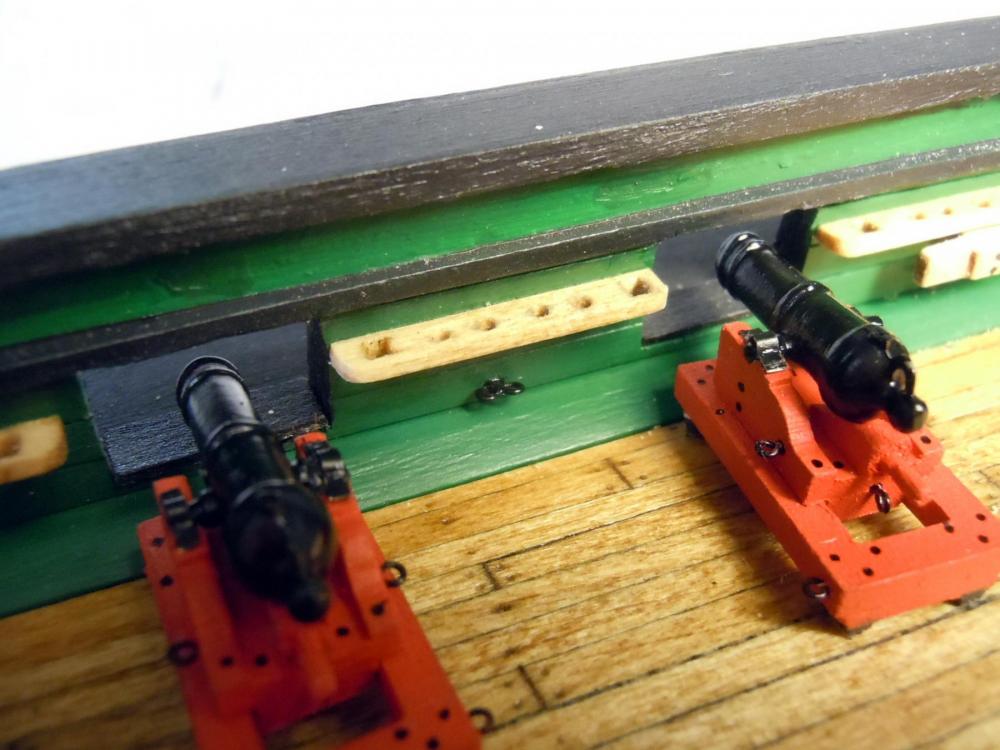
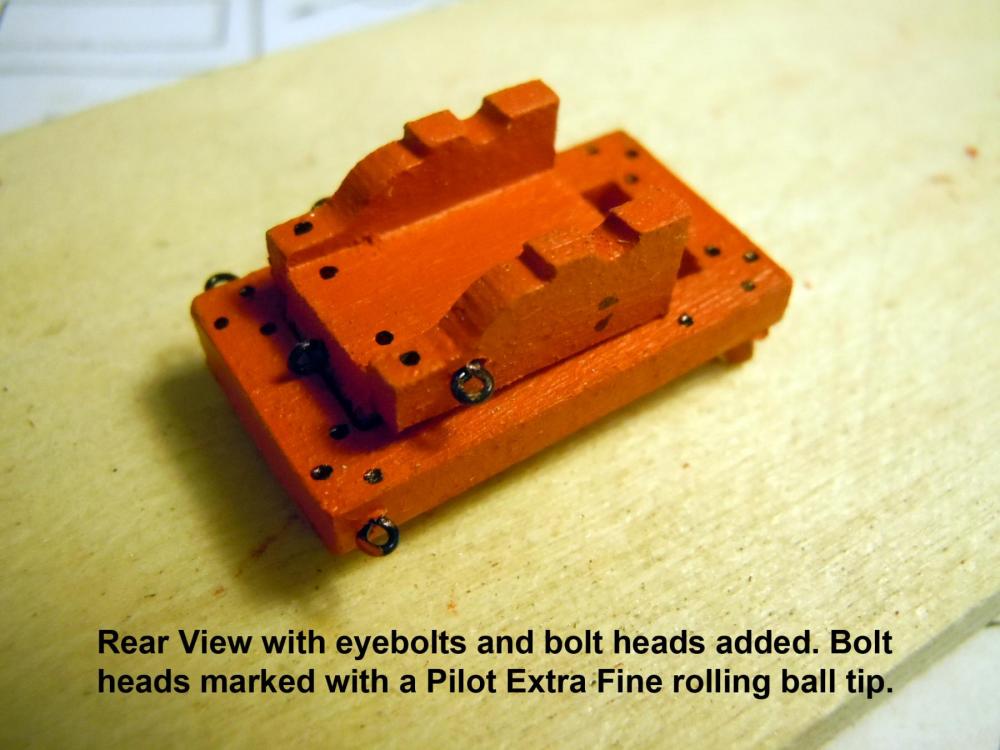
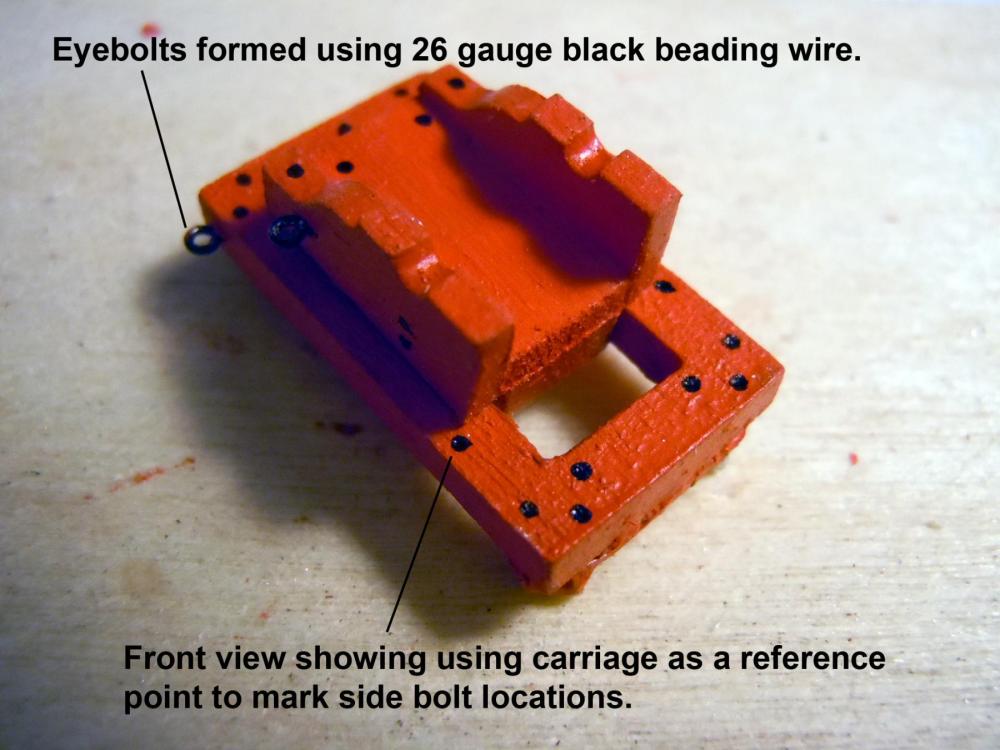
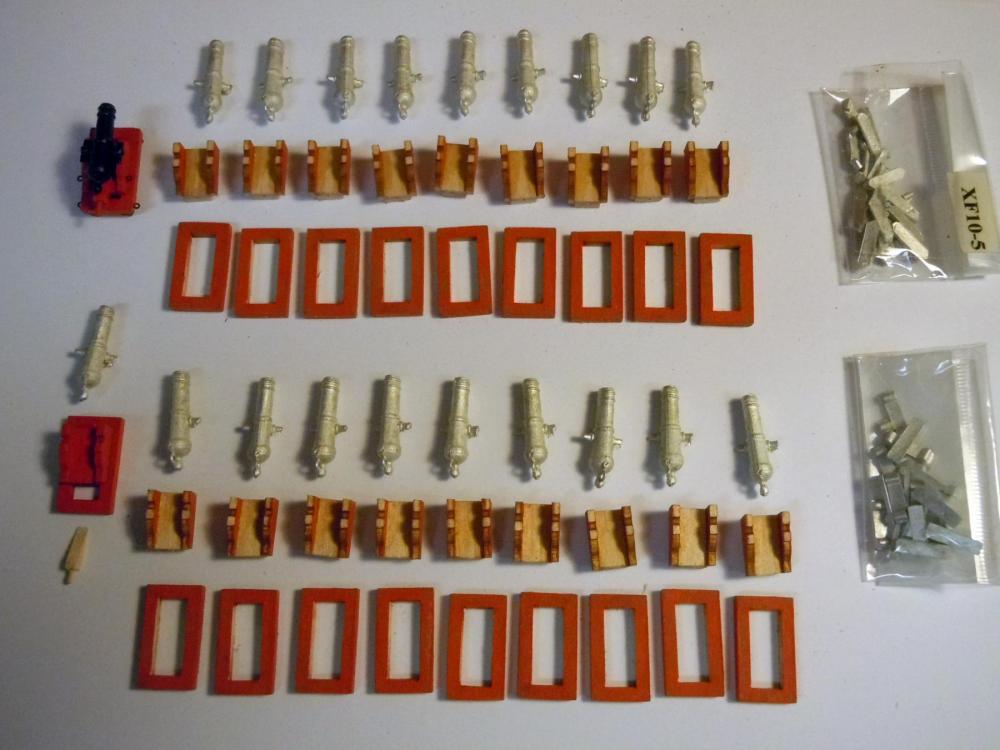
Continuing on with the building the carronades I added eyebolts using 26 gauge black beading wire and added them as needed. Next I tried a few options for bolt heads and decided the best test results were obtained using a Pilot Fine Point rolling ball "Precise V5". Once beds and bases were marked and eyebolts added the beds were glued to the bases in the forward position. Next the master carronade barrel was glued in place relative to the gun port; and the master was then used to match each barrel to be tack glued into position on one side only. This allows further adjustment when trunnion straps are added and fitted to an individual gunport if needed. Once the barrels were glued in place the trunnion straps and quoins were needed. The straps were formed over a .045" rod set in a V notch cut in a piece of hardwood. Hardwood is needed to resist the down force of the pliers during the forming. Lengths of .005" brass strips were cut and trunnion straps formed on each end of the strip, then cut off and the next one formed on the strip. This speeded up the making of the 40 needed. Once formed all were spray painted Satin Black. The quoins were made using 3/32" square basswood explained early in this build. This shows them just set in place until next steps.


-
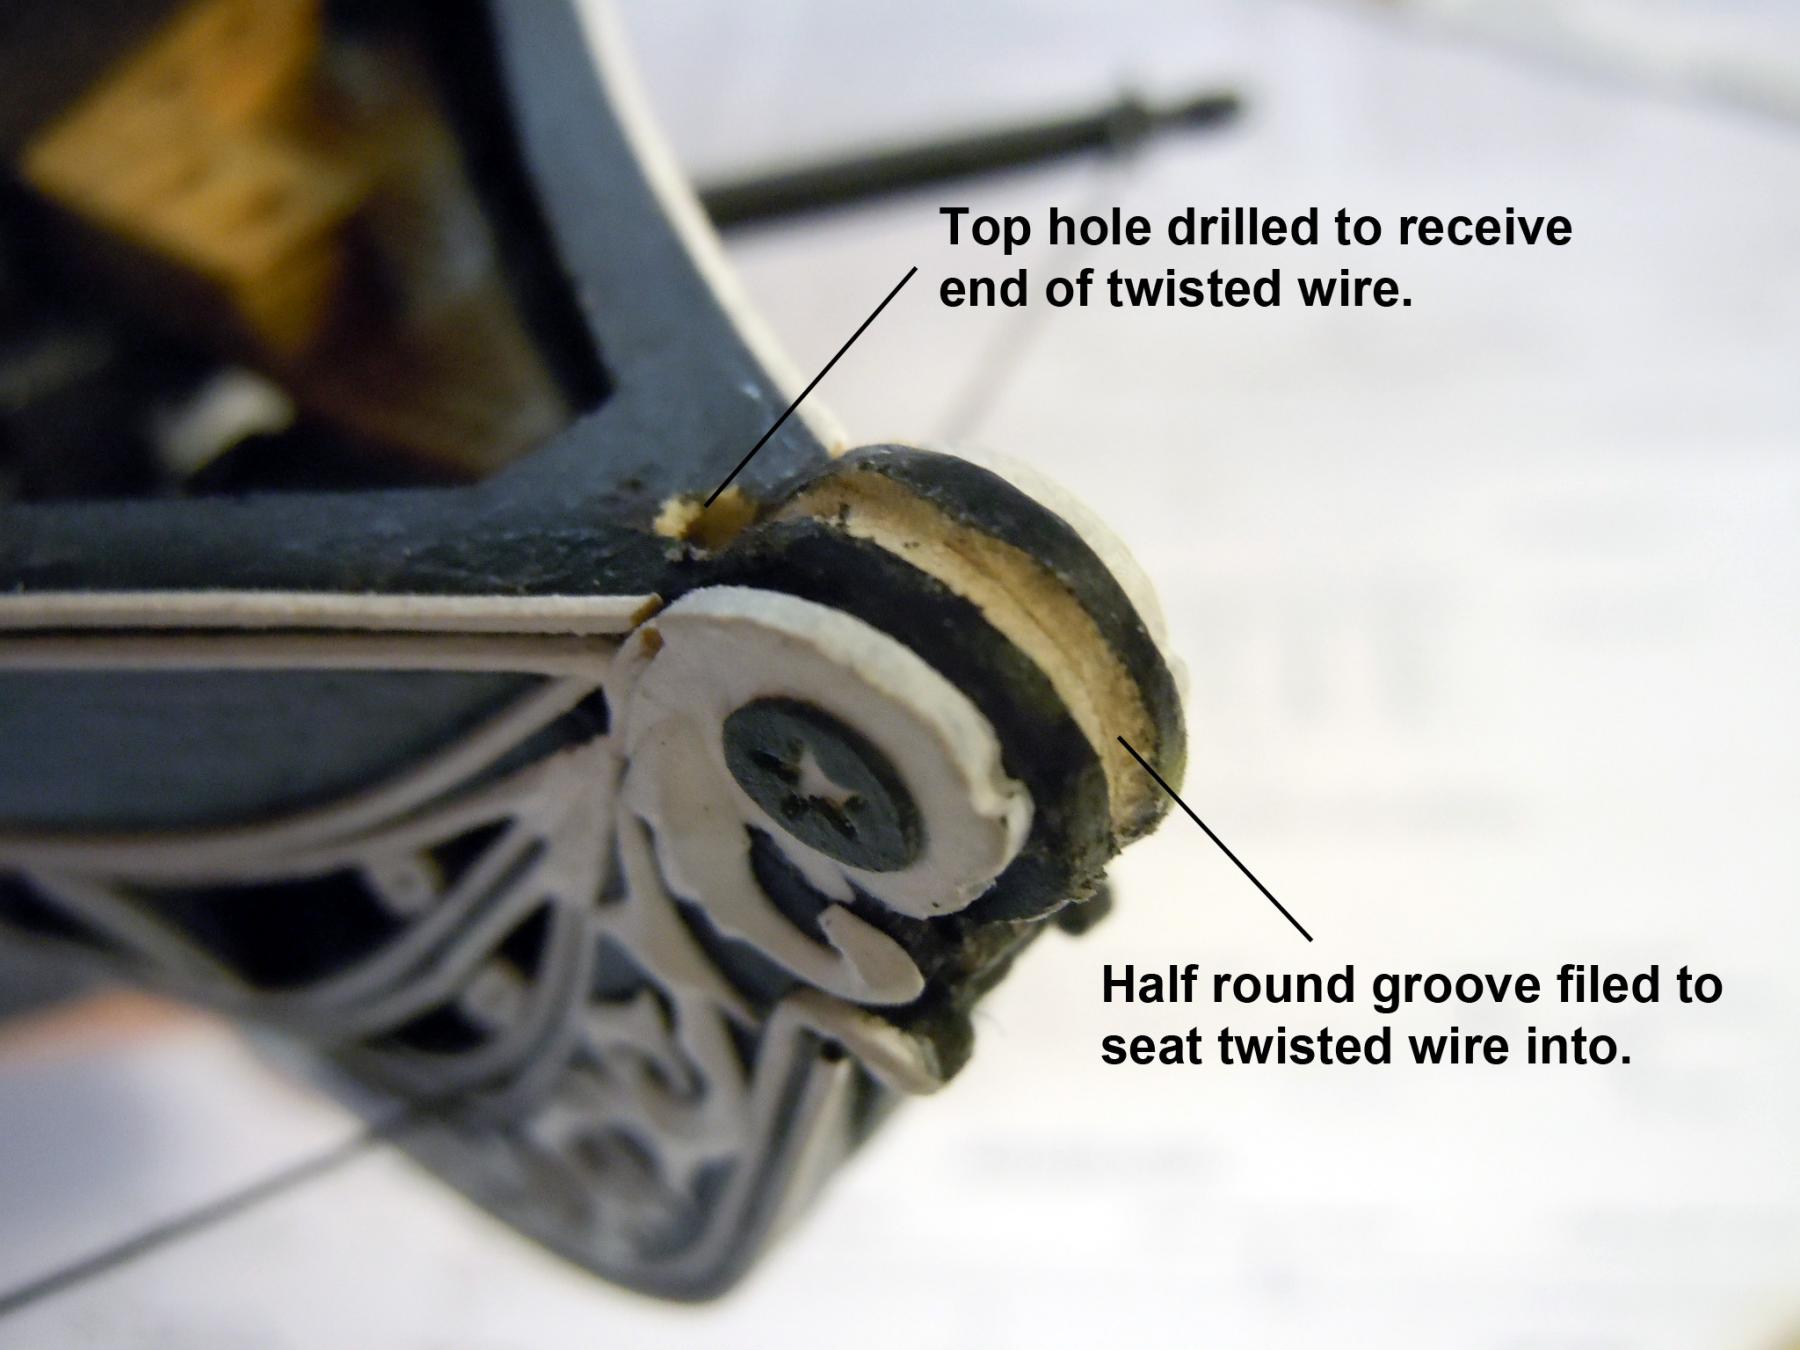
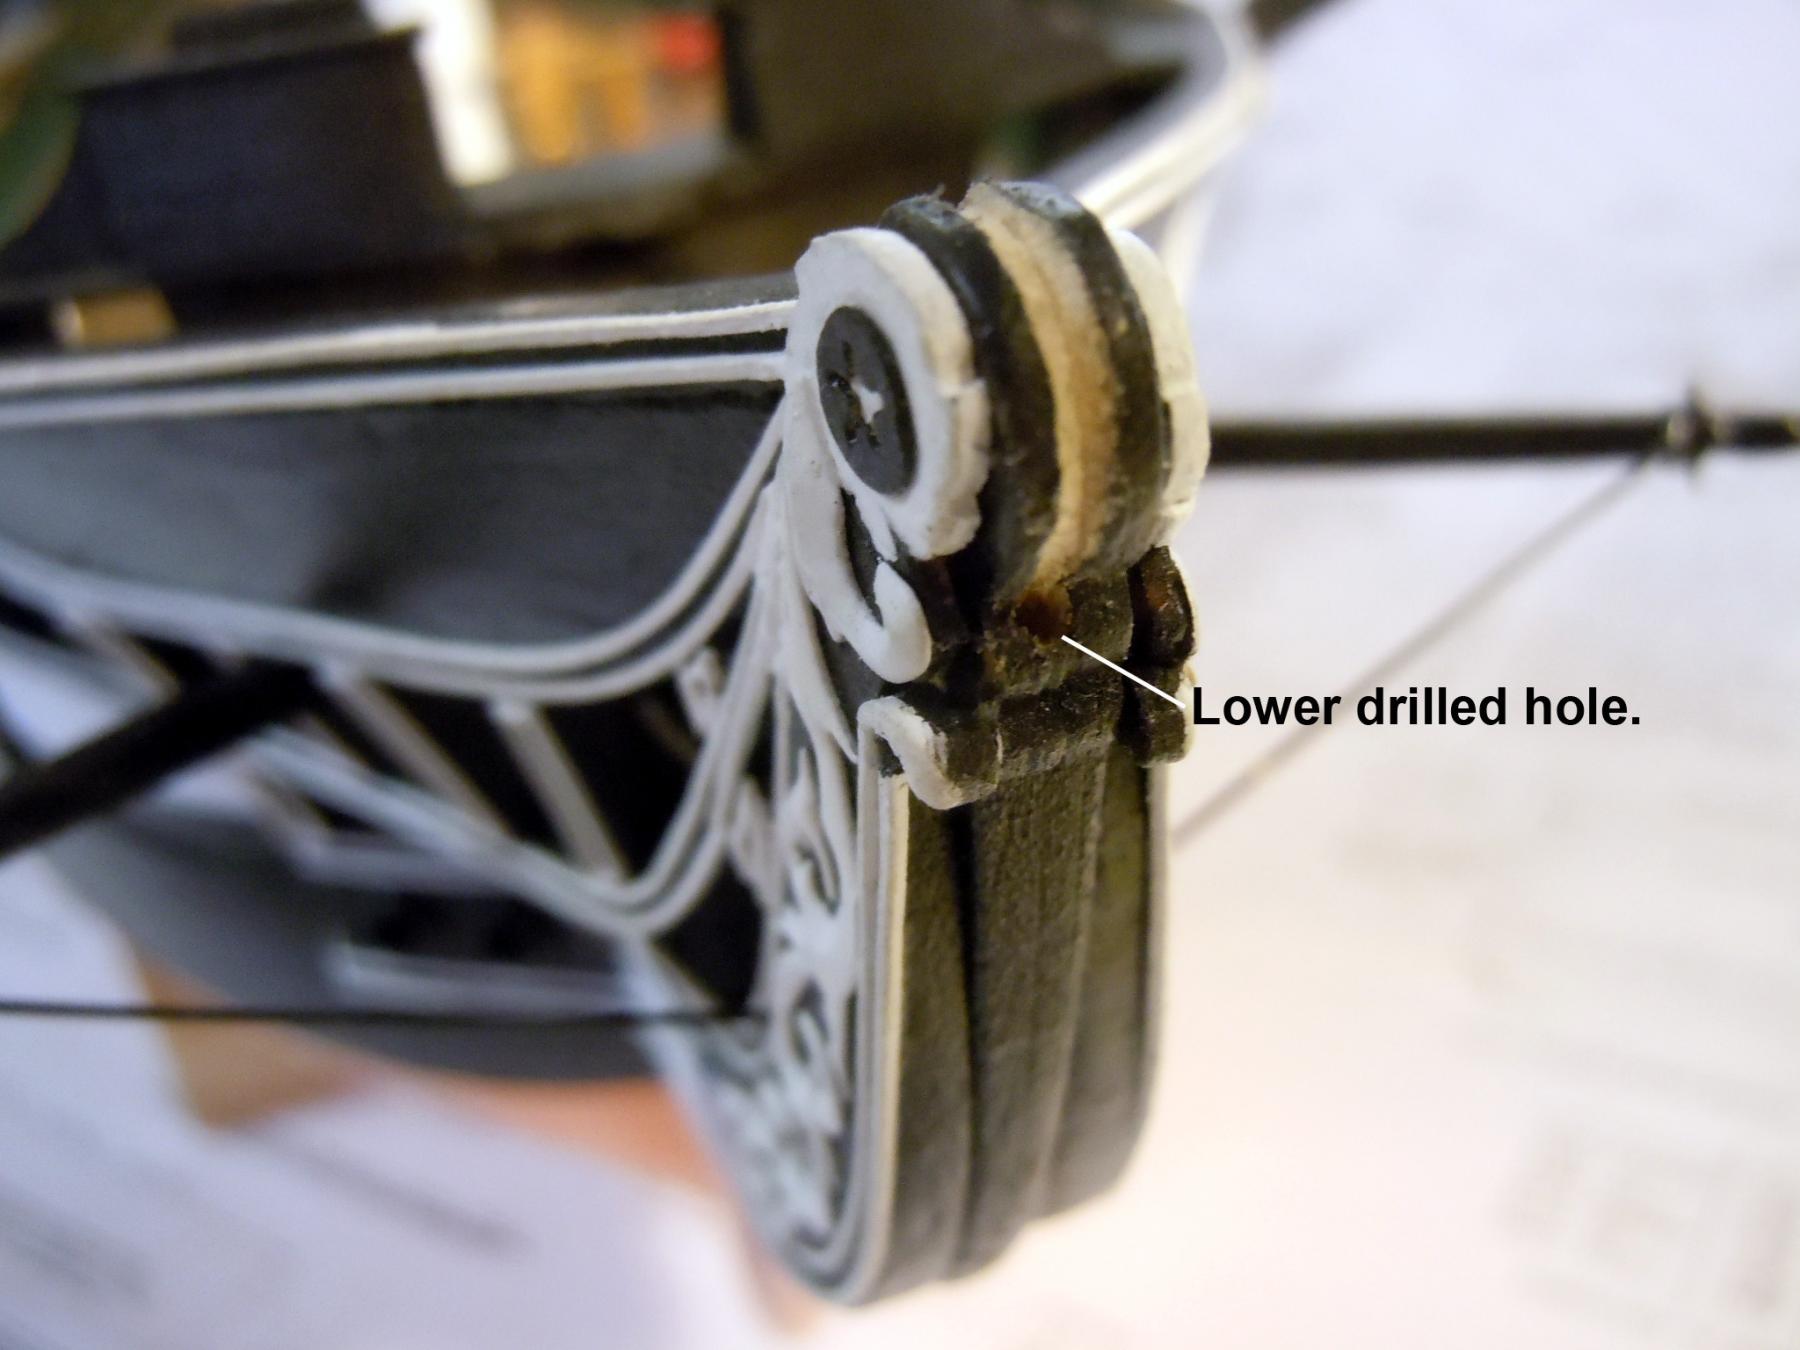
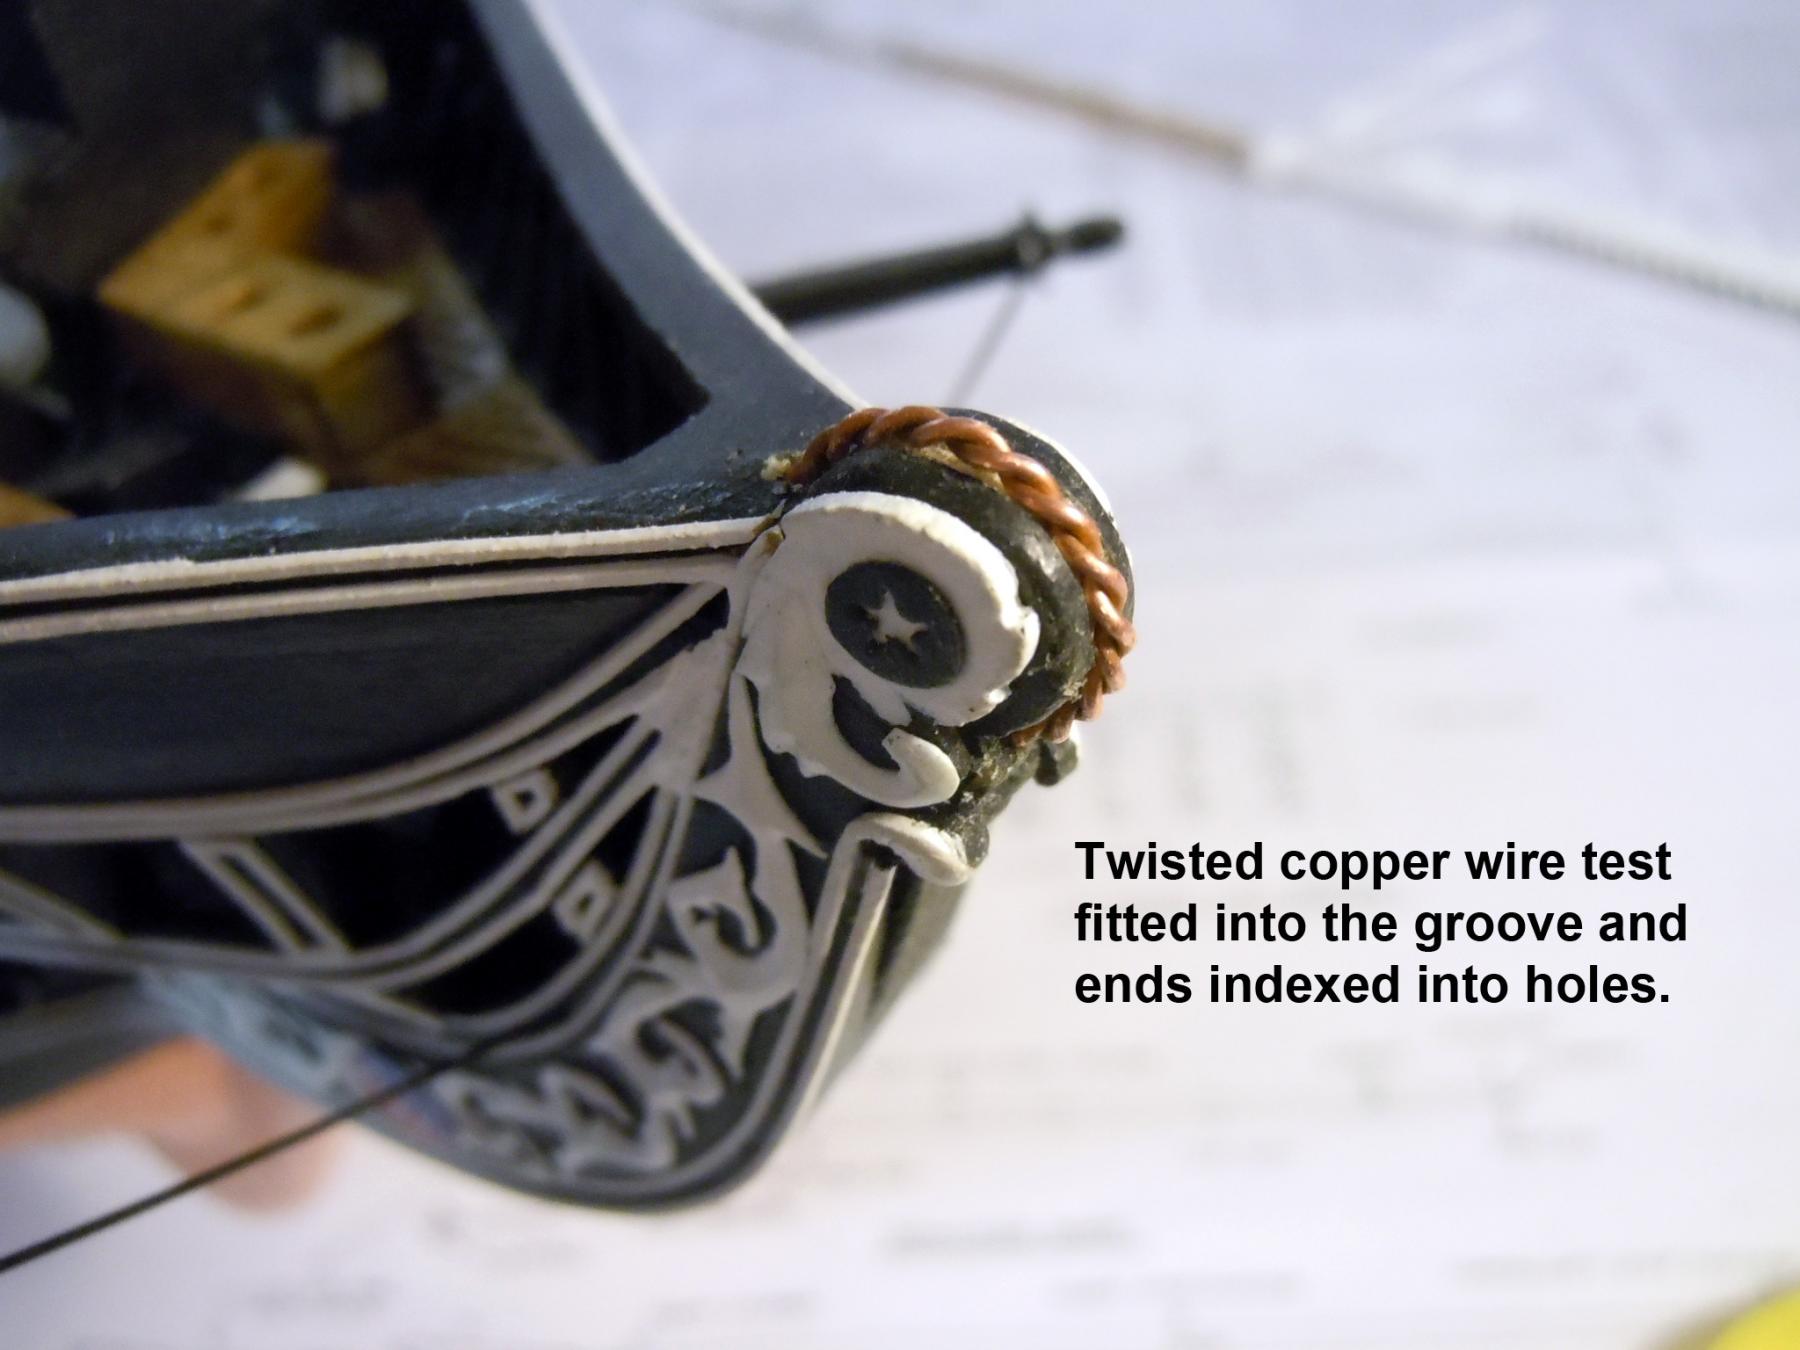
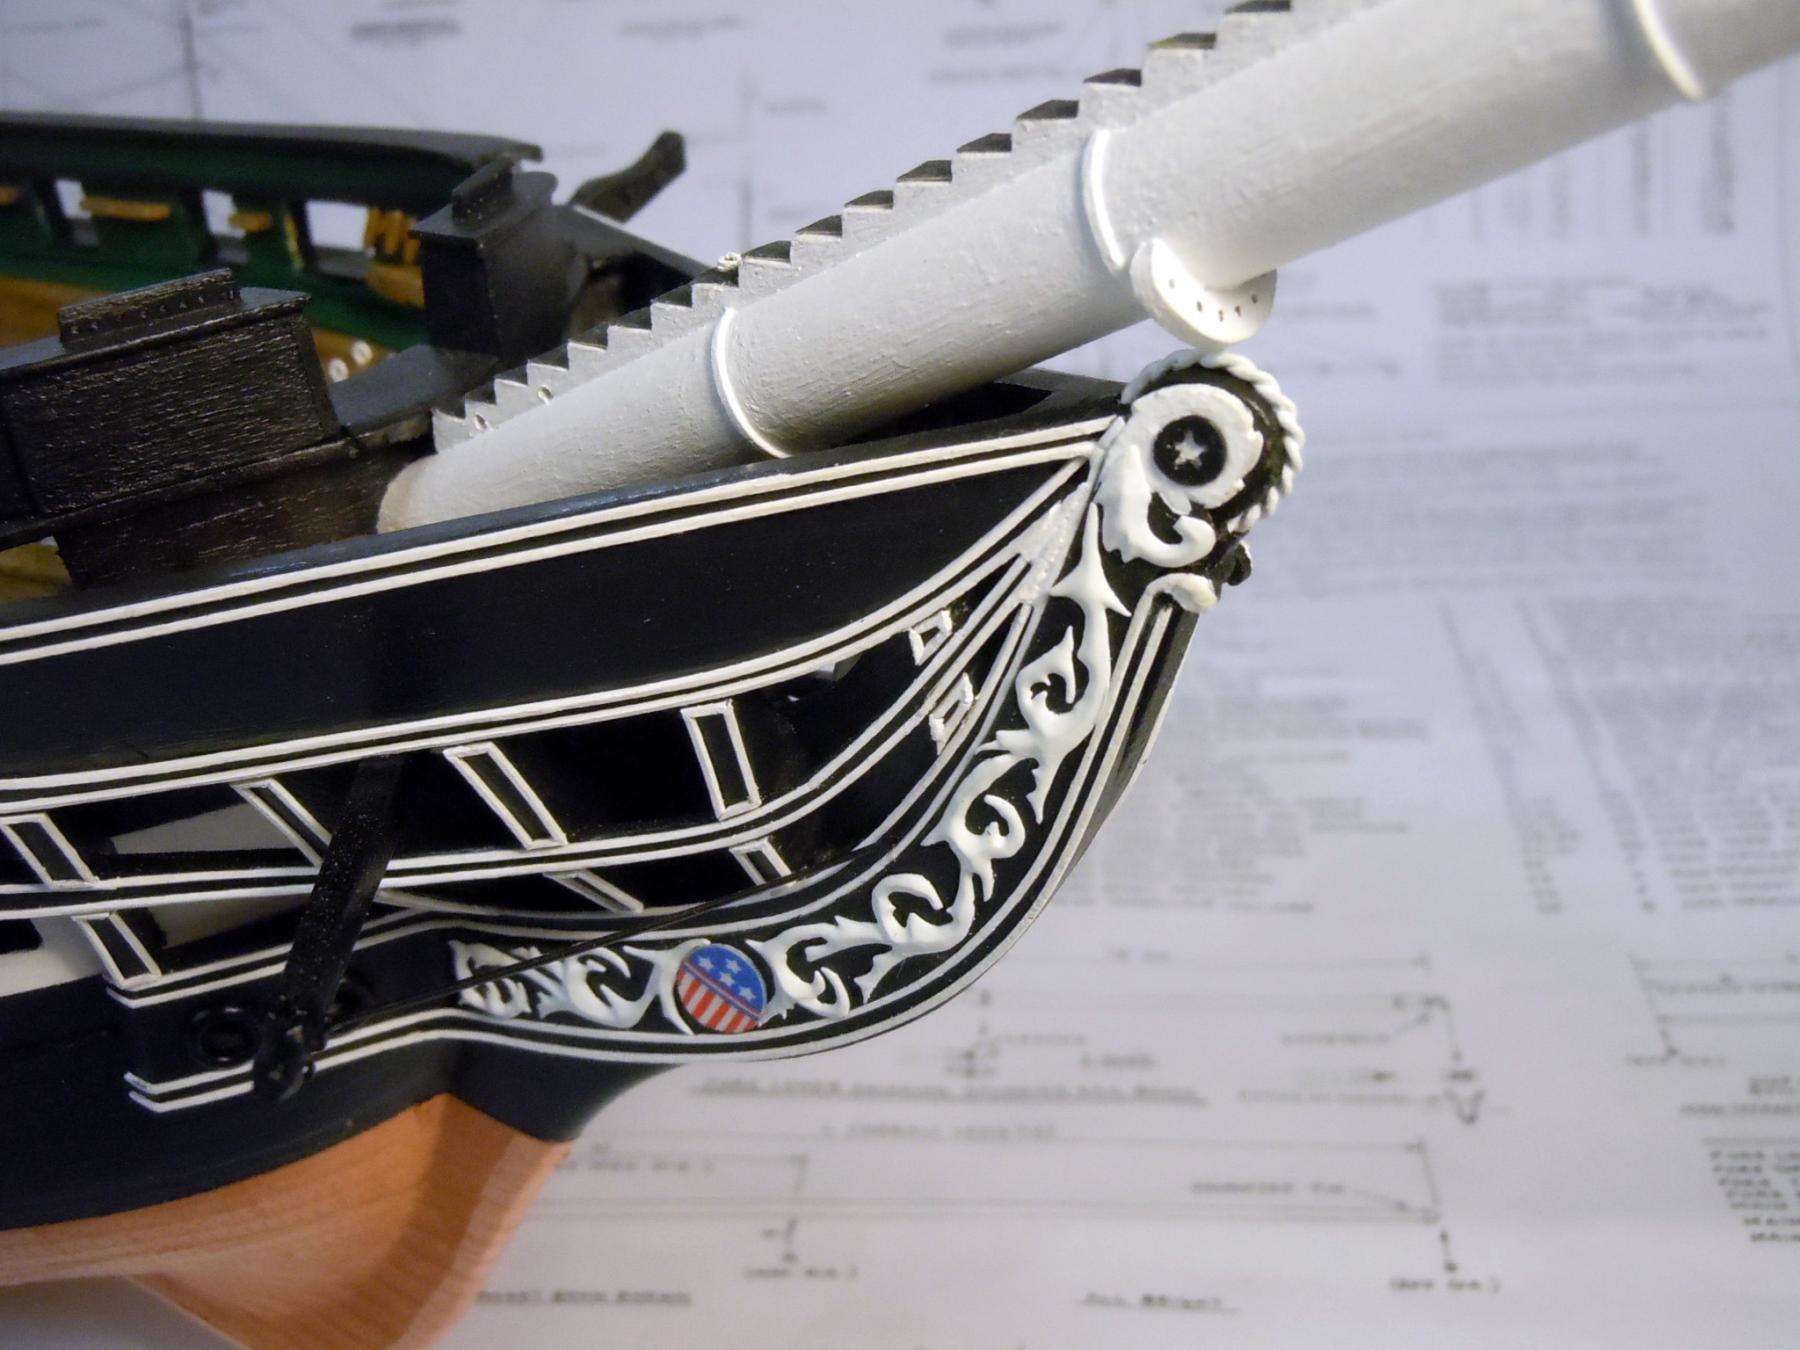
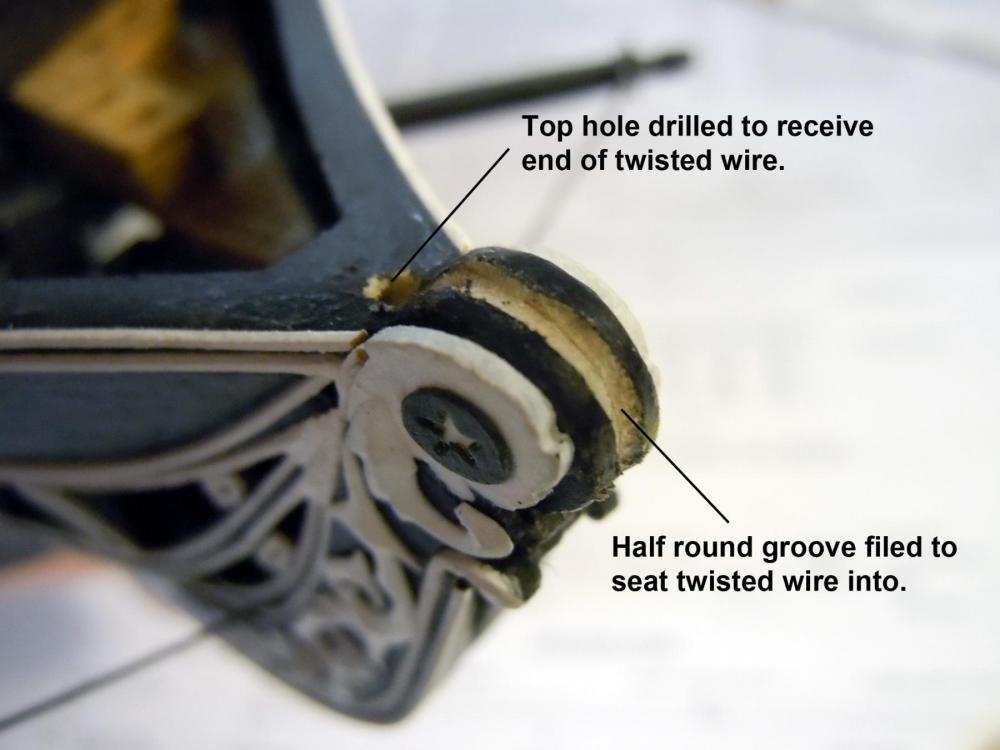
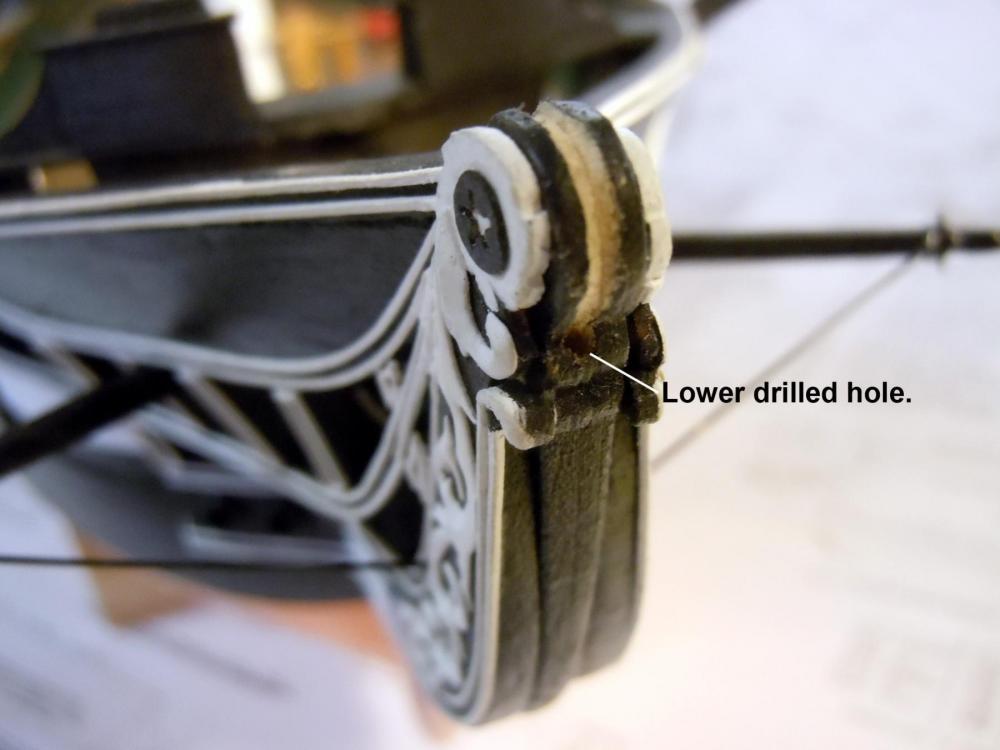
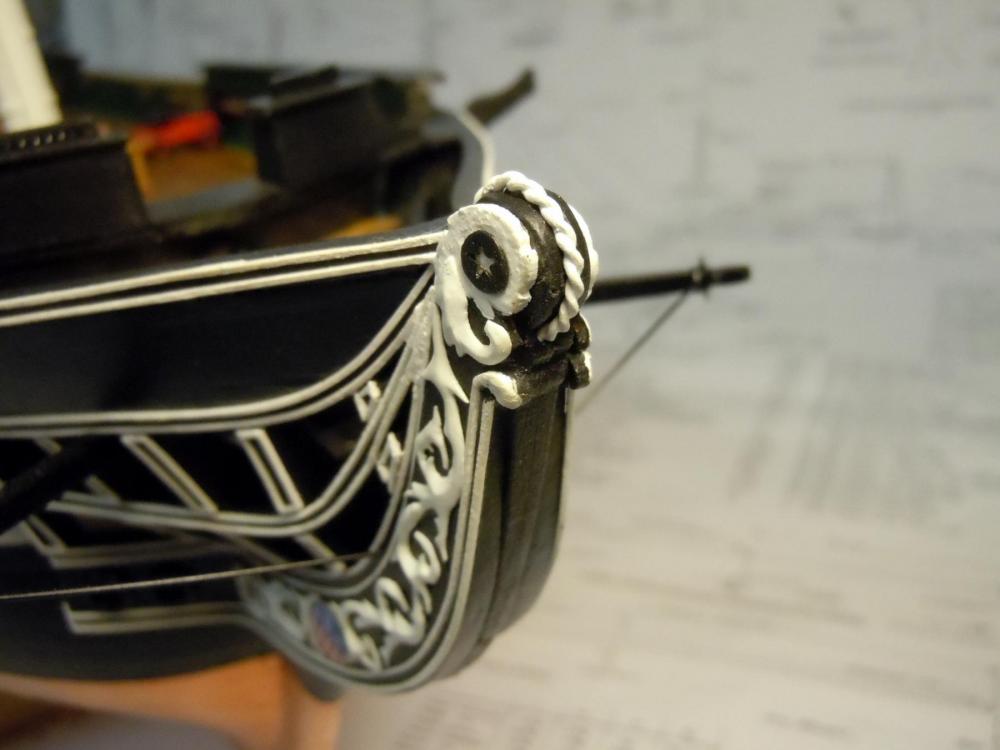
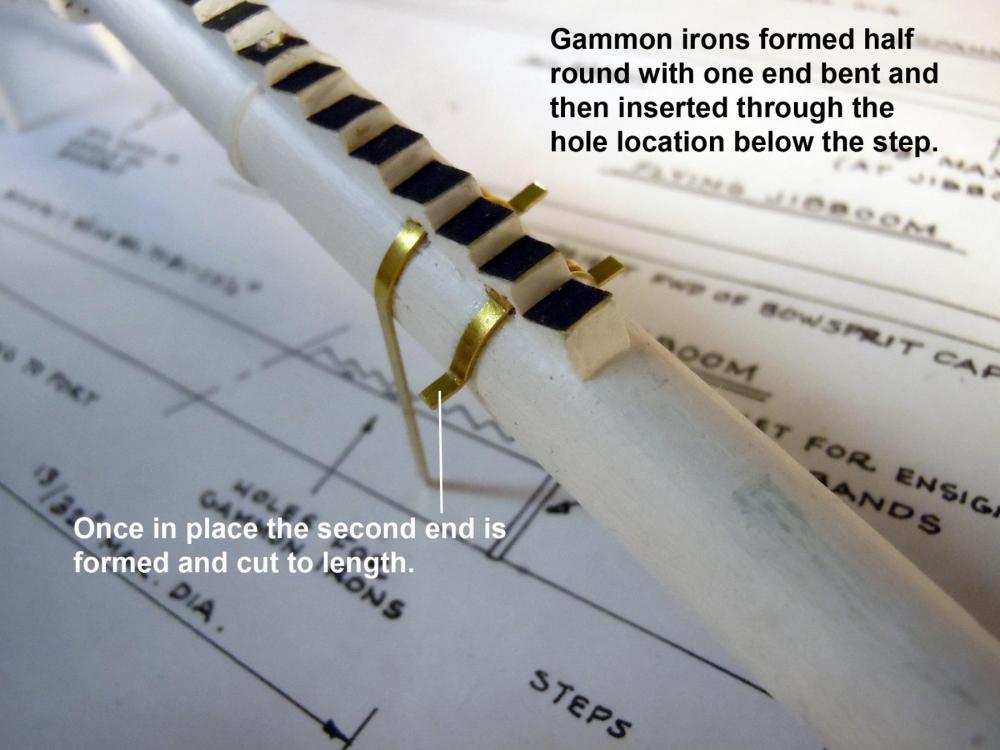
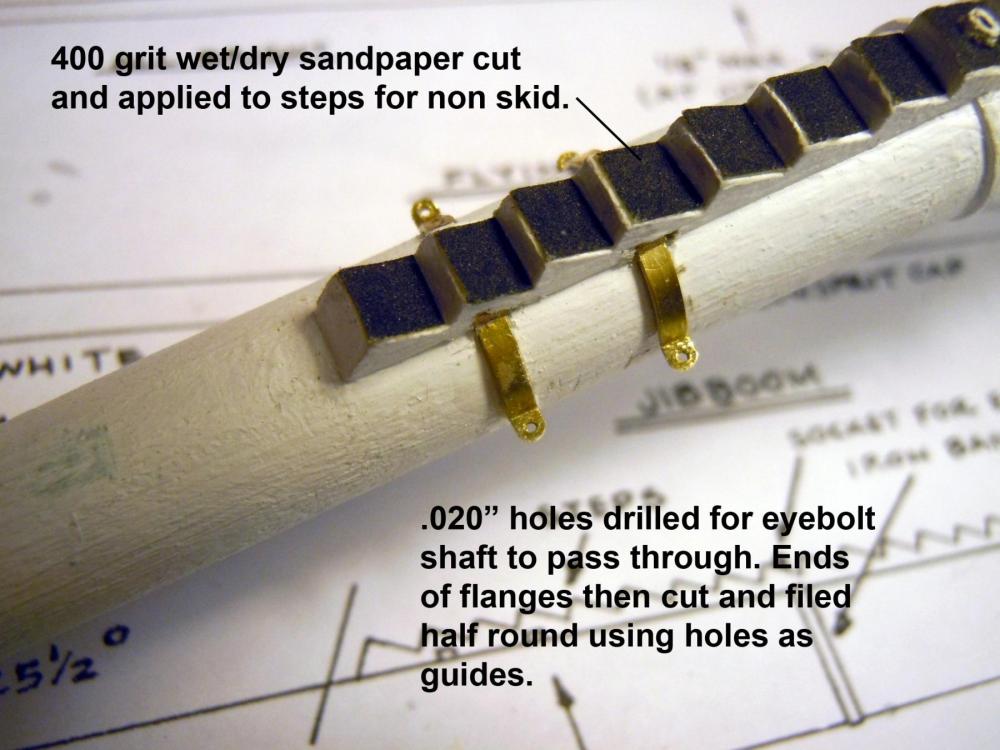
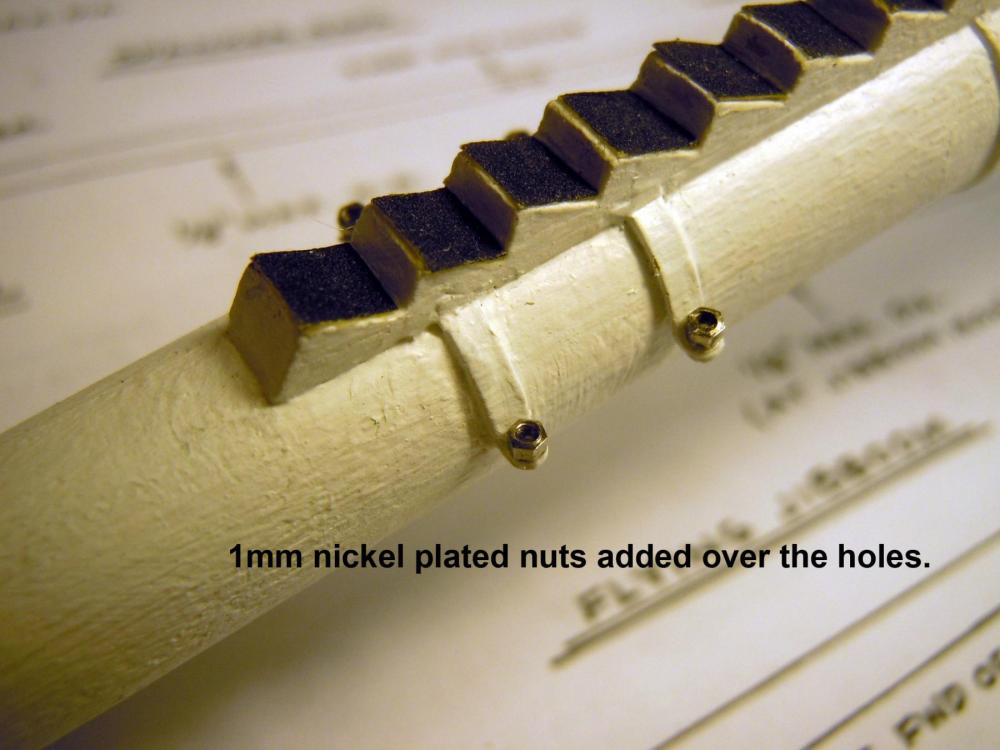
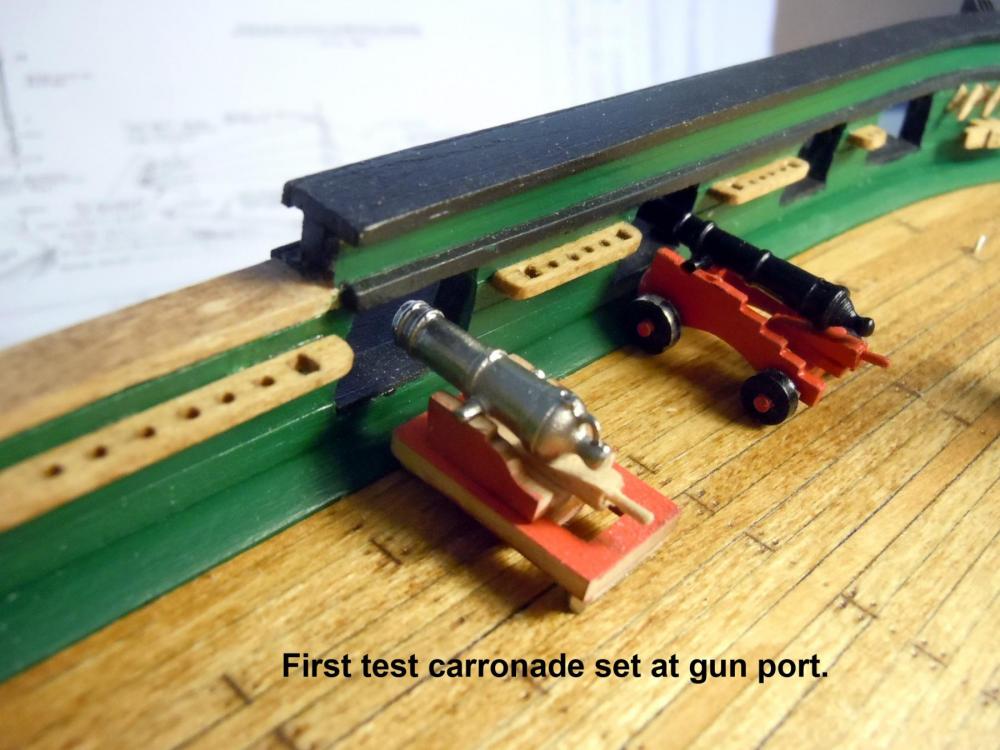
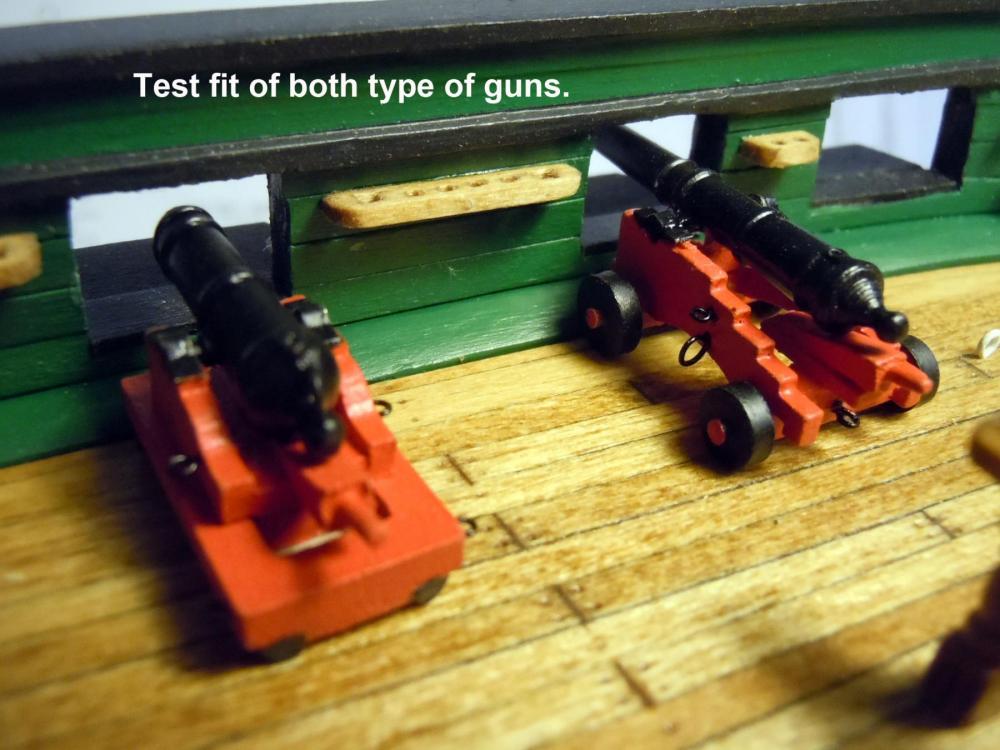
I have been busy with spar deck details and the like; however I did add a billet head detail I saw in the previously posted drawings. I used copper wire and twisted it and inserted the ends into holes drilled on either side of the billet head. I then added the gammon irons which required some careful surgery to cut holes under the steps. These should have been added before adding the steps to the bowsprit. A lesson for those who may follow. I also fitted the eye bolts and cut the two lengths of chain needed. The chains will be added once the bow sprit is permanently installed. Next I have moved on to the carronades and the barrel castings will require a great deal of cleanup. I built a test one to sort out the best process for a mini production line. Here is the first one just set in the gun port to check on size relative to deck. Here I have painted it up and added the eyebolts, this one is able to slide but I am not sure if this is really needed once rigged with lines. I will also need to decide whether to add the in haul lines for the long guns. Also you can see that the belaying pin rails are in place as well. I will be busy for awhile and here is the production process set up ready to go for the carronades. Once all are built the rigging process will be done. After these will come the brass canopy frames for the companionways.


-
30. Black (For Cast Bronze and Brass) Ingredients Sodium Thiosulfate... 6.25 gm [MORE INFO] Ferric Nitrate... 50 gm [MORE INFO] Distilled Water... 1 L Process Heat immersion - 1 minute. When article is immersed in hot solution (120-140°F, 50-60°C) a succession of colors is produced. It changes to a purplish color after about 45 seconds. The color darkens quickly and the article is removed after about 1 minute. Wash thoroughly in hot water and air dry, wax finish. Here is a link to the rest of the formulae: http://www.sciencecompany.com/Patina-Formulas-for-Brass-Bronze-and-Copper.aspx#30
-
Try this product from JAX Chenicals. I have used this in the past and it works great but follow the instructions. https://www.jaxchemical.com/jaxshop/shopexd.asp?id=61
-
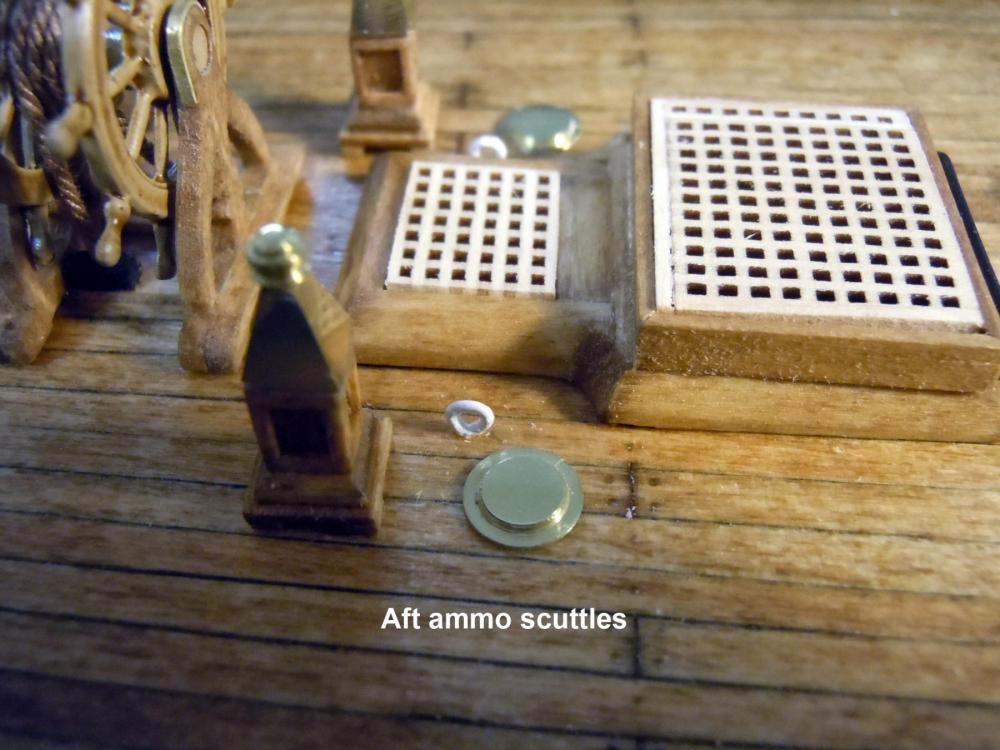
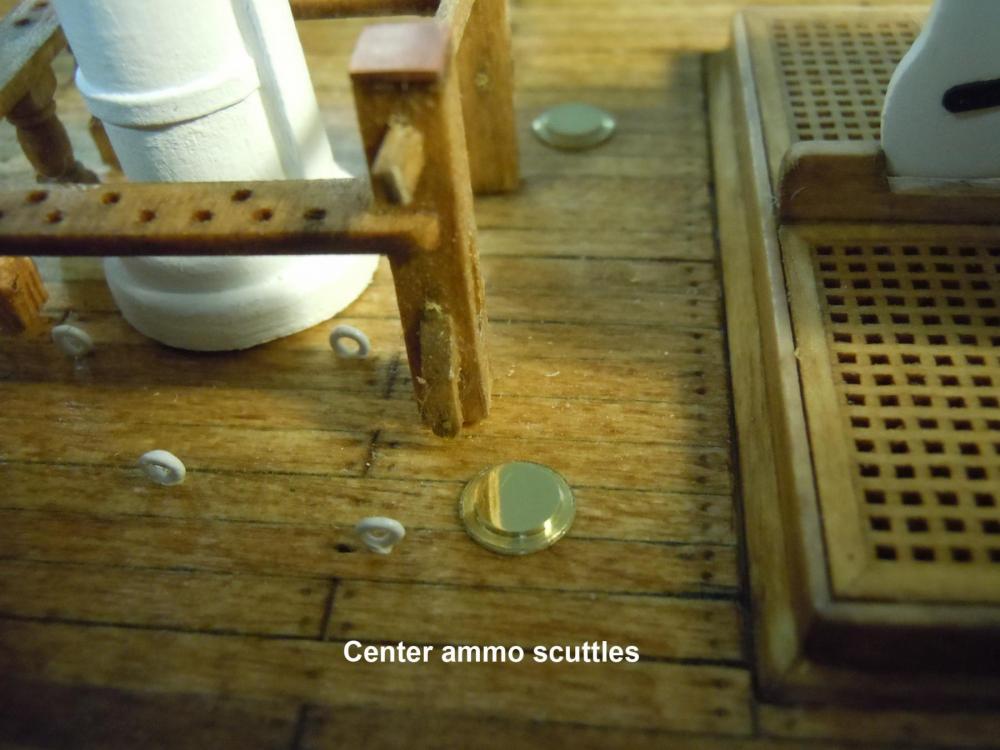
I have a question about the ammo scuttles and hope someone can help. The plans show locations for aft and center ammo passing scuttles in the spar deck but none forward. It seems odd that there are no forward (bow) ammo scuttles. Can anyone confirm that there are only four (4)? I also assume that they were made of brass so as not to spark so I turned them using brass and polished the top of the lid.
-
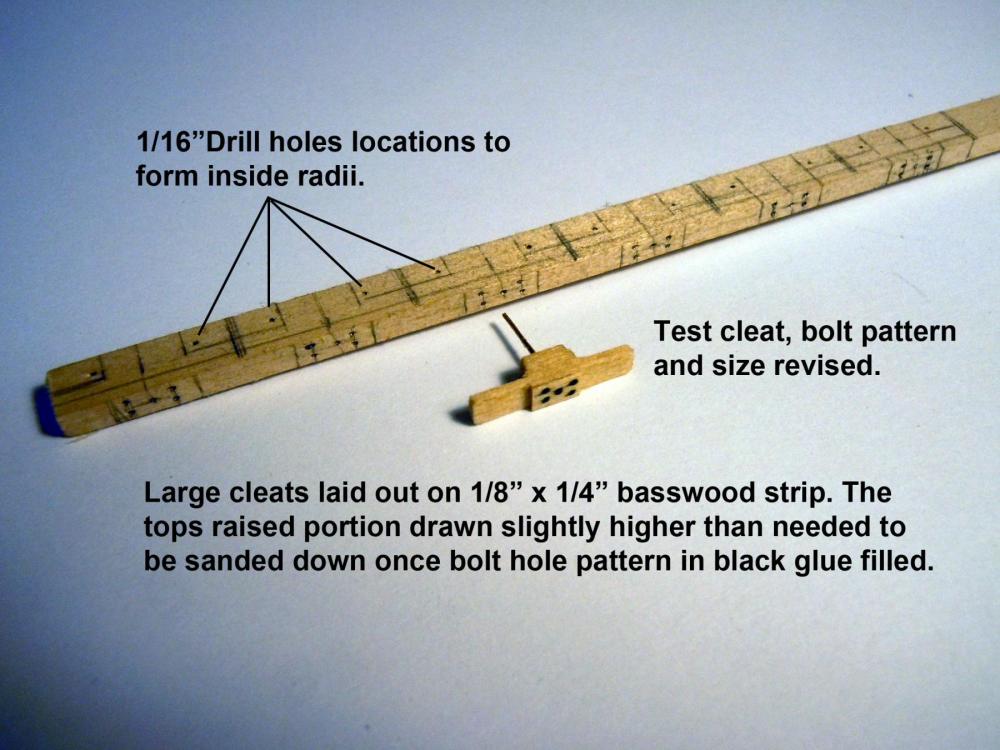
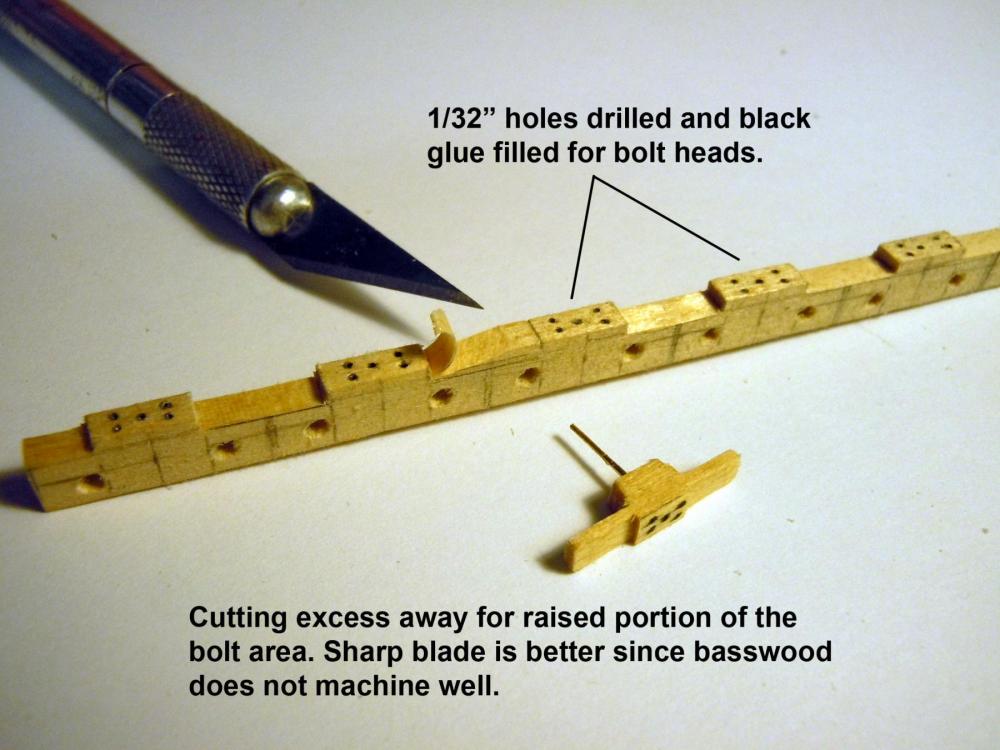
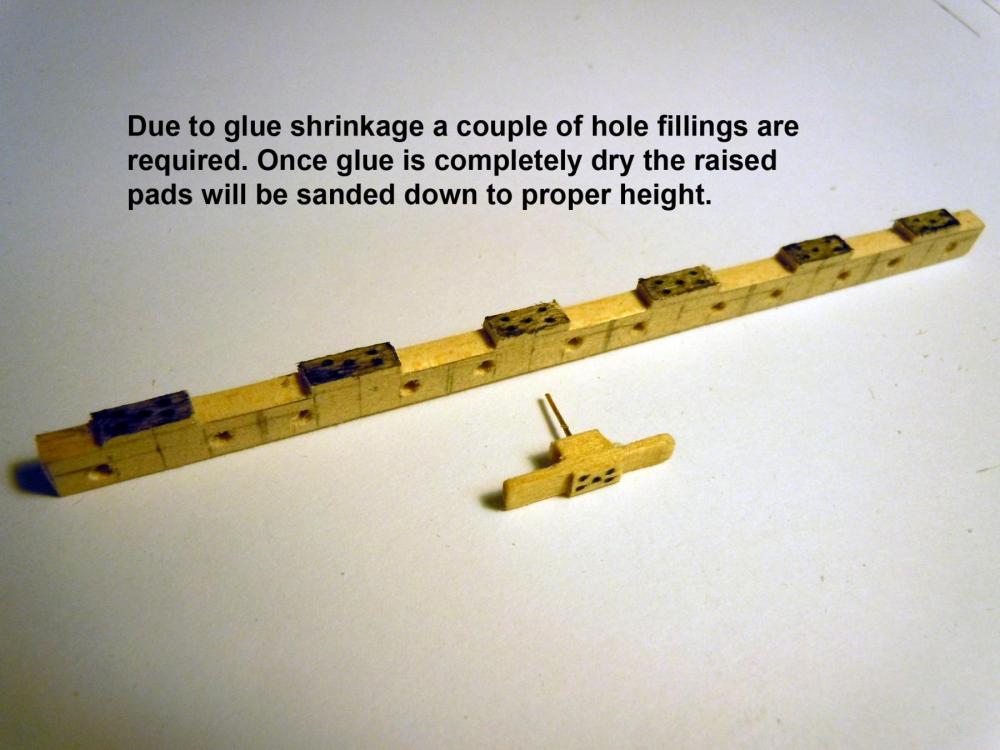
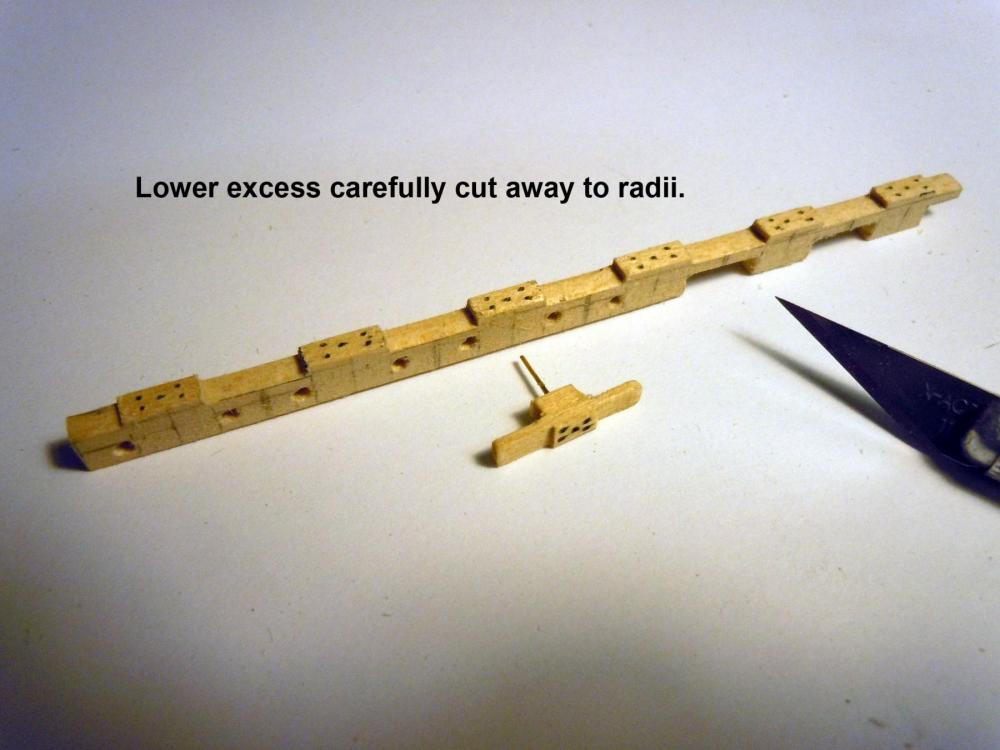
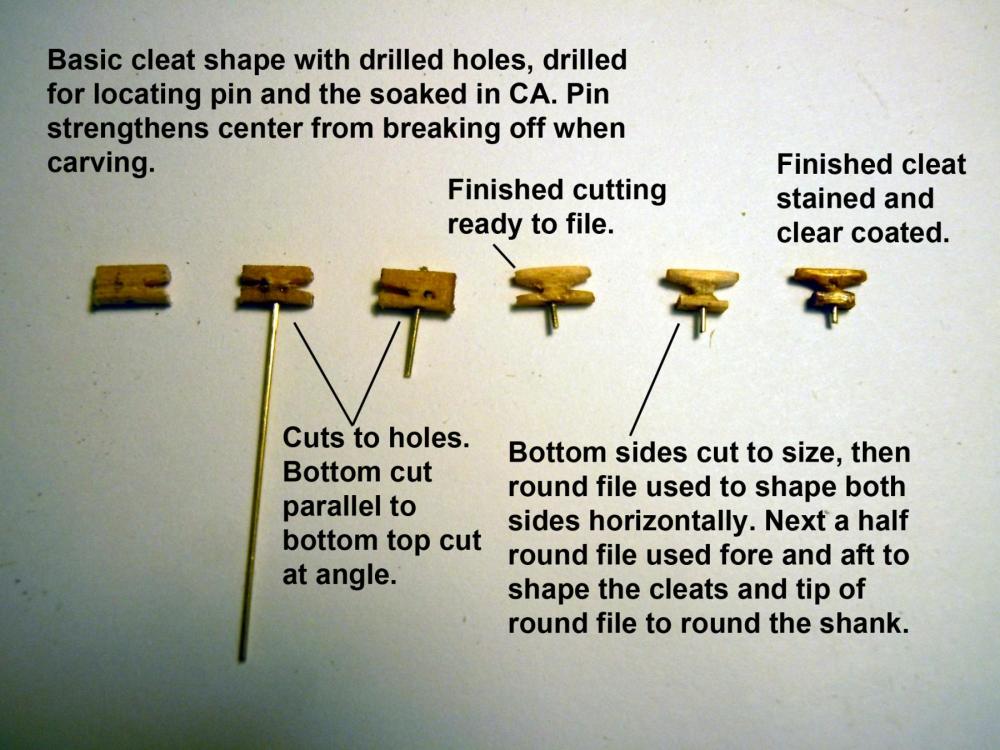
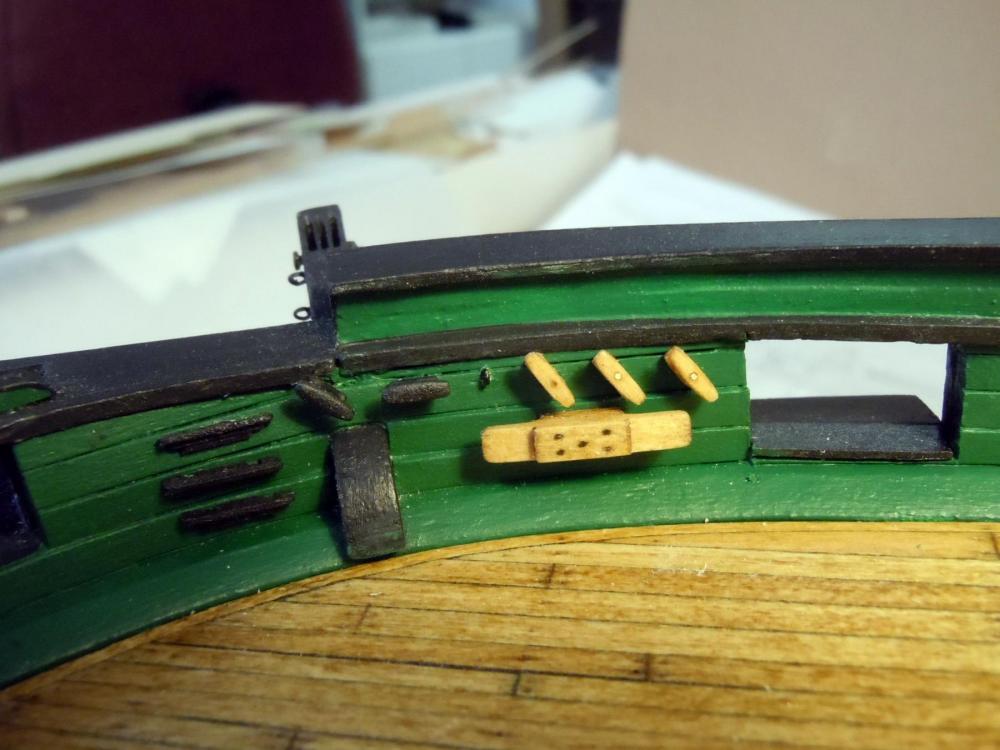
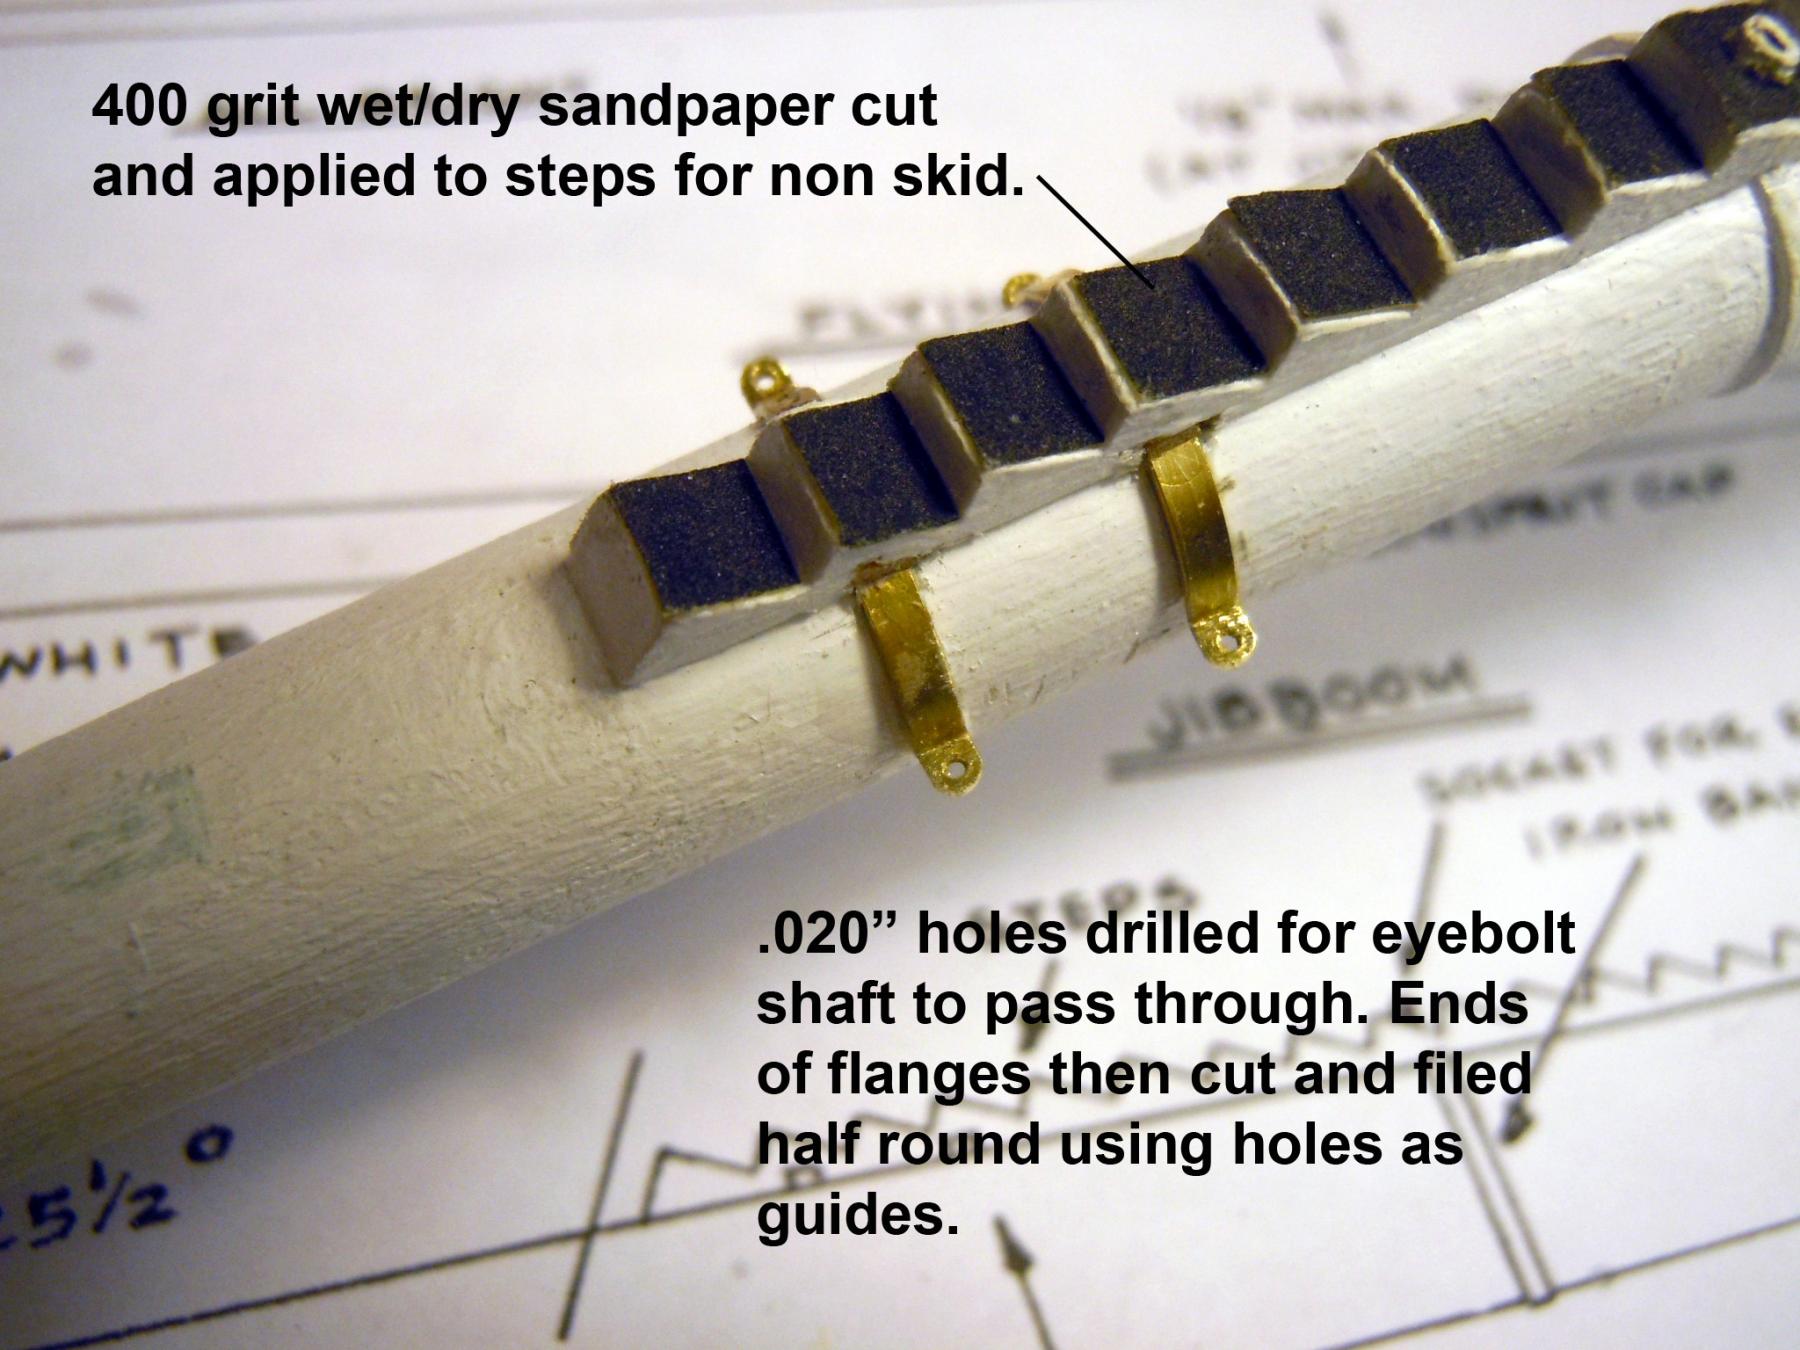
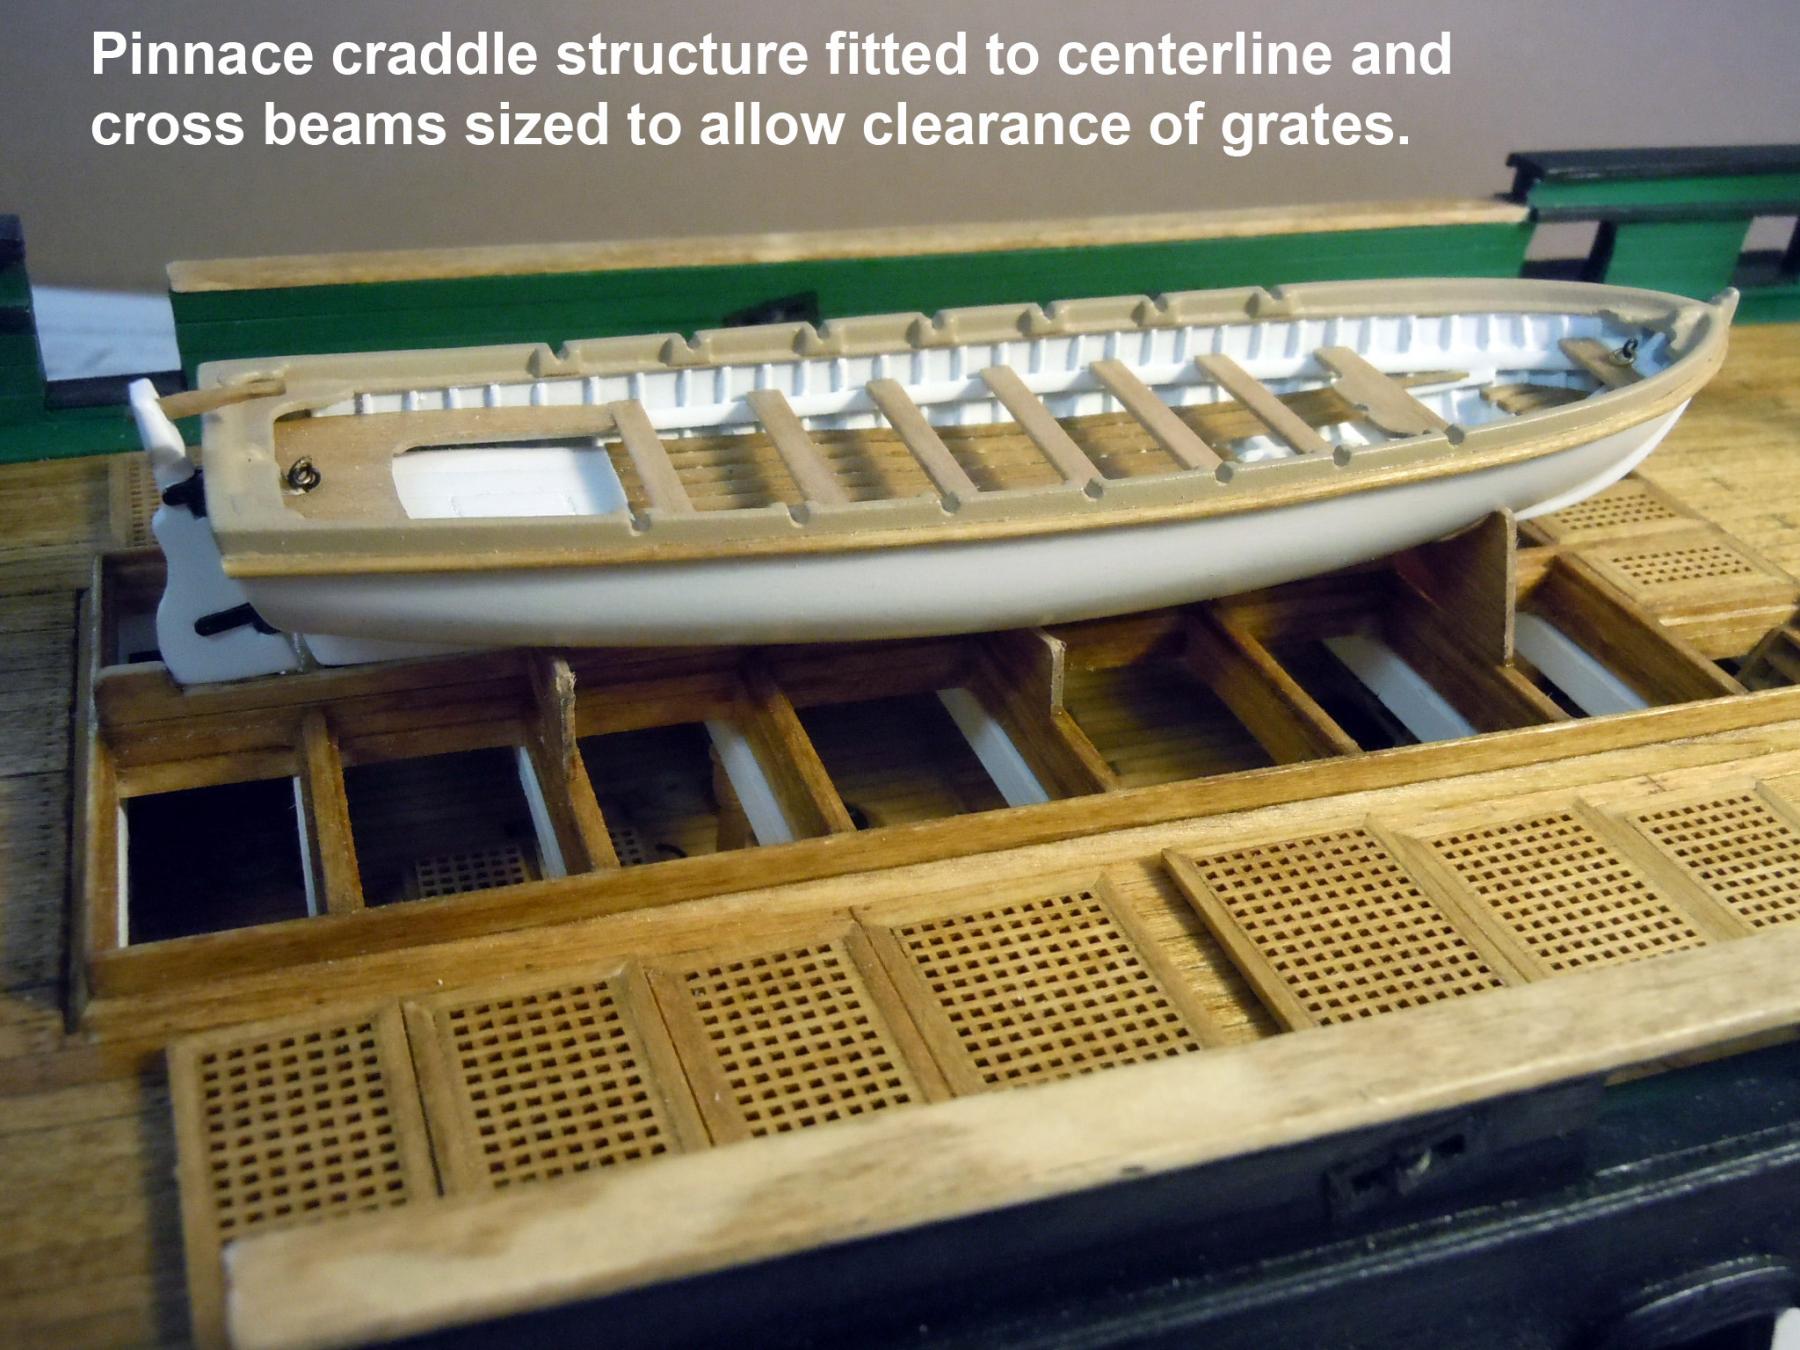
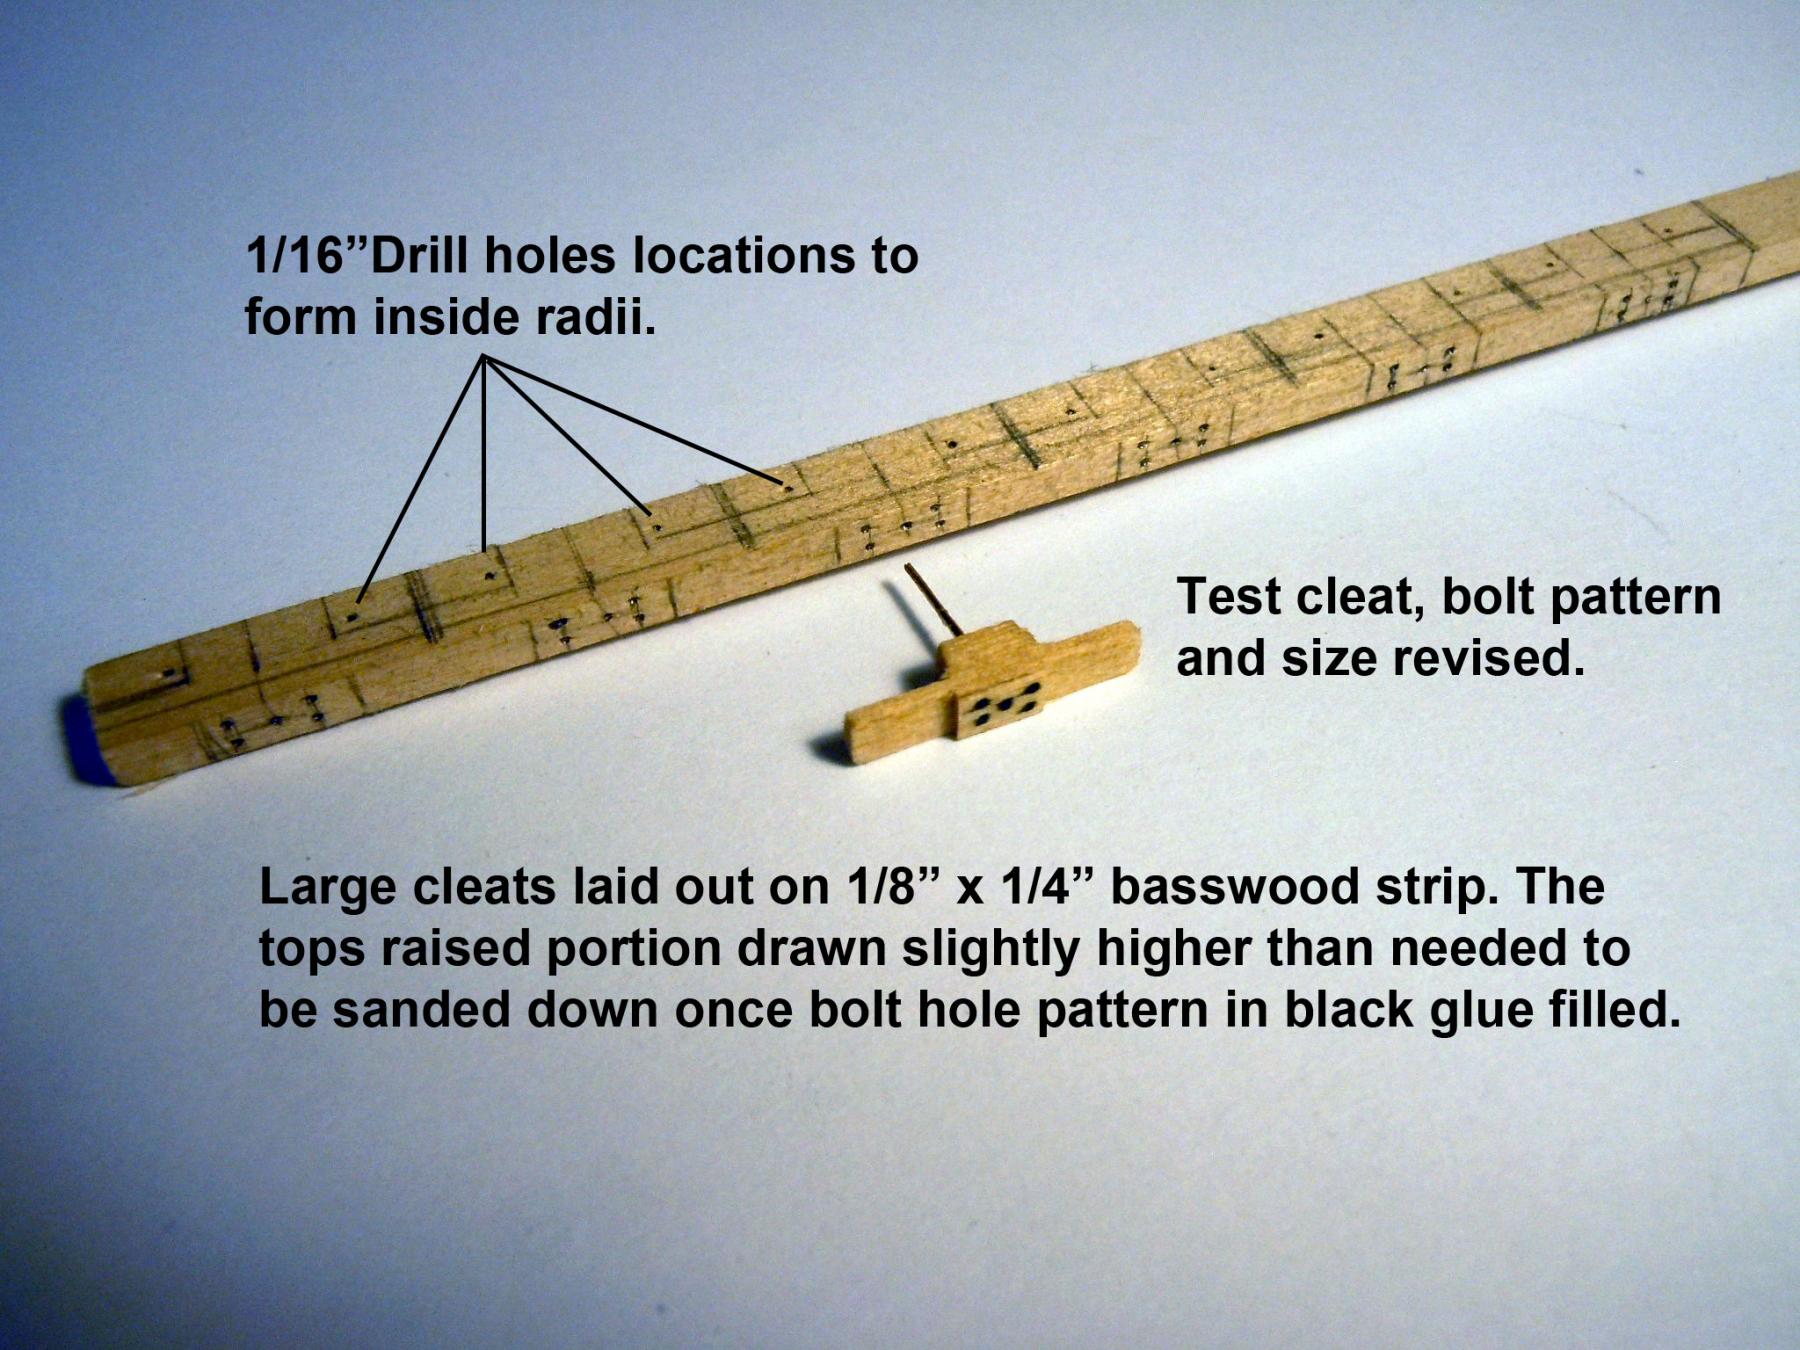
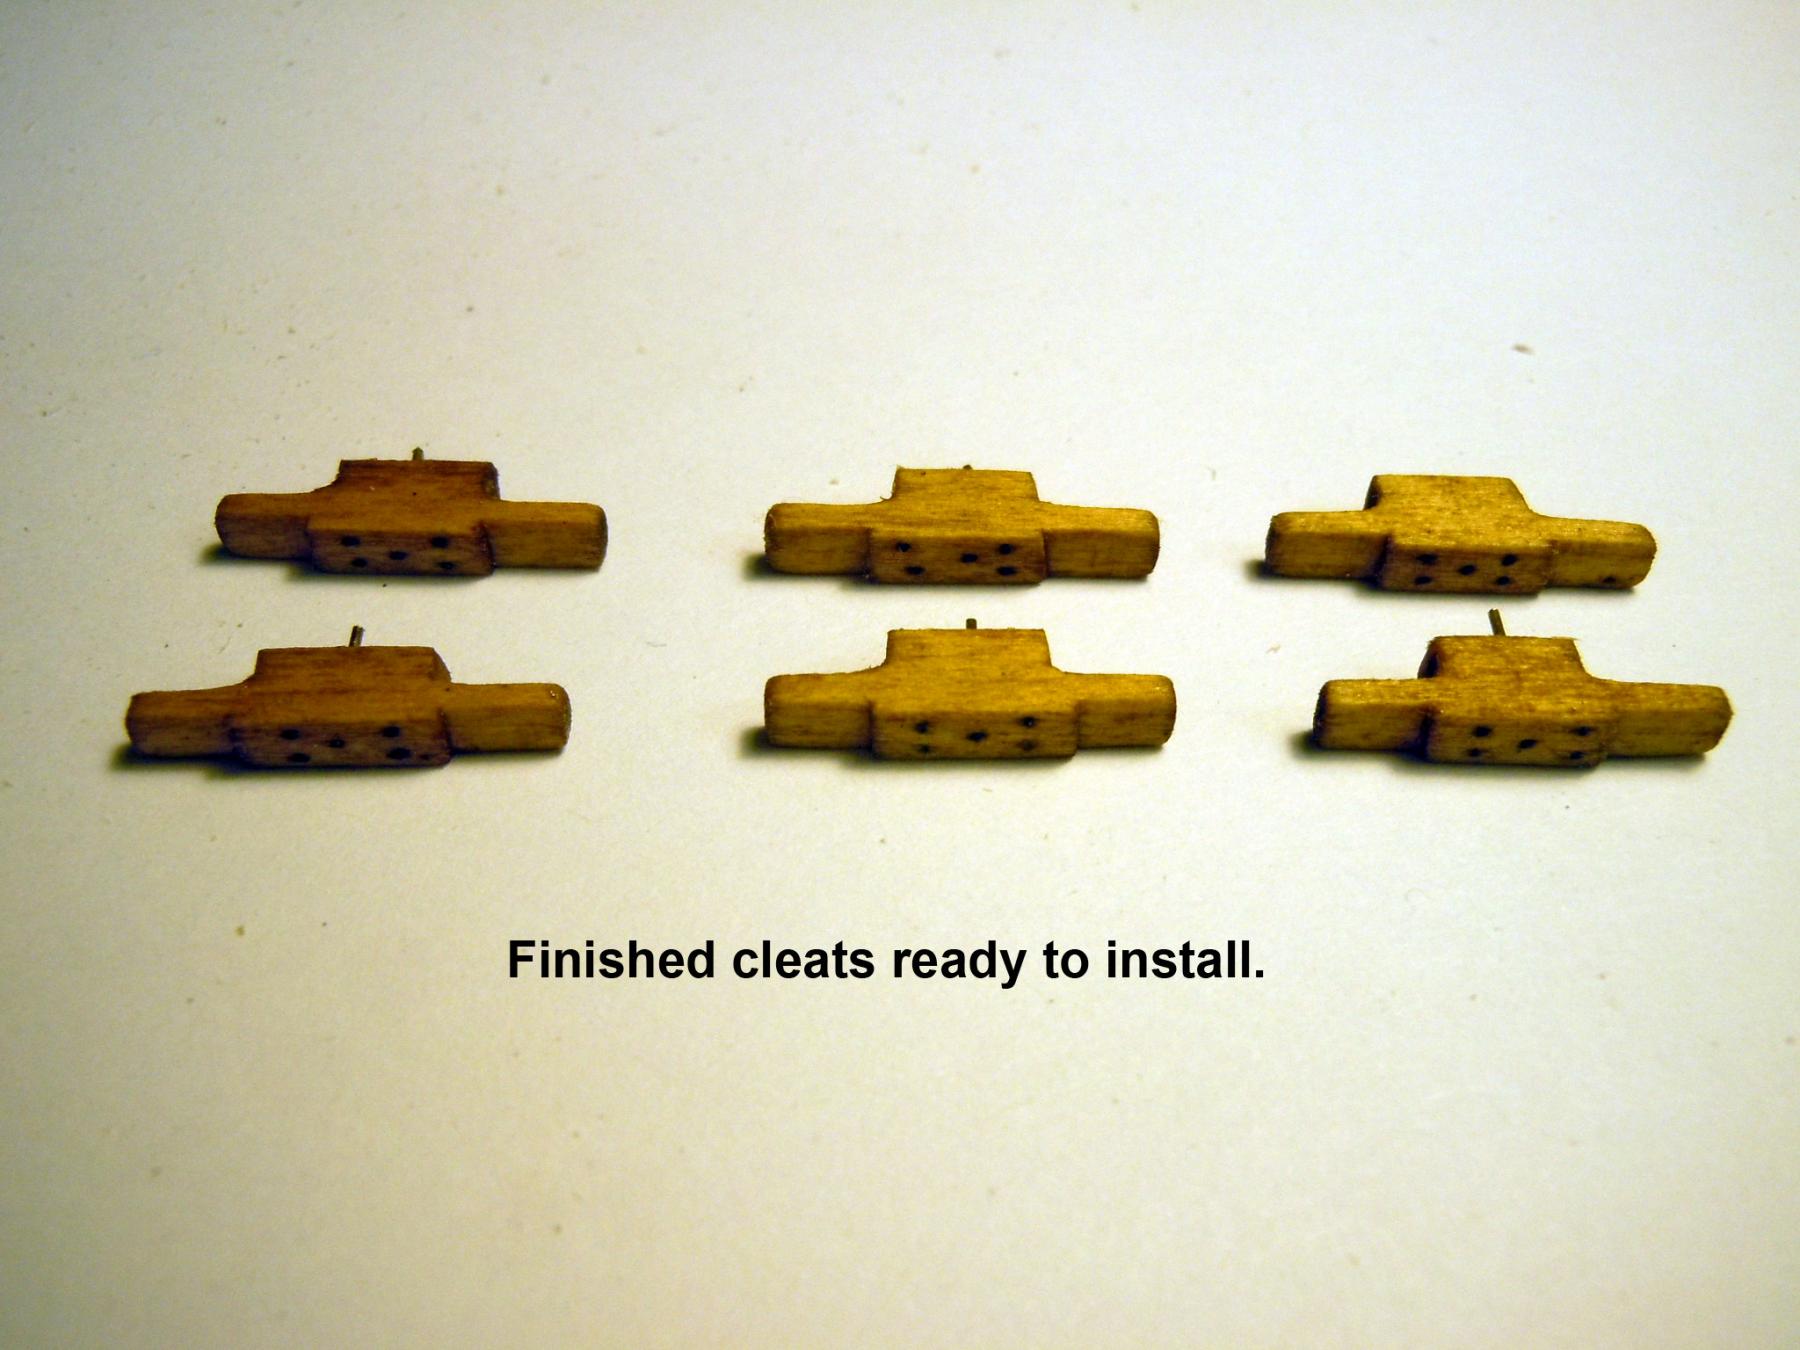
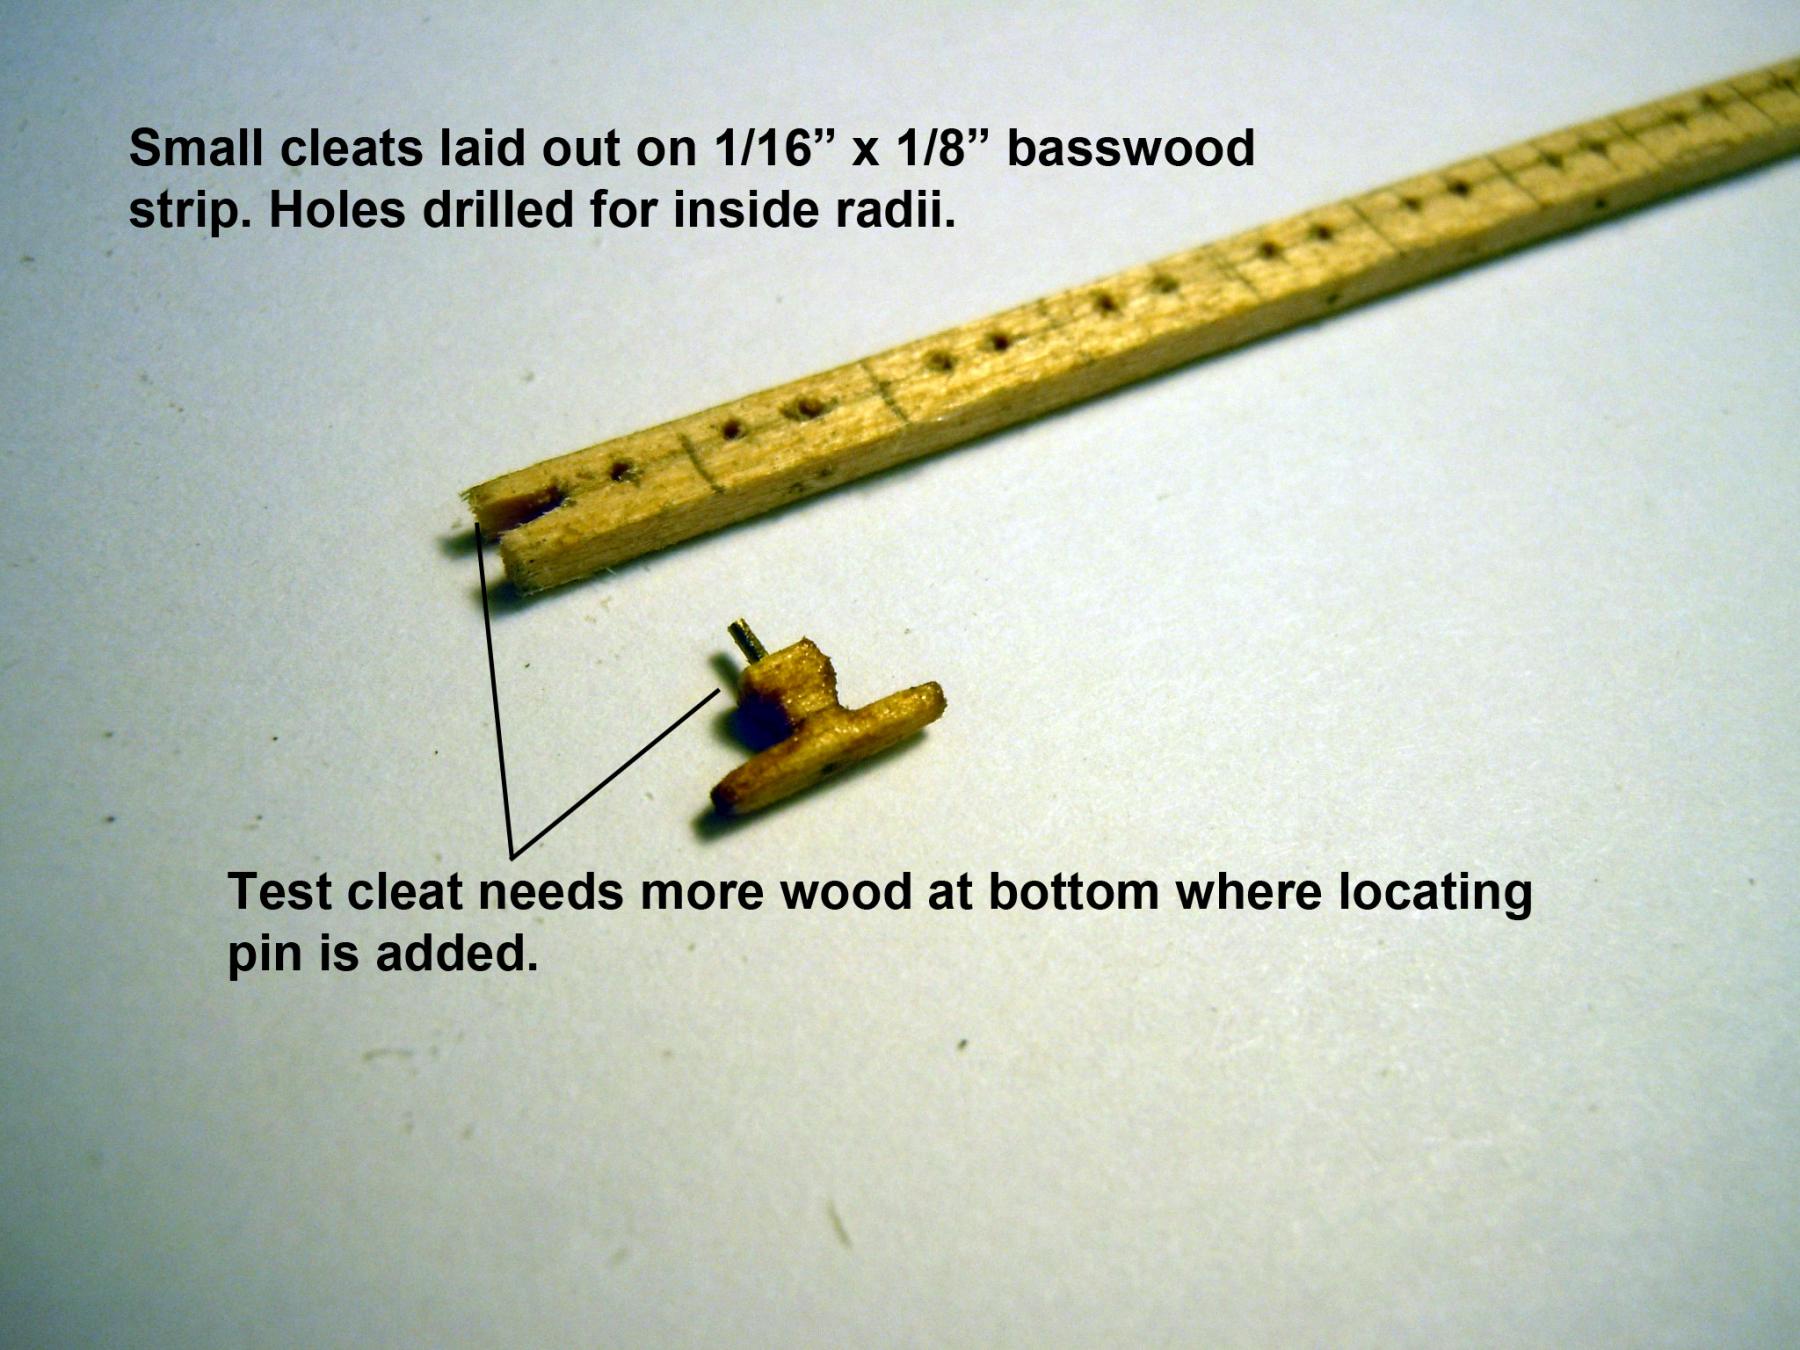
I rebuilt the pinnace cradle to allow for removal of grates with the pinnace in place. Here is a sequence of making the large cleats and then the small cleats per a previous request to show. Here are the small cleats. Now back to adding the rest of the cleats and then onto the eyebolts and paint touch up.