xken
-
Posts
841 -
Joined
-
Last visited
Content Type
Profiles
Forums
Gallery
Events
Everything posted by xken
-
 Great News! Here is a link to purchase rivets in various quantities. These would be great for the inner walls on ships like the USS Constitution. https://model-motorcars.myshopify.com/collections/small-parts-hardware/products/rivet-1-0-mm-head-diameter-brass-z050b-2?variant=33045009868
- 162 replies
-
- 6
-

-
- dirty dozen
- fishing
- (and 2 more)
-
Great news! For those who wish to add rivets to the walls of a ship here is a link to purchase in various quantities. This is a much more realistic size than I have seen used. Enjoy! https://model-motorcars.myshopify.com/collections/small-parts-hardware/products/rivet-1-0-mm-head-diameter-brass-z050b-2?variant=33045009804
-
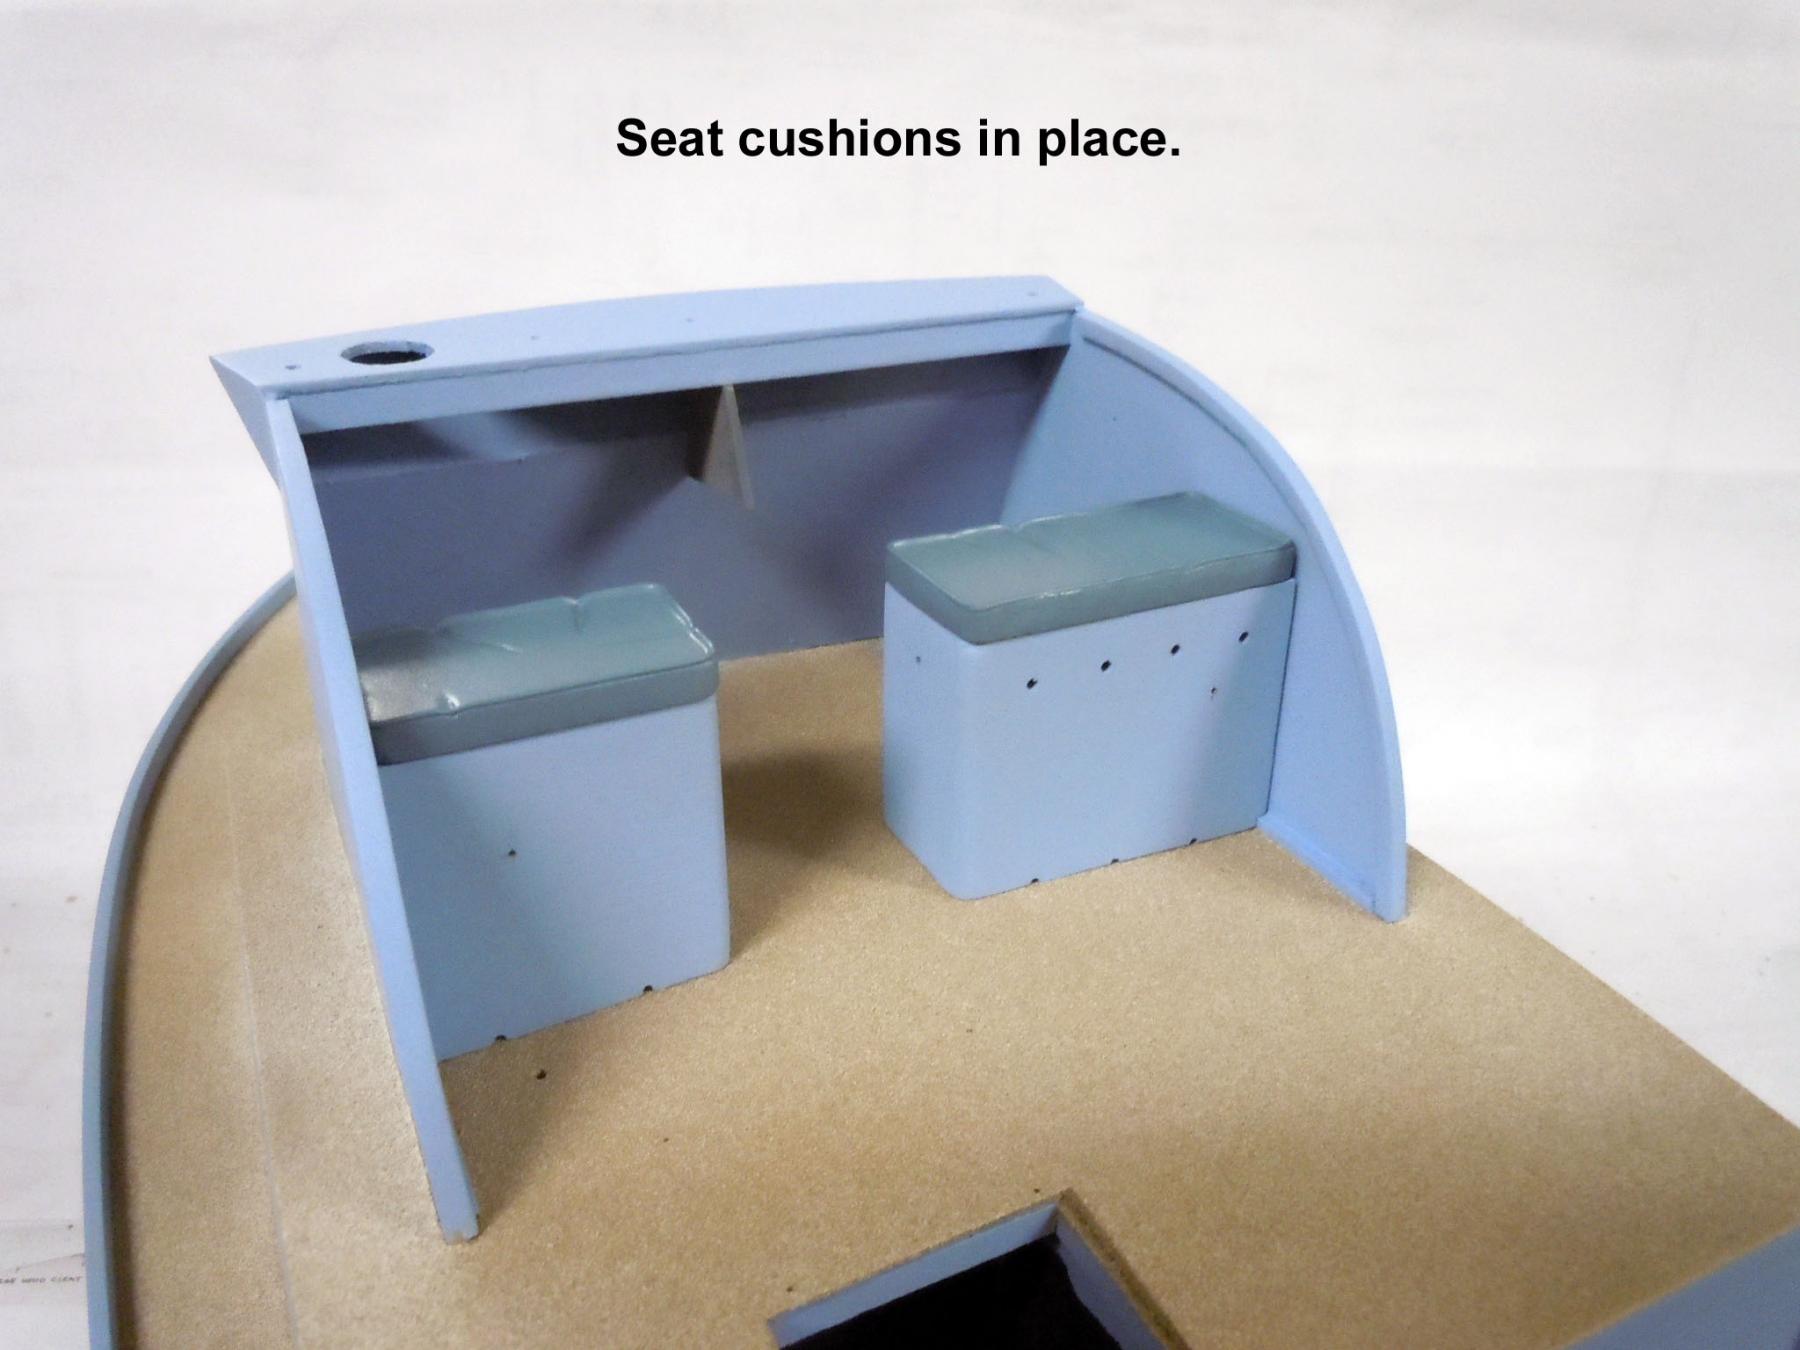
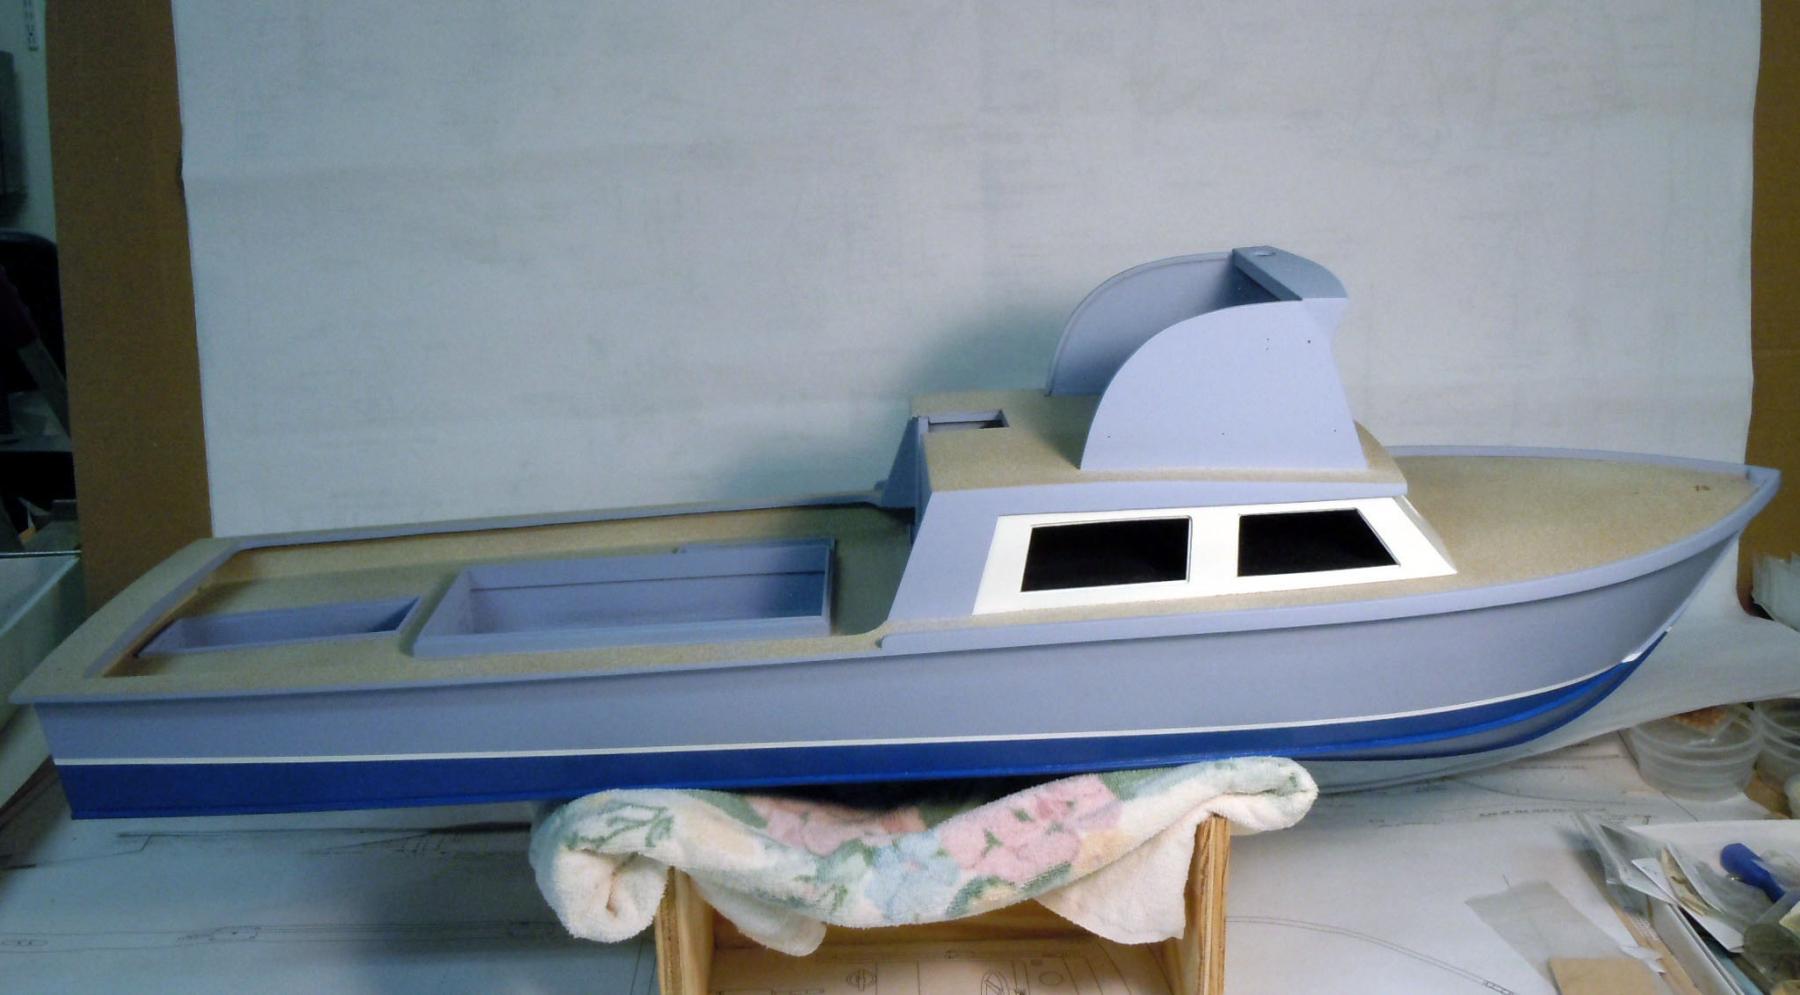
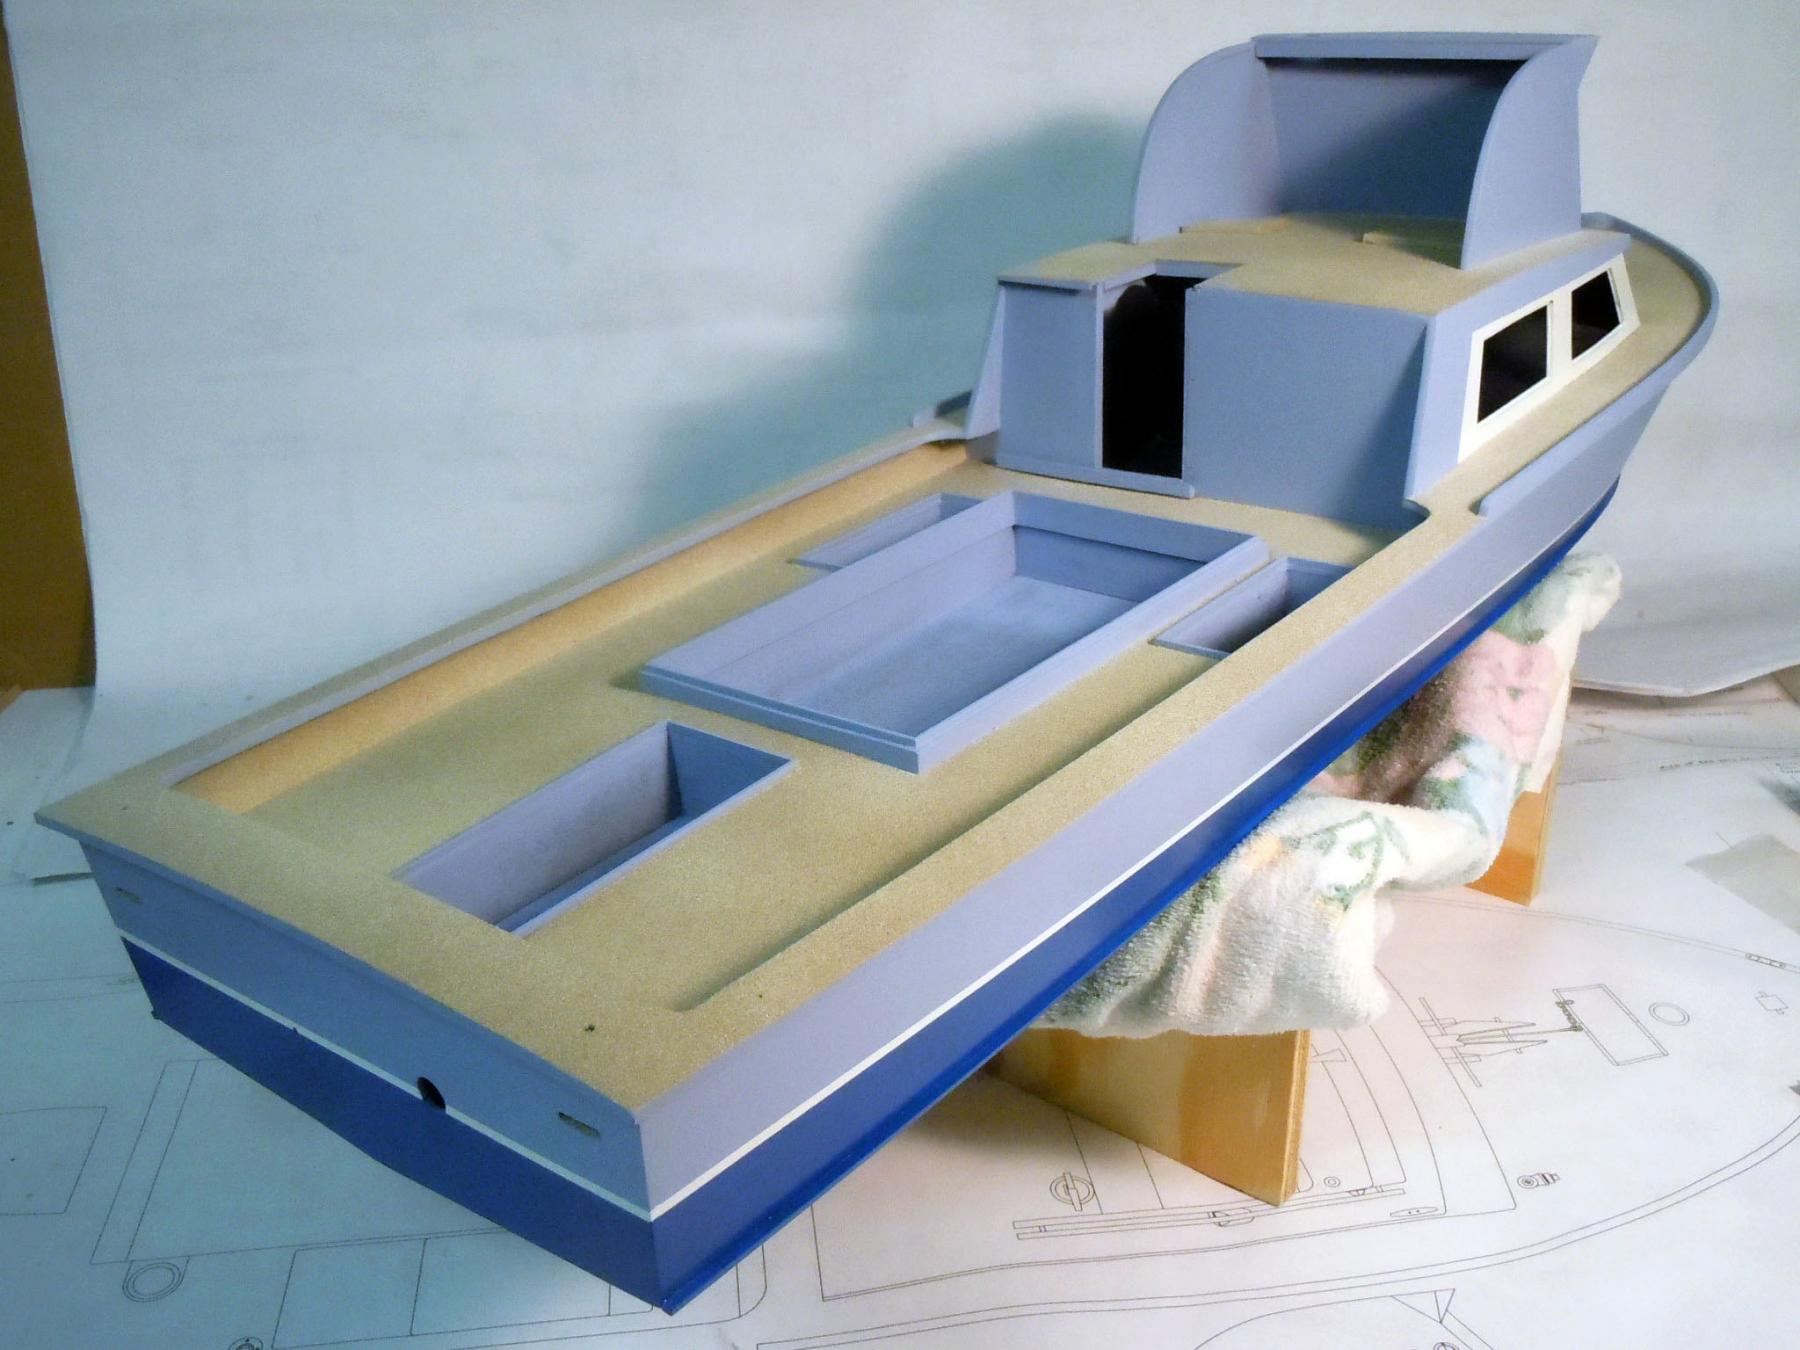
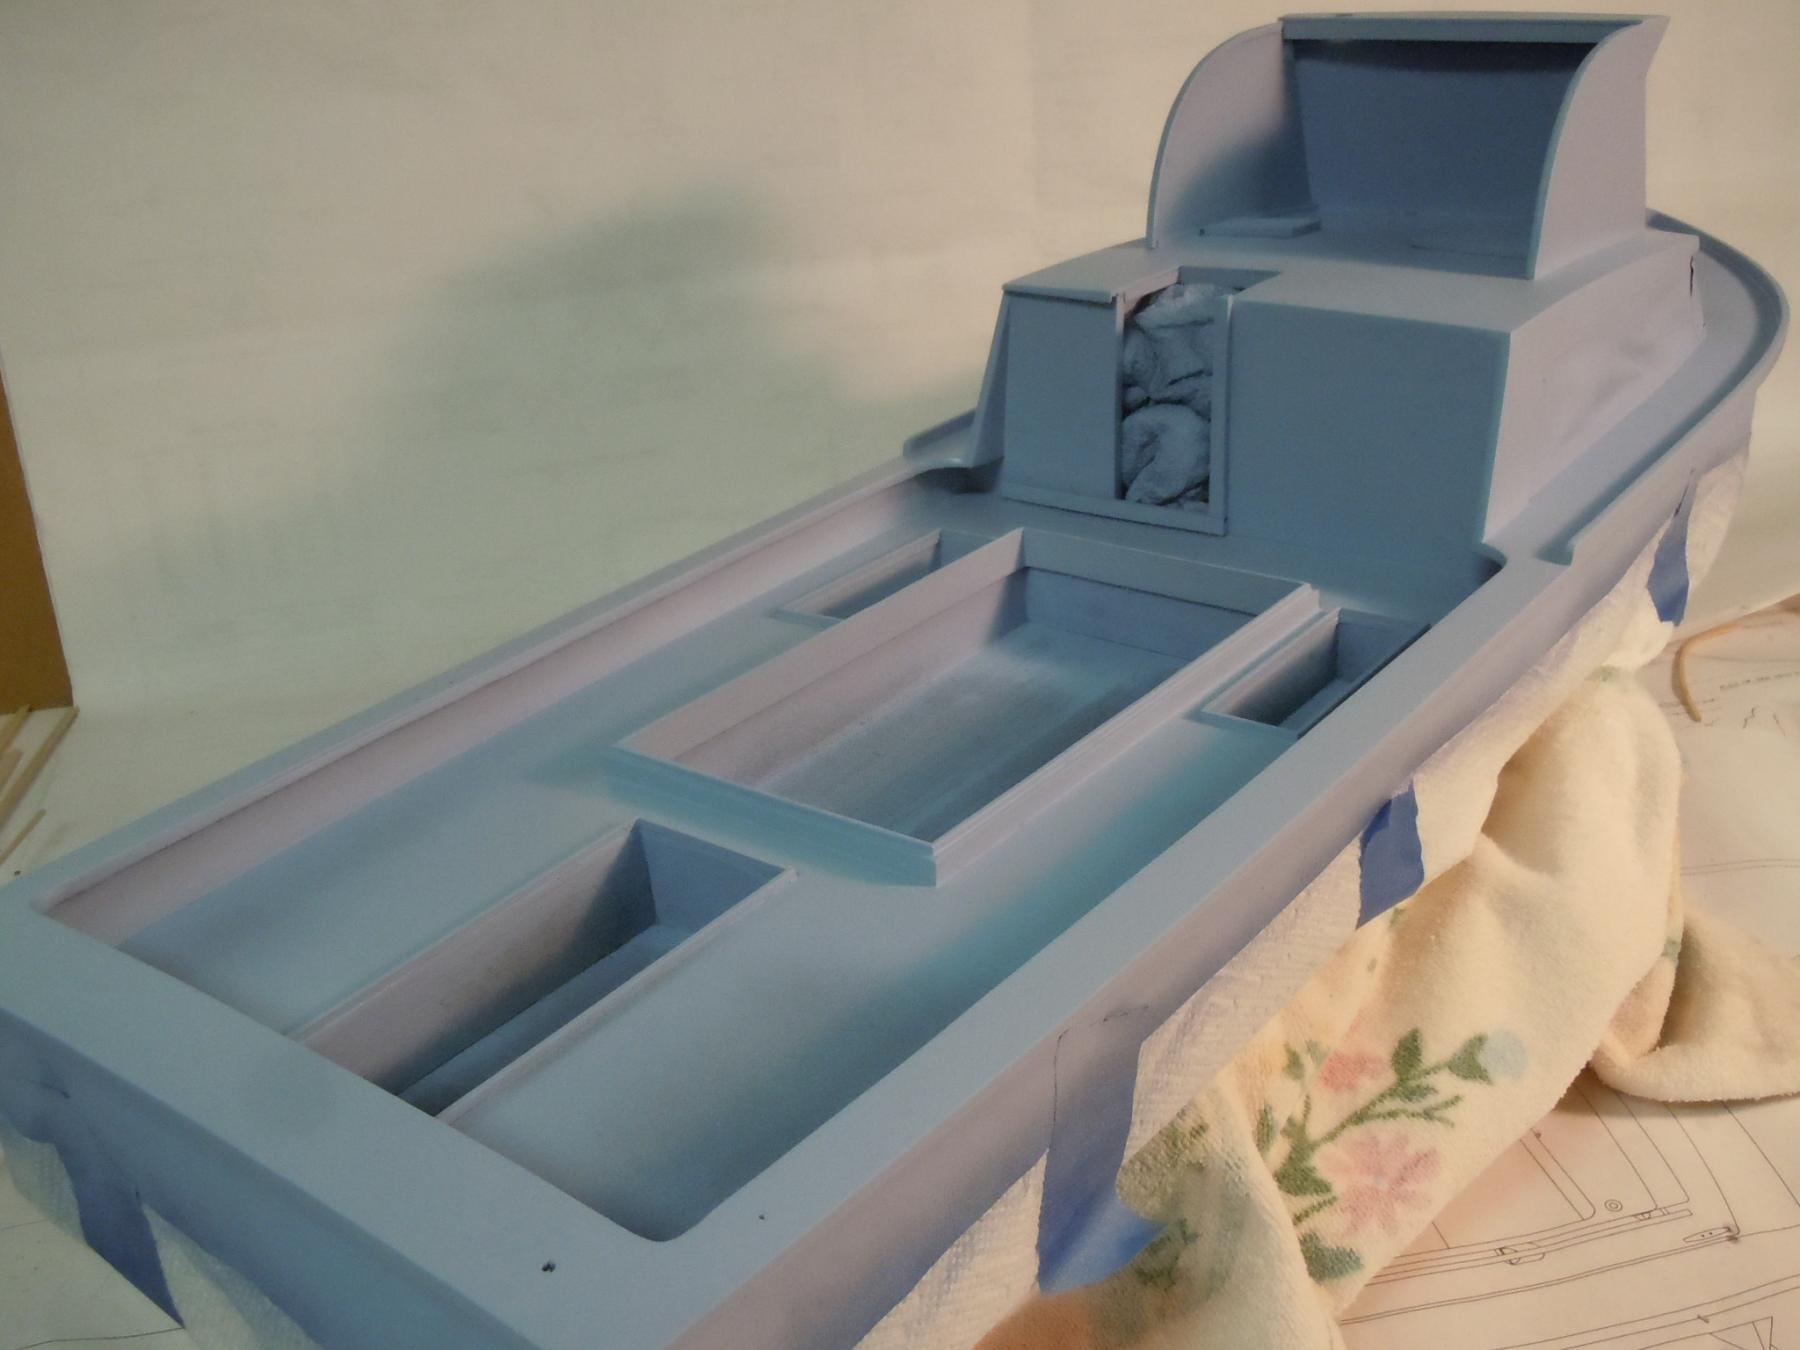
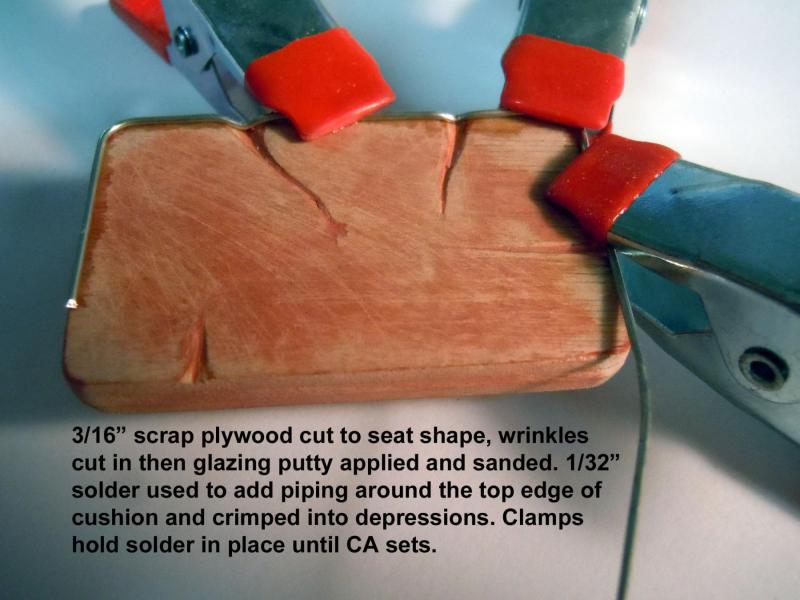
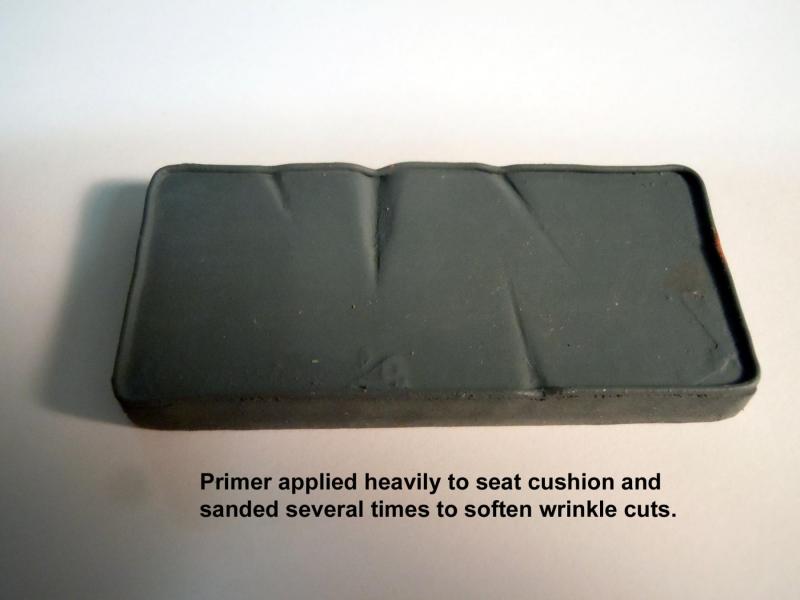
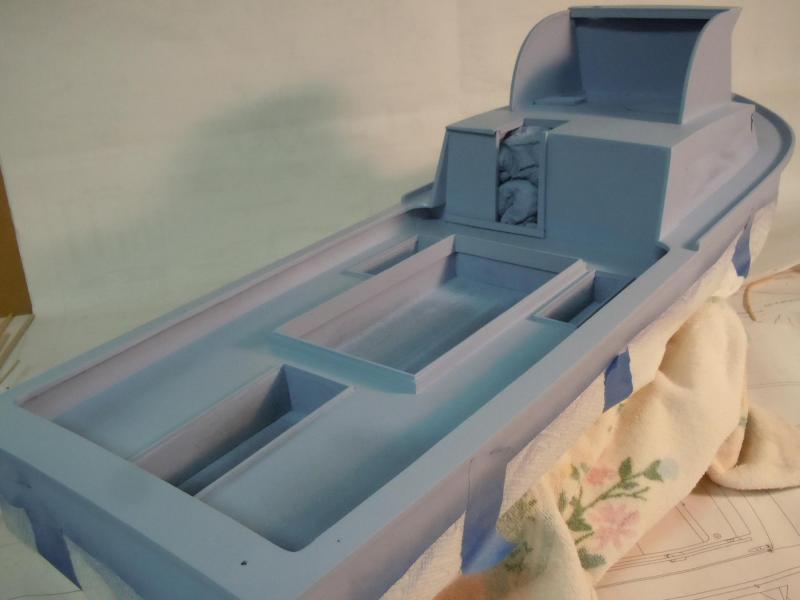
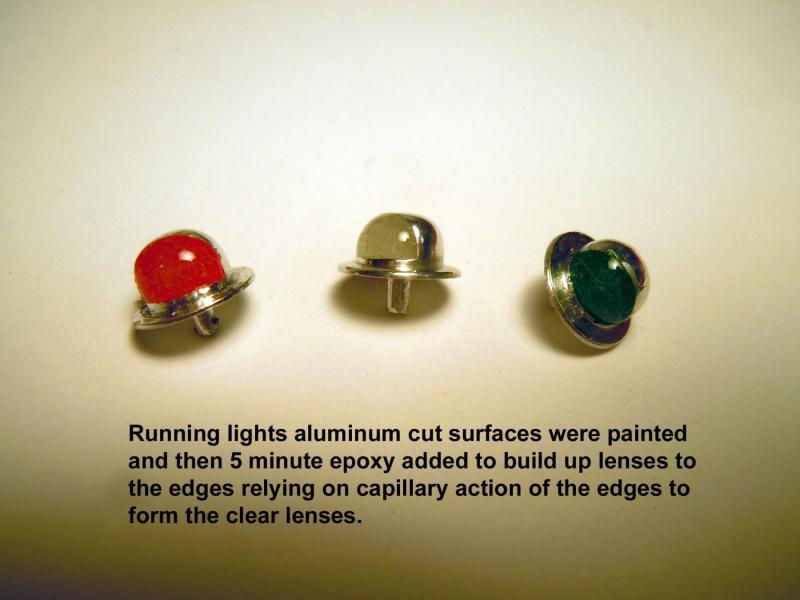
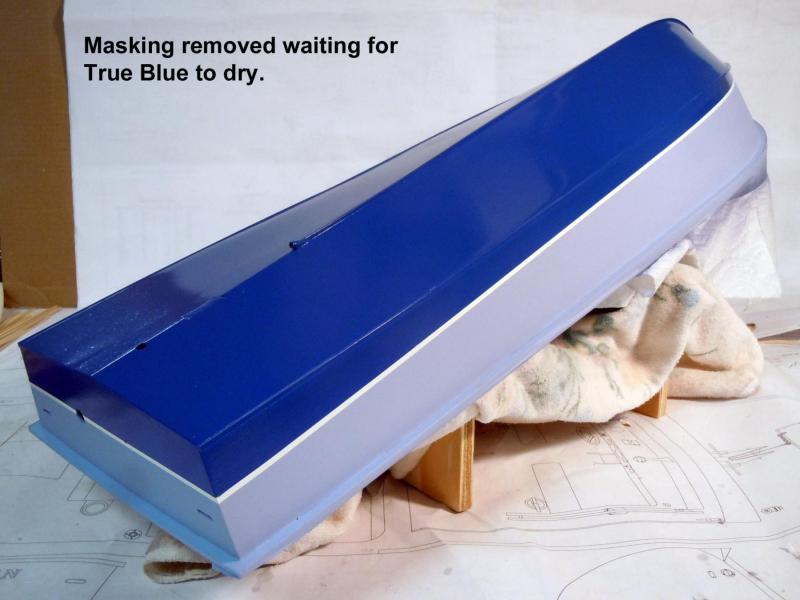
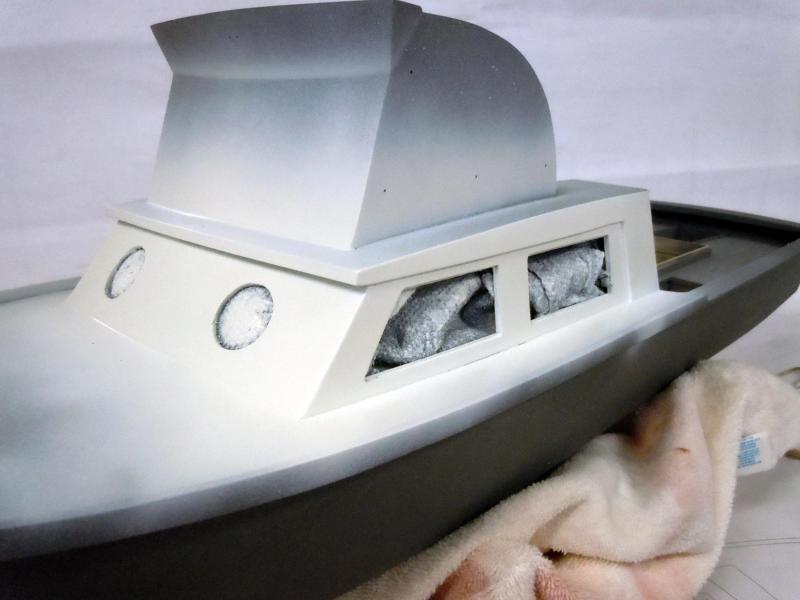
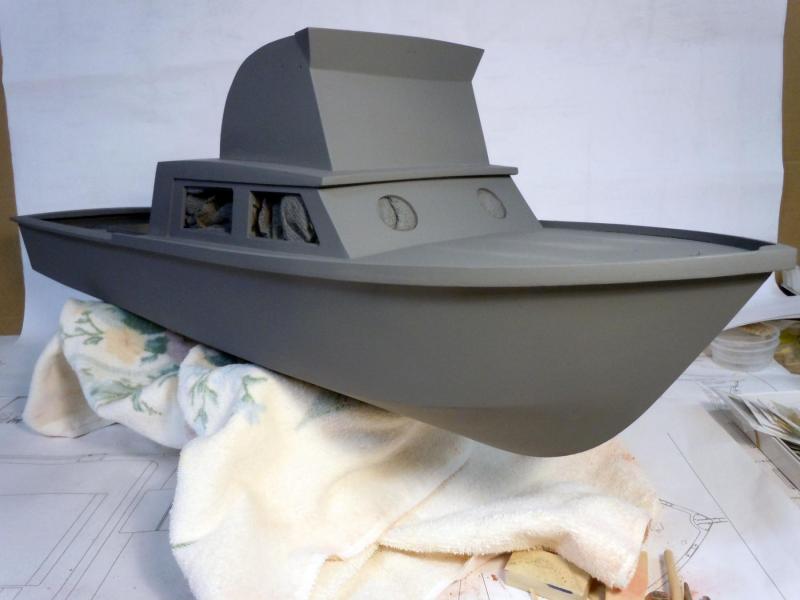
Thanks again for your kinds remarks! I made the seat cushions while waiting for paint on the hull to dry completely before having to mask it off. If masking tape is applied too soon it will leave impressions in the paint. I started the cushions using 3/16" scrap plywood. Cut the perimeter shape and hardened the exposed side walls with CA to prevent delamination of the plywood down the road. I then cut and formed wrinkles in the cushion and filled the top wood grain with glazing putty which also softened the wrinkles more. I added the piping using 1/32" solder and pressed it into the wrinkled edges as it was glued around the top perimeter. The two ends overlapped and were cut together to butt fit. Here they are with the final paint color that was sprayed with Satin Finish to knock down the gloss. Once the hull was dry I masked off the lower hull to prevent over spray on the hull finished colors. I use paper towel sections since they absorb the paint and do not support paint runs like so other materials. Here is an image of the upper hull sprayed the Chalky Blue. While waiting for the Blue set I painted the cut surfaces of the starboard and port running lights and then added 5 minute epoxy to build up and shape the lenses for all three with the center light clear. Once the Blue was set came the time consuming masking off of the Blue surfaces to paint the Sand and Limestone textured horizontal surfaces. Patience and 1/4" masking tape is required to do the job correctly. Here are the results when all the masking is removed. I will next paint the inside of the work deck compartments Black, touch up the hatchway Black due to over spray. Then onto the eye candy small details starting with fittings and as time progresses the engine build up. GREAT NEWS!!! I talked with a friend who wanted to borrow some pictures of my builds and he shared with me that he bought Scale Hardware and is in the process of adding them to his site which may be up and running soon. https://www.modelmotorcars.com I have suggested that he think about selling the various rivets in bulk packs for ship builders, and perhaps a sponsor for this site. Stay tuned!


- 162 replies
-
- 15
-
-
- dirty dozen
- fishing
- (and 2 more)
-
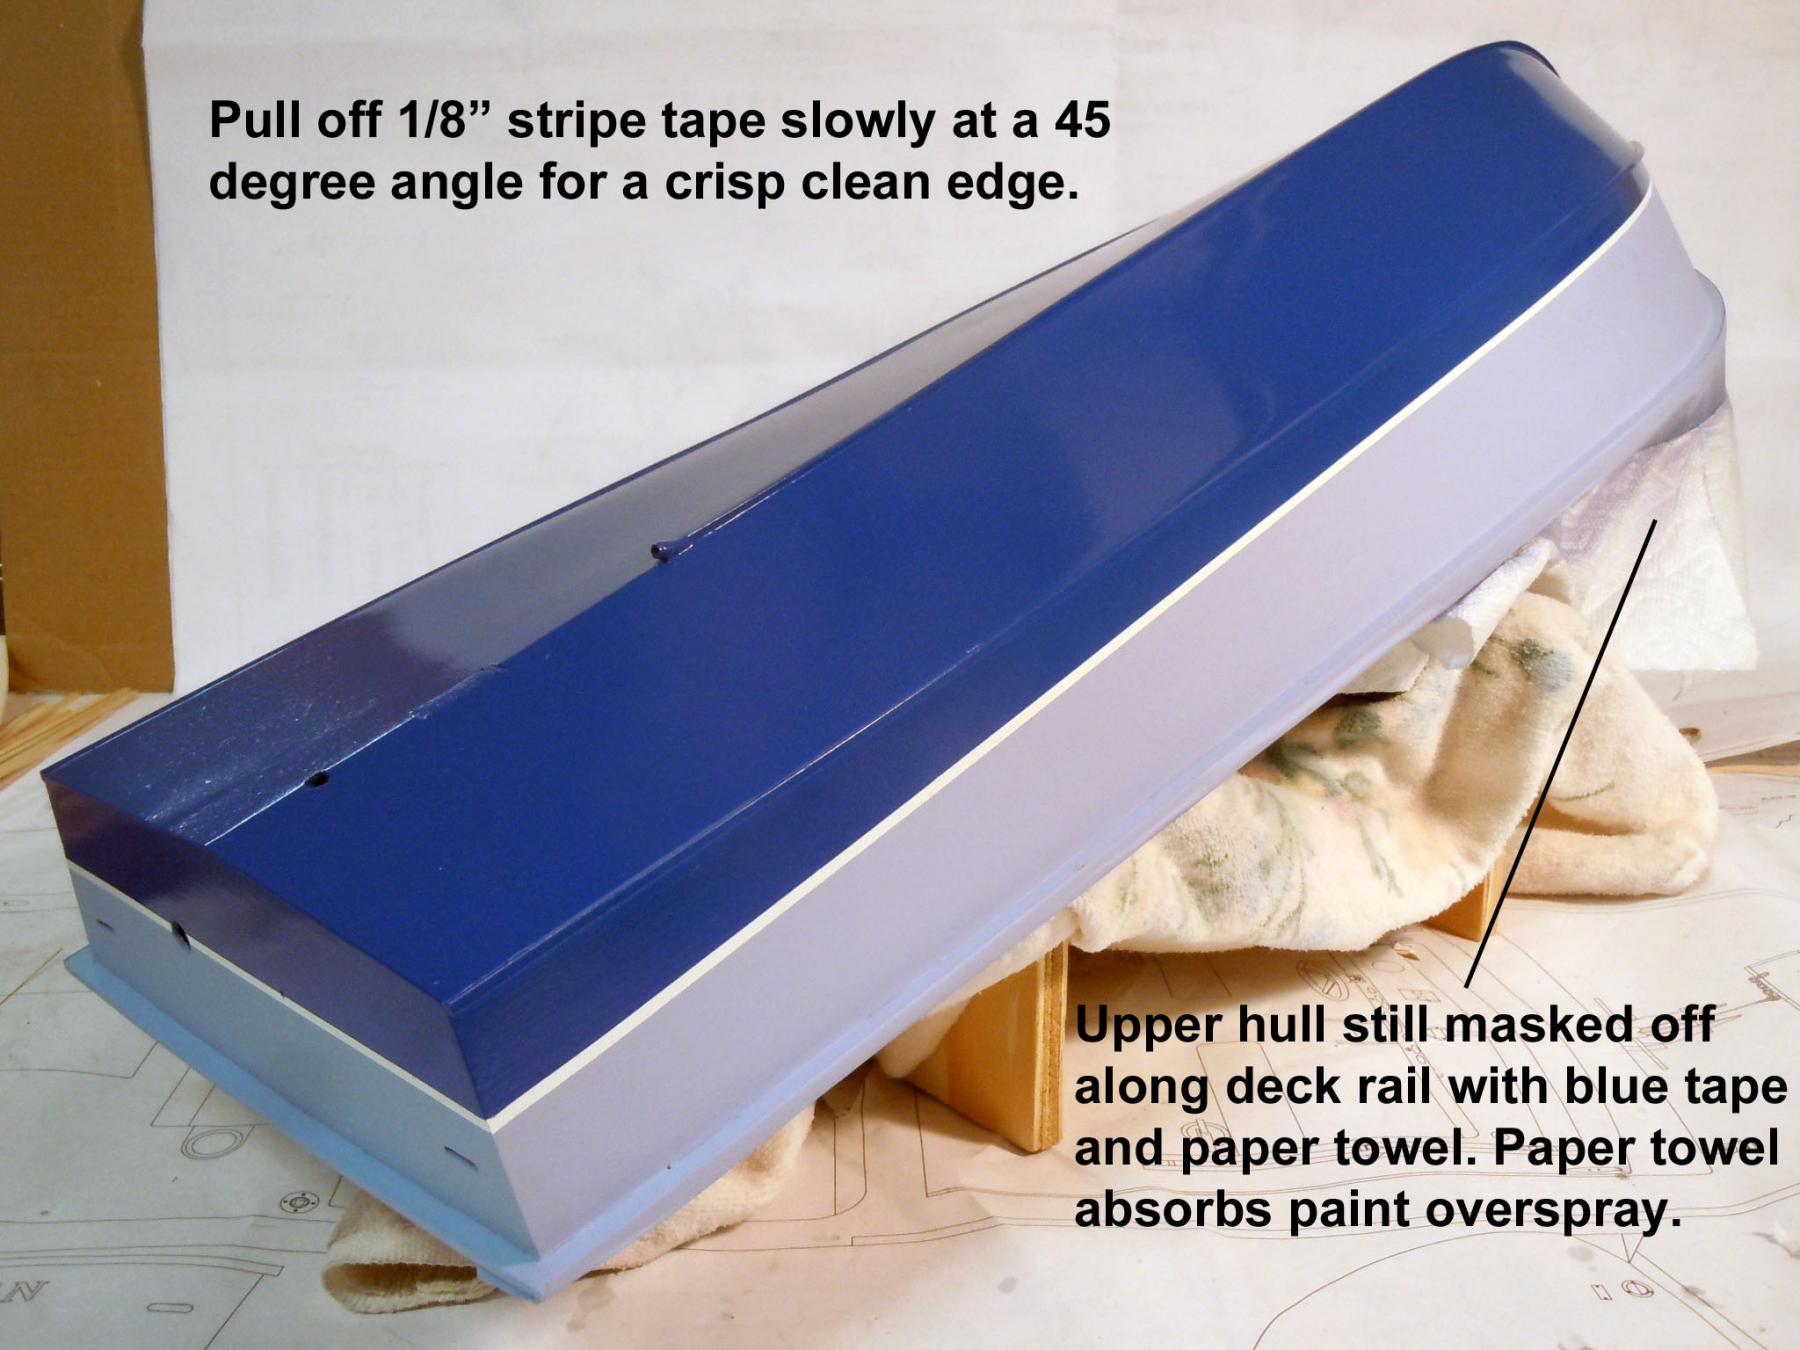
Steve, John, thank you for your kind words! I learned how to make it rain in Central California...just try painting a model boat hull outside. After priming and sanding and adding the rub rails and priming again I moved onto painting. First, I sprayed the White band for the White waterline stripe. Once completely set I then added the 1/8" masking tape and burnished it down with my fingernail for a tight seal. I then sprayed the Chalky Blue from the deck rail up over the stripe tape using light coats so as not to bleed the paint under the edges. Once dry I then masked off along the top edge of the stripe tape with blue tape and paper towel overlapping the ends to protect the Chalky Blue and sprayed the True Blue. A tip for spraying paint with spray cans is to warm the paint can under running hot water, shaking frequently until a temperature change cannot be felt. This does two things; better atomizes the paint and increases the pressure in the can for better spray pattern. Also carefully and slowly remove the 1/8" tape at a 45 degree angle for a crisp edge. The colors due to lighting vary in the pictures, but the closest match to the real boat is the transom in the second picture. Now to make seat cushions while paint dries.


- 162 replies
-
- 16
-
-
- dirty dozen
- fishing
- (and 2 more)
-
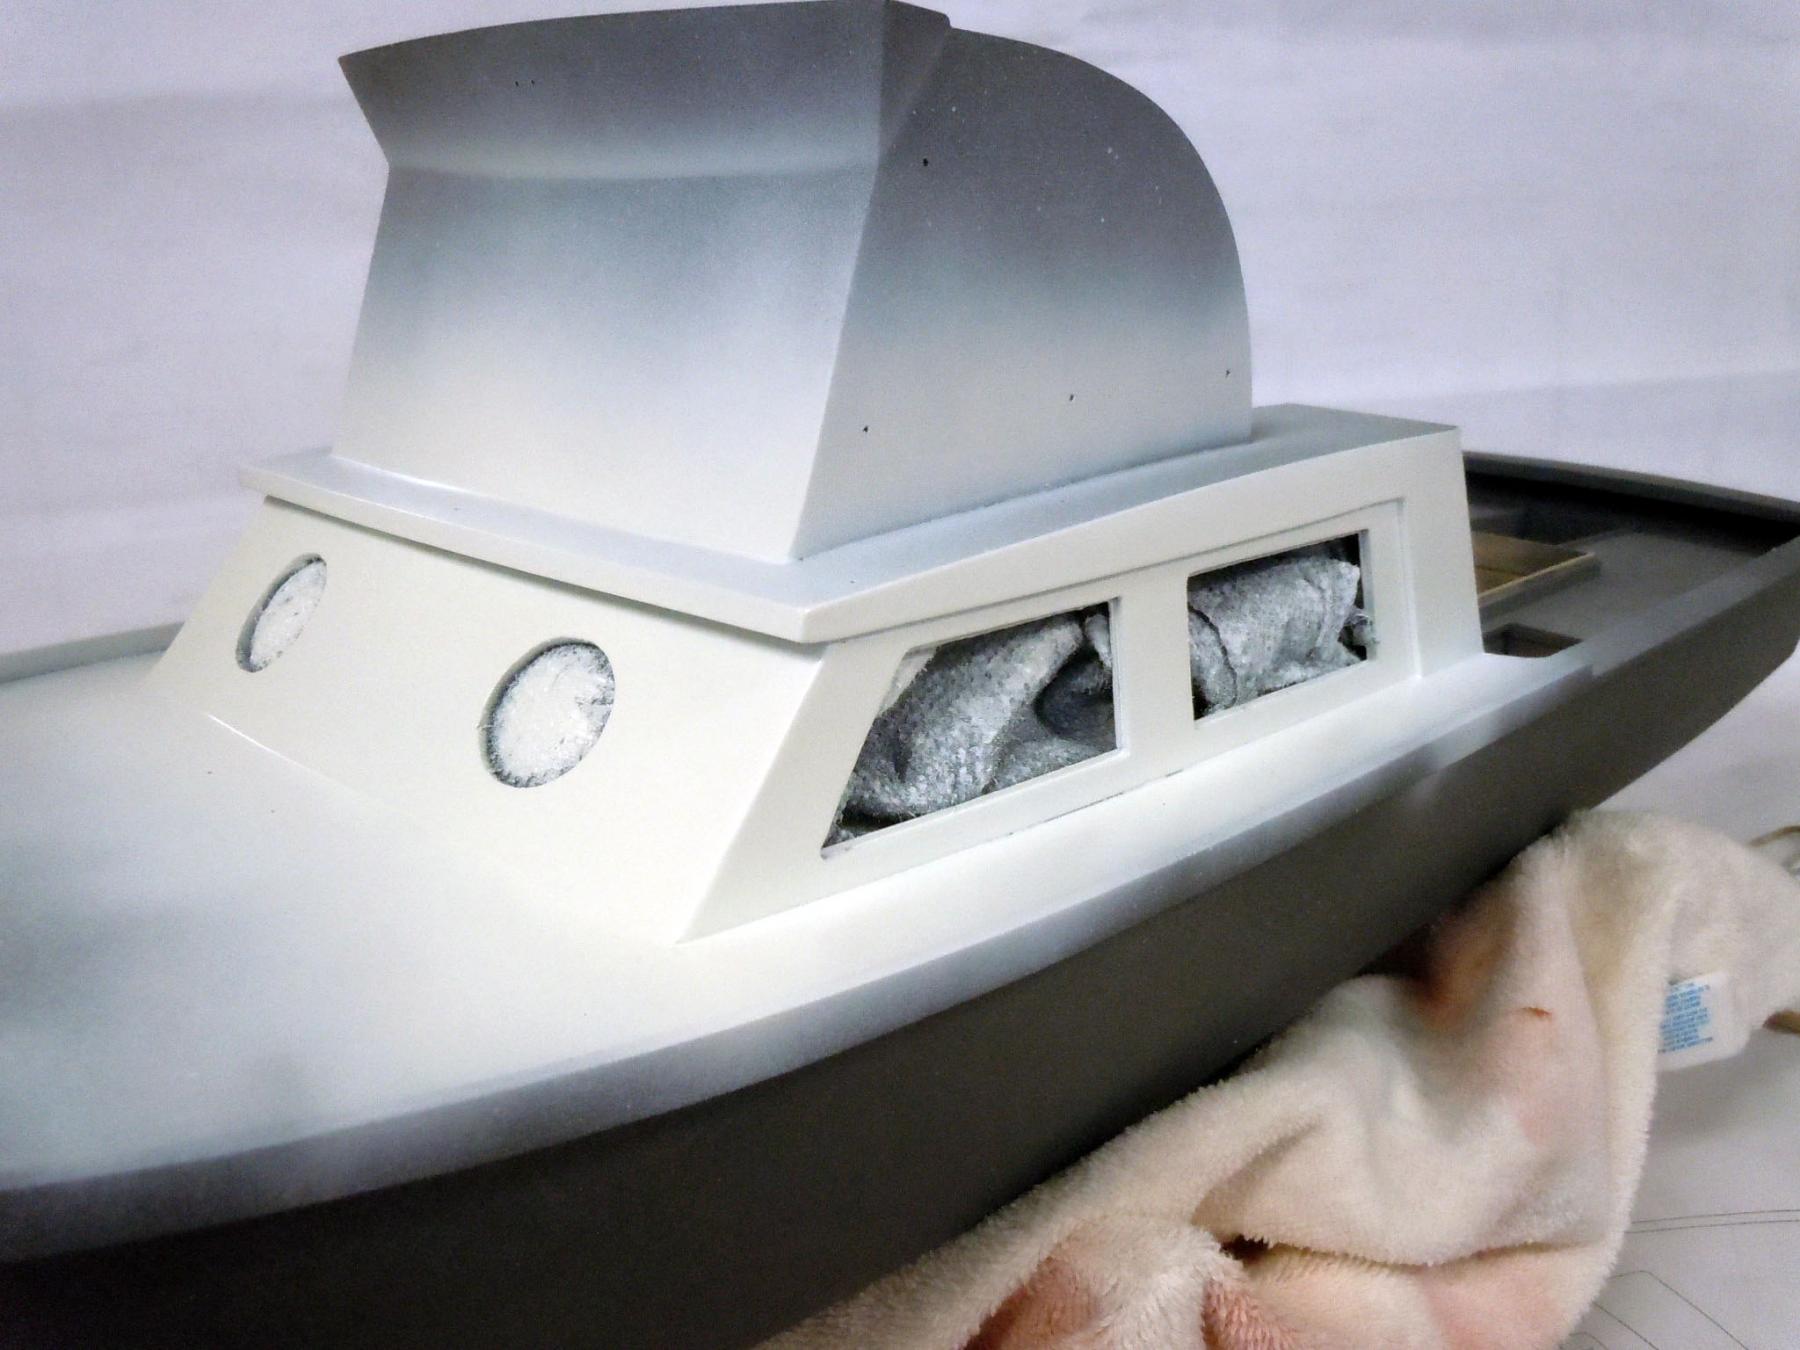
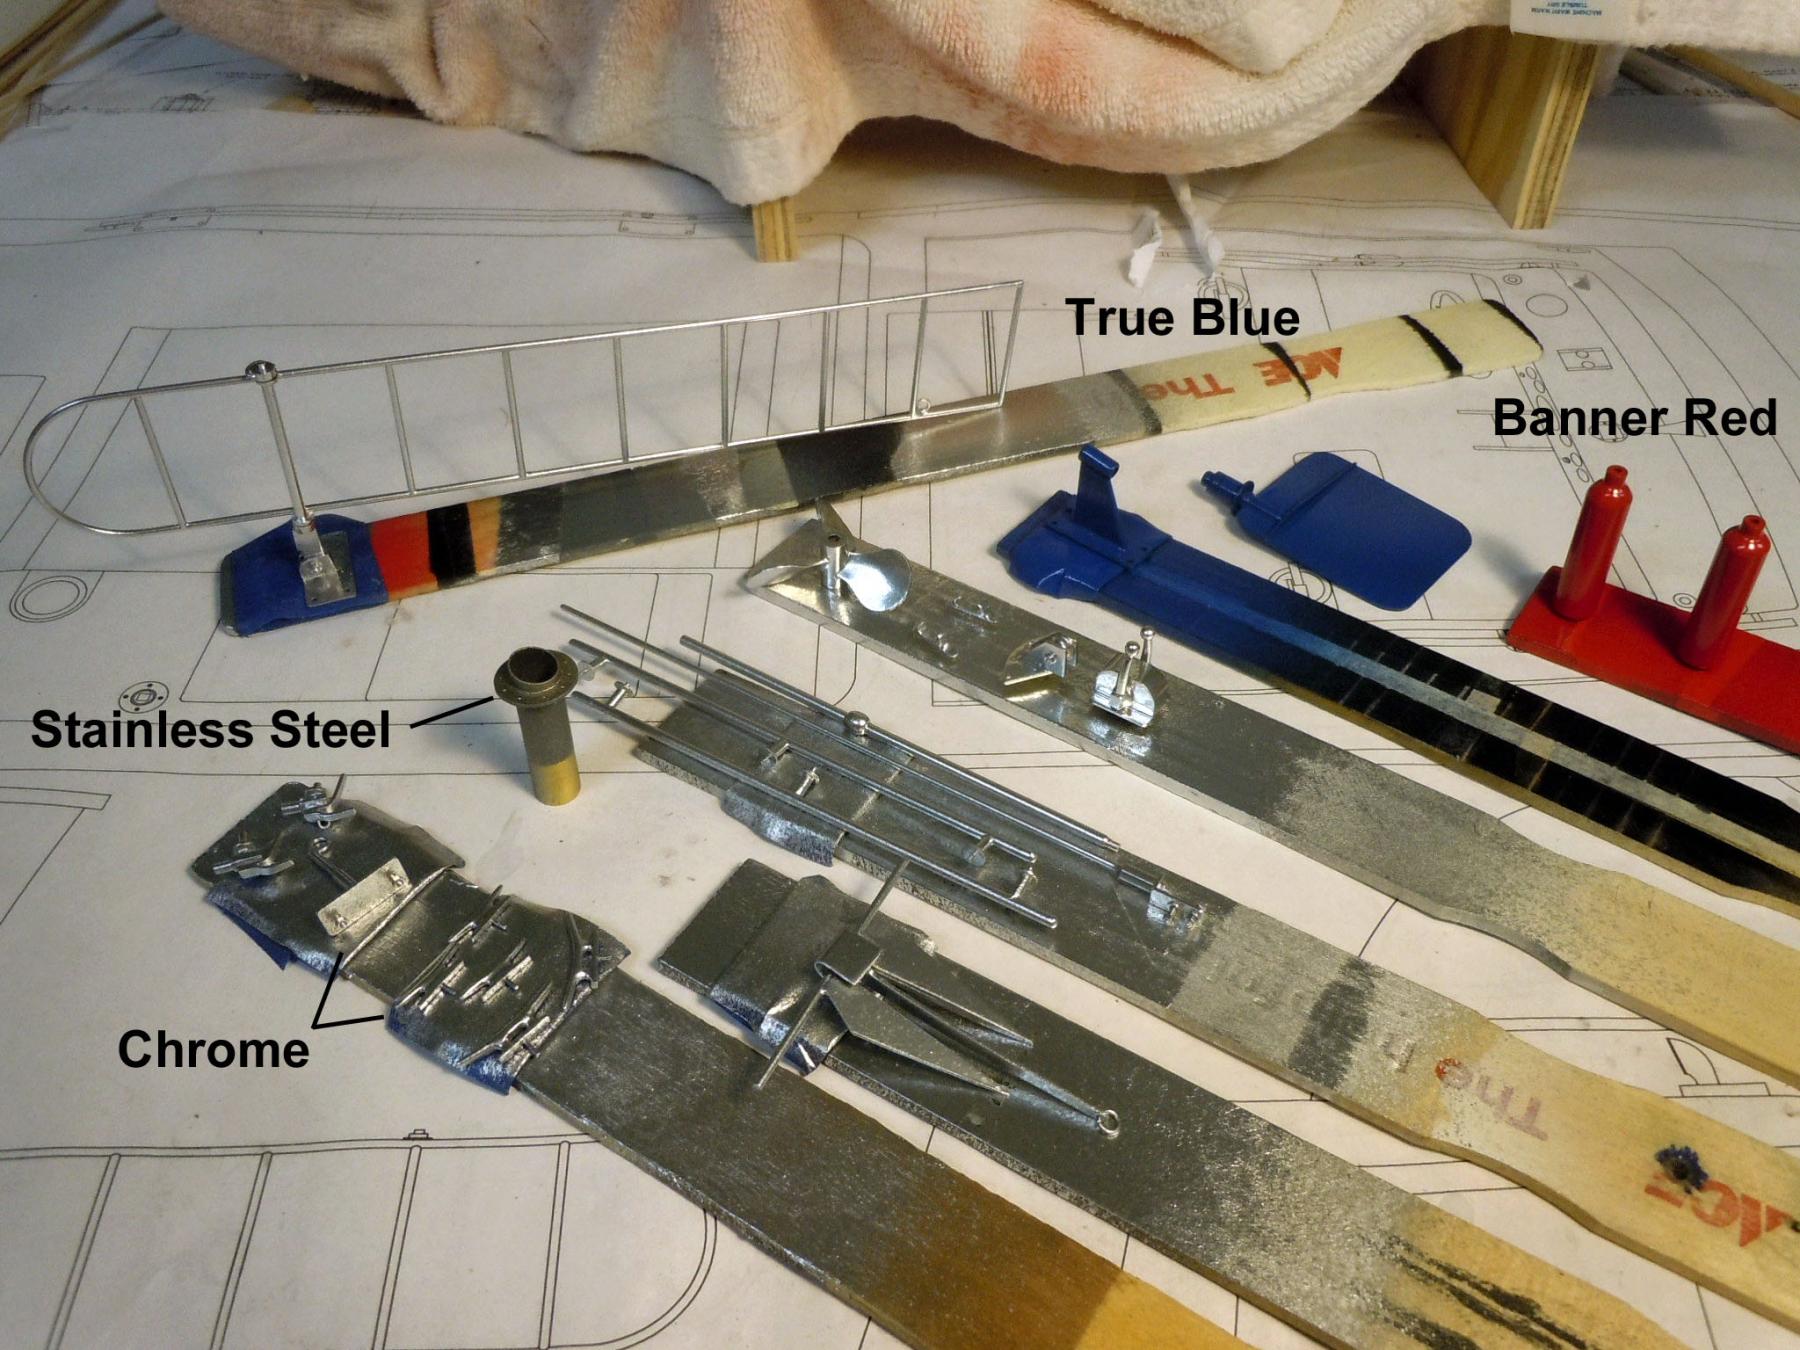
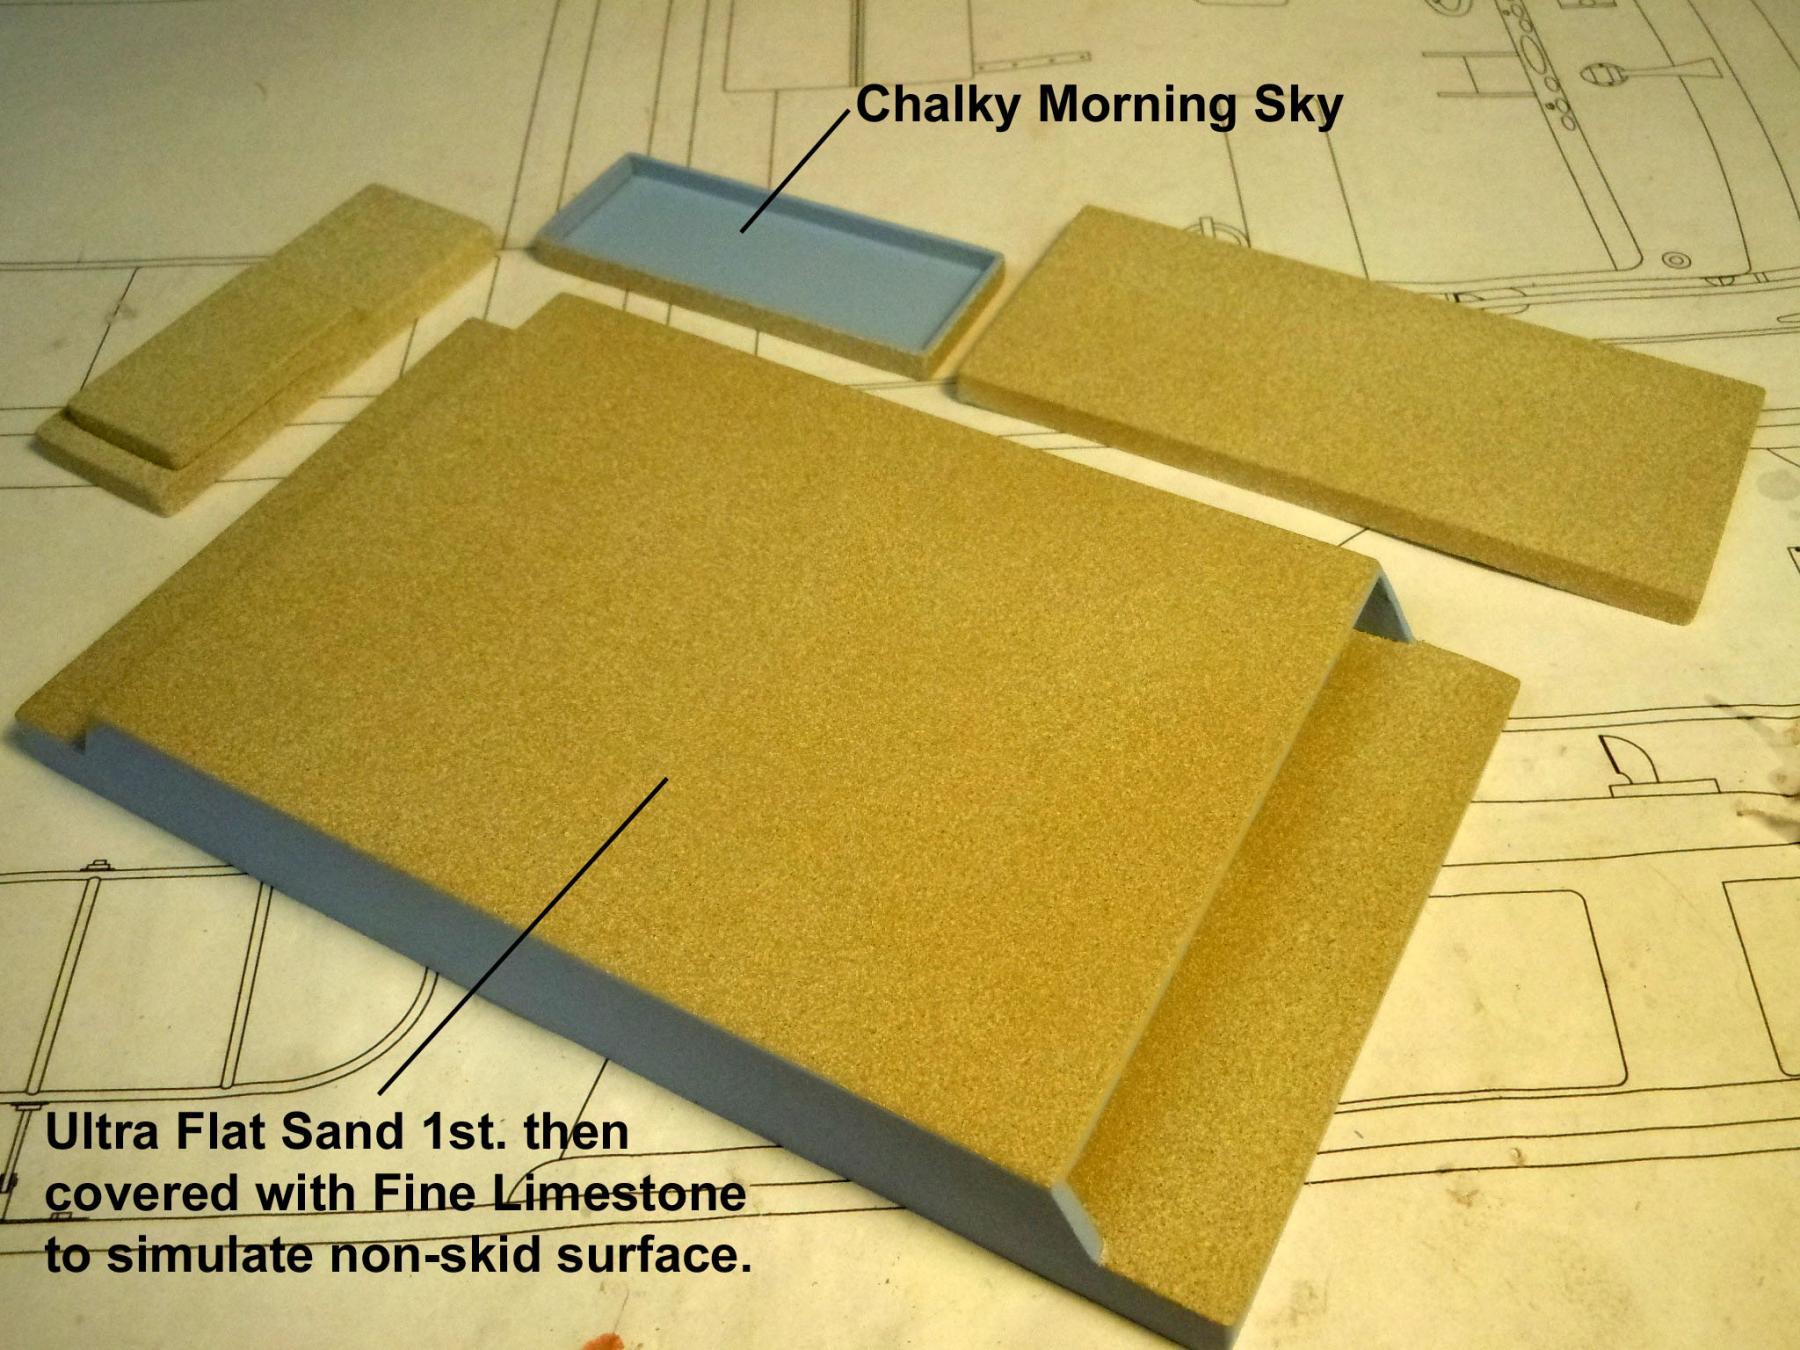
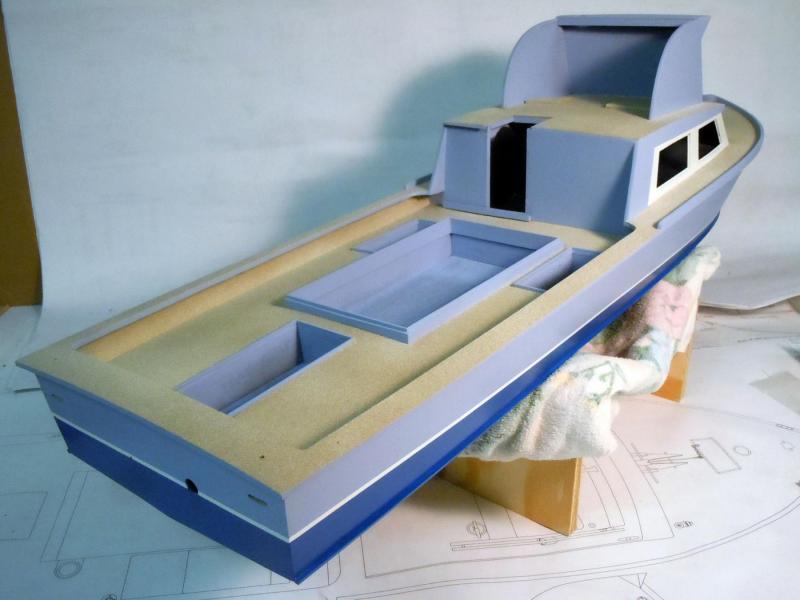
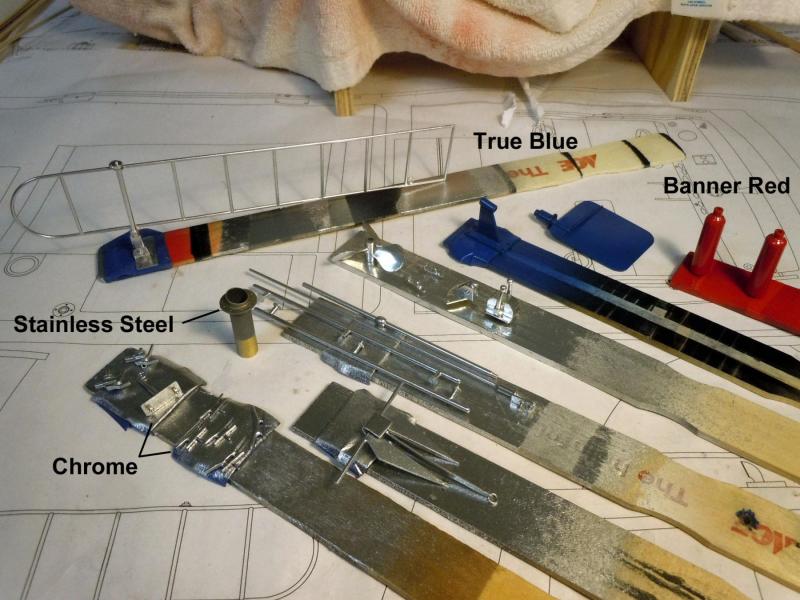
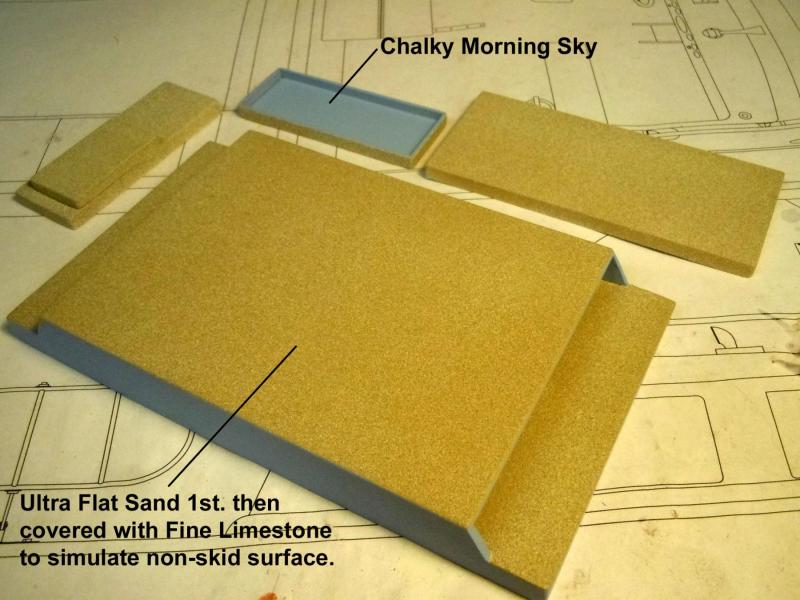
While helping my wife over the weekend I researched paint colors and considered the various ways of simulating the non-skid texture. First, I painted the cabin belt that will be White and will allow it to set hard before masking off to spray the Chalky Blue. Then last, the non-skid deck texture was painted first with a flat Sand then covered with Fine Texture Limestone for the texture over the sand color. The bottom of the hull will be a True Blue. The fittings were painted with Chrome paint and the exhaust pipe with Stainless. Here are a few of the test painted parts so far. All paints are the Krylon brand. The cabin belt painted White. Assorted painted parts and colors. Here are the non-skid textured surfaces. I was very pleased how it came out. One tip is to spray at a distance with light coats. Here is a close-up showing the masking off details around the engine cover vents. Now that the hull is sanded smooth ready for paint I will now add the rub rails on the sides and the false keel which will stick out from the hull surface.

- 162 replies
-
- 12
-
-
- dirty dozen
- fishing
- (and 2 more)
-
Chidokan, thanks for the build info, it will come in handy. Gary glad to hear you enjoyed looking at some of my other builds. This weekend I will be helping my wife at one of here craft shows. Here is a look at the boat primed up ready for a final touch up sanding before paint goes on. I will need to locate some of the correct colors first however.
- 162 replies
-
- 13
-
-
- dirty dozen
- fishing
- (and 2 more)
-
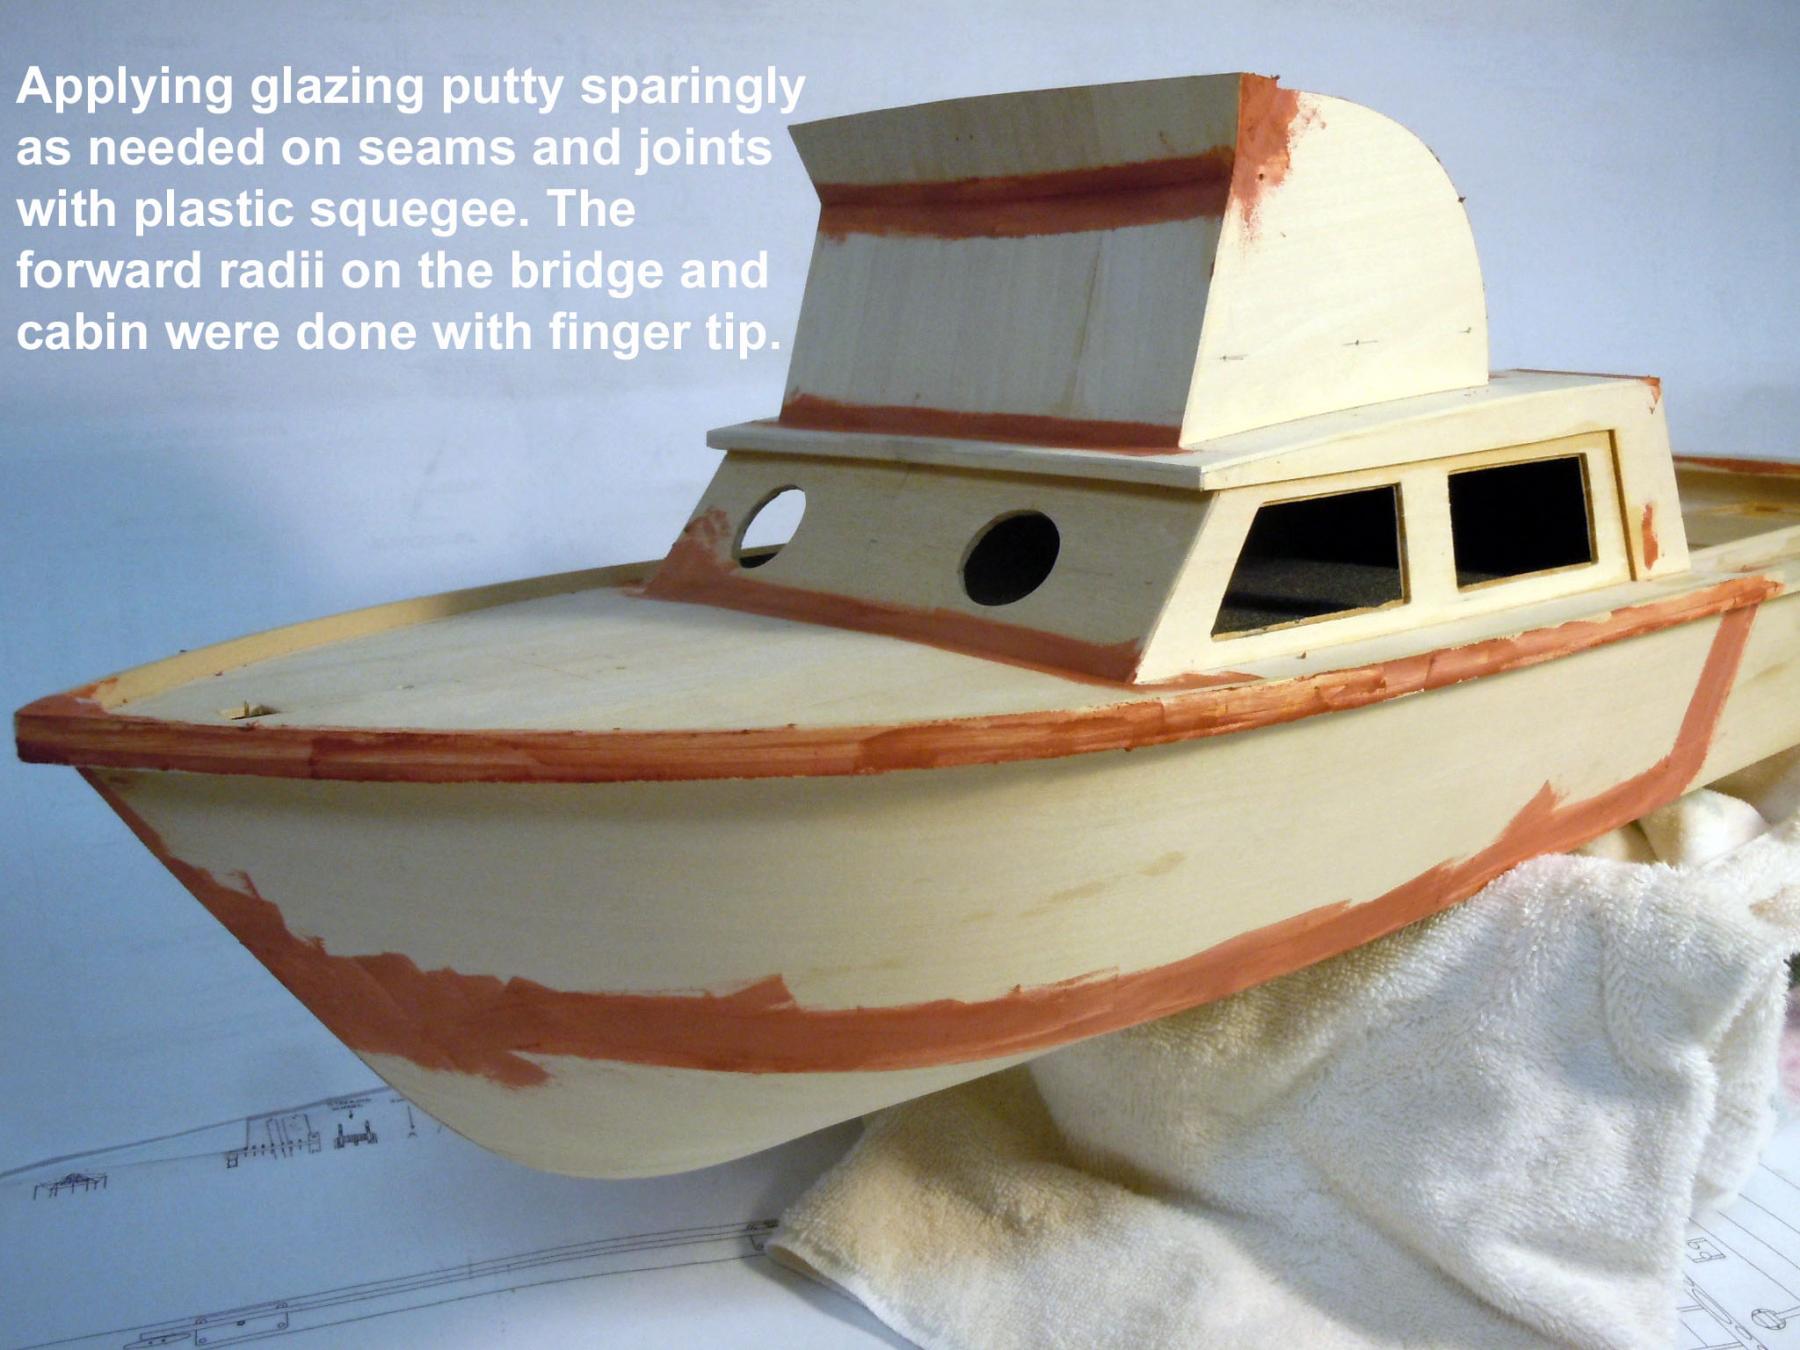
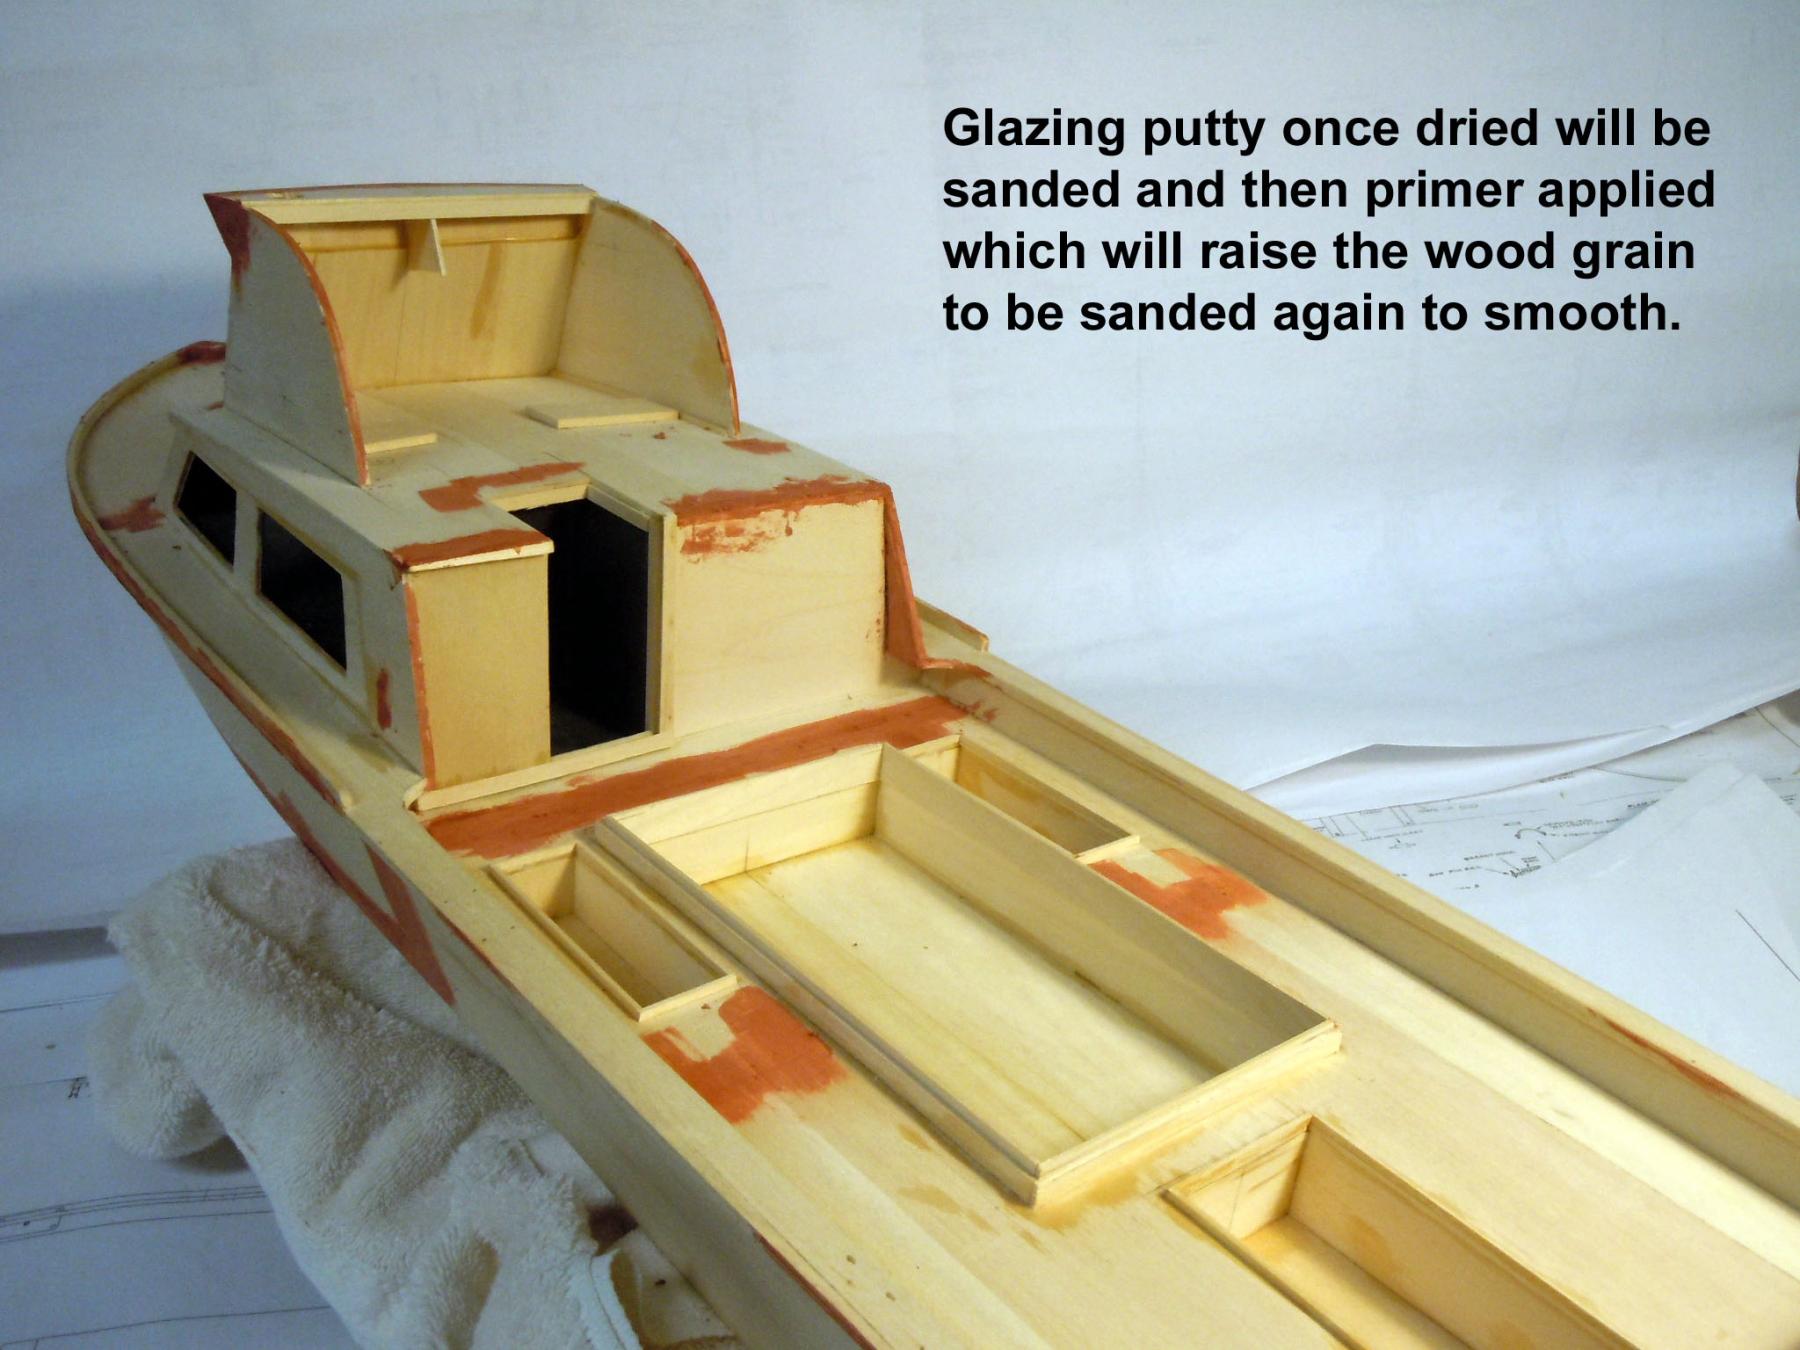
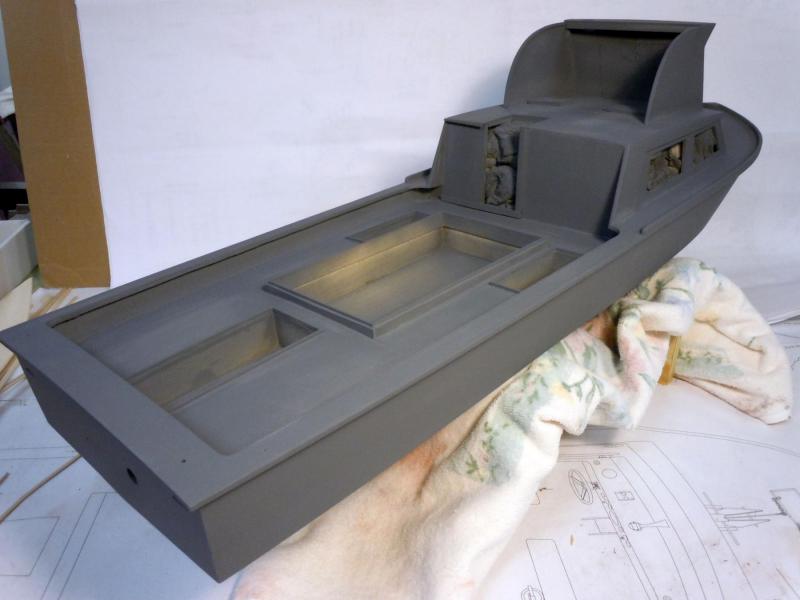
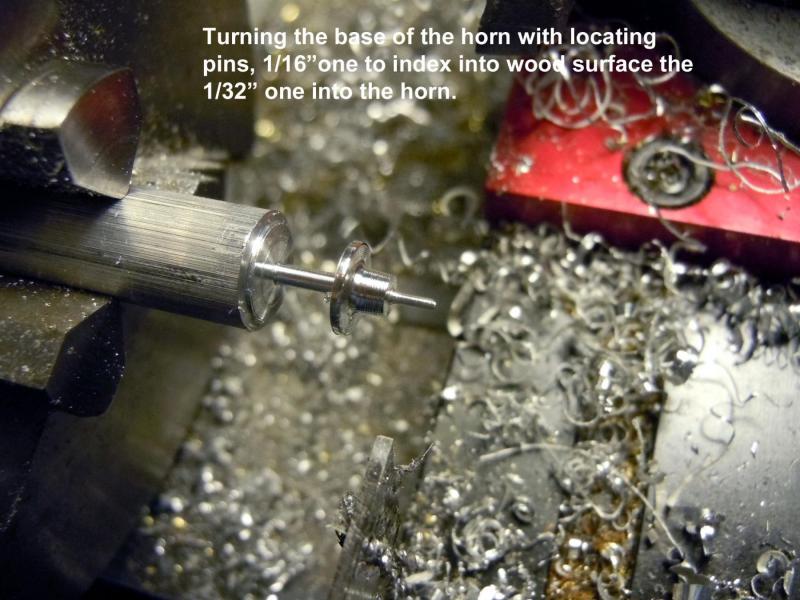
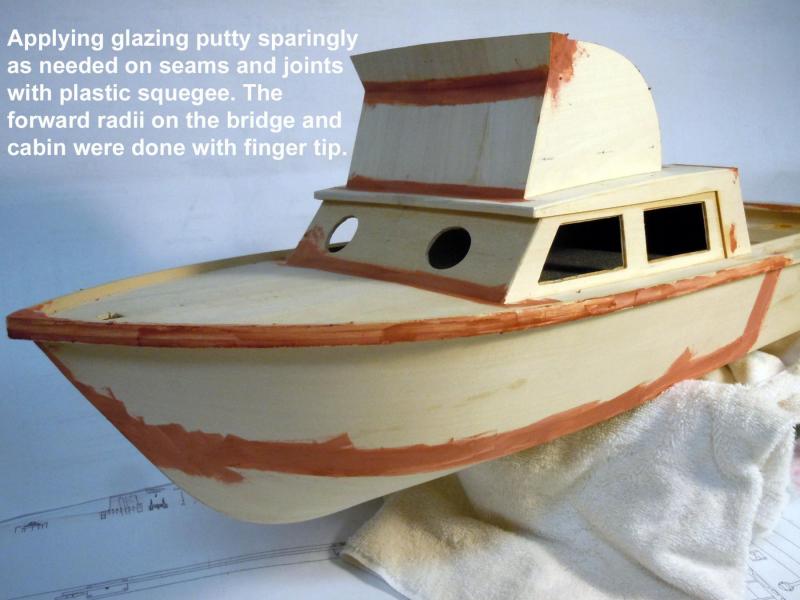
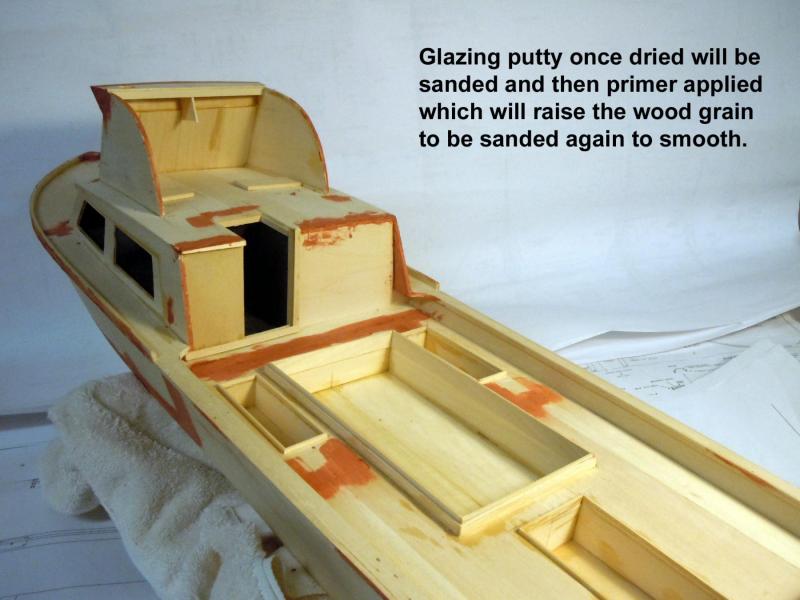
I turned the horn using aluminum and had to make it in two parts; the main body and the base. The board meeting went extremely well and the model was well received and all started planning a diorama display while I was presenting it to them. Now that the meeting is over I stripped down the boat and started applying auto body glazing putty to the obvious joints and areas that needed it like butt joints, dings and scratches that happen as part of the build process. I will now be sanding, priming and painting parts and allowing them to cure. Primer will raise the grain so a couple of sanding and priming operations will be involved. Now to the messy sanding, most of the models I have previously built did not require this much painting. Here is an image of the Glazing and Spot Putty I used, bought at local AutoZone.
- 162 replies
-
- 8
-
-
- dirty dozen
- fishing
- (and 2 more)
-
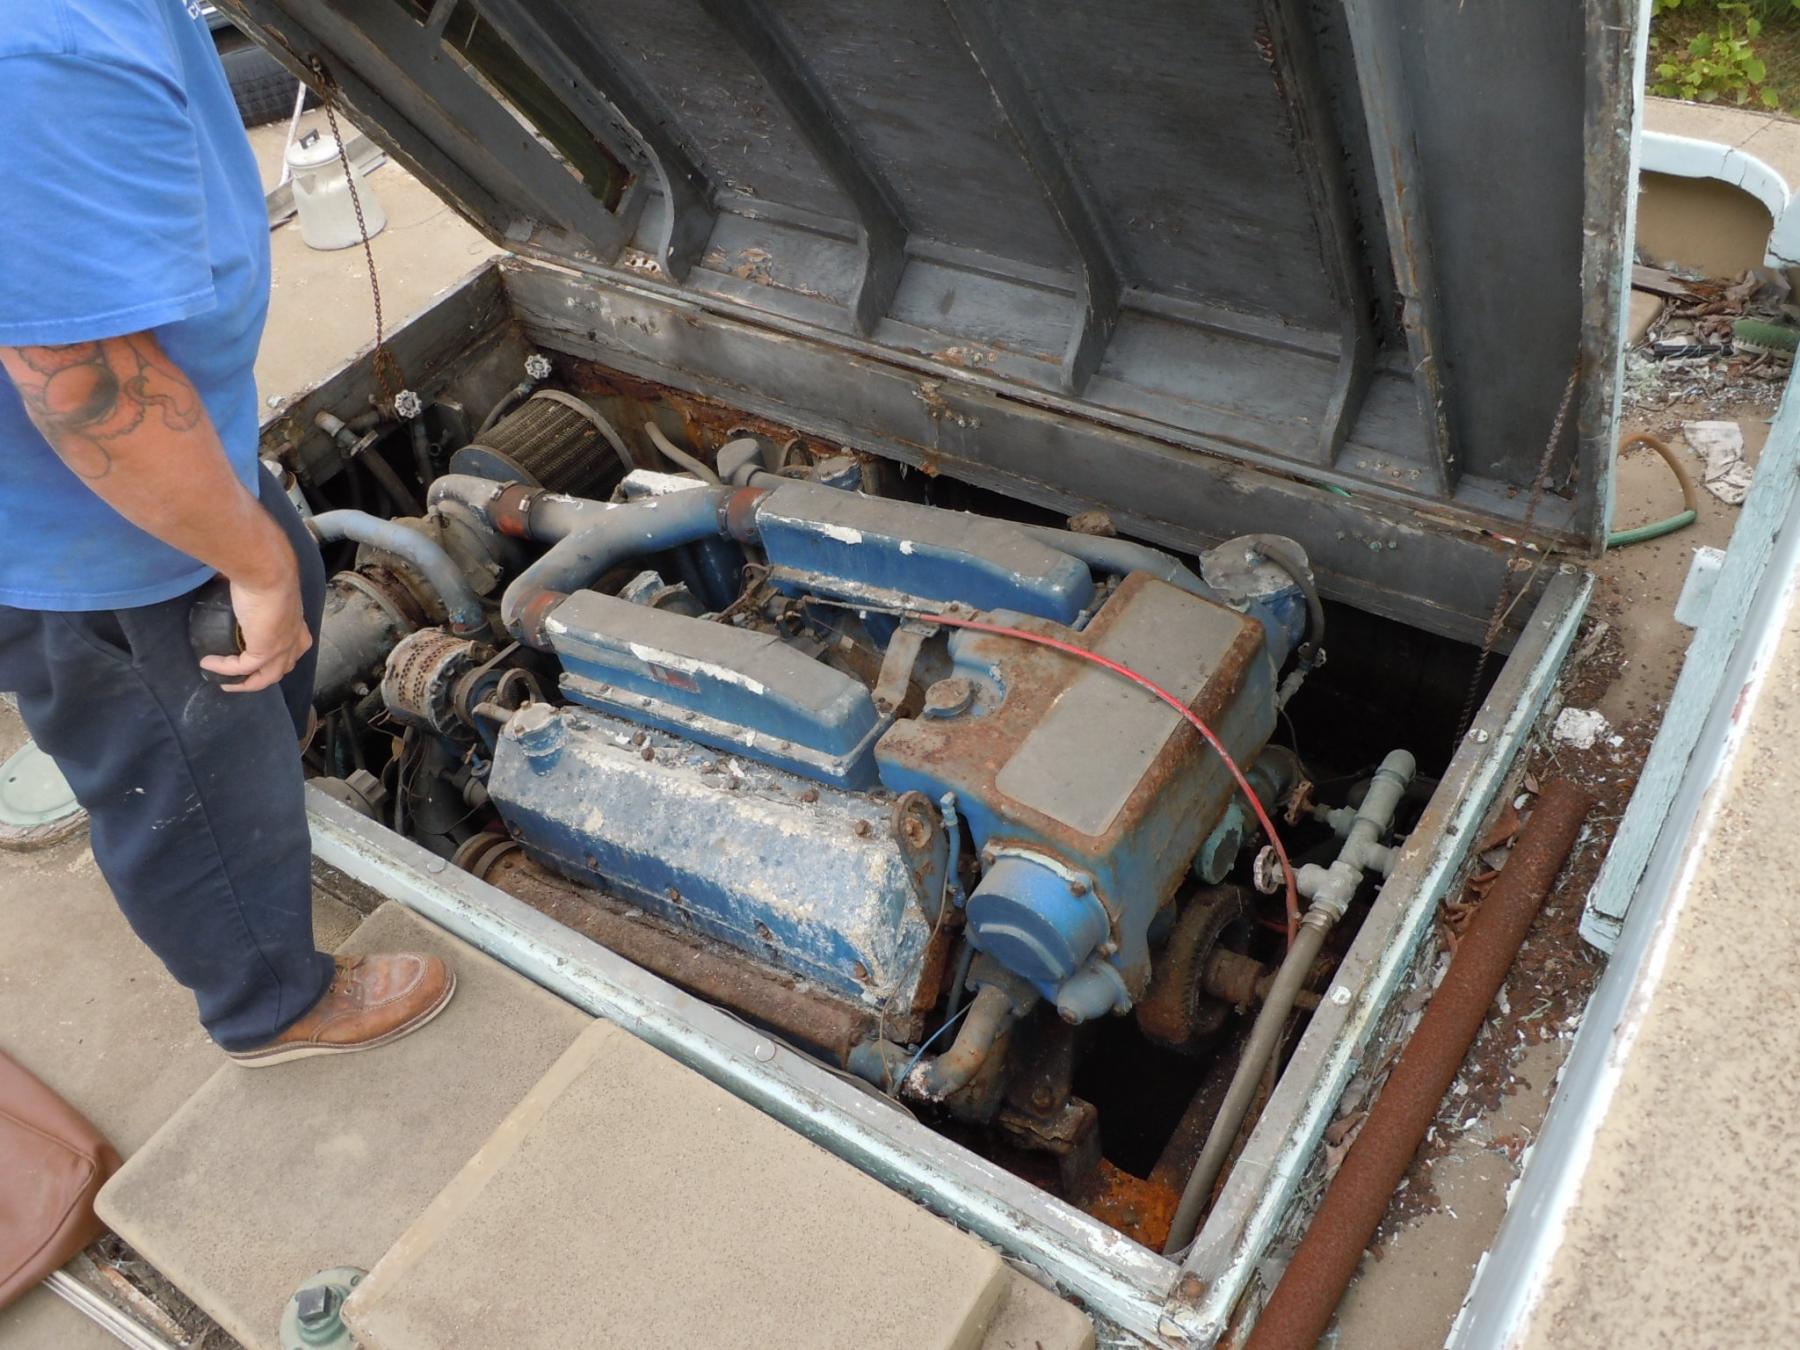
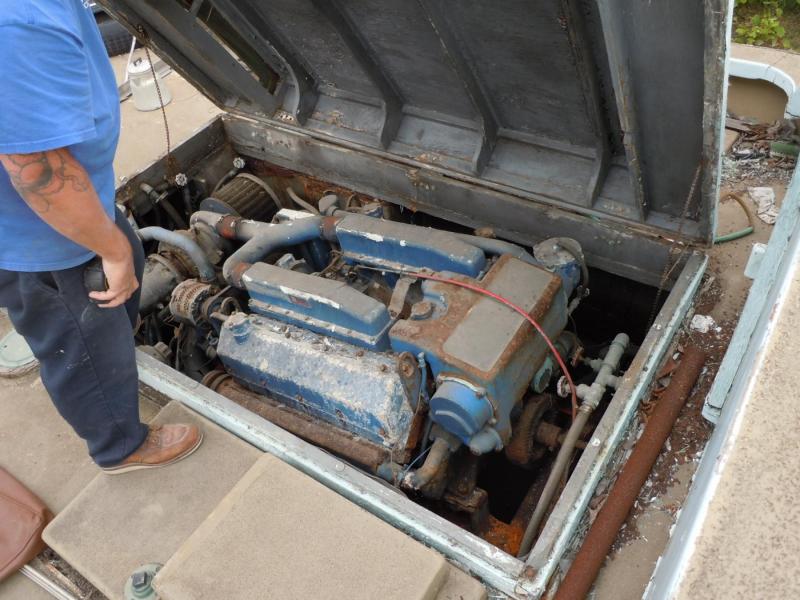
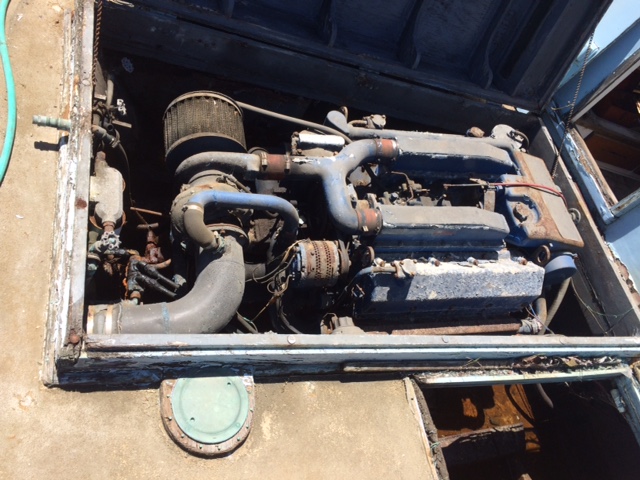
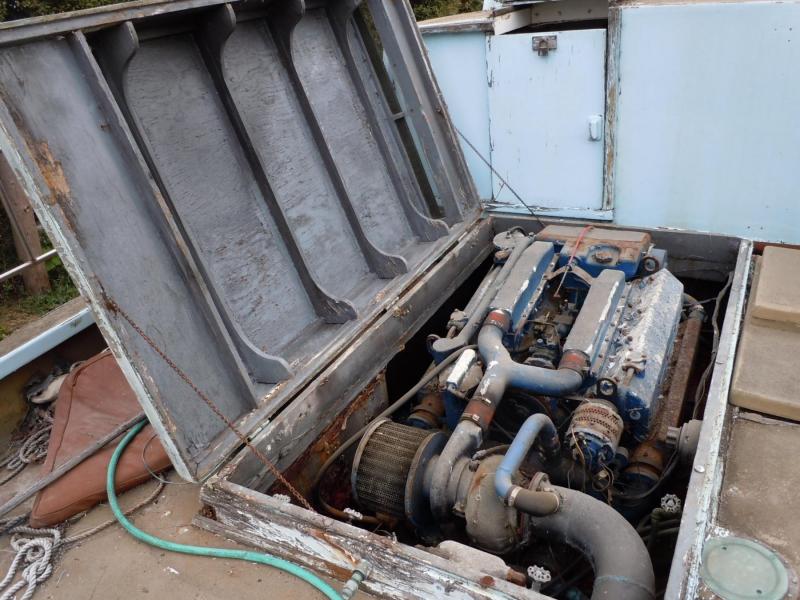
I will only make a dummy up so it kind of looks like an engine in the compartment. Here is the info I took off the nameplate: engine# 516985; piston 195120; crankshaft 160940; RPM 2800; Horsepower 320. Also here are a couple of images. Let us know what model or name. Thanks Ken
- 162 replies
-
- 8
-
-
- dirty dozen
- fishing
- (and 2 more)
-
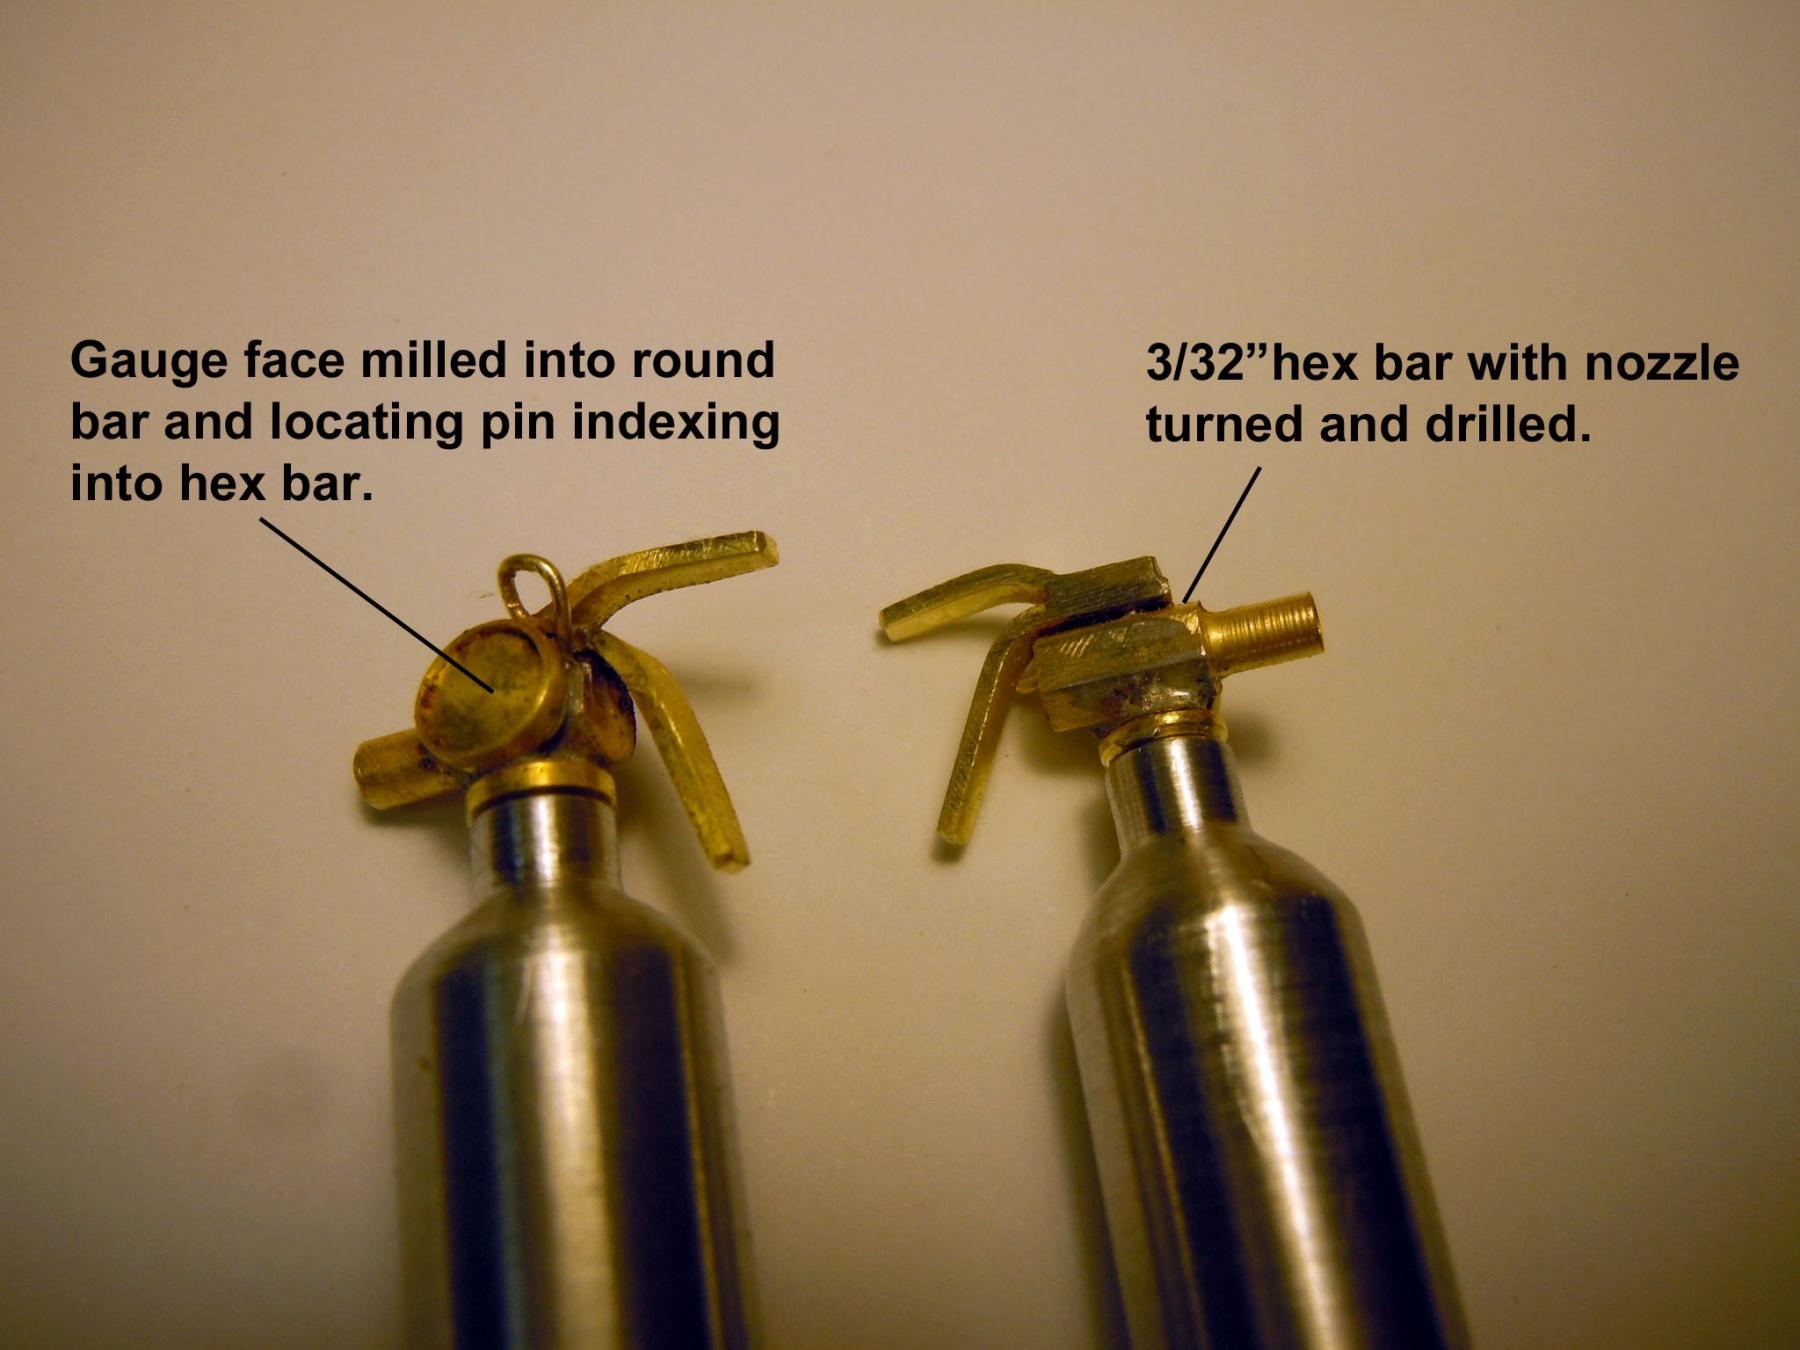
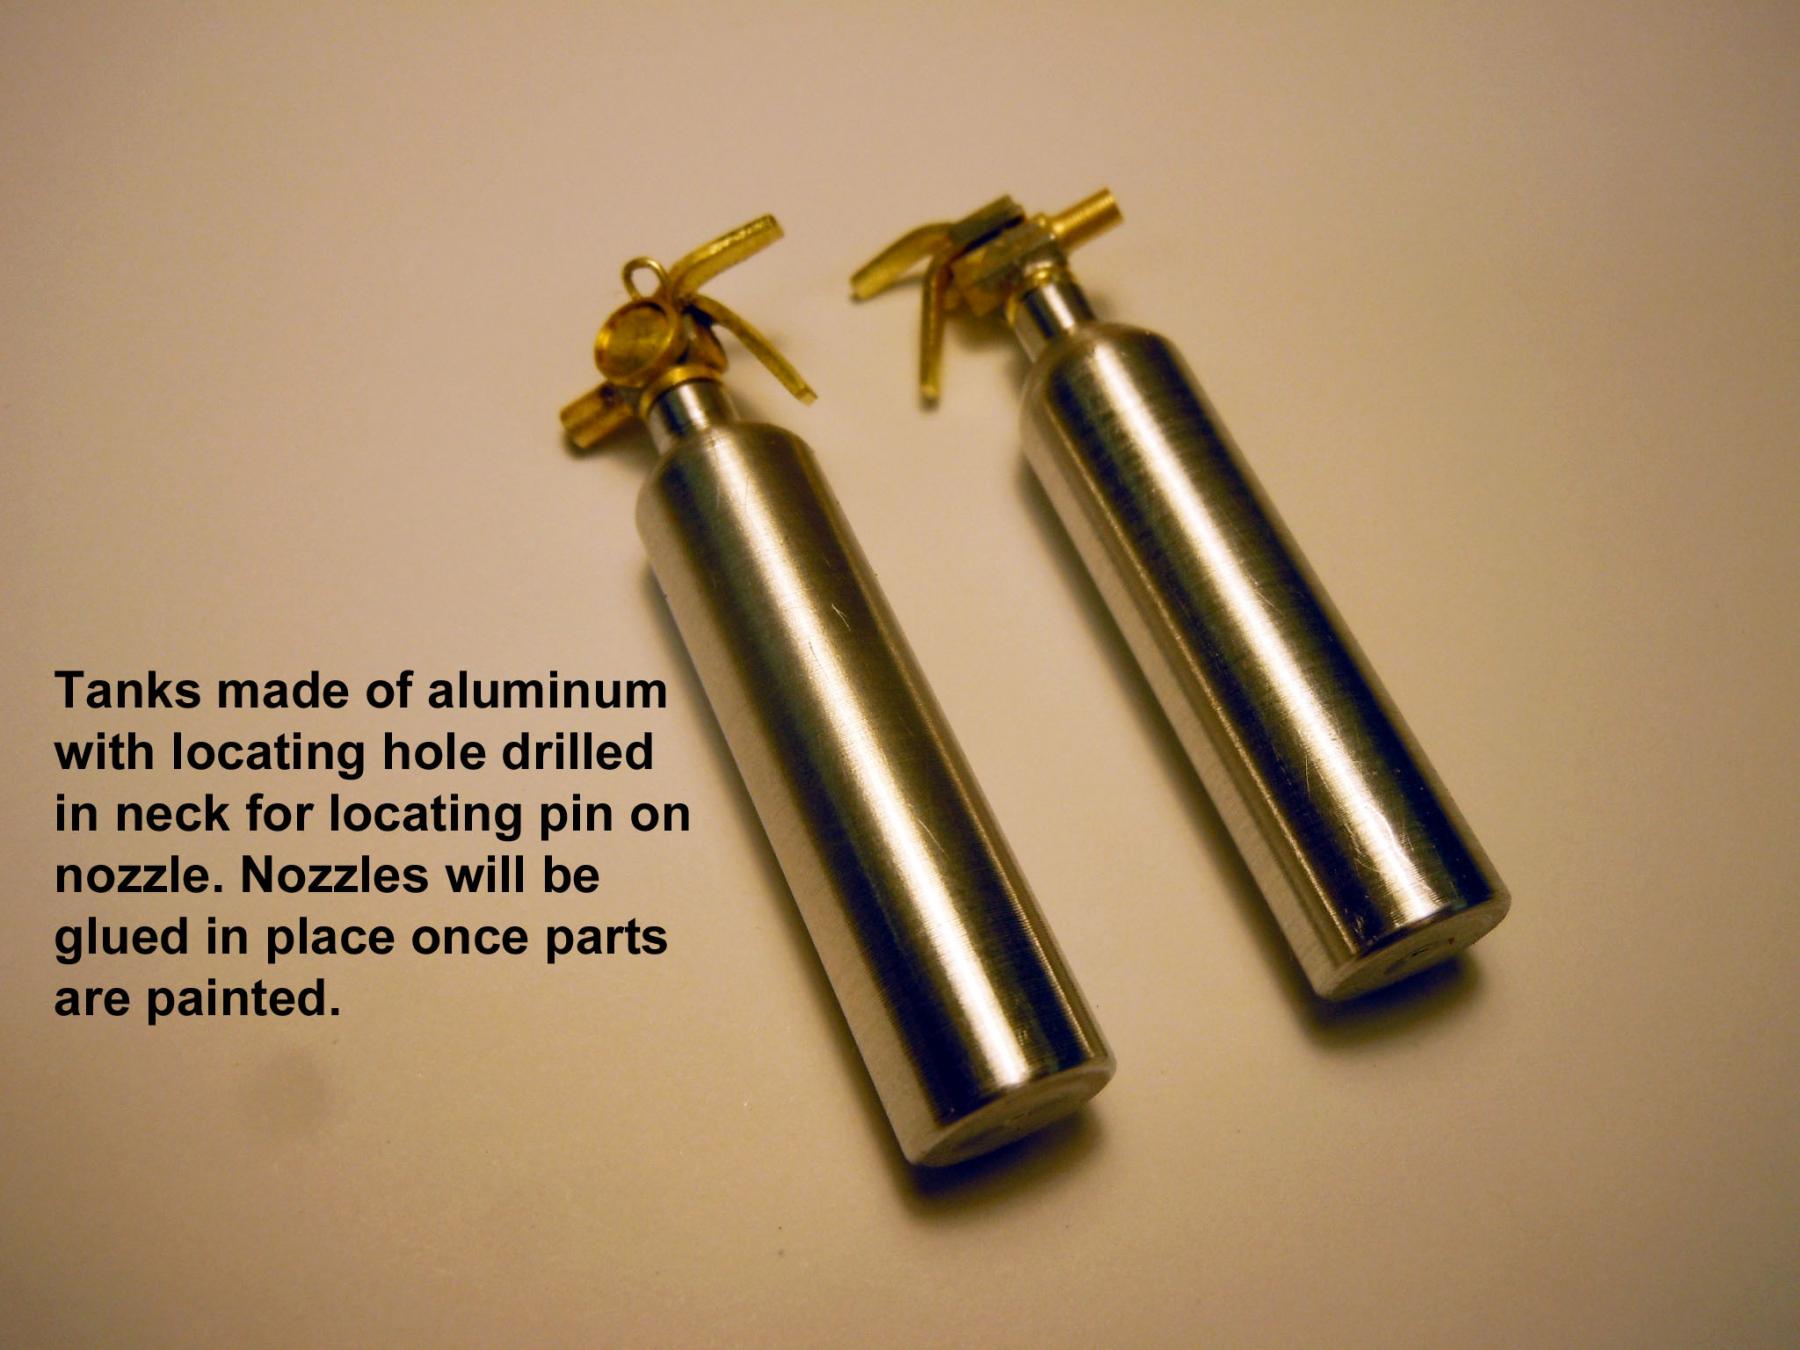
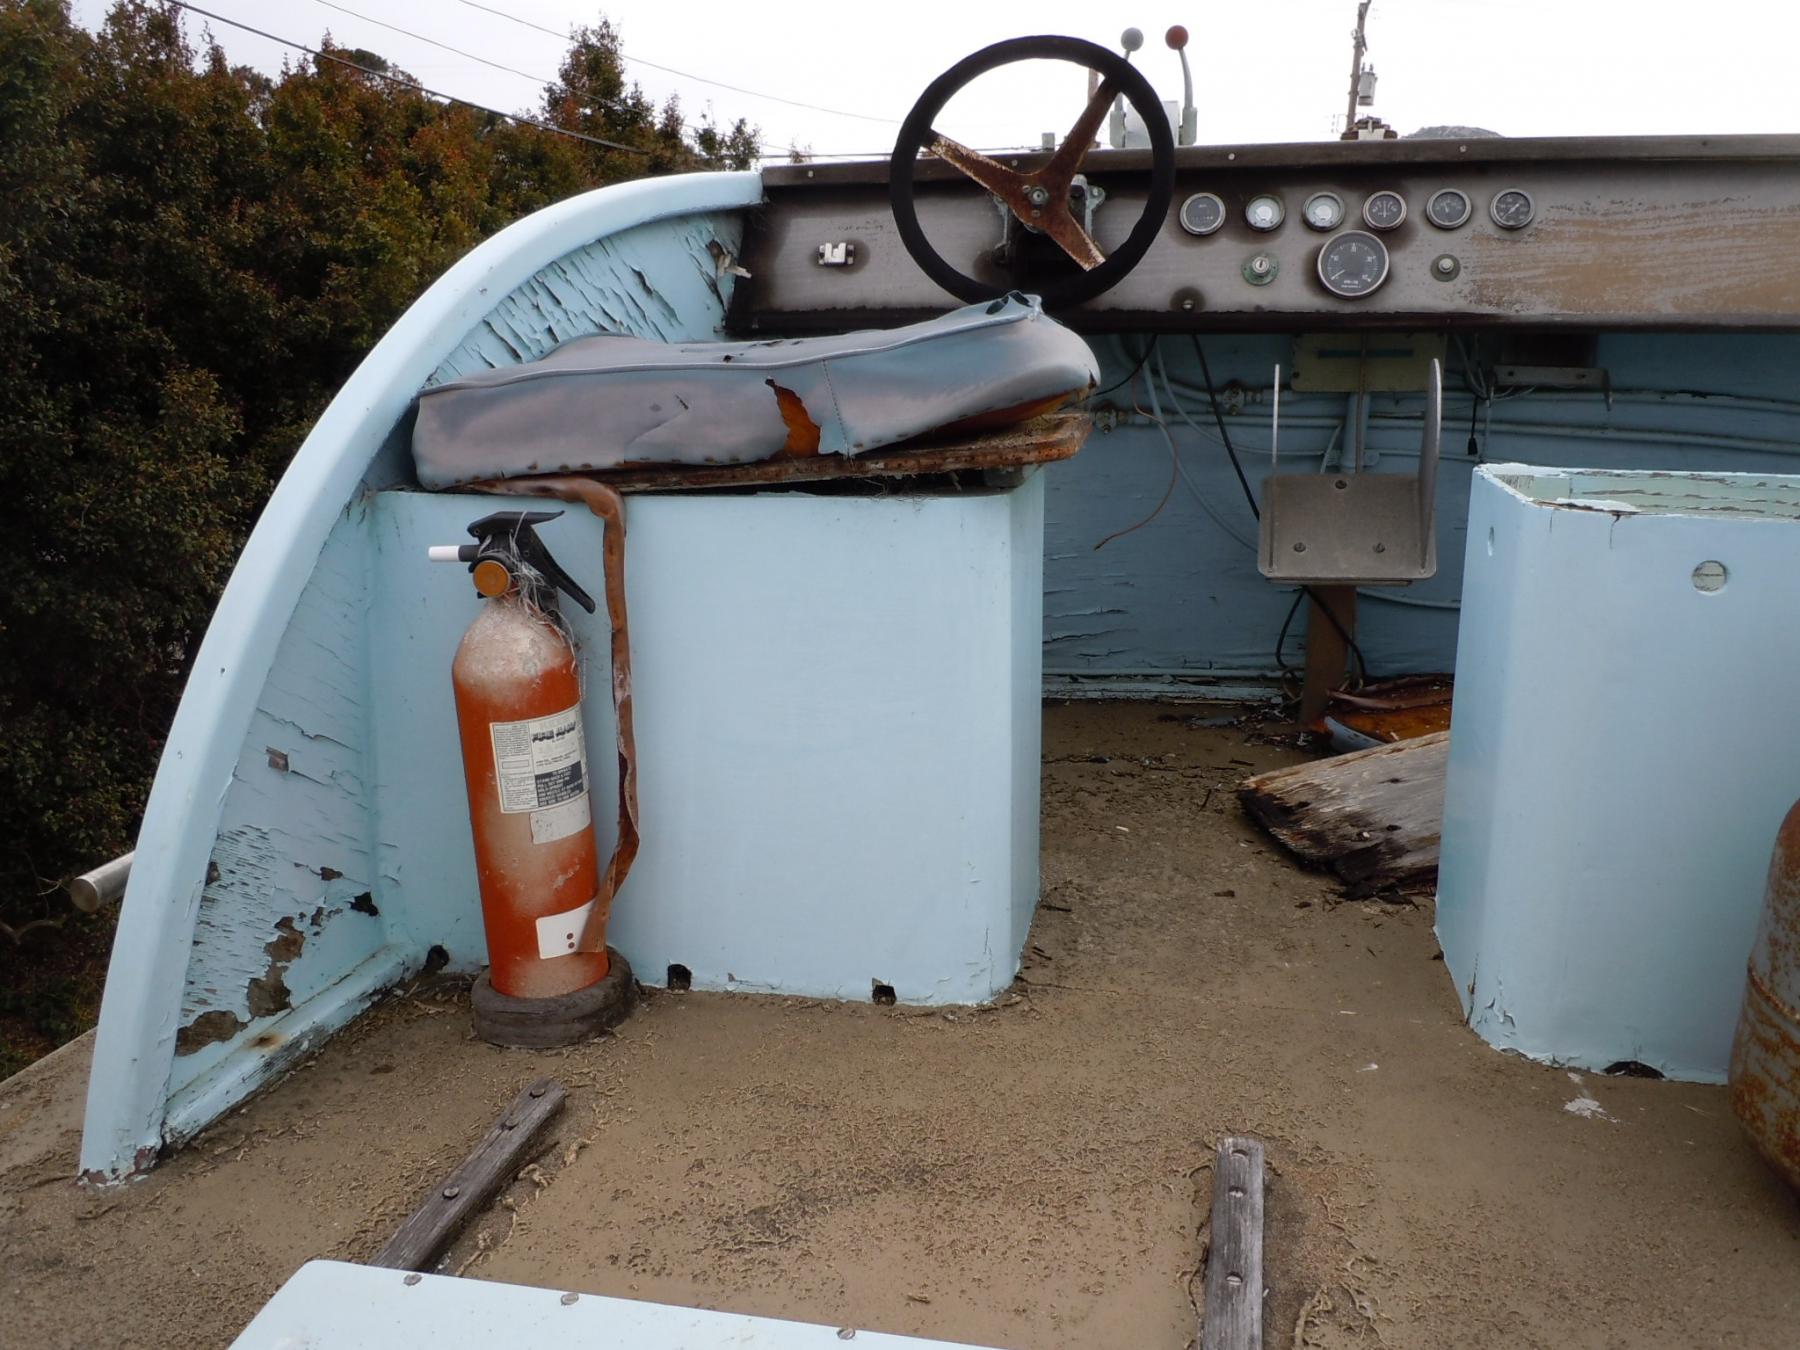
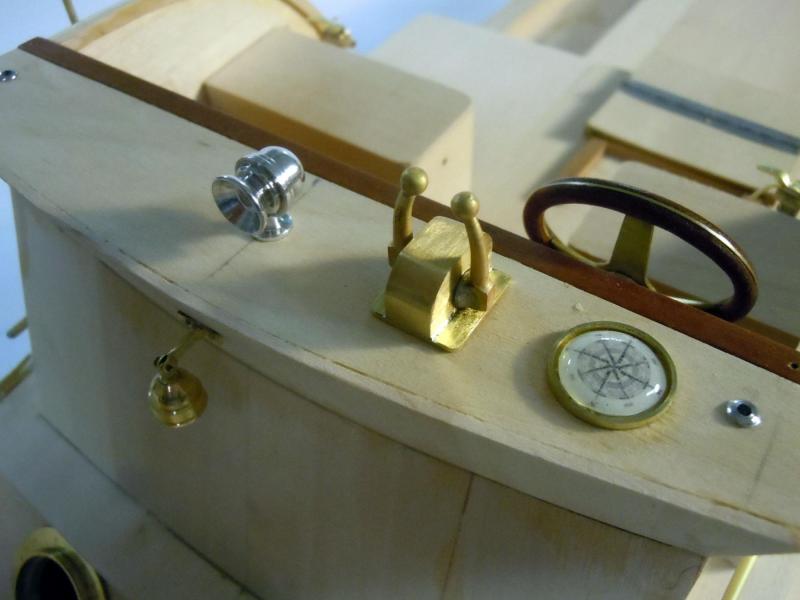
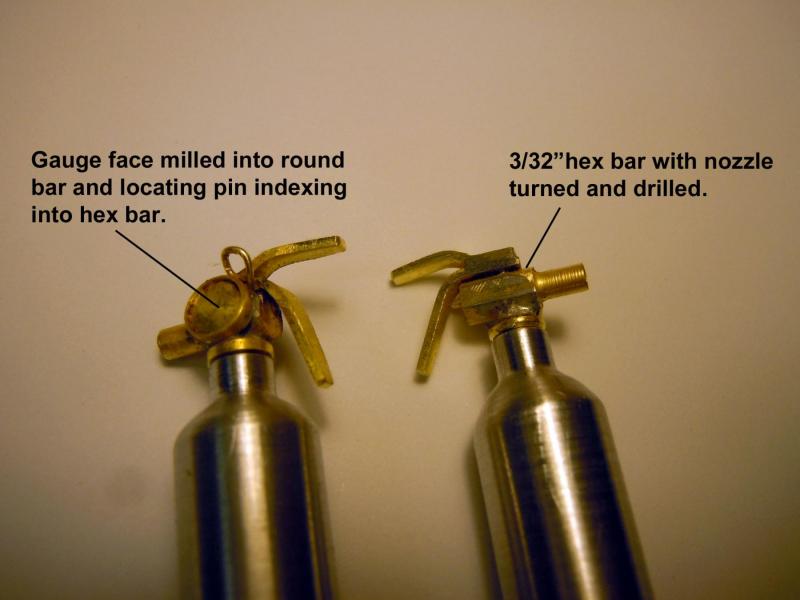
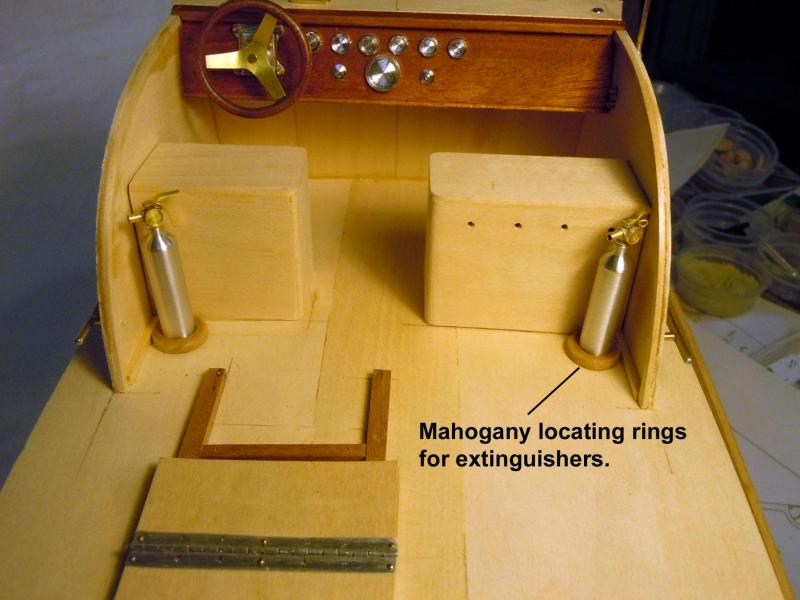
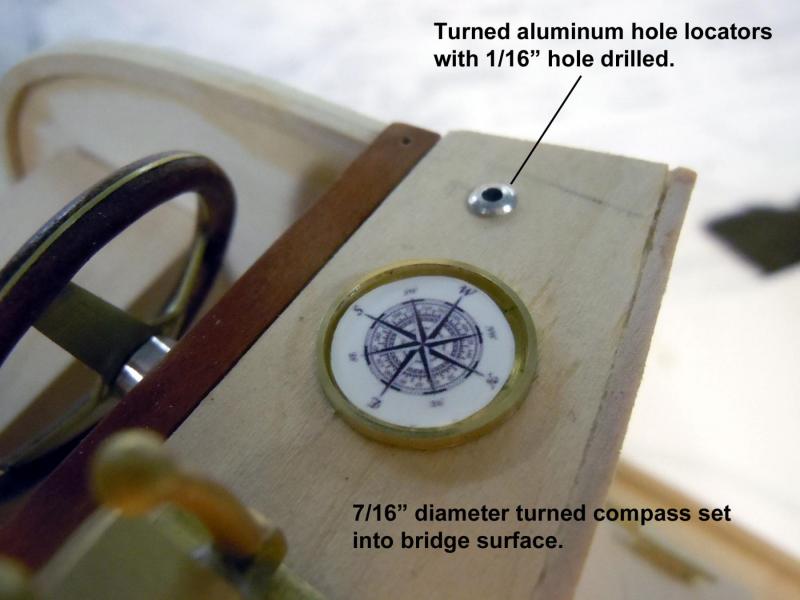
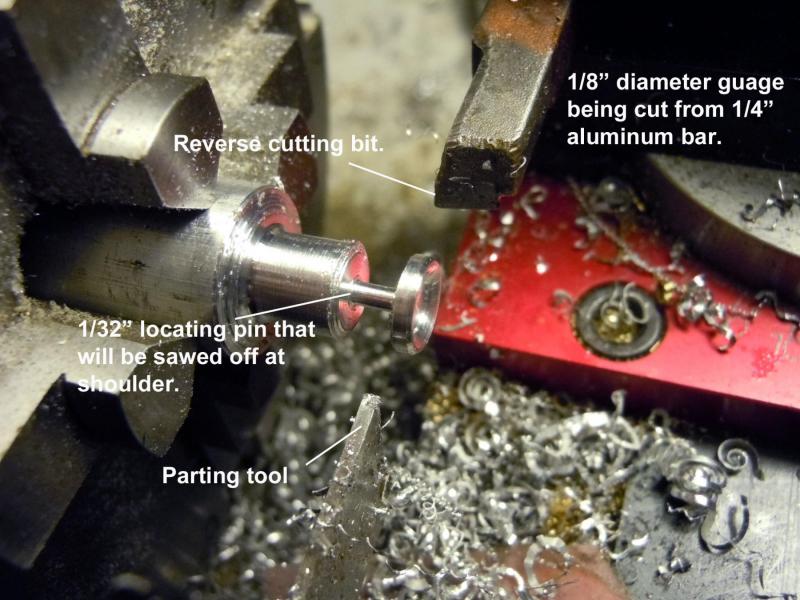
Patrick, I am glad you enjoyed the "icing" I used this technique for many years for instruments on cars and airplanes. Capillary action of liquids works great for doming. For the larger instruments like the compass a toothpick was used to transfer the epoxy and help it flow to the edge since you have to work quickly. The fire extinguishers started with turning the aluminum tanks first and drilling the neck end to receive the locating pins for the nozzles. The nozzle assembly started by turning 3/32" hex bar down and then drilled. Next the gauge was milled to form the shoulder for the gauge face that will be epoxied later. The handles were then cut, formed, indexed on the locating pin for the tanks and through the hex bar and soldered in place. The tanks and nozzles are press fit for now to allow easier painting when the time comes. I also made the locating rings out of mahogany which are just set in place for now. They were on the real boat as seen in the picture below. Now to work on getting ready for the board meeting this evening. It will be raining here so I will need to devise a transport carrier and cover.


- 162 replies
-
- 14
-
-
- dirty dozen
- fishing
- (and 2 more)
-
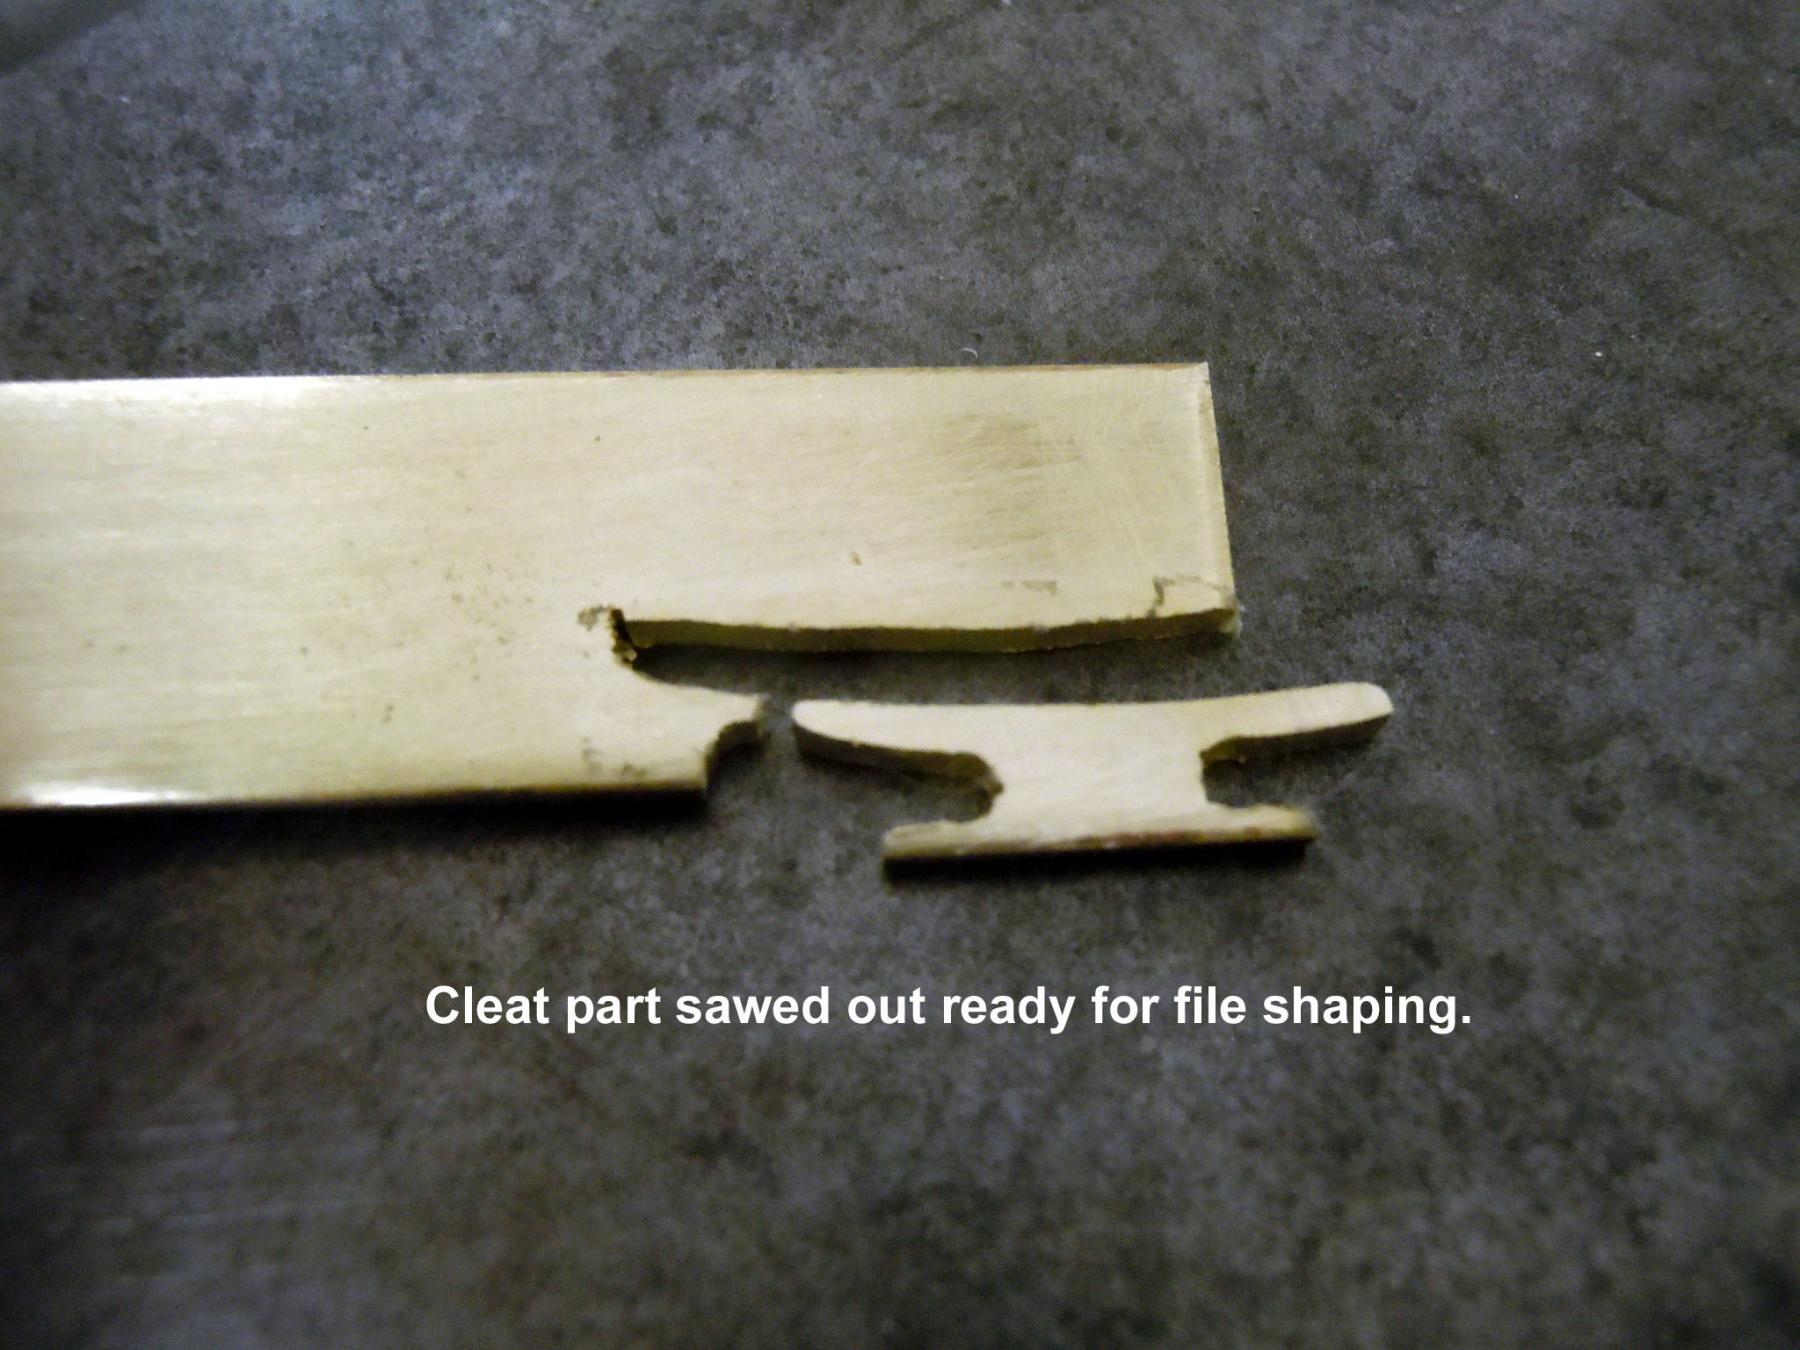
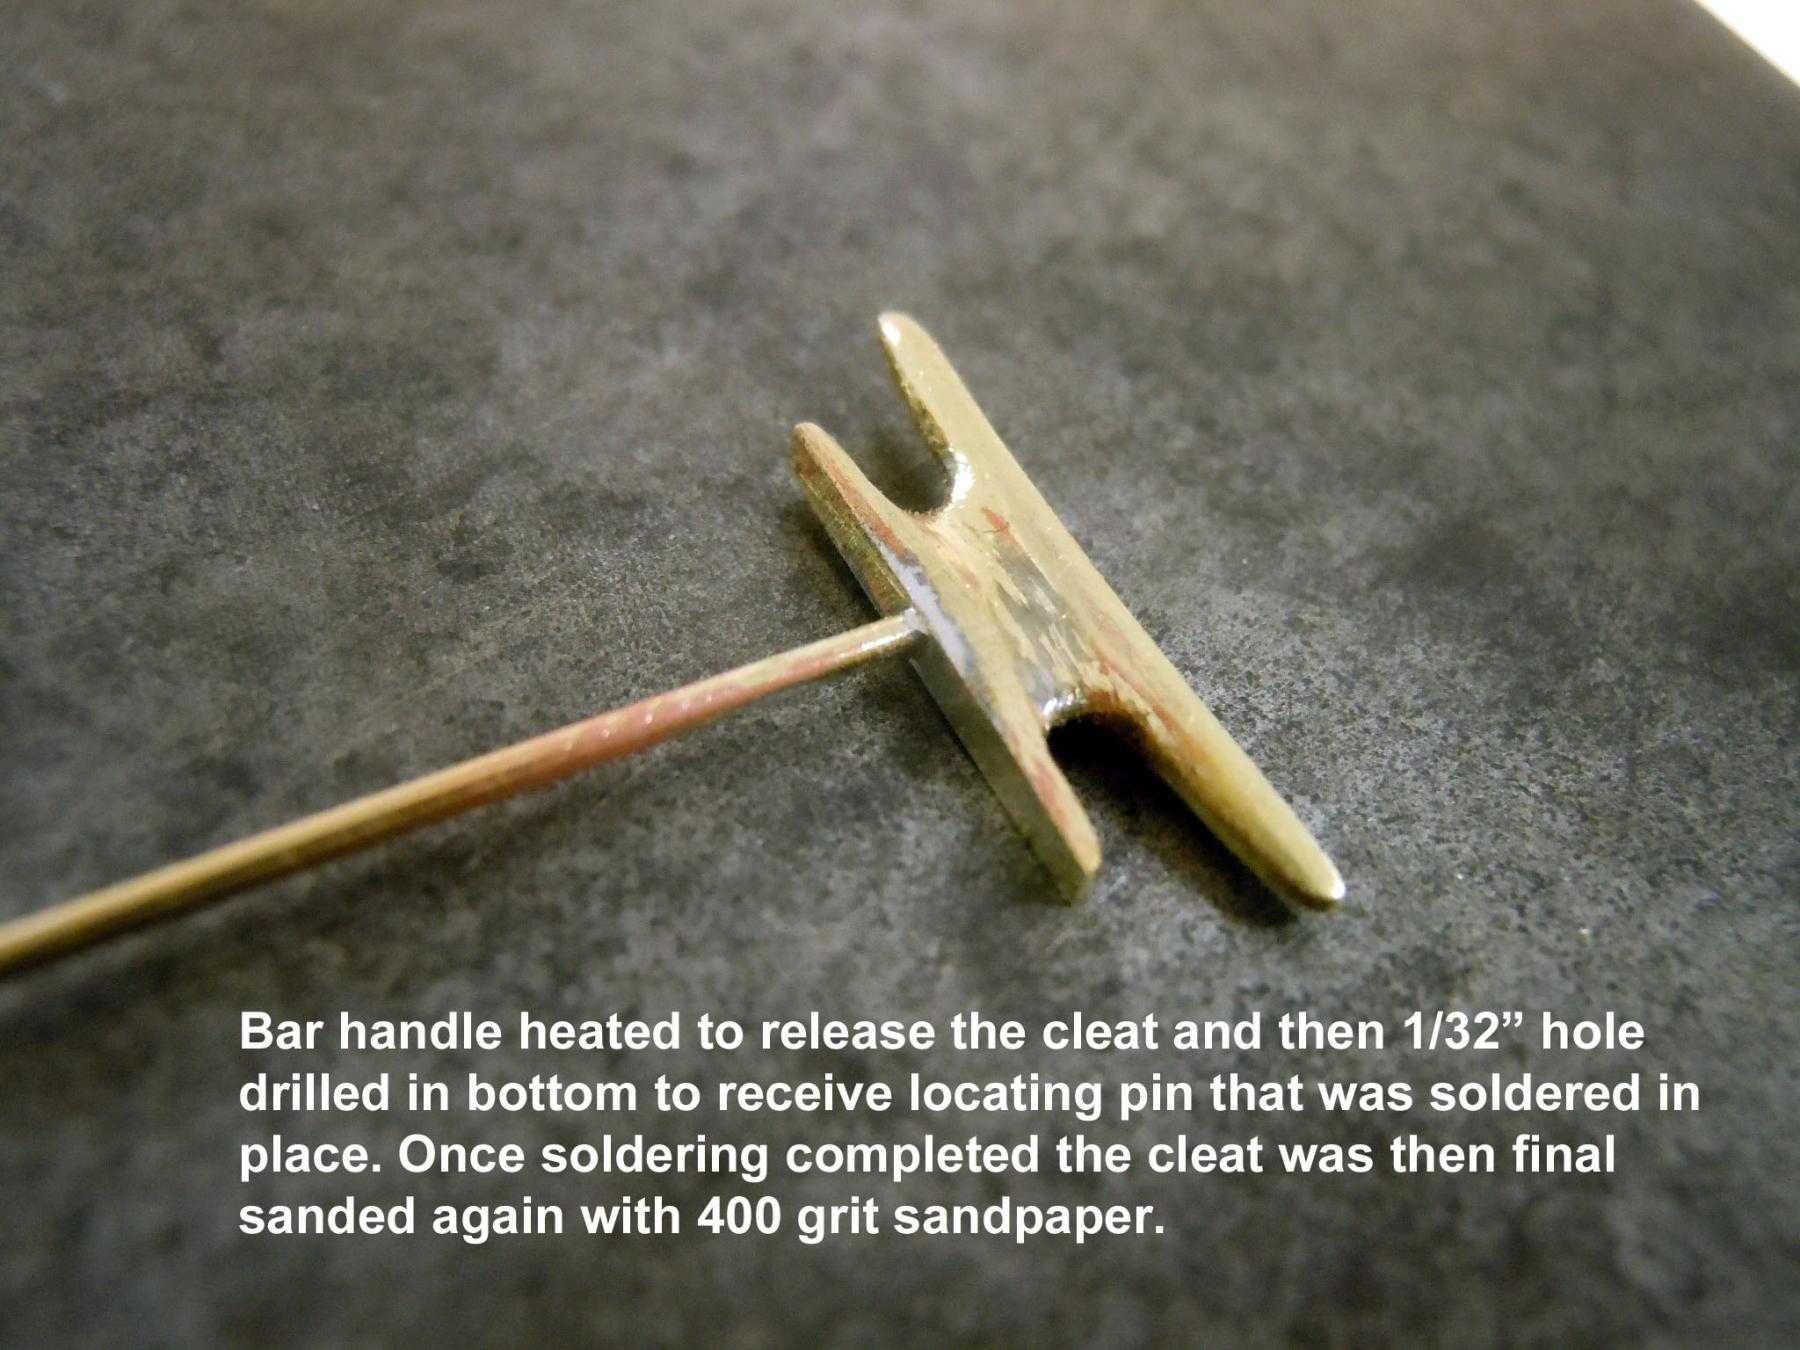
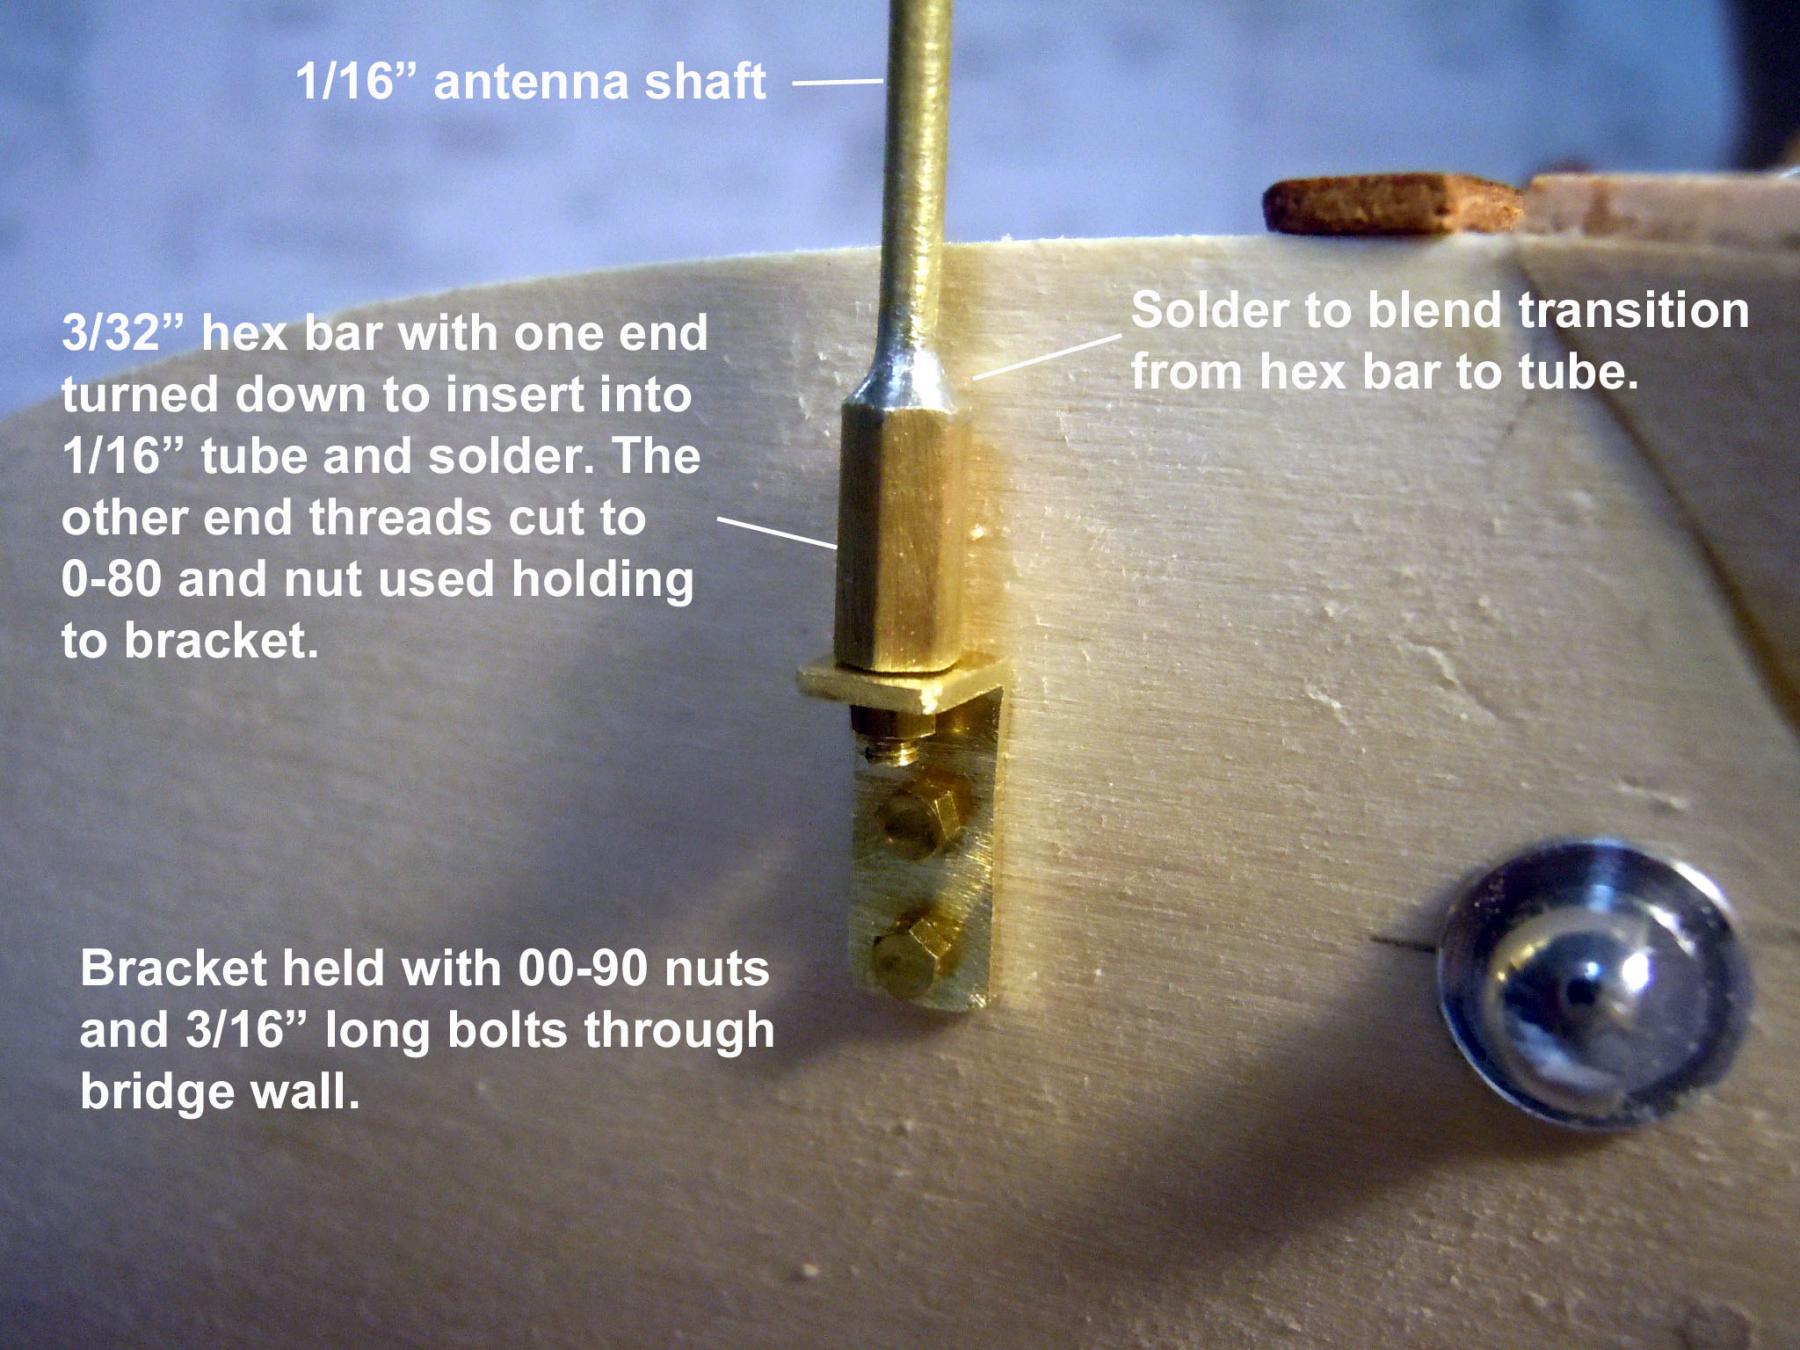
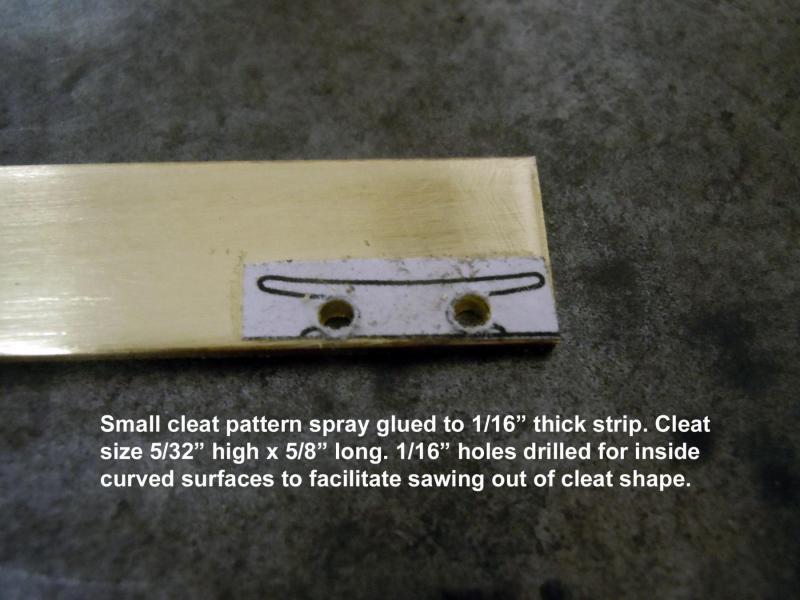
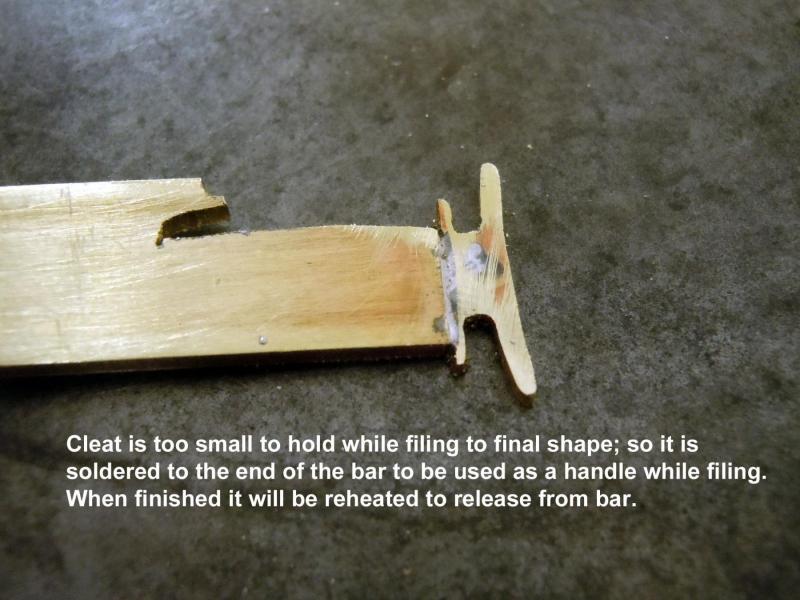
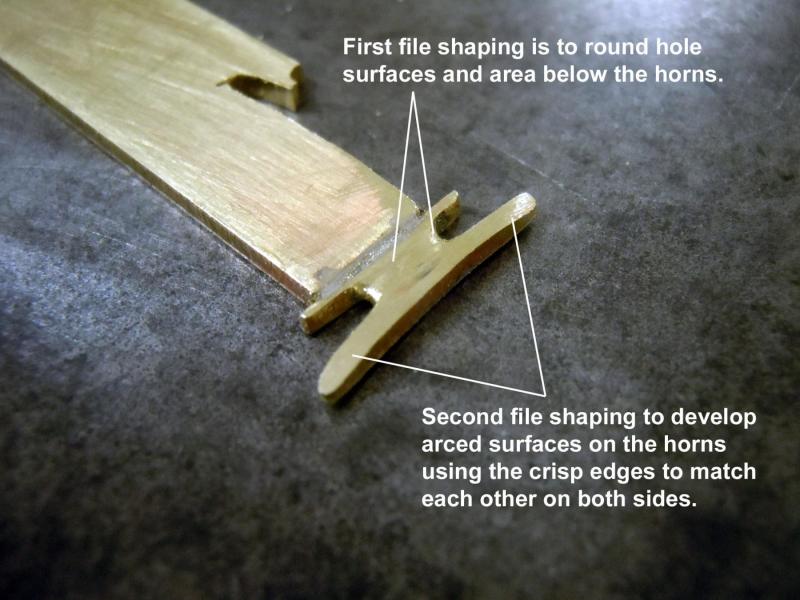
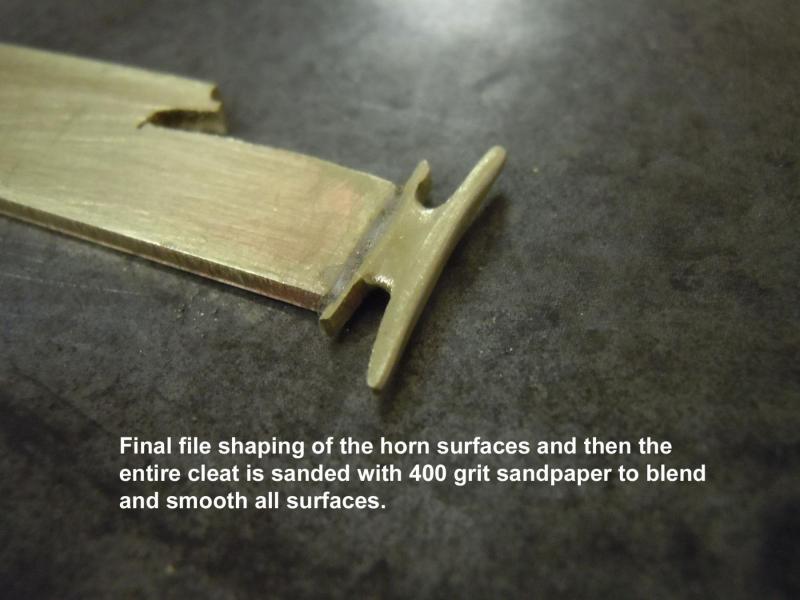
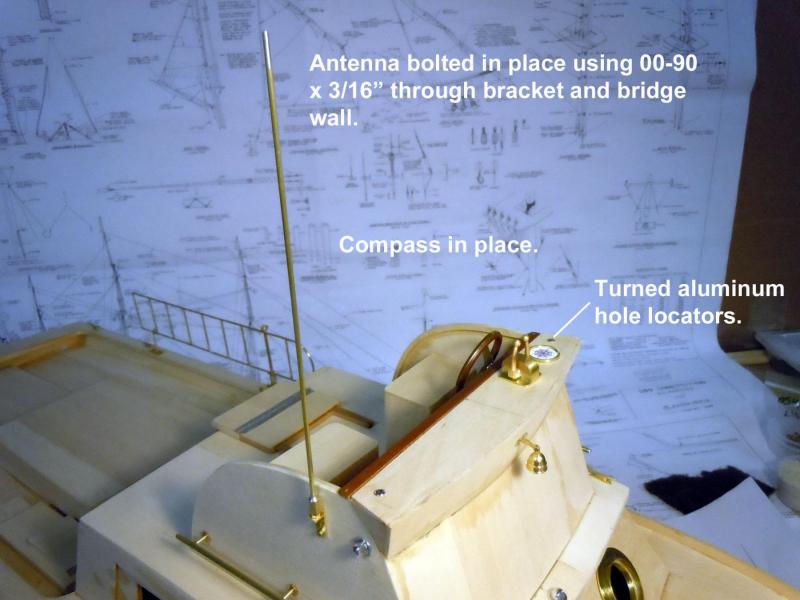
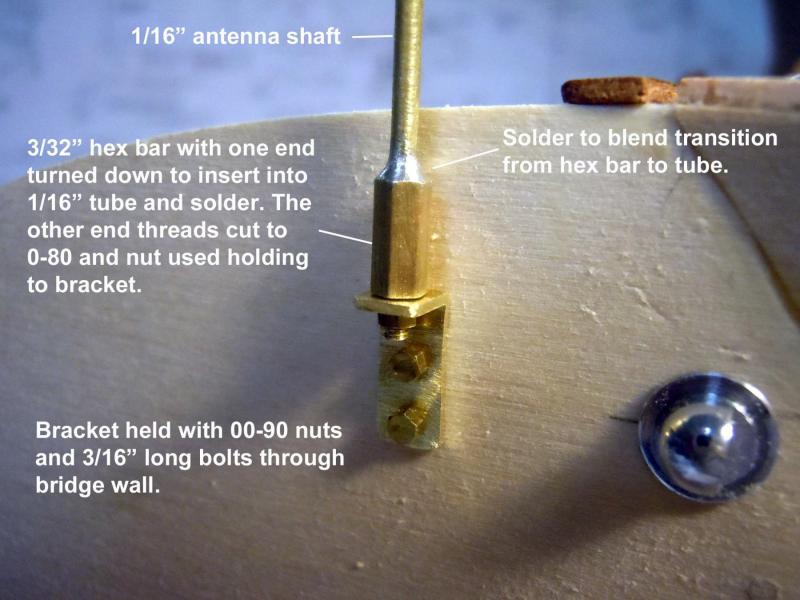
Greg, Patrick thanks again! Here is a sequence explaining the making of the cleats both large and small but the ones being shown are the small ones. Of particular interest is the soldering to a handle for holding these small parts while working on them. This is one big advantage of working with brass on small parts. Next I made the antenna located on the starboard side which was still on the boat when I photographed it. This is for John, here is the generic compass as since this is for display I decided not to make it with working gimbals which I have done in two of my WWI planes. I created an image and cleaned it up in Photoshop and reduced it to 1/2" size and printed it on photo paper which gives a cleaner image than plain paper. It was glued in place and then 5 minute epoxy was used to create the domed lense. Note that the closeup camera lense sees things the human eye at distance does not. It is actually much clearer than the picture shows. Next to the two fire extinguishers.


- 162 replies
-
- 12
-
-
- dirty dozen
- fishing
- (and 2 more)
-
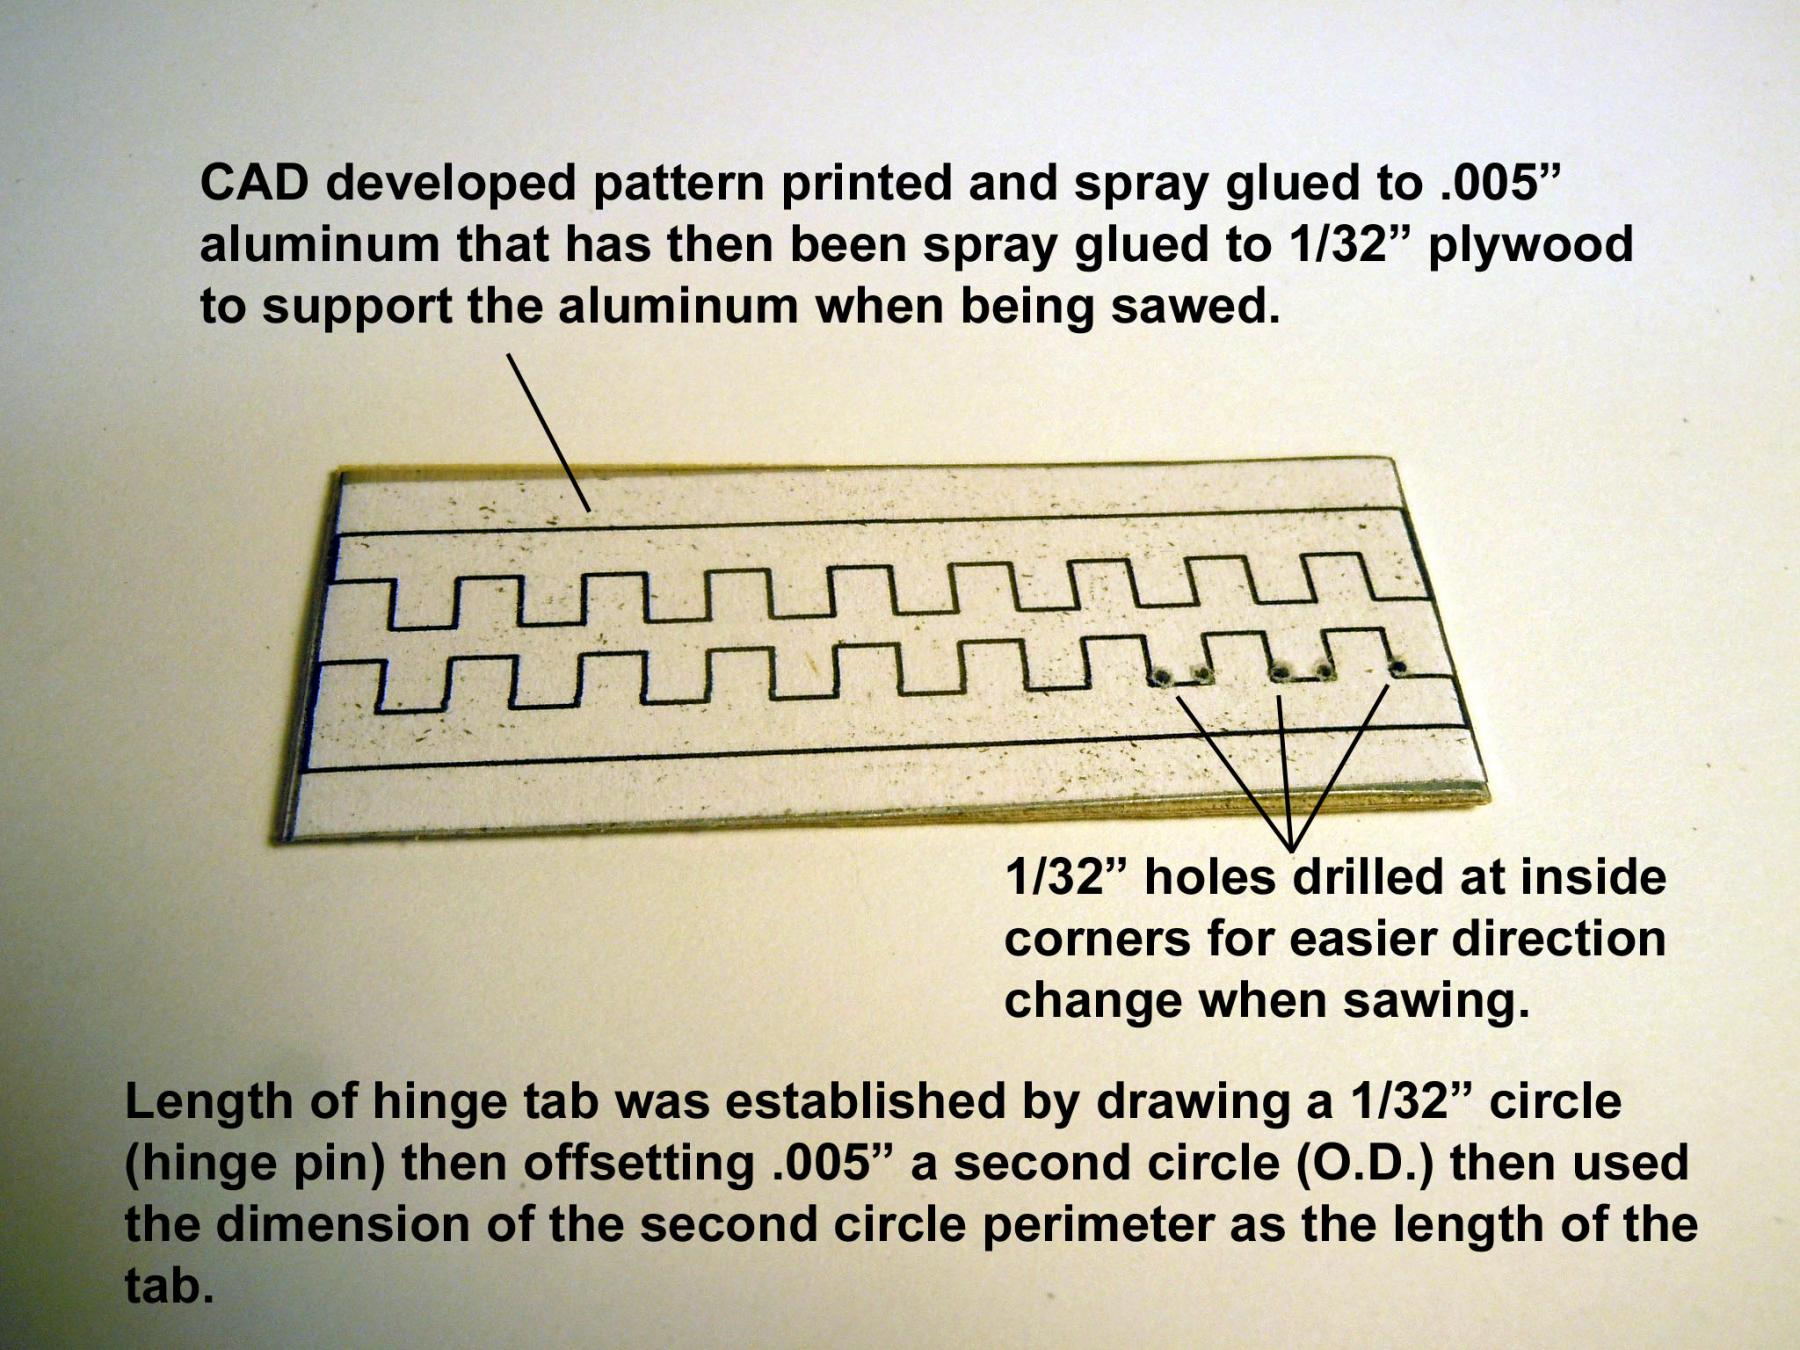
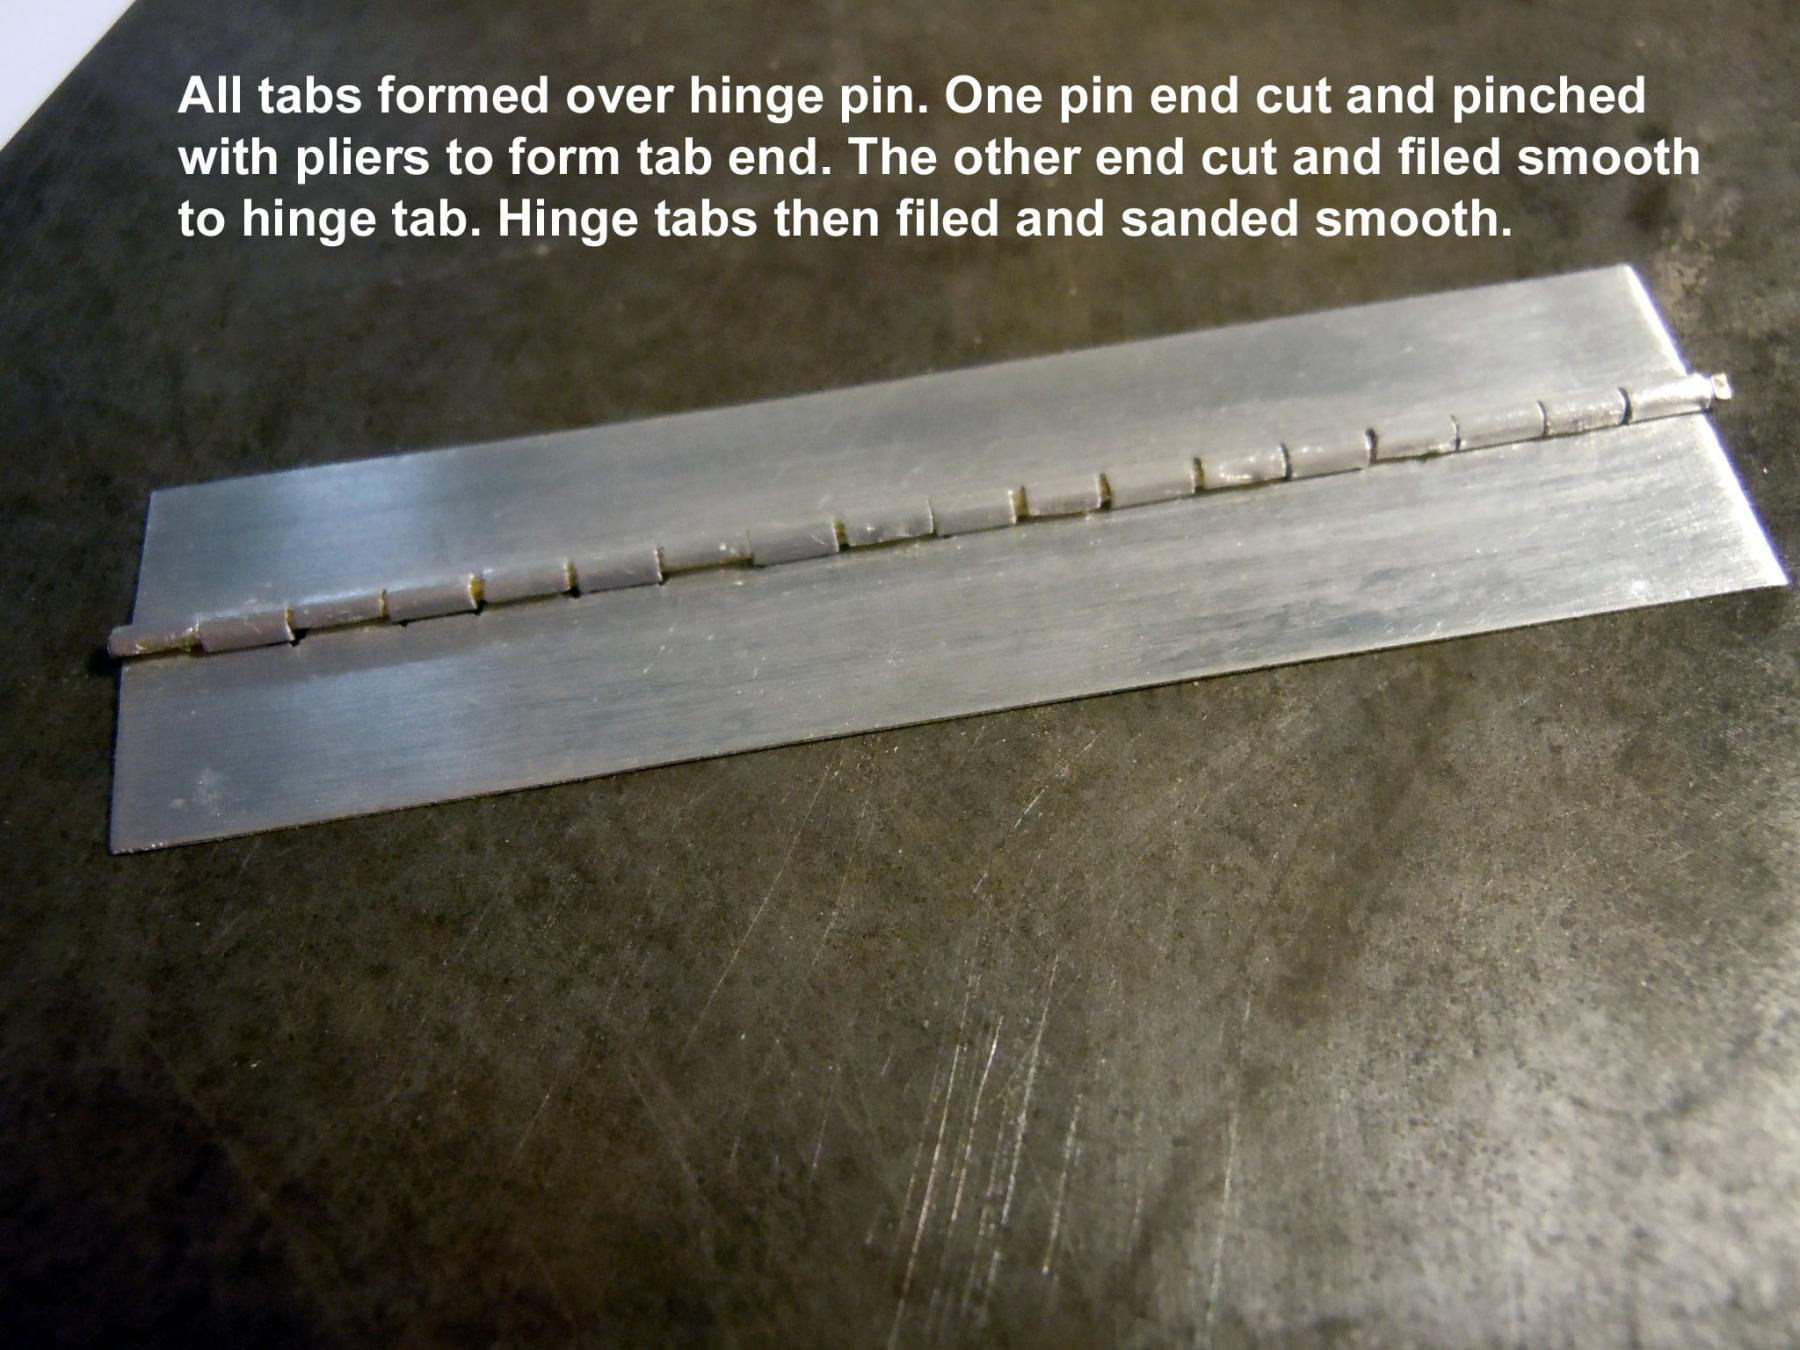
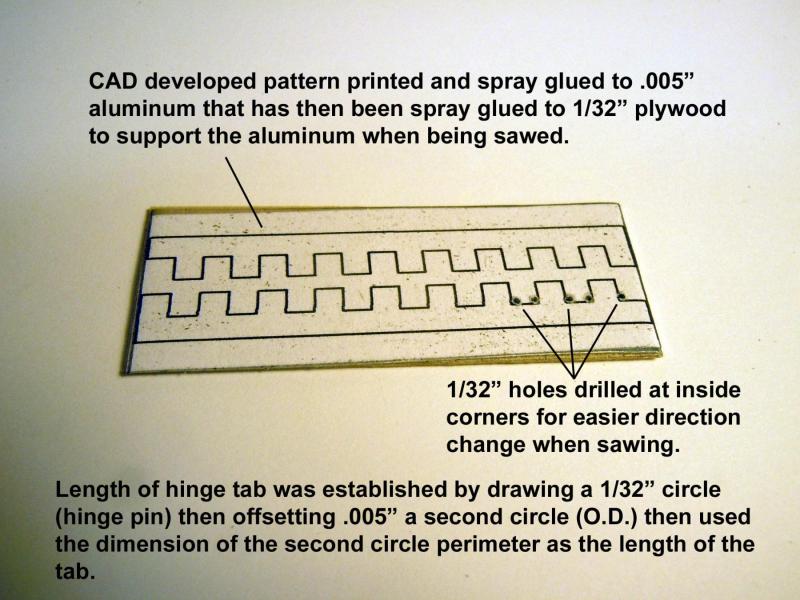
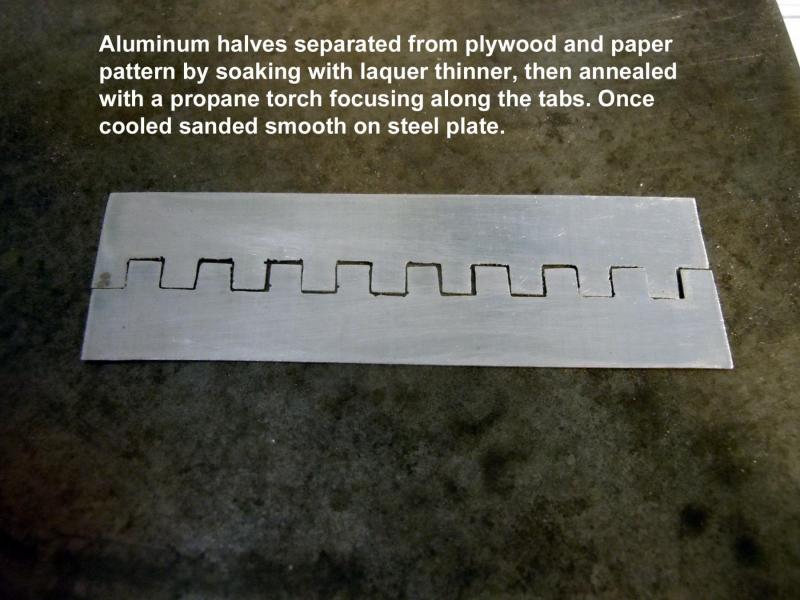
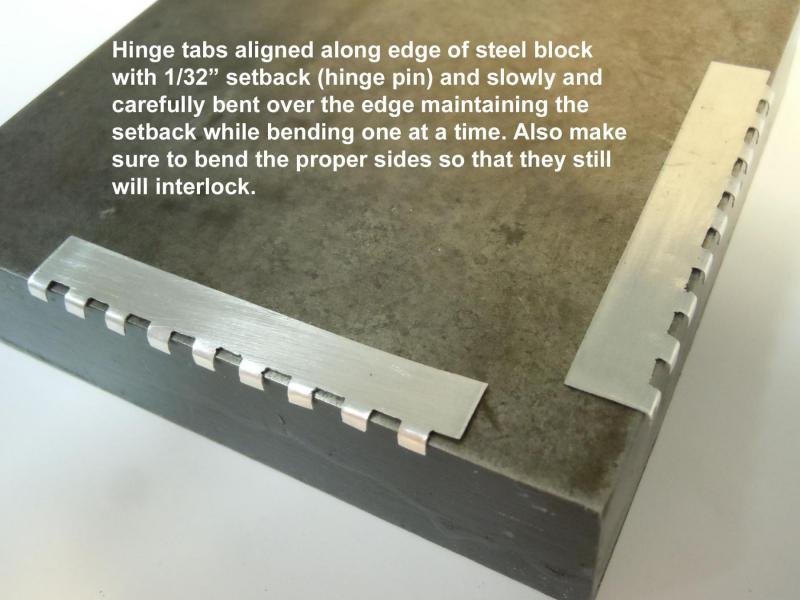
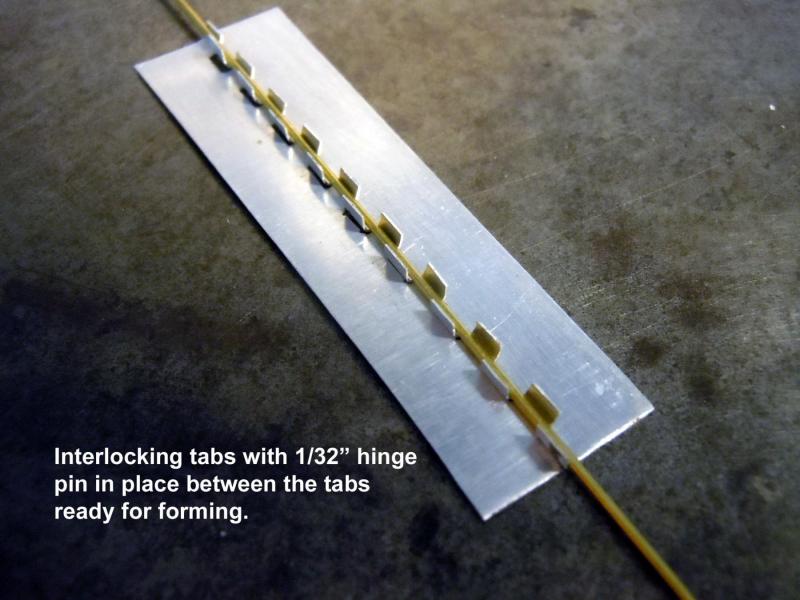
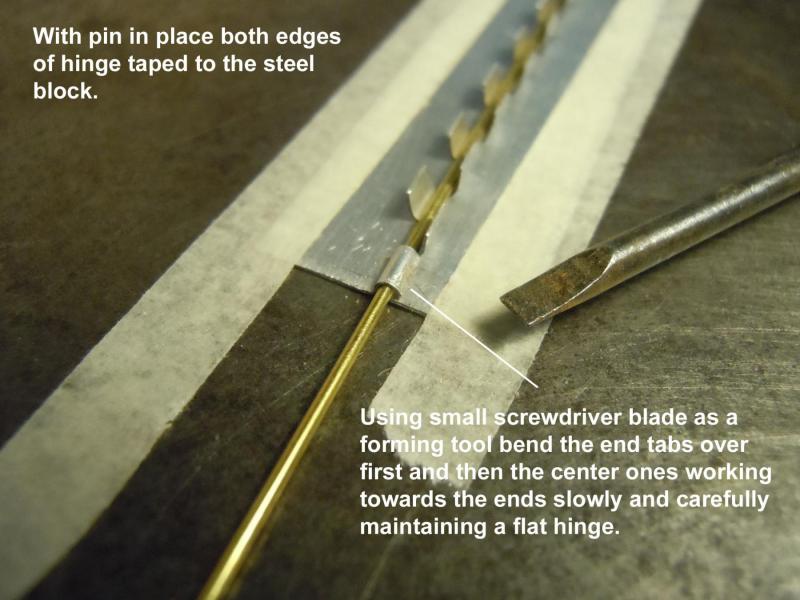
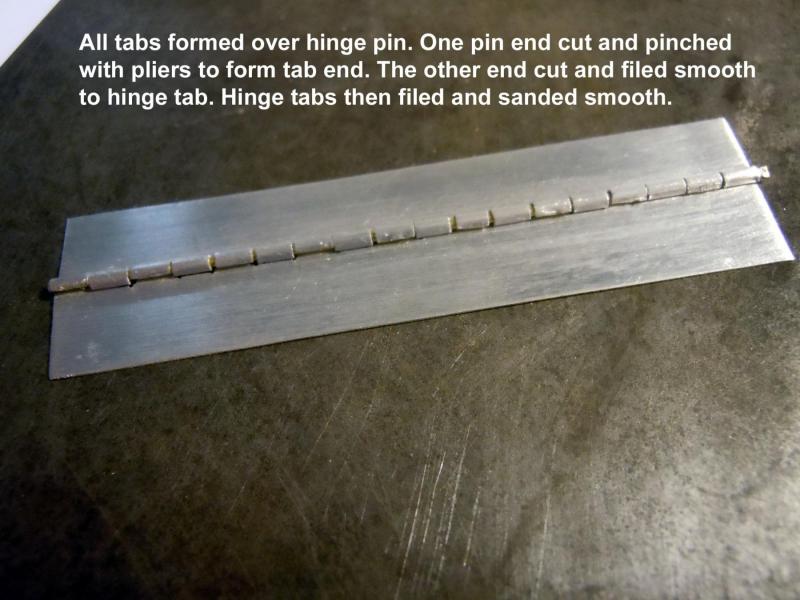
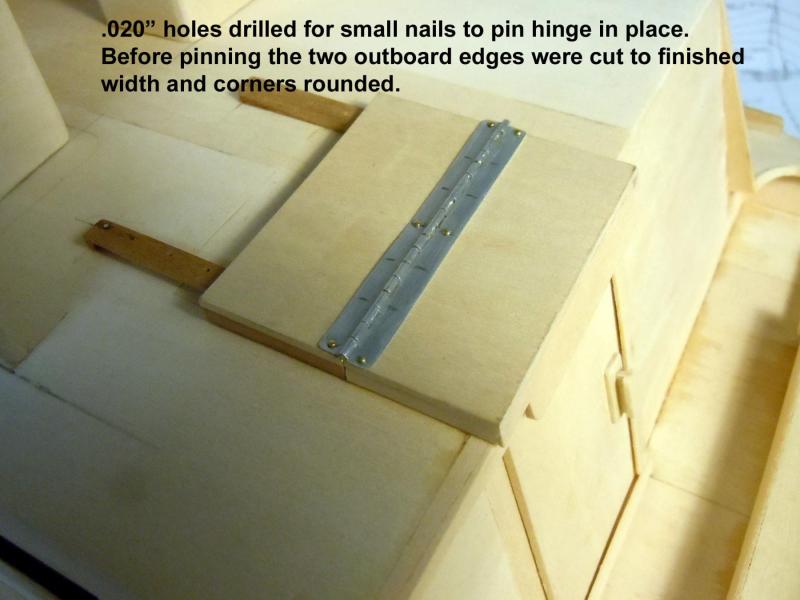
John, yes I will probably make a generic compass sine I have no reference for the original other than the 8 inch hole in the top surface of the bridge. I the meantime I could not find a source for a piano hinge as small as I needed I decided to make my own. Again the CAD drawing was used to develop the hinge tab length and size and one side drawn then copied and mirror imaged then rotated. I used .005" aluminum to replicate the stainless steel look of the original. Here is the process in photos of making the hatch hinge. Now to make the large and small cleats while I keep checking for compass images that may work.


- 162 replies
-
- 15
-
-
- dirty dozen
- fishing
- (and 2 more)
-
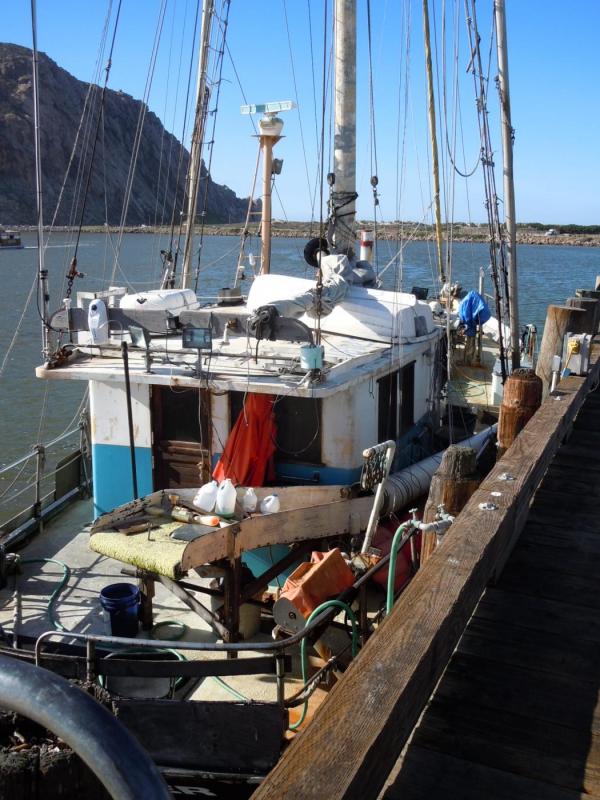
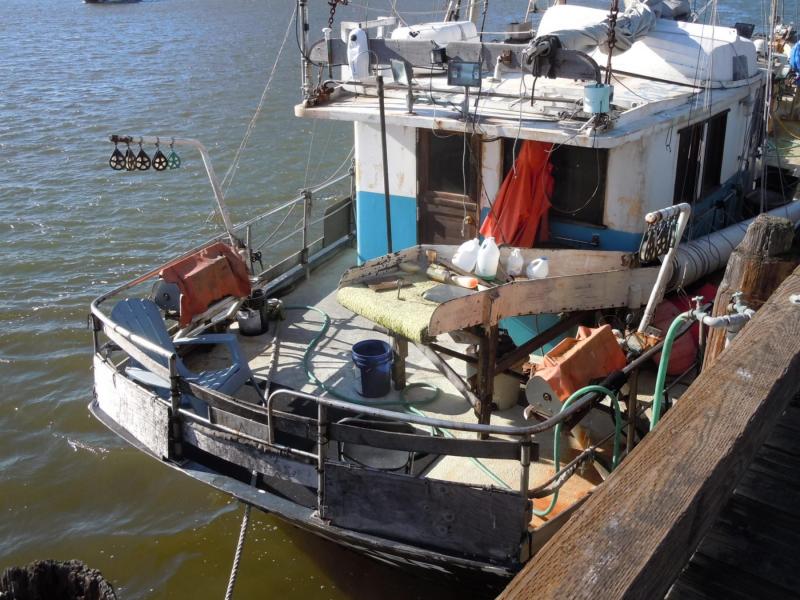
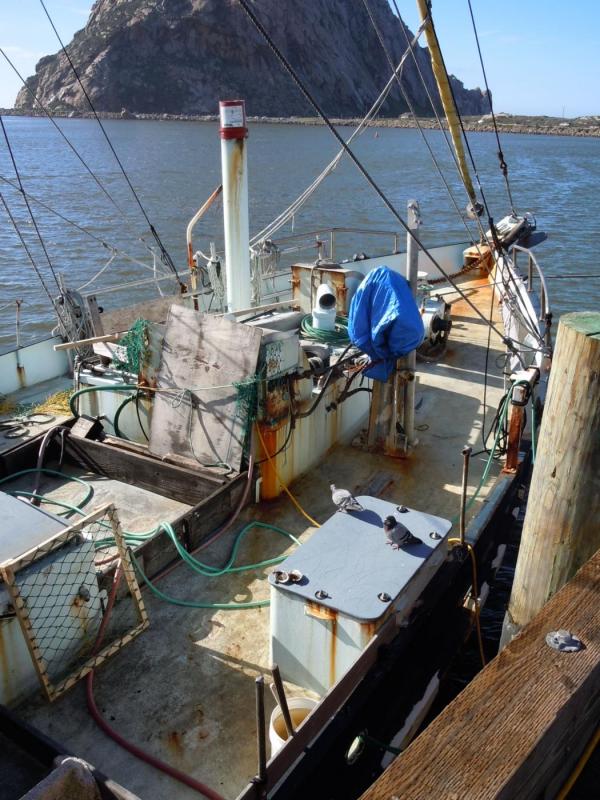
Bob, I think you may be correct at 60 feet, next time I am down there I will pace it off for a better guesstimate. Look the pictures over and if you need some detail shots let me know and I can take them as well.
- 162 replies
-
- 4
-
-
- dirty dozen
- fishing
- (and 2 more)
-
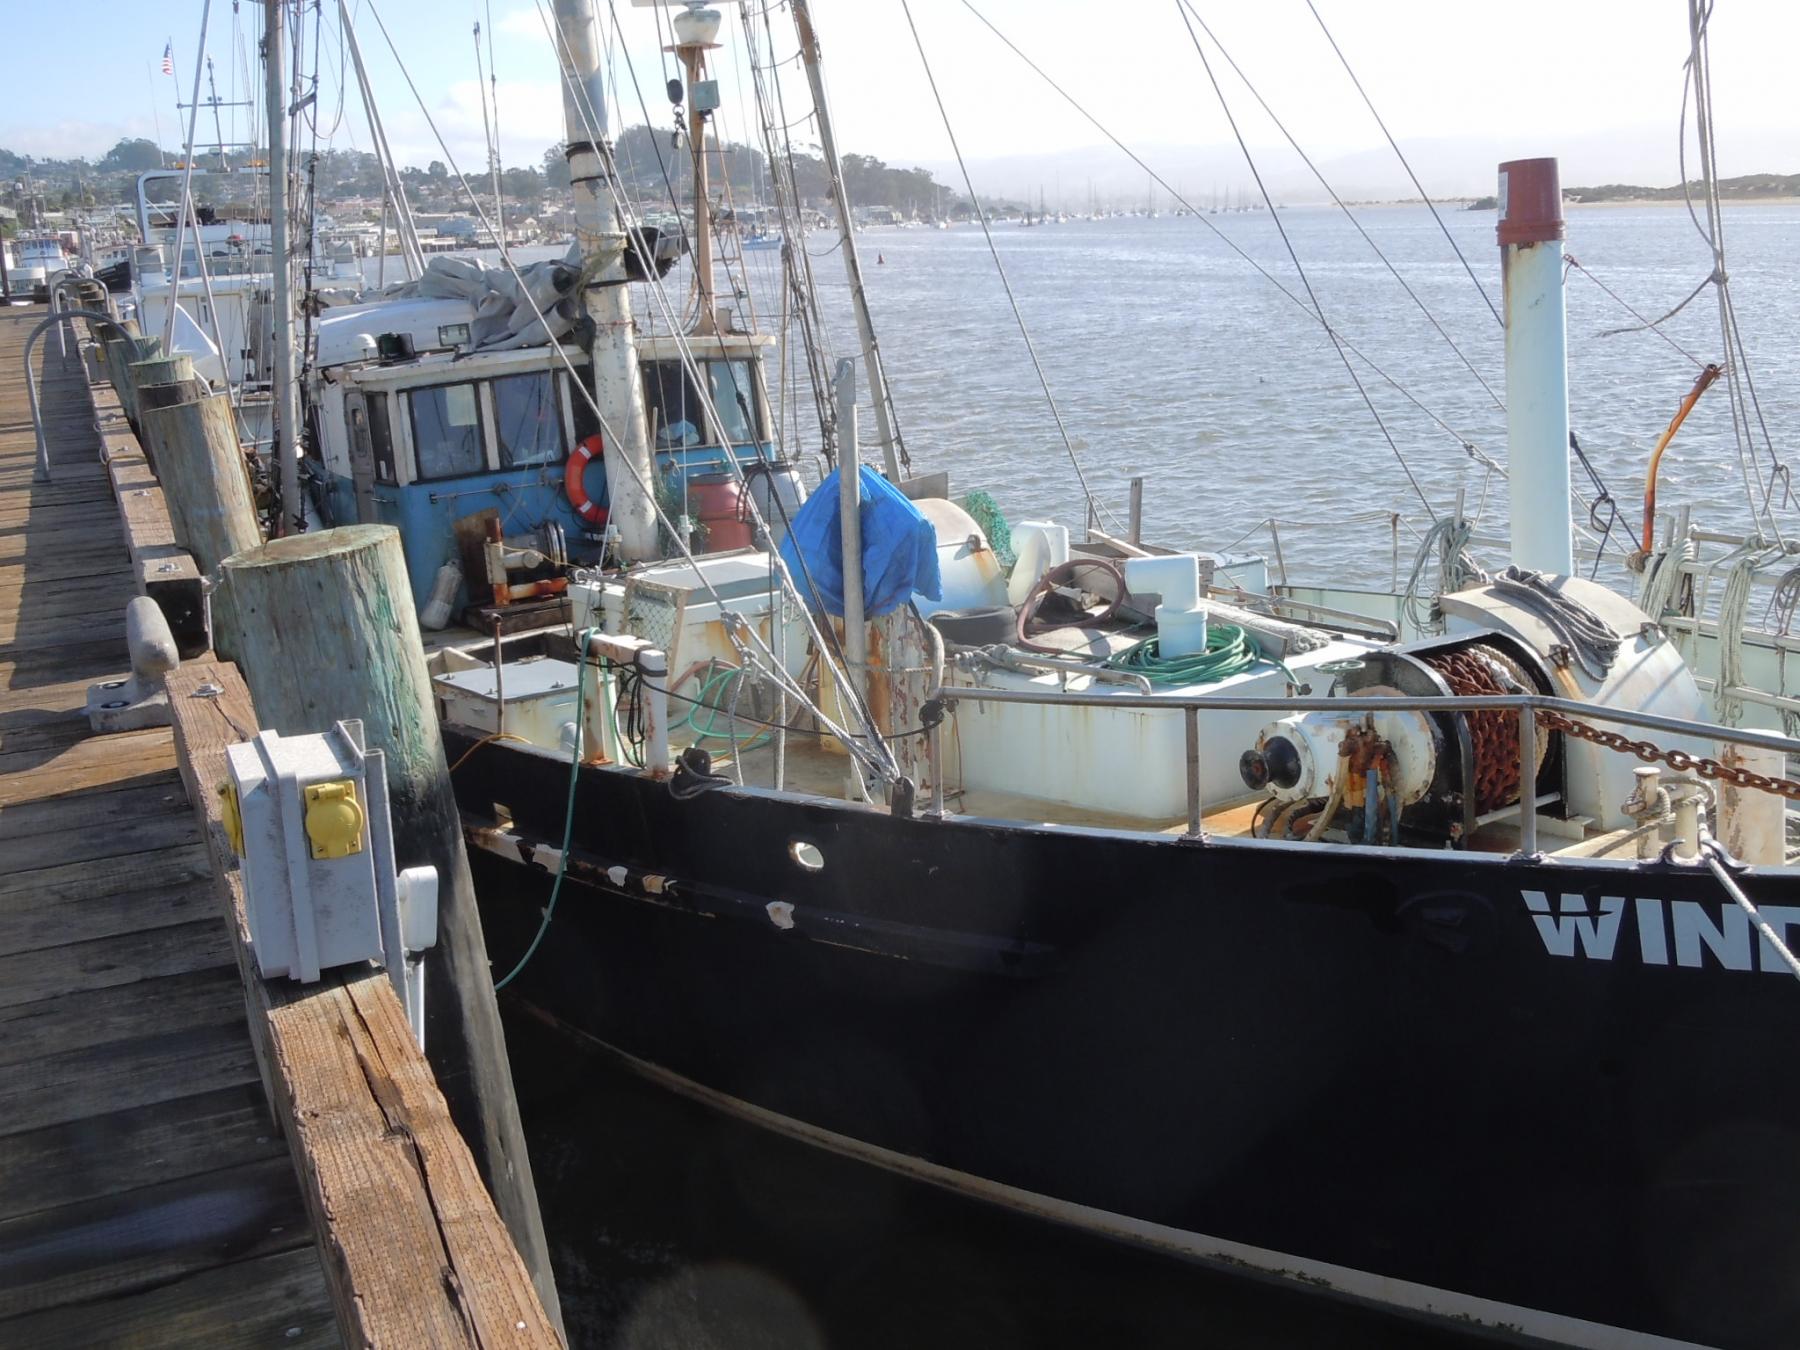
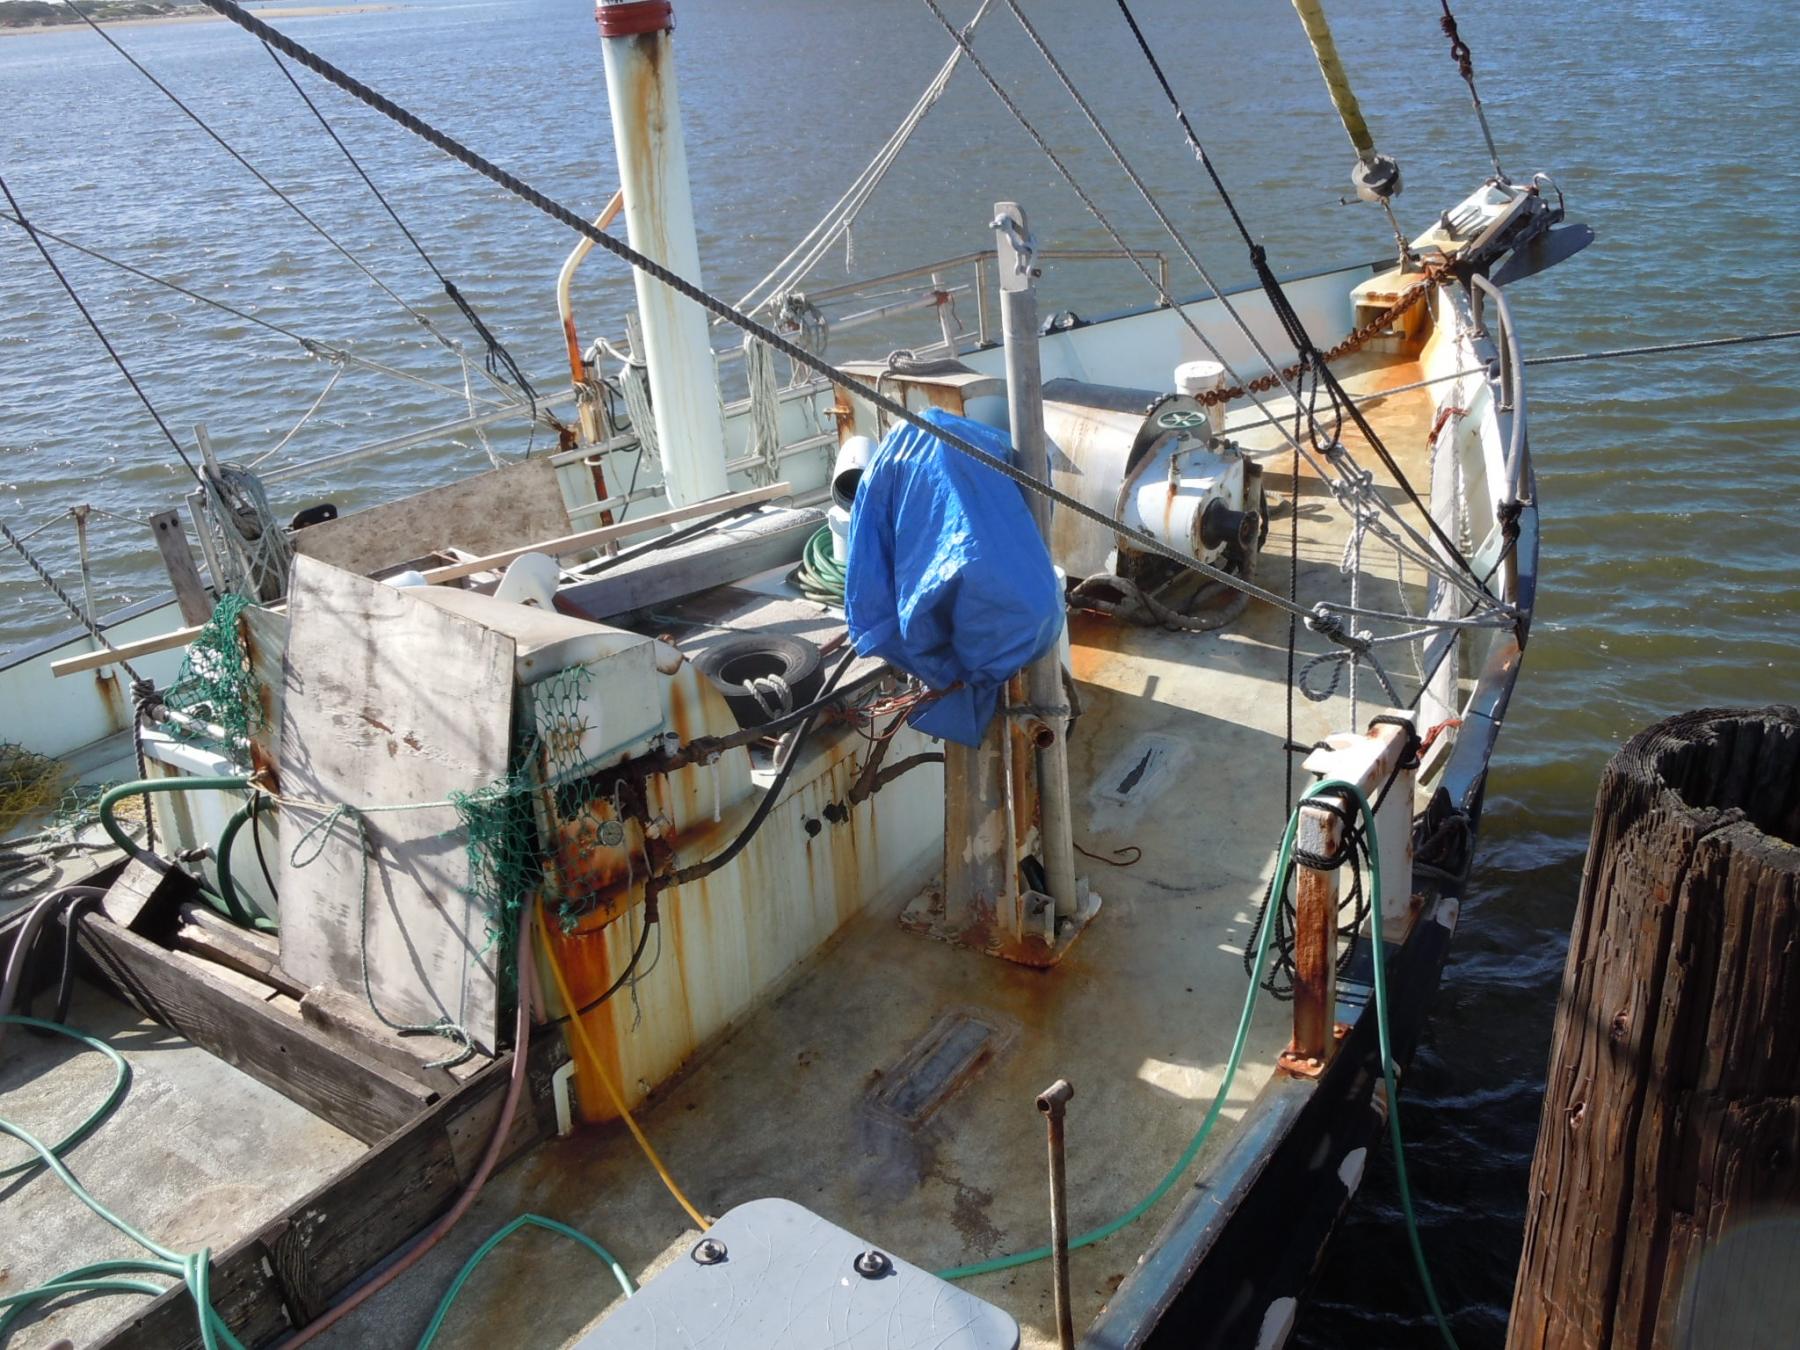
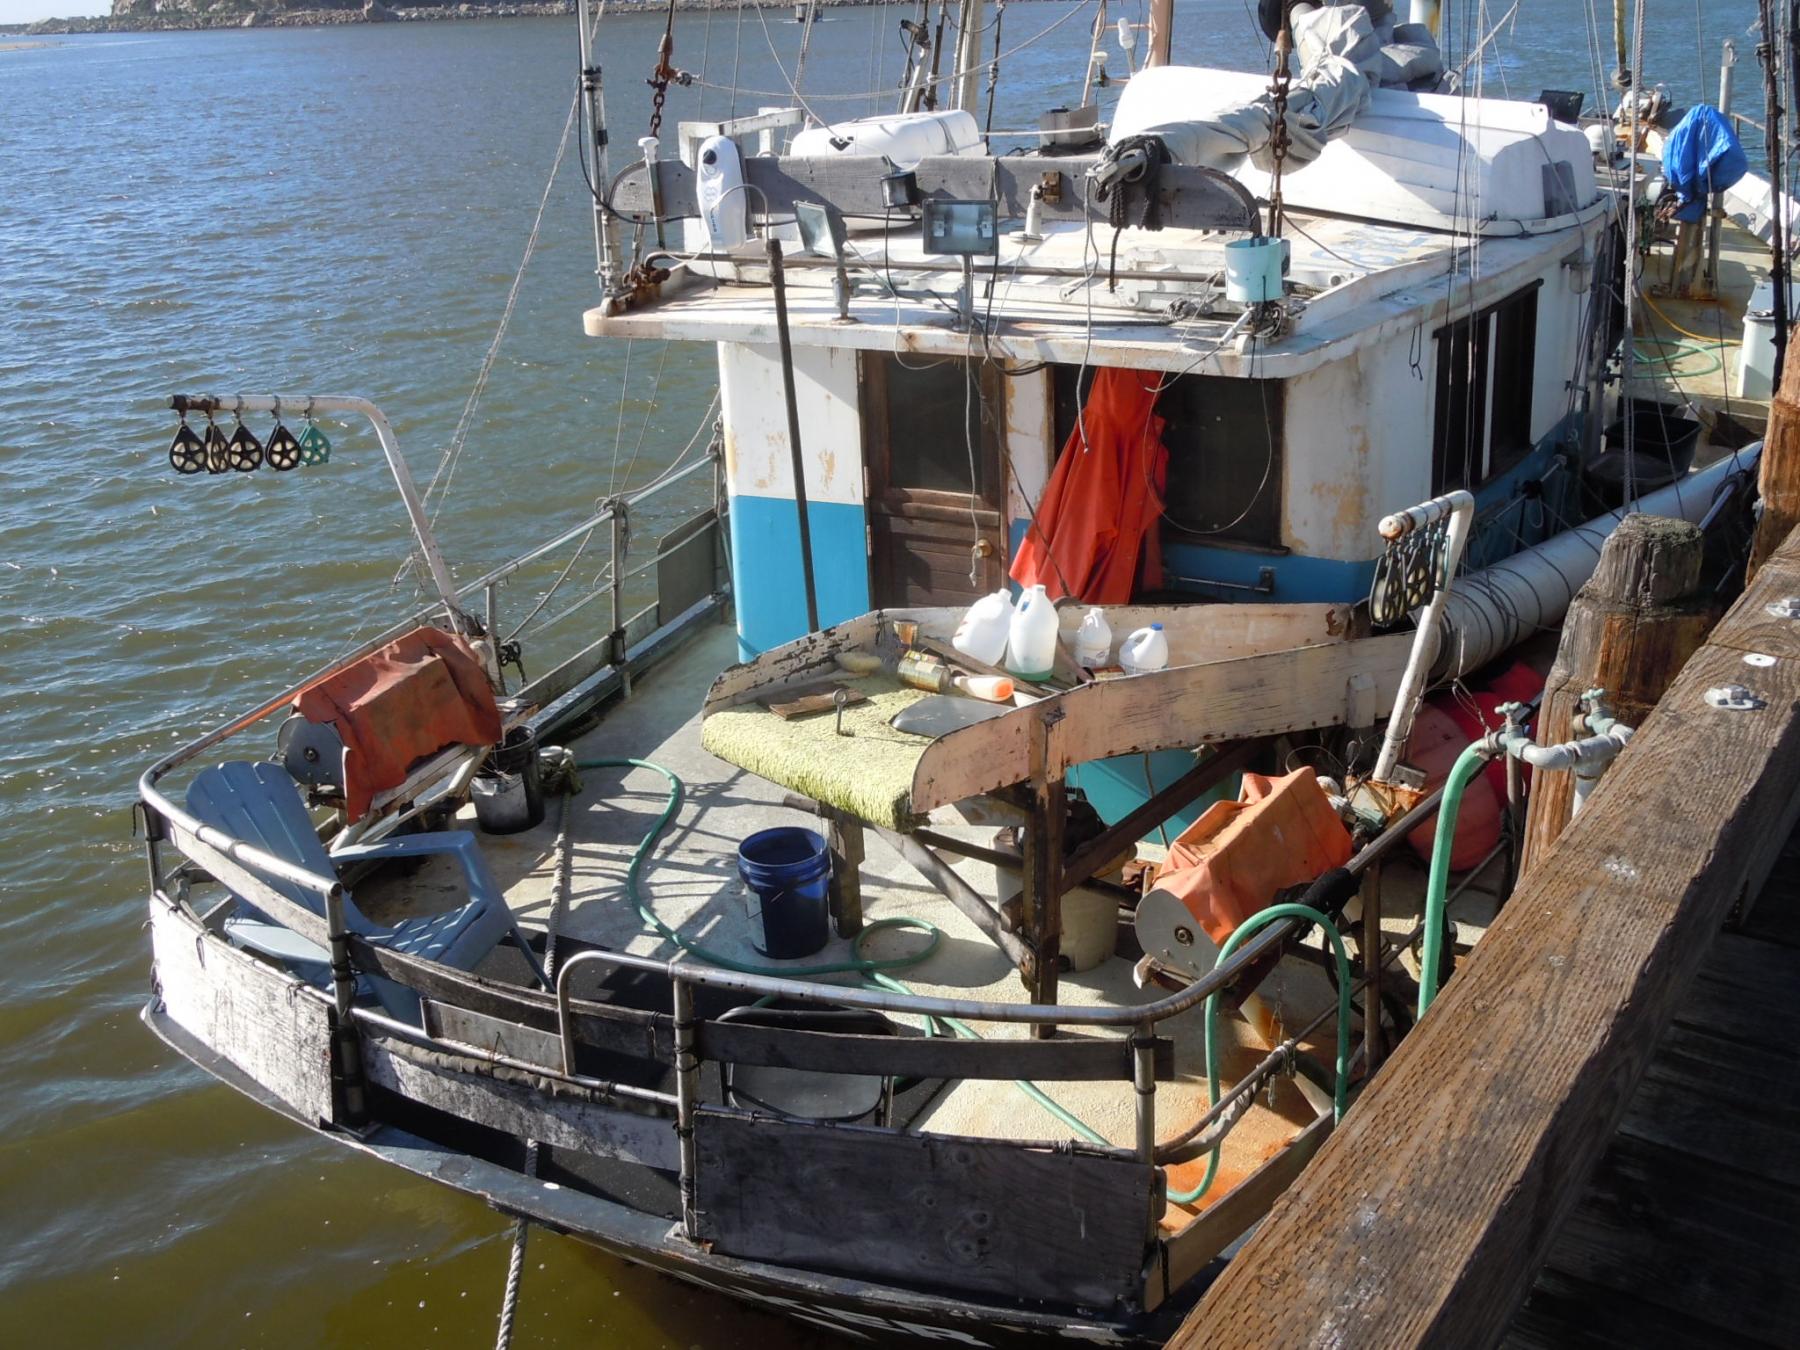
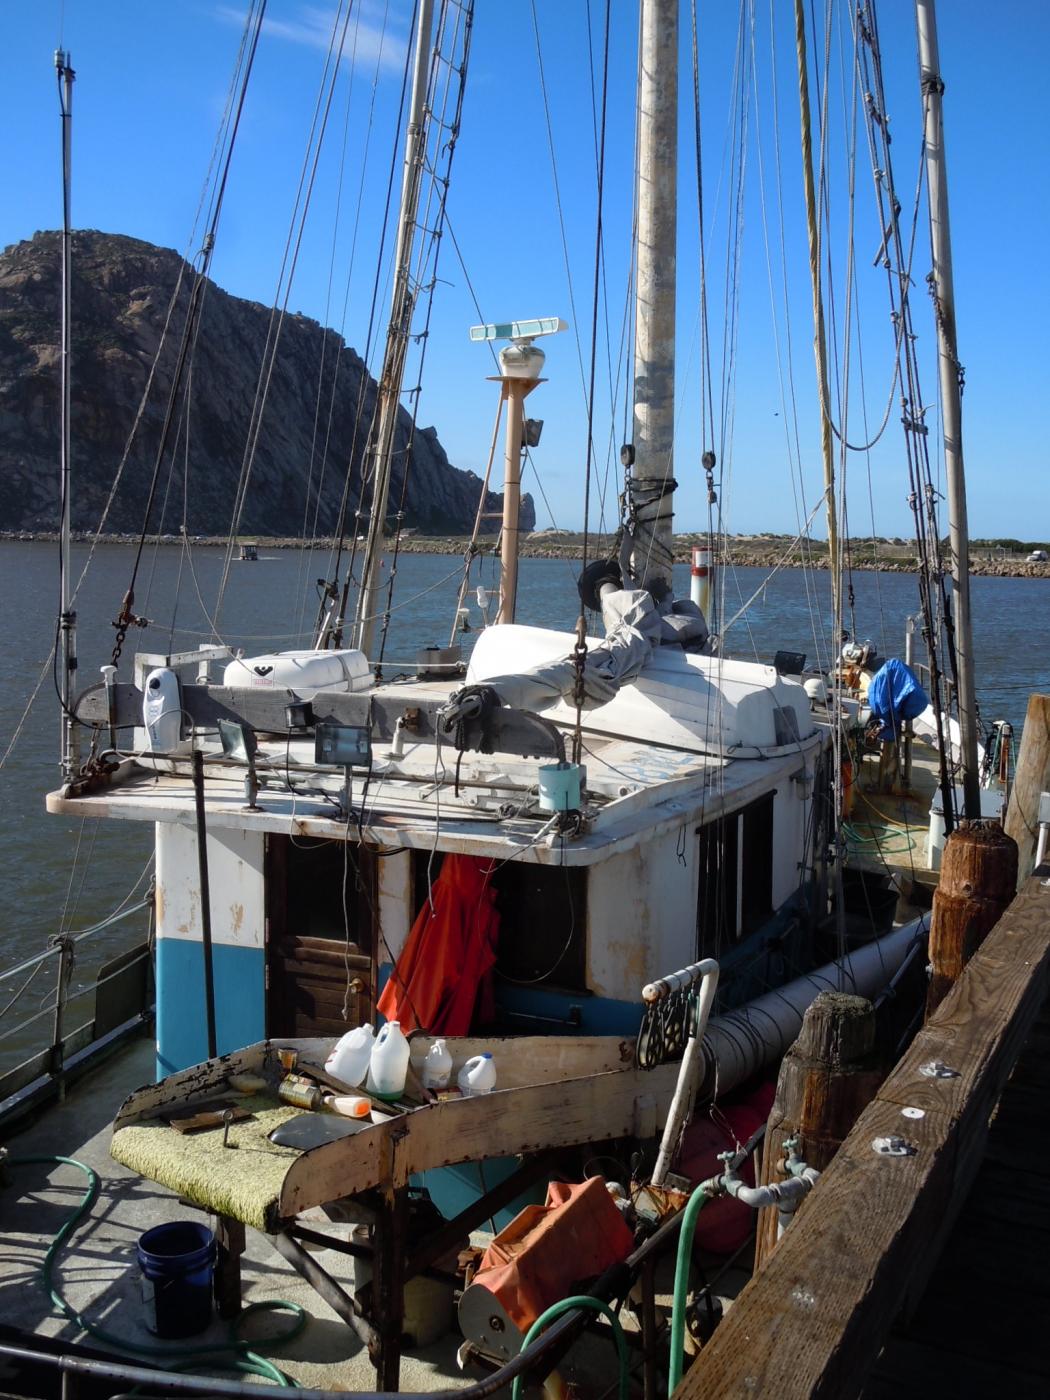
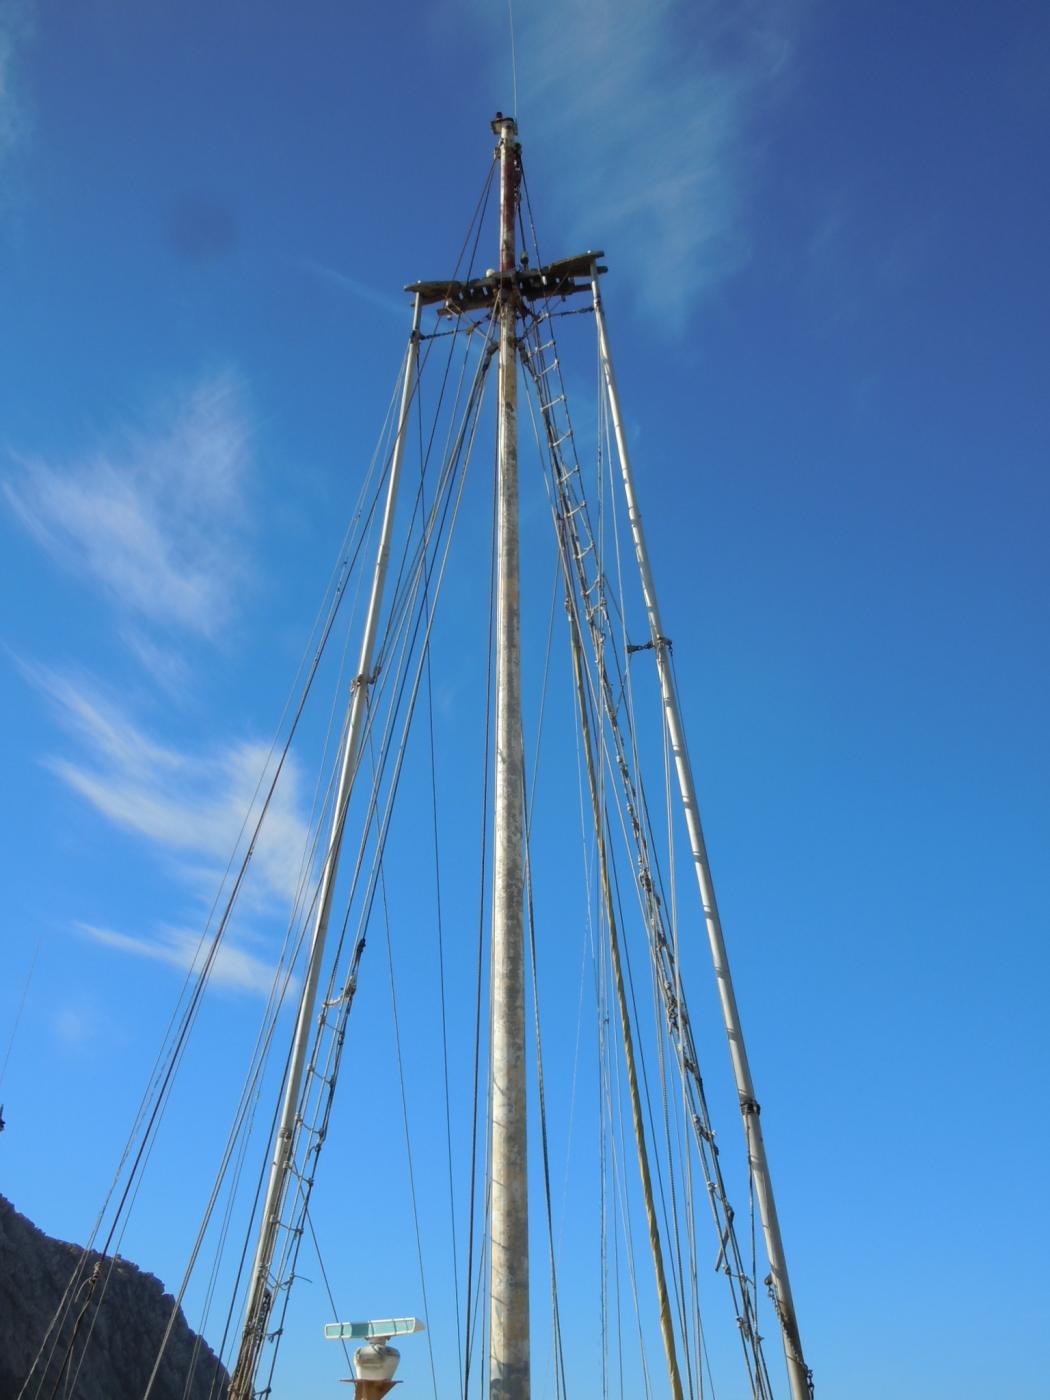
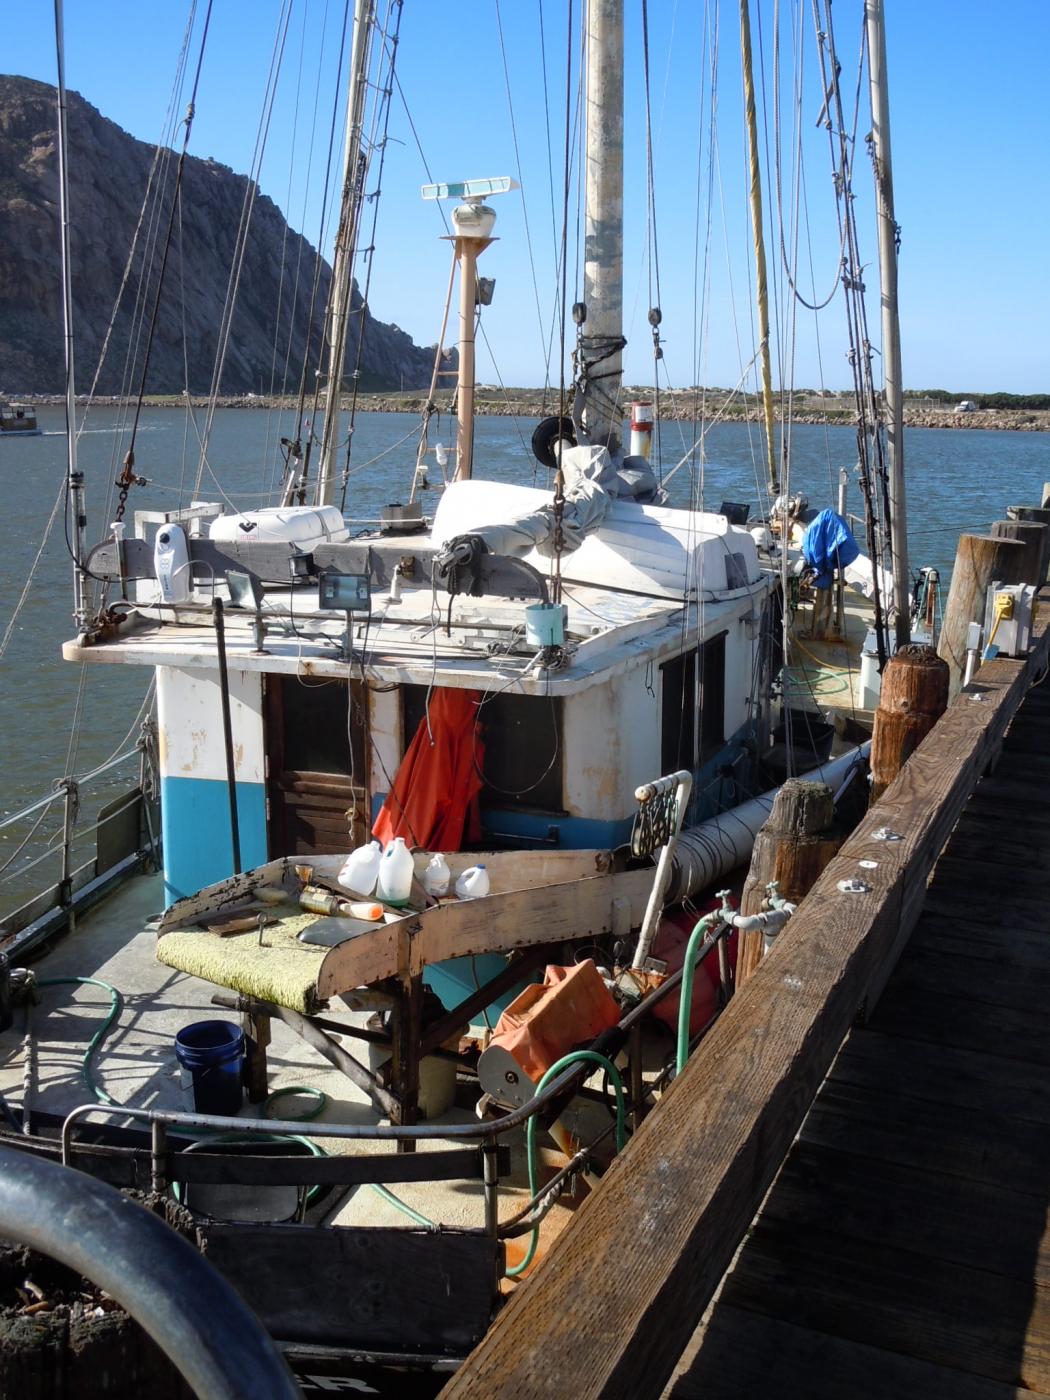
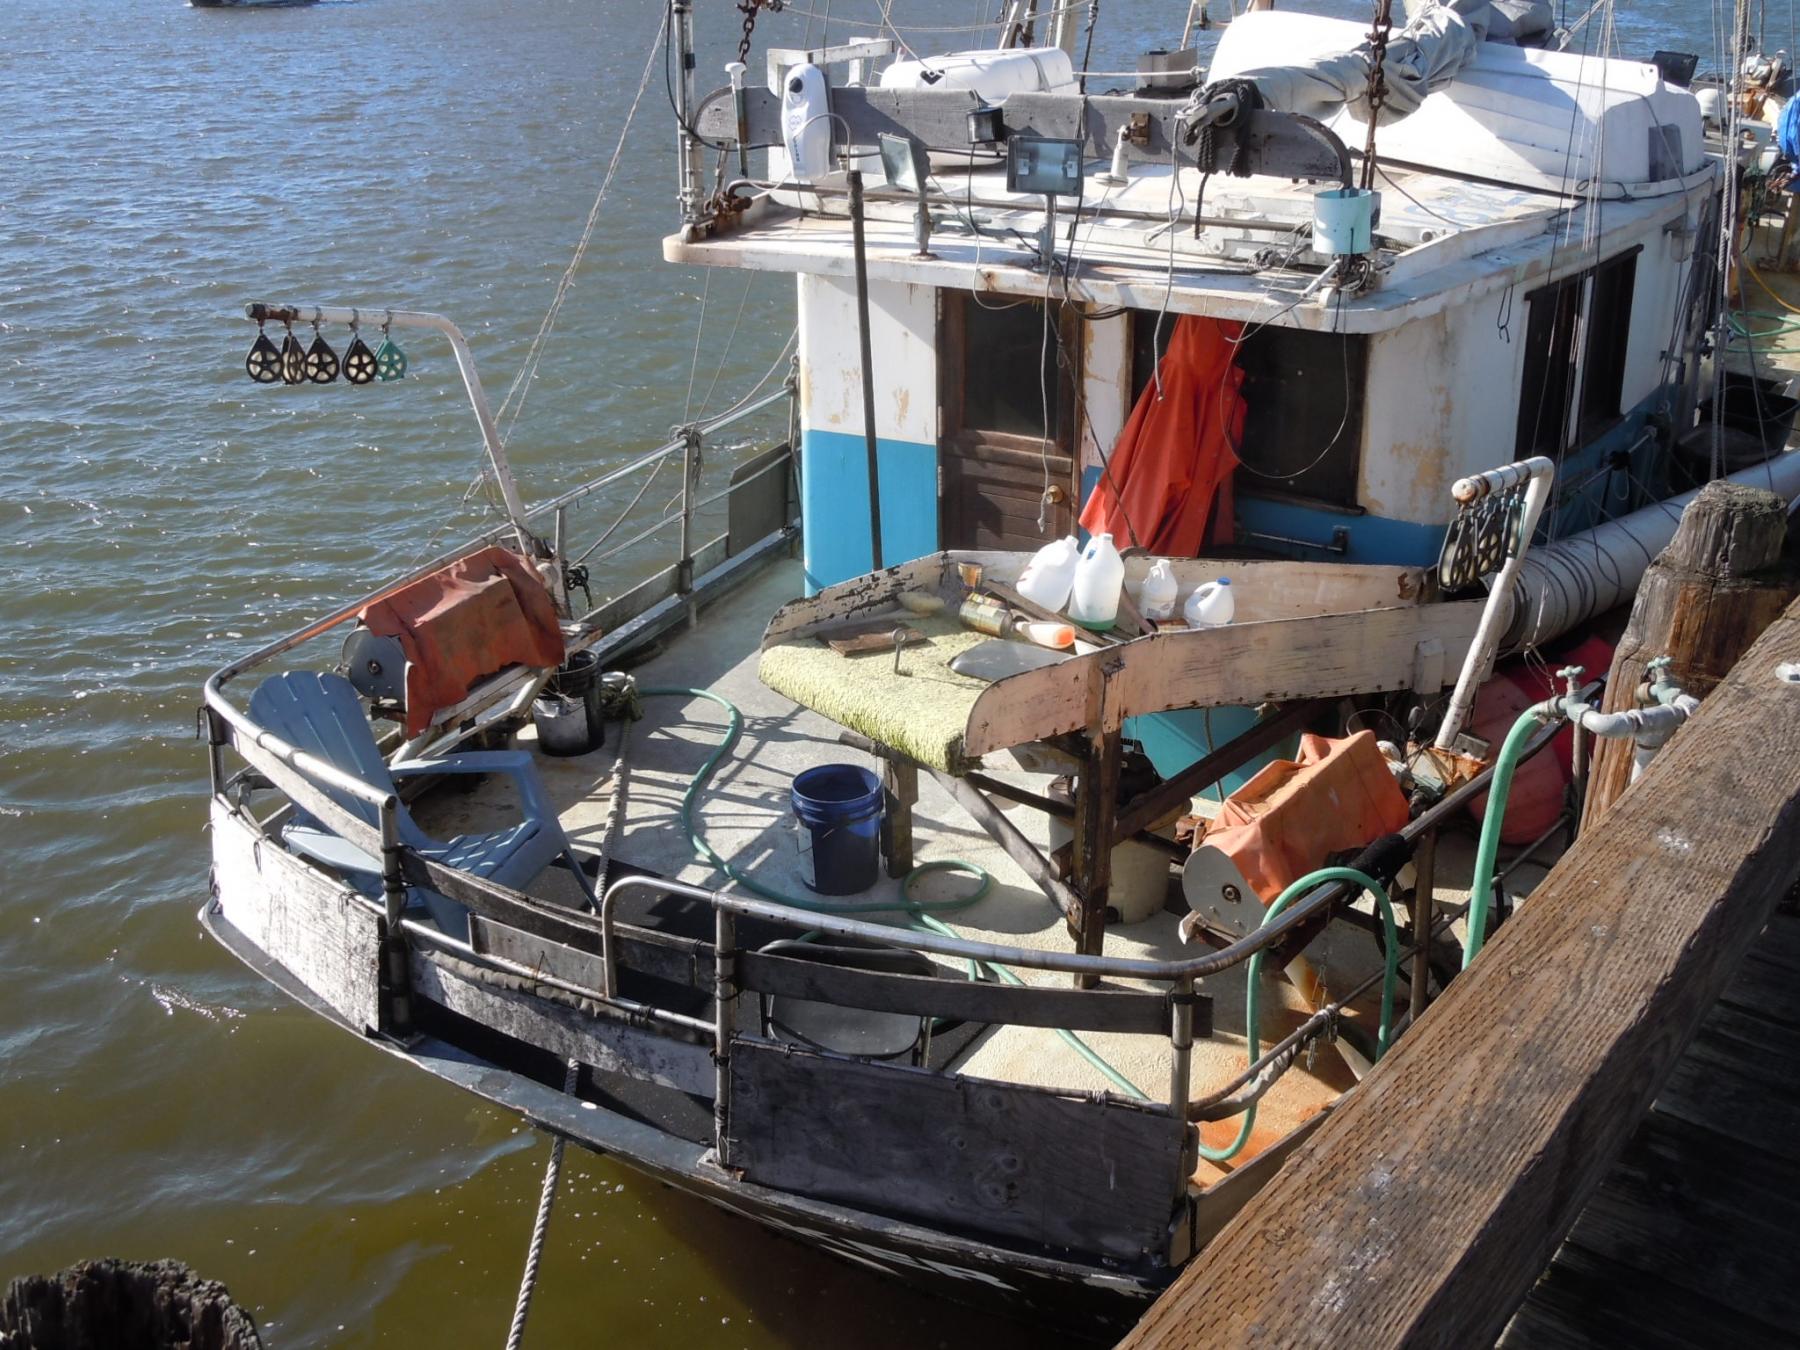
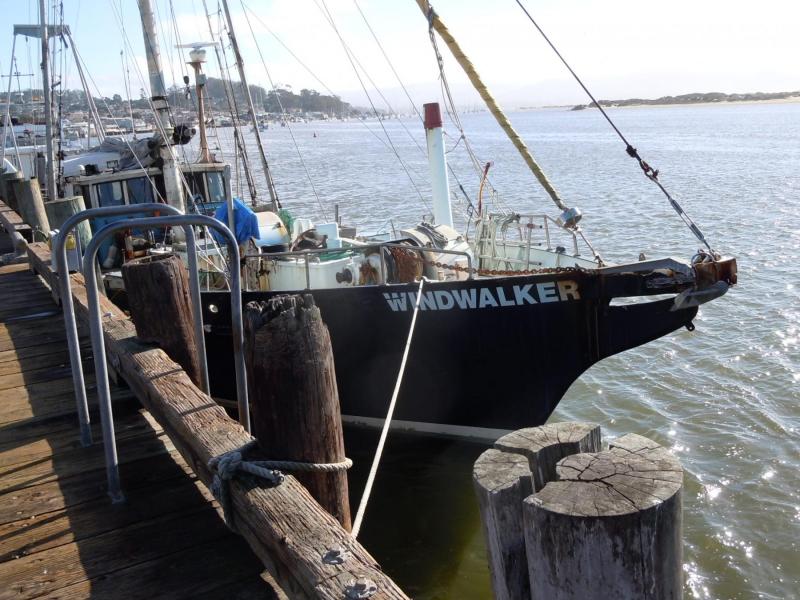
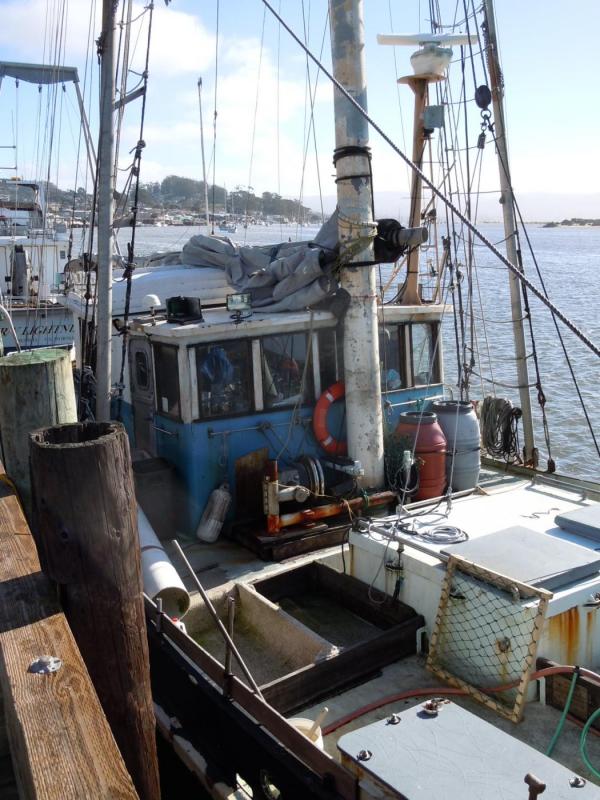
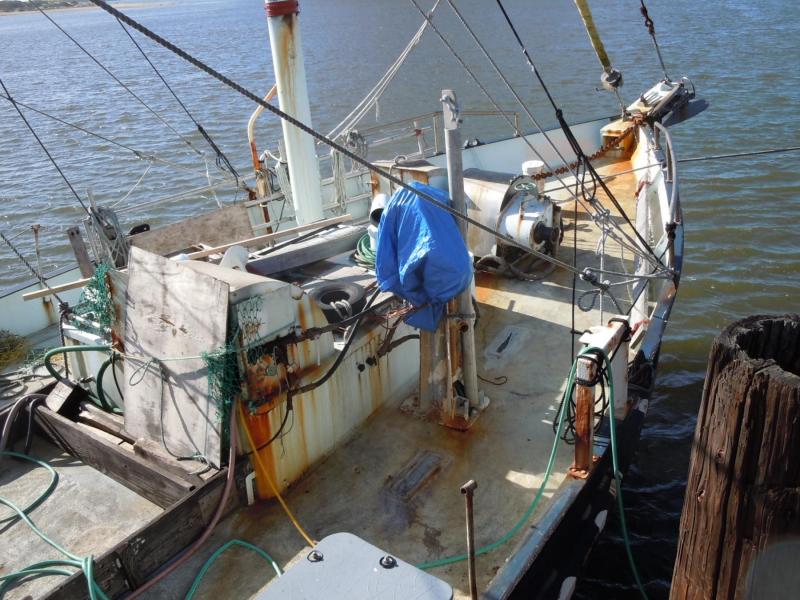
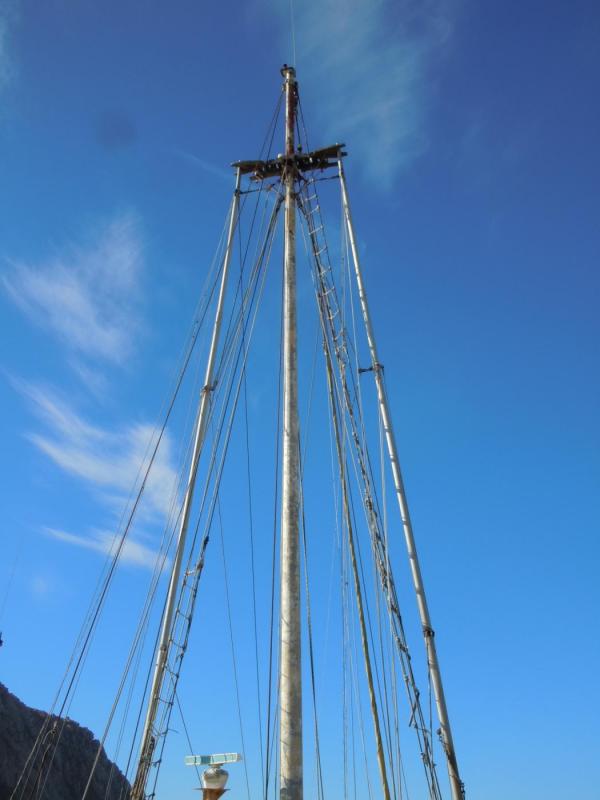
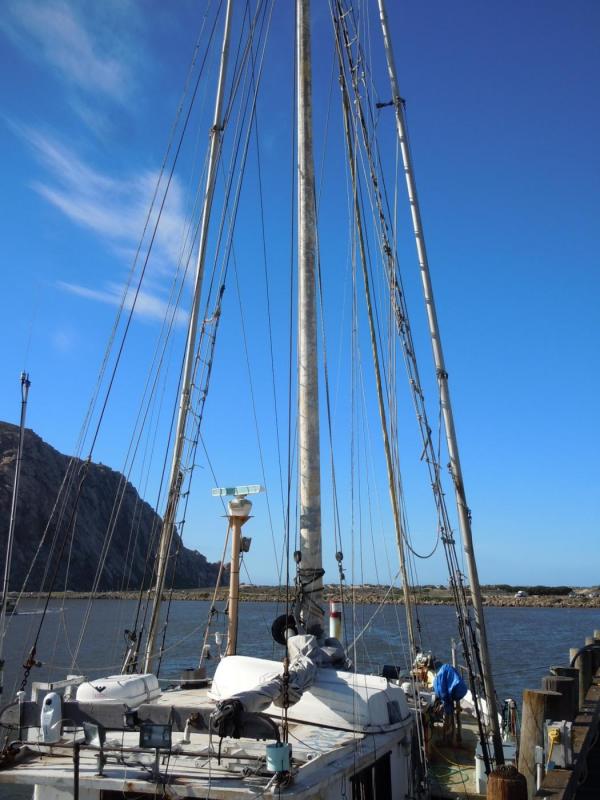
Capt'n Bob, These are for you. Look what I found today at the north pier. I hope these will help and if you need more detail pictures let me know.


- 162 replies
-
- 9
-
-
- dirty dozen
- fishing
- (and 2 more)
-
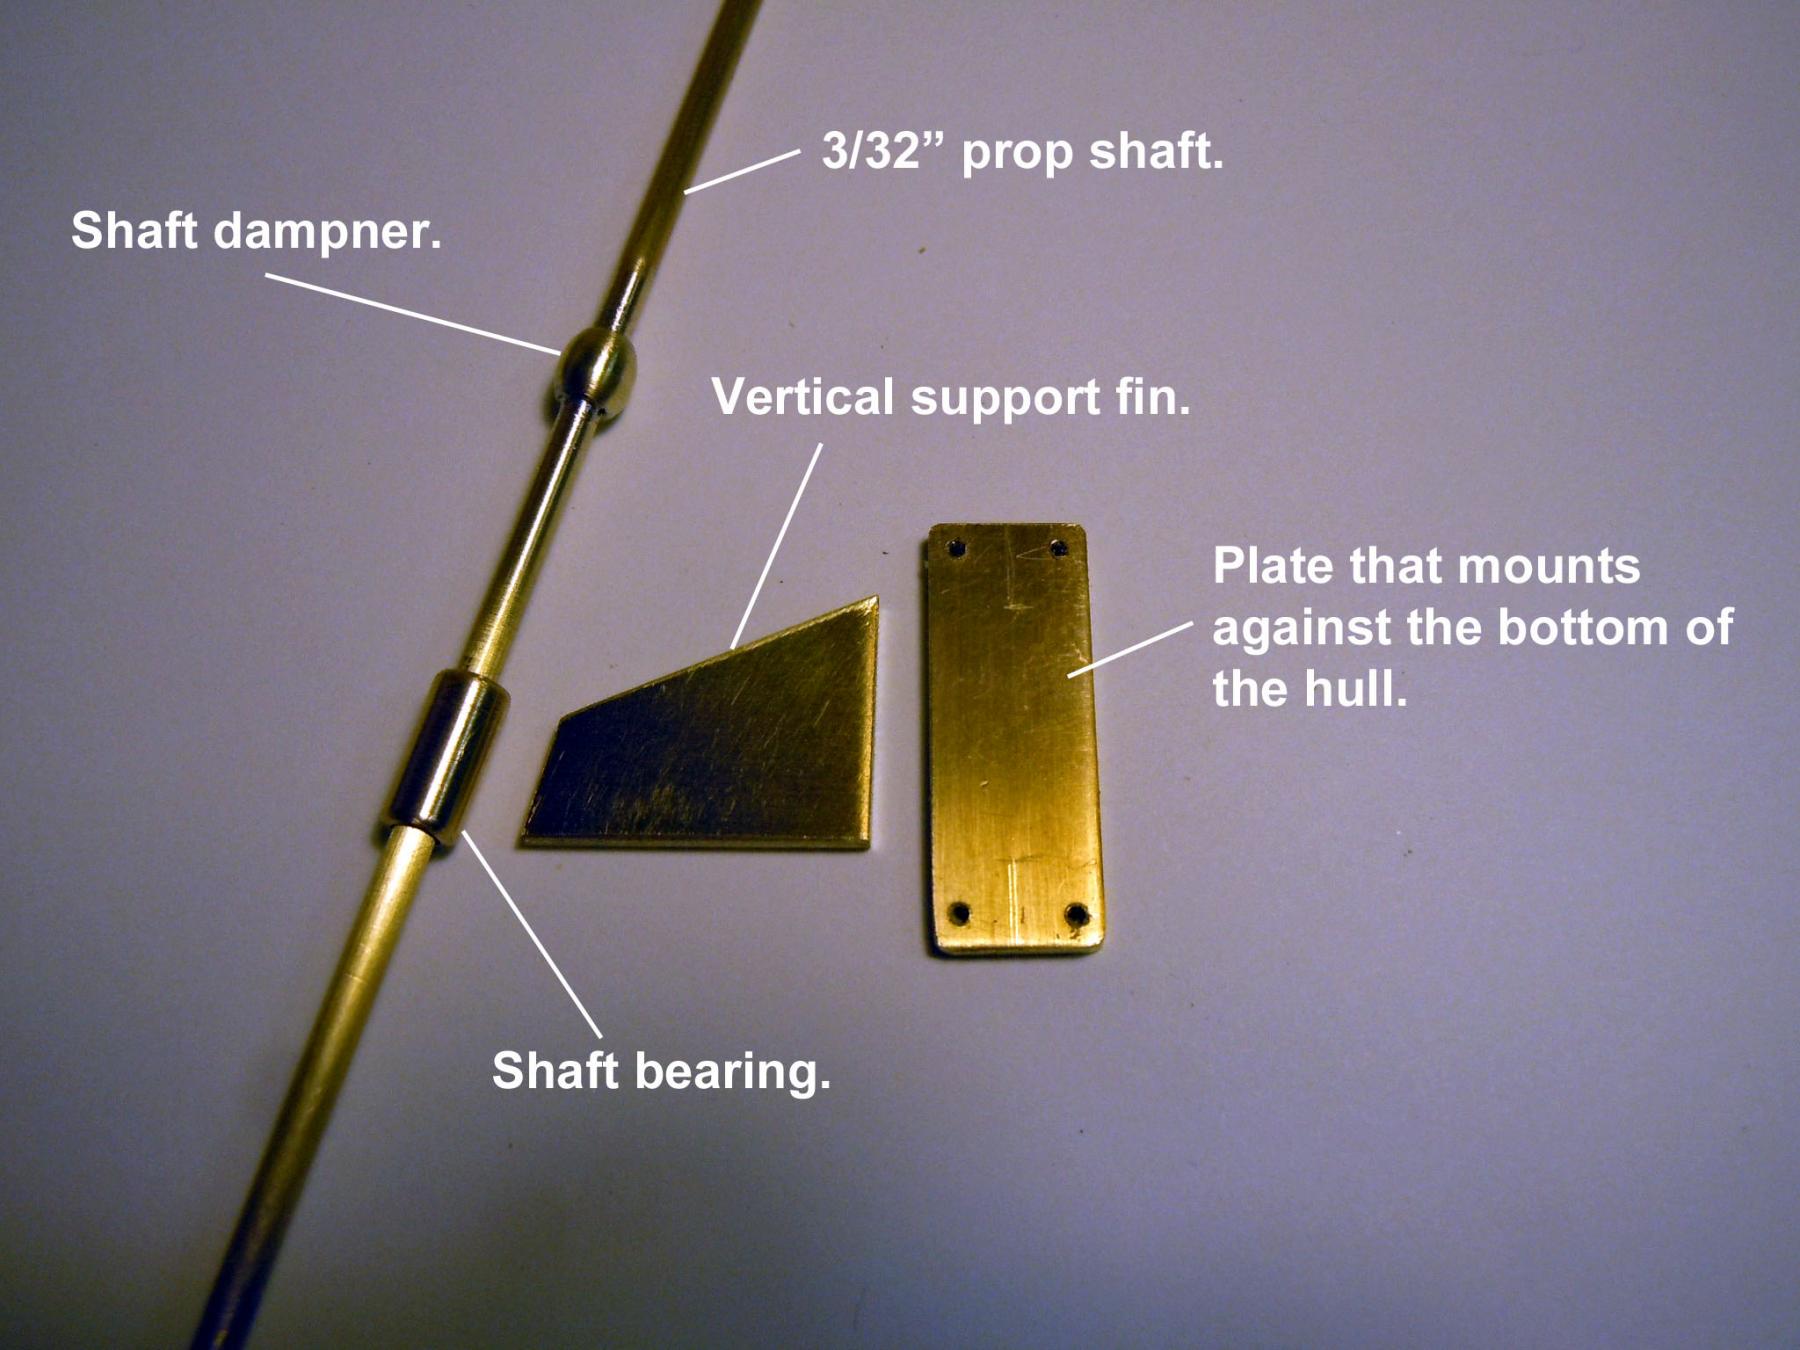
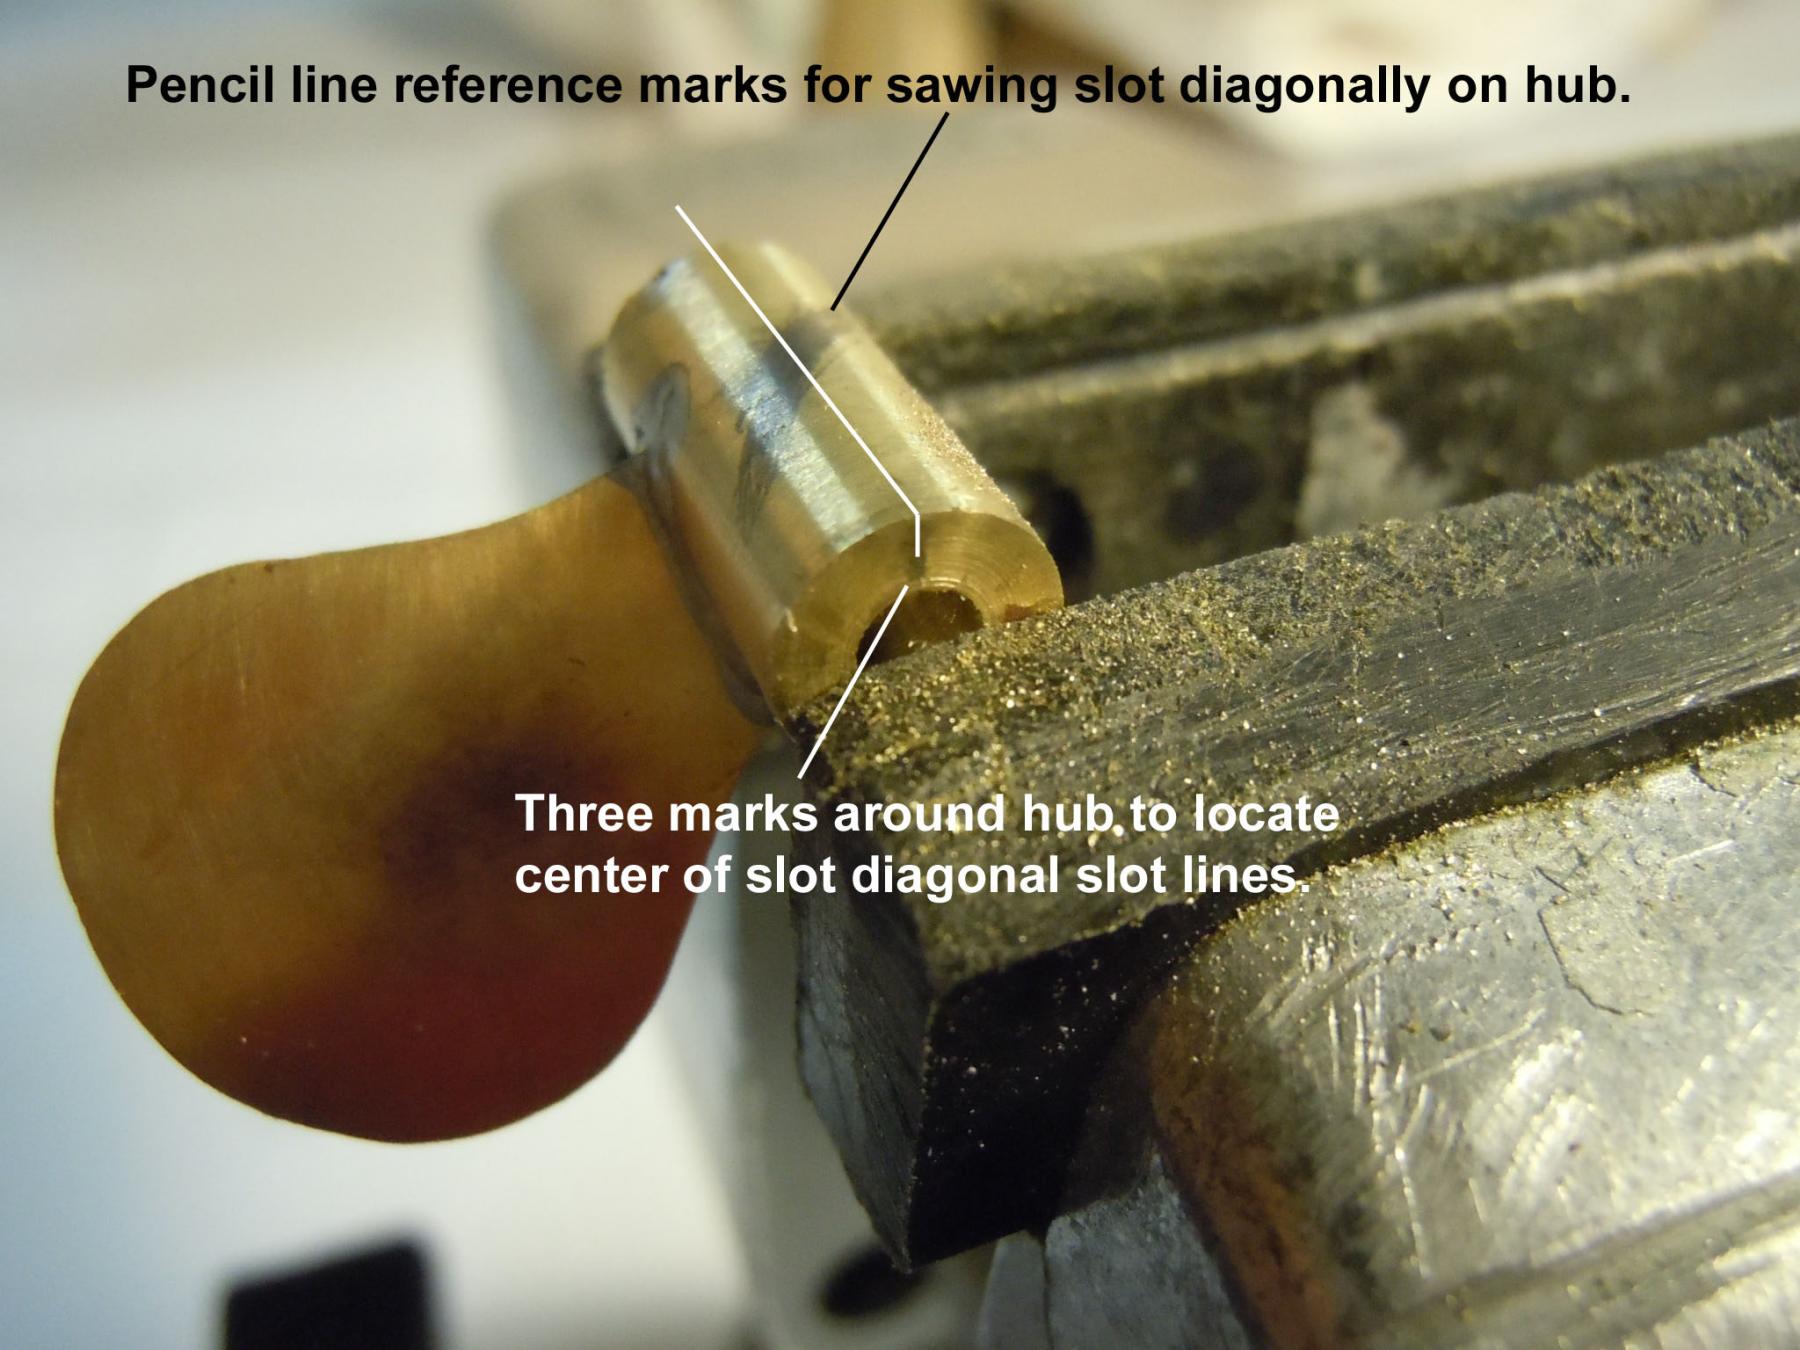
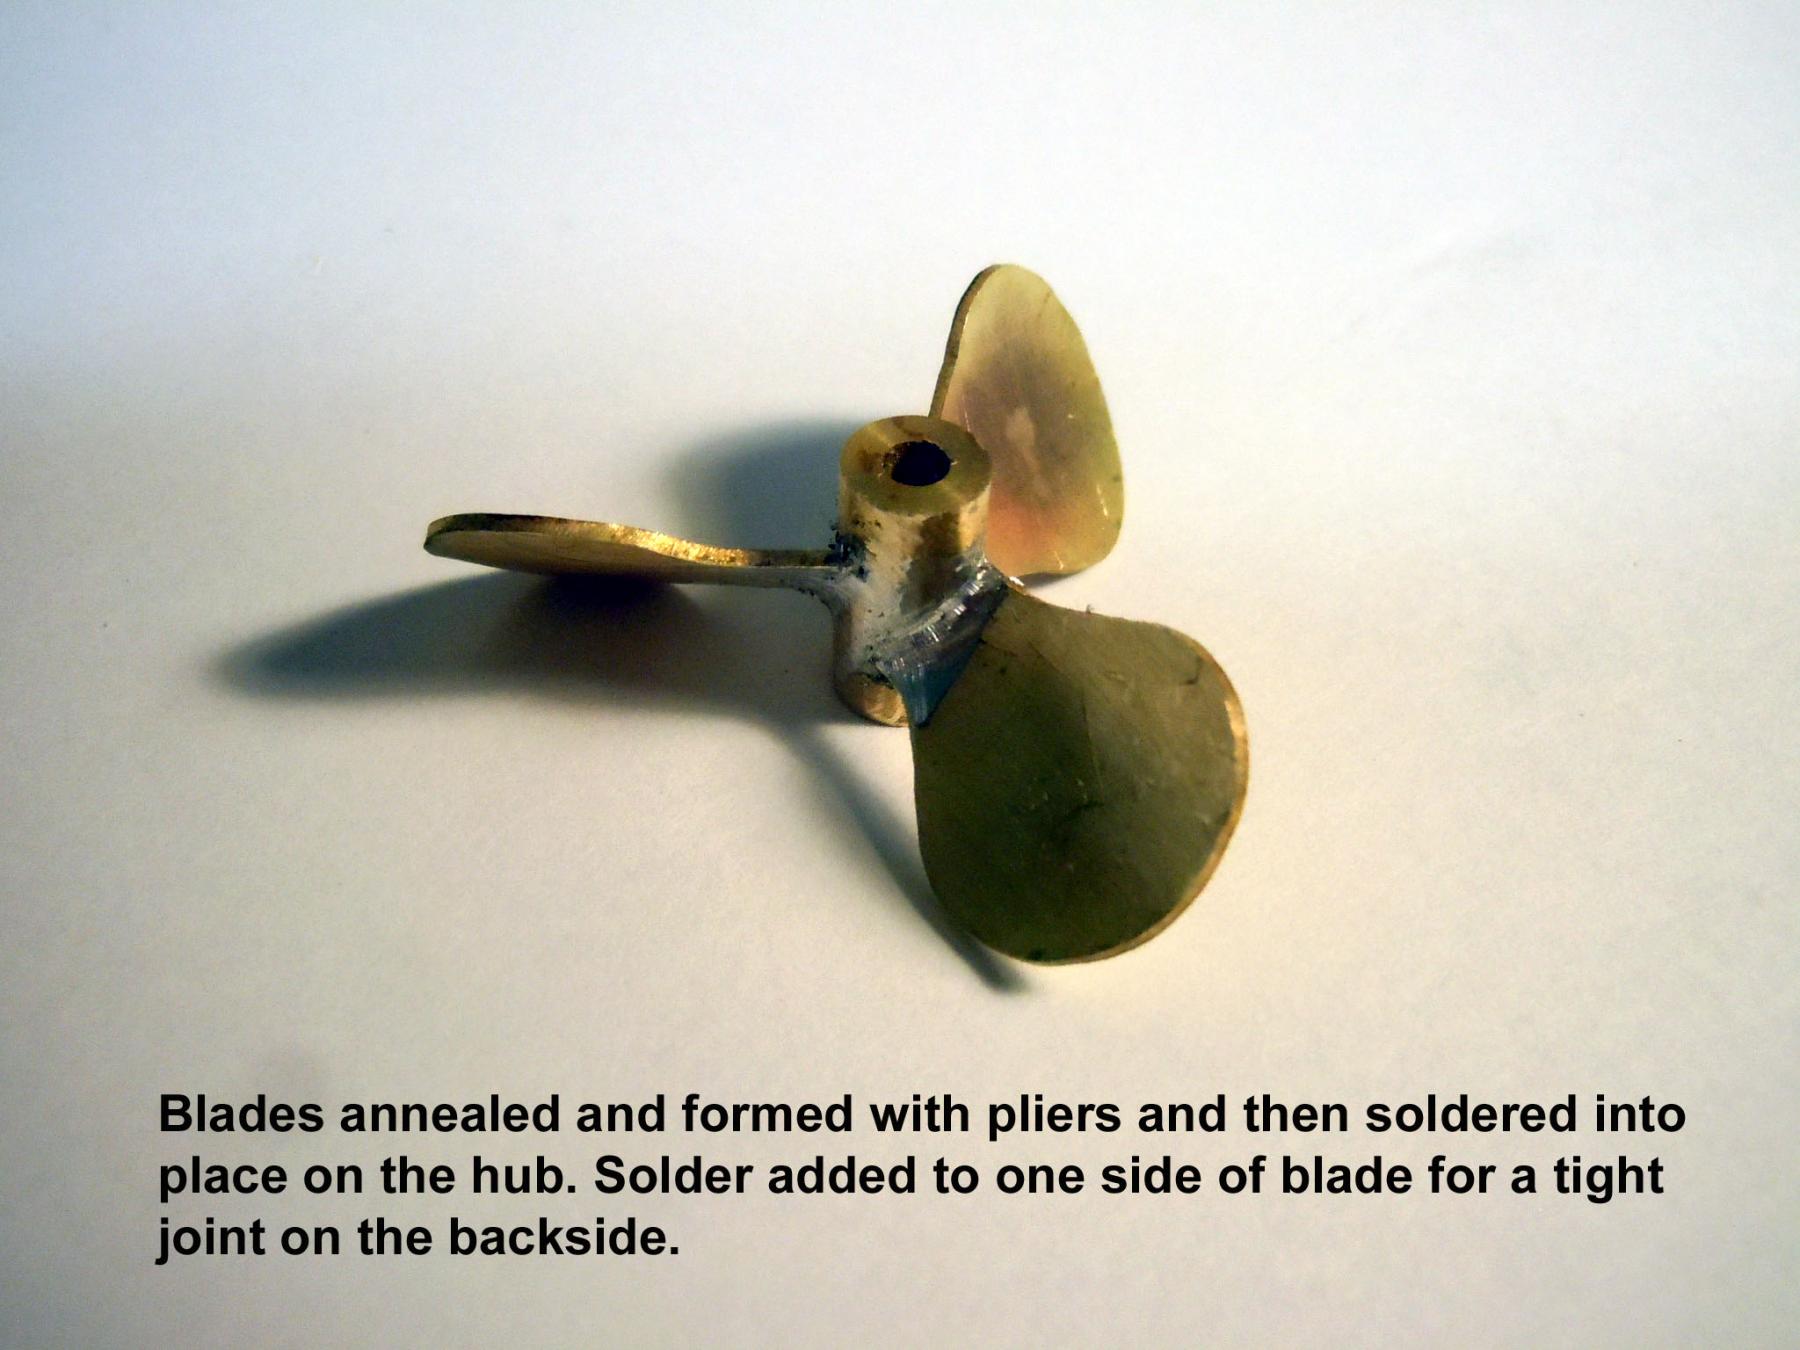
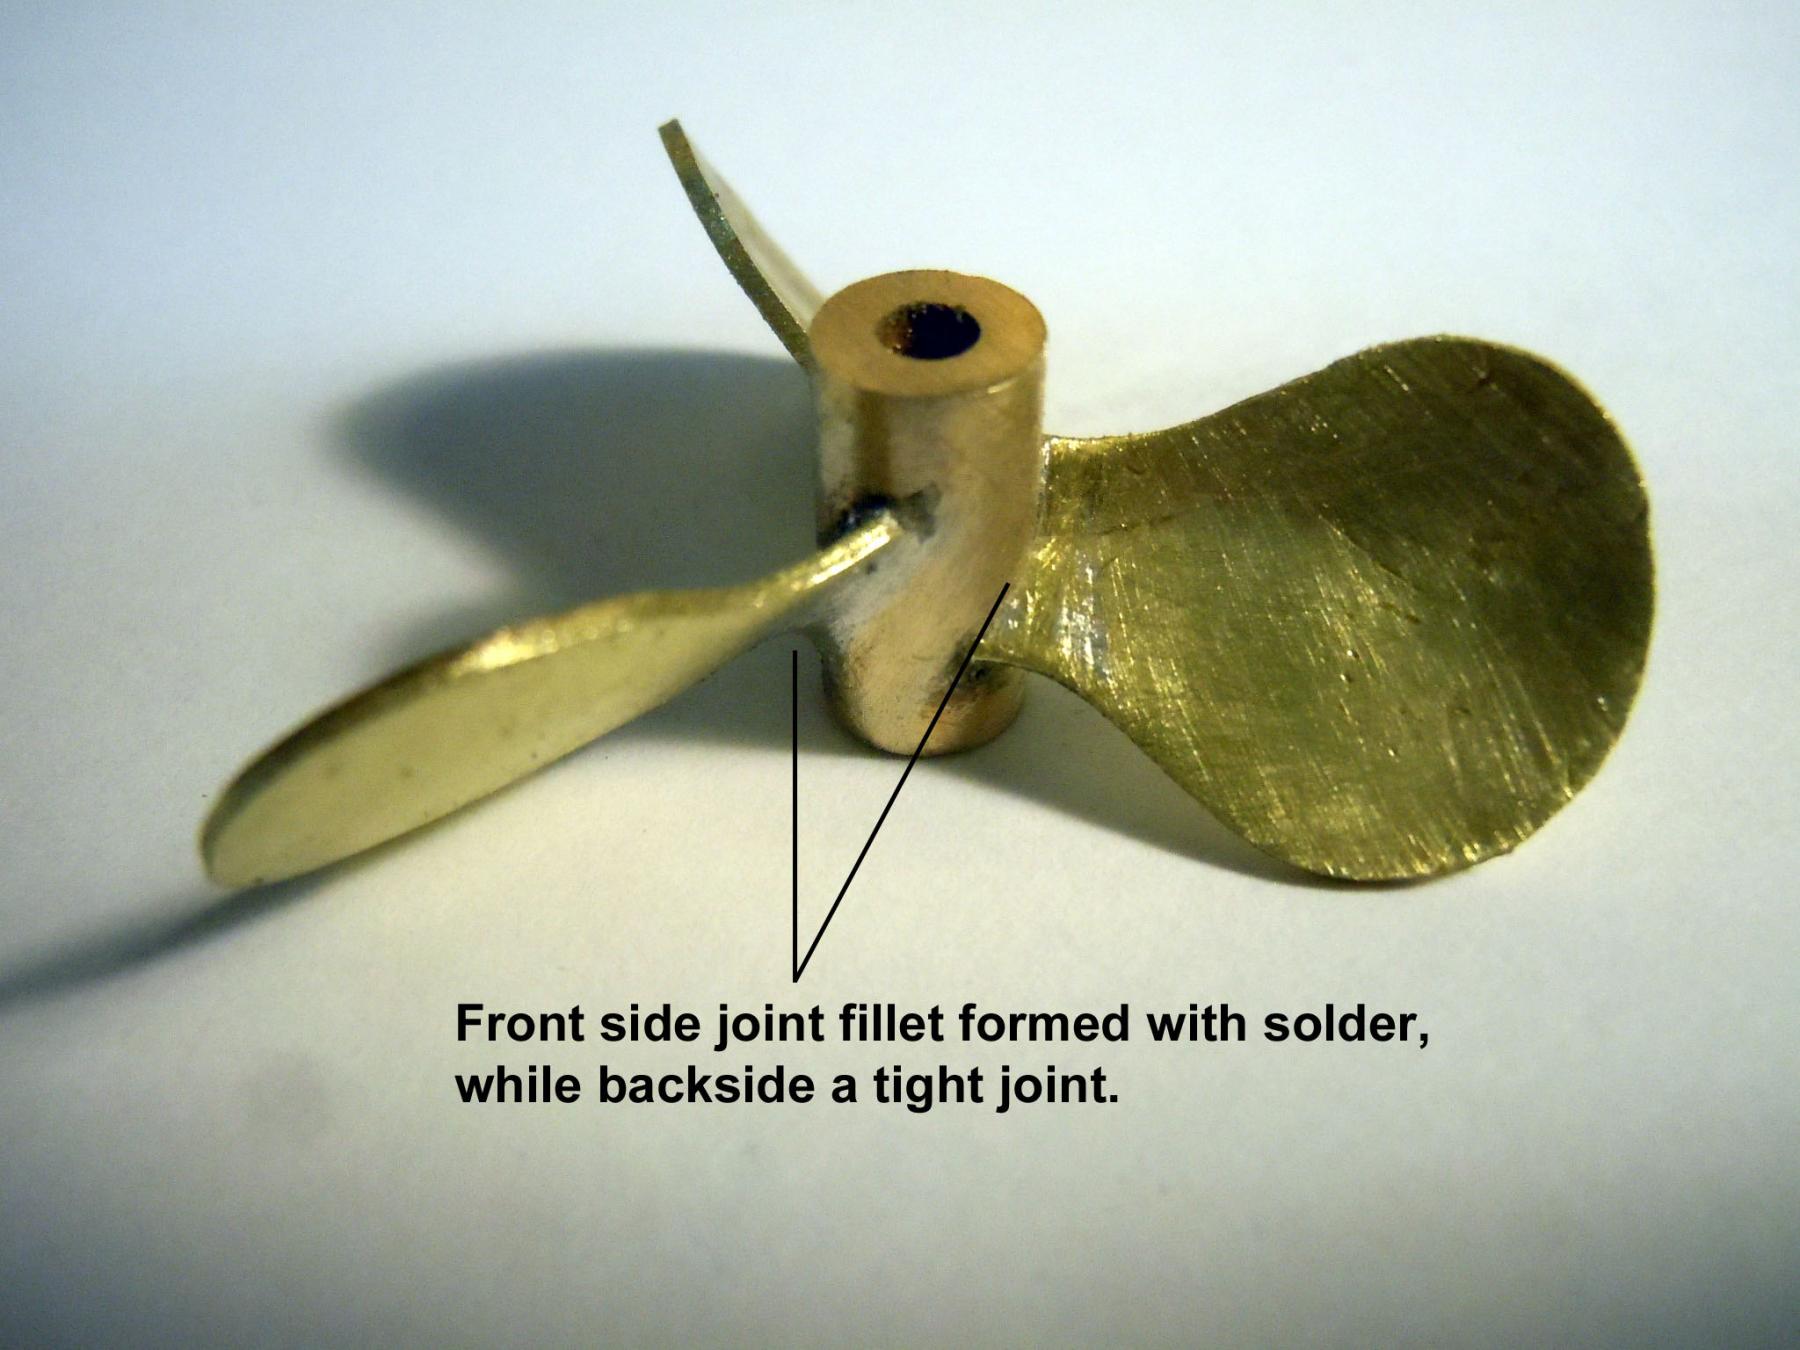
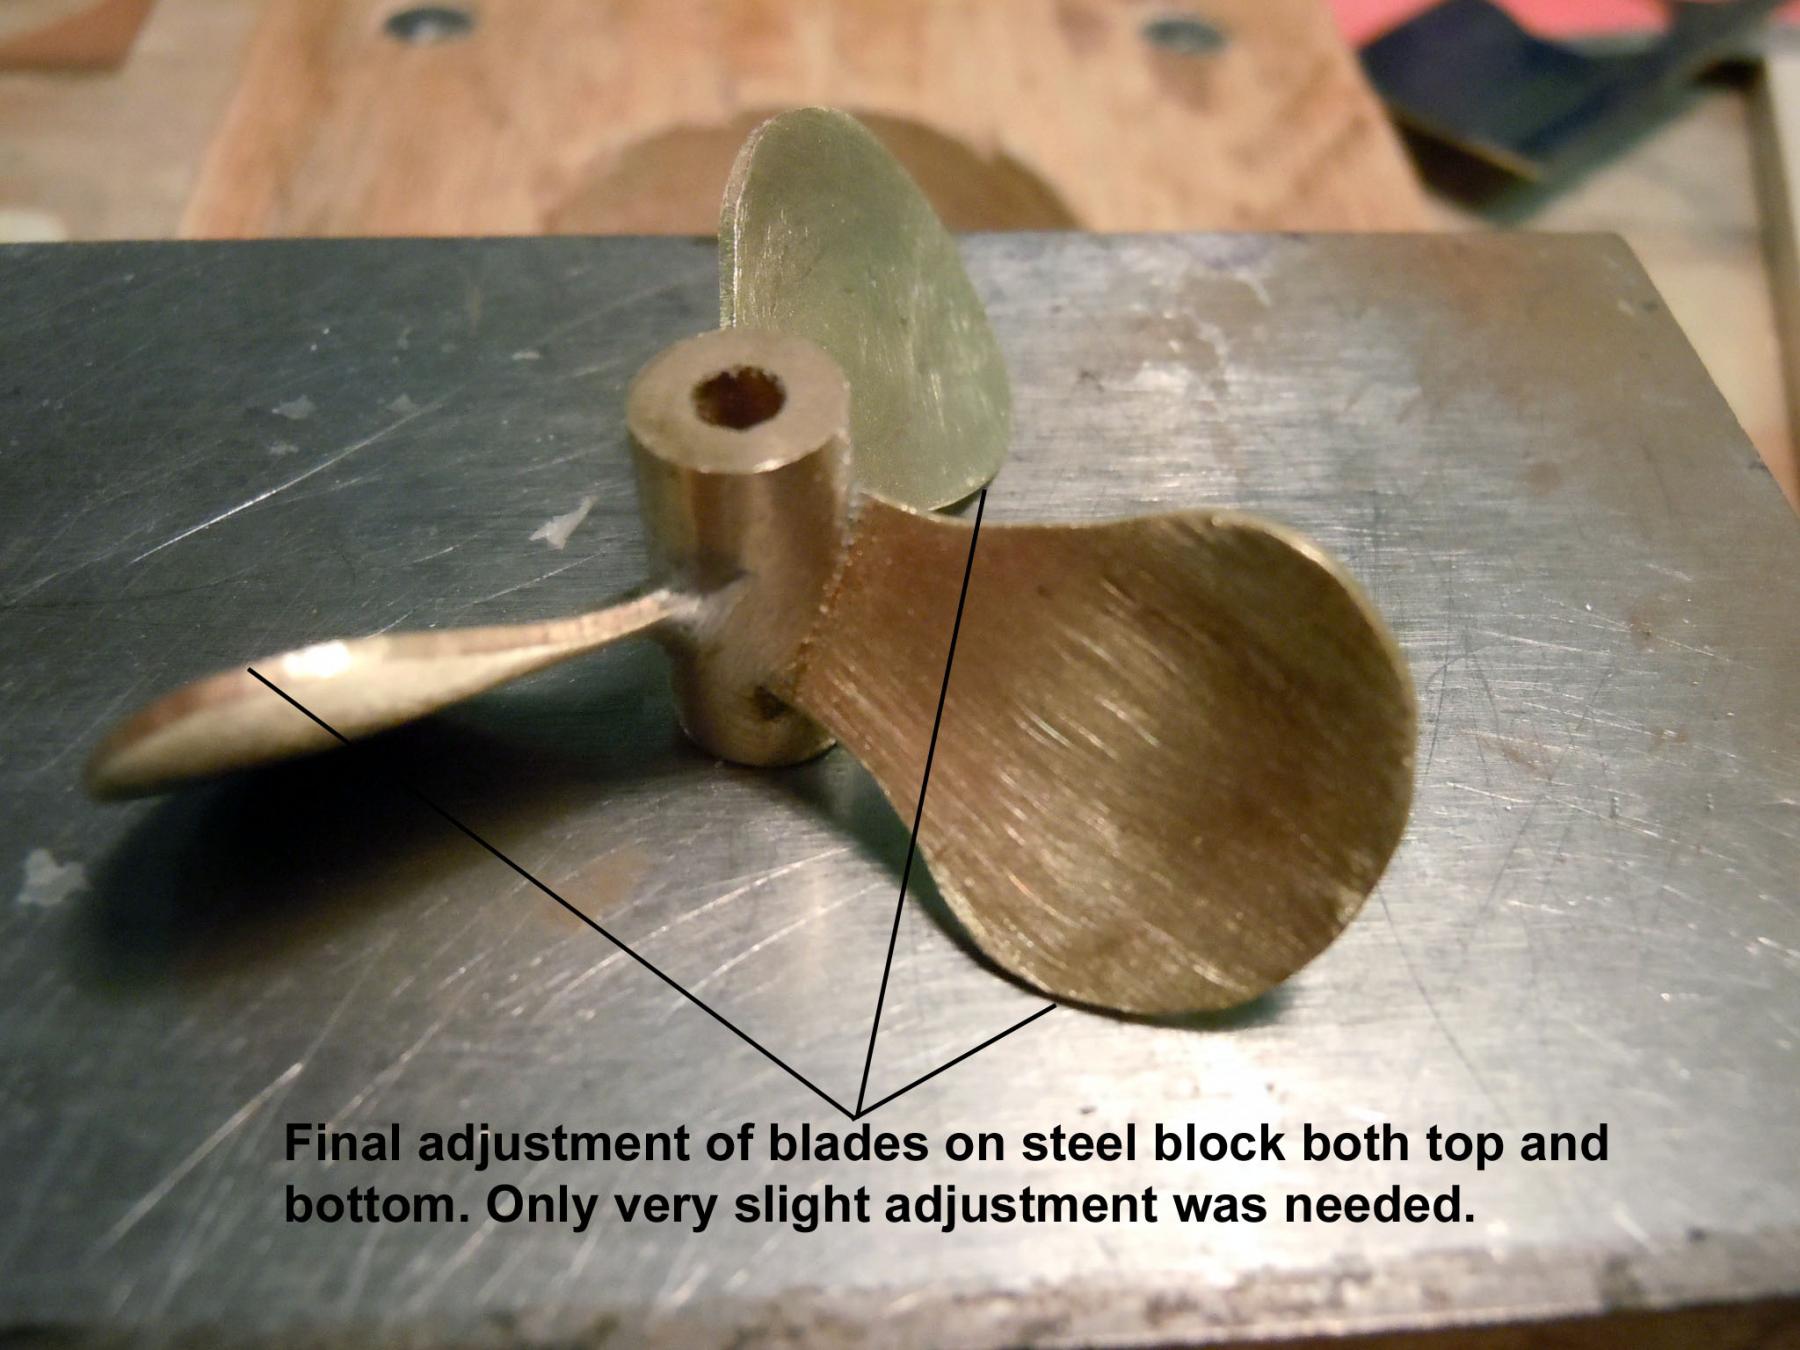
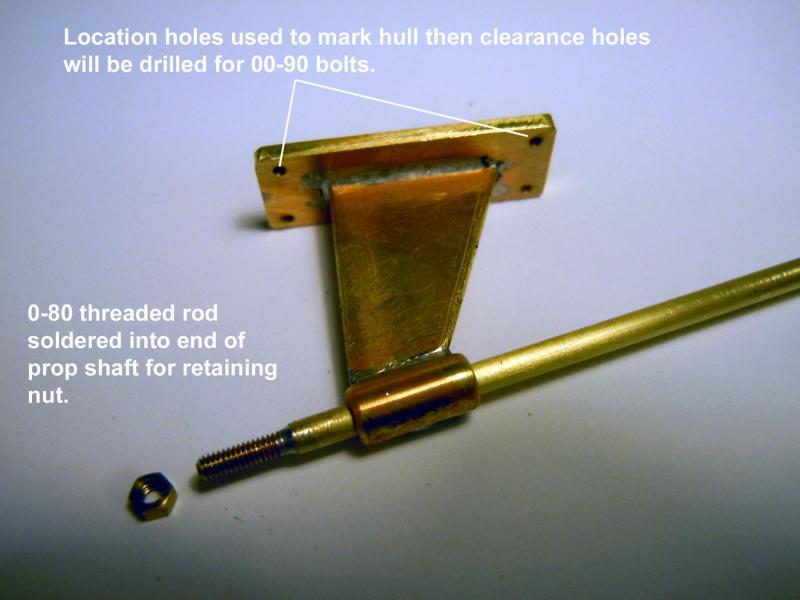
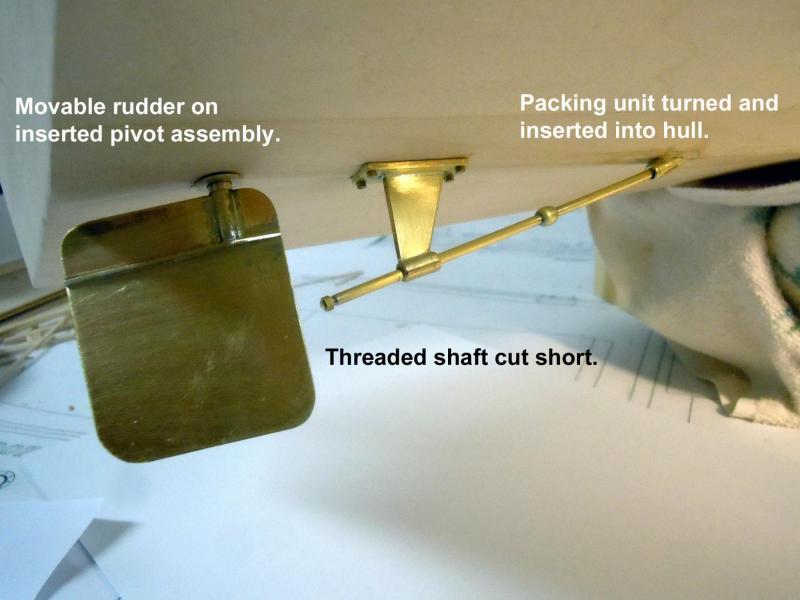
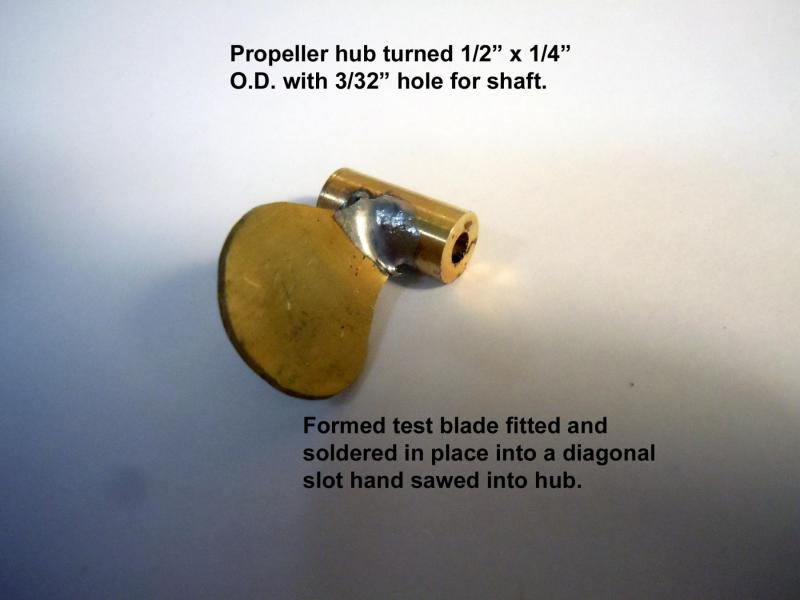
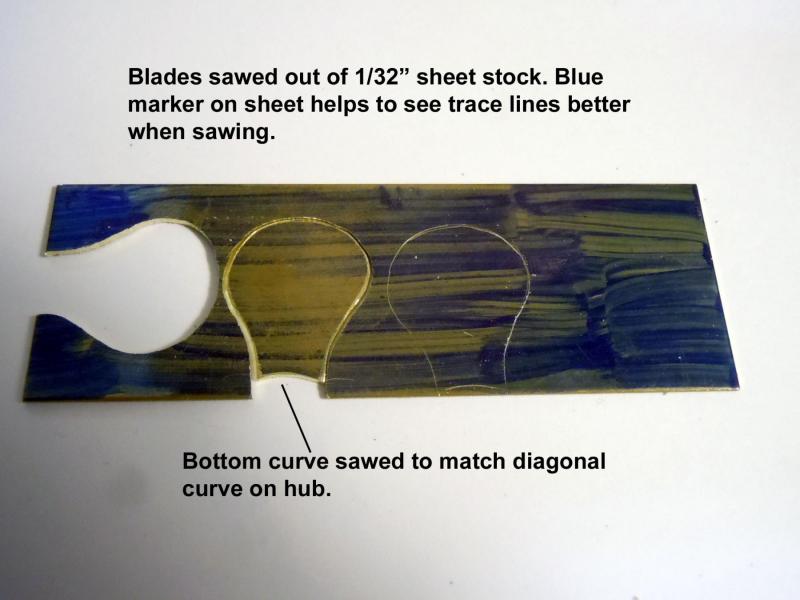
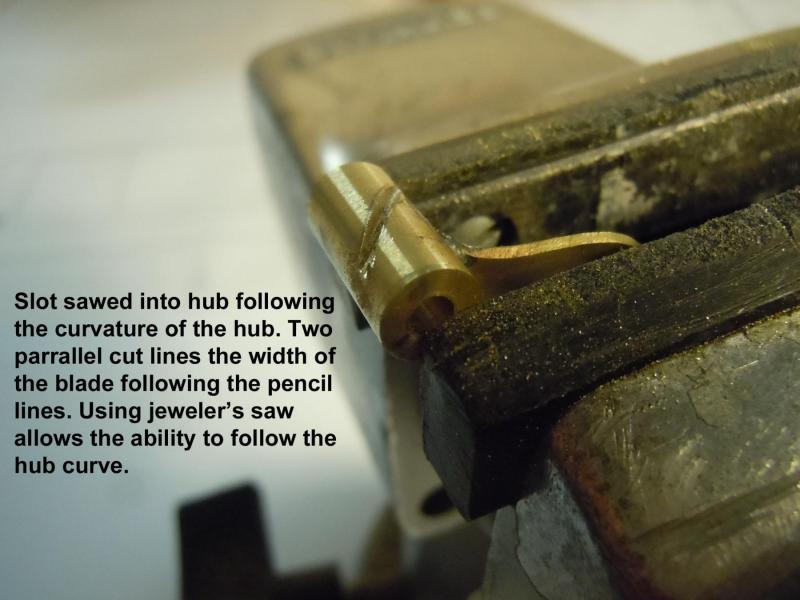
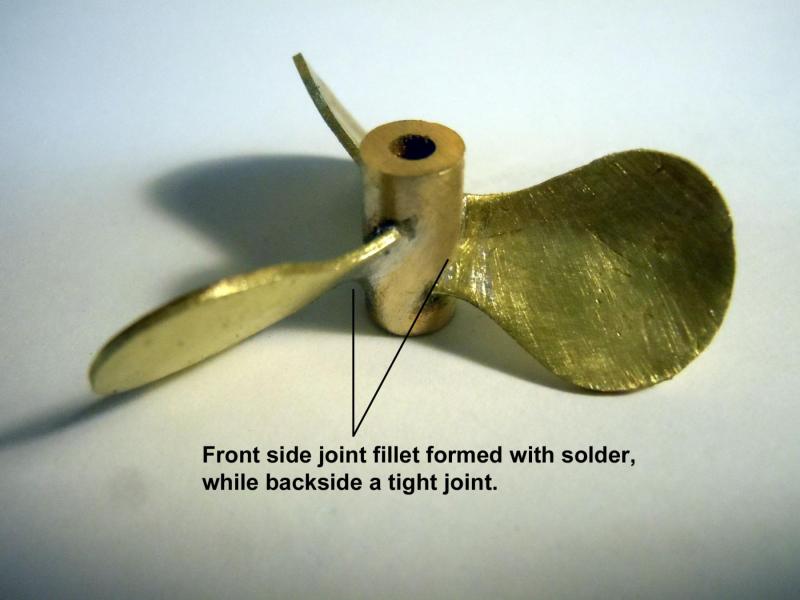
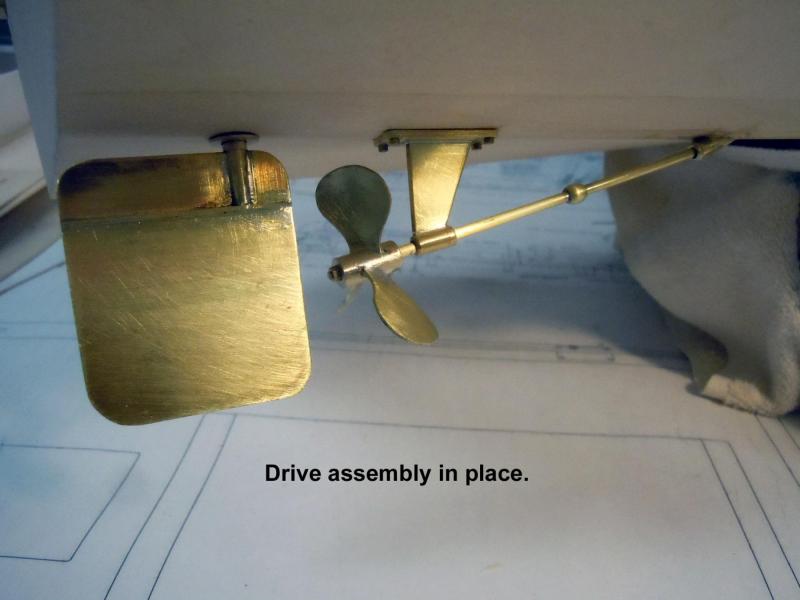
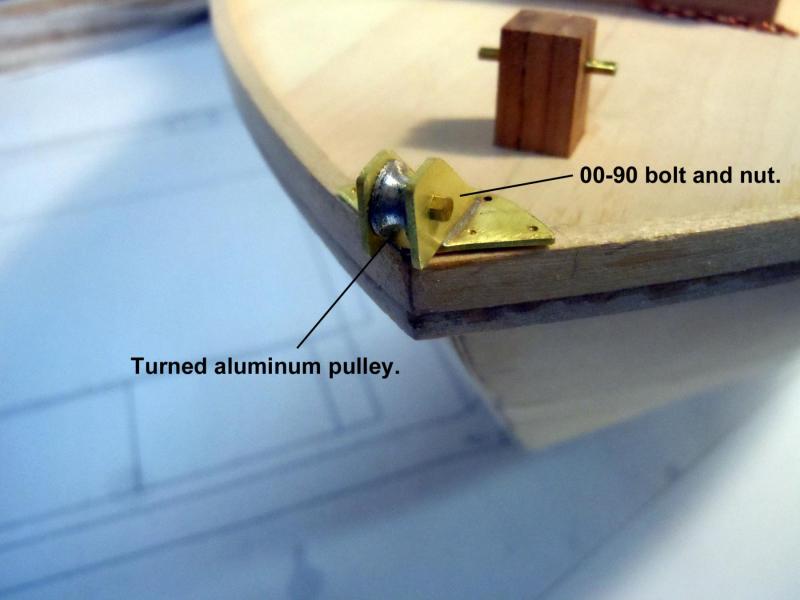
After building a working base for handling I started on the drive assembly. First I cut the parts for the bearing support for the drive shaft. I also cut and assembled the rudder with a 5/32" shaft incorporating a pivoting stop pinned to the top of the shaft. The completed rudder with bearing press fitted into hull. Then came my first attempt at a propeller. Not being familiar at all with propellers or having the real one for reference I did some research and checking with the maritime people and we settled on a three bladed design that was common for the period for this style of working boat. Here is a sequence showing the build process. The blade spins by hand and the rudder turns. Now to make the two different sizes and types of cleats and lights.


- 162 replies
-
- 17
-
-
- dirty dozen
- fishing
- (and 2 more)
-
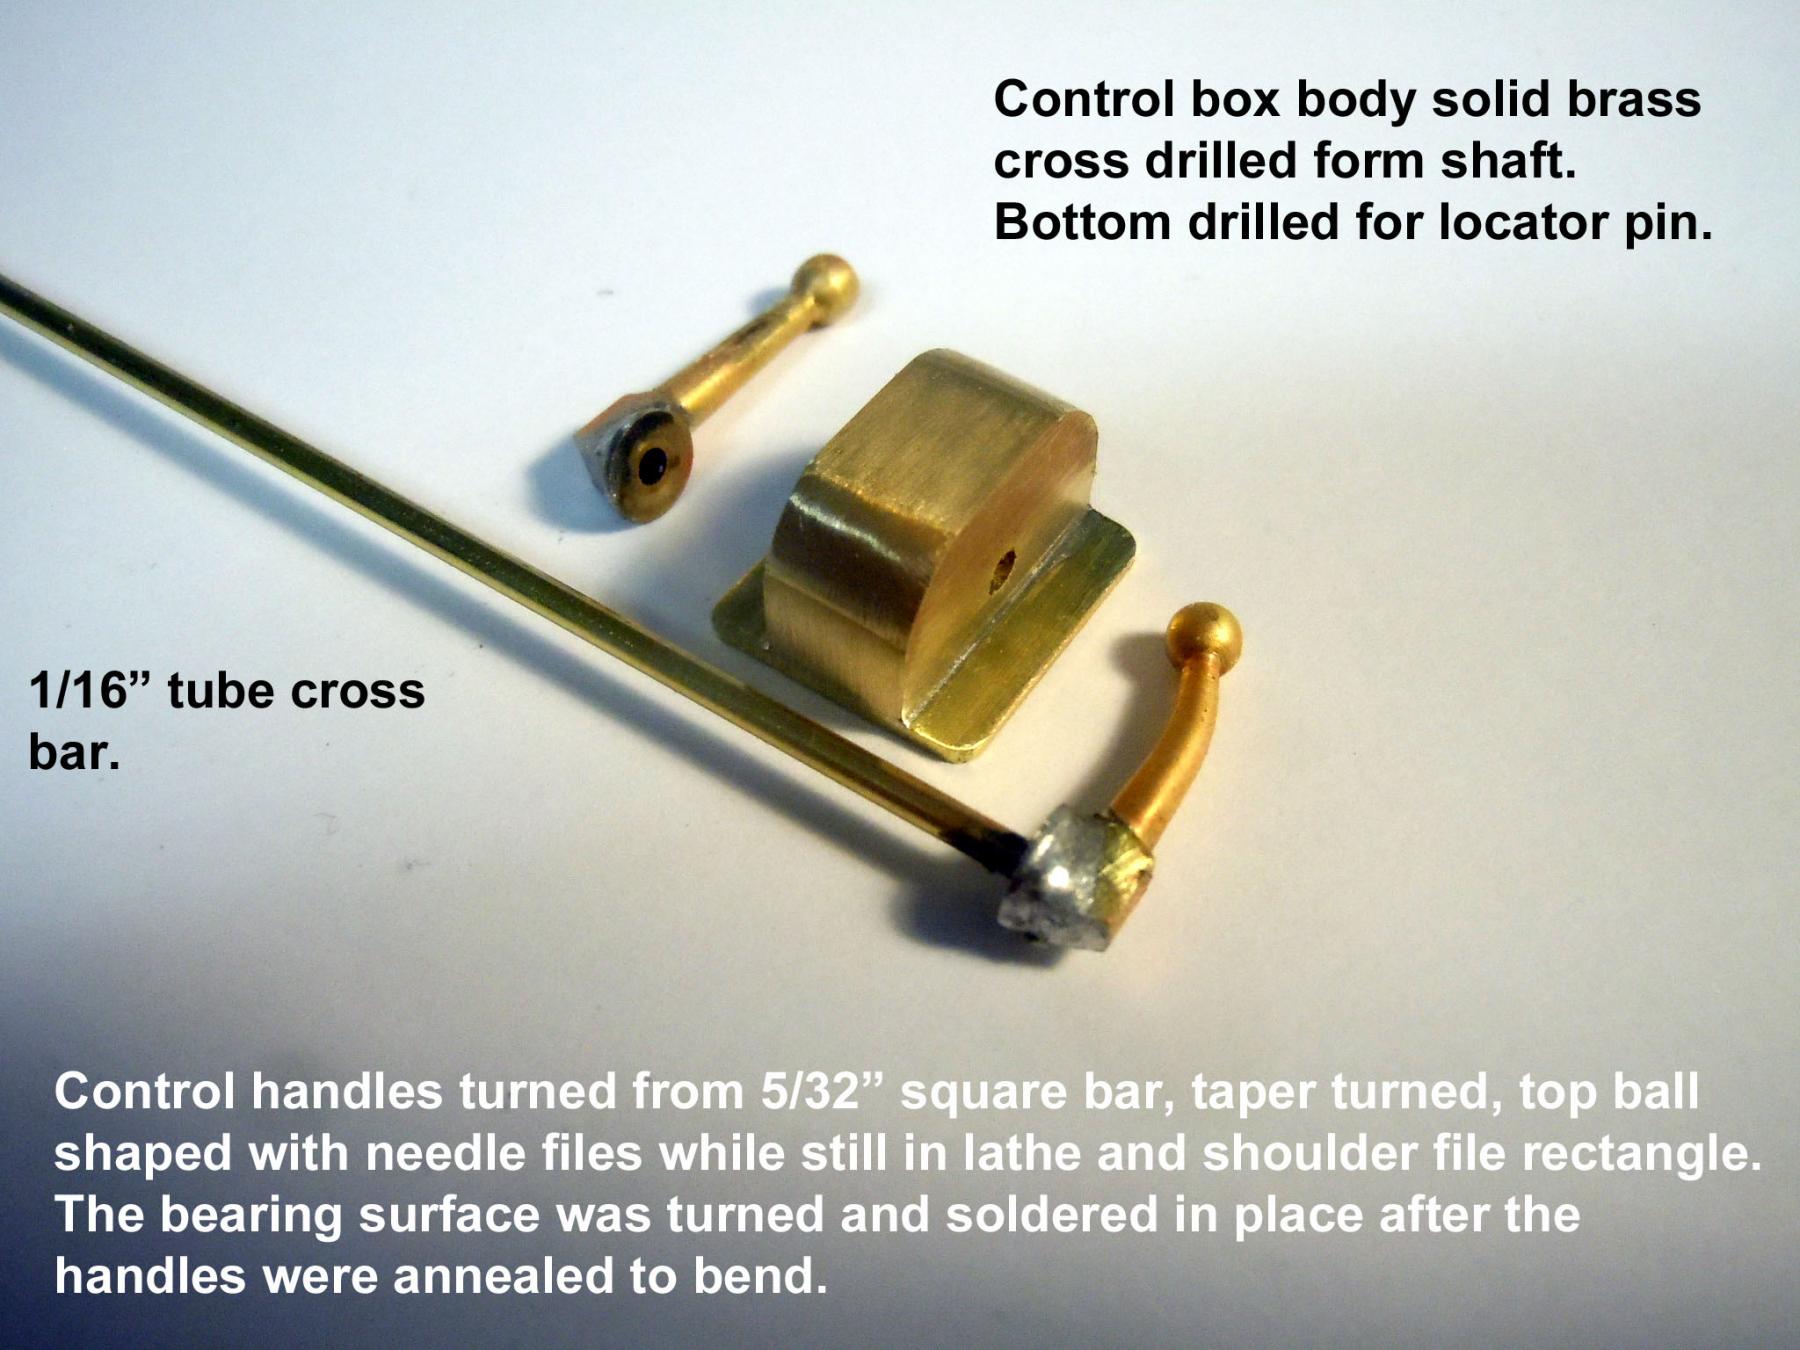
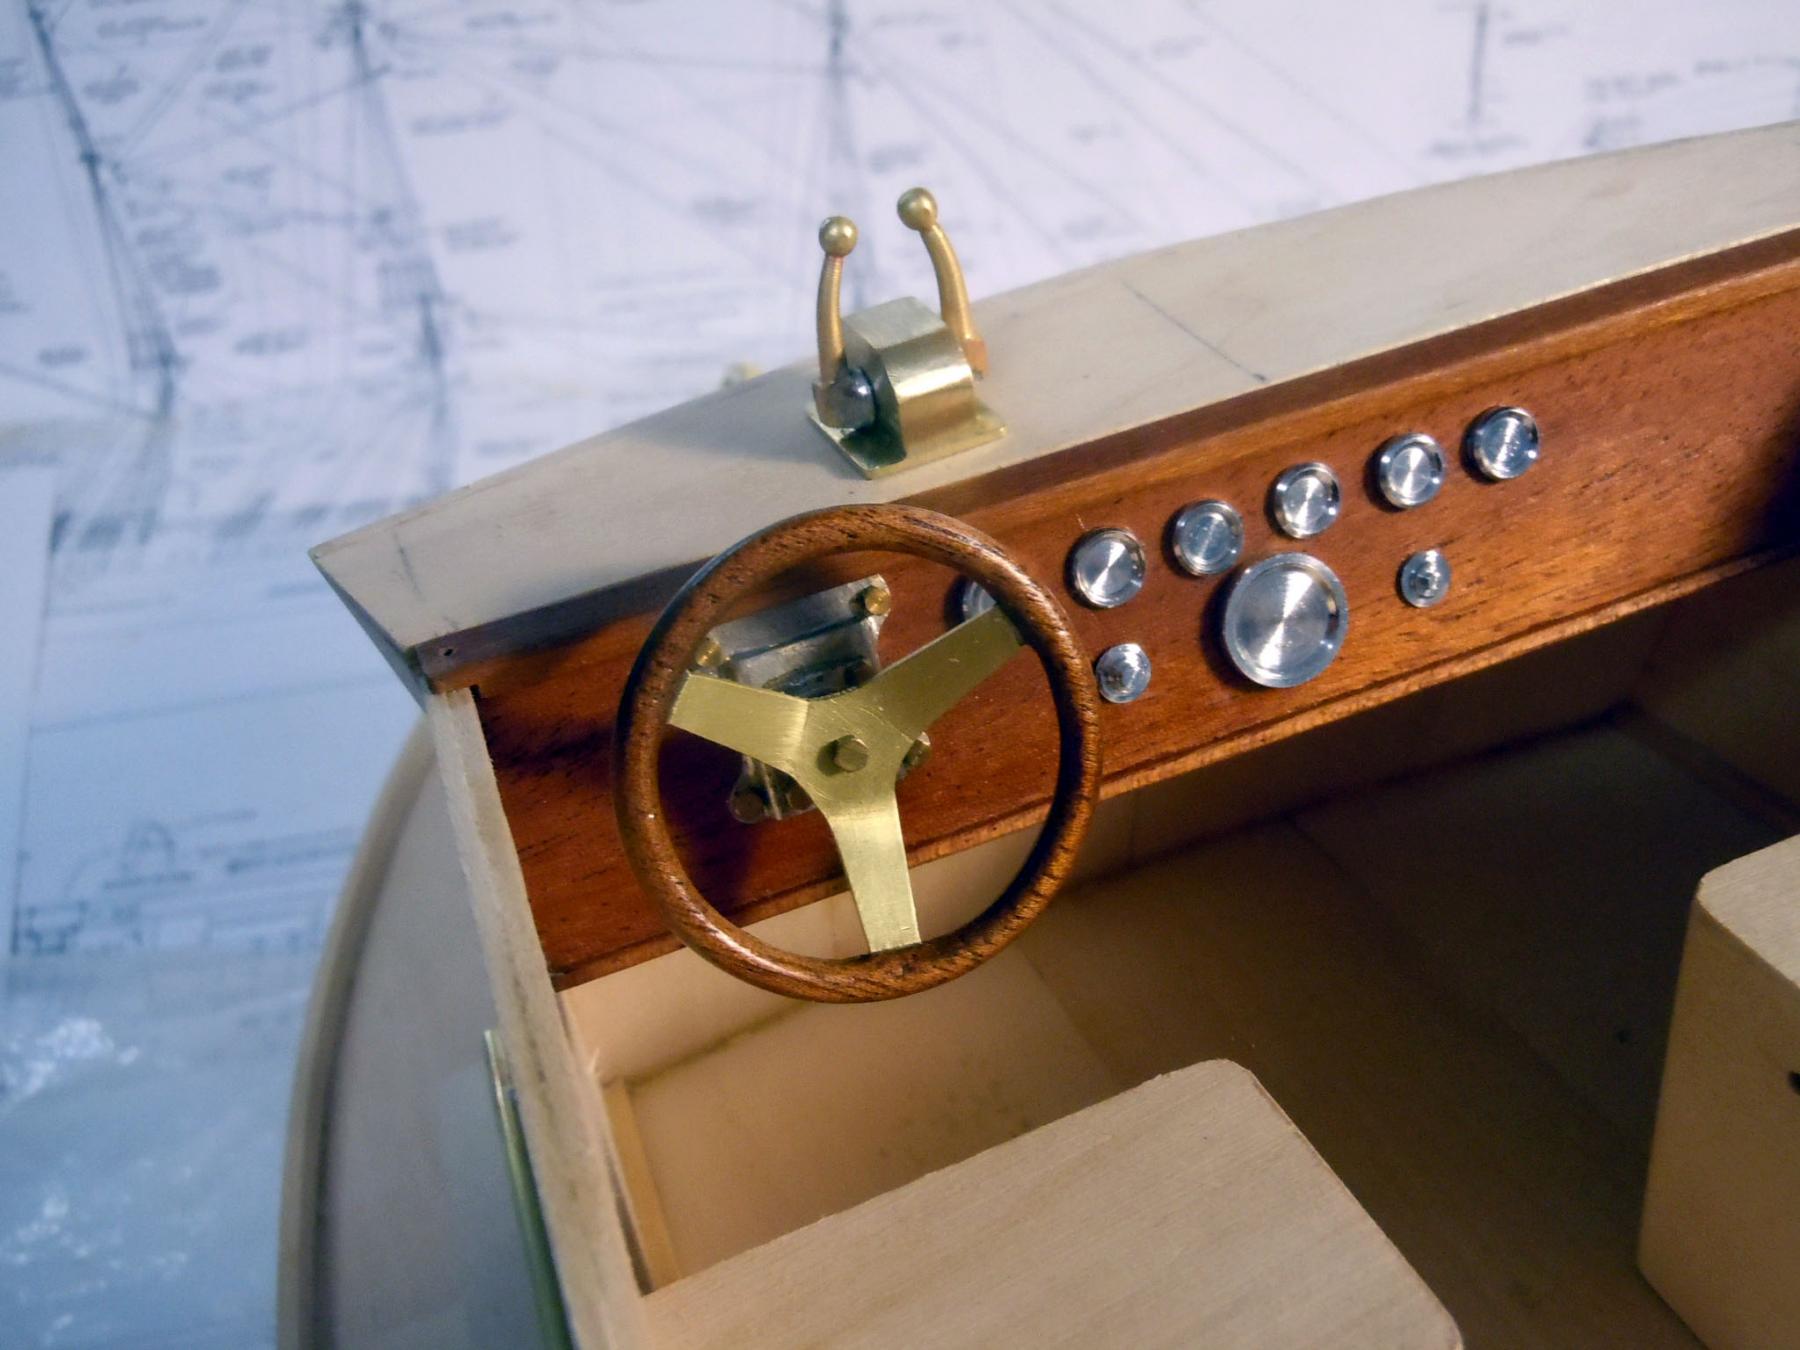
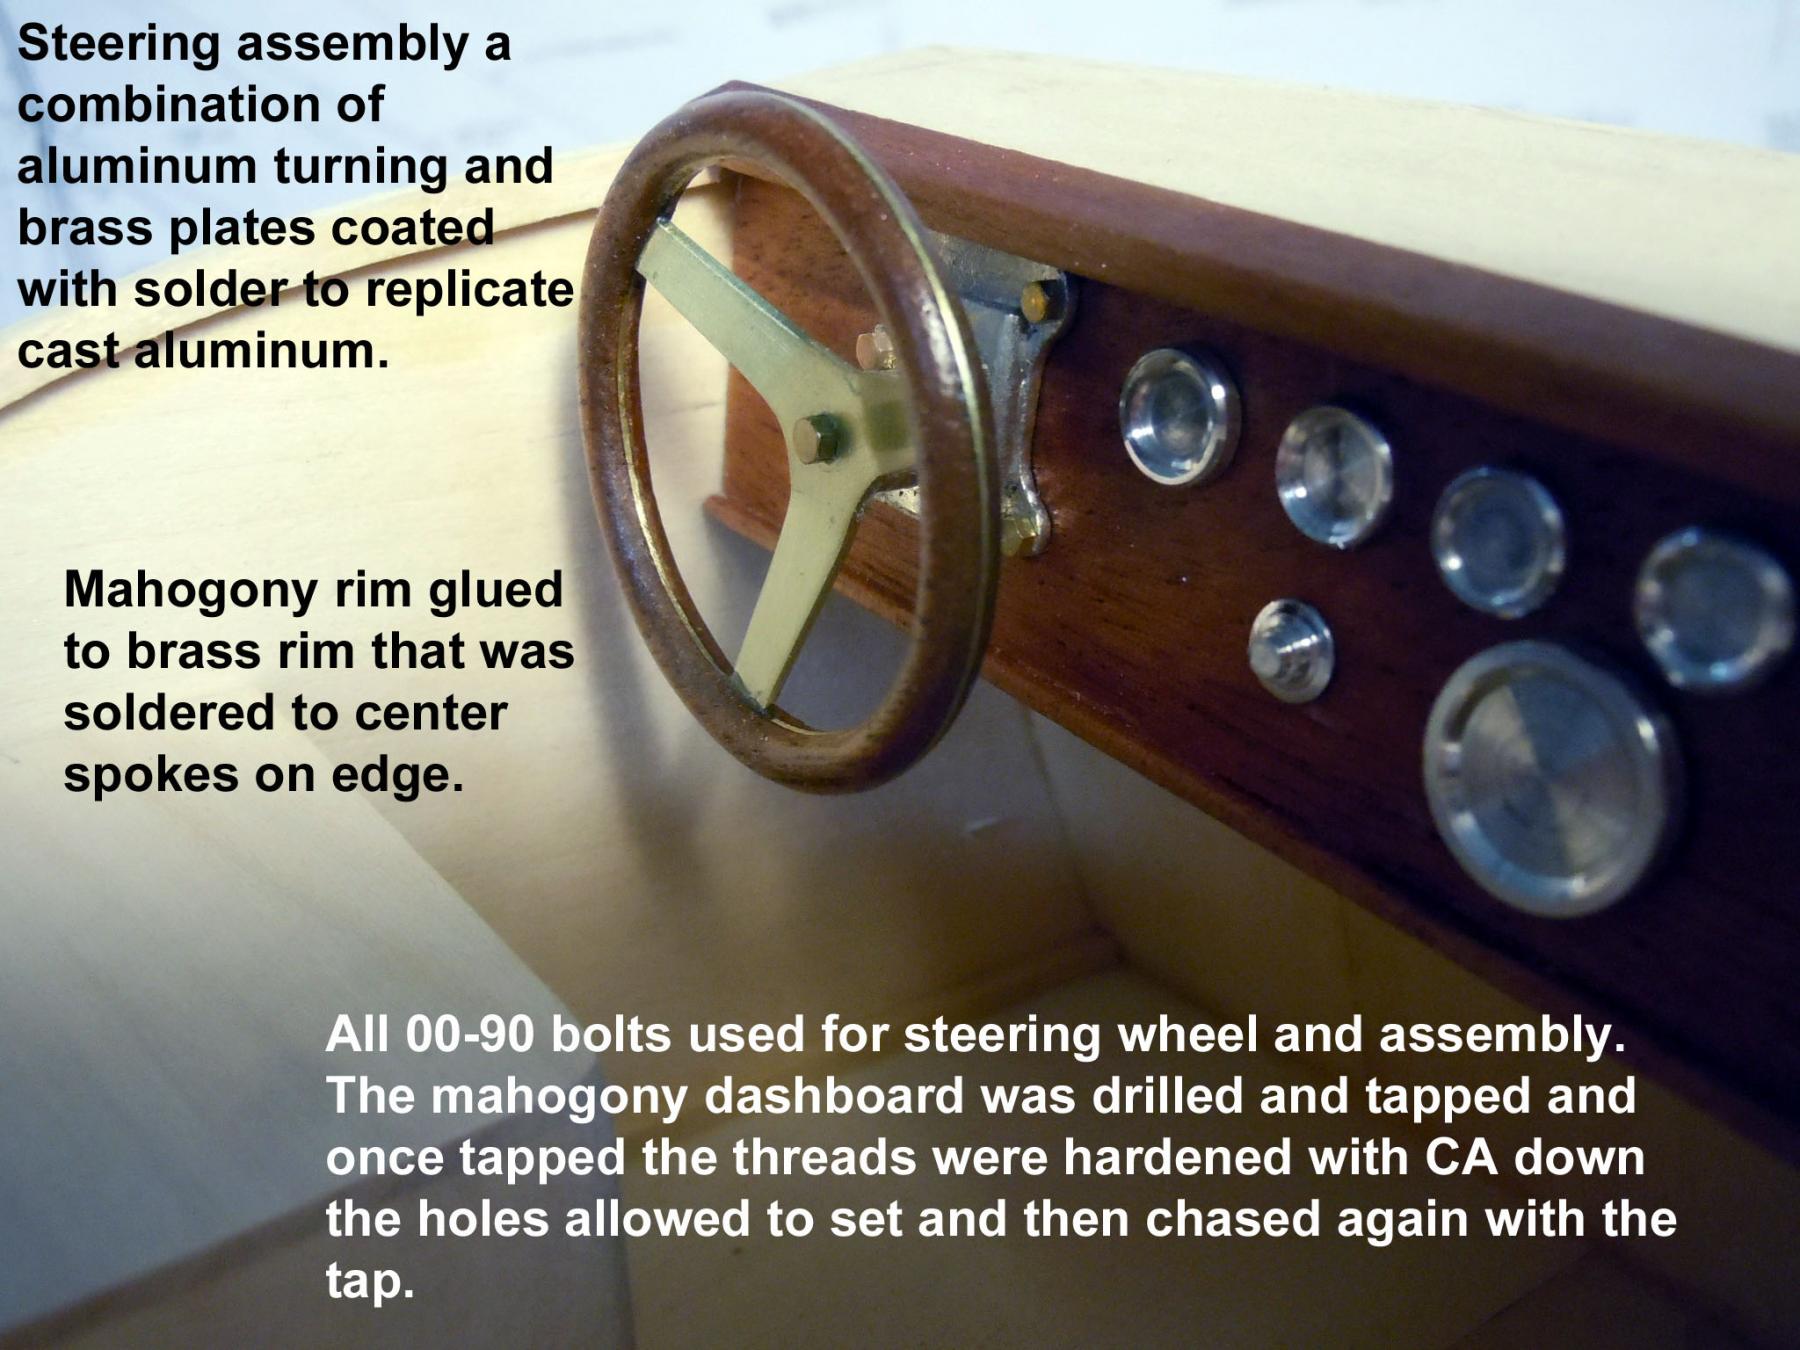
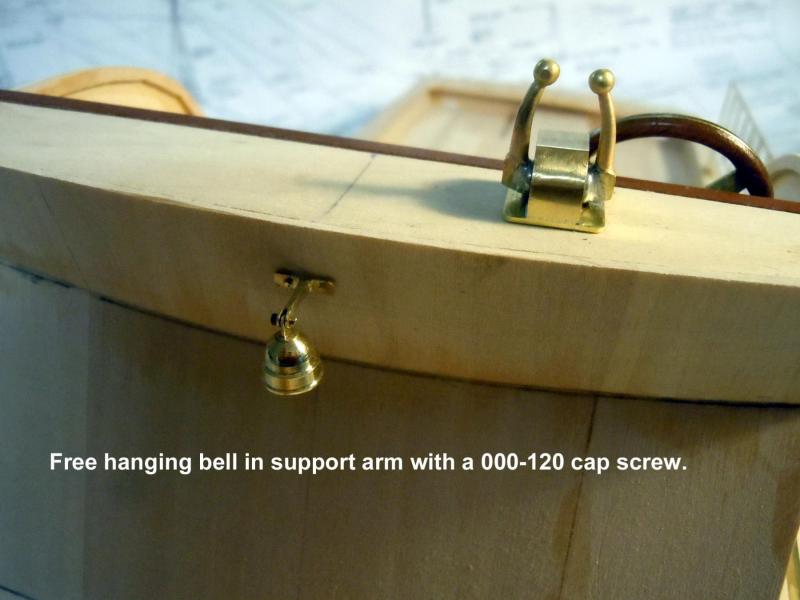
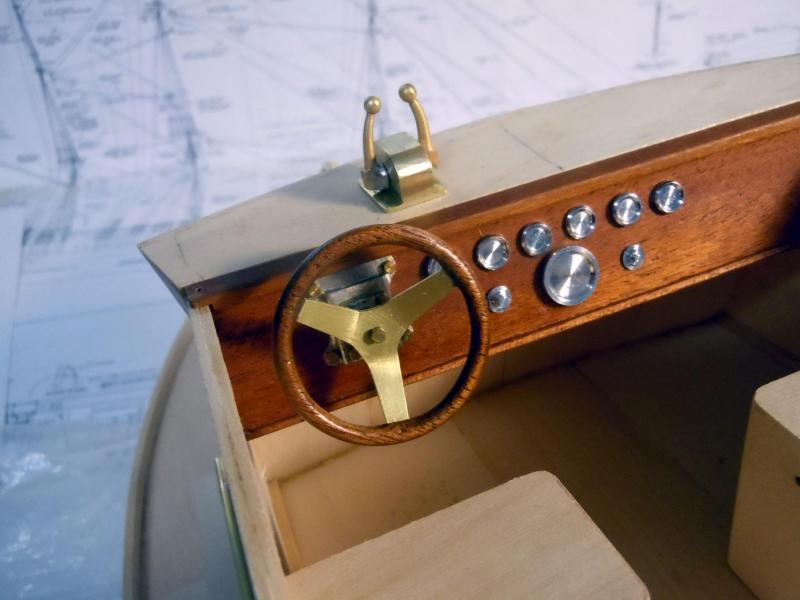
Did some cleanup on the dashboard and glued the gauges in place for now and made a rear placement support bracket for the dash to hold it in place. I then made the steering wheel with a brass support structure for the center spokes and rim and then the mahogany rim was formed in two parts and glued to the brass rim. Inside and outside rim surfaces were then filed and sanded to blend smooth. I drilled and tapped the mahogany dash holes with a #61 drill bit and 00-90 tap. I then hardened the wood threads with CA and once the CA good and set I re-tapped them to clean them up. Added the support bracket for the bell and used a 000-120 cap screw to free hang. Next came the control box and handles. They were taper turned with a ball on the end starting with 5/32" bar stock. The main box was solid brass and a mounting plate soldered to the bottom. Next a piano hinge and propeller with rudder. However, I may have to make a support base before adding the rudder assembly. I also am still searching for a brass compass that was mounted in the upper surface in front of the steering wheel.


- 162 replies
-
- 12
-
-
- dirty dozen
- fishing
- (and 2 more)
-
Model Shipways paint help
xken replied to Five Points's topic in Painting, finishing and weathering products and techniques
Try 90 % Isoprol alcohol from local drug store. It must be the 90% not the regular stuff. I use this rather than water to thin the paint.- 1 reply
-
- 4
-
-
Greg, yes all things are pinned for removal to paint the main hull and cabin. I learned that lesson years ago. As I have said before, model building is sometimes like playing chess and having to think two or three steps ahead to keep yourself out of trouble.
- 162 replies
-
- 5
-
-
- dirty dozen
- fishing
- (and 2 more)
-
Patrick, it would be easier if you just google my name Ken Foran many have posted my work at various sites depending upon the subject. My real interest is WWI airplanes. Look for the Sopwih Camel that was a commission for Fine Art Models and they recently sold the prototype model with the spare engine.
- 162 replies
-
- 4
-
-
- dirty dozen
- fishing
- (and 2 more)
-
Patrick, my first scratch built boat but not my first scratch built model. I have scratch built WWI airplanes, WWII Planes, a MASH helicopter, a functioning 1/8 scale 1911 Model T board track racer and the list goes on. Just new to ship building.
- 162 replies
-
- 4
-
-
- dirty dozen
- fishing
- (and 2 more)
-
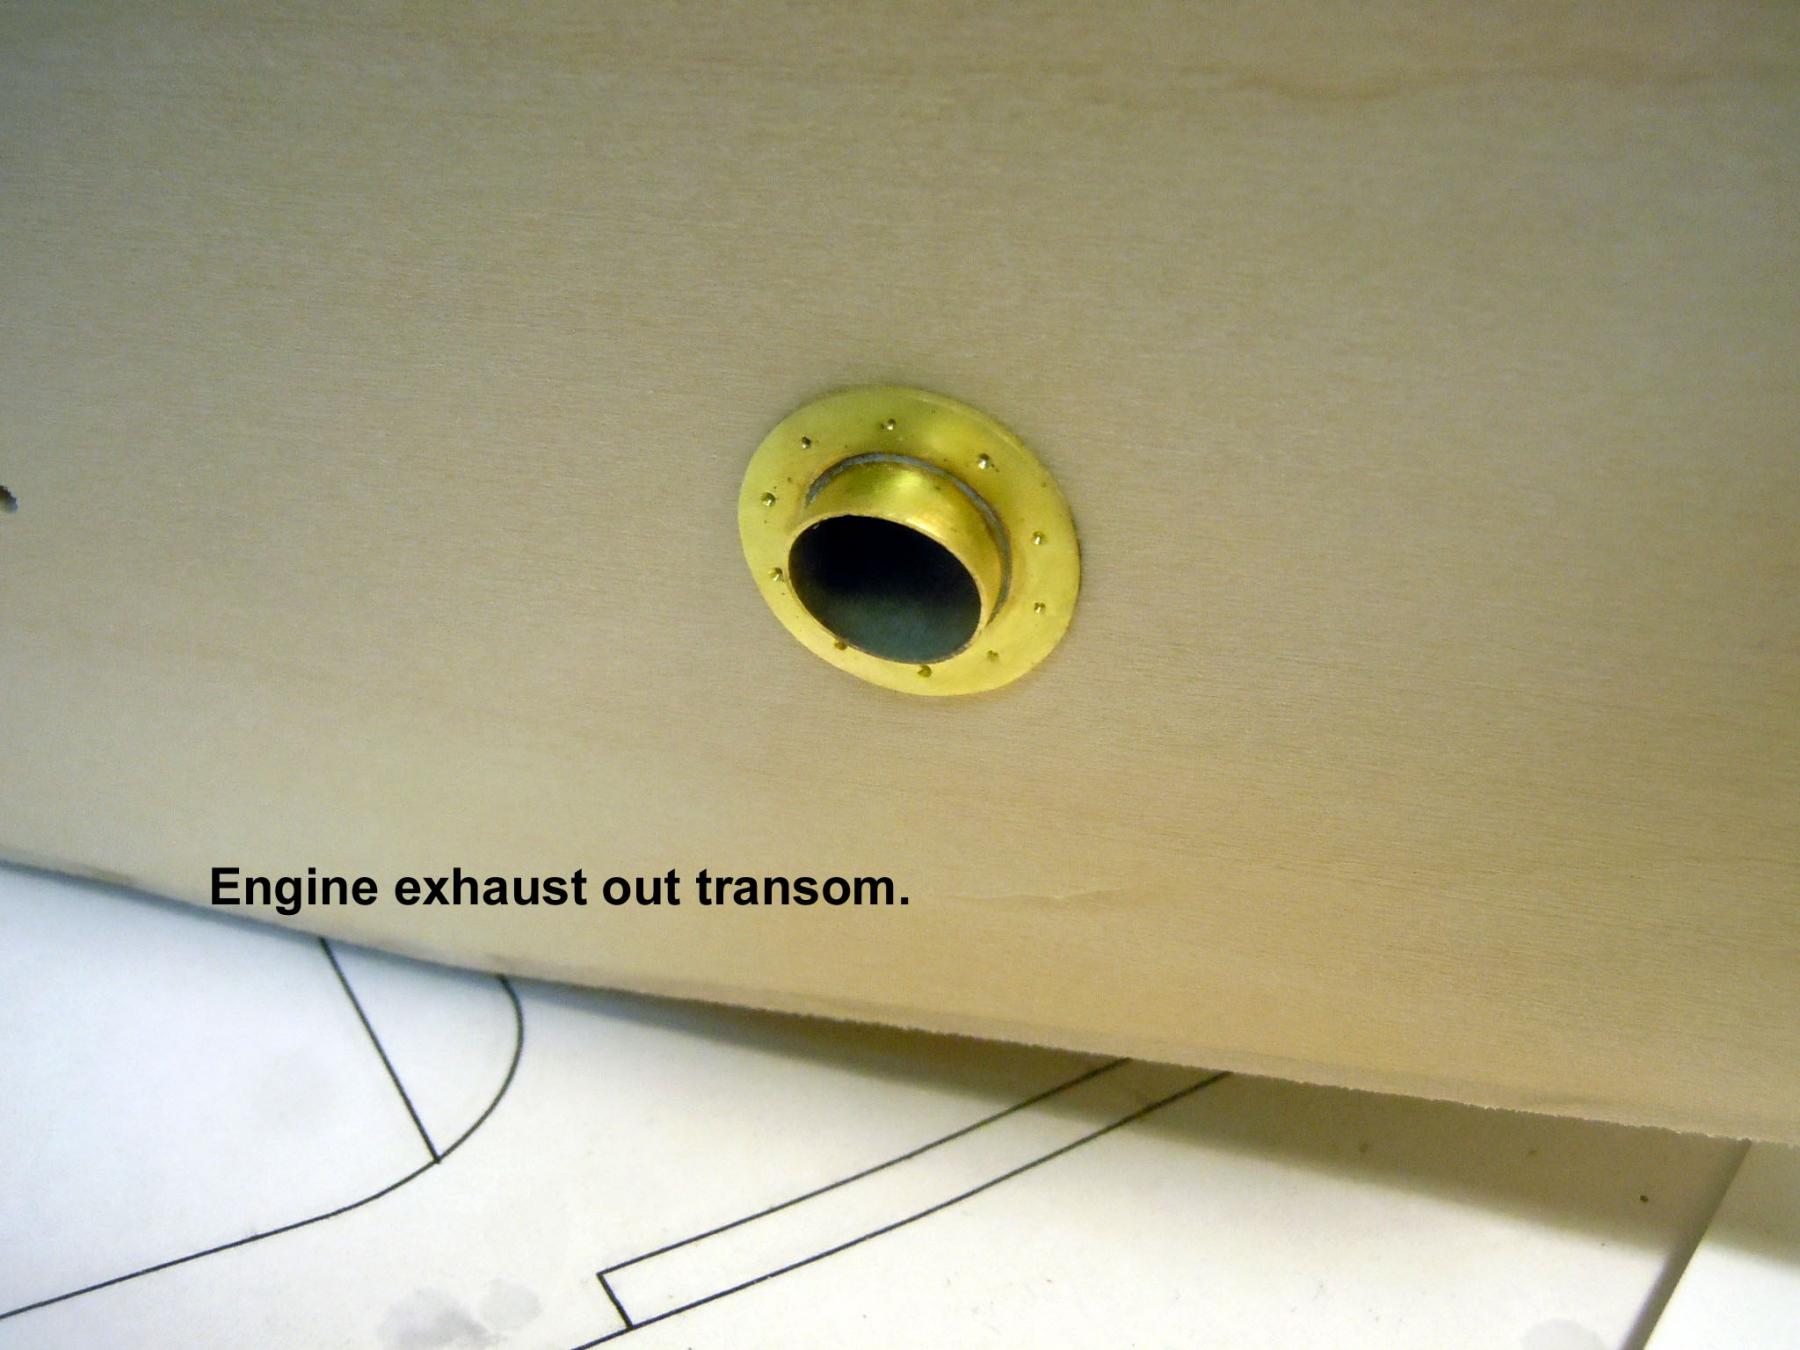
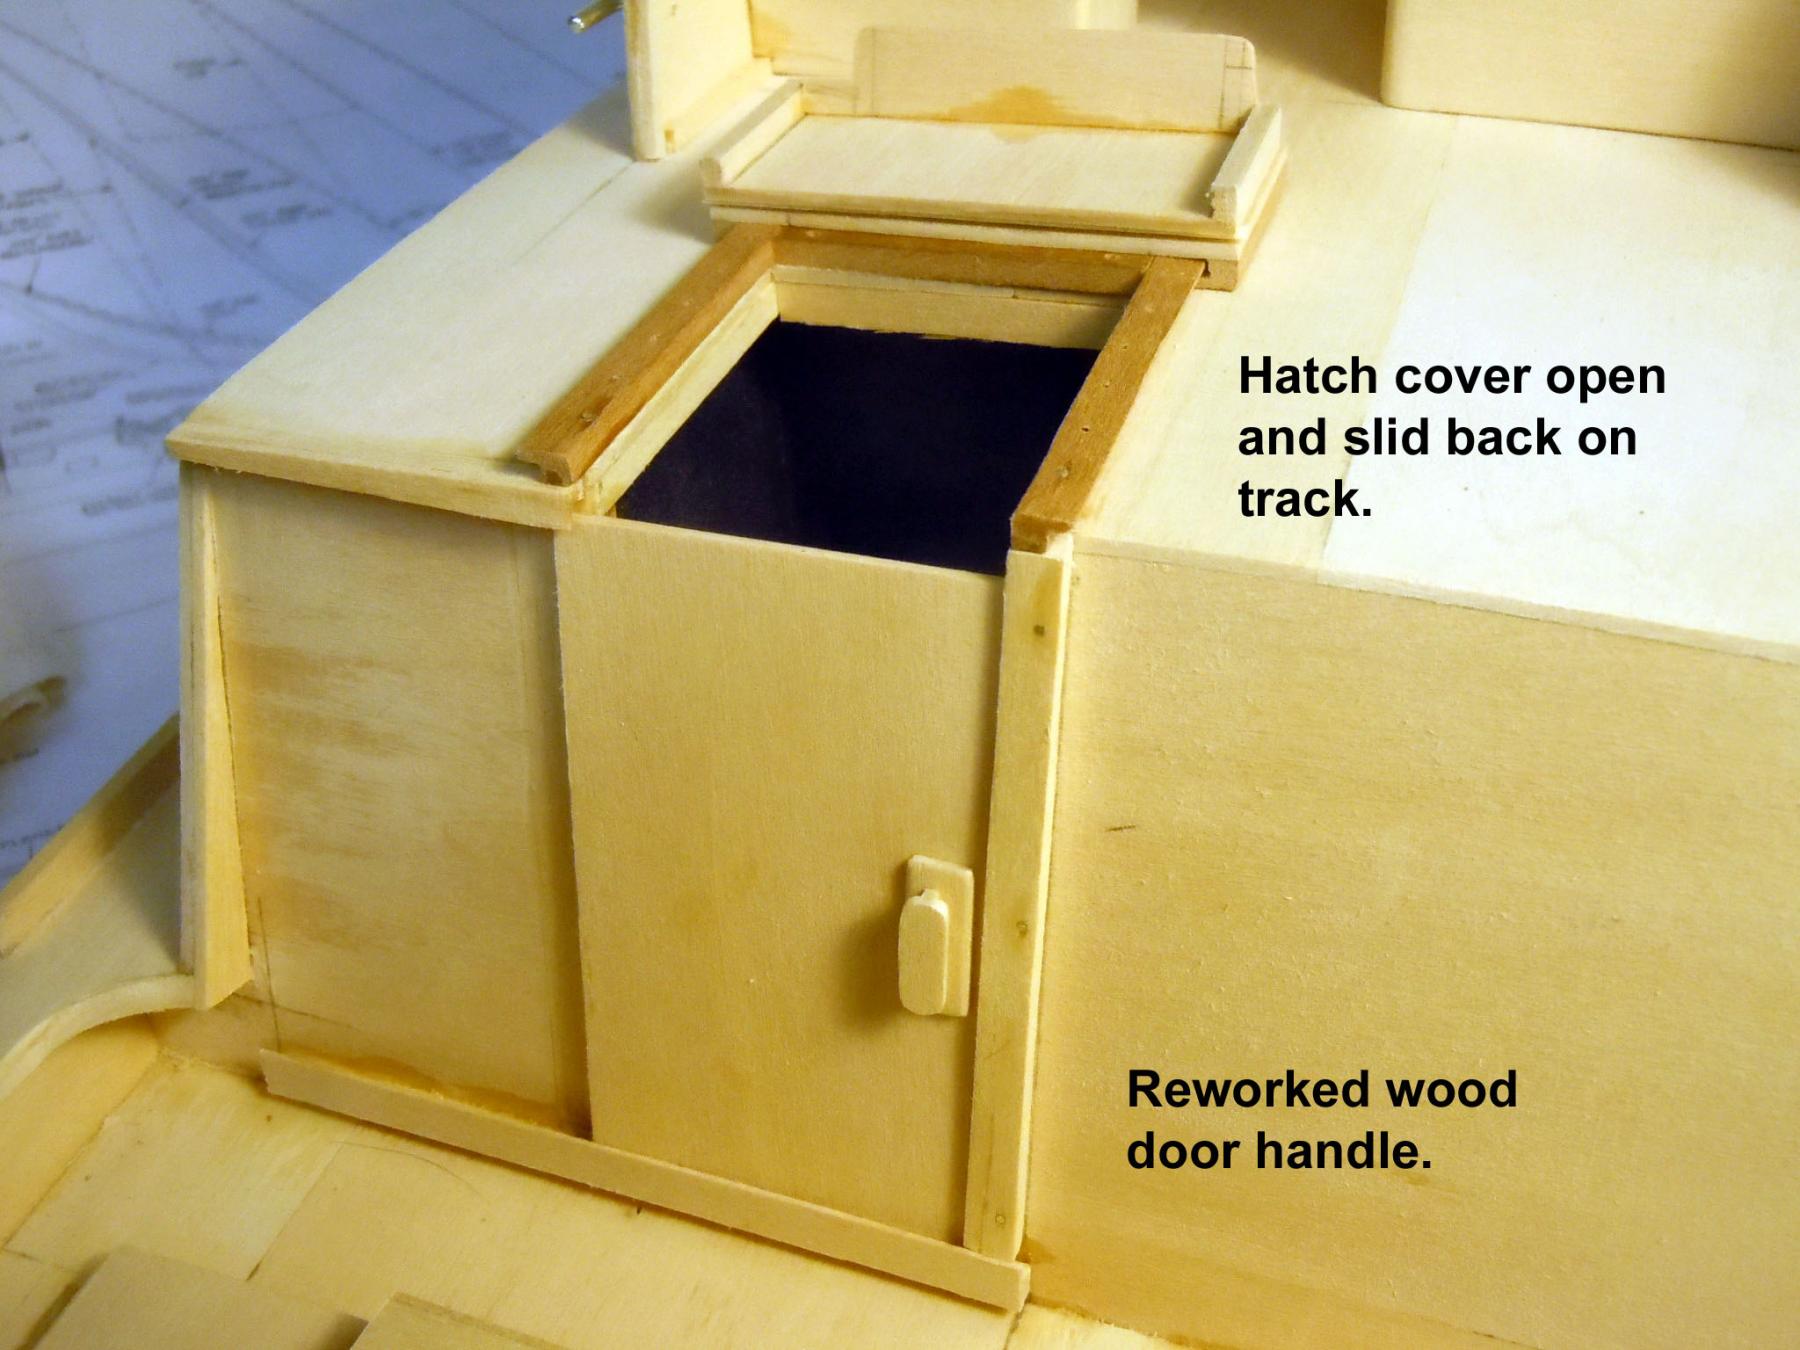
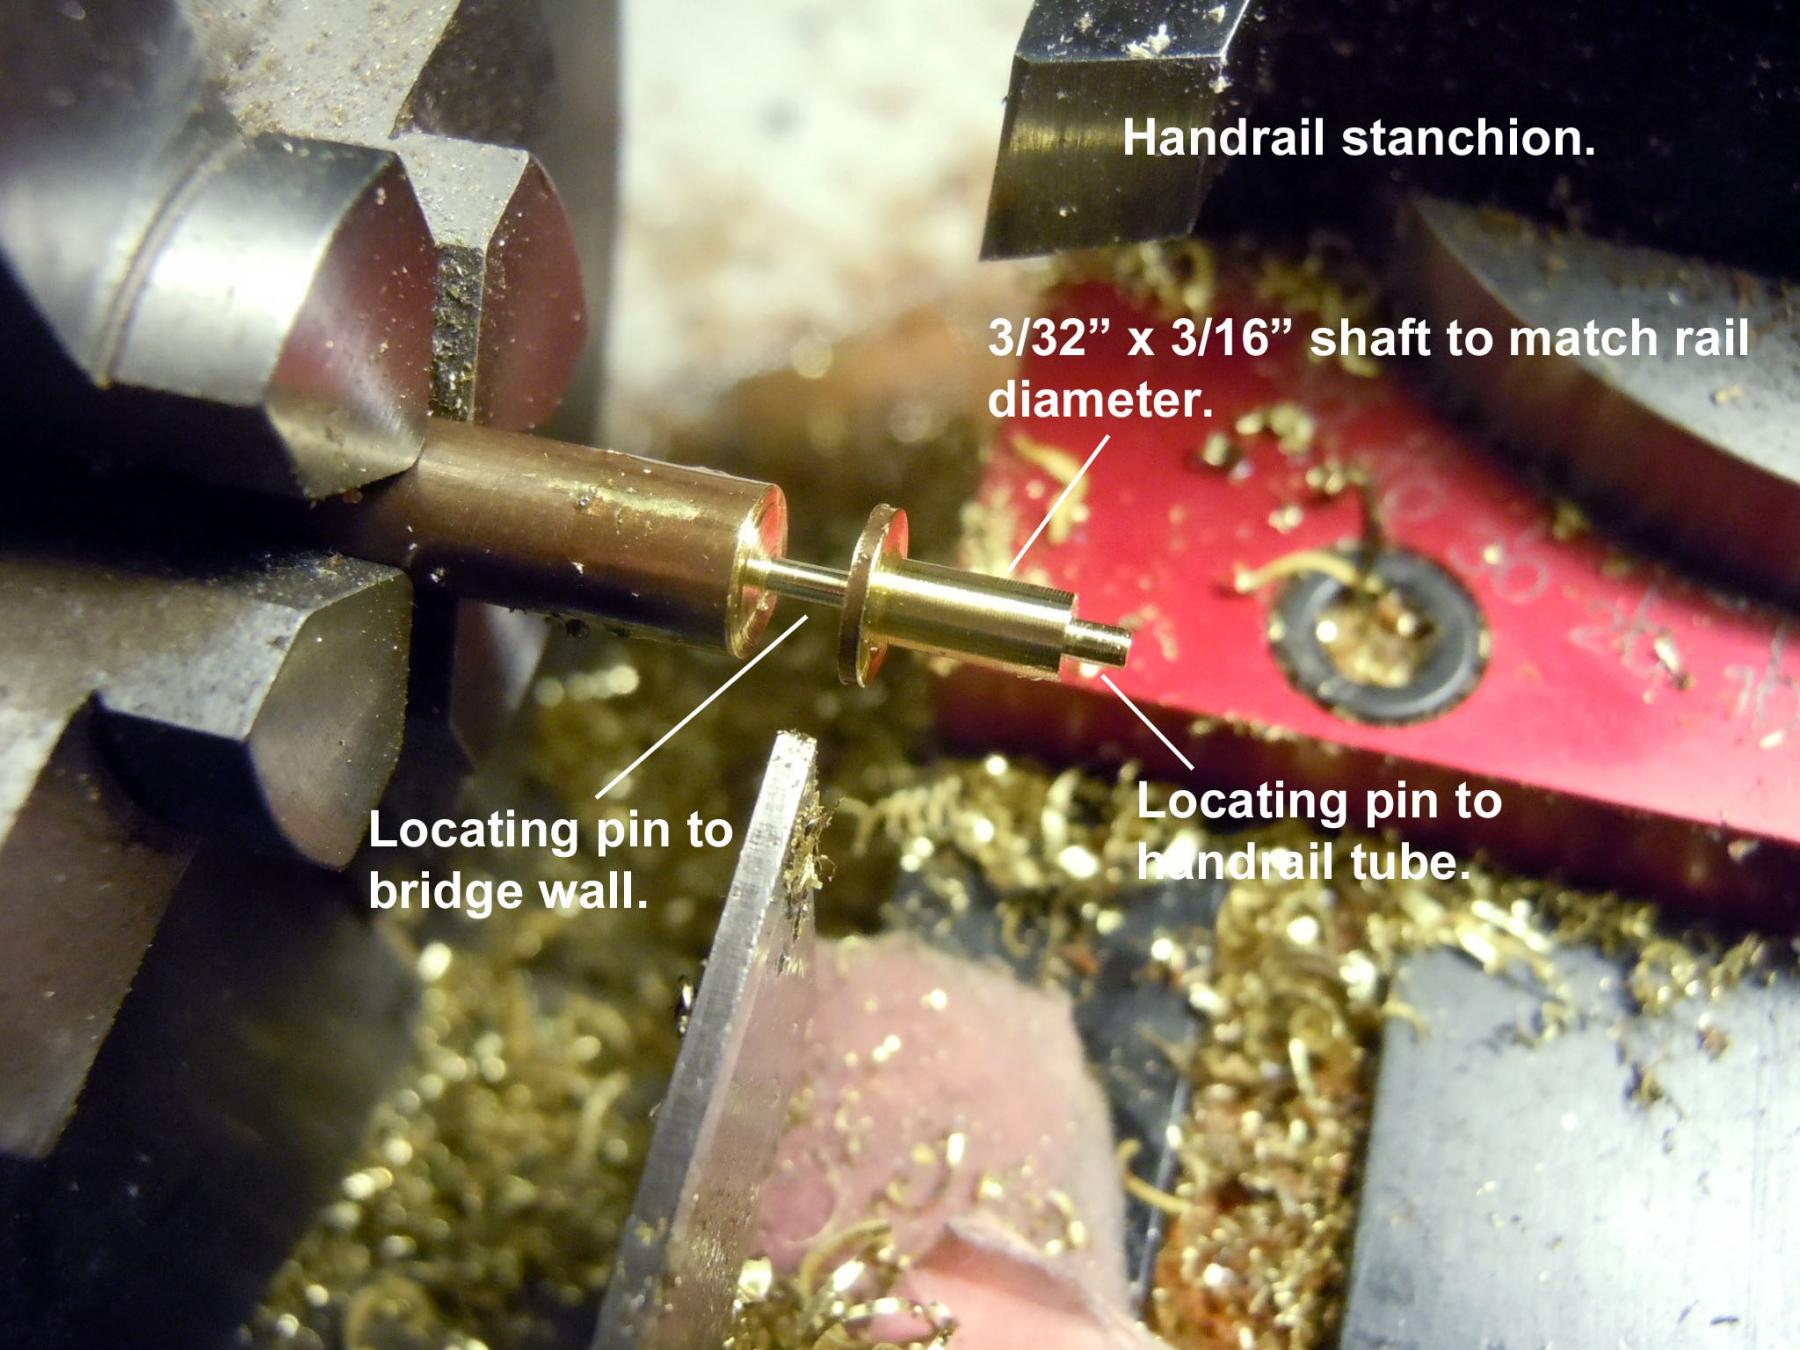
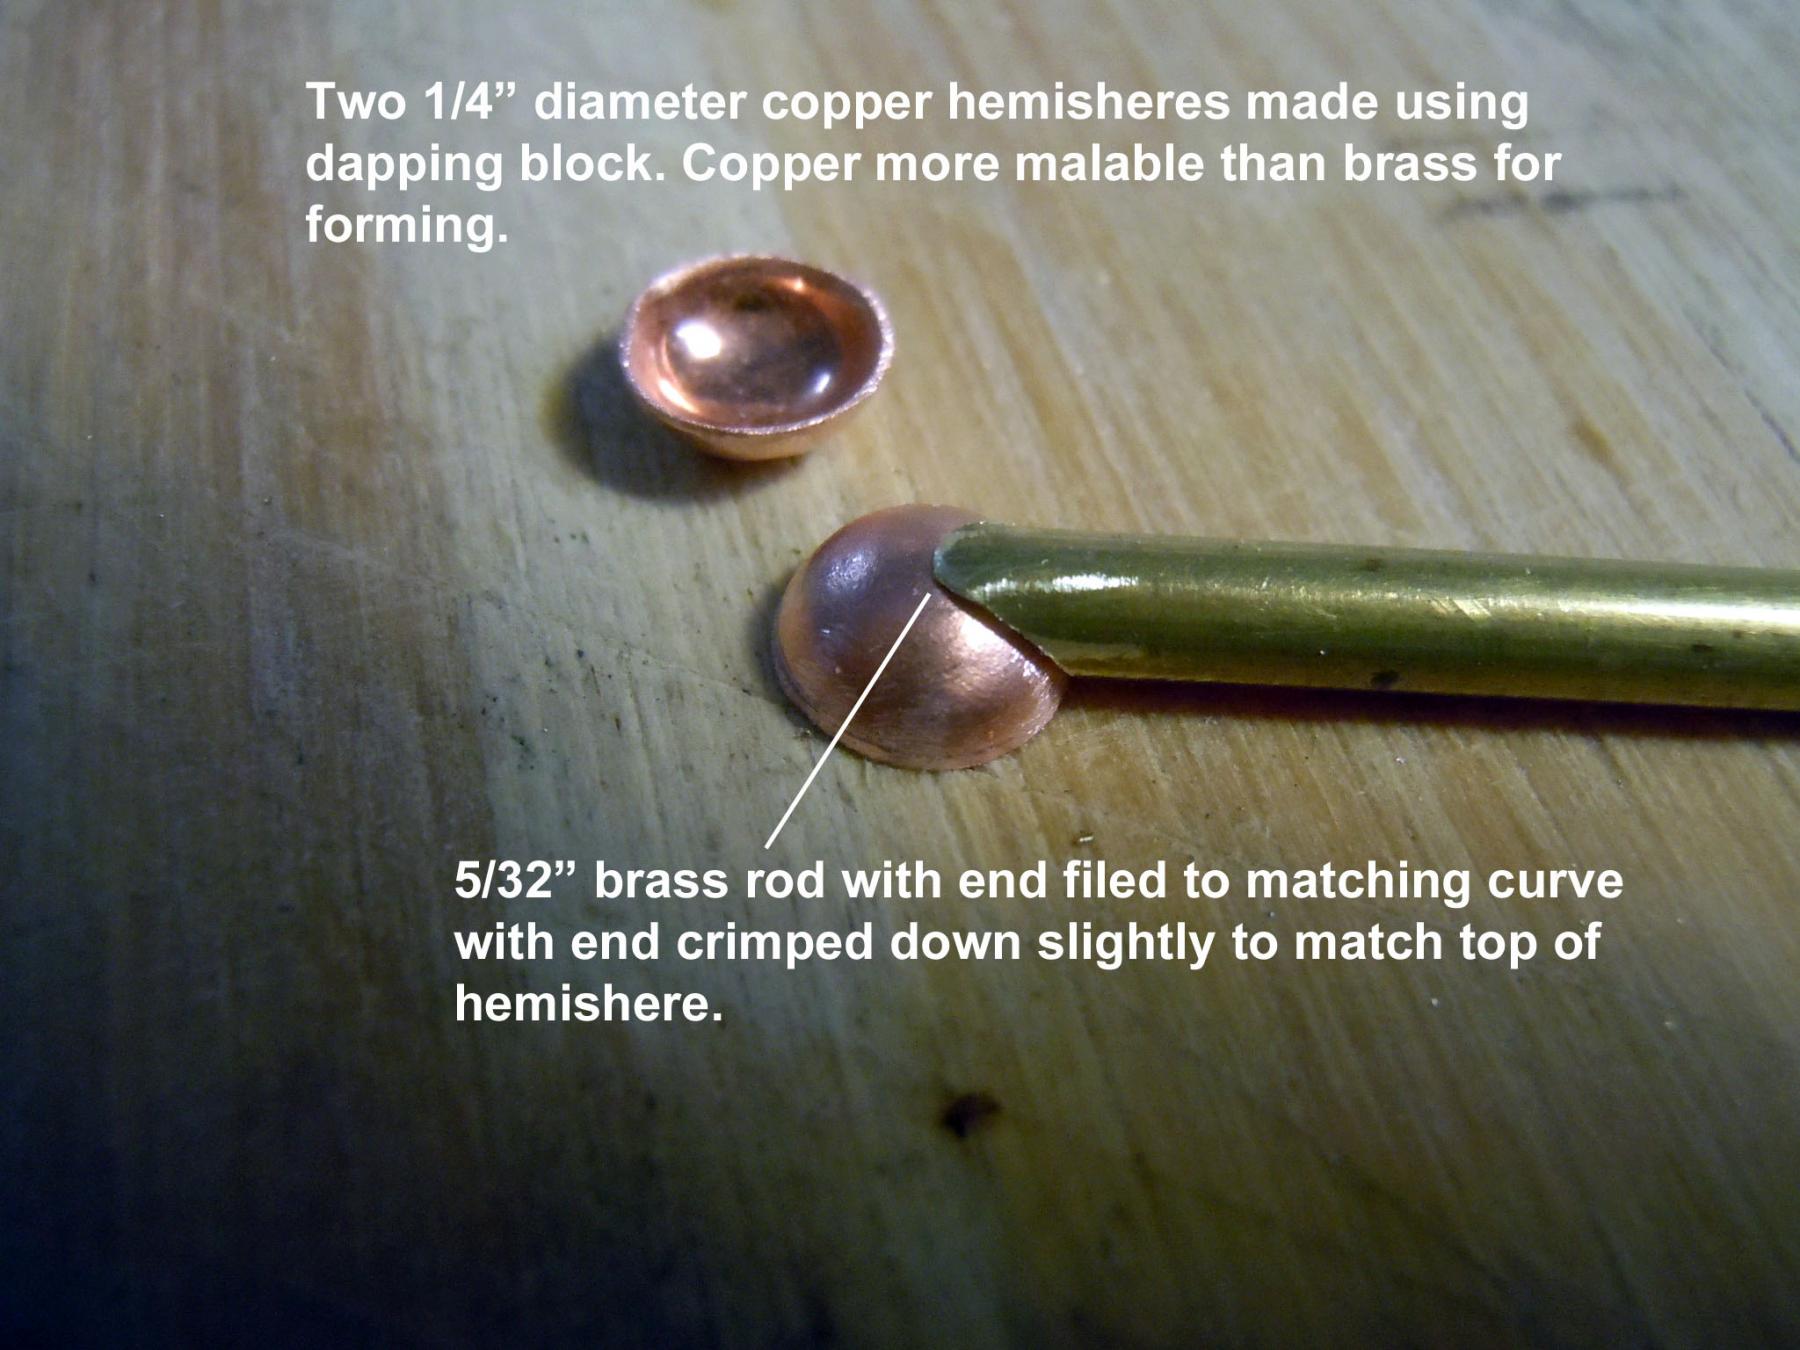
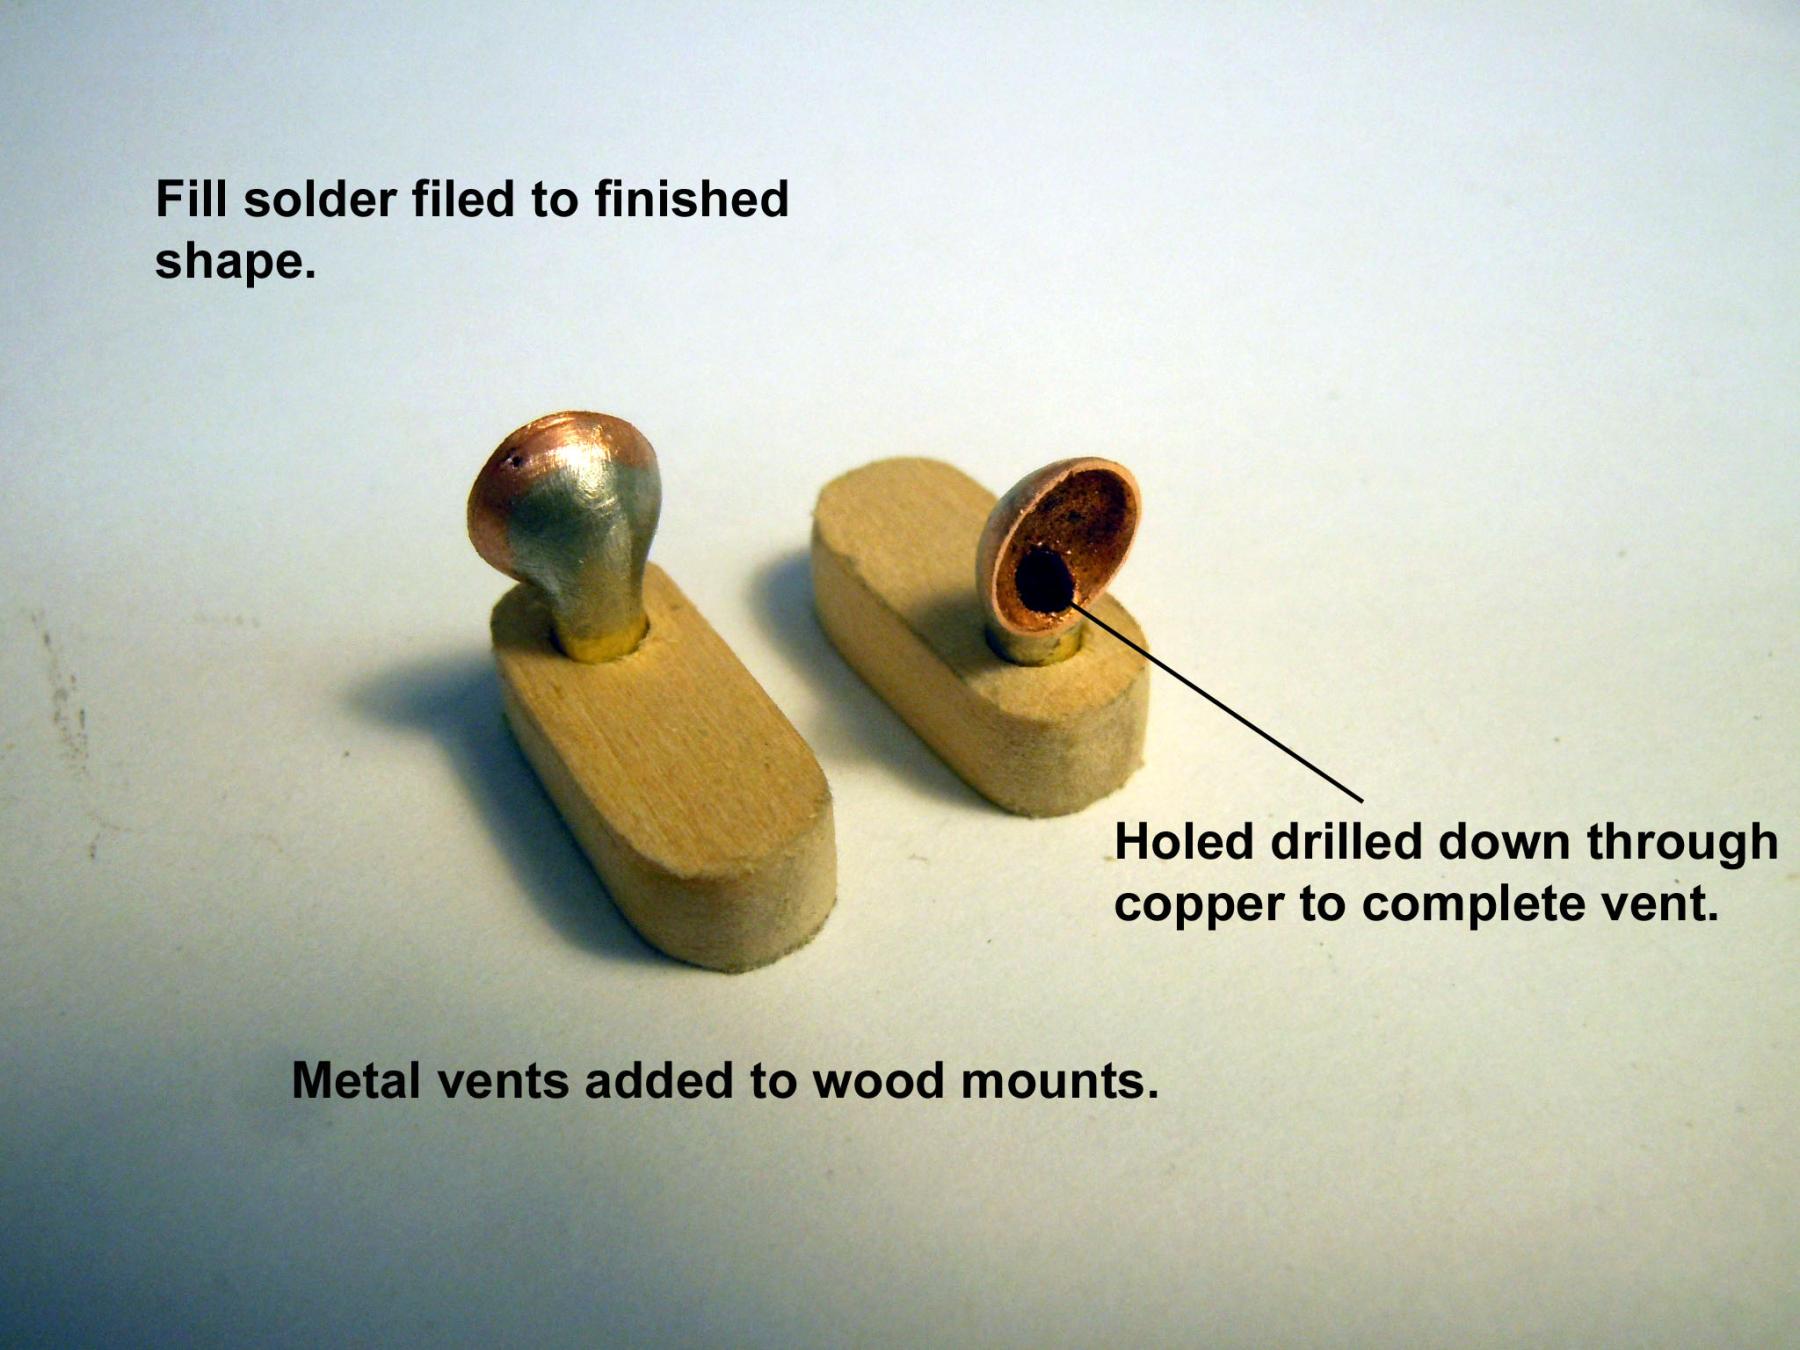
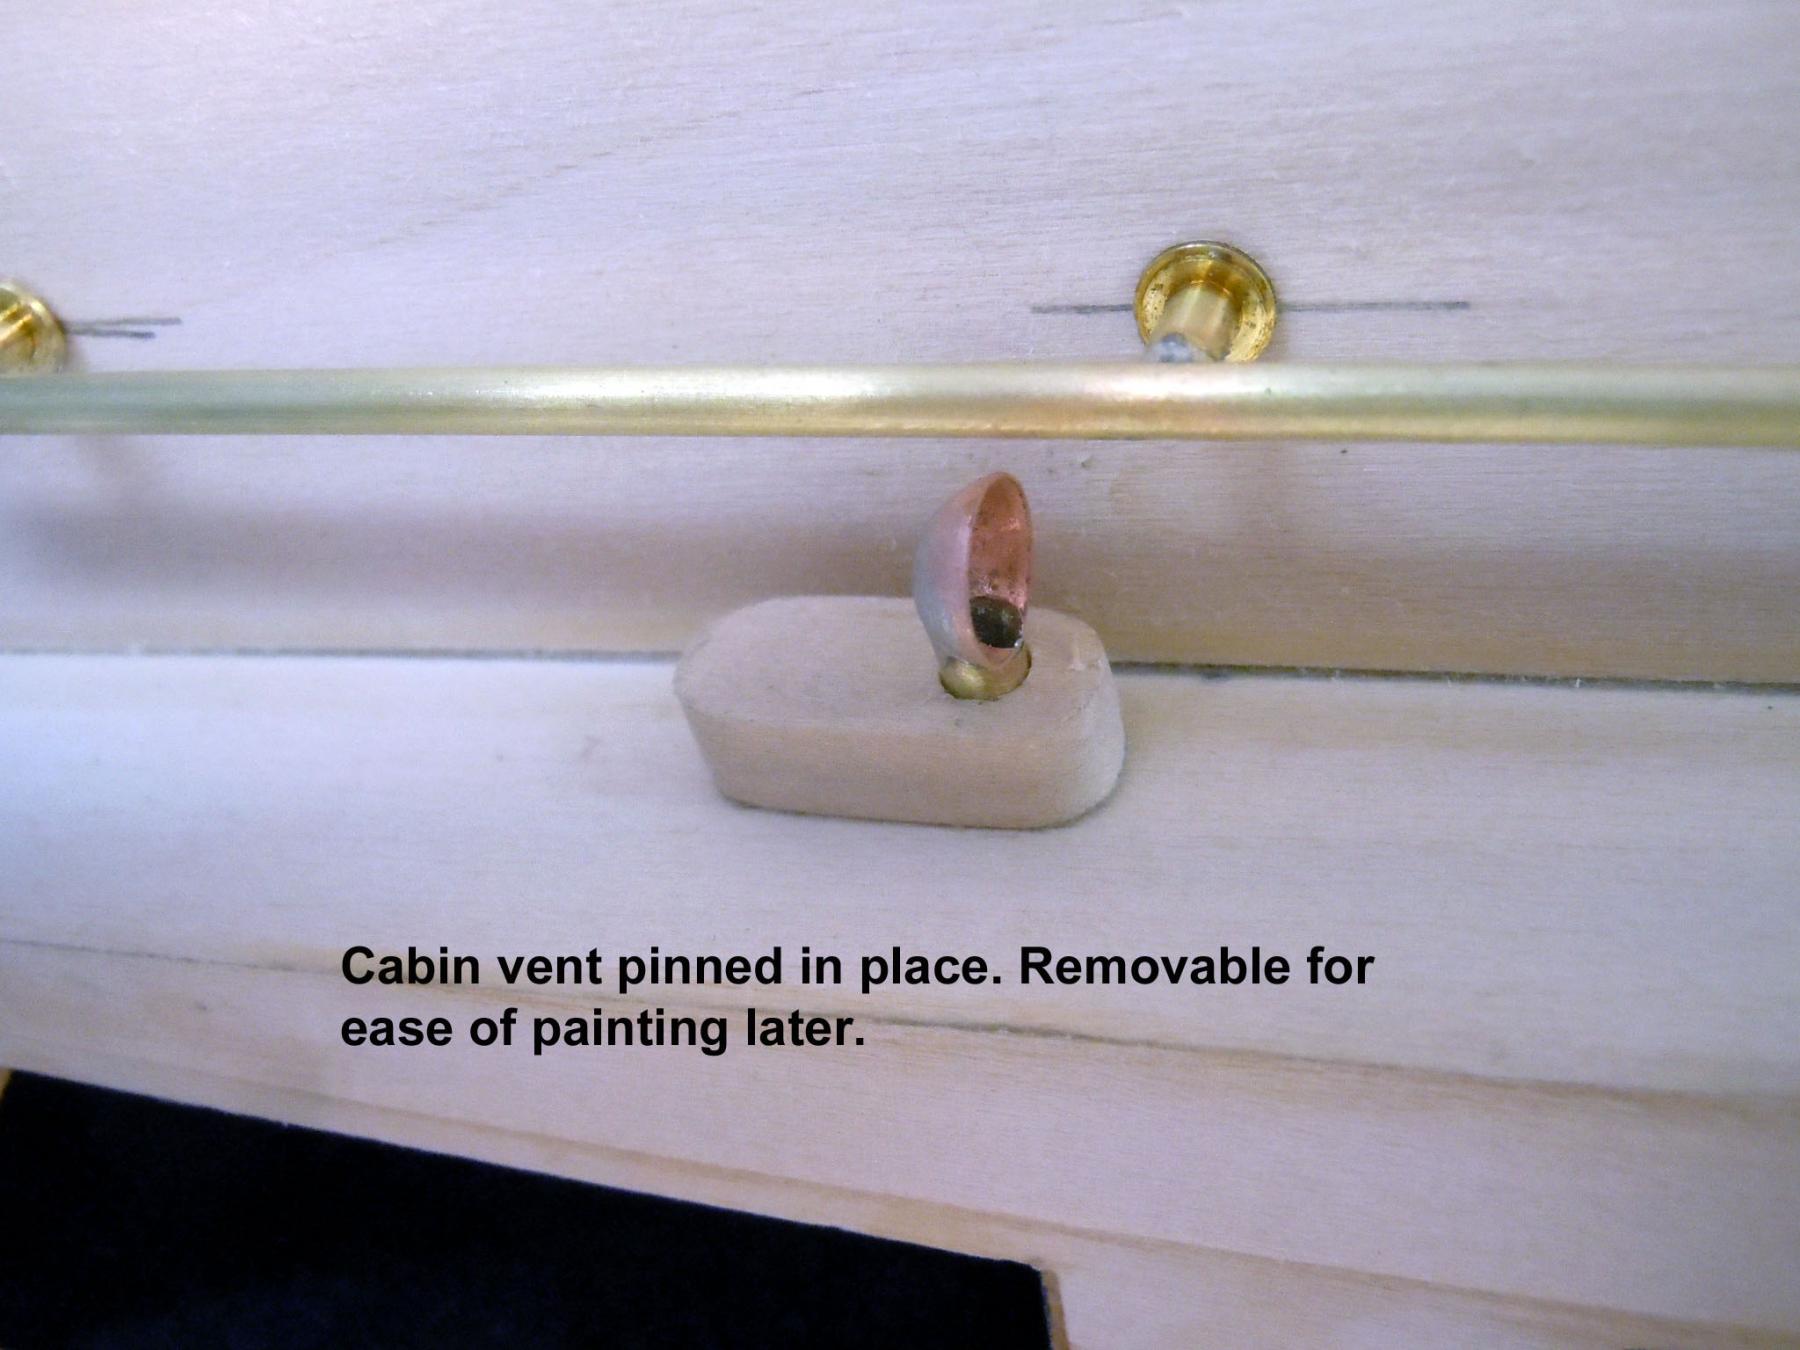
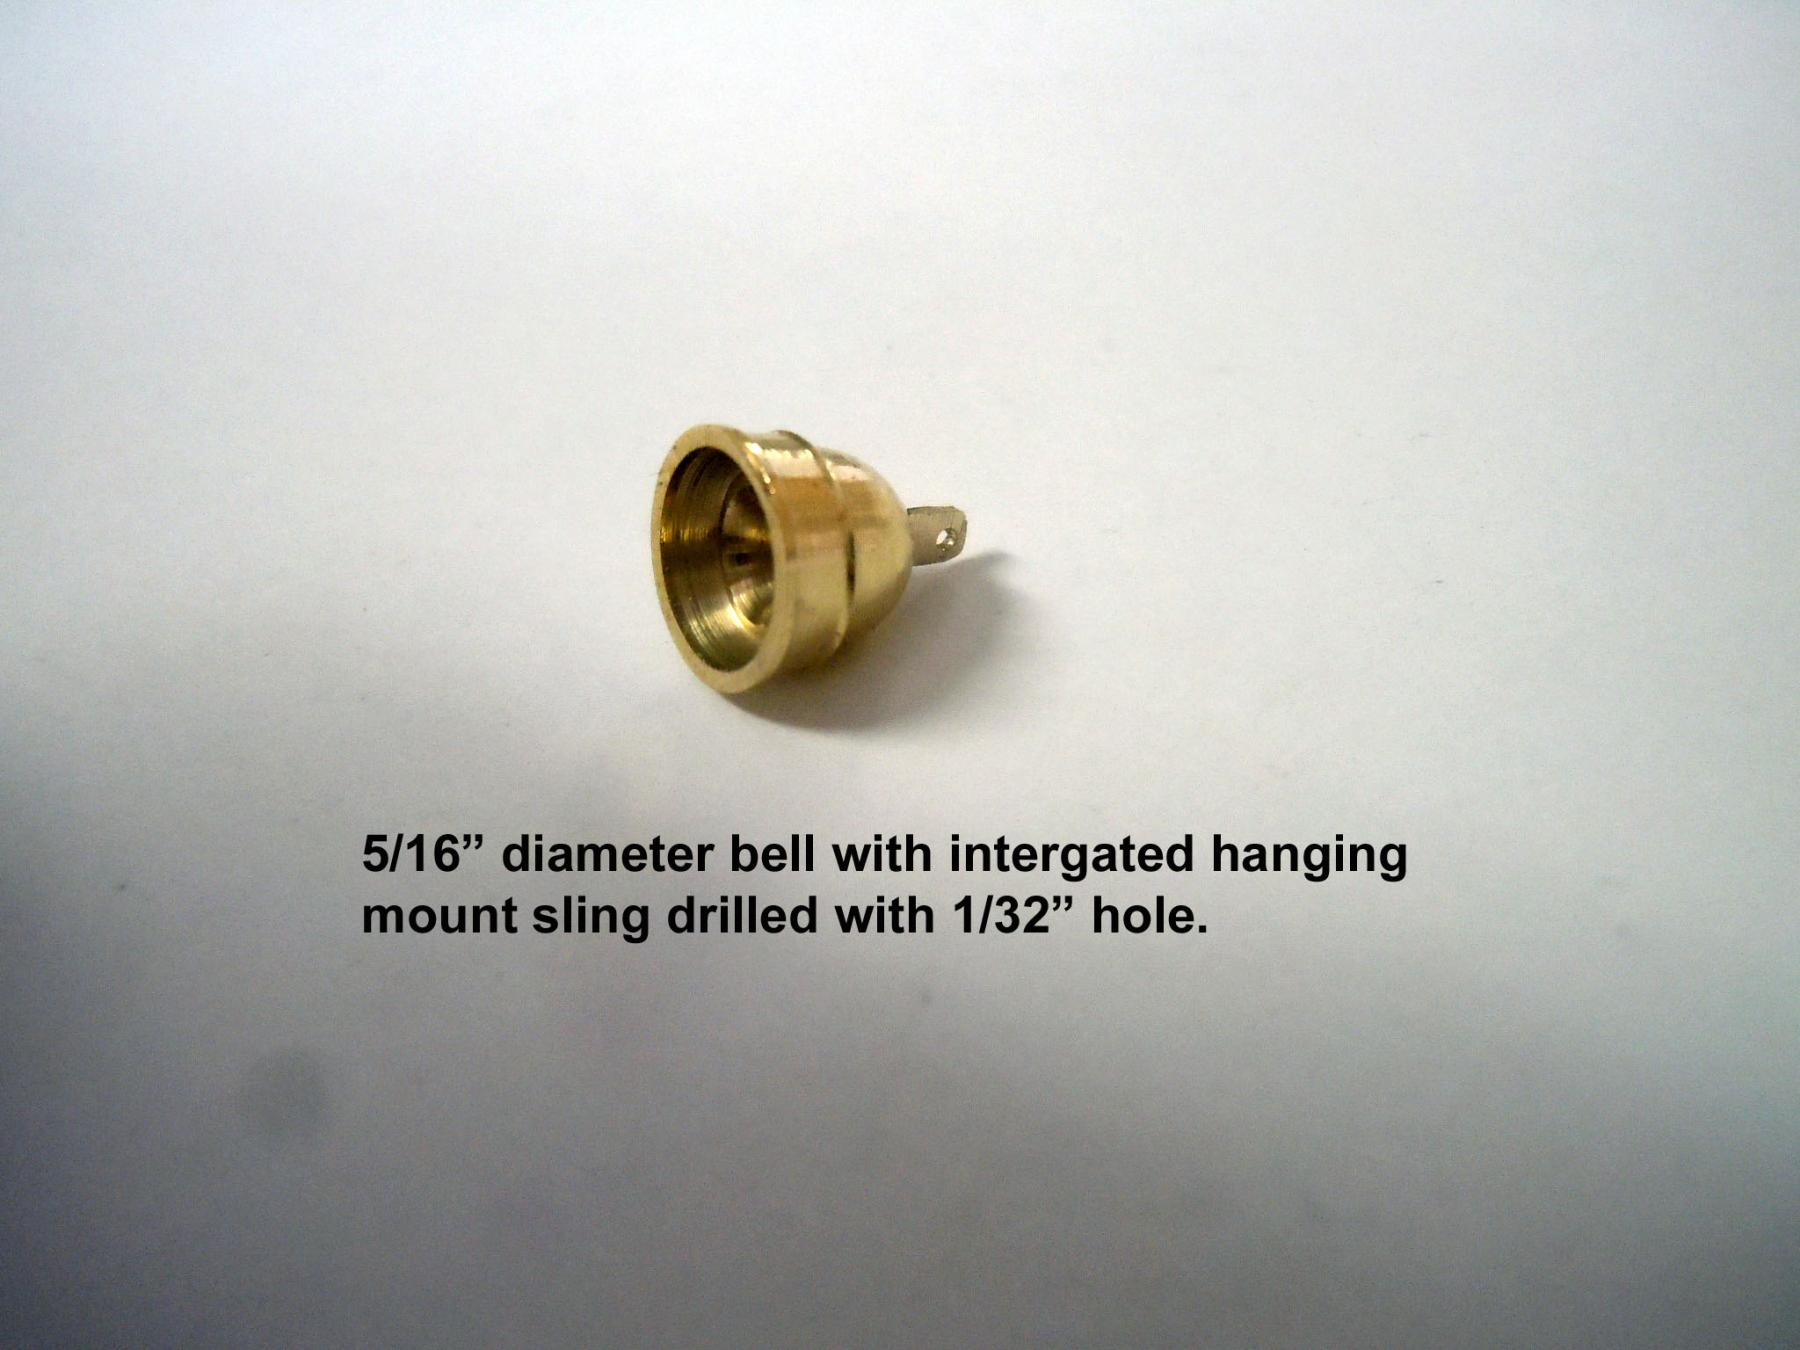
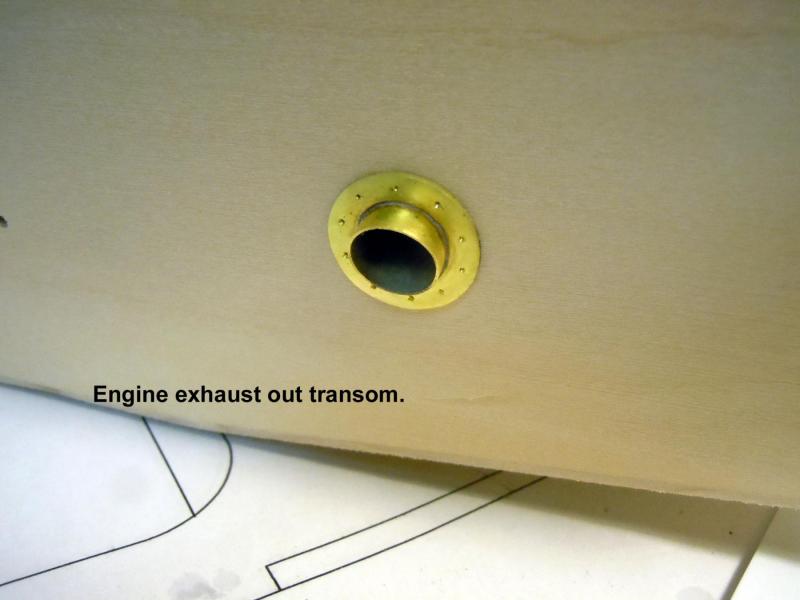
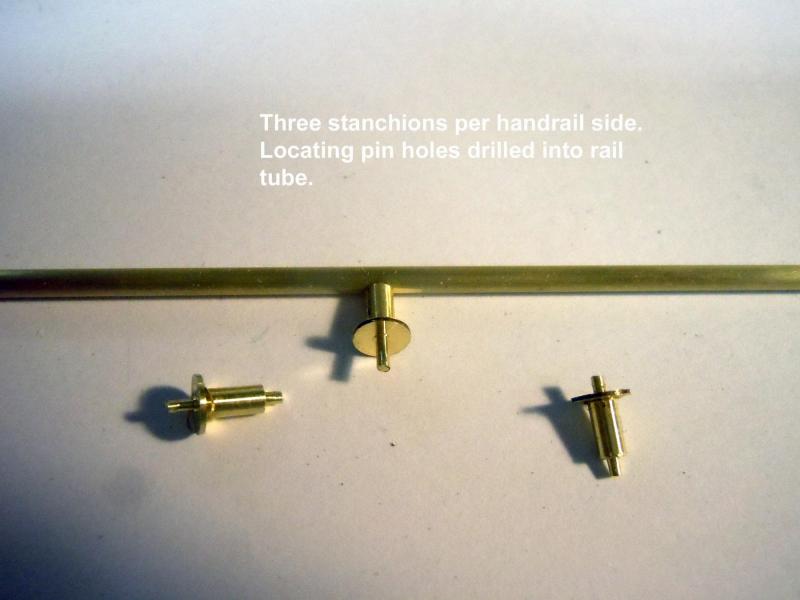
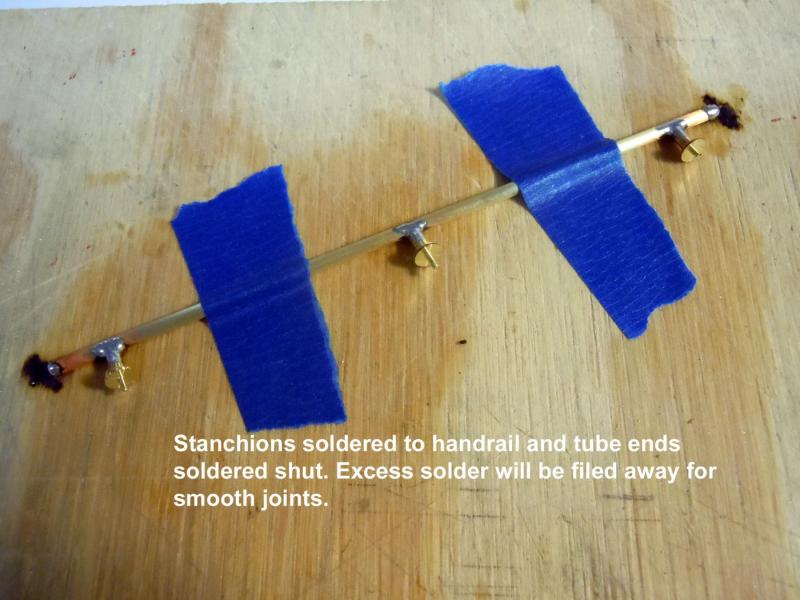
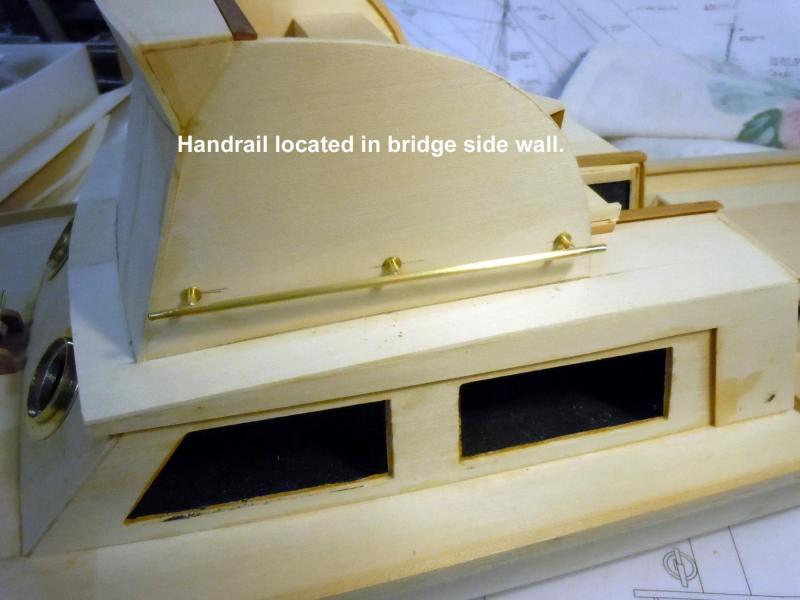
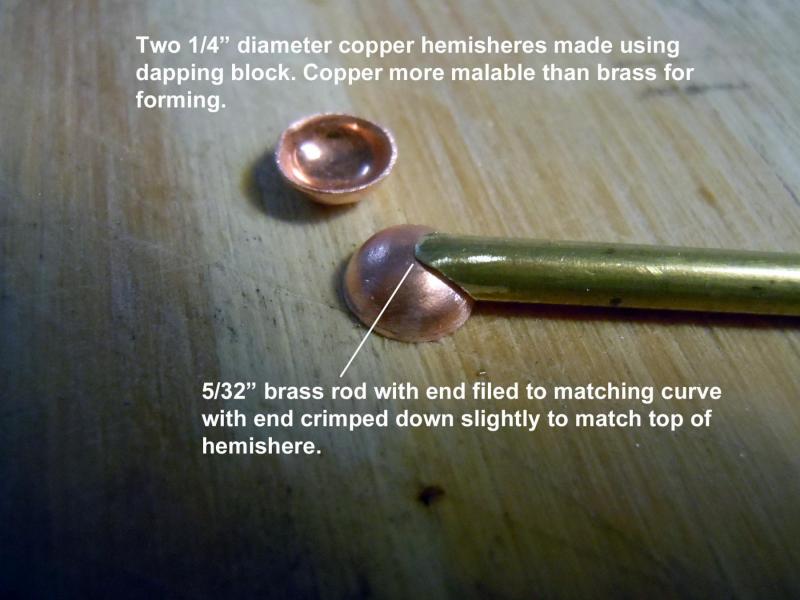
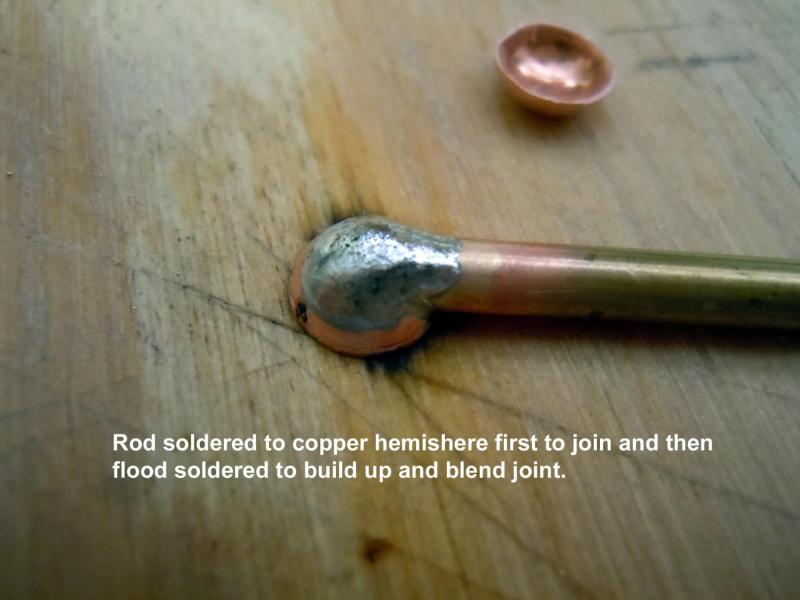
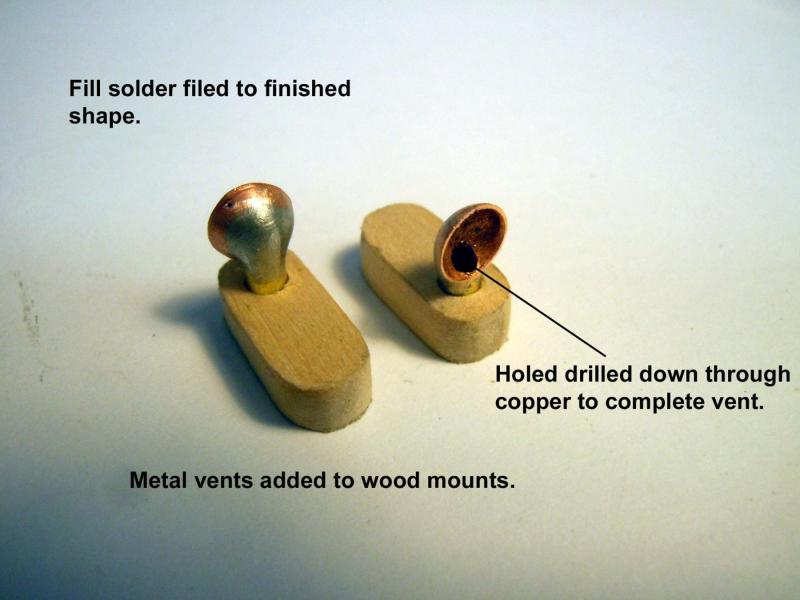
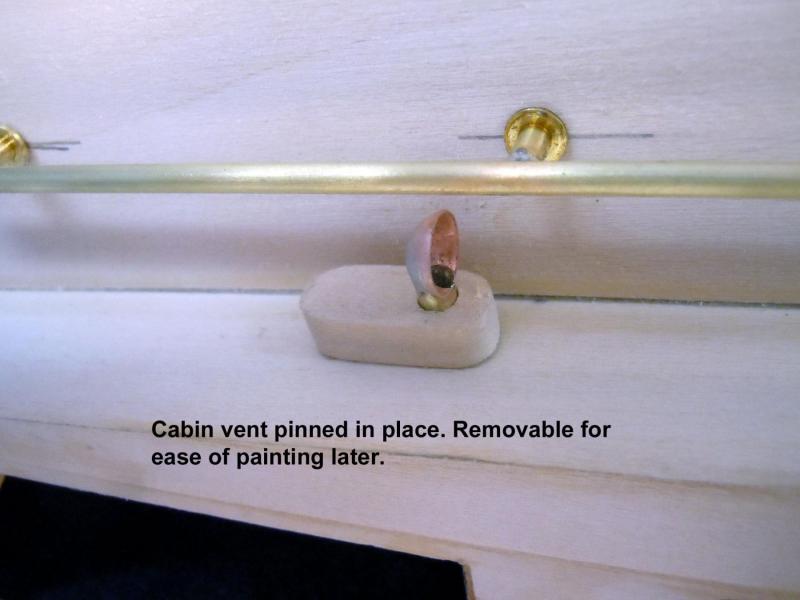
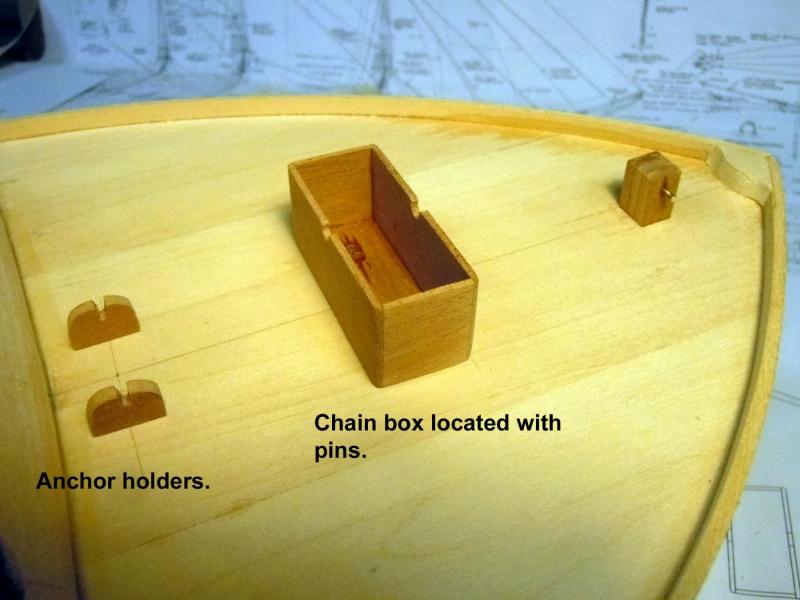
I have been busy with the grand kids and working on the small accessories on the lathe making parts for them. Here is the bow anchor chain guide for lack of a better word. I also made the engine exhaust with a 3/8" diameter tube. I also reworked the sliding door handle with the proper wood one. I then moved onto the handrails that attach to the sides of the bridge. First six identical stanchions had to be turned on the lathe. This is where the precision of the Sherline comes into play. Next I made the cabin vents using both copper and brass parts soldered together. I 1/4" diameter copper hemispheres were made using my wife's dapping block. I then started on the boat bell that will mount of the forward angled bridge wall. Here is the bell with the integrated sling mount drilled with a 1/32" hole to attach to the hanging bracket. Happy New Year to all builders around the world!


- 162 replies
-
- 13
-
-
- dirty dozen
- fishing
- (and 2 more)
-
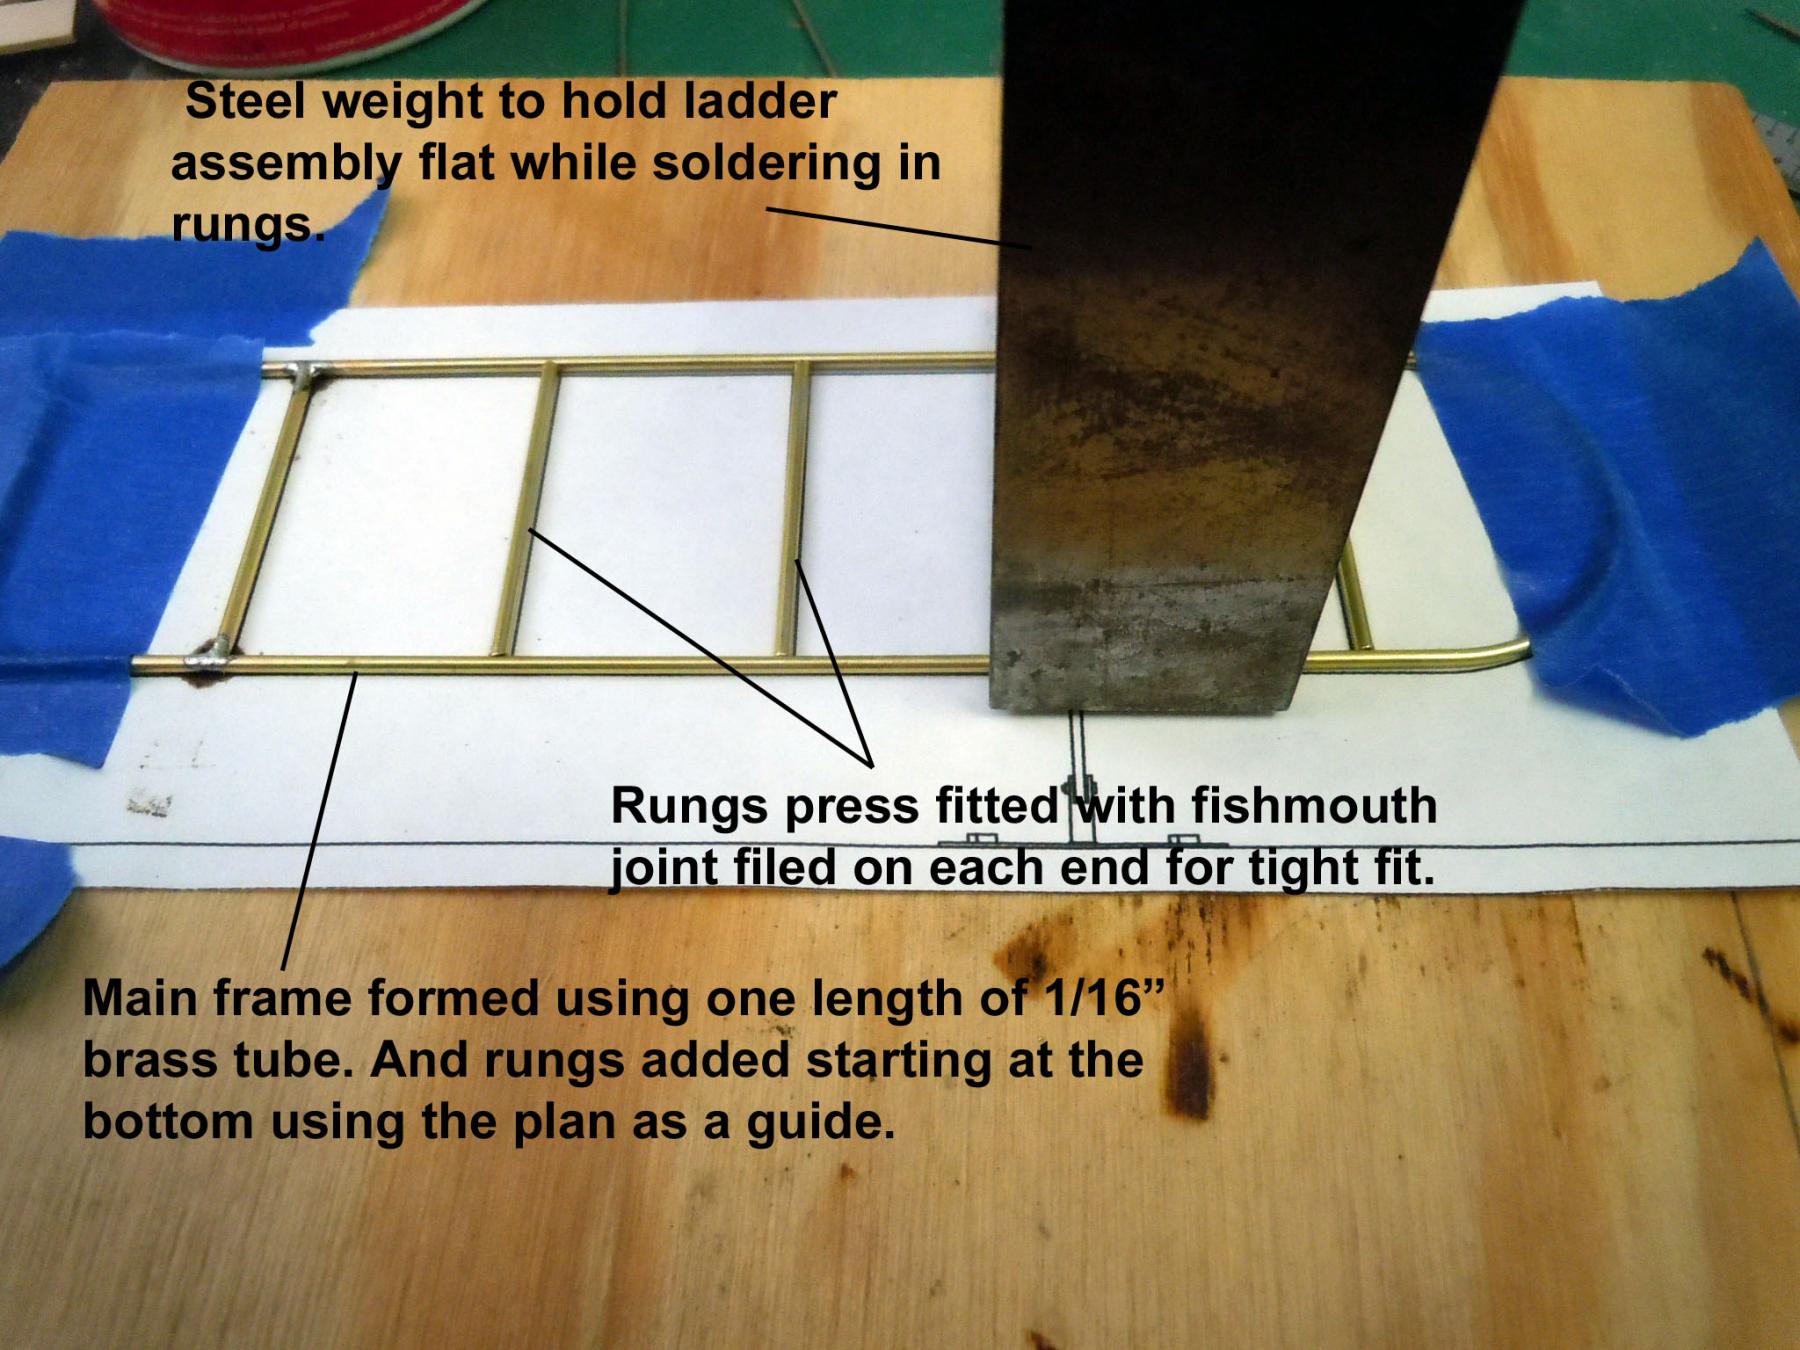
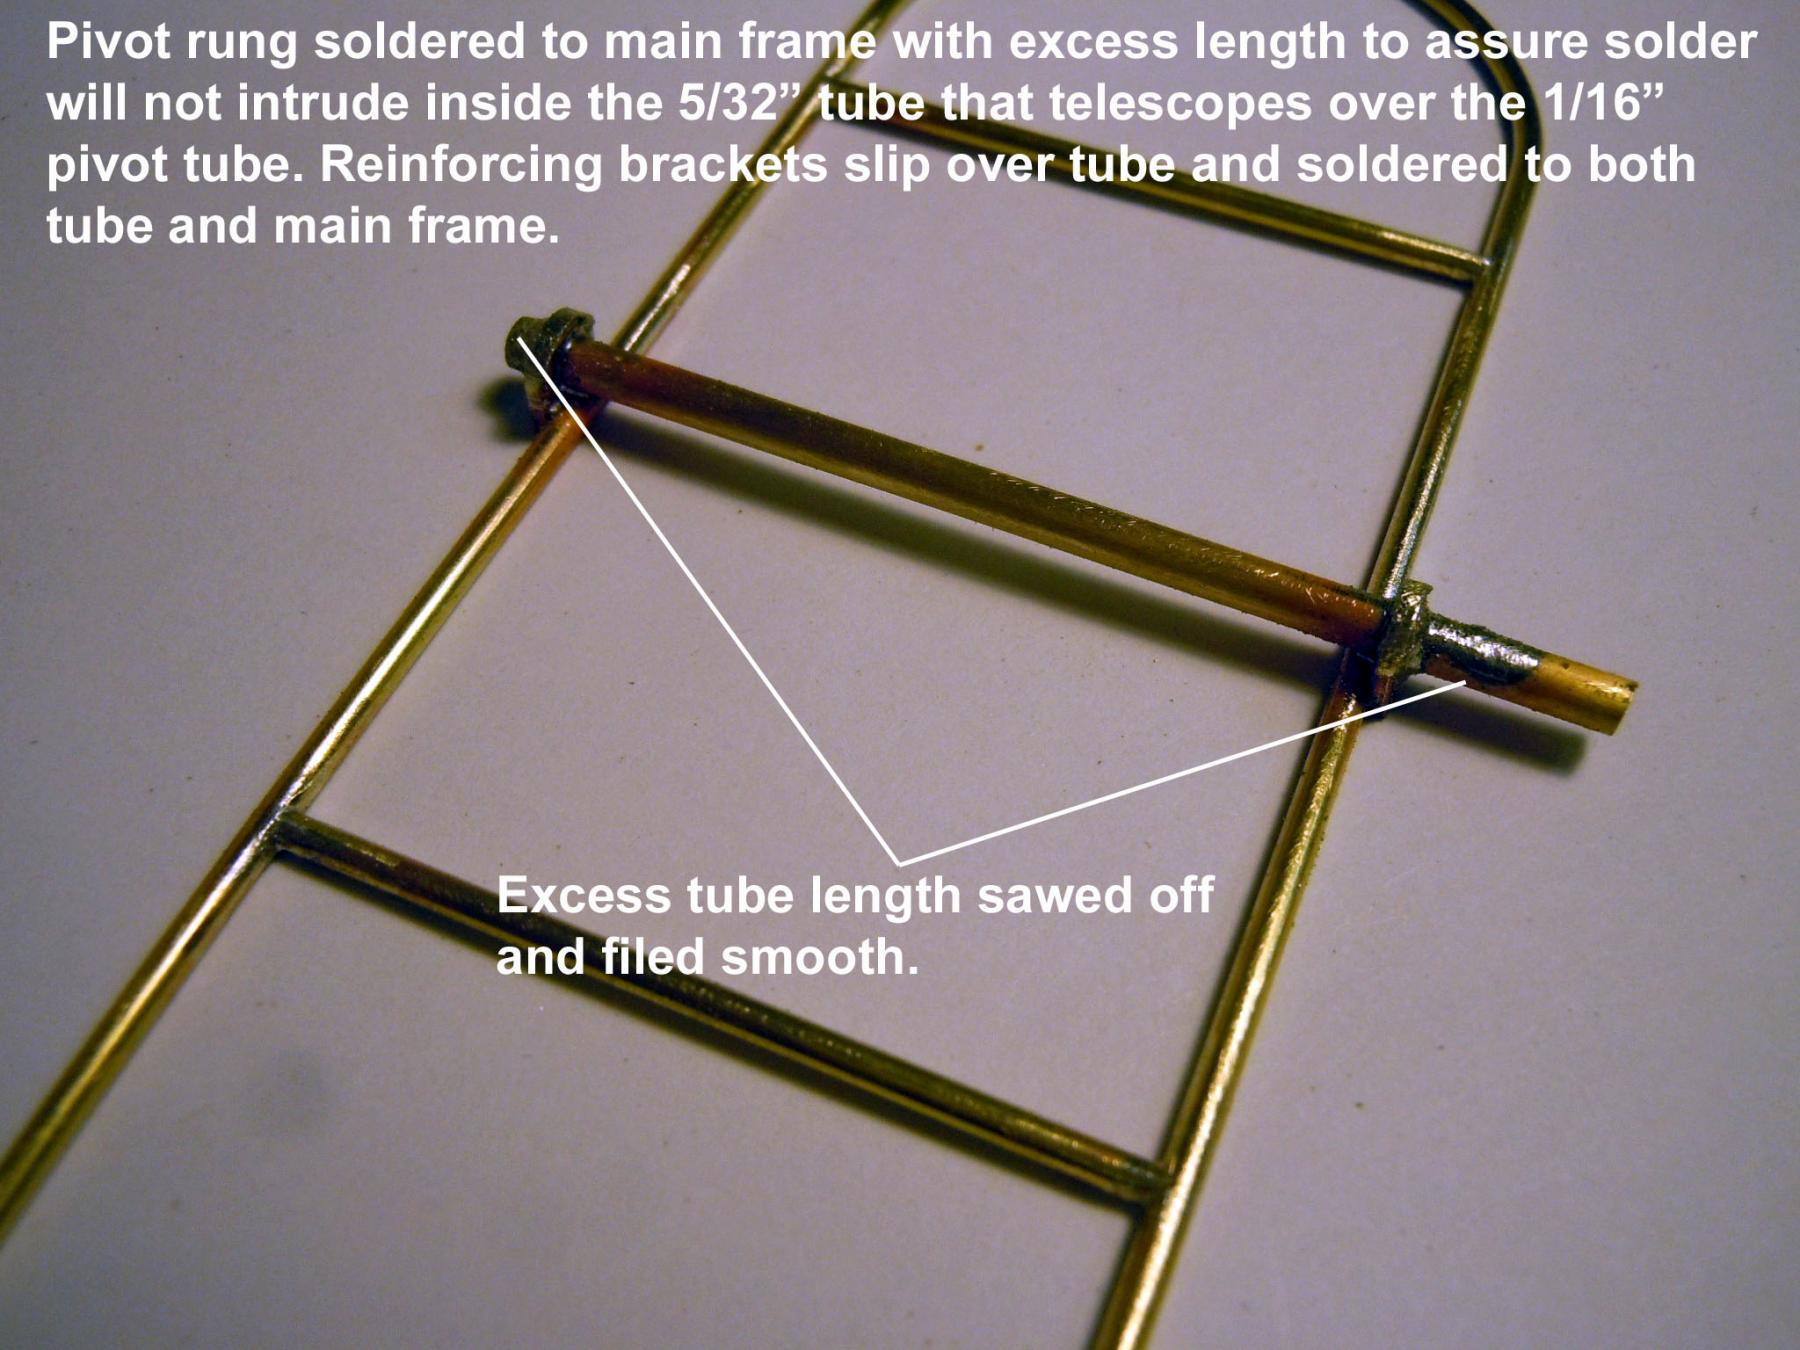
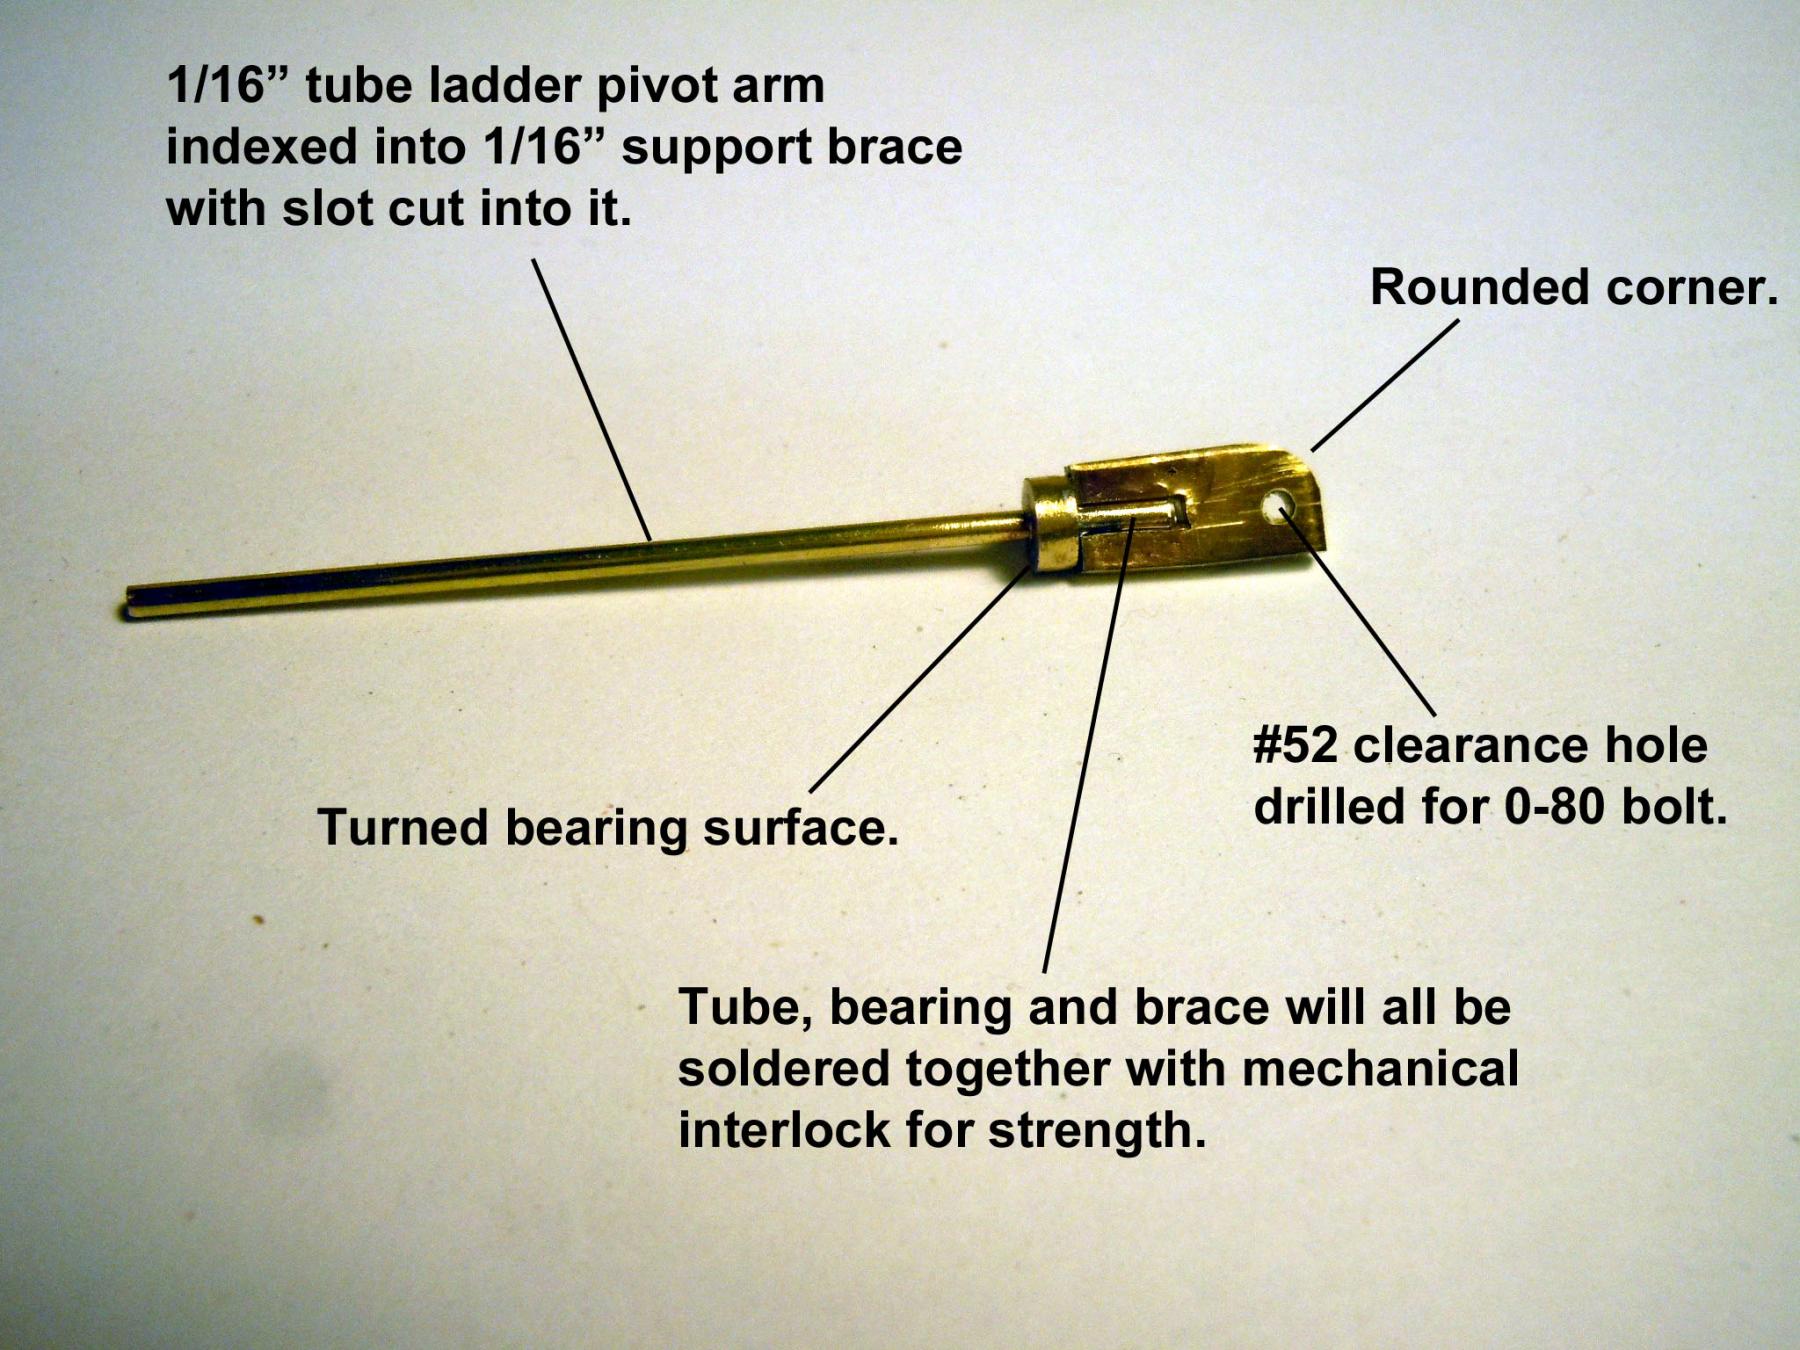
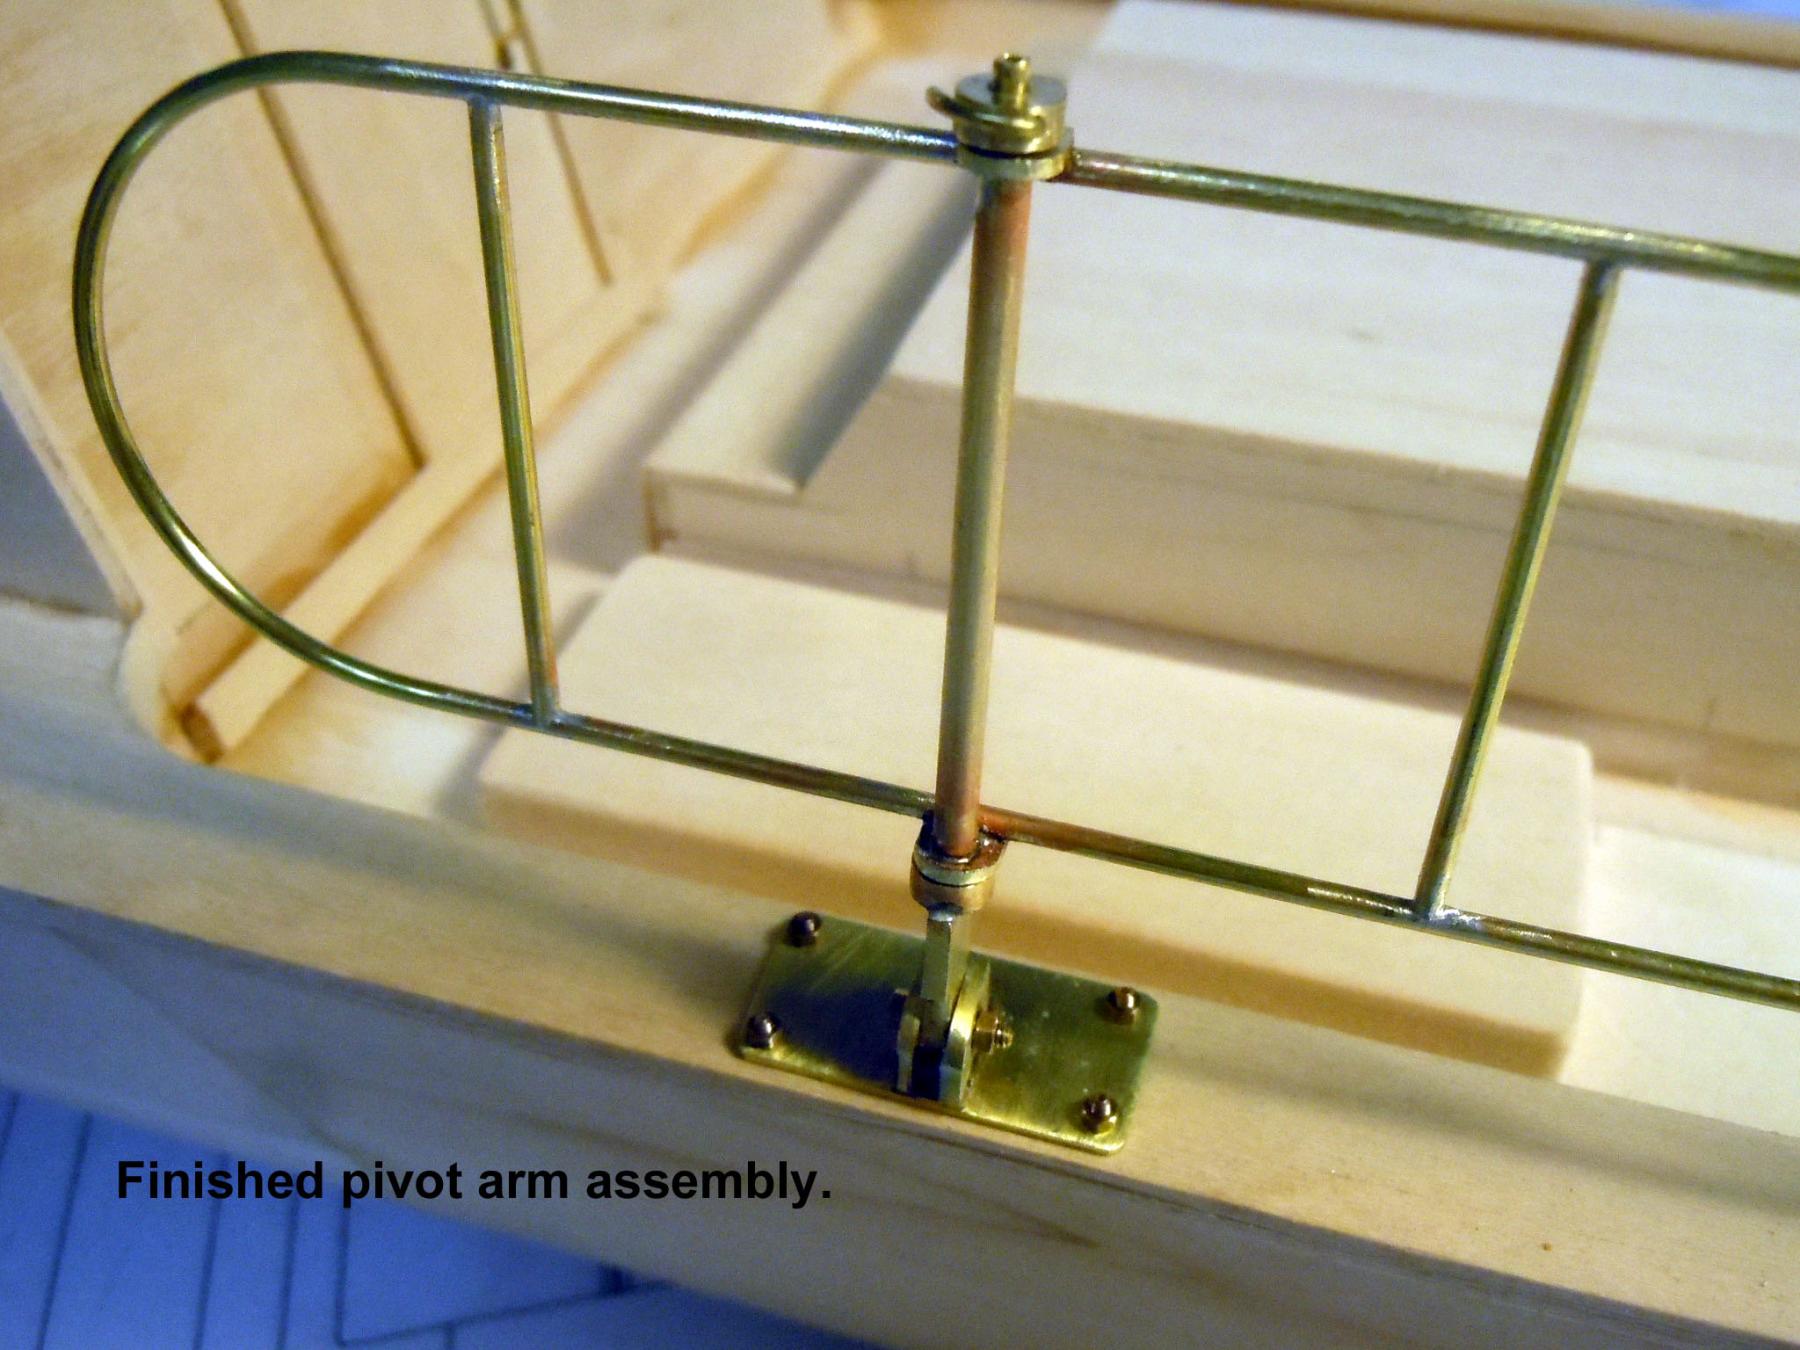
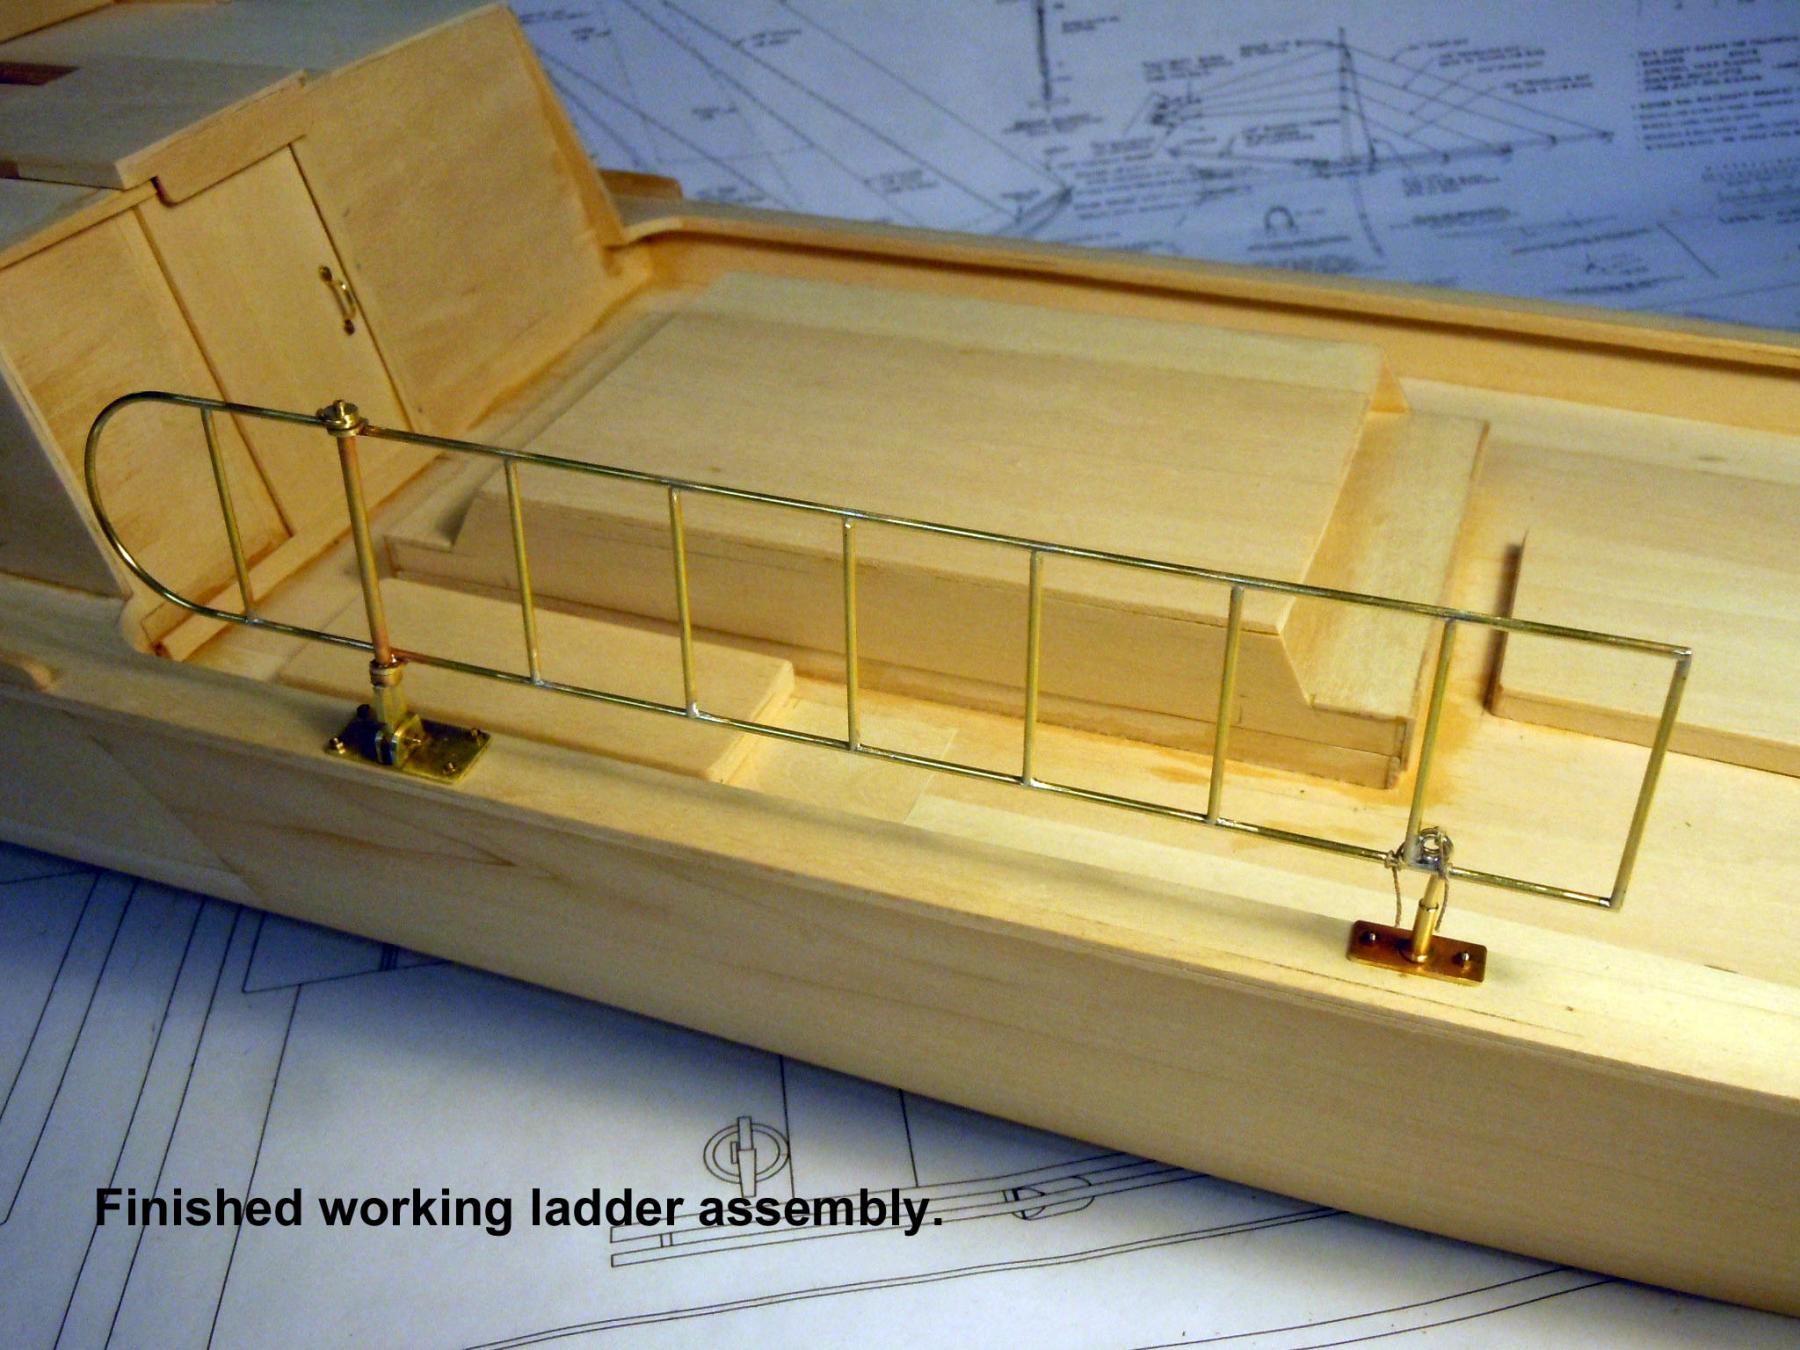
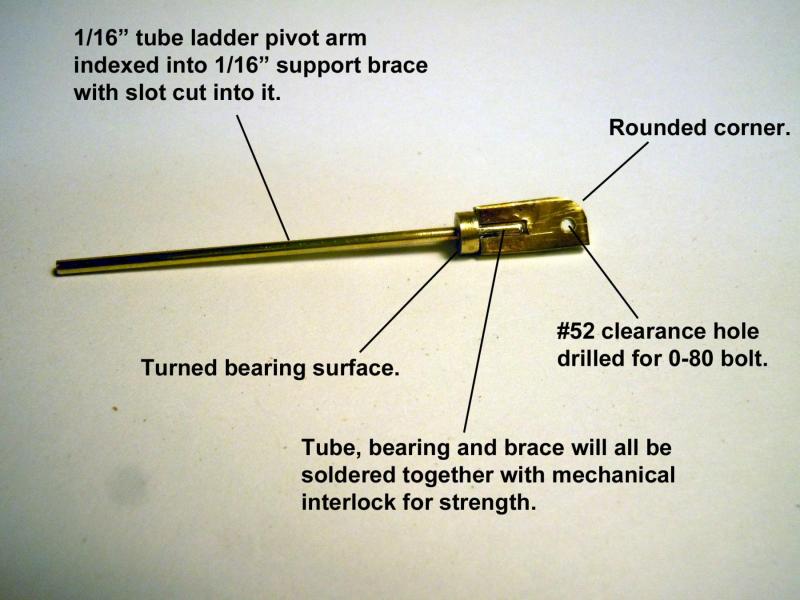
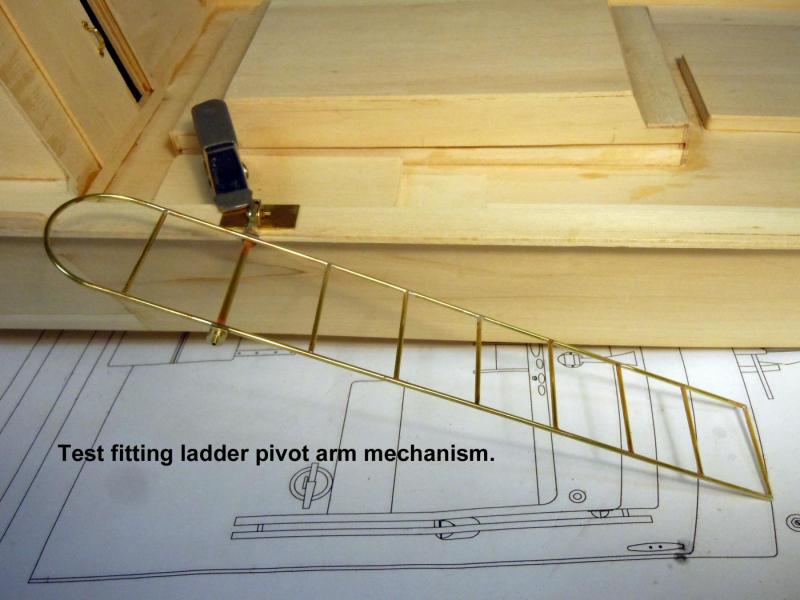
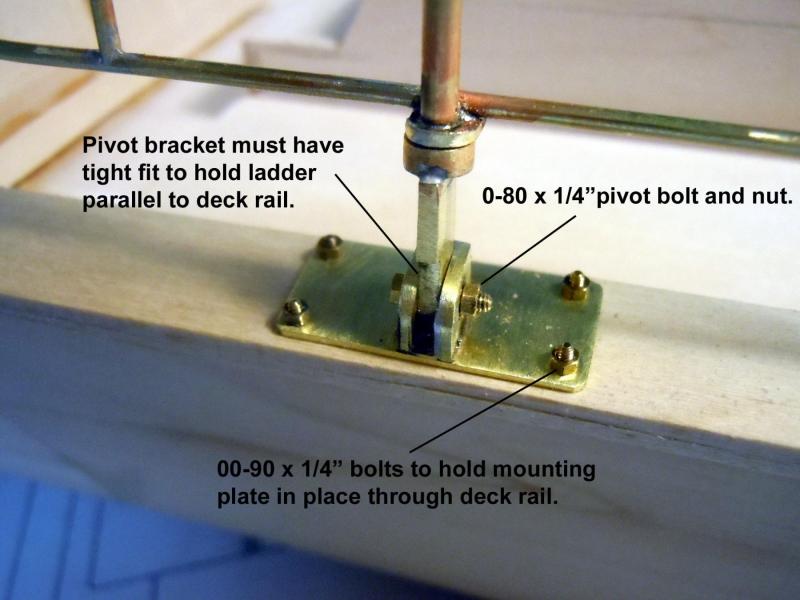
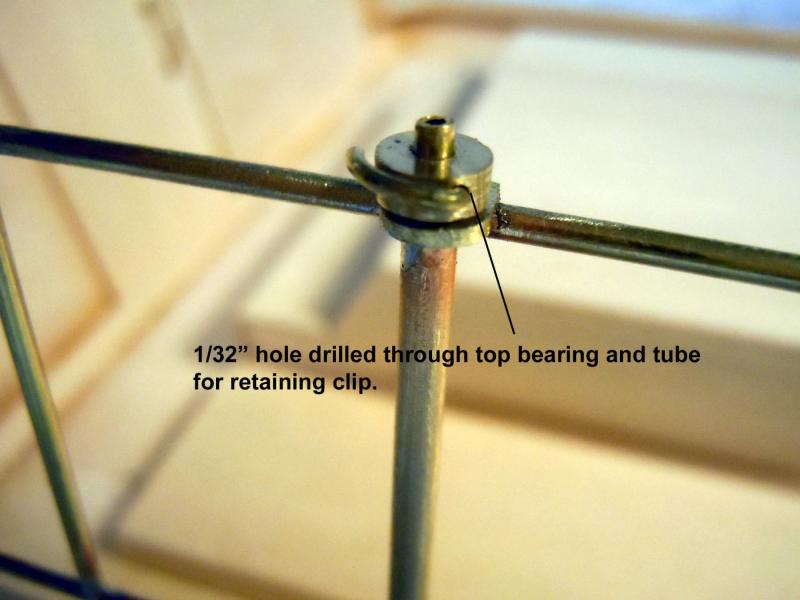
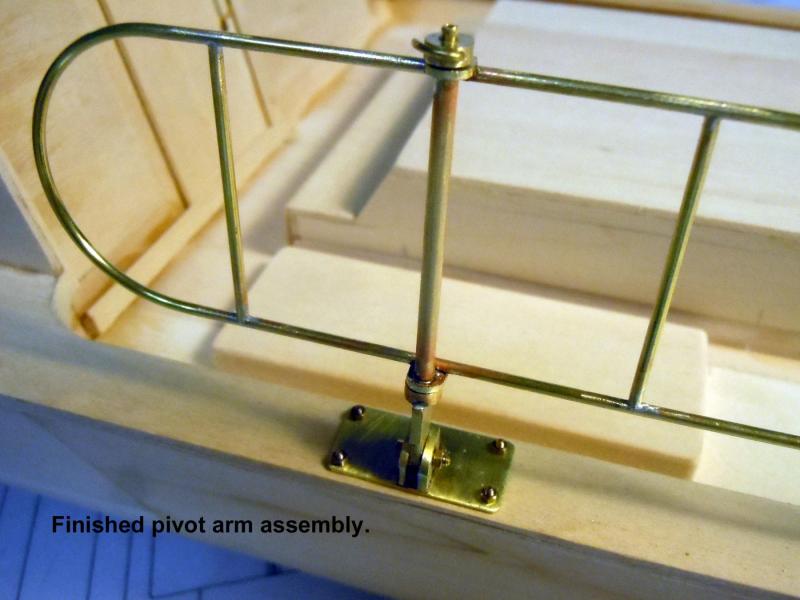
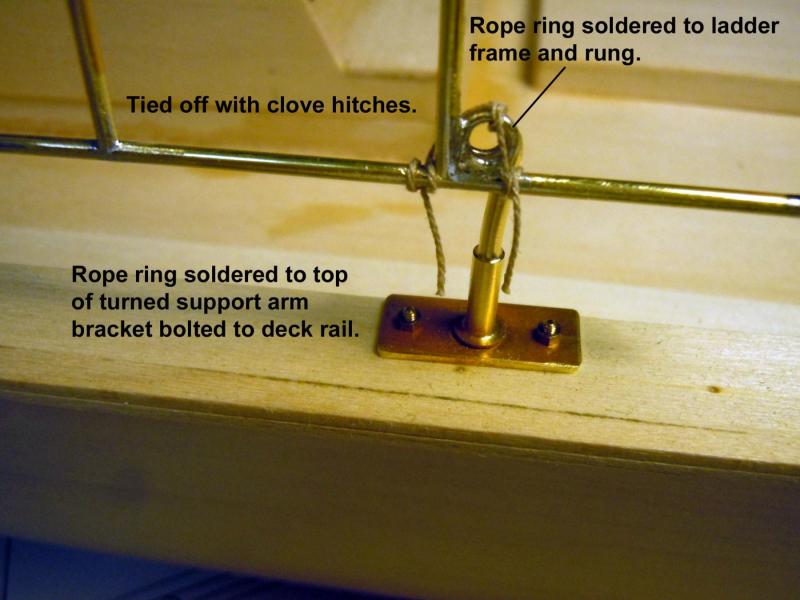
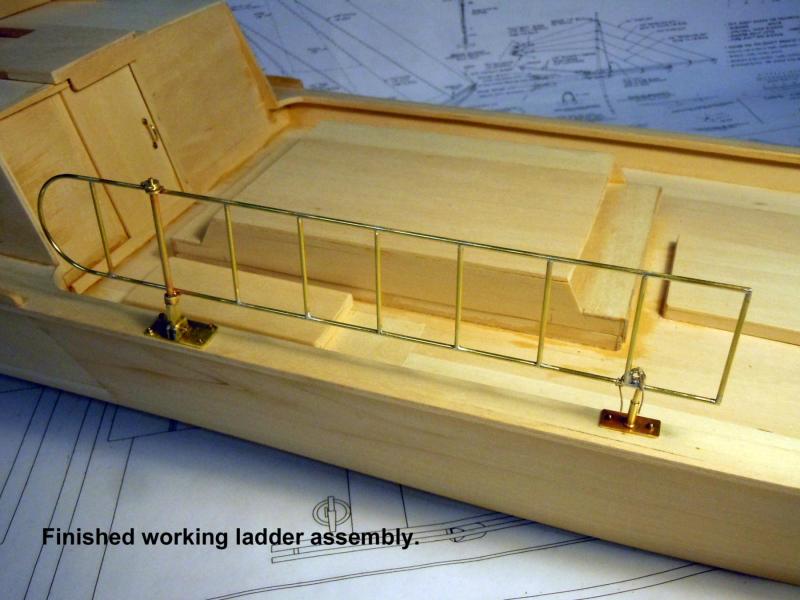
John, Patrick thank you! Yesterday I learned that the Dirty Dozen was used in the 1977 Disney movie "Sultan and the Rock Star" will have to check it out. Here is a sequence of fabricating the dive ladder that stored along the deck rail and then folded down and pivoted into the water. This ladder was salvaged and will be part of the display in the museum. The challenge was getting a tight fit on the pivot bracket to keep the ladder parallel to the deck when stored. Now to the chain bracket on the bow.


- 162 replies
-
- 10
-
-
- dirty dozen
- fishing
- (and 2 more)
-
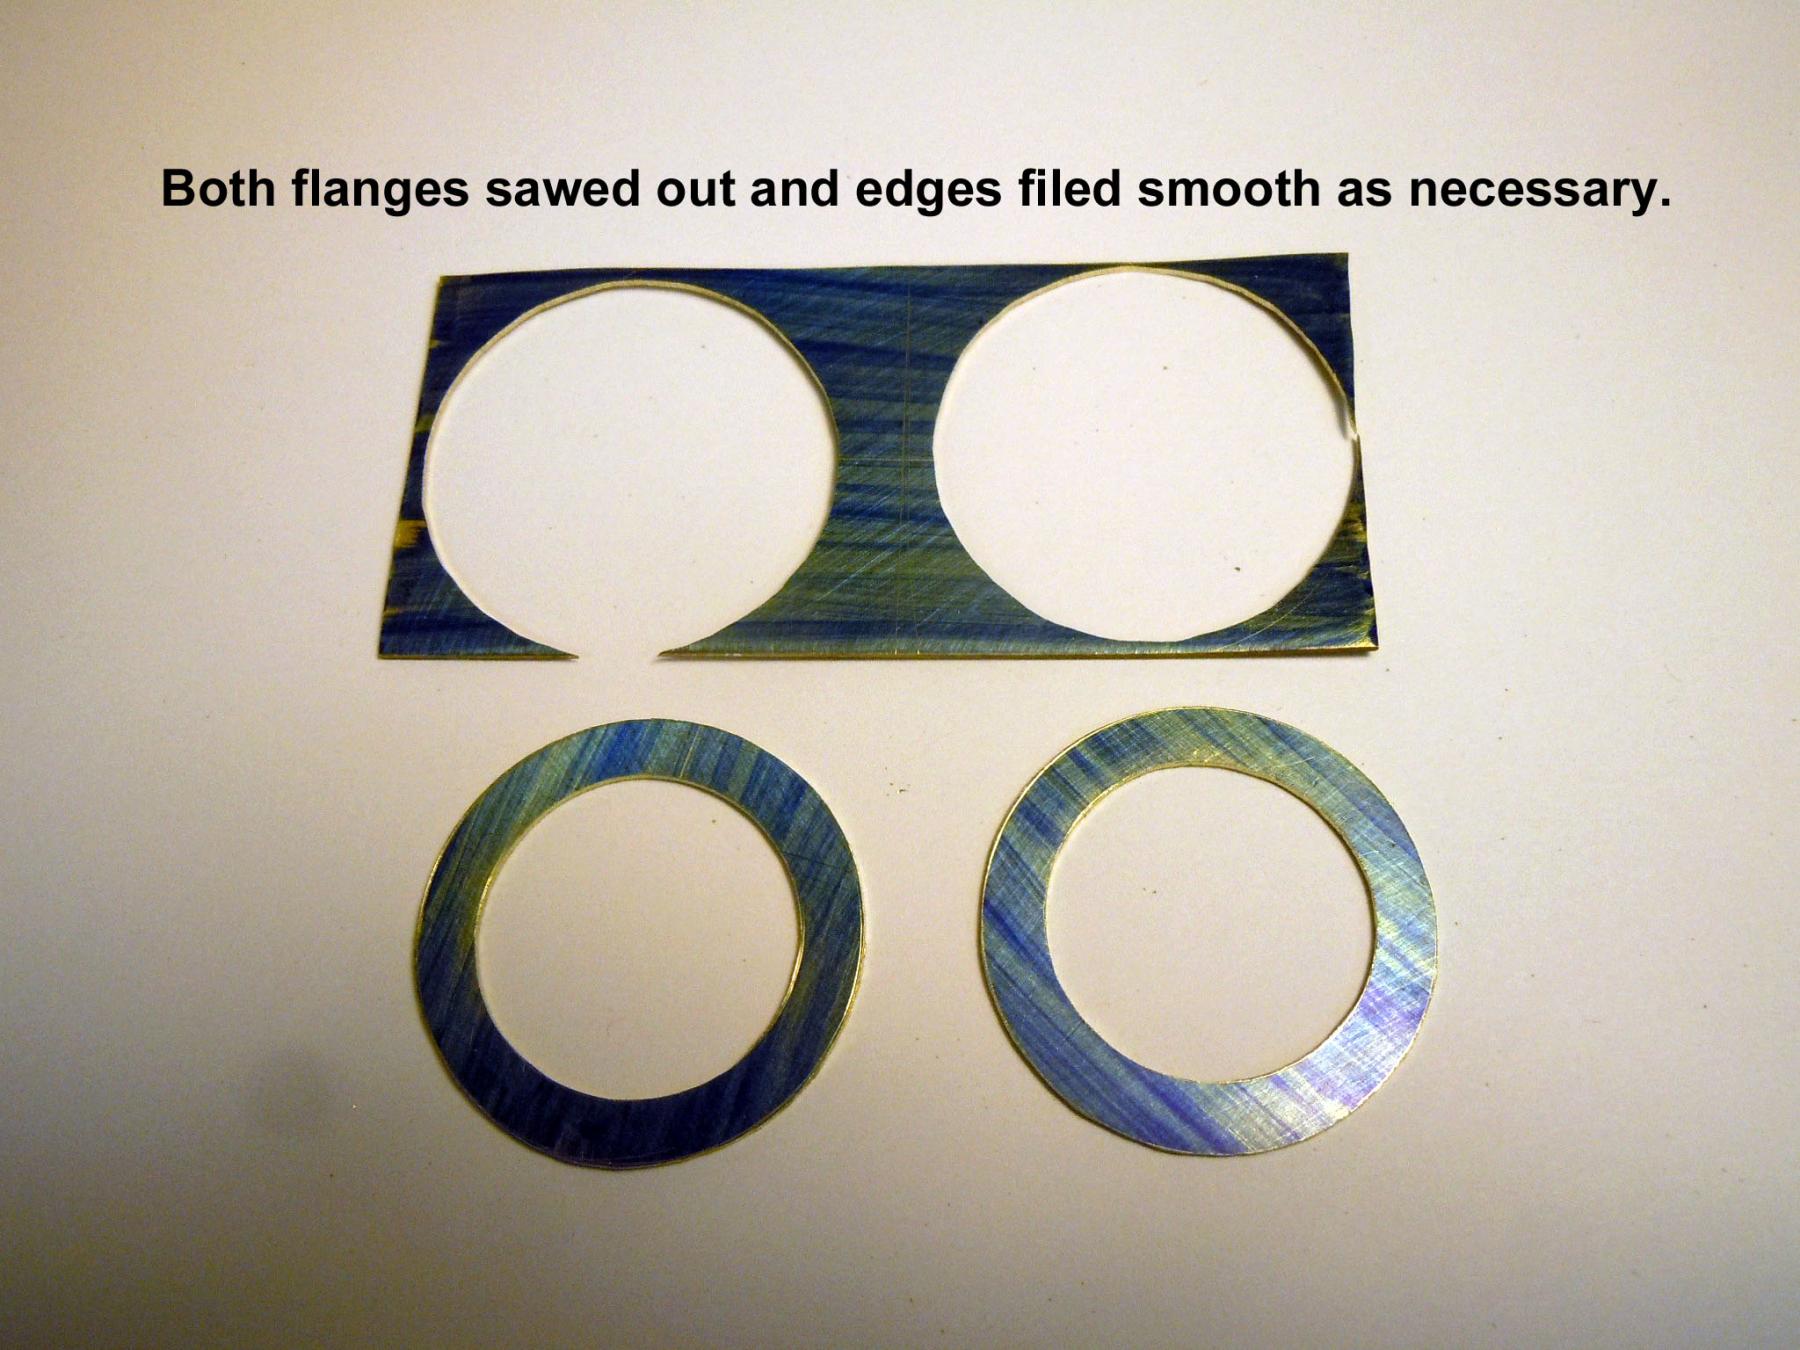
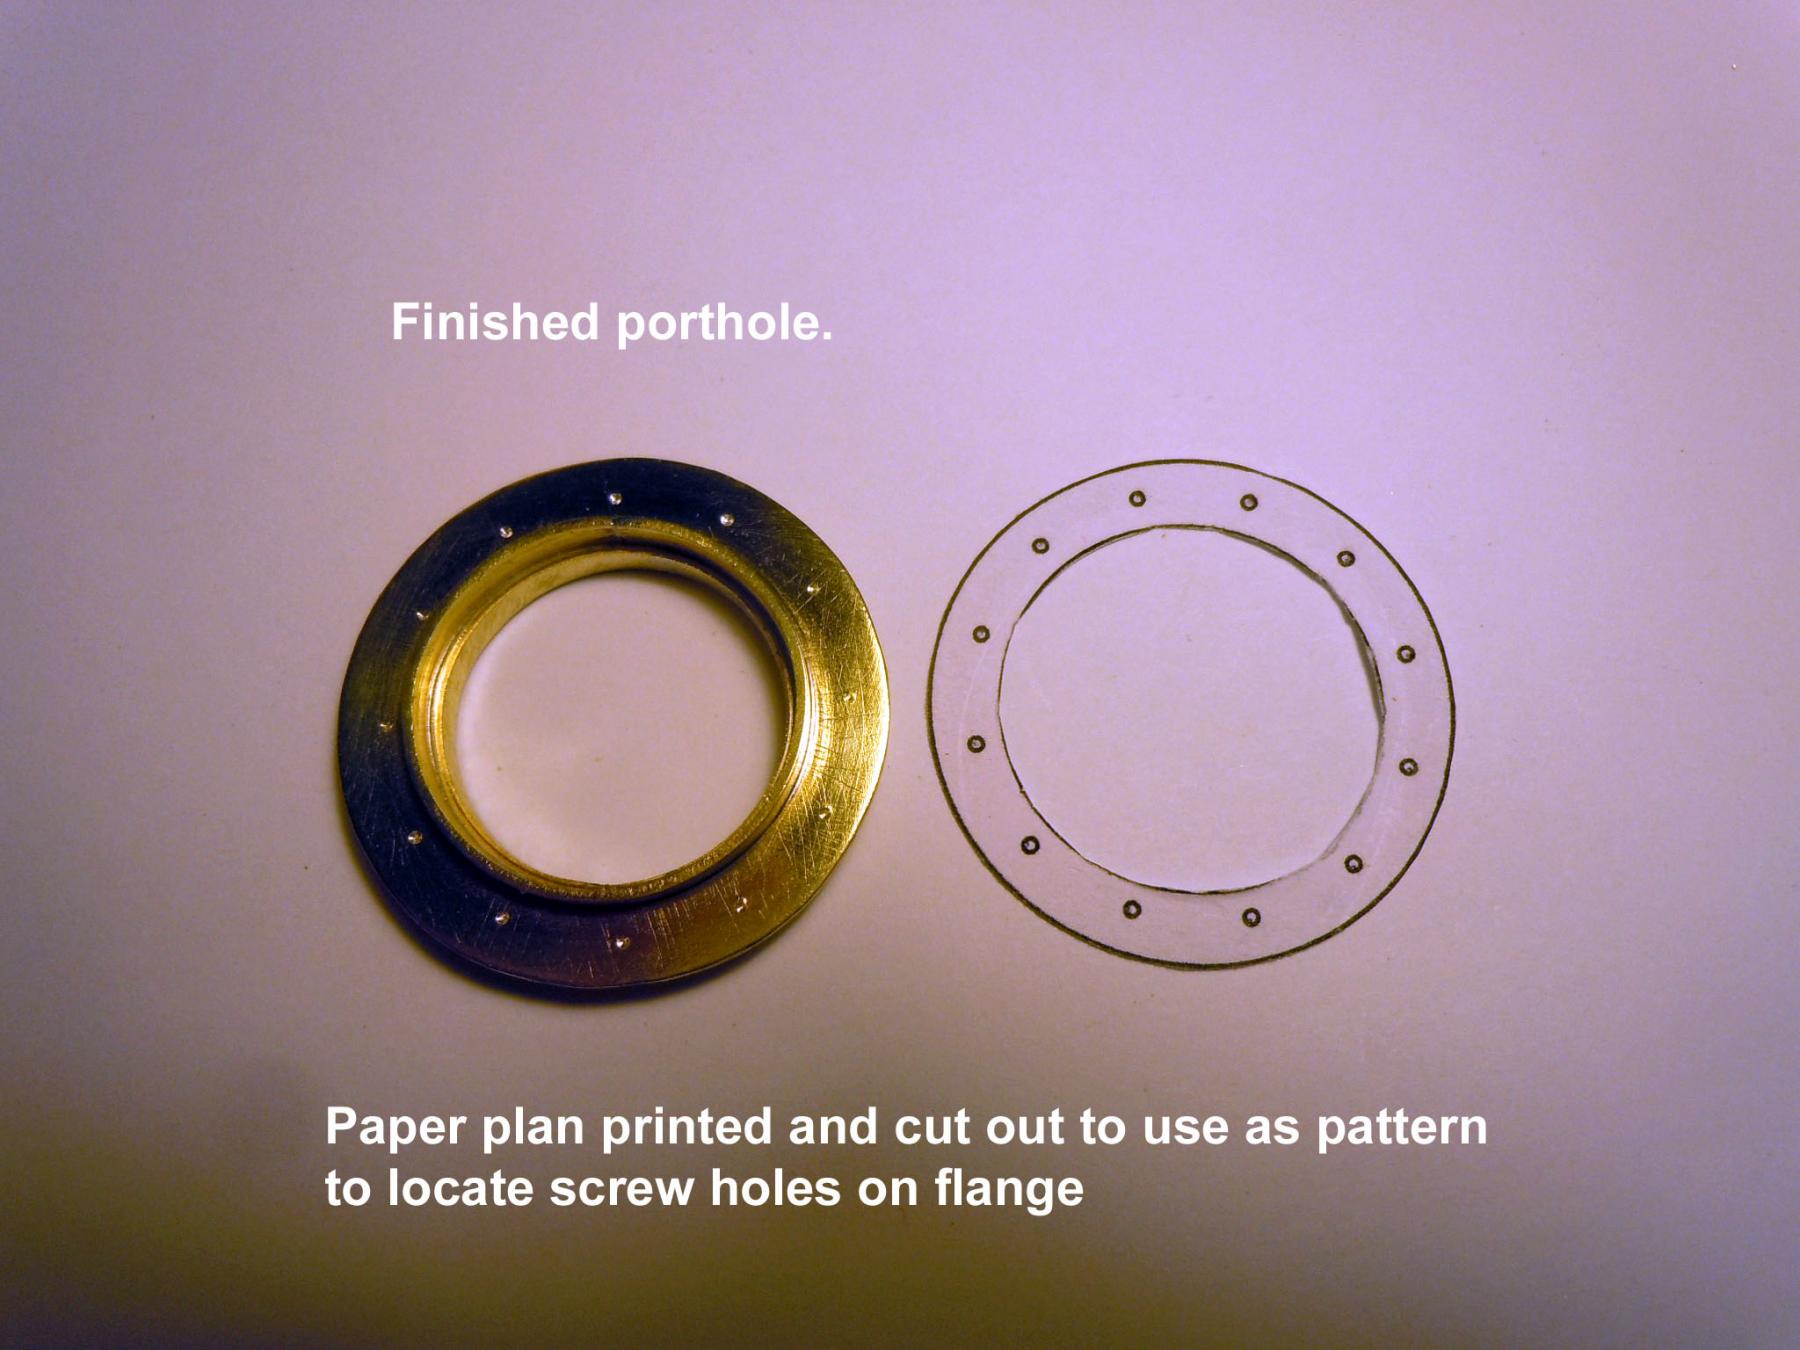
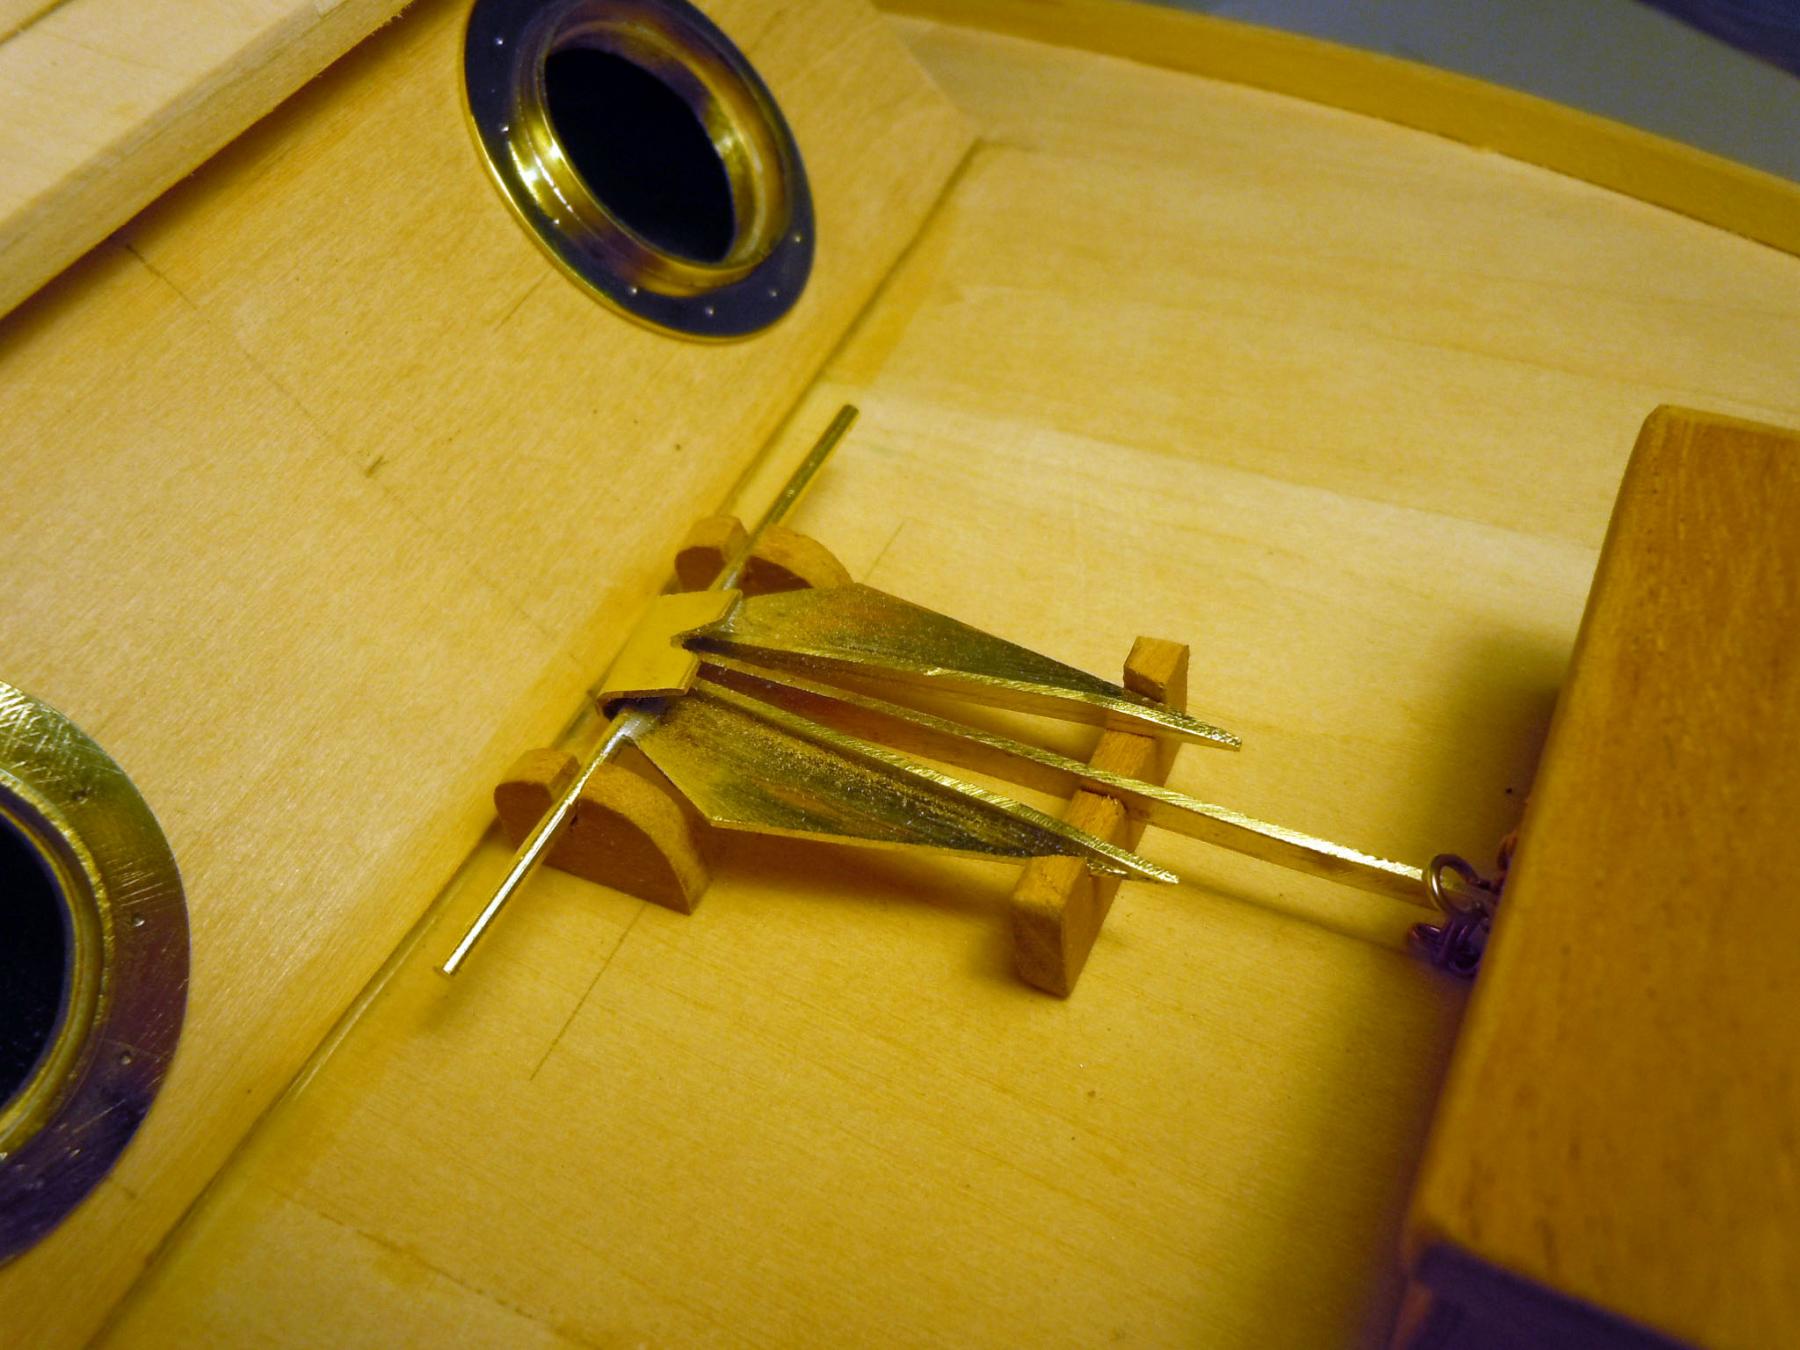
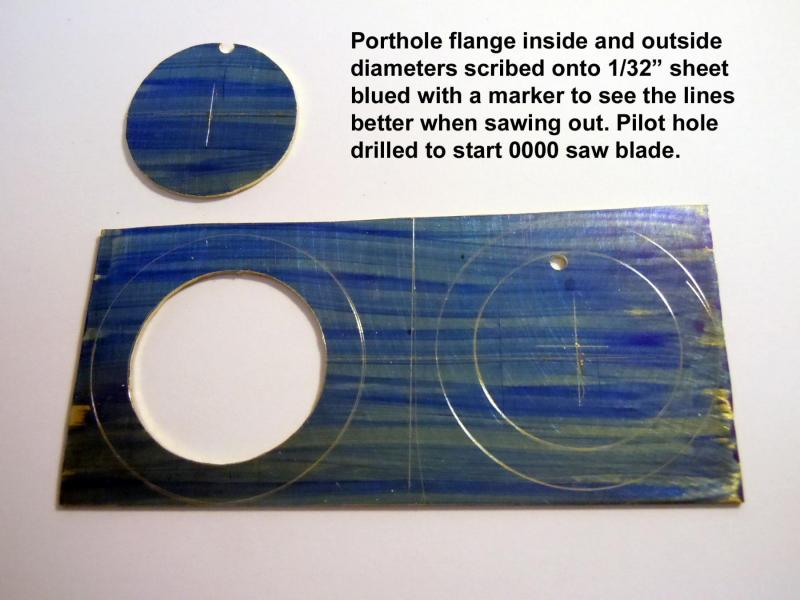
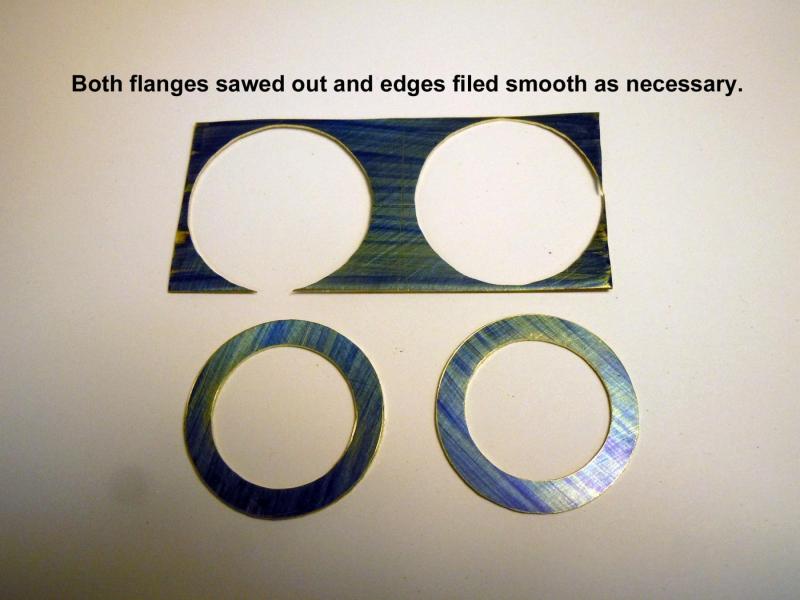
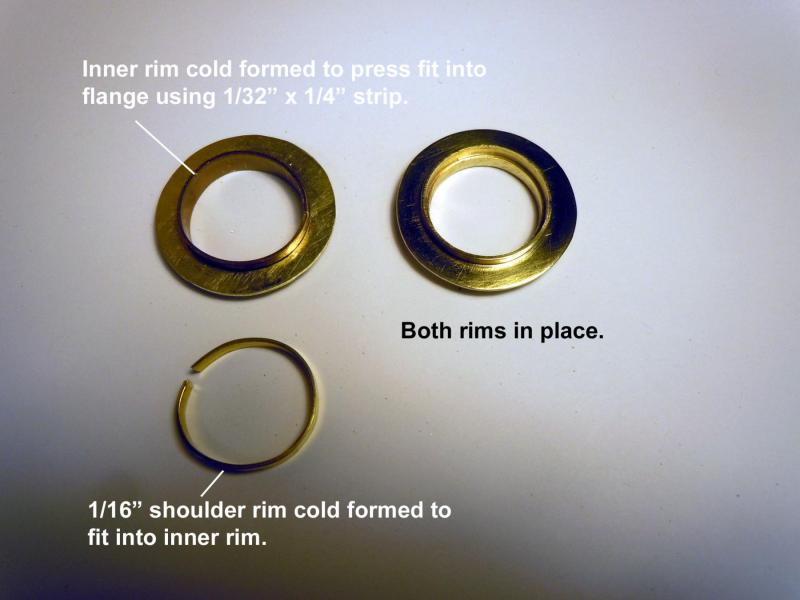
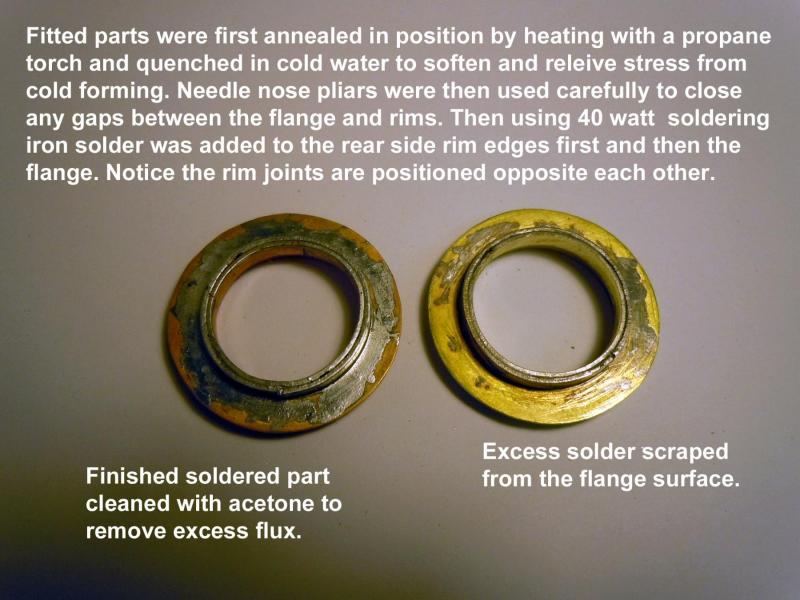
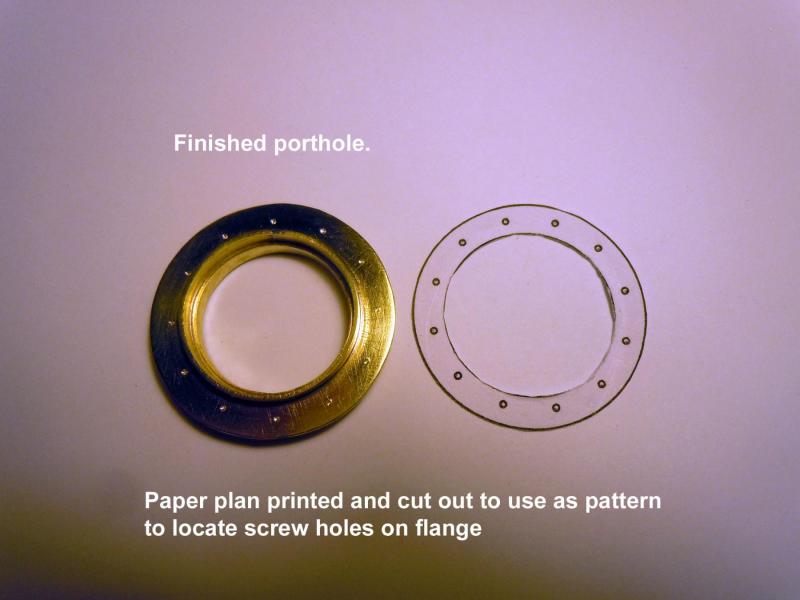
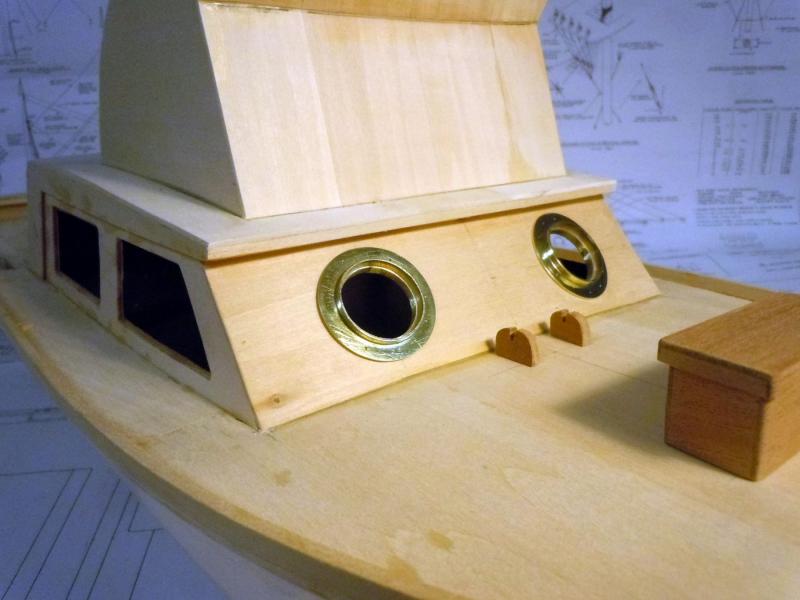
I got back to working with brass and made the porthole windows and Danford anchor and turned the hawse rope holder. I decided since this is a display model that there was no need to make these working porthole windows which on the real boat opened inward. Here is a sequence explaining the porthole building process starting with 1/32" sheet. The shoulder rim will support the glass window. Here is the articulating anchor. The copper chain started with round links which I carefully squeezed with needle nose pliers into elongated oval links to look more realistic. Next I will move onto the ladder and it's support brackets.

- 162 replies
-
- 12
-
-
- dirty dozen
- fishing
- (and 2 more)
-
John, just this past year I found a source 18 miles from where I live for Novacan Black Patina. When I moved from Ohio the movers would not allow chemicals on the truck so most of the chemicals were left behind with friends. I only brought my gallon of JAX Instant brass cleaner. On the Constitution I have blackened so of the parts where it makes sense. As for rivet heads I have a supply of rivets that I now use sparingly since my source went out of business this past summer. In some cases depending upon the scale I have made my own rivets.
-
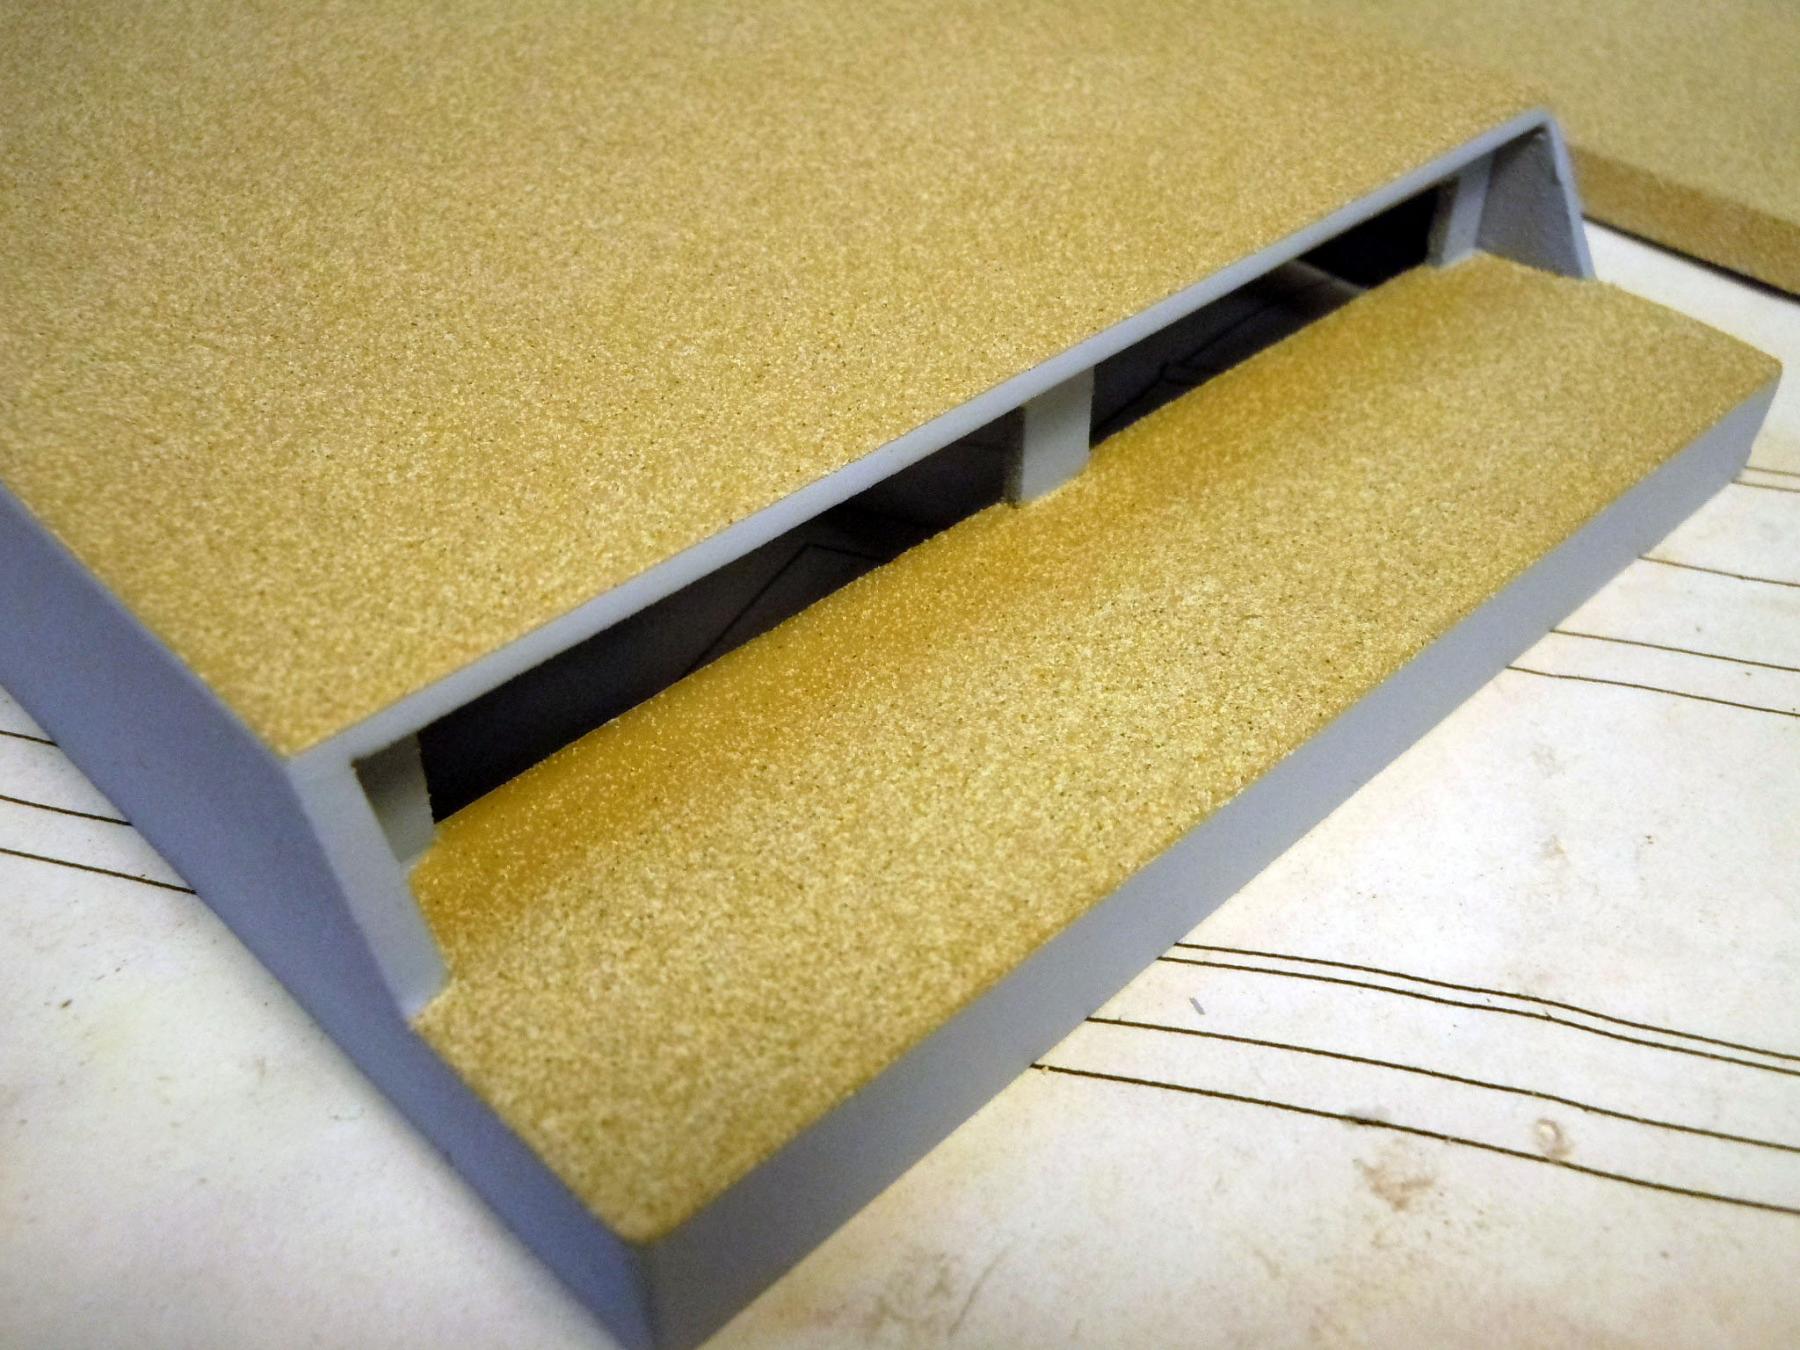
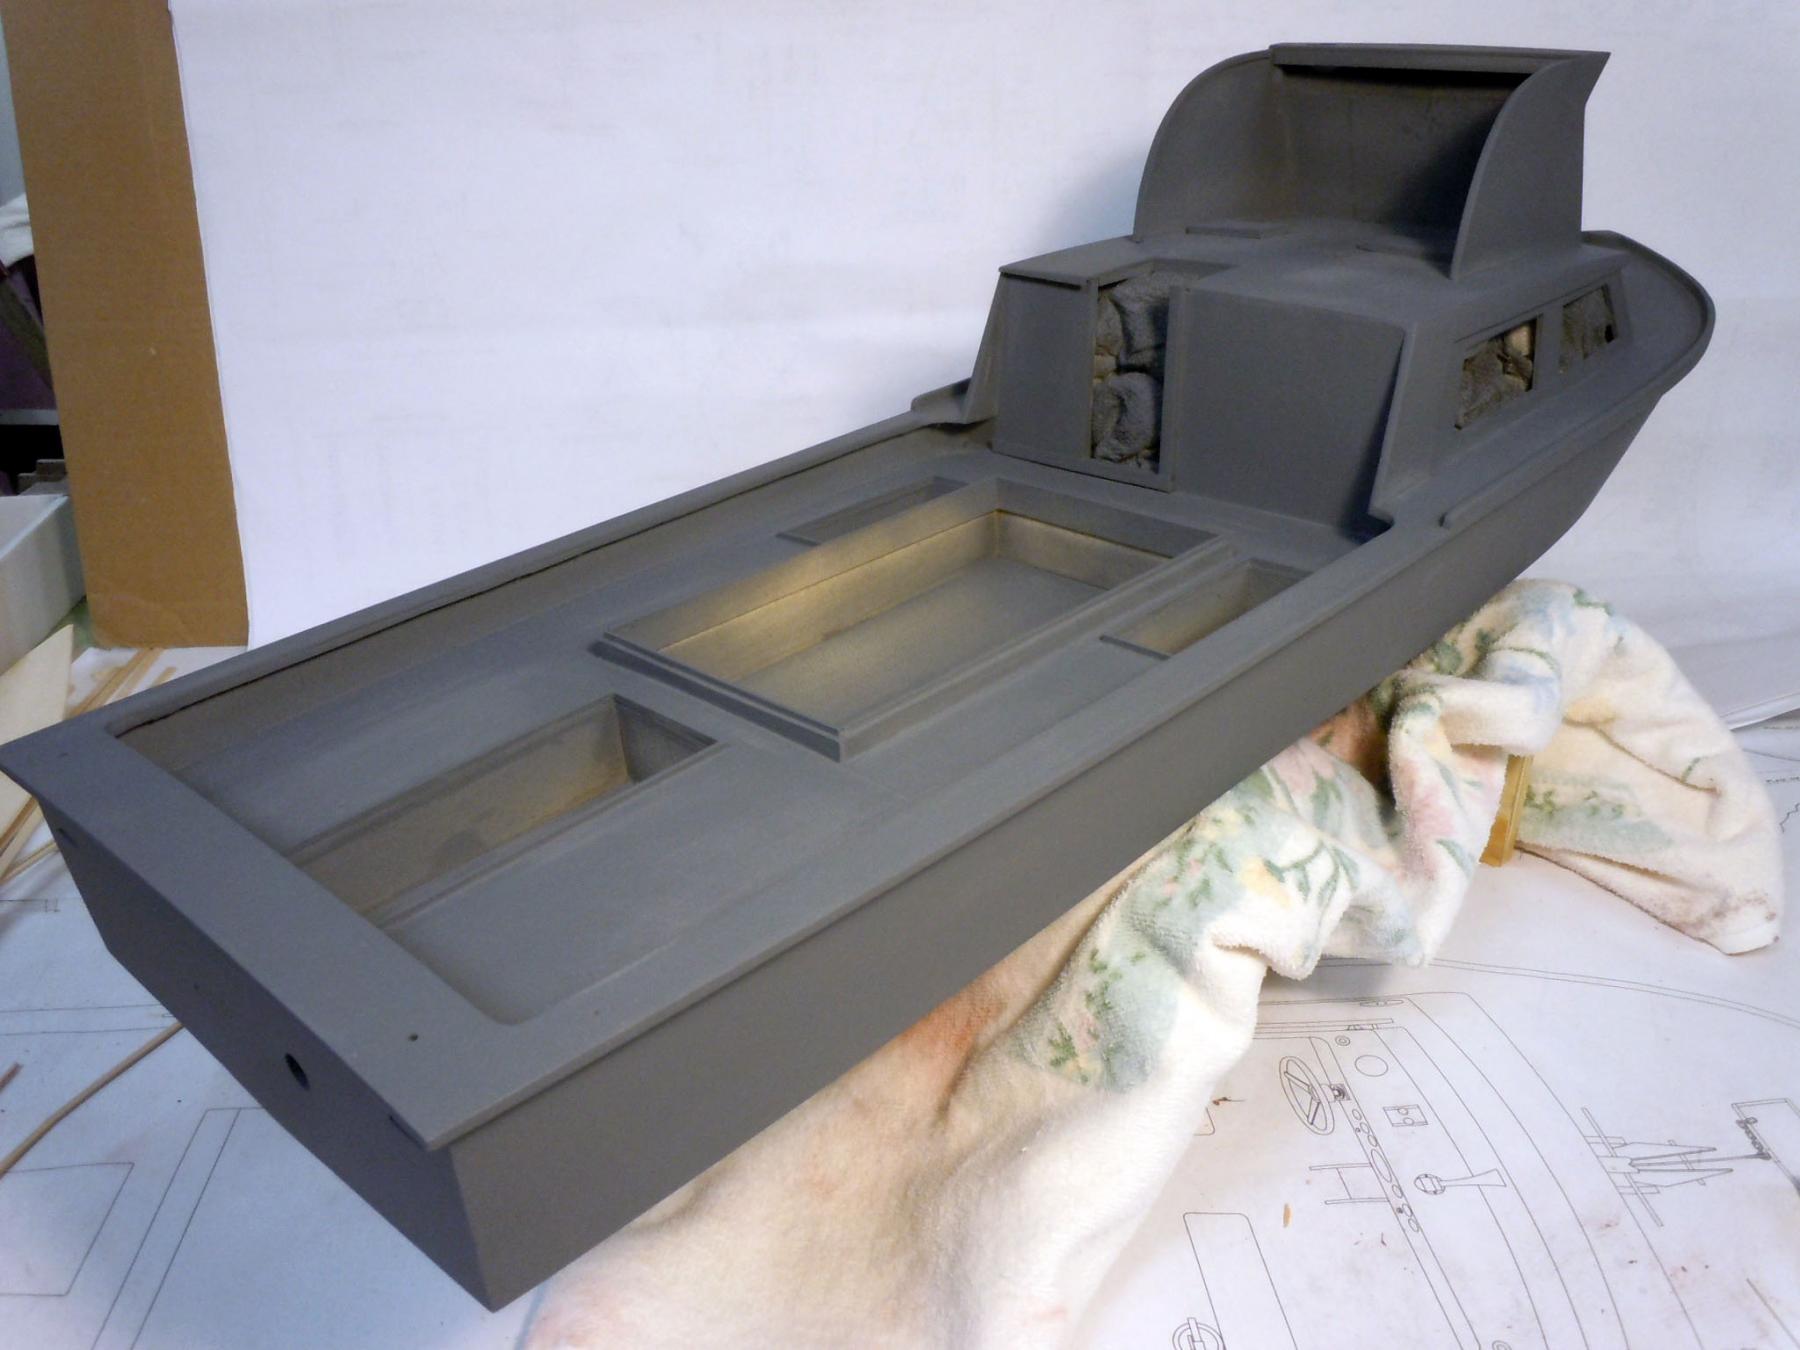
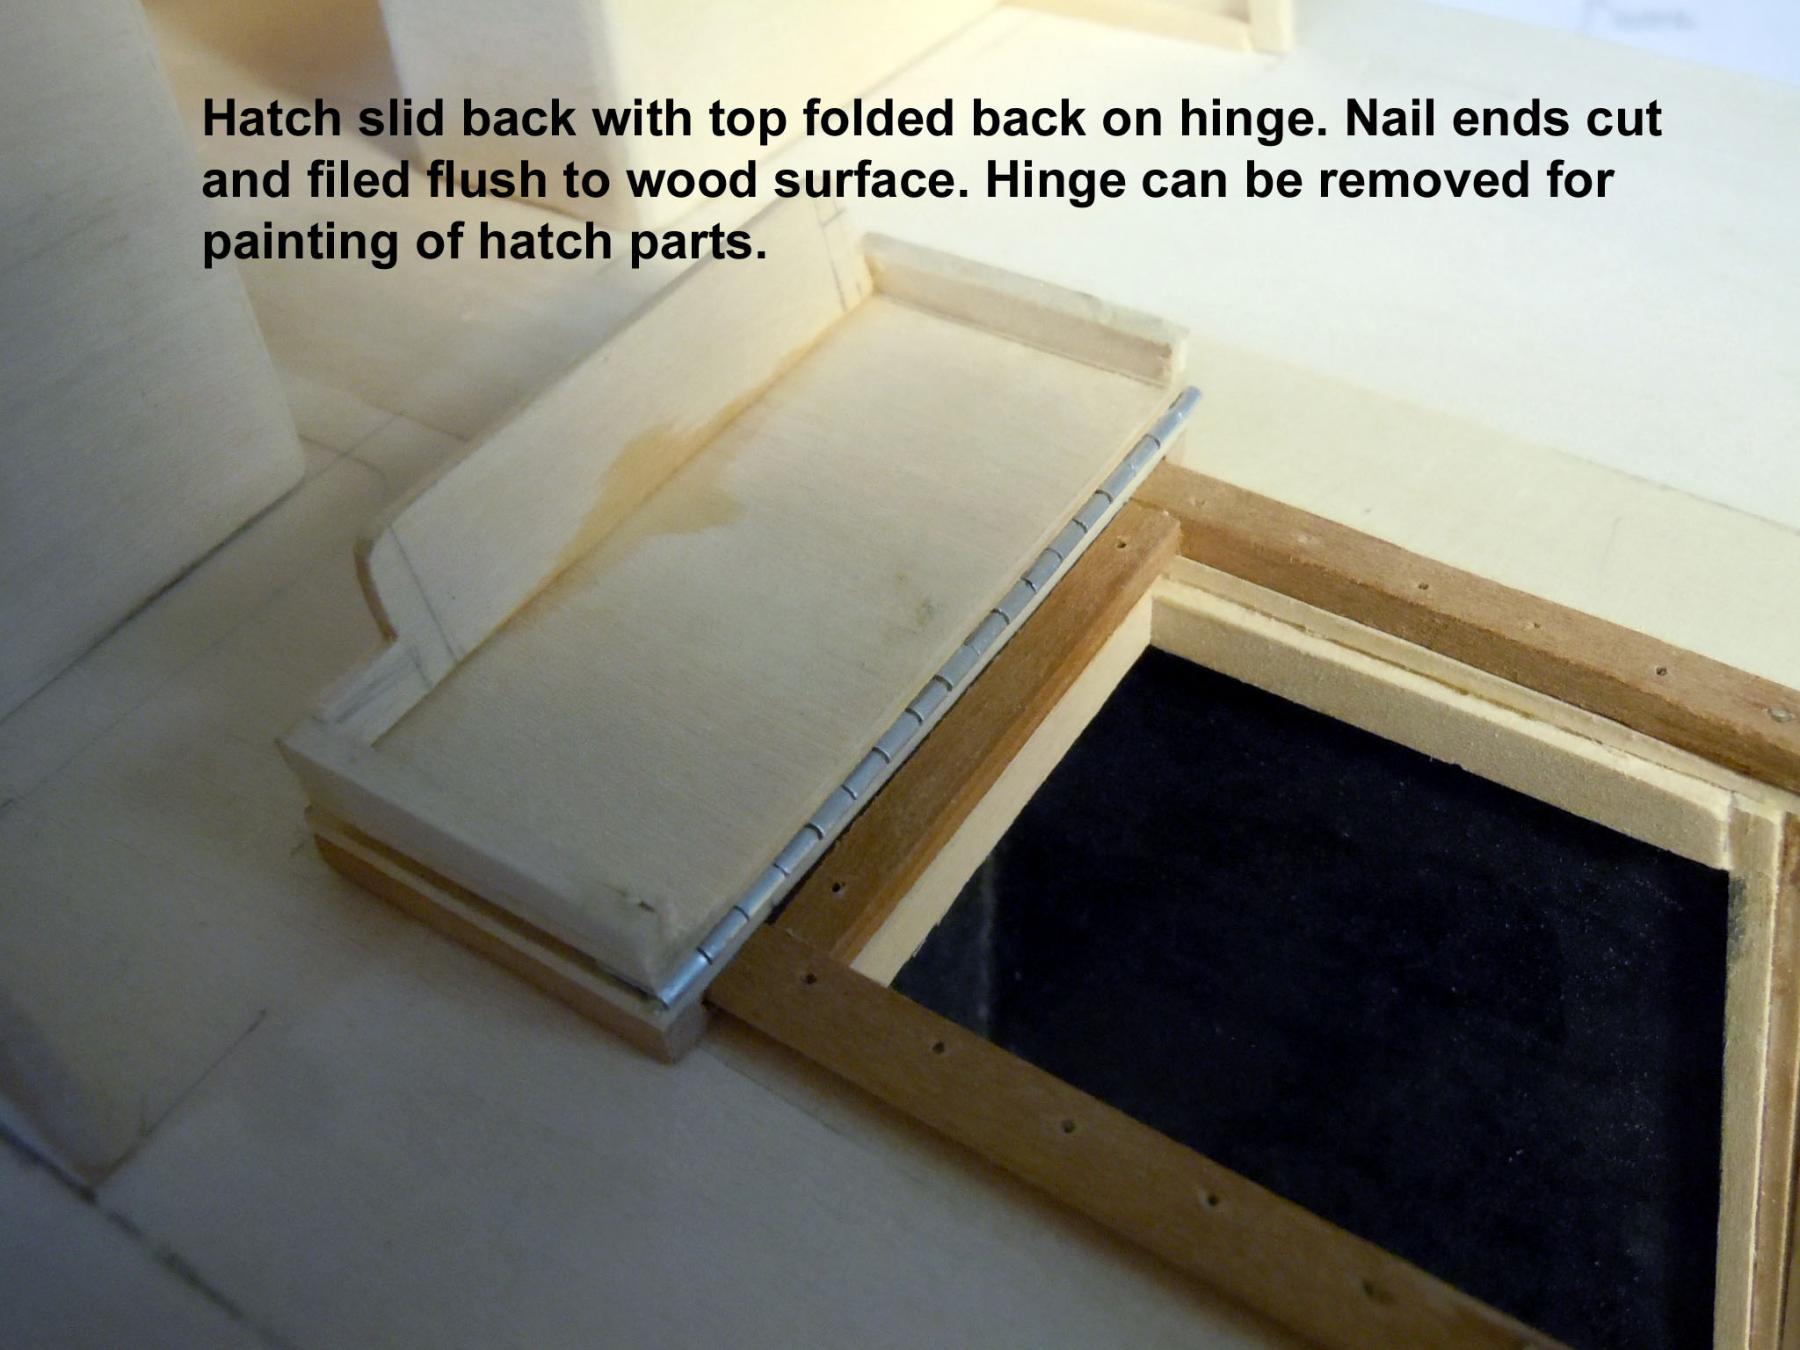
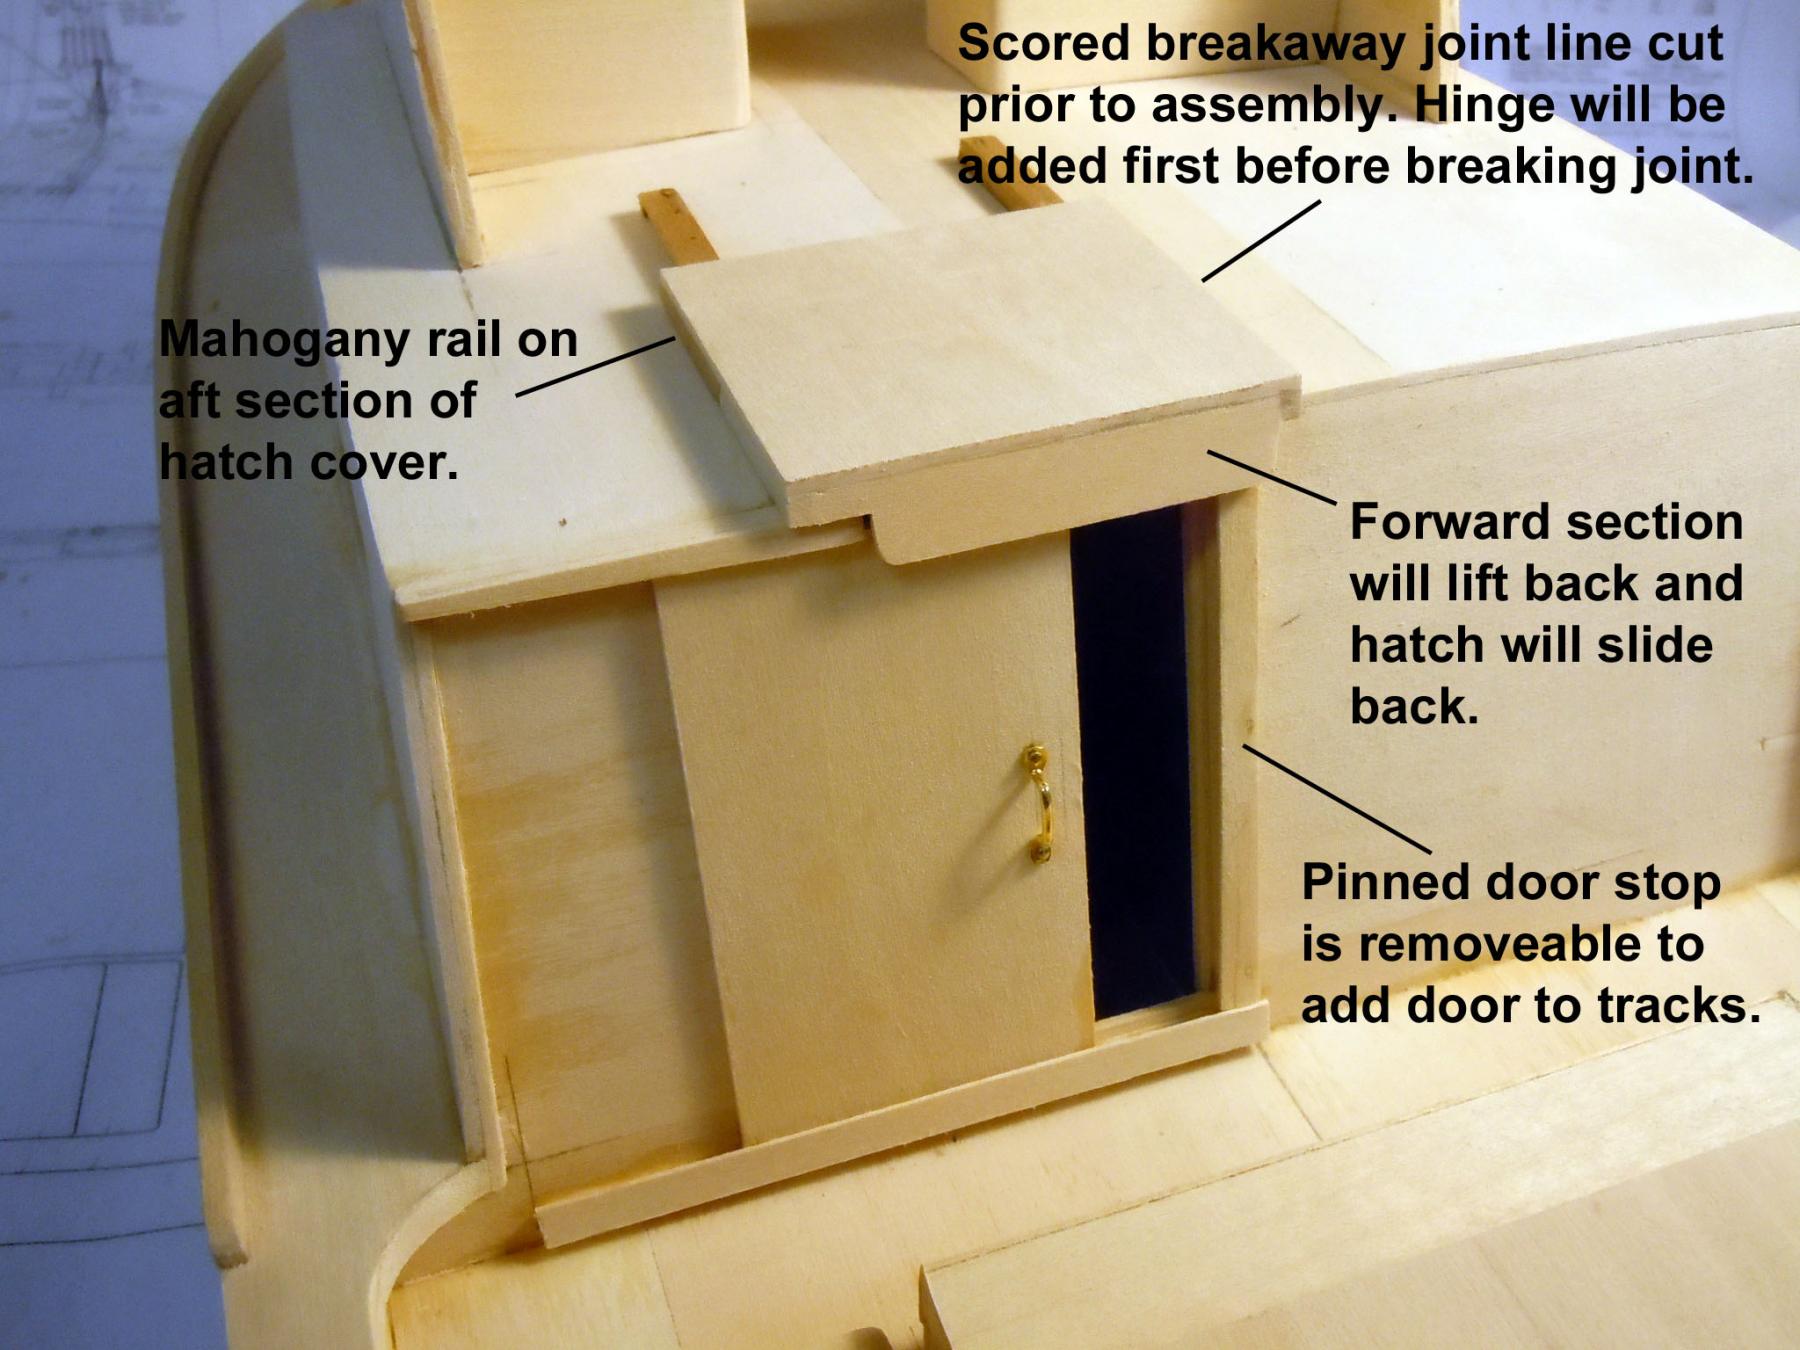
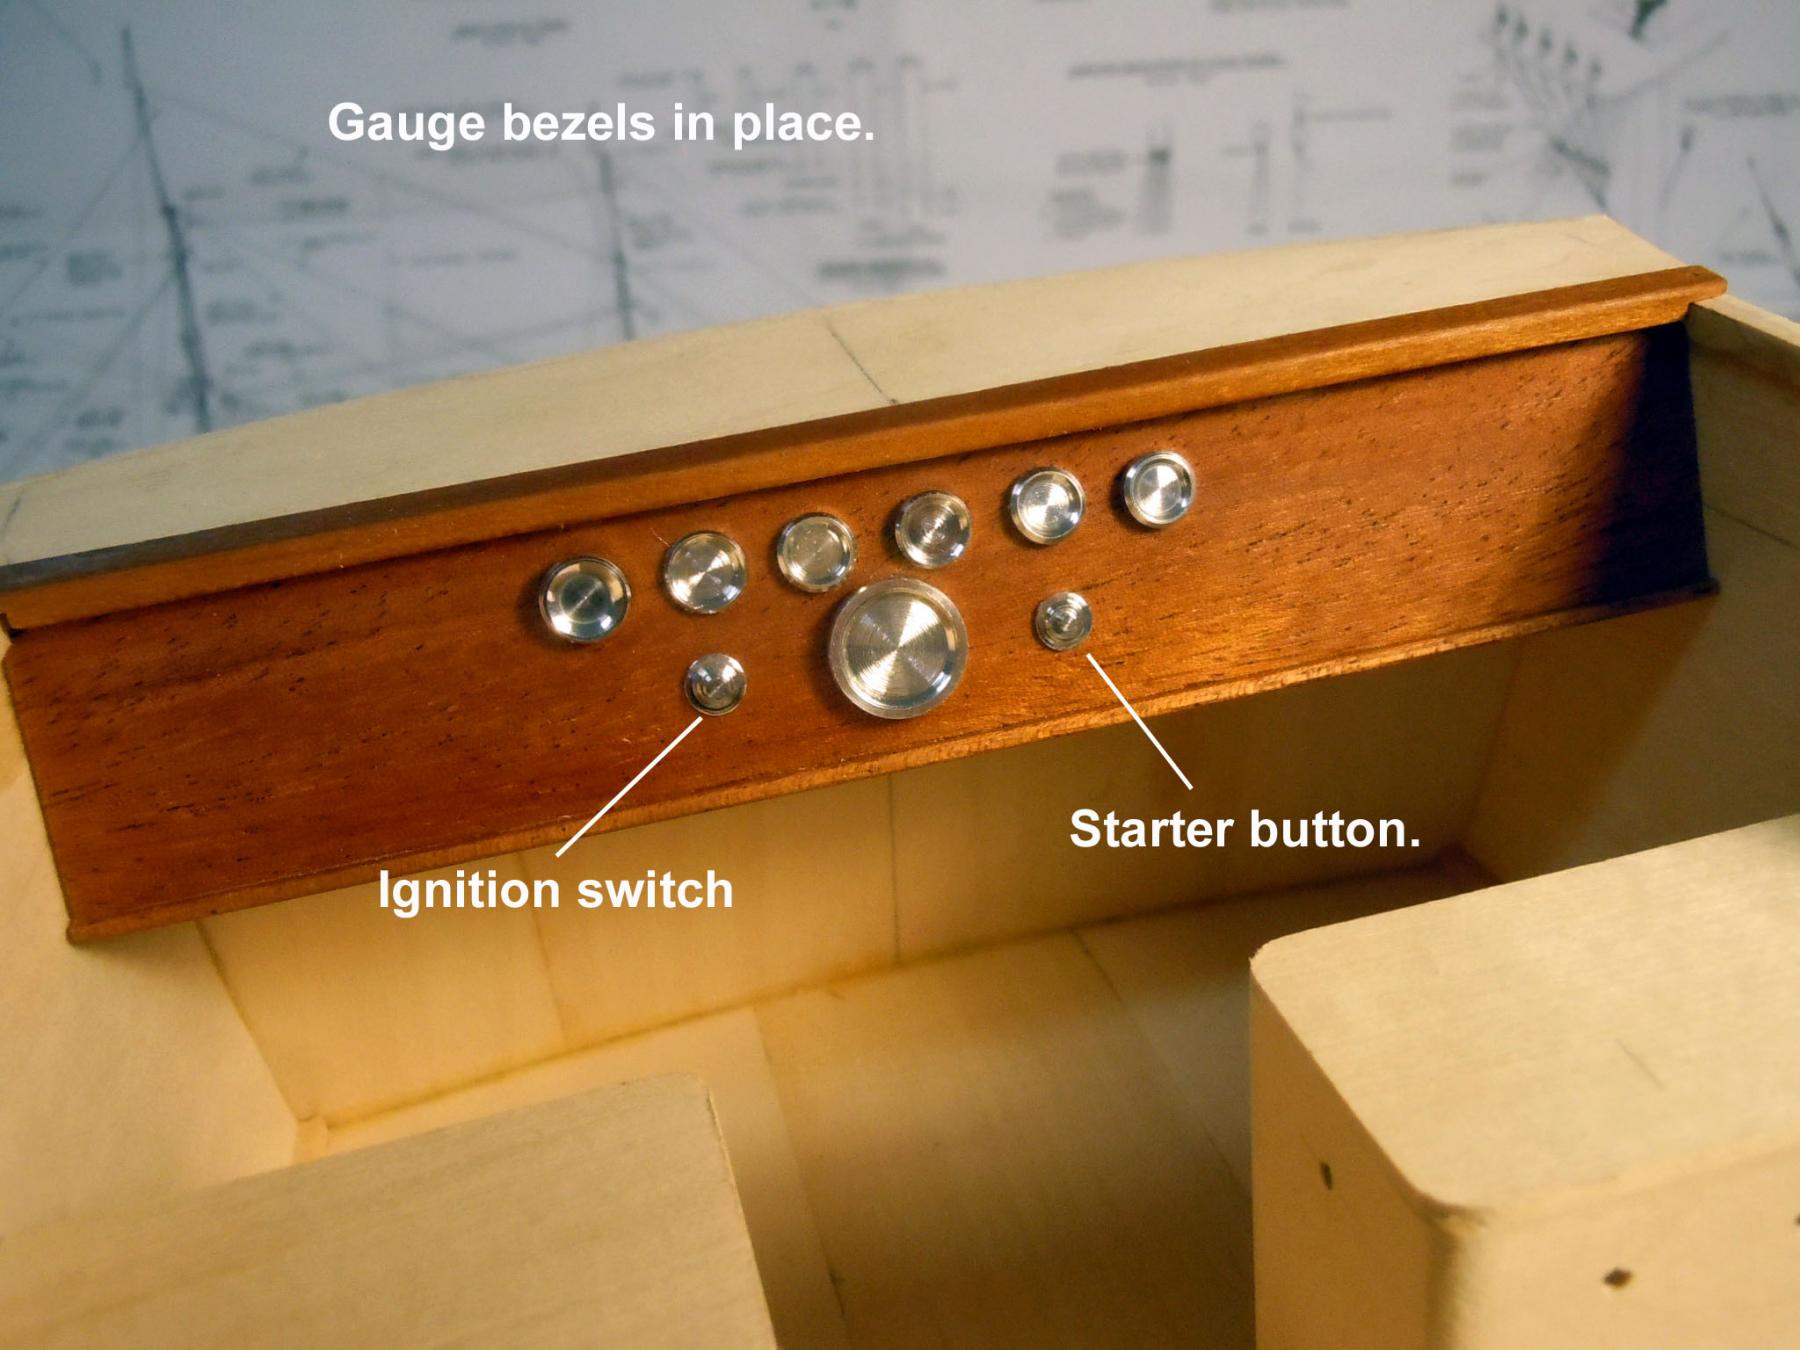
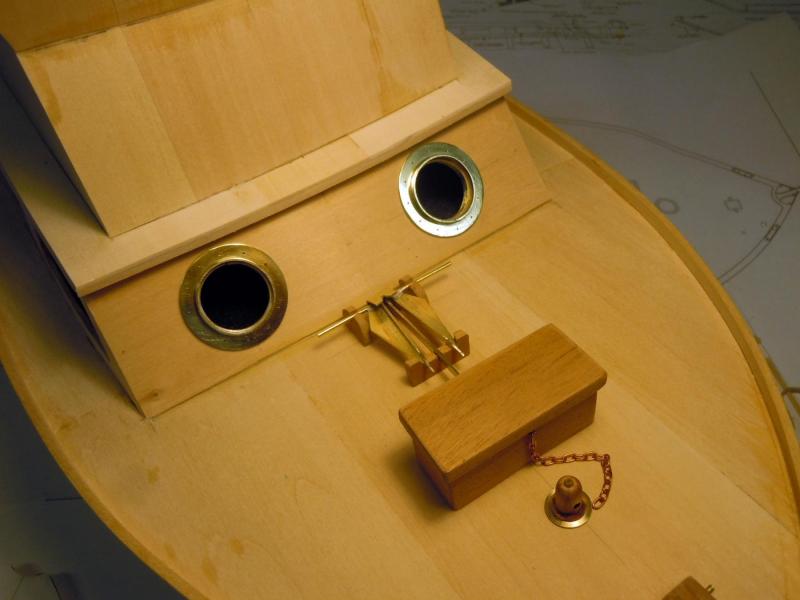
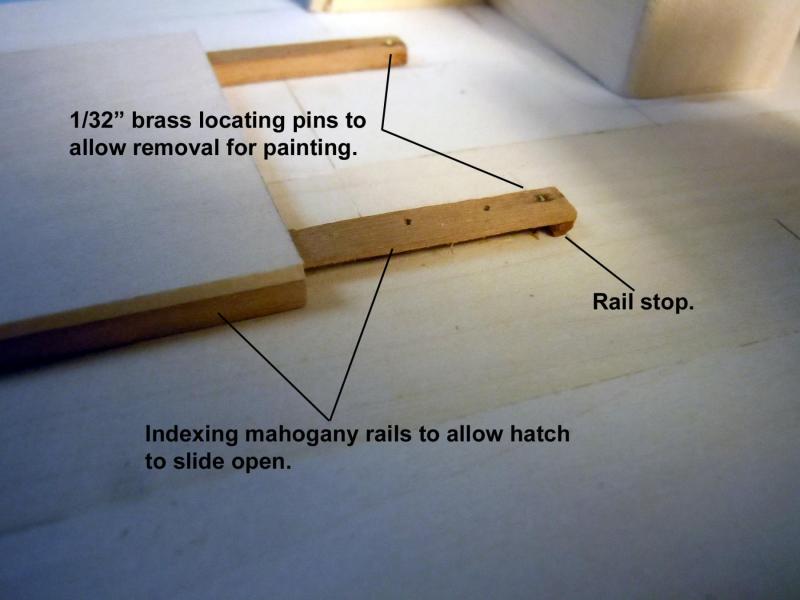
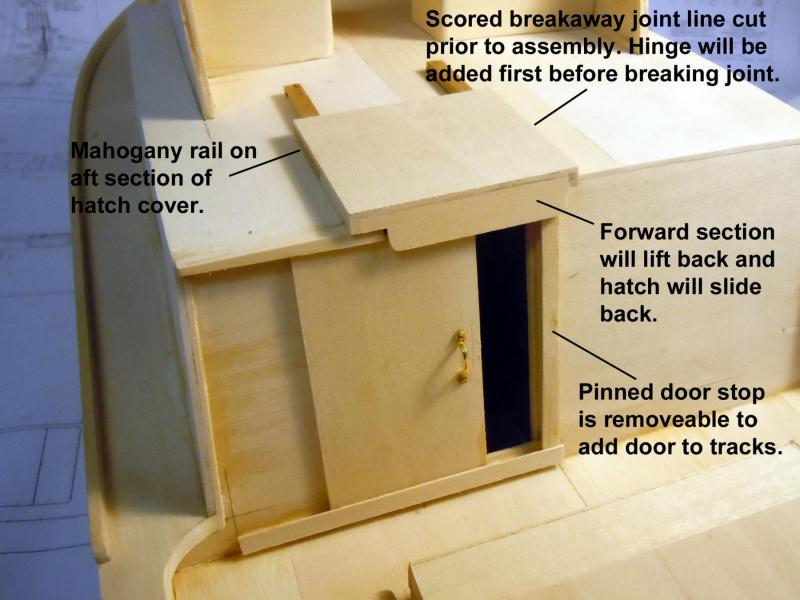
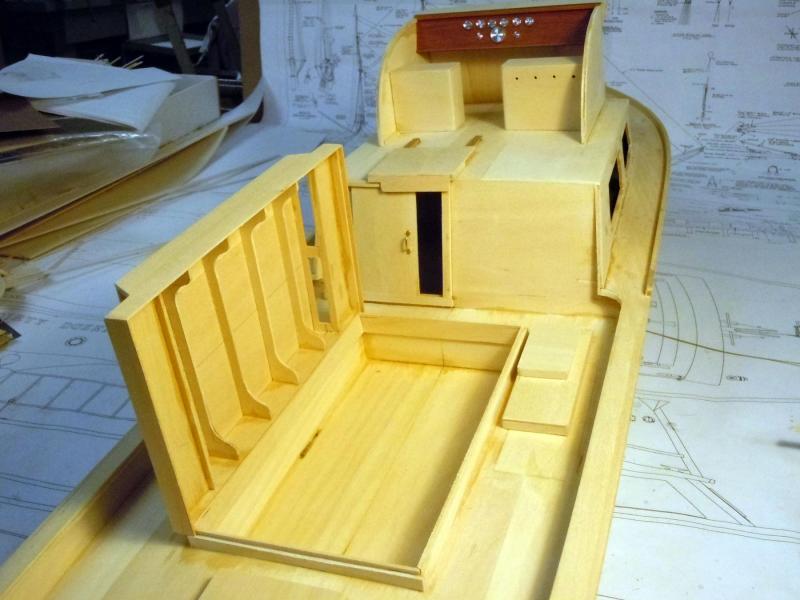
Built up the top hatch cover which is two parts hinged together; the forward part has the sliding rails indexed into tracks on the cabin top and the aft part lifts up and both slide back in the mahogany tracks. I then moved on to cutting the gauge bezels out of aluminum. The tachometer is 7/16" diameter, the Total hours 5/16" diameter with the rest of the gauges 1/8" diameter. All were polished with metal polish on a Q-tip and buffed with a rag before being cut down ot the parent locating pin. Here they are in place on the dashboard. I then worked on the forward deck items that are all mahogany. More to be added like the chain box lid and hawse. Here is an overall view with the engine hatch open. Yesterday I had a meeting with the president of the Maritime Museum and we went to the boat yard photographed and measured the rudder. Now I can draw it up and add to the plans. Now back to work.

- 162 replies
-
- 12
-
-
- dirty dozen
- fishing
- (and 2 more)
-
Kurt thanks again for your great support on the book. John, I doubt it will be available until very late 2017 or early 2018 depending upon the production schedule of the publisher. I will only be adding a chapter on ship building most of which will be based upon my experiences that can be seen on this site between the Niagara and this build.