xken
-
Posts
841 -
Joined
-
Last visited
Content Type
Profiles
Forums
Gallery
Events
Everything posted by xken
-
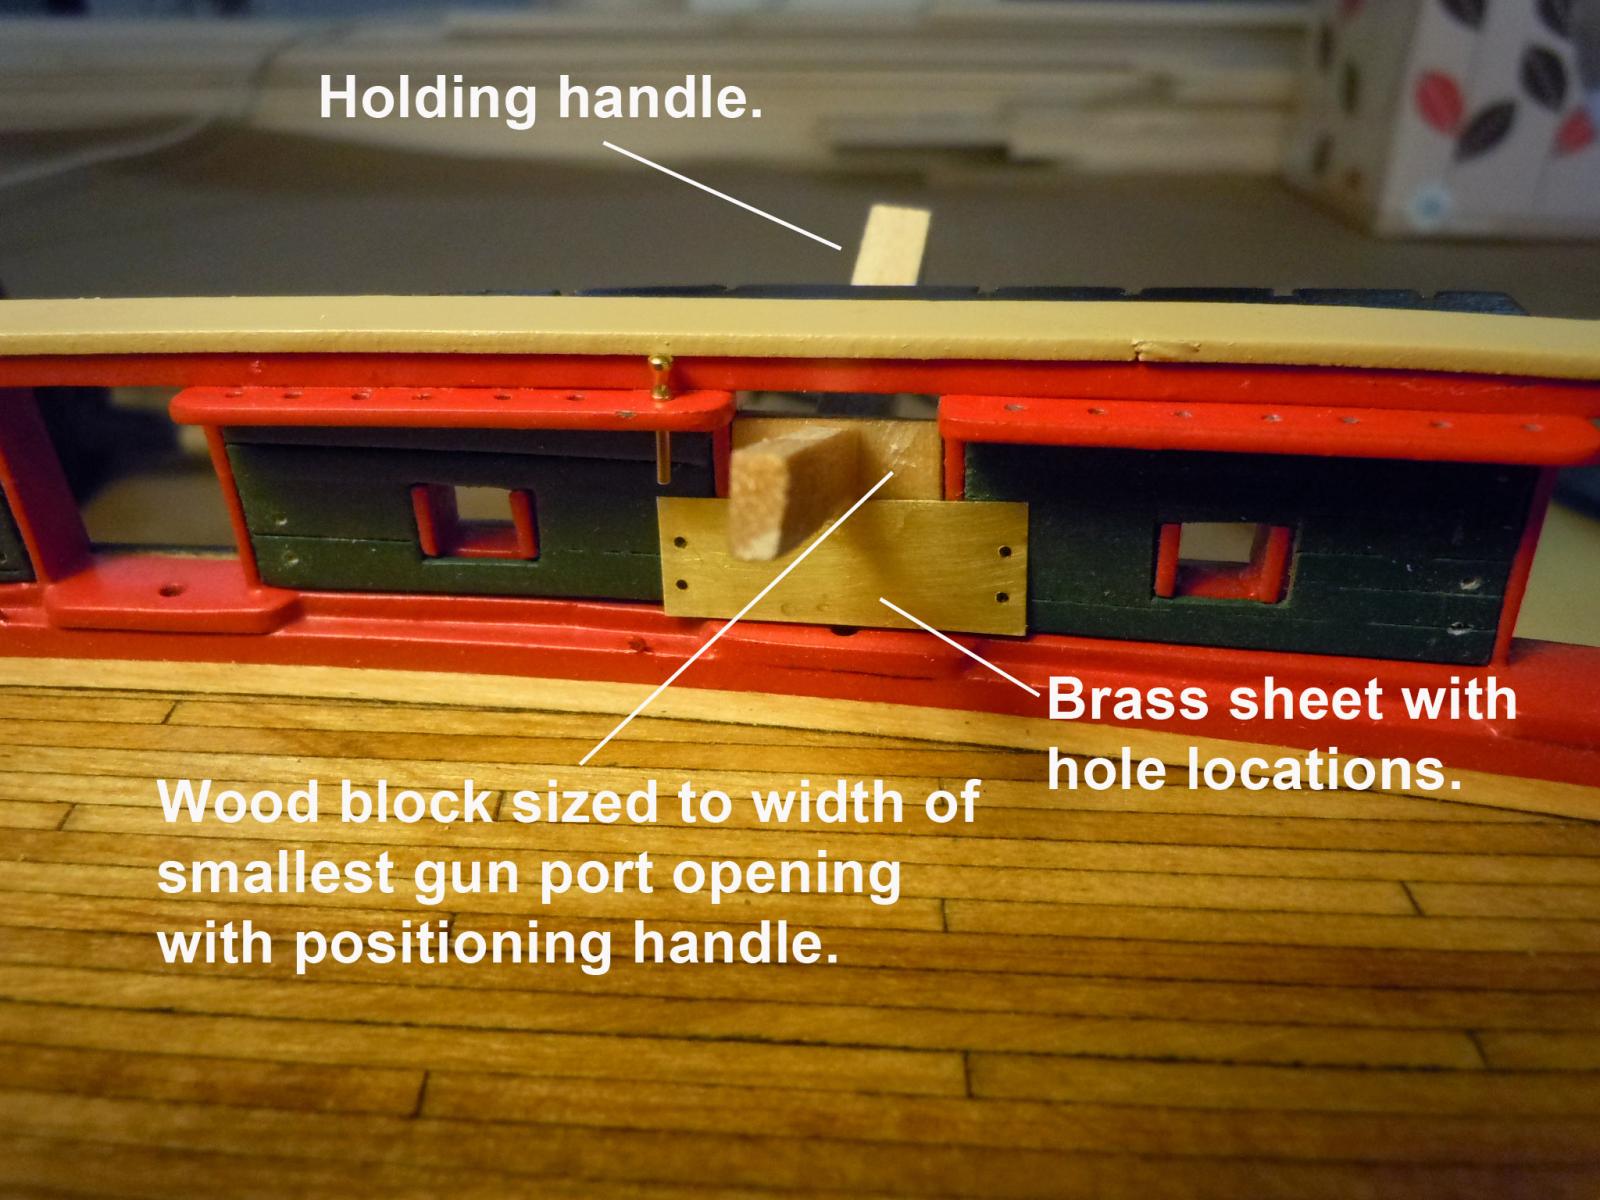
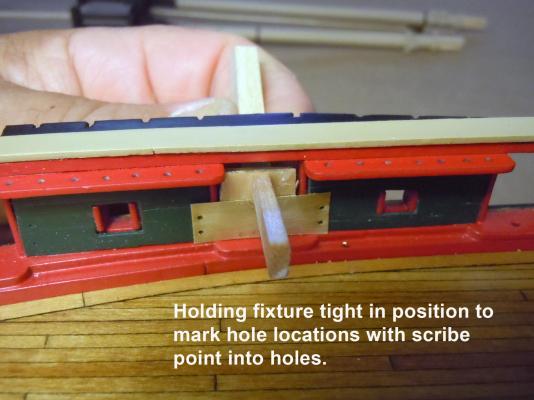
 Just a quick update and tip on locating gun port holes on the inner hull walls. I made a fixture using a small piece of brass sheet with the hole locations in place relative to the bottom and sides of the gun ports. This sheet was glued to a piece of 1/8" thick wood stock sized to the width of the narrowest gun port. Keep in mind the side of the fixture is positioned against the side wall of the larger width gun ports. If I was perfect they would all be the same. I then glued holding handles to the inner and outer wood surfaces. When using the fixture the outer handle is used to hold the fixture flush to the bottom and then to each side to locate the hole locations with a sharp pointed scribe. Will be drilling and adding eye bolts with rings into holes per test location and then build a fixture to rig the cannons before adding them to the deck per Kurt's suggestion.
- 440 replies
-
- 6
-

-
- niagara
- model shipways
- (and 1 more)
-
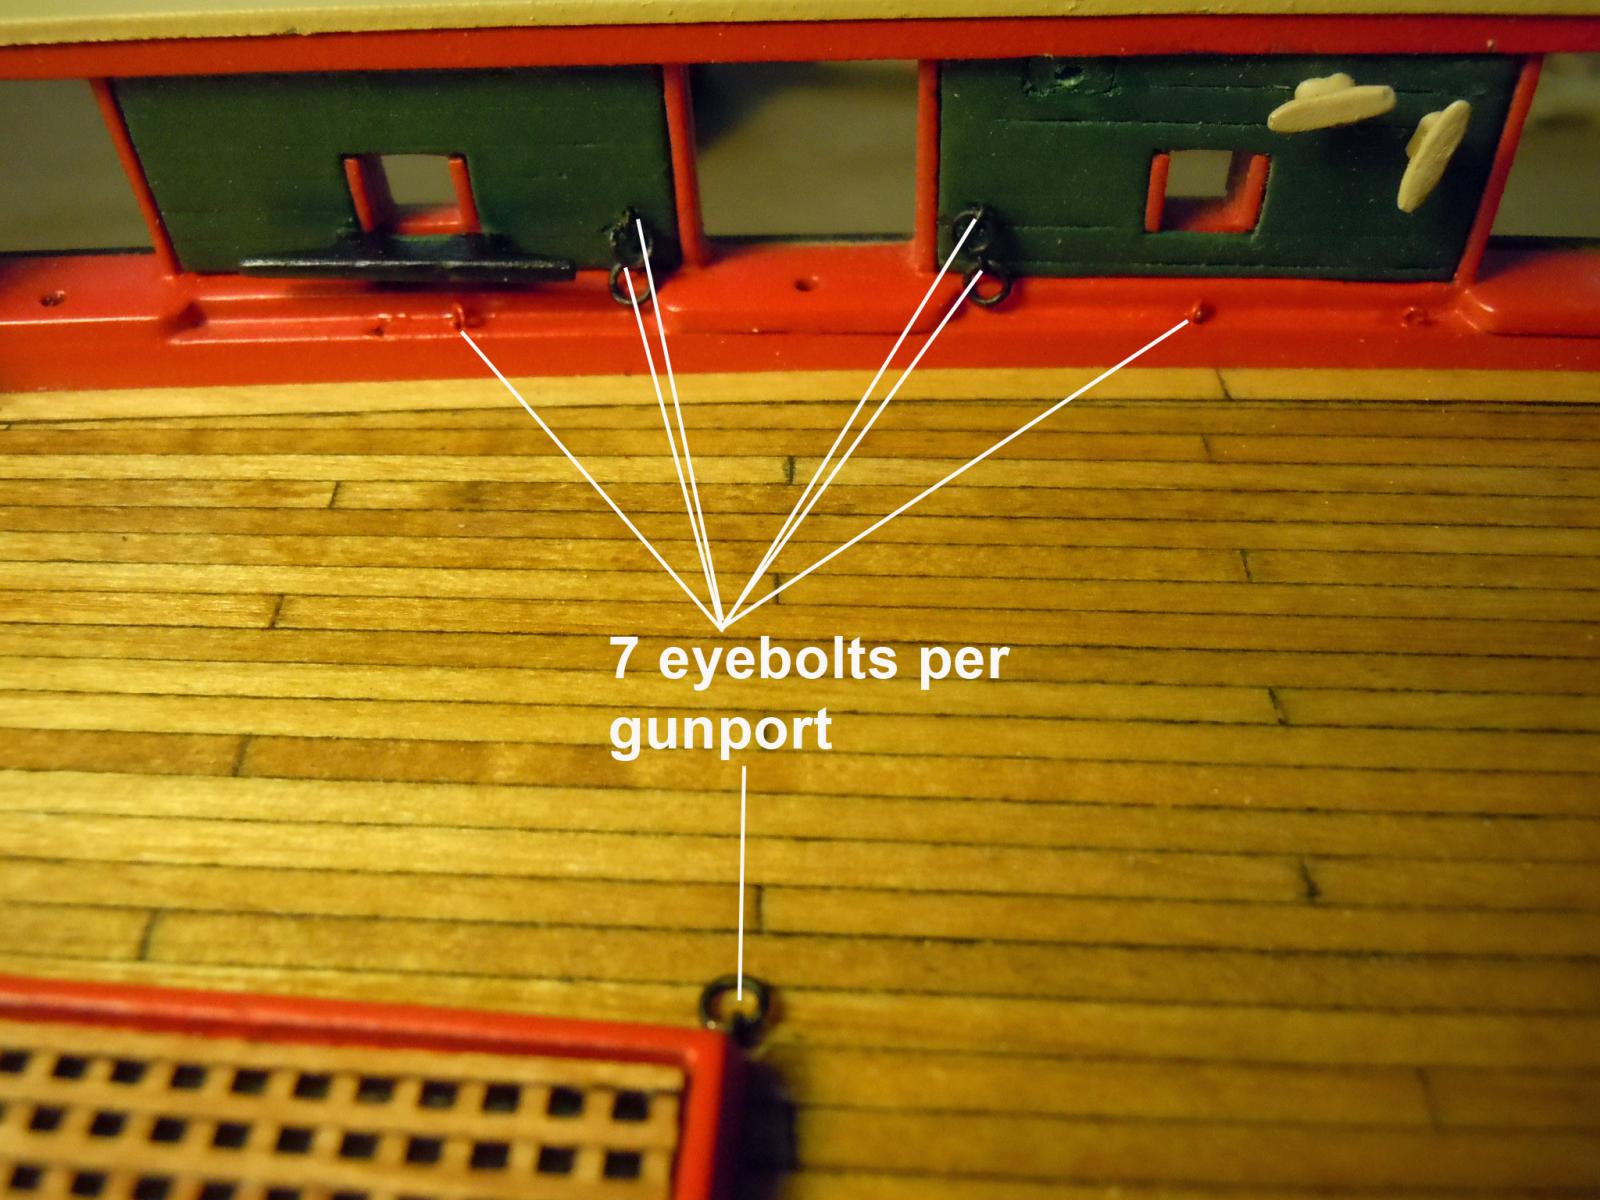
Kurt, Thanks for the heads up on the building fixture that is a great idea and I will use. Correct me if I am wrong, but I assume that the gun center line and the deck ring are in alignment and perpendicular to the hull opening (gun port); and the length of the line to the deck ring will shorten or adjust moving to the bow and stern? As for the eye bolts here is my breakdown count not including the yards: Transom tiller chain – 4 Deck on plank sheer – 14 Deck structures - 6 Gun port needs 7 x 22 – 154 (4 on hull wall; 2 on water board; 1 on deck with ring) Bowsprit Cap – 4 Foremast – 8 Total – 190 So I suggested to ME to add a second pack of the 120 which should cover the yards as well.
- 440 replies
-
- 2
-
-
- niagara
- model shipways
- (and 1 more)
-
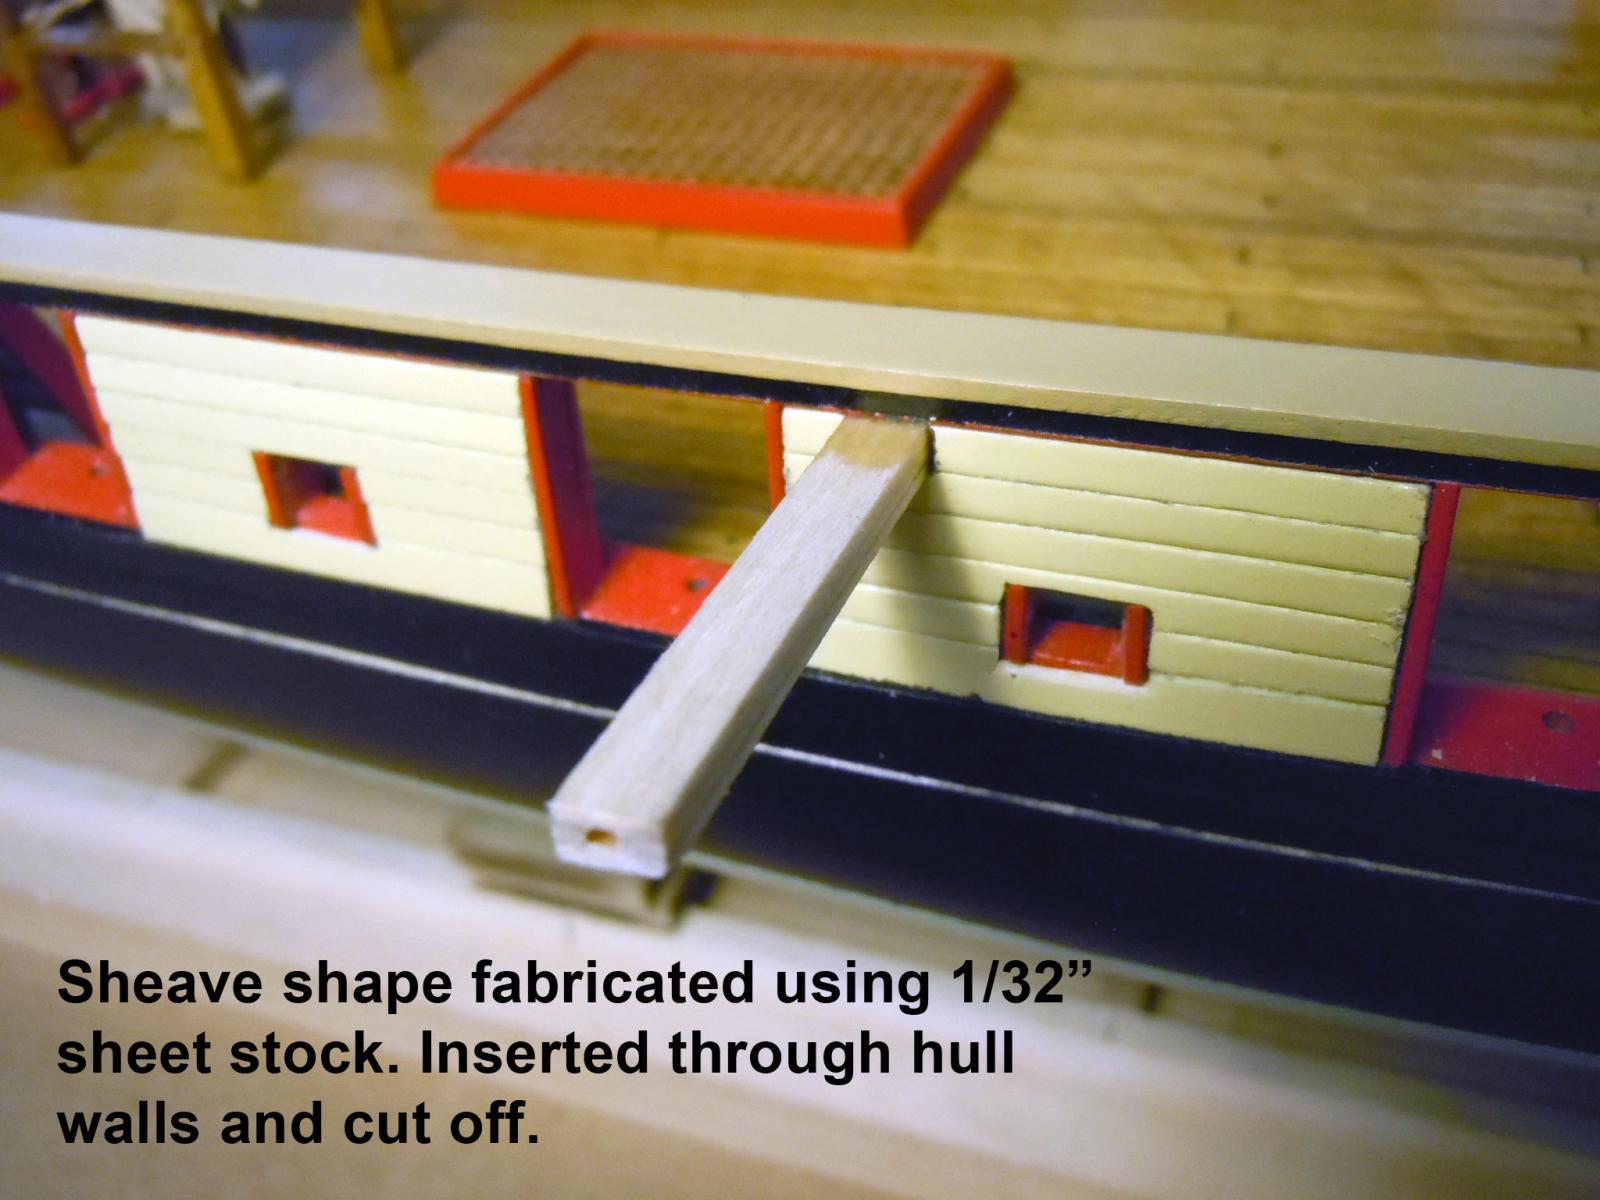
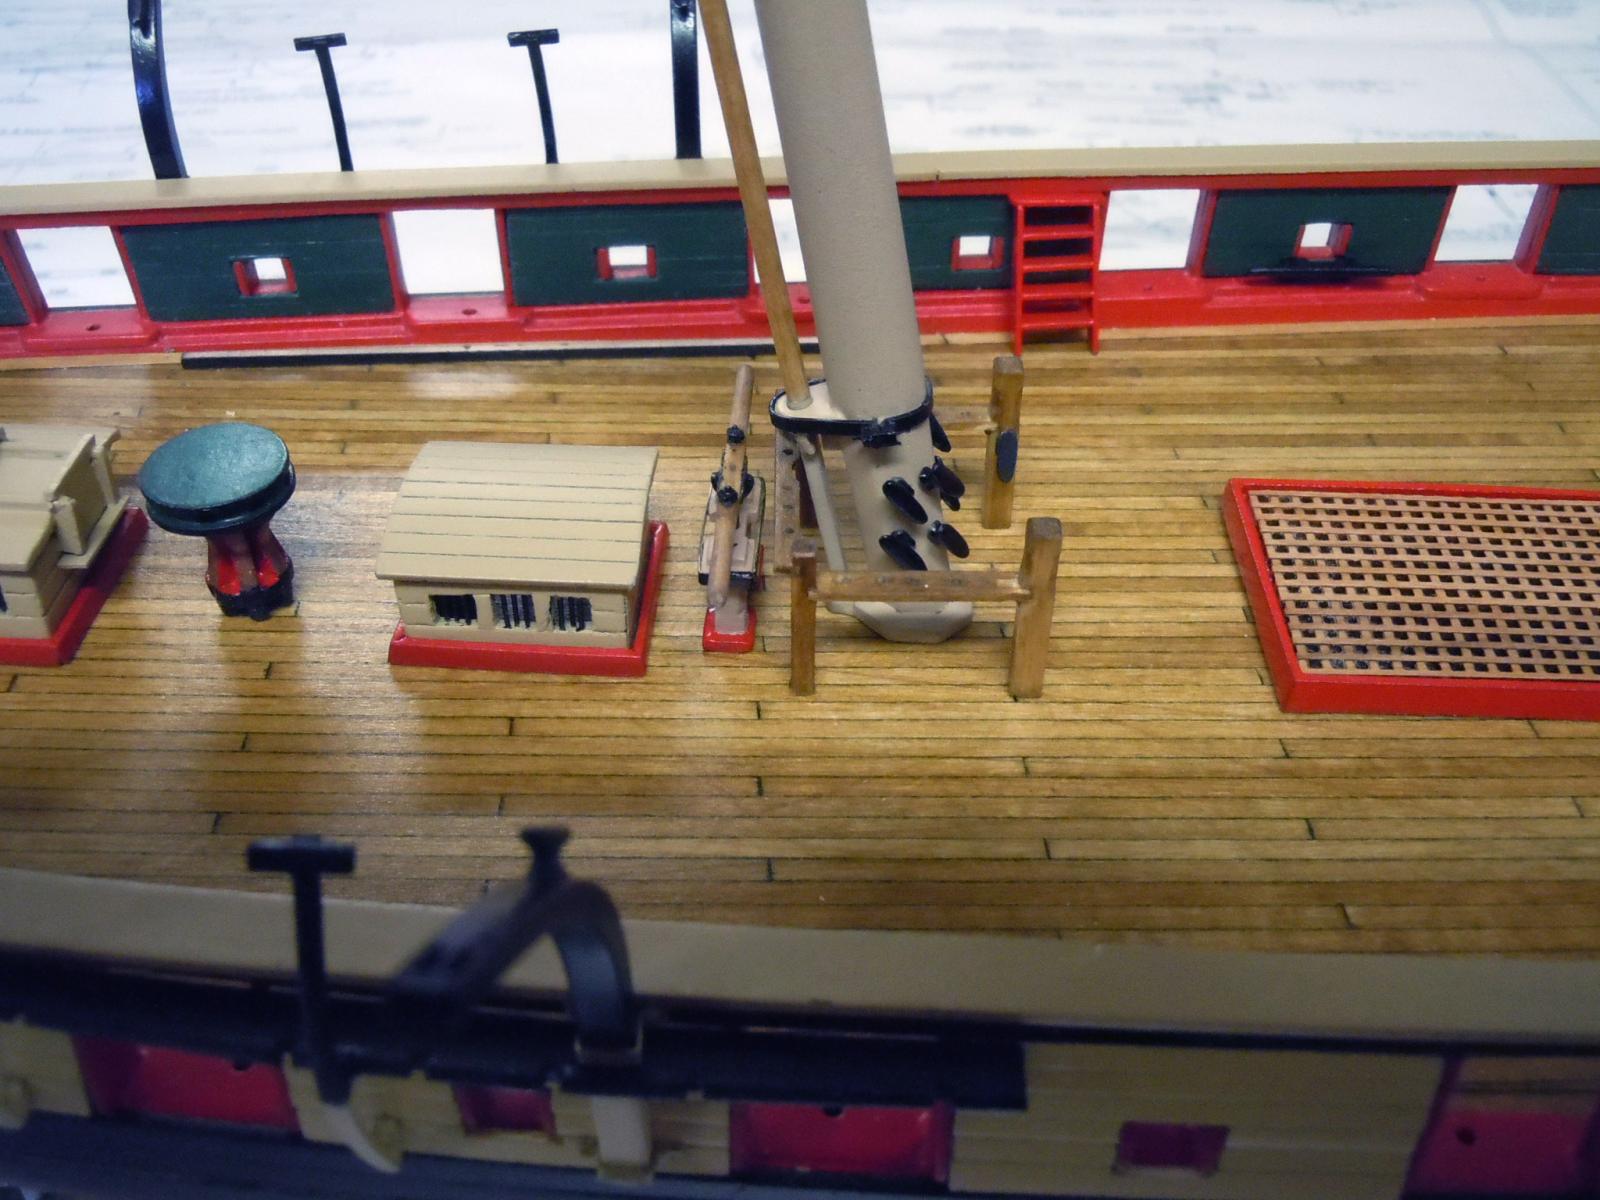
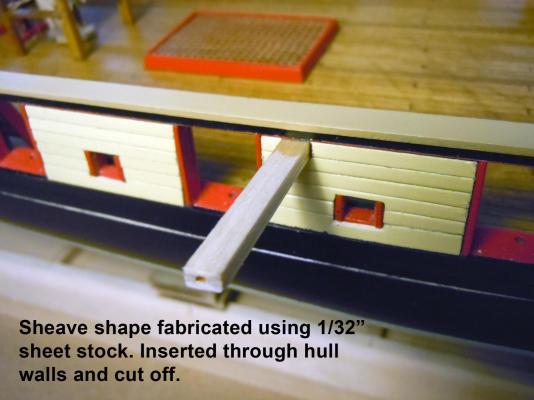
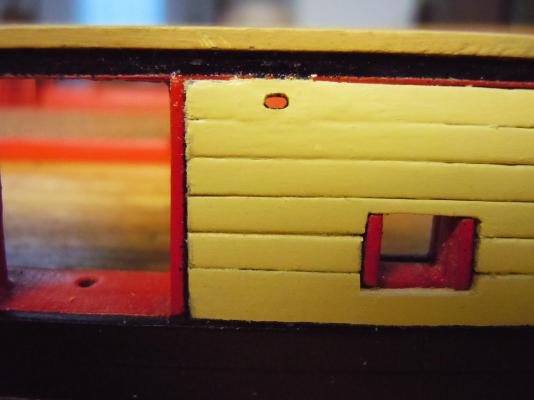
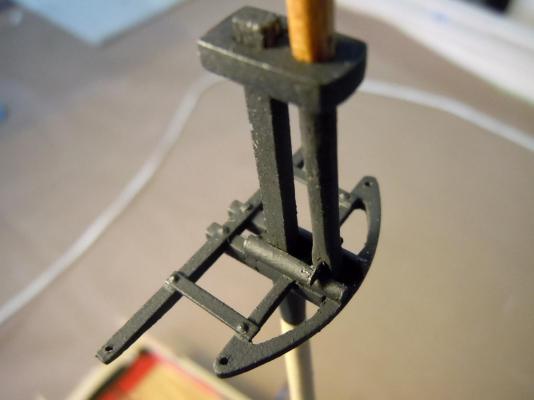
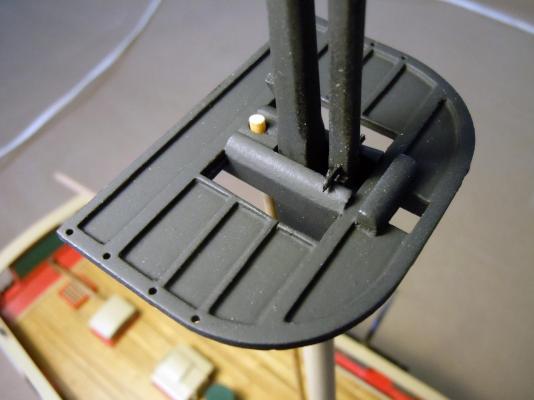
Working away on hull details and sorted out the sheaves that go through the hull walls. I decided to make a length of sheave profile using 1/32" stock forming a hollow rectangle shape. I then carefully cut a slightly undersized rectangular hole through the outer hull wall and then very carefully enlarged the hole to fit the profile. Then with a small drill bit drilled the four corners into the inner wall and cut it to size. The profile end was primed,sanded and then painted with green paint and inserted into the hole to fit flush with the inner hull surface. Once fitted it was CA'ed in place and when set placed masking tape around the profile to protect the painted hull surface and cut the outside length off. With masking tape still in place the exposed surface was sanded,primed and painted yellow. Tape removed and painted to blend with surface. Three more were repeated using the same profile part. Here is a picture of the profile inserted. Here is the finished outside of the sheave. Next I started adding eye bolts . The kit has two sizes so I added the larger ones to the outside bow and side surfaces since they seemed too large for inside application and not enough of them. I then added the small eye bolts down the waterway and sheer plank and outside transom per kit plan instructions. Keep in mind the bowsprit (4) and foremast (8) have these already added. I then thought I would start at the center gun port as a pattern for the rest and added the 4 rings to eye bolts on either side; then two on the planksheer on each side of the gun and finally the eye bolt and ring towards the center of the deck. I then looked at the remaining bag of eye bolts and thought not enough there in the bag. Sure enough the Bill of Materials said a bag of 120; counted out the the ones I used and the remainder in the bag and totaled just 80 not 120. Then quick math told me that 22 x 7 = 154; not enough to begin with. Emailed Model Expo and they should send more so I will just finish out with what I have. Here is a picture of the gun port pattern. If I am understanding correctly the ropes are attached with hooks to these rings. Feedback would be appreciated. Back to eye bolts and rings.

- 440 replies
-
- 7
-
-
- niagara
- model shipways
- (and 1 more)
-
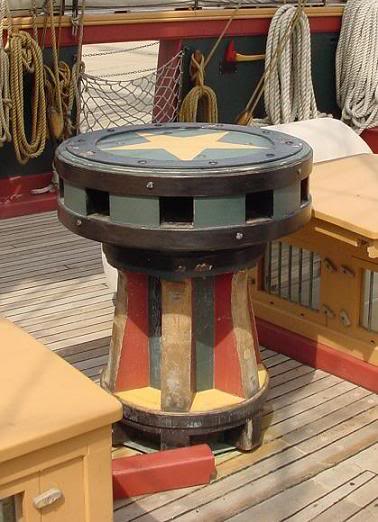
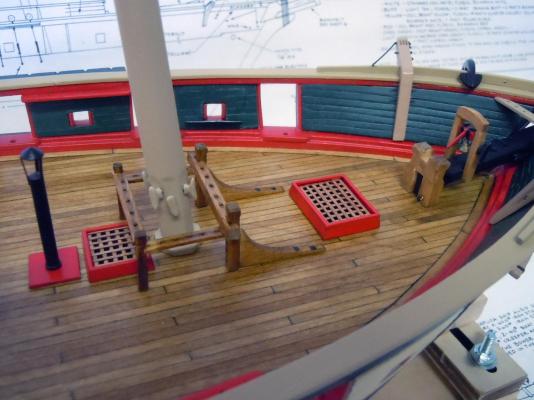
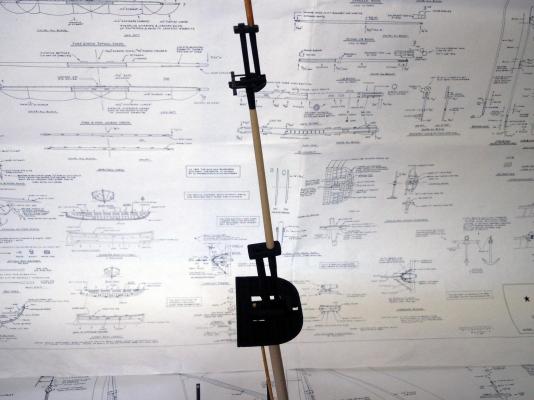
Thank you for the compliments! On the bolt heads this can be done on aluminum and copper as well and experiment with the amount of force to hit with for various results. Also the hardness of the material will affect the look as well. I have used this many times on thin aluminum for rivet heads. A question for anyone.....the red board in the reference picture is not mentioned or shown in the plans; is it a brake or positioning board for the capstan that indexes in the bottom openings next to the deck?
- 440 replies
-
- 1
-
-
- niagara
- model shipways
- (and 1 more)
-
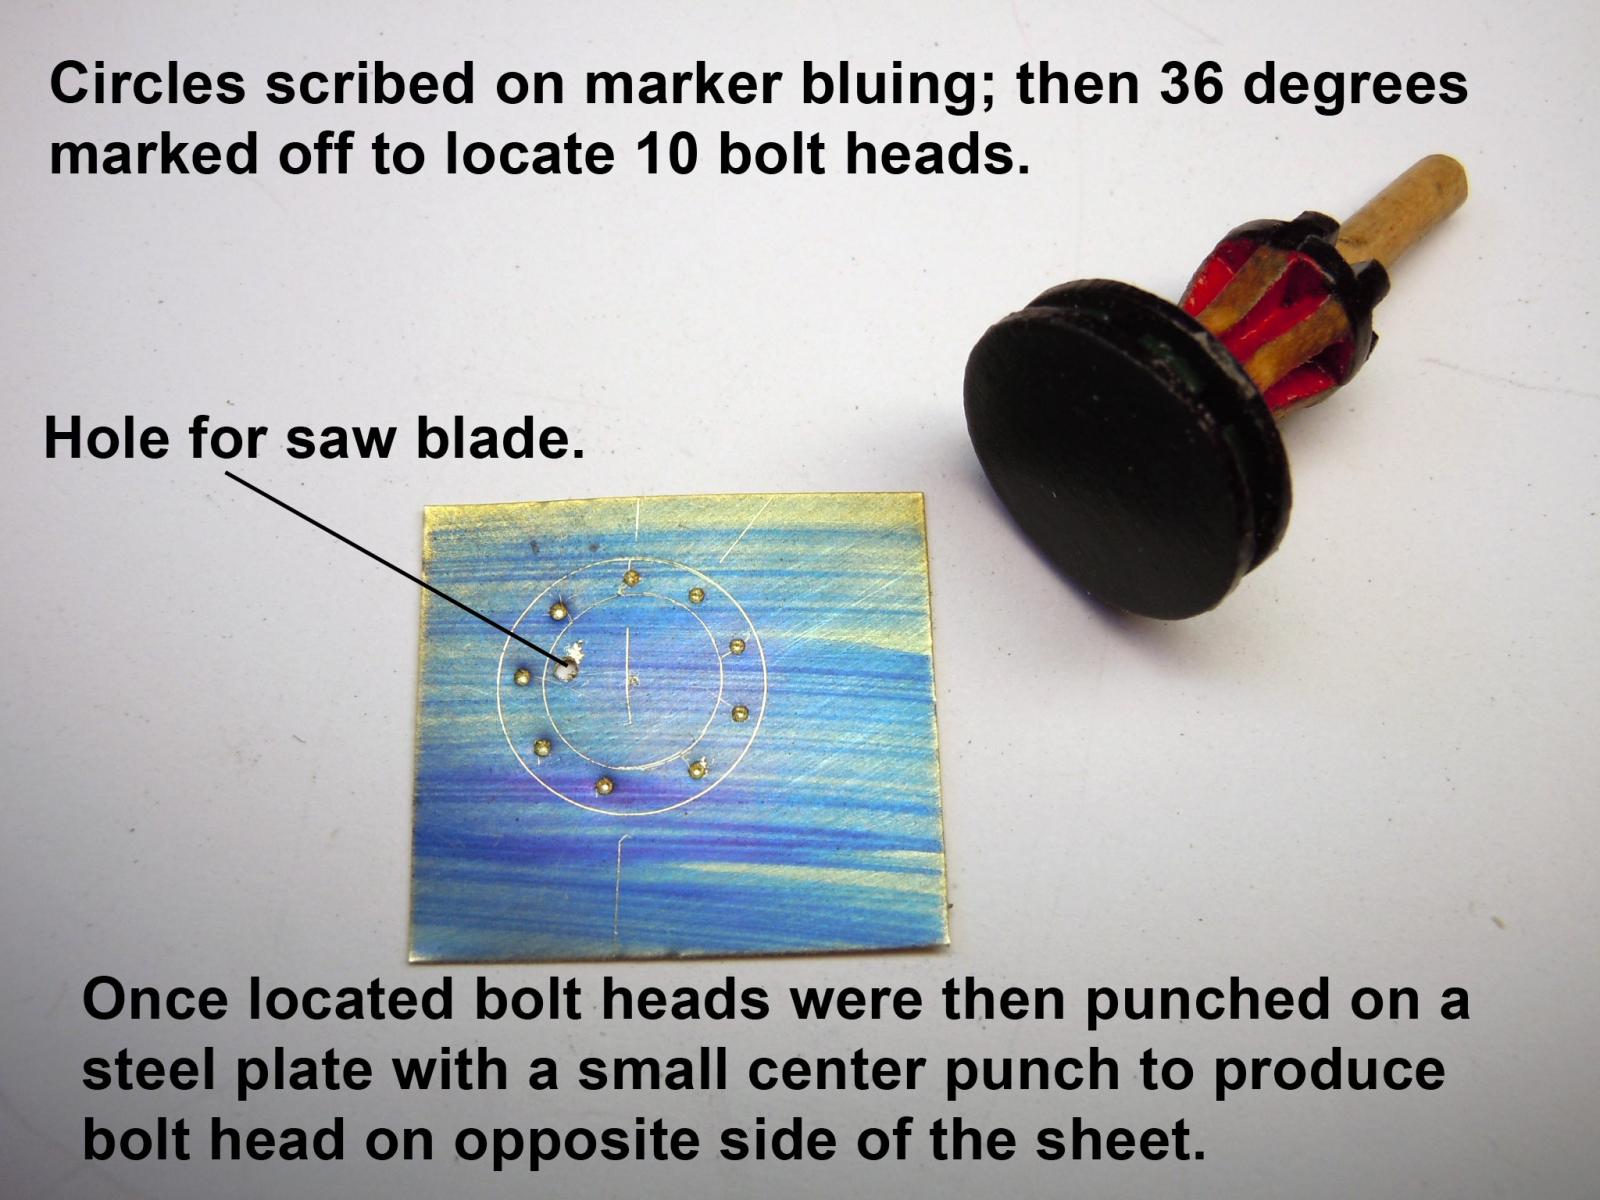
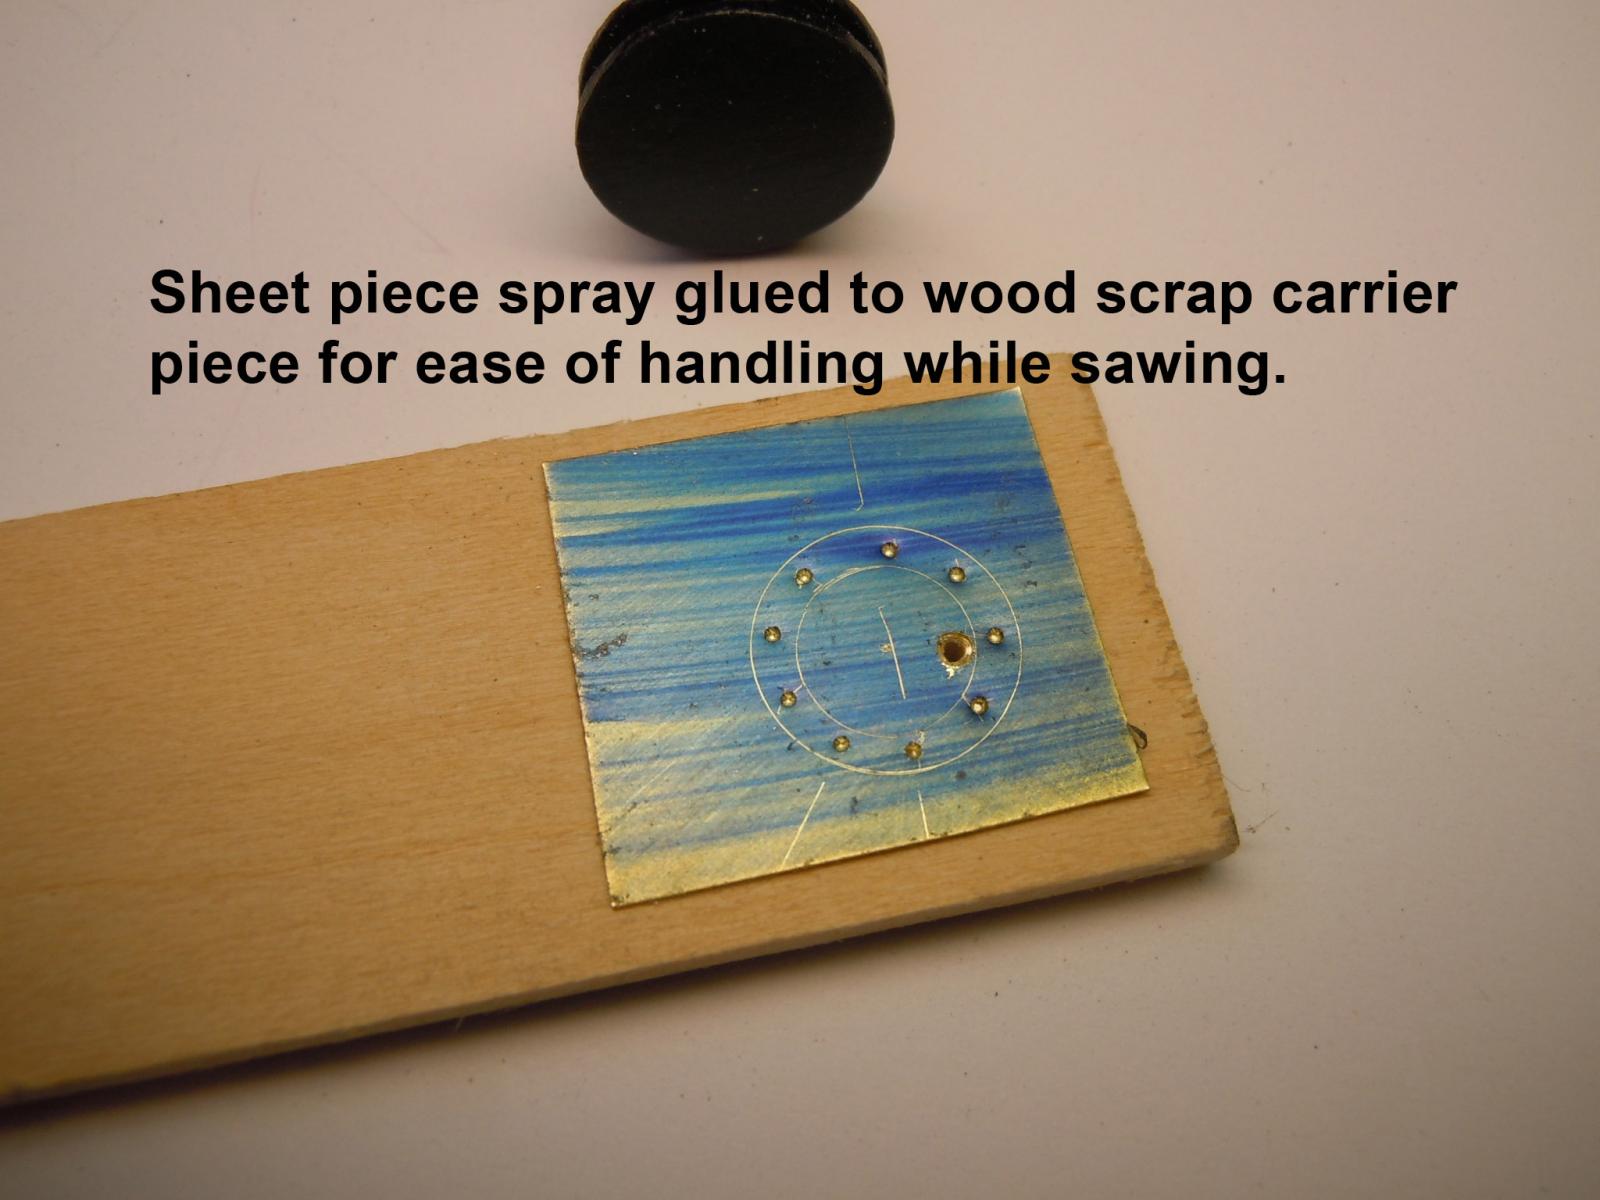
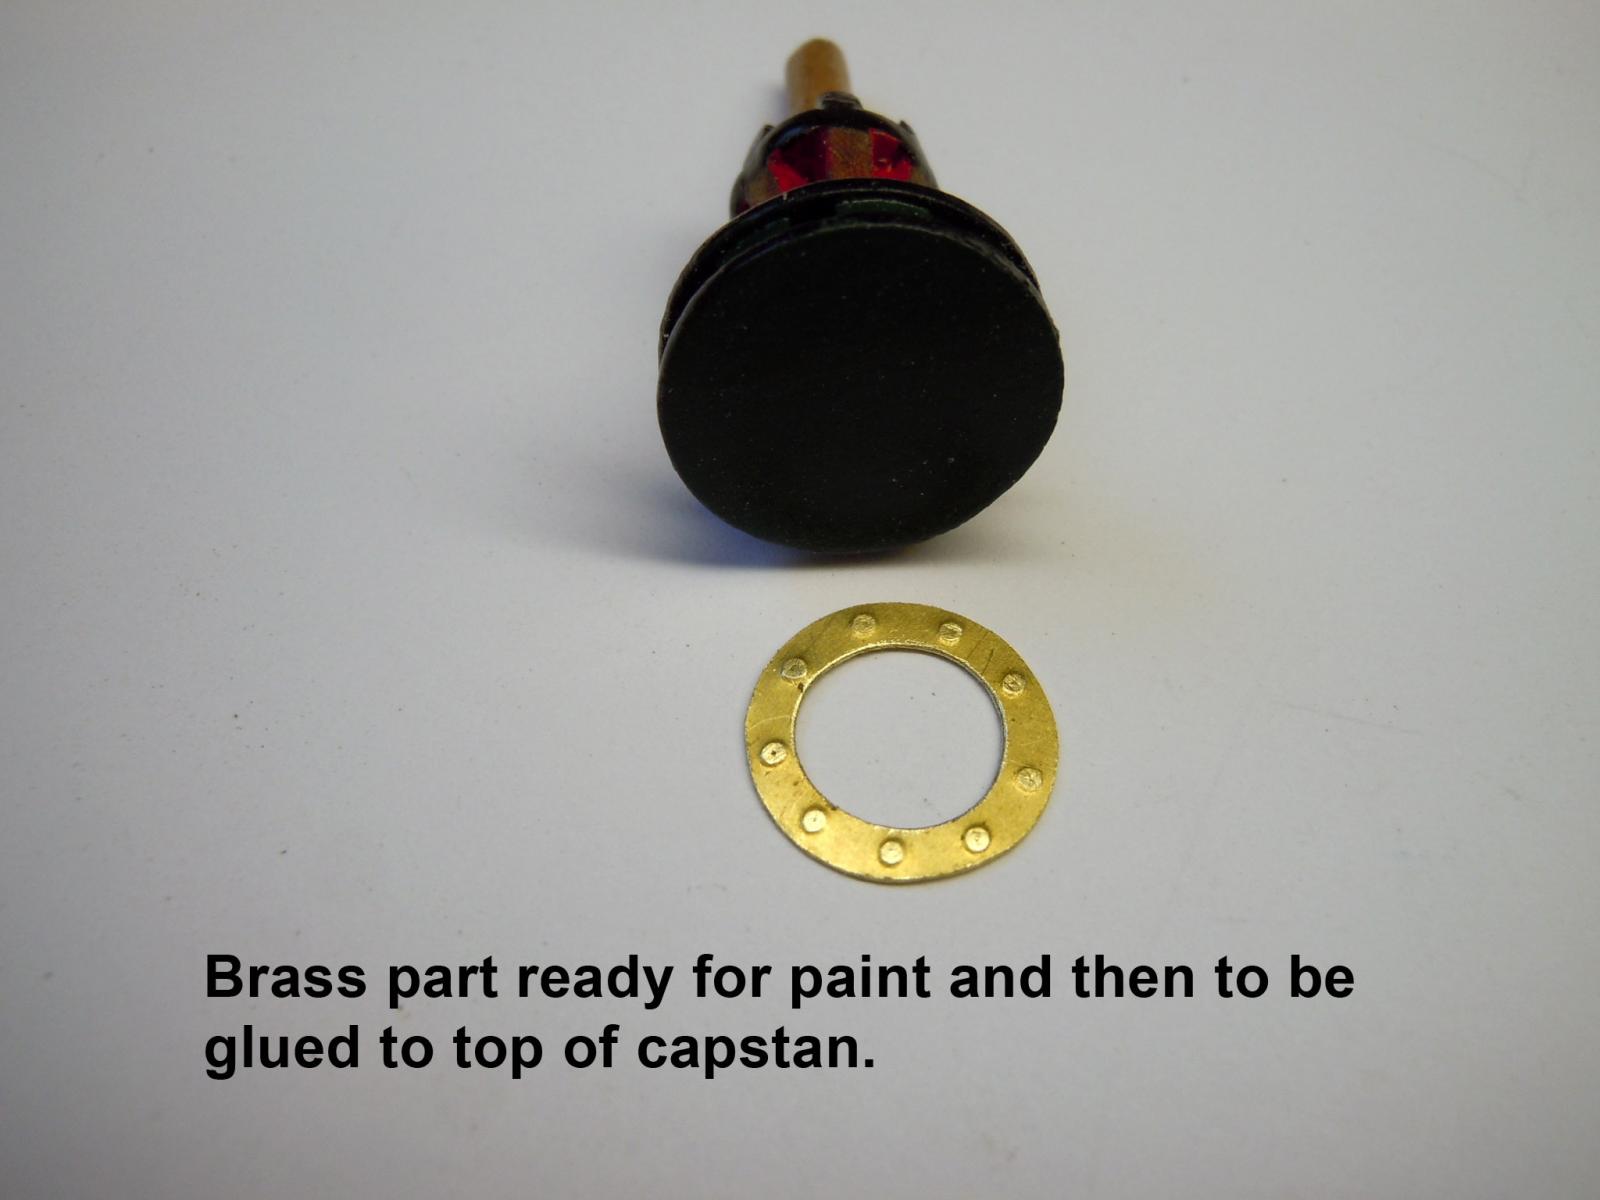
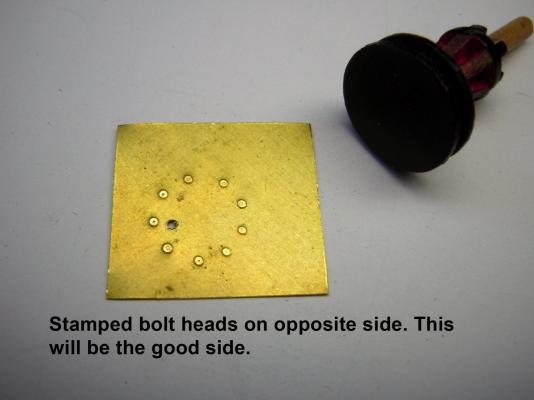
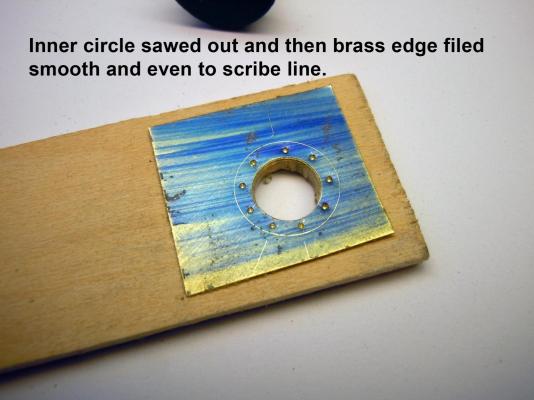
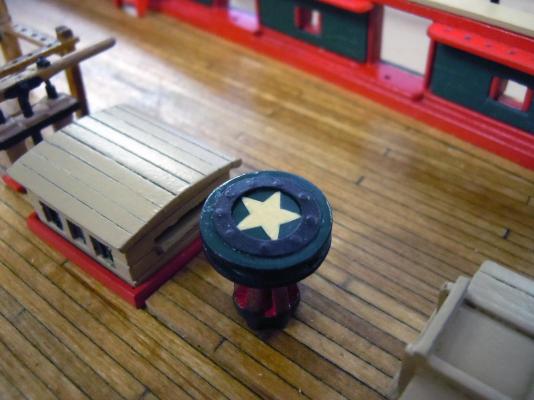
Just a word on soldering; patience is needed to let the iron get hot enough for the solder to flow. Most issues I have seen with cold joints is not allowing the iron to get hot enough. If one has a cold joint, add more flux and retry with the really hot iron. I started to finish up capstan and thought I would show my humble effort at adding the top detail. Here is the reference photo I found of it. To add the top metal ring I started with a brass sheet piece .005" thick and covered it with a blue marker to see the scribed lines better. Drew two concentric circles the correct size. Then drilled a starter hole for the jeweler saw blade. Scribed a line through the center and then marked of 36 degrees with a compass from the first line. Then with a small compass marked off the 10 bolt head locations. Using a small center punch on a steel block I hit each location with a slight tap. Here is a view of the bolt heads on the opposite side that will be the top good side when finished. Small parts get hard to handle when sawing so I spray glued (3M 77) it to a scrap piece of wood as a carrier for handling. Once the center was sawed out I cleaned the edge up with a needle file. Then I sawed out the outer edge and cleaned it up. Here is the part ready to paint. I hand painted a star on the top of the capstan the size of the inside diameter of the circle. If I had decal paper I might have made a decal; I figured that I could at least hand paint one quicker to keep going. I then CA'd the painted ring in place. The capstan will not be glued into the deck so if I decide later to rework the star. I have also been busy with cleats, bits, eye bolts etc. Just a great deal of little items that are easier to add now than later.


- 440 replies
-
- 8
-
-
- niagara
- model shipways
- (and 1 more)
-
Here is a link to the Weller SP-120 that I use. http://www.amazon.com/Weller-SP120-Watt-Soldering-Iron/dp/B00002NB9K/ref=sr_1_1?ie=UTF8&qid=1433881352&sr=8-1&keywords=weller+sp120 As for the solder and flux I went to the local welding supply shop and they ordered it for me and had it in a few days. I imagine in Dearborn there are a few. Ken
- 440 replies
-
- 2
-
-
- niagara
- model shipways
- (and 1 more)
-
George, I do most of mt soldering with a Weller 120 watt soldering iron and on the thick heavy stuff a propane torch with a very small flame. I use Staybrite Solder that I purchase from a plumber supply house and it usually has to be ordered. I get the 1/32" diameter 1 pound roll which is more cost effective than other sources and a 16 oz. container of Harris brand Stay Clean flux.
- 440 replies
-
- 3
-
-
- niagara
- model shipways
- (and 1 more)
-
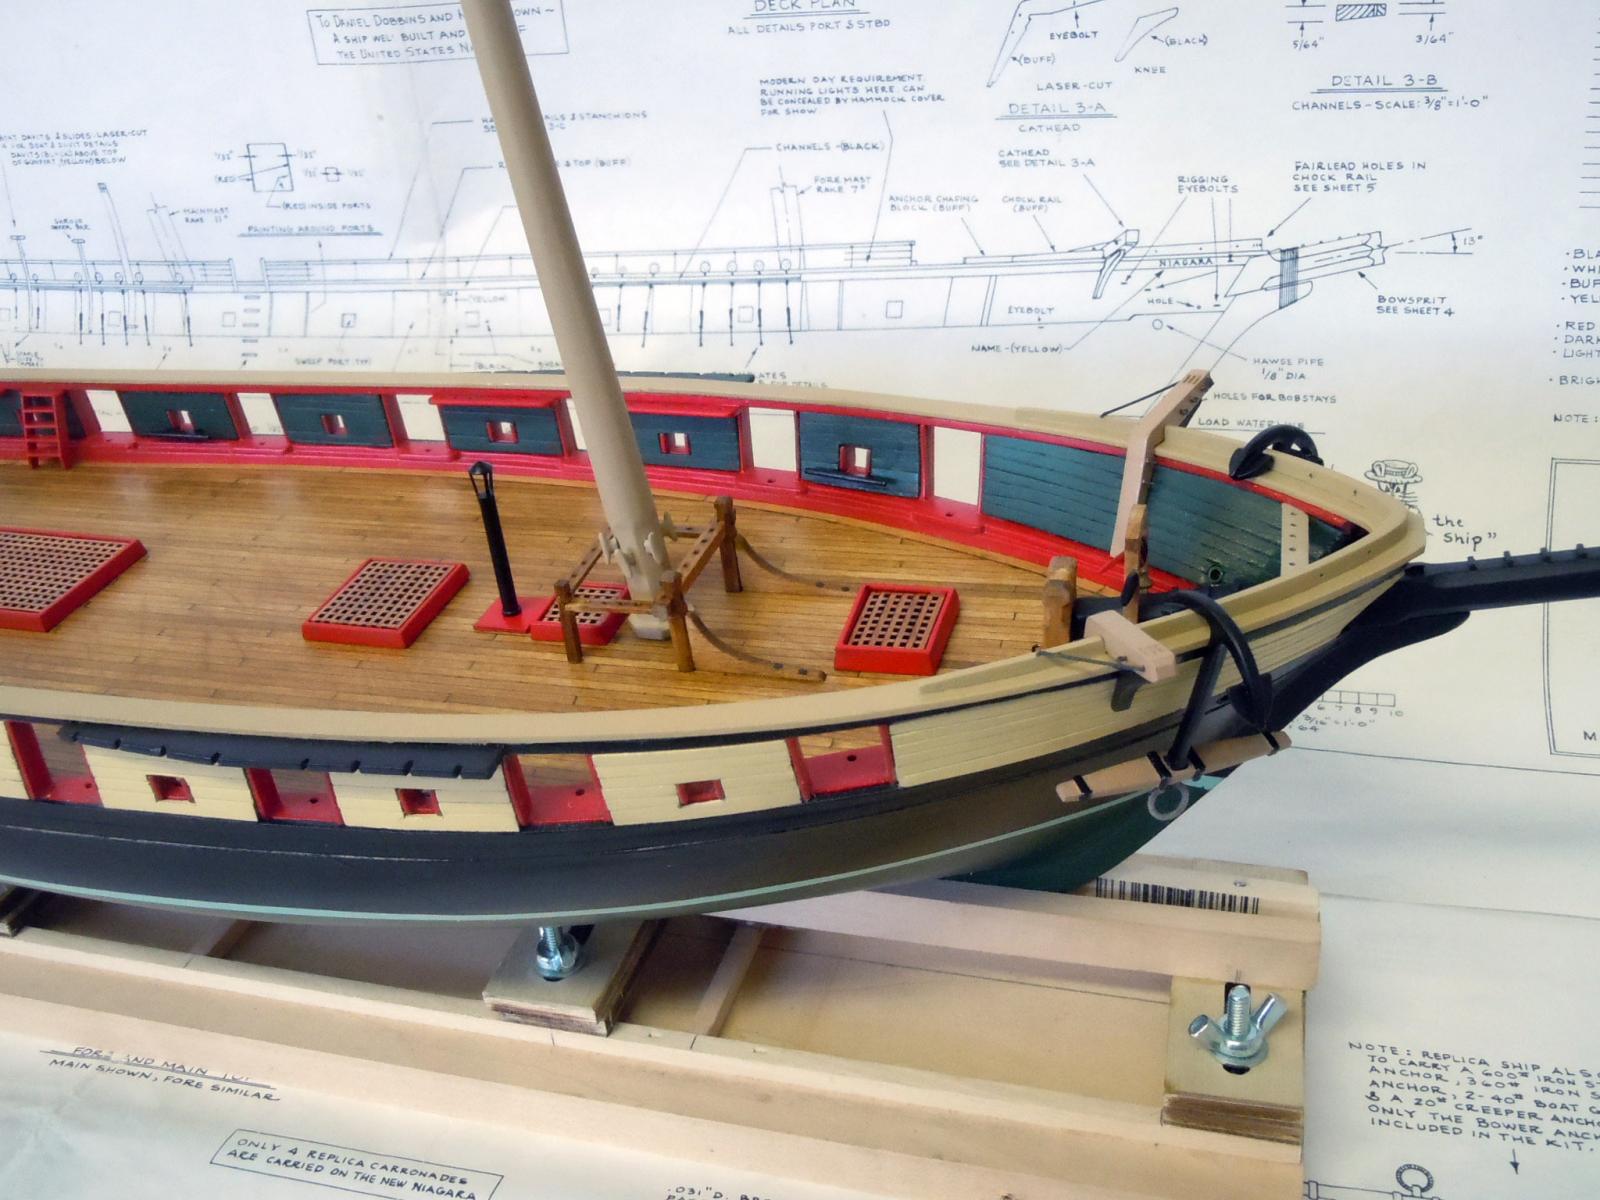
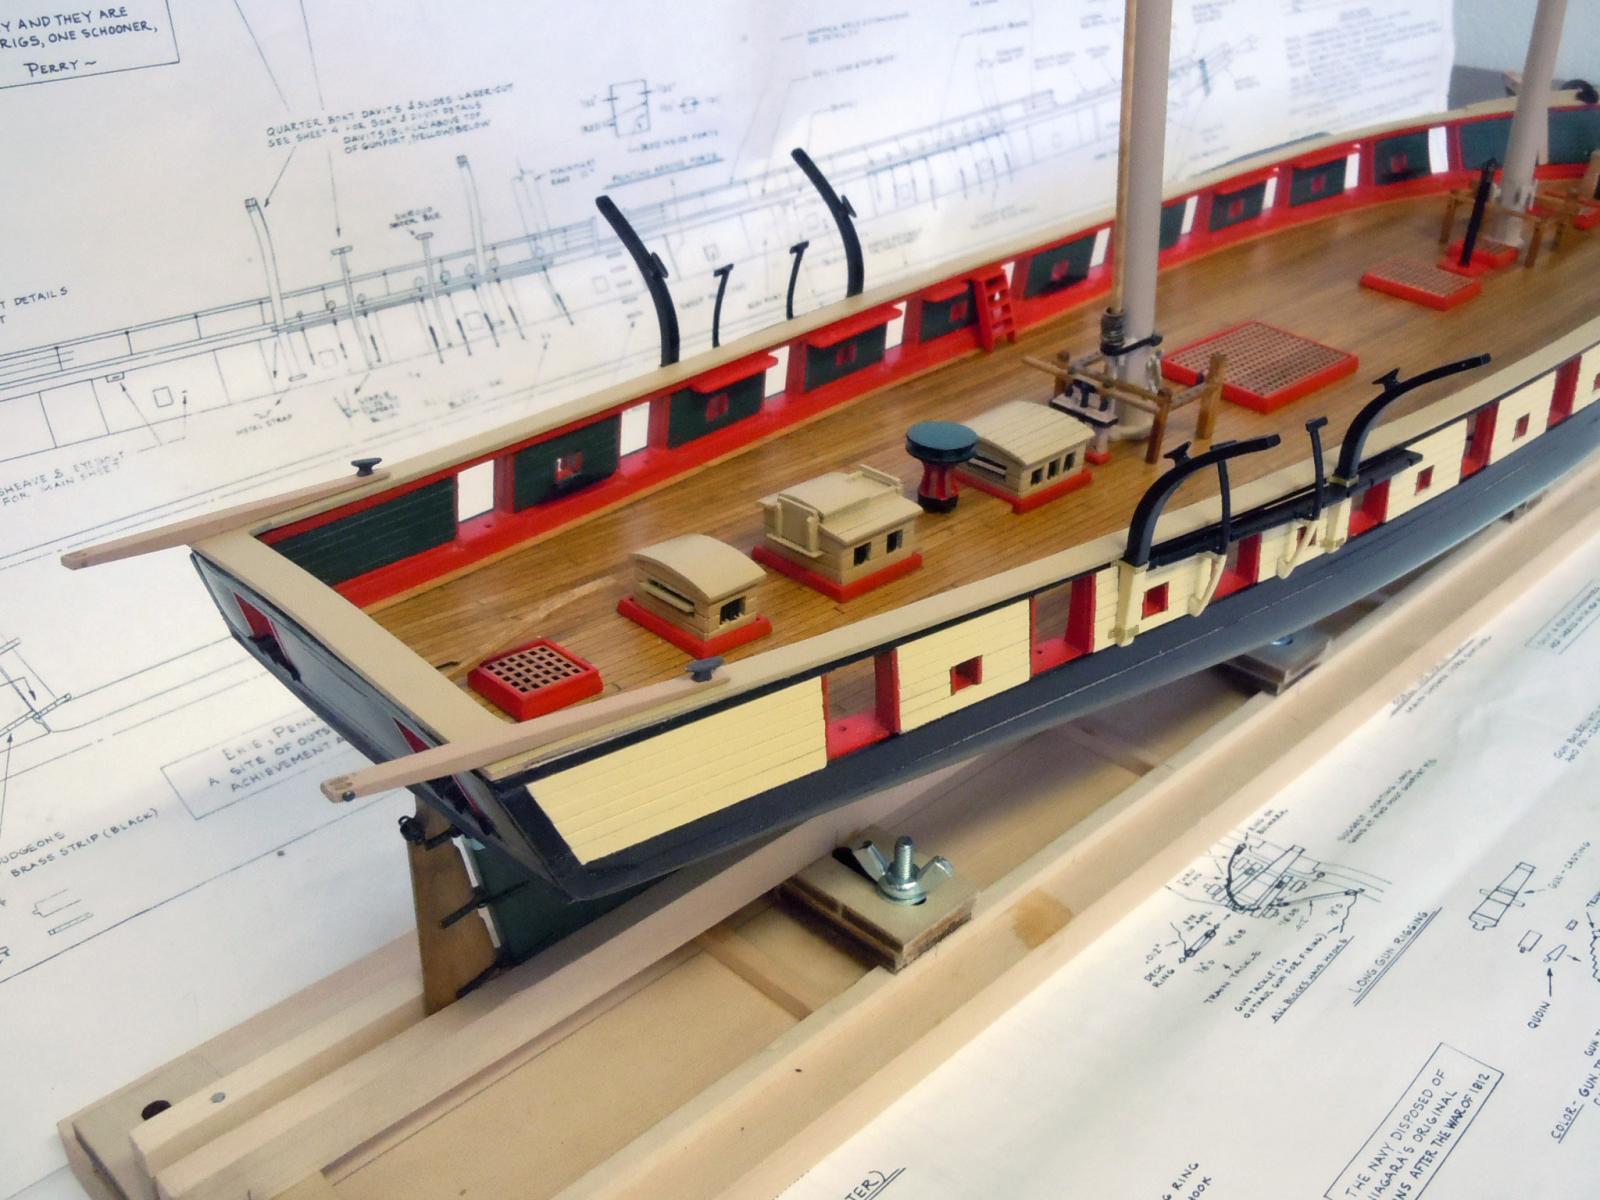
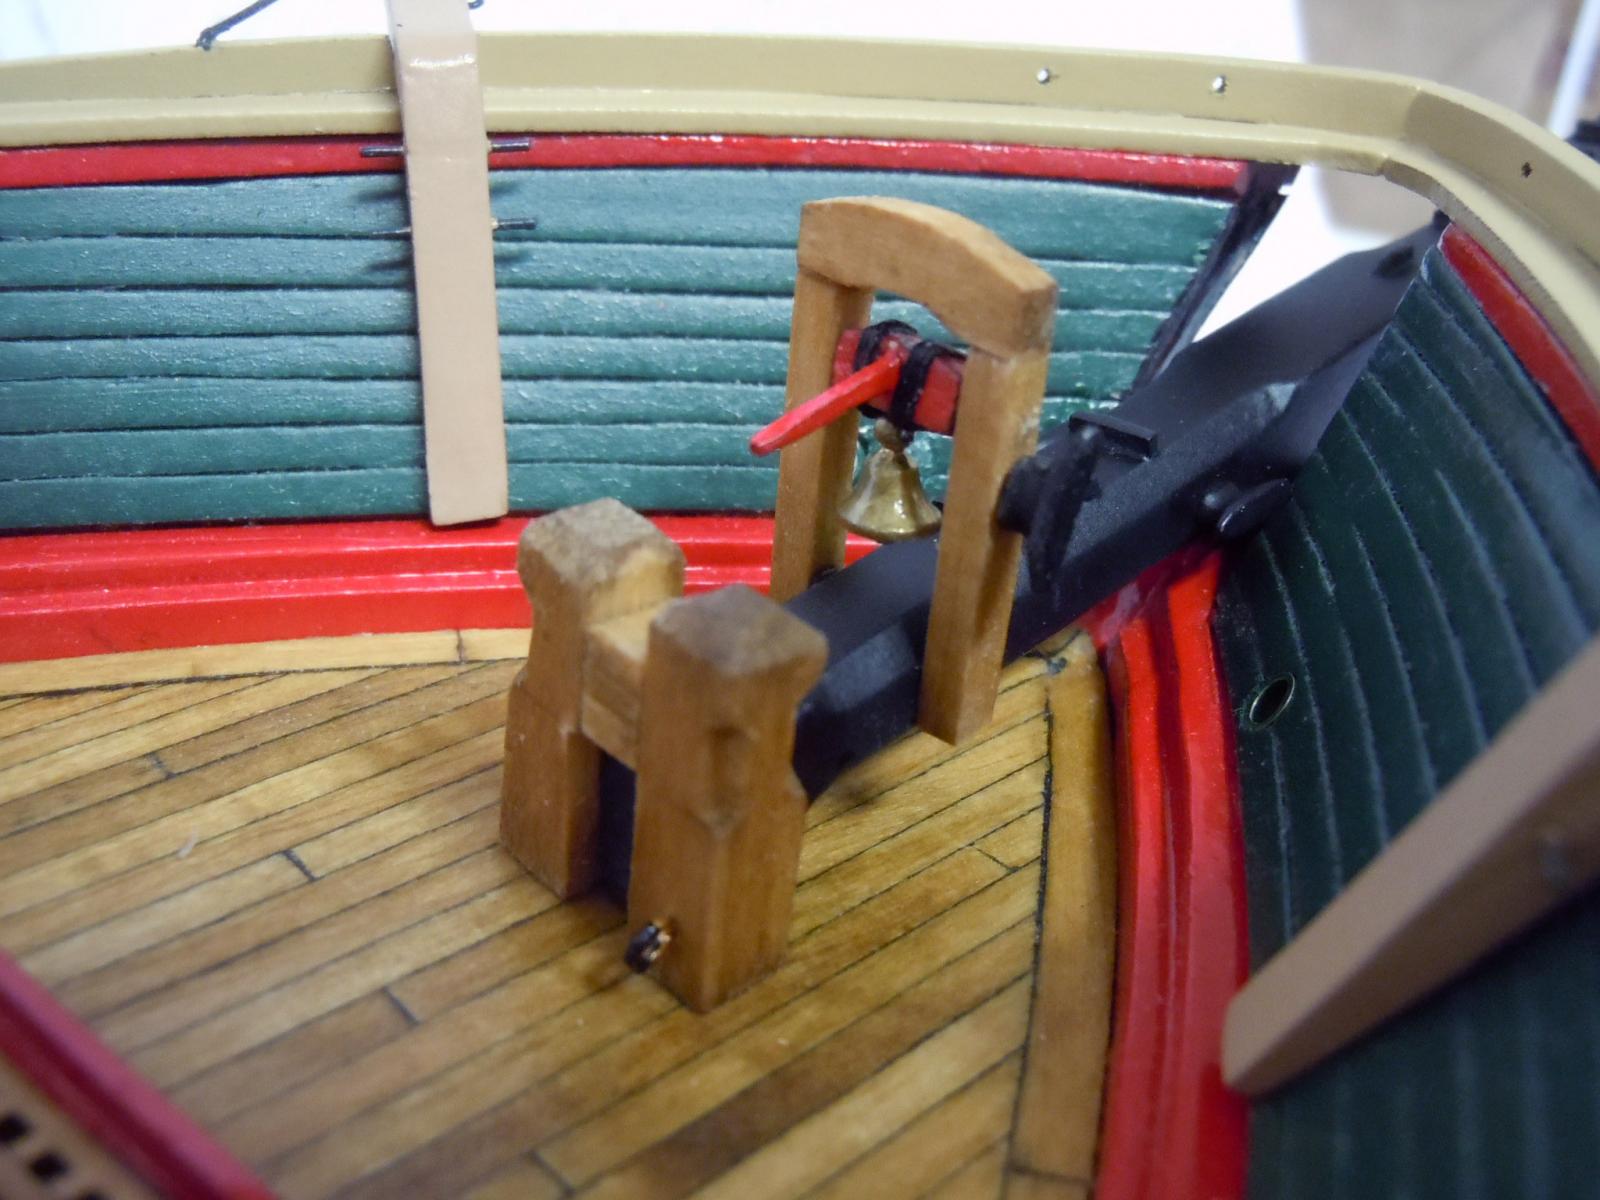
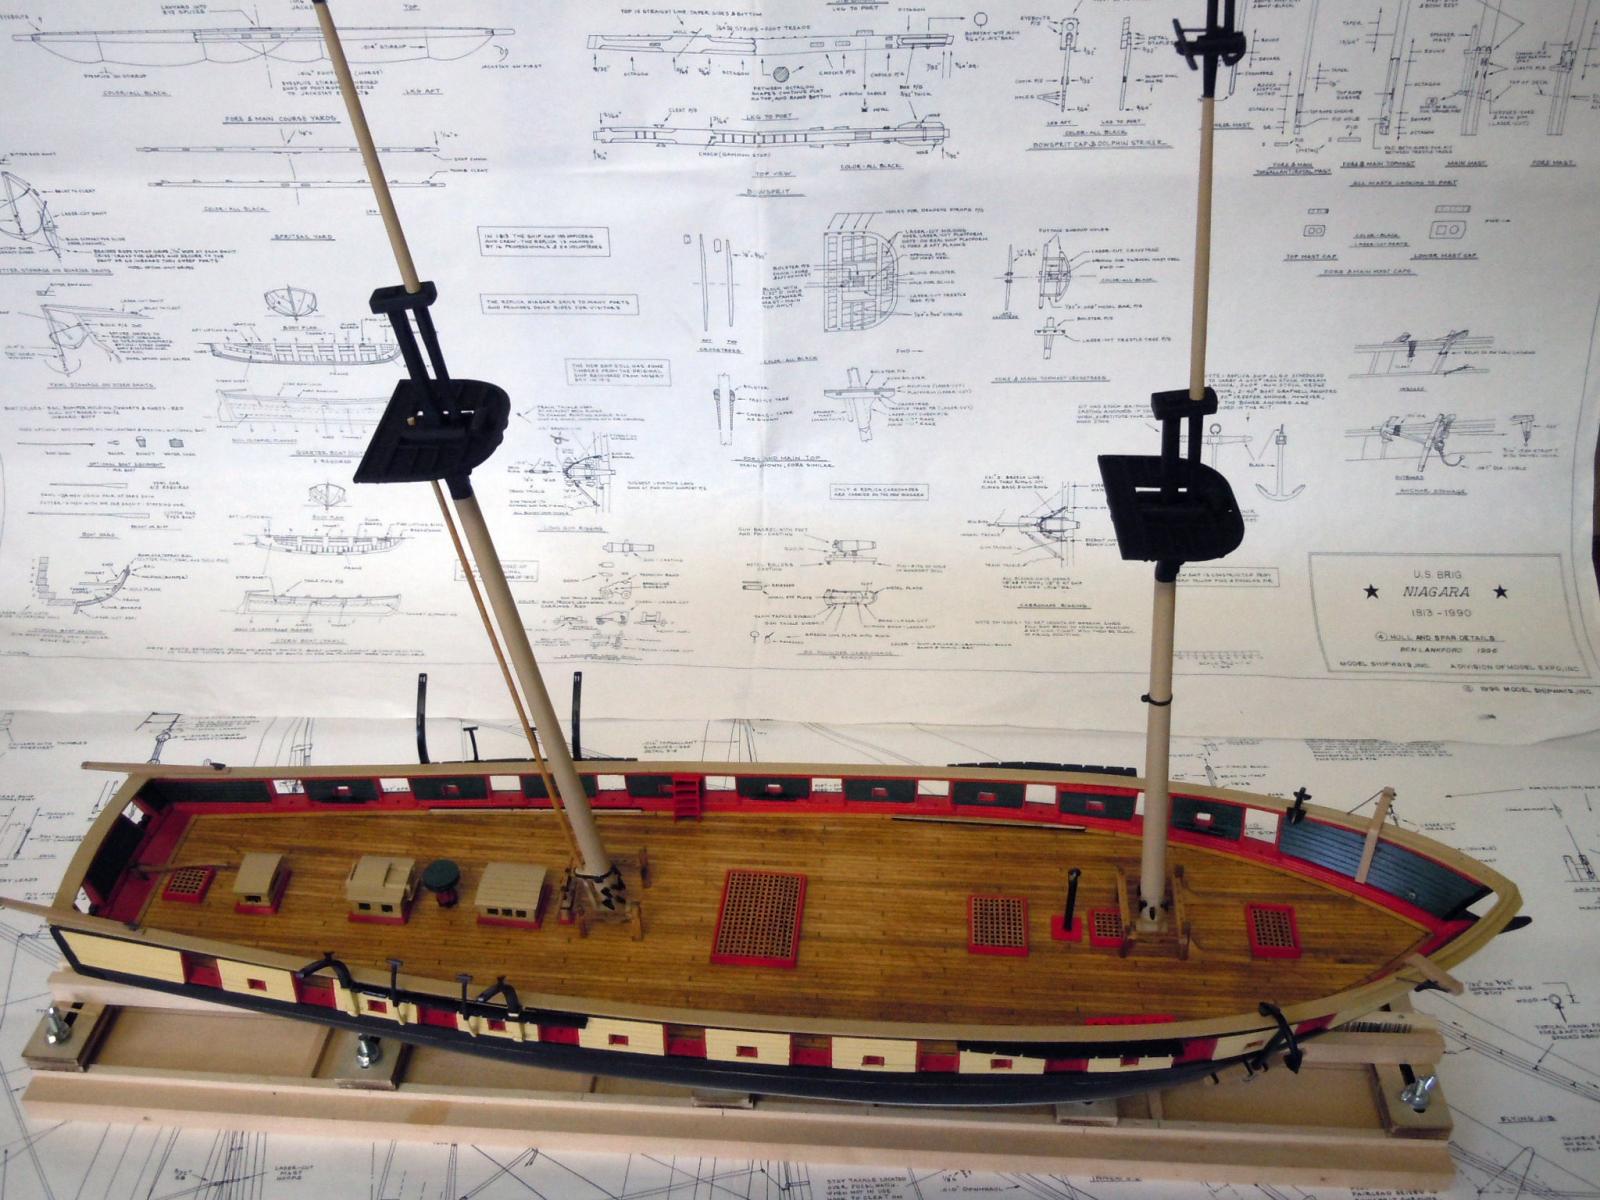
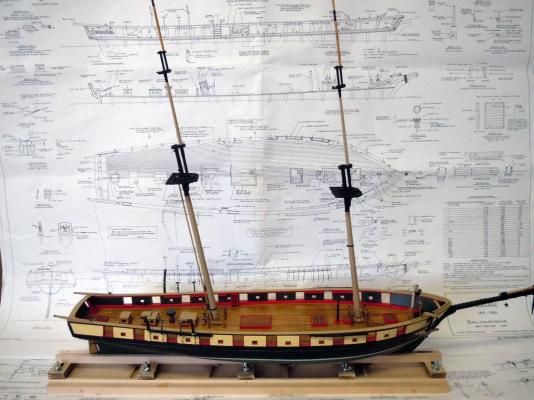
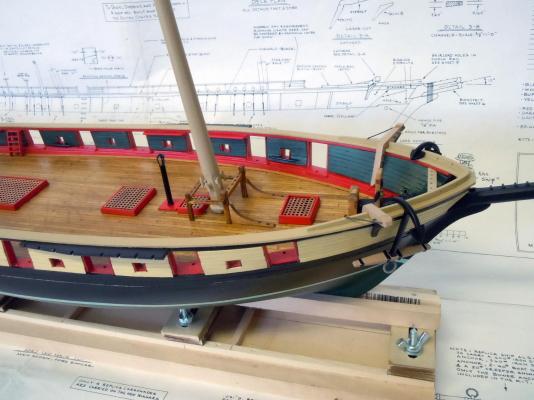
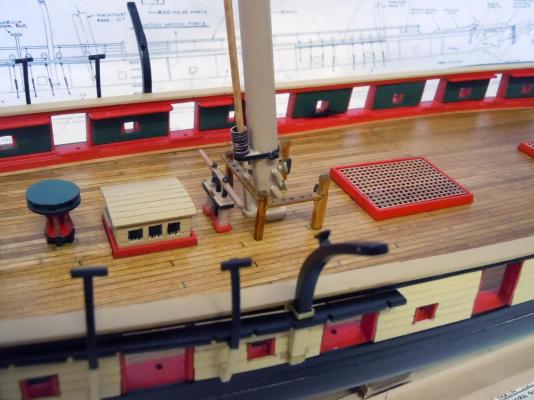
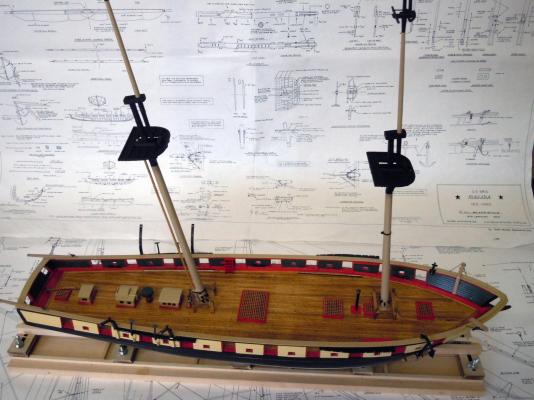
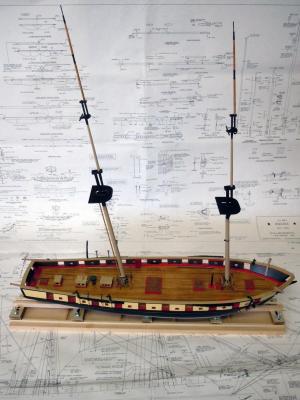
Got a little time over the weekend to work on the brig. I spent the time gluing parts and components in place. Everything from the mast sections to all the deck details made so far. Here is an overview with the masts in place. Here is the bow section with the bell and bowsprit glue in place. A view looking from the stern forward. Looking at the base of the main mast. Looking at the base of the foremast. The masts are not glued to the deck slots so they can be removed for access to the deck area around them. Next to finish up the deck details like the rings and the rest of the cleats and start the canons. I hope those purchasing my book really enjoy and learn from them.

- 440 replies
-
- 4
-
-
- niagara
- model shipways
- (and 1 more)
-
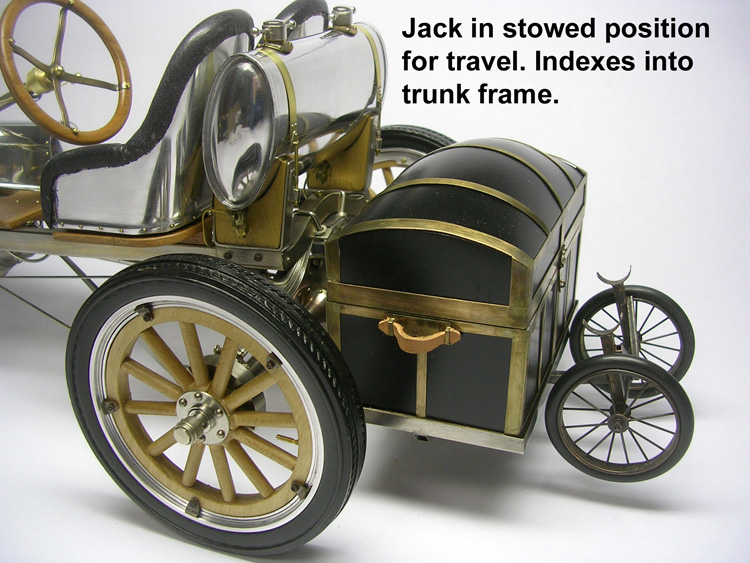
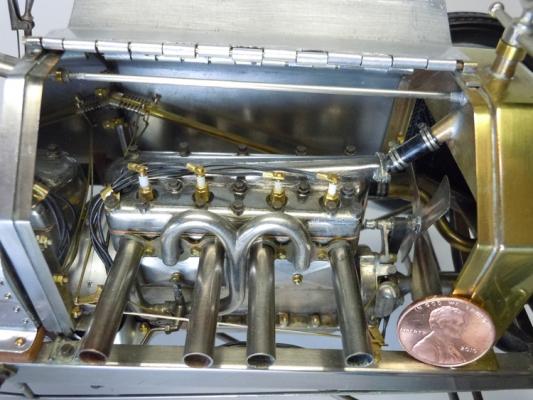
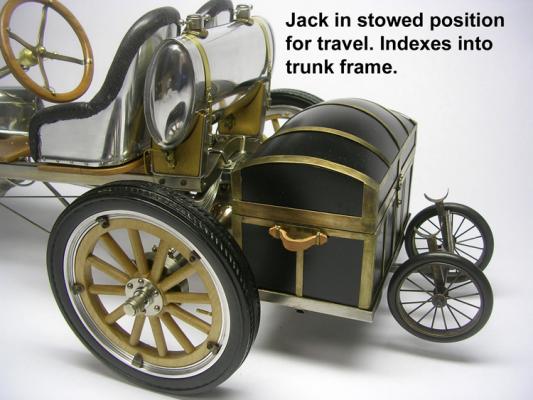
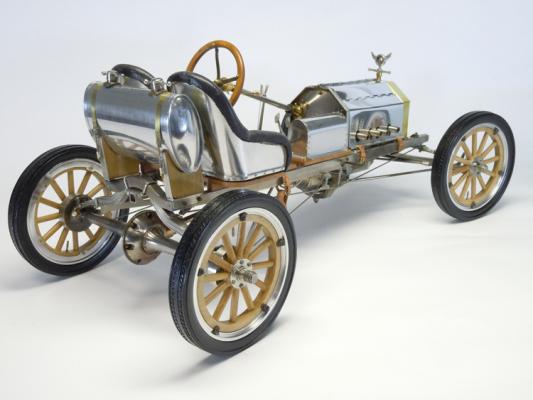
Scott, I forgot to mention in the post above that I normally research my subjects and scratch build them using as much as possible the same materials as the subject. Here are images of the 1/8th scale1911 Model T racer that I scratch built as a online tutorial of building with brass. The hand crank turns the crankshaft with aluminum pistons going up and down geared to the camshaft that opens the valves in scale goes through the transmission and geared rear end and turns the rear wheels. The hand brake works the rear brakes. In the engine picture for example the radiator hose clamps work, the spark plugs have the sparking tang with a spark plug wrench to remove them; so at times, I am anal when it comes to some details. Here is a picture of the trunk that has tools in the upper tray that hides a sound card of the engine running. The quick change jack works to raise the wheels off the ground for changing. The wheel spokes are turned out of hard rock maple to simulate in scale the wood grain of the real spokes. The wheel clinchers hold the tires to the wheels. etc. Here is a rear view the seats are covered with goatskin leather from women's dress gloves which is very thin and subtle and works great in scale for upholstering. This Brig is the first time I have built a model from a kit and I figured that was the quickest way to learn ship building since I have no access to a tall ship to do my own plans with CAD. I will hold back my thoughts on these plans and assembly instructions. Ken
- 440 replies
-
- 6
-
-
- niagara
- model shipways
- (and 1 more)
-
Nigel, great build and I enjoy the extra effort to add details not included. Keep up the great work! Ken
- 270 replies
-
- 1
-
-
- red dragon
- artesania latina
- (and 1 more)
-
George, here is a link to the publisher http://www.schifferbooks.com/model-building-with-brass-4764.htmlor you can also try Amazon. Scott, this is my first ship build so I am trying to follow the plans as described in every detail not only to produce a good model but also to learn about ship building. My past experiences have been WWI aircraft, horse drawn vehicles, a MASH helicopter, and a functional 1/8 scale Model T board track racer. I am a firm believer that God is in the details and that model building is a form of entertainment that should be enjoyed. I have also been told by many that I am crazy for the level of detail I put in my models; but that is just the way I build them regardless of the subject. Ken
- 440 replies
-
- 4
-
-
- niagara
- model shipways
- (and 1 more)
-
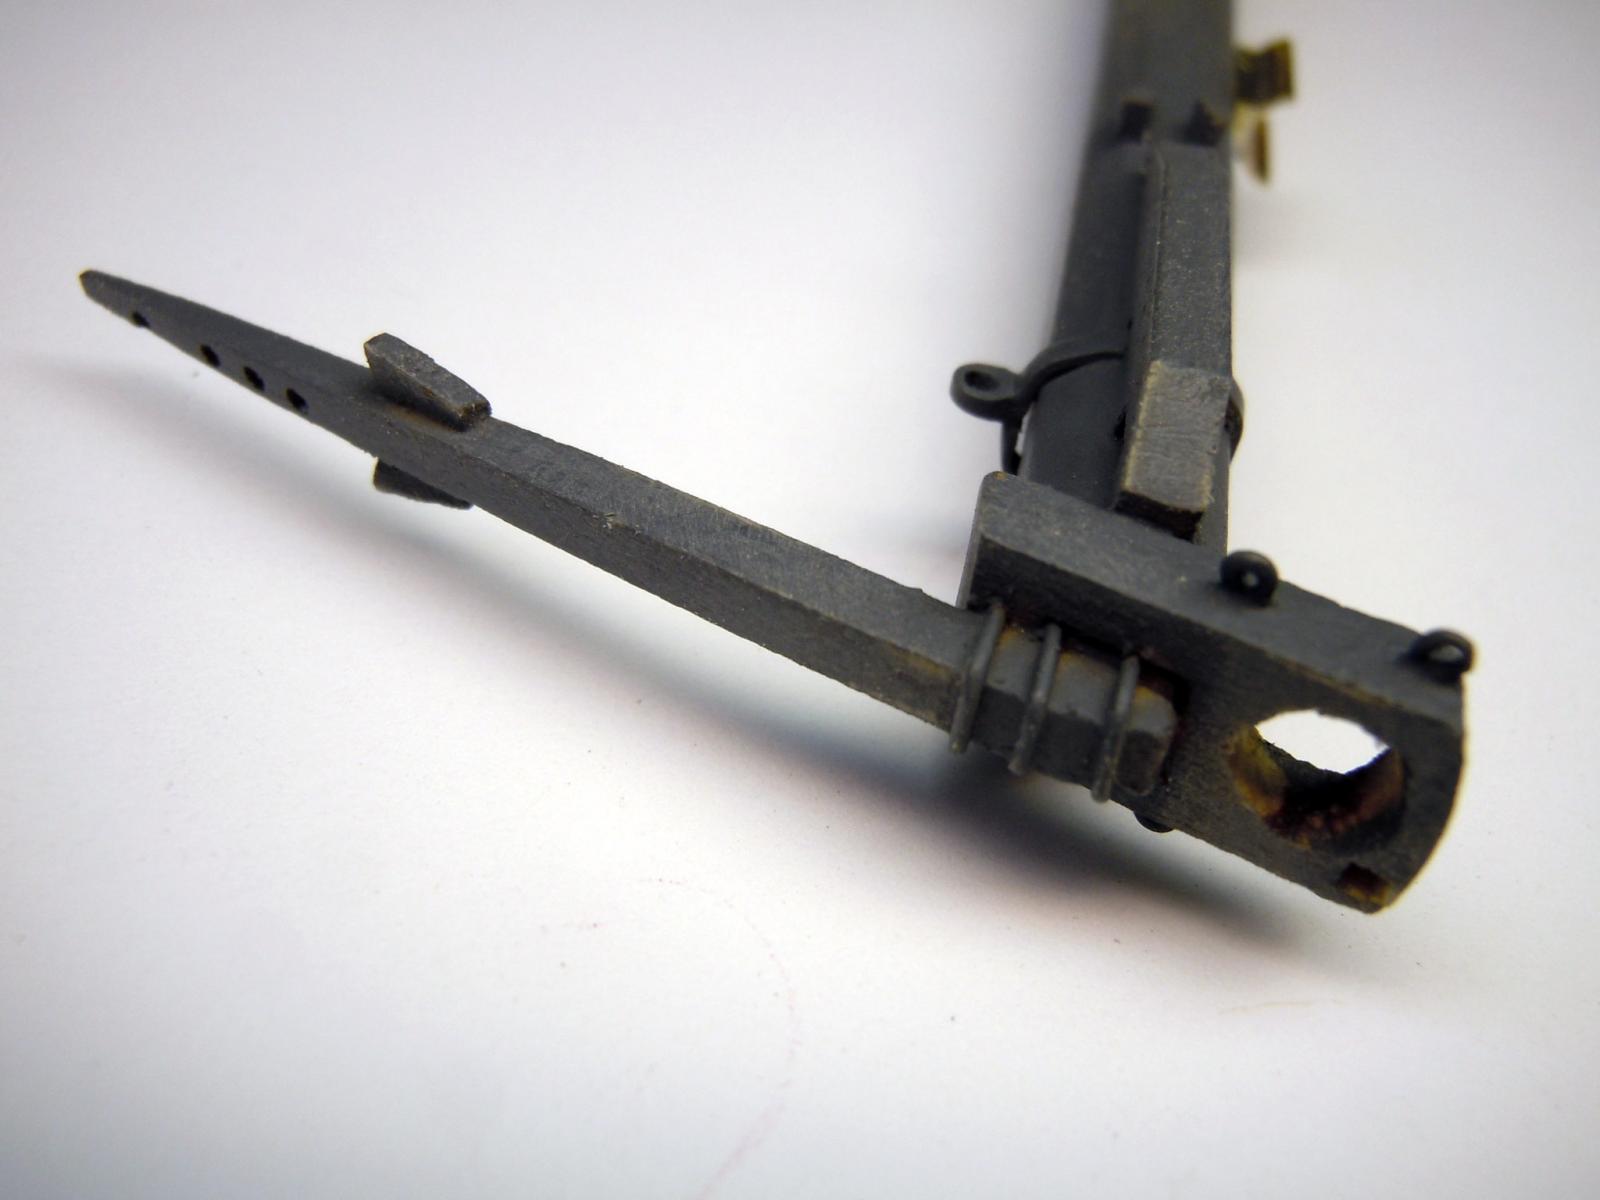
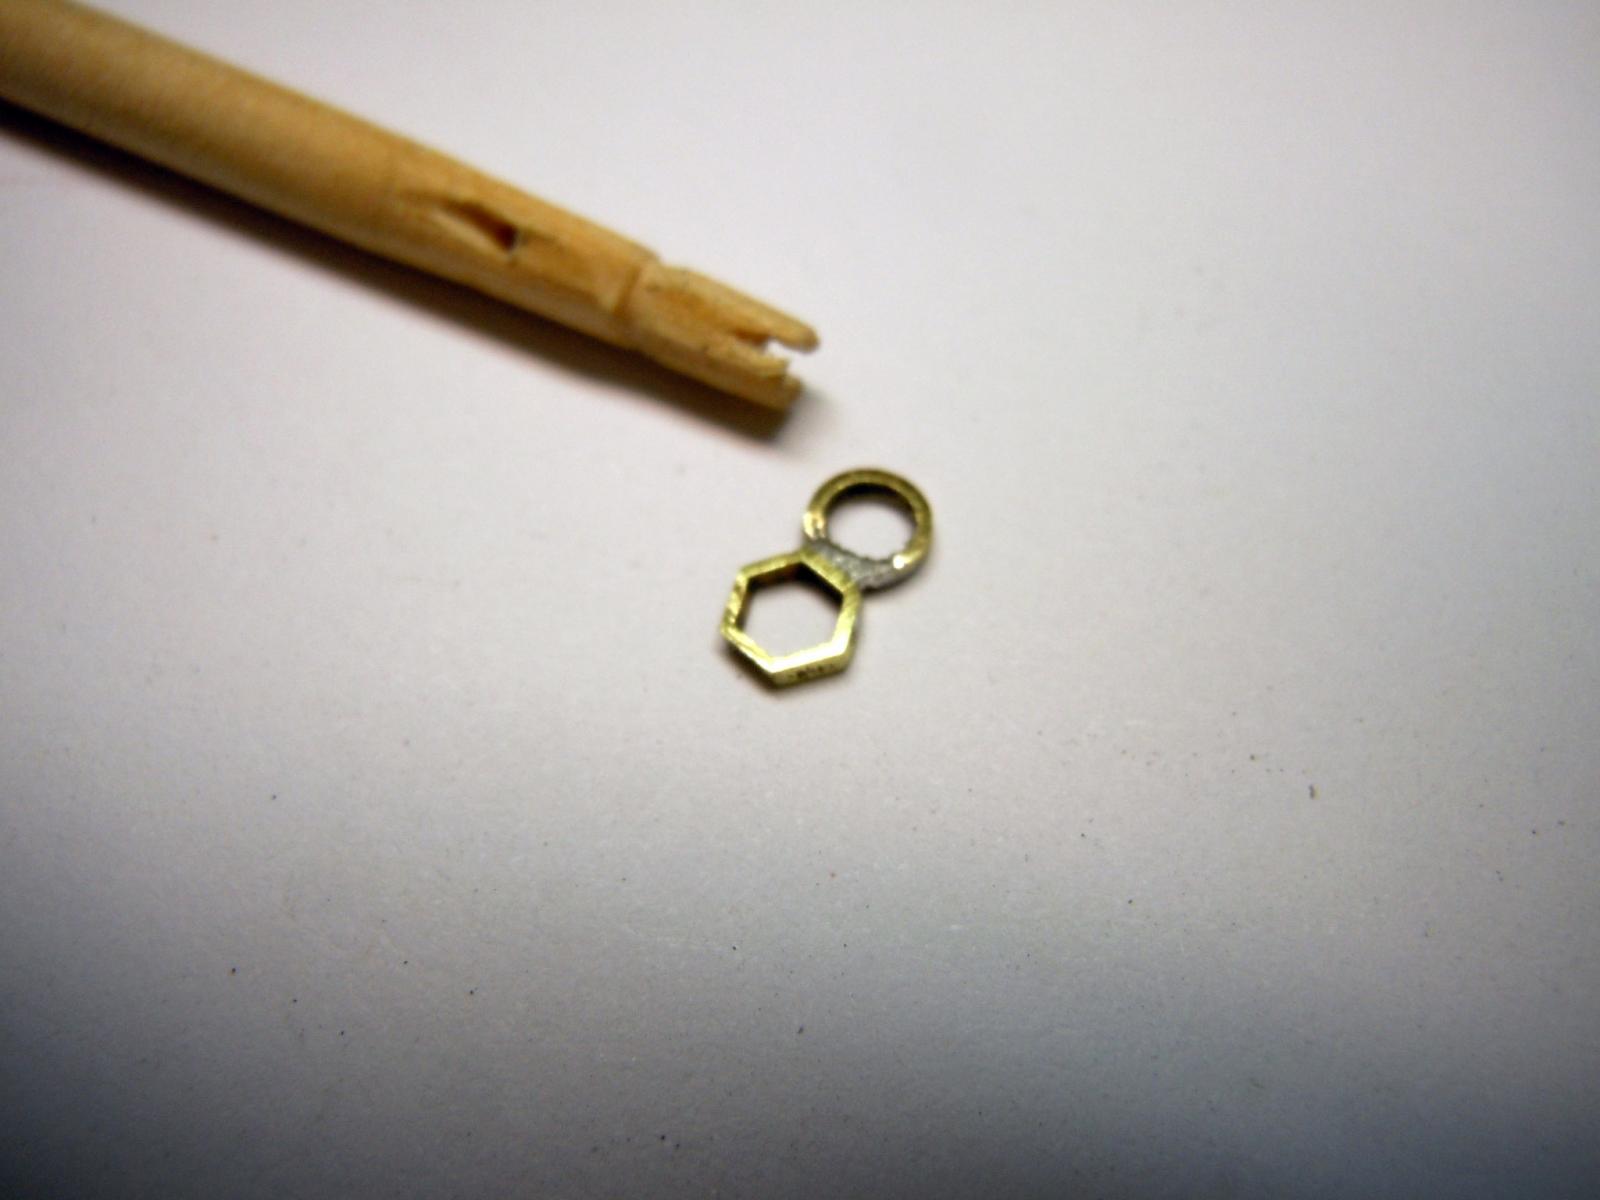
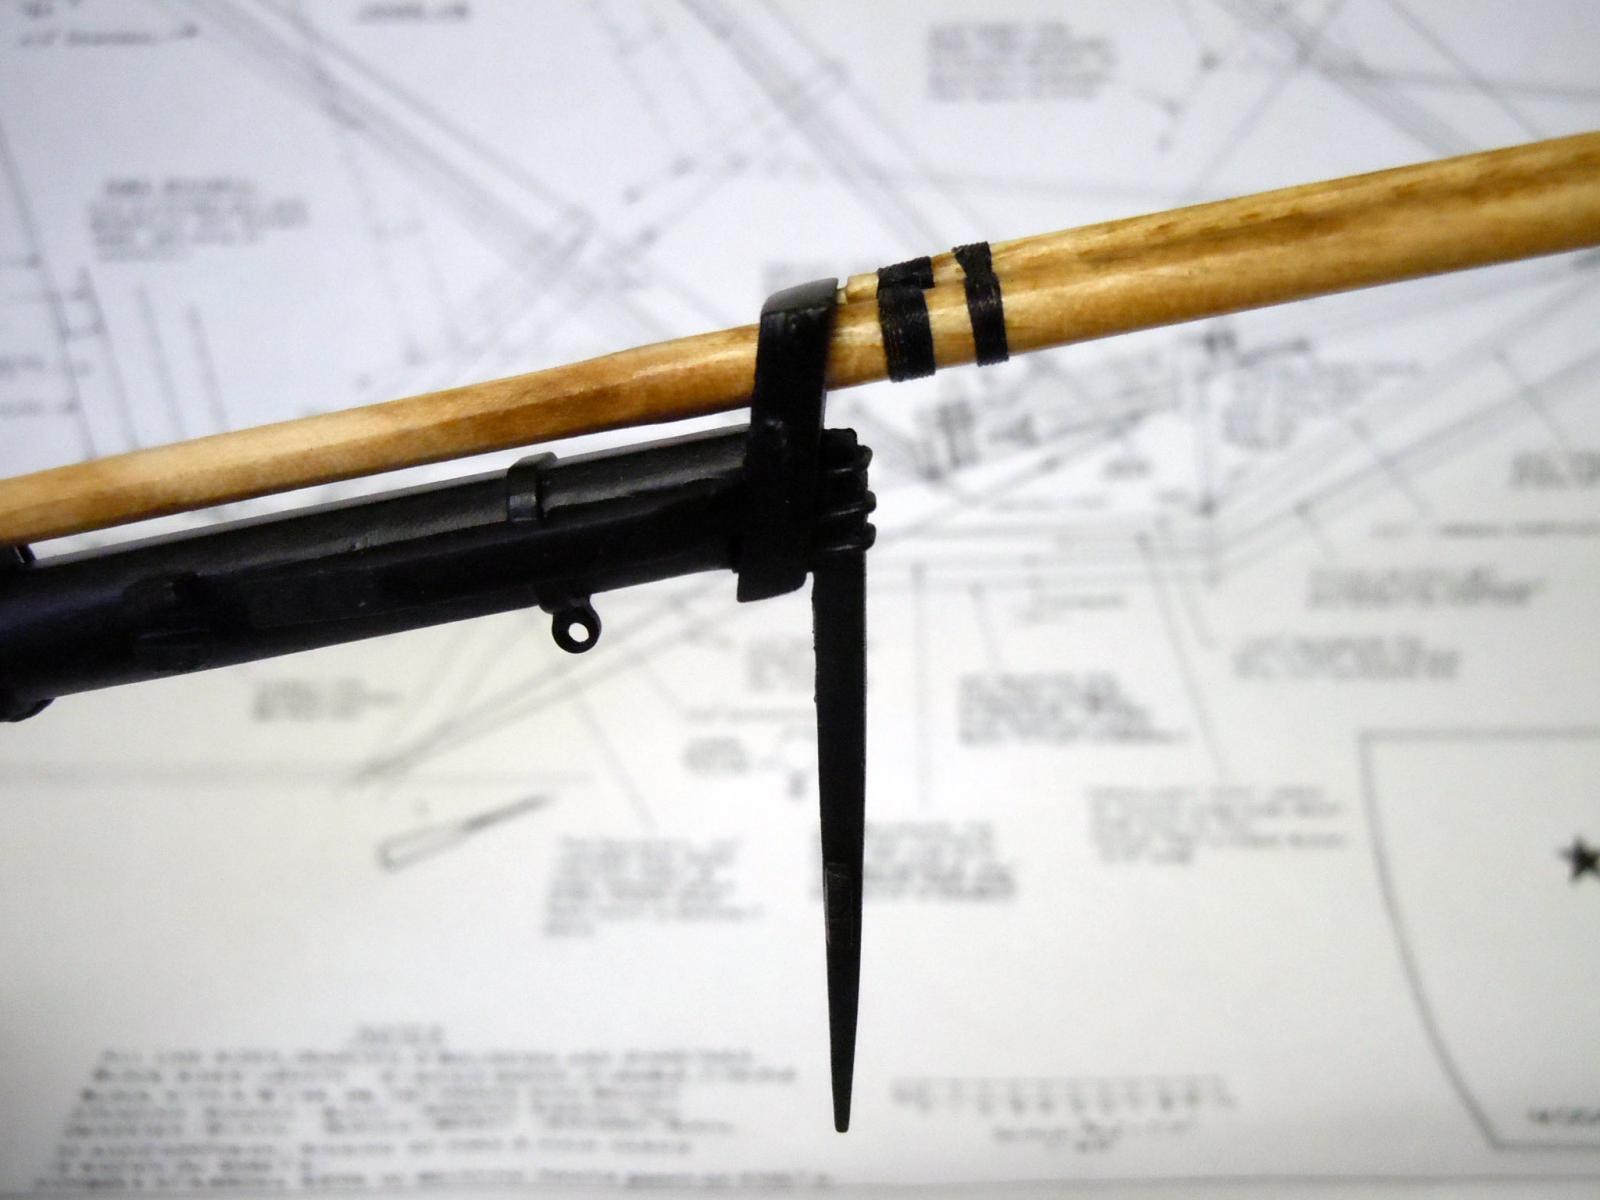
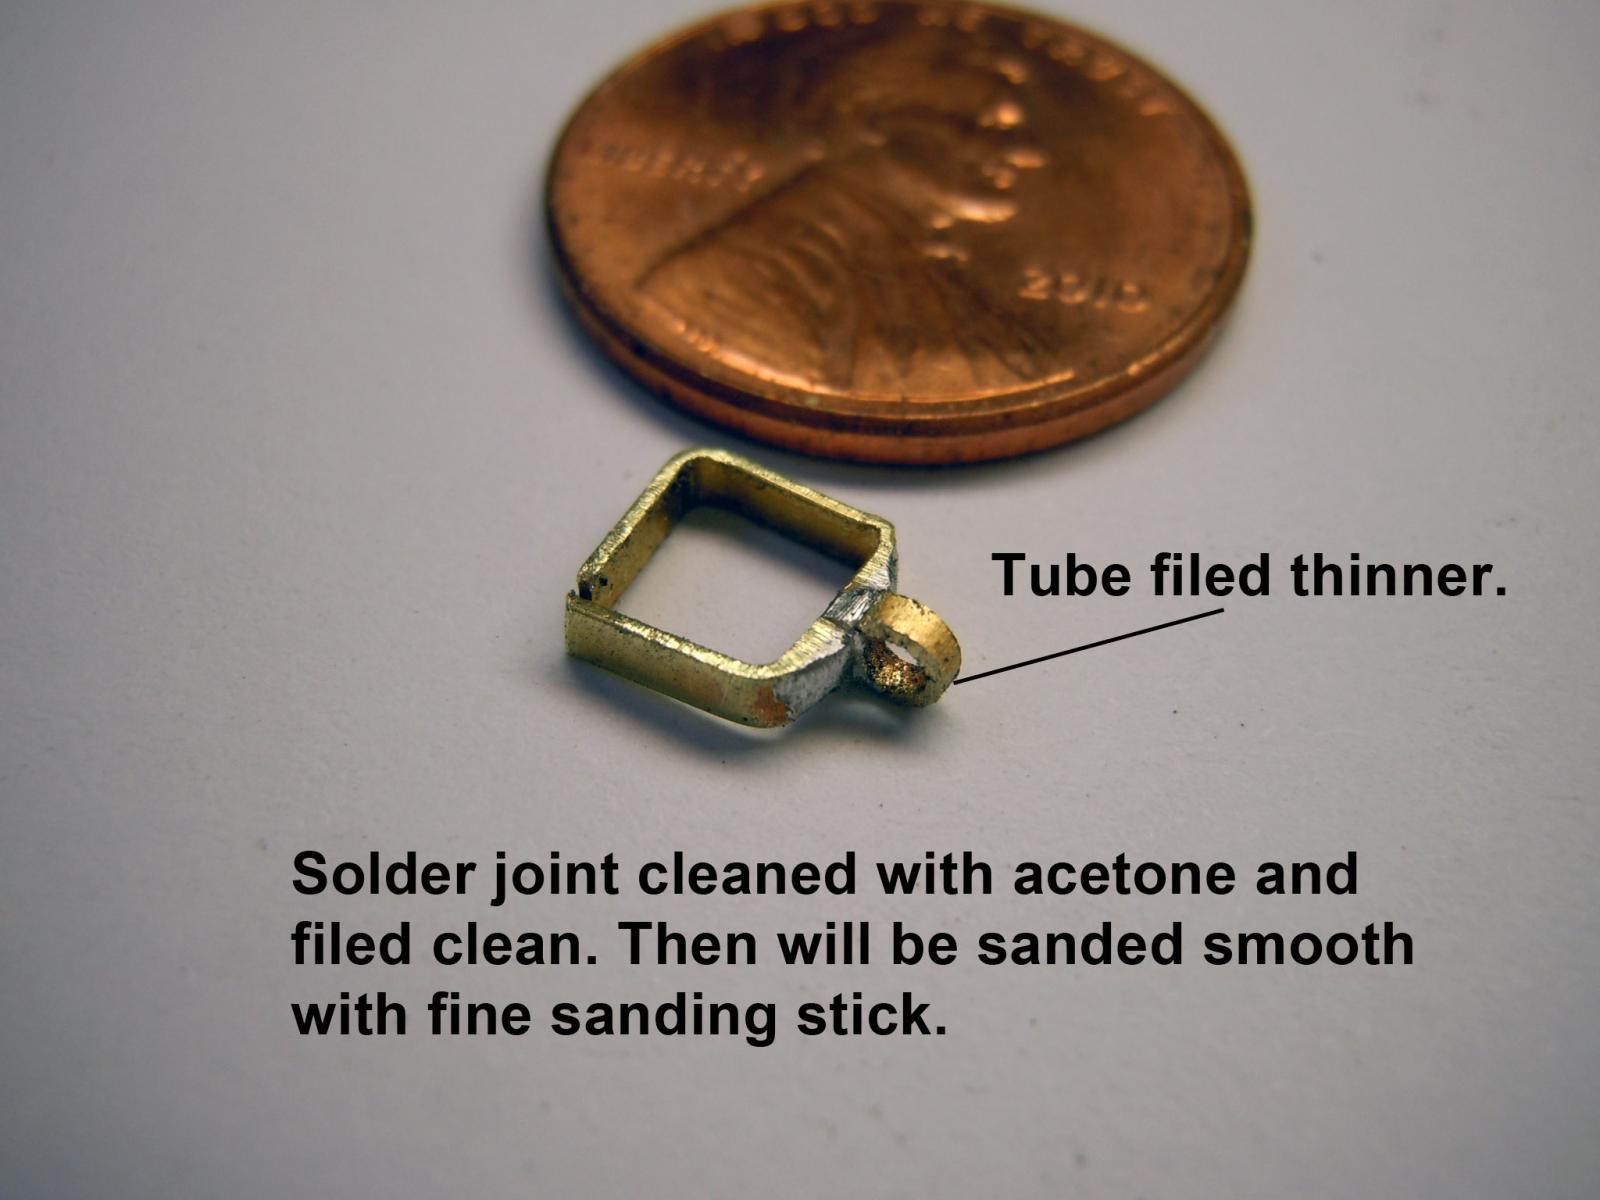
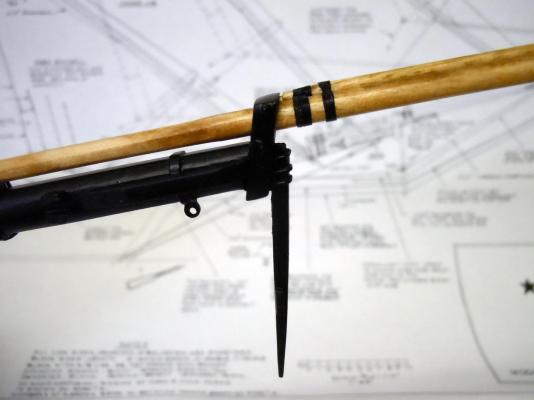
Steve, Canute is correct in the process and about the correct use of the primer color before painting. One thing to always may sure is that if you sand through to bare wood you need to prime again before applying paint color. Guys thanks for the plug on the book! I have been busy with home projects but have had some time to build the bowsprit which had quite a few little parts including the ships bell and also glued the deck in place. Here is a sequence of photos showing some of the steps during the building of it. Starting with the basic carving of the shape and adding parts. Here is the dolphin striker fitted and ready to paint. Here is the bowsprit saddle I fabricated using brass. I started with a base of 1/16" bar and the cut a 5/32" I.D. tube vertically to get the half round shape. Then soldered the two together. Kurt, here is the connector for the jib boom and the flying jib boom where I used the stick method to solder the 5/32" round ring to the hexagon ring. Here is the bowsprit glued in place and ready to add the lashing of it to the bow. Here is just a close up detail of the forward lashing of the jib boom to the flying jib boom and the dolphin striker completed. Finally here is the ship's bell in place and movable using the handle. The bell casting was cleaned up and the hole drilled clear and painted with Gold Foil paint to replicate brass. Next I will work around the finished hull and add all the little components as well as the cannons. Ken


- 440 replies
-
- 6
-
-
- niagara
- model shipways
- (and 1 more)
-
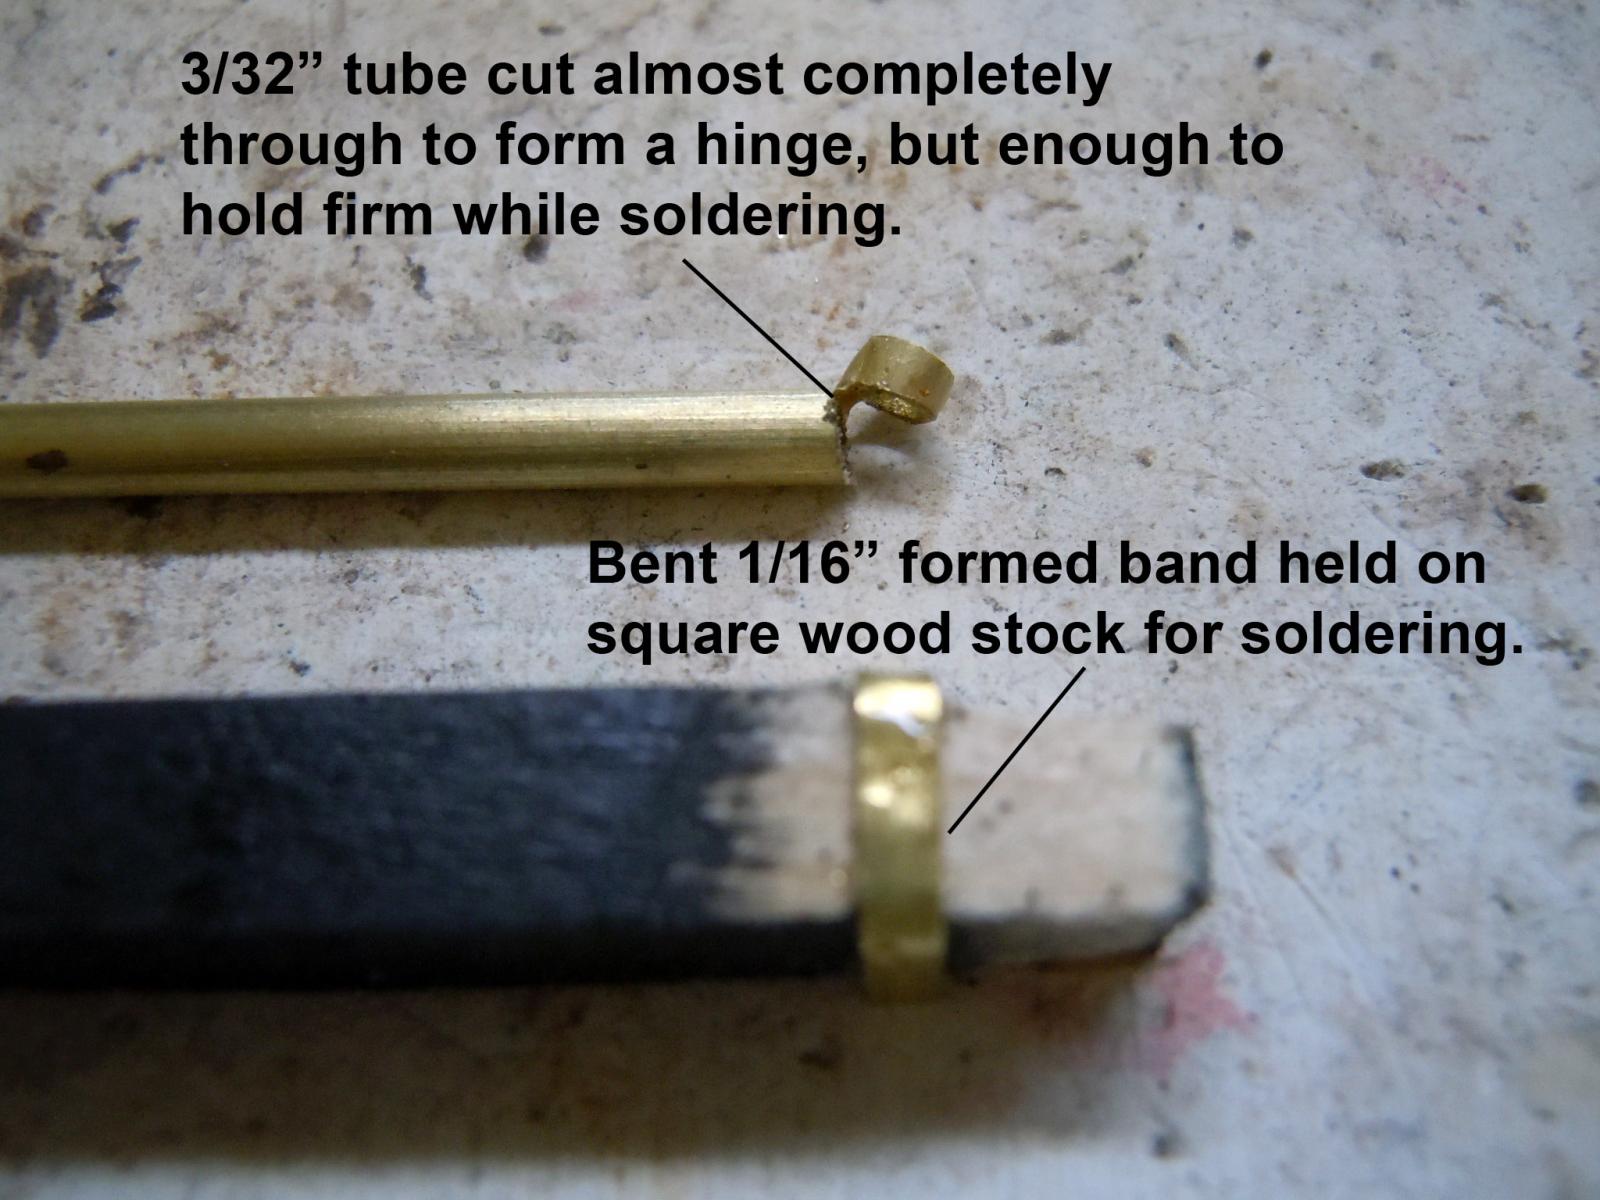
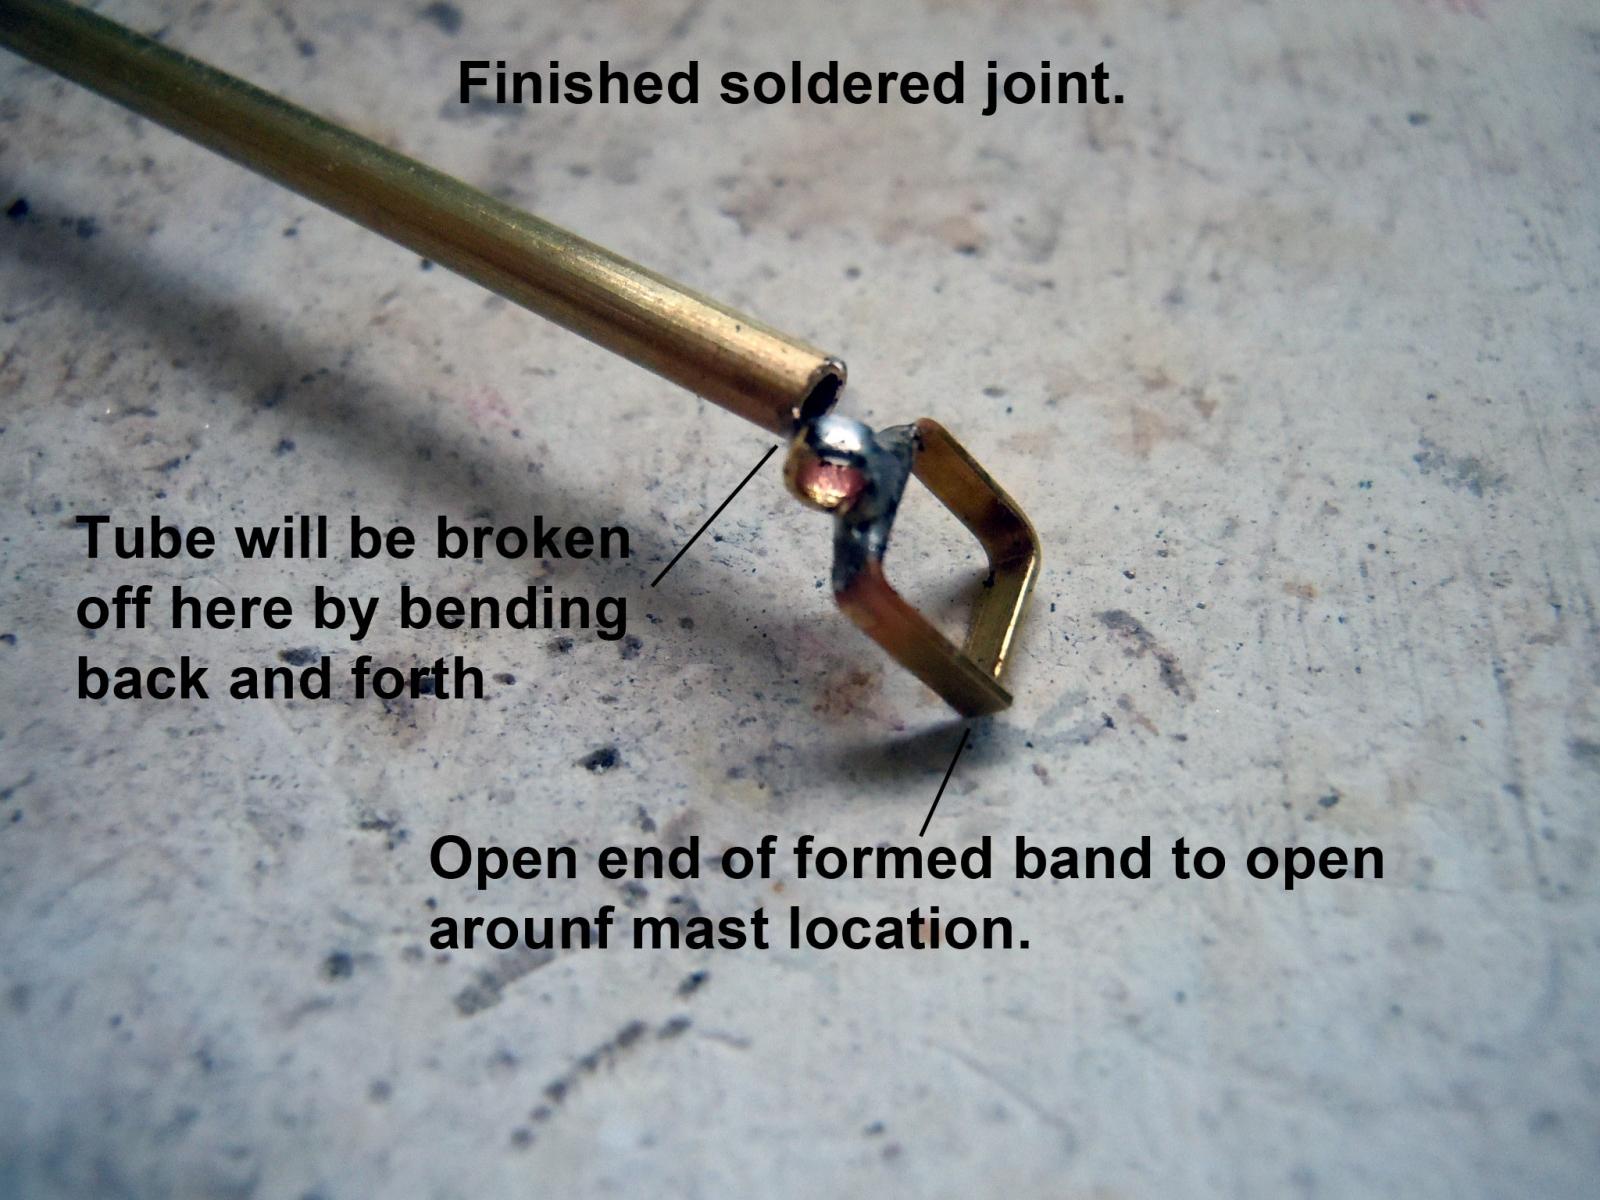
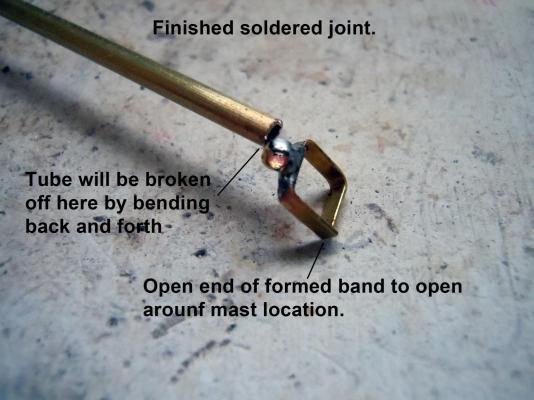
The deck is glued down; the bowsprit is started, main beam carved and primed but still needs all the bits and pieces added yet. I discovered that I overlooked a square bracket with eyelet on the main mast and thought I would share a soldering technique I use for small items like this. First I formed the square band using 1/16" wide x.020" brass strip leaving one corner open to be bent later to fit on mast. Then I sawed the brass tube almost completely through leaving enough for a hinge to bend slightly. This provided a handle to hold the small ring to the band when soldered. The square band was slipped on a scrap piece of square stock and weighted down to hold the band steady. Flux was then added to both parts. I then added a drop of Staybrite solder on a hot tip to the center of the band and then touched the ring to the solder and band completing the joint. The ring was held in place until the solder chilled. I then flexed the rod to break loose the ring; cleaned the joint with acetone on a Q-tip and then finish filed the ring with a needle file to the desired thickness on center and then filed the band to clean it up of any excess solder. Once satisfied with filing I then final finished with a 220 sanding stick. The part was then fitted to the top of the mast by flexing the open corner joint and once in position it was CD'ed. Once the glue set the corner joint was filed to match the rest and painted. Here are photos of the major steps. Ken


- 440 replies
-
- 8
-
-
- niagara
- model shipways
- (and 1 more)
-
Finished both masts with all the pieces parts for the main components. I will study the plans to add the eye bolts and such before the mast components are glued together. For now everything is just press fitted. Here are a couple of close-ups showing details of the tops. Note the glue made carriage bolt heads. Here is an overall view showing where I am at to date. Next I will glue the deck down to the frame structure and then permanently add all the bits and pieces to both the hull and masts. Many cleats and sheaves etc. I will also start the bowsprit. Ken
- 440 replies
-
- 6
-
-
- niagara
- model shipways
- (and 1 more)
-
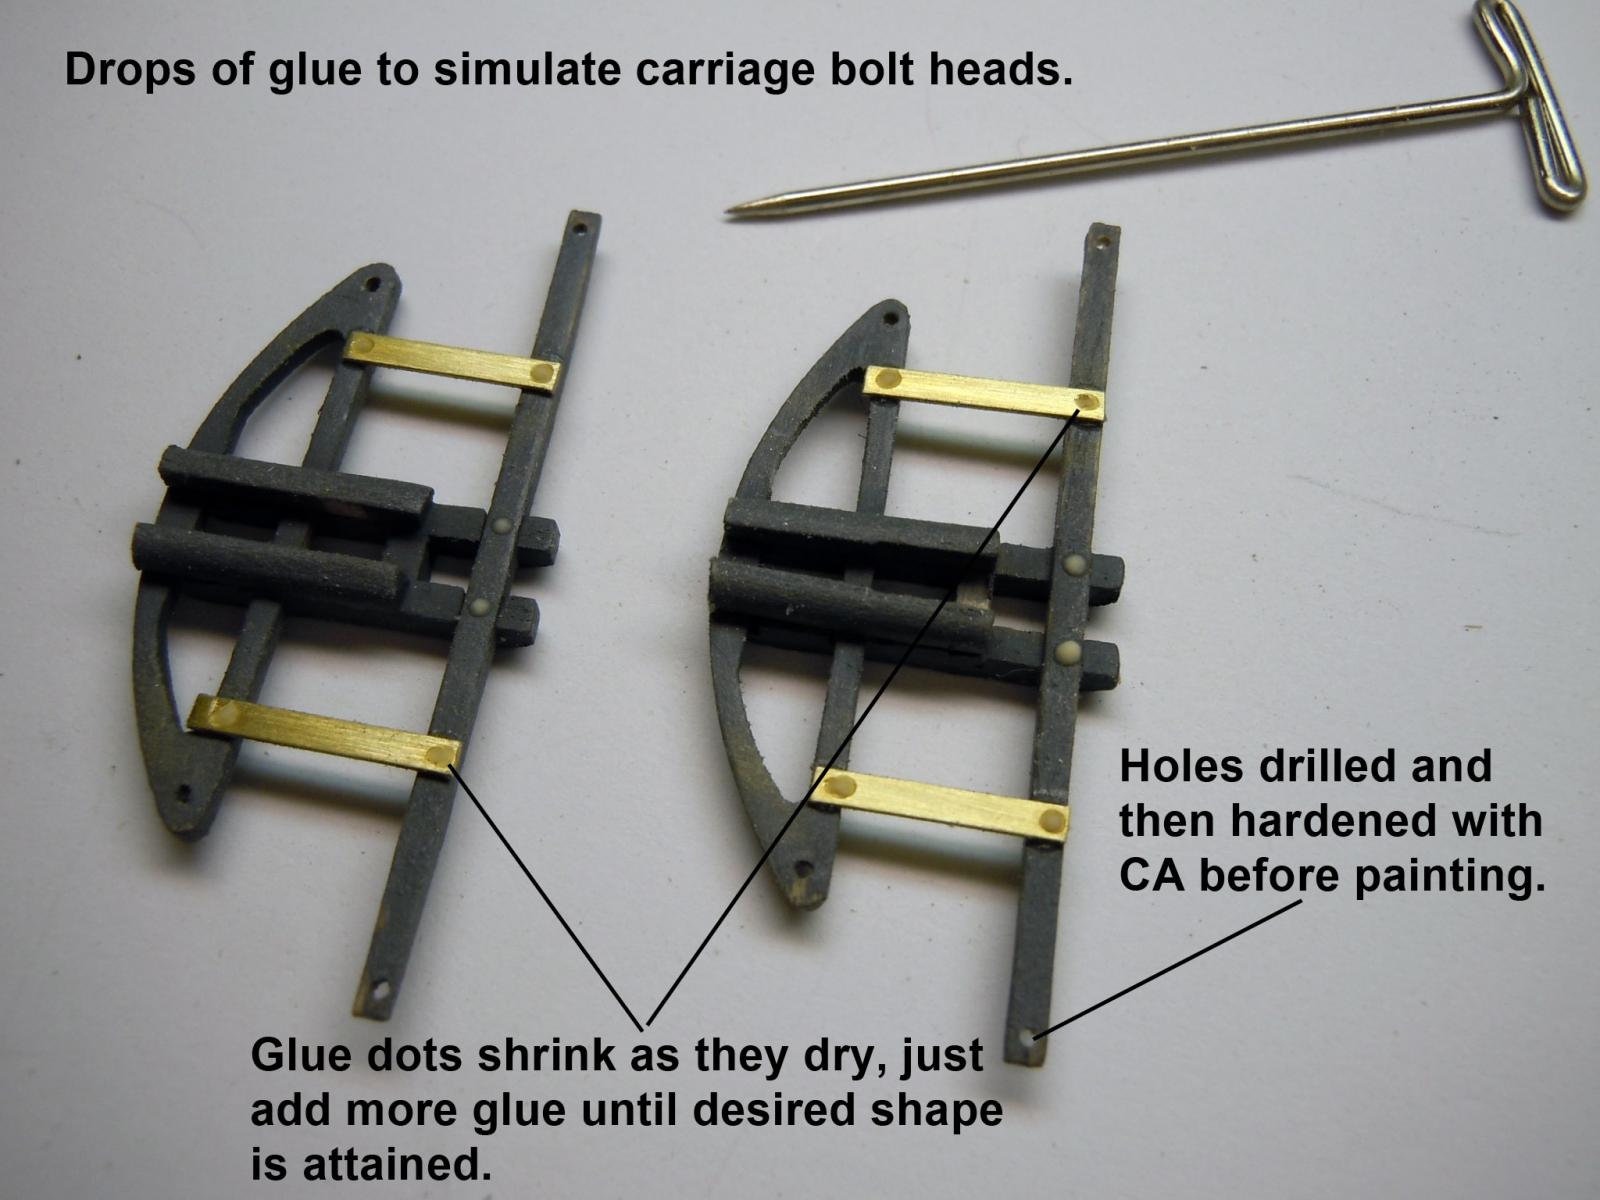
Just a quick update on the top mast crosstrees on how I made and detailed the carriage bolt heads using yellow glue. I add just a drop of glue using the tip of a T-pin. The metal strips are drilled to form a cavity for the glue to set into. Glue drops shrink as they dry some more glue can be added to form the desired head shape. Once satisfied with all, they are primed with light coats. Also holes are drilled in the ends before being primed and are hardened by adding CA to the holes, once dried the holes are then re-drilled to assure they are opened. This will minimize tear out when being rigged later. This shows the process before being primed. Some are well formed and a couple will be touched up. Ken

- 440 replies
-
- 5
-
-
- niagara
- model shipways
- (and 1 more)
-
George, here is where I get my stock, however they have a $20.00 sale minimum. http://www.specialshapes.com/ Ken
- 440 replies
-
- 3
-
-
- niagara
- model shipways
- (and 1 more)
-
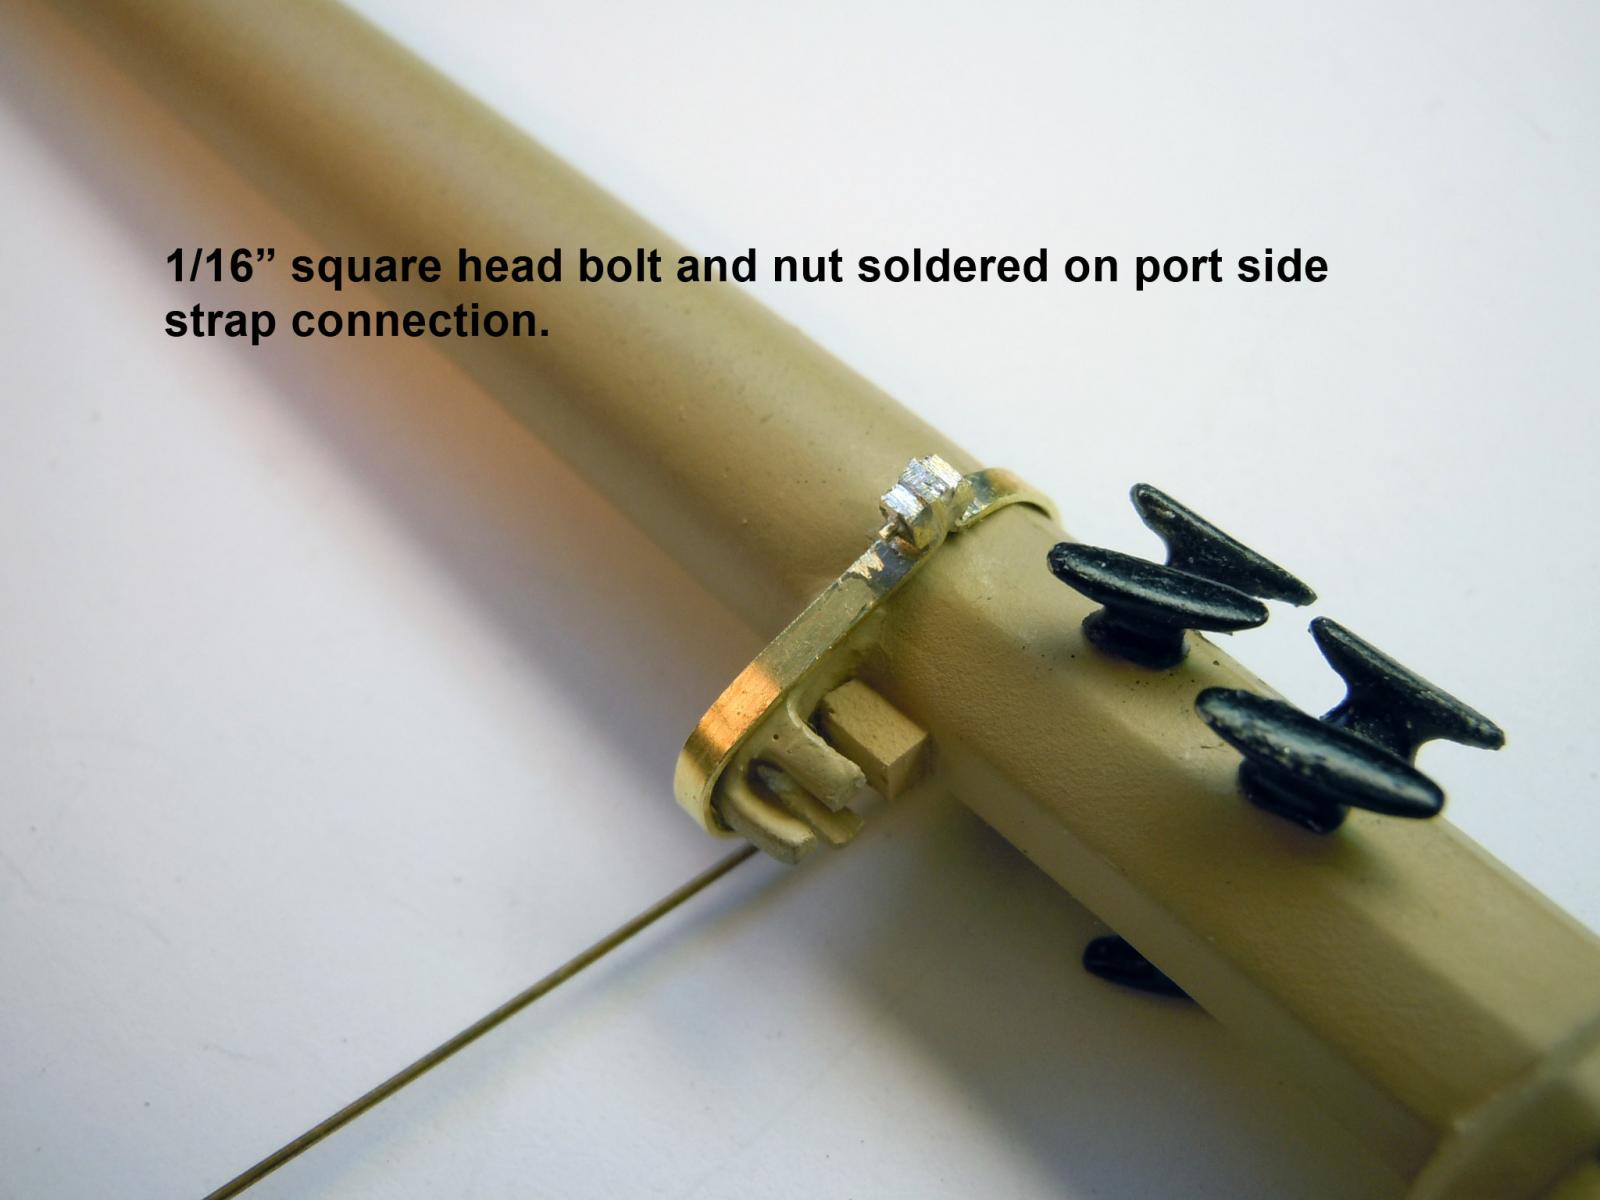
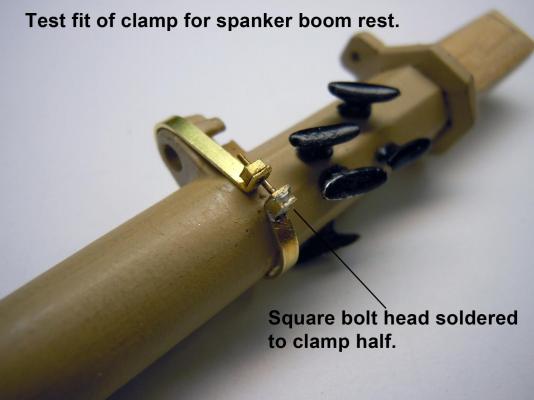
George, for these I started with 1/16" square brass bar stock, sawed off the thickness of the nut; filed the cut side smooth then drilled a .024" hole centered in the center. The jeweler's saw is a must for doing this. On other projects I have turned down this size of bar stock to make square bolts for horse drawn vehicles. These were done in brass due to the soldering need to the clamp halves. I also explained earlier in this post how to do them in wood if soldering is not needed. Hope this helps. Ken
- 440 replies
-
- 2
-
-
- niagara
- model shipways
- (and 1 more)
-
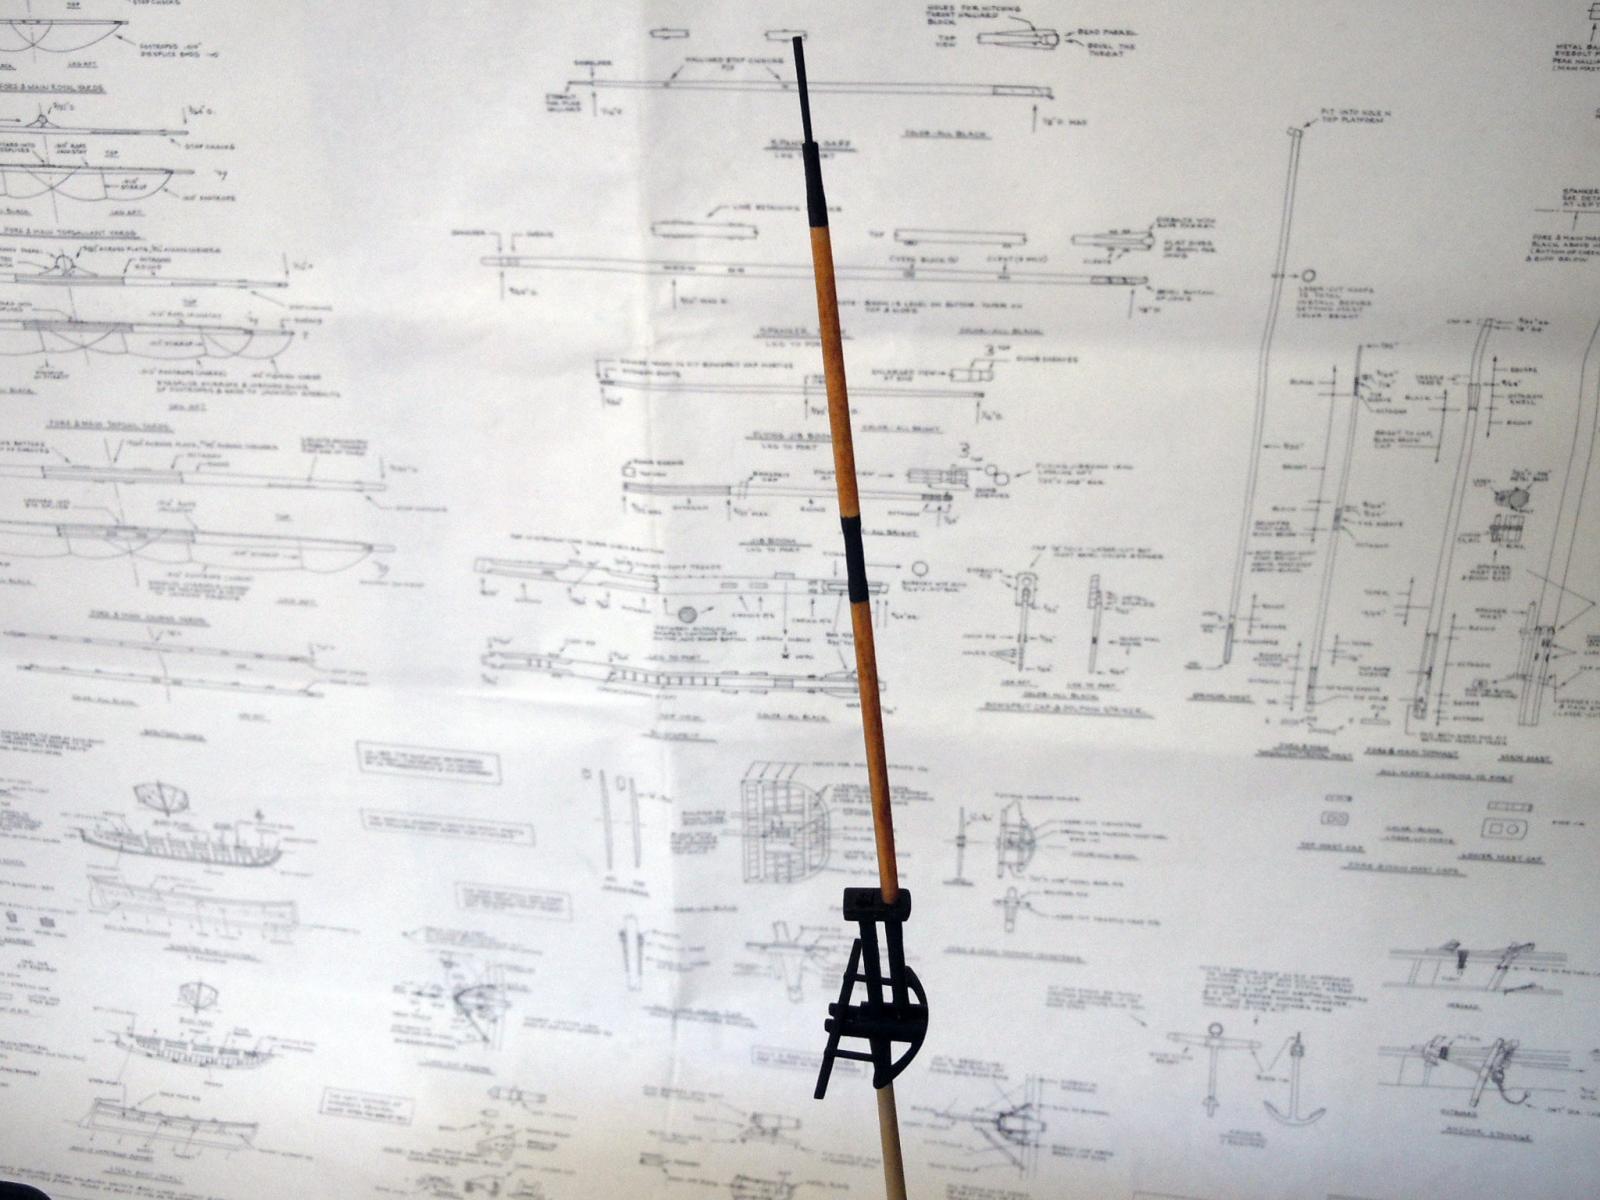
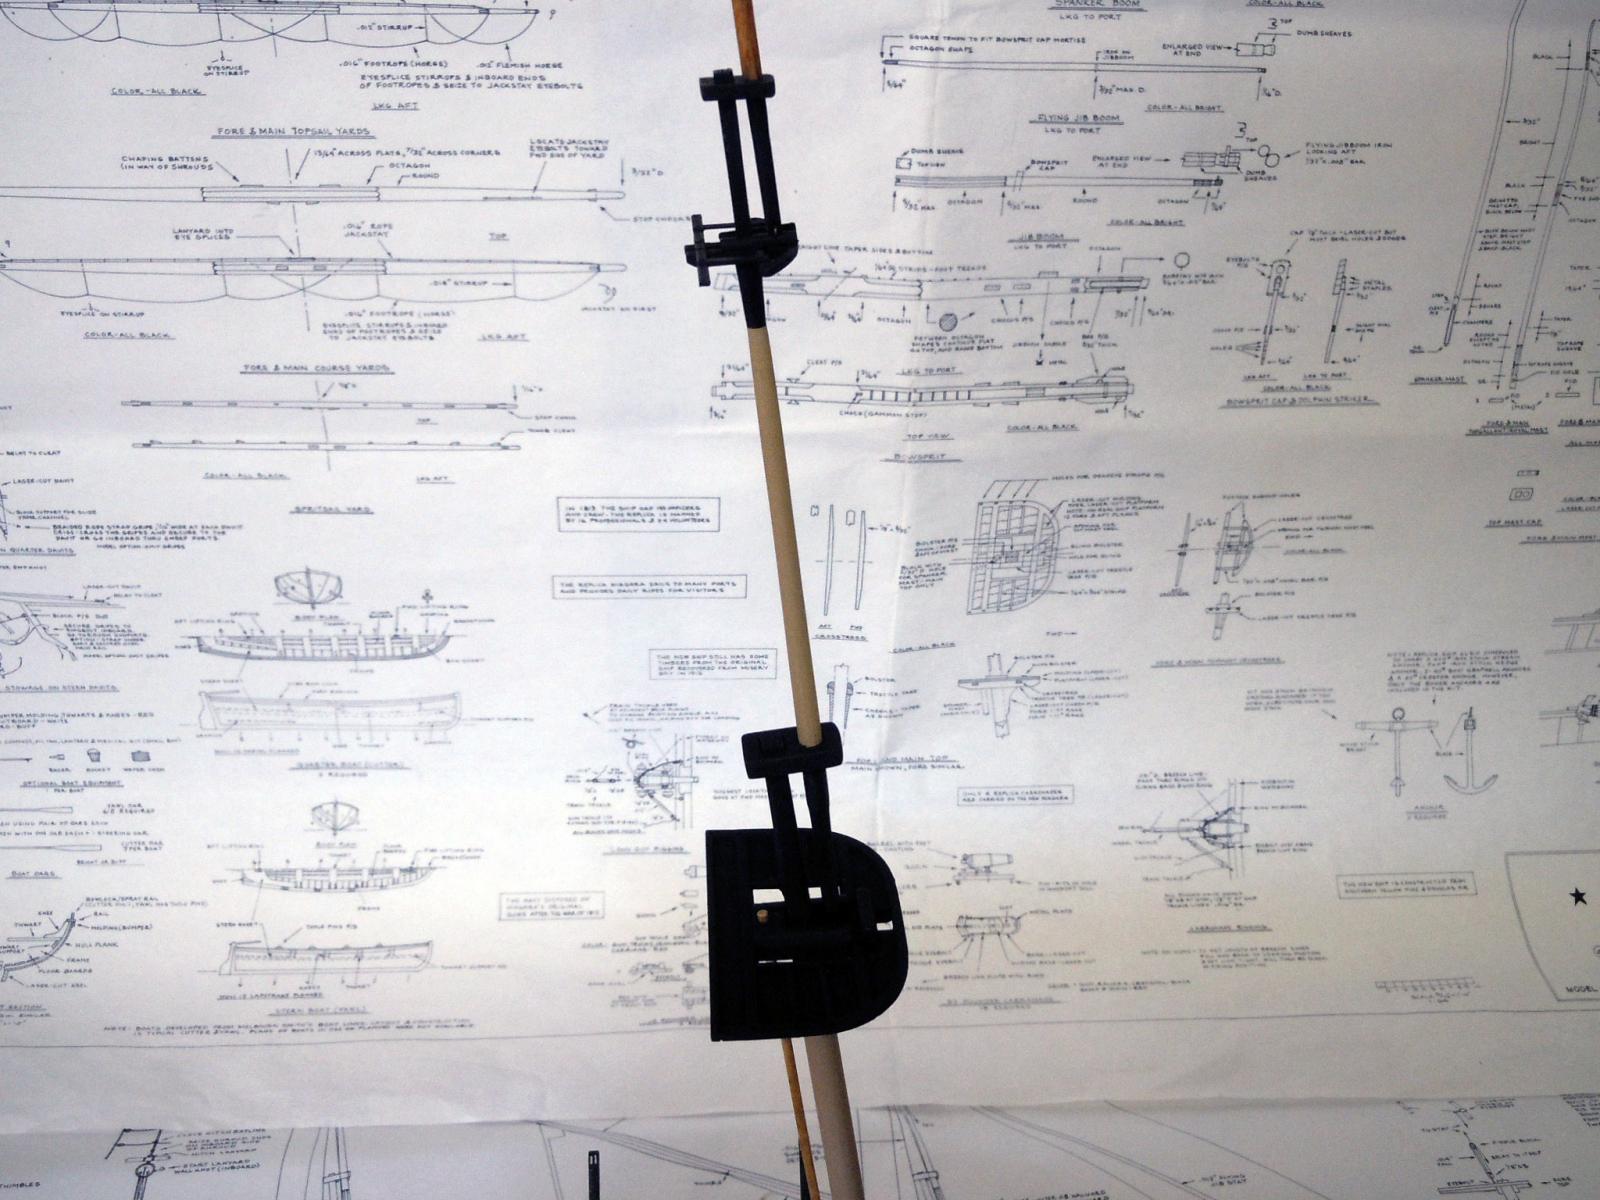
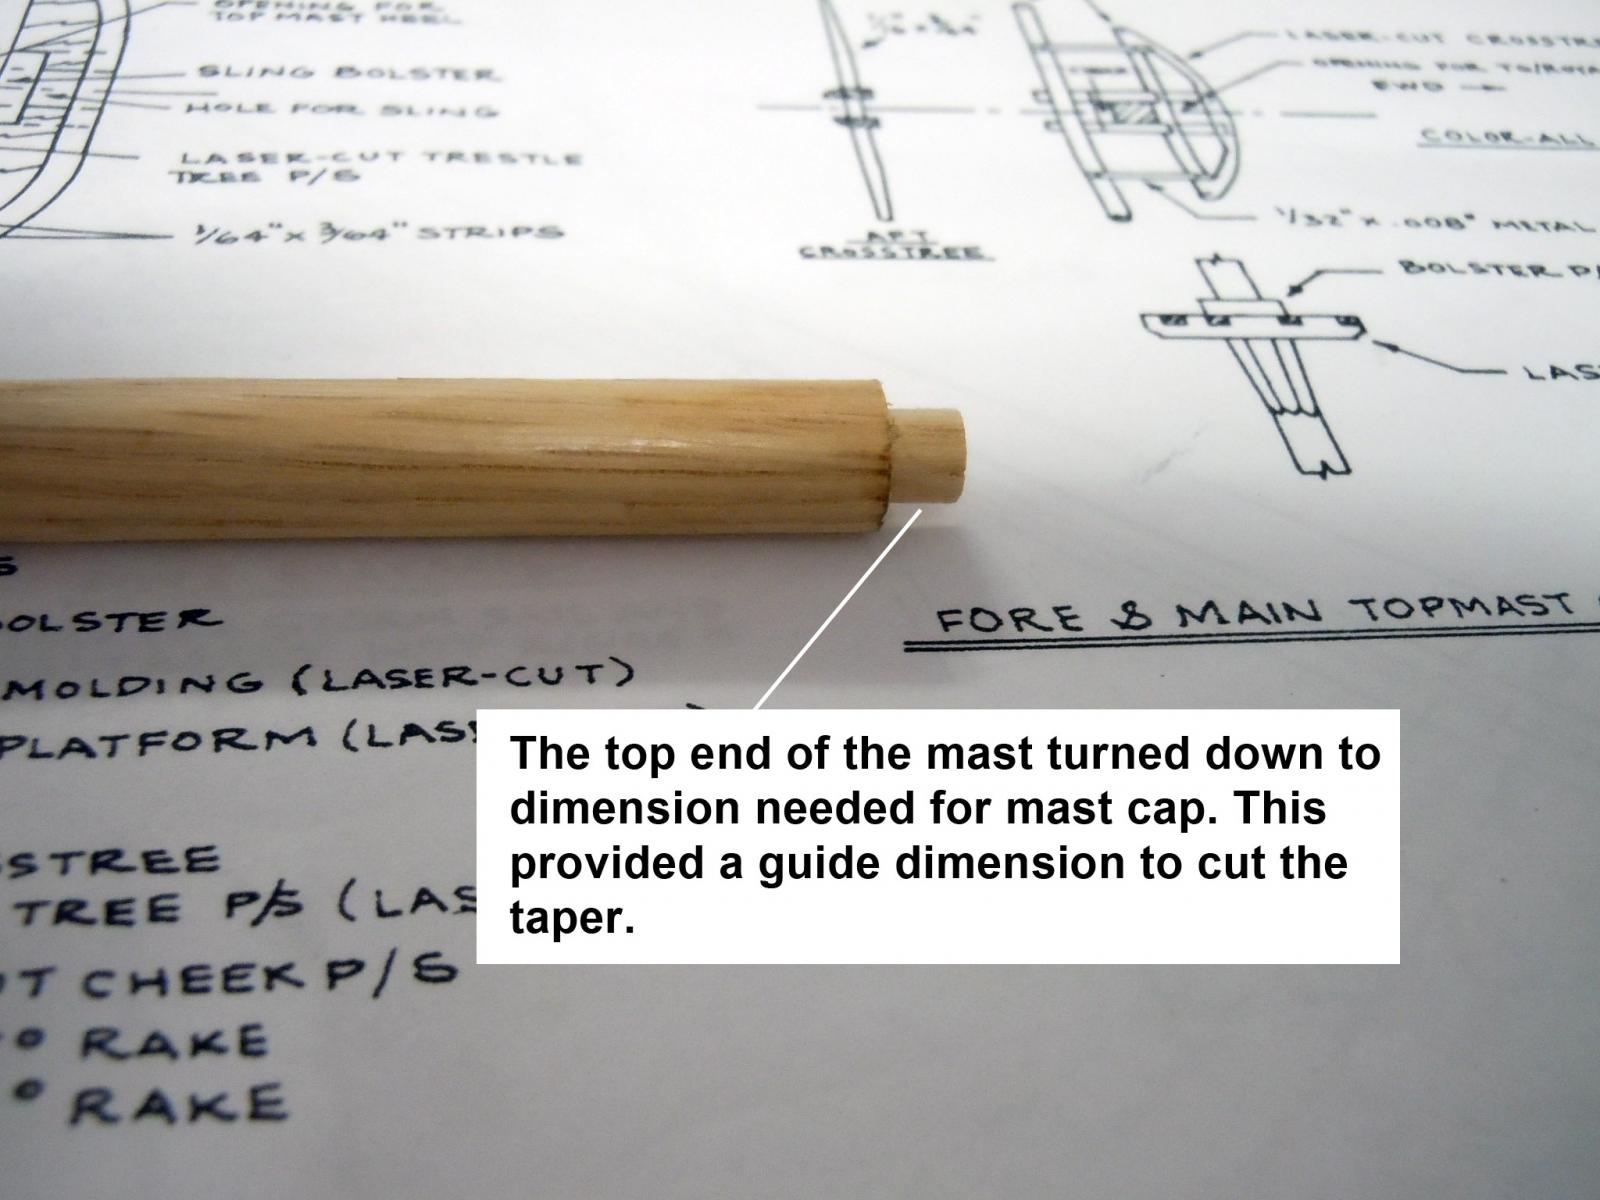
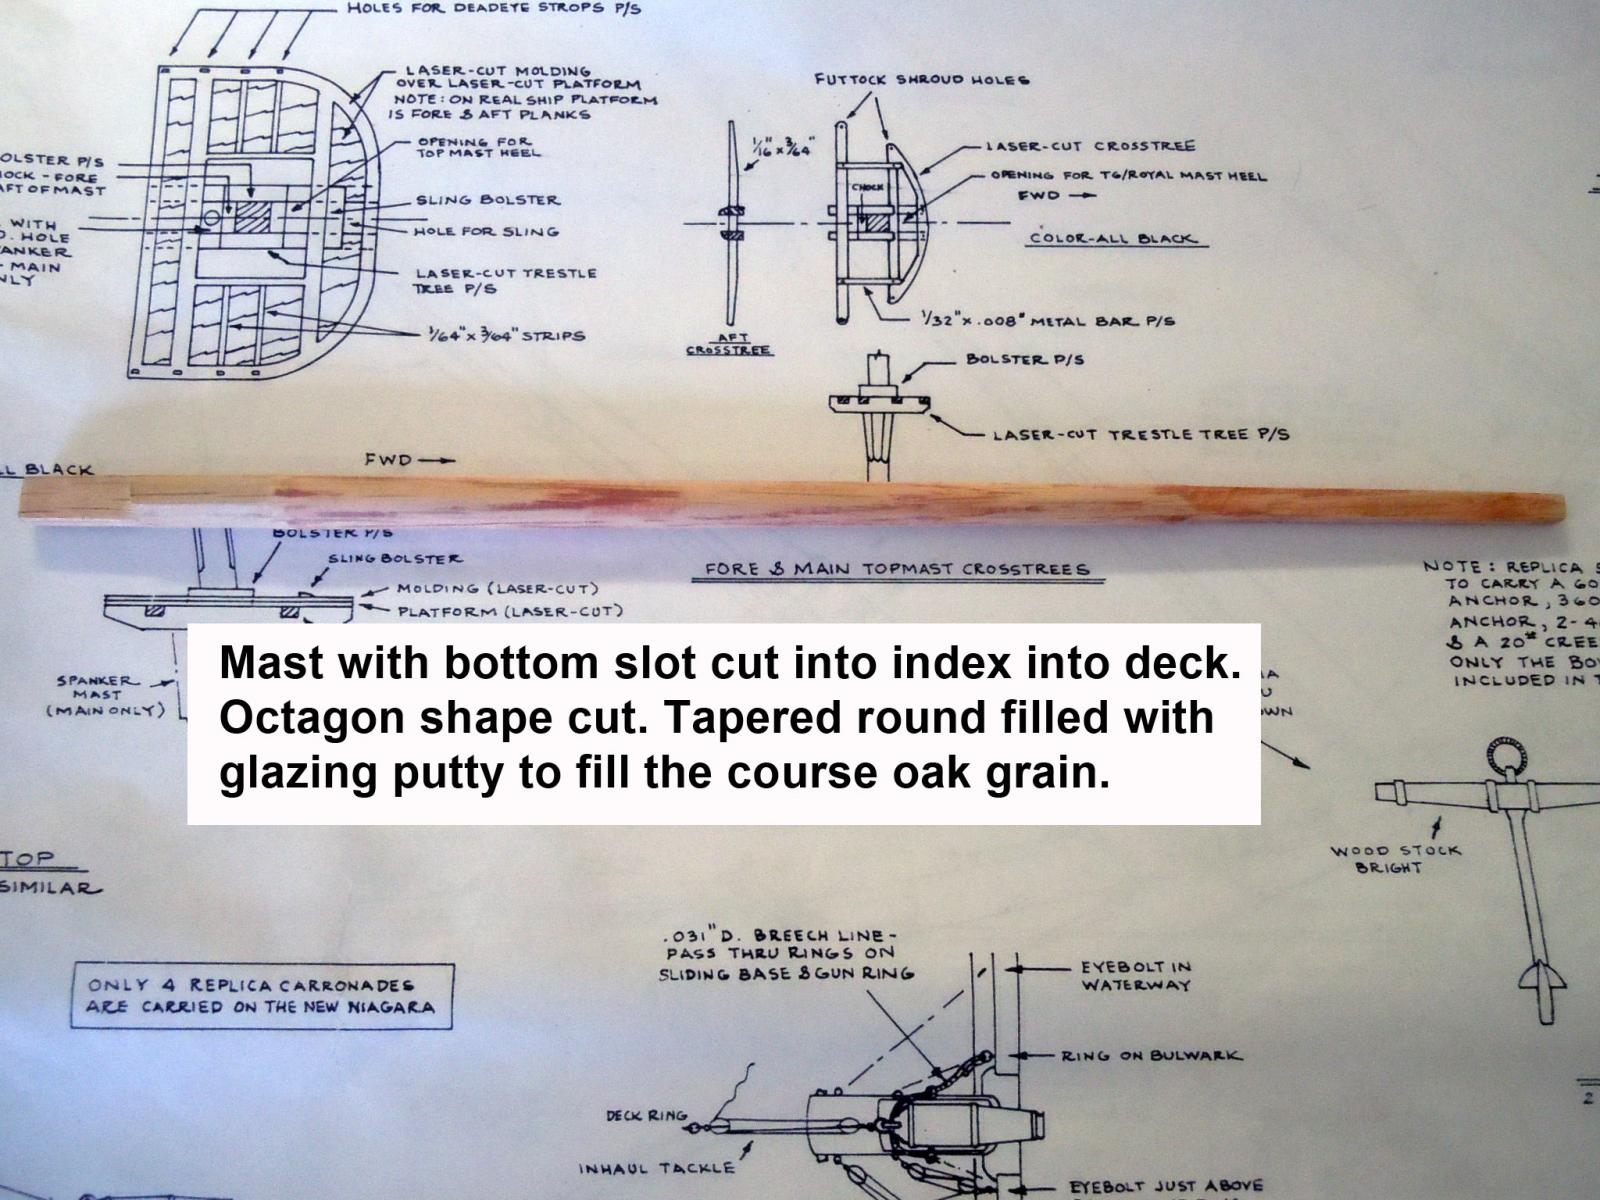
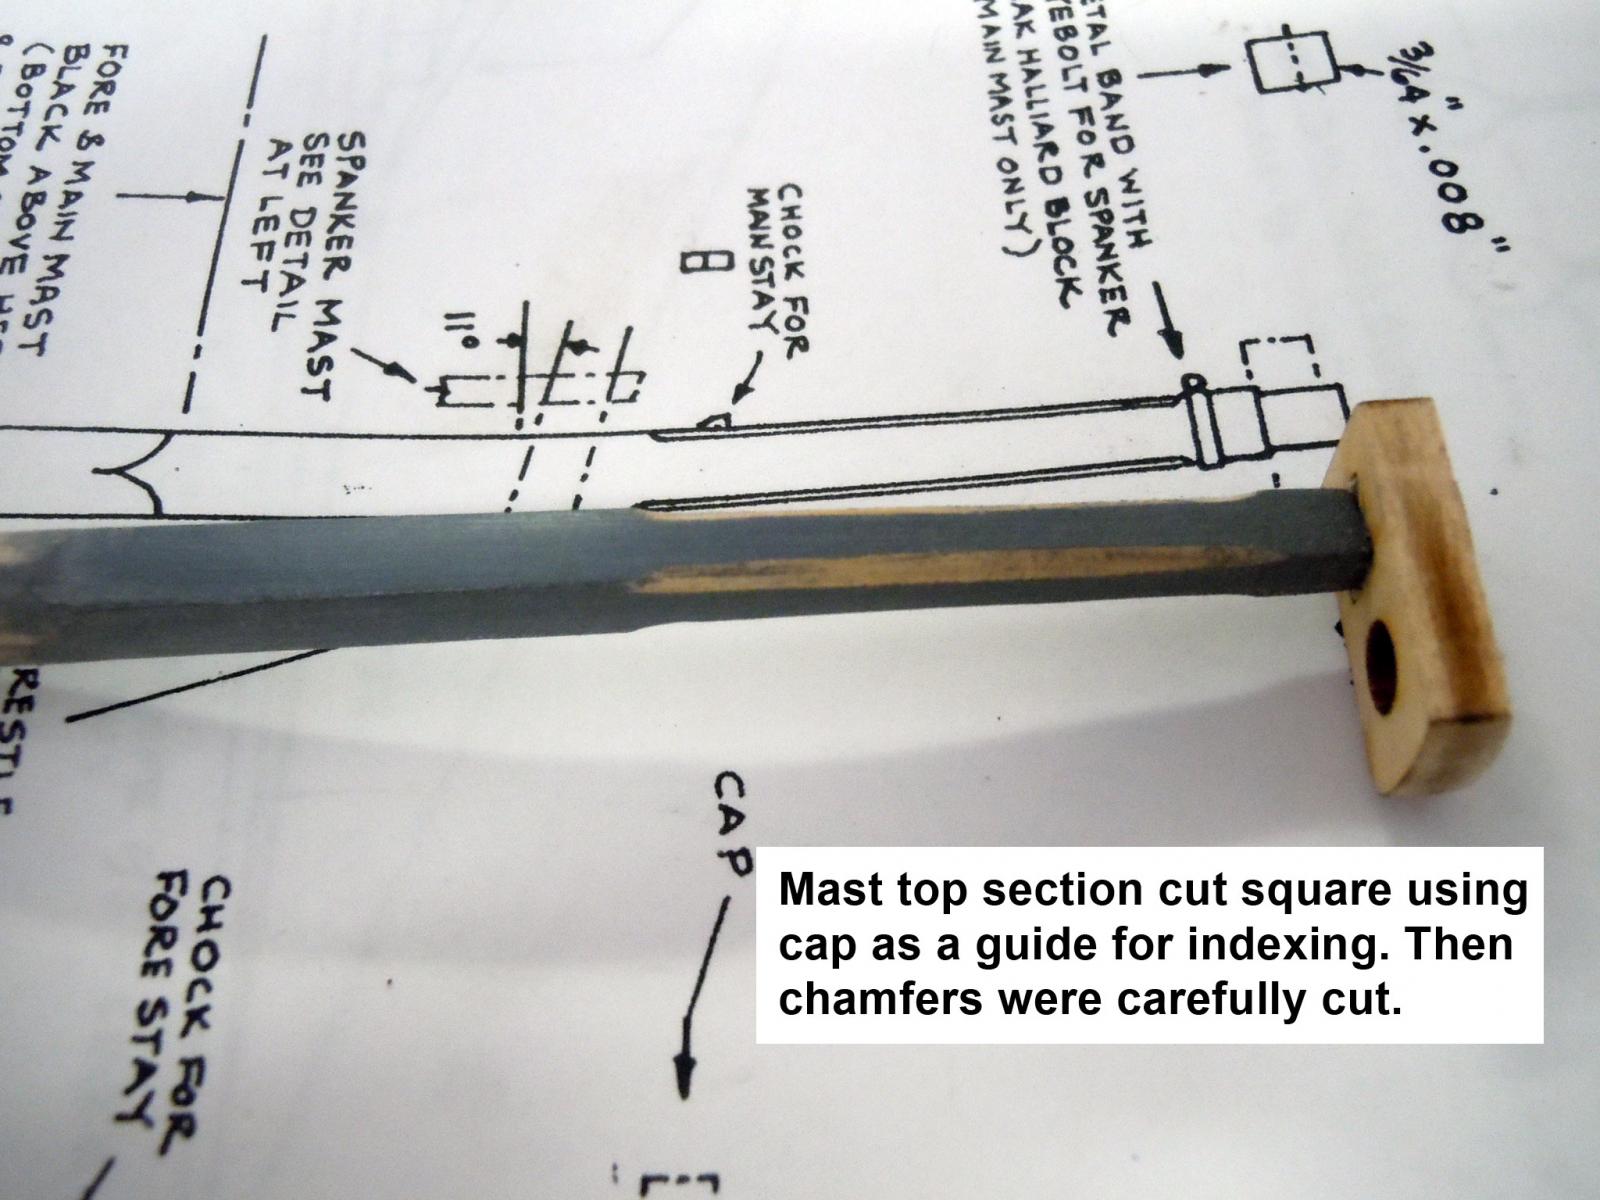
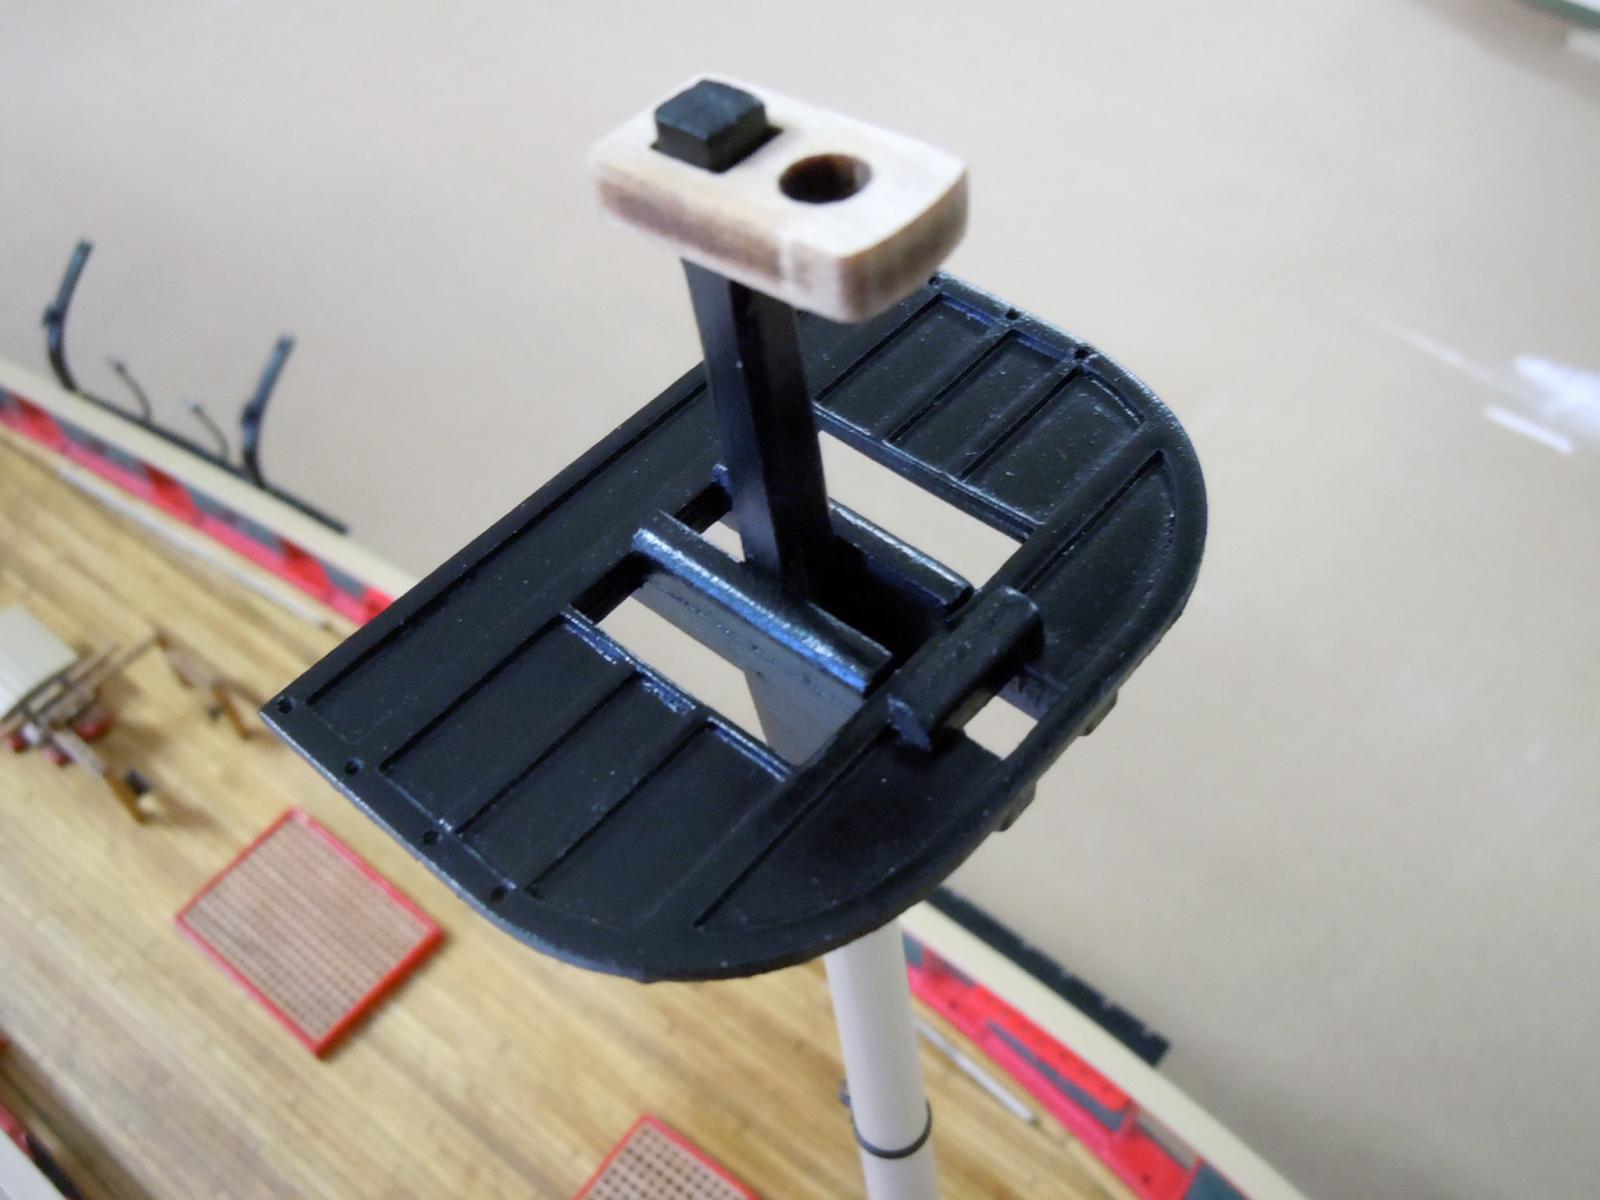
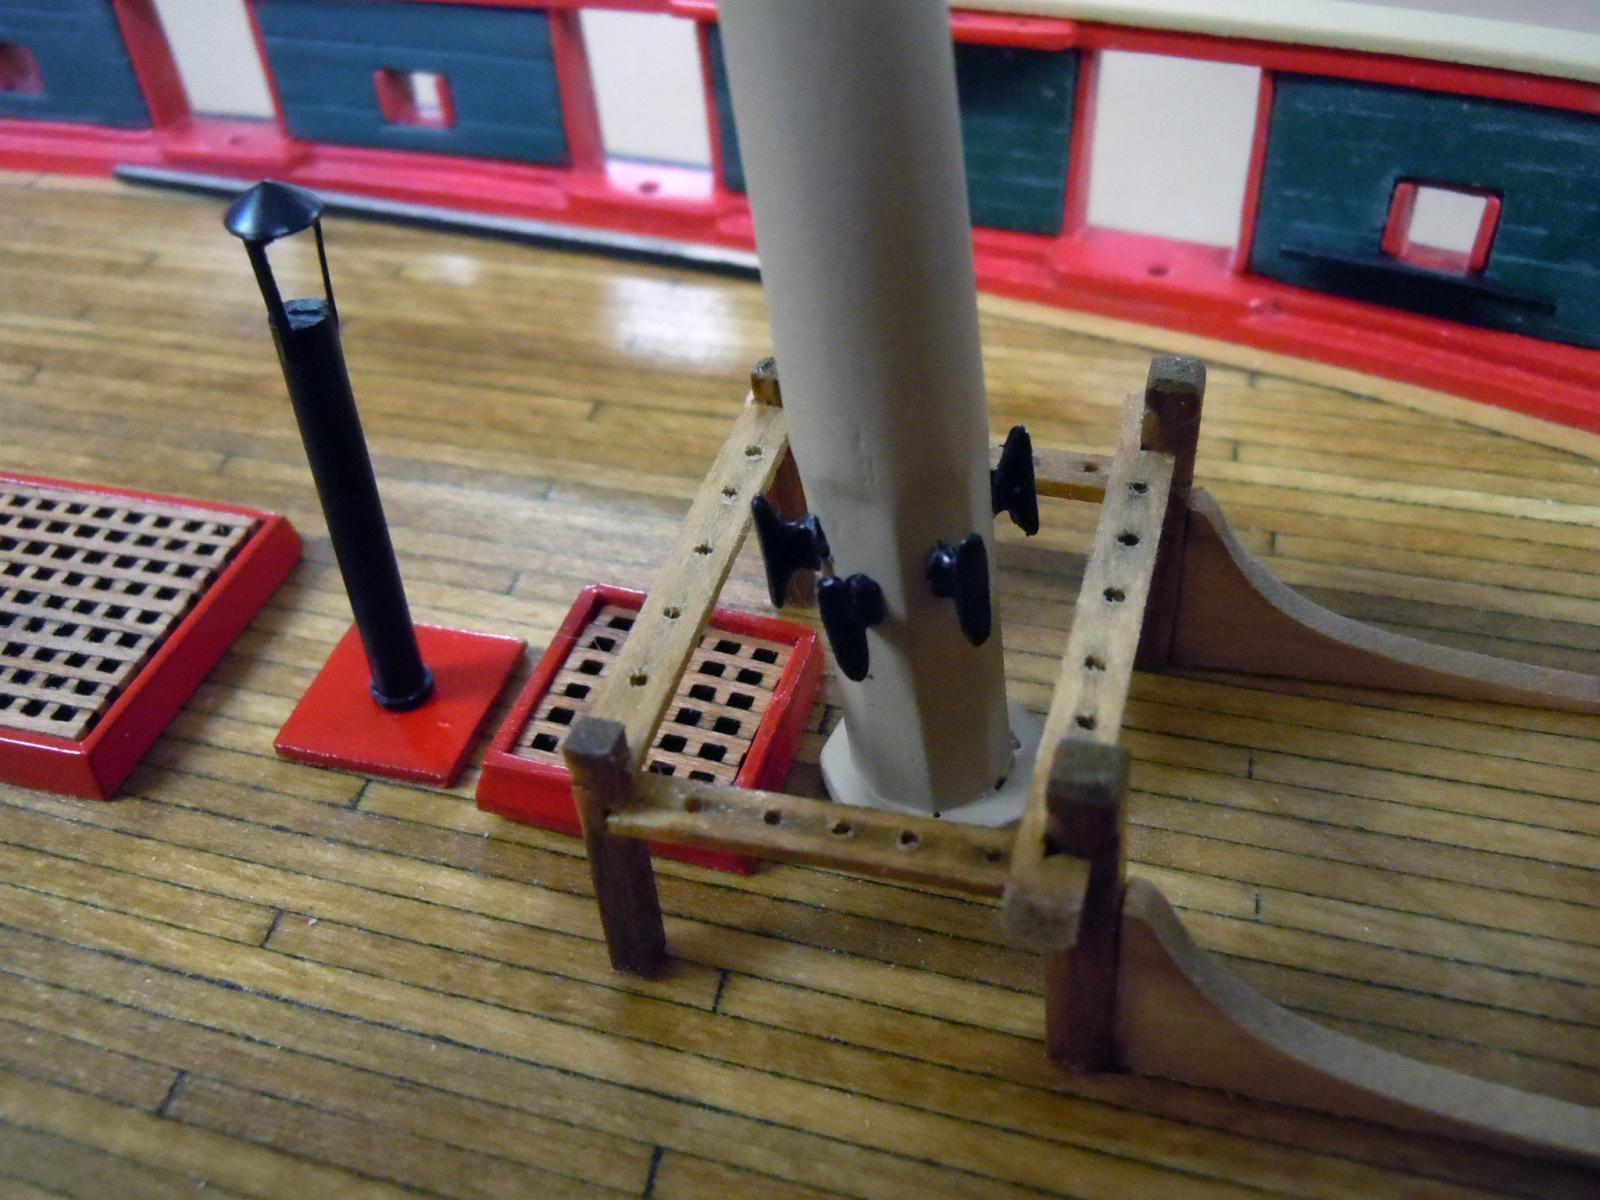
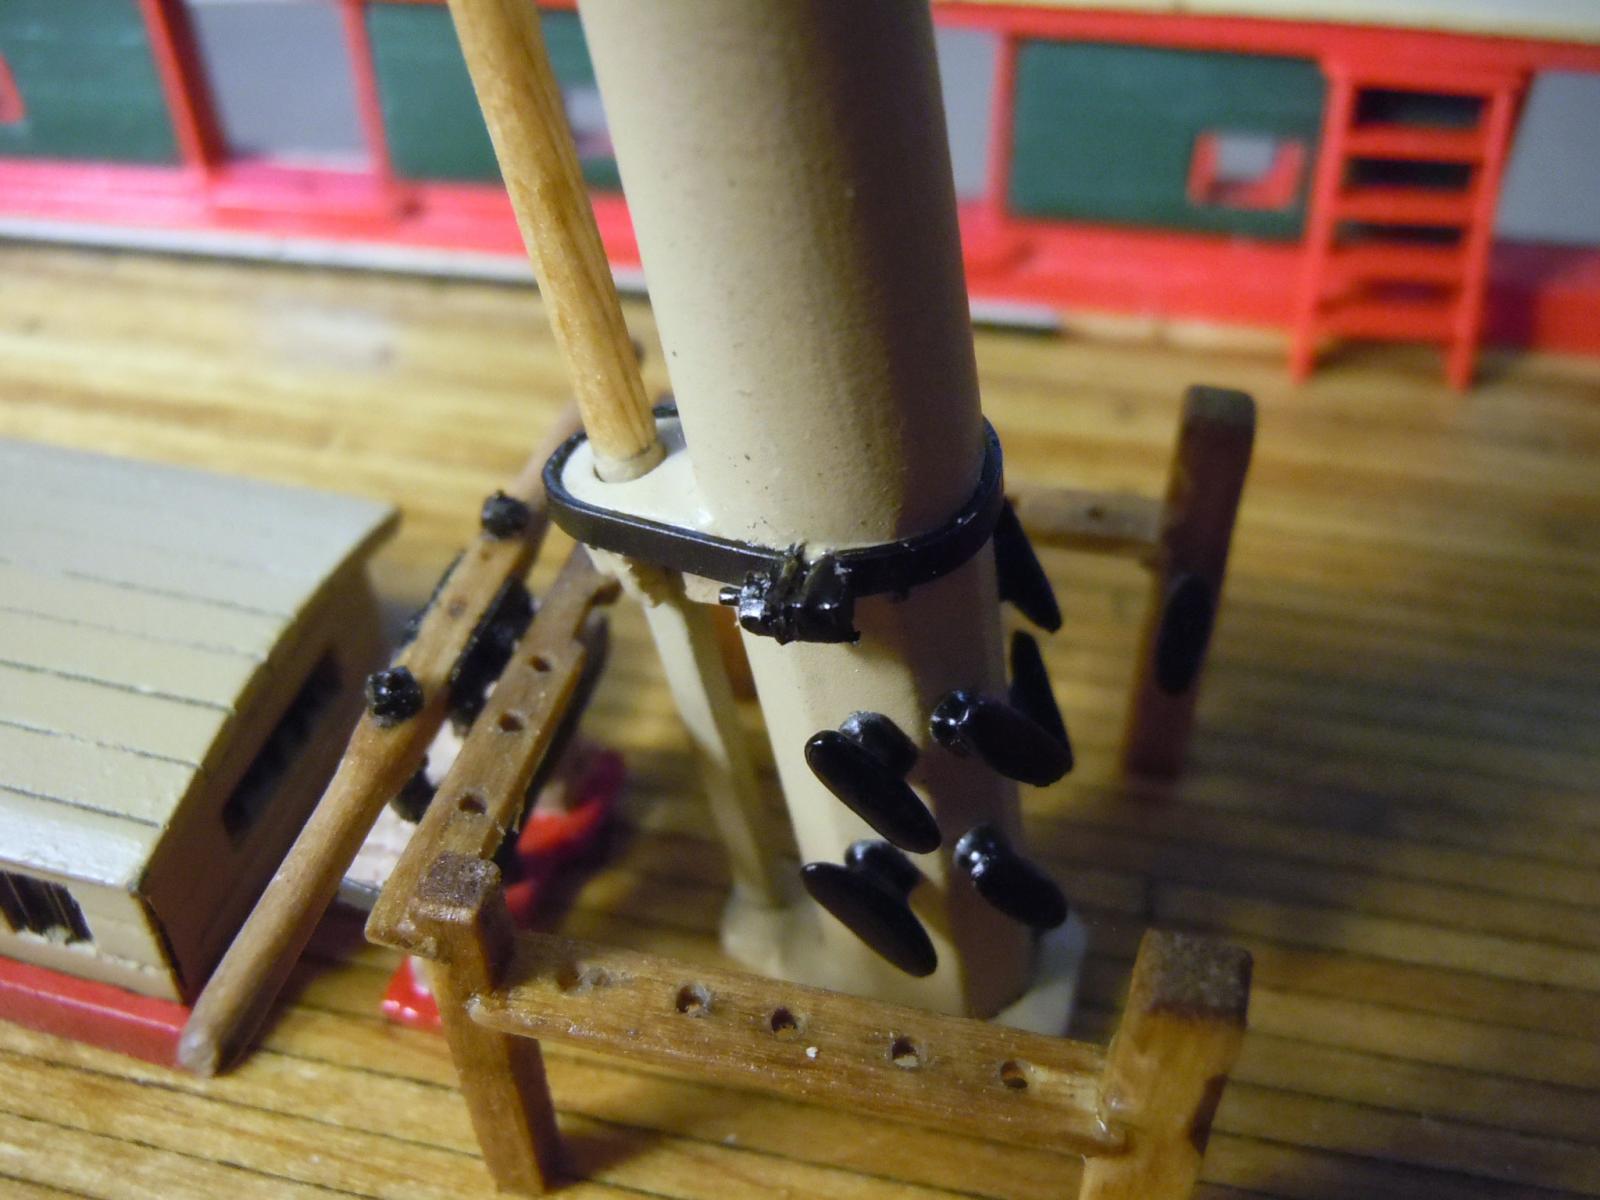
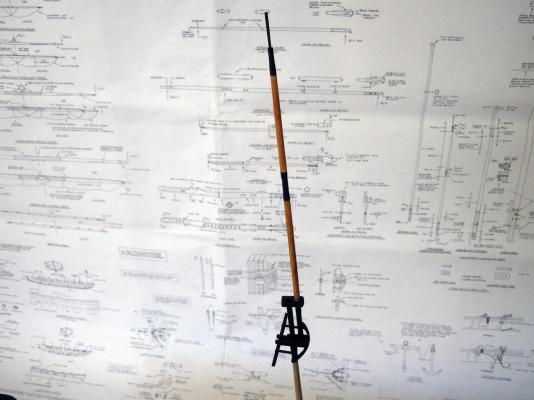
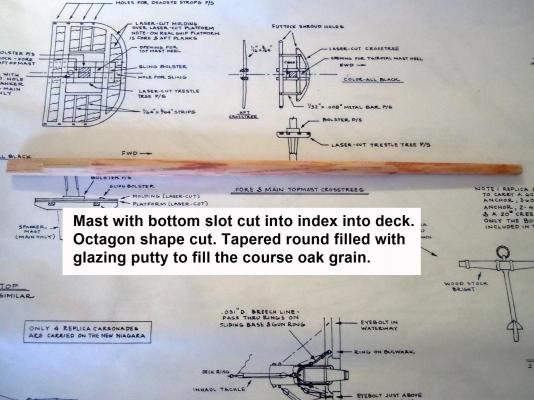
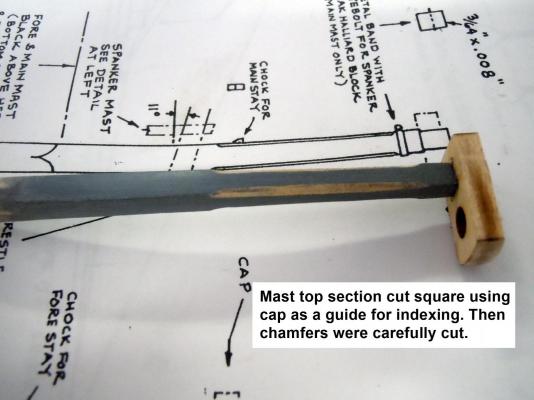
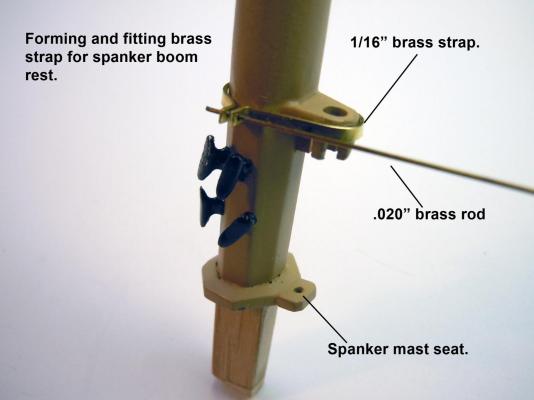
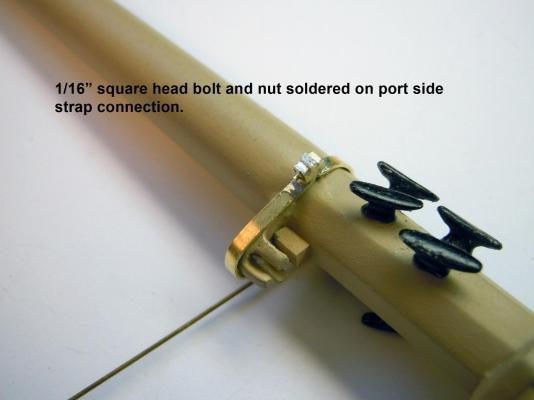
I was able to get a little accomplished over the holiday weekend despite being grunt labor for my wife selling her wares at a local art show. I built both of the lower masts by turning the ends to the needed size as a target to cut the taper towards. Carving the oak dowels was a bit of a challenge due to the course grain that required being smoothed with putty. The tops were then cut using the caps as a guide to carve towards and fit. Both tops were then built and fitted to the masts, then painted satin black which I think I will respray with flat black. The main mast needed a two part clamp for the spanker boom rest which I made using 1/16" wide brass strip. Here is a series showing the fabrication of it. Here is a closeup showing it painted satin black in place. Here is a standoff picture showing the main mast in place on the deck. Ken


- 440 replies
-
- 6
-
-
- niagara
- model shipways
- (and 1 more)
-
George, I usually use it over primer as well; however it can stick to some woods like oak that have a course grain where it can get a good bite. The glazes are basically a thickened primer with a bit of extender. Ken
- 440 replies
-
- 2
-
-
- niagara
- model shipways
- (and 1 more)
-
I use Bondo Automobile Glazing Putty purchased at Autozone. But 3M is another good brand as well. http://www.autozone.com/paint-and-body/body-filler/3m-bondo-glazing-and-spot-putty/167010_0_0/ Above is a link. Ken
- 440 replies
-
- 2
-
-
- niagara
- model shipways
- (and 1 more)
-
I used a piece of strip 1/32" thick and 1/16" wide drilled several .020" holes in a row down the strip added a drop of CA to each hole to harden and then cut the nuts square around the hole and filed the cut edges square. This technique can also be used with gray automotive gasket material which turns black with CA added. Sometimes the holes have to be carefully re-drill or reamed once the CA is added and before cutting square. Just check first to make sure the hole is open. Ken
- 440 replies
-
- 4
-
-
- niagara
- model shipways
- (and 1 more)
-
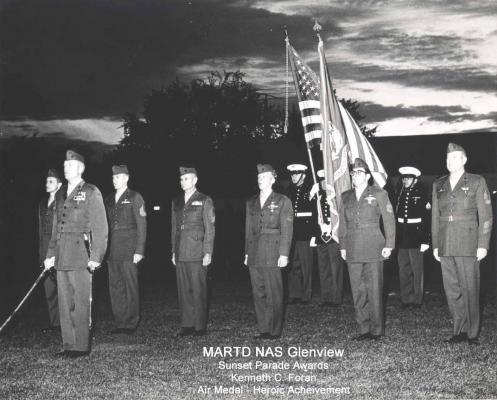
Rich, oh yea I know the situation to well. On the mission we went on we learned later that the C.O. of 5th Special Forces at Phu Bai recommended the pilots for Navy Crosses and the crew chief and I for DFC's; never heard anymore until I was back at NAS Glenview I was awarded single mission AM at a sunset parade with a few others getting awards. Obviously they were downgraded from DFC's. Here is the picture they gave me as a keepsake. I am the second from the right with the fashionable MC glasses. Ken
- 440 replies
-
- 4
-
-
- niagara
- model shipways
- (and 1 more)
-
Rich, when I left Major Nelson was still in command; then he became X.O. of HMM-164 in Vietnam. He was the pilot on the mission I was awarded the single AM rescuing a Green Beret team out of Ashau Valley which was a 20 minute hoist extraction under constant enemy fire. Ken
- 440 replies
-
- 3
-
-
- niagara
- model shipways
- (and 1 more)
-
Rich, a small world; I was assigned to HMM-261 at New River in 1966 out of "A" school when 261 rotated out of Vietnam and became a training squadron for CH-46"s. Major Nelson was the C.O. I was a structural mechanic and machine gunner. Are you familiar with www.popasmoke.com ? Semper Fi! Ken
- 440 replies
-
- 4
-
-
- niagara
- model shipways
- (and 1 more)
-
Rich, I flew with HMM-164 and HMM-362 Marine helicopter squadrons in Vietnam '67 - "68. I was awarded a single mission AM with combat V and six strike/flights during my 13 month tour there. I was one of those crazy Canadians that came down in 1965 and was nearly trampled to death at the border by American draft dodgers heading north and enlisted for three years in the Marines to get the G.I. Bill to go to college. I graduated the Cleveland Institute of Art with a B.F.A in Industrial Design. Semper Fi to those who fly! Ken
- 440 replies
-
- 4
-
-
- niagara
- model shipways
- (and 1 more)