HOLIDAY DONATION DRIVE - SUPPORT MSW - DO YOUR PART TO KEEP THIS GREAT FORUM GOING! (Only 44 donations so far out of 49,000 members - C'mon guys!)
×


xken
-
Posts
841 -
Joined
-
Last visited
Content Type
Profiles
Forums
Gallery
Events
Everything posted by xken
-
 George, the closest I have come is using yellow ochre to prevent solder flow; but it also works to a limited degree as a heat sink. Sometimes parts will be clamped together for soldering and clamps also function as heat sinks. But in general I have not set out to use a heat sink or heat sink putty.
- 440 replies
-
- 3
-

-
- niagara
- model shipways
- (and 1 more)
-
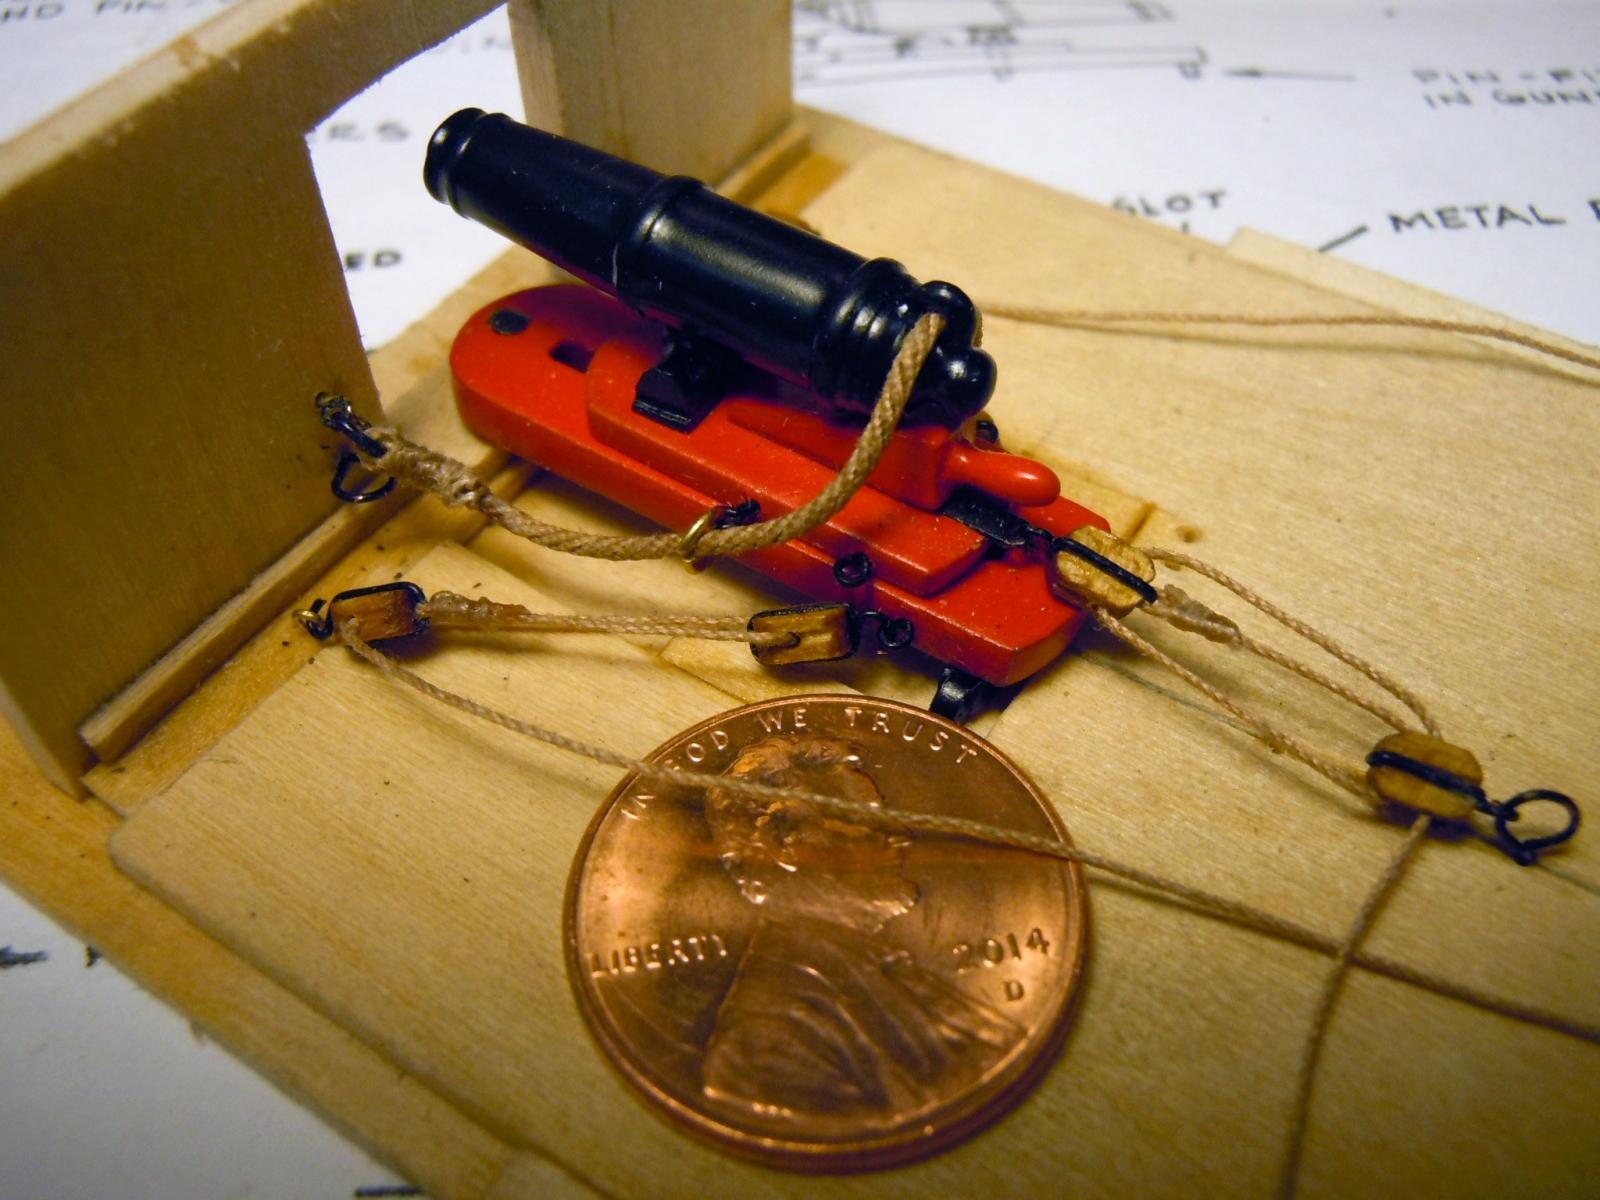
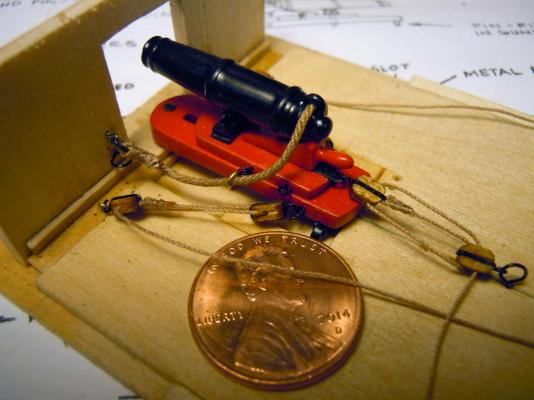
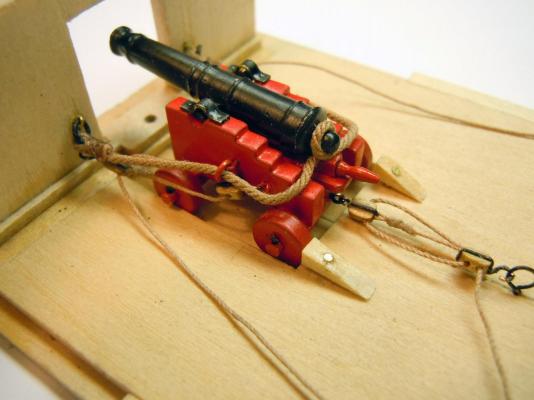
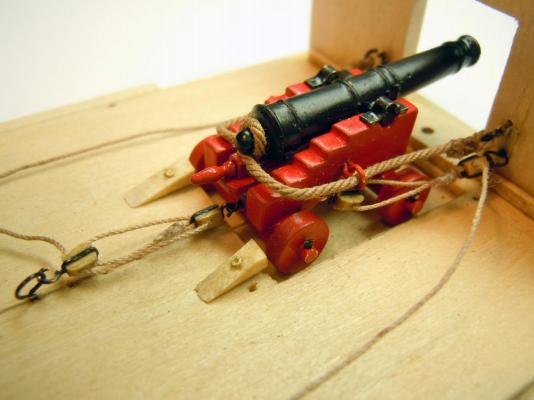
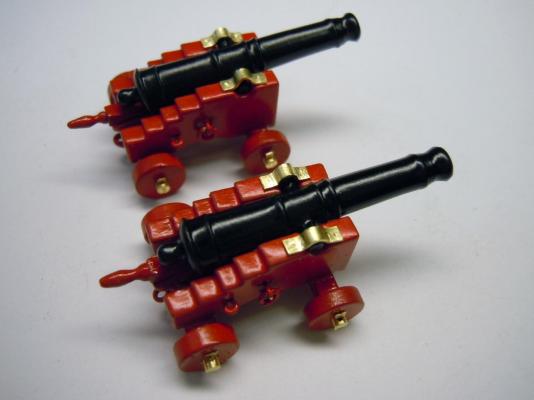
Here is the first carronade rigged build using the same fixture as the long gun. I added a U.S. penny for scale. Here it is rigged in place on the deck. A side by side with the long gun. Now to continue on with the rest of the carronades.


- 440 replies
-
- 9
-
-
- niagara
- model shipways
- (and 1 more)
-
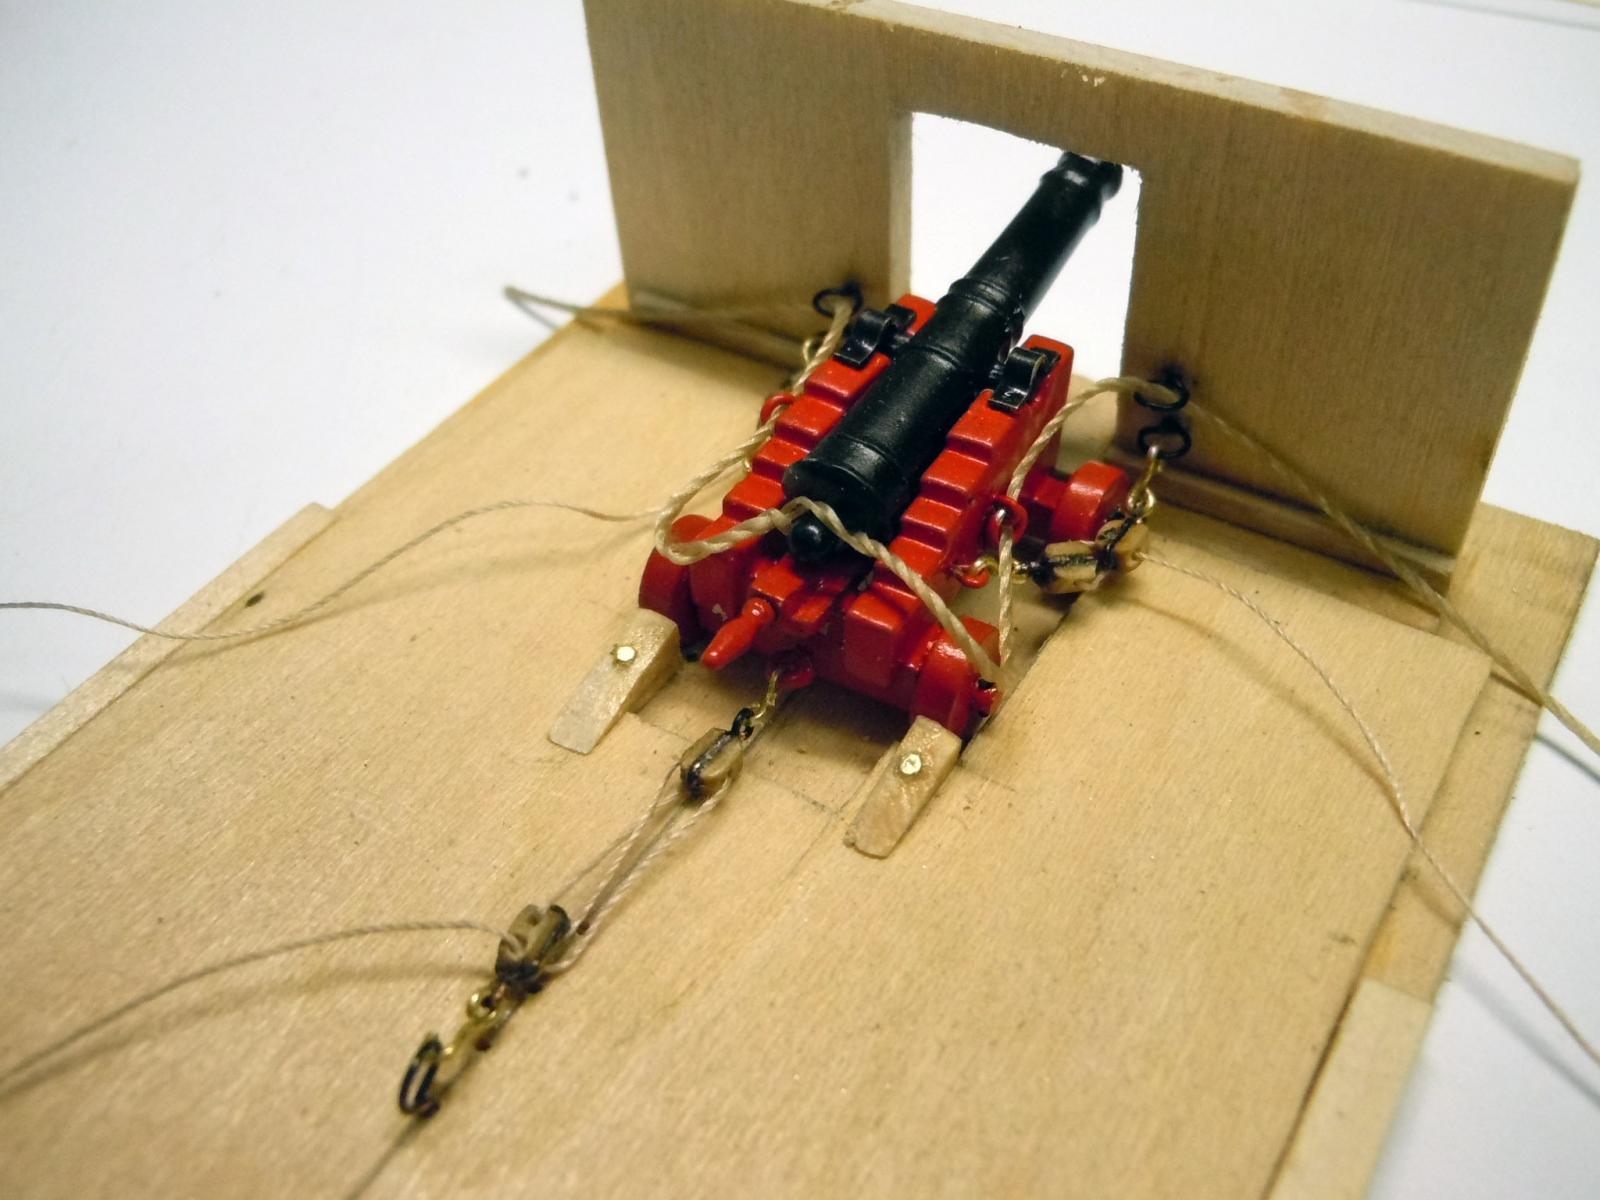
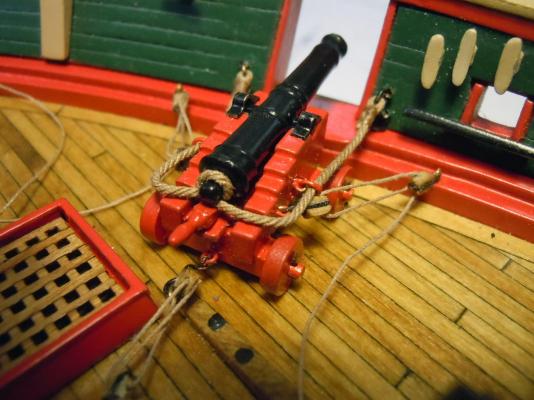
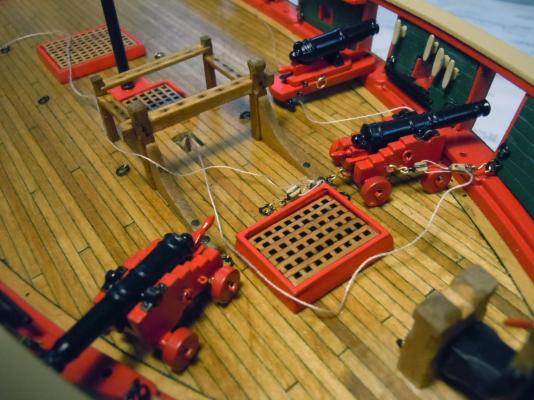
The rope order arrived and I rigged up the two long guns to get a feel for doing and learning from them before doing all the carronades. For the benefit of others the breech line is Light Brown .035"(.88mm) and the tackle line is Light Brown .012" (.30mm). The whipping is sewing thread. Here are a sequence of the rigging in the fixture I made which works very well. The big challenge was whipping the breech ropes and the tackle blocks. I used the sewing thread I found to do the rolling hitches rather than the traditional wrapping and it looked more to scale than the .008" from Syren. In checking over the plans I realized that more eye bolts are needed in the waterway for the gun rigging Here are the two long guns permanently installed. The excess tackle line will be addressed later once the carronades are completed. I am trapping the tackle line at the bottom of the block as I wrap the black 28 gauge wire with the hook incorporated at the top of the block. Here are pictures of the long guns in place. Now onto the carronades and set up a mini production line. These will take a while to complete. Thanks again for the suggestion on using the Syren rope; much better than the kit supplied line for the guns.


- 440 replies
-
- 7
-
-
- niagara
- model shipways
- (and 1 more)
-
George, yes I hope you do enjoy it. Let me know your thoughts on it and keep in mind it is a primer to useing brass in model making.
- 440 replies
-
- 1
-
-
- niagara
- model shipways
- (and 1 more)
-
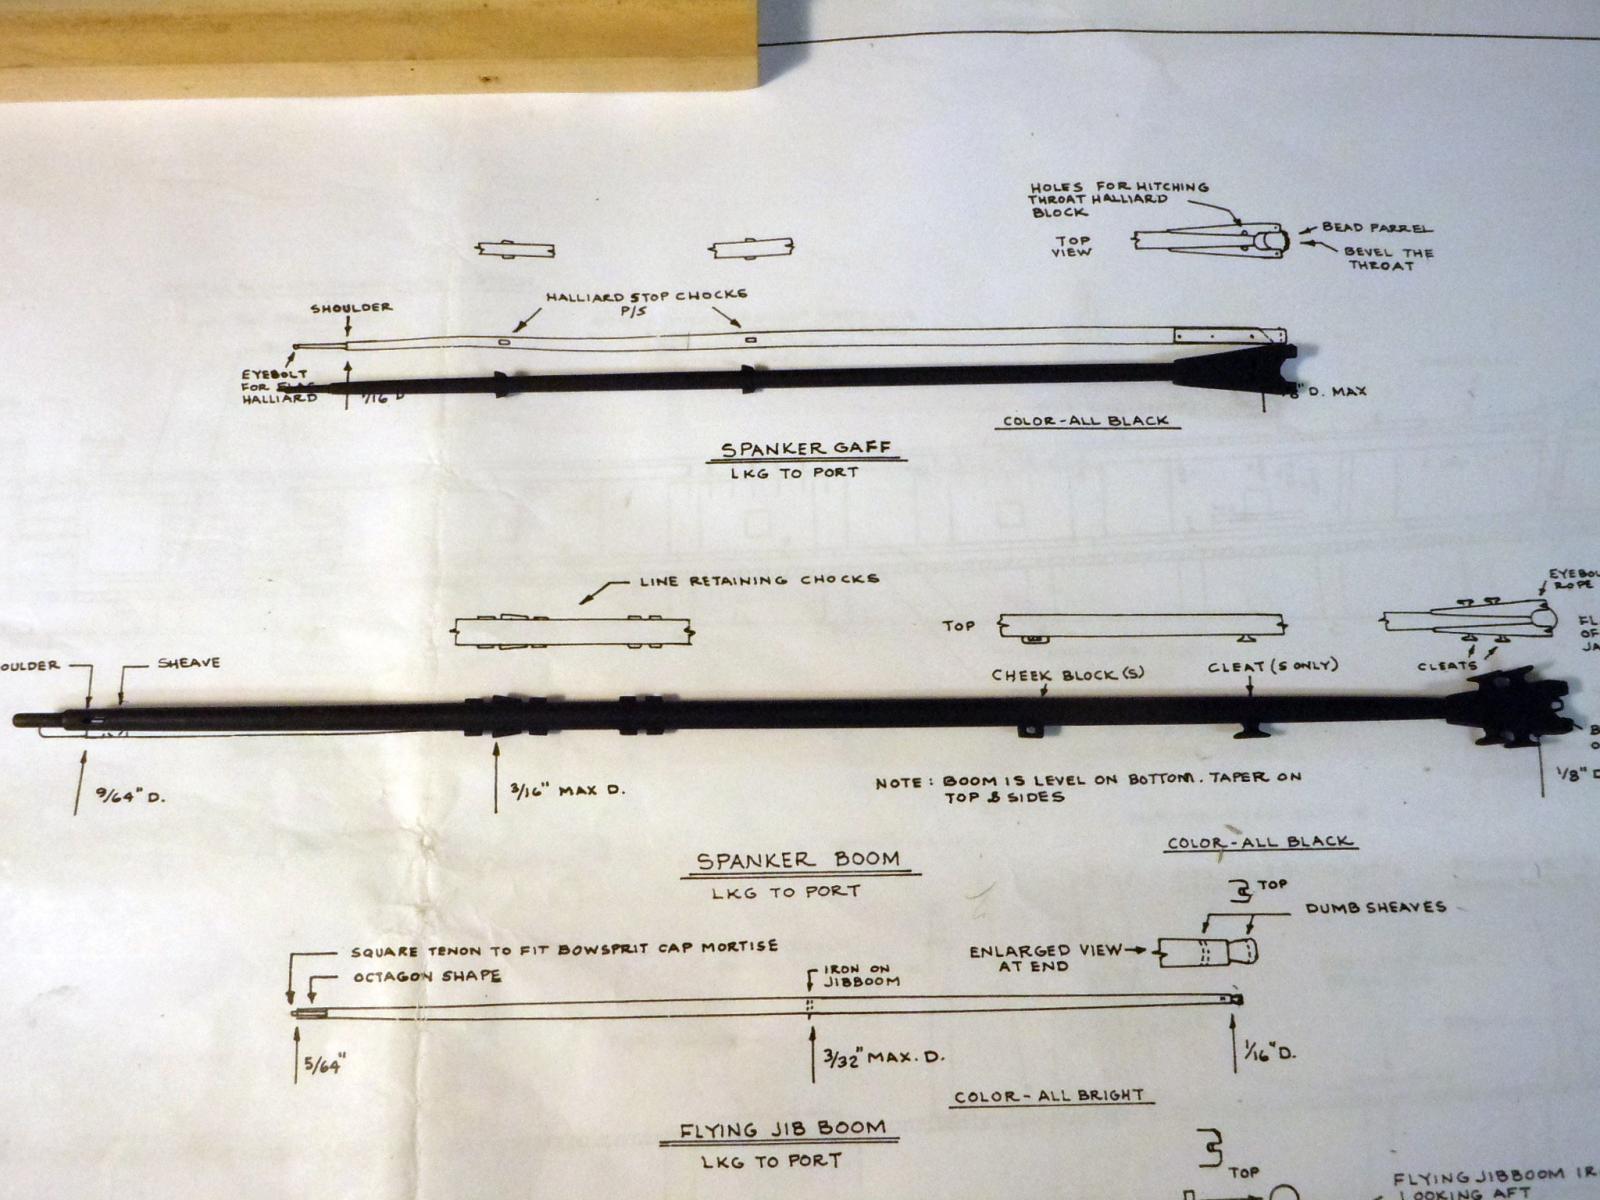
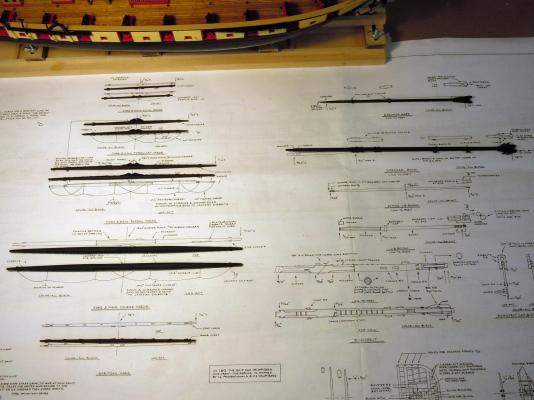
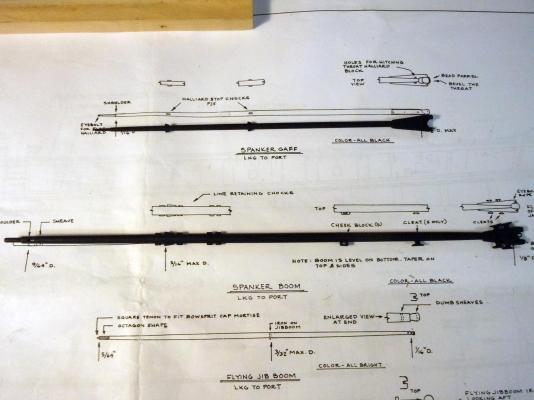
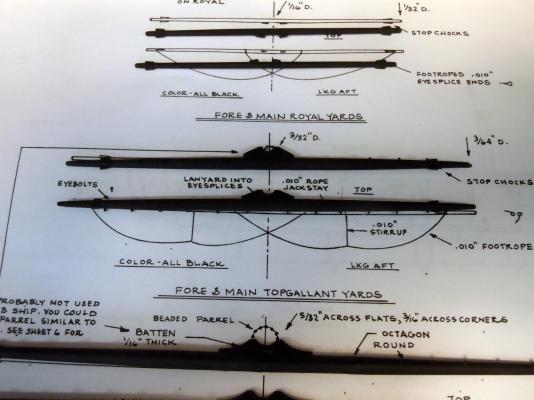
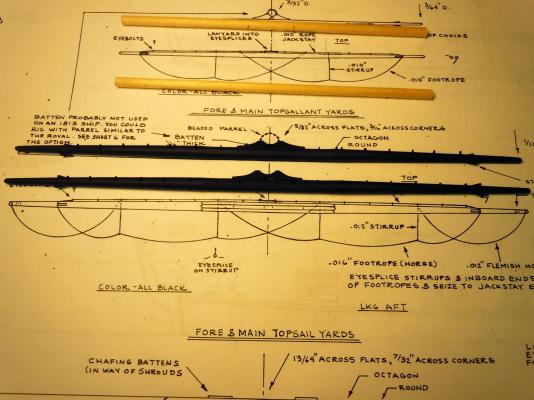
We had a great holiday weekend with our kids,grand kids and friends whale watching and cookouts. I did manage to get some building in and completed all the yards, spanker gaff and boom. The wife thinks I should have a "Yard Sale" All are still in need of some fine tuning especially on stop chocks now that they are painted and glue set. The thumb chocks were much easier to fabricate than I thought they would be; I started by drilling the right size hole and then splitting through the center of the hole and shaping. I did not think to take pictures of this process. Here are a few pictures; had to see details when painted flat black. Next I will finish up details on them while waiting for my rope order to be delivered.
- 440 replies
-
- 5
-
-
- niagara
- model shipways
- (and 1 more)
-
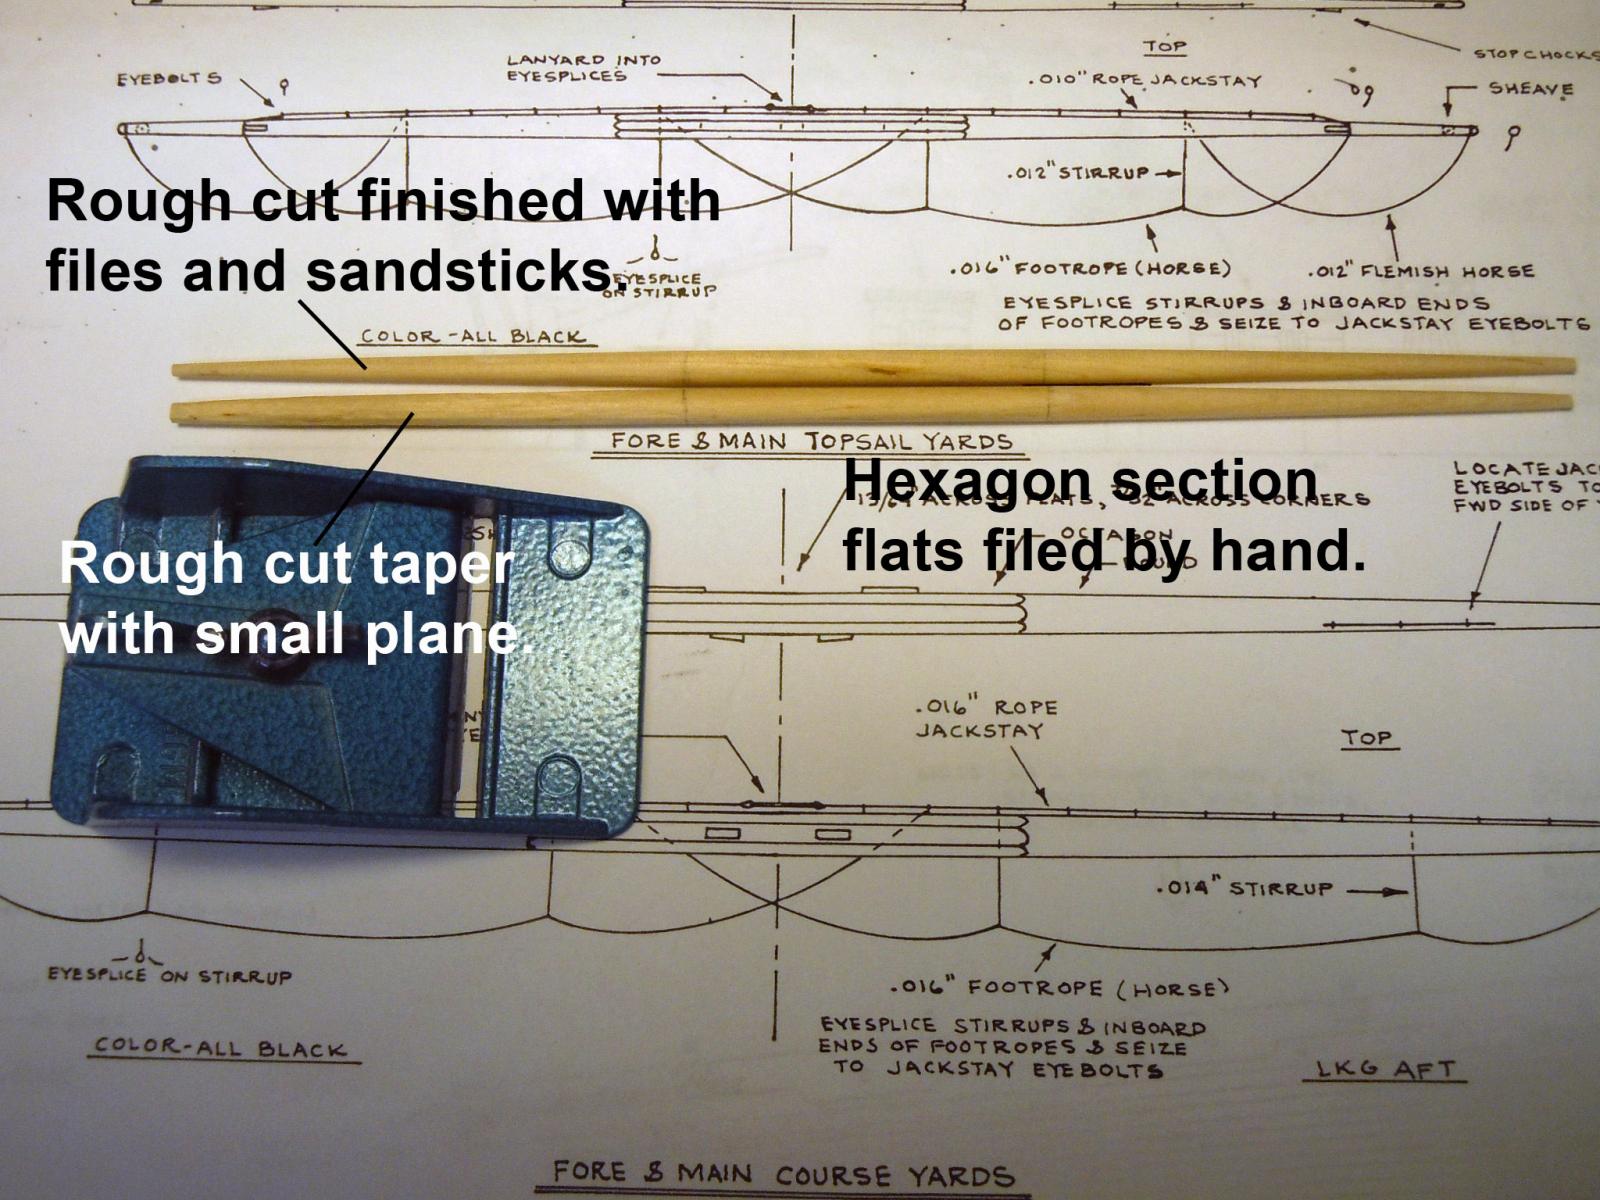
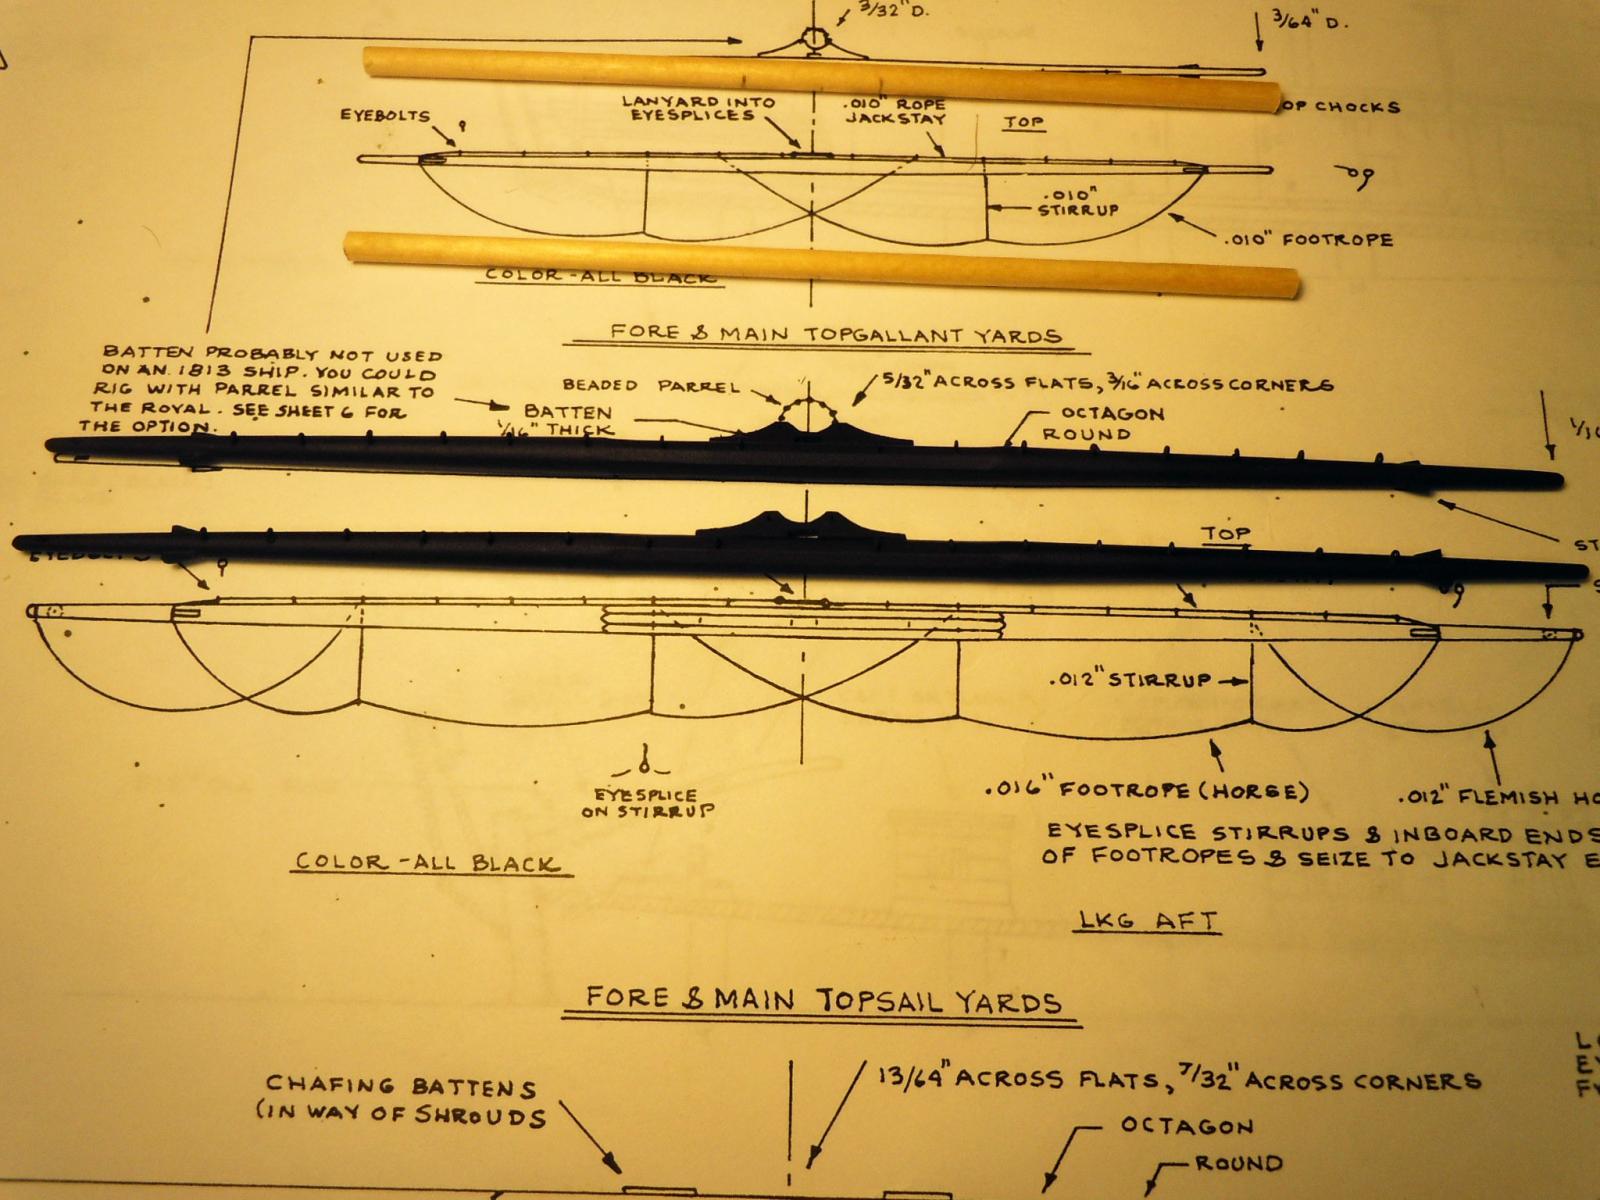
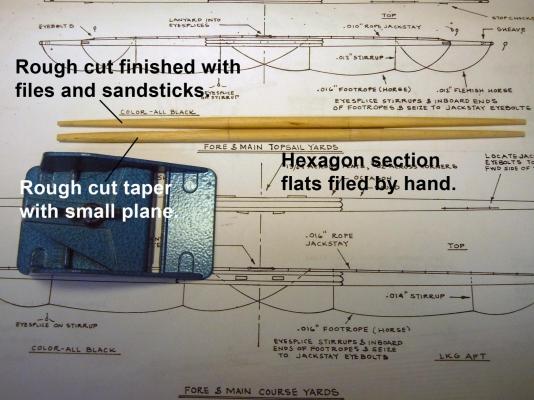
Well I think I have sorted out the tackle blocks and have decided to wait for the rope shipment to arrive to make sure I use the correct tackle rope. Just received notice this morning that the order has shipped so should arrive by Monday or Tuesday if all goes well. I have moved onto the yards and again had to dip into my personal stock of dowels since the kit had no 1/8" dowel as I sorted out the dowels provided against the plans. I started with the topsail yards having the smaller hexagon center section to start with that was marked in the center area. First I shaved the rough cut taper using the small plane and then chucked in the lathe to finish the taper using a file then sanding block and finally a sanding stick for a smooth finish. Once both were cut and finished I drilled the locations for the eye bolts and then added them and adjusted their alignment using a .020" brass rod. The stop chocks and batten were also added. Once finished then painted black. Next I will move on and finish up the rest.
- 440 replies
-
- 8
-
-
- niagara
- model shipways
- (and 1 more)
-
Brian, great details and very clean, crisp build. Keep up the great job you are doing!
- 831 replies
-
- 3
-
-
- Armed Virginia Sloop
- Model Shipways
- (and 1 more)
-
Larry, thanks for the link; I have visited your site several times looking at this sequence and you answered my question on the rope coils being made separate and then added. Right now I am experimenting with changing to 28 gauge brass wire and trapping the tackle rope with the wire on the block. This way I can set up tackle blocks while I wait for the rope order to be delivered.
- 440 replies
-
- 3
-
-
- niagara
- model shipways
- (and 1 more)
-
Brian, thanks for reinforcing my thoughts on "looking right" which I think is one of the key tenets of modelling. An old friend of mine once told me that "It does not have to always be right, it just has to look right." The pin system will work for the two long guns, and as for locating I use a small divider set at the needed standoff dimension put it on the center-line of the gun barrel on the deck then press the end of the divider point into the deck to locate the pin hole. I have found that at small scale, dividers work better for dimensioning than a scale; especially for transferring multiple locations of the same dimension.
- 440 replies
-
- 3
-
-
- niagara
- model shipways
- (and 1 more)
-
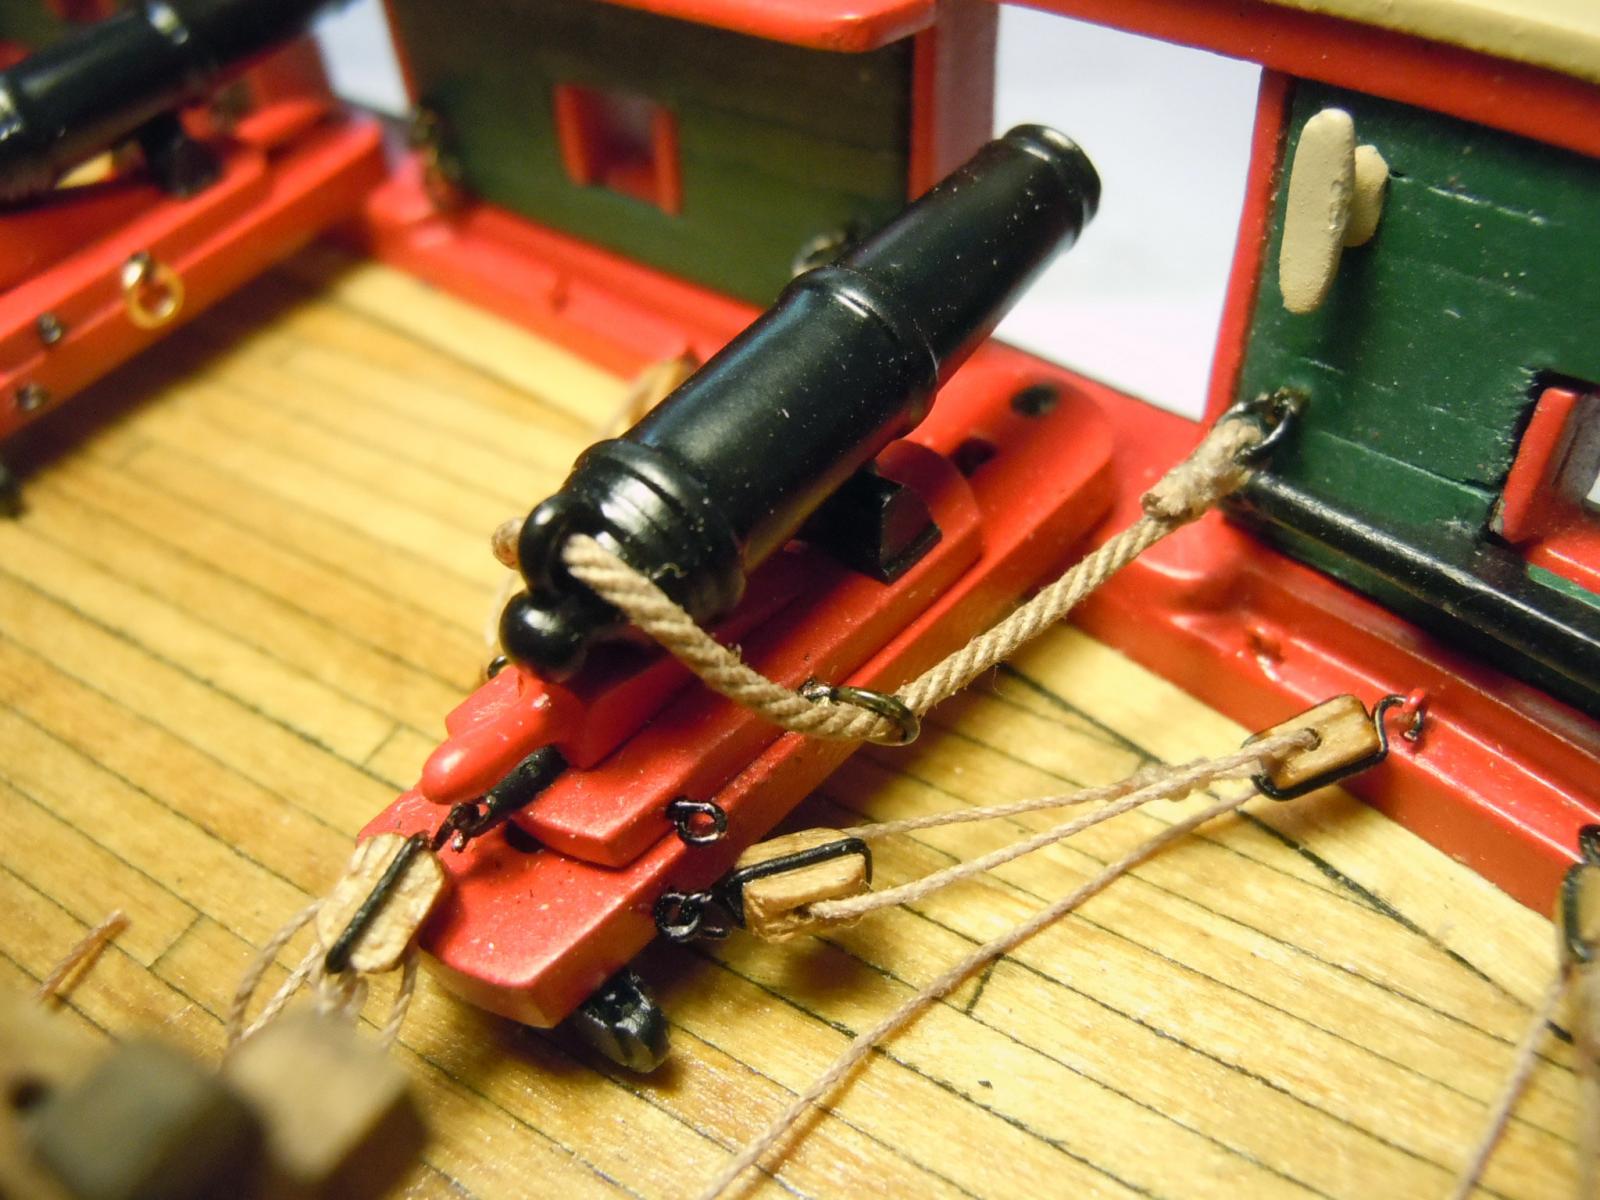
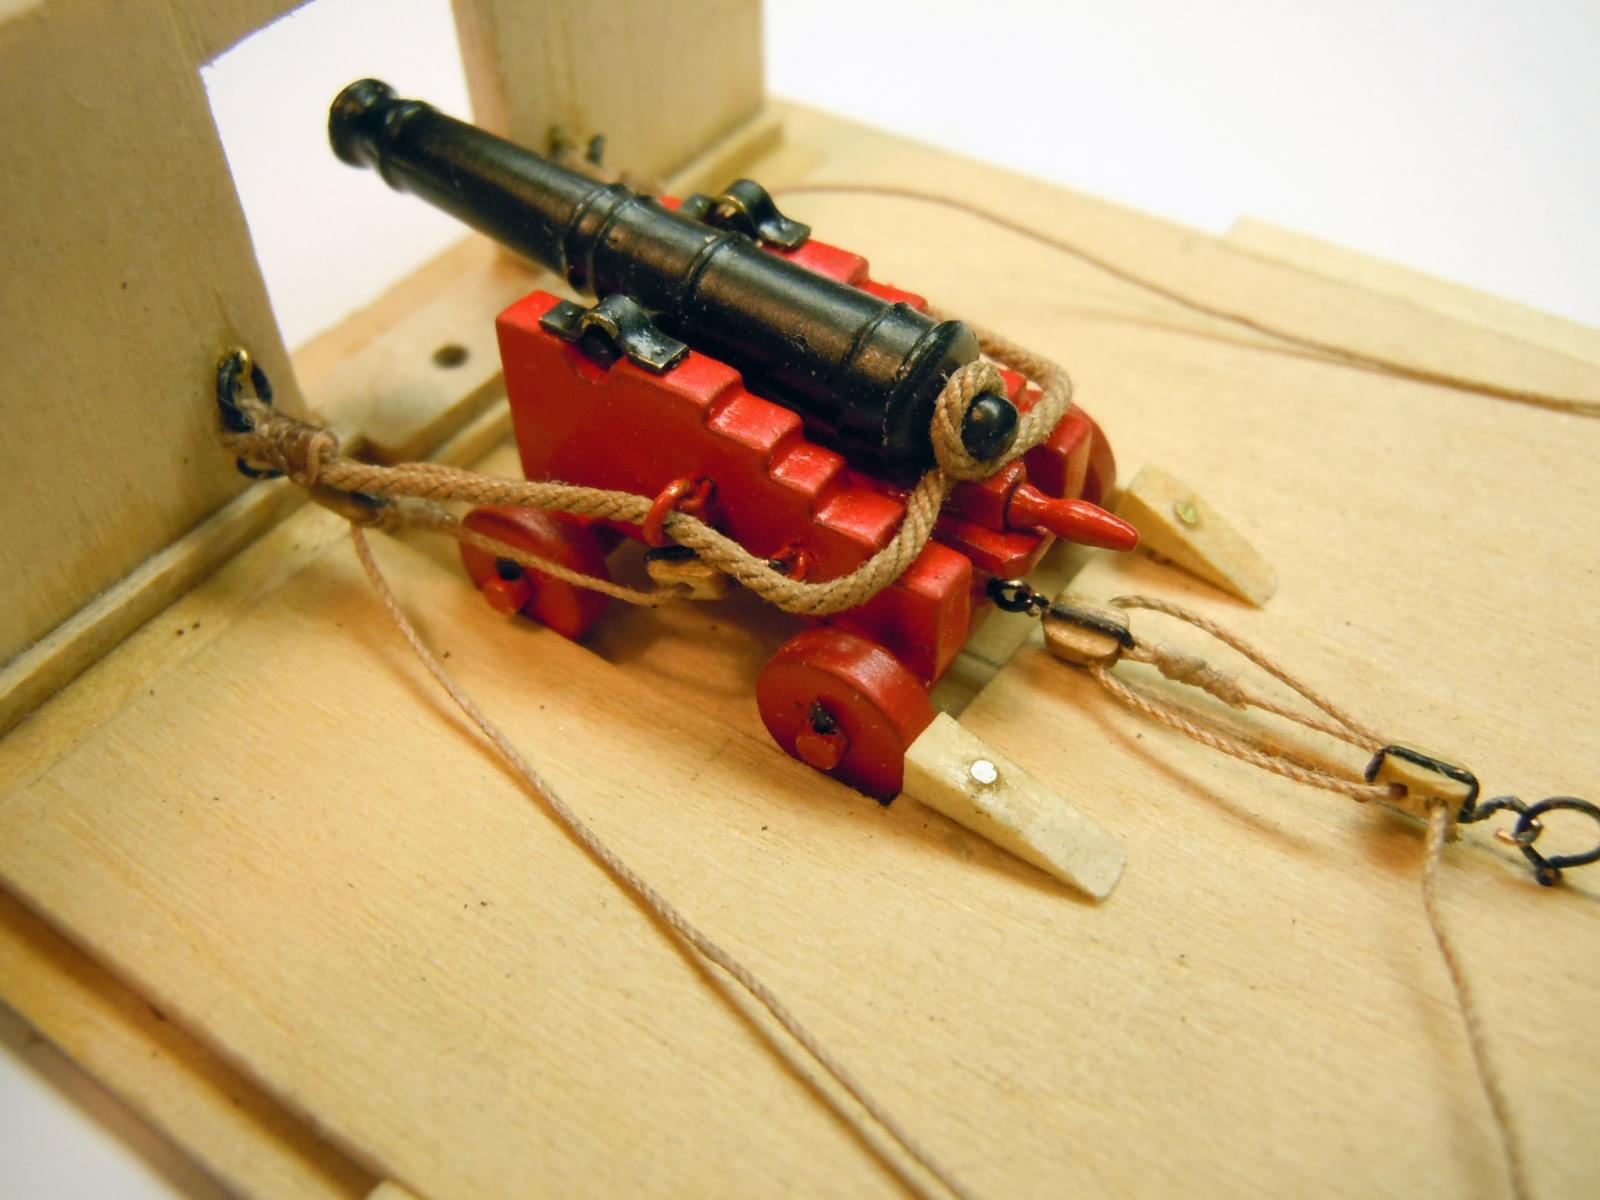
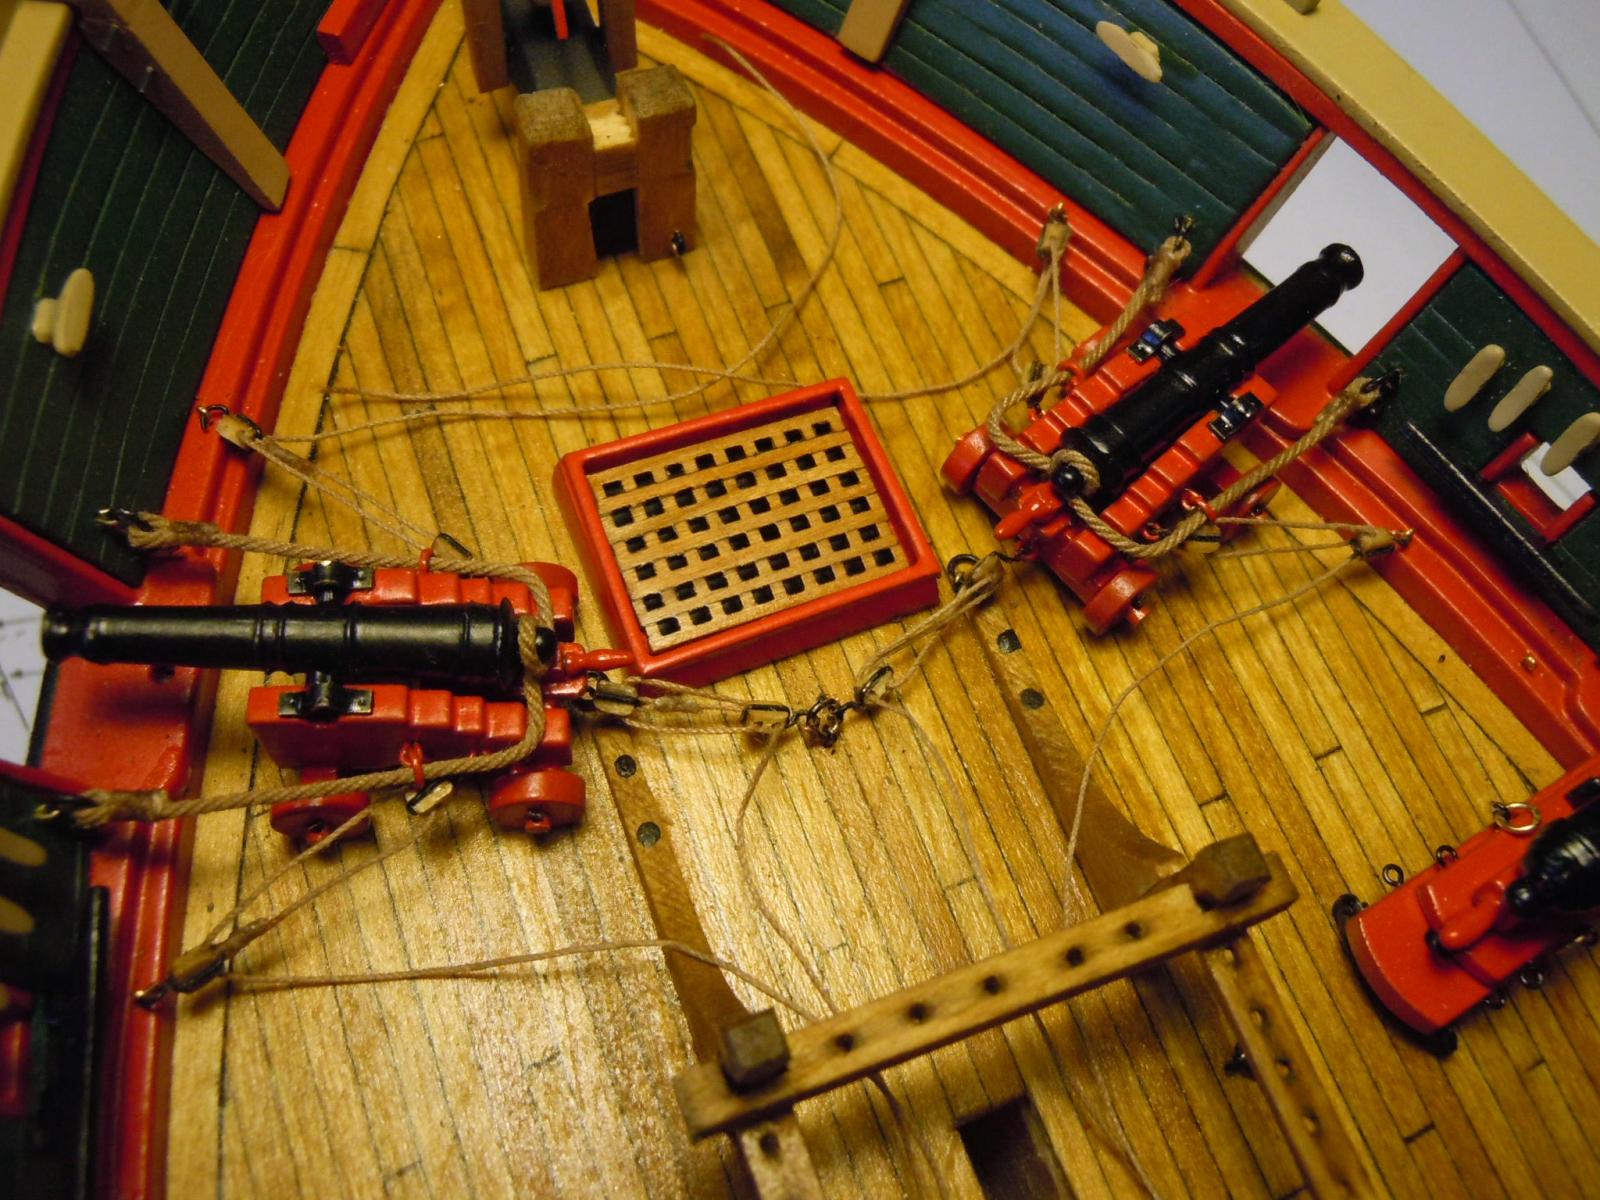
Thank you all for your feedback and suggestions. I decided to add a locating pin in the front axle which should hold the two long guns in their respective places once rigged. Here is the pin in the brass axle. I also test fit the port gun in place and the blocks seem over sized and I will eliminate the secondary brass hook at the bulwark to increase the length of the rig. If still too short the one at the carriage will go as well. I think you will be able to see what I mean in the photo. The starboard gun is located on it's pin. I think the carronades will be easier with their locating pin already in place.
- 440 replies
-
- 7
-
-
- niagara
- model shipways
- (and 1 more)
-
The rope order is placed and will wait for it's arrival. I ordered three sizes based upon the plan notes. Thanks again for all your help.
- 440 replies
-
- 2
-
-
- niagara
- model shipways
- (and 1 more)
-
Thanks all the the suggestions will sort out best approach.
- 440 replies
-
- 2
-
-
- niagara
- model shipways
- (and 1 more)
-
A question for all....are guns, carronades etc. glued to the deck and then finally rigged to bulwark rings? I will move onto to forming yards (and honey-do's) until I can resolve the rope rigging issues. I took lengths of the kit rope and soaked it in hot water and then hung it with a weight to straighten it out. It did straighten nicely but still way too stiff for working with. I have used this technique on WWI airplanes for rigging them. George, thanks for the update on sizes, I will cross reference and order some.
- 440 replies
-
- 1
-
-
- niagara
- model shipways
- (and 1 more)
-
Brian thanks for the link; now to figure out which ones to get. Also thanks for the pictures, they say a picture is worth a thousand words. What scale are those you are doing?
- 440 replies
-
- 2
-
-
- niagara
- model shipways
- (and 1 more)
-
Brian, please by all means post some photos; I need all the help I can get being new at this. Can you share a link to the Syren rope? I thought of adding the rope as you suggested once I had everything together and started to assembly things. I may try on the next ones; I started with the long gun to learn since there are only two of them. Thanks!
- 440 replies
-
- 1
-
-
- niagara
- model shipways
- (and 1 more)
-
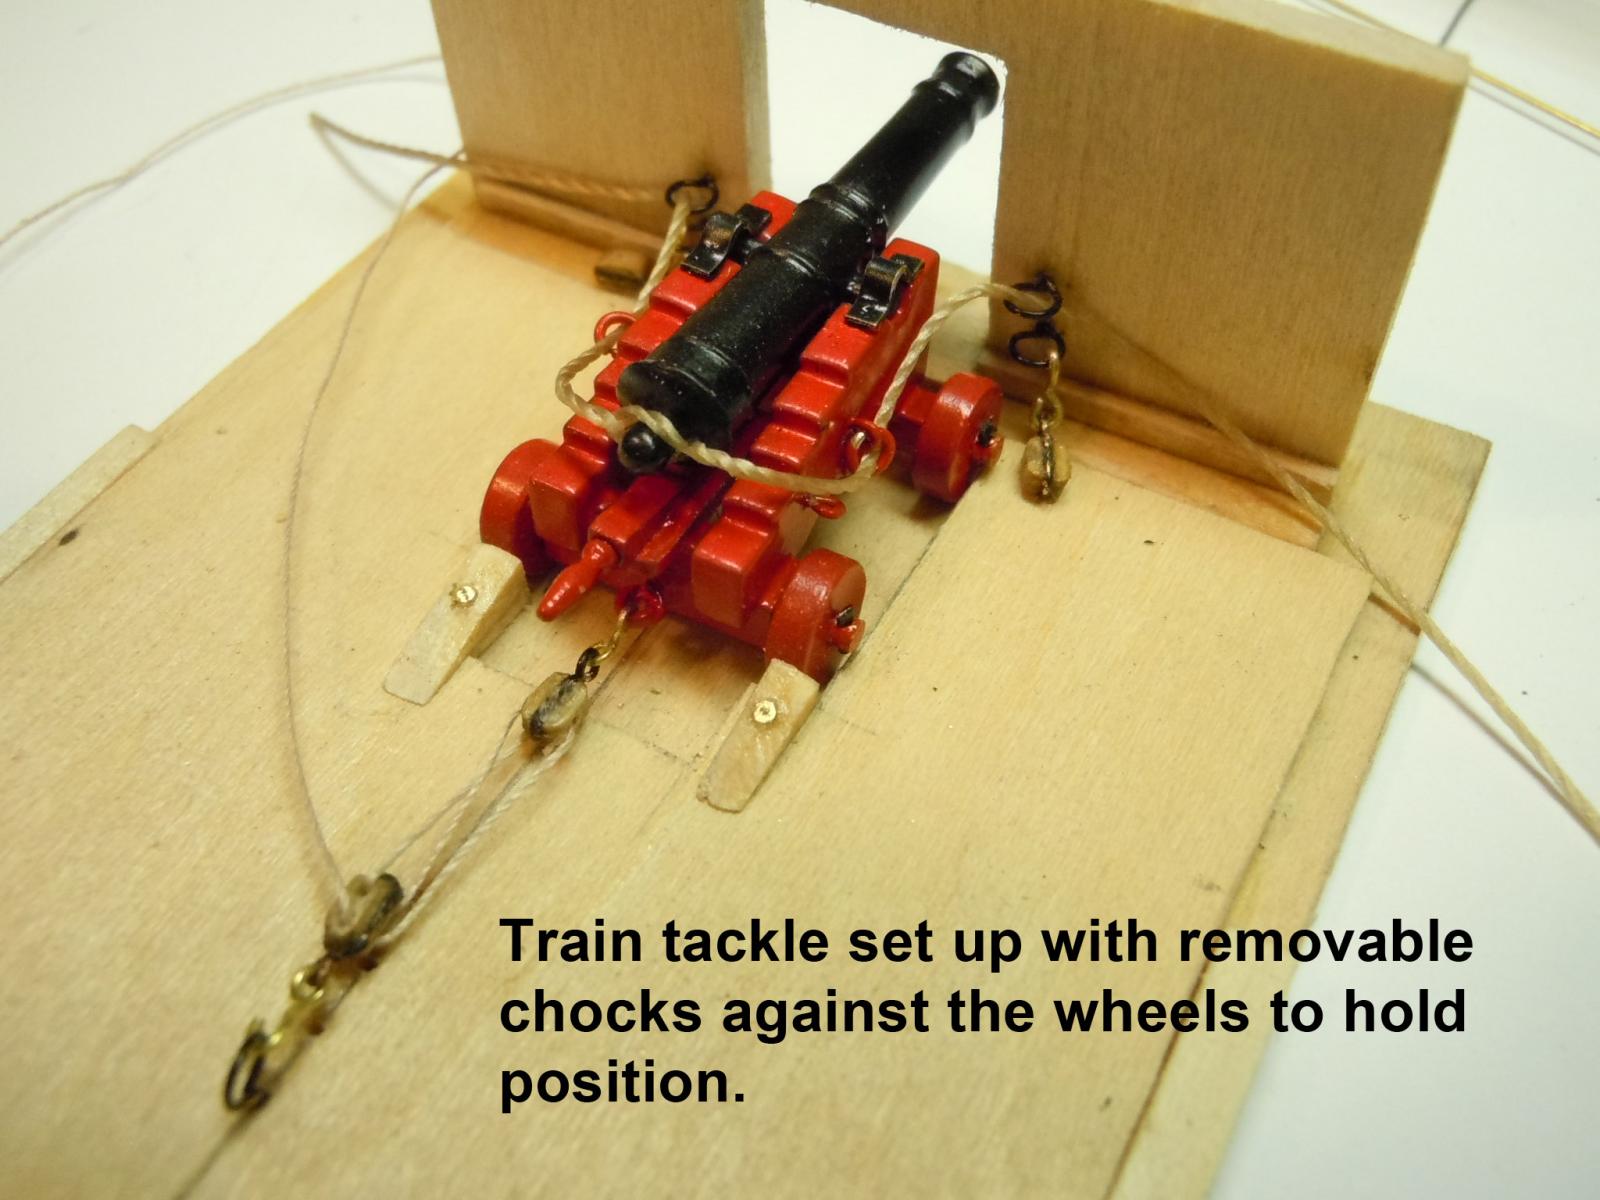
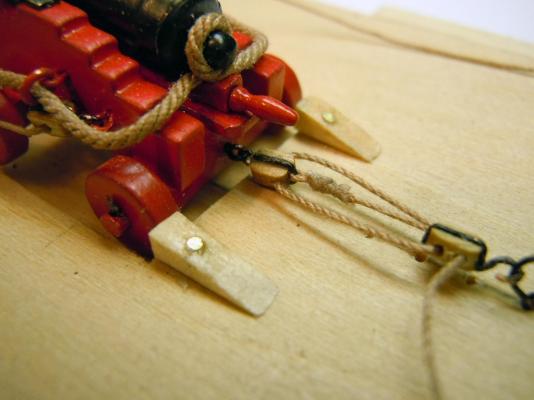
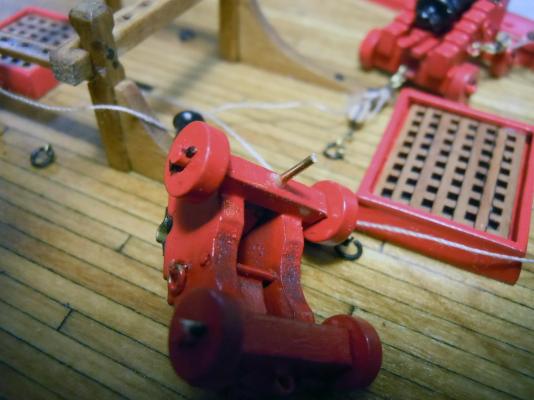
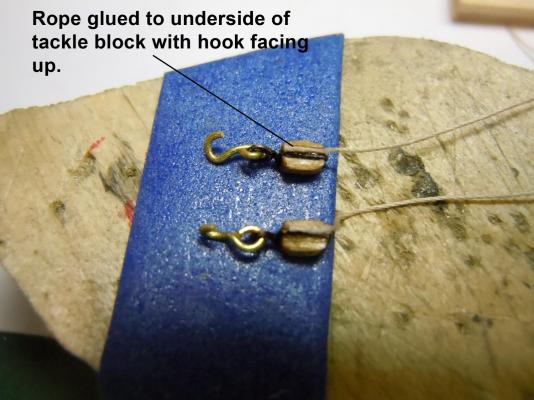
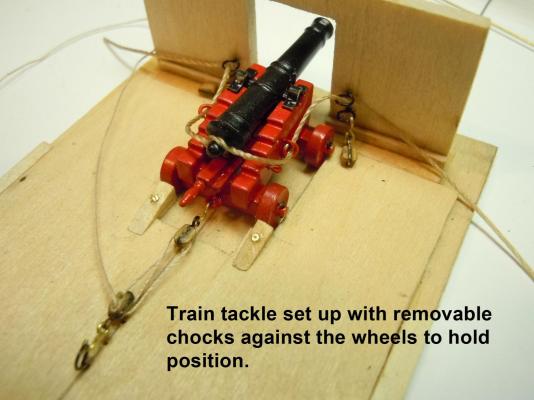
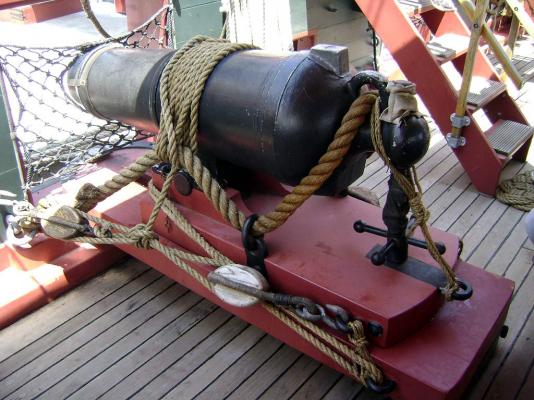
Scott I will take that as a compliment. I started with the train tackle and quickly realized that for tension I needed to add wheel chocks that are removable to use the fixture for the carronades. I just drilled holes in the chocks and deck then added a pin to locate them in the holes in the deck. After a couple of tests I learned that the rope (thread) needed to be glued to the underside of the block adjacent to the side wire. I used masking tape to hold the blocks in place to glue the ends in place and thread the rope through the holes drilled in the block. Here is the train tackle with the chocks added. The kit thread is way to stiff so I found some sewing thread in my wife's stash of thread spools. Much softer and limber to work with. The breech line in the kit is also extremely stiff and a little undersized based upon the photograph of the real carronade. Will see if I can locate a substitute as well. Here are all the lines in place for now with the gun position all the way forward and the gun tackle blocks touching each other. On the deck it will be set back so as not to touch or I will have to remove the bulwark end brass hook. Will be working on honey-do's for the rest of the day.

- 440 replies
-
- 5
-
-
- niagara
- model shipways
- (and 1 more)
-
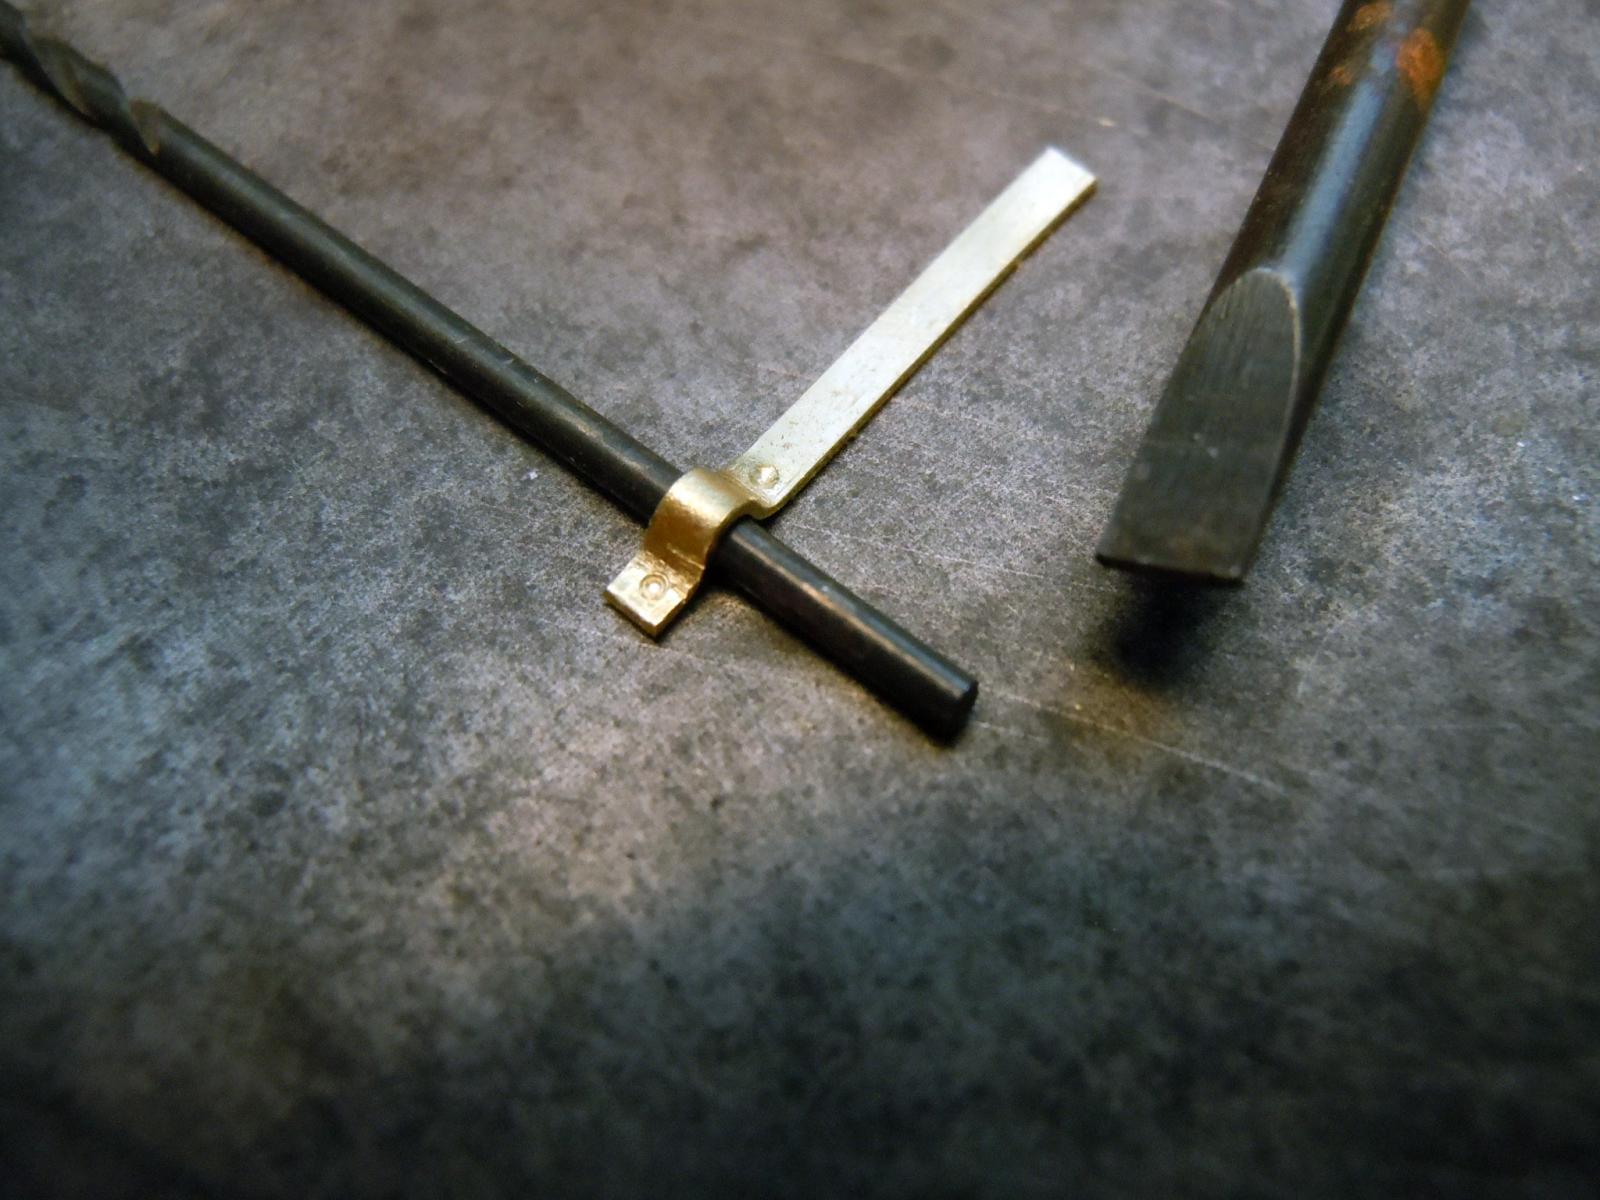
I am following this photo that I have found and it appears to be a loop on the block that attaches to the rear of the gun bed and then a hook that engages the rings on the bulwark. The plans really show no detail on these hook ups. Since my picture was taken I have developed a better looking brass hook for mine that I will post later.
- 440 replies
-
- 4
-
-
- niagara
- model shipways
- (and 1 more)
-
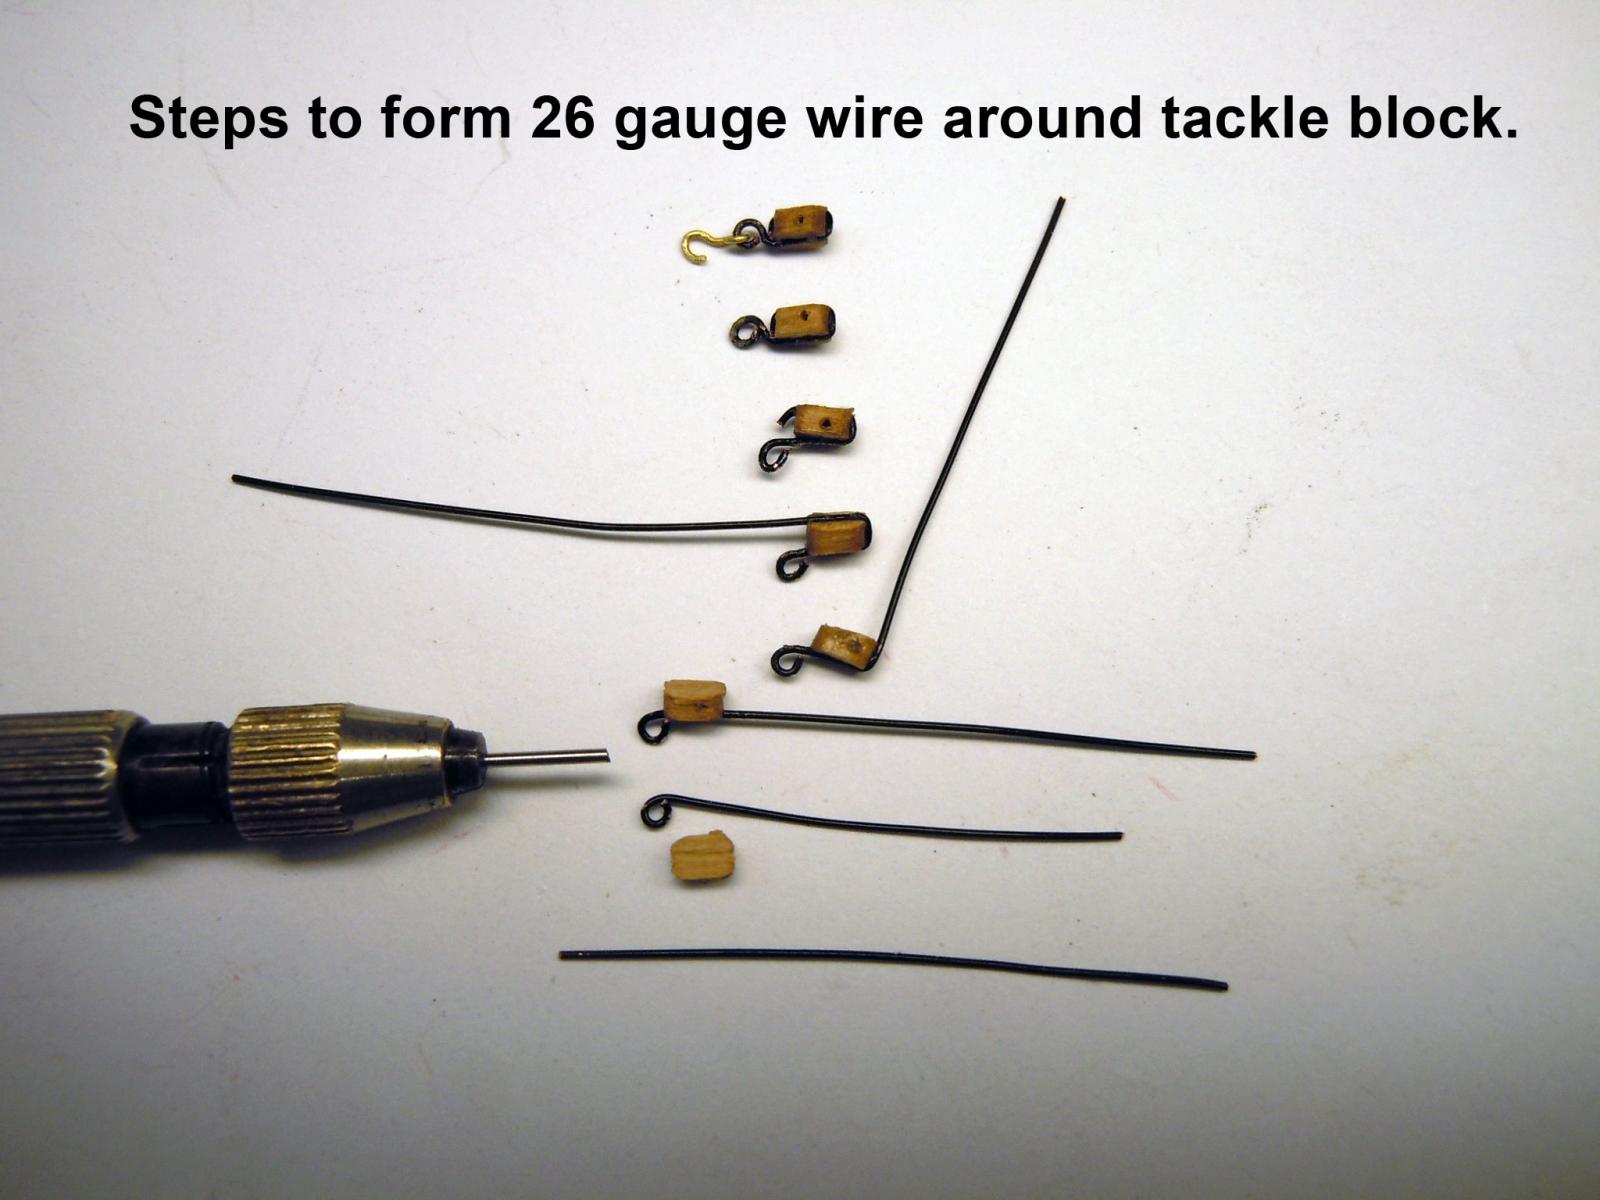
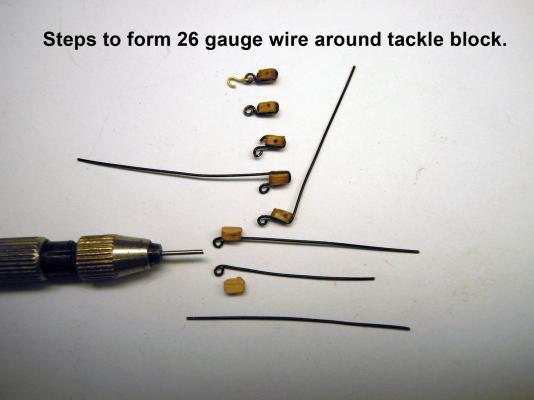
Nigel, I did not take pictures of the process; but will try and describe the steps I took. First I started with a good sharp set of needle files; made in USA. Find a local machine shop supplier; remember ancient proverb"You get what you pay for." I used a round, a square, half -round and a flat needle files. First I drilled the barrel bore to round it. I started with the tip of the round file and cleaned the half round shape at the front of the barrel. I also used the round tip to clean the rope loop at the rear. I then used the square file to sharpen the edges of the bands using the light refection as a guide. I then used the half round to crisp up the detail around the rope loop. Then the flat file was used to smooth up the barrel areas between the bands. Then these areas were sanded with a 1/4" wide sanding stick (Alpha Abrasives) to finish up the surfaces. Then barrels were primed and painted red (Krylon Banner Red) then sprayed with Clear Satin Finish. Mostly just time and patience. Right now I have just figured out the best way to make the 6 tackle blocks needed for each gun using the black 26 gauge copper wire. Critical is the gluing the wire to the block after each bend to get a crisp bend. Once wrapped with wire the hole was drilled out due to being filled with glue. Then the hook was carefully formed and added to the block. Here are the forming steps I used. Here is the test fit of the block to the long gun. Again it appears that not enough blocks included in the kit; 120 on materials list versus the 104 in the bag.
- 440 replies
-
- 3
-
-
- niagara
- model shipways
- (and 1 more)
-
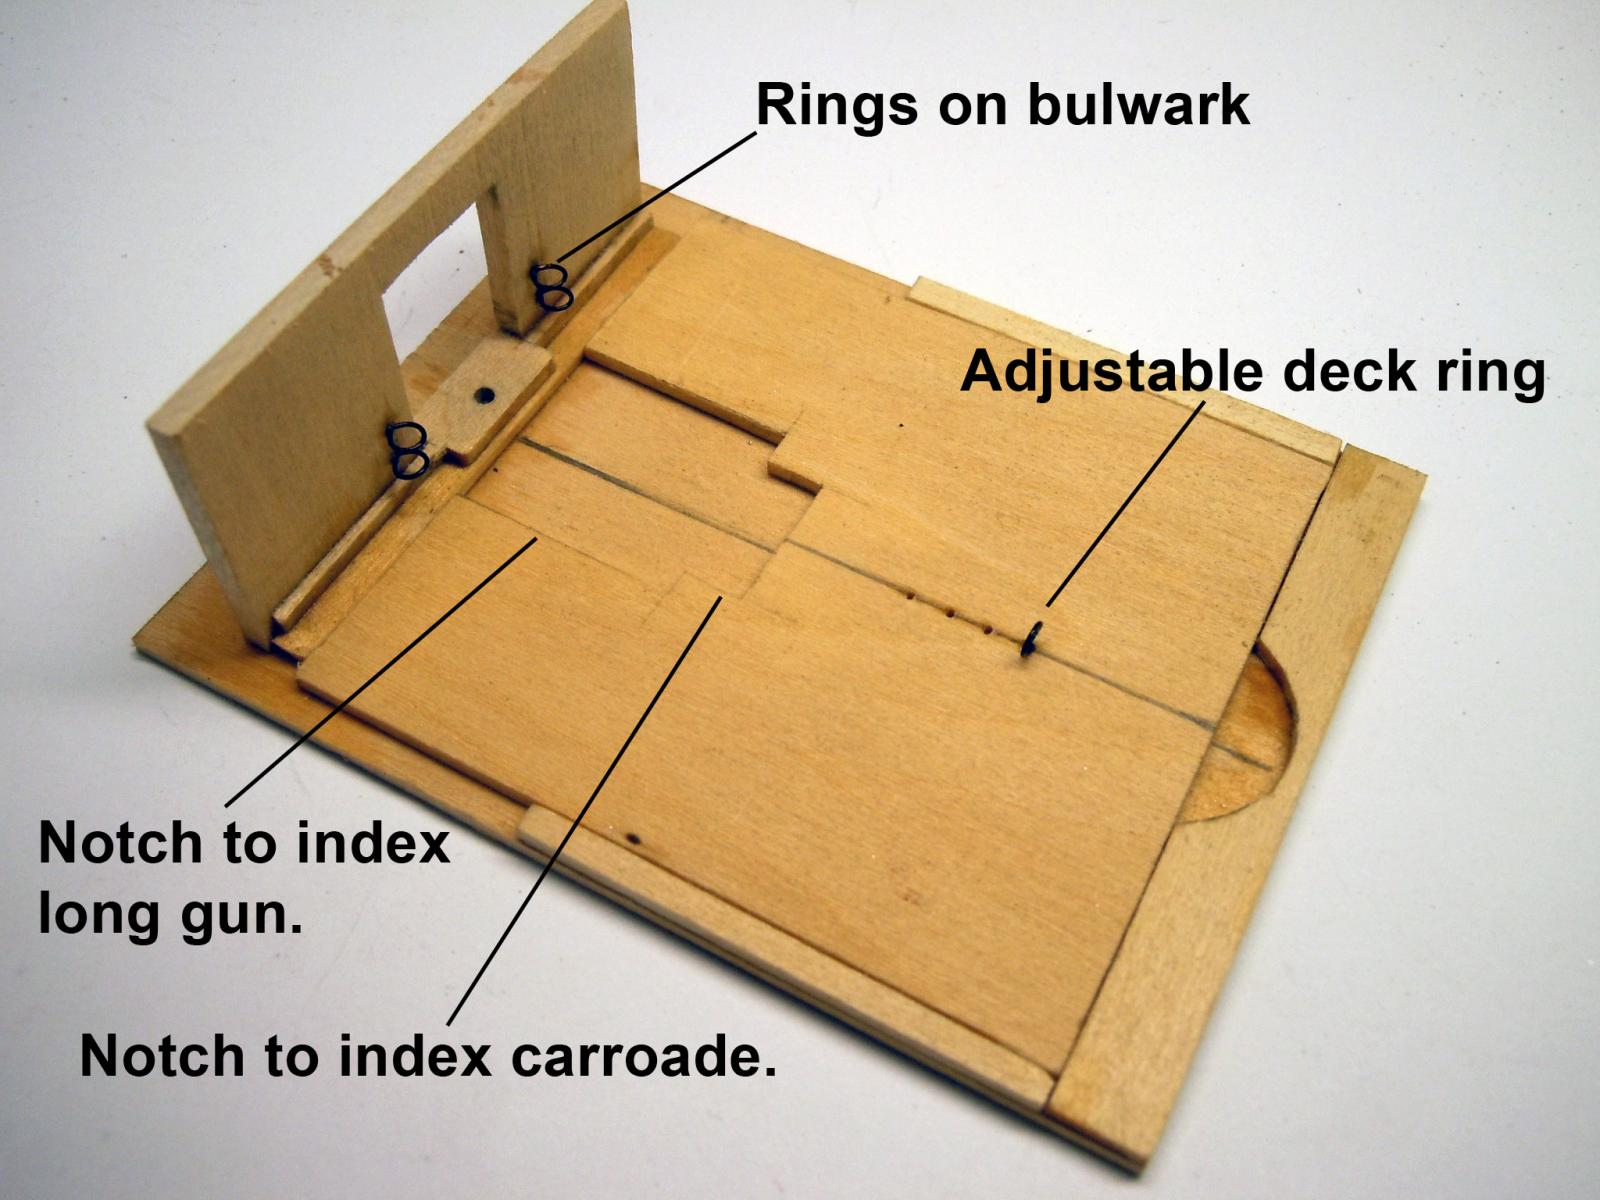
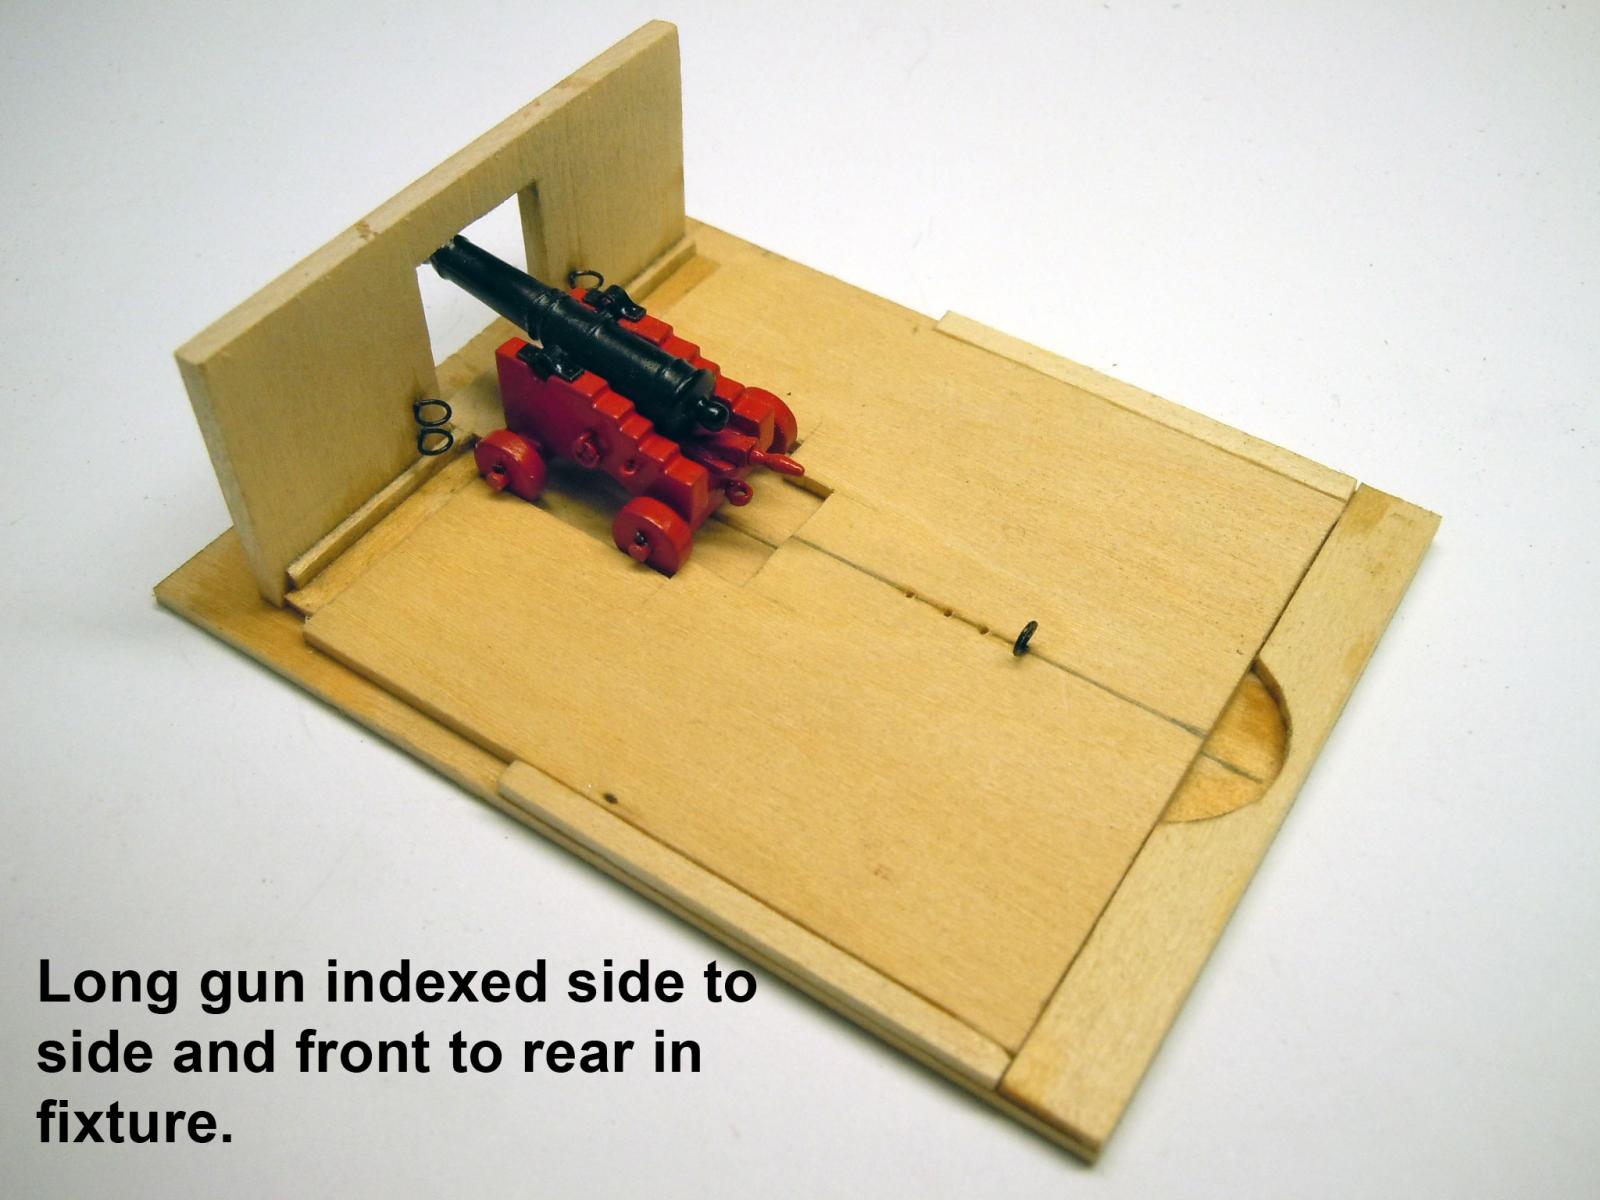
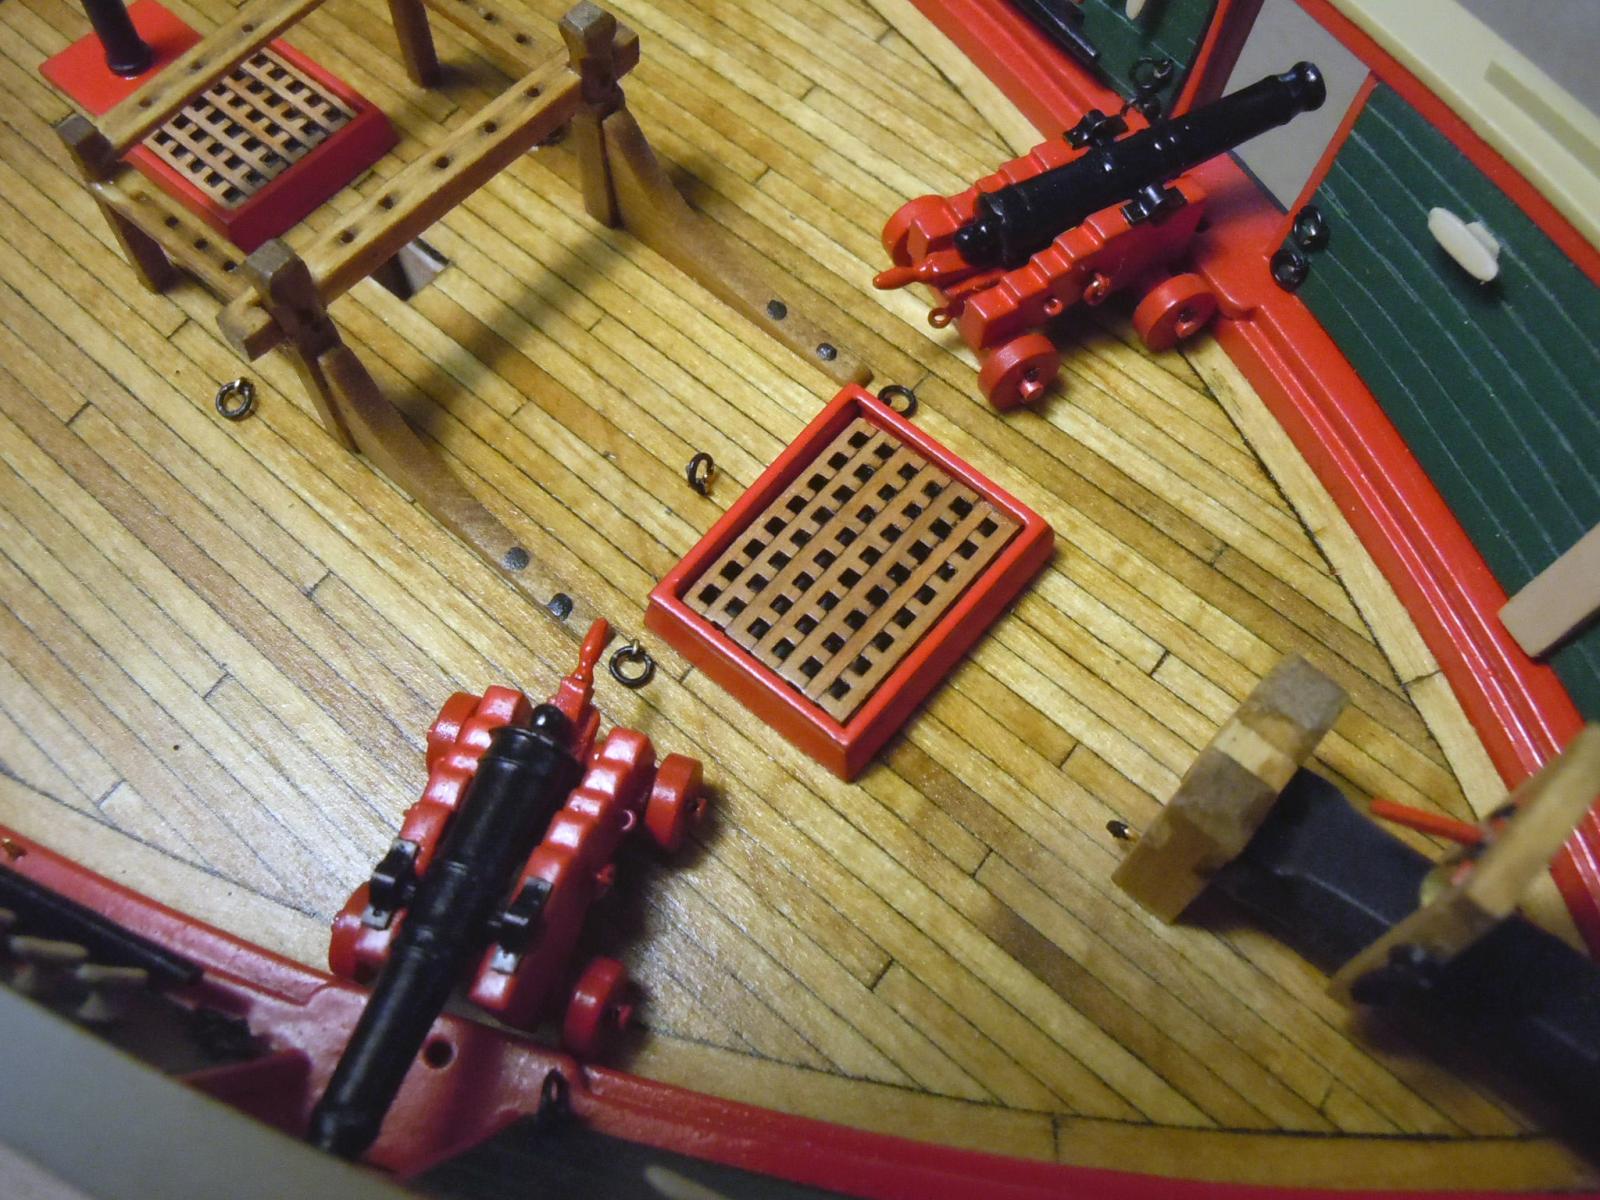
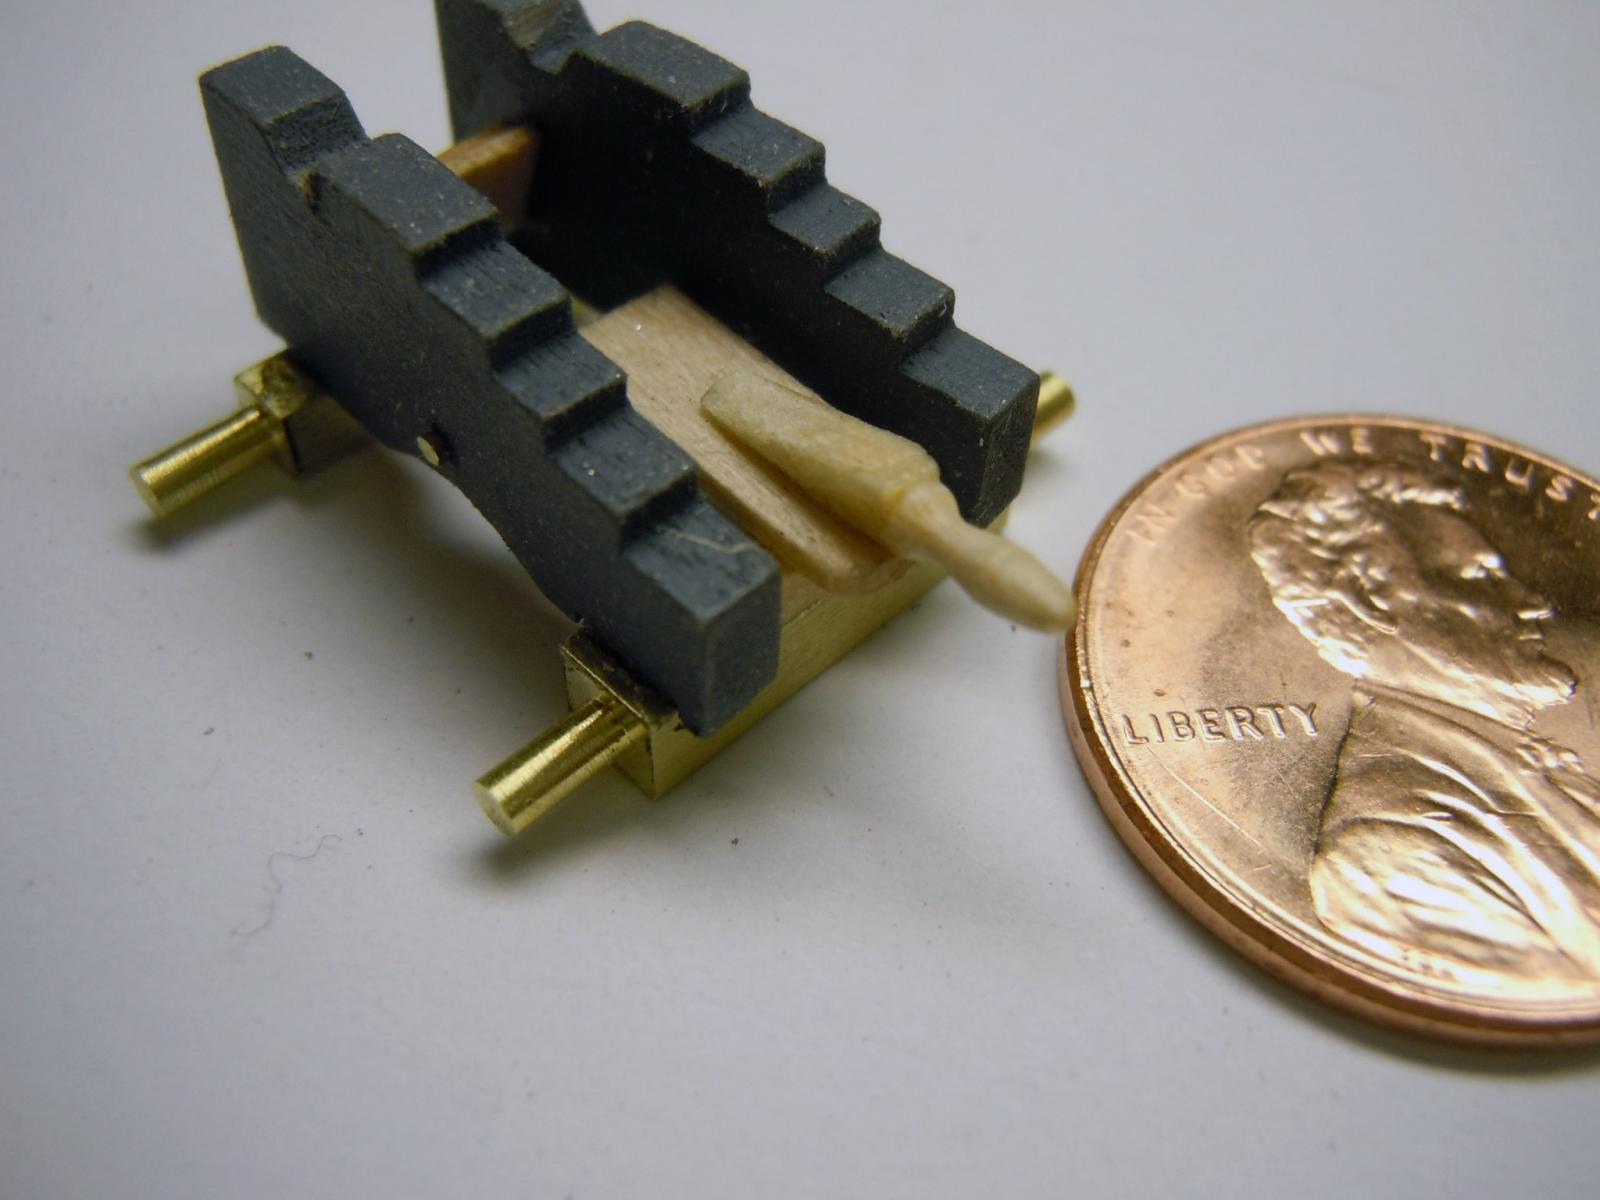
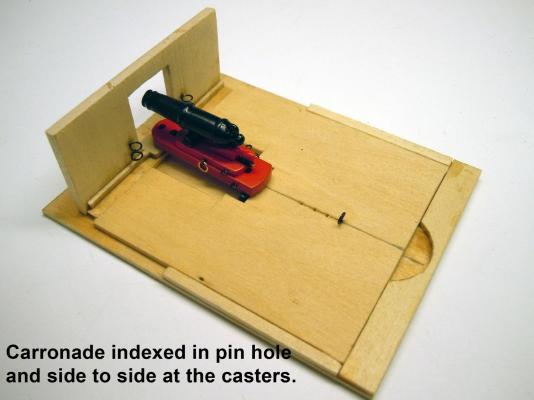
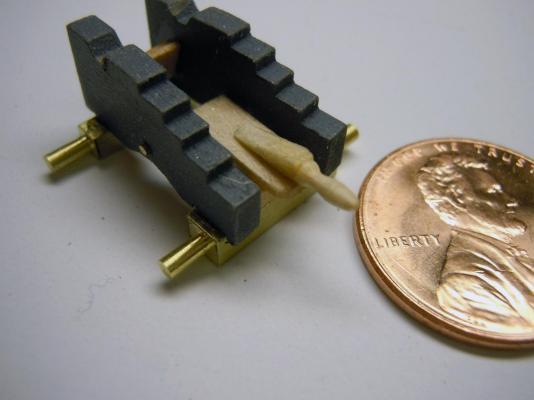
While assembling the carronades I also designed and built a rigging fixture for both the carronades and long guns per Kurt's suggestion. Thanks again Kurt for the suggestion. This will at least hold them in place on a center line as they are rigged. I also added an adjustable deck ring for the various lengths bow to stern. The bulwark rings are fixed to hold them in place while fussing with the lines. I made the indexing platform removable for future gun builds in different scales so just a new platform needs to be made. This shows the rigging fixture as built. Here is the long gun indexed in place. Here is the carronade in place. Once I get into assembly I may need to glue this fixture to a carrier piece that can be clamped into the pan a vise to change angles for ease of assembly; time will tell. Keep in mind I am still new at ship building. Now I have to fabricate hooks before I can start rigging the guns. For those who have been through this process already any advice or suggestions are welcome.


- 440 replies
-
- 5
-
-
- niagara
- model shipways
- (and 1 more)
-
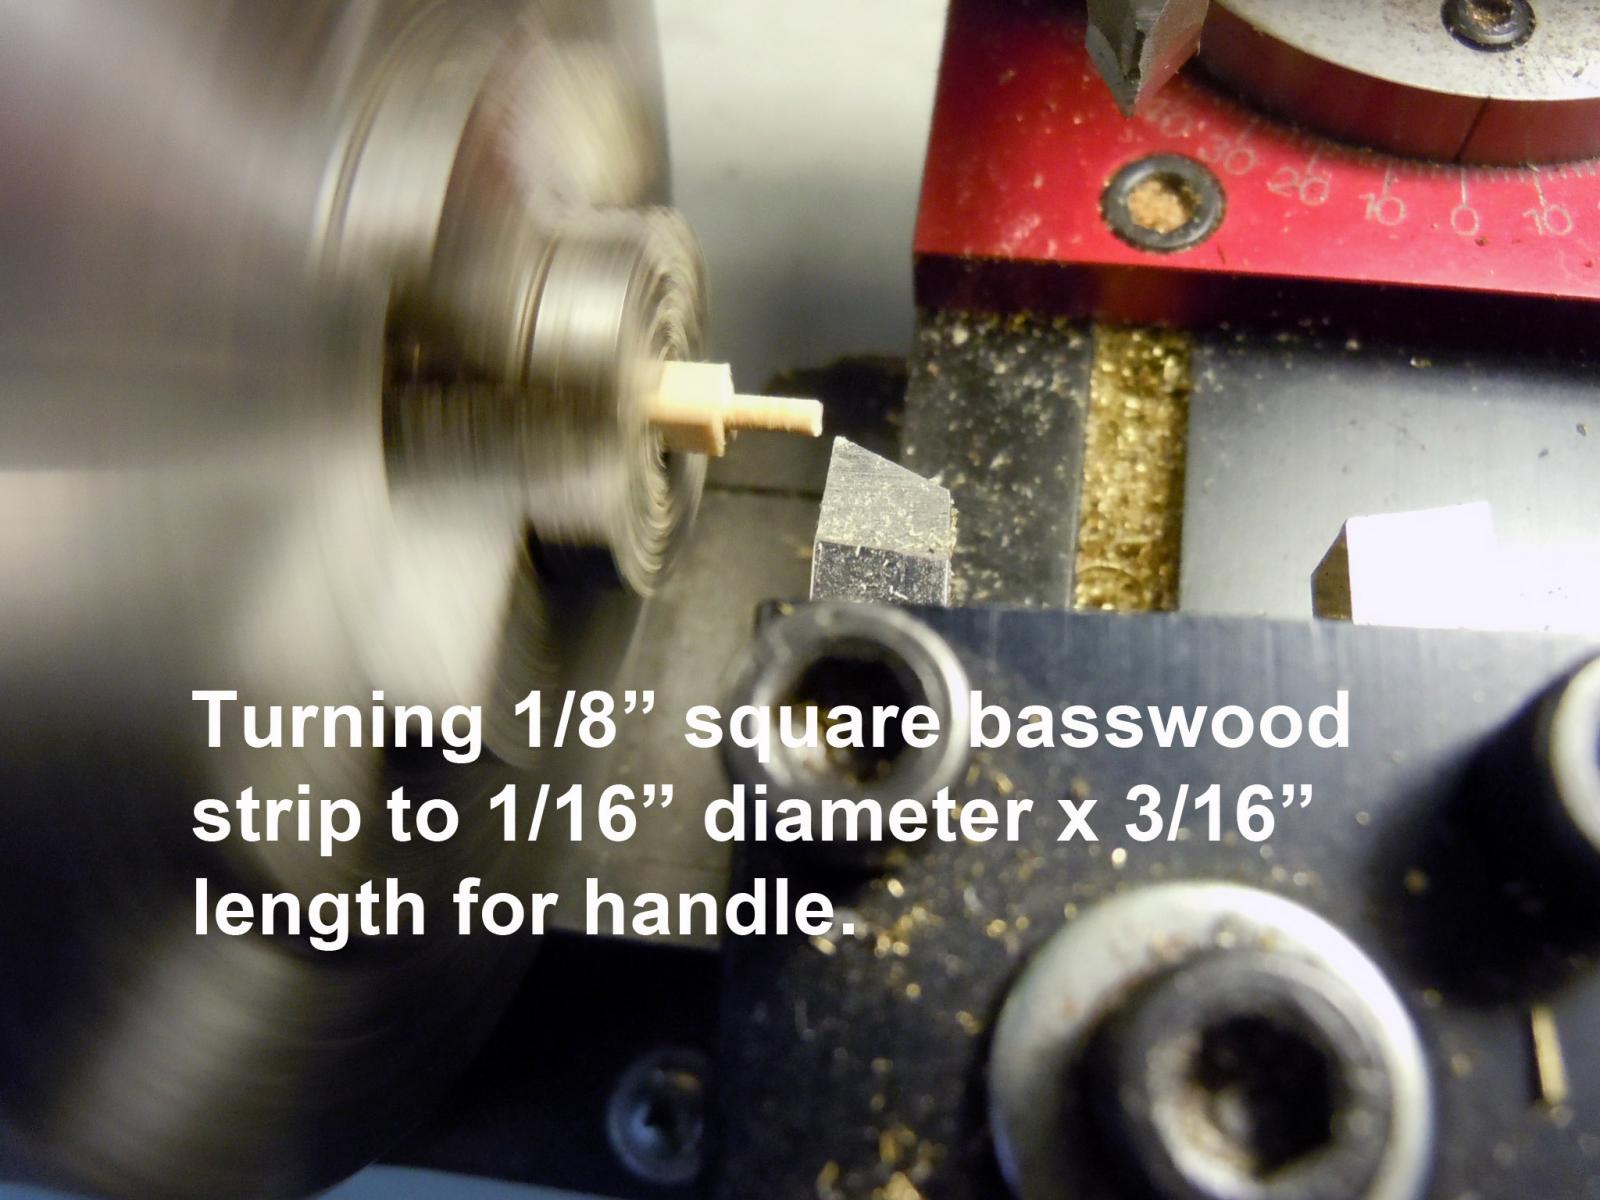
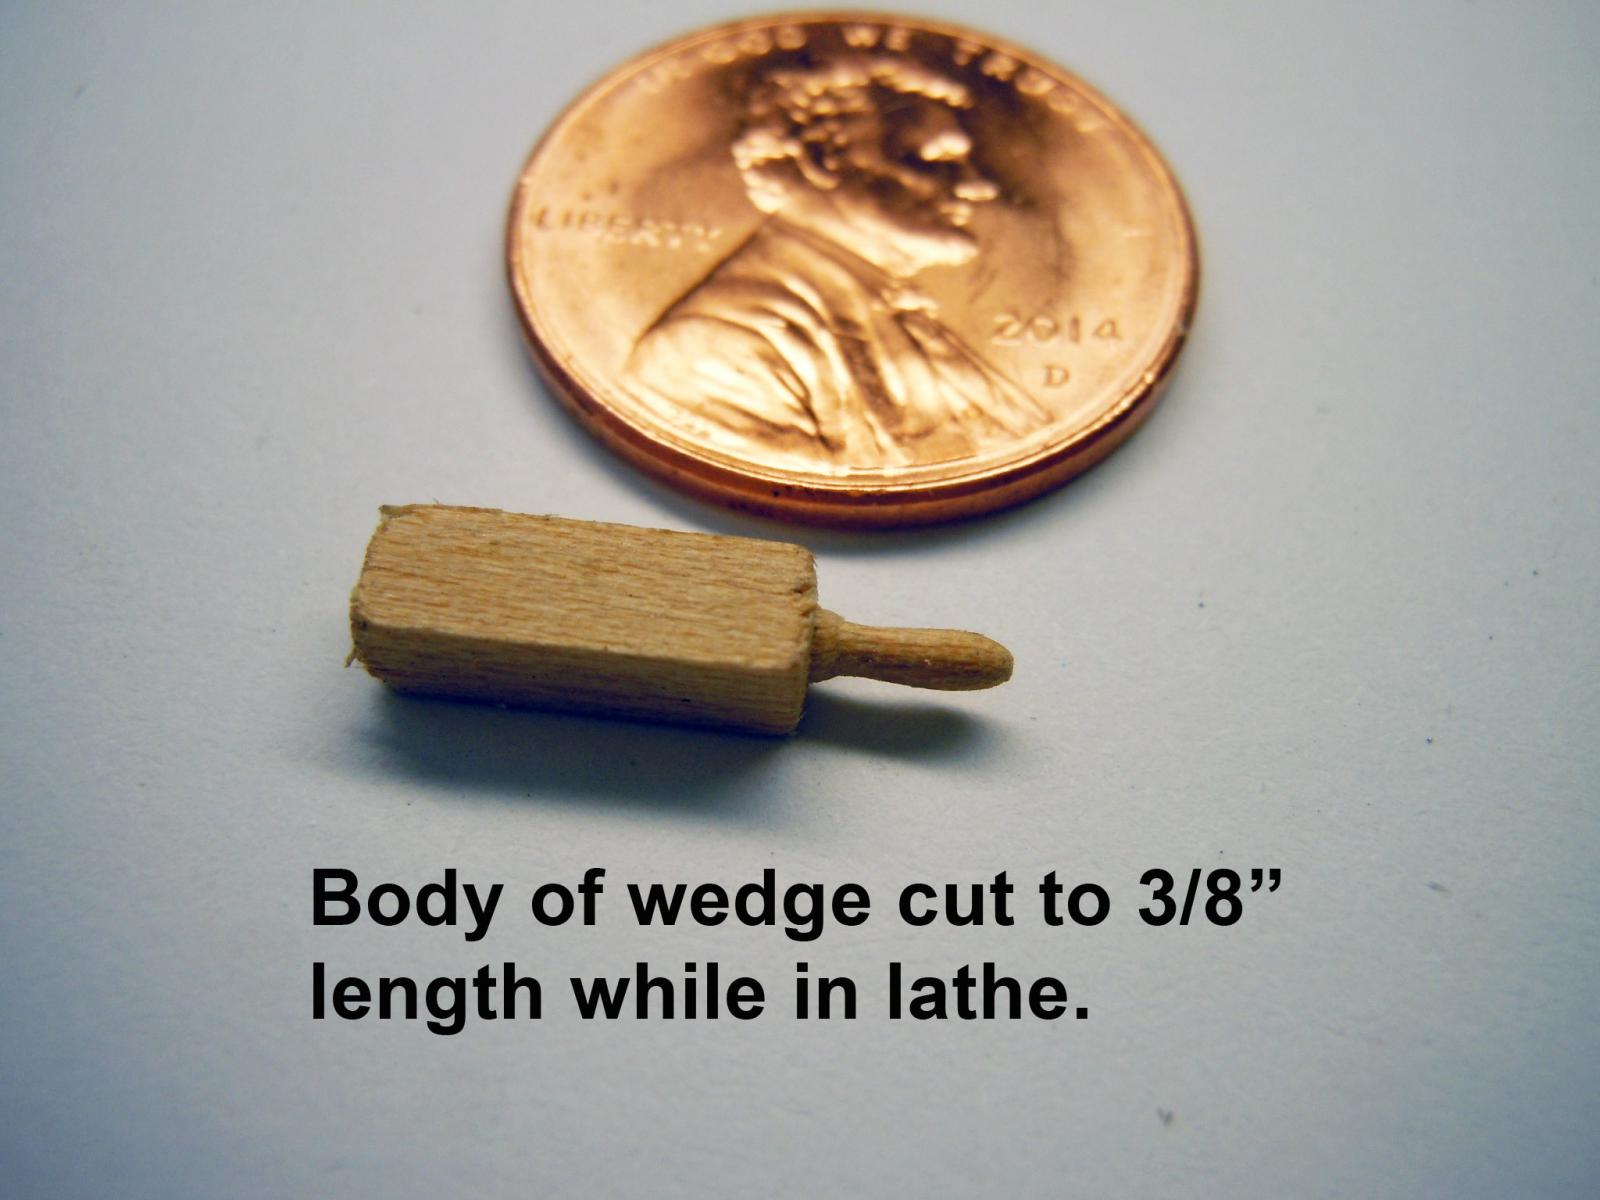
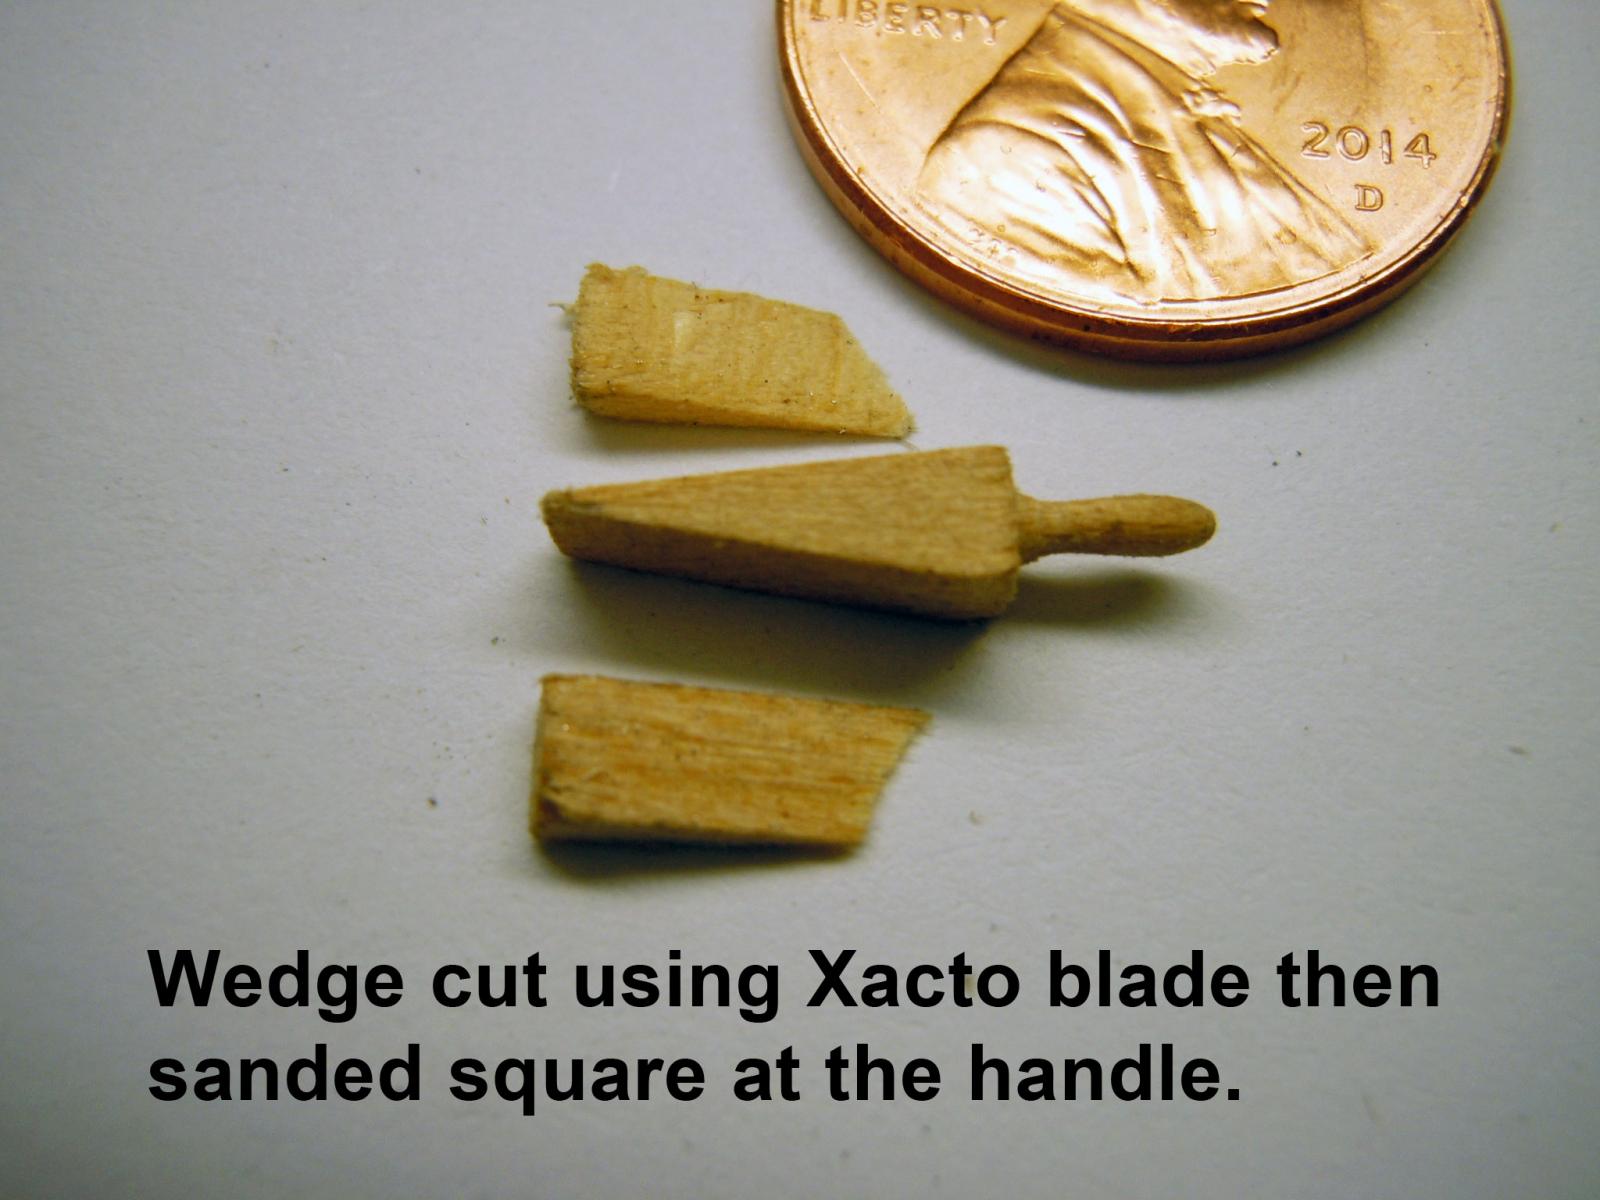
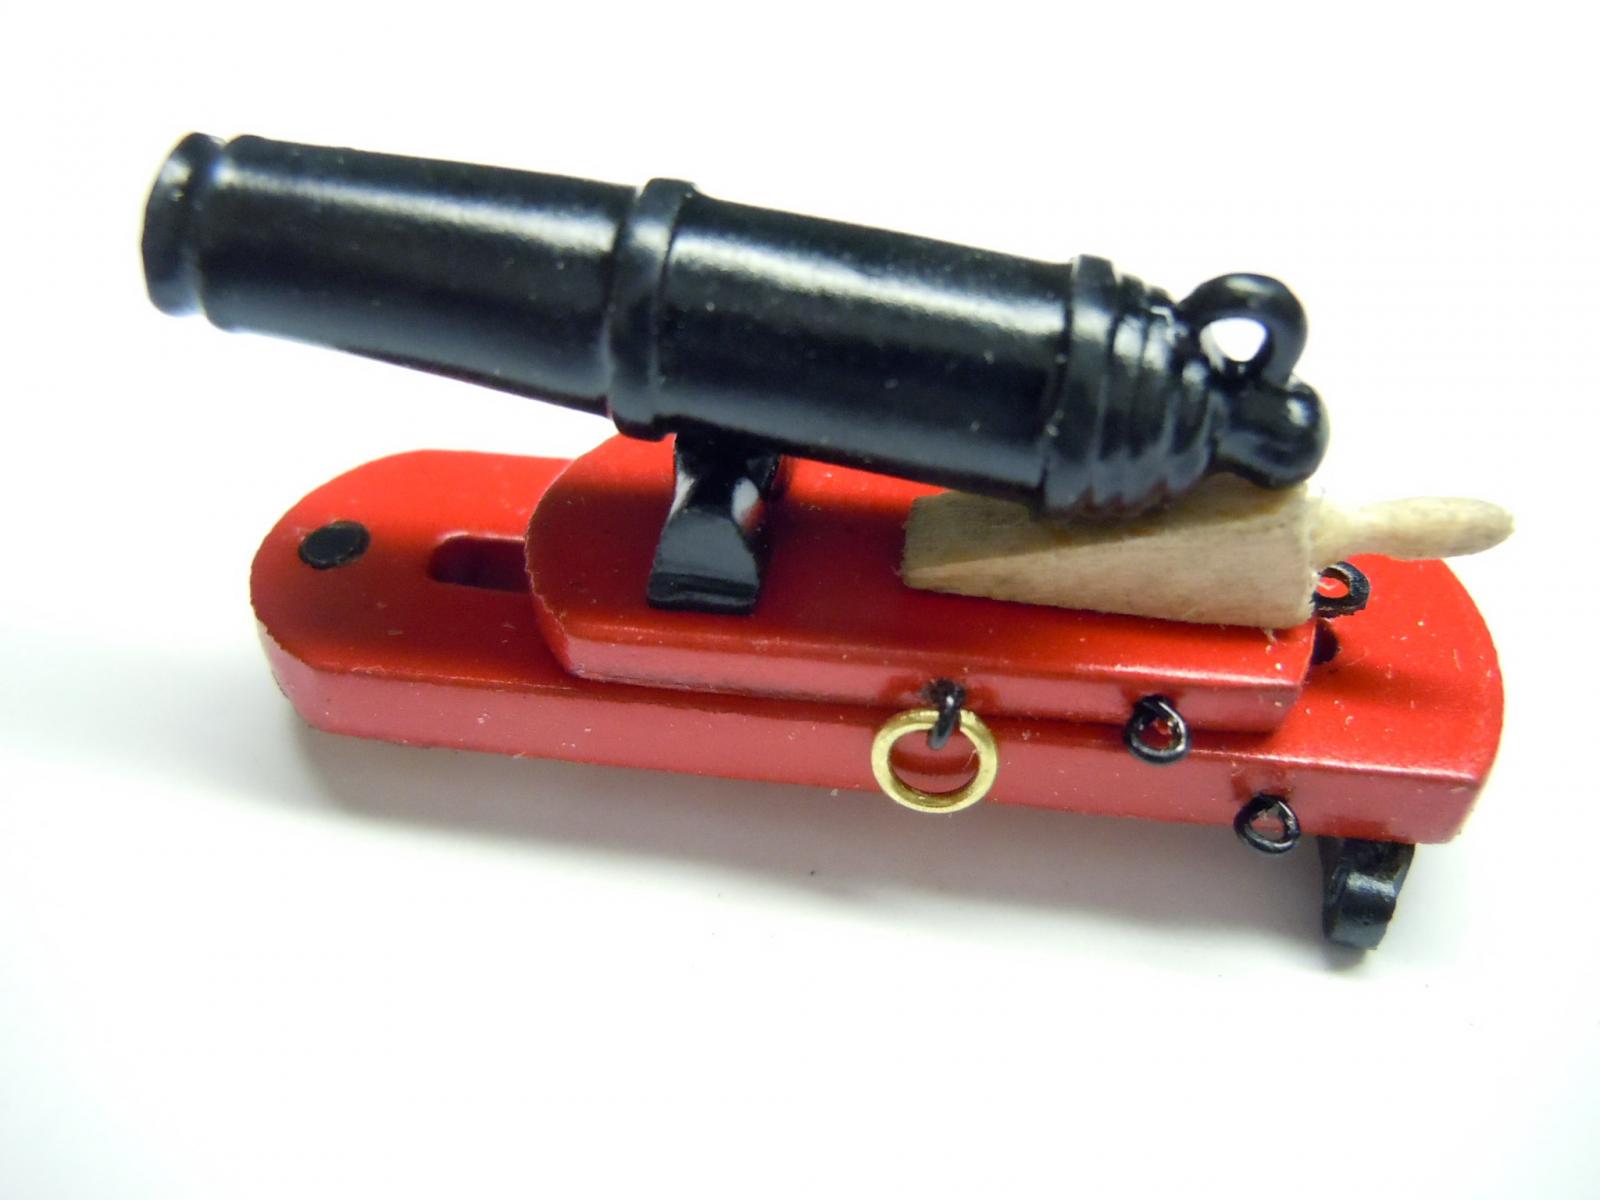
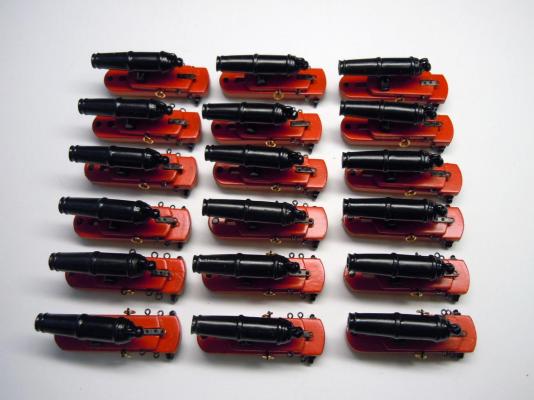
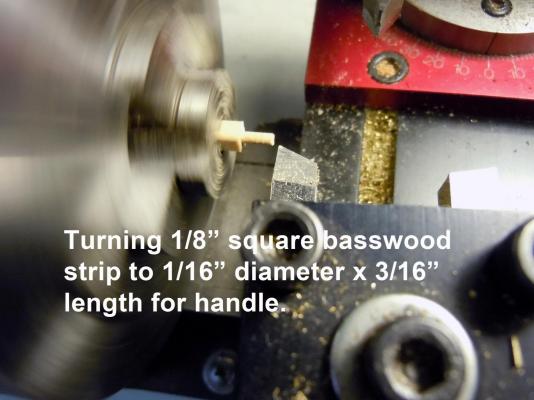
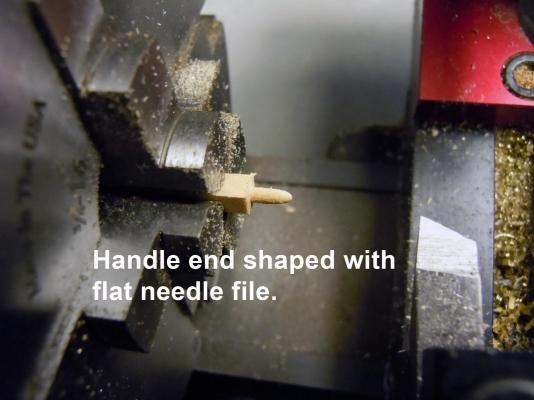
Scott you can have these skills as well, no real secret just experience over time and learning from others which is what I am doing since this is my first ship build. Here is a "gaggle" of carronades now waiting for their quoins. Now here is a sequence of how I made the test quoin using the 4 jaw chuck in my Sherline lathe turning down 1/8" square basswood. First I turned a shaft down to 1/16" diameter x 3/16". Since I am using Basswood which is very soft I shaped the handle rear with a flat needle file. I then turned the inside curve with a tapered half round needle file then sanded with a 1/8" sanding stick. Once sanded I reset the stock in the jaw and marked it at 3/8" and cut it off using a small saw. Next I cut off the two side using a #11 Xacto blade as square as I could and then sanded square at the handle end. Here is a test fit in the carronade. This shows it primed and painted. Now to make 17 more.


- 440 replies
-
- 8
-
-
- niagara
- model shipways
- (and 1 more)
-
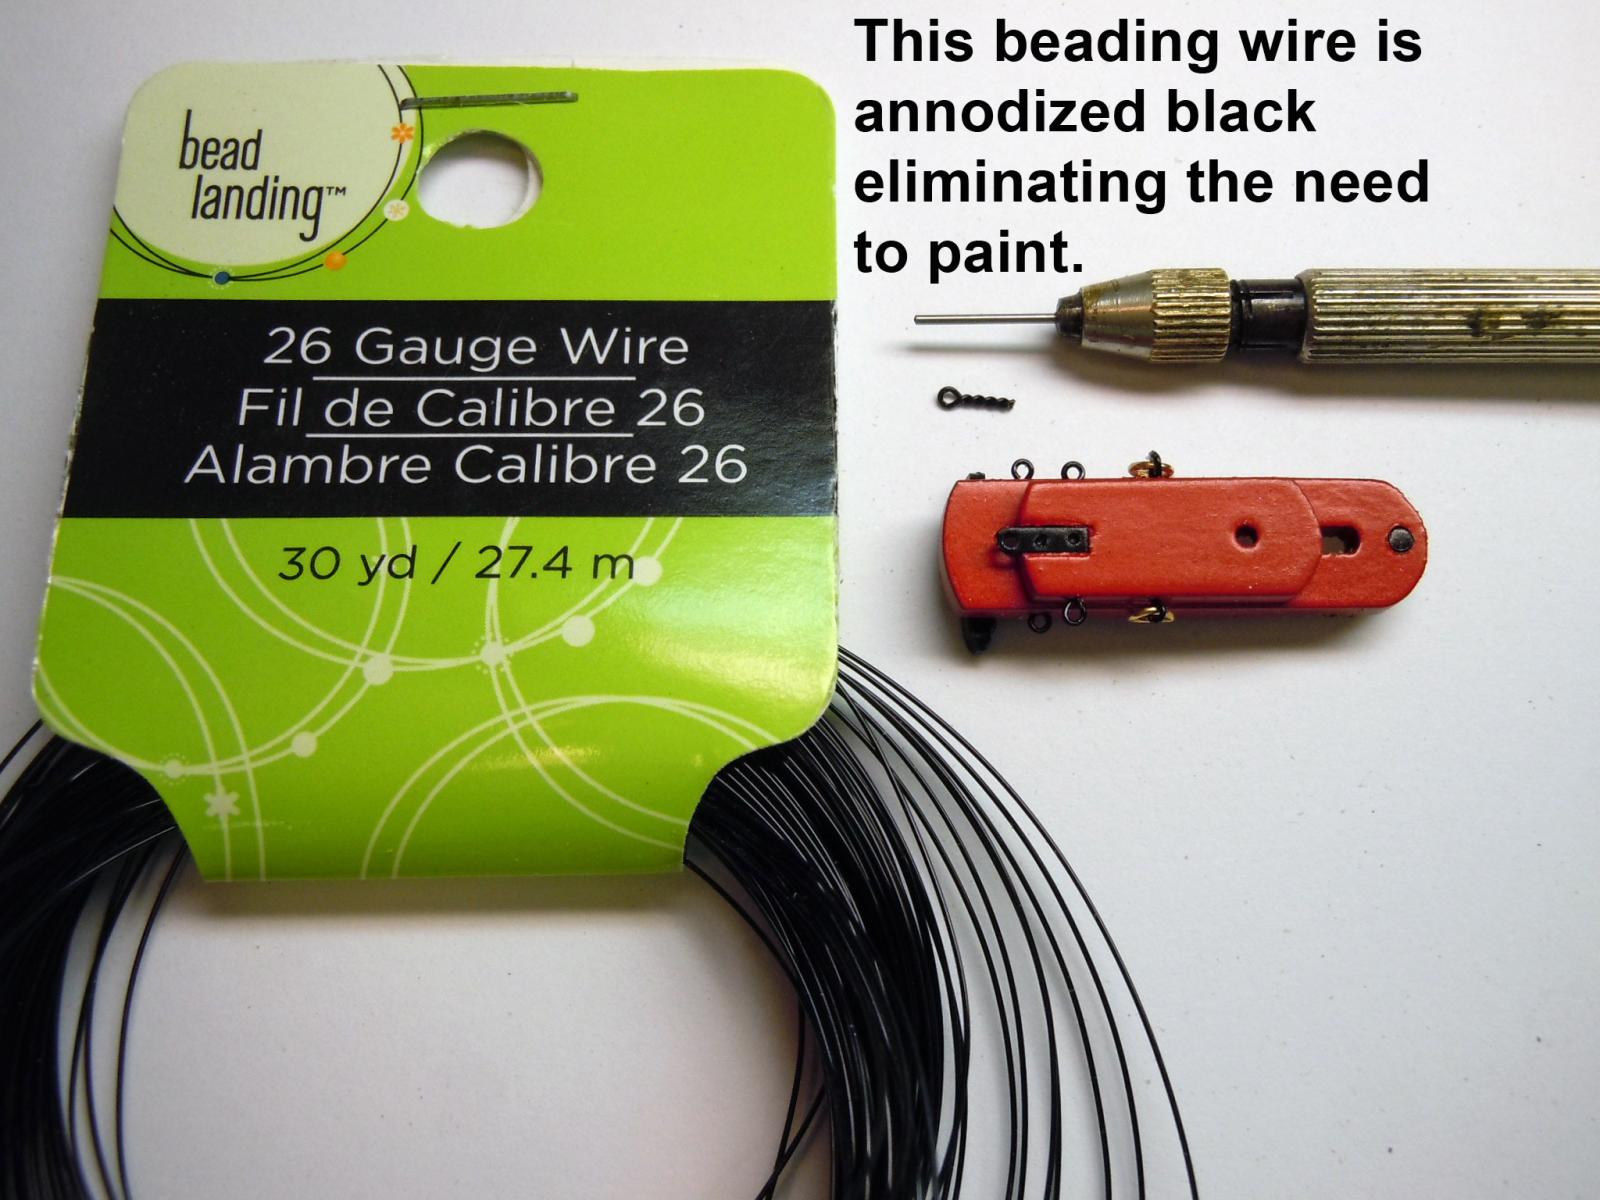
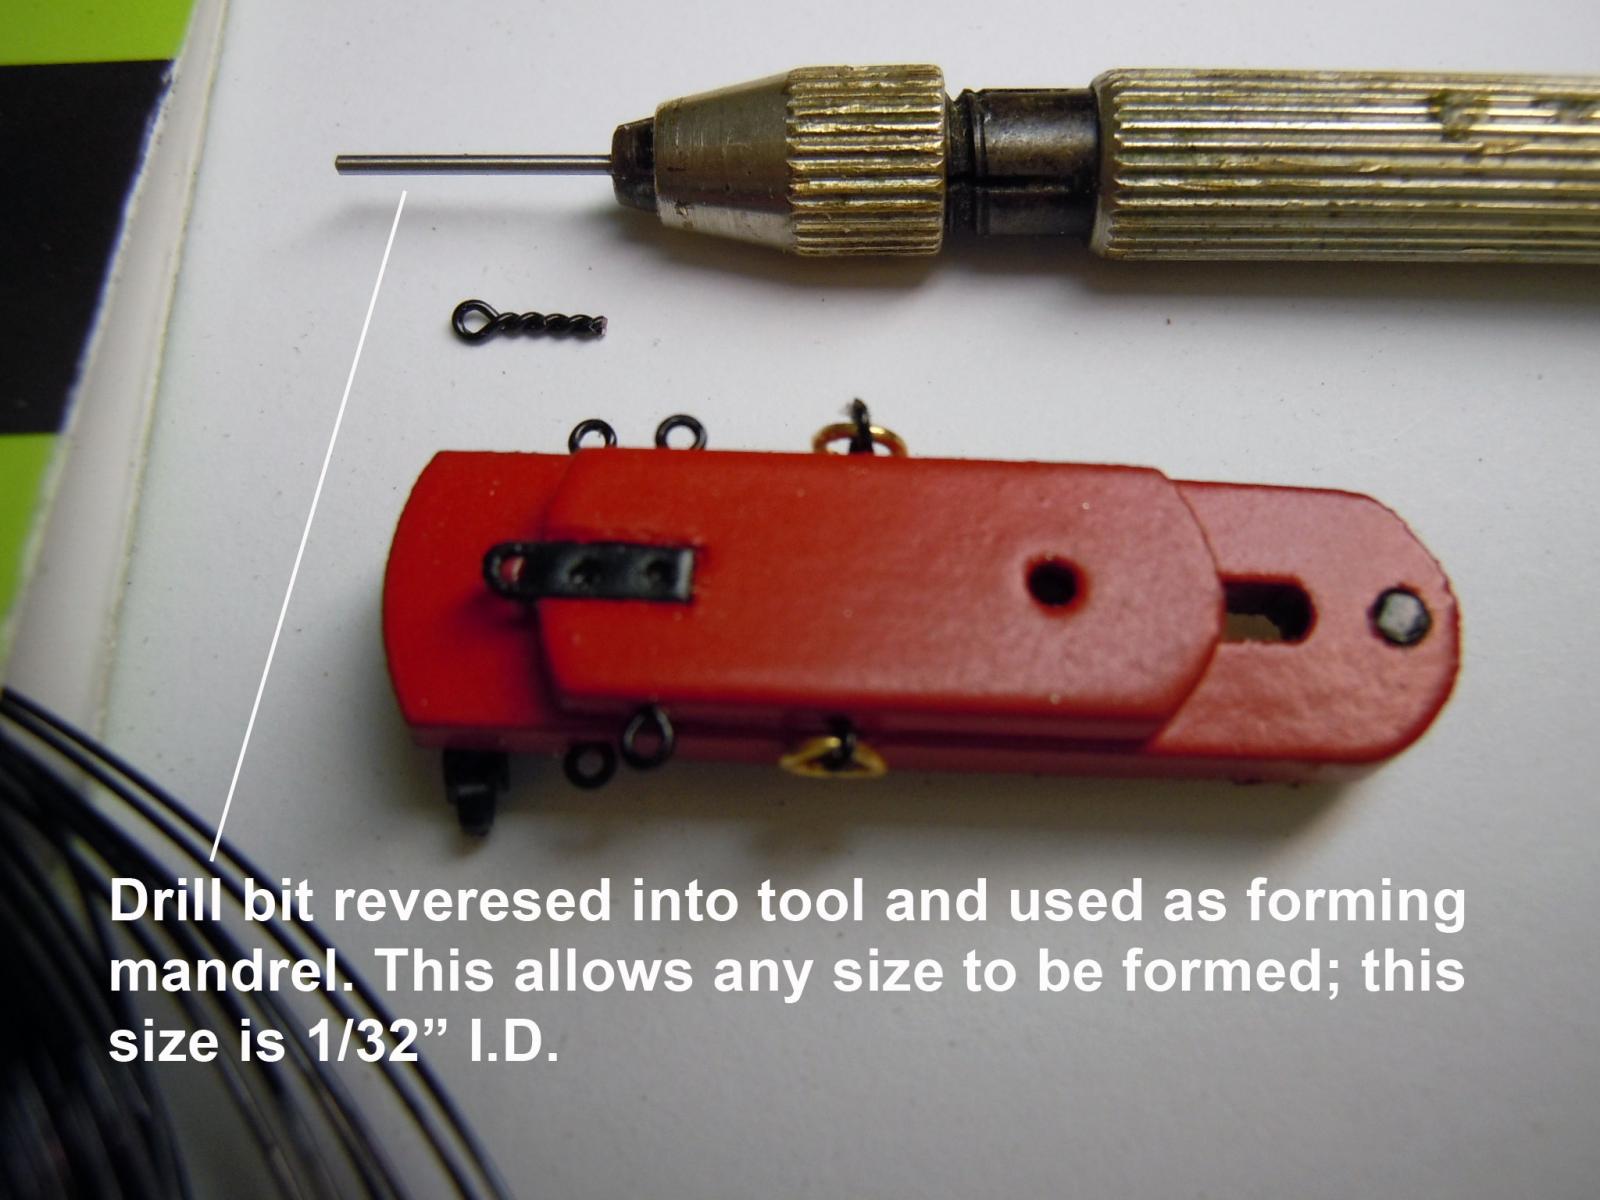
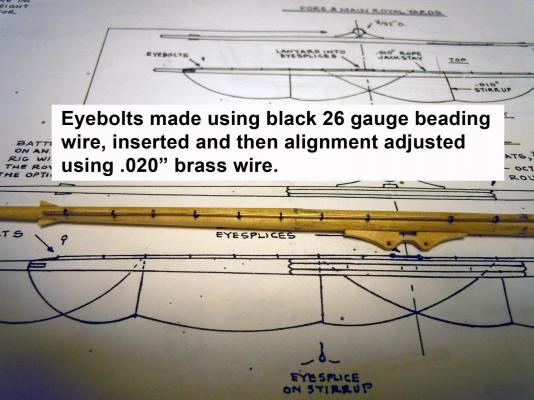
Taking a break from building the carronades and thought I would share this beading wire that I use for making the eye bolts. I is anodized black copper wire that eliminates the need for painting them. It is available at craft stores like Michael's in the jewelry area. I make them by holding a drill bit reversed in the handle with the shank showing. This way any size can be formed; here I am making them 1/32" I.D. The kit did not provide enough and they would have had to be painted black anyway. Just another way to save a little time and aggravation. The carriages are all complete and now to clean the bases and barrels.


- 440 replies
-
- 8
-
-
- niagara
- model shipways
- (and 1 more)
-
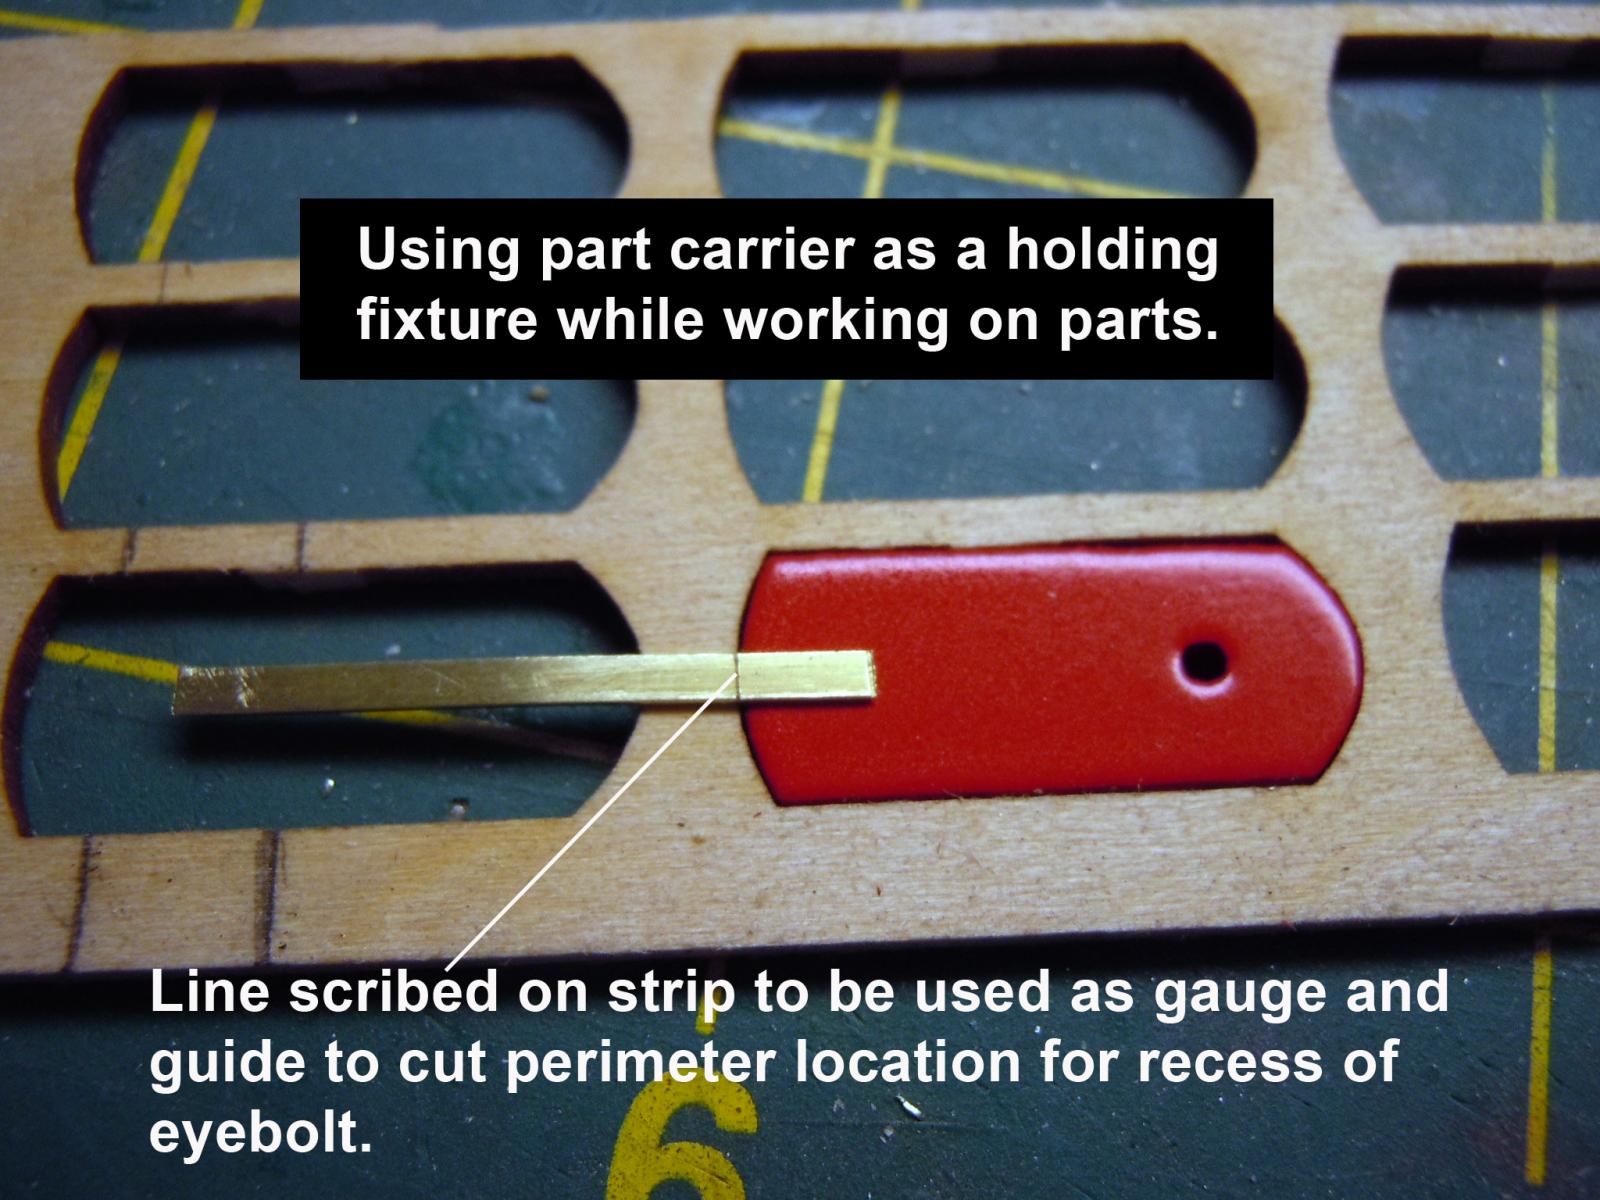
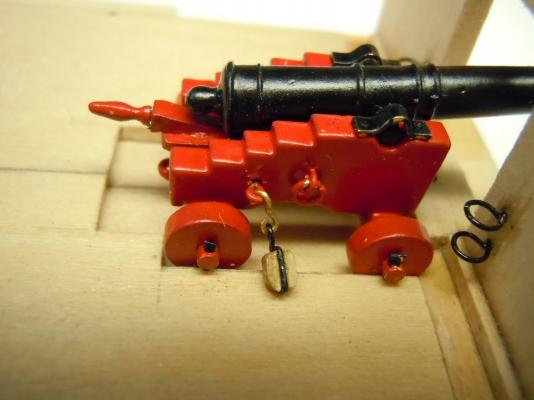
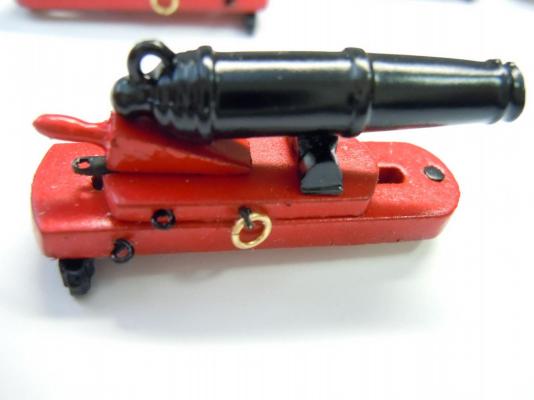
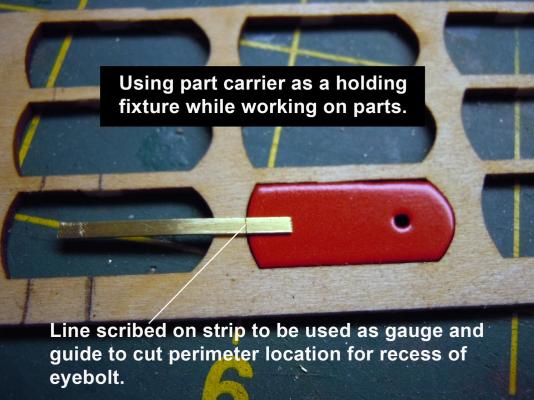
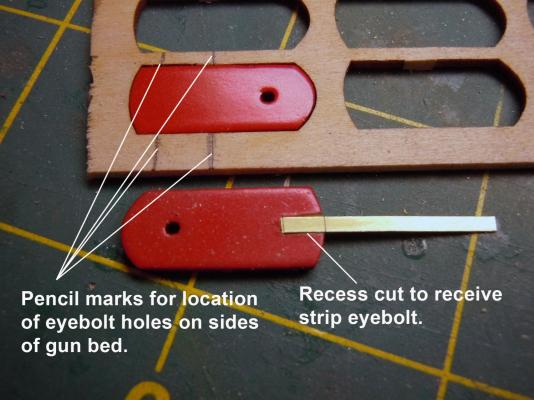
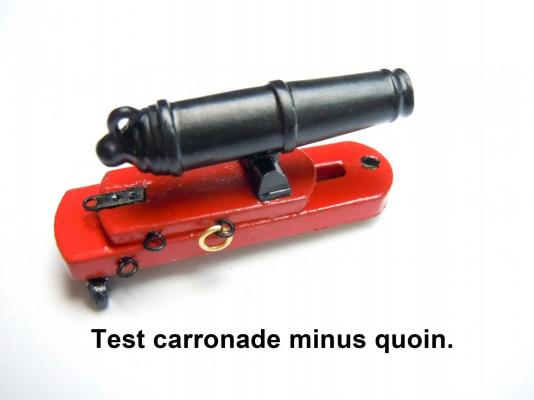
A quick update on the carronade setup; I studied the plans more after sanding and painting the carriage parts and realized that the eye bolt strap below the quoin needed to be recessed so using the part carrier from the laser cut I made a holding and marking fixture for the recessing of the straps and locating the holes on the side for the eye bolts. Here is my set up for doing them. The location of the side holes, inserted into the fixture, then raised by the hole and sides marked with the point of a small scribe. Then points centered and drilled. Here is the first test carronade minus the quoin which the handles will be turned on the lathe per the long gun ones. The locating pin is 1/16" brass rod and for now I have not included the metal plate that traps the pin. Thinking on how to make them easier; would have been great to have had these photo etched as part of the kit along with the ship's name. Here it is set in place next to the long gun on the deck. Now onto producing the rest now that I have an idea of what needs to be done. My goof was to sand and paint the carriage parts first. Next time I will cut the recesses before painting.

- 440 replies
-
- 8
-
-
- niagara
- model shipways
- (and 1 more)
-
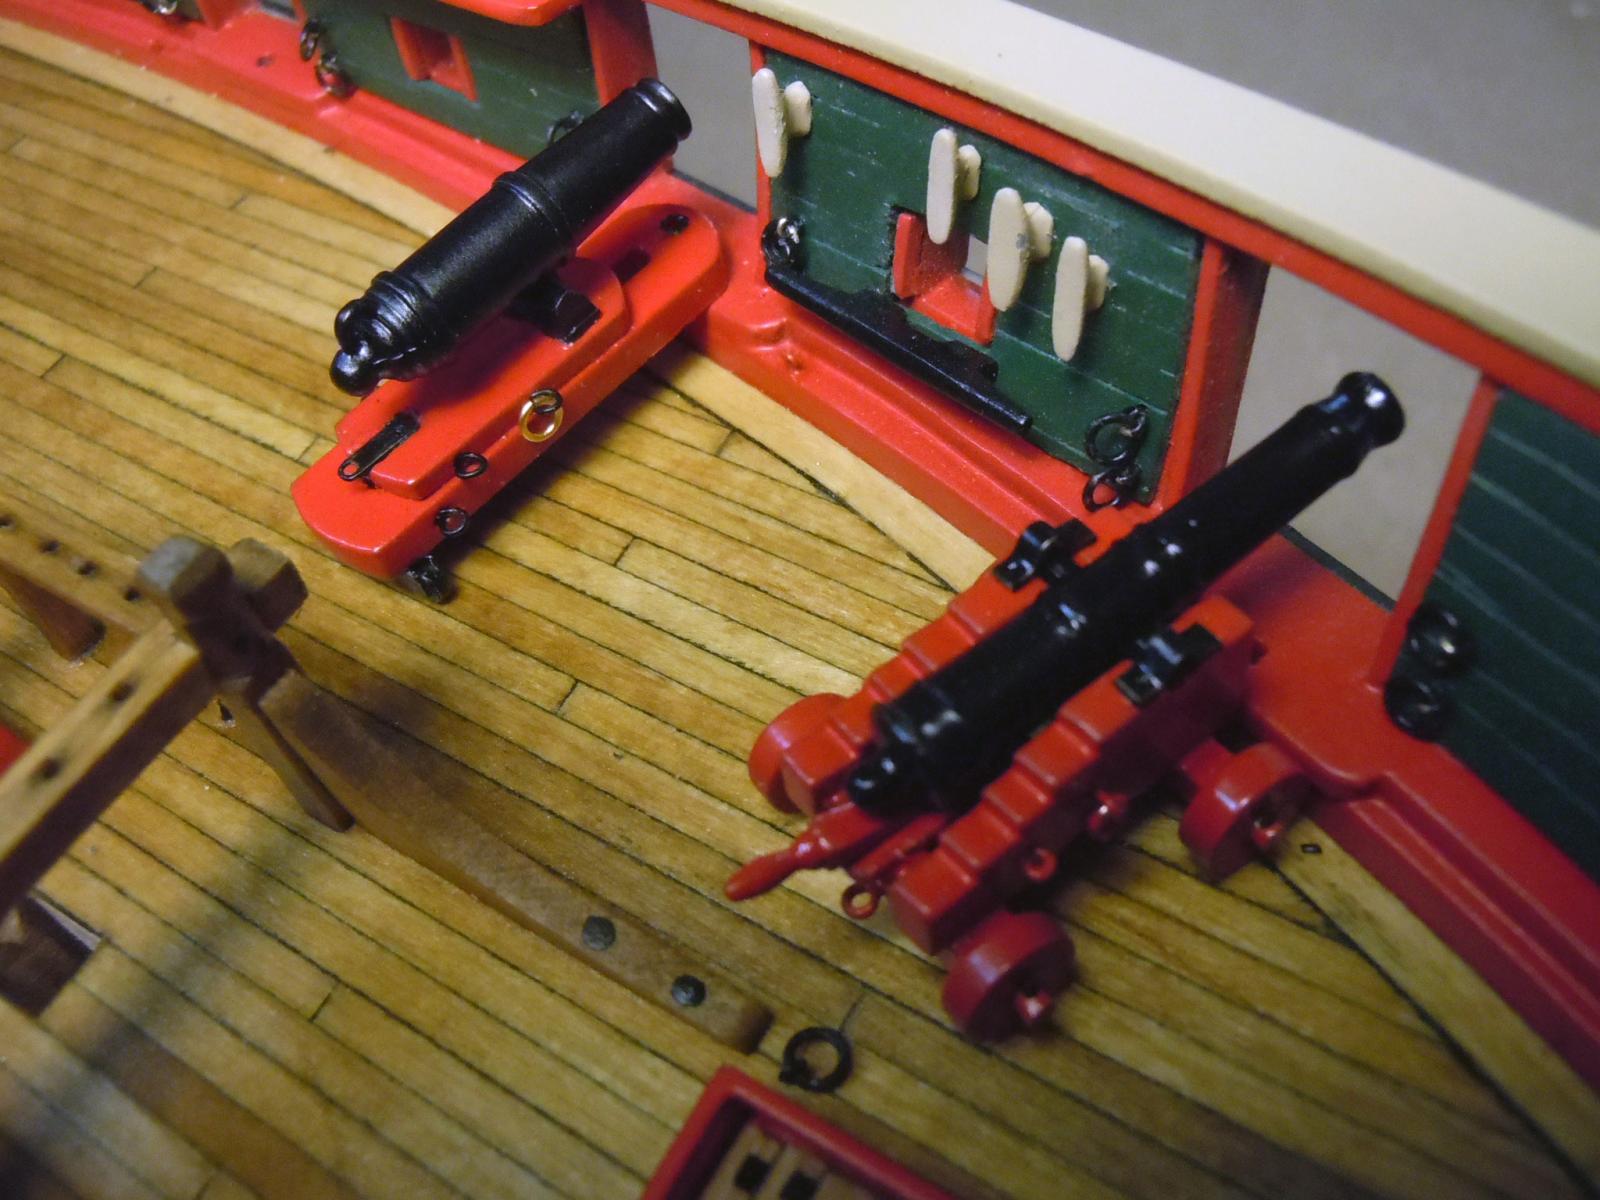
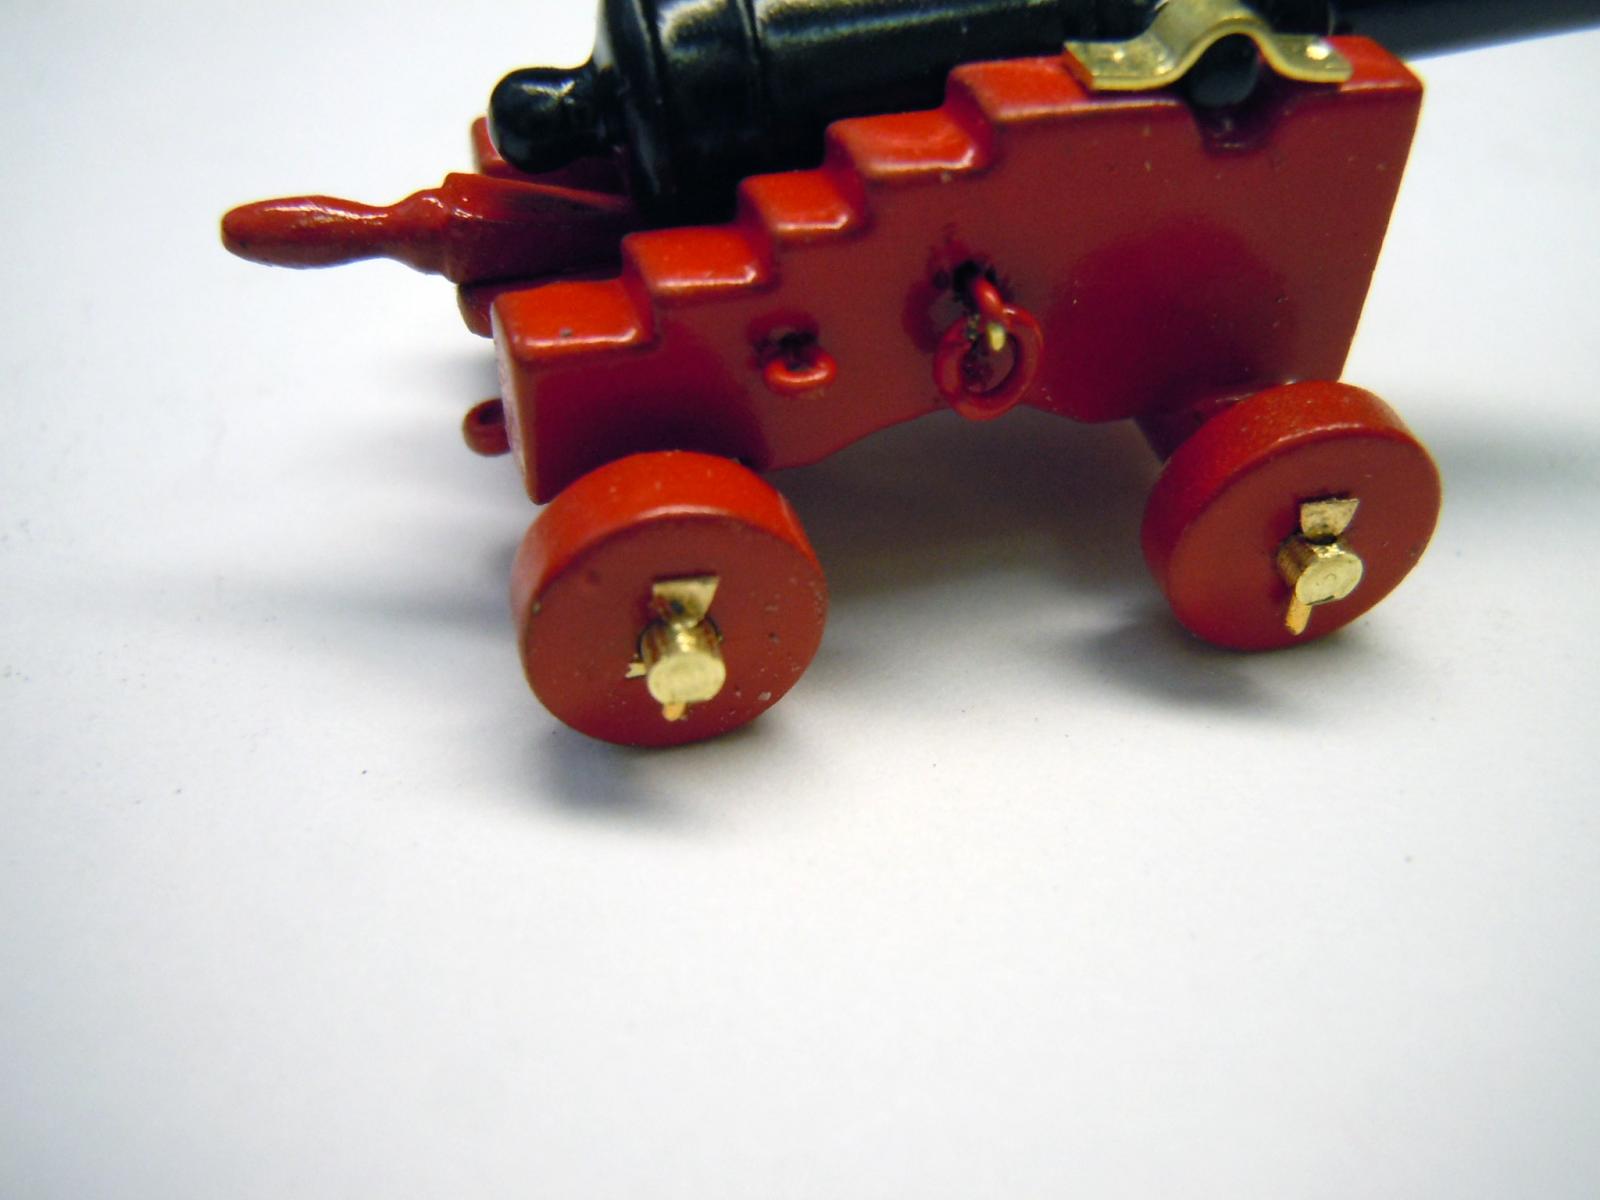
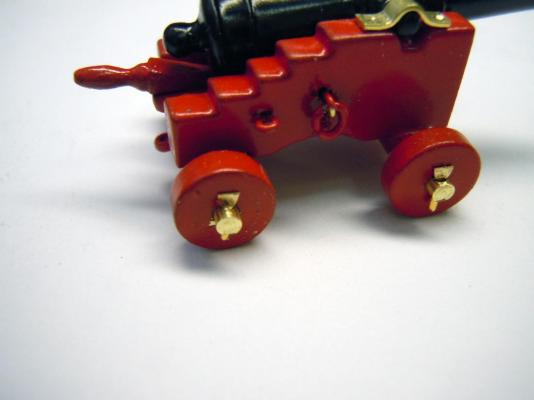
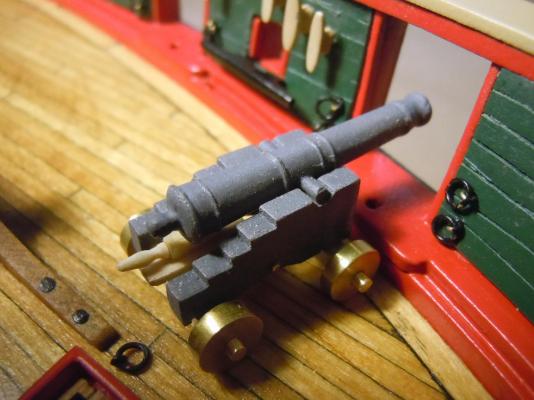
Finished up the two long guns for now, they will be rigged with the rest. One gun barrel casting was very good and the second left a great deal to be desired and was slightly out of register; but salvageable for this build. I used a small drill bit as a mandrel to form the trunnion bands using the soft brass strip supplied in the kit. A small screwdriver blade was used to press the brass strip tight against the bit and steel plate. Each side was slightly drilled to simulate a bolt head. Prior to painting the eye bolt locations were drilled including the rear axles. The axle ends were also drilled to receive the wheel retaining pins. To fit the wheels on the axle shafts the paint was scraped off to allow the wheels to turn. The pins were formed by hitting the end of a .020" rod flat and then cutting and trimming the head and length. This shows the parts fitted to both guns prior to painting. Here is the finished painted port gun in place. Here are both guns in place on the deck. I glued the quoins in place so they would not get lost and the wheels do turn. These guns will be rigged per the plans instructions when I do the cannonades. Next, onto the cannonades and set up a mini production line.


- 440 replies
-
- 6
-
-
- niagara
- model shipways
- (and 1 more)
-
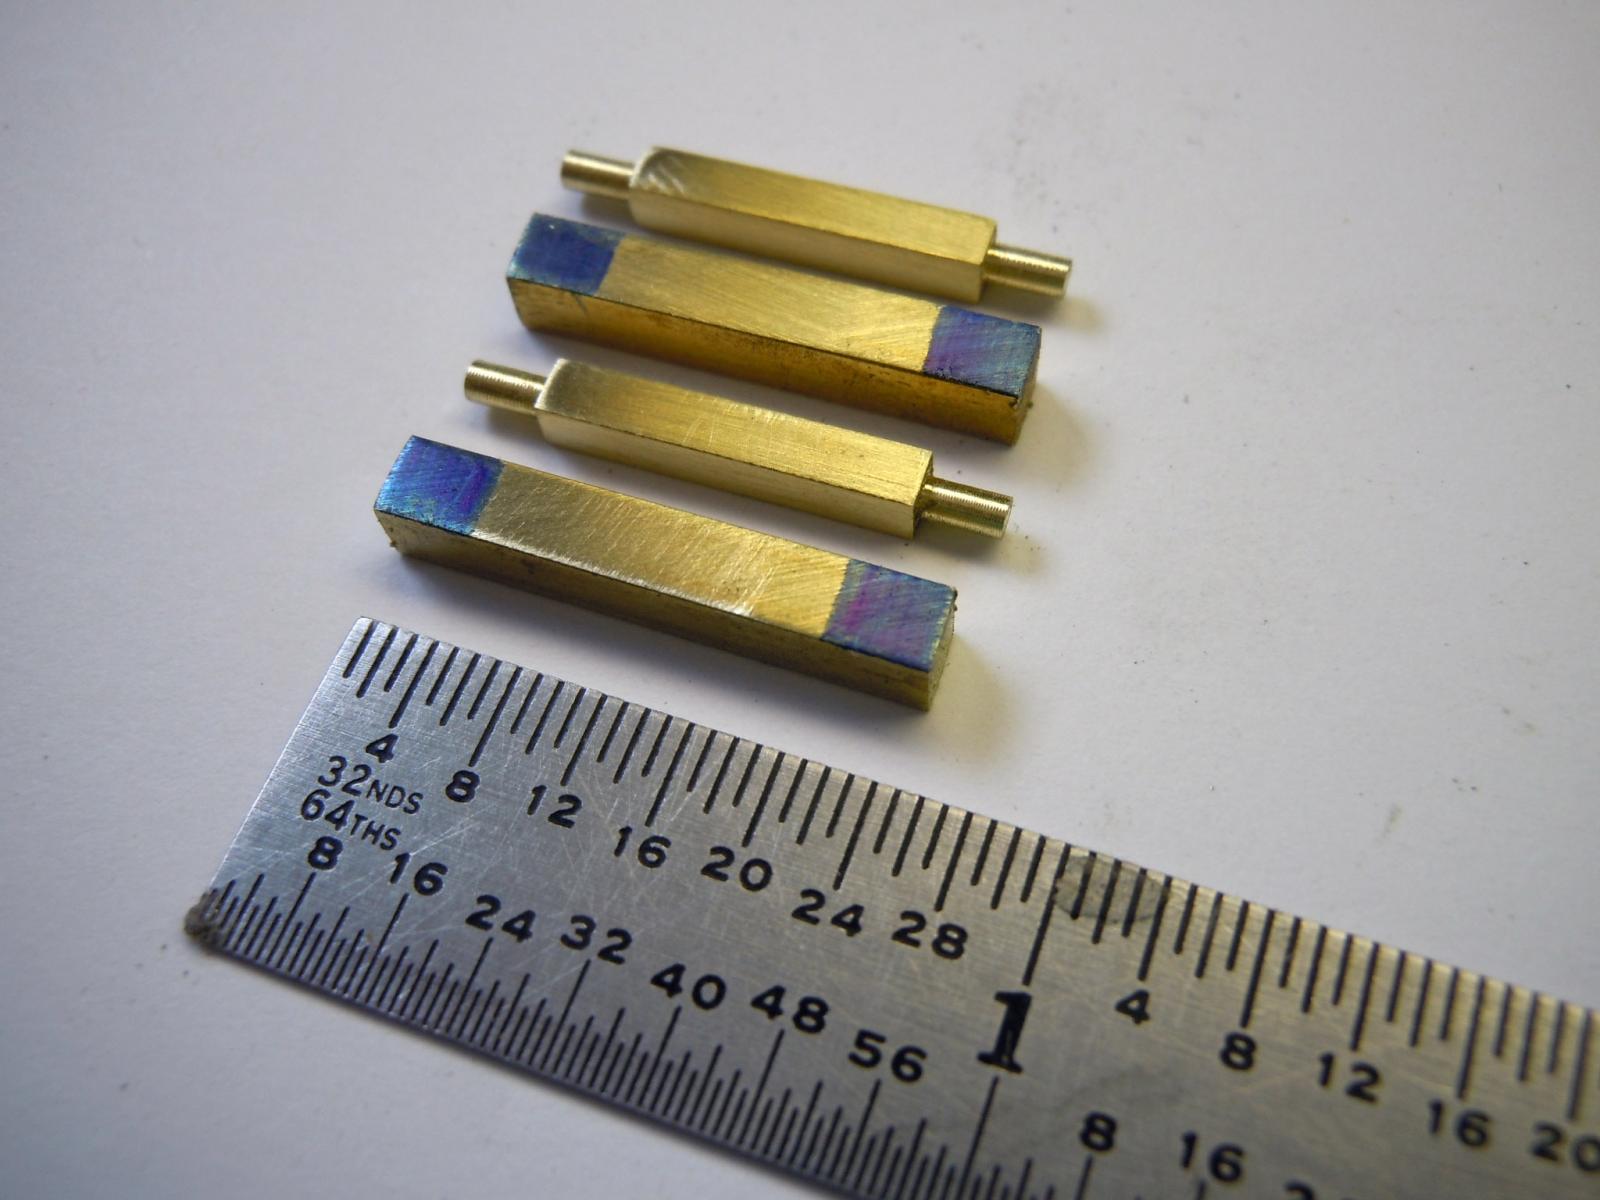
Used my jig and located all the eye bolts with the rings in the bulwark and deck. I then decided to start the two long guns which I am in the middle of building before I move onto the cannonades. I was not satisfied with the quality of the wheels so I turned some out of brass and while I was at it I also turned the axles as well, which are two different sizes. Here are pictures of the axles; I use the blue marker as a reference point to turn to while in the lathe. Square stock requires a 4 jaw chuck in the lathe. I then turned the handles for the quoin; this is when the Sherllne lathe tolerances are great in doing this small stuff. I started with 1/16" dowel. The wedge has a hole drilled into it to receive the pin on the handle. Here the quoin is setting on the gun bed. I could not resist doing a test fit into the bow gunport. The cast gun barrel needed quite a bit of cleaning up before priming. Now back to finishing up the long guns.

- 440 replies
-
- 9
-
-
- niagara
- model shipways
- (and 1 more)
-
John, I also will be looking forward to seeing your pictures, especially since I am building it presently.
- 2,250 replies
-
- 2
-
-
- model shipways
- Charles W Morgan
- (and 1 more)