

Robert29
-
Posts
375 -
Joined
-
Last visited
Reputation Activity
-

 Robert29 got a reaction from TrunkMonkey in HMS Victory 1805 by Robert29 - FINISHED - Caldercraft - Scale 1:72
Driver Gaff and Driver Boom shipped in place.
End of Driver Gaff
End of Driver Boom
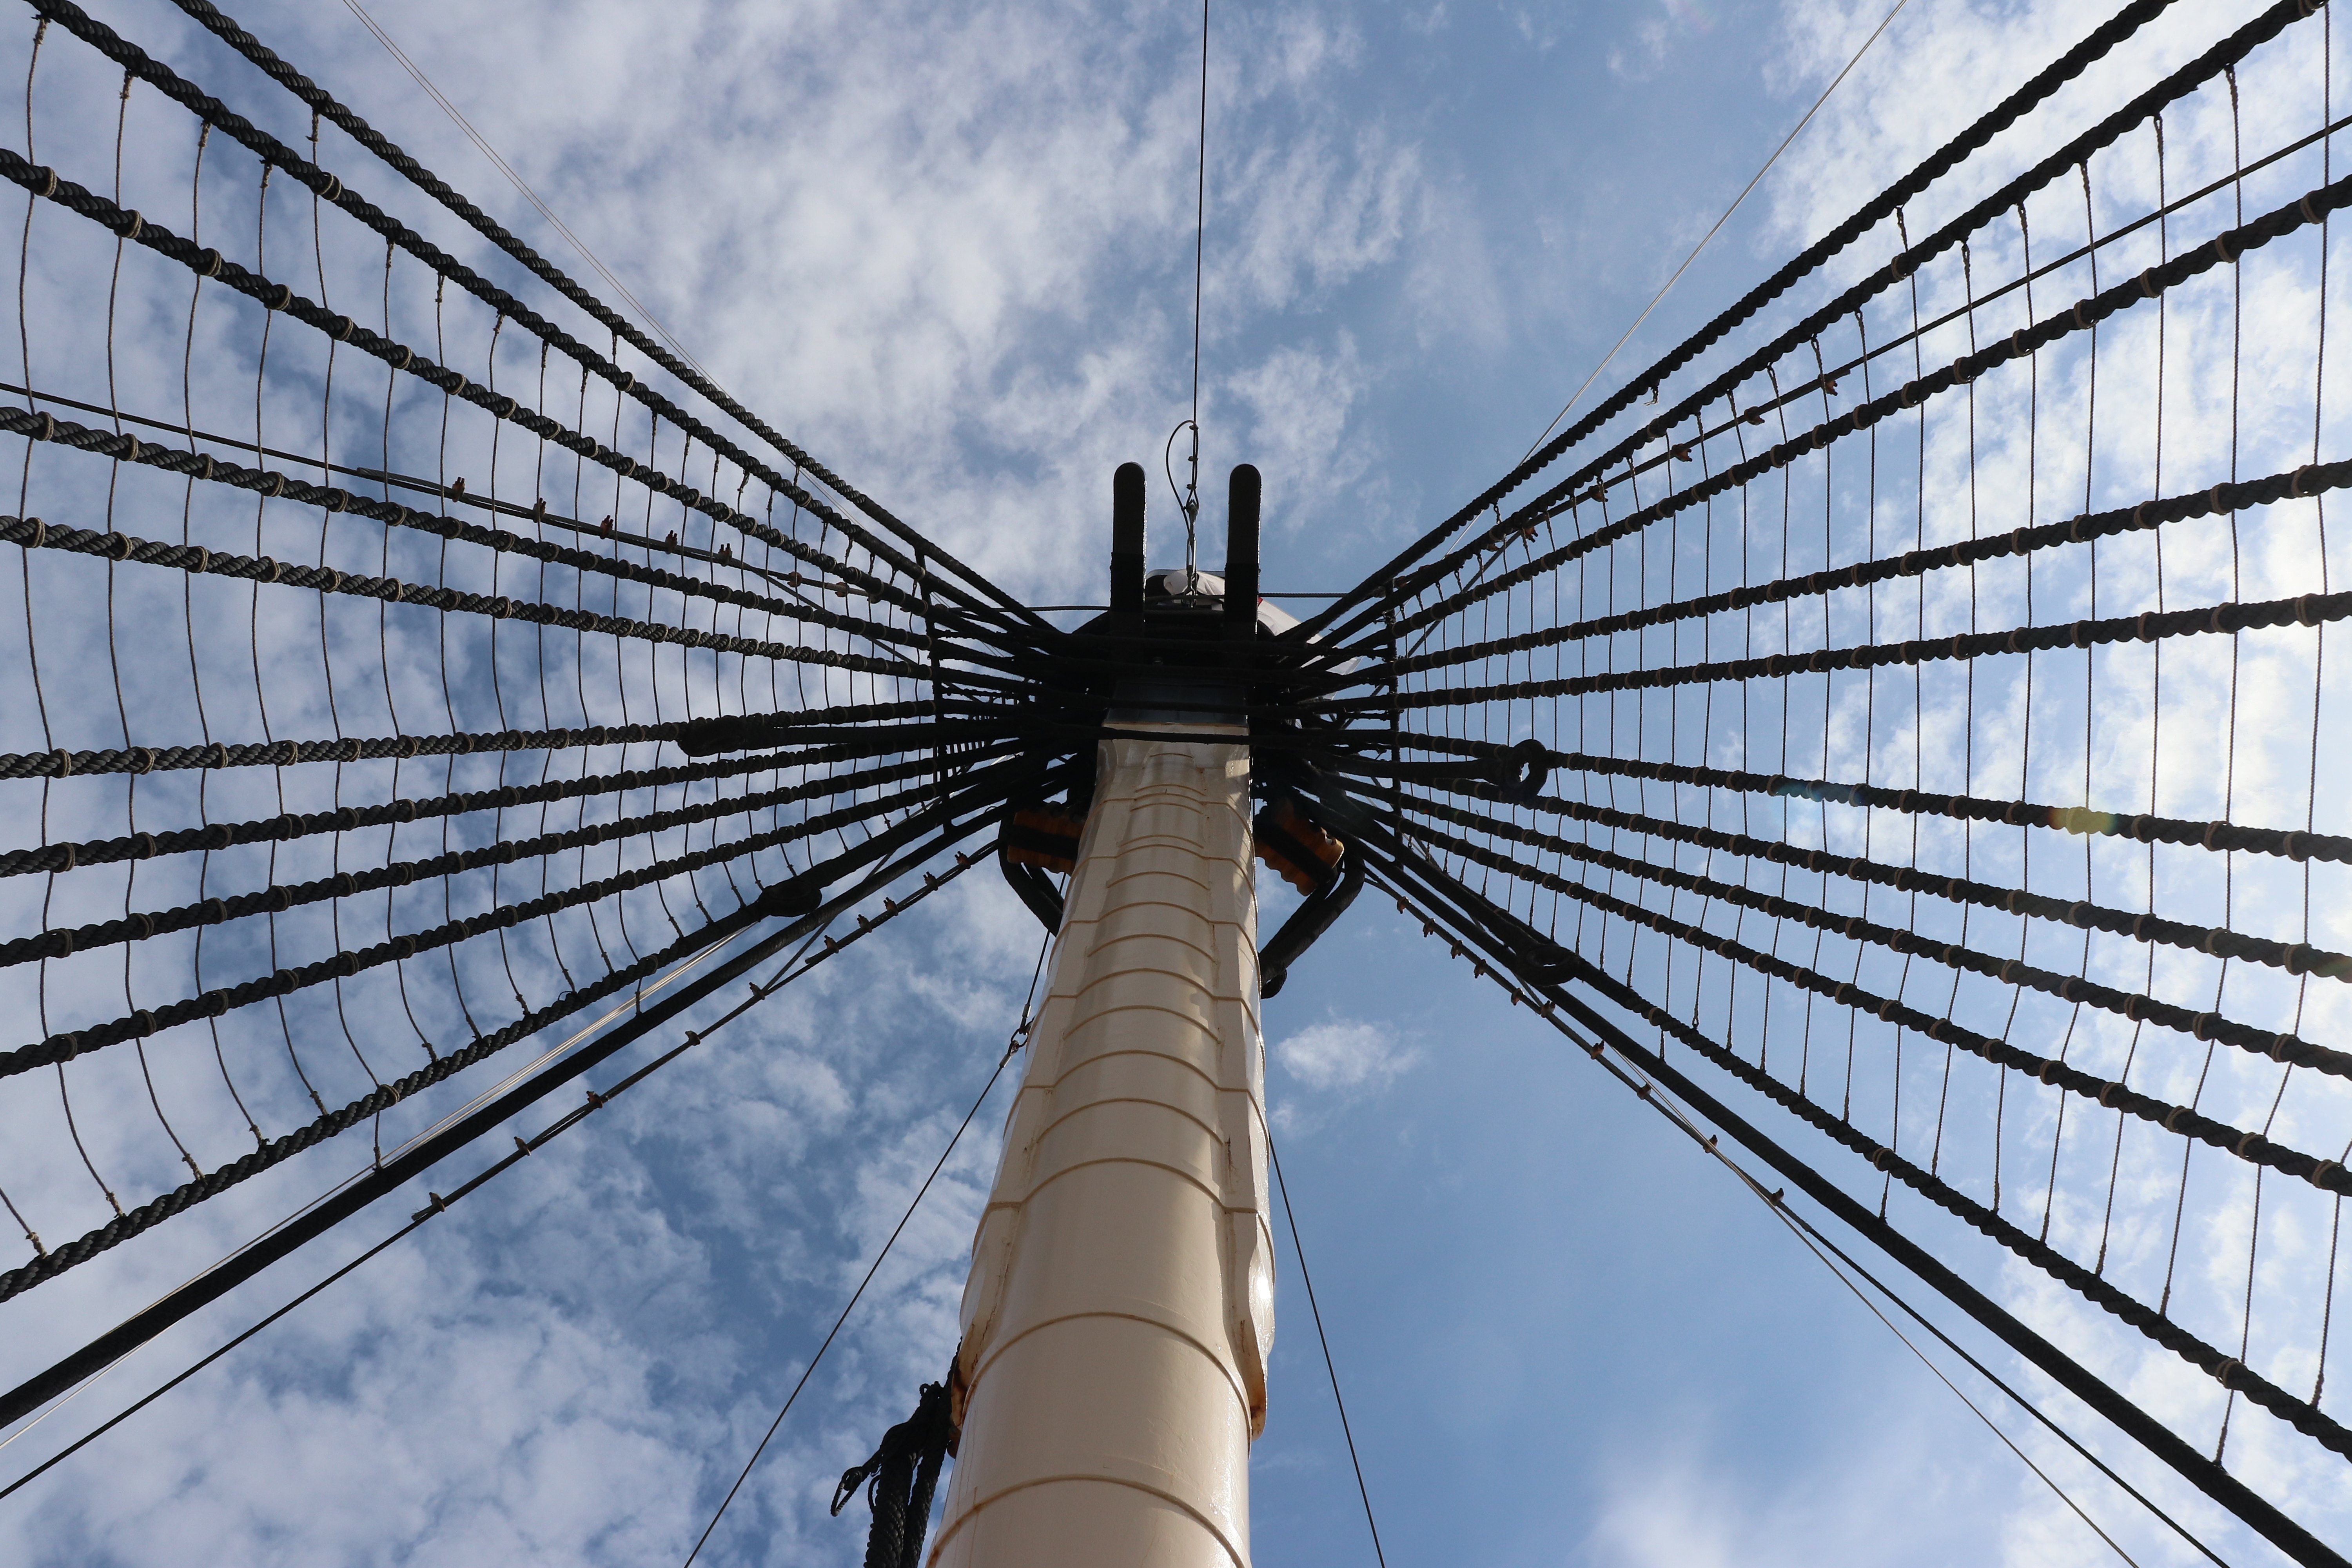
Tops railings in place. For the moment only dry fitted just in case I need to remove them.
Next step is the rigging of the clue lines, sheets and tacks for the Fore Yard and the Main Yard. I can also start adjusting the yard horses to a sagging look and find a method to start doing the rope coils for all the belaying ends.
Robert
-
Robert29 got a reaction from TrunkMonkey in HMS Victory 1805 by Robert29 - FINISHED - Caldercraft - Scale 1:72
Most of the Braces in place.
Spritsail Yard Braces and Spritsail Topmast Braces rigged in place.
Fore Yard Braces
Fore Topmast Braces
Fore Topgallant Braces
Main Topmast Yard Brace and Crossjack Brace. Note how the Crossjack Braces cross each other.
Main Topgallant Brace.
I left the main yard braces loose for the moment as otherwise they will be a bit in the way when installing the Driver Gaff and the Driver Boom. Now I have started work on the Driver Gaff and the Driver Boom which will also enable me to finish the main yard braces, the mizzen topmast braces and the topgallant braces.
At the moment the yard horses are haywire, going in every direction. Whilst rigging I keep hitting them so I might as well leave them and adjust them, giving them that hanging effect, when I have all the rigging finished.
Robert.
-
 Robert29 got a reaction from BenD in HMS Victory 1805 by Robert29 - FINISHED - Caldercraft - Scale 1:72
Thank you Ron, glad my build log is of some help to others like other build logs have been of great help to me. Case in point flying the pennant flag.
I was wondering how to fit the pennant on the main mast and couldn't really find any details on the internet. Then I remembered seeing something on Gil Middleton's great build log. Gil had details how pig sticks were used and I used the same idea. The pig stick is hoisted above the mast head so that the flag is not fouled by the stays. The hoisting halyards are secured to the top.
Also secured the kedge anchor on the starboard mizzen channel.
Some more finishing touches to go.
Robert
-
 Robert29 got a reaction from kiwiron in HMS Victory 1805 by kiwiron - Caldercraft - 1:72
Looking good Ron. Yes 0.5mm is quite thin and especially where the planks get narrower they break quite easily. Wetting and heating helps to minimise the problem.
Robert
-
 Robert29 got a reaction from AJohnson in HMS Victory 1805 by Robert29 - FINISHED - Caldercraft - Scale 1:72
Thank you Ron, glad my build log is of some help to others like other build logs have been of great help to me. Case in point flying the pennant flag.
I was wondering how to fit the pennant on the main mast and couldn't really find any details on the internet. Then I remembered seeing something on Gil Middleton's great build log. Gil had details how pig sticks were used and I used the same idea. The pig stick is hoisted above the mast head so that the flag is not fouled by the stays. The hoisting halyards are secured to the top.
Also secured the kedge anchor on the starboard mizzen channel.
Some more finishing touches to go.
Robert
-
 Robert29 got a reaction from egkb in HMS Victory 1805 by Robert29 - FINISHED - Caldercraft - Scale 1:72
Thank you Ron, glad my build log is of some help to others like other build logs have been of great help to me. Case in point flying the pennant flag.
I was wondering how to fit the pennant on the main mast and couldn't really find any details on the internet. Then I remembered seeing something on Gil Middleton's great build log. Gil had details how pig sticks were used and I used the same idea. The pig stick is hoisted above the mast head so that the flag is not fouled by the stays. The hoisting halyards are secured to the top.
Also secured the kedge anchor on the starboard mizzen channel.
Some more finishing touches to go.
Robert
-
.thumb.JPG.33e8fc9704bbb01f03cf31c187b62df9.JPG) Robert29 got a reaction from Retired guy in HMS Victory 1805 by Robert29 - FINISHED - Caldercraft - Scale 1:72
Robert29 got a reaction from Retired guy in HMS Victory 1805 by Robert29 - FINISHED - Caldercraft - Scale 1:72
Thank you Ron, glad my build log is of some help to others like other build logs have been of great help to me. Case in point flying the pennant flag.
I was wondering how to fit the pennant on the main mast and couldn't really find any details on the internet. Then I remembered seeing something on Gil Middleton's great build log. Gil had details how pig sticks were used and I used the same idea. The pig stick is hoisted above the mast head so that the flag is not fouled by the stays. The hoisting halyards are secured to the top.
Also secured the kedge anchor on the starboard mizzen channel.
Some more finishing touches to go.
Robert
-
 Robert29 got a reaction from mort stoll in HMS Victory 1805 by Robert29 - FINISHED - Caldercraft - Scale 1:72
Thank you Ron, glad my build log is of some help to others like other build logs have been of great help to me. Case in point flying the pennant flag.
I was wondering how to fit the pennant on the main mast and couldn't really find any details on the internet. Then I remembered seeing something on Gil Middleton's great build log. Gil had details how pig sticks were used and I used the same idea. The pig stick is hoisted above the mast head so that the flag is not fouled by the stays. The hoisting halyards are secured to the top.
Also secured the kedge anchor on the starboard mizzen channel.
Some more finishing touches to go.
Robert
-
Robert29 got a reaction from kiwiron in HMS Victory 1805 by Robert29 - FINISHED - Caldercraft - Scale 1:72
Thank you Ron, glad my build log is of some help to others like other build logs have been of great help to me. Case in point flying the pennant flag.
I was wondering how to fit the pennant on the main mast and couldn't really find any details on the internet. Then I remembered seeing something on Gil Middleton's great build log. Gil had details how pig sticks were used and I used the same idea. The pig stick is hoisted above the mast head so that the flag is not fouled by the stays. The hoisting halyards are secured to the top.
Also secured the kedge anchor on the starboard mizzen channel.
Some more finishing touches to go.
Robert
-
 Robert29 got a reaction from The Gimps Chimp in HMS Victory 1805 by kiwiron - Caldercraft - 1:72
Looking good Ron. Yes 0.5mm is quite thin and especially where the planks get narrower they break quite easily. Wetting and heating helps to minimise the problem.
Robert
-
 Robert29 got a reaction from GrandpaPhil in HMS Victory 1805 by Robert29 - FINISHED - Caldercraft - Scale 1:72
Thank you Ron, glad my build log is of some help to others like other build logs have been of great help to me. Case in point flying the pennant flag.
I was wondering how to fit the pennant on the main mast and couldn't really find any details on the internet. Then I remembered seeing something on Gil Middleton's great build log. Gil had details how pig sticks were used and I used the same idea. The pig stick is hoisted above the mast head so that the flag is not fouled by the stays. The hoisting halyards are secured to the top.
Also secured the kedge anchor on the starboard mizzen channel.
Some more finishing touches to go.
Robert
-
Robert29 got a reaction from Retired guy in HMS Victory 1805 by Robert29 - FINISHED - Caldercraft - Scale 1:72
Thank you Graham. Hope it could be an idea to other builders. I found so many ideas in this forum from other builders in building my Victory.
Anchors rigged in place as well. I deviated a bit from the manual's instructions on how the anchors are secured. I included some chain as seen in many of the pictures I sourced.
Starboard Sheet Anchor.
The Bower Starboard Anchor. Apart from the chain I also added the rope tied the the lower end of the anchor. Button I have no clue where the other end of this rope is belayed. The same with the running end of the cat head tackle line. The manual says it is to be belayed around the cathead at the cathead cleat. Shouldn't it be belayed somewhere on board behind the bulwark!!! Maybe I am wrong, I am no expert, any suggestions would be appreciated.
Robert
-
Robert29 got a reaction from Retired guy in HMS Victory 1805 by Robert29 - FINISHED - Caldercraft - Scale 1:72
Thank you Captain Hook, yes it is a lot of work, and now that I am nearing the finish I am really eager to see how it looks when its in a showcase that I still have to make.
It's been a long time with no updates. For the last month I had other priorities. End of November I went to visit my daughter and my grandson who live in Stratford-Upon-Avon in the UK. Christmas time they came to Malta and were staying with me, so basically I did not have much time for the Victory. At the moment I am fitting the anchors, for which I will soon have some photos to upload.
For quite some time I have been thinking what am I going to rest the Victory on when its in the showcase. I did no want to make any curly fancy stands and I came up with the following idea.
I had some wooden strips which were left over trimmings from another house project and decided to use them.
In the very beginning of the project, in the kit manual it was advised to drill holes though the keel and embed a nut inside to take a threaded rod which then can pass through whatever stand is used and again through a base/table top and secured with another nut on that end.
Apart from the holes for the threaded rods I also drilled another hole for the supply wires for the led lights I installed.
The keel will rest on the stands in between the wooden bars to hold it in place. The supports on the sides are made to the exact measurements to support the hull and keep the ship from leaning to any side.
This is the stand on the stern side. A hole is drilled on one side through which the threaded rod coming out of the keel will pass through and secured to the base. This way the threaded rod will be completely hidden.
Same thing with the stand on the bow side.
This is the stand in the middle. I did not really need this stand, but I needed something to hide the supply wires coming out of the keel which are to be connected to a transformer hidden under the display table. I drilled a hole on one side through which the wires will pass through. There are no visible wires feeding the led lights throughout the ship, not even the supply wires now.
Hoping to be back soon with photos showing the anchors,
Robert
-
 Robert29 got a reaction from Mr Whippy in HMS Victory 1805 by Robert29 - FINISHED - Caldercraft - Scale 1:72
Thank you Ron, glad my build log is of some help to others like other build logs have been of great help to me. Case in point flying the pennant flag.
I was wondering how to fit the pennant on the main mast and couldn't really find any details on the internet. Then I remembered seeing something on Gil Middleton's great build log. Gil had details how pig sticks were used and I used the same idea. The pig stick is hoisted above the mast head so that the flag is not fouled by the stays. The hoisting halyards are secured to the top.
Also secured the kedge anchor on the starboard mizzen channel.
Some more finishing touches to go.
Robert
-

 Robert29 got a reaction from Knocklouder in HMS Victory 1805 by Robert29 - FINISHED - Caldercraft - Scale 1:72
Thank you Ian and Graham. Getting closer to the finish.
Fitted two flags and tried to make them look as realistic as possible.
I used glue purposely for fabric. The brand is Guttermann, had used it on sails for another model, very good stuff. Didn't want to risk other glue, so for that very little bit I had to buy a new one, as the previous one I had, had dried up.
Put glue on one side, placed the thread and attached the two faces.
With a couple of clips I arranged the flag to look like it is sort of flying, then. with a brush I wetted it all with water and let it dry again. When I removed the clips it kept the shape.
The ensign staff fitted in place and the ensign hoisted in place.
The Union Jack also hoisted in place on the Jackstaff.
Still have to fit the pennant. But first I have to check exactly where it goes and how it is fitted.
Robert
-
Robert29 got a reaction from BenD in HMS Victory 1805 by Robert29 - FINISHED - Caldercraft - Scale 1:72
Ian, thank you again for your feedback. Even though I included the cathead stopper, I will leave the tackle as well.
Sjor, thank you for your comment. I try my best as well. There are great and very skilful builders in this forum from whom I have learn a lot.
Although I haven't completely rigged the anchors I continued some rigging on the davits. I had decided not to fit all four boats on deck, on the skid beams otherwise the only area that is still showing of the upper gun deck, will be obscured by the boats as well. Two of them I am hanging on the davits.
The Launch and the Barge are the two boats going on the davits. I hooked them in place to find the right positions of the davit rigging and the of the tackles. I will unhook them again to add the fittings (oars, anchors, etc.) in them, which I have ready, just fit them in.
The Launch on the starboard side.
The Barge on the port side.
The Pinnace and the Cutter to be rigged on the skid beams. I am not rigging them for now. I will leave them for the last minute as before I rig them in place I need to dust the deck under them. Fittings still to be adde in the boats as well. It's unbelievable the amount of dust the model accumulates. When finished I have to go over every inch of the model with a brush.
Robert
-
Robert29 got a reaction from BenD in HMS Victory 1805 by Robert29 - FINISHED - Caldercraft - Scale 1:72
Thank you Ian and Graham. Getting closer to the finish.
Fitted two flags and tried to make them look as realistic as possible.
I used glue purposely for fabric. The brand is Guttermann, had used it on sails for another model, very good stuff. Didn't want to risk other glue, so for that very little bit I had to buy a new one, as the previous one I had, had dried up.
Put glue on one side, placed the thread and attached the two faces.
With a couple of clips I arranged the flag to look like it is sort of flying, then. with a brush I wetted it all with water and let it dry again. When I removed the clips it kept the shape.
The ensign staff fitted in place and the ensign hoisted in place.
The Union Jack also hoisted in place on the Jackstaff.
Still have to fit the pennant. But first I have to check exactly where it goes and how it is fitted.
Robert
-
 Robert29 got a reaction from maurino in HMS Victory 1805 by Robert29 - FINISHED - Caldercraft - Scale 1:72
Thank you Ian and Graham. Getting closer to the finish.
Fitted two flags and tried to make them look as realistic as possible.
I used glue purposely for fabric. The brand is Guttermann, had used it on sails for another model, very good stuff. Didn't want to risk other glue, so for that very little bit I had to buy a new one, as the previous one I had, had dried up.
Put glue on one side, placed the thread and attached the two faces.
With a couple of clips I arranged the flag to look like it is sort of flying, then. with a brush I wetted it all with water and let it dry again. When I removed the clips it kept the shape.
The ensign staff fitted in place and the ensign hoisted in place.
The Union Jack also hoisted in place on the Jackstaff.
Still have to fit the pennant. But first I have to check exactly where it goes and how it is fitted.
Robert
-
Robert29 got a reaction from GrandpaPhil in HMS Victory 1805 by Robert29 - FINISHED - Caldercraft - Scale 1:72
Thank you Ian and Graham. Getting closer to the finish.
Fitted two flags and tried to make them look as realistic as possible.
I used glue purposely for fabric. The brand is Guttermann, had used it on sails for another model, very good stuff. Didn't want to risk other glue, so for that very little bit I had to buy a new one, as the previous one I had, had dried up.
Put glue on one side, placed the thread and attached the two faces.
With a couple of clips I arranged the flag to look like it is sort of flying, then. with a brush I wetted it all with water and let it dry again. When I removed the clips it kept the shape.
The ensign staff fitted in place and the ensign hoisted in place.
The Union Jack also hoisted in place on the Jackstaff.
Still have to fit the pennant. But first I have to check exactly where it goes and how it is fitted.
Robert
-
Robert29 got a reaction from Retired guy in HMS Victory 1805 by Robert29 - FINISHED - Caldercraft - Scale 1:72
Thank you Ian and Graham. Getting closer to the finish.
Fitted two flags and tried to make them look as realistic as possible.
I used glue purposely for fabric. The brand is Guttermann, had used it on sails for another model, very good stuff. Didn't want to risk other glue, so for that very little bit I had to buy a new one, as the previous one I had, had dried up.
Put glue on one side, placed the thread and attached the two faces.
With a couple of clips I arranged the flag to look like it is sort of flying, then. with a brush I wetted it all with water and let it dry again. When I removed the clips it kept the shape.
The ensign staff fitted in place and the ensign hoisted in place.
The Union Jack also hoisted in place on the Jackstaff.
Still have to fit the pennant. But first I have to check exactly where it goes and how it is fitted.
Robert
-
Robert29 got a reaction from BenD in HMS Victory 1805 by Robert29 - FINISHED - Caldercraft - Scale 1:72
Long overdue update. I had other priorities and things have been moving extremely slow. When I found the time I was doing the rope coils. Here are a few images. I have ordered and received some flags which I will put up soon. So basically a few more coils, the flags, some fine rigging adjustments, a good cleanup and the Victory should be finished.
Robert
-
Robert29 got a reaction from AJohnson in HMS Victory 1805 by Robert29 - FINISHED - Caldercraft - Scale 1:72
Thank you Ian and Graham. Getting closer to the finish.
Fitted two flags and tried to make them look as realistic as possible.
I used glue purposely for fabric. The brand is Guttermann, had used it on sails for another model, very good stuff. Didn't want to risk other glue, so for that very little bit I had to buy a new one, as the previous one I had, had dried up.
Put glue on one side, placed the thread and attached the two faces.
With a couple of clips I arranged the flag to look like it is sort of flying, then. with a brush I wetted it all with water and let it dry again. When I removed the clips it kept the shape.
The ensign staff fitted in place and the ensign hoisted in place.
The Union Jack also hoisted in place on the Jackstaff.
Still have to fit the pennant. But first I have to check exactly where it goes and how it is fitted.
Robert
-
 Robert29 got a reaction from flyer in HMS Victory 1805 by Robert29 - FINISHED - Caldercraft - Scale 1:72
Thank you Ian and Graham. Getting closer to the finish.
Fitted two flags and tried to make them look as realistic as possible.
I used glue purposely for fabric. The brand is Guttermann, had used it on sails for another model, very good stuff. Didn't want to risk other glue, so for that very little bit I had to buy a new one, as the previous one I had, had dried up.
Put glue on one side, placed the thread and attached the two faces.
With a couple of clips I arranged the flag to look like it is sort of flying, then. with a brush I wetted it all with water and let it dry again. When I removed the clips it kept the shape.
The ensign staff fitted in place and the ensign hoisted in place.
The Union Jack also hoisted in place on the Jackstaff.
Still have to fit the pennant. But first I have to check exactly where it goes and how it is fitted.
Robert
-
Robert29 got a reaction from mort stoll in HMS Victory 1805 by Robert29 - FINISHED - Caldercraft - Scale 1:72
Thank you Ian and Graham. Getting closer to the finish.
Fitted two flags and tried to make them look as realistic as possible.
I used glue purposely for fabric. The brand is Guttermann, had used it on sails for another model, very good stuff. Didn't want to risk other glue, so for that very little bit I had to buy a new one, as the previous one I had, had dried up.
Put glue on one side, placed the thread and attached the two faces.
With a couple of clips I arranged the flag to look like it is sort of flying, then. with a brush I wetted it all with water and let it dry again. When I removed the clips it kept the shape.
The ensign staff fitted in place and the ensign hoisted in place.
The Union Jack also hoisted in place on the Jackstaff.
Still have to fit the pennant. But first I have to check exactly where it goes and how it is fitted.
Robert
-
Robert29 got a reaction from maurino in HMS Victory 1805 by Robert29 - FINISHED - Caldercraft - Scale 1:72
Long overdue update. I had other priorities and things have been moving extremely slow. When I found the time I was doing the rope coils. Here are a few images. I have ordered and received some flags which I will put up soon. So basically a few more coils, the flags, some fine rigging adjustments, a good cleanup and the Victory should be finished.
Robert