HOLIDAY DONATION DRIVE - SUPPORT MSW - DO YOUR PART TO KEEP THIS GREAT FORUM GOING! (Only 20 donations so far - C'mon guys!)
×


Roger Pellett
-
Posts
4,519 -
Joined
-
Last visited
Content Type
Profiles
Forums
Gallery
Events
Everything posted by Roger Pellett
-
It looks to me like it was called an “insurance gun” because the guy who was supposed to fire it better have a good life insurance policy.🤣🤣🤣 Roger
-
It depends on how you source your wood. Lumberyard sourced wood is usually planed on all four sides giving you an edge that will safely ride against a table saw fence. The same with a piece of genuine mahogany that I recently bought from Woodcraft. I have two pieces of very old (real) Boxwood that have had their top and bottom surface planed but edges left rough. One edge will have to be band sawed and then planed on the jointer before it can be sawed on the table saw. And, of course if you plan to harvest your own, a band saw is by far your best choice. Roger
-
Merry Christmas and a happy, and healthier, New Year. Roger
-
I used to own a Preac saw. It was a nice little machine but underpowered. For reducing 1in and thicker lumber to model ship sizes your full sized table saw will work just fine.
-
A wonderful model Valeriy. It’s great to see that you are safe and well. Best wishes for the new year. Roger
-
Band Saw Recommendations
Roger Pellett replied to ChrisLBren's topic in Modeling tools and Workshop Equipment
I believe that the old Delta saw that grsjax mentioned above was a 14in saw. These were the industry standard in the 1980’s and if you can find one it should meet your needs. These saws can be upgraded with new tires, new guides, a new tension spring and if necessary a larger motor. Many of these improvements are designed to fit the Delta saw. I don’t know if anyone makes a bandsaw with an integral motor, one that is directly connected or geared to the saw. If so, I would avoid it in favor of a belt driven tool. With a belt driven tool, you can easily change the speed of the blade , increase motor HP, or replace a dead motor. Roger -
David, Elsewhere on the forum you will find several threads about Harold Hahn. Mr. Hahn build POF models back in the 1970’s and 80’s. His workmanship was first class, and his models are displayed in several museum collections. He built his first models from maple but later switched to the high end modeling woods- Boxwood and Holly. Mr Hahn’s principal power tool was an 8in table saw using a Sears Kromedge Thin Rip Veneer blade. He cut frame stock, planking, etc. using this setup. Based on Hahn’s experience, I set my used Sears Table Saw up as Hahn had done and cut pear, Boxwood, and Holly into model sized pieces to build a POB model. You have better equipment than I did and I suspect better than Hahn did. You will need a zero gap insert to keep the blade from swallowing your work. Blank inserts should be available for Jet saws. Roger
-
I just read a book about the sinking of the steamer Wexford on Lake Huron during the November 1913 “white hurricane.” The wreck was discovered in 2000 at the southern end of the lake in about 75ft of water so she is accessible to amateur divers. She has been badly looted even though she is legally the property of the Province of Ontario. Roger
-
Keith, You’re right! Although I always enjoy peeking at the plastic warship models and love the detail that these guys achieve, I realize that they involve the two modeling challenges that I least like: using CA glue to affix tiny parts, and painting. I really enjoy figuring out how to make these detailed parts myself. Roger
-
I have wanted this set of books ever since they were published. Unfortunately now that a set is available, I realize that without them I still have enough reliable modeling information to last me several lifetimes. And, instead of adding this massive set to by library, what am I eventually going to do with the stuff that I already have. The Superior branch of the University of Wisconsin has a great collection of Great Lakes maritime history materials. I suggested that they should purchase this HAMMS set. The librarian told me that they already owned the volumes dealing with the Great Lakes and the others didn’t fit their charter. Roger
-
The laws concerning objects salvaged from underwater are complex and often lead to nasty lawsuits. It is also now considered unethical by the serious wreck diving community to disturb underwater wreckage. This was not the case in the not so distant past. Before paying for this cannon, I would think that the buyer would be wise to do some serious homework! Roger
-
Maybe just rationalization, BUT: There was no structural advantage to be gained from an outboard keel. There are examples of later vessels where the garboard strake is part of the keel. Such could be the case here. Lack of an outboard keel would limit upwind Sailing possibilities but in that case the vessel could be and probably was rowed. For a vessel that was often beached, an outboard keel would be an easily damaged nuisance. Roger
-
Sleep Deprivation on Navy Ships?
Roger Pellett replied to Goodshipvenus's topic in Nautical/Naval History
My Navy sea duty was limited: an eight week midshipman cruise and a one week sea trial aboard a nuclear submarine. The midshipman Cruise, was aboard a minesweeper, and I was immediately put into the regular watch schedule as JOOD underway. While we did not operate at the tempo that Dr PR describes above, we did stand watched around the clock. Waking up to stand watch and then going back to sleep once it was over was particularly difficult. The Midwatch 0000-0400 was dreaded although some OOD’s liked it as the Captain was usually asleep then. During a minesweeping exercise with the Japanese Navy, watches were six hours on and six off. I have just been reading several memoirs about the US Navy during the Vietnam War. While I was familiar with the Navy’s “brown water operations” and the role played by minesweepers off shore, I was unaware of the combat that cruisers and destroyers also engaged in in coastal waters. All of the accounts that I read highlight the fatigue experienced by the crews of these vessels. Roger -
which mini wood lathe is best?
Roger Pellett replied to Benjamin S's topic in Modeling tools and Workshop Equipment
Benjamin, If you are 15 years old, you must be in high school. If you have time in your schedule, WITHOUT NEGLECTING REALLY IMPORTANT SUBJECTS, you might check to see if you can take a basic machine shop course. This would teach you what these tools can and cannot do as well as how to use them safely. This could also help you to avoid wasting your money on the wrong tool. I also agree that adapting a corded electric drill to make a homemade lathe is a good idea. An electric drill is a basic tool that you will never waste your money buying. Roger -
Unless your friend especially wants sails, I would leave them off. You have produced an elegant model that looks like it could be displayed in the model room of the New York Yacht Cub or the Royal Yacht Squadron. Sails can only detract from the classic appearance that you have achieved. Roger
- 31 replies
-
- 1
-

-
- Shamrock V
- Amati
- (and 2 more)
-
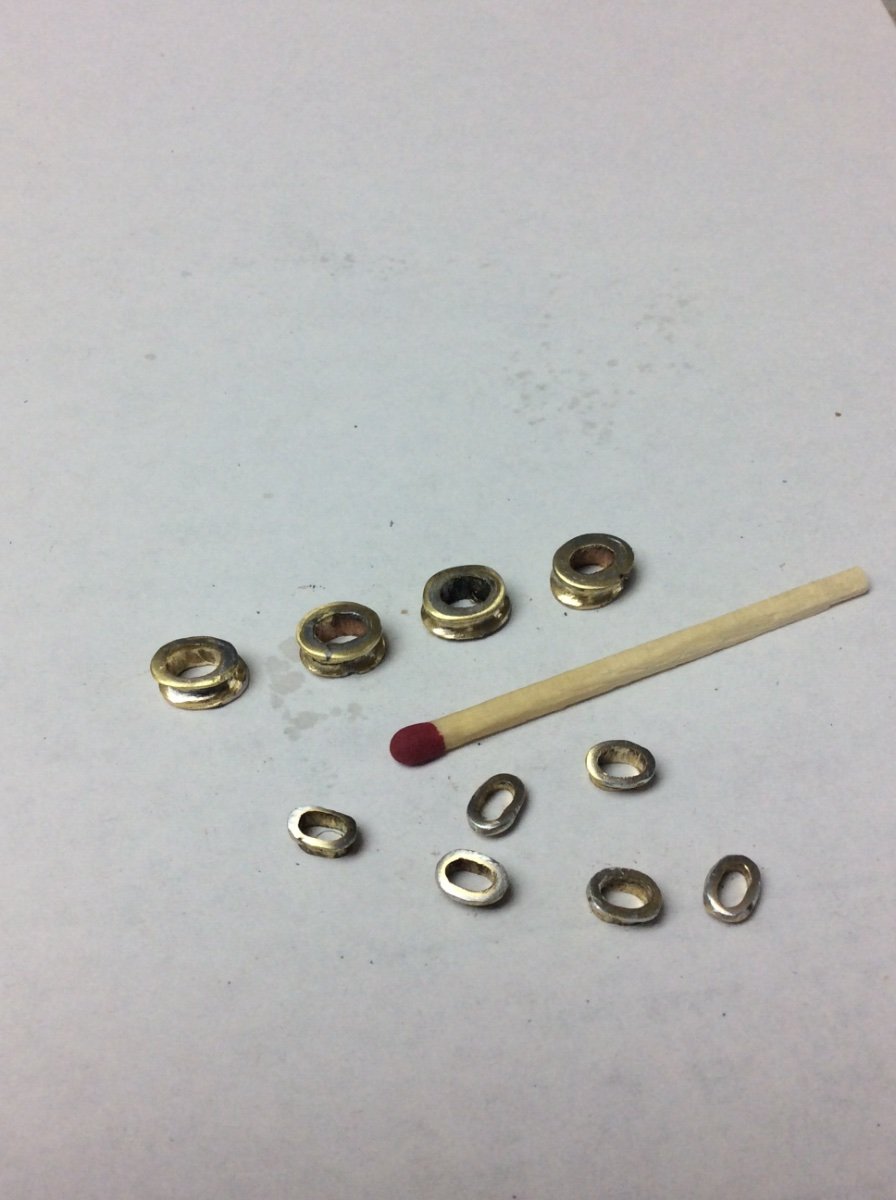
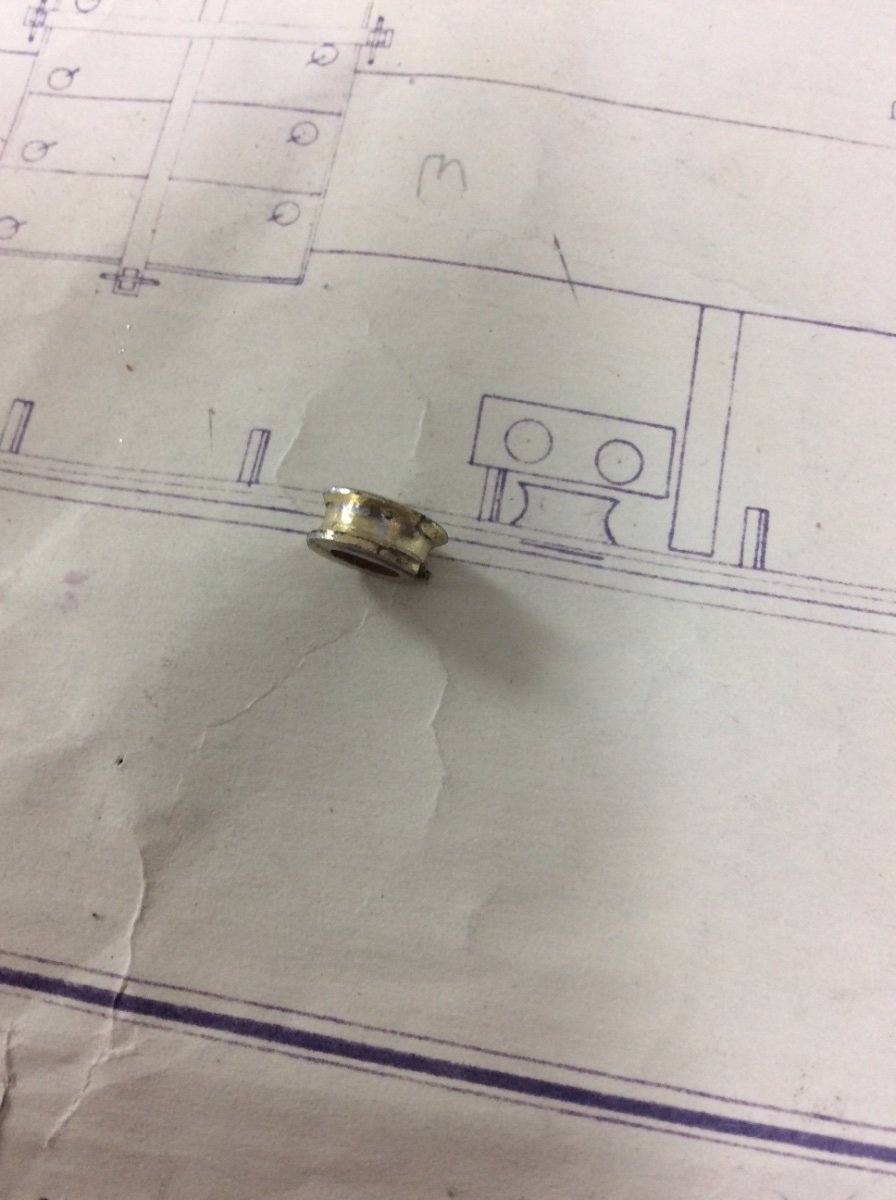
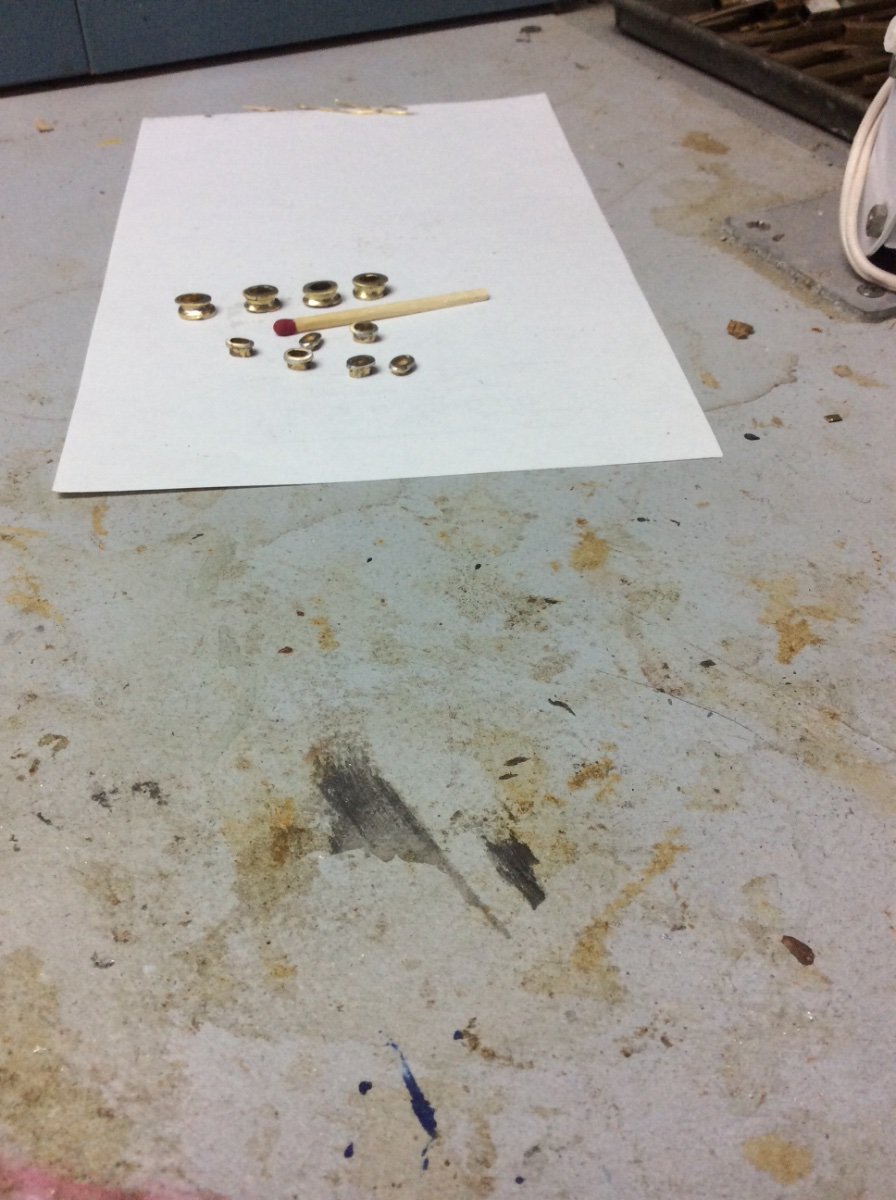
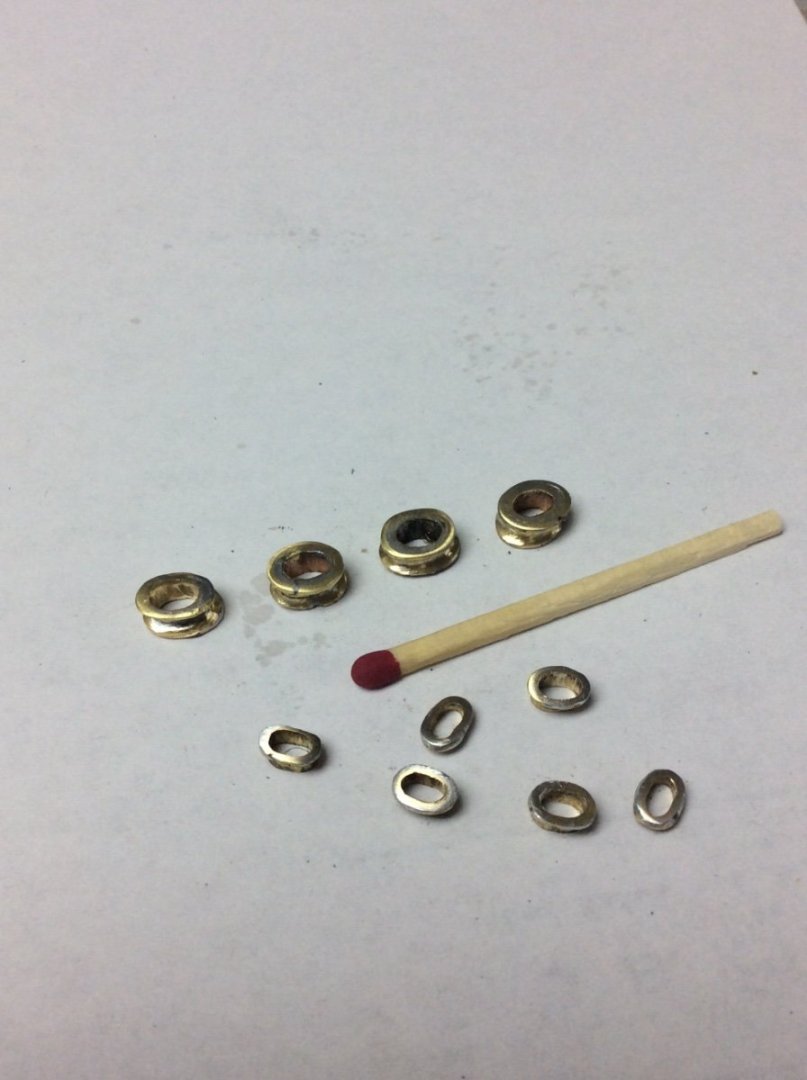
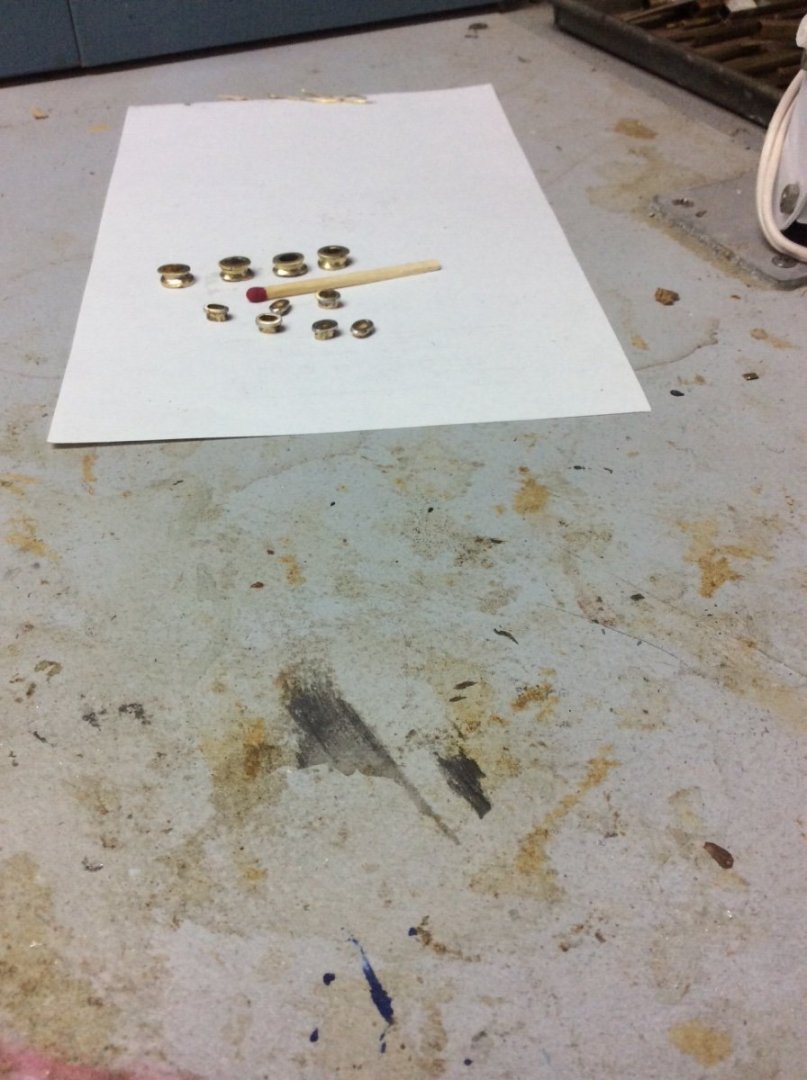
Mooring Pipes: The forecastle deck bulwarks are pierced with four oval holes for mooring cables. All of these are reinforced with heavy cast inserts. Two of these handled cables that passed to a steam driven capstan on the deck. These two openings were also reinforced with large cast hourglass shaped fittings on the inside of the bulwarks. The main deck also features two of these same fittings. I had been thinking for a long time about the best way to make these: casting from a carved wooden pattern, sheet brass bent around a former, coppersmithing by flaring a tube, etc. I finally settled on the following system that worked. Using a large machinist vise that closes accurately I flattened a piece of K&S brass tubing to the correct oval shape with the inside opening equal to that of the fitting. I found that this tubing flattens easily to the required shape without buckling. To get a consistent shape I made a simple stop to limit the closure of the vise jaws. The stop was made from from 1/32” and 1/64” craft plywood glued up in a stack. I next drilled a hole in a block of wood. The diameter of the hole was just large enough to hold the flattened tube vertically. To make the smaller pipes, I wrapped one piece of annealed brass wire around the flattened tube to form an oval and cut it. I then soldered it in place and cleaned it up with a file. Done! The larger hourglass shaped pieces were more complicated. First of all, the ID of the large inside fitting needs to be large enough for the OD of outside fitting, the smaller fitting described above, to nest inside. K&S tubing is available in telescoping sizes. Therefore, telescoping sizes each correctly flattened should nest. I therefore, flattened the next larger size of tubing using a thicker stop calculated to produce the correct ID. Again, I set the flattened tube up vertically in a block of wood, but this time I formed three wire loops. Beginning with the bottom loop, I soldered each loop to the flattened tube and in the case of the second and third tubes to the next tube in the stack. It was then just a case of shaping the stack with needle files to get the correct shape. Some refinement will be necessary when the pipes are finally fitted in place Here are the results. Roger
-
Why do you want to build ship models? Do want to recreate something representing a particular historic time or event. Are you interested in a particular maritime industry or culture, or is the intellectual challenge sufficient to sustain you throughout the project? I personally believe that more models are never completed because the builder loses interest than because he lacks ability. What type of work interests you? Wood carving, metal work, painting, rope work? Are you content following instructions or do you like to branch out on your own? Will you be satisfied with quality of parts and materials furnished by someone else? I think answering these questions can help you select the right project for you. In my opinion there is no reason why a competent craftsman who can read drawings and is interested in learning about maritime technology cannot pick something that interests them, accumulate the necessary research materials and scratch build a model. If you are interested in building a 1940-1960 era naval vessel a great example would be the US Navy 1950’s era MSB (minesweeping Boat). See the build log on the Scratch Build 1900 and Later section of the forum. Roger
-
Al, celebrate your small victories! Roger
-
Very nice, Al. Another handsome Coast Guard vessel that we never see modeled are the 1920’s era 75ft “Six Bitter” patrol boats. Maybe someday? Roger
-
My current modeling project requires extensive fabrication of sheet brass. Where possible, I prefer soldered joints but there are cases where this doesn’t work; wood/brass joints or joints where soldering would damage other soldered joints. In these cases I use Epoxy, usually in the dime to quarter amounts that Bob mentions. I would not try to mix these using tiny quantities using the Epoxies that we have been discussing. Instead, I use the Epoxies that come in tubes. My favorite is J.B. Weld Original Formula. I have found that with these formulations, the eyeball is able to judge the 1:1 proportions accurately enough to get a mix that cures with adequate adhesive strength. Since stress is force/area I wouldn’t use Epoxy to join very small parts such as those made from wire. I would solder these. Roger
-
I have an old, by computer standards, Apple IPad that was free when I signed up for an IPhone and ATT calling plan. It works fine surfing the web, and using Model Ship World as well as taking pictures for my build log.
-
I haven’t bought any for a long time but I suspect that West System Resin, Hardener, and pumps would cost about $60-70 too. Just checked- 1qt West Sysrem 105 Resin, 7oz 205 hardener, and a pair of pumps: $86.60 on Amazon.
-
Back in the early 1930’s a guy named E. Armatige Mc Cann wrote a book about building a clipper ship model. The book was serialized in Popular Science or Popular Mechanics Magazine and full sized drawings to produce a 1/8”=1ft-0” model were available from the magazine. The book was about building a model of the Clipper Sovereign of the Seas but the 1930’s vintage drawings that I have are for Flying Cloud. At least one ship model company, A.J. Fisher sold kits for both Flying Cloud and Sovereign of the Seas. These were solid hull kits requiring the hull to be carved to shape, unlike today’s POB kits. I dimly remember my father working on an A.J. Fisher Flying Cloud Kit, probably during 1946. He never rigged the model as he began a full sized boat building project in 1947. I have the unrigged model that I cleaned, restored, and put in a glass case that I built. I hope that my children and especially my grandchildren will treasure it as a link to him. I suspect that your model also dates from the mid 1930’s to1940’s. With the poured lead keel, I wonder if your model was intended to sail. I can see no other reason for a metal keel. You are off to a a good start. I would continue by completely finishing the hull and deck. This should include deck houses, deck fittings, belaying points, etc. as well as any painting that needs to be done. I would securely mount the hull; pedestals or cradle before proceeding to rig it. Roger
-
I know virtually nothing about RC models but I do have experience working with Epoxy. Epoxy can be tricky to use. It must be mixed in accordance with the specific resin/hardness ratios specified by the manufacturer. Different manufacturers use vastly different mixing ratios. If you add hardener beyond the specified ratio to “speed things up,” the mix will not cure, and you’ll wind up with a sticky mess. Since chemical formulations between brands vary, under no circumstances would I suggest trying to thin the resin. Use it as it comes from the can! Epoxy cures with an Exothermic reaction- it gives off heat. A large batch can get quite hot. A thinner can effect this too in an unpredictable way. Like most other things, you get what you pay for. The marine brands; West, System Three, etc IMHO are worth spending money on compared to the hardware store bands. West System requires a 5:1 resin to hardener ratio that can be hard to measure correctly. West System sells calibrated pumps that are foolproof or you can weigh out the materials with a scale. Other brands, such as I believe System Three feature an easier 1:1 ratio. Epoxies now are available in a bewildering array, all with different specialized features. You can surely find a low viscosity one. OR. At least one high quality brand- West System is “modular.” The basic Resin/hardener mix results in a thin mix; about like maple syrup. West then sells different additives that allow the mix to be thickened to the consistency of peanut butter. It’s your model to finish as you see fit, but working with Epoxy you have one and only one chance to get things right. Once you have coated your model, the outcome is in the hands of the Epoxy Gods. If the mix does not cure, you will wind up with a difficult if not impossible to remove sticky mess. Roger
-
In the Odyssey, the mast is raised each time the vessels put to sea. In confined waters this can be daily as the ships are beached each night. Having done this many times in small craft, the easiest way is for someone in the boat to “walk the mast up” starting at the stern and moving forward. I can see how this same technique would have been used by these ancient sailors. This would have involved several crewmen. With the mast vertical, it was probably too heavy and awkward to lift it into a hole in a mast step. A vertical post that the upright mast could be lashed to would seem to make sense. Roger