Chuck
-
Posts
9,700 -
Joined
-
Last visited
Content Type
Profiles
Forums
Gallery
Events
Everything posted by Chuck
-
 Thanks Kurt.....Photoshop......LOL Dont take my word for it Kurt, you can judge for yourself when you come by the shop. Its going together without a hitch so that makes it a lot easier. Chuck
- 421 replies
-
- 2
-

-
- medway longboat
- Syren Ship Model Company
- (and 1 more)
-
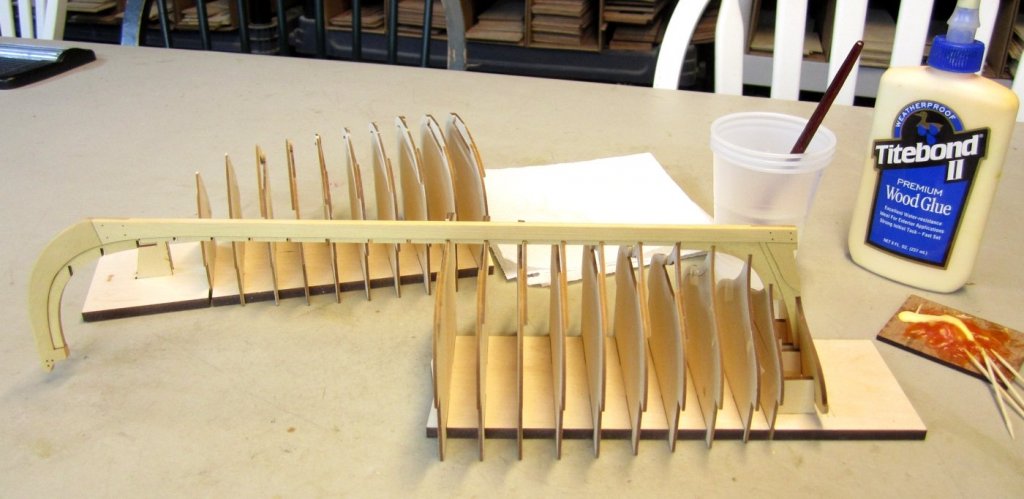
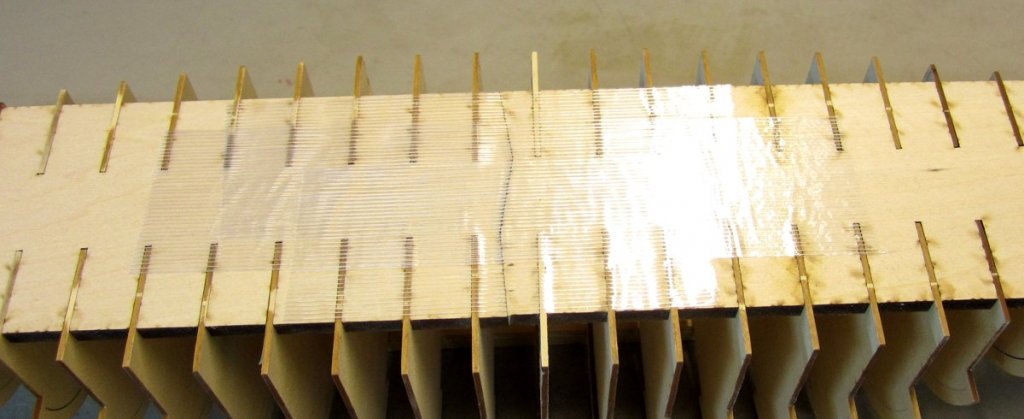
Today I glued the keel onto the frames. You want to have a cup of water and a paint brush handy before you begin. This is used to clean the excess glue from the joints after the keel is placed on top of the frames. Before you begin, make sure that all of the frames are facing the correct direction. The lettered frames face one way and the numbered frames face the other way. I also recommend tat you do a few dry test runs before using the glue. We are basically starting with the stern half of the frames first. Practice placing the keel into position. You will quickly discover that all of the frames are not lined up perfectly with their intended notches in the keel. You will need yo work them in one direction or the other until the keel slips into all ten notches. Doing a few dry test runs will let you know which frames you will need to tend to once the glue is added. Dont rush it. You will have plenty of time to do this and tweak each frame if need be. I found it easier to place a generous dab of glue on the end of the frames rather than in each slot of the keel. Once seated properly clean off the excess glue and leave it to dry. Once that dries, it will be time to slide the forward ten frames under the keel and repeat the same process. Absolutely do a dry run with this. Once that glue dries, flip over the model and tape the two halves of the build board together along the joint. DONT glue it. Use a generous length of tape and several pieces. I like to use the reinforced tape with the string in it for added strength. Then its time to fair the hull. Its somewhat fragile as many of you who have built the other models like this will attest. But it is pretty sturdy. Use either 320 or 220 grit sand paper to fair the hull. I wouldnt use a coarser grit because it will grab the frames and possibly split them etc. But use a light touch and proceed slowly and carefully just like you would with any other fairing. Here is my model after it was completely faired. You can use the laser char on the edge of each frame as a guide as you continue fairing as well. I mentioned earlier how another builder familiar with this type of model gave me a building tip. He said to use the tape on each side of the frame to help strengthen it while you fair the hull. I can report that it was a big help and I recommend that you guys do it as well. In addition, because so many people have built the pinnace , the original longboat or the barge, I have had many other tips and experiences shared. One additional tip was really good. In the photo below you can see a small 3/32" wide by 1/32" strip glued to each frame where the attachment is. This is usually where the frame would break if you are a heavy-handed sander. The scrap strip was glued with tite-bond. It really made it sturdy and I didnt worry at all about splitting the little tab connecting the center of the frame. Once I was done fairing the hull, they were removed using either of these two methods. You can apply some rubbing alcohol and let it just fall off with a little coaxing. You could also just leave it there. There will be a plank covering it inside and out and it wont be seen. Just keep it to 3/32" wide or less. It wont make it any more difficult to remove the frame centers later on. I just used this strip on the five single frames but you could do it on all of them. But its up to you. I faired the hull with no breakage. Now its time to line off the hull and start planking!!!!! YIPPEE

- 421 replies
-
- 32
-
-
- medway longboat
- Syren Ship Model Company
- (and 1 more)
-
That shouldnt be an issue at all.
-
The tops should be flat from port to starboard yes.... Chuck
-
Very nice start.... Yes there should be a curve to the sheer...or sweeping arc. I am not sure why anyone would think differently as the plans clearly show it. Just follow the plans and you will be OK.
-
That is a possibility but I am trying to keep the project at an intermediate level and trying to not over engineer it "out of the box". So I am just going to stick with the usual ship model building practices to hopefully keep the costs down and difficulty level down. But that doesnt mean that anyone building her couldnt add those and "bash" the kit while discussing the merits and viability in their build logs. That is what makes these group projects fun and educational. I couldnt tell you for sure how they were actually bolted because that info is not as detailed for these small open boats. But I assume it was done the same way as in larger practice. Probably using small 5/8" to 3/4" copper bolts. Maybe someone could chime in here as well. Mays book and other sources dont have a lot of info on that detail. I am following and using the methods shown on the contemporary models so a simple brass, copper or monofilament pin does the trick.
- 421 replies
-
- 4
-
-
- medway longboat
- Syren Ship Model Company
- (and 1 more)
-
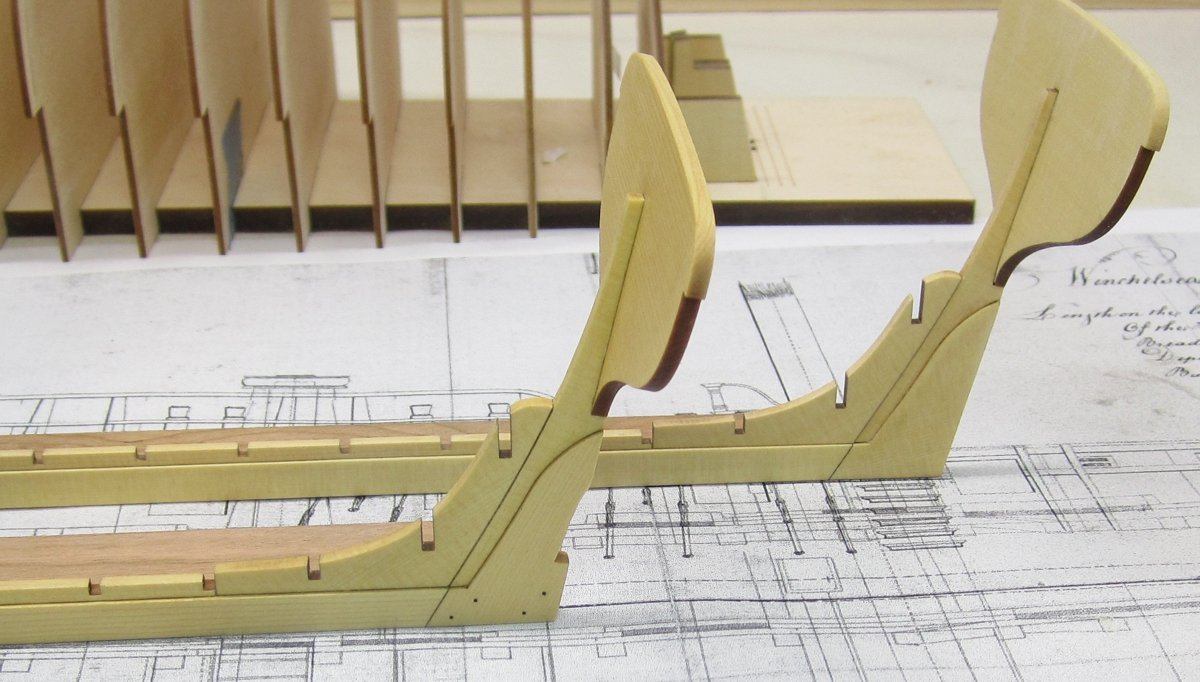
I finished the second keel assembly today. You can see the differences. You will note that before gluing the transom into position I added the bolts for the lap joints on the keel. There are once again several way to do this depending on your tastes. The bolts would have been copper but I dont like the look of shiny copper on a model. So I am using 20lb black fishing line. It works very well. You could substitute 22 gauge copper wire if you wish. The bolts are only simulated in that they dont go all the way through. You can of course do that as well. But rather than risk the drill bit wandering, I decided to just drill shallow holes that were filled with the black mono-filament. Then I used a straight razon to shave the excess away flush with the surface. I sanded it with 320 grit sandpaper. Then applied some wipe on poly. Feel free to ask any questions. Next I will glue the keel onto the frames and start fairing the frames for planking.

- 421 replies
-
- 28
-
-
- medway longboat
- Syren Ship Model Company
- (and 1 more)
-
Ropewalk (and serving machine)
Chuck replied to Charter33's topic in Modeling tools and Workshop Equipment
I also find that companies who make parts for robotics are a great source. Not commercial robotics. I am referring to the hobby stuff. There are quite a few companies that make parts of all kinds for educational purposes and developing robotics for the hobby. www.vexrobotics.com and my favorite servocity.com for example...and not just for the gears, they have lots of cool stuff. -
Its the same but there isnt any finish on it yet. Its all cedar which will appear different once a finish is applied. The model is all cedar so far. It could also just be my bad camera work!!! Chuck
- 421 replies
-
- 5
-
-
- medway longboat
- Syren Ship Model Company
- (and 1 more)
-
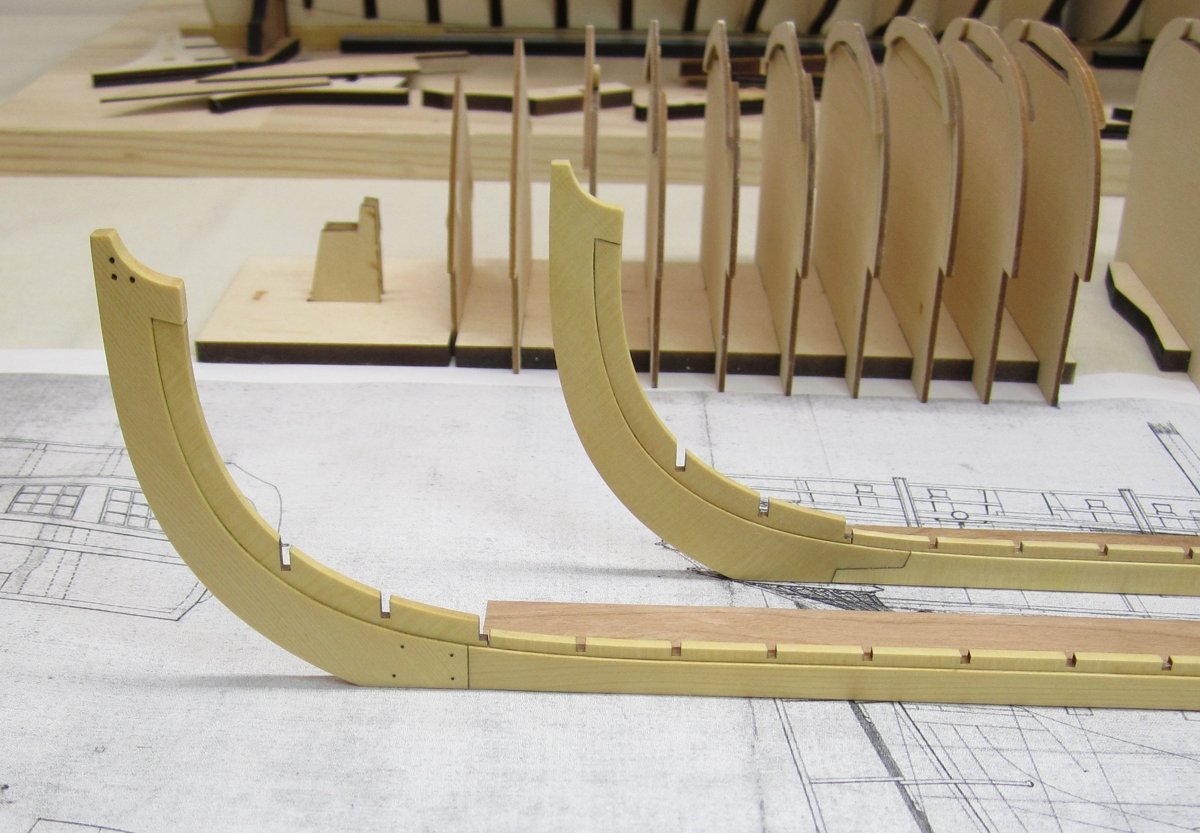
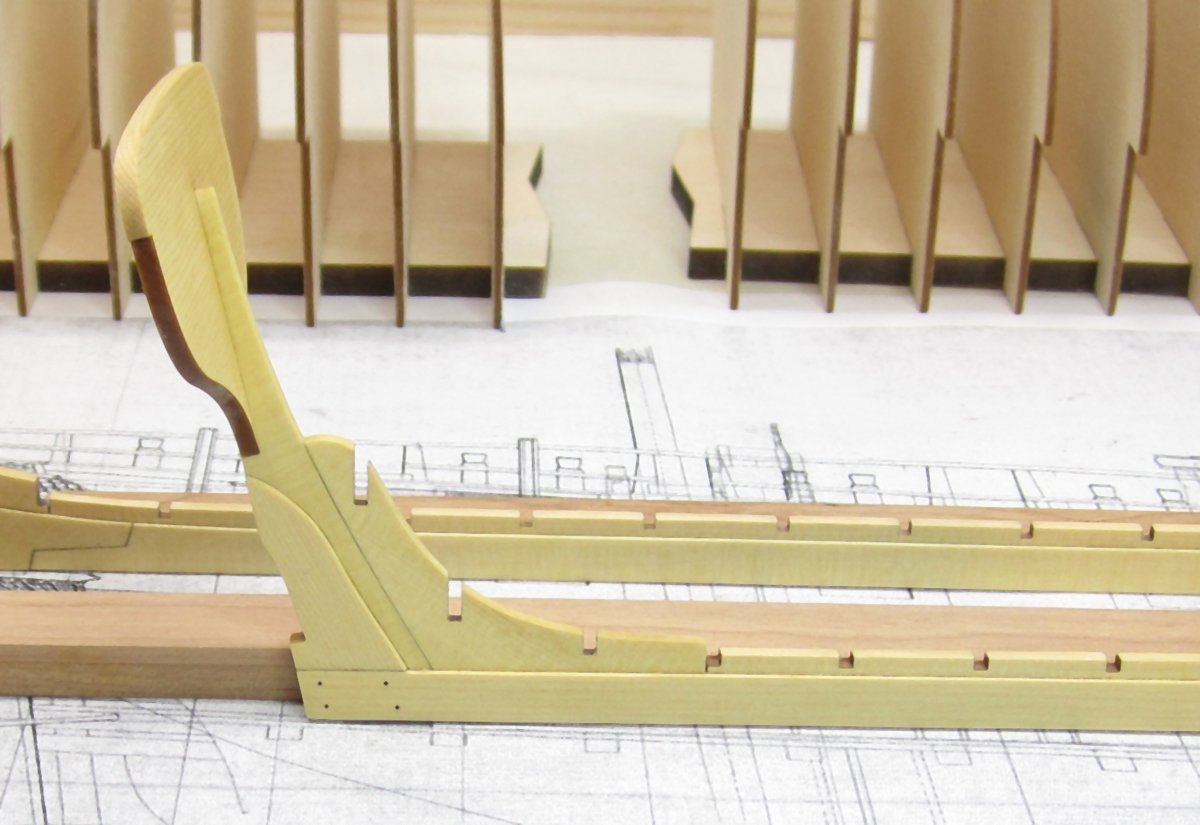
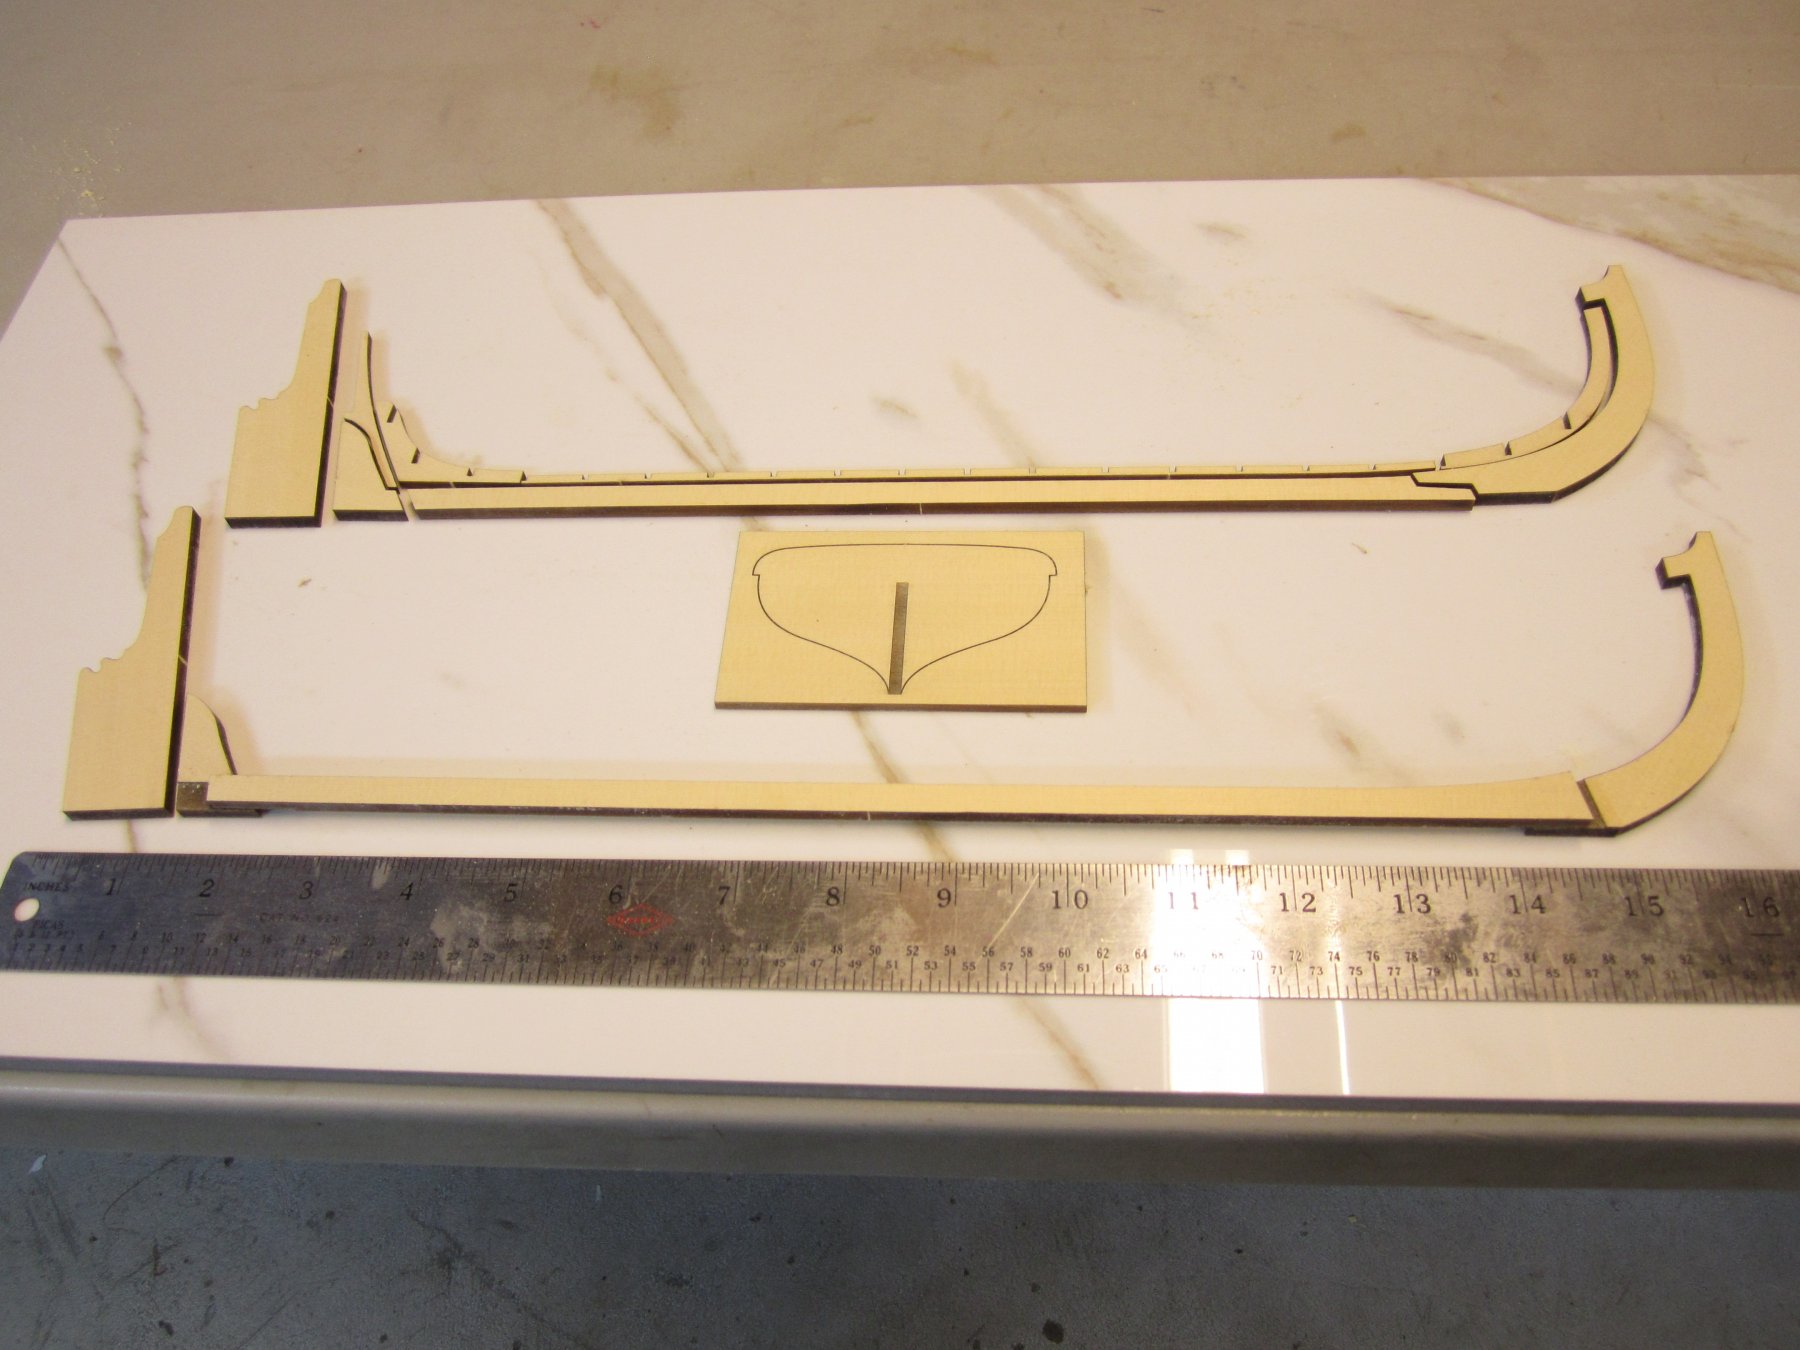
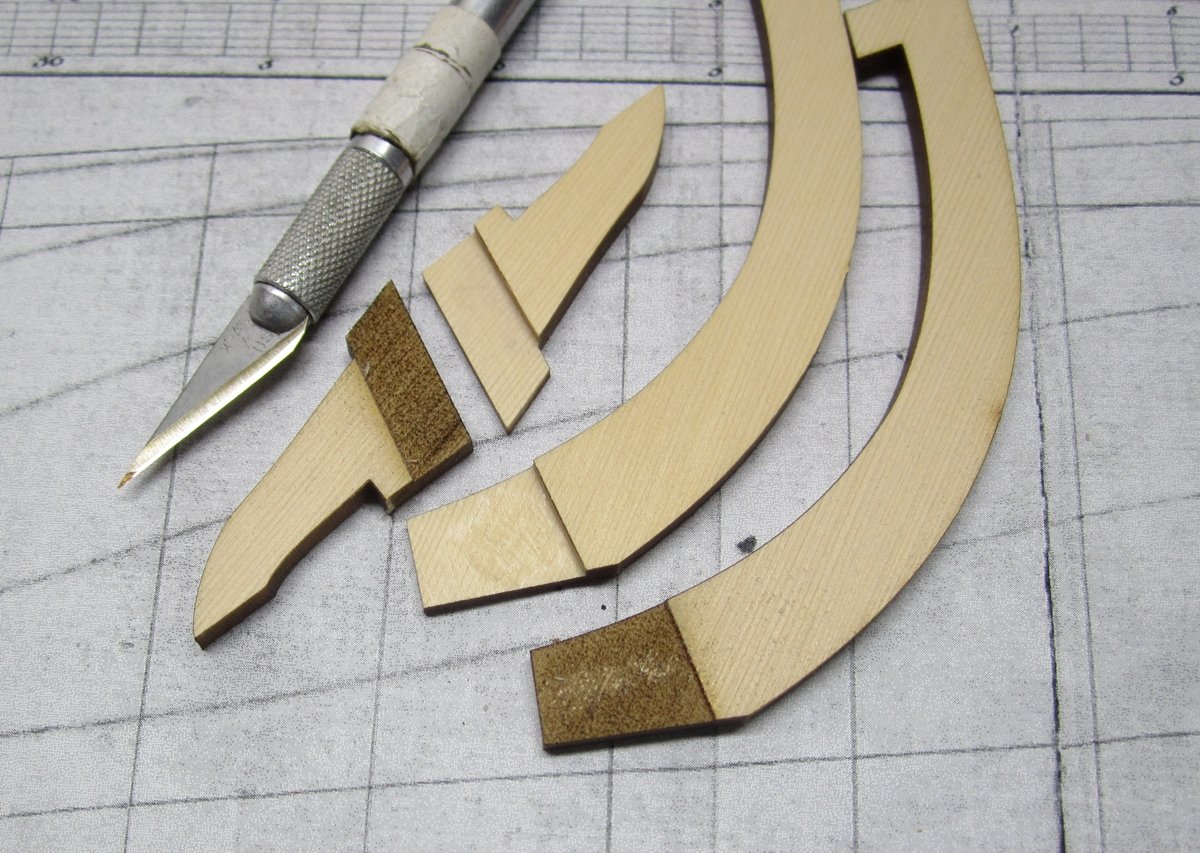
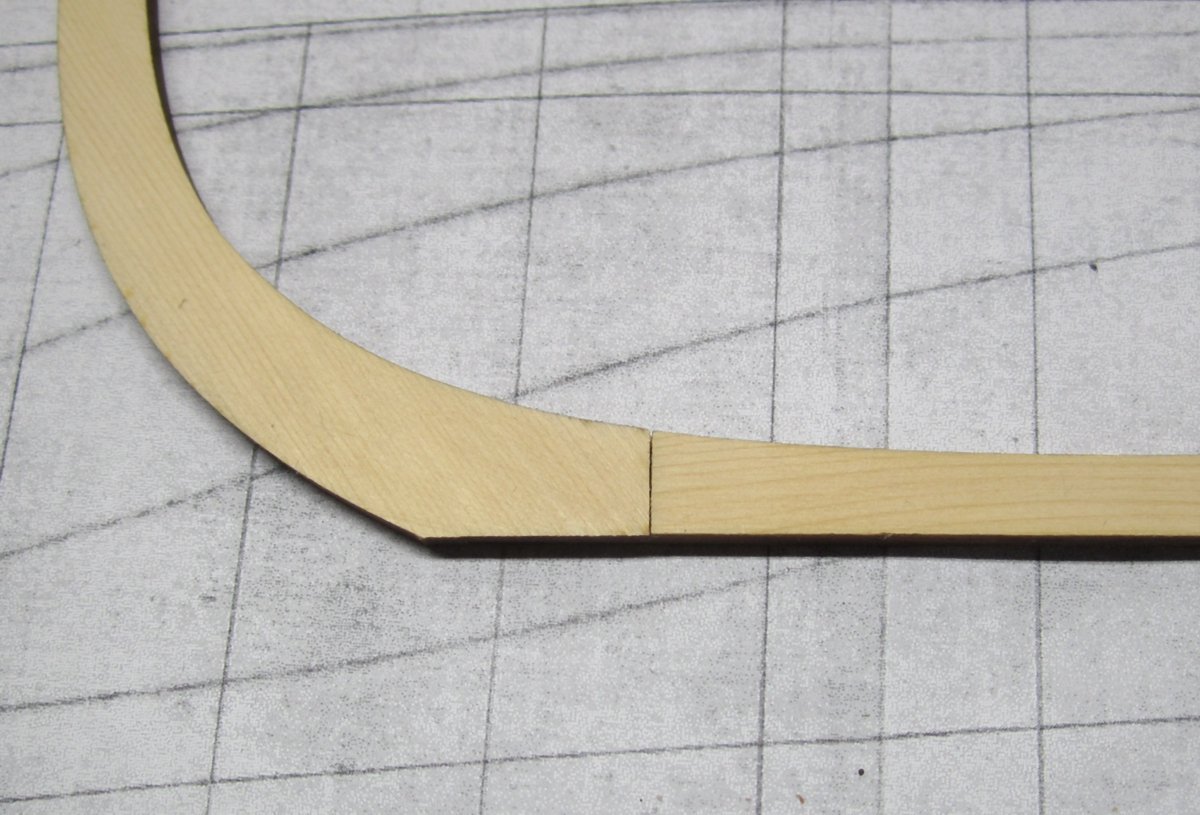
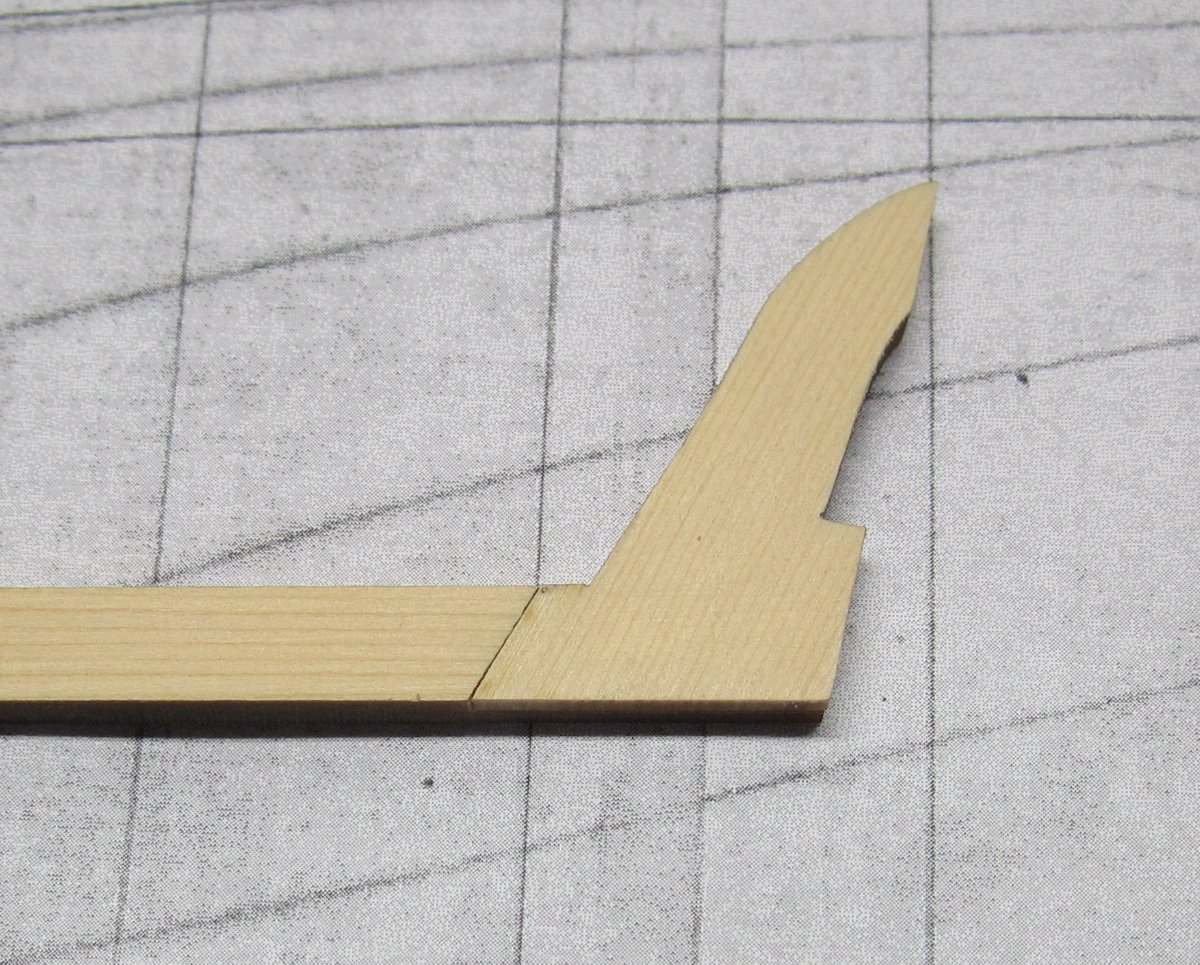
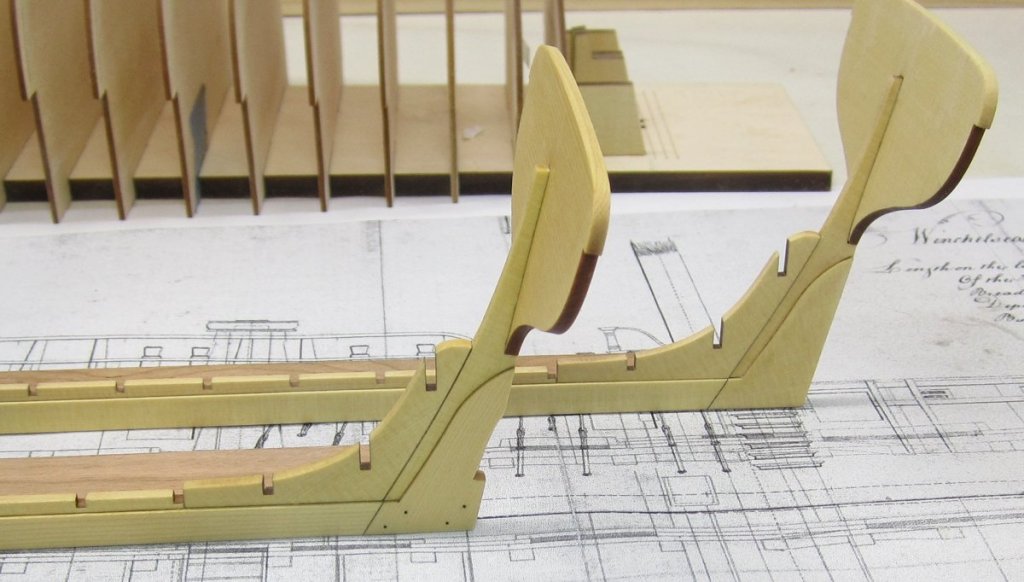
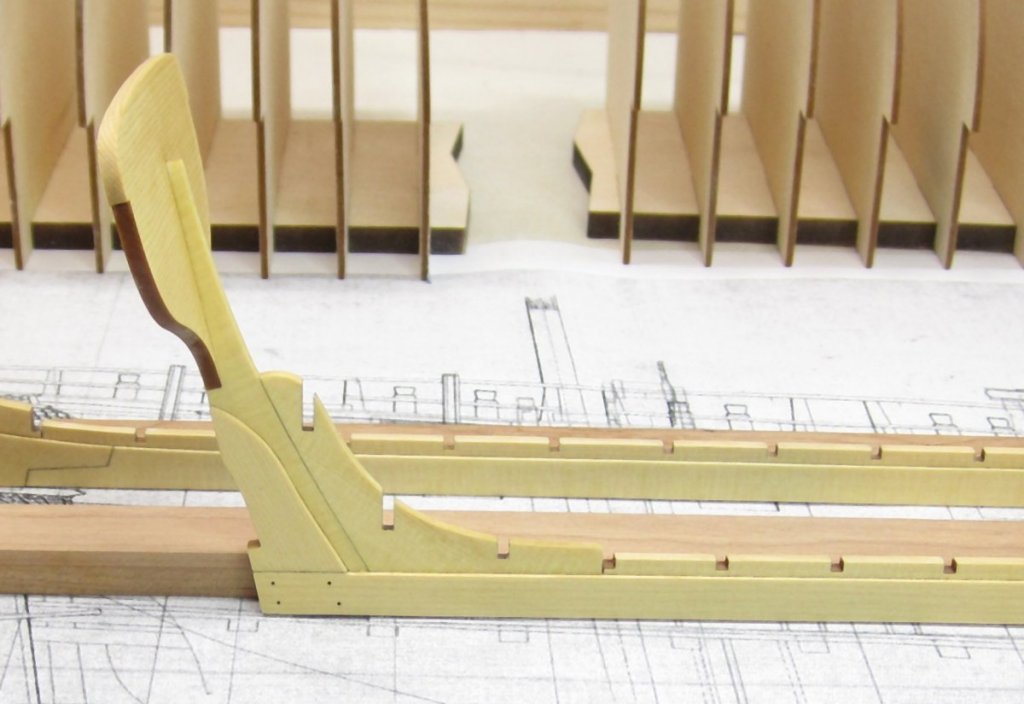
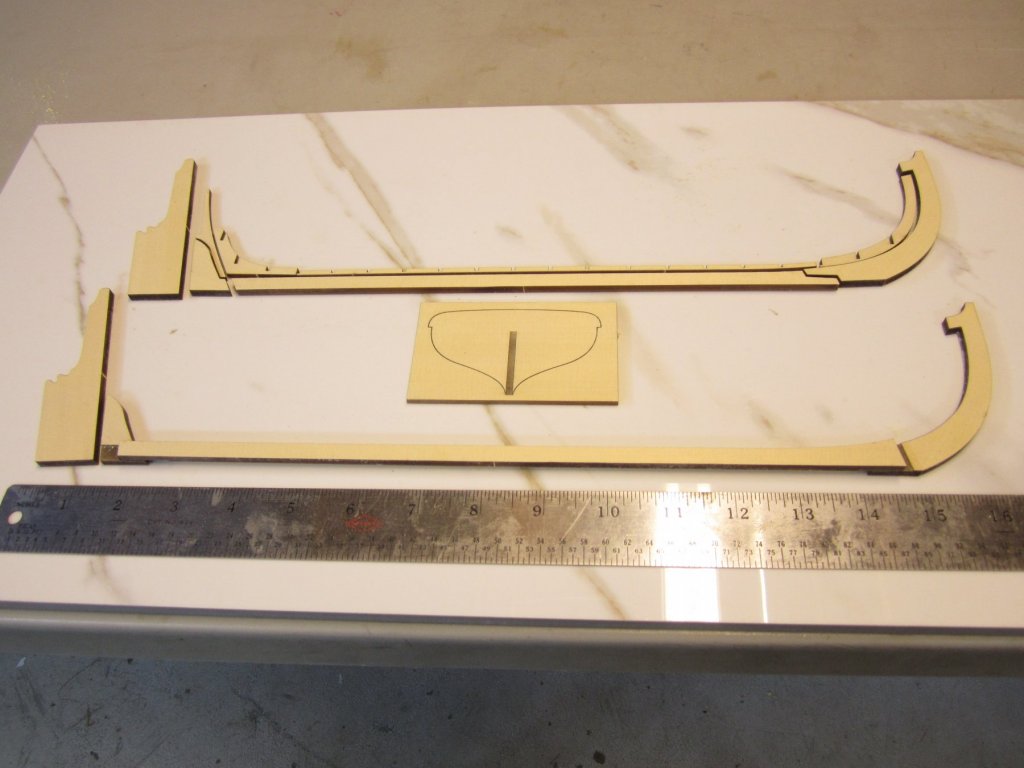
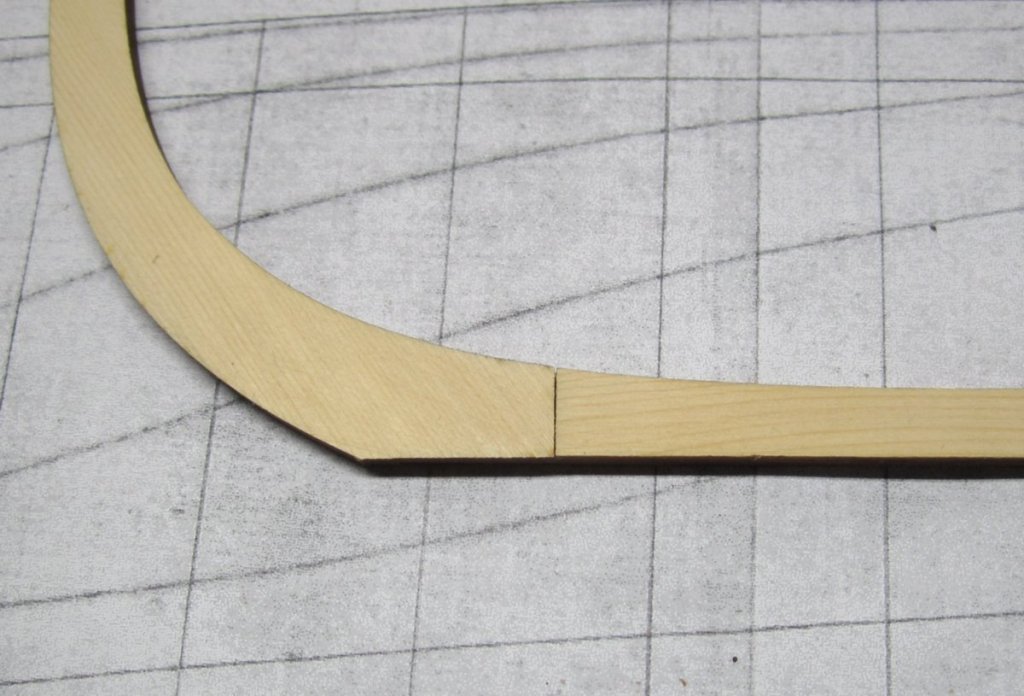
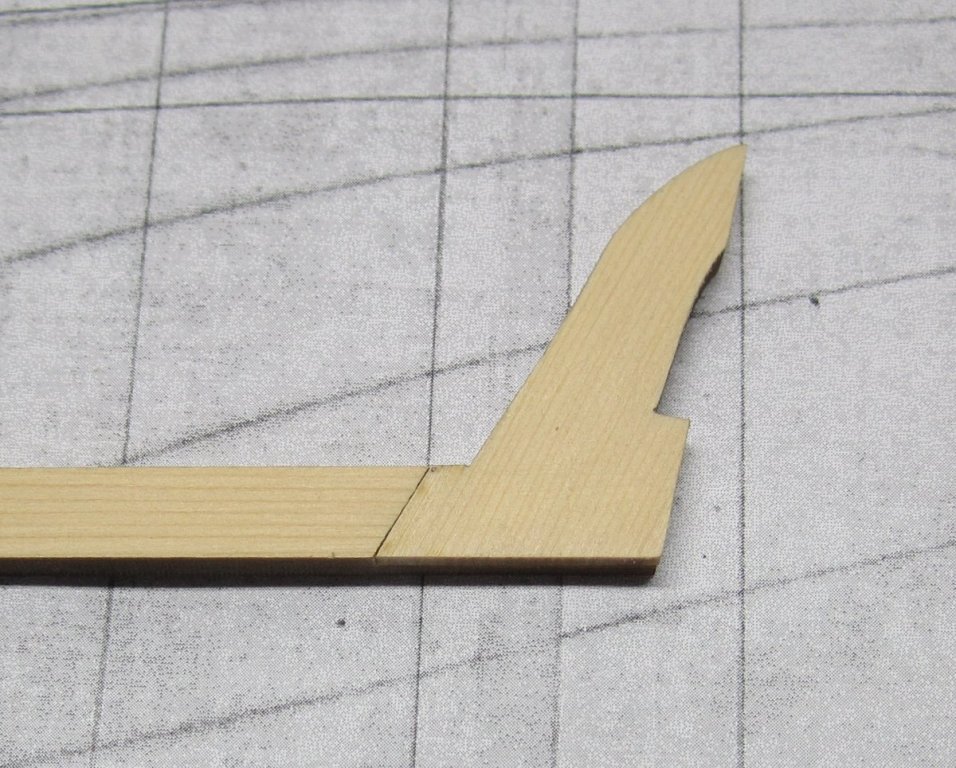
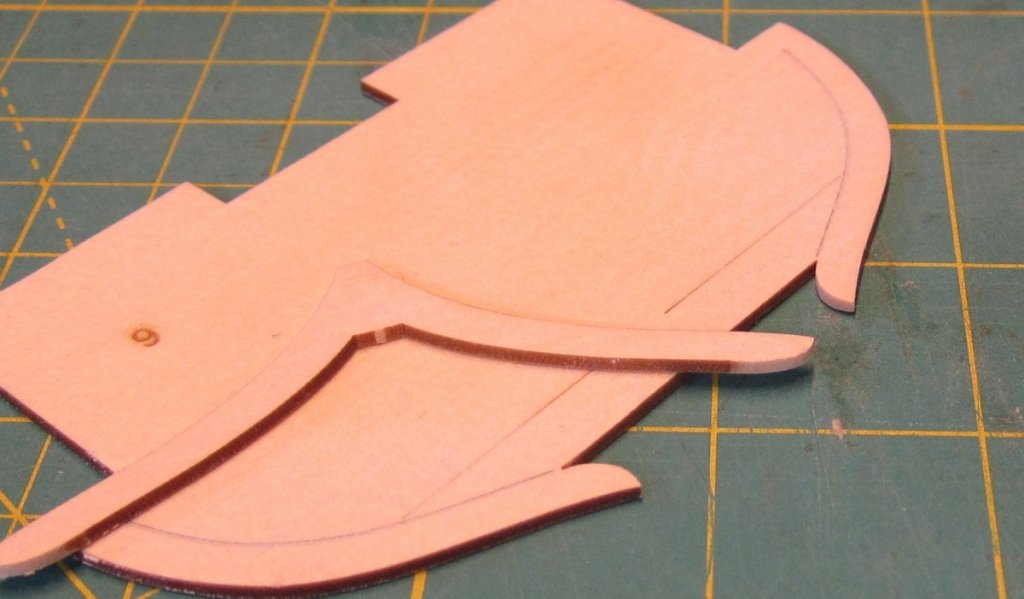
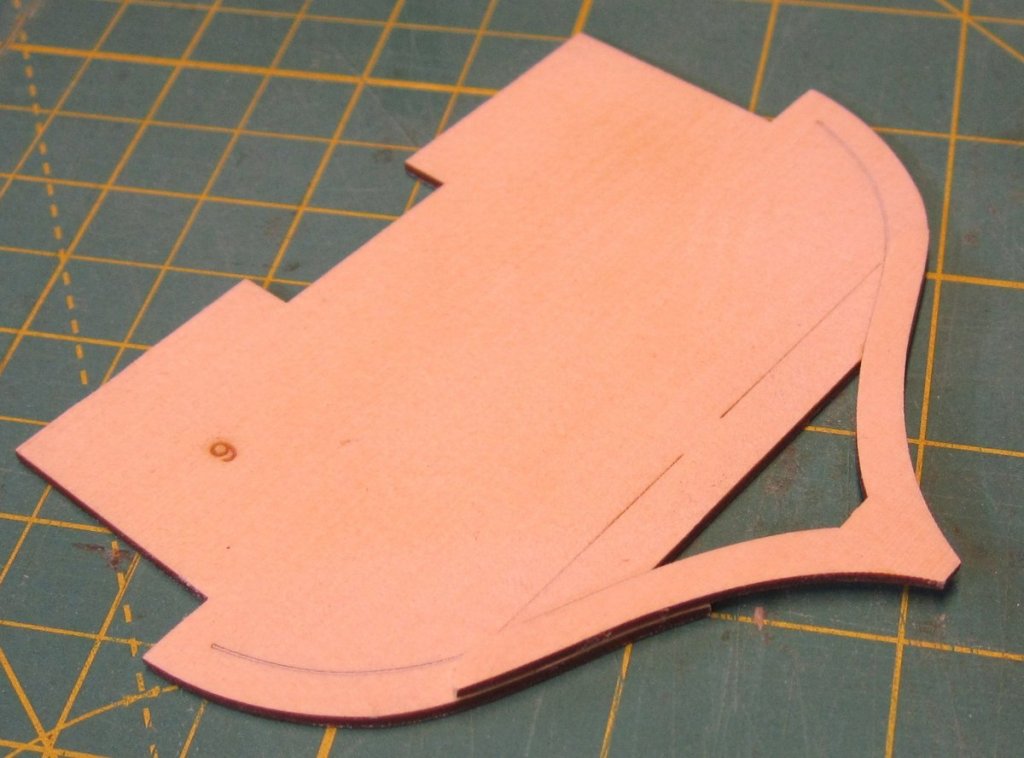
I think she will be a pretty longboat. If you recall, there will be two options for assembly of the three keel parts. The simpler version has the parts simply butt together and that is fine. But for those who want to try a bit more ambitious joint, there will be some laser cut parts prepared with the beginnings of some lap joints. I Have not removed any laser char from these pieces before "carving" and completing the lap joints. In the photo below you can two of each part. One shows the lap joint as prepared by the laser cutter. The laser can not etch deep enough to complete the lap joint. But you have the area laid out with precision so you only need to make it deeper. You can remove the material until it is half the thickness on each side of the lap joint. There are multiple ways you can do this depending on your skill level and what tools you have. You could use a sherline mill for example. In my case however, I opted for the cheap yet effective sharp #11 blade. I slowly sliced off little shavings until it was close to the correct depth. Then I used a sanding stick to clean it up. Periodically, I stopped shaving and slicing to check how the lap joints fit together. The two photos below show the two lap joints test fit together. Just a little more to do and clean up and I have it. One thing I would caution you on is not to rush it. Dont get "close enough" and then think you can sand the outsides flush after you glue them together. This would be very bad. You would see the weird twisted shape that would develop and the other slotted keel parts wouldnt fit onto it properly and that error of impatience would snowball as your project moves forward. Keep in mind that these are extreme close-ups.....you can really see the wood grain. But once the finish is applied....that will disappear. I will take photos again once the remaining pieces are added and the bolts are added. ut after the glue dries on these three parts, I will sand the laser char from the edges and clean it up. and once again, here is a comparison of the two options for assembling the three keel sections. The slotted parts will be added as soon as I clean it all up. You might also notice my change to the stern post so the model will use the more historically accurate method to attach the rudder. The older photo is below and those changes arent shown.

- 421 replies
-
- 29
-
-
- medway longboat
- Syren Ship Model Company
- (and 1 more)
-
Ropewalk (and serving machine)
Chuck replied to Charter33's topic in Modeling tools and Workshop Equipment
Great looking stuff. I feel compelled to also mention that my very simple ropewalk and serving machine are very very easy to make on your own. I have no issue what-so-ever with anyone using my design or anything even close to it for non-commercial purposes. If you are making one for yourself that is perfectly fine by me. These machines in concept are very very simple. Most will be similar because the concept behind making rope or serving rope is so simple. I am just happy to see more folks trying their hand at making their own rope....and even going through the trouble of adding the detail of rope serving to their models. That is very well done.....I wish you many years of good use from them. -
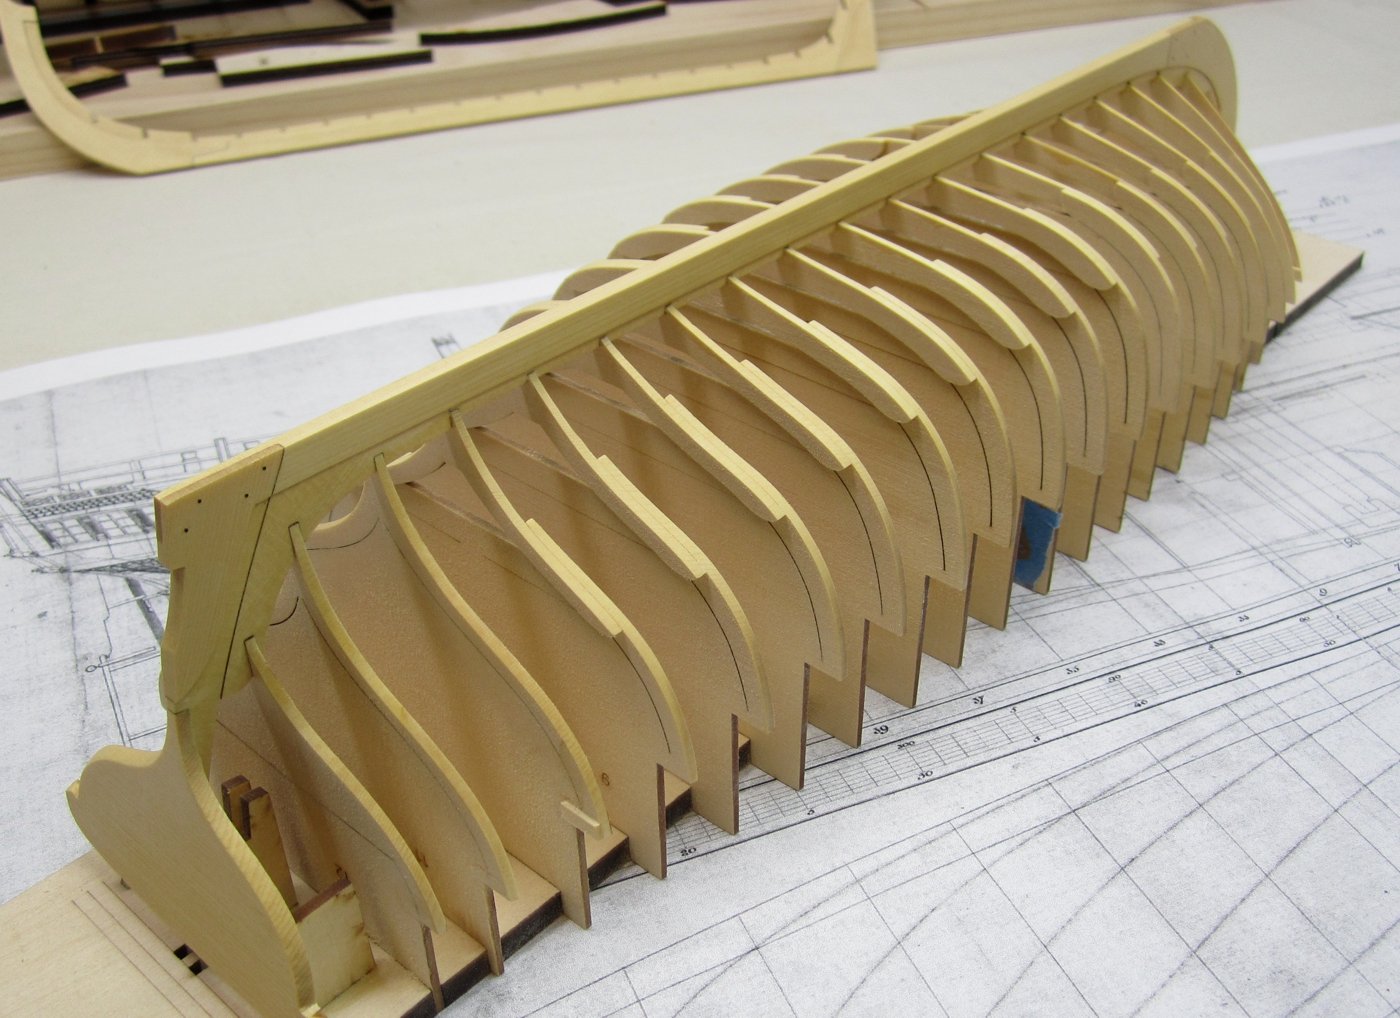
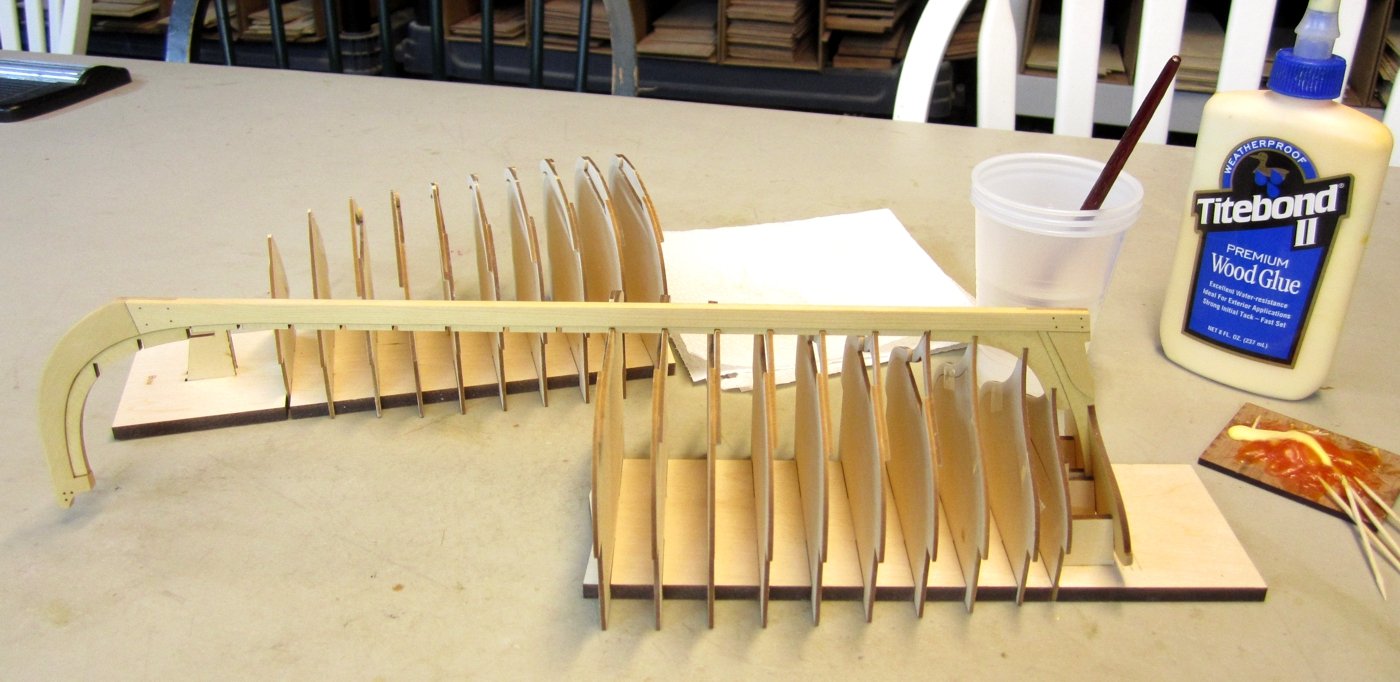
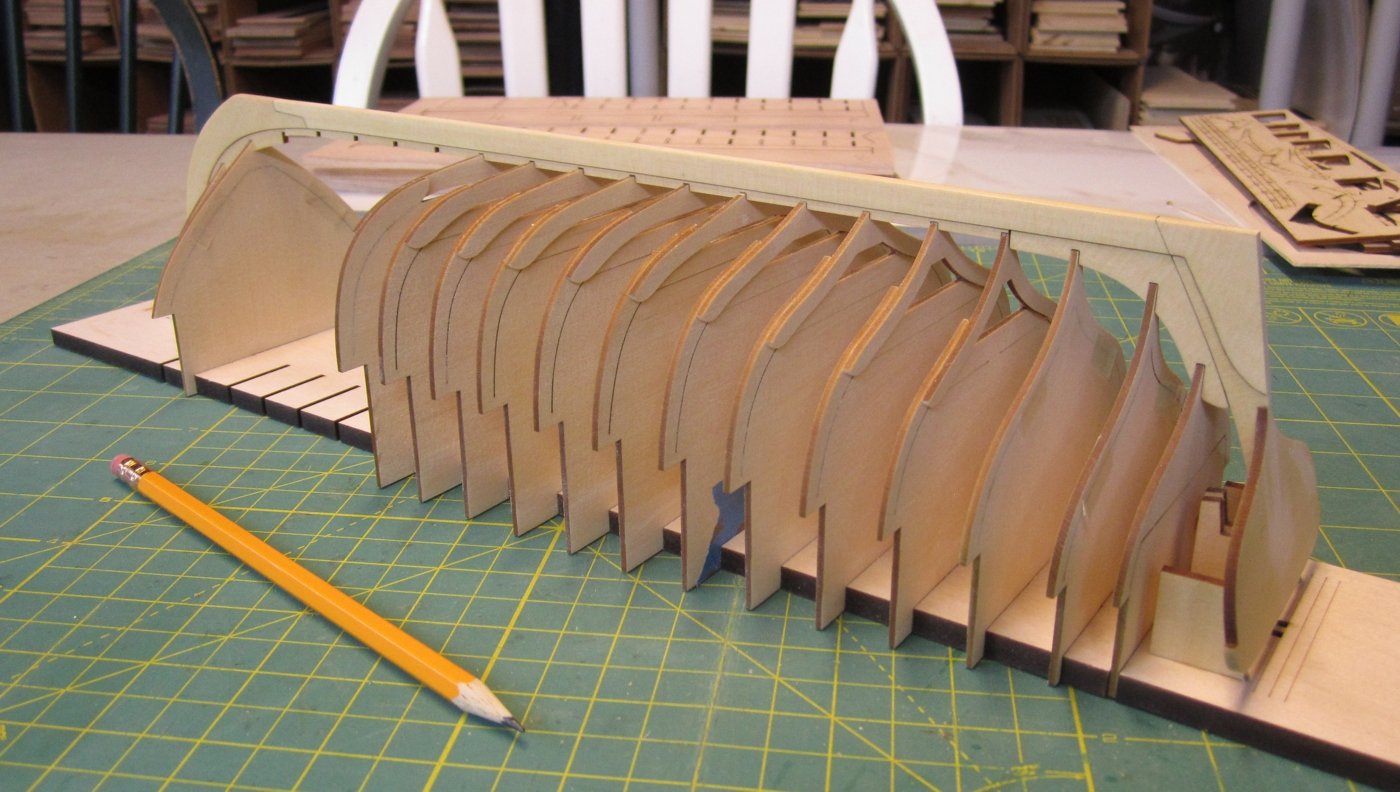
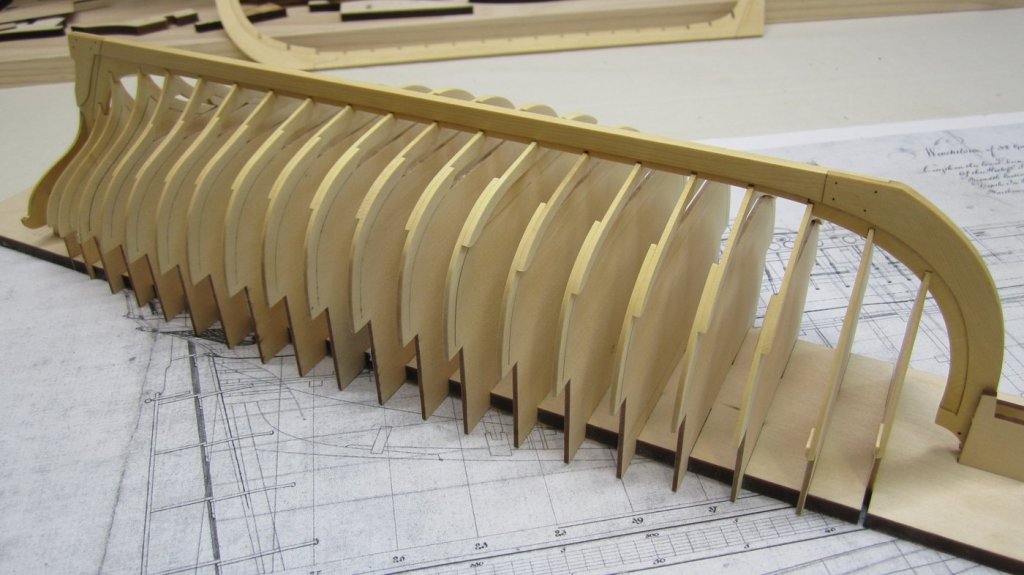
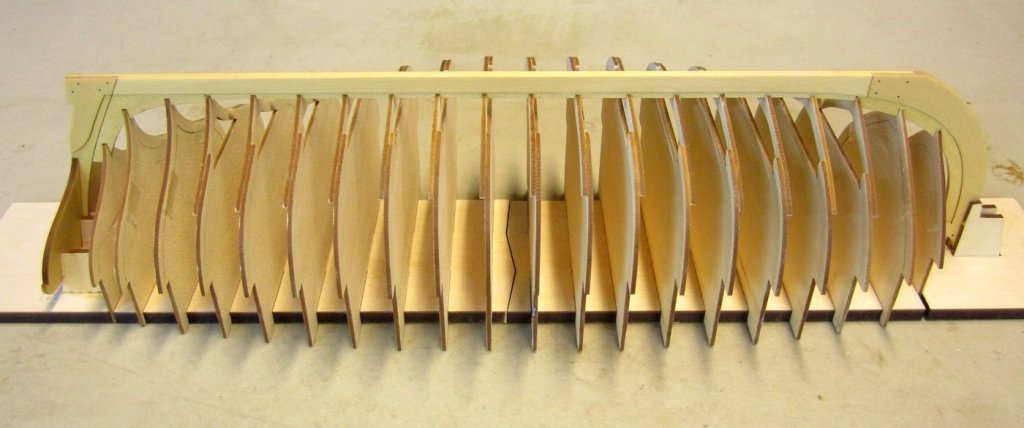
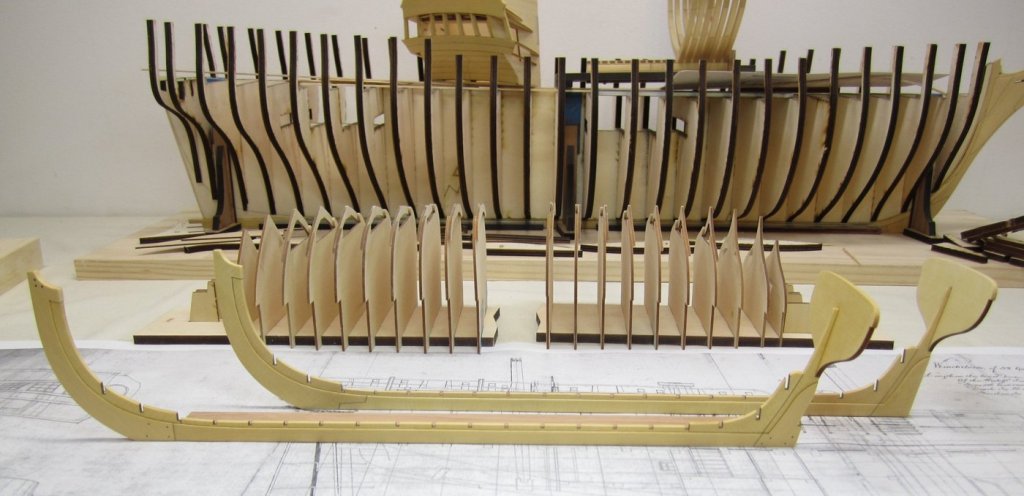
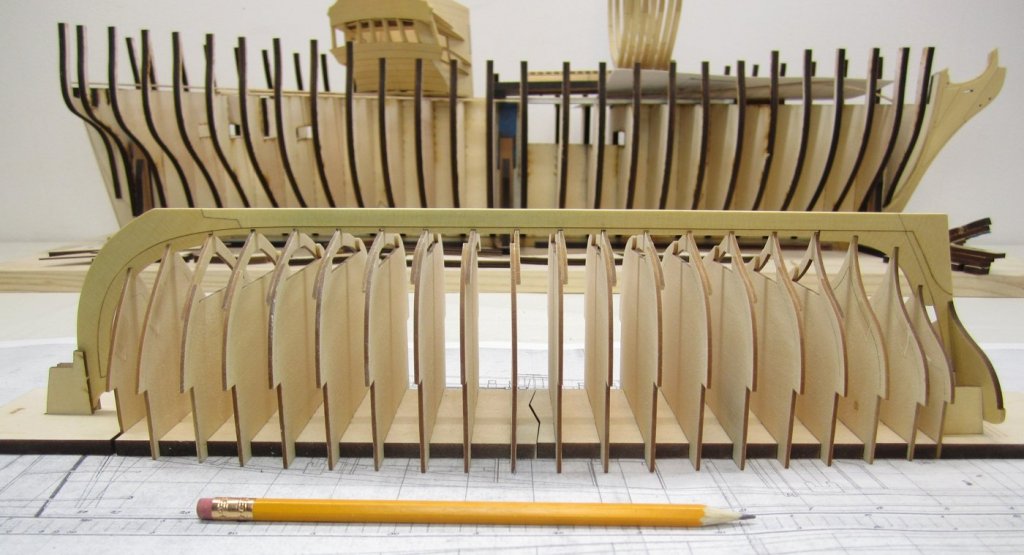
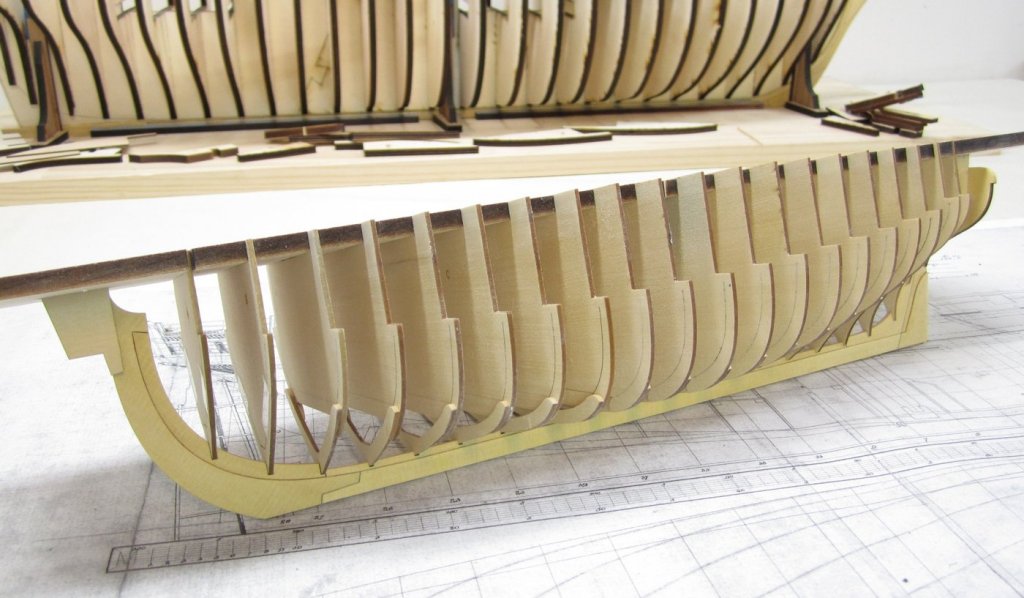
A bit of a milestone. All of the frames are completed and assembled. I have not applied any wipe on poly yet, but will do so before gluing the keel into position. I am holding off because I want to build the second version of the keel assembly with the actual lap joints. That is the one I will actually use. So I should have an update soon with those details. But for now...I have tested all of the frames and all fits well. The photo below shows the simpler keel assembly dry fit. Hopefully you can get a sense of the hull shape now and the graceful sheer. Because this is an early longboat it has a much more pleasing shape than the other Long boat model I made. I have gently flipped it "right-side-up" in the build board so you can hopefully see the sheer and shape better. Once I complete the other keel and glue it to the frames....fairing and planking can begin. Its coming together quickly. In fact, other than the plans, this will constitute the starter package as seen in the photos. Everything you need to get this far. If you have any questions let me know.

- 421 replies
-
- 29
-
-
- medway longboat
- Syren Ship Model Company
- (and 1 more)
-
Very nice!!! I want to see this model completed and sitting next to an expertly weathered WWII Era Armored Tank. Just for giggles...yu should place one of your other models next to it for comparison. Chuck
-
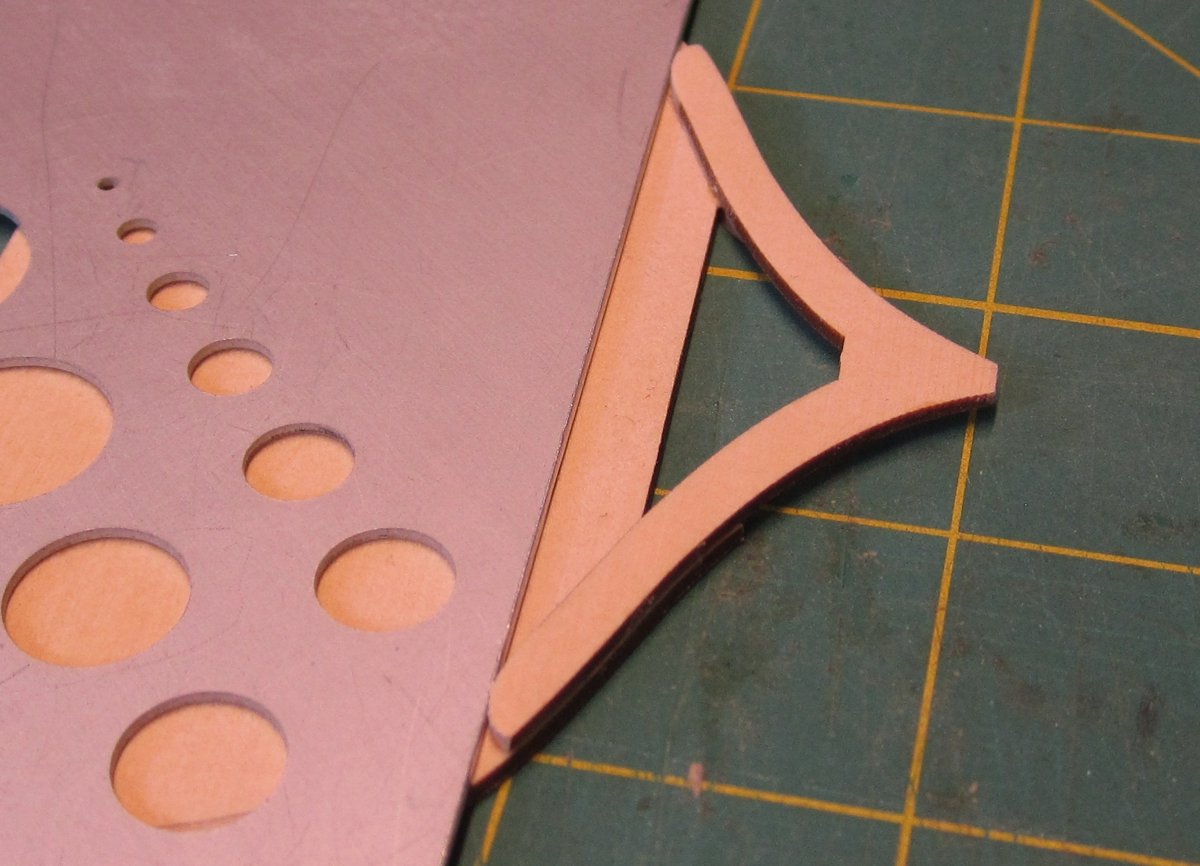
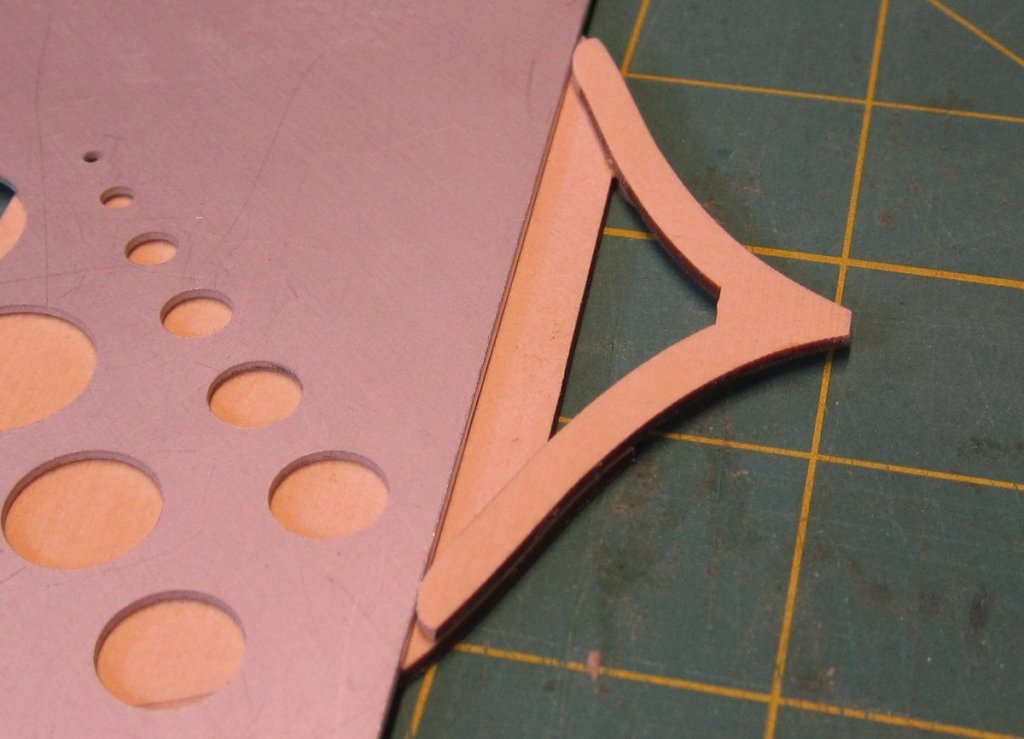
I am not sure yet if I will. But yes at this scale it is certainly a possibility. On a fully planked hull they would be very hard to see however. So I may hold off and just give it a try on the partially planked version. One thing I forgot to mention in my previous post which is very important, is not to forget to sand off the laser char on the two piece frames. But not the whole thing.... Just remove the char from the tips of the floors and the top timbers as shown below. This will be difficult to do later. Doing it before you assemble the frames is best. Just be careful not to break away the frame center from the top timbers. The remaining char is best removed when fairing the hull as it can be used to help you see certain areas that need more fairing before planking.
- 421 replies
-
- 11
-
-
- medway longboat
- Syren Ship Model Company
- (and 1 more)
-
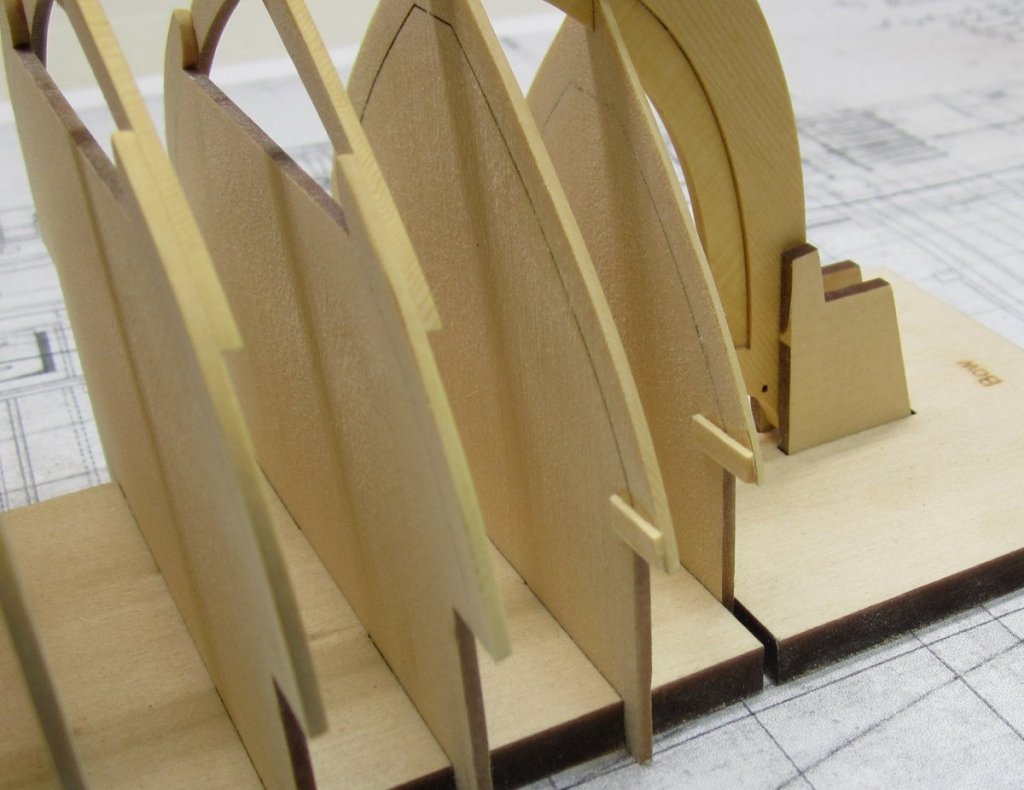
Thanks guys...and Michael its just good to have you along for the ride. I would love to see one of your past builds made into a group project by the way. Maybe we can talk about it at some point and put something together. Anyway, progress continues. One piece frames are pretty straight forward. For the two piece frames, there is an etched line for reference on the top half that contains the top timbers. The floor is resting on top of it in the photo below. Note how thin the kerf is on the laser cutting. You can hardly see a difference between the lightly etched line. Compare it too the MS kit version....which is actually smaller so the kerf is just a sloppy mess. That is just a comparison of proper laser cutting vs. not so proper laser cutting. These two pieces must be assembled for 15 of the 20 frames. This can be done by just placing a straight edge or ruler on that line as shown below. Then apply some TitebondII to the top timbers only. Be careful not to get much glue near the cut lines that separate the center. Once dry it will make removing the center more difficult later. But dont skimp on the glue either. Use enough to ensure a good bond with the floor piece. Especially on the tips of the floor and top timbers. Add the floor and align with the straight edge along the etched reference. Once dry you are all done and can assemble the other two-piece frames. Easy peasy!!! I am moving along pretty good here and only have the last five frames to laser cut and assemble then its time to fair the hull. I will make a recommendation. Dont forget to use the tape to help reinforce the center before you start fairing. Also, only work on one frame at a time so you dont mix up the parts from one frame to another. Once you complete each frame, test its fit in the build board. I have made the slots for the two tabs on each frame very tight on purpose. More than likely you will need to sand the two tabs thinner for a good "press fit" This is important because you dont want the frames too loose so they fall out on their own. You dont want them too snug so they are difficult to remove. We will be removing the jig after the planking is completed. So the fit should be just right....if you cant easily remove the frame then its too tight. I would rather sand the two tabs thinner than try to make the slots wider. This for me is easier and takes just a few seconds. If you sand too much and the frame becomes too loose, that is no problem. Just add some blue painters tape to the two tabs to thicken them up so they fit really good. You can see that I had to do that with one frame so far. In addition...test the bottom of the frames for a similar fit in the notches of the keel. I do this as soon as I finish each frame. Here is what the model looks like today. Hopefully the frames will all be completed over the next few days. Then I will glue the keel into position permanently. I will describe the process when that time arrives. But if you want a sneak peak and plan on joining this group once it starts. I would also recommend that you read the monograph on building the barge. It describes the process as well. Just in case you cant wait. Here is a link... https://www.syrenshipmodelcompany.com/royal-barge-kit.php .

- 421 replies
-
- 29
-
-

-
- medway longboat
- Syren Ship Model Company
- (and 1 more)
-
I just gave you access so you should be good to go!!! Enjoy.
-
Requesting feedback for future MSW Group Projects
Chuck replied to Chuck's topic in Group Projects on Model Ship World
It is indeed. We are setting these groups up here specifically for just that reason....because many of you dont live close to a physical group of people in order to have one locally. -
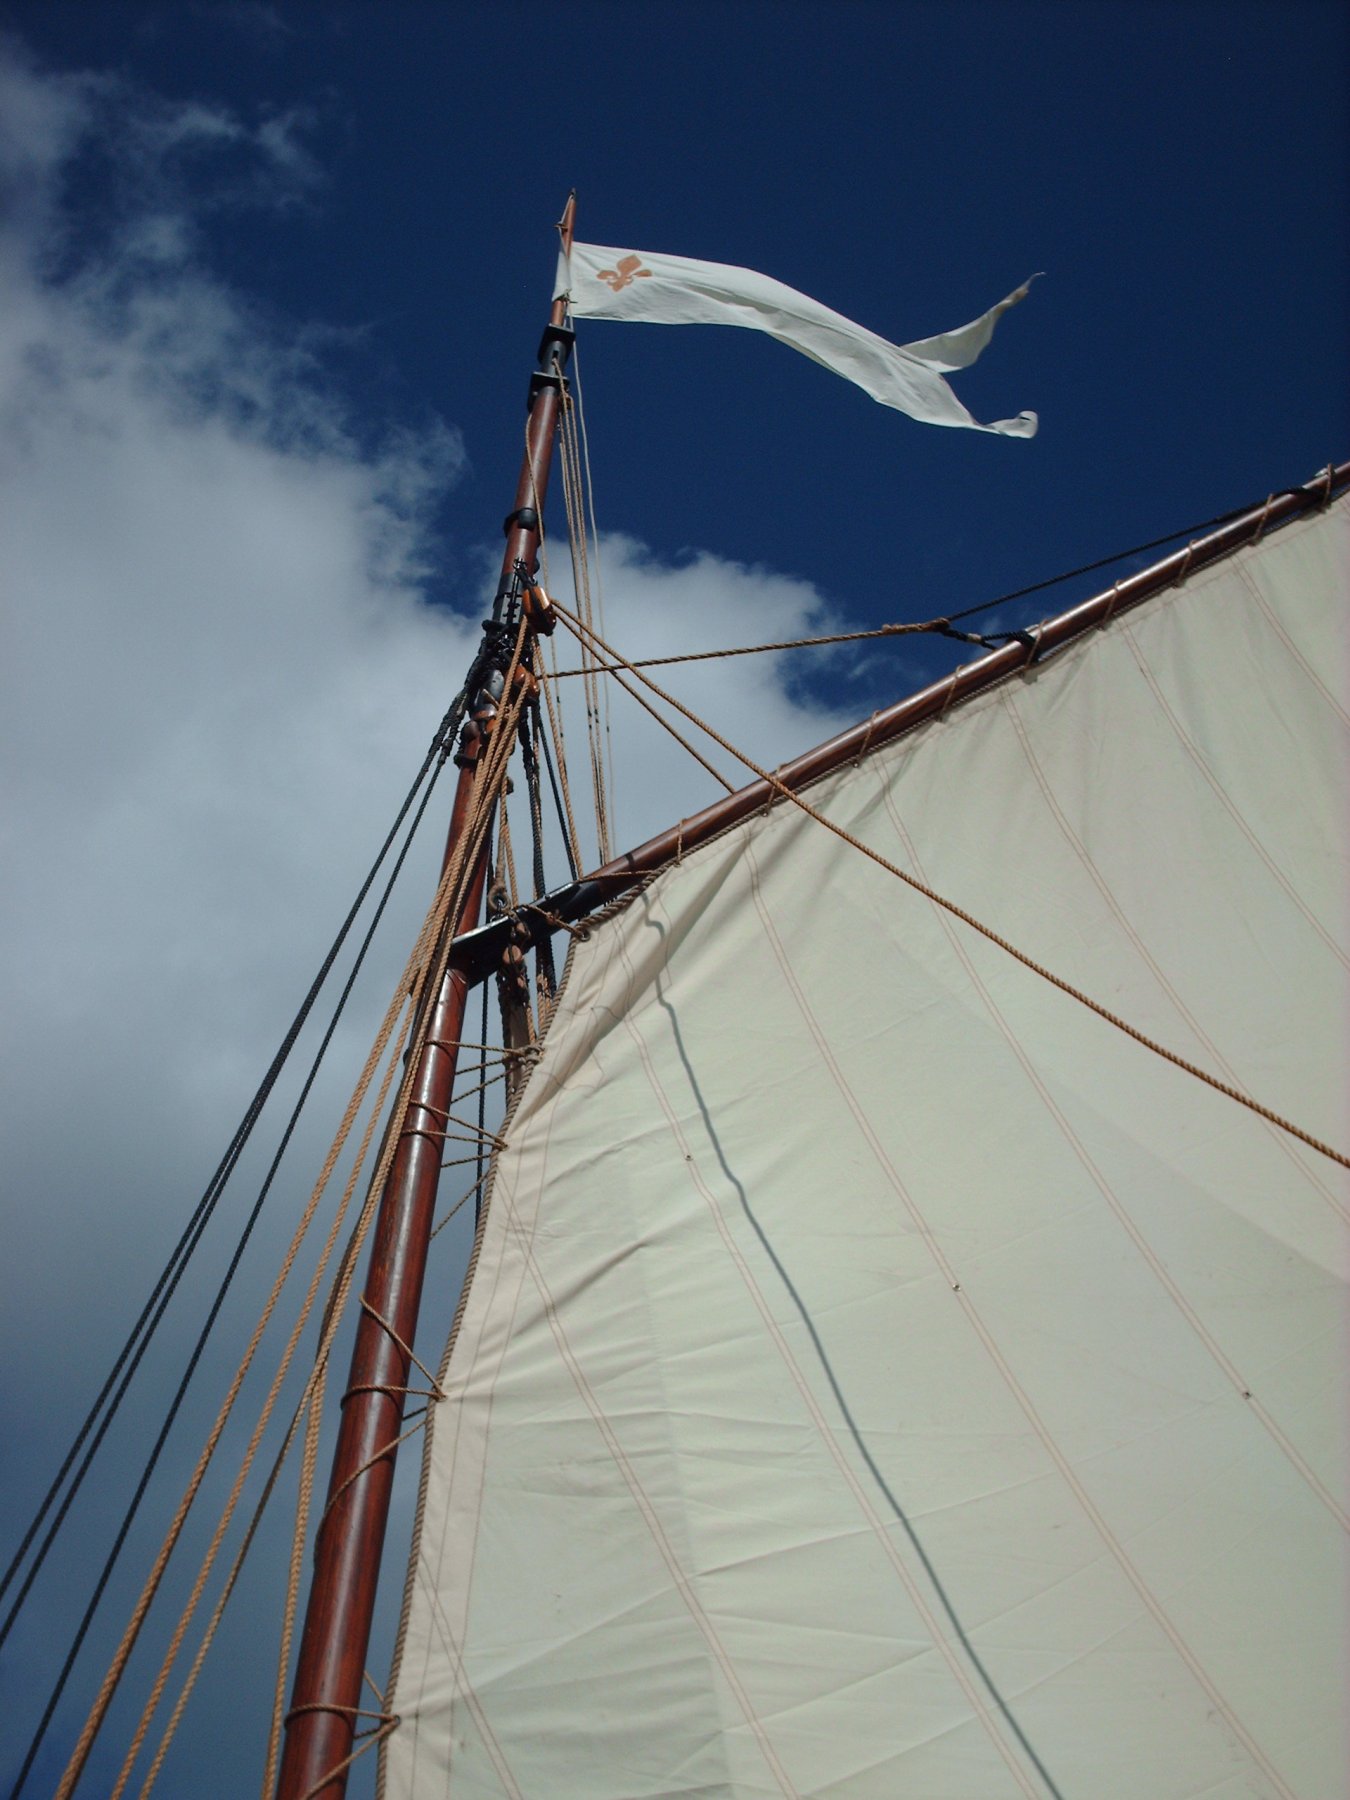
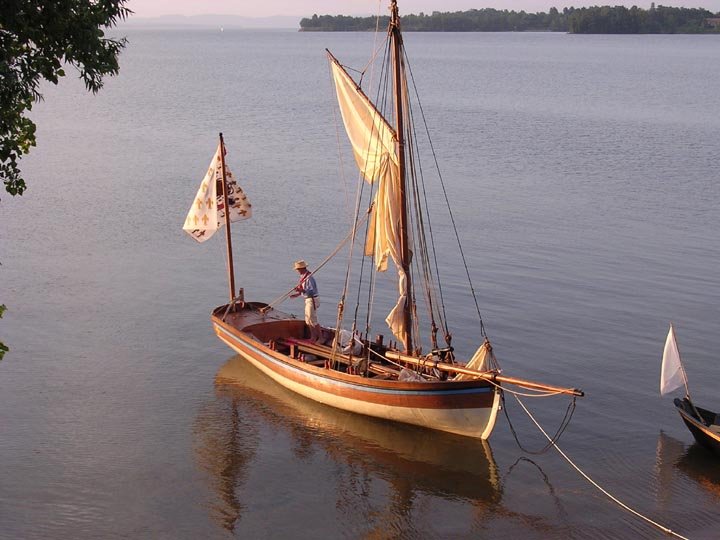
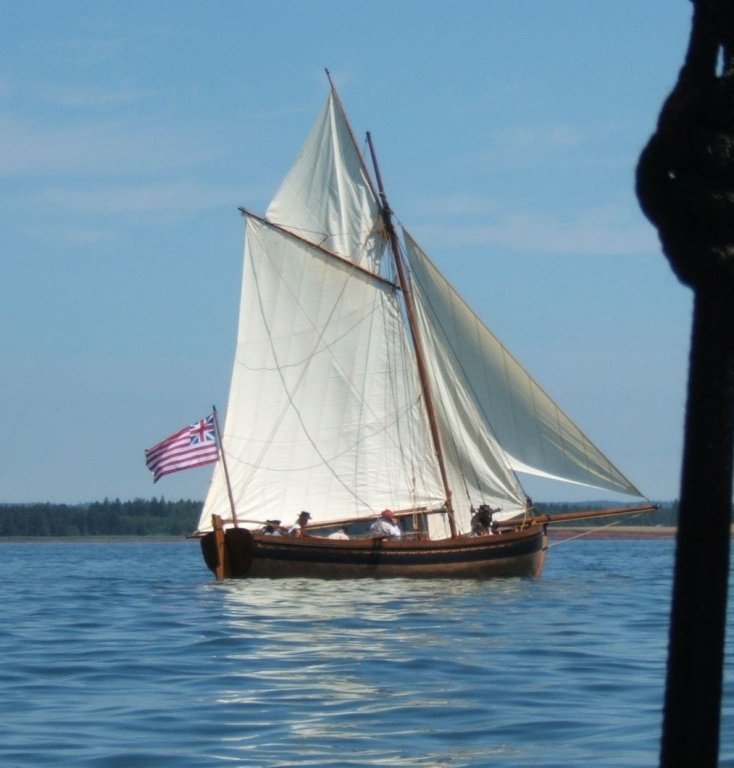
Some close up images of rigging details from the replica under sail......

- 421 replies
-
- 14
-
-
-
- medway longboat
- Syren Ship Model Company
- (and 1 more)
-
I think I might have mentioned this somewhere but I will repeat here. There will be a starter package containing keel parts, frame parts and build board along with the plans. You scratch everything else. Estimate $100 Then there will be a full kit version no rigging materials...just the hull. Estimate $180ish but this could be way off because I m not close to knowing yet Lastly...a separate rigging/sail package with everything to add masts/sails to your model. Containing mast material, rope, blocks, whatever else including sail material. Estimate $45ish Thats it. Otherwise it gets to crazy. This should make it economically feasible for most folks who may only want the starter package and scratch everything else. Otherwise they can buy one of the other options. But I cant itemize it out into smaller packages because that would be insane to keep track of. Starter packages will only be available for those taking part in the MSW group project and bought through this site. Once I add it to my store....there will only be the full hull kit and rigging packages available.
- 421 replies
-
- 11
-
-
- medway longboat
- Syren Ship Model Company
- (and 1 more)
-
Thanks The Queen Anne Barge kit uses pre spiled planks as well. Its not a big deal to make them. I basically spile and create the shape for the plank like I normally do on a scratch project. Once I am satisfied that my plank fits on my prototype I trace it and make a laser cut version. This laser cut version is then tested on the model. I will tweak it as needed and when I get it perfect, I glue it into position and move on to the next one. It takes a while but the results are very good.
- 421 replies
-
- 11
-
-
- medway longboat
- Syren Ship Model Company
- (and 1 more)
-
Requesting feedback for future MSW Group Projects
Chuck replied to Chuck's topic in Group Projects on Model Ship World
Its not a physical group....to clarify....if you dont join this online group (similar to TRiton Group) then you must wait to buy them. But if you join the online group....LIke TRiton, which is just a group of build logs of the longboat all in the same area. The group we are referring to is just the online group put together here on MSW. Not a physical group in your geographical location. -
I am shooting for September guys....
- 421 replies
-
- 7
-
-
- medway longboat
- Syren Ship Model Company
- (and 1 more)
-
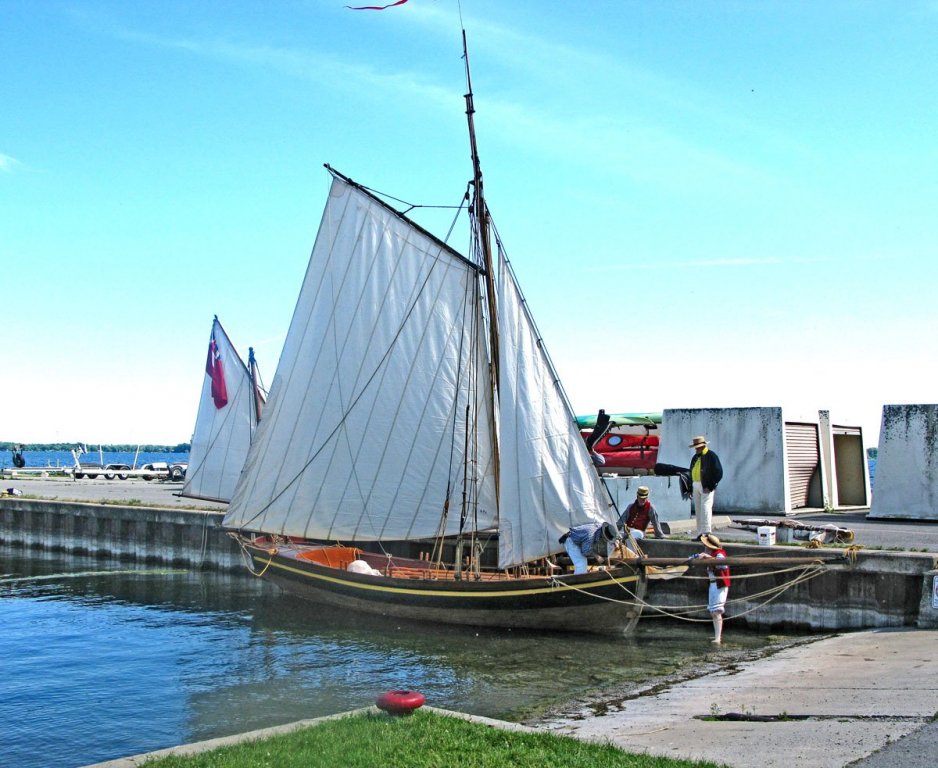
I have been speaking to Peter Rindlisbacher who is an artist and model maker. He is the builder and owner of the longboat replica in the photos I posted. He has already given me some great insight about the rig. He actually sails this thing and is very knowledgeable. I believe he is also going to be the dinner speaker this year at the conference. I have invited him to join our little group project as well. Here are some additional photos of his longboat replica.

- 421 replies
-
- 27
-
-
- medway longboat
- Syren Ship Model Company
- (and 1 more)
-
Very nicely done.....almost time to start putting some skin on those bones!!!
- 607 replies
-
- 9
-
-
- winchelsea
- Syren Ship Model Company
- (and 1 more)
-
Joe I will make probably six kits at a time because that is all I can really make with my capacity. I wont place them in my storefront until after everyone who has signed up for the group has one. My guess is around 15 or 20 people. But remember....no line cutting. If you sign up for the group you must start a build log. No short-cutting to get an early kit. As soon as most have a kit I will place it in my store for anyone to buy and enjoy. Unfortunately a 1/4" scale version is not going to happen. Just the 1/2" scale version.
- 421 replies
-
- 6
-
-
- medway longboat
- Syren Ship Model Company
- (and 1 more)