Chuck
-
Posts
9,700 -
Joined
-
Last visited
Content Type
Profiles
Forums
Gallery
Events
Everything posted by Chuck
-
 https://www.micromark.com/Doc-ObrienS-Powders
- 421 replies
-
- 7
-

-
- medway longboat
- Syren Ship Model Company
- (and 1 more)
-
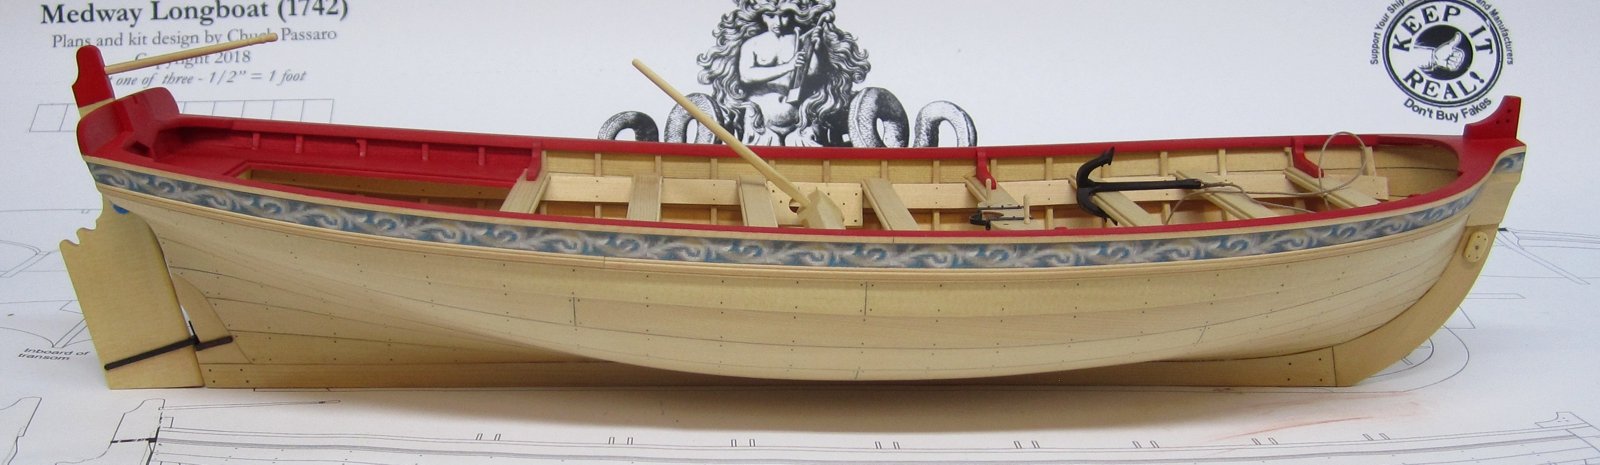
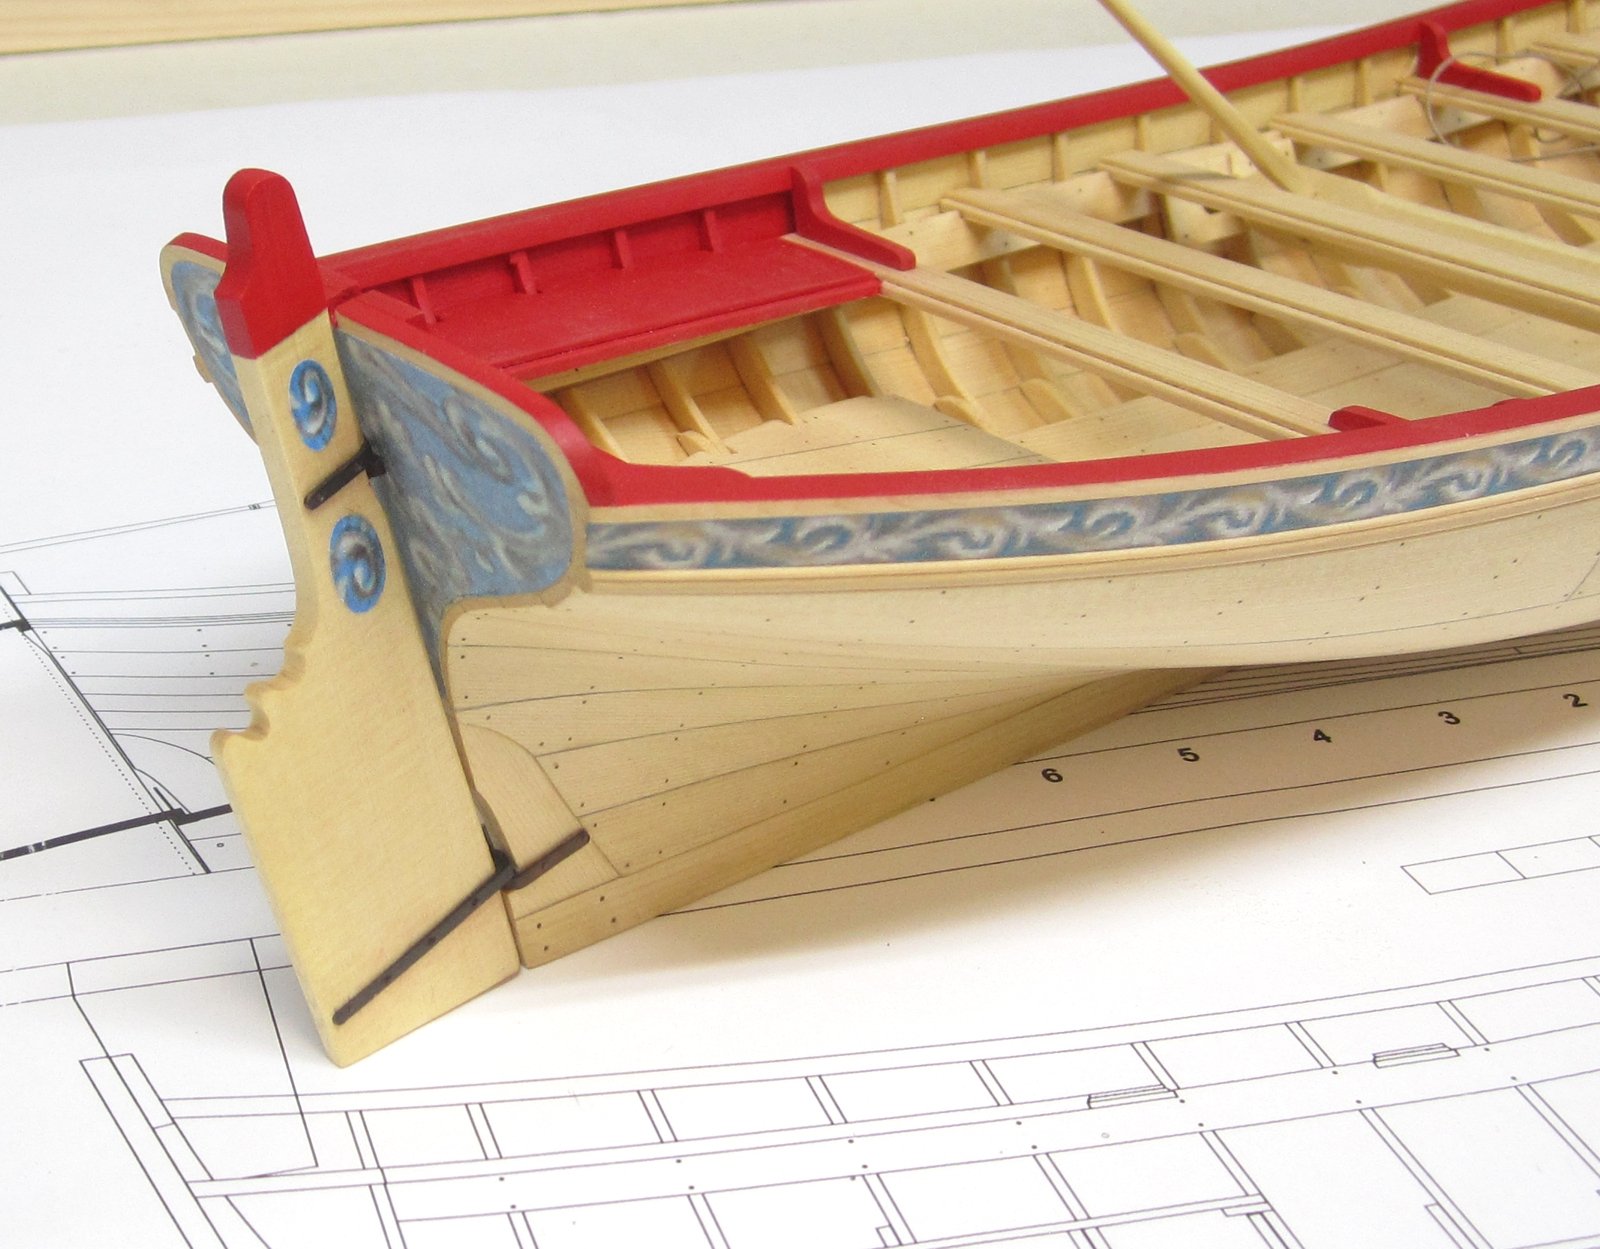
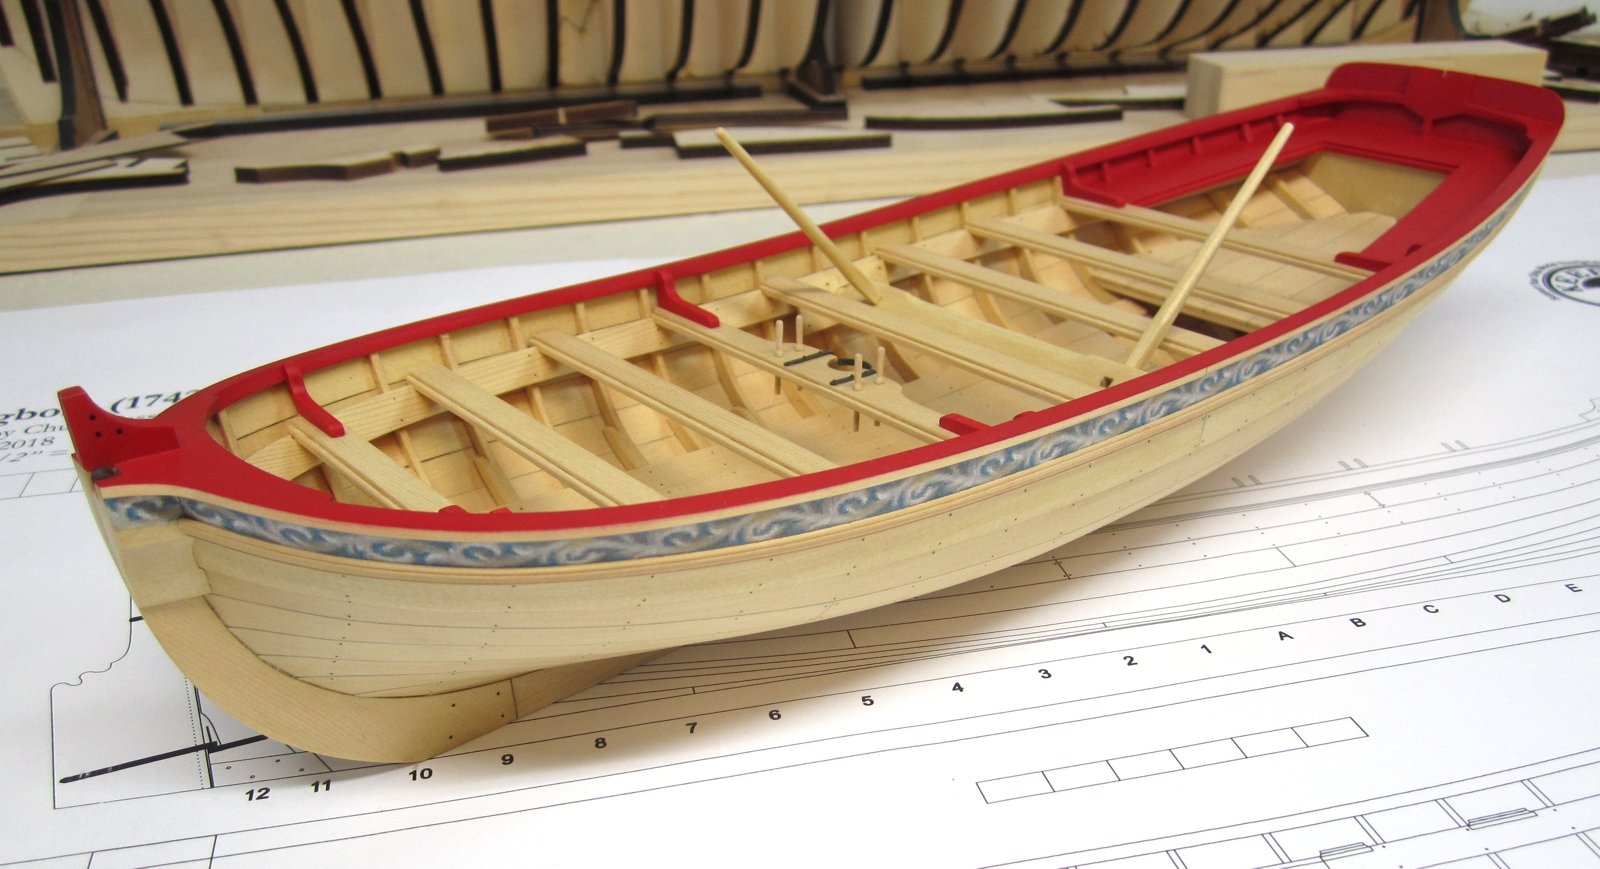
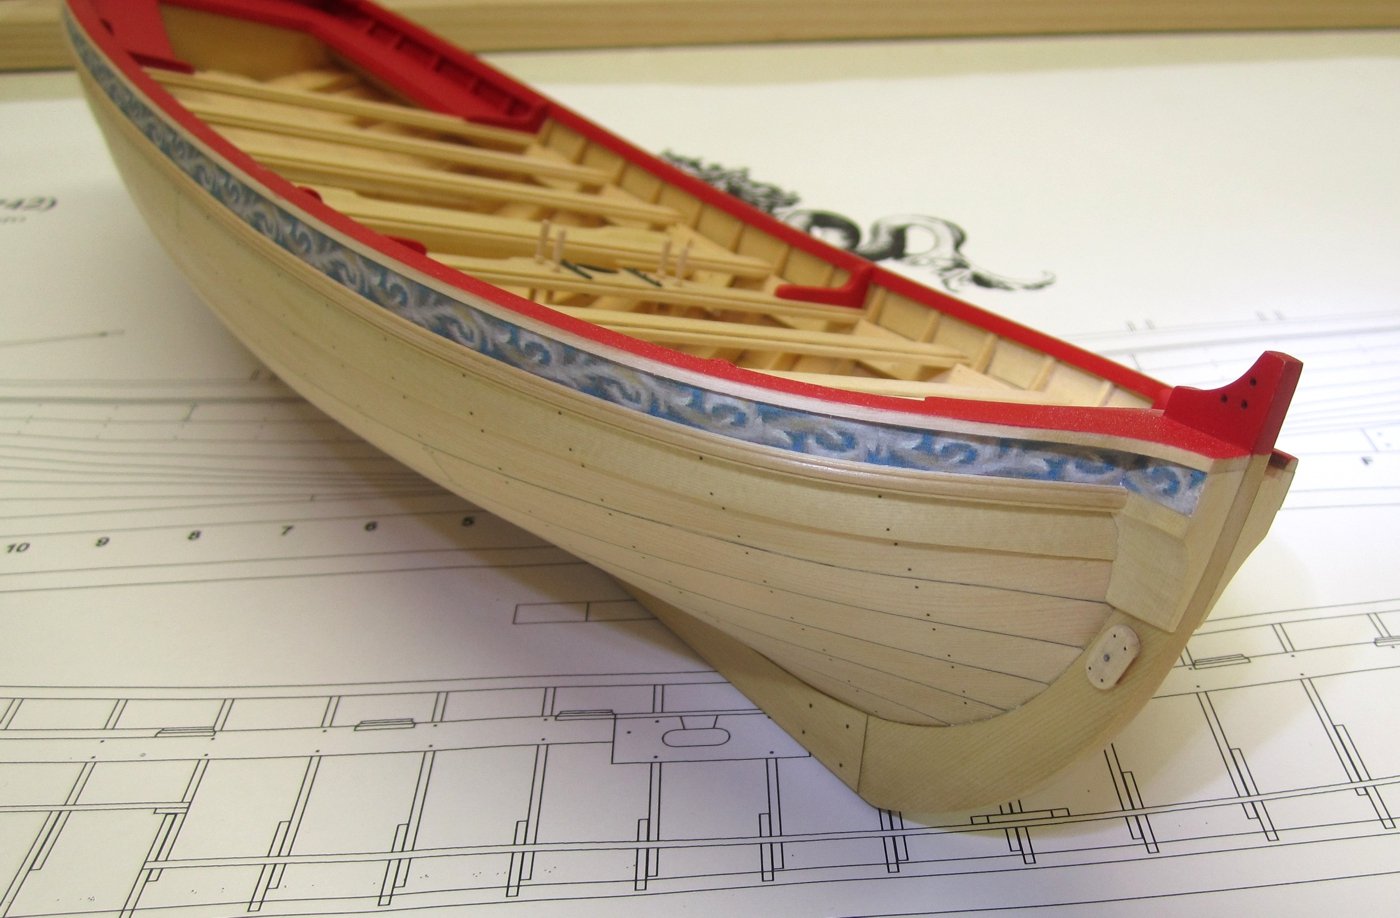
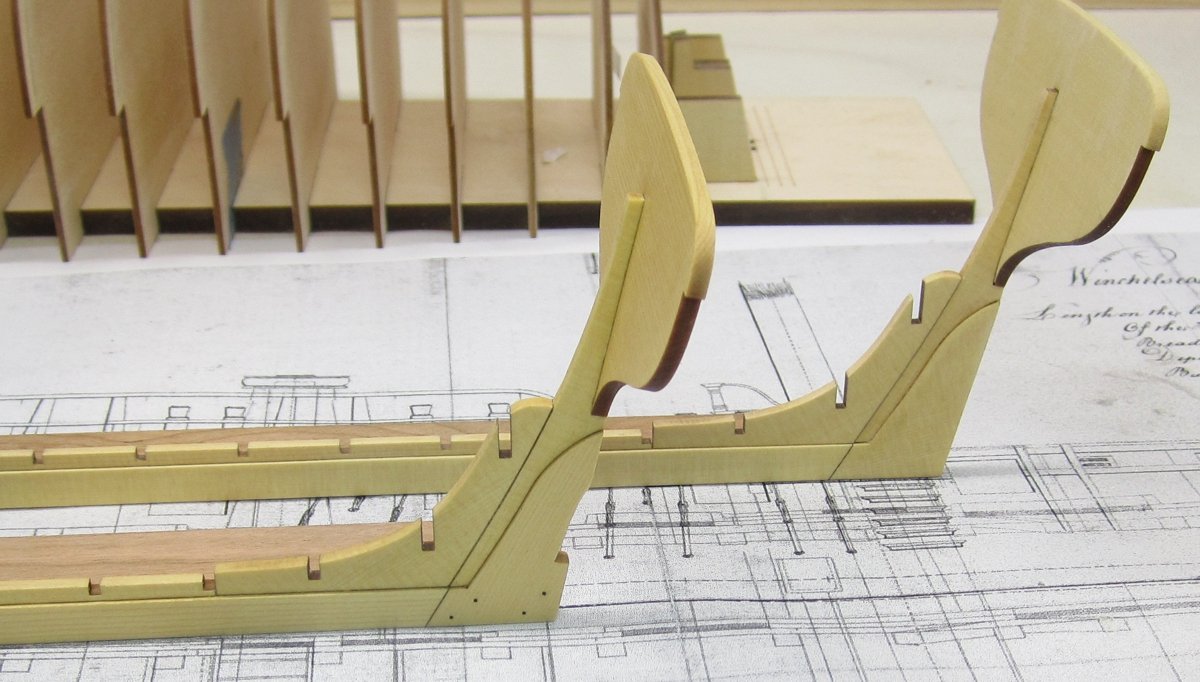
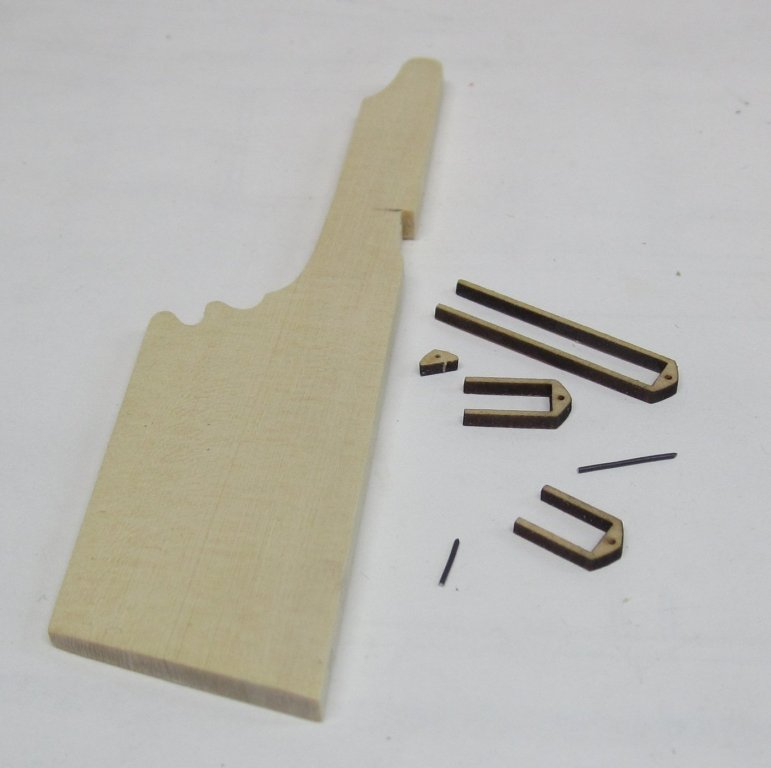
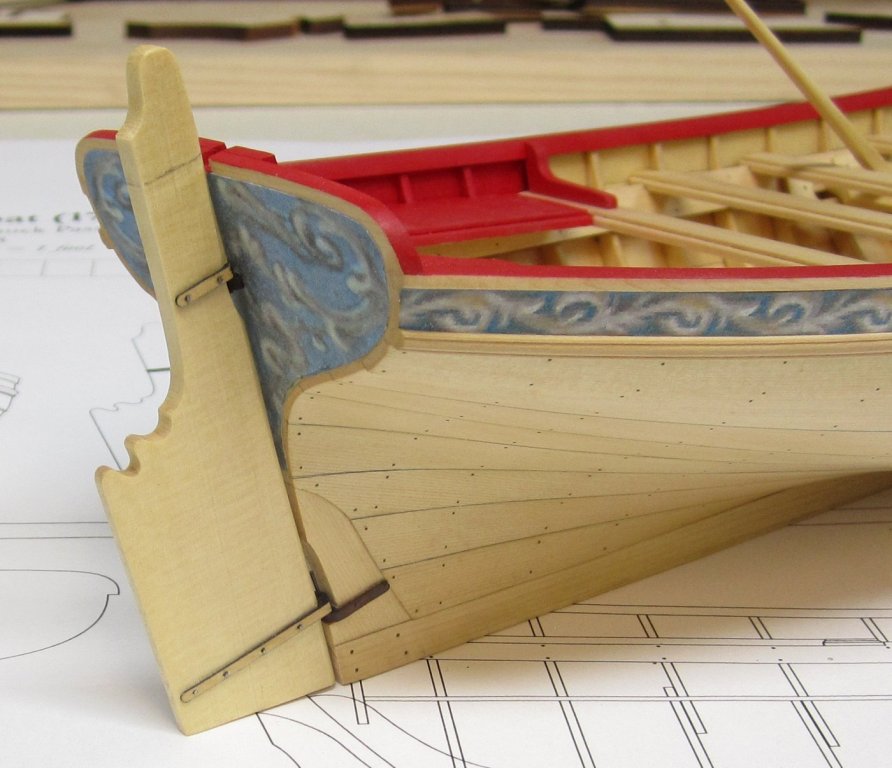
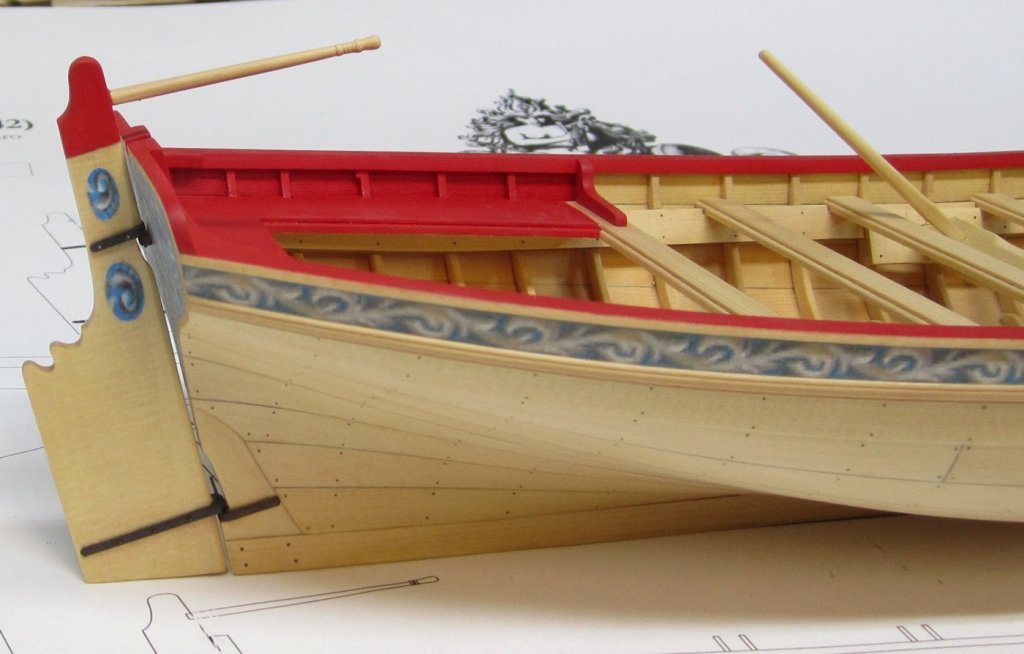
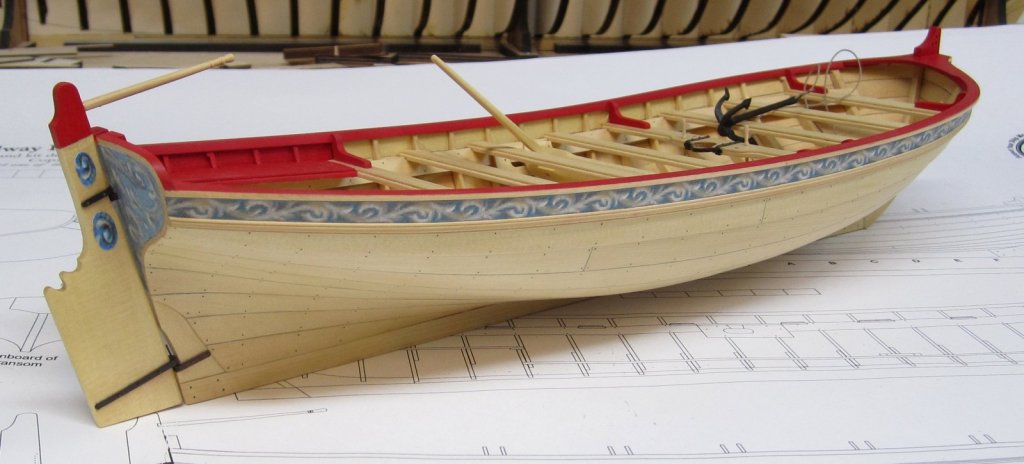
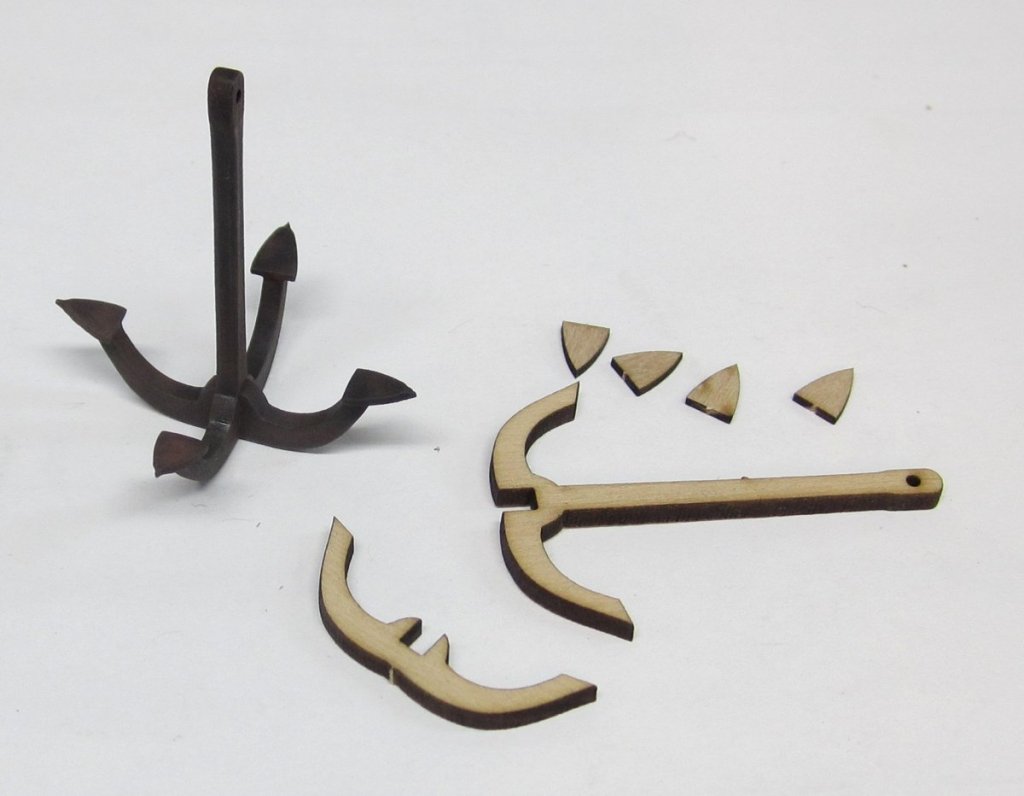
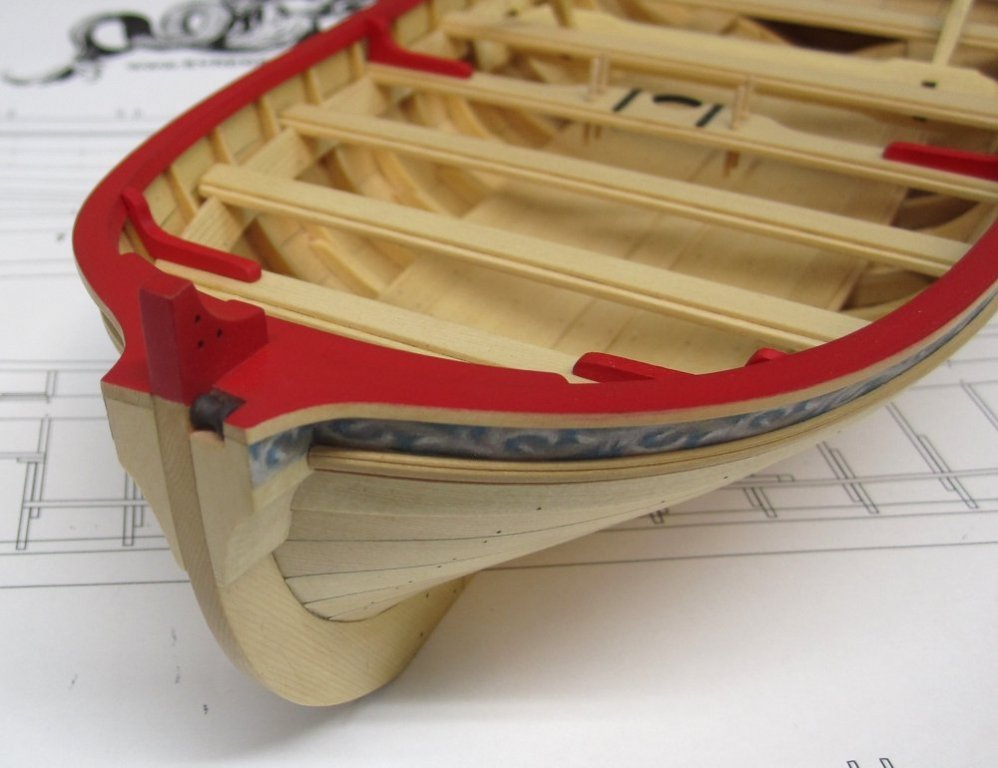
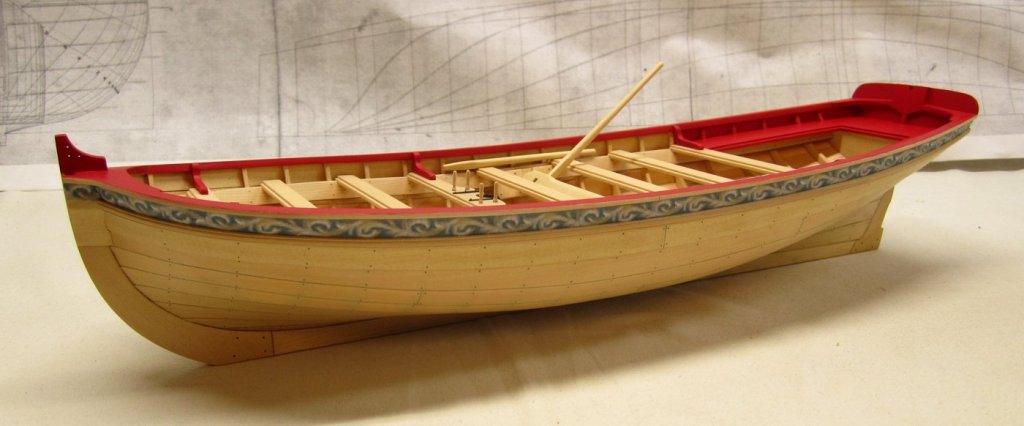
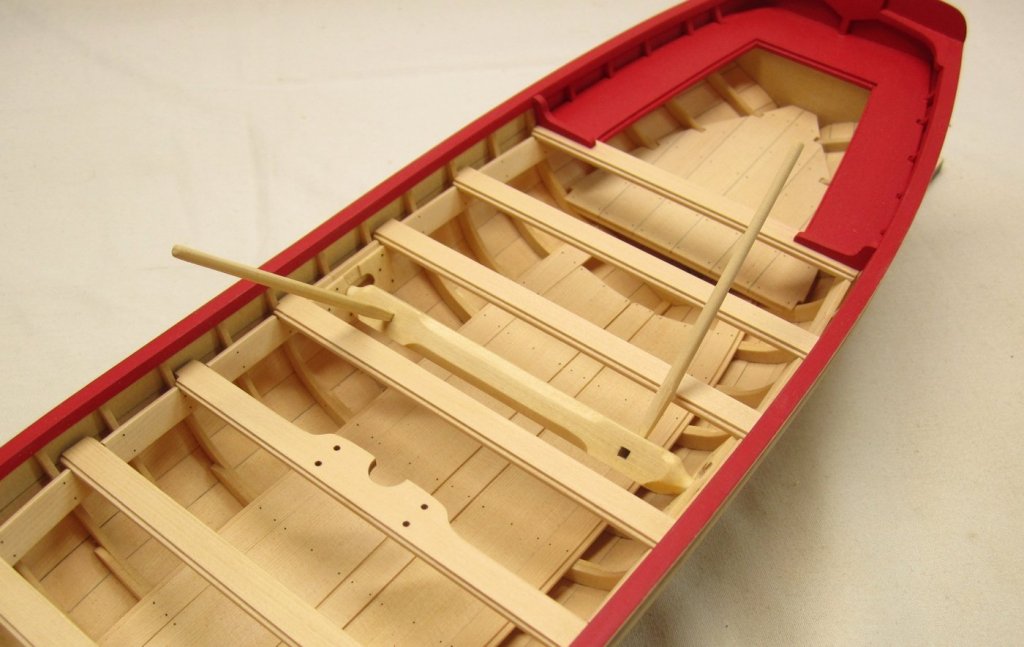
So close now!!!! 😀 The rudder hinges were something new that I wanted to try since the scale is much larger. So I laser cut them entirely from boxwood. You can see that they are too thick at this stage but this is by design. Once glued in position on the rudder and hull, they are quite sturdy. This is when I sanded them down thinner so they were like the thickness of the brass strips I would use. About 1/64" thick. Then I drilled holes for the bolts and inserts 24 gauge black wire to simulate them. Filing them down so they sand proud of the straps. I also used 24 gauge black wire for the hinge pins. These are actually working pintels and gudgeons. They were painted black and then a coating of weathering powder added to make them look better and not just like a painted black piece of wood. It came out really well I think. I also must mention that I painted the edges on top and bottom black BEFORE I glued them into position. Its must cleaner this way. I only had to paint the outside after adding the bolts. The tiller was turned in my dremel from a 3/32" x 3/32" strip. Nothing to difficult. I painted and added the friezes to the rudder and mounted it. All I have left to do on the hull is add the the thole pins. Then make the oars . I already made the grapnel. Made from Boxwood and treated just like I did for my anchor kits. Chuck

- 421 replies
-
- 26
-
-

-
- medway longboat
- Syren Ship Model Company
- (and 1 more)
-
Maybe, probably..... But that would be a bit "kitchen sink" for my tastes any way. No need to add every little doo-dad just because it would have been there. I think it would be very distracting and isnt warranted. But you guys can always add it in. I dont think its worth the risk of splitting that thin cap rail. It would be pretty tough to fix at this point. Chuck
- 421 replies
-
- 12
-
-
- medway longboat
- Syren Ship Model Company
- (and 1 more)
-
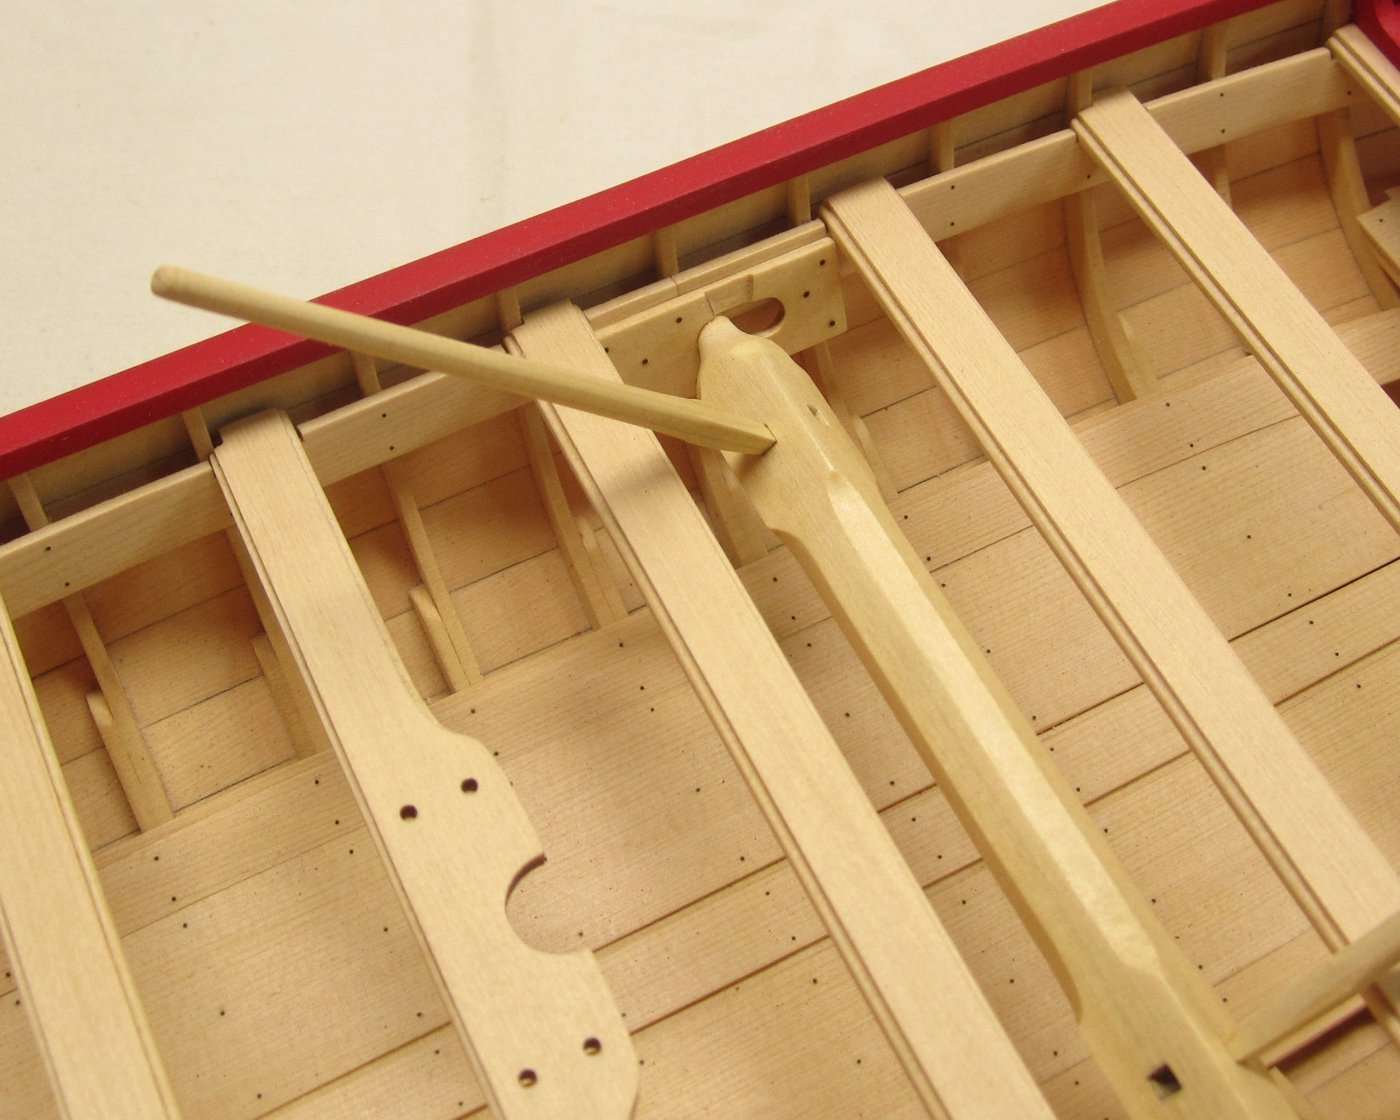
For the roller at the bow, I chocked up a 1/8" x 1/8" strip in a dremel. You can use a drill or even a mini lathe if you have one. I first used a sanding stick to roughly turn it into an octagon. Basically I just knocked off the corners a bit to make rounding it off easier. I blackened it with a sharpie. and glued it into position. Almost there with the hull. Just have the thole pins and the rudder to do next.


- 421 replies
-
- 26
-
-
- medway longboat
- Syren Ship Model Company
- (and 1 more)
-
I do sometimes cut my own brass strip but the stuff I used this time is a common size. Its available commercially. Its from K&S. 1/32 x .025 or 1/64. http://www.ksmetals.com/29.html Chuck
- 421 replies
-
- 6
-
-
- medway longboat
- Syren Ship Model Company
- (and 1 more)
-
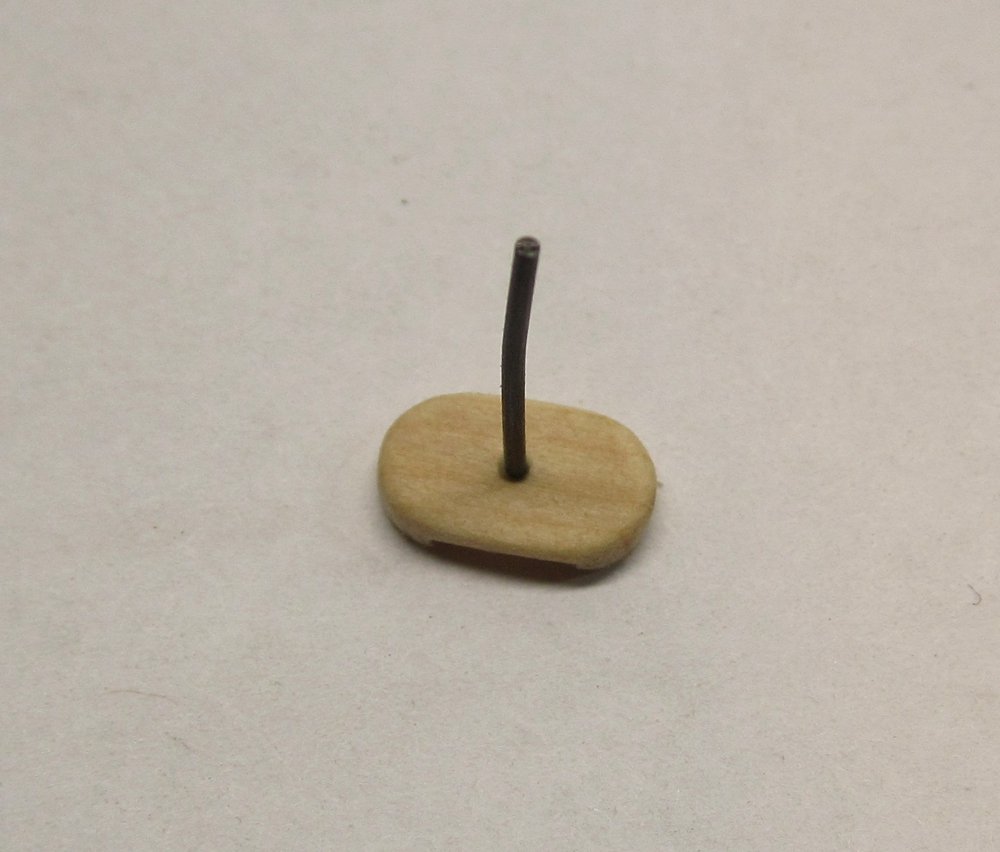
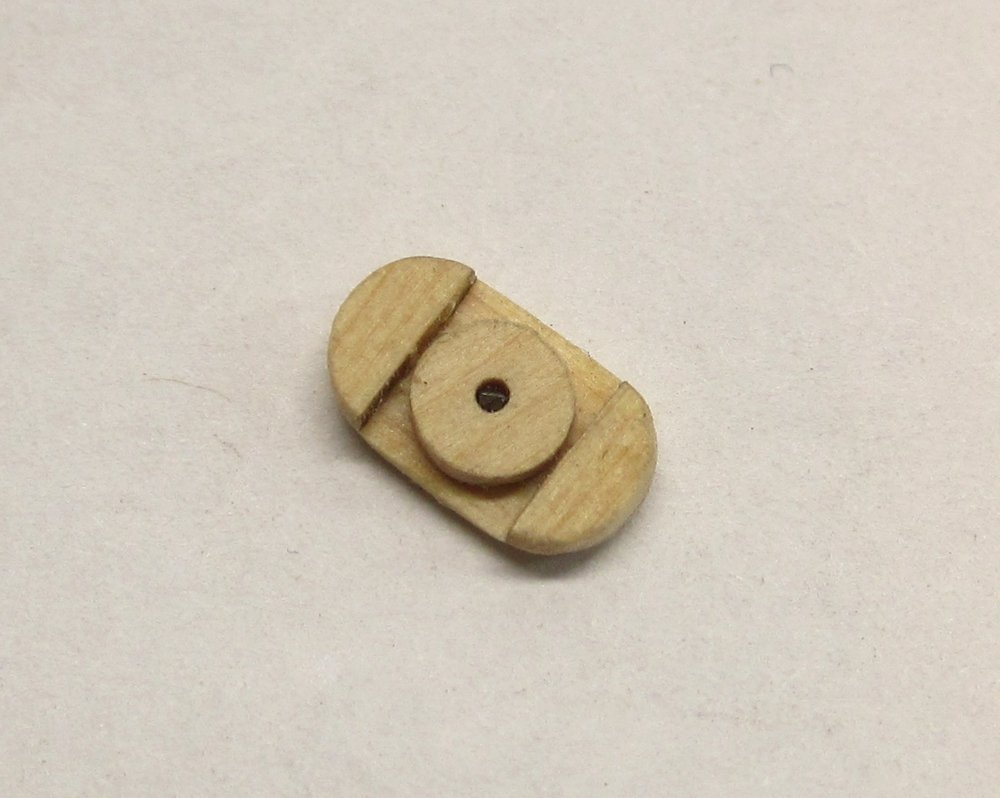
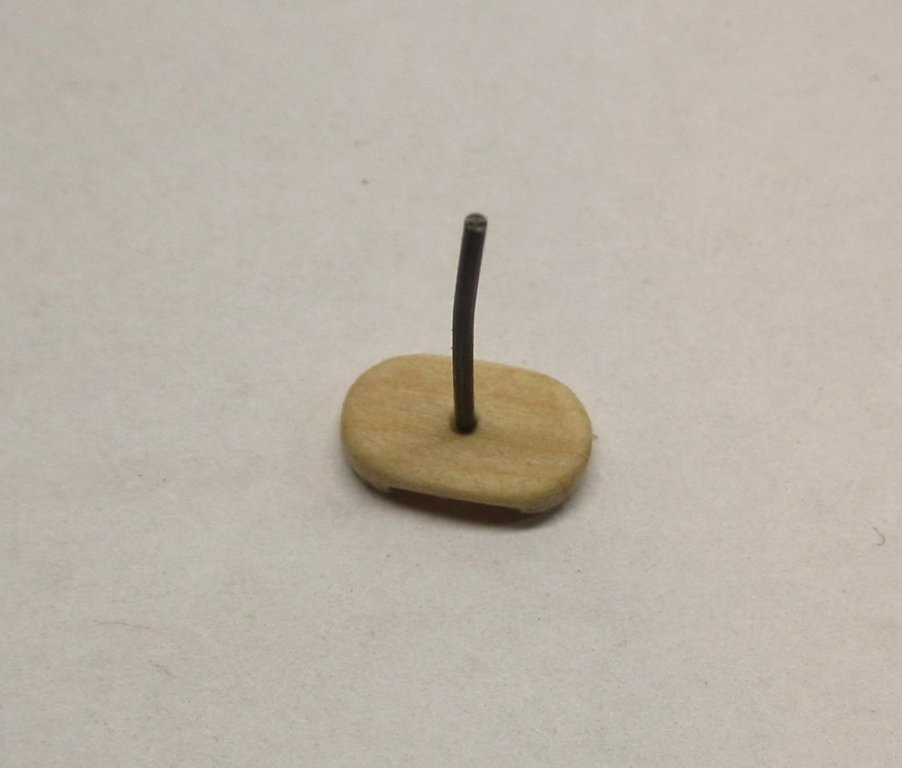
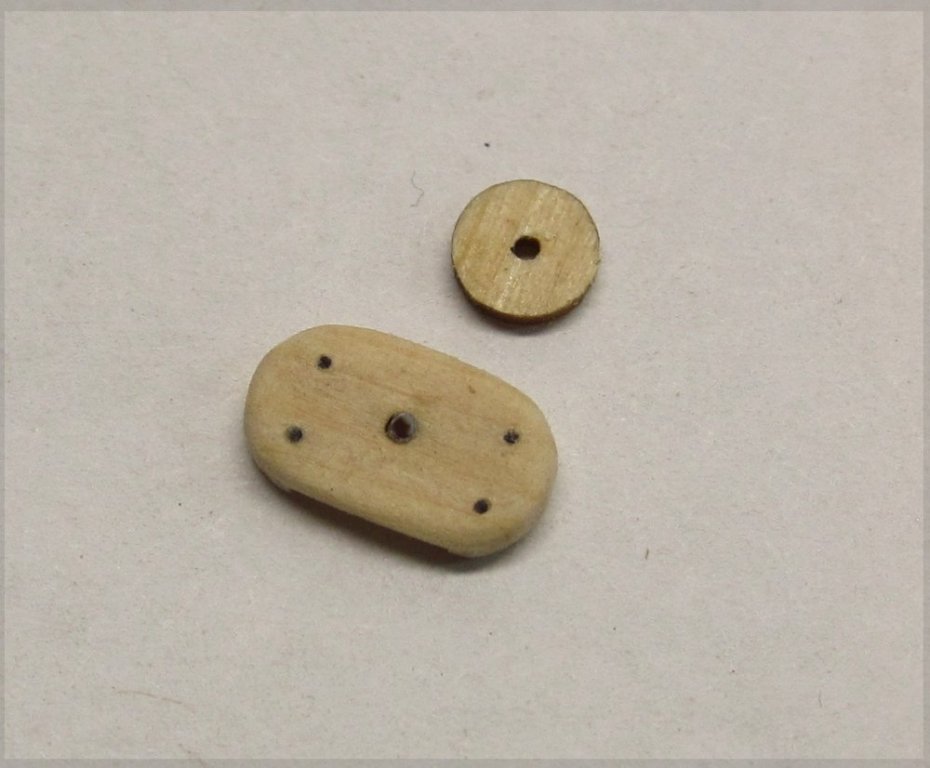
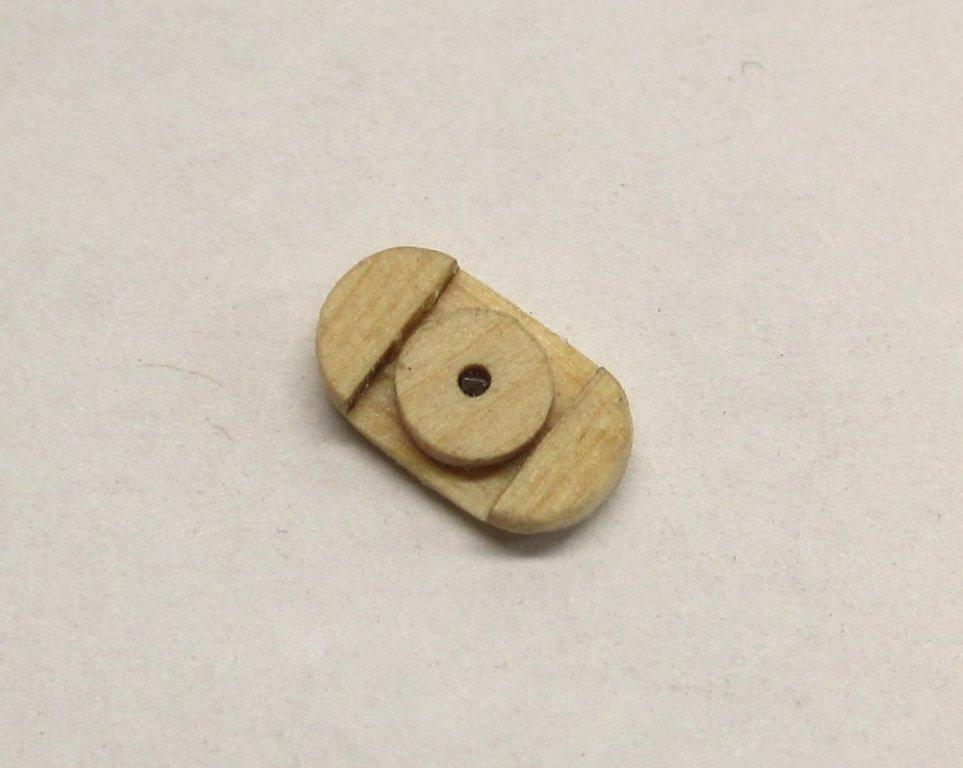
Thank You I added the fixed block at the stem on the starboard side. Its pretty straight forward. You only need one but I laser cut a bunch of extras for you guys because its tiny. Just in case. Glued the small pieces to the back like this. Inserted 22 gauge black wire and snipped it off flush on the outside but left it sticking out on the other for the sheave. Used 10 lb fishing line to make the four bolts as shown on the plans. Sanded it and rounded off the edges. Added the sheave but with no glue so it will be a working sheave. Not that it really matters. Then I glued it on the stem. Pretty straight forward


- 421 replies
-
- 17
-
-
- medway longboat
- Syren Ship Model Company
- (and 1 more)
-
No reservations and lines......I will make em as fast as I can. I am just a one man shop so please understand....thanks guys. Chuck
-
Nope...I wont be there either. I couldnt get away this year. Maybe next year.
-
It will be another two weeks in all probability. I have to create the page on my Syren website and set it up for ordering. You will enter that in the cart when you check out. I am also making ten more kits right now. Tomorrow the guys from my local club are coming by the shop to pick up theirs and begin working on it. So everything is going well. I just finished setting up this area on MSW. So we are almost there!!!😊 Chuck
-
Masts, Rigging and sails for your model - Questions and discussions
-
Planking your Longboat - Discussions and Questions
-
Part One - PartOne.pdf Part Two - PartTwo.pdf Part Three - PartThree.pdf Part four - Partfour.pdf Part five - Partfive.pdf Medway rigging plan - no sails - medwayrigging.pdf Medway sail plan - medwaysailplan.pdf Medway Flag - ensign.pdf Planking fan for Longboat....large planking fan.pdf Bow and stern Lining off templates.....line out templates.pdf Friezes...freizes.pdf Planking - external planks just in case.pdf 7-10-7 templates for yards and mast - 7-10-7medway.pdf Furled Sail Tutorial...Sails for a Cutter Rigged Long Boat.pdf 😊
-
This is where we will discuss building the keel, frames and framing........and the build board.

-
You will notice a few "pinned topics" at the top of this group project area. These pinned topics were set up as an area for all of you to discuss those related subjects as it pertains to the Medway Longboat project. If you have a question or comment related to them please post within those topics so everyone can easily find them later. For example, There will be a pinned topic on planking your longboat. Please post any questions you have about planking in that pinned topic or in your own log for "your" longboat model. Other than those pinned topics, we ask that you only create a build log of your own. Please title it similar to the example listed below. "Chuck's Medway Longboat (1742)" This will make it easier to read if at any time in the future we have to move these build logs somewhere else. It will work just like any other build log. This forum should not have any topics in it other than the properly named "longboat build logs" and pinned topics. Should you want to ask a question or post something, make sure it is posted in either a log or one of the pinned topics. Dont start a new topic. If for whatever reason you guys feel there is a need for a new pinned topic because your discussion doesnt relate to the ones already there....just let me know and I will start another one for you. You know the drill....this basically works like all of the other group project areas. Feel free to ask any questions about this group here. All questions and comments are appreciated and very helpful. To join this project, you must purchase a longboat kit. This group project will have a two parts. First there is the hull. Then there is a secondary mini kit for masting and rigging available should you want to add those details. Add link here

-
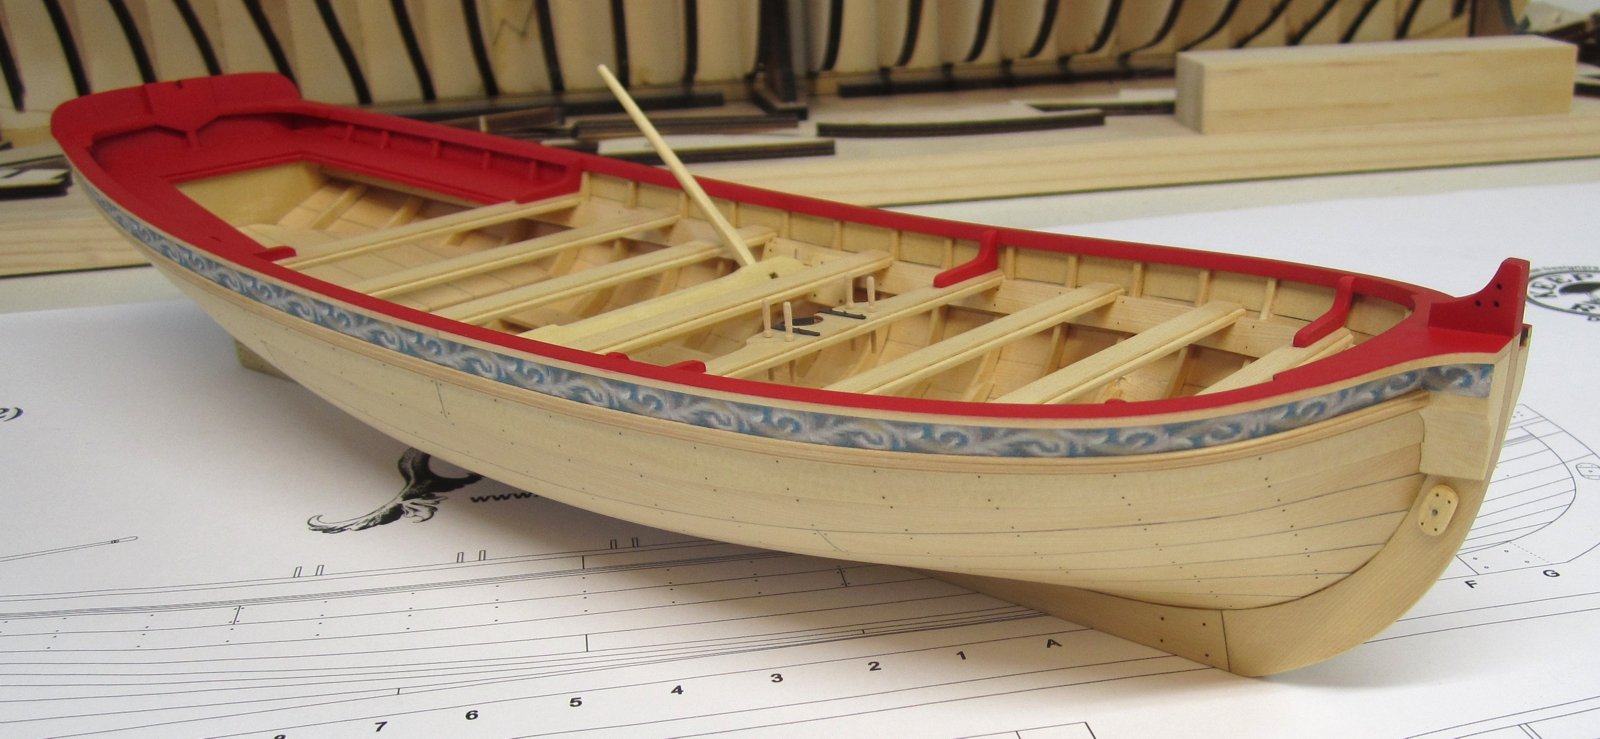
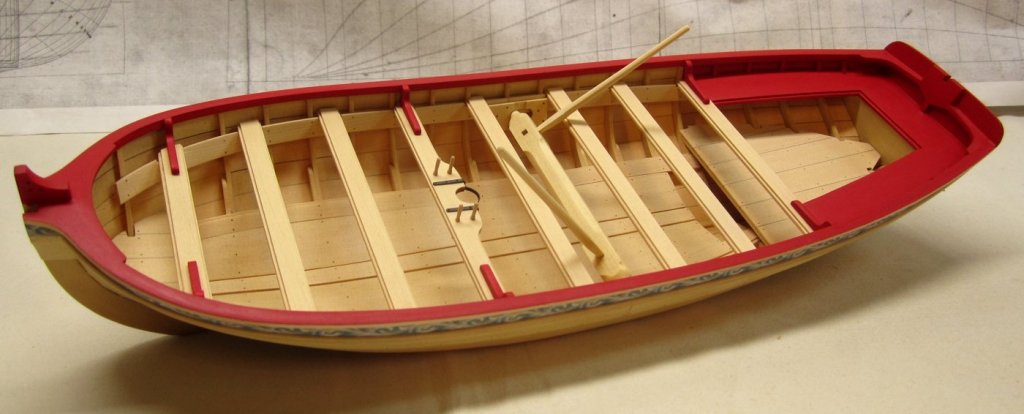
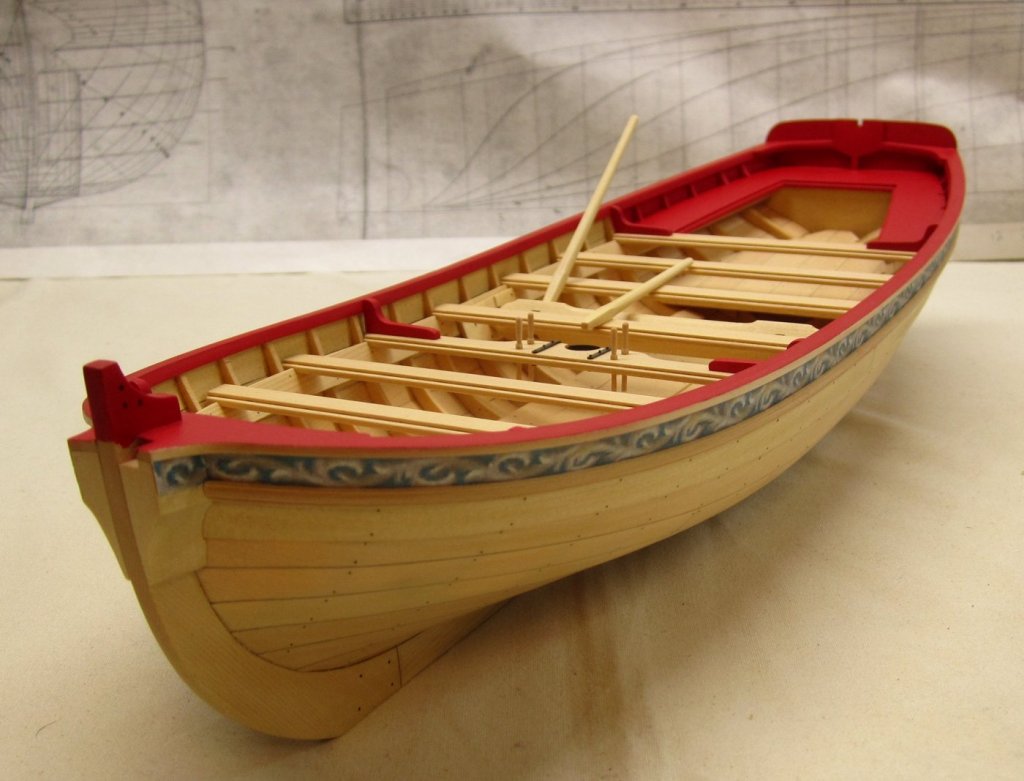
Thanks....yes I am not a big fan of those brass and/or bulbous wooden belaying pins. Easy enough to make them myself and you only need four for the longboat. The knees are all finished now. I will add the roller and fixed block sheave on the stem next.

- 421 replies
-
- 41
-
-
-
- medway longboat
- Syren Ship Model Company
- (and 1 more)
-
Its this......instead of the sanding drum you see in the photo, I insert the 1/16" x 1/16" strip. Its only abut 1" long so it wont wobble.
- 421 replies
-
- 10
-
-
-
- medway longboat
- Syren Ship Model Company
- (and 1 more)
-
Thanks No photoshop here!!!! Just go slow and be careful. And keep your hands clean and workspace clean. Thats the secret. Sloooowwww and STEADY. 😊
- 421 replies
-
- 12
-
-
- medway longboat
- Syren Ship Model Company
- (and 1 more)
-
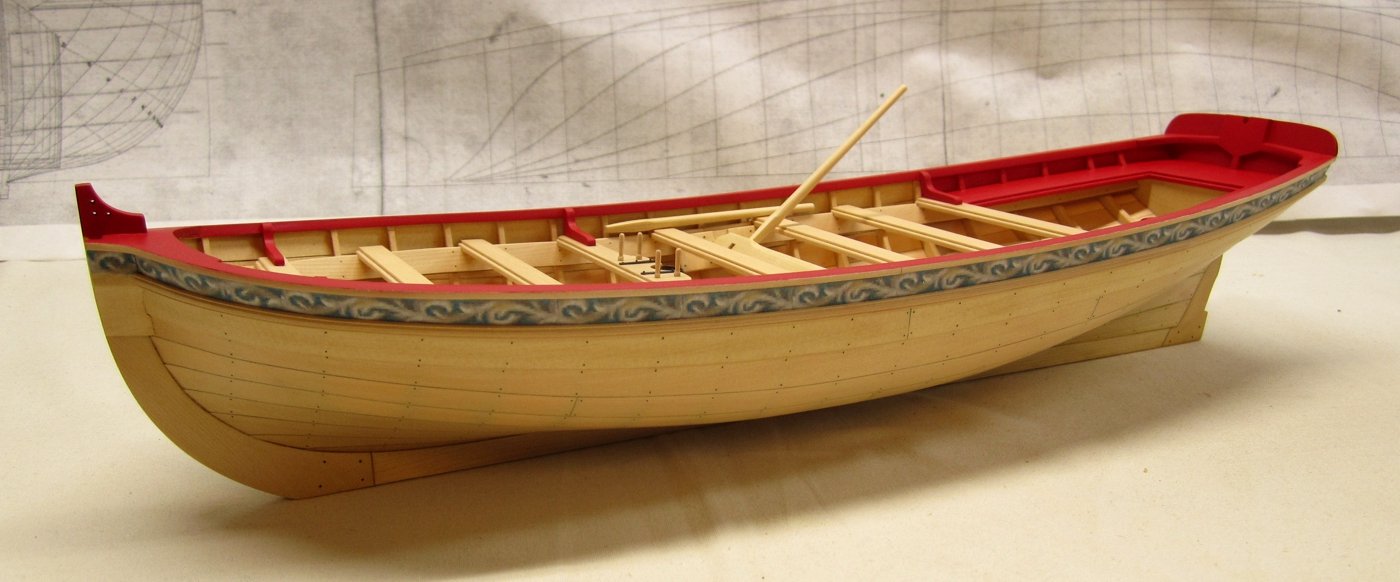
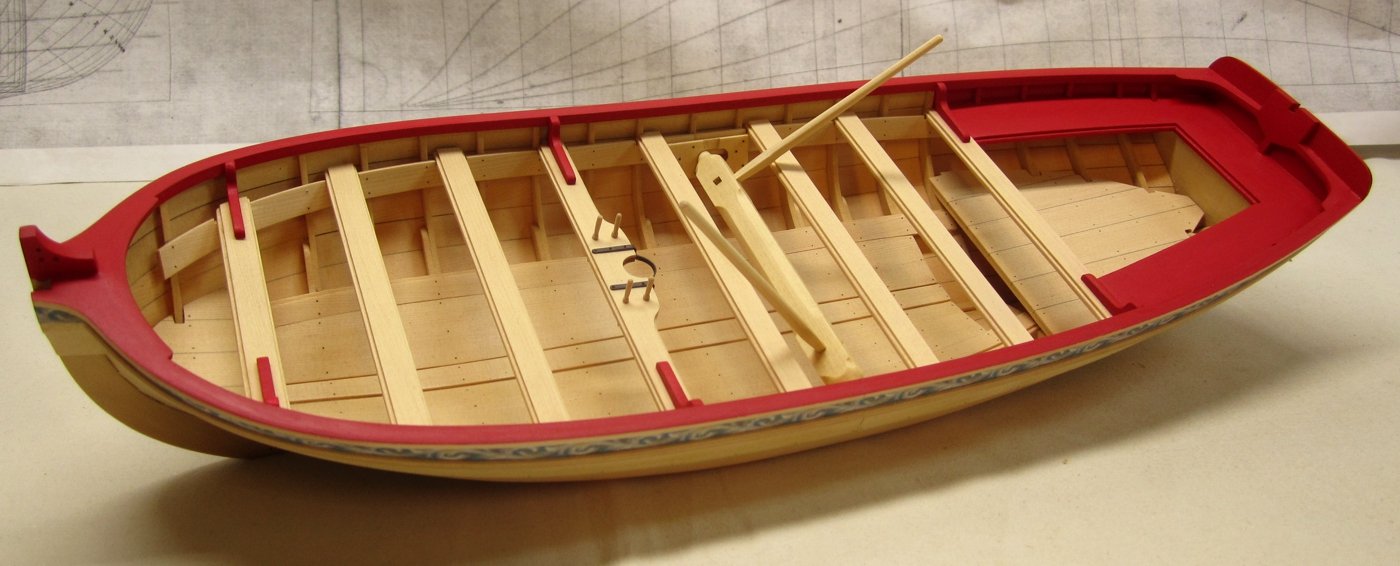
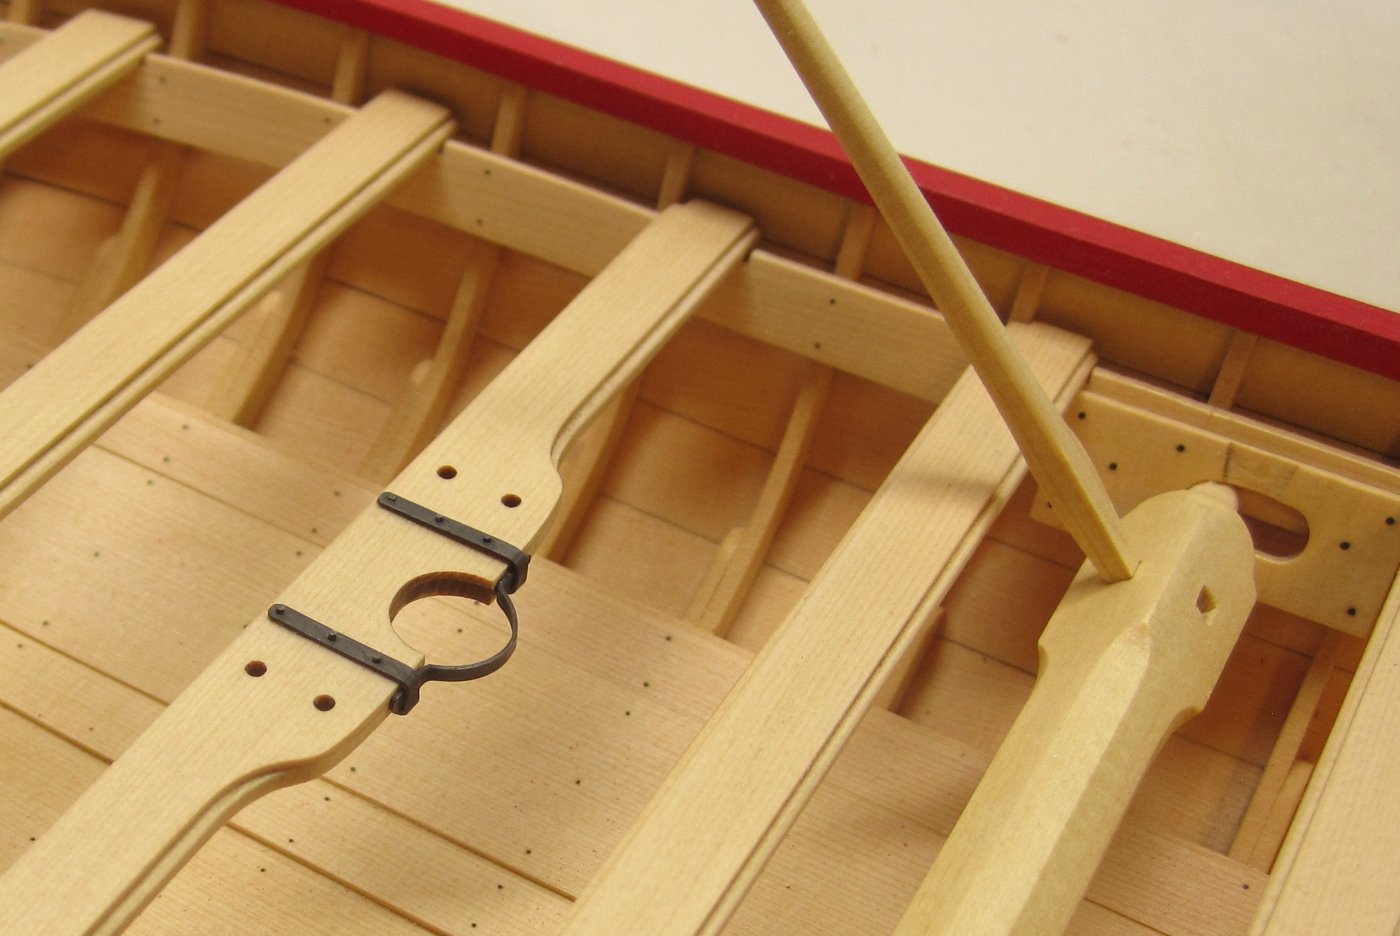
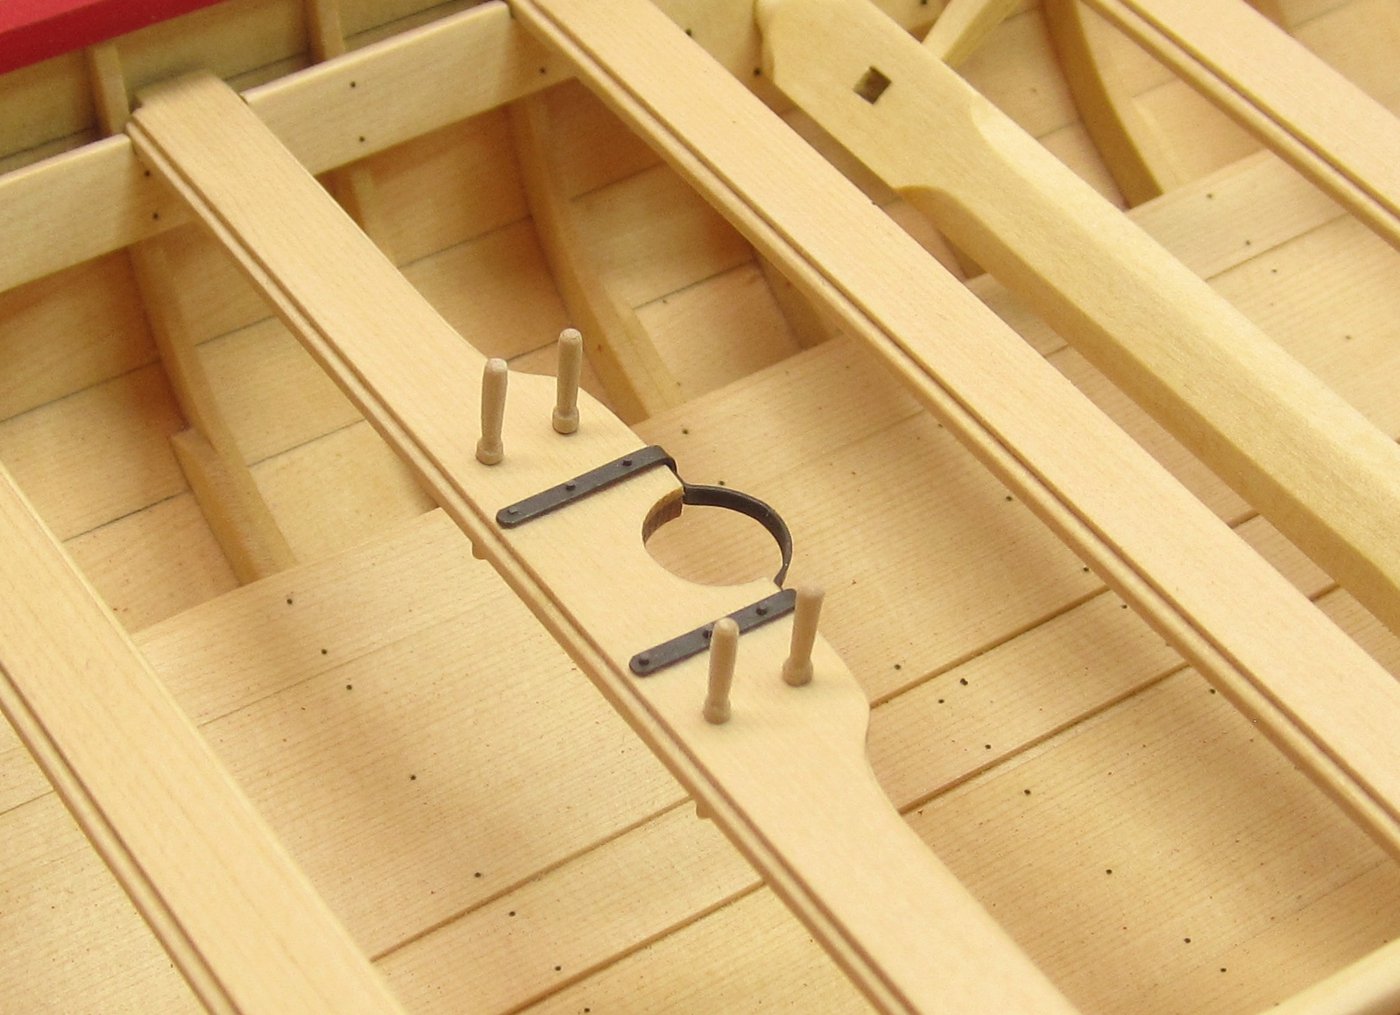
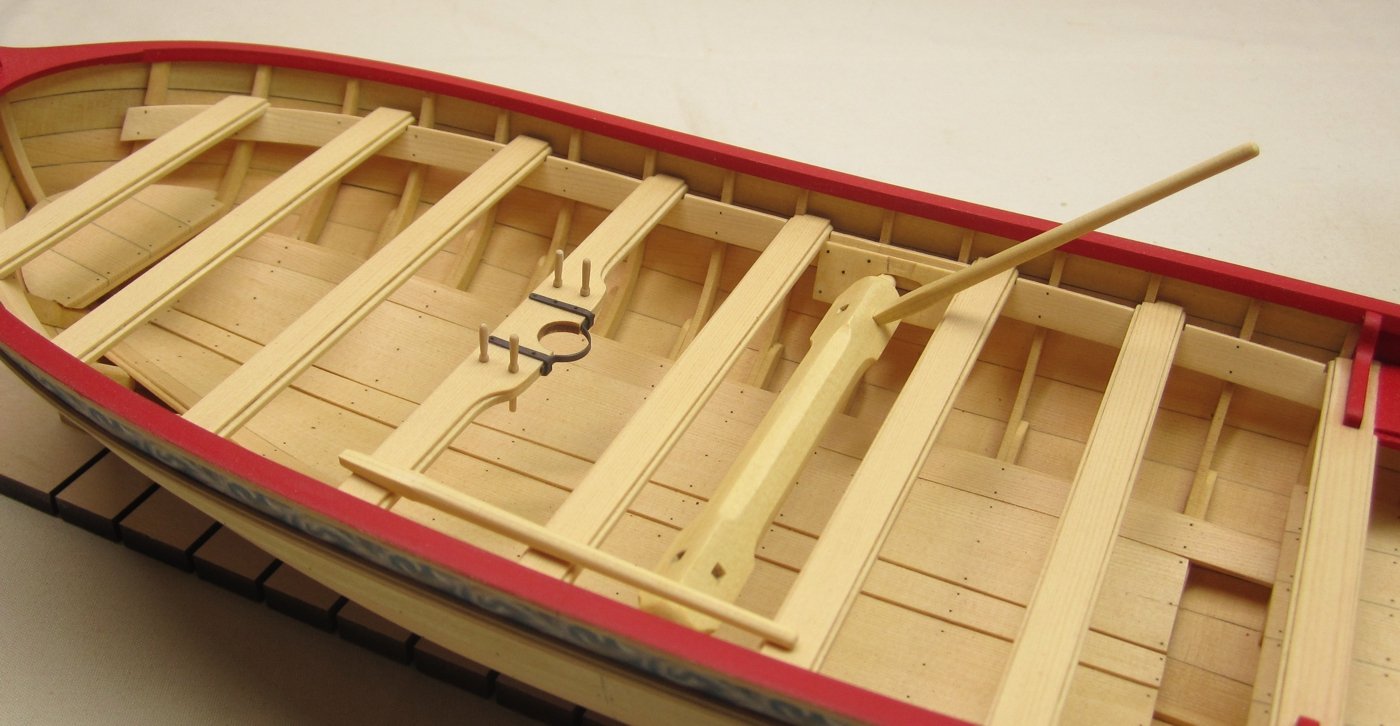
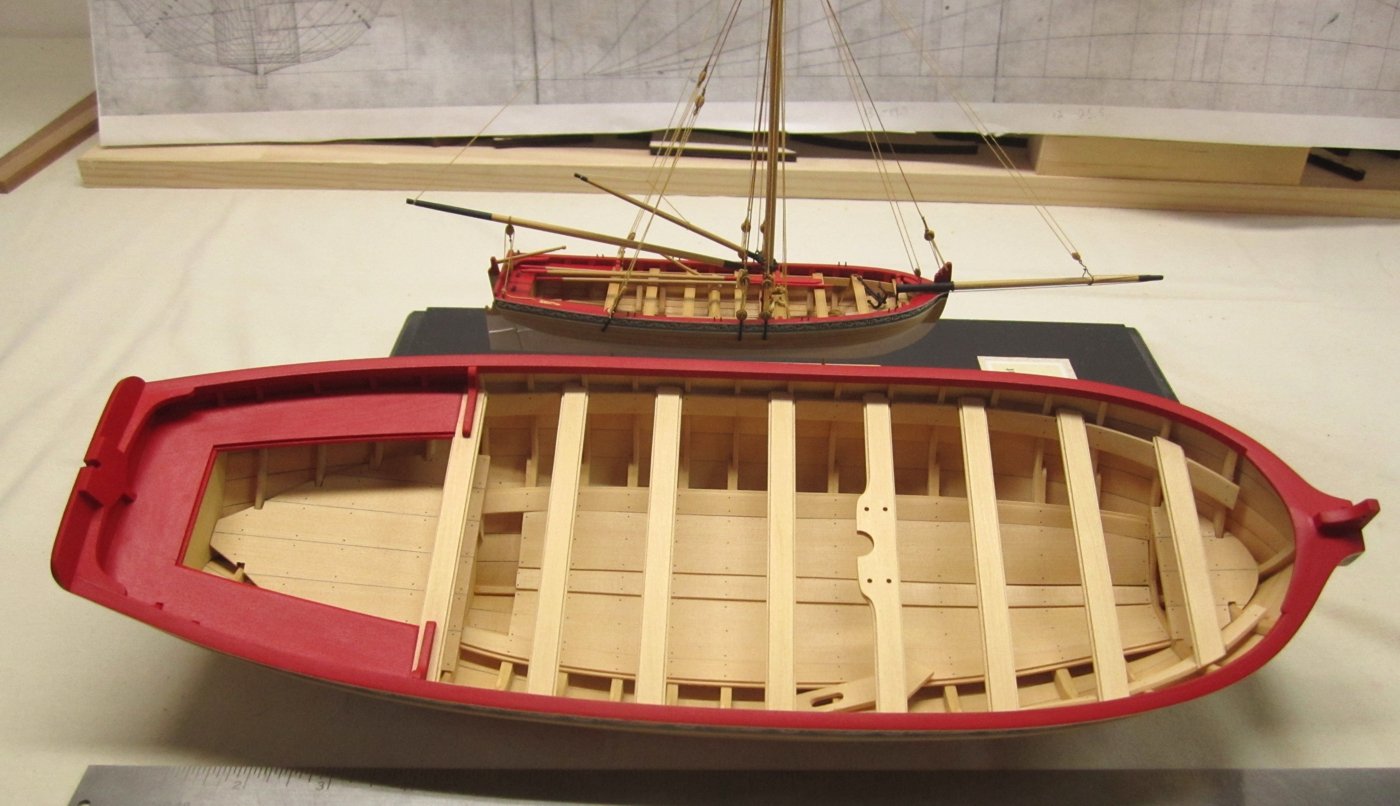
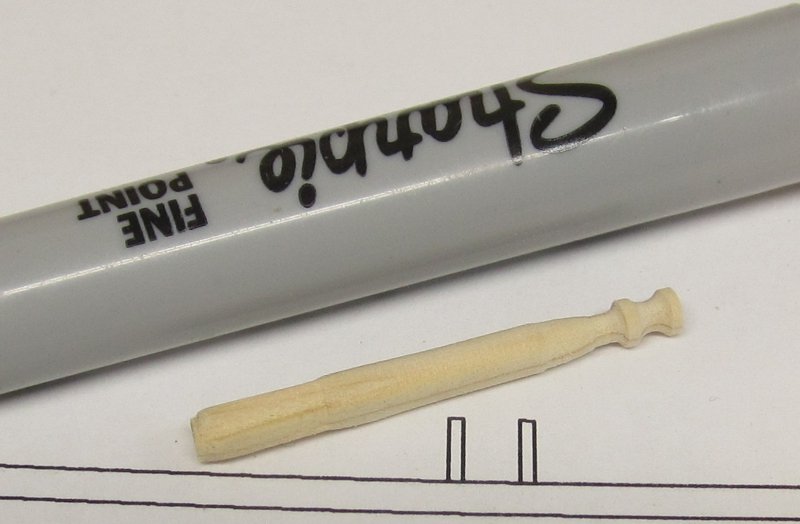
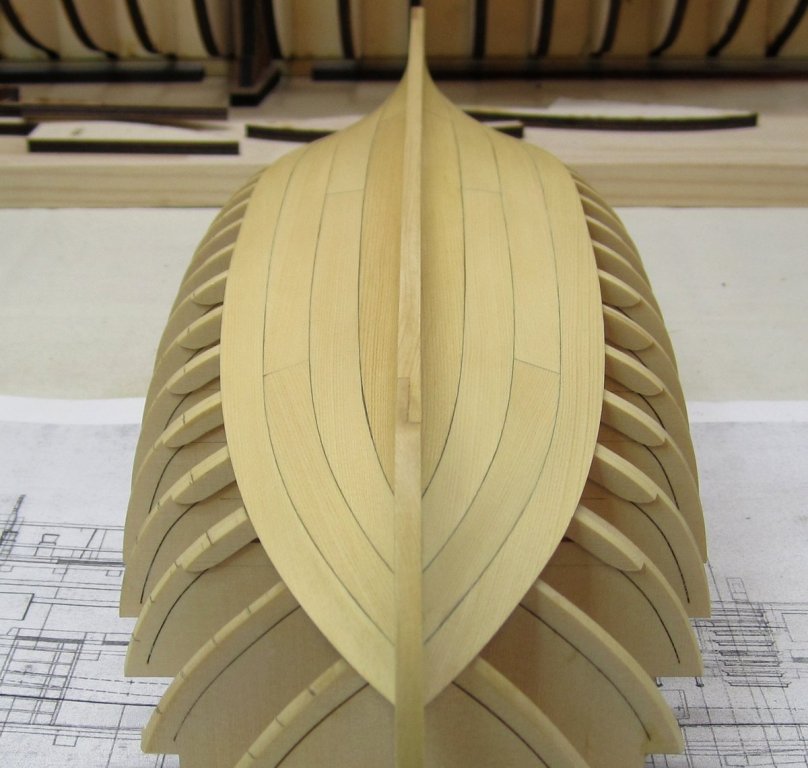
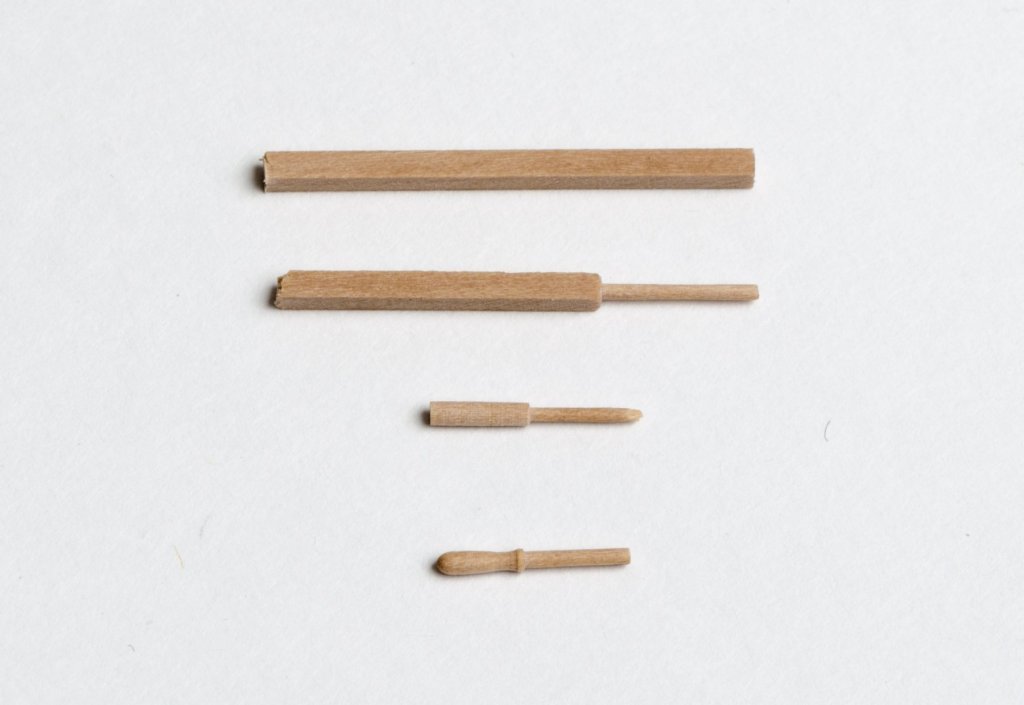
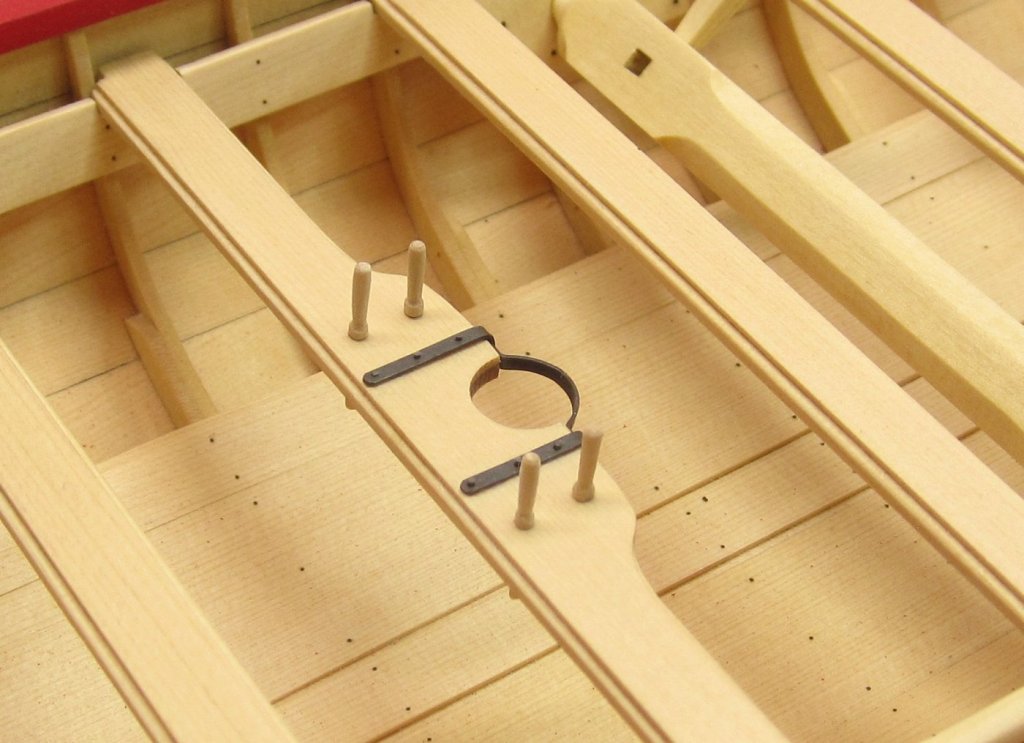
Moving along to the mast thwart... The ironwork was fairly straight forward. I used 1/16" x .025 brass strip to make the three straps needed to hold the mast in position. I of course drilled the three holes for the two bracket straps while the brass strip was flat (#74 drill bit). I used the plans to find their placement. Then I bent the two brass straps to shape around some scrap wood the same thickness as the thwart. The final iron strap was bent around a 3/8" dia. drill bit because that is how big the mast will be. Then I bent back the ends so I had a half circle remaining. Then the three pieces were blackened and glued into position. Once glued into position below....I drilled through the holes in the straps part way. Then I inserted small lengths of 24 gauge black wire into each hole. I carefully filed them down so they stood proud of the straps and looked like bolts. Then I touched up the blackening a bit. I turned the four belaying pins from 1/16 x 1/16 boxwood strips in my dremel. I use the flex shaft with the small pen-sized head while I turn the belaying pins to shape. Here is a photo of Mike's belaying pins from Cheerful which are done the same way. And this is what they look like finished on the thwart. Next I will complete the knees along the sides of this thwart and the forward -most thwart. That will complete most of the interior work before rigging starts. Although I will make some oars and a grapnel too. 😄 That will leave the rudder and tiller and a few last details and the hull will be completed. and ready for rigging.


- 421 replies
-
- 34
-
-
- medway longboat
- Syren Ship Model Company
- (and 1 more)
-
Just under the thwarts but on most cont. models one is shown in place and the other rests on top of the thwarts. The mast was portable and not permanently stepped remember. They would unhook the rigging and store that as well. Everything about the rigging and masts were portable so the boat could be brought onboard the frigate and stored at the waste.
- 421 replies
-
- 7
-
-
- medway longboat
- Syren Ship Model Company
- (and 1 more)
-
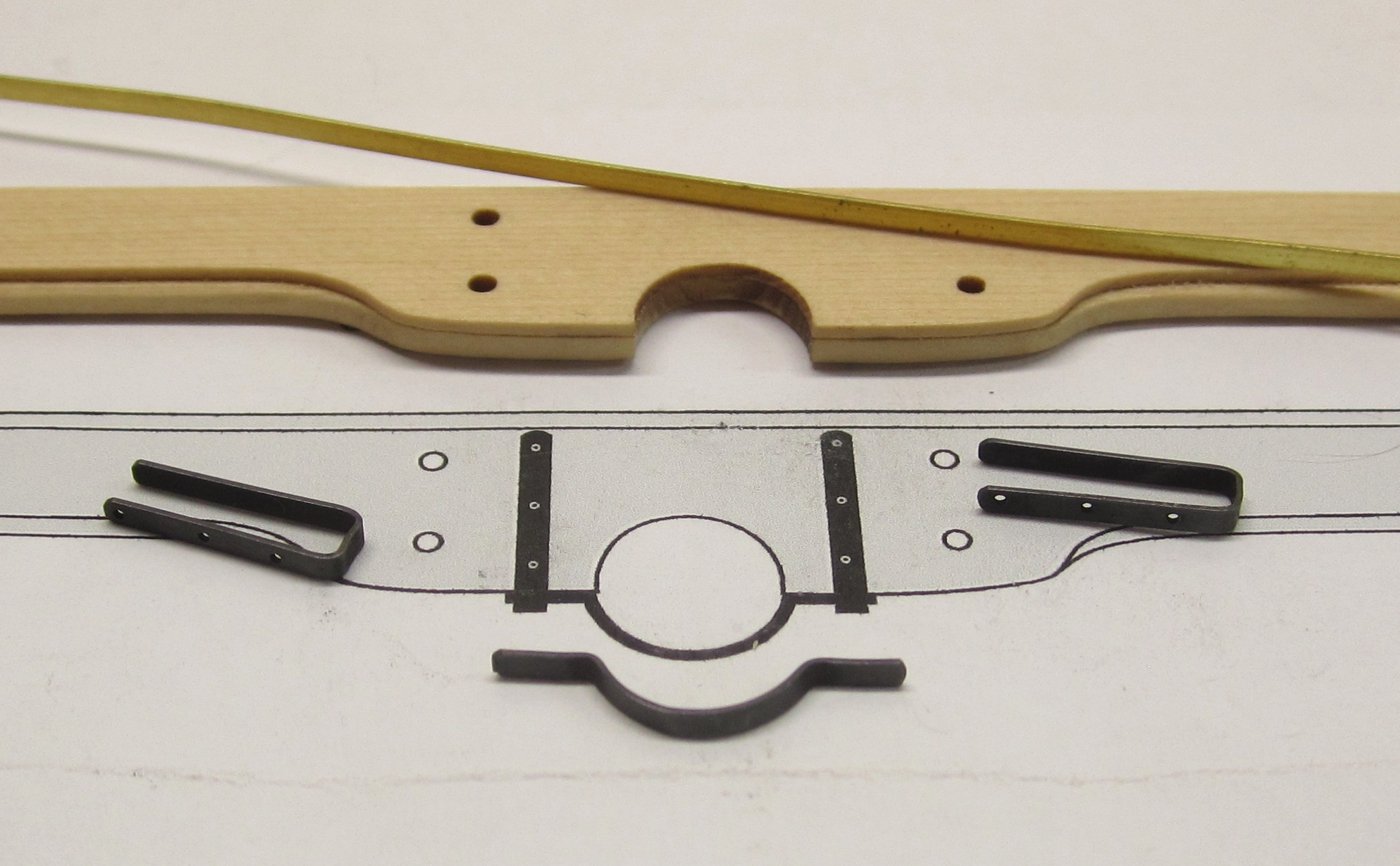
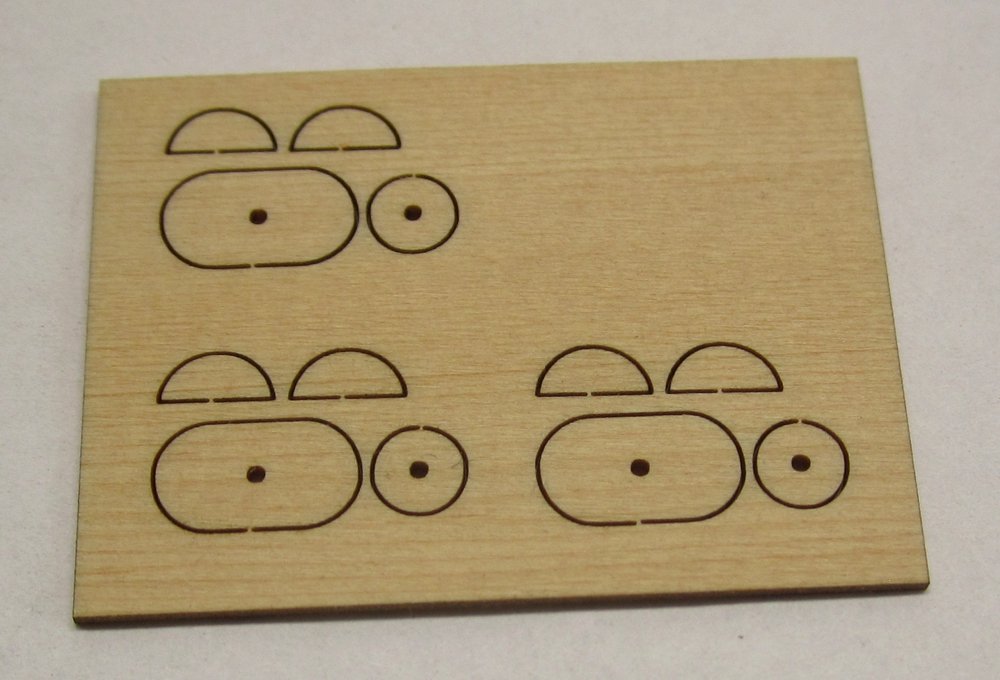
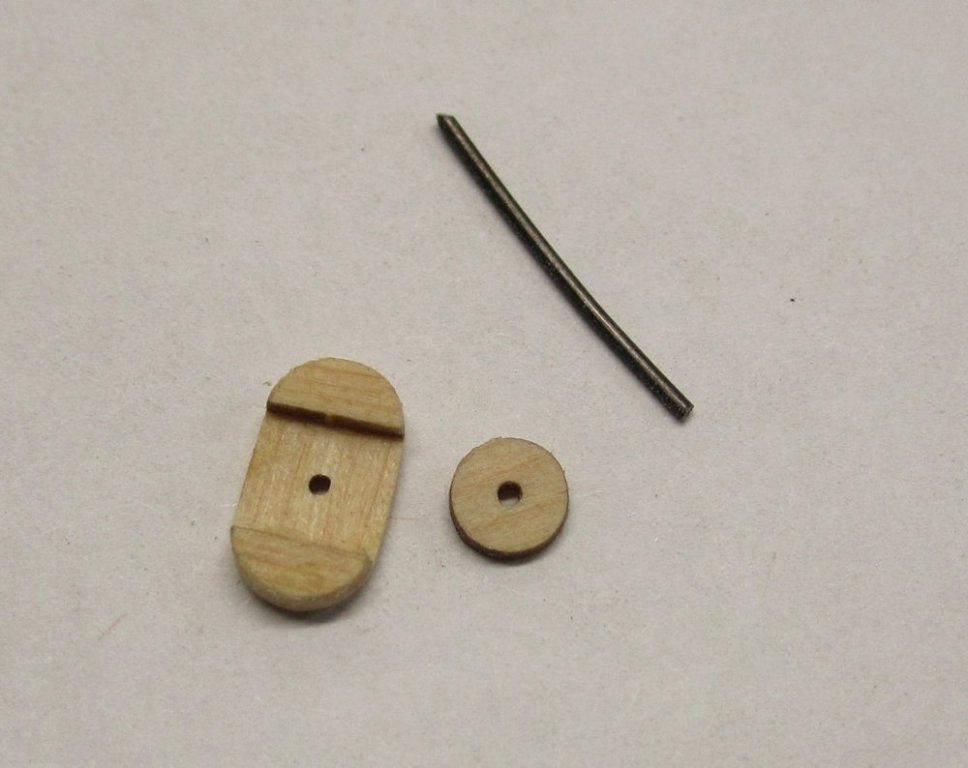
The Windlass is completed and installed. All I had to do was reduce the ends of the windlass until they were cone shaped and able to fit into the slots of the brackets. I just dis this by hand a little at a time with some sandpaper. I constantly tested and adjusted the cone shape until it slid into the slots easy enough. This meant shortening each side slightly. The brackets are laser cut. I removed the char and added the bolts while off the model. I used black fishing line as usual. The brackets are glued directly to the riser between the thwarts but actually under them. This left a space on the bottom edge between the frames and the bracket as expected where it hangs below the riser. So before gluing it into position, I added a 1/16" x 1/16" strip to the back, bottom edge of the bracket first. This made it so the bracket was seated firmly against the frames and riser. Before adding the bolts I held the bracket against the riser so I could mark the locations for them. You can see how some line up with the frames. While others are just into the riser. This detail is shown on the plans. The two windlass bars were shaped from a 1/8" x 1/8" strip. I just rounded off one end as you see below by chocking it in my hand drill. Then I squared off the other end as shown on the plans so they would fit in the square holes of the windlass. I will only show one in position and just rest the other atop the thwarts. But in the photos you see both installed just for the fun of it.

- 421 replies
-
- 29
-
-
- medway longboat
- Syren Ship Model Company
- (and 1 more)
-
Ok Guys.....put your thinking caps on. What if any type of flag (1742) should we fly on the mast? Lets see some images... Chuck
- 421 replies
-
- 5
-
-
- medway longboat
- Syren Ship Model Company
- (and 1 more)
-
I ship almost anywhere in the world. Except for China, LOL
- 1,784 replies
-
- 12
-
-

-
- winchelsea
- Syren Ship Model Company
- (and 1 more)
-
Nope....you will always need to buy at least the starter package and the plans will NOT have any drawings for the bulkheads and other parts. This is being done to prevent folks from stealing the design and pirating the project. You wont need those templates on the plans because you will have the laser cut parts. It also prevents people from posting the plans on their websites and forums as a download which is unfortunately all too common. It has happened with my Cheerful and I only need that to happen once before I find a way to prevent it. Chuck
- 1,784 replies
-
- 13
-
-
- winchelsea
- Syren Ship Model Company
- (and 1 more)
-
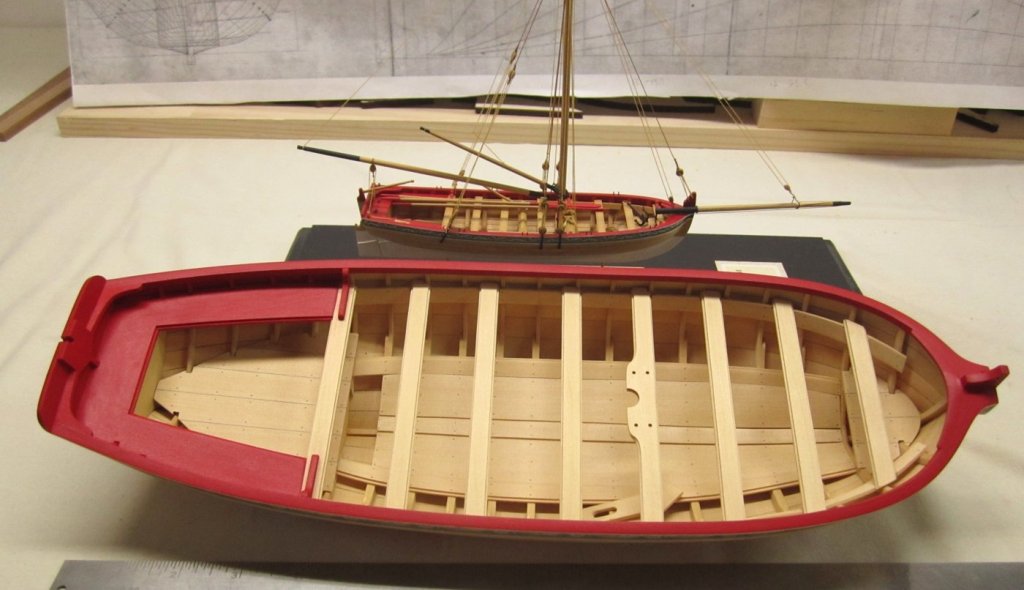
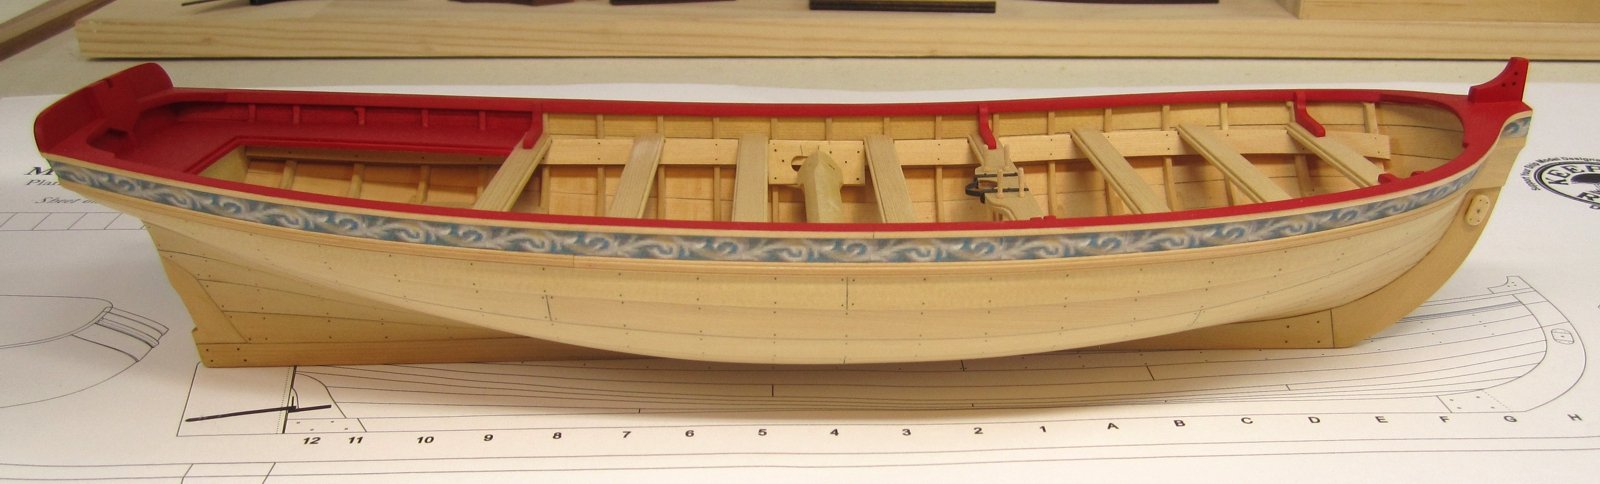
I currently offer milled sheets and strips at Syren. I dont know many other who do. But most exotic lumber places stock it in larger billets. The Medway longboat posted below is made entirely from AYC except for the molding strip which is boxwood. https://www.syrenshipmodelcompany.com/milled-lumber.php#!/Alaskan-Yellow-Cedar-Ship-Model-Wood-from-the-Syren-Woodshed/c/28580529/offset=0&sort=normal