Chuck
-
Posts
9,703 -
Joined
-
Last visited
Content Type
Profiles
Forums
Gallery
Events
Everything posted by Chuck
-
 Message in a model Stories from the Navy Room of the Rijksmuseum by Ab Hoving Distributed by: Sea Watch Books, LLC, Florence, Oregon www.seawatchbooks.com, seawatchbooks@gmail.com This book grabs your attention with a catchy title and a beautifully illustrated dust jacket, and never lets go! When you first open “Message in a Model”, your first impulse will be to thumb from page to page, studying the nearly 400 remarkable photos, stopping briefly to read a caption before going on. Only after completing your photographic tour through this book, will you start to read Ab Hoving’s many stories, which are truly intriguing. It starts in 1889 when the Dutch Department of Defense donated some 1400 models and maritime heirlooms to the Rijksmuseum in Amsterdam. A substantial number of the artifacts would remain in storage, unseen and unappreciated by the public. Not designed to last hundreds of years, many pieces would suffer from the ravages of time. Realizing that time was not on their side, the Rijksmuseum brought Ab Hoving onboard in 1989, as head of the Dutch History restoration workshop. For the next 23 years, Mr. Hoving would work with a small team of colleagues and volunteers, painstakingly bringing the collection back to it’s former glory. These efforts would culminate in the reopening of the Rijksmuseum in 2013. This would be the first time since 1927 that the public could visit the Navy Model Room. Along the way, Ab Hoving added to his knowledge of these artifacts, which he shared with visitors to the museum. It was during these tours that he noticed how the demeanor of the attendees changed from one of interested surprise to one of enthusiasm. It was this observation that would be the inspiration for this book. “Message in a Model” deals with 54 subjects that represent a wide range of artifacts, or artifact groups. With such a magnificent collection at his disposal, you would think that the majority of them are magnificent sailing ships, such as the example featured on the book jacket, and in the photo to the right. This is not the case. One particular model selected by the author is anything but magnificent. In fact, it is referred to as an enigma. This vessel actually existed, but what was its purpose? Hoving offers some compelling theories as to what it’s possible use may have been. He also gives reasons why this strange craft could have contributed to a war being declared! Many of the subjects chosen by Hoving involve technological innovation and inventions that were submitted to the Navy Board in the form of models. For numerous reasons provided by the author, many of these ideas never went any further. The motives may have included political jealousy, ambition, economics, a lack of understanding, or merely that some were ahead of their time. This brief review touches on only a few of the diverse subjects this remarkable book contains. They were chosen as a brief sampling of what awaits you inside “Message in a Model.” The lavish illustrations, coupled with Ab Hoving’s stories will entertain and intrigue you, while stimulating your imagination. This book is highly recommended. Reviewed by Bob Filipowski
 -
Thanks Bob I have both of these books and really enjoyed the subject matter. The model that Gib made is beautiful to say the least. It would make a fine project should anyone love the subject of Yachts like I do. I highly recommend both volumes. Chuck
-
Very nice choice Ed. I may have some stuff laying around for the YA. I was planning on building her a few years back and was starting to compile some research. Should I find that info I will get it to you straight away. Looking forward to seeing this one take shape. Chuck
- 3,618 replies
-
- 2
-

-
- young america
- clipper
- (and 1 more)
-
Standing rigging color preference and historical musings
Chuck replied to Chuck's topic in Masting, rigging and sails
Thats what I was shooting for. The image of my rope is not a good photo...to bright. My gray charcoal looking rope is actually pretty darn close. I just cant take a picture of it to show. I will try wwhen I get back from vacation next week. Chuck -
Standing rigging color preference and historical musings
Chuck replied to Chuck's topic in Masting, rigging and sails
This would be ideal and I am working hard to get there. Contemporary rigging color...It is not very brown or too black. Its not too gray and somewhere in between. Chuck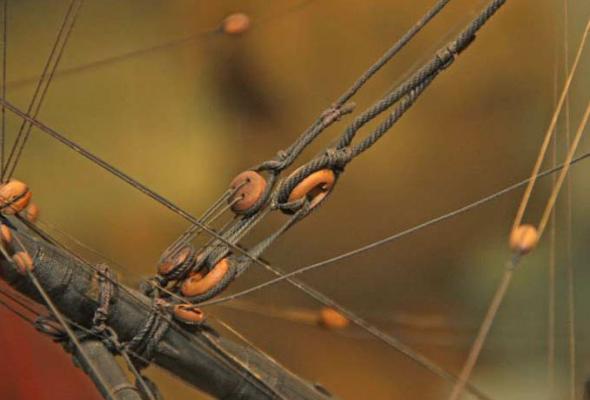
-
Standing rigging color preference and historical musings
Chuck replied to Chuck's topic in Masting, rigging and sails
Thanks guys...Chuck, I could absolutely make some. You just need to tell me what size you need when you get to that point. Then there are the folks who just use the tan color for everything. That looks good too. And here is an image recently I believe of the Frigate constitution. Its more gray than brown. I have been looking for a model done with brown standing rigging that is very dark but I havent seen too many. Most are jet black and that is tough to see the lay of the rope like it is shown below. It all quite confusing and hard to to choose. I cant wait to test out both on a model and see which I prefer. Chuck -
Looking good Len. Tedious to rig those guns but it looks very good. Boy that is nice deck planking too. Look forward to seeing more. Chuck
- 122 replies
-
- 1
-
-
- bellerophon
- victory models
- (and 1 more)
-
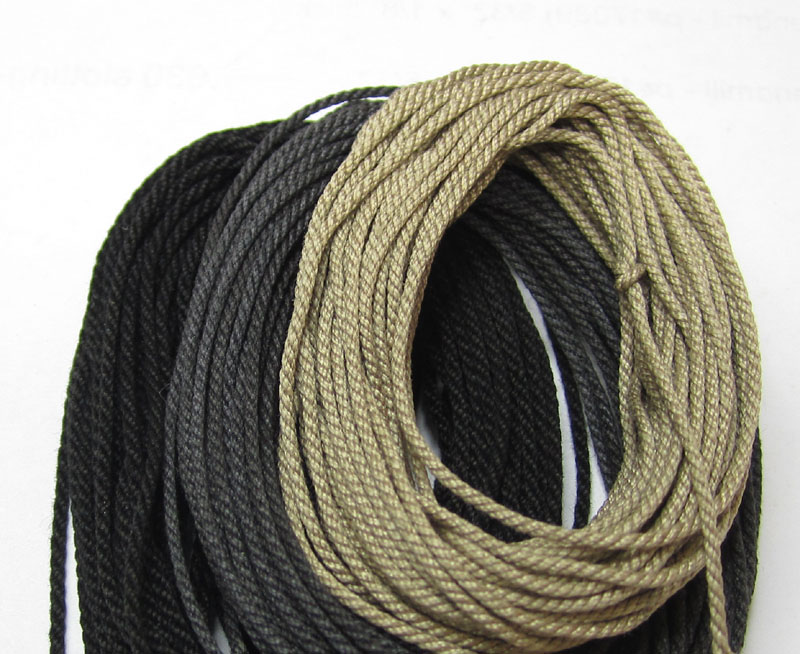
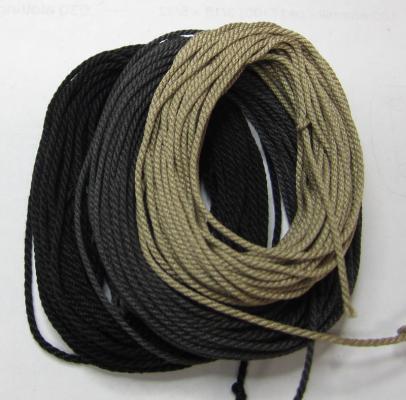
Hello folks. As some of you know, I am supplying scale rope in tan and in black. I am not the biggest fan of using a deep black rope but I know many of you prefer it. When I ordered my Linen line to make up the rope I also ordered some of their dark Gray/Brown color. My original though was to also supply it in this color for folks like me who prefer a lighter shade for the standing rigging. It is easier to see the lay of the rope. Because it takes so much time to make it...I wanted ask everyone if there is indeed a large enough group that prefers the standing rigging as a dark gray or even deep brown. I prefer the grayish tone as shown. I figured I would ask before I spend too much time on it. Anyway...here is a photo of my gray/brown standing rigging next to my black and tan examples. Is this something that would be desired?? If not, I will just keep it for my own personal use. It is my opinion that the actual standing rigging was a dark charcoal color after being exposed to the elements and wasnt a deep black. The brown linen color is OK too but I dont like it as much so it is not pictured. Its just not dark enough for my taste and looks too even. The color is slightly darker than it appears in the photo...but I had to pump up the brightness or the black rope would have looked like a black shadow. I would appreciate your thoughts on the historical nature of the color of tarred rope as well as your impression of the rope shown. Spending a week stocking up on it when no one will want it would be a waste. Thanks in advance

-
Looking good...wonderful job with the planking.
-
Alex... Wonderful progress. One of my possible future projects. Chuck
- 227 replies
-
- 1
-
-
- cumberland
- 74 gun
- (and 1 more)
-
Because its a special project exclusively created for MSW. We developed the plans and offer them to folks at no charge. This forum was created to start a group that is working on them so ll logs and questions about its construction can be kept in one area. This will help all participating members to compare notes and find information. Chuck
-
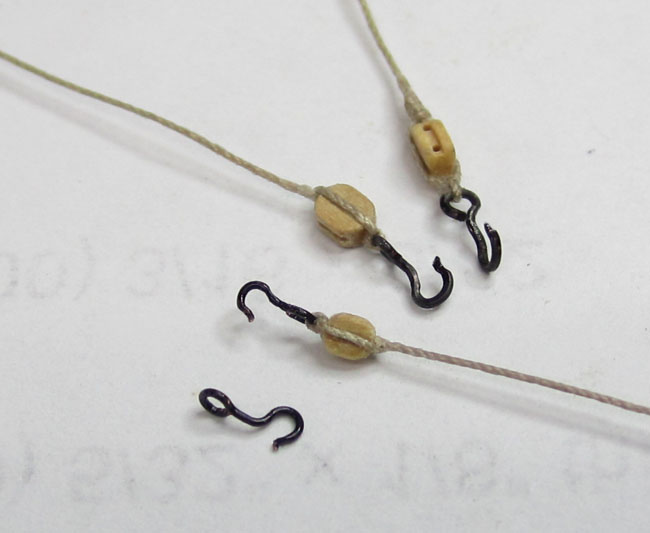
Very nice hooks. I know how small these actually are and how finicky it is to make the hooks and strop them. Here are some of my blocks with hooks. The bottom block is a 2mm. The two above that are 3/32". This is about as small as I can make a reasonably good looking hook. Chuck

-
The Great Ordnance Survey of 1698: A Facsimile Introduction by Richard Endsor and Frank Fox Florence, Oregon: SeaWatchBooks, 2013 8-1/2” x 12”, hardcover, 275 pages. $95.00 ISBN: 9780983753255 At first glance, this volume seems so esoteric as to appeal to a tiny minority of the maritime community. Closer examination, however, quickly dispels that notion; this facsimile potentially appeals to a very wide audience and, given that it is limited to 199 copies, potential readers probably should not postpone a decision to purchase for too long. What, then, makes a facsimile of an inventory so interesting and useful? First, there is the very useful and concise introduction, which explains the background to the survey, its scope and limitations, and the most effective manner in which researchers can exploit it. Although not explained elsewhere, this is where one finds the index, an essential tool for making good use of the survey itself. The survey itself is valuable on multiple fronts. Researchers may use it to validate the armament tables for Royal Navy ships of the period. Archaeologists will find it very useful in identifying specific tubes uncovered on underwater or terrestrial sites, and in determining a part of the history of such identified weapons. They also may find it useful to know such inventory numbers exists at all—more than one researcher has spent years puzzling over numbers engraved into gun barrels that do not seem to correlate to the usual meanings (either casting dates or indications of weight). Modelers, too, will find this facsimile very useful when constructing projects of the era. The establishment for the galley frigate Charles Galley, for example, indicates its armament as eight 12-pounders, twenty-two 6-pounders, and six 4-pounders. The survey tells us that, in 1698, it actually carried twenty-six 6-pounders and six 3-pounders. Furthermore, the survey also lists the lengths, diameters at the trunnions, and diameters of the trunnions for each gun, opening up the possibility of making very accurate models of each weapon (some of the ship’s 6-pounders were nine feet long, some eight, and some only six and a half!). All in all, this is a fascinating document. Any researcher, archaeologist, or modeler dealing with late seventeenth- or early eighteenth-century English ships will find it a valuable resource. Paul E. Fontenoy North Carolina Maritime Museum
- 1 reply
-
- 3
-
-
The NRG has now started publishing book reviews online in addition to in the Nautical Research Journal. https://thenrg.org/resource/books If you have a moment, please check it out. It may be of interest to all of you. Chuck

- 1 reply
-
- 5
-
-
Very nice planking...shaping up to be a great looking Syren model. Chuck
-
Cannon look really good nice work on those hooks. Well done.
-
Thats looking great Grant. I would try and make the holes farther apart as the would be closer to the ends of each block. Other than that they look perfect. Great work. Chuck
-
WHAT THE!!! My rope is SQUARE!
Chuck replied to von stetina's topic in Rope Making/Ropewalks's Discussions about Rope Making
Yes I know the salt can be a problem...but believe it or not. You can drop an entire ball in a pot of Rit dye with salt. If you leave it in the pot of hot dye solution you get some pretty good penetration. The color comes out rich. I actually mixed rit brown with the black just so it wasnt so dark....but the results werent consistent so I just started using black. Chuck -
WHAT THE!!! My rope is SQUARE!
Chuck replied to von stetina's topic in Rope Making/Ropewalks's Discussions about Rope Making
For my black I used Rit dye. It works well and doesnt make the rope stiff like using water-based wood stain. You can basically buy any colors you want. Just mix a little with water and add salt in a bucket. Coil your finished rope and dip it in for a while. Then pull it out and rinse. To get a really rich and deep black you have to leave it in the dye for a while. -
You are correct as far as I have seen but consider this. The becket of the block. Usually this isnt added. Or at least not so its as visible. You can see in this picture that the eye of the hook is very small in comparison to the becket and the hook. So by not making them perpendicular it simulates this in a way. You would have to make a very small eye in that hook so it doesnt look oversized. Its a small detail but one to be considered. The eye instead could visually take the place of the becket and looks a lot like the picture I posted. Especially on really small scale models.
-
WHAT THE!!! My rope is SQUARE!
Chuck replied to von stetina's topic in Rope Making/Ropewalks's Discussions about Rope Making
The only way to combat this 100% is to create a rope with only one thread on each first...no issue there. Then take those ropes and make a larger one. You will never get a square rope that way. Although you will go left handed then to right-handed rope etc. It takes a long time to make rope that way. But, you may have more success trying this. I know I t has worked for me. Forget using two on each of the four whirls. Instead, use three on only three whirls. Then, if you were turning the initial strands 150 times....simply double it, or even triple it. The initial twisting must be really tight. This will cause the strands to condense significantly but will combat the squareness effectively. For example, I start with three on each whirl where they are 25' long. I twist them until the strands become 20.5' long. I twist them until they are just about to knot up upon themselves. Then when you twist all three together, make sure you keep the rope taught as it lays up. In this case, I dont over twist at all. Over twisting seems to amplify the square profile. Give it a try...see what happens. Remember to really make the initial strands on each whirl tightly wound together. Thats the key. if its not when you twist all three together to make the final rope...its the looseness that creates the square shape. The three strands have too much room between each of there loosely wound threads for the lay to form correctly. I hope that makes sense. This black line was made that way. I have taken three strands on each whirl and made them tight. You can see the rope is not square. While experimenting I initially had the strands much looser and it did result in the square shape you are talking about. So this corrected that issue nicely. Chuck -
WHAT THE!!! My rope is SQUARE!
Chuck replied to von stetina's topic in Rope Making/Ropewalks's Discussions about Rope Making
This usually only happens when you put two threads on each spindle or even three. If you are only using one thread this is something that doesnt happen. From my experience, there is only one sure way to combat this. But can you confirm that you are indeed having this issue when putting two or more threads on each spindle of your ropewalk in order to make thicker rope? There is another method too but it requires more space. Chuck -
AHH!!!! very nice....that saved me the trouble. I make mine the exact same way. It just takes some practice. Chuck
-
Woops....good catch....30 gauge for those small ones. Chuck