Chuck
-
Posts
9,724 -
Joined
-
Last visited
Content Type
Profiles
Forums
Gallery
Events
Everything posted by Chuck
-

Requesting feedback for future MSW Group Projects
Chuck replied to Chuck's topic in Group Projects on Model Ship World
We want to get a consensus so we shall see if any one topic/subject is preferred and we shall seek one out. And dont forgetthe other question I asked.....shall we keep it as scratch projects only or offer some sort of starter package? I love Michaels cutter project......perhaps. -
Just an announcement of sorts. I wanted to let everyone know that after a bit of time gone by since we created a special project for our members, the NRG and the folks at MSW will be actively starting to bring you some new projects. Funds have been set aside specifically to create a new group project which will be offered to our members. This will be a project similar to Triton where plans will be made available after signing up for the project. These will probably not be huge fully framed first rates mind you. Instead we are looking at smaller and quicker projects that will be fun to build in a short time period. But we hope that the new projects will offer some elements that will allow the participants to try something new or build a model using a new approach etc. We will of course make more info available when the time comes but I would like to ask for some feedback, These projects should be of smaller interesting subjects not over done and widely available.....please do list some of your ideas....perhaps -1/2" scale longboat project fully framed like in actual practice circa 1740 with rigging -Smaller boats of a more modern flavor....early 20th century boats and racing yachts. Plank on bulkhead perhaps -Bow section or possibly stern section showing those details and some techniques for building them (headrails, stern carvings and stern lights etc. -Your suggestions Rather than just plans for download and only scratch type projects some might not have the tools for....perhaps your thoughts on -Semi scratch group projects where framing kits may be made available or starter packages of sorts....for example maybe all of the framing components for a cross section or small period boat with the balance of the project being completed from scratch....after downloading a planset. This would also deter theft of design like what happened with Triton. This would of course come with a small fee as well. Similar to my barge framework/Cheerful bulkhead set as a starter set. Your thoughts???? As not everyone has the tools to scratch build everything yet they may want to participate. In addition, we may be approaching some of you after seeing some of the fine models our membership have made. We may contact you to see if your projects....with your help and guidance....can be translated into some fun group projects for all to enjoy. Feel free to point out a few or even contact me directly via PM if you have a specific idea or ice boat design concept.....oh wait I am getting ahead of myself. You get the idea....if you think a small craft project you are working on or someone you follow would make a great group project...feel free to contact me about via PM. Or bow section or stern section or cross section....or whatever. But please no fully framed or large frigates or 74 gunners. We want to make sure that not only you guys can start and finish them, but we will also need to be able to start and finish the designs and prototypes as well. We dont want to wait ten years to bring them to you....lets keep them manageable. Perhaps a small project on building a brodi stove....or double capstan??? Just dive right in with your ideas and contact me. Chuck
- 110 replies
-
- 11
-

-
Alistair.... Welcome back buddy. Man its been too long. It is nice to see you back in the shop and I hope to see you on the forums. Let me know if that heavy frigates book doesnt sell. I may be interested. Chuck
- 1 reply
-
- 2
-
-
Wonderful job.....
-
Nope....the admiral says no fun with models until after I catch up with making rope and blocks. I am almost there!!!
-
Ian you are doing such a wonderful job on her...please send me some images by PM from time to time anyway.....I would love to see it. Please take some photos of her so I can see the outboard details.....
-
Nicely done..... Do you have a build log for Cheerful? I didnt see one.
-
Eventually you should sand it flush with the transom.....its looking really good. Dont forget to add that small rectangle of planking forward of the last wide plank.
- 103 replies
-
- 2
-
-
- queen anne barge
- Syren Ship Model Company
- (and 1 more)
-
Generic Sharpie by DocBlake
Chuck replied to DocBlake's topic in - Build logs for subjects built 1851 - 1900
Wonderful work on both!!! I am sure the model will come out just as beautiful as your full size. It looks like you had the perfect day for sailing in that photo. -
Any progress on your model. You are doing a wonderful job on it. Looking forward to seeing an update.
- 103 replies
-
- 1
-
-
- queen anne barge
- Syren Ship Model Company
- (and 1 more)
-
Just scroll up....if you voted you can see the results...on the top of this topic.
-
Linen yarn is available for ropewalk stock
Chuck replied to Jaager's topic in Masting, rigging and sails
I am not sure how either one of those machines work. But Druxey is correct. Those ropes are laid up too loosely. When referring to the tension, I would suggest increasing the amount of twists on the the three strands (or four) initially....this will build up more tension and energy. Then you will be able to twist all three or four strands together more (in the opposite direction) and it will keep the more tightly laid up state. There will be more opposing tensions created to keep the rope nice and tight. Its the opposing tensions that keep the rope from untwisting and also nice and tightly laid up. The rule to remember is....the more initial twists of the individual strands will allow you more twists in the opposite direction when you lay up the final rope. Here is a fresh .025 tan that I just finished making. You can see how much tighter it is laid up. Hope this helps. Chuck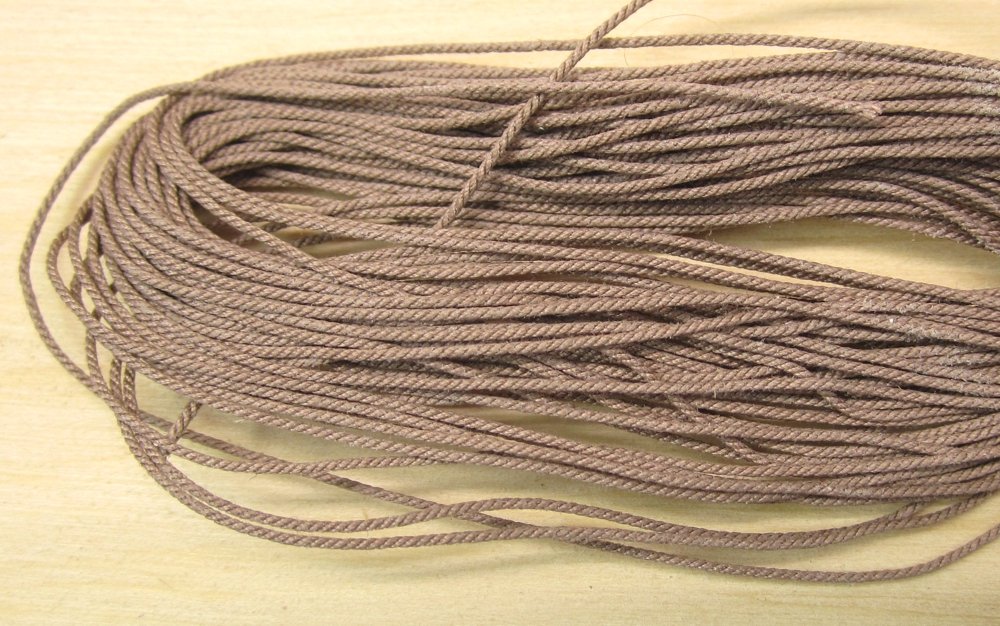
-
Keep in mind that you will see plenty of POF kits from Chinese companies like ZHL. Because these companies have been known to pirate and steal the hard work of other reputable ship model MFGs, they are banned from this forum. So please read up on our banned list of pirated MFGs and be aware that we do not allow them on our site or any person building them. If this is something that is as important to you as it is to MSW and the NRG and the ship model community at large, you may want to avoid any products from these companies as well. See here for the details
-
Thanks I am going to omit those on my prototype...they are nearly invisible and I find it distracting but I have seen it done well on other models. Builders choice I suppose. Chuck
-
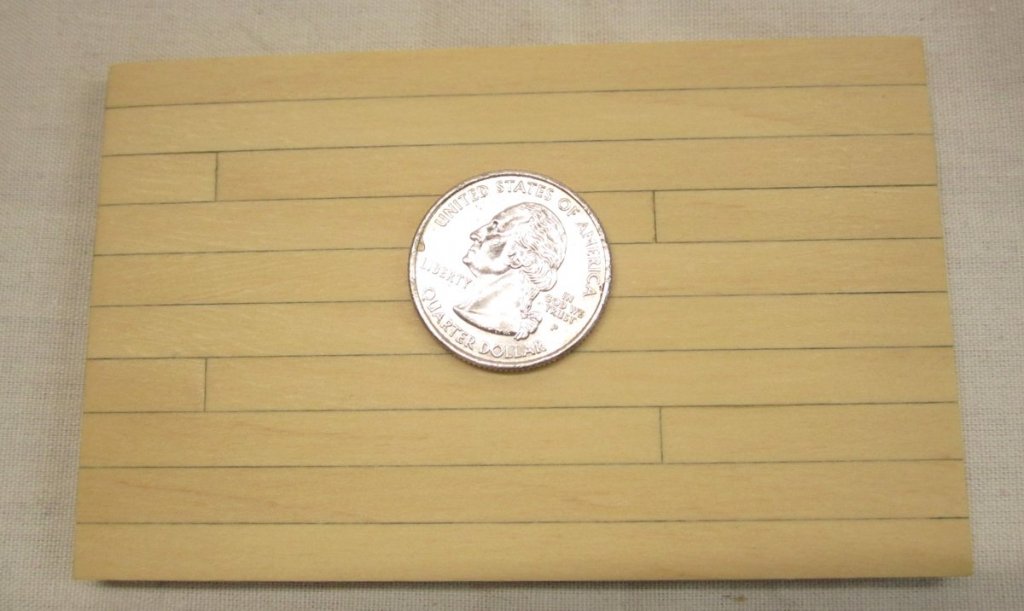
Its a little yellower and less tan than boxwood but its supposed to mellow and darken with age and get more tanish. Time will tell. My wood guy just dropped off several hundred sheets so I am fully stocked should anyone want to give it a try. Unlike boxwood however it is very soft. About the same hardness as Basswood but without any of the issues that basswood has. The surface quality is excellent after sanding and finishing. The planking sample below was made using 1/4" wide planks ripped from cedar. The seams between each plank were darkened with a pencil on one edge only. It has two coats of wipe on poly and I made this sample about two or three weeks ago. You will see slightly darker grain running through the wood before you finish it. But once you apply the wipe on poly or sanding sealer....the darker grain doesnt change color but the lighter wood between it does and it makes the grain almost invisible because it darkens to the same color. Hope that makes sense....its hard to explain. The fluorescent lights in my shop make it tough to photograph but I am messing with the camera settings to try and match the real life color best I can. I dont want to misrepresent it as I really really like this stuff once I got used to the soft nature of it after using boxwood for so long. Chuck
- 130 replies
-
- 27
-
-
My laser cutter brand has improved this model several times over the last few years. They have made it so the wires coming from the power source are easy to connect to the tube now.....I will send you a pm with a link to a video. Its the only reason why I am changing the power source because the wires are a pain in the butt to connect to the tube. But now there is no soldering needed at all....or at least there wont be if I can run the new wiring. Chuck
- 1,784 replies
-
- 6
-
-
- winchelsea
- Syren Ship Model Company
- (and 1 more)
-
Thanks To finish the yellow cedar I sanded it with some 320 grit paper and applied a coat of wipe on poly. Here is what it looks like. I have also done a mock up of the planking in yellow cedar. My photography stinks but I think you can get a good sense of the grain structure and finish of the wood after applying the wipe on poly. Chuck
- 130 replies
-
- 26
-
-
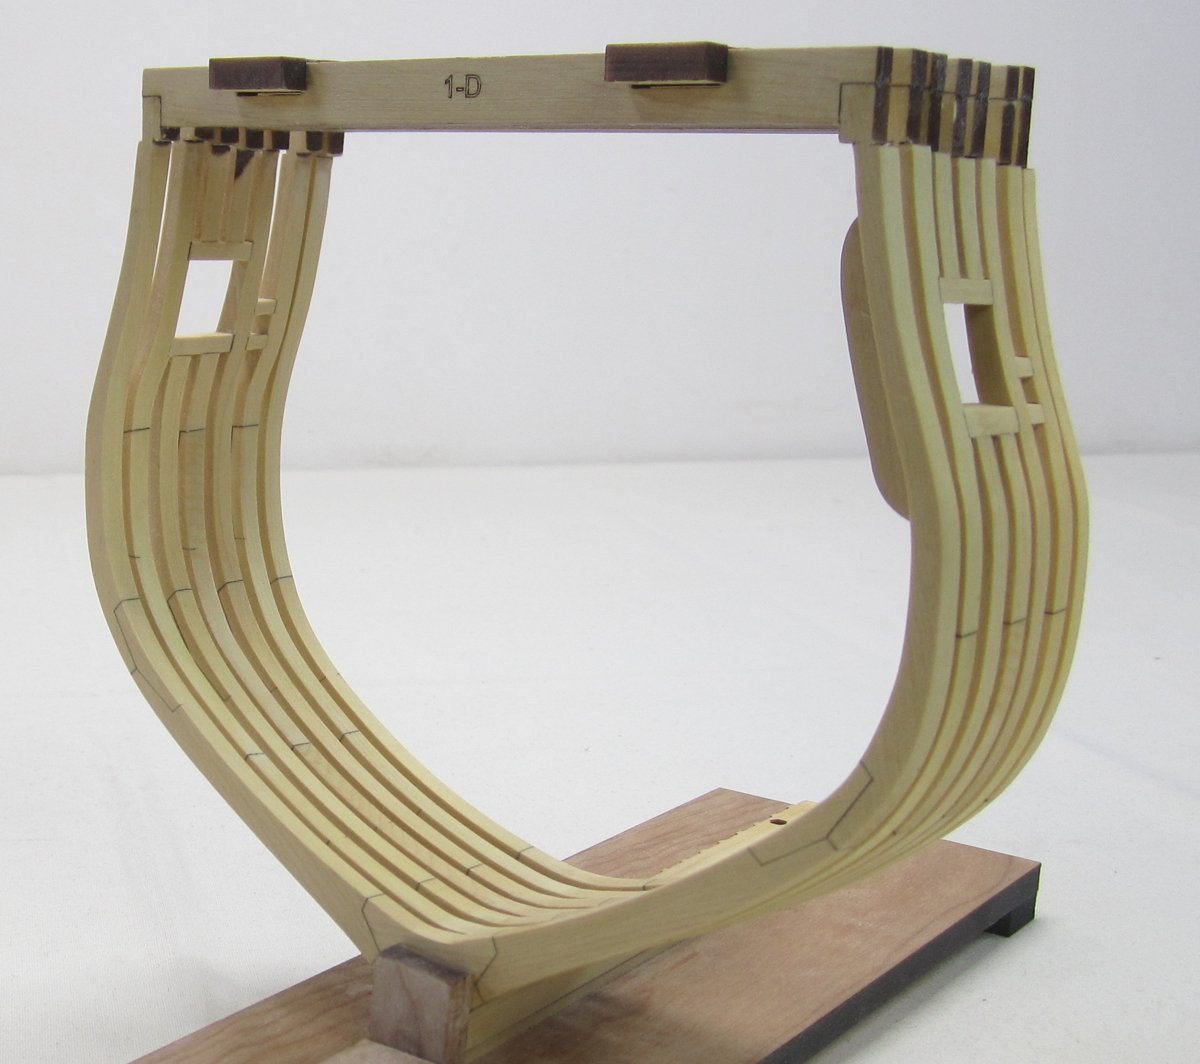
Your ears must have been burning Druxey.....When permanently gluing the frames to the keel I thought the same thing and all of the top supports for each frame have already been adjusted for the kit. When folks buy the kit they will have the etched line as reference although technically speaking, once frame one is glued into position properly all the others follow suit after inserting the frame registration pieces in the notches. But it couldnt hurt to have them on all of the frame tops. I will instruct everyone to glue frame one in position before trying to tweak and create the port sills. Frame one can be used as an "anchor" of sorts when glued properly in position to ensure that all of the other frames are aligned while testing and tweaking the port sill pieces. At least it was very helpful for me doing it that way. Once all of the port sills are made and set aside the remaining six frames are glued in position permanently and the registration strips are added before the glue dries. That is going to be the actual sequence of events. Chuck
- 130 replies
-
- 18
-
-
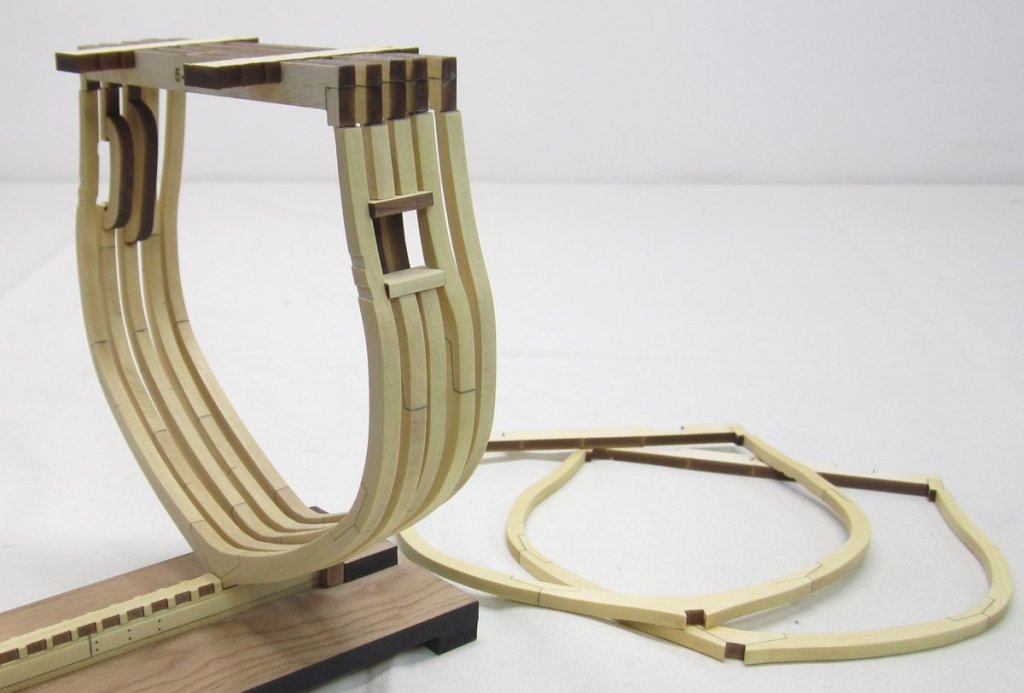
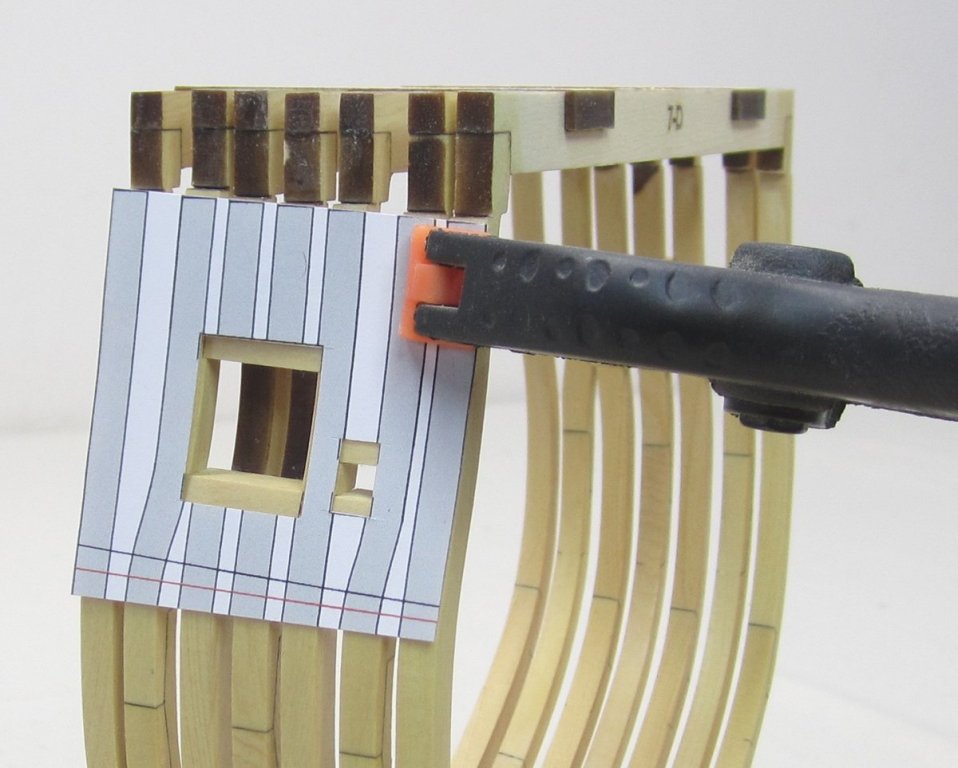
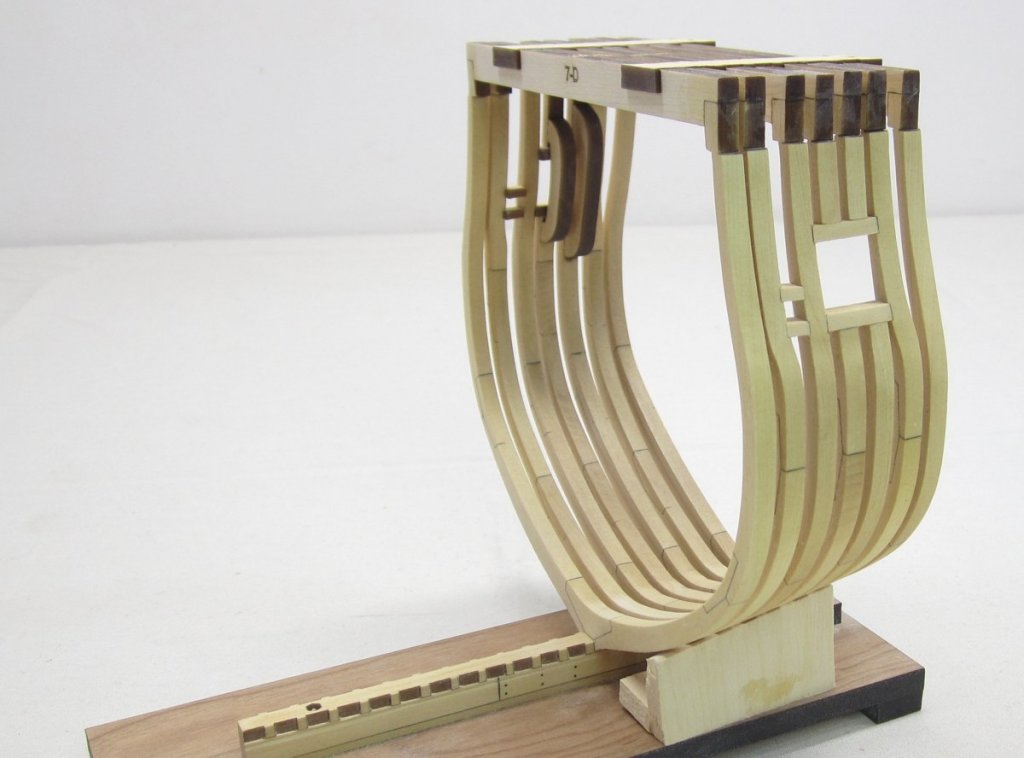
Not a lot that you can see but plenty of stuff to move the project forward. I did however finish cutting/tweaking the notches for the port sills. This is tricky work and is probably the hardest part of the project. But if you go slow it will be fine. The laser etched notches for the sills are not as wide as they need to be. This was done on purpose because it will be inevitable that you will be tweaking these so the port framing is correct. In fact, to make this easier I used a template to mark the top and bottom of each sill for the ports and sweeps first so I knew where to start my tweaking. The process involves constant removal of the associated frames to make small tweaks and then installation and testing. When the port side was done, they pieces were labelled and then set aside. I repeated this process again on the other side. Then the frames were glued into position permanently and the two small frame spacers reinserted on top to register them again before the glue dried. Once the frames were set, I then glued the sills in permanently and faired the exterior of the first seven frames. It was helpful to make a support which can be seen under the frames. This protected the whole assembly while fairing the outboard of the frames. Then just for a test (I wont recommend this for other building the kit). I removed the inboard "Ear" tabs on the port side which held the frames together for the gunport. But before doing so I made sure the sills were well glued in position and not moving. I cut the tabs free and test faired the inboard frames on the port side. But it will be best to wait until after the outside planking and battens are added later to do this. This was just a test for me as I didnt want to move forward until I knew the concept worked......which it did. Chuck

- 130 replies
-
- 31
-
-
I agree....with regard to the laser cutter it is the alignment of the optics but also how clean they are. A dirty/scratched lens and mirrors will also hurt the overall effect. It is great that they have one though....very nice resource. I just ordered a bunch of parts for mine because I have been lucky over the last four years. Its only now showing signs of needing some TLC. I just ordered a new laser tube, lens and power supply among a few other things. $1700......but its well worth it. I am all thumbs with this electronic/electric wiring stuff though, so I am very nervous about doing the revamp. Should be running as good as new when its fixed up. But I have to look for someone who can assist me with it who knows their way around a machine like this. I have a few engineers and electronics guys in mind...but they dont know I just volunteered them for duty yet.
- 1,784 replies
-
- 18
-
-
- winchelsea
- Syren Ship Model Company
- (and 1 more)
-
No ...there will be no scribed or etched planks for me. There is nothing like planking with individual plans when its done with care. That is a shortcut that I will never take. Thanks Druxey!!!!
- 1,784 replies
-
- 19
-
-
- winchelsea
- Syren Ship Model Company
- (and 1 more)
-
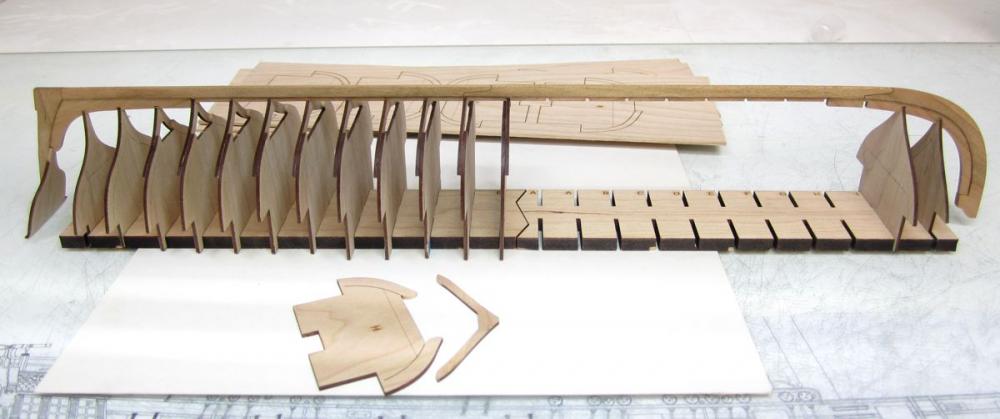
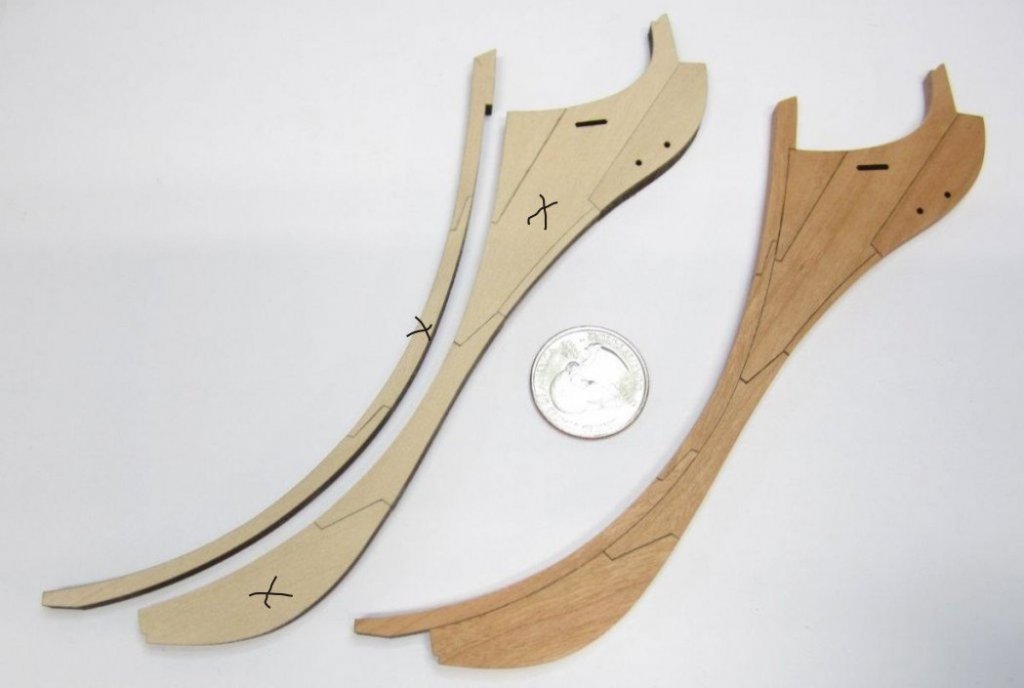
You have to plan for that...there are no gaps. You need to strategically flip some pieces when being cut so the angles match almost perfectly. For the stem parts I was able to flip some parts so the angles are nice and tight. You can see that I built the stem in two sections so that after assembly I did tweak the long curved edge so the seam was nice and tight but the individual elements went together better than if I cut them and tweaked them by hand. I do this to all of the parts and for the life of me I dont know why all kit MFGs dont do this. Note how the letters on the center section of bulkheads are on the other side....that was flipped when cutting so the joint fit perfectly without any need to sand them at all. The parts of the stem with the X's on them were also flipped on my file when laser cutting them.
- 1,784 replies
-
- 26
-
-
- winchelsea
- Syren Ship Model Company
- (and 1 more)
-
No pre-sales unfortunately....I am feeling stressed out as it is. I want to wait until this hull is planked before I start selling starter kits. I havent worked out the details yet but let me tell you...there are a lot of bulkheads and they are big. In addition to those, the starter package will include laser cut keel and stem parts, whatever strip wood is needed to frame the gun ports and stern along with the stern frames. Of course the plans as well. Basically everything needed to complete the skeleton so you can begin planking. My guess is it will be in the neighborhood of $150 give or take....plus shipping.
- 1,784 replies
-
- 15
-
-
- winchelsea
- Syren Ship Model Company
- (and 1 more)