HOLIDAY DONATION DRIVE - SUPPORT MSW - DO YOUR PART TO KEEP THIS GREAT FORUM GOING! (Only 13 donations so far - C'mon guys!)
×


Chuck
-
Posts
9,660 -
Joined
-
Last visited
Content Type
Profiles
Forums
Gallery
Events
Everything posted by Chuck
-
 That looks great....I should be catching up to you soon enough. I think the supports will keep your hull ...or any hull for that matter from twisting. Nicely done.
- 607 replies
-
- 9
-

-
- winchelsea
- Syren Ship Model Company
- (and 1 more)
-
Just an FYI....had I mentioned it.....they would have never put the extra parts on the sheet. LOL...You wouldnt have got extra of anything. Chuck
-
You will certainly change your mind Phil. Although small and inexpensive, the planking of the hull is certainly advanced and will give any model builder a really good challenge. Most beginners dont know what the word spile means and in order to plank this hull they fail to realize the extreme bends and plank shaping required. This is more evident when it comes time to plank inboard. In addition to this, the fragility of the hull and small parts also ramp this kits skill level up to advanced. This type of hull structure needs someone familiar with handling a model with a light touch which is something that requires some experience. Having said that, I will certainly watch and follow along as you build the model, and hope that your progress can help those who start to build their own. It shall be a very interesting progress. Tools are the easy part, since everything is laser cut and if you use the planks supplied....hardly any are required beyond the basic stuff as outlined in the instructions. Oh....I dont know what the eta is...but a 1/2" scale version is in the works from ME. This is what I suggested they do all along. But anyway, that one would make life a lot easier for folks. Might want to wait for that one. Chuck
-
You could but nobody will see it. The molding strip will run along that seam and will be obscured or even covered. Lovely work.
- 103 replies
-
- 3
-
-
- queen anne barge
- Syren Ship Model Company
- (and 1 more)
-
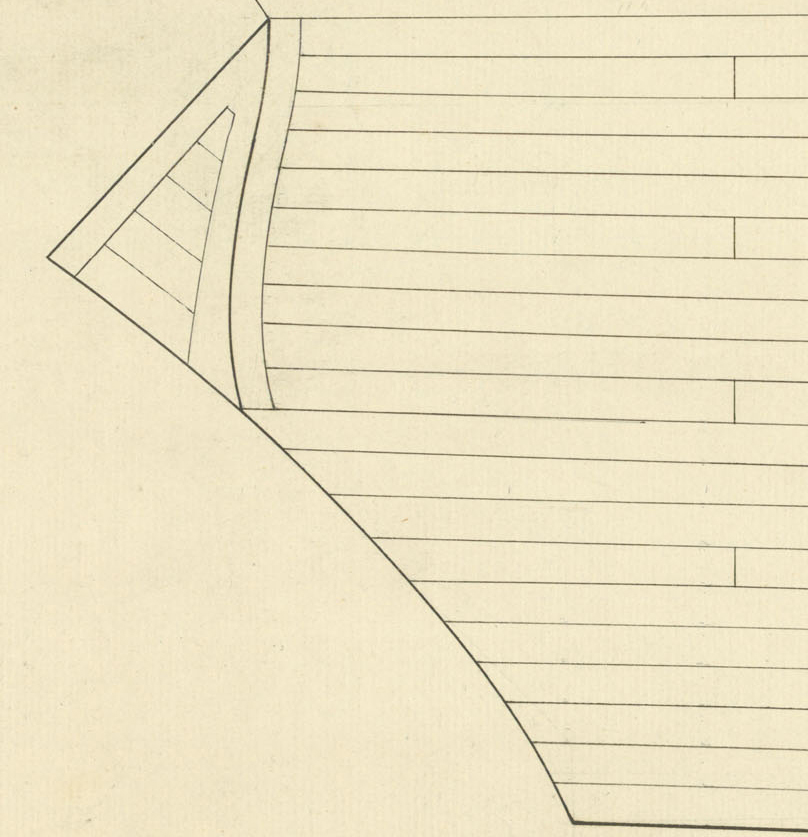
Dont plank cheerful like that....very different square tuck. Mine follows the original draft to the letter....you are doing a great job on her so far. Here is the square tuck from cheerful's original draft for the external planking. Cant get anymore correct than this!!!


- 574 replies
-
- 7
-
-
- cheerful
- Syren Ship Model Company
- (and 1 more)
-
I actually waited til I had the flag staff so I could make sure it was straight when gluing it in. Thank goodness it takes a while for Titebond to cure which allows you to move the flag around while its in the step so you can get it straight.
- 120 replies
-
- 8
-
-
- queen anne barge
- Syren Ship Model Company
- (and 1 more)
-
Very nice....and yes that is the exact reason I added extras. Same is true for the decorative panels.....you should be almost ready to add those too. You are moving along relatively quickly which is good. I see a Pegasus Cross Section Rusty beta test in the works for you!!!
- 120 replies
-
- 7
-
-
- queen anne barge
- Syren Ship Model Company
- (and 1 more)
-
Thank you very much guys. This is a fun project but it will no doubt be an advanced kit. But so far ....so good. Chuck
-
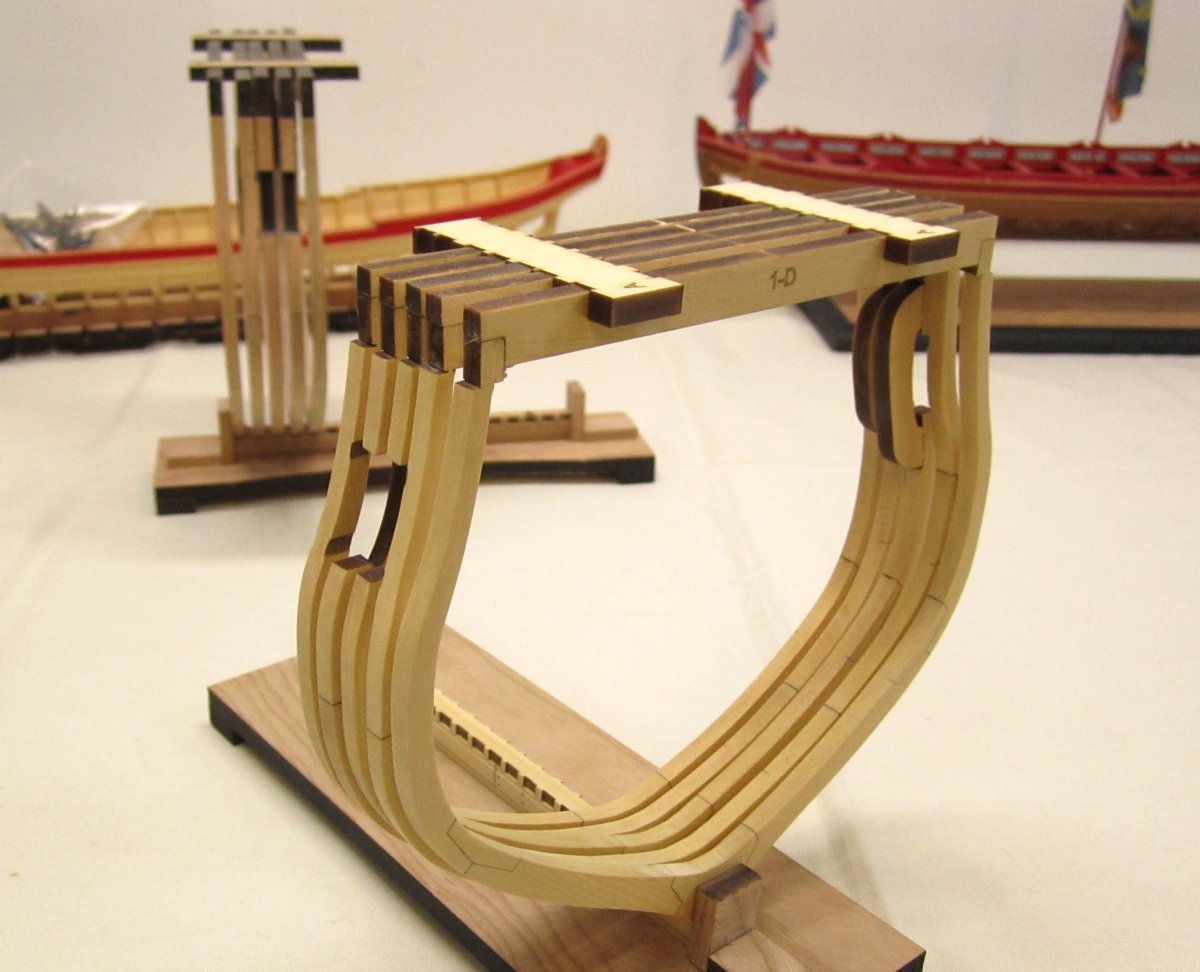
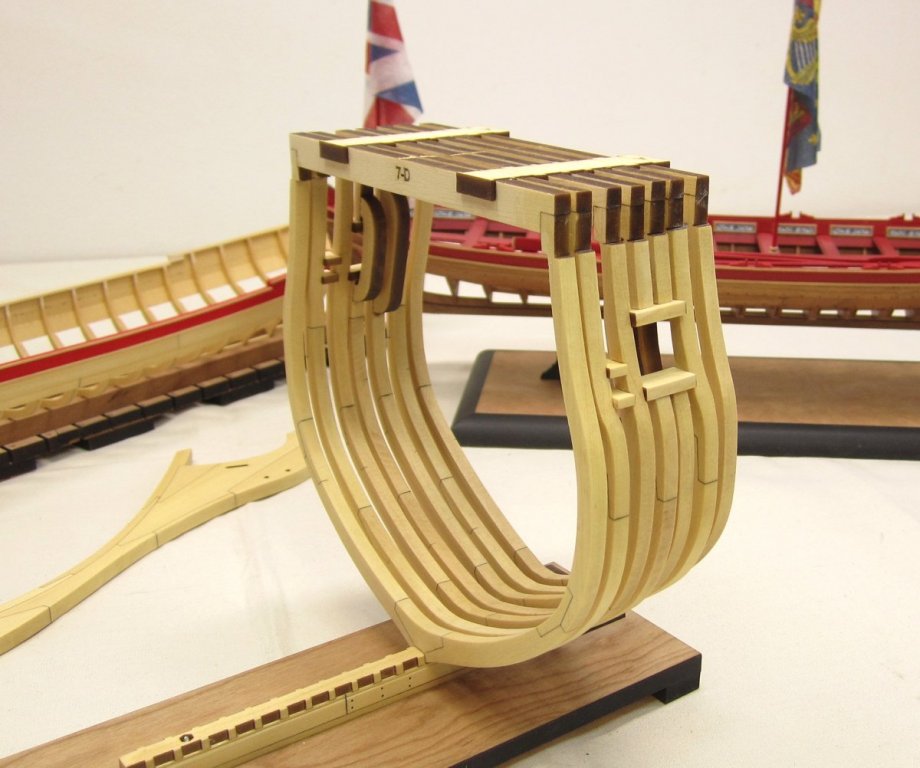
I did reach a milestone of sorts. I have completed all seven frames in phase one. The frames will be built and installed in three phases to make it easier to manage. Phase one has seven frames. Once the frames are all done and dry fit in the keel, you can start adding the port framing. The port framing is tricky but manageable. You will be removing the frames quite a bit to tweak them and the slots for the port sills so you can get a good fit. Same is true for the sweep port framing. Once you have the port framing dry fit nicely, then we can glue all the frames in this phase permanently to the keel. Then glue the port framing in too!!! I havent glued it together yet....but that is the next step. What you see in the photo are all the frames and port sills simply dry fit port and starboard. I will glue it all together after the Connecticut show. Then the frames can be faired outboard...and the alignment tabs you see on the inboard side removed as well...but I get ahead of myself. Then its onto phase two and another seven frames done exactly the same way.
- 130 replies
-
- 40
-
-

-
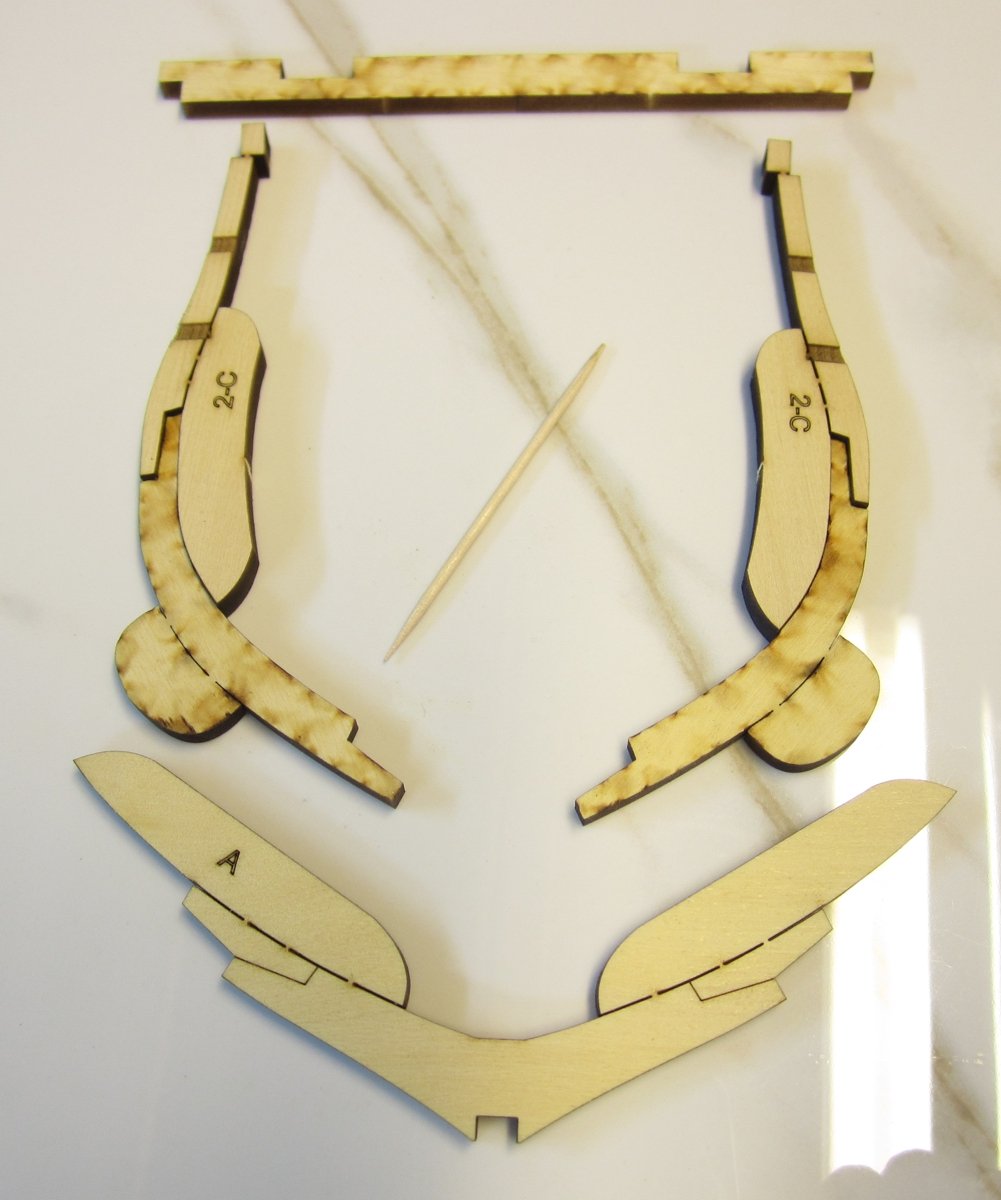
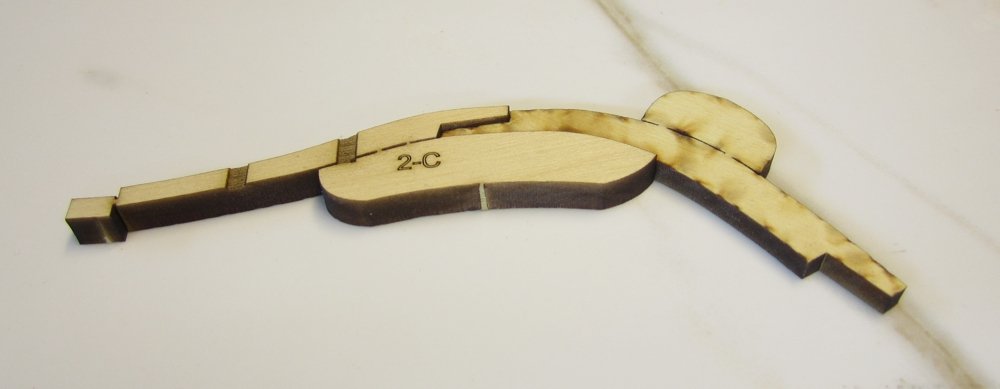
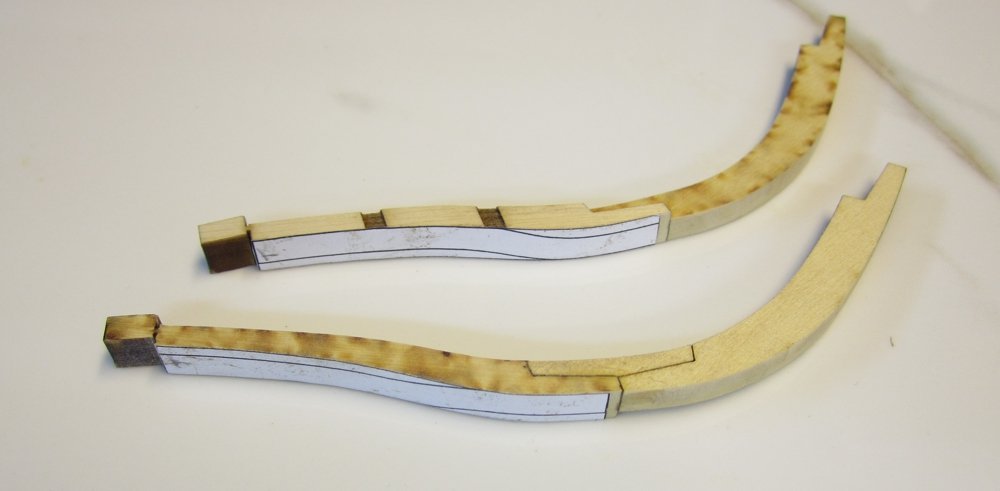
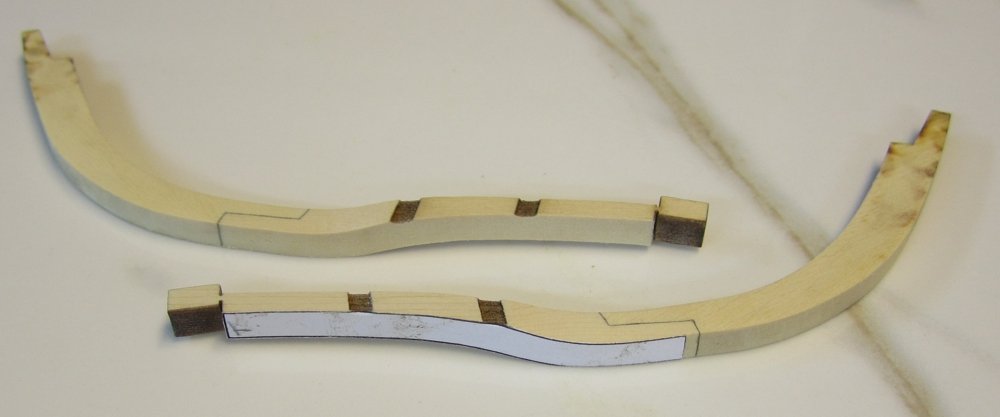
Thanks!!! I never posted how I am going to handle the shifted or bent frames. This is how it will be done. Its basically the same as the traditional frame you saw already where you flip over the pieces for a better fit. BUT....the top timbers are 1/4" thick vs 3/16" thick like the other parts of the frame. You can see the components below. After making so many of these I have found that it is best to glue the two pieces for each side of the frame together first. Note how the top timbers (2-C) are thicker. Once the tightbond is dried, I dont sand any of the char off yet. But I did remove the alignment tabs to make shaping the shifted top timber easier. Then I glue some specially prepared templates to the outside edge of the frame showing the bend as shown above. I used rubber cement but anything low tack will work. Then its just a matter of shaping to match the template. I used a sharp #11 blade to just shave away the majority of the wood that needed to be removed. Then I used some 220 grit sandpaper to finish it off nicely. Once done you can remove the template as seen below. Then its just like any other frame where you glue these two parts to the other frame sections.

- 130 replies
-
- 26
-
-
That looks very very good. One thing you can do that I recommend is to spray the painted surface with dull coat or a matte fixative. Dont spray a heavy coat but several light coats from afar. This really evens out the painting and you wont see any brush strokes at all. It works a treat!!! And you dont have to worry about getting any on the unpainted cherry. It works there as well.
- 120 replies
-
- 6
-
-
- queen anne barge
- Syren Ship Model Company
- (and 1 more)
-
This is a poll of just registered members. Only members can vote. The most logical place for it is in the kit build log area and that is why it is there. This is the largest collection of build logs on any ship model site. The knowledge and expertise shared is quite valuable and it is something we want to encourage people to sign up for in order to see and take advantage of.
-
Its looking excellent so far. Well done!!
- 103 replies
-
- 1
-
-
- queen anne barge
- Syren Ship Model Company
- (and 1 more)
-
Measure them....compare to my measurements. Chuck
-
Actually scale means nothing and the measurements are what you need. It depends on what size you need for the ship you are working on. If you are building a frigate at 1:64 scale and your frigate carried 12 pounders then my 1 29/64" barrels are fine. If you are building a larger ship that carried 42 pounders then my larger size would be better. What are you building? What scale.....and what size guns did she carry? You can also download the drawing from my site (cannon page) and compare them to your plan to see if they match as well. Chuck
-
I have been swamped with trying to rebuild my inventory before the Connecticut show. But yes I have made some progress but nothing really new. I basically have caught up to where I was on the earlier version. This is where I am at right now. The good news is that I have completed the set up in shop for some serious model building after the show. I am ready to go and have set up an area to take better pictures.....hopefully. Right now everything is kind of thrown onto the same table....as you can see.

- 130 replies
-
- 34
-
-
Looks very good Mike. Dont forget to bring it on Saturday to my shop. I will have bulkhead formers laser cut by then.
- 607 replies
-
- 8
-
-
- winchelsea
- Syren Ship Model Company
- (and 1 more)
-
This is just in the states Mike...I have no idea what is happening in Europe but I am actually looking to buy bulk from Europe soon as the prices do seem to be stable there. Also it is very very tough to find 12/4 stock boxwood in the states now and it is plentiful in Europe. There is just the shipping and taxes to contend with. Gilmer on the west coast of the US for example only has 8/4 boxwood and its priced at $40 per board foot now as opposed to $24 per board foot just last year. Its a bit of a ripp-off. I have been led to believe by those suppliers that it is because of the increased tax placed on all lumber imported into the US by these companies. But who knows why....could just be greed. Chuck
- 1,784 replies
-
- 3
-
-
- winchelsea
- Syren Ship Model Company
- (and 1 more)
-
Its 20 lb black but 15lb is also very good. Chuck
- 120 replies
-
- 3
-
-
- queen anne barge
- Syren Ship Model Company
- (and 1 more)
-
I am going to use it for almost everything. The only thing I wont use it for is any scraped molding. That will be boxwood. It is very flexible.
- 1,784 replies
-
- 6
-
-
- winchelsea
- Syren Ship Model Company
- (and 1 more)
-
Its just one way I have seen the it done in original source material. There are many variations.
- 1,784 replies
-
- 5
-
-
- winchelsea
- Syren Ship Model Company
- (and 1 more)
-
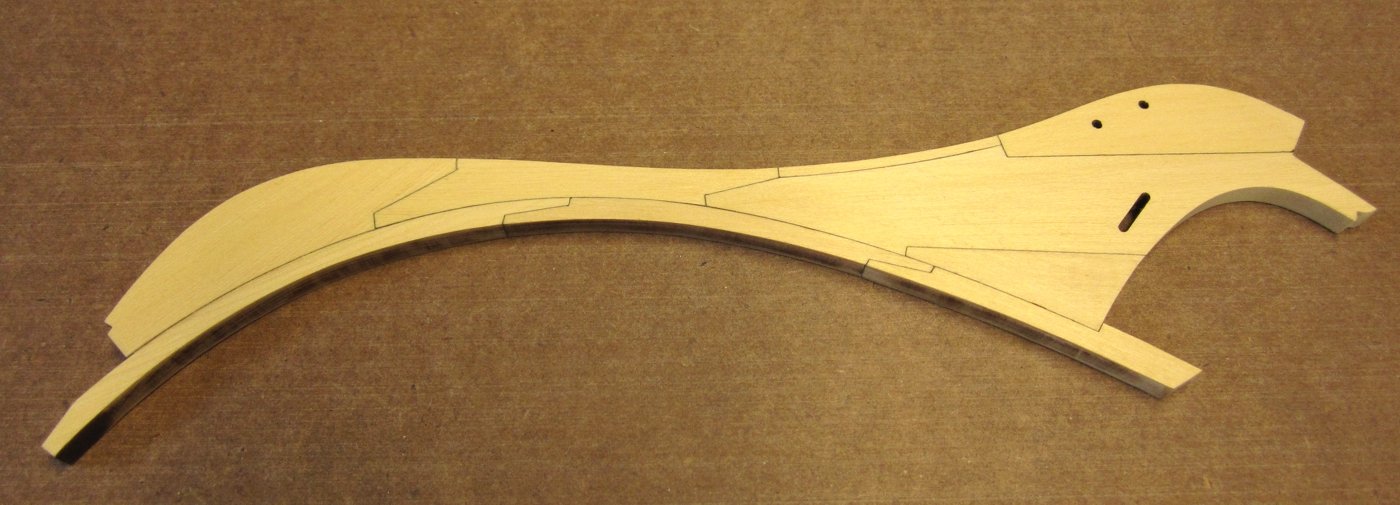
Here is a very accurate photo on a neutral background to showcase the yellow cedar stem. This should give you a really good idea of the grain (lack of) and texture of the wood. It does not darken along the end grain. Laser char is at a minimum and this has just a light coat of wipe on poly. After a few months the color will deepen to nice amber color but it holds a really crisp edge and sands great. Its a soft wood but finished nothing like a soft wood. It finishes like a hard wood similar to boxwood in my opinion. But at a 40% or so discount. Chuck


- 1,784 replies
-
- 25
-
-
- winchelsea
- Syren Ship Model Company
- (and 1 more)
-
Absolutely...I have read a good deal but please send me via PM so the build log doesnt get to clogged with non-build info. The yellow cedar is wonderful stuff.
- 1,784 replies
-
- 4
-
-
- winchelsea
- Syren Ship Model Company
- (and 1 more)
-
Its 1/48 scale. After much deliberation and the desire to build a true 1/4" scale frigate before I drop, this model will now satisfy that urge. I was no longer going to look at the many beautiful 1/4" scale build logs on this site with mouth open in jealousy. I have always been curious why there are no 1/4" scale frigate kits available as well. I know there are plenty who want to build at this scale and now there will finally be one available. Its not that large actually at about 3 feet long. I can do so much more at this scale from a design standpoint too!!! Mike and I have been discussing it along with some design changes and we just decided to build it together in this scale. I believe everyone should attempt to build at least one frigate like this in 1:48 scale in their lifetime if they can. And I believe most serious model builders dream of of doing so like me, so I am going to help all of them make up their minds by making it very accessible and hopefully painless to build. Chuck
- 1,784 replies
-
- 23
-
-
- winchelsea
- Syren Ship Model Company
- (and 1 more)