DONATION DRIVE - SUPPORT MSW - DO YOUR PART TO KEEP THIS GREAT FORUM GOING!
×


Chuck
-
Posts
9,691 -
Joined
-
Last visited
Content Type
Profiles
Forums
Gallery
Events
Everything posted by Chuck
-
 That is extremely disappointing. I have a bridge in Brooklyn I want to sell you. LOL Chuck
 -
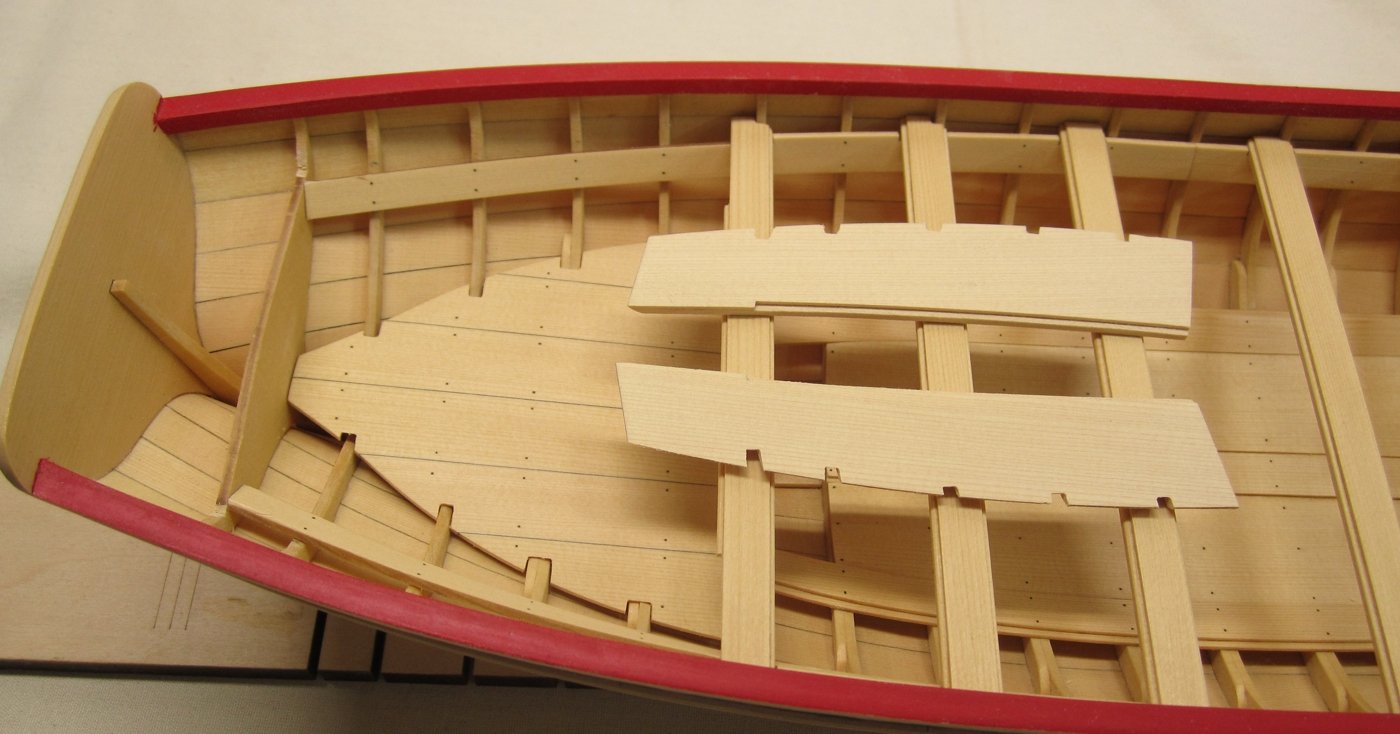
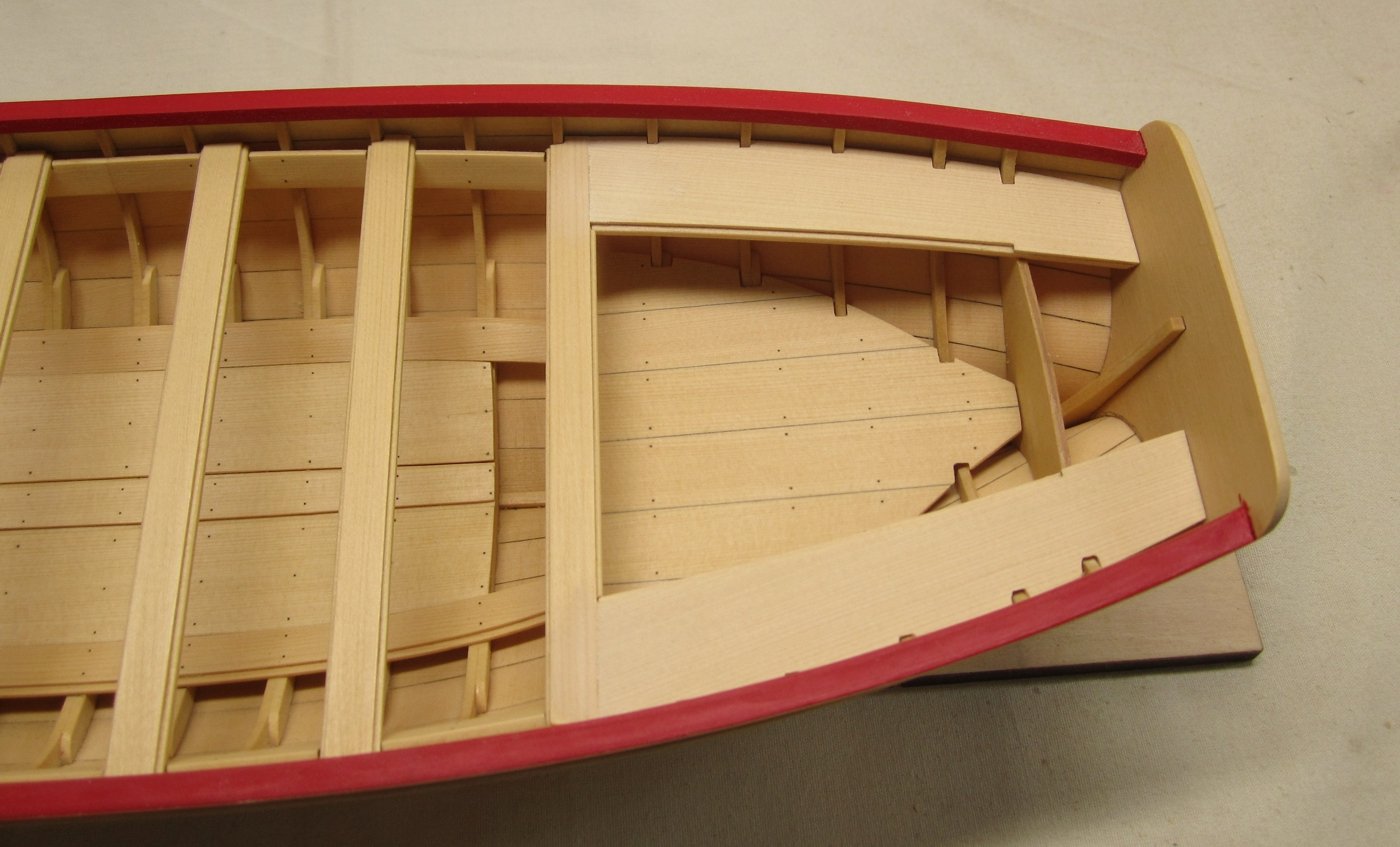
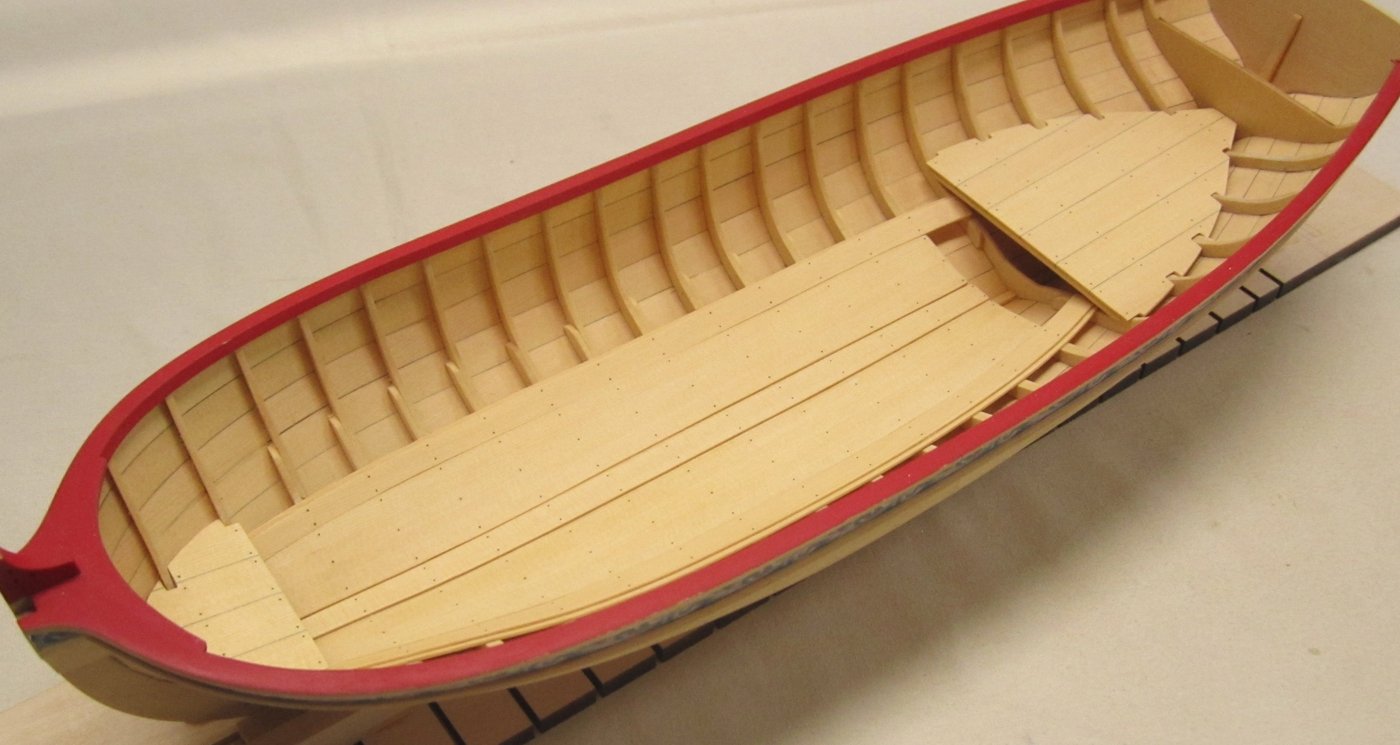
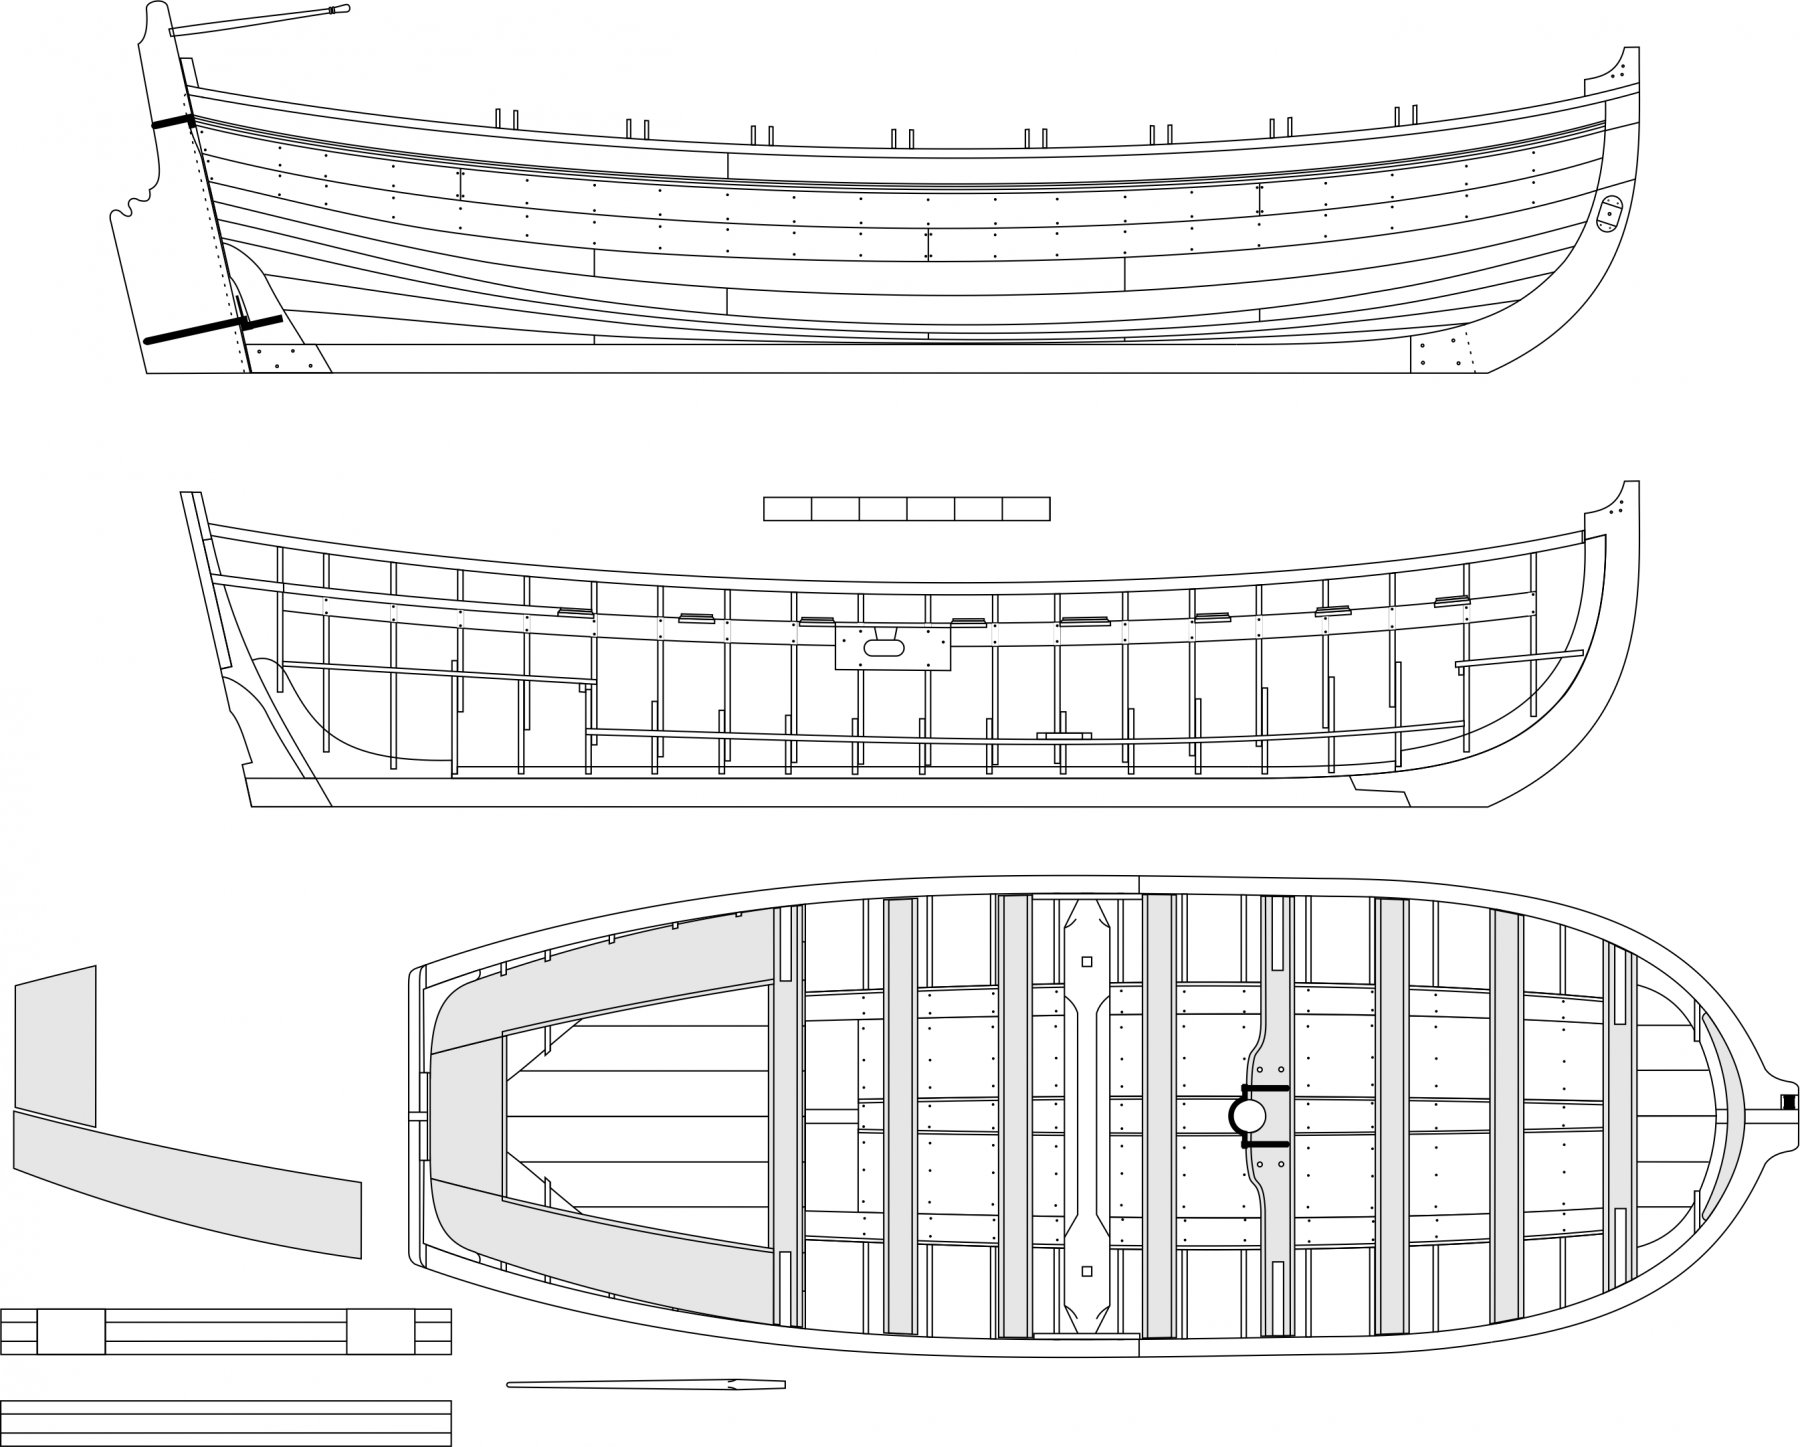
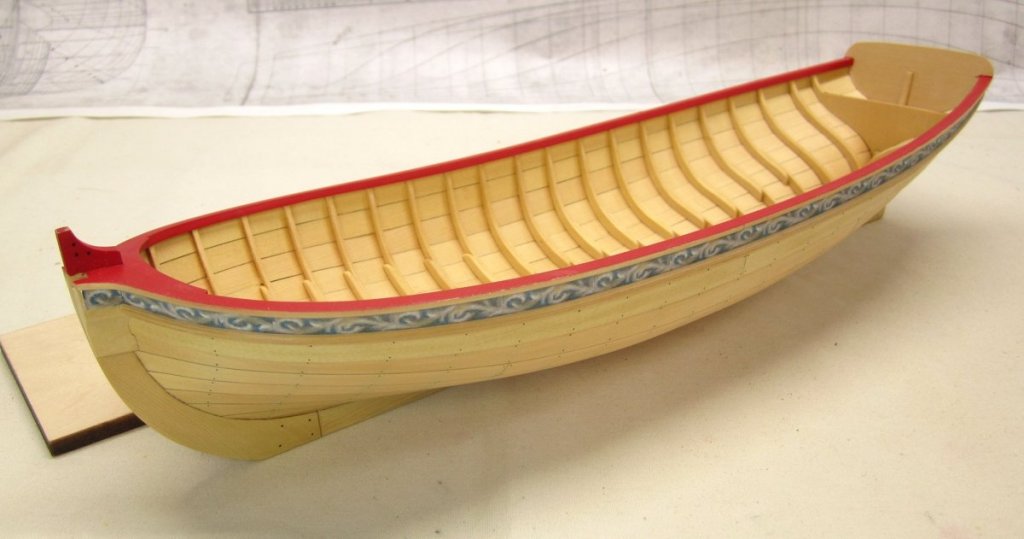
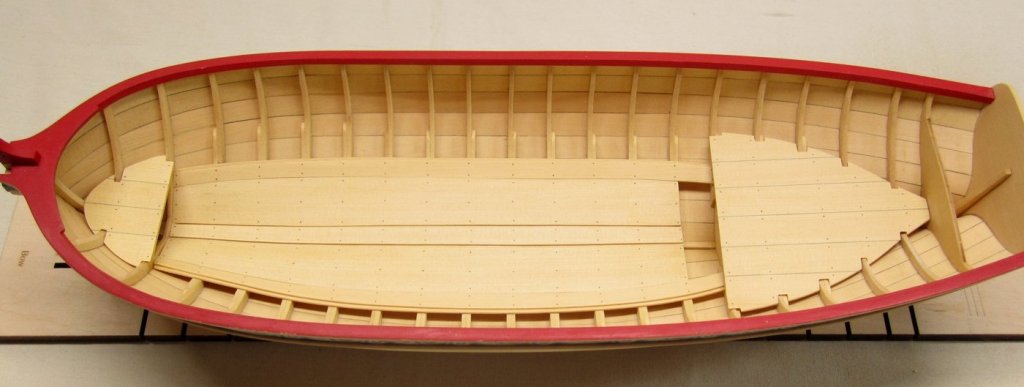
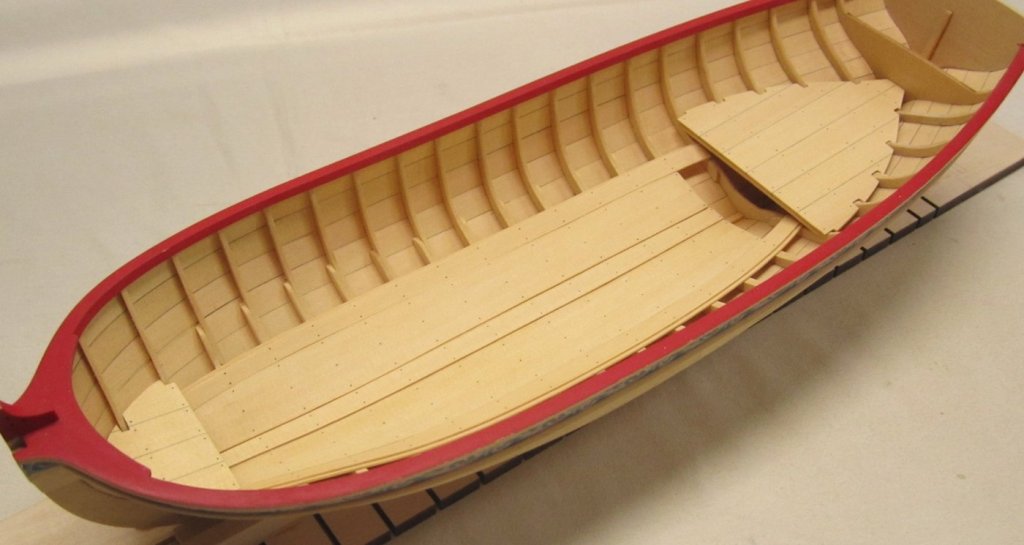
Moving right along.....I will be working my way forward on the interior. None of the thwarts are glued into position just yet. There will be some things that need to be done to many of them as I work my way forward. For example, the seats in the cockpit need to be notched into the aft thwart. The seats are what I did next. The seats are laser cut in two layers just like the thwarts. The laser char was removed from their edges and then they were glued up so there was a decorative edge on one side like shown in the photos and on the plans. The two side seats were "tweaked" for the best fit first. They are laser cut a bit long on purpose to give everyone some wiggle room with this. You will be shaping and sanding and test fitting many times over until these fit properly. Everyone's model will very slightly so the notches for the frames will need to be filed in. BUT ..... -first, I beveled the aft edge of the seats so they sit flush against the transom which is angled. -then I held the seat in position against the frames so I could mark their locations on the seat. -I filed the notches for the frames a little at a time constantly testing the fit and adjusting. The edge of the seat against the frames also must be beveled to sit properly against the inside planking. -When the slots for the frame were acceptable, I laid the seat in position to cut its forward edge to length knowing that it will be notched into the last thwart. You can see the notch I filed into the thwarts below. Basically you must file away the lower layer of the thwart. In the next photo you can see how it looks after test fitting. Once they were glued into place, the center seat was treated the same way and adjusted to fit. This is how the whole model looks at this point. Its getting close now with only a few more details to add. The seats in the cockpit area will be painted red like one of the contemporary models. The two contemporary models are painted differently but I think I will follow the scheme shown below in the unrigged contemporary version. I also posted a photo of the rigged contemp. model to show you guys the difference.


- 421 replies
-
- 41
-

-
- medway longboat
- Syren Ship Model Company
- (and 1 more)
-
I would certainly be curious. Let us all know.
-
That is not boxwood at all. They shouldnt sell it as such. It is clearly a dyed wood to imitate (very poorly) boxwood. They used a yellow dye and my guess is that in spots you will find that the yellow doesnt go all the way through the strip. The wood texture being all stringy and fuzzy is indicative of submergence and cooking in a dye bath for long periods of time and the same thing would happen to any soft wood when submerged like that. Good dyed veneers dont have that texture. Take a sharp blade and slice a shaving off of the top of a strip and see what the color looks like deeper and if you even stand a chance of getting a smooth finish on that wood. I doubt it. Its basically a cheap dyed wood veneer which is common and that is why you will only find MS offering it in 1mm thickness. Cheap yellow wood veneer ripped into strips. These veneers are usually dyed very bright primary colors like this example of yellow veneer sold for marquetry enthusiasts. This is what the store writes about it but its a good quality dyed veneer and actually pretty expensive. "All of the dyed veneers that we work with have been bleached first and then pressure cooked with dye to saturate completely through every wood fiber. This is done to reduce fading and any ability to sand through the color. This dying process is done in Italy. These dyed veneers could be any of the following: Maple, Birch, Poplar, Tay, Koto or any American white wood."

-
Not that I am aware of...but they were removable to allow drainage and pumping of the water that lie beneath it.
- 421 replies
-
- 3
-
-
- medway longboat
- Syren Ship Model Company
- (and 1 more)
-
Ouch!! I guess I shouldnt have nailed the center floorboard. 😏
- 421 replies
-
- 4
-
-
- medway longboat
- Syren Ship Model Company
- (and 1 more)
-
That was my initial thought as well. But both contemporary models have the bottom boards nailed so I followed suit since this is a model of a model. Its easy enough for folks to decide otherwise though. Chuck
- 421 replies
-
- 7
-
-
- medway longboat
- Syren Ship Model Company
- (and 1 more)
-
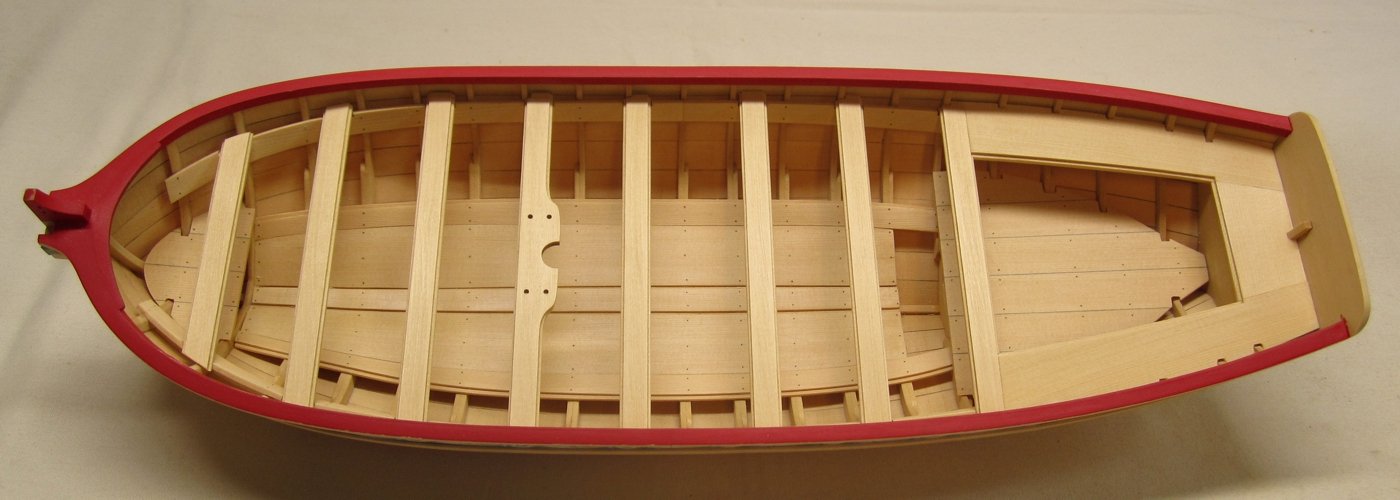
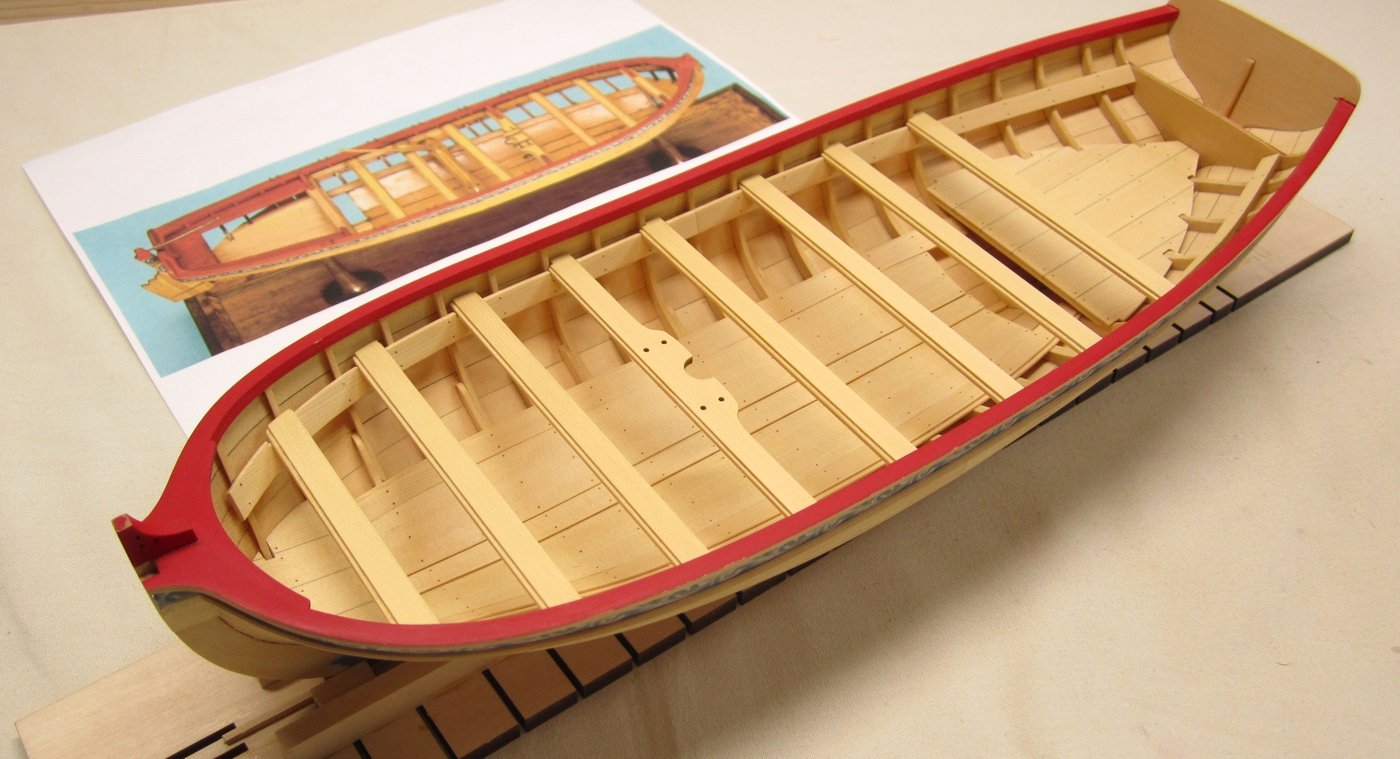
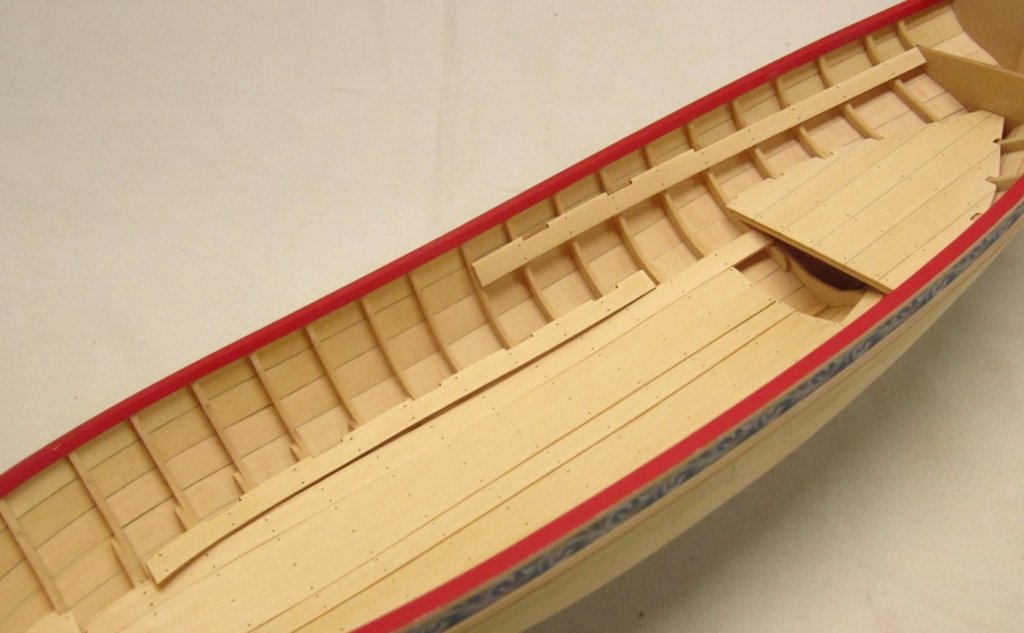
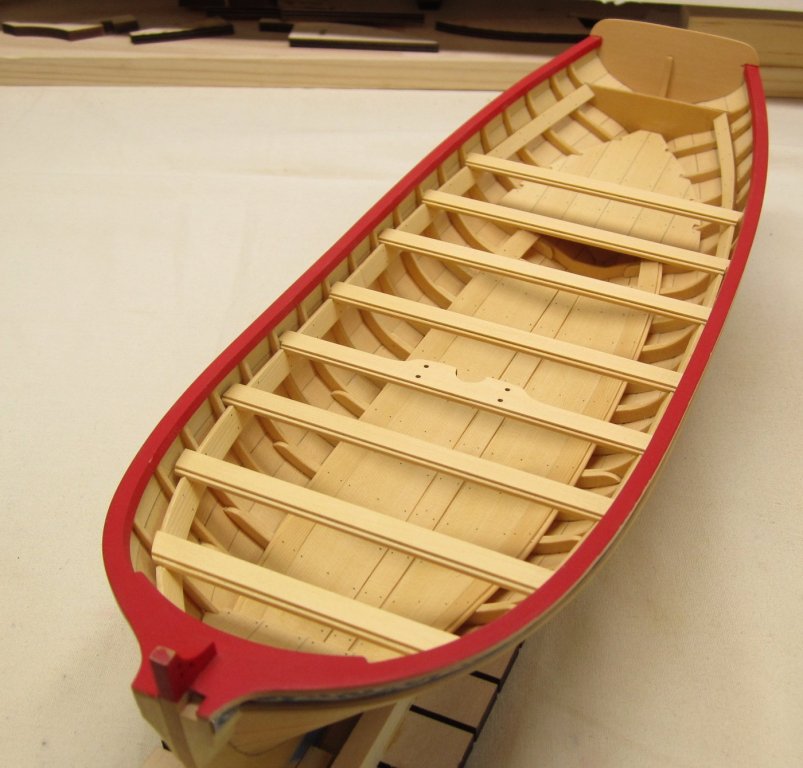
Installing the risers was up next. They are designed in two pieces for each side. They are laser cut with notches in them for the thwarts. This means that the placement of these is crucial. The very first thing I did was measure off the plan the distance from the top of the caprail down to the top edge of the riser. I did this at every frame on both sides of the model so I was sure these would be placed at the same level port to starboard. The aft piece is the first to be glued into position. But I did add the nails ahead of time because I think it would be easier. So I clamped it in position temporarily to mark the frame along the riser and then after unclamping, I drilled and inserted the fishing line for the nails. This first piece is left a bit long just like I did with the planking. So you need to mark the forward end in the middle of the frame and cut off the excess. This is very important because the next section will butt against it and the thwart notches need to line up. Its easy enough to do but you must be careful. Then it was glued into position making sure that the top of aft end was level with the top of the bulkhead frame it sits against. The cockpit seats will sit on top of this so they need to be level with each other. You could see the forward section waiting to be glued into position. No trimming needed. This just needs to be butt against the aft section tightly. Here you can see both sections of the risers in position. Then I made up the thwarts. Like the floorboards these have a fancy edge. Since scraping Cedar is problematic, I made each thwart in two layers glued together. I just cleaned the char of the edges and glued the layers together creating an even fancy edge on both sides. These are laser cut extra long as well. You will need to cut them to length so they fit in the notches nicely. You may have some that require some notching around the frames. But its pretty straight forward stuff. These are not glued in yet. I will wait until I make the cockpit seats next and after some detailing on those which I will describe, they will be glued unto position. The center thwart with the cut away for the mast also needs detailing before it can be glued into position. Its finally moving along and actually looks like a boat!!! It wont be long now!!! Feel free to ask me any questions. This model really shows the beauty of the yellow cedar which I am really liking the more I use it.

- 421 replies
-
- 38
-
-
- medway longboat
- Syren Ship Model Company
- (and 1 more)
-
Not to many actually. Thank you for the kind words. I wish I had more time during the week to build. I am only spending about 4 hours a week on this project as far as build time goes. The platforms and floorboards took me a couple of hours. If I had to guess actual build time (not development time for the plans and design) I would say I have spent maybe 25 hours give or take actually constructing the model up to this point.
- 421 replies
-
- 13
-
-

-
- medway longboat
- Syren Ship Model Company
- (and 1 more)
-
You could but its tough to see where the frames are Mike. So I held it up to the light because the hull is translucent and marked the locations for the frames on the outside of the hull. Chuck
- 421 replies
-
- 9
-
-
- medway longboat
- Syren Ship Model Company
- (and 1 more)
-
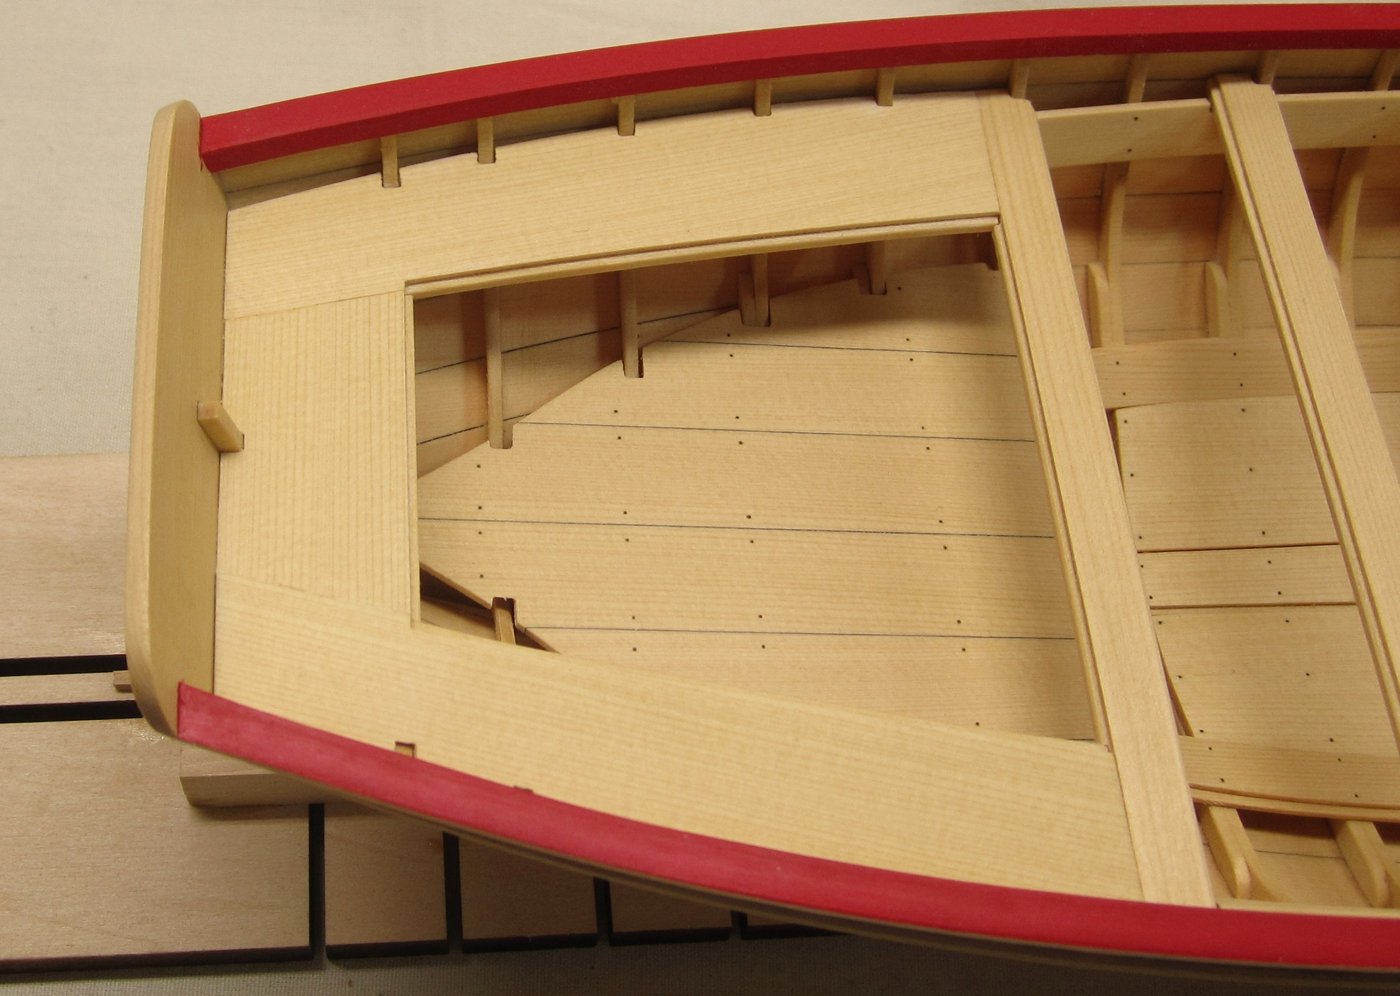
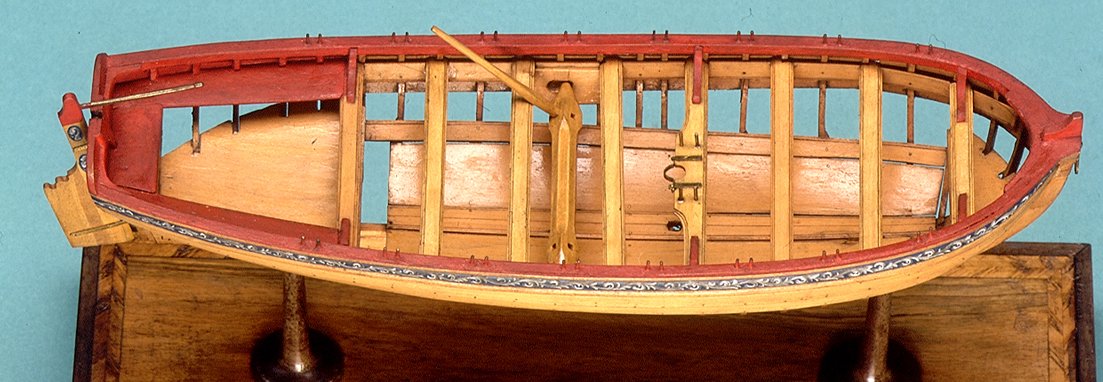
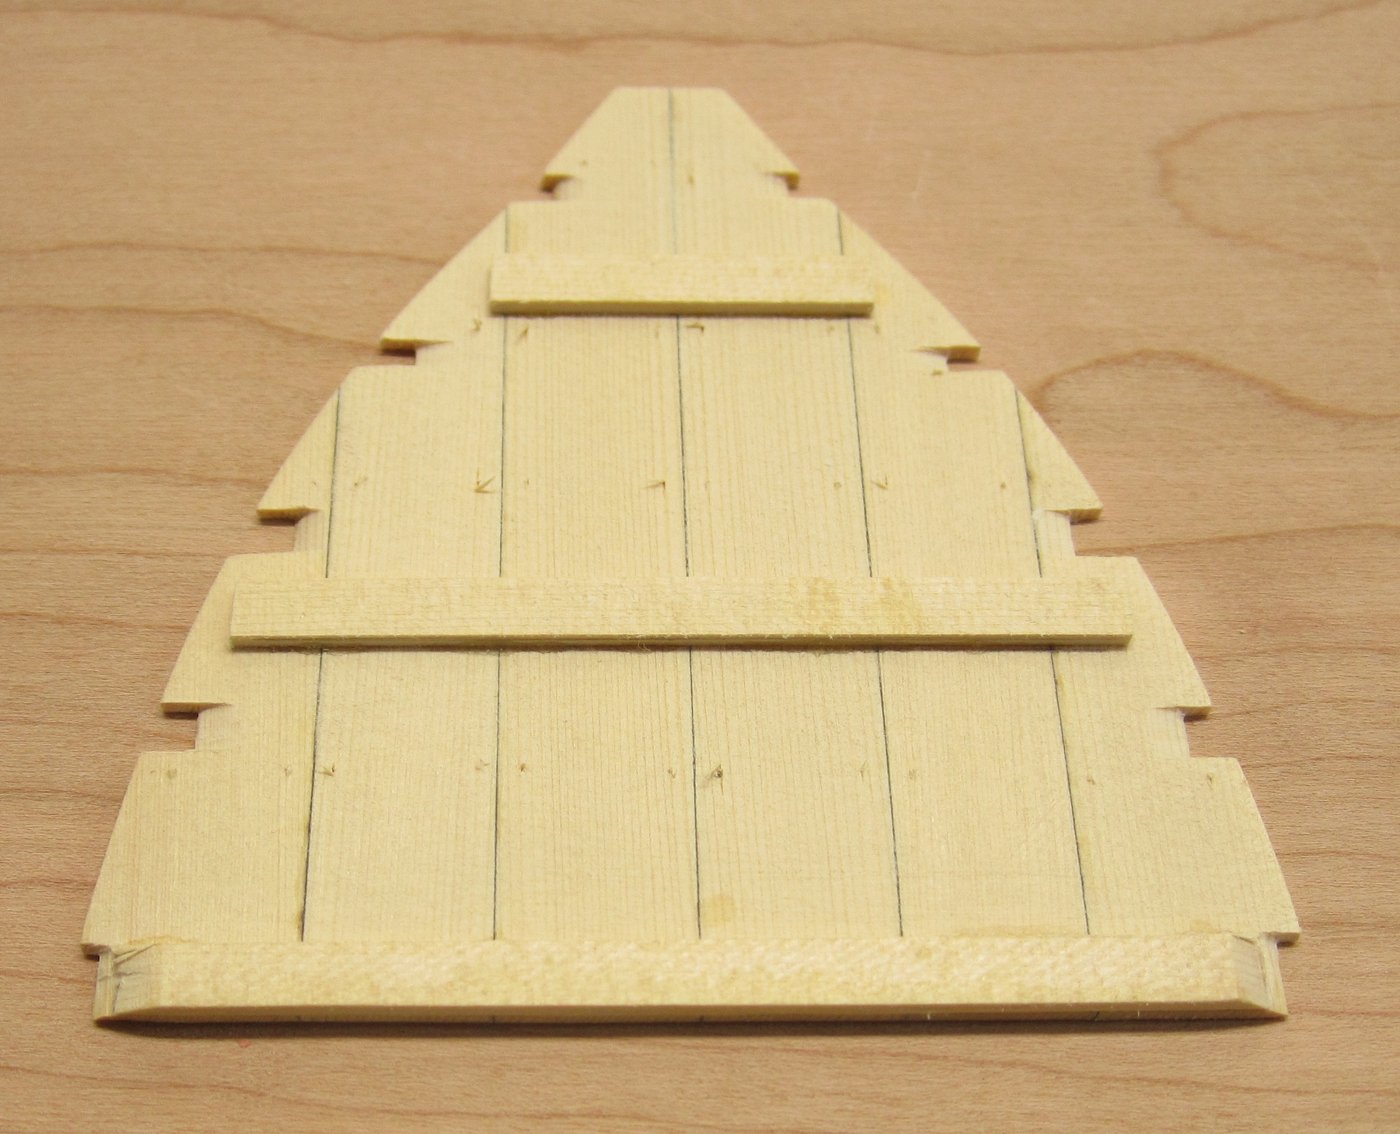
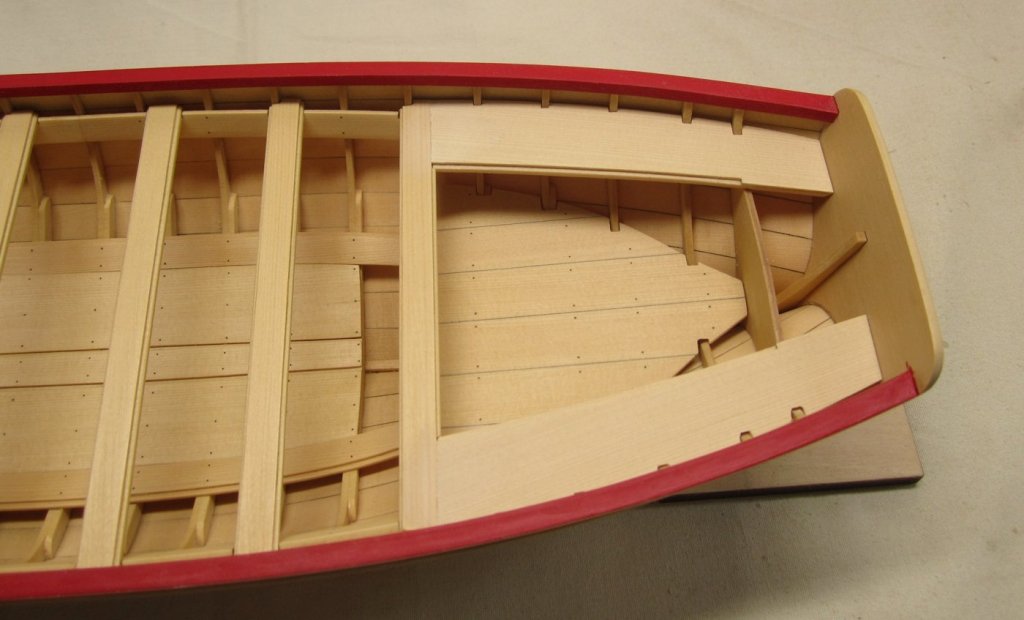
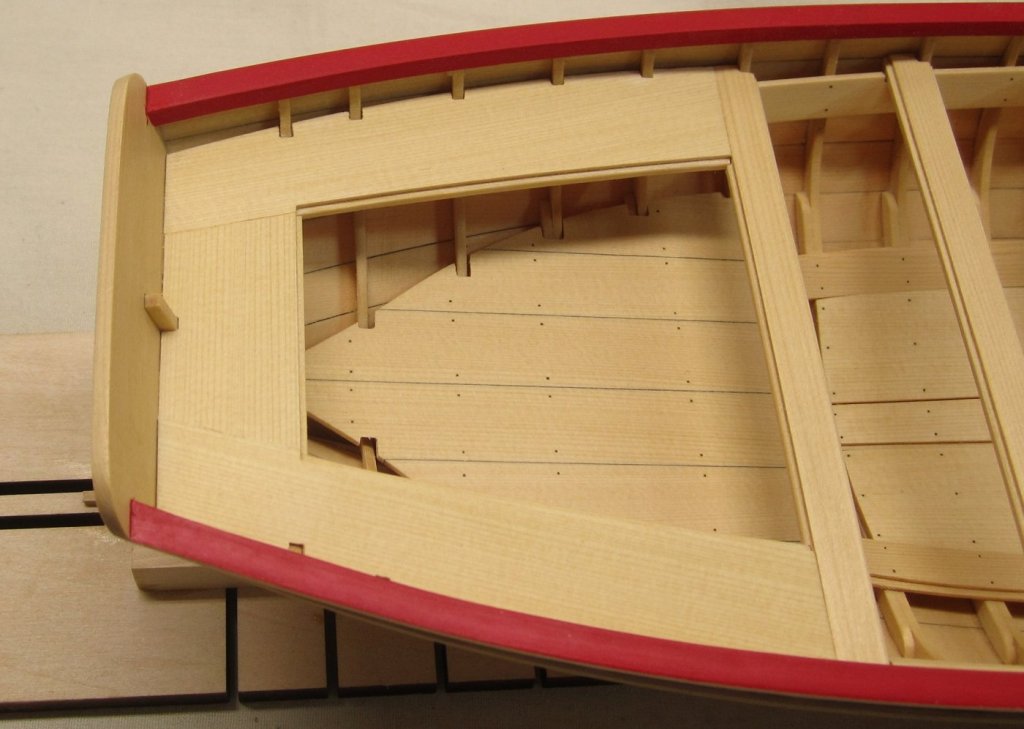
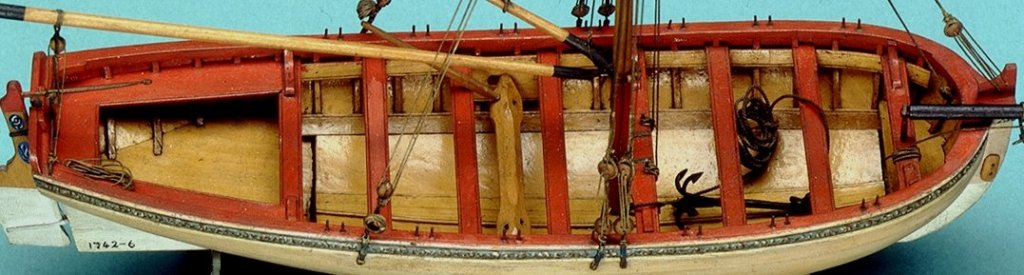
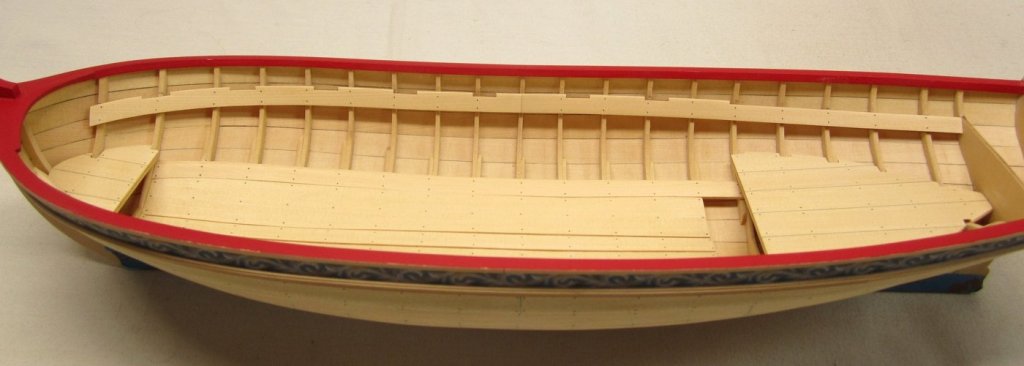
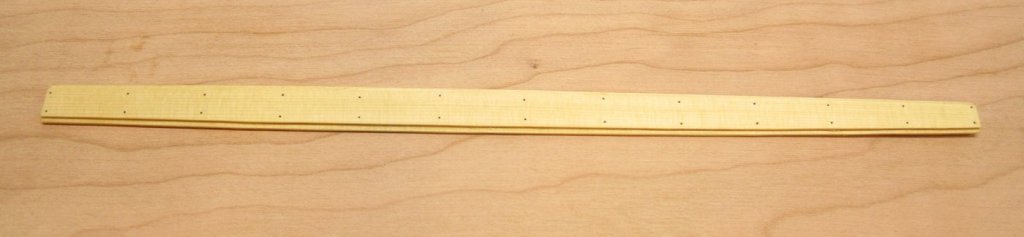
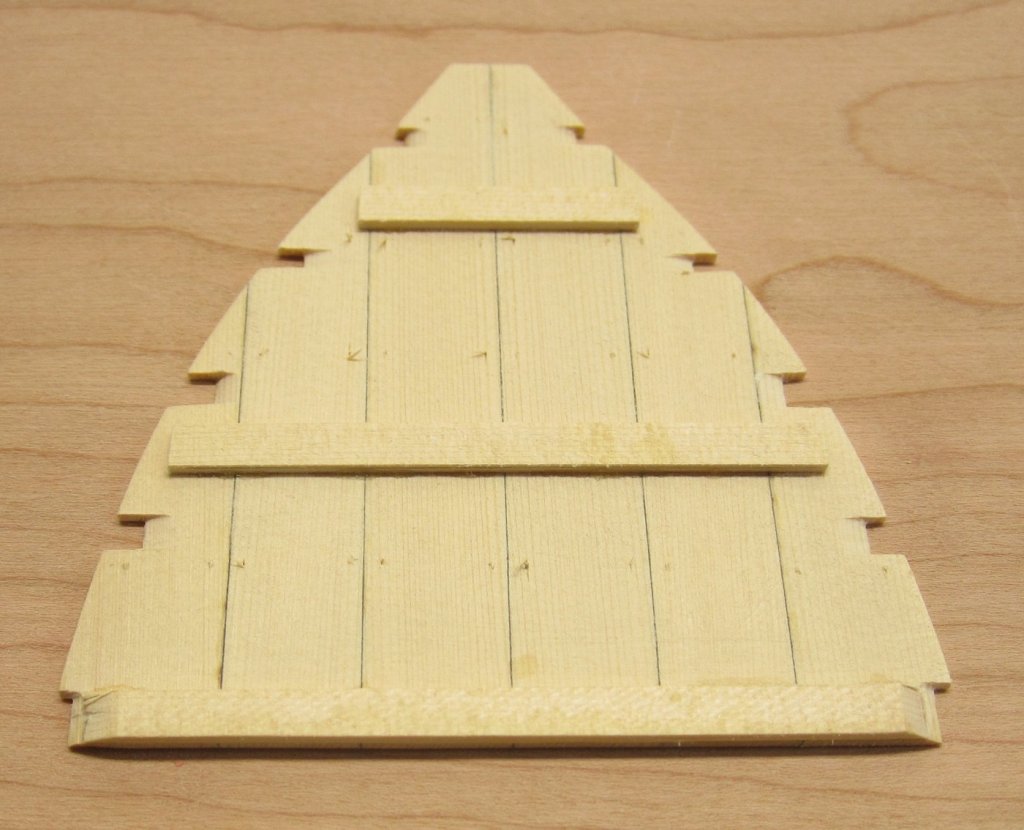
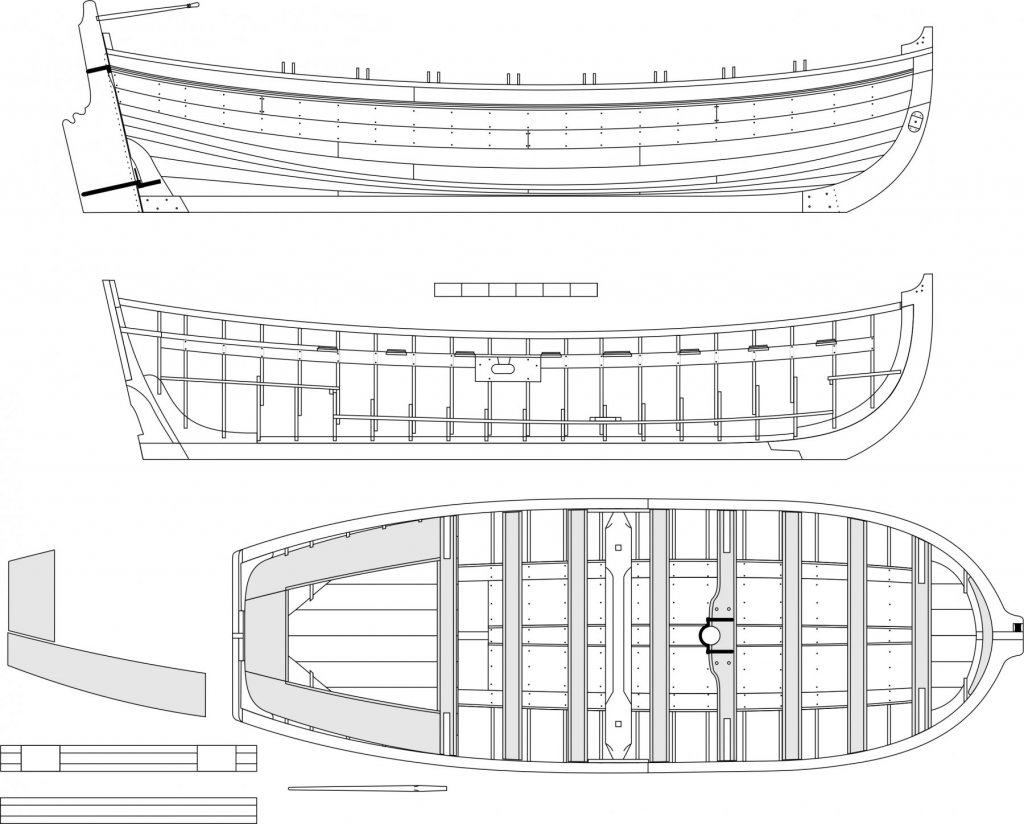
I did finally finish the nailing of the external planks. That took a long time. My advice would be to really consider how long it takes to drill all of those holes and insert the 10 pound black fishing line. I think its quite worthwhile but once you commit to it you have to follow through and do it to the entire model. So think it over first. Once that was done, I could work on the inside...finally. The photos below show the floorboards and platforms in position. The floorboards are a bit different than you might be used to. This is the way they are made on the contemporary model and I actually found some original drafts of longboats that show them this way as well. Its very interesting and I think its a nice detail to add to make this longboat model a bit unique and different from other kits of the same subject matter. It may be hard to tell from my photos but the center plank and two outside planks of the floorboards have a rabbet along their edges. Normally I would scrape these details into the planks but Yellow Cedar doesnt scrape well. So instead I made these three floorboards in two layers. They are all pre-spiled and laser cut. The finished thickness for the floorboards is 1/16". So two 1/32" layers were used. They were glued together to leave the rabbet on both sides although the outside planks of the floorboards only have a rabbet on one side. You guys will see this on the plans. Once completed I marked the locations where the frames would be so I could add the simulated nails before I glued the floorboards on the model. See below. The thinner floorboards were easy enough to glue into position. Its the wider boards that were a bit tricky. These are 1/16" thick as mentioned and because they are quite wide it was more difficult to pre-bend and glue into position. Should anyone have trouble with this there are other solutions. You could make these out of two layers of 1/32" stock like the other floorboards and glue each layer into position separately. They would bend more easily that way. You could also convert the wider floorboards into two thinner strips too. The platforms were pretty straight forward. Each of the pieces are laser cut and after gluing them together edgewise they are ready for test fitting. I also ran some 1/16 x 3/16" strips across the bottom of the platforms to give it strength. Probably just like they do in real life. I also added one of these across the flat edge of each platform which will show so take your time with this. The platforms were nailed off the model as well. A look at the bottom of the aft platform...it aint pretty, but it doesnt have to be. One feature not laser cut into the platforms are the notches for each frame. Everyone's model will be slightly different as they may shift. So you must mark there locations and file the notches before final placement can be finished. Its not hard to do. You may want to trace each platform on some card stock first and locate the notches that way as an alternative. Then transfer them to your cedar versions. The bow platform is a bit trickier because of its location. So I recommend that you do make a card templete first and transfer it to your glued up version. I made the pieces for the bow platform over-sized to compensate for the wide variety of bow shapes everyone will have. But you can see how mine look ad are shaped. Note how the notches are also beveled so they sit nicely against the frames. This is something you will need to do as well. The bow platform is done exactly the same way. A look at the contemporary model.


- 421 replies
-
- 35
-
-
- medway longboat
- Syren Ship Model Company
- (and 1 more)
-
Thank you very much. If we could only go back in time and ask them!!! But as model builders of boats from this era we can only guess. Sometimes more questions than answers. I do not know the answer to that question, but it must have seemed practical at the time. That set up was copied from two contemporary models one of which is known for its original rigging. I wondered the same thing when I saw that the first time.
- 1,051 replies
-
- 3
-
-
- cheerful
- Syren Ship Model Company
- (and 1 more)
-
Honestly I dont know. But at scale for the model I just poked tiny holes on the corners and lashed it to the rope with sewing thread.
- 1,051 replies
-
- 4
-
-
- cheerful
- Syren Ship Model Company
- (and 1 more)
-
No not a separate package. But I did put together a list of what is needed on my website page for cheerful.
- 39 replies
-
- 1
-
-
- cheerful
- Syren Ship Model Company
- (and 1 more)
-
No you dont have to, but it would be smart.....otherwise you are flying blind. Its a quick exercise and on a boat this size doesnt take very long. This way as you are sanding and tweaking your planks and your strakes start to shift from strake to strake.....you will have your pencil lines there to keep you on track. Plus this group project is about learning a skil you may have never tried before and doing it within a group may be a huge help in the end. OR Of course not😵.....You just have to make sure that you place your planks exactly where I placed mine and you must fair your hull exactly like I faired mine. And you must of course bevel the edges of your planks exactly like I did. Then I am sure you will have no problems and get a great fit. This second part is just a joke in case it didnt come across that way. LOL...
-
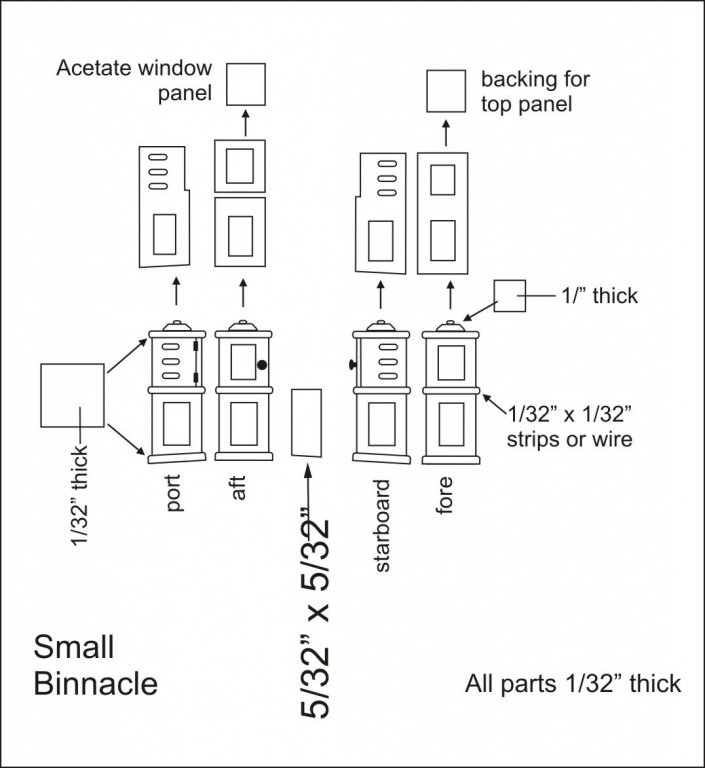
It would be a small one like on Sultana or fair american. Possibly even a small one column binnacle cabinet.
-
Nice progress Mike. Ever-so-slightly, yes the planks are a bit oversized because everyone will need to make adjustments. It would pretty tough for everyone to place there planks exactly the same and with each strake that will open small gaps. Each builder will also fair the frames differently especially at the bow and stern. But with some care and adjustments you should get a really tight fit.
-
That looks beautiful Toni. It was a pleasure to follow you as you built it over the years.
-
Thank You, Yes I did. I darkened the only one plank edge with a soft pencil. I usually darken the edge of the plank being installed against the one that is already on the hull if that makes sense. The plank edge already on the hull is left natural. But only after beveling it for a tight fit.
- 421 replies
-
- 10
-
-
- medway longboat
- Syren Ship Model Company
- (and 1 more)
-
How are you coming along with this model. Havent seen you on the forum in a bit. Any progress? 😊
-
Making any progress on the project??? Any updates? 😃
-
Excellent start Mike!!! 😄 You are the first unofficial member to start building the Medway LB. Hopefully there will be many more once it officially gets started. I asked mike to start building in Pear to see how it looks and maybe gauge some interest from others. I am not sure yet if I will offer it in Pear but lets see how it goes. Excellent use of those extra braces at the stern but remember you will need to snap those off after you finish planking so you can remove the model from the baseboard. So far the pear version looks very good!! Keep in mind that all of the frame parts are actually cherry (poor man's swiss pear)...but the keel and everything else will be swiss Pear. You would never know otherwise unless I mentioned that. Its a perfect match.
-
They are indeed very very different models!! I will post a photo of both side by side when I get bit further along
- 421 replies
-
- 6
-
-
- medway longboat
- Syren Ship Model Company
- (and 1 more)
-
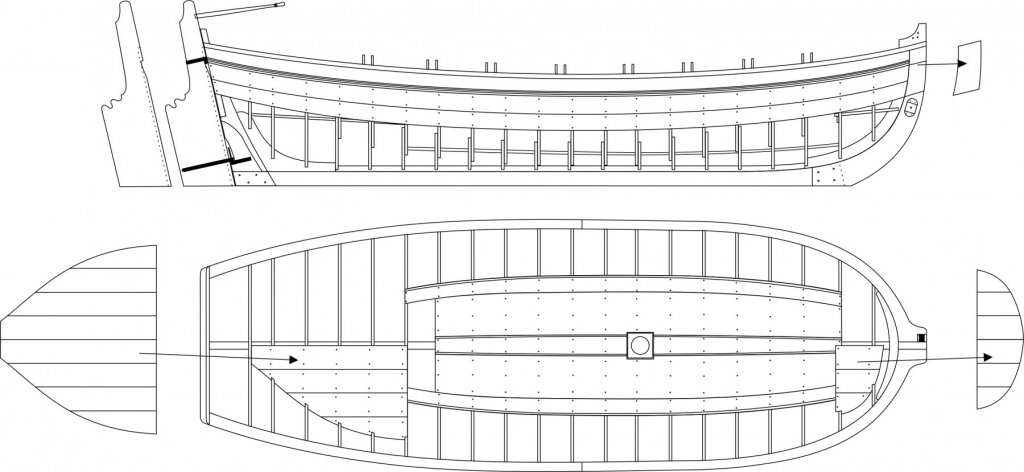
Thank You guys for kind words and support. Here is a quick look at some images of the plans as they are in development. Still lots of work to do on these but they are getting close. They wont be finalized until after I finish the hull but this will give you an idea of what this project will look like. And yes (before anyone asks) the images are altered and no parts shown will enable them to be pirated.....these are just pretty pictures at this point and all parts templates are on sep sheets.😊

- 421 replies
-
- 26
-
-
- medway longboat
- Syren Ship Model Company
- (and 1 more)