-
Posts
70 -
Joined
-
Last visited
-
 Saburo reacted to a post in a topic:
HMS Winchelsea by scrubbyj427 - 1:48
-
 scrubbyj427 reacted to a post in a topic:
HMS Winchelsea by scrubbyj427 - 1:48
-
 scrubbyj427 reacted to a post in a topic:
HMS Winchelsea by scrubbyj427 - 1:48
-
 FrankWouts reacted to a post in a topic:
HMS Winchelsea by Beckmann 1/48
-
 FrankWouts reacted to a post in a topic:
HMS Winchelsea - FINISHED - 1764 - by Chuck (1/4" scale)
-
 FrankWouts reacted to a post in a topic:
HMS Winchelsea by scrubbyj427 - 1:48
-
 FrankWouts reacted to a post in a topic:
HMS Winchelsea by scrubbyj427 - 1:48
-
 FrankWouts reacted to a post in a topic:
HMS Winchelsea by scrubbyj427 - 1:48
-
 FrankWouts reacted to a post in a topic:
HMS Winchelsea by scrubbyj427 - 1:48
-
 FrankWouts reacted to a post in a topic:
HMS Winchelsea 1764 by Stuntflyer (Mike) - FINISHED - 1/4" scale
-
Mike, thank you for the quick response! Jim
- 607 replies
-
- winchelsea
- Syren Ship Model Company
-
(and 1 more)
Tagged with:
-
Mike, where did you find the Chapter 3 instructions that cover the construction of the Q galleries? Jim
- 607 replies
-
- winchelsea
- Syren Ship Model Company
-
(and 1 more)
Tagged with:
-
JJ, I did not have the problem you are encountering with the Wales not aligning at the top. HOWEVER, I have found that at the stem I do have a problem as I reach the bottom of the timber bollards. On top of the top strake of Wales, the plans call for a 7/16" strake (called a black strake, although it is not painted black) and this, like the Wales, is double planked (according to Chuck, the top plank of the "black strake" is to be sanded down in thickness to under 2/64"). This thinning is to give a "step down" appearance I guess from the Wales to the single strakes that are above the "black strake." Now comes my problem - I guess it is only mine since I have not seen it mentioned elsewhere. Above the black strake are two planks, each of which is 1/4" wide and they are to flow smoothly under the timber bollards to the rabbit in the stem piece. When I temporarily placed the black strake and two 1/4" wide planks above the Wales, I did not have room under the bottom of the timber bollards for the top 1/4" wide plank. It looks to be like I am going to have to remove about 1/8" of the exterior timber bollards on both sides of the stem to allow the 1/4" planks to fit smoothly right up to the rabbit in the stem and under the timber bollards. This came as a complete surprise to me and another disheartening mistake (evidently on my part). So far, I have had more than my share of such disheartening mistakes with this model.
-
Worldway, For what it is worth, I have found that sanding sticks (I get mine at a beauty salon store, where they are sold for sanding fingernails) in various grades from 100 to 600 work really well on bulkheads. the important thing, as you know, is to frequently check the bulkheads at various heights with a batten to ensure you are getting the right curvature and that the batten is getting maximum contact with the edge of the bulkheads. Good luck and happy sanding!
-
Great job, Ryland. Happy New Year! Jim
- 263 replies
-
- Medway Longboat
- Syren Ship Model Company
-
(and 1 more)
Tagged with:
-
B.E. I want to congratulate you on a really superb build. Just beautiful Jim
- 335 replies
-
- alert
- vanguard models
-
(and 1 more)
Tagged with:
-
 jimvanlan99 reacted to a post in a topic:
HMS Winchelsea by Beckmann 1/48
-
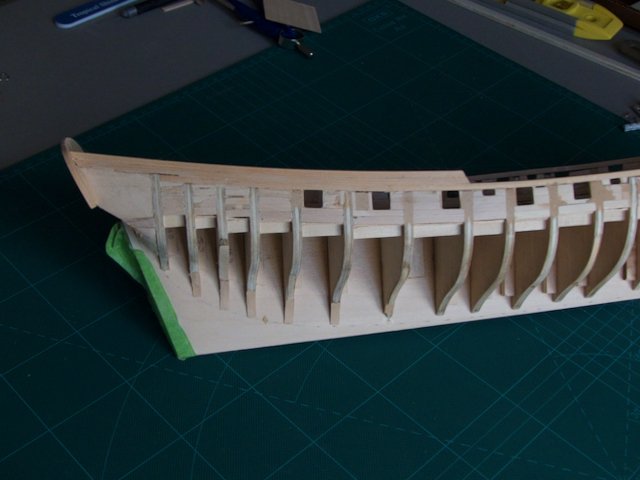
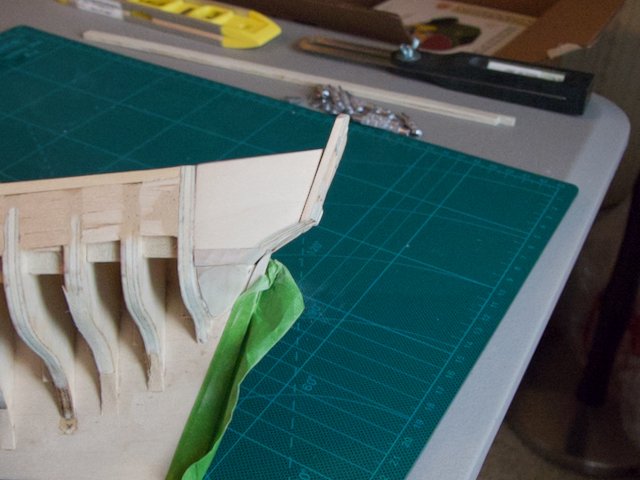
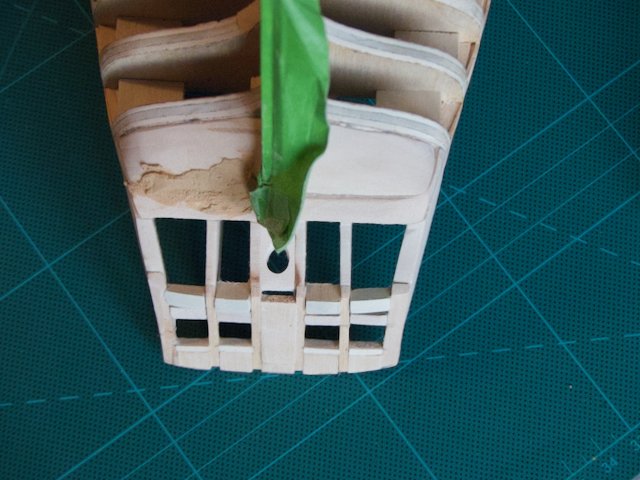
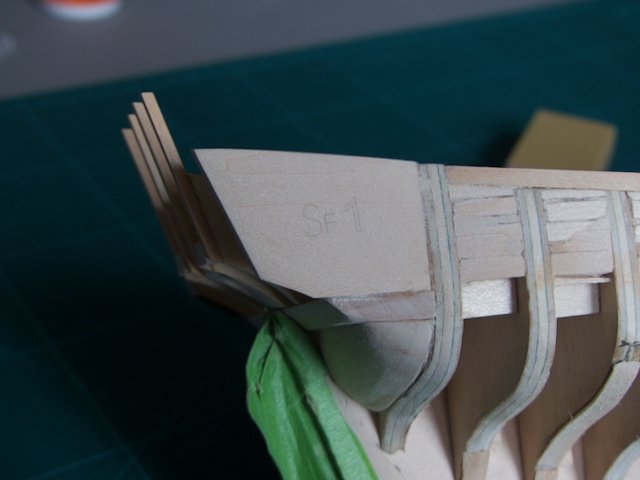
Worldway, Glad to see you are back in the saddle on Fair American. I too am on a small sabbatical from FA - partially due to distraction by Syren's Medway longboat, which I just finished and now due to shoulder surgery which has left me with only my right hand for a month or so. I saw you pictures of the stern fillers that you had to carve and sand - tough work. Anyway, since another modeler or two kept telling my stern fillers were not sufficiently faired and needed more sanding, I thought I would send you a couple of pictures of how far down I had to sand my blocks. The blocks in this photo were deemed entirely too rounded for the planks to lie smoothly across the blocks to the transom. Same thing in this one. The next two were almost right - you can see that the bulge of the filler blocks has been almost completely taken away filler Hope this helps. Jim
-
Ryland, Great job on the hull! It's looking really great. Jim
- 263 replies
-
- Medway Longboat
- Syren Ship Model Company
-
(and 1 more)
Tagged with:
-
BE, Your guns turned out beautifully. In my limited time as a modeler, I have had a terrible time getting brass to blacken and then for the blackening to stay put on the brass rather than to come off on my hands. I know that a lot has to do with the correct cleaning of the brass. And I see that you use Humbrol Matt Cote to seal. Could I trouble you to outline for me what you use to clean the brass and how you do this? It would really help me (and perhaps others). Thank you, Jim
- 335 replies
-
- alert
- vanguard models
-
(and 1 more)
Tagged with:
-
BE - beautiful job on the deck furniture! Jim
- 335 replies
-
- alert
- vanguard models
-
(and 1 more)
Tagged with:
About us
Modelshipworld - Advancing Ship Modeling through Research
SSL Secured
Your security is important for us so this Website is SSL-Secured
NRG Mailing Address
Nautical Research Guild
237 South Lincoln Street
Westmont IL, 60559-1917
Model Ship World ® and the MSW logo are Registered Trademarks, and belong to the Nautical Research Guild (United States Patent and Trademark Office: No. 6,929,264 & No. 6,929,274, registered Dec. 20, 2022)
Helpful Links
About the NRG
If you enjoy building ship models that are historically accurate as well as beautiful, then The Nautical Research Guild (NRG) is just right for you.
The Guild is a non-profit educational organization whose mission is to “Advance Ship Modeling Through Research”. We provide support to our members in their efforts to raise the quality of their model ships.
The Nautical Research Guild has published our world-renowned quarterly magazine, The Nautical Research Journal, since 1955. The pages of the Journal are full of articles by accomplished ship modelers who show you how they create those exquisite details on their models, and by maritime historians who show you the correct details to build. The Journal is available in both print and digital editions. Go to the NRG web site (www.thenrg.org) to download a complimentary digital copy of the Journal. The NRG also publishes plan sets, books and compilations of back issues of the Journal and the former Ships in Scale and Model Ship Builder magazines.


.thumb.jpg.69f47b7ffbd4a348320ee74894d705ca.jpg)
