HOLIDAY DONATION DRIVE - SUPPORT MSW - DO YOUR PART TO KEEP THIS GREAT FORUM GOING!
×


mikiek
-
Posts
2,276 -
Joined
-
Last visited
Content Type
Profiles
Forums
Gallery
Events
Everything posted by mikiek
-
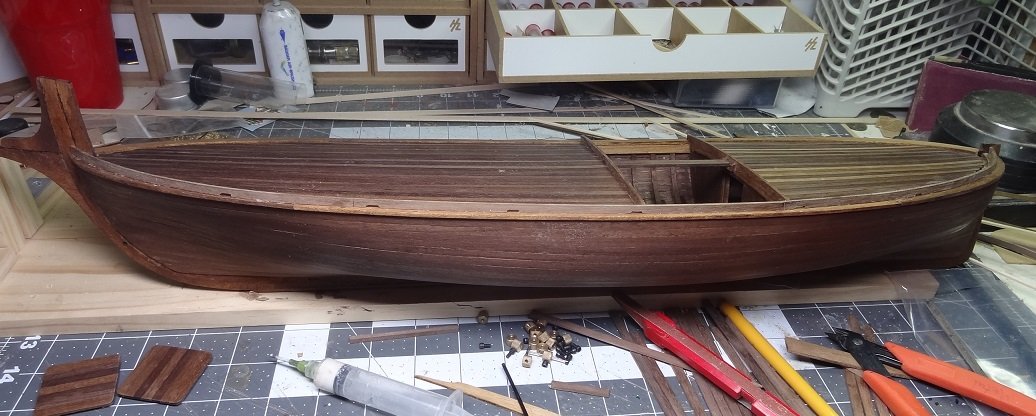
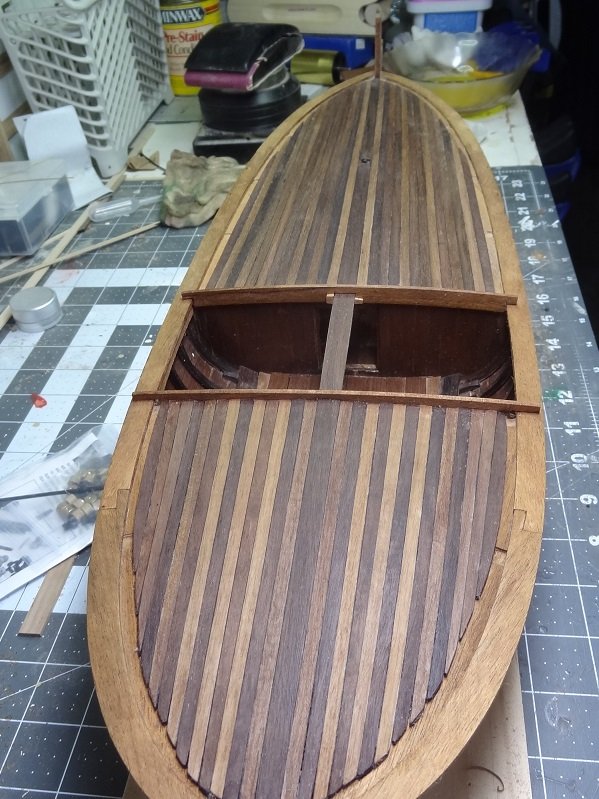
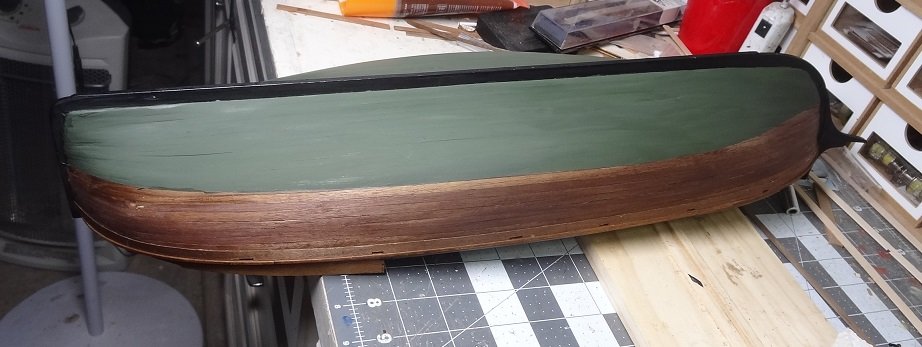
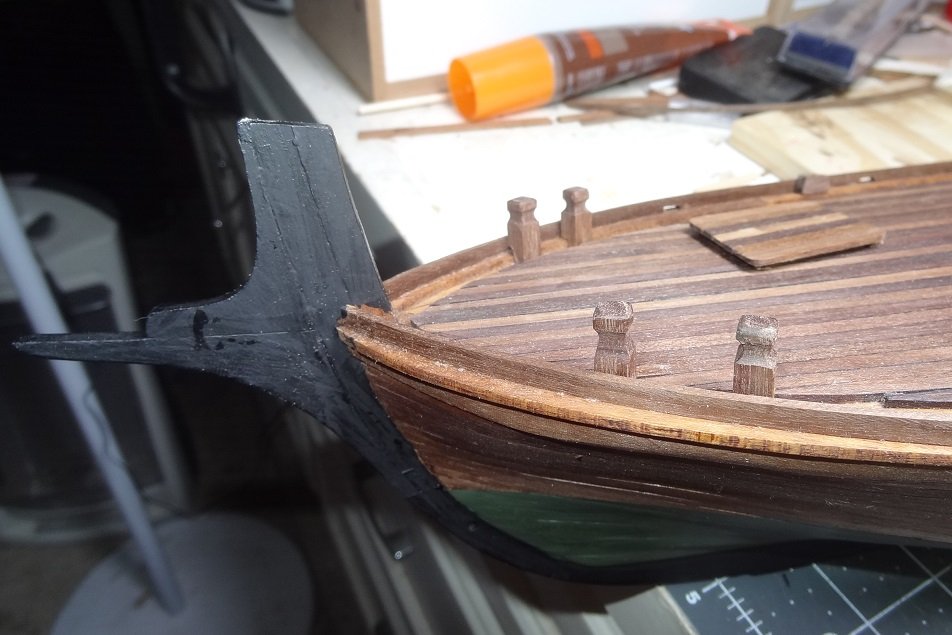
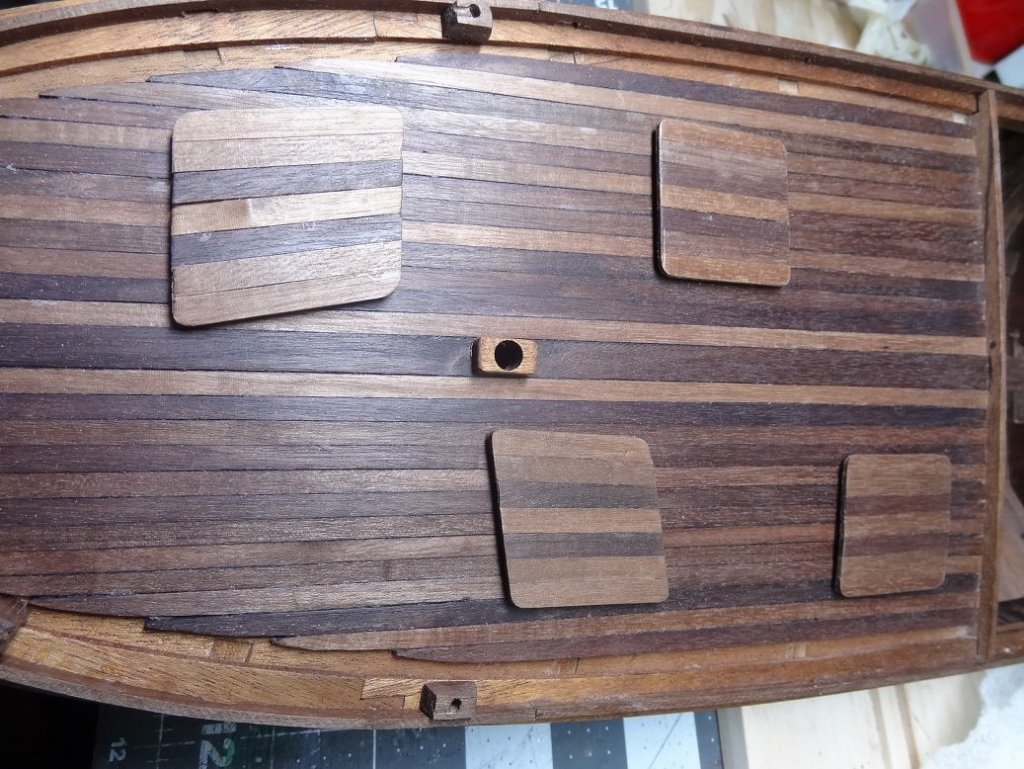
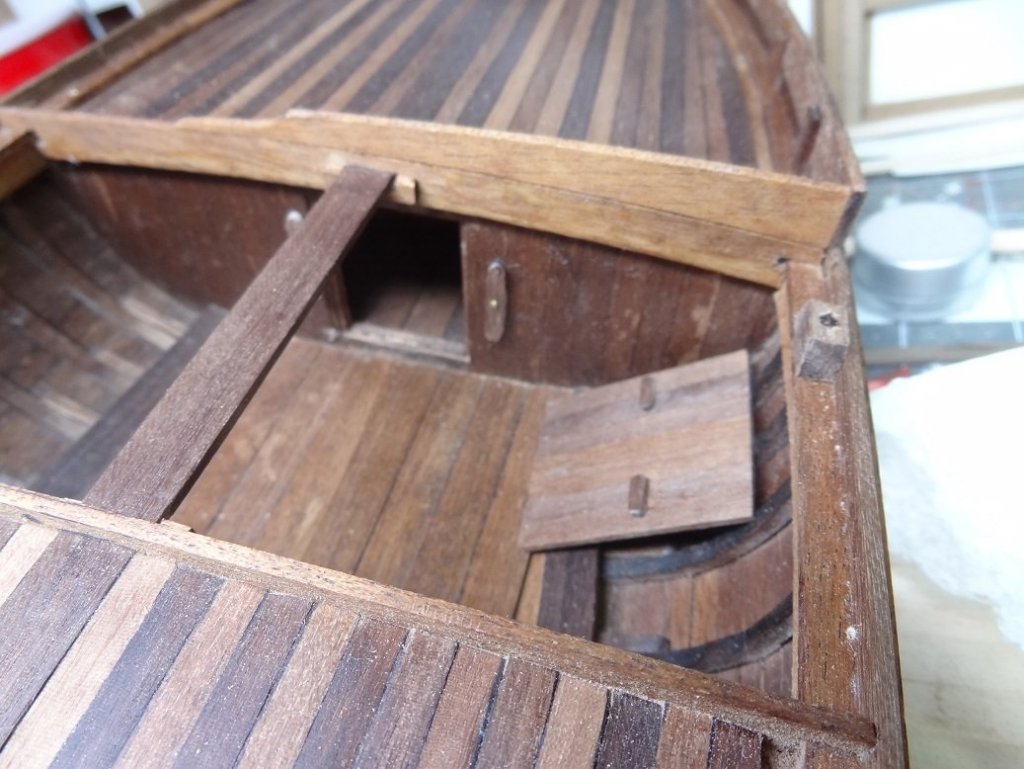
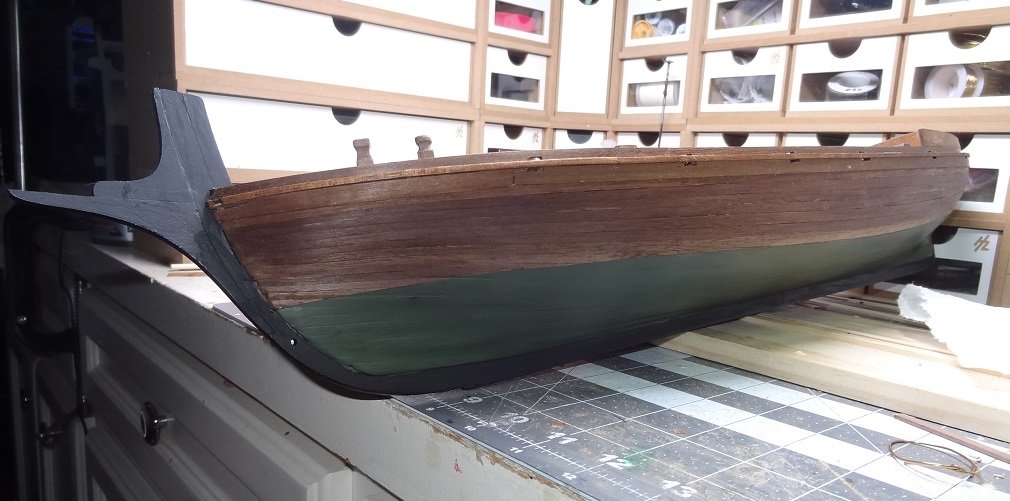
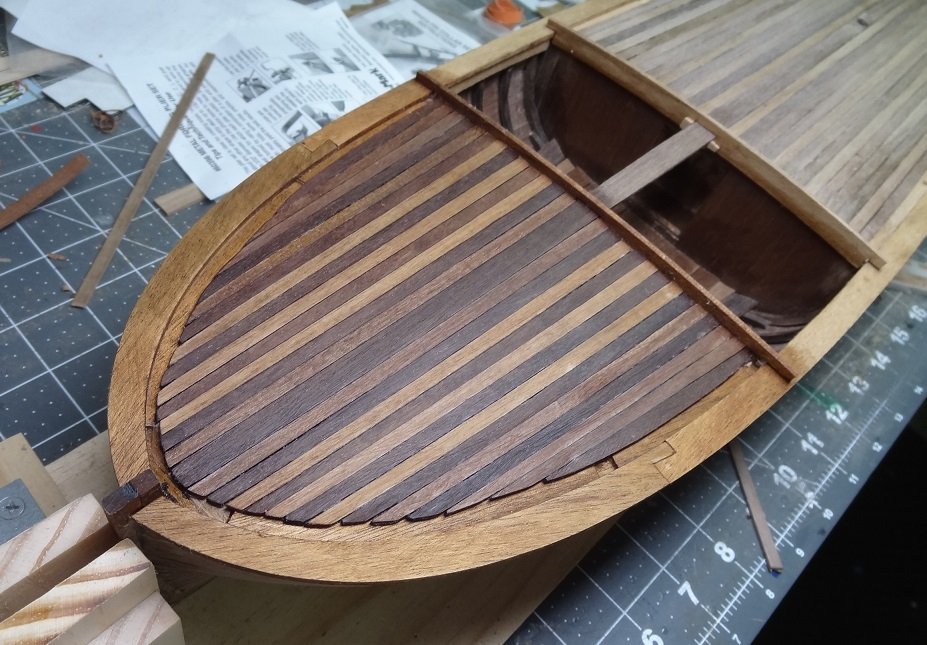
 Hey everyone. I'm still finishing the hull details and the few deck toys that go with this build. Everything is looking good - no real problems. I did have that question on mast rake angle, turns out there isn't any for Trajta. Straight up & down. I keep thinking back to that mast foot that I glued in the wrong place. What a nightmare that would have been if I had not caught it. I've also painted the hull. Above the paint line the rest of the hull is wiped down with the linseed mixture and stained. Most everything on the deck is just the linseed. I'm still liking that on the walnut. Here's a few shots: The bitts Hatch covers - yes I know one looks crooked. Per the plans! Door to the forward cargo hold - I glued this one shut Door to the aft cargo hold - I glued the door off to the side so you can see in. The deck I have not put varnish on anything yet although you would never know it looking at the deck.
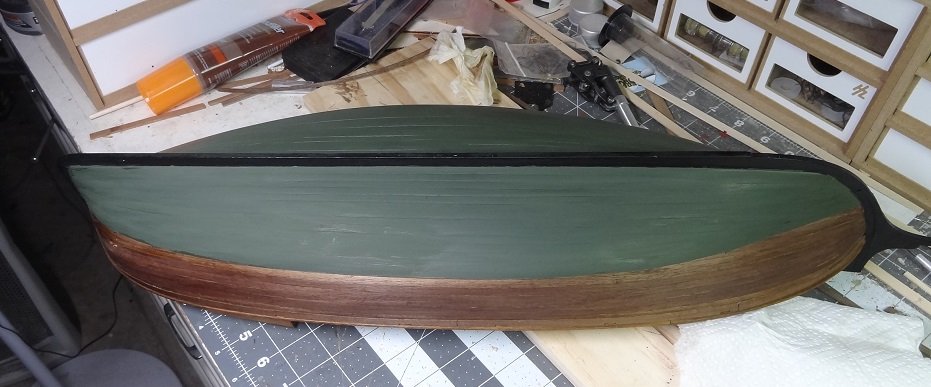

- 204 replies
-
- 4
-

-
- trajta
- marisstella
- (and 1 more)
-
Chuck's products will add a lot to your build. I did use the kit rope in a couple of places, mostly for long runs right at the mast. Inside a lot of the other rigging. The MS deadeyes were not bad. I would suggest using them as long as the 3 holes look pretty even. You'll likely paint those anyway. I'll wager you really like the looks of your gun tackles with the rope & blocks. I felt like that was the best detail on my build. My only suggestion to you is when you begin to use them keep close tabs on how many you are about to use and how many that will leave you. There's nothing worse than being a few short and having to wait for another order. Inventory control! Have fun Tom.....
-
One other thought. When you're done with those port frames you might consider painting them and the insides of the ports before planking. If you wait until after planking then you will have to mask the planks and paint the ports. Then mask the ports to paint the planks. Painting before planking can save you a masking step. I found doing a good job of masking those bulwarks to be quite tedious. I described it as 90 minutes of masking for a 5 minute paint job. Then you tear it all off and do the opposite.
-
Check your plans on this, but I seem to remember that the gun & oar openings are "framed" with 1/32" square sticks inside & out. They go on top of what you have done. Your plank ends will butt against the ones running vertical. Instructions didn't mention them but they are on the plans. I suppose those might be done after planking but would probably be a lot easier done before. It's been a while but I do remember something like that.
-
Got it. I have not looked at that sheet too much yet. Speaking of waterline would that typically be painted on the side - a stripe like on a square rigger? Or, I know you suggest painting the underside of the hull - is the waterline designated by where the paint stops? Is waterline really even shown on these boats? I'm asking because I was hoping to take the dark green paint up higher than the where the waterline is on the sides.
- 204 replies
-
- 1
-
-
- trajta
- marisstella
- (and 1 more)
-
Zoran, if you're out there - Don. I can't find any place that specifies the mast rake. It really doesn't look like there is any but I need to be sure.
-
It's always fun when you can put in some major part like that - even if it isn't finished and/or the boat isn't ready for it. It can really change the complexion. Wait till you get the whole bowsprit done and slip that in for a test. Hope your workbench is bigger than mine. Whereas most install the bowsprit first, I did it last for for just that reason. Space got tight. You've probably heard this before but do as much rigging as you possibly can off the boat. You should be able to get at least one end of all the standing rig installed. It'll look like a big tangled mess but will be worth it. You can make a stand for your masts with a piece of 1'x6' or even a 2'x4'. Drill holes for each spar in your masts - main, top, top gallant, top gallant royal. Don't put them together permanently until you are ready to put it all on the boat. That way you can keep them low and don't have to work with your arms at head level. Keep it up Tom.
-
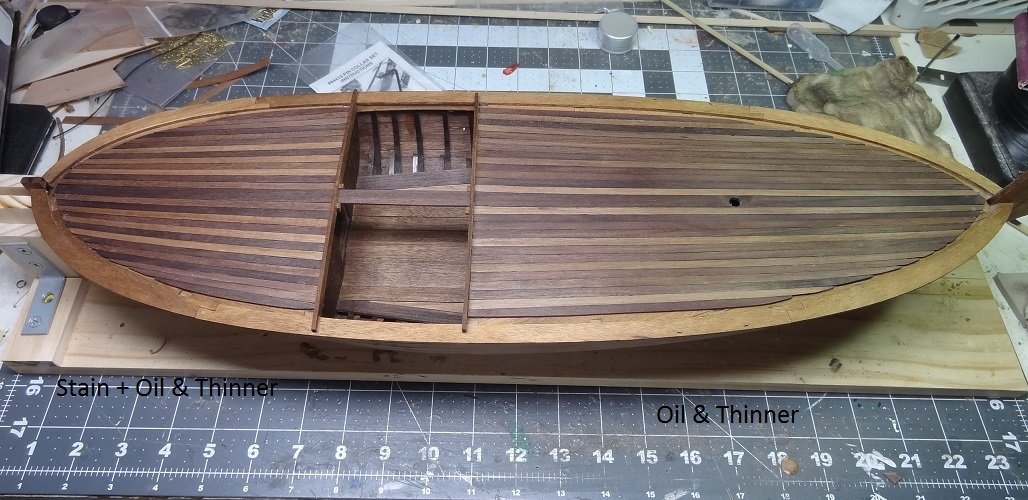
Don - I used the raw linseed oil - for no particular reason. Saw them both at the store, had no idea of the benefits of one over the other. I'm just a "natural" kind of guy so I see raw and boiled I choose raw I will say, days later, I see a difference in the foredeck and aftdeck. Each got a different combination of applications. First off, I think I could have added more thinner to the linseed/thinner mixture. I just eyeballed it and may have more linseed than thinner - the manual suggests 40% linseed, 60% thinner. The aftdeck got some pre-stain conditioner, then the Natural stain, then the linseed. I did it this way because at the time I didn't have linseed oil and as usual I couldn't resist getting some color to the wood. So it was conditioner and stain and about 2 days later the linseed. The foredeck (which was completed after the aftdeck) got the linseed first, then stain (I forgot the conditioner ). Days later I am noticing the foredeck darkened up as time went on. Right after the stain application it looked similar to the aftdeck but has since darkened some. One thing I am wondering. I mixed the linseed in a bowl when I did the aftdeck and just left the bowl uncovered on the bench. A day or so later I used the same mixture on the foredeck. I can't help but wonder if a lot of the thinner had evaporated so I was applying mostly linseed. So there's one thing to watch out for - proper ratios and keep any extra covered. The manual says to wipe up the linseed immediately, which I did but using a paper towel. I'm thinking something more absorbent like microfiber or at least a cloth rag would be a better choice. I would also give the linseed a minimum of 24 hours to dry. More time would be even better. This will give you a more accurate idea of the final look. Lastly, I wonder if when using the linseed mixture, maybe you just forego staining all together. The linseed did add a nice luster to the wood even before the stain. Don't let this sound like I had problems. I did not. Using the linseed mixture is quick and easy and if it could potentially eliminate the need for stain then it ends up be economical as well. As I posted earlier, I will use the process going forward for any staining I have to do. That said, I will continue to refine my process. The key I think - good ratios, effectively wiping up excess and allowing sufficient time to dry. One other note. I needed to stain the upper portion of the hull which has some spots where I had to apply some filler (paintable/stainable). You probably are aware of my feelings on trying to color filler I did apply the linseed first and it did seem to darken up the filler somewhat, bringing the filler color closer to the wood color. Staining afterwards brought the color even closer. Not perfect but better.
- 204 replies
-
- 1
-
-
- trajta
- marisstella
- (and 1 more)
-
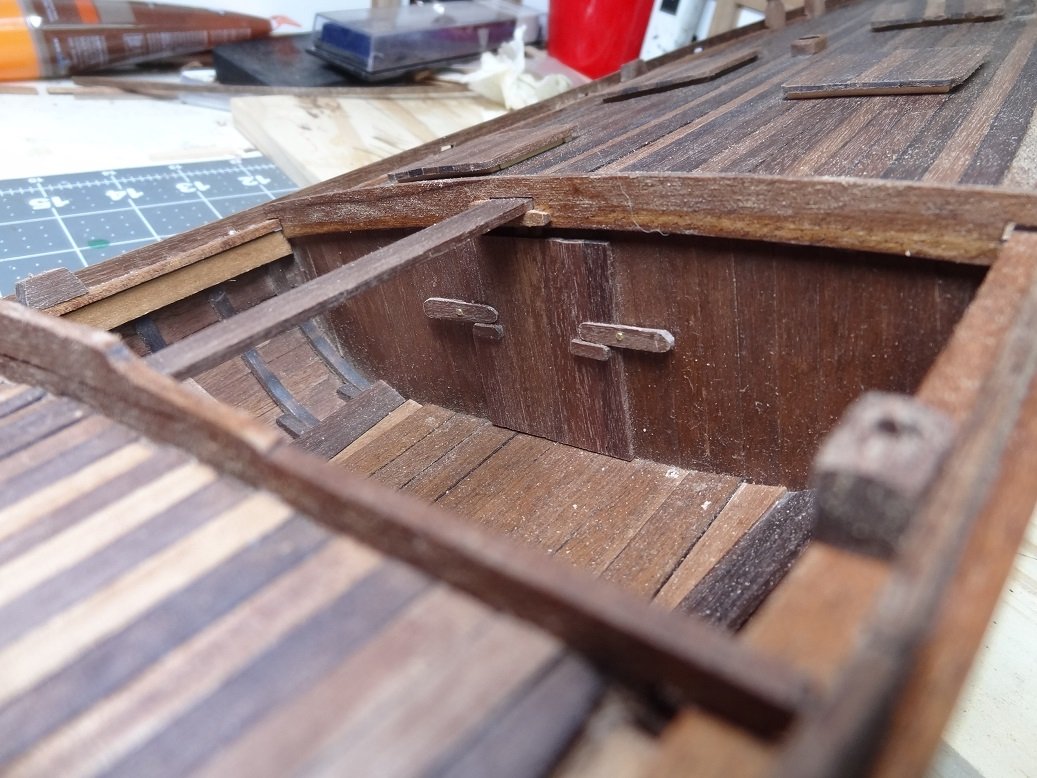
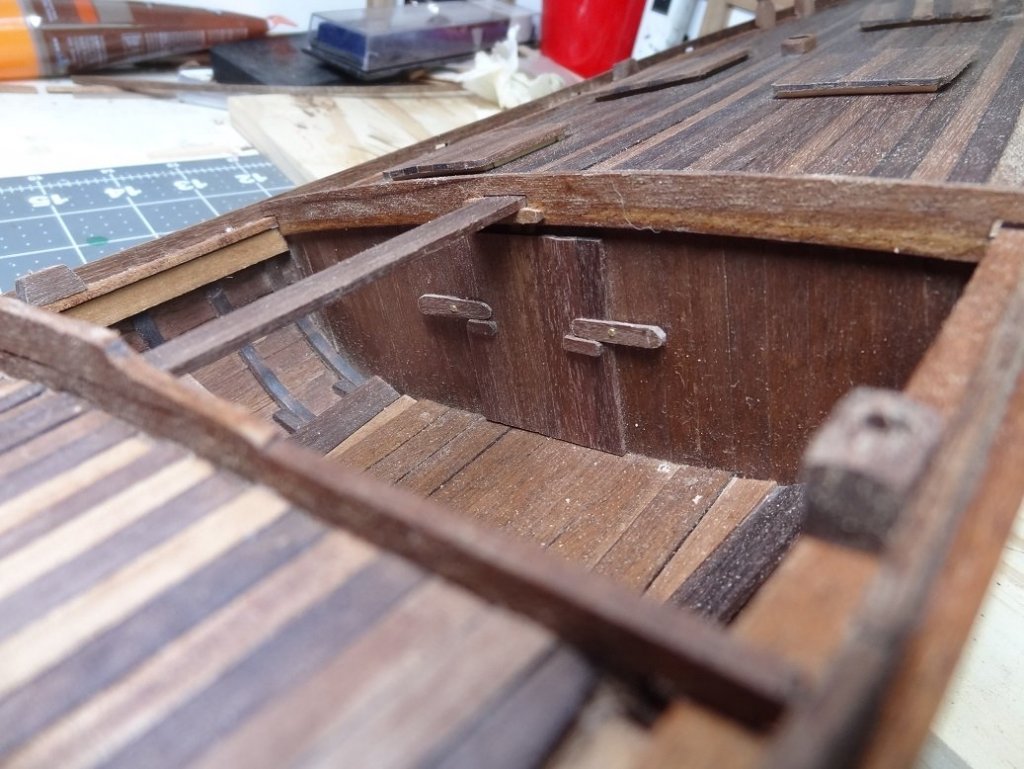
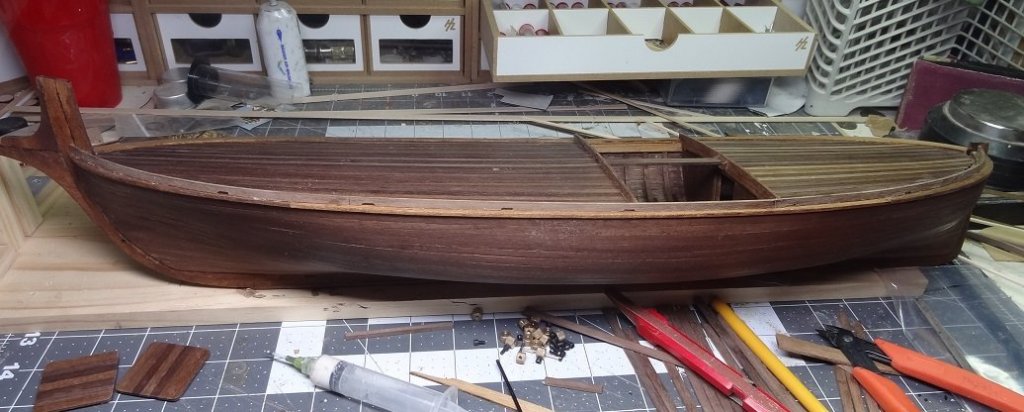
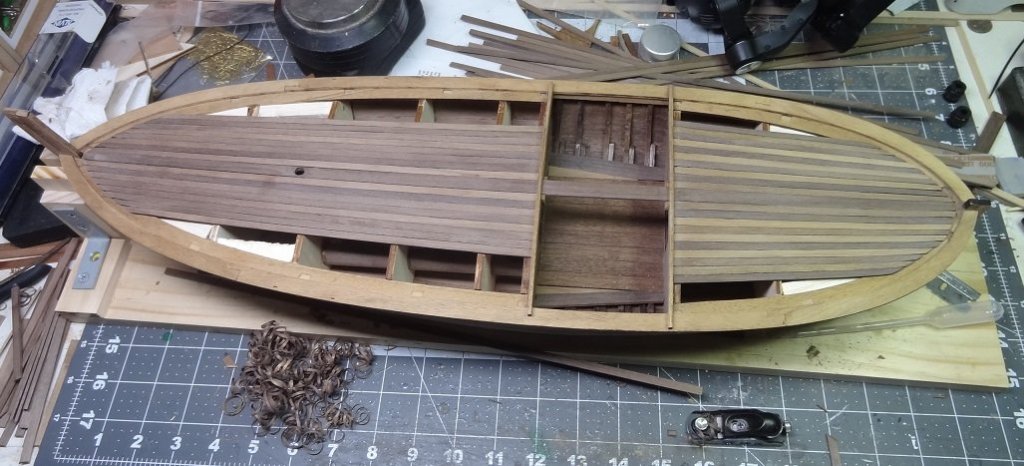
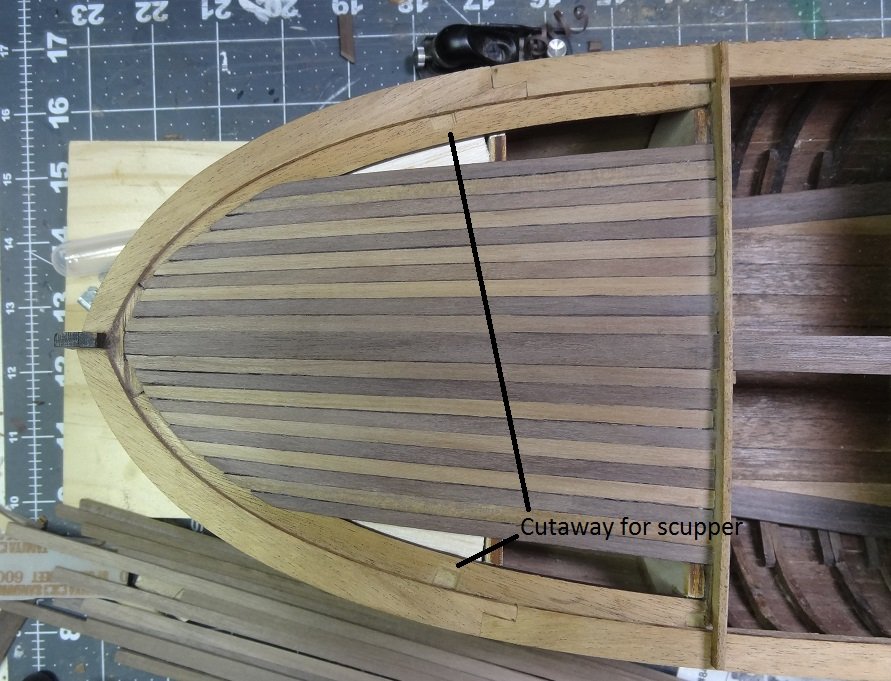
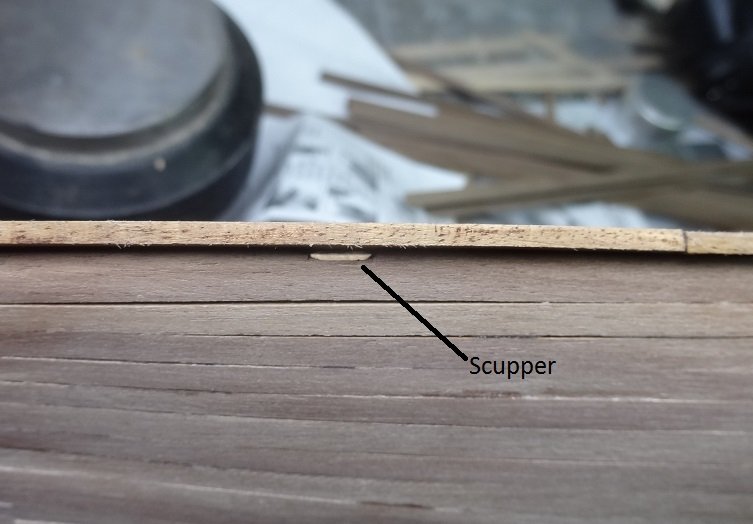
I don't know why but installing the bulwark rail proved difficult. If I understood the pix in the manual it's one stick that sits on the waterway running from stem to sternpost - 4mm x 2mm laying edge on. And it is supposed to have notches taken out of the bottom edge to match the scuppers in the waterway. So you have to lay the stick in place, mark where the notches go, file the notches and then hope when you install it they all line up. Try as I might, I didn't feel comfortable gluing the whole stick at once. Not enough hands. It was going to take some CA in spots for a quick join and white glue in others to get the best bond. Dry runs were proving that it wasn't going to happen. So I ended up cutting the stick in 3 pieces - much better. I could hold the piece down with 2 hands while the CA set. I'll give myself a C on lining up the scuppers and unfortunately the opening is too small to try to adjust it now. Several other tasks were contingent on getting these rails in so I can move on now. An observation - this 1 stick constitutes the entire bulwark. I guess at scale it means this piece raises up 10"-12" above the deck. That's not a lot of protection for a boat that could go offshore. Here's the bulwark The scupper notches

- 204 replies
-
- 5
-
-
- trajta
- marisstella
- (and 1 more)
-
David - I hope you have a good place to dock her now. She's a real eye-catcher. I hope you are pleased with your effort. As far as a new kit for the shelf, if you want to stay small what about Enterprise or Independence? For either, you can stay with the plans or bash to your hearts content. I've had Enterprise in progress for over a year. When I need a change of pace - a little bit here, a little bit there. Once again, congratulations on your completion!
-
Thanks man - wouldn't that be something! Can't wait to get some varnish on it.
- 204 replies
-
- 1
-
-
- trajta
- marisstella
- (and 1 more)
-
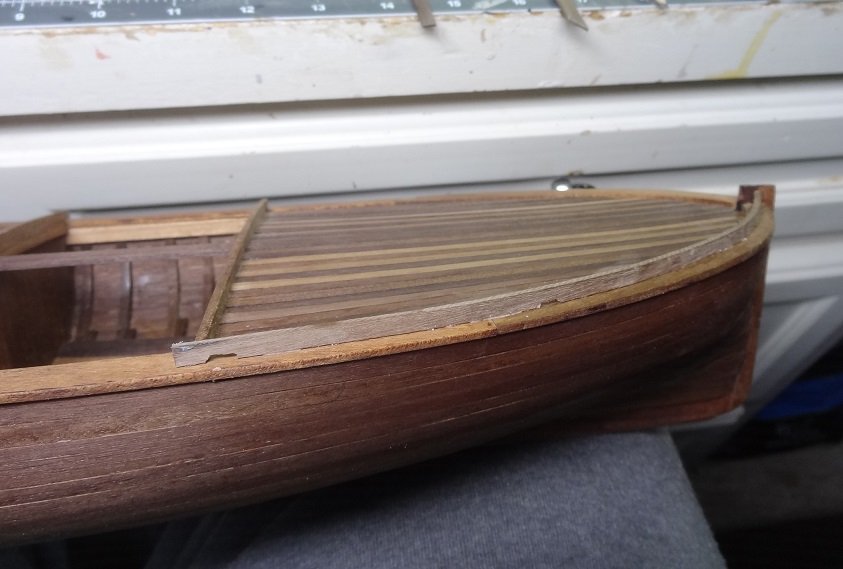
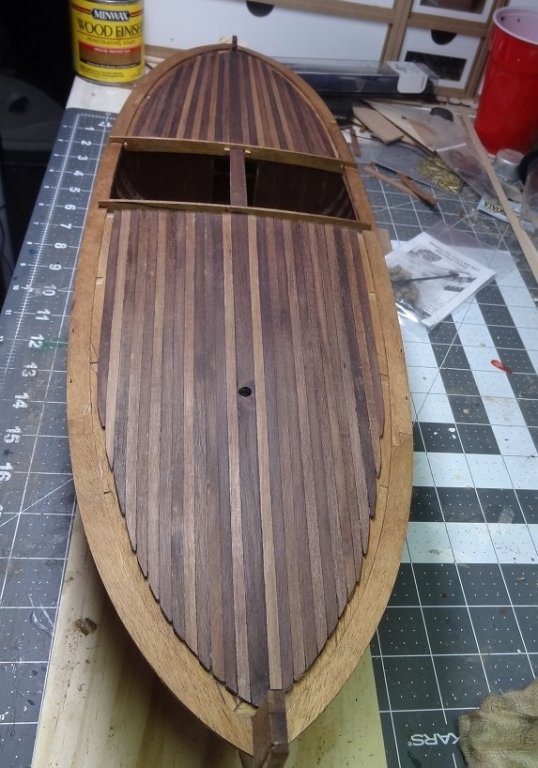
Answered my own questions and I'm impressed. Per the manual, I mixed some Linseed Oil & thinner and applied that to the foredeck - applied thick but wiped it up immediately. Then it needs to dry - I left it for about 3 hours. So that was the mixture on raw wood. It looks really nice! So nice in fact that I wanted to put some on the aft deck which I applied stain to last nite. Sanded it first with a 600g sand sponge then applied the oil. Again, very impressive. I don't think the pix show it very well but the wood has a very deep, rich look to it. Zoran - you are on to something! I'll be doing this from now on for stained areas. So I need to stain the fore deck and will be ready to finish off the other deck items.


- 204 replies
-
- 5
-
-
- trajta
- marisstella
- (and 1 more)
-
Steve - I'm reading a nautical oriented book taking place around the Revolutionary War. The guys are doing a lot of rowing around. Every time I read a section like that I picture this boat.
- 190 replies
-
- 1
-
-
- pinnace
- model shipways
- (and 1 more)
-
Thank you Don. The one thing I didn't do as suggested in the manual is an initial wipedown with linseed oil & thinner. I'm not sure if that is for cleaning the wood or conditioning it or all of the above. Have you done that with any of your Marisstella builds? Kinda makes me wonder if linseed oil could replace the Natural stain I used. I suppose it would give the wood that wet look and then you only apply some lacquer or varnish. Will need to pick some up and see what it can do.
-
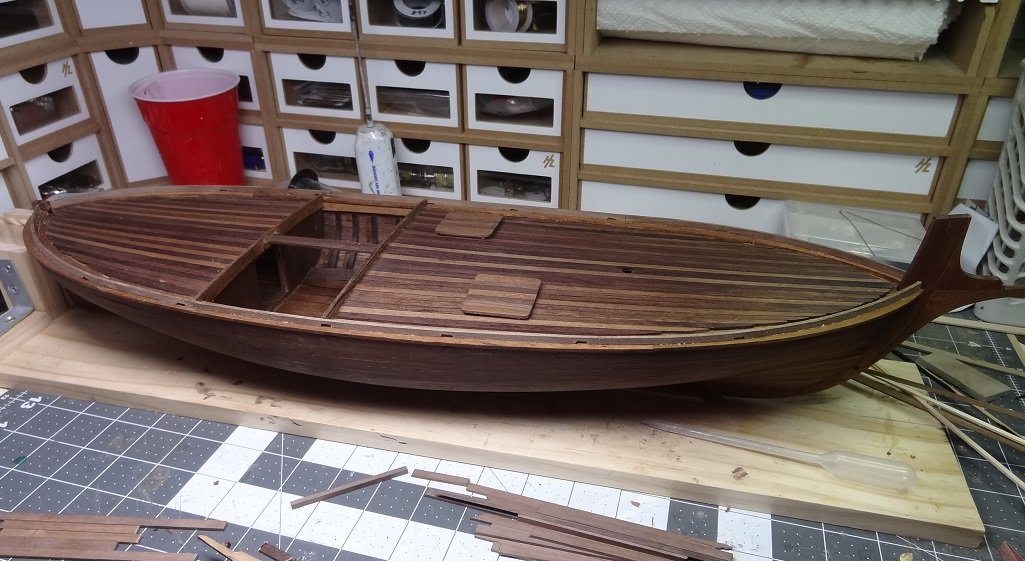
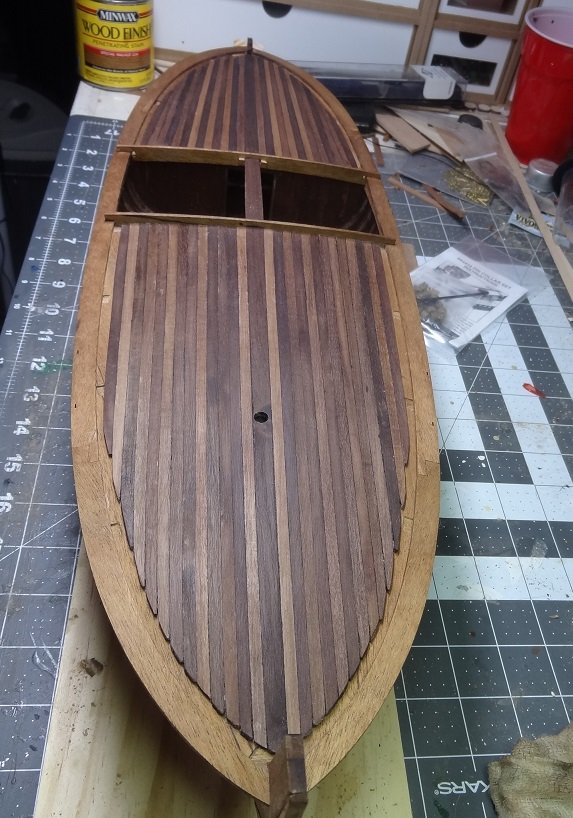
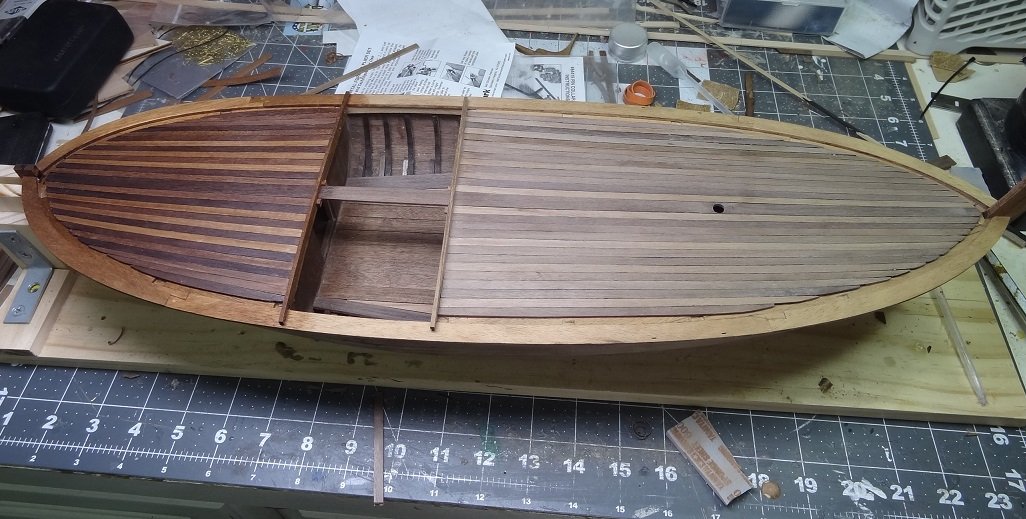
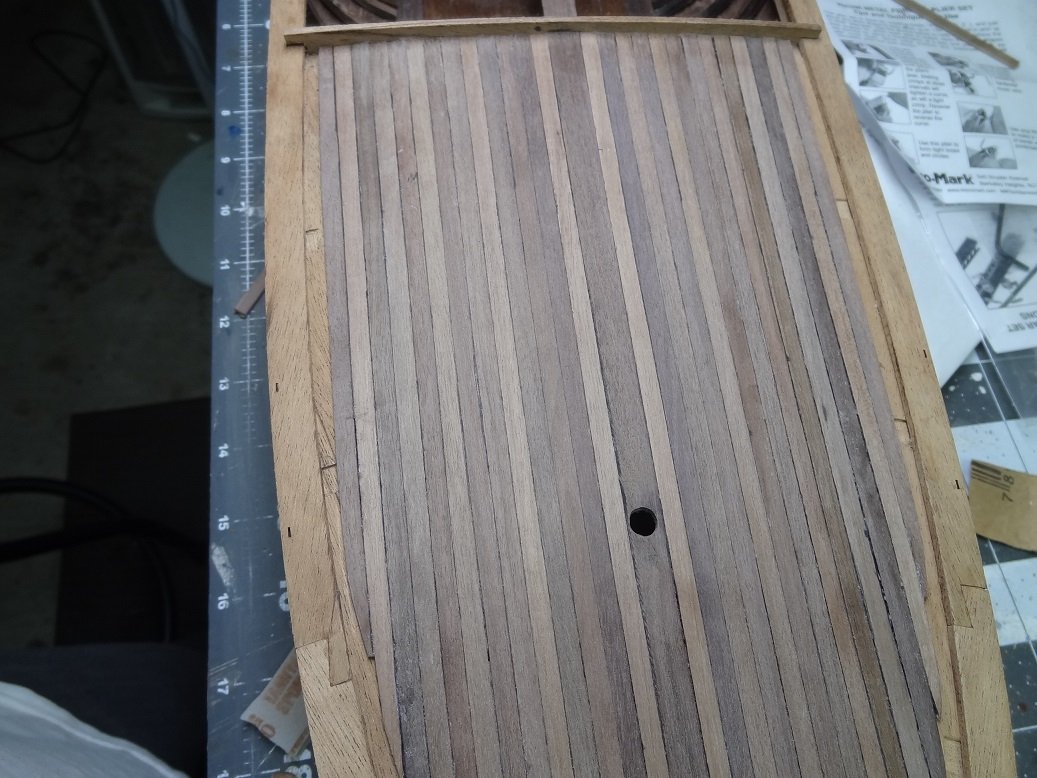
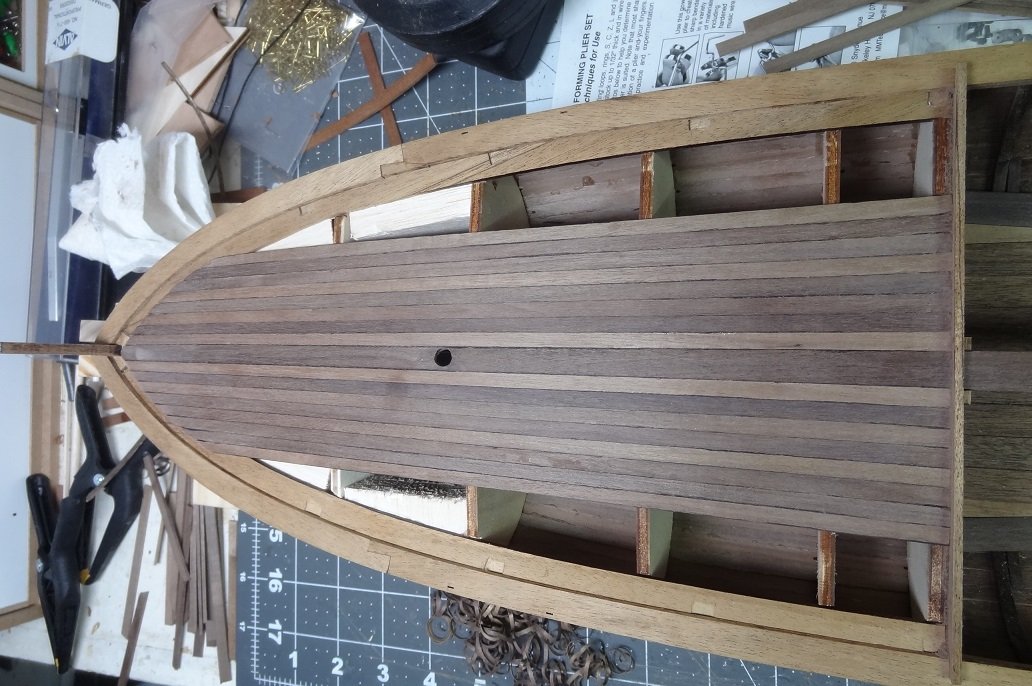
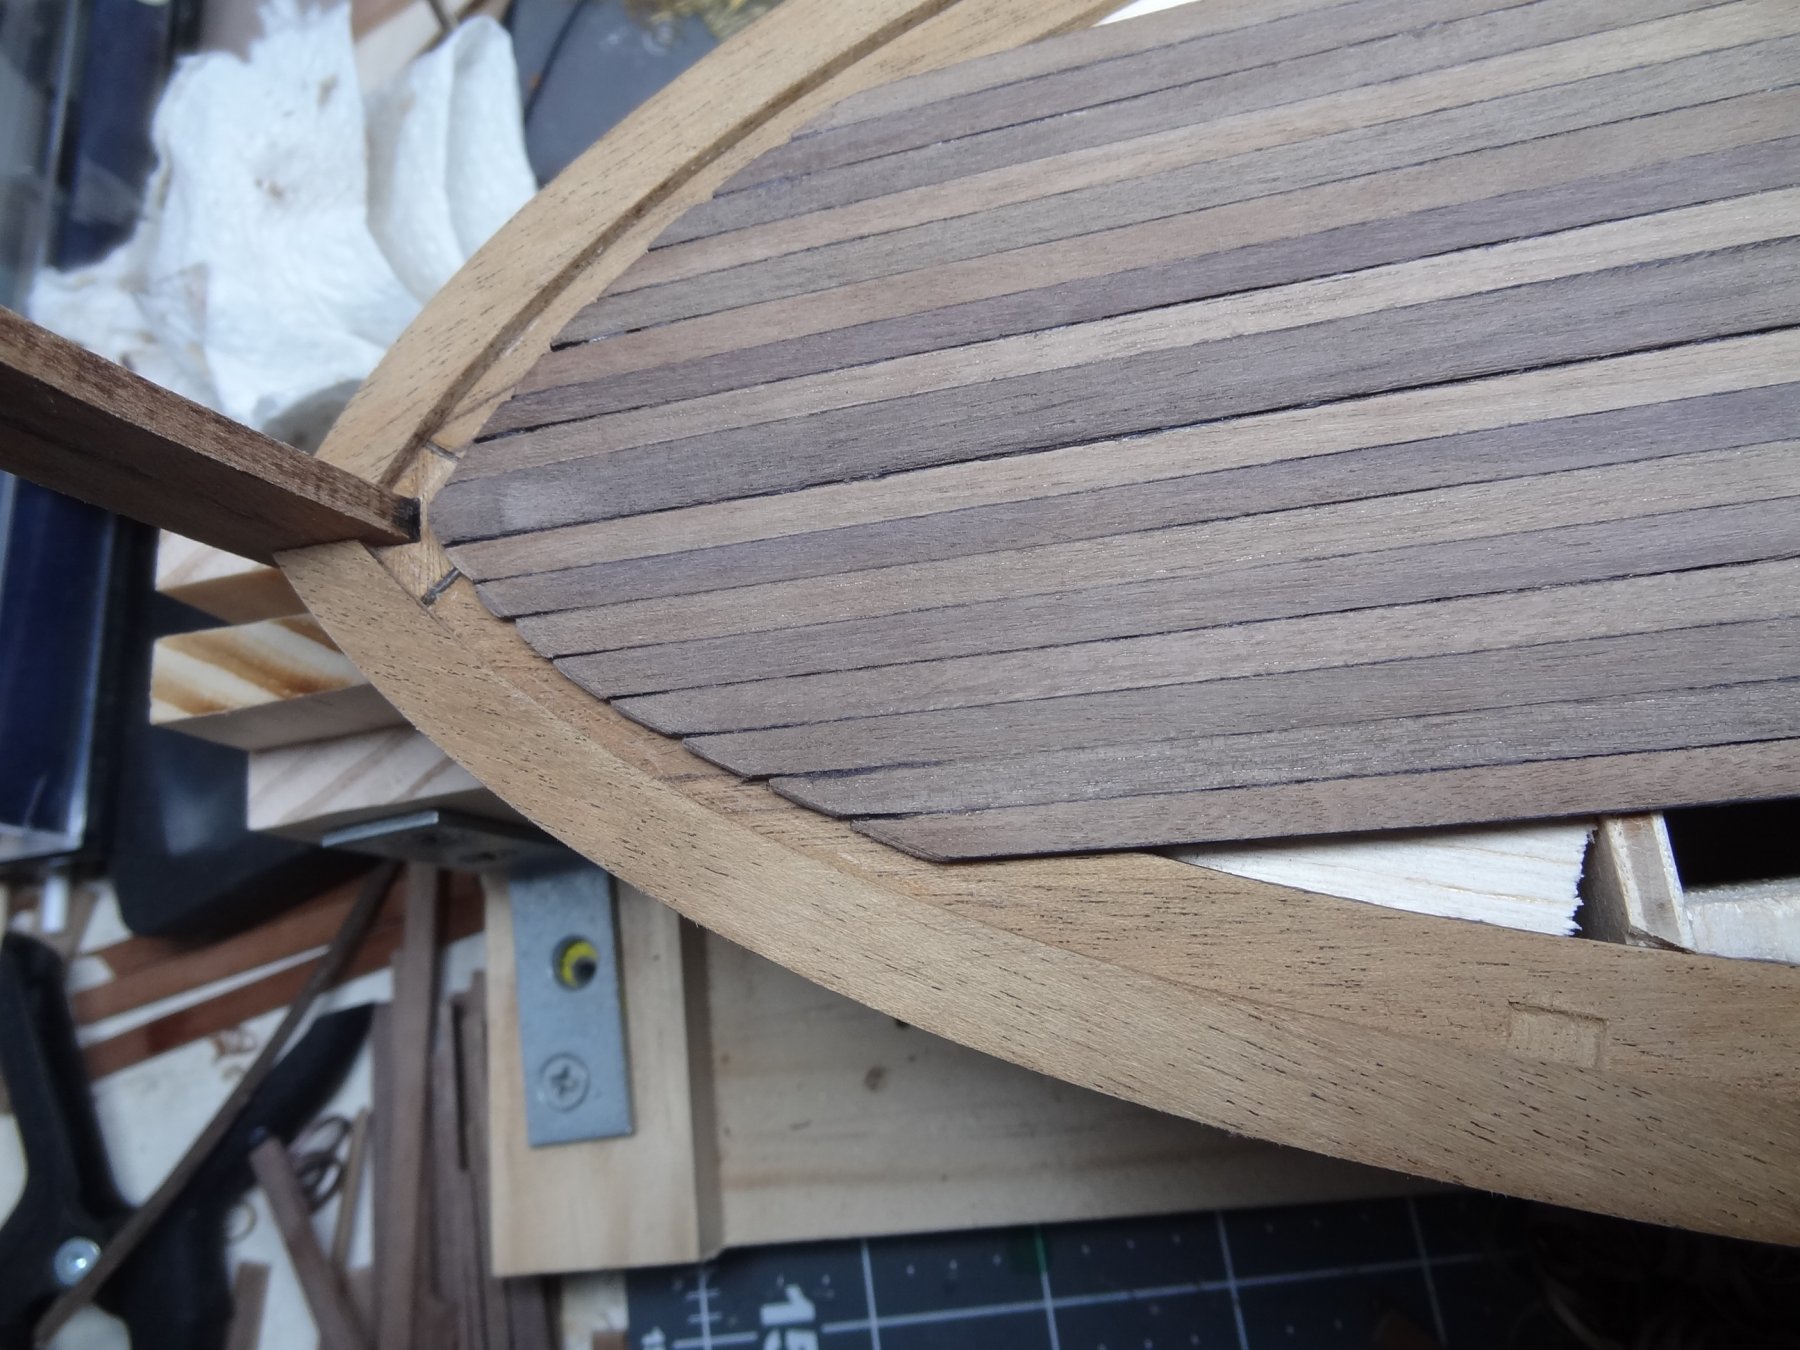
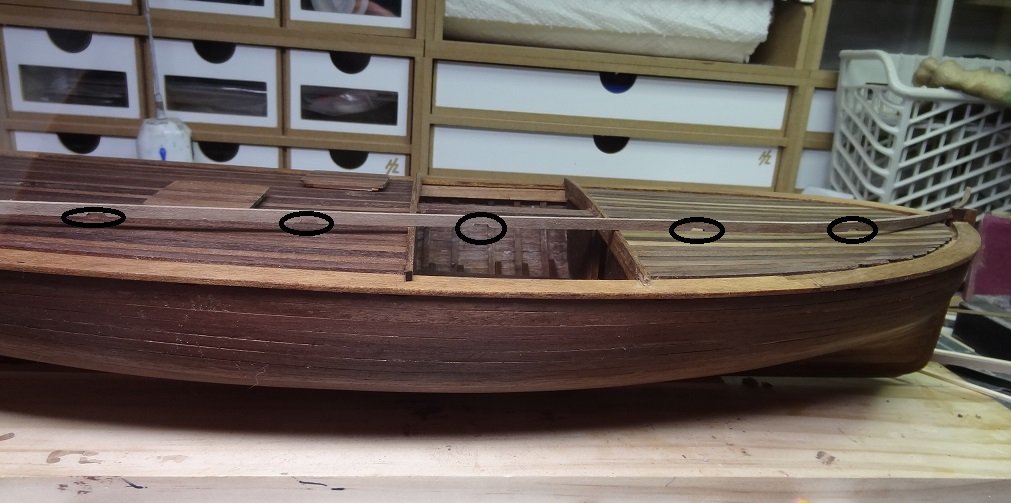
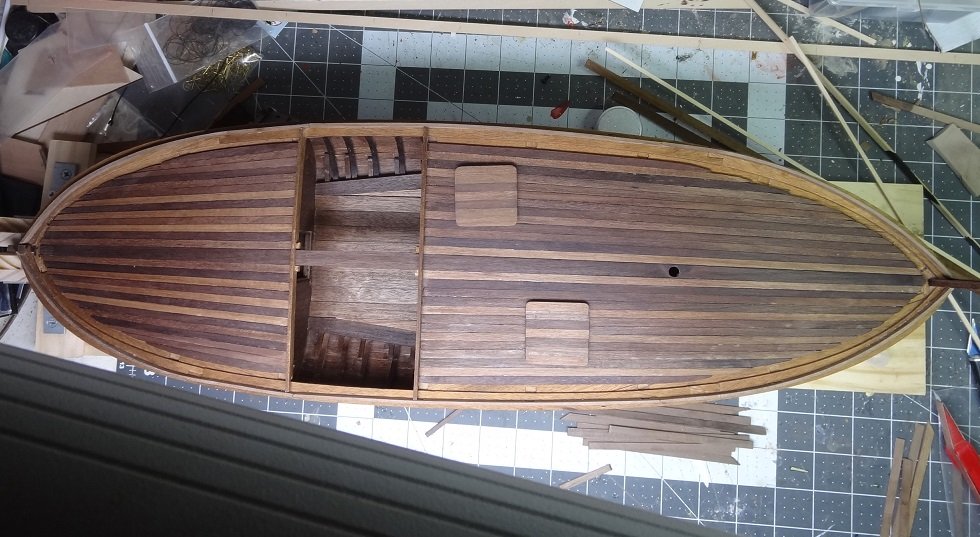
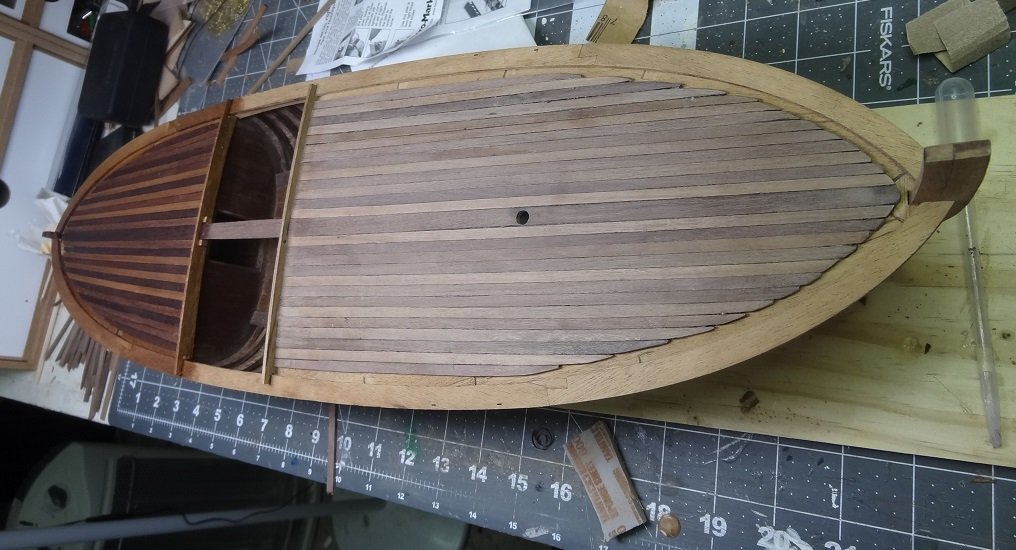
Deck planking is complete although the finishing process is still in the works. At milestones like this I always try to to just leave things be and move on to the next task. The temptation is to paint/stain/finish whatever it is I have been working on. I think we all want to see how it will look close to being finished so we tease ourselves. I couldn't resist either so while the foredeck is still being sanded I did put stain on the rear deck. So it's walnut sticks, Minwax Pre-stain and Minwax Natural stain. Like I said earlier, everything above the wale will receive this same coloration which really doesn't stain like we are used to seeing. If you've ever wiped a damp rag over raw wood, that's about what the Natural stain does. Personally, I really like this stain. I ended up being off by one plank on each side of the fore and after decks. I used 1 less. But I am OK with the result. So have a peek.


- 204 replies
-
- 6
-
-
- trajta
- marisstella
- (and 1 more)
-
Don't get overly dependent on tools like that. Not all the ports have perfect 90 degree corners. The waterways should have a vertical curve from bow to mid-ship to stern. If you set perfect squares on that curve it will look a bit odd. In a perfect world if your hull is level, the vertical frames should be aligned with a plumb line and you would see that in fact the ports are not square. Granted this is overkill for a model, but just understand the theory. Hardly anything on a boat is square. Things slope and slant for a reason. When you do use your tool be sure to center it on the holes in the waterway. Pins will go in these holes and would be used as a pivot point to help angle a carriage one way or another. So the holes are really the center line of your port. Adjust your framing accordingly.
-
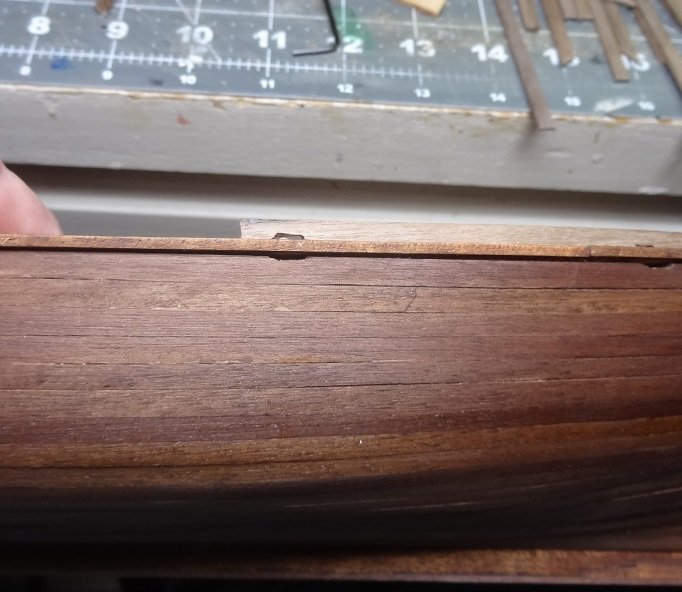
Hello Antony - thanks for stopping by. I've never done scuppers where you have to chisel a notch in the waterway. Usually we just put some holes in the bulwark and call it done. This was a bit of a challenge - scraping away enough material to make them functional but not going thru the waterway. Looking at the photos I see I probably could have made the notches a little deeper, but I think I'll leave them be.
- 204 replies
-
- 3
-
-
- trajta
- marisstella
- (and 1 more)
-
Had not considered shellac. Whatever it is I like it.
-
A good experience in trial and error. One of many you will encounter with this build. I think what you have will work. I like that you wrapped around the corner and were able to cover the edges of the transom planks. That is the purpose of those pieces - to cover the inevitable ugliness of that corner joint and seal it up. It's almost like a corner molding we use on a house. I wasn't sure what you were asking regarding the yawl? The rear davits will be a piece of wood mounted towards the end of the side hand rails. They will extend off the stern. No real relation to the fashion pieces.
-
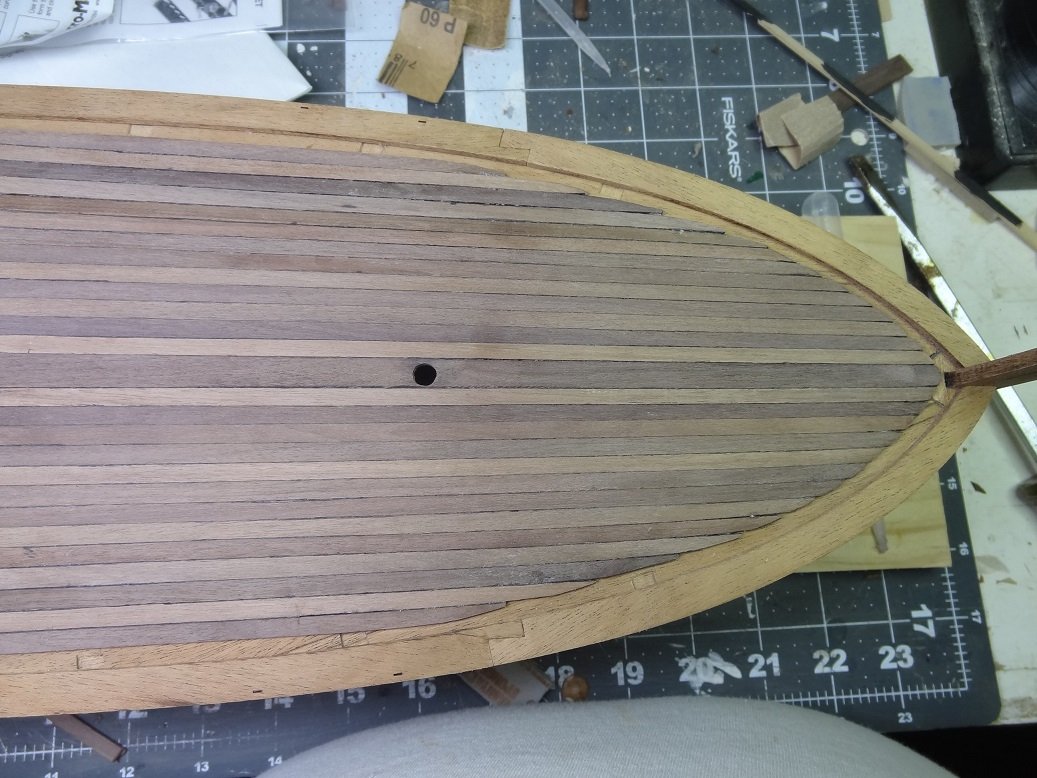
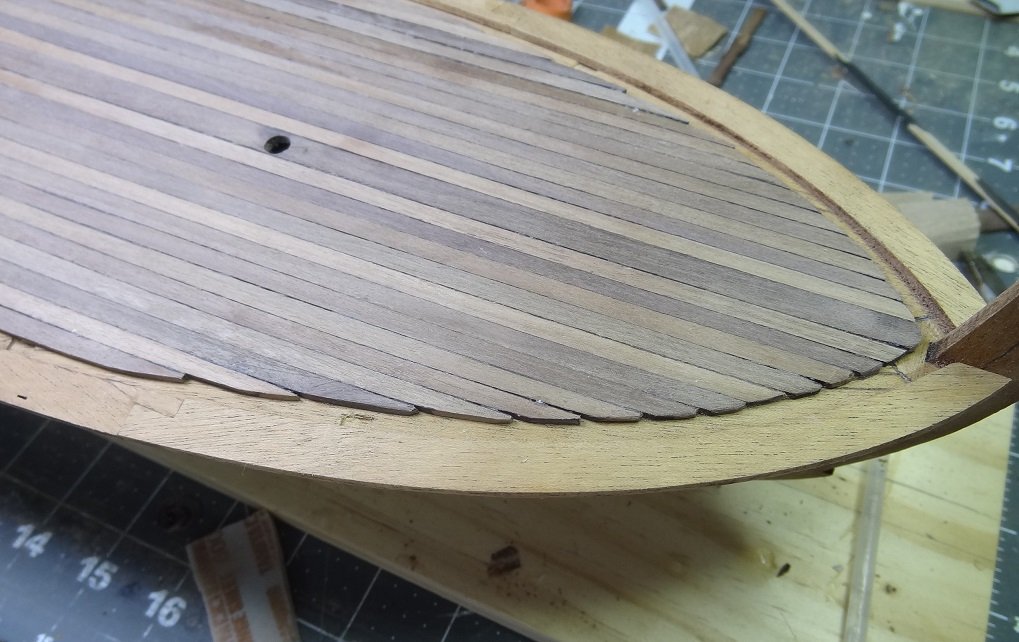
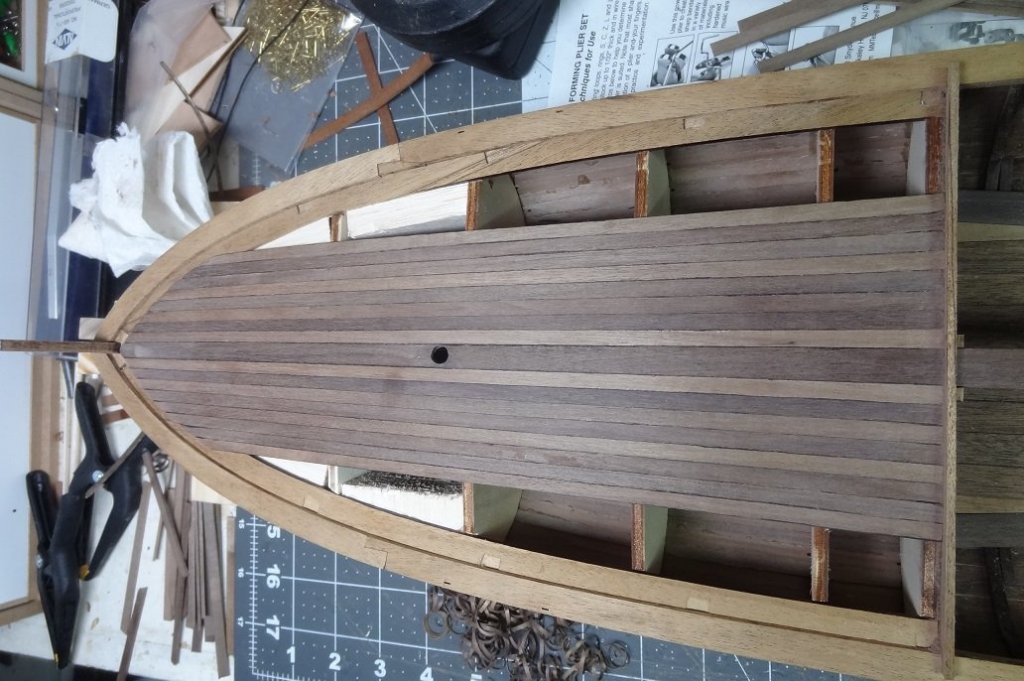
Deck planking continues. I've been digging thru the pile of sticks trying to separate lighter colored ones from darker so that I can make a pattern similar to the pix in the manual. That shows alternating lite/dark sticks. I'm afraid there will not be enough lite ones for both front & back so I will continue on with the pattern on the stern deck since I can get 2 planks from 1 stick. I will need to determine how many shades of dark are left and figure out how to arrange them on the bow deck. Don't read this the wrong way. There are plenty of sticks to plank the decks. It's just that there are a lot more dark colored ones than lite colored The tapered planks are laying well and a slight overall curve is beginning to show itself. I think the sticks are going to end up very similar to the planking plan. I did (or at least have been) working on the hole for the mast. However the drill keeps wigging out - runs for a couple seconds and then stops. So that is still in progress. I think I've done a reasonable job keeping a gap between the plank tips and the waterways. This is done so the planks don't cover up the scupper openings on the rail. Be Exterior scupper opening. I have the start of a paint plan in my head. I'm thinking the bottom 2/3 of the hull being a dark forest green. From the wale down to the paint edge I will stain with the same dark stain used in the cargo hold. Decks and everything above the wale will be stained with Minwax Natural. And then a matte varnish all over.

- 204 replies
-
- 6
-
-
- trajta
- marisstella
- (and 1 more)
-
Beautiful color on the spars. What wood and/or stain is that?
-
Doug - if you are considering buying another piece and doing it again, think about getting or making (I don't know what diameter your dowel is) something like a 1/4"x1/4"x24" stick. Whatever the dowel dimensions are the stick should be a little larger. Use some wood with a good straight grain. Make your own spars from square sticks. It's almost a guarantee that a dowel will warp over time. While the grain appears straight, closer examination usually shows it is not and that is why they warp. I have a page or two in my Niagara log that shows what I did and even a jig that can help taper and cut octagonal sides should you need that. A suggestion for turning - use a file or rasp to take away material at first. More bang for your buck. 50 or 100 grain paper next and then some 200. To get a good consistent shape, start where the spar will be thinnest. Let's say that's the left side. With the drill/lathe on,place the file on the left side and hold for a second. Slowly slide file to the right about an inch than back to the left. Then out to the right 2 inches and back left. Out 3 inches and back. Follow that pattern until you get to the middle of the spar (or where ever the taper stops) then do it all over again. You might also see about holding the drill in a vise or something to free up a hand.
- 99 replies
-
- 2
-
-
- essex
- cross-section
- (and 1 more)
-
Doug - seems like you could do #3 without the collet. I'm guessing you put one end in the drill and started tapering the other end? Instead, taper the end in the chuck leaving enough for the chuck to hold on to. When nearly done stop. At that point you could either work the free end or put the free end in the chuck and repeat. Remove from chuck, cut off the big ends and touch up by hand. If you had a lathe that's probably how you would do it. What are you using to reduce the material? Sandpaper? File/Rasp? Is the drill mounted somehow or just laying on your bench?
- 99 replies
-
- 1
-
-
- essex
- cross-section
- (and 1 more)
-
Don - with those types of "molds" I had to go thru a succession of bends and molds. The bend in the mold getting more acute each time. If you have those crimping benders, put just a slight crimp in a few spots. I'm trying to remember who told me not to try to do the full bend in one shot