HOLIDAY DONATION DRIVE - SUPPORT MSW - DO YOUR PART TO KEEP THIS GREAT FORUM GOING! (Only 20 donations so far - C'mon guys!)
×


mbp521
-
Posts
1,002 -
Joined
-
Last visited
Content Type
Profiles
Forums
Gallery
Events
Everything posted by mbp521
-
 Wefalck, Thanks for the tip. I have seen several builders use pastels as an alternative to painting, but had never thought of using them for the aging process. This is something that I will definitely give at try when I get to that point. -Brian
 -
Thank you Keith. Funny that you mention that, over the past few days I have been building the pilot house (updates coming soon), and during that time have been thinking of ways to add some weathering to it so it wouldn't appear so "pristine". Once I have the upper deck completed, I think I will build a couple of mockups of the sides and play around with some colors to add a little age to it. Cairo wasn't in service very long very long (Jan - Dec, 1862), so she wouldn't have aged too much, but the battles she was in and the work she did would have given her paint a bit of character. My painting skills leave a little to be desired and I don't want to go in and make a mess of things, but I may do something. I still have a lot of time to think about it. -Brian
-
George, Just catching up on your build. Beautiful job on the coppering! Are you planning on chemically aging the copper or letting it naturally tarnish? One of the things that I found that using the tape for coppering instead of gluing individual plates on is that you don't have to worry about the excess glue seeping through the joints and having to clean that all up. It never fails that when cleaning the glue from the plates that the cleaning rag eventually snags a corner or two of the plates and bends them out of shape. Once this happens, it is next to impossible to hide the crease in the copper. Also the tape allows the tarnishing to come out a lot more even than the plates, if you happen to miss a glue spot. I let mine naturally tarnish from handling and it produced a nice brownish patina, somewhat like on old penny. -Brian
- 602 replies
-
- 1
-

-
- Flying Fish
- Model Shipways
- (and 2 more)
-
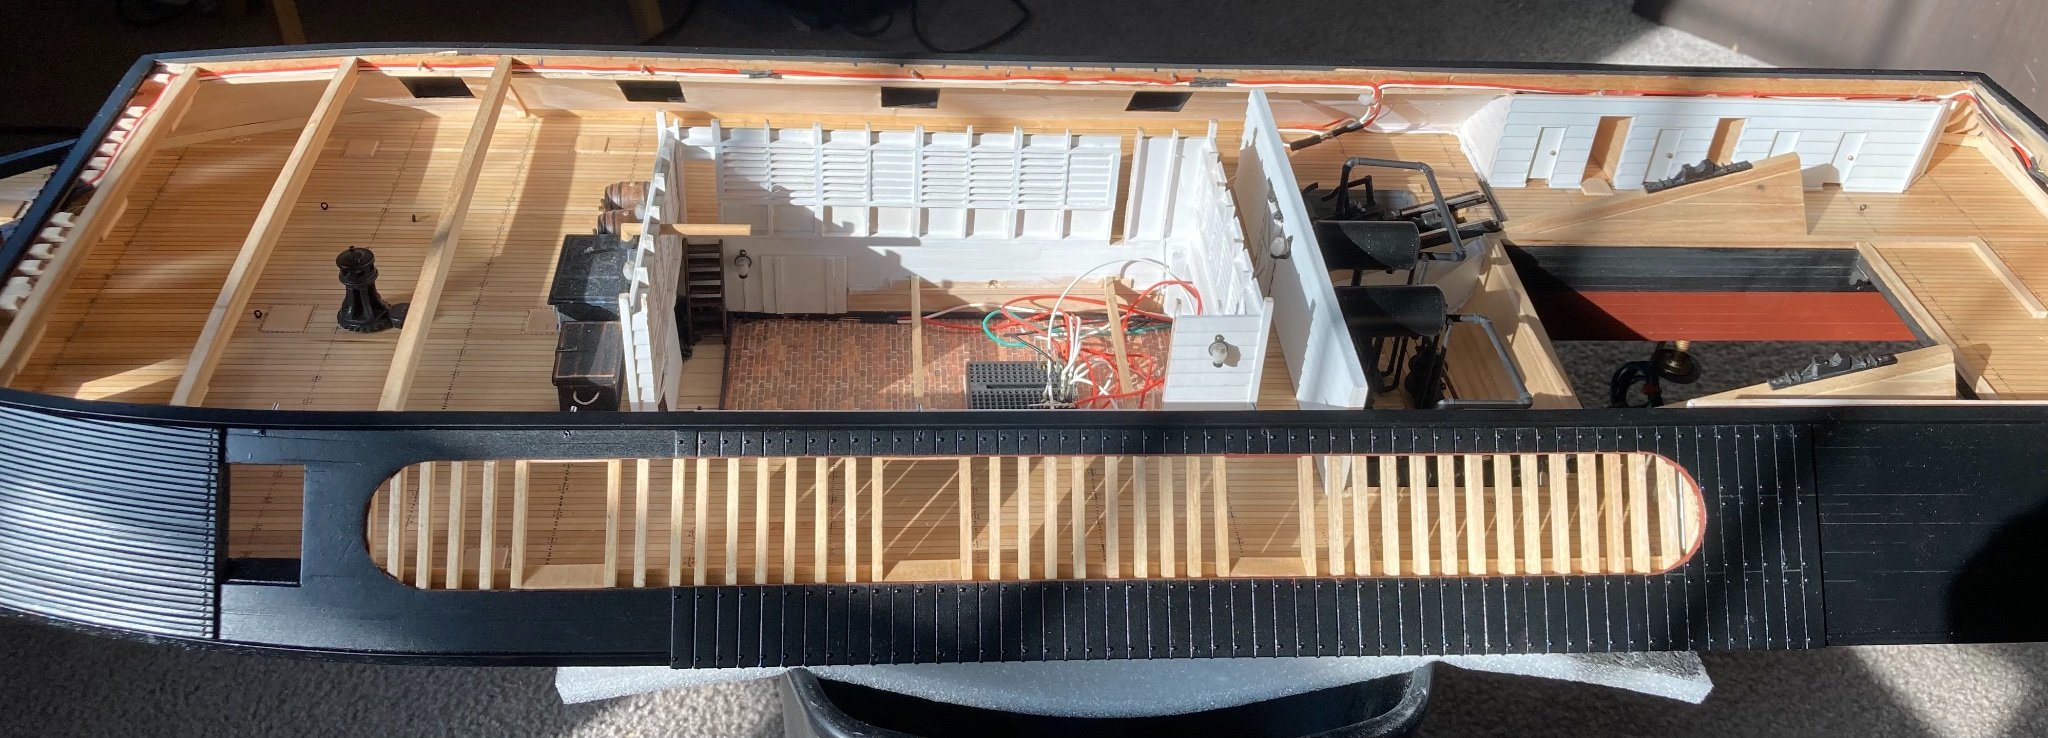
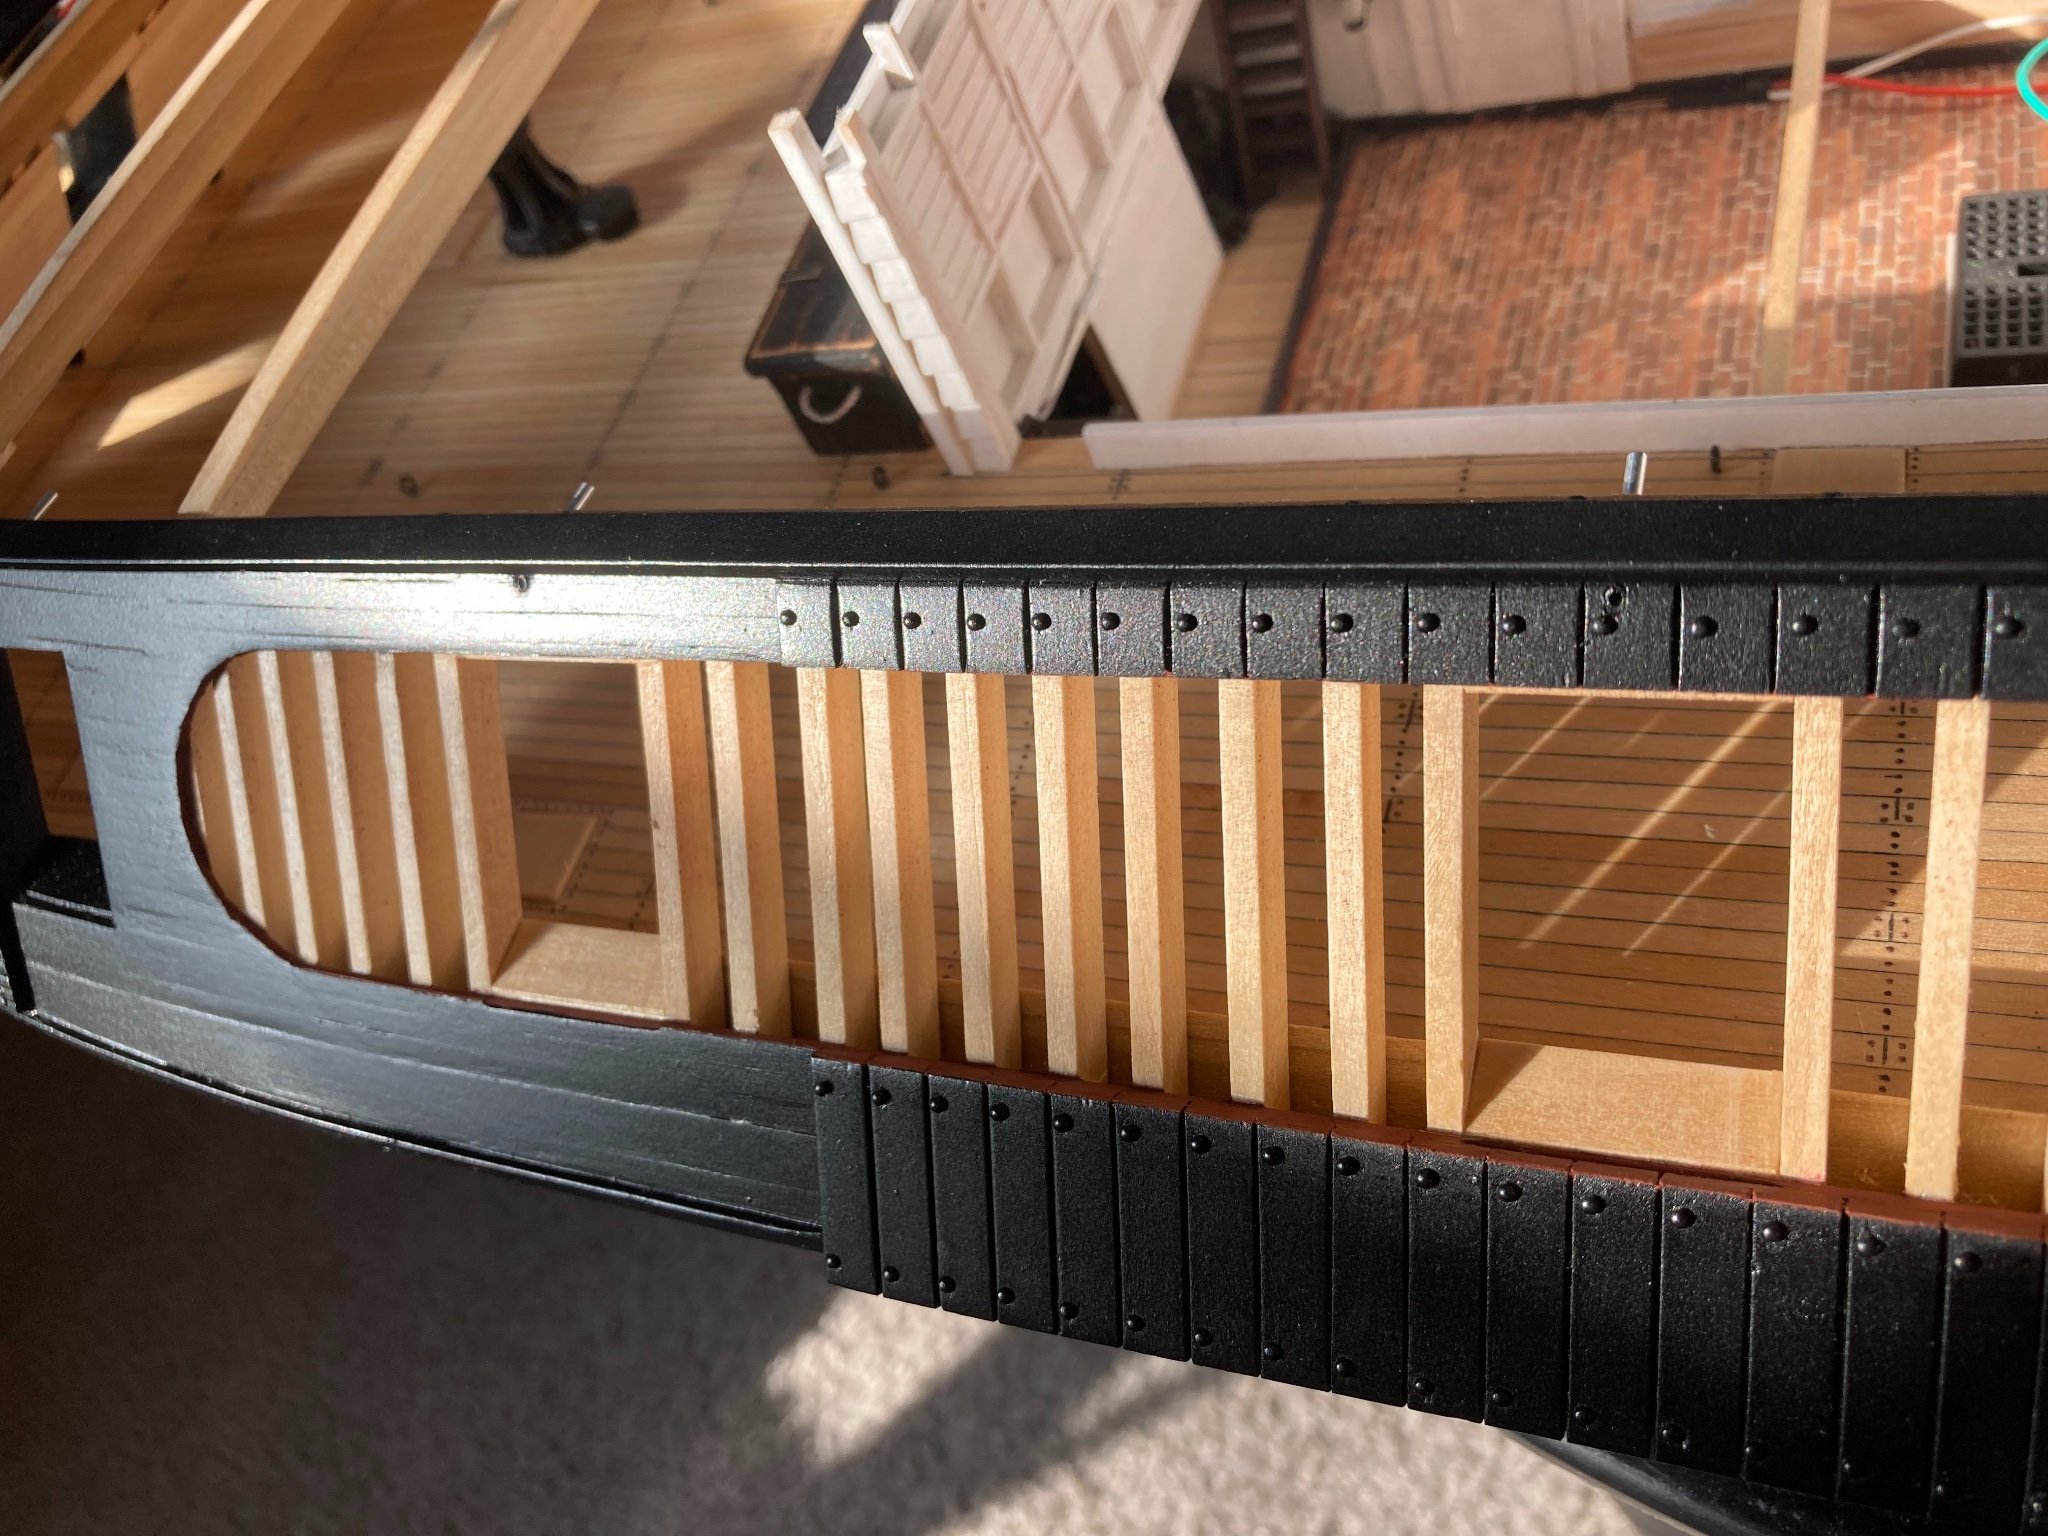
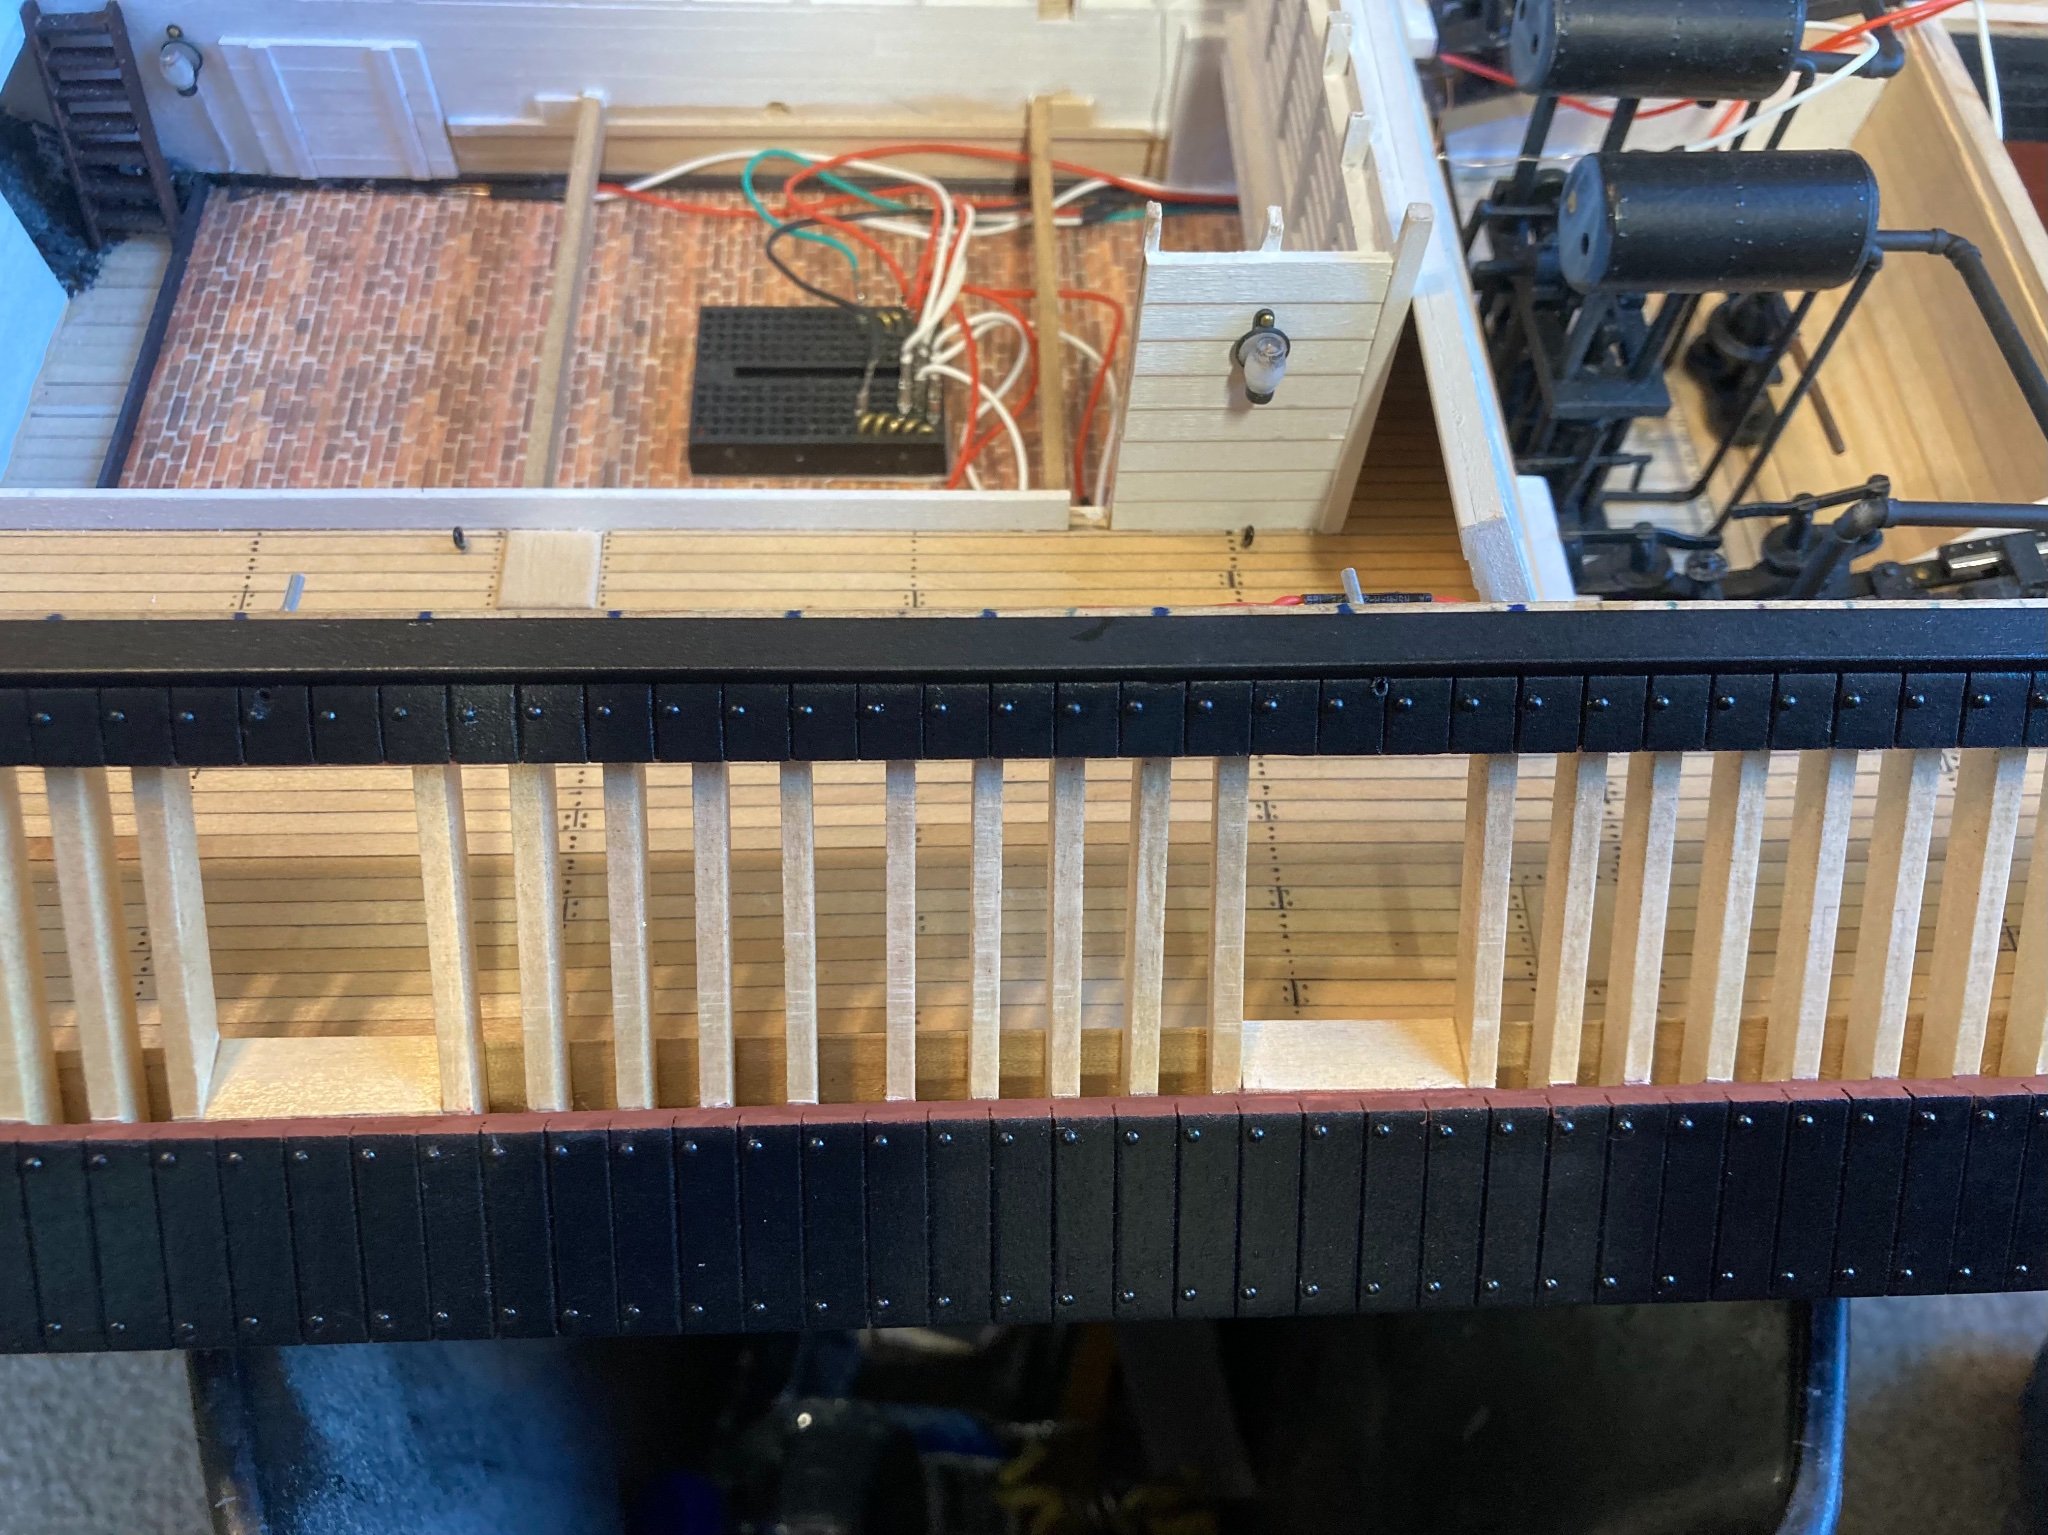
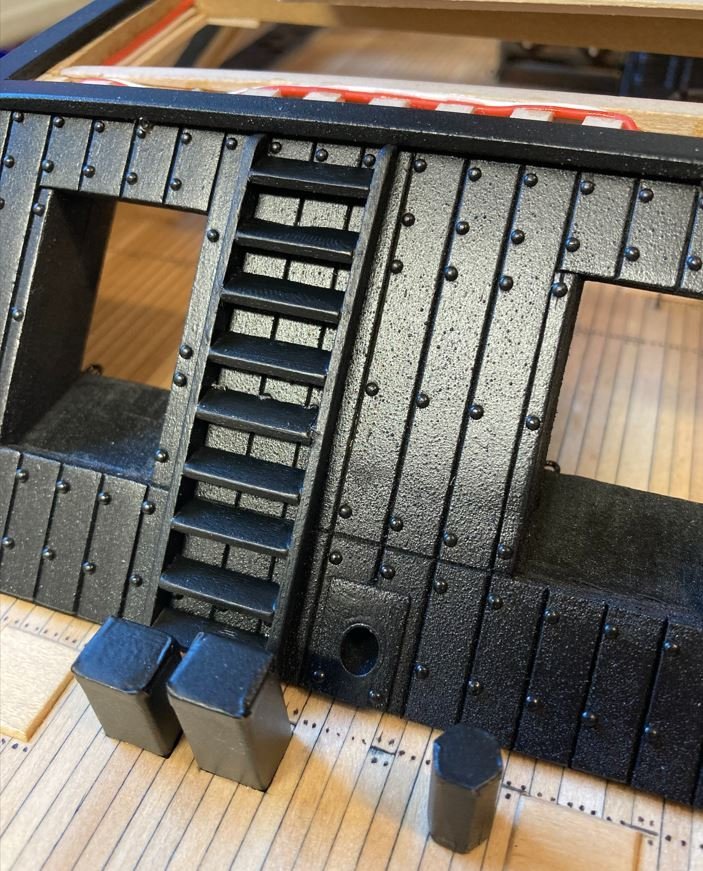
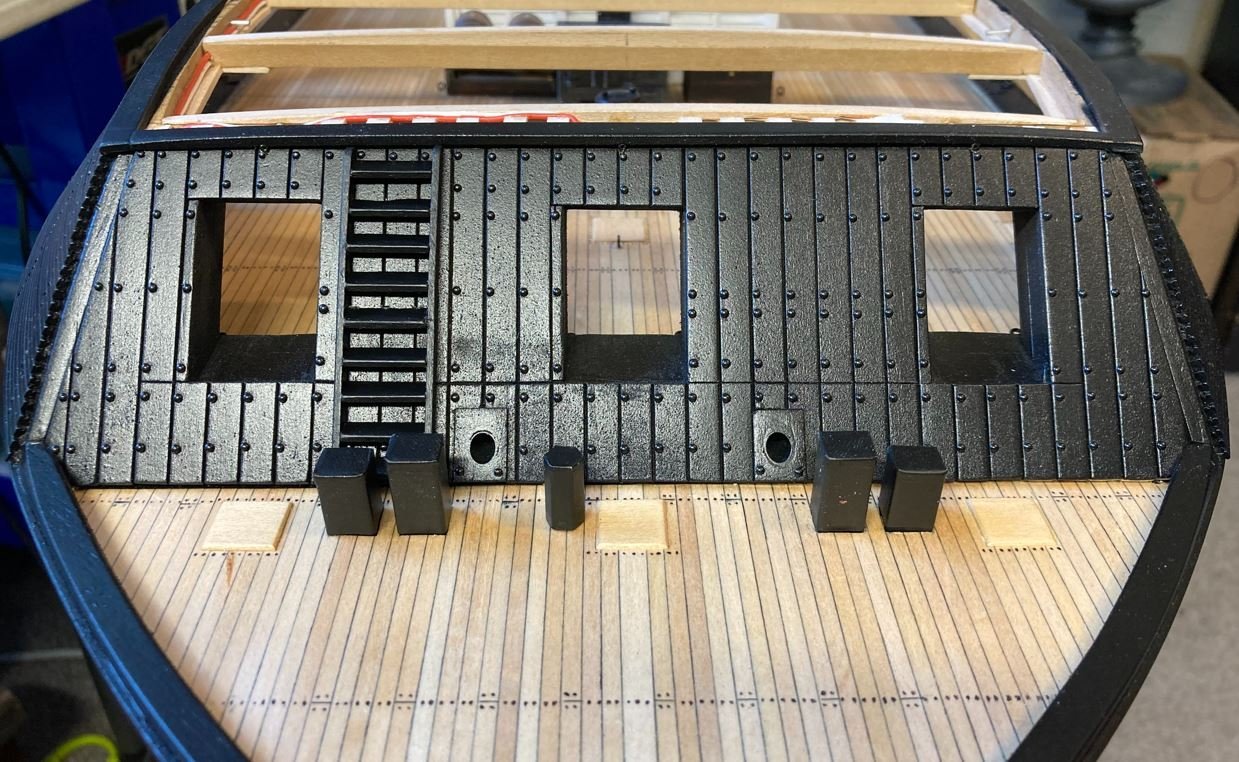
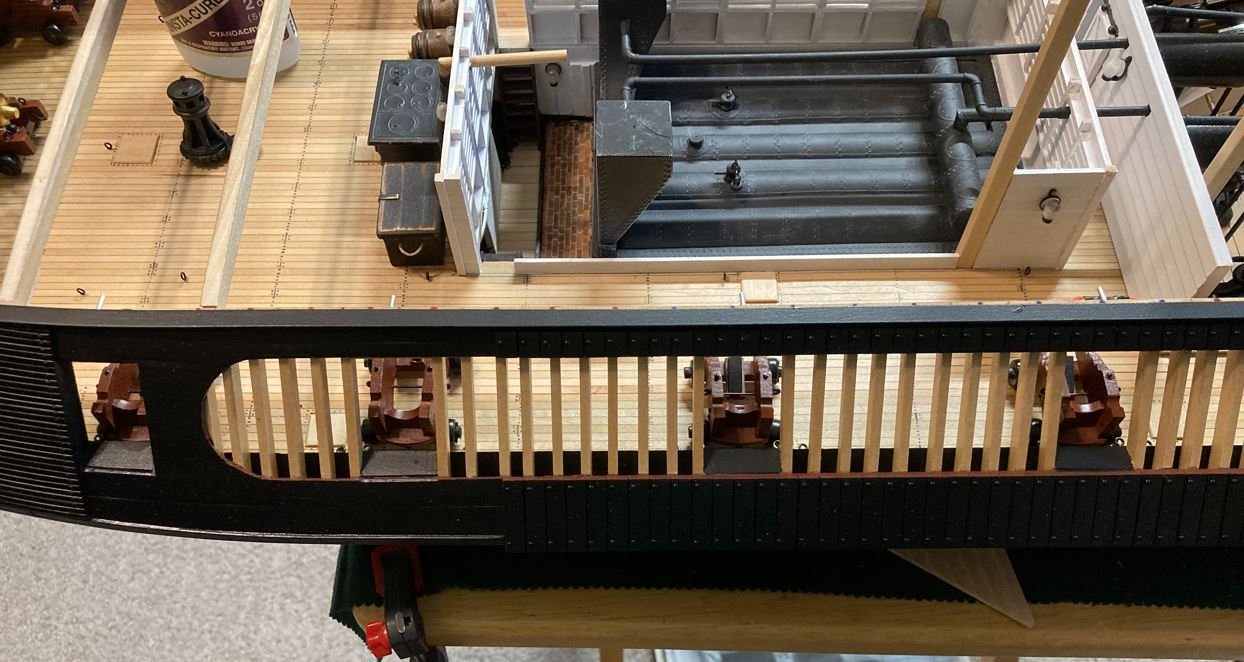
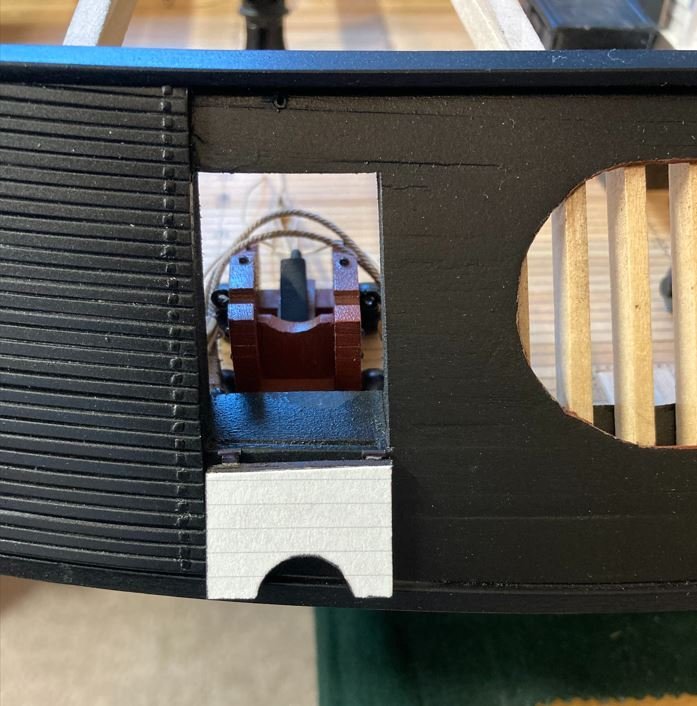
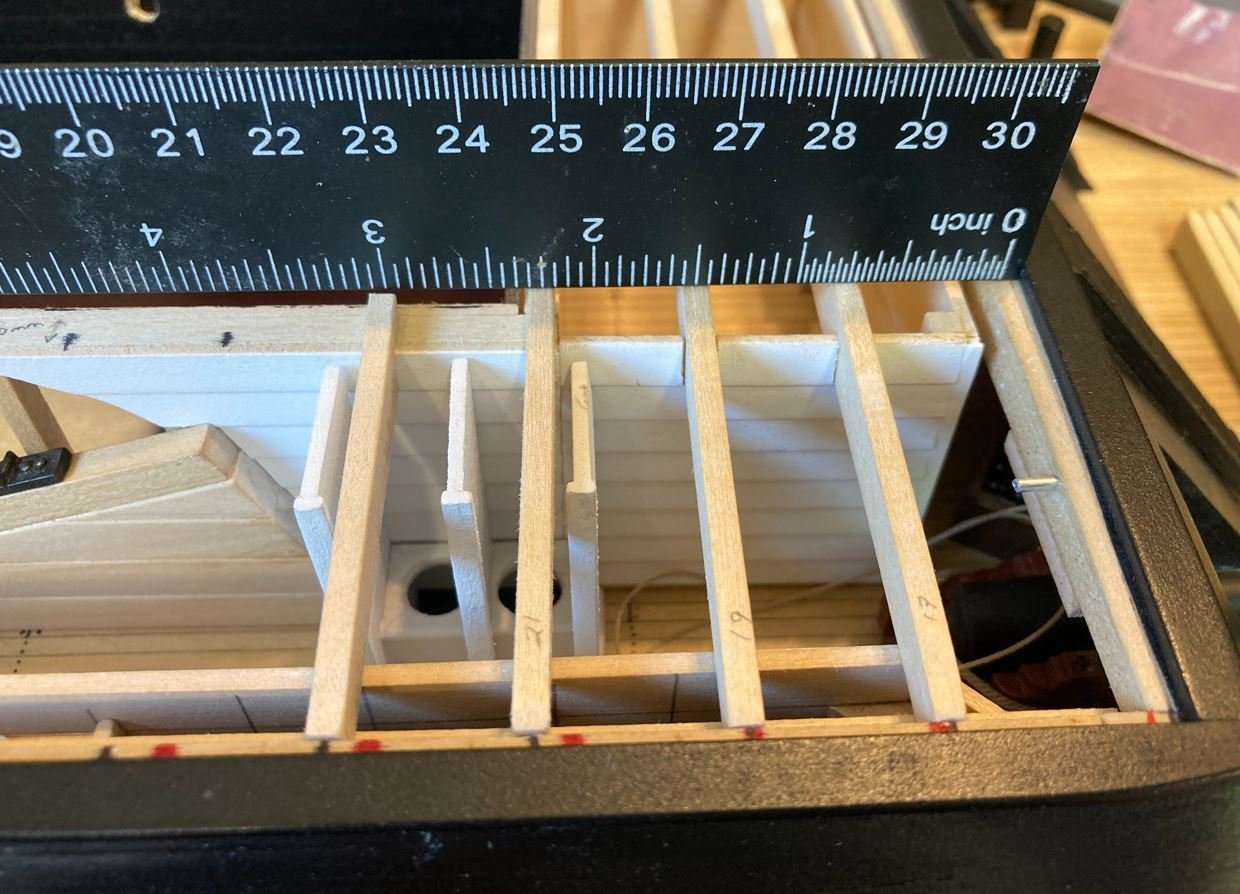
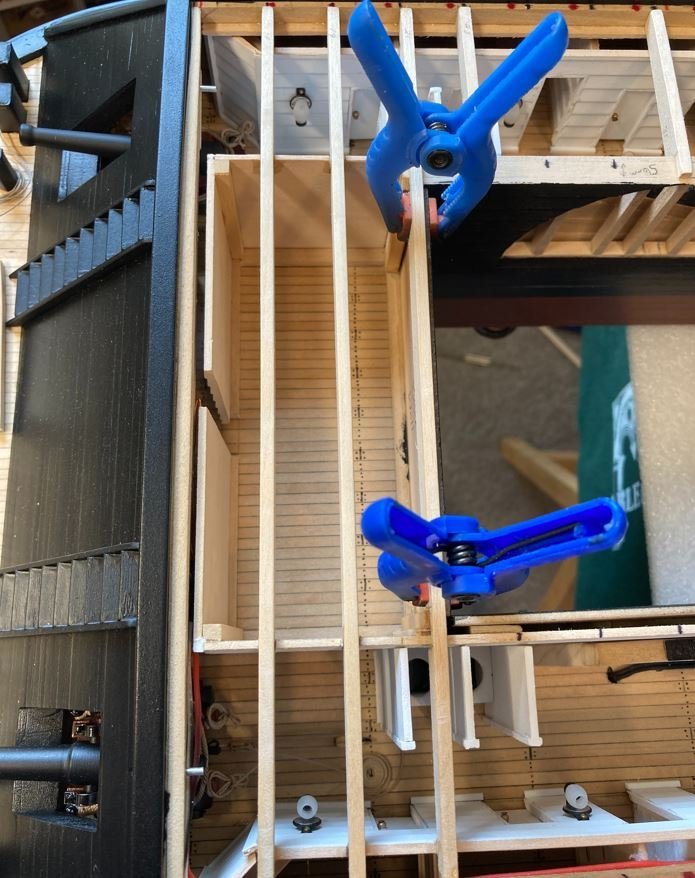
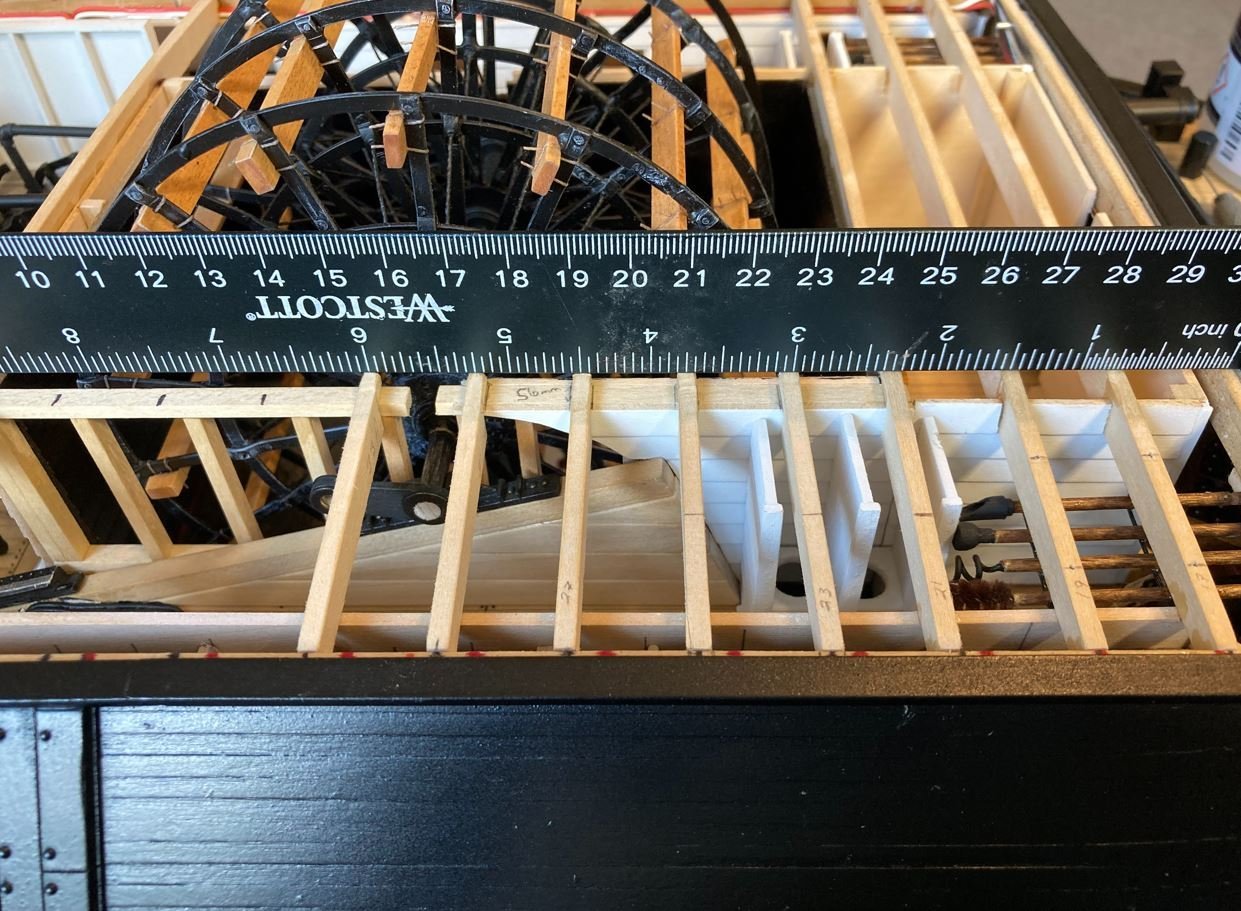
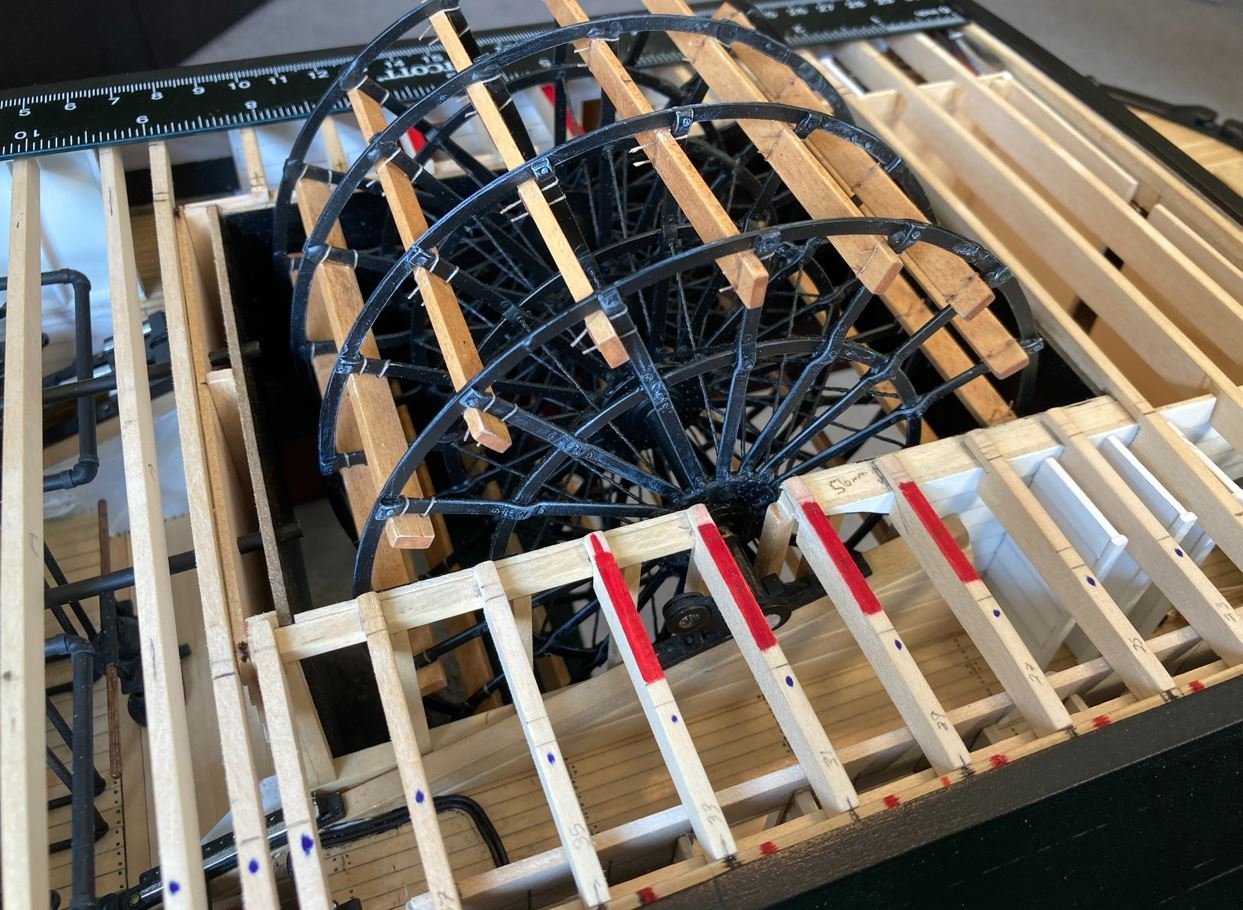
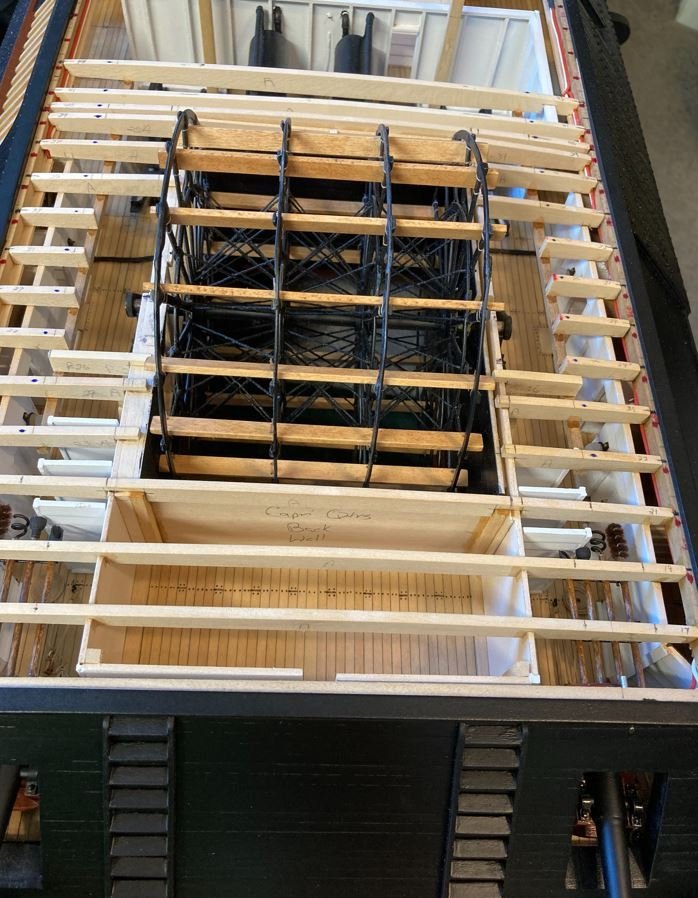
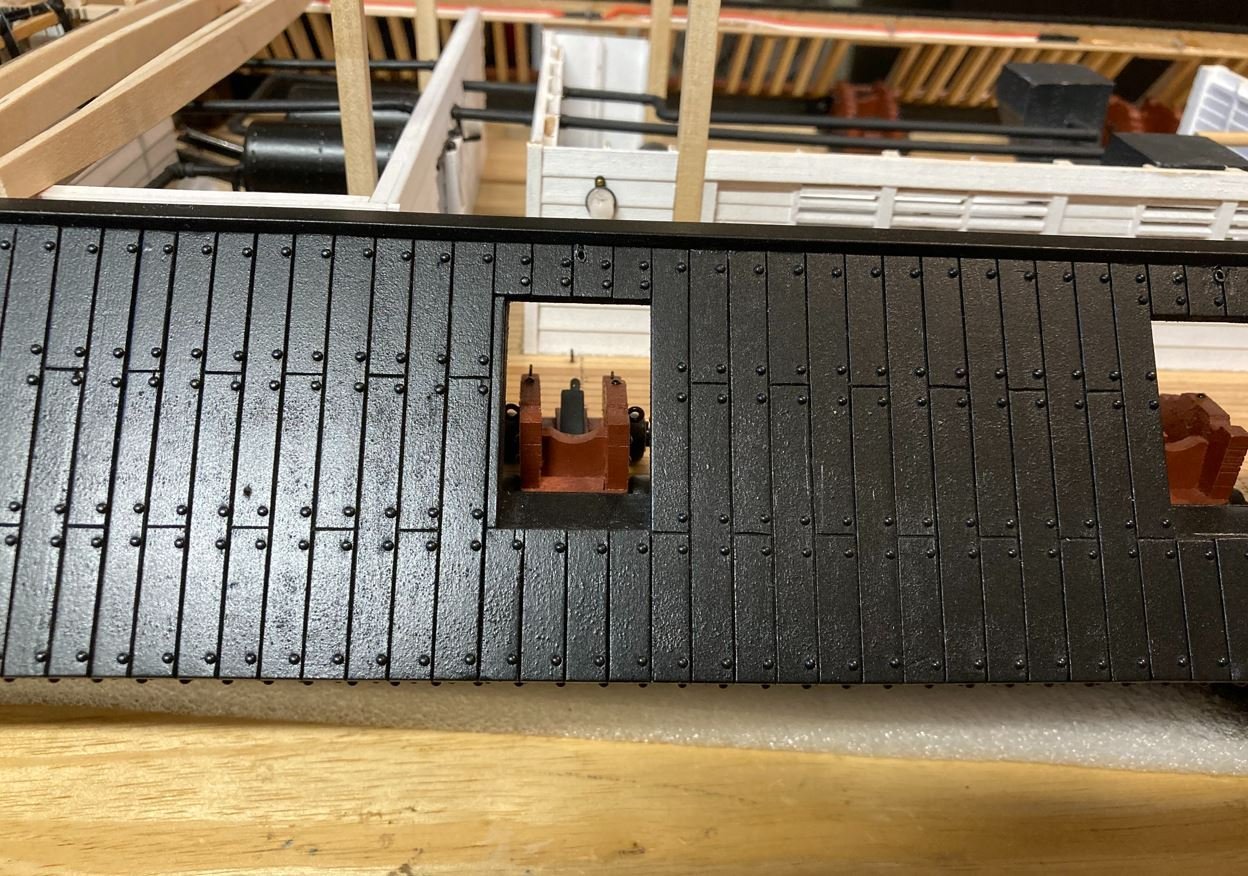
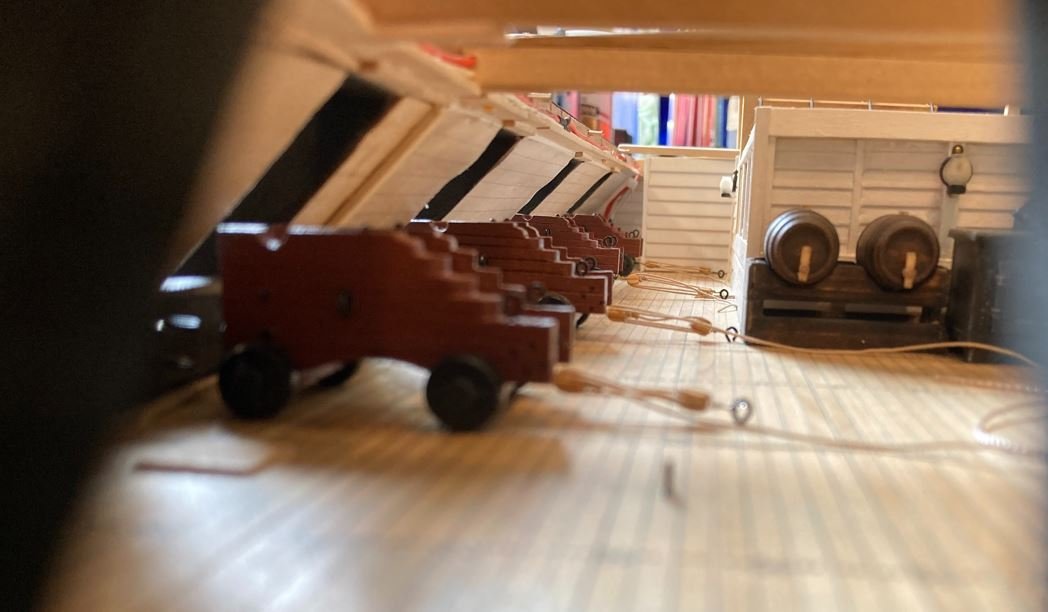
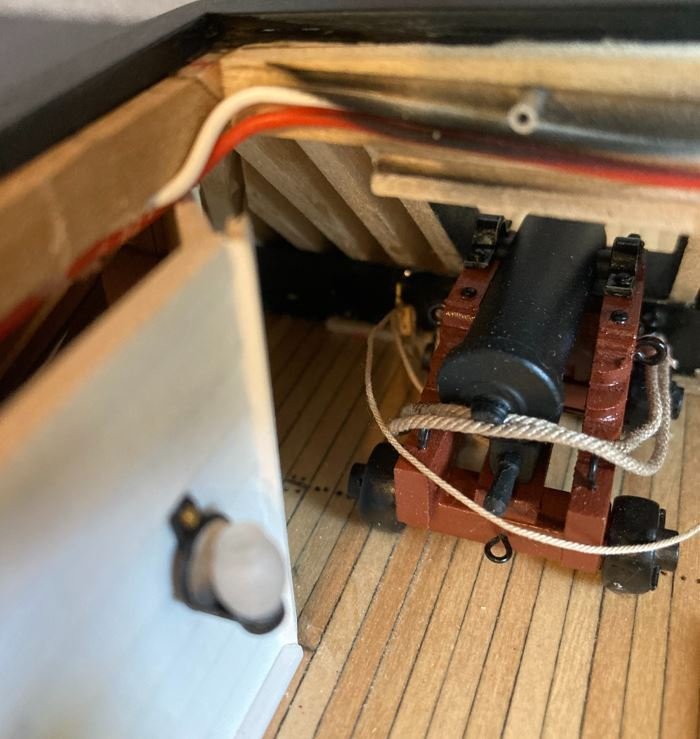
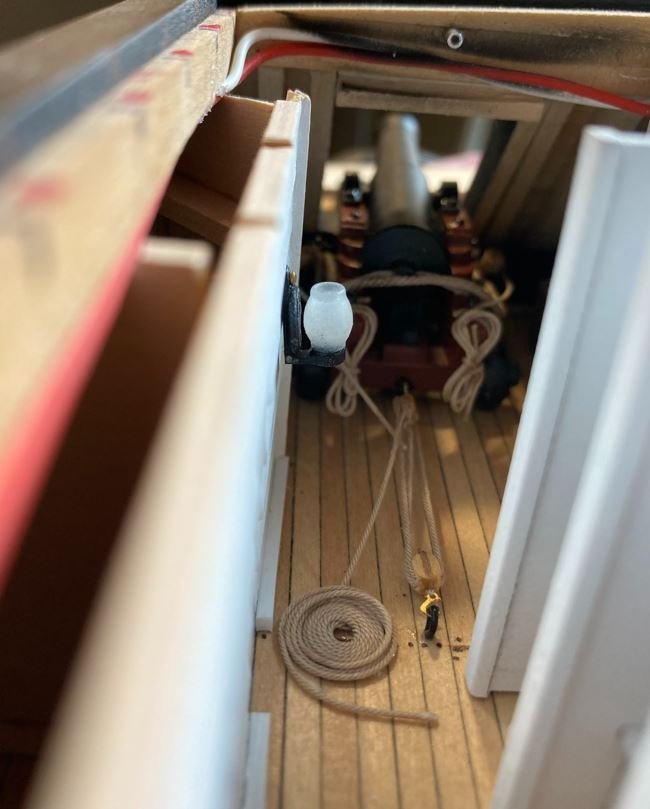
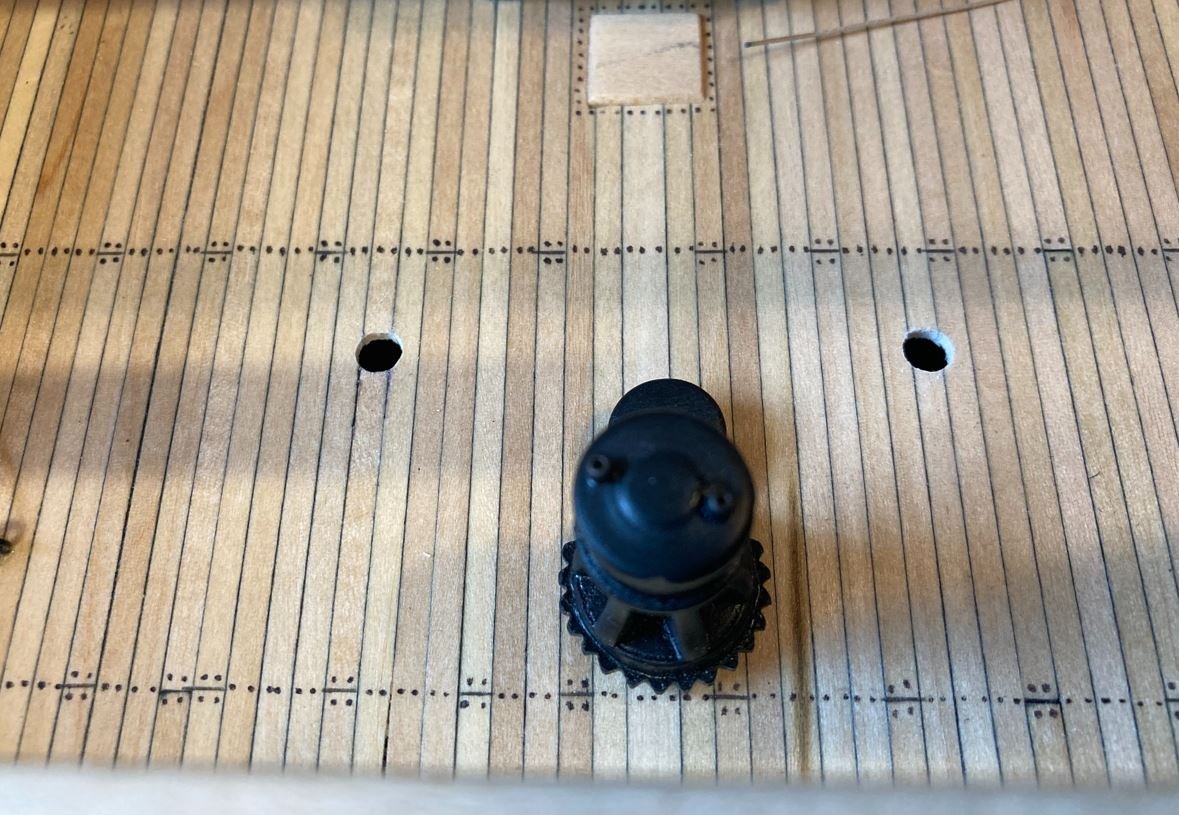
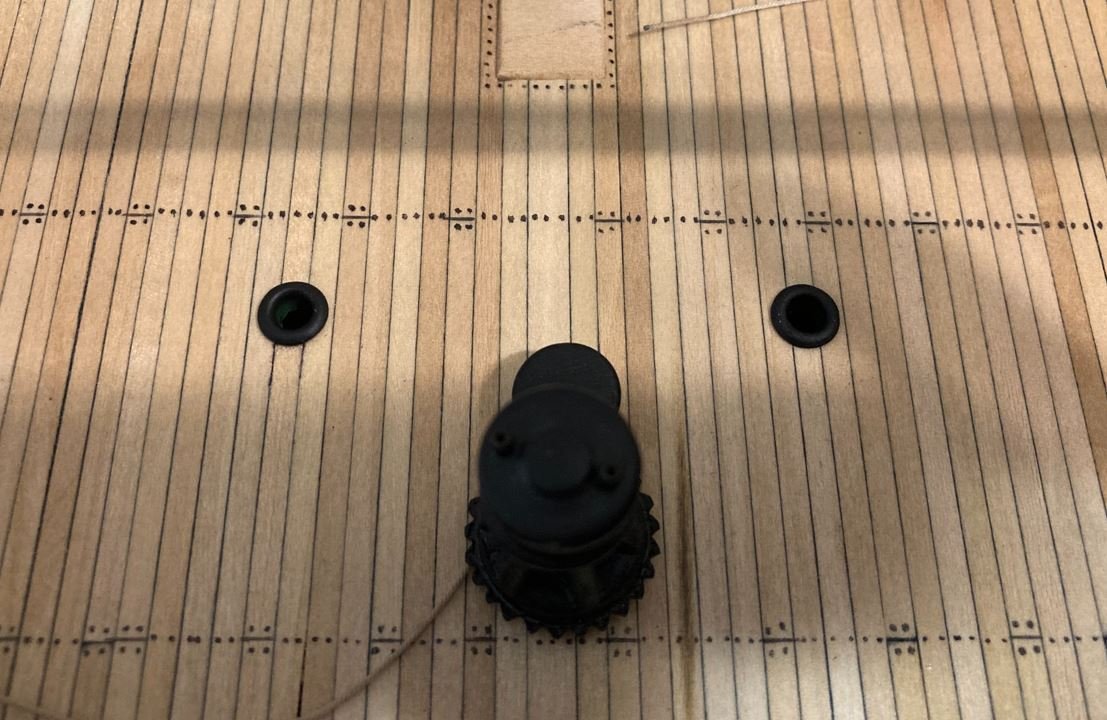
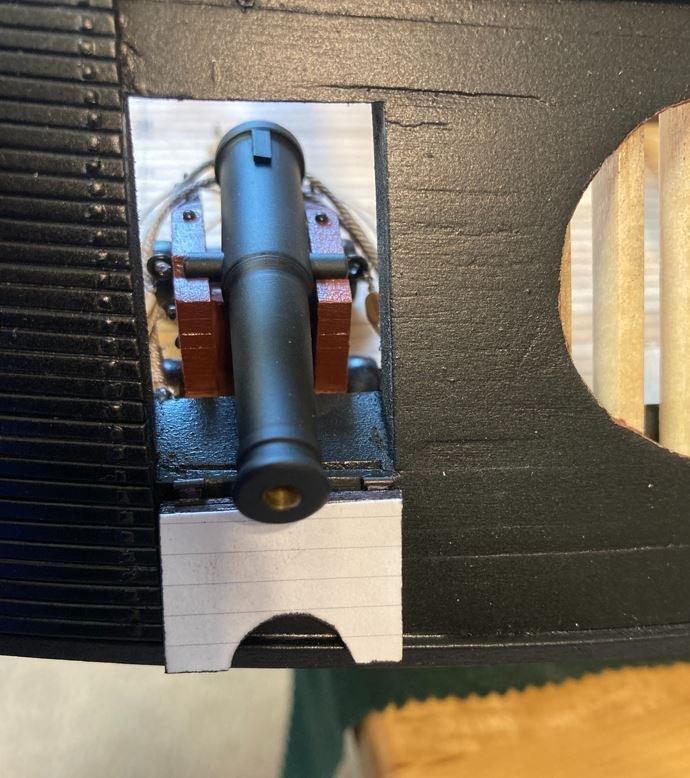
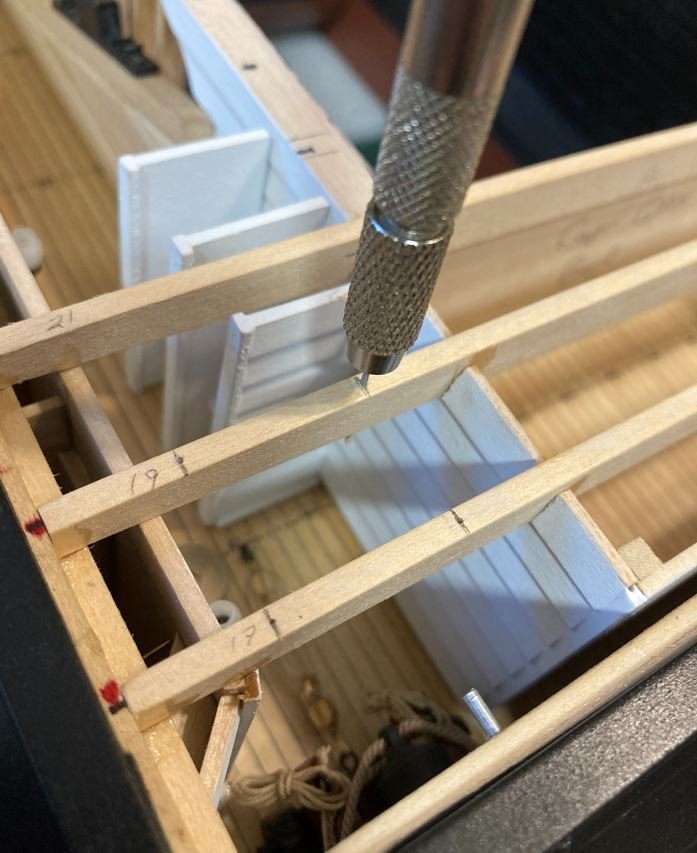
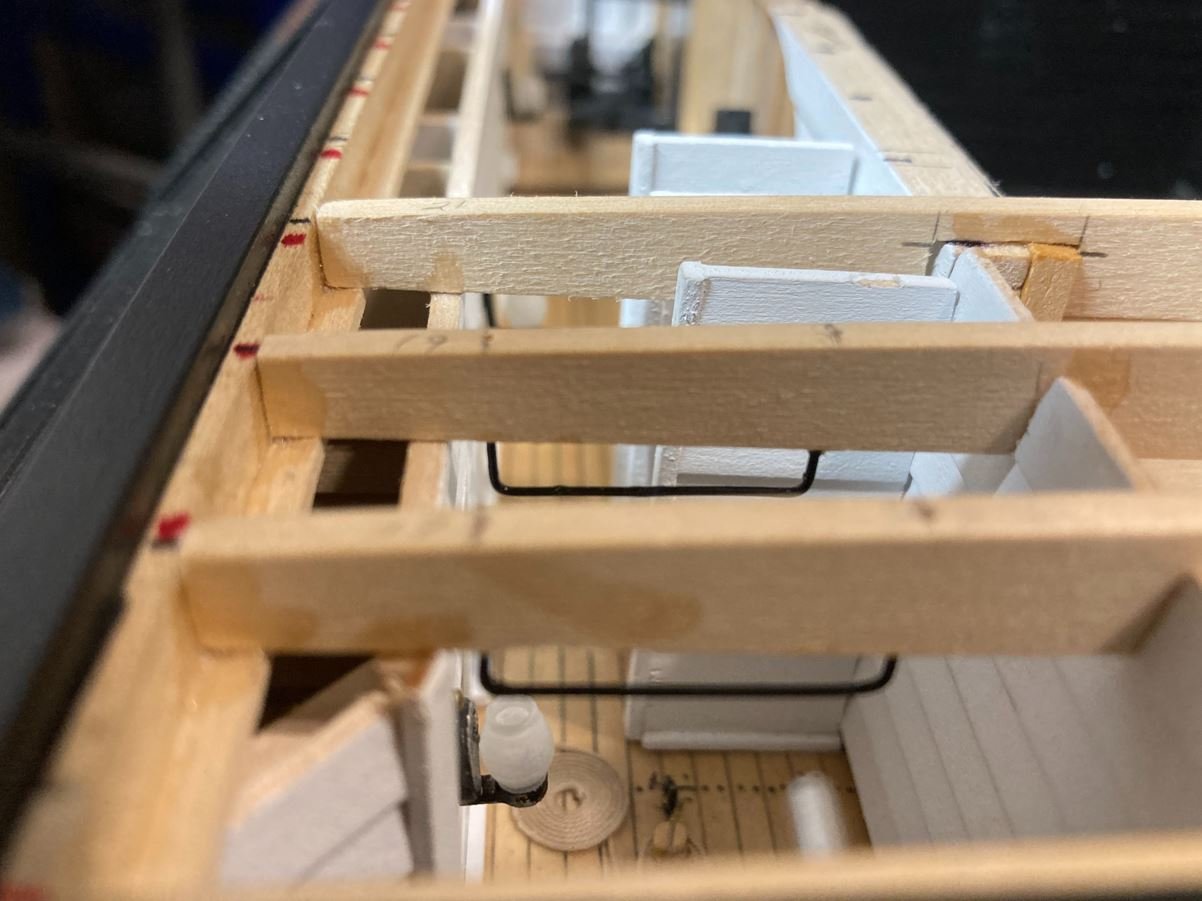
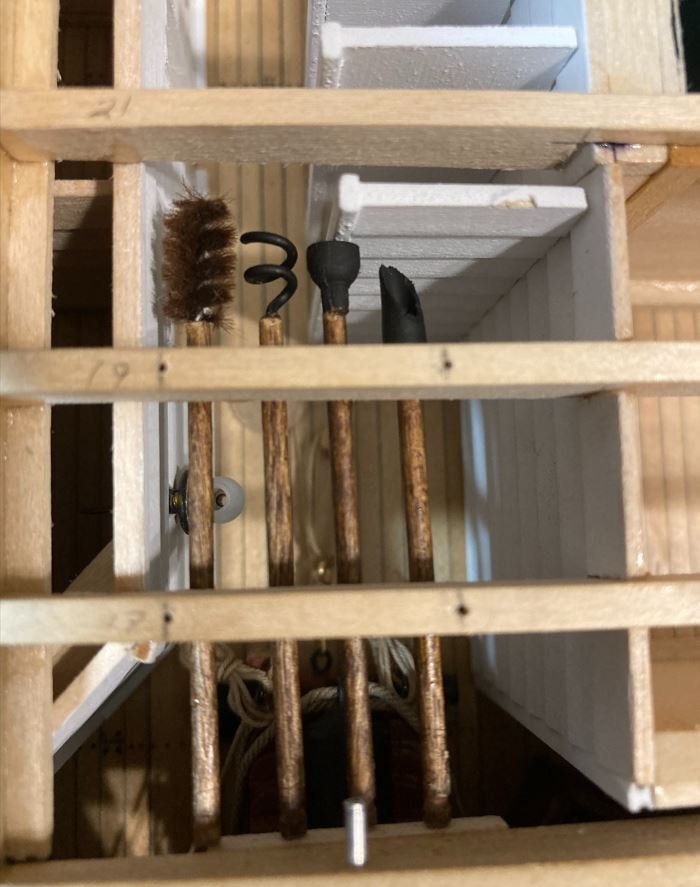
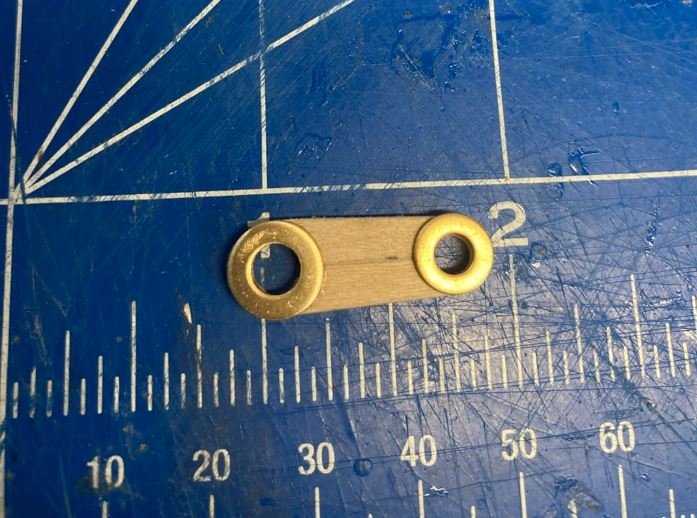
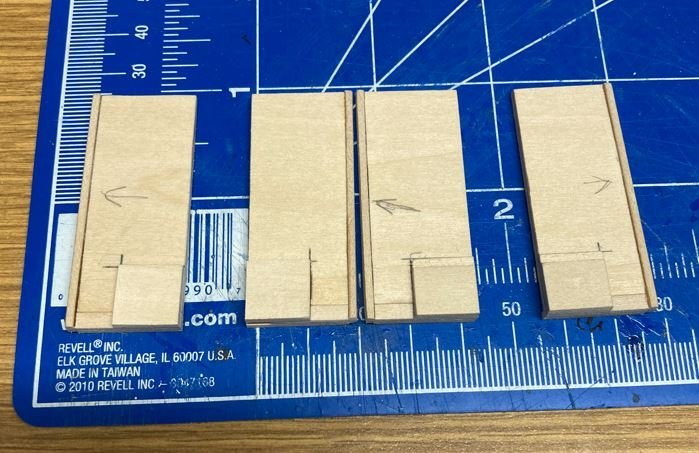
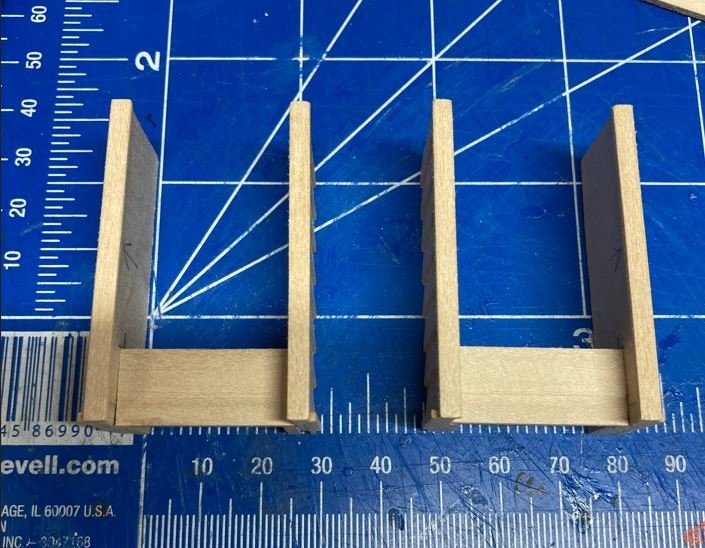
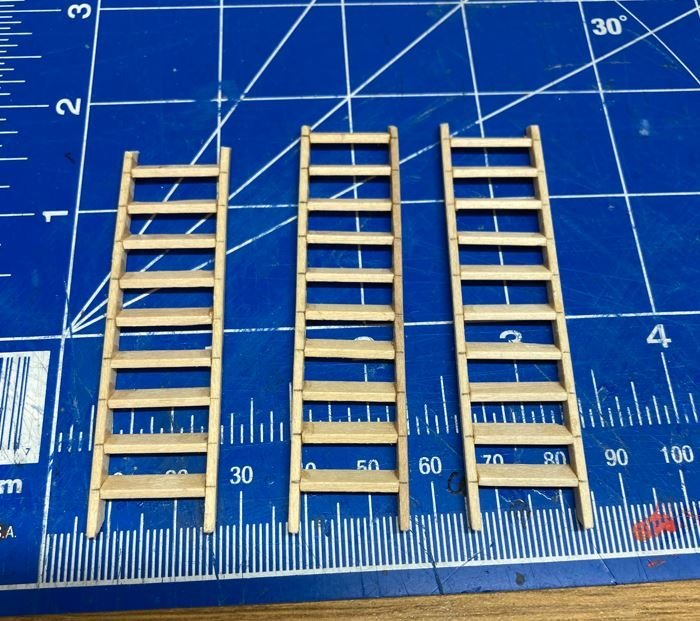
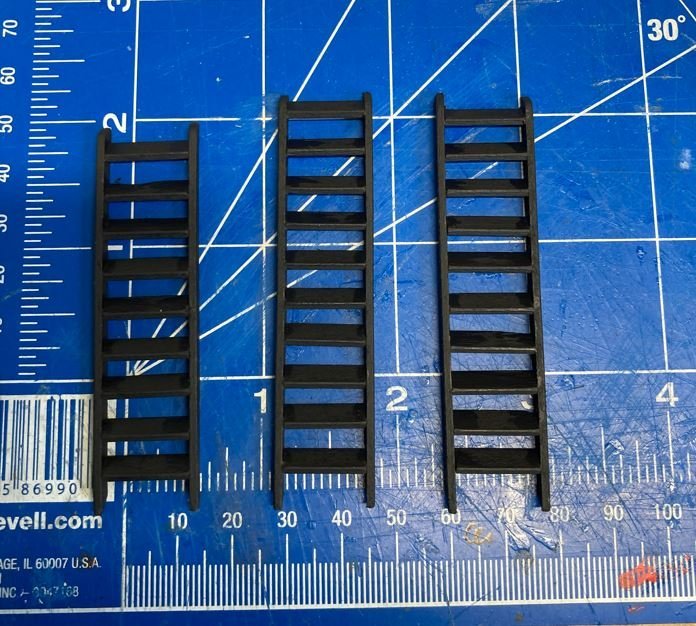
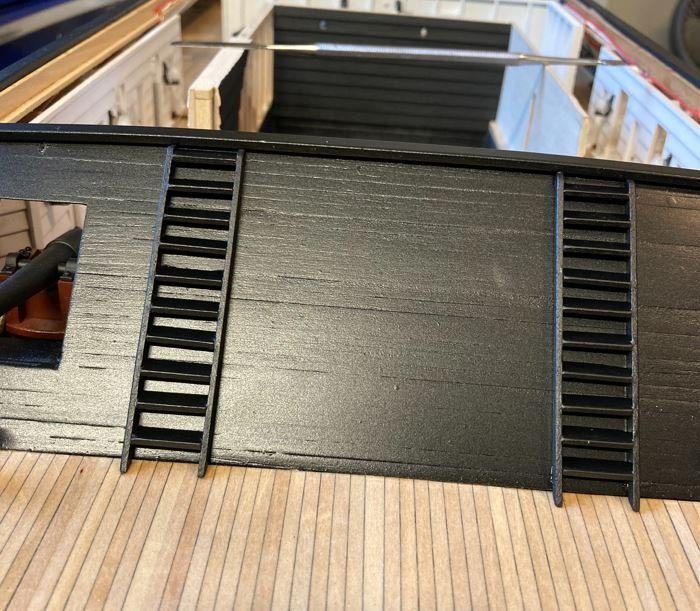
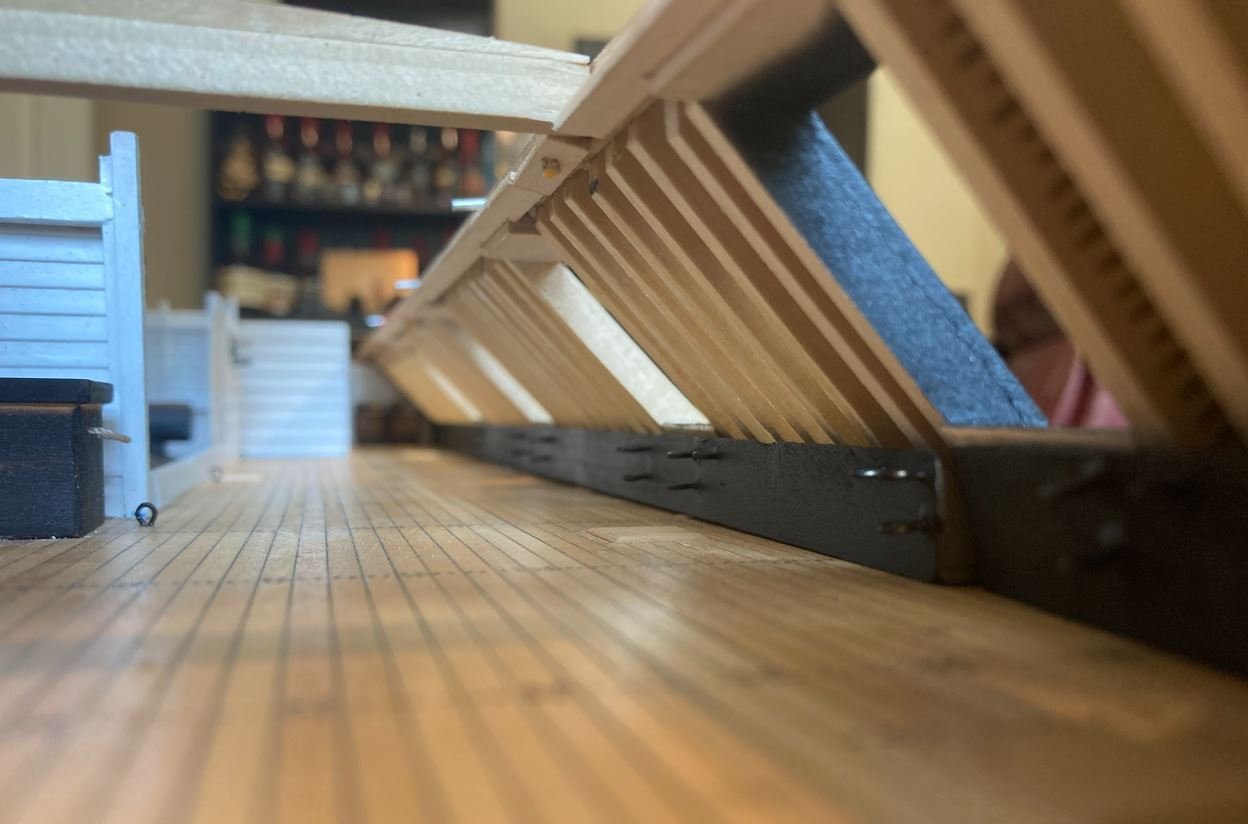
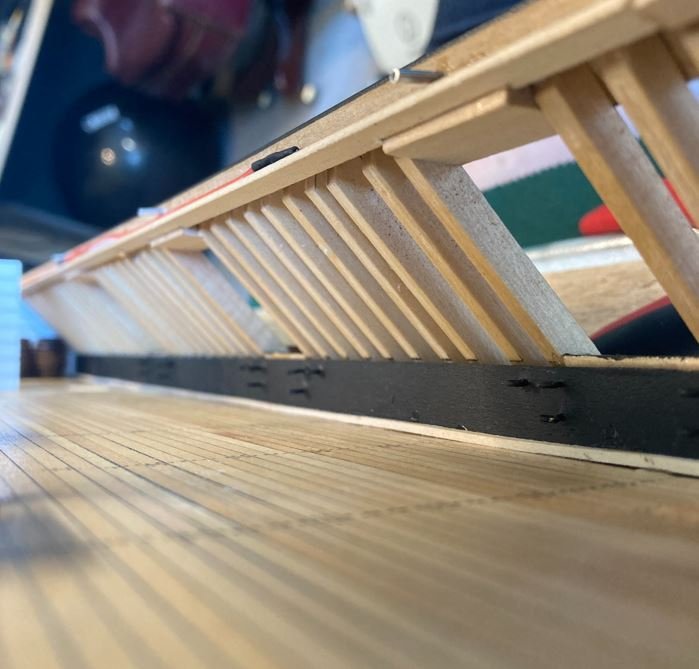
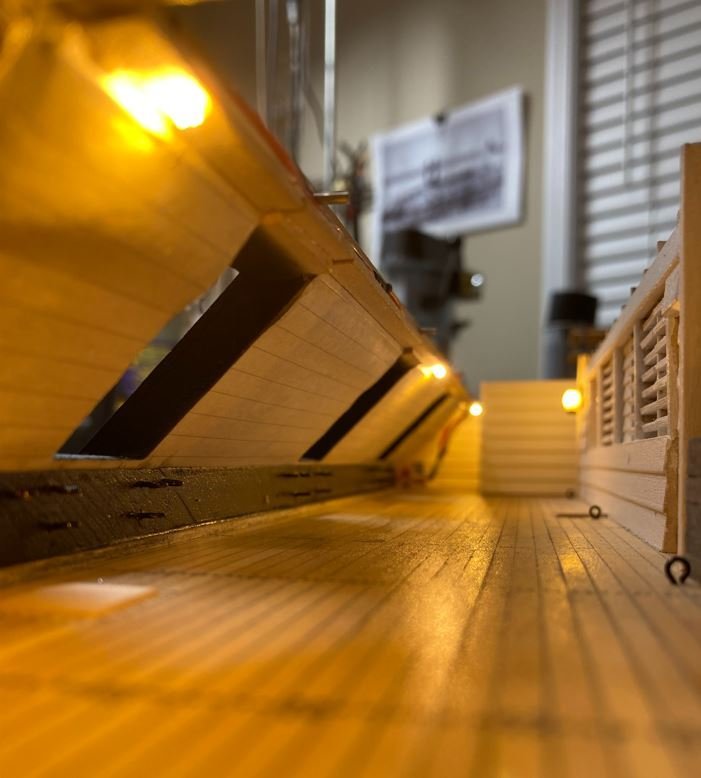
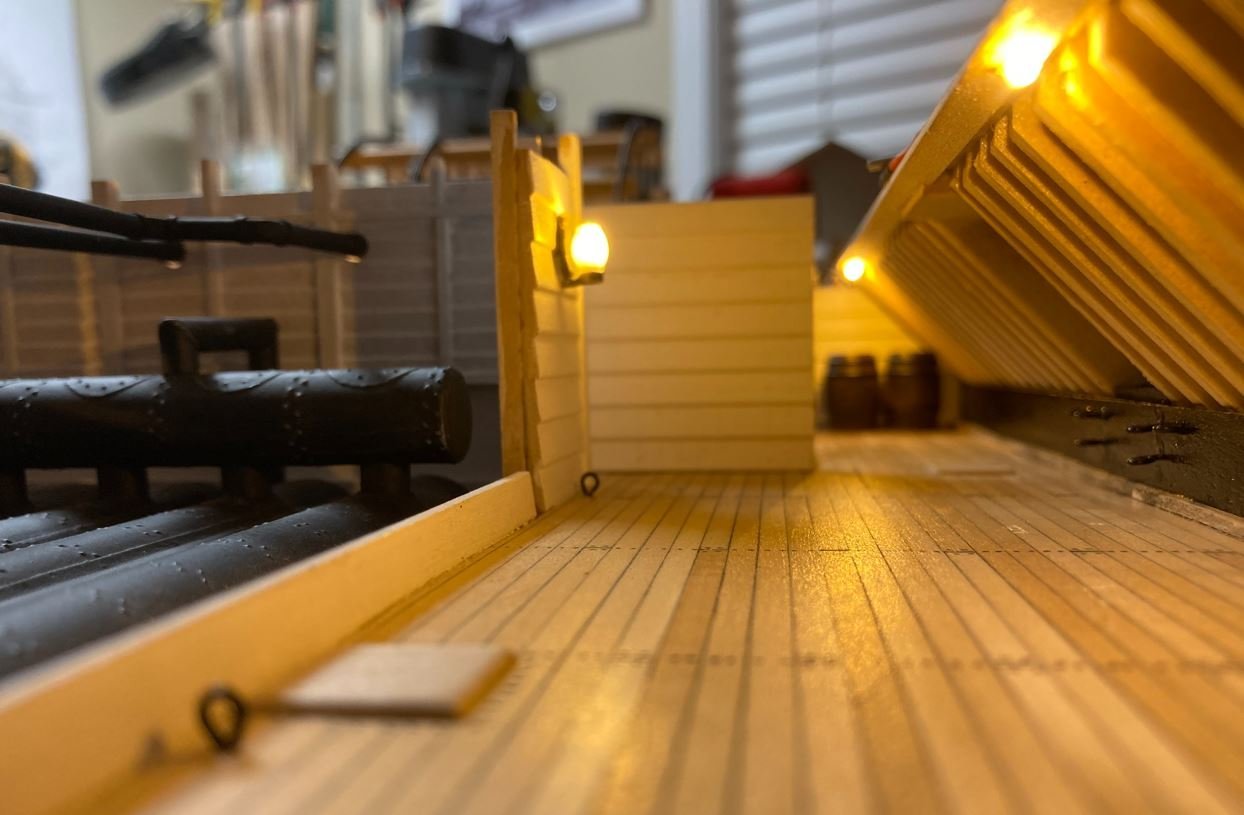
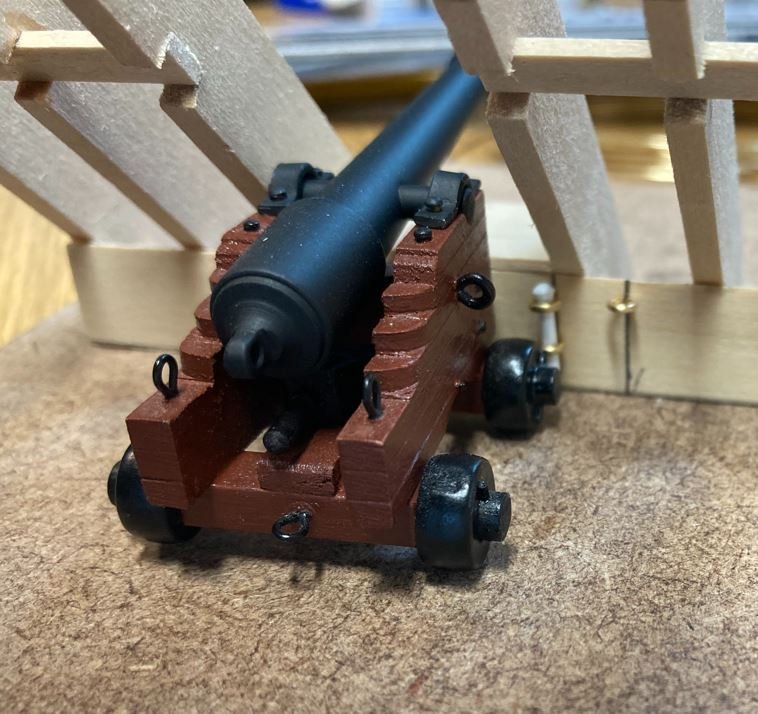
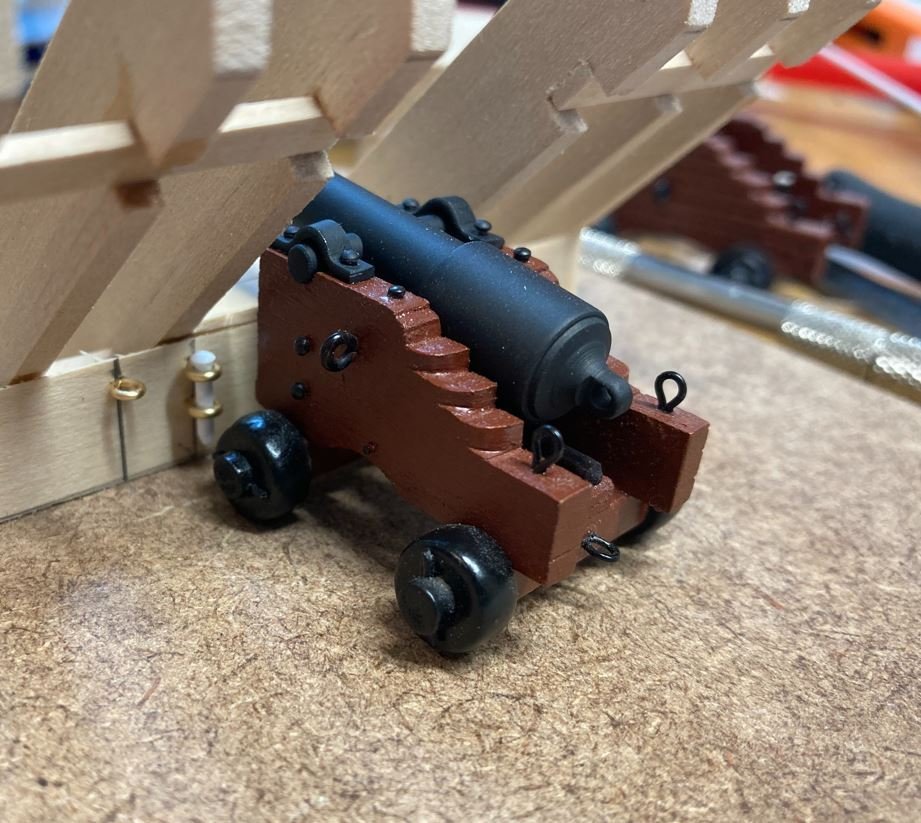
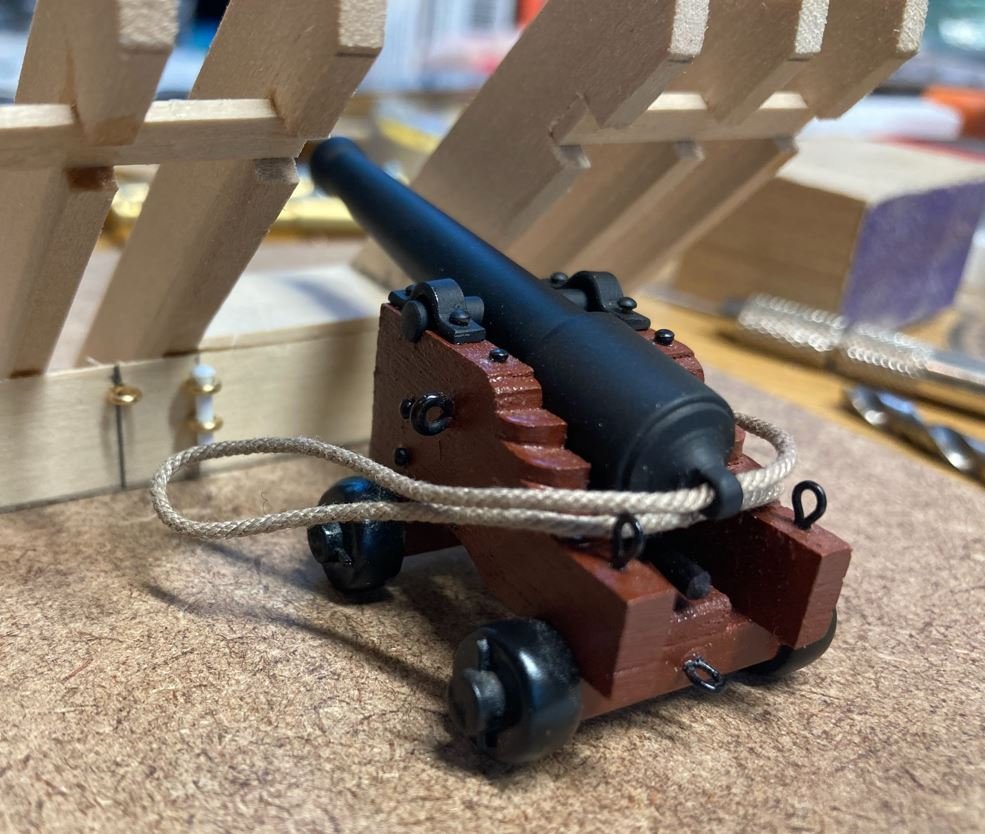
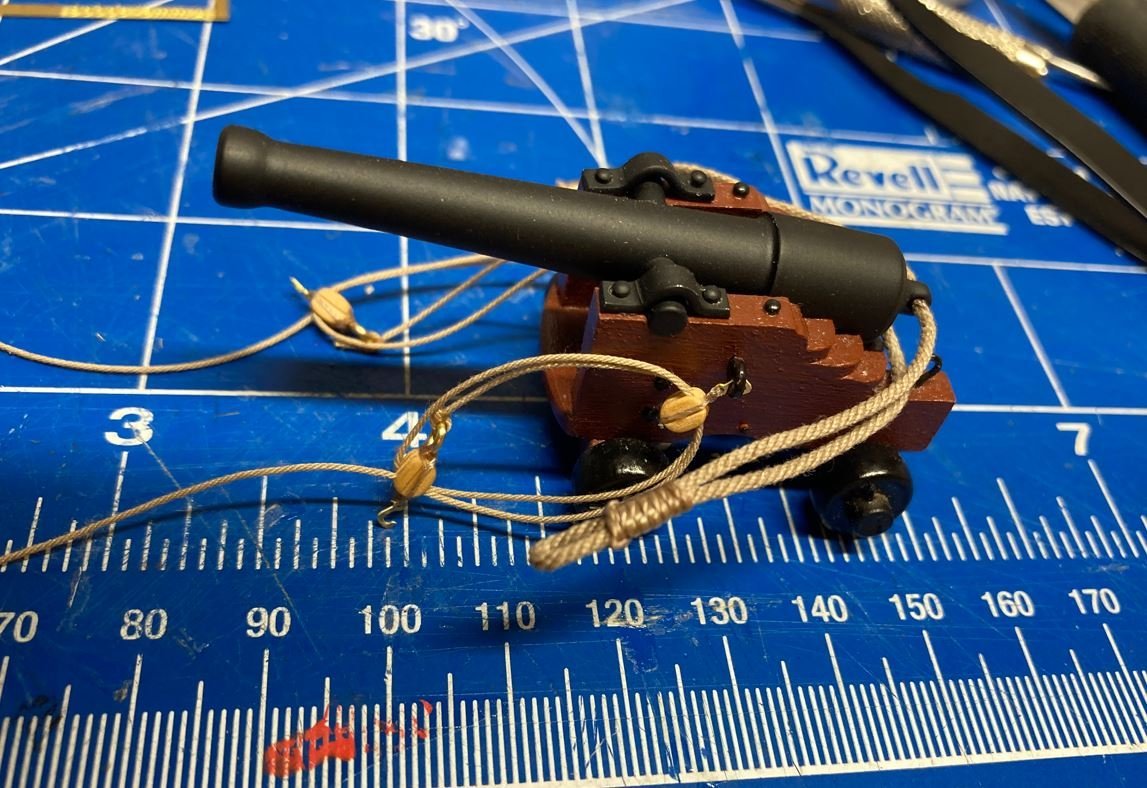
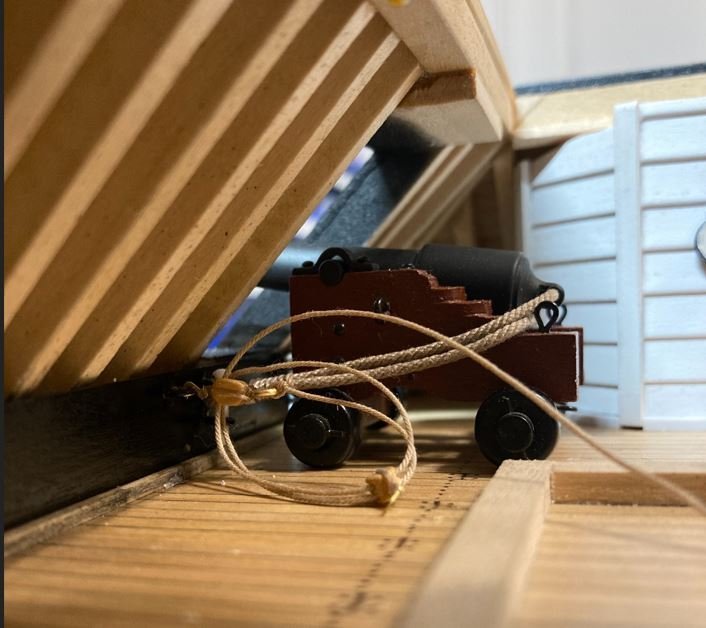
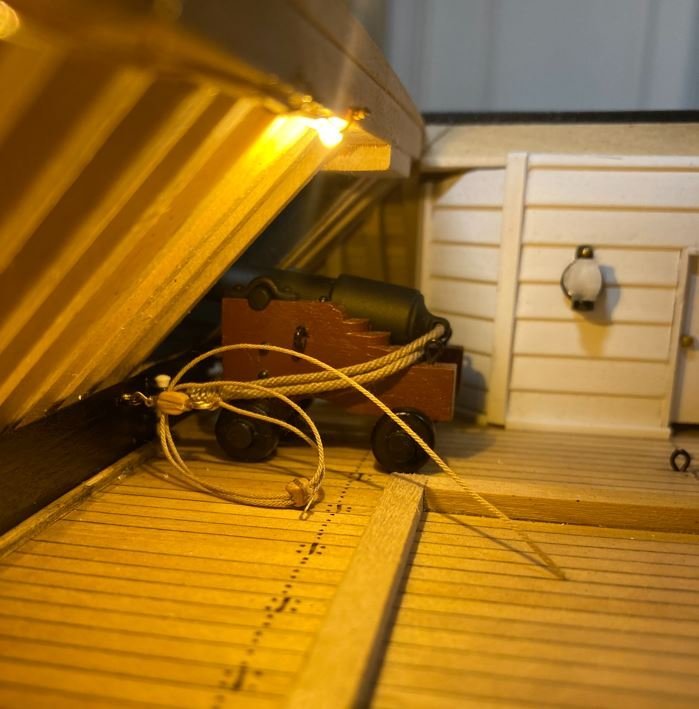
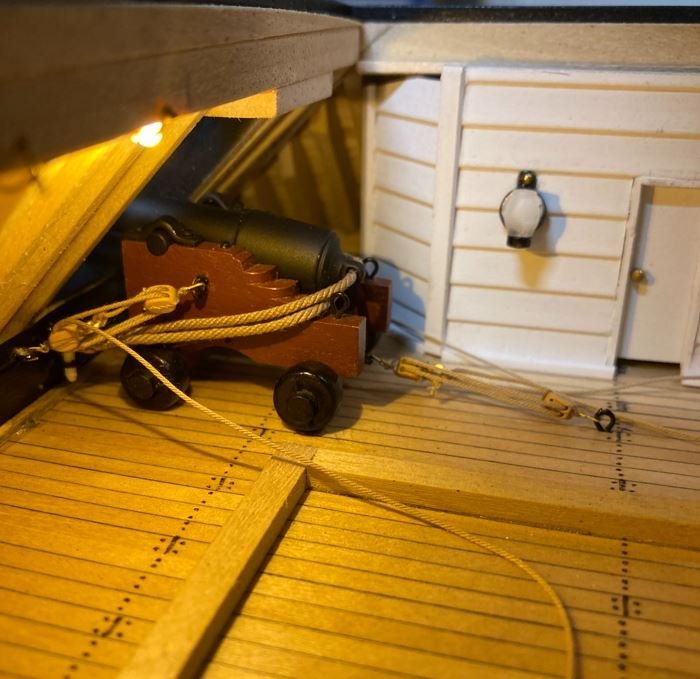
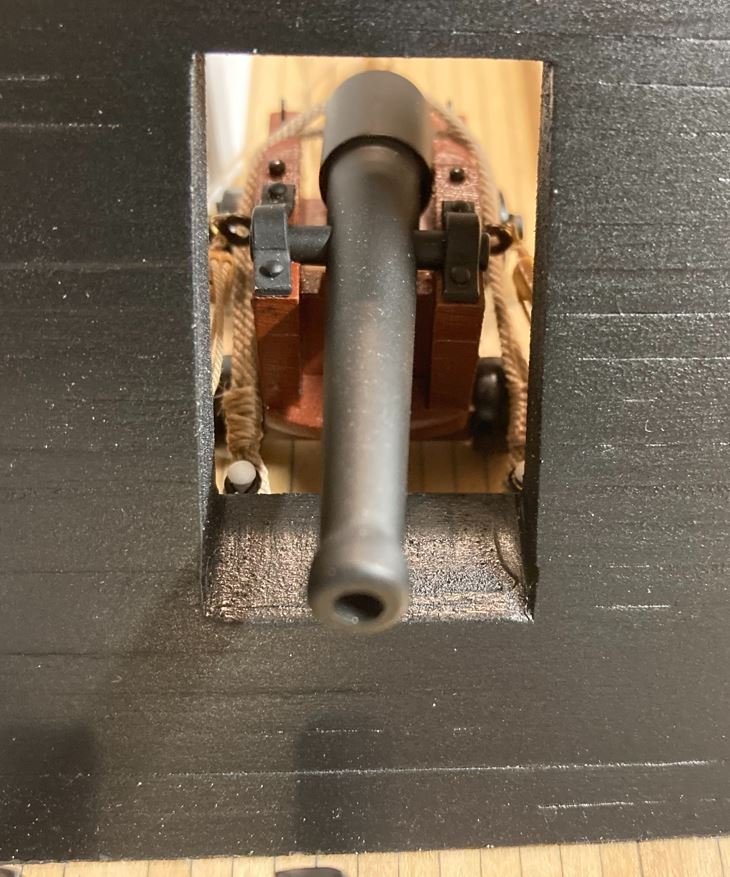
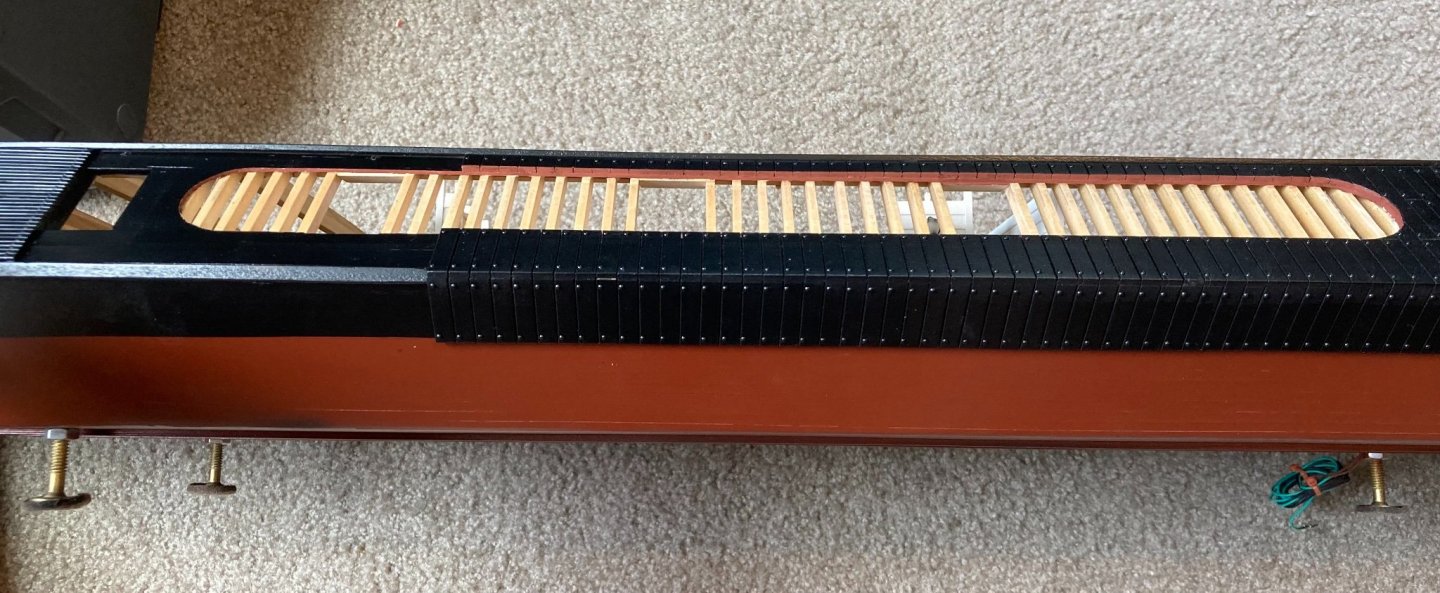
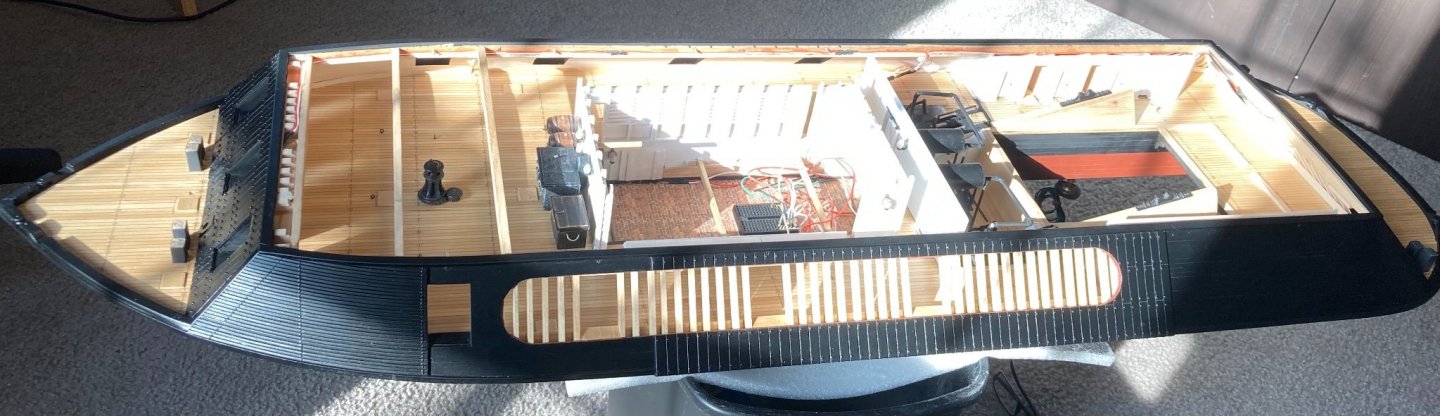
Hello everyone, Time again for another update. This time around I finished getting the aft 32-pound smoothbore in place and rigged. Here are a few shots of it going in Breech rope being seized.. Completed breech rope. Training rigging going in. And this cannon completed. I haven't been keeping track of the hours that I have spent on this build, but I do know that between the two aft cannons it took more than three hours to complete. These are some seriously tight quarters to get the hooks mounted to the eyebolts and the ropes drawn up tight. This task of the build has definitely swayed me from ever wanting to do a ship in the bottle build. Unfortunately, for all the work put into these, very little of it will be seen One of the smaller projects on this post was the completion of the paddle wheel crank. This was another instance of where I didn't take very many pictures of it being built. I have a bad habit of getting engrossed in these small pieces that I only think of taking pictures of them when they are done. Anyhow, here is the basic construction of the crank. Just a small piece of wood with two flat washers for the hubs. Once these were built up, they were painted black and installed. Next up were the exterior ladders. After reviewing all of the pictures of Cairo's sister ships, from what I can tell, she was the only one that just had ladders on the forward and aft casemates. All of the pictures of the other boats in the City Class show ladders mounted on the side casemates as well. Not sure if this was a later addition to the others or what, but since there is only one known picture of the Cairo in existence and there is not a ladder shown on the port side, it makes it very difficult to determine if the starboard side had one either. In studying the HSR drawings, there is also no indication of side ladders either, so I went with my best judgement and did not place any on the sides. And at the risk of sounding lazy, I am somewhat relieved I wasn't able to see any other ladders, because these are one feature of boat building that is not at the top of my fun list. This is only because they are so tedious and fragile, and I know it's just me, but I usually have a hard time getting all of the rungs lined up evenly. These were not as difficult as some of the smaller ones, but they are still ladders. Ladders glued together. Painted up Aft ladders in place. Forward ladder in place. and since I forgot to take a picture of the completed bollards in my last post, here is one with the forward ladder as well. Once the ladders were placed it was time to move on to more interesting features that will most likely not be seen, but I wanted to add just because it is a feature that I have never built on a model before. The "Head". I didn't want to devote a whole lot of time on them since they will be mostly hidden anyway, so I kept these structures simple. In reading up on the history of these boats, somehow they were able to channel the water off the paddle wheel to "flush" the heads and provide water for the showers. I did do some digging on this as well and was not able to find anything on it, so I decided to leave those details out. Next up, I started working on the roof beams. I needed to get some of these in place so that I could start placing the cannon implements. Once a few of the beams were in place I started on the rack for the implements. These were just made with some 20ga wire bent to shape. Holes drilled into the beams. Racks in place. ...and implements installed. There sure was not a lot of wiggle room to work around these aft cannons, it sometimes makes me wonder how often these aft guns were used. I'm guessing that the only time they would have been fired would have been during training exercises or when the enemy was crossing her stern or if the boat was in retreat and she was just protecting her six. Once the racks were in place, I continued on with more of the roof beams. Another small project that I completed were the interior hawse pipes. This was another detail that there is very little info on, and one that I added because I wasn't real sure where the anchor chain was stored. We do know that these boats had anchors because there is part of one that was destroyed when Cairo was torpedoed in the museum and there are hawse pipes mounted in the forward casemates. So I went with logic, and the limited knowledge that I have about anchor stowage and decided that if the capstan was used to haul the anchor, then the chain would have to be stored somewhere. So I figured that once they hauled the anchor in, the chain would be directed to the hold to keep it out of the way of the limited deck space available and free up space for the gun crews to move around without tripping over it. In my mind it all makes sense, and I couldn't find any info that would disprove my theory. So I ran with it. To continue with my thoughts on this, I figured the operation would work somewhat like this: the anchors would be weighed pretty much like any normal anchor. It would be pushed overboard and the chain let out until it hit bottom. The Western rivers were not known for their massive depths, and this was before they started dredging the river channels, so it most likely didn't require a lot of chain before the anchors settled into the mud. Once the crew was ready to get underway, heavy ropes with hooks were attached to the chain either at the bow, or just inside the forward casemate, the ropes were then wrapped around the capstan and the anchor hauled up. As the chain was coming up, the crew would direct it down the interior hawsers to it's storage locker until it was needed again. I may be way off base on this operation, but it sure sounds good on paper. If anyone has a better thought on this or actually knows how this was done, please share. The curiosity is killing me, and the info on this is very limited. So here are the holes drilled in the deck for the hawse pipes. and the hawse pipes installed. Next was the installation of the hog chain braces. Not a great bit of detail here. More to come on these later. Then it was on to getting this baby armed. I took a different approach to installing the port and starboard gun carriages since they were a little easier to access. The port carriages were easier due to the viewport opening in the side, which gave me access to the eyebolts through the casemate. I placed all of the carriages in their respective gun ports and then rigged them without the guns attached. Without the guns in the way I was able to get to the eyebolts better. However, it still took about an hour per carriage to rig up. After the rigging was completed, I went ahead and mounted the lower port doors. I wanted to get an Idea of what they were going to look like and how much the white interior paint was going to contrast with the black outer paint. It does stand out, but I think it looks alright. I studied the old pictures of the other City Class boats, but it is hard to tell in a black and white photo if these doors were painted white on the inside or if it is the sun reflecting off the black paint. In some instances, some of the boats look like the doors were painted black on the inside at one point. All lower port doors installed. I am going to hold off on installing the cannons and top doors for as long as I can. I don't want to risk snagging them and having to redo them while I work on the other features. I completed the rigging on all of the port carriages and moved over to the starboard side. This is where I am currently at so that will do it for this update. I am going to finish up on the rigging for the starboard carriages and get the lower port doors installed then work on installing and rigging the forward guns. Once these are completed I will install some gun deck details like the cannon ball crates, barrels and crew lockers. Until next time, thank you all for stopping by, liking and the kind comments. Please stay safe and healthy. -Brian


- 739 replies
-
- 19
-
-

-

-
You guys are good. I love and welcome the small talk. I find all these stories interesting and fascinating. Good to hear personal histories of fellow builders. -Brian
-
Roger, Quite the career you had there. Thank you for sharing and thank you for your service in the Navy. I am prior Air Force, but for some odd reason I have always had more interest in ships than planes. Never been able to figure that one out. 🤷♂️ -Brian
-
Roger, Interesting story about the Monitors. I love these little known tidbits of history. I appreciate the clarification on the “piping” definition. Out of curiosity, we’re you a pipe fitter by trade? In my younger days I worked as a loss prevention officer at a department store that underwent major renovation while I was there. During that time I was assigned to escort the pipe fitters who were replacing the buildings cooling system (towers and chillers). That’s a job that that requires some great skills in measuring and welding. Being in my late teens then I was in awe of the preciseness of their work. -Brian
-
Eric, Funny with all of today’s technology and precise laser cutting CNC machines that there can be such a significant difference with the frame widths from one model to the next. One would think that they would all come out exactly the same each time. Well maybe in a perfect world. Toni had a lot of great information on her presentation this morning and your comment above was, in my opinion, one of the most valued. Fix your errors as soon as you can before it gets too late. Sound advice! I look back on some of my earlier builds and think of how much I have learned over the years and that I can’t believe I built something that way and left it. All learning opportunities and growth as a model builder. Great job on getting the frames fared up. This is one of the parts of a build that I dread the most since getting the hull shaped correctly is critical in the overall appearance. It’s amazing at how much just a millimeter out of whack can affect everything. -Brian
-
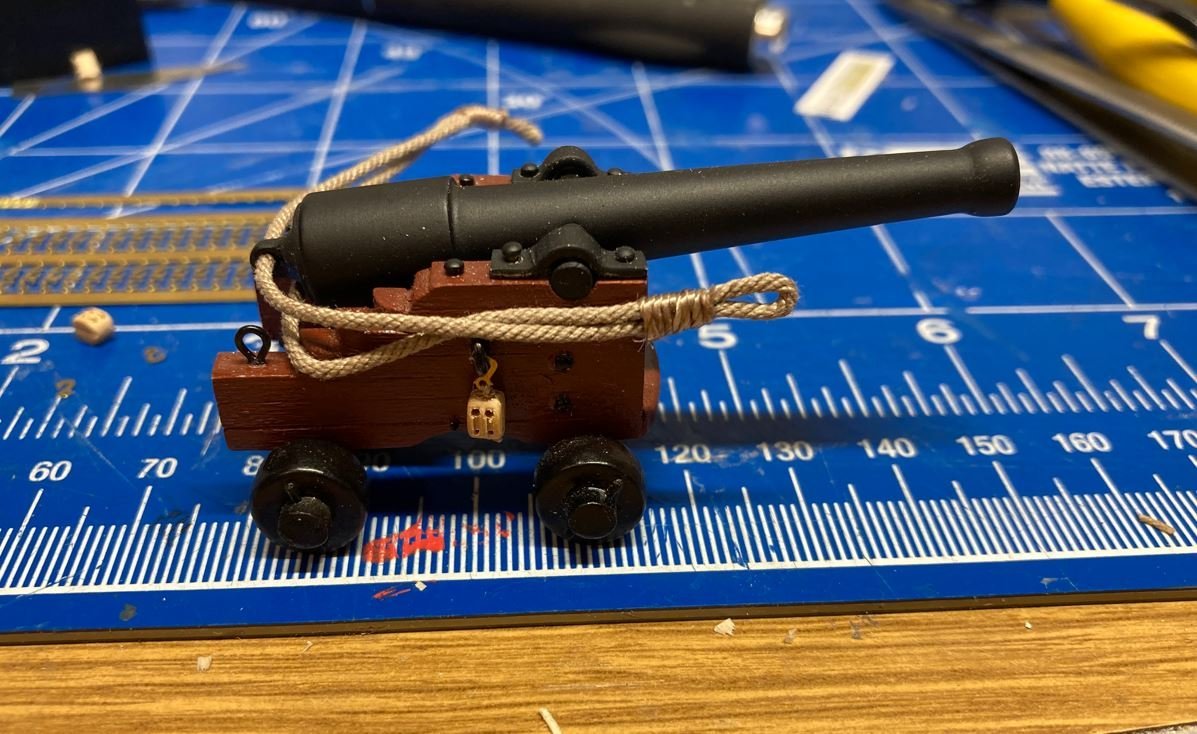
Lewes 5, Thank you for the question. I used .045 (1.14mm) rope from Syren Ship Model Company. Chuck has some fantastic and great quality products for model shipbuilder on his site. -Brian
-
Mark, I believe that the USS Tennessee and the USS Atlanta both had the armored gun ports. Ironically, both of these ships were captured CSS ships, which poses the question, did the Southern shipbuilders come up with the idea for the armored ports or did the Northern shipbuilders? I do know that the City Class gunboats port doors did little more than shed some of the rain water out of the gun deck. The timbers they were constructed from were only about 2" thick and would provide minimal protection from musket fire and zero defense against a cannon ball. You also have a good point on maneuvering the guns around. The smaller ones wouldn't be as much of an issue as the larger ones. However, Cairo's guns ranged from 3550 lbs. on the Parrots to 8465 lbs. on the 42 pounders. That still a lot of iron and wood to be moving around in such tight quarters, especially with only six men per gun. Also, thank you for clarifying the "Training Tackle" term for the running rig on the cannons. My nautical terminology glossary is a tad bit limited. -Brian
-
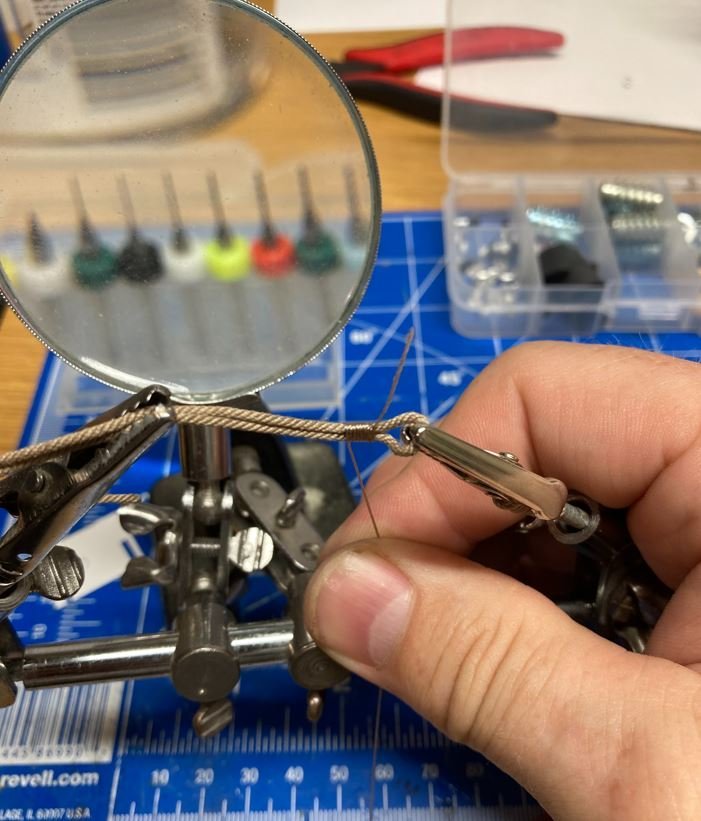
Don, Pat, Steven, Gary & Eric, Thank you so much for the kind comments. I appreciate your continued support. Mark, Thanks for the kind comment and not to worry about asking about the breech ropes, this is an interesting question which could possibly use some more discussion. While they do look like they are somewhat short, I based my rig on some of the research pictures that I found on how the 19th century naval guns were rigged. Most of the ones that I found show breech ropes that look like they barely allow for clearance to reload after recoil, most of these navy ships had almost vertical gun ports. Since the gun ports on these Iron Clads were sloped at 35° angles (port and starboard sides) & 45° angles (fore and aft sides), I would guess that this drastically reduced the amount of clearance for reloading. I'm wondering if the breach ropes were just used to keep the guns from recoiling too far back given the limited space on the gun deck and were only used to keep most of the strain off the smaller ropes and blocks of the running rigging and the running rig was used to run the guns in and out for reloading. Many of the examples I used show fairly short breech ropes. One of the examples that I used can be found here at this link. This was a drawing that I had found a while back and Eric posted the link in a previous post. It is a beautiful break down of the Cairo showing the artists interpretation of what she may have looked like on the interior as well as a breakdown of her guns. Now I do have to admit that I did reverse the eyebolts for the running rig and the breech ropes since with the sloped sides it made it impossible for me to install the keeper pins for the breech rope anchors, so they had to be placed through the gun ports. A minor deviation that hopefully will not be noticed too terribly much. I am also not 100% sure that I did get the lengths right due to my interpretation, this was just my best guess. However you have got me to thinking more and more about it and I may need to go back and revisit some of my research. 😁 -Brian
-
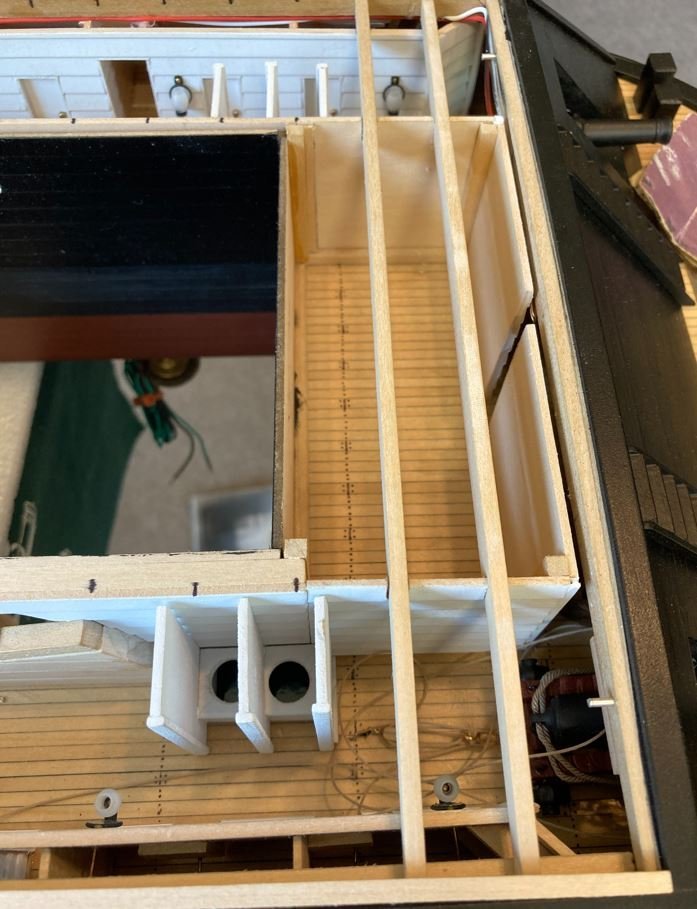
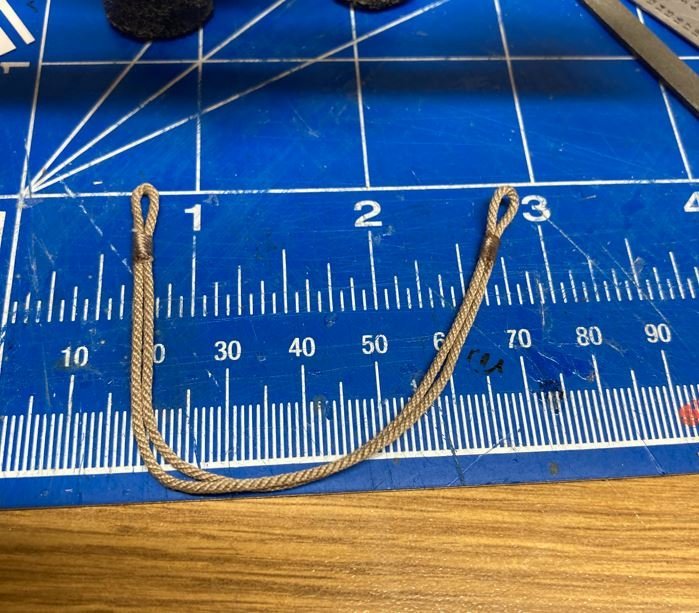
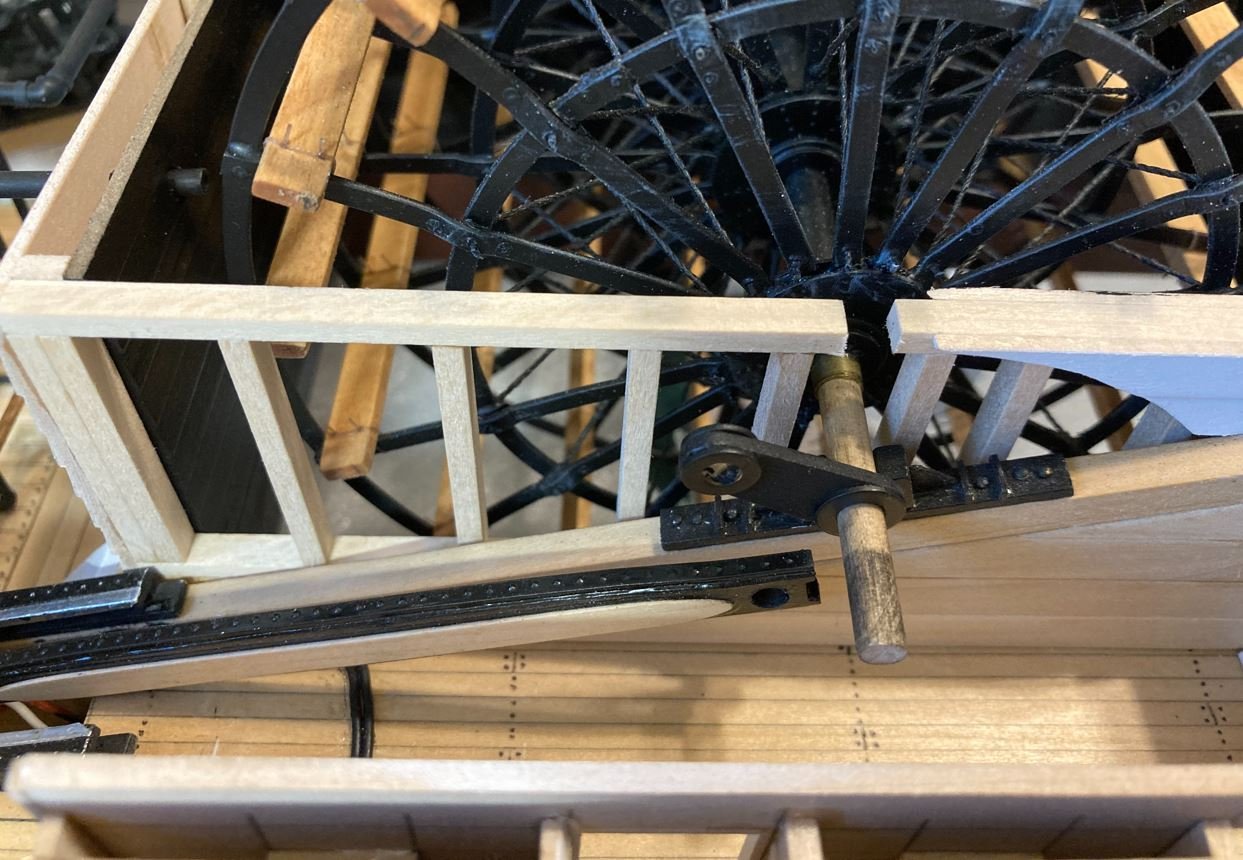
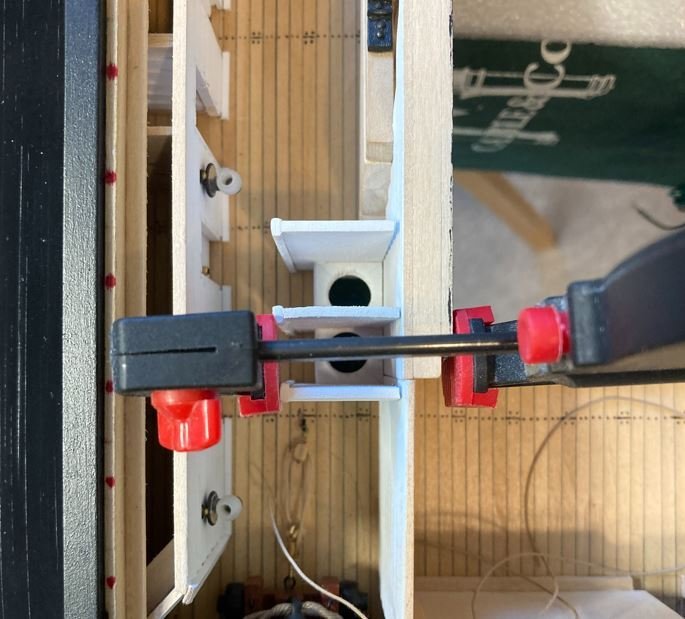
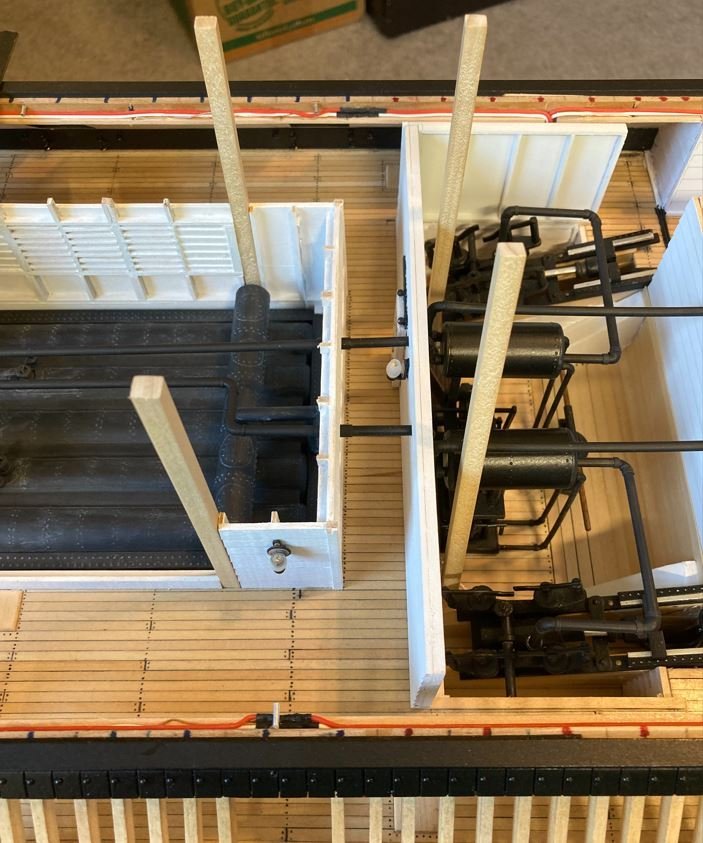
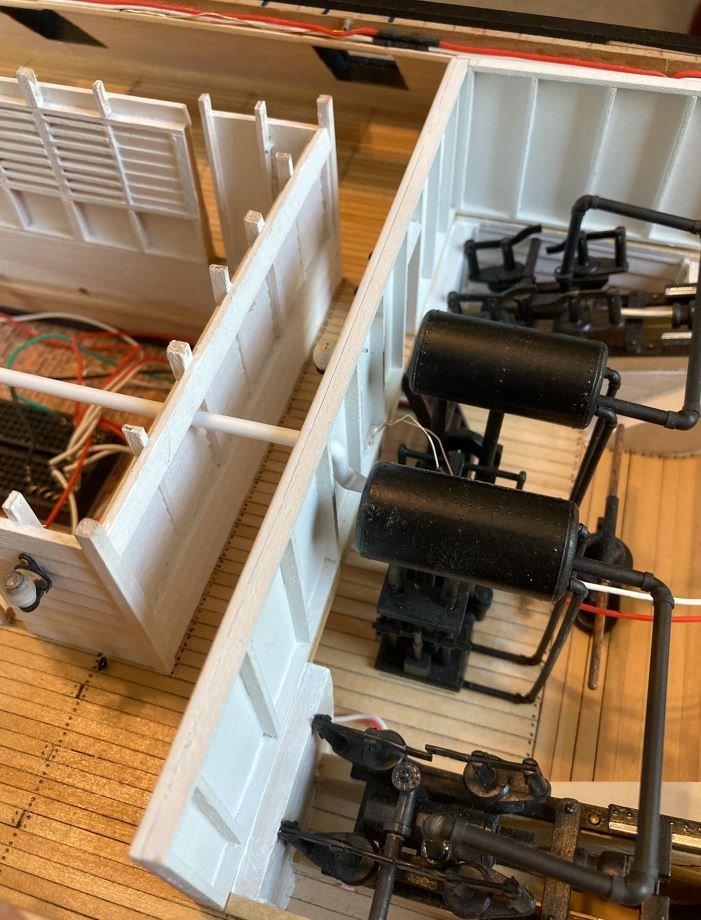
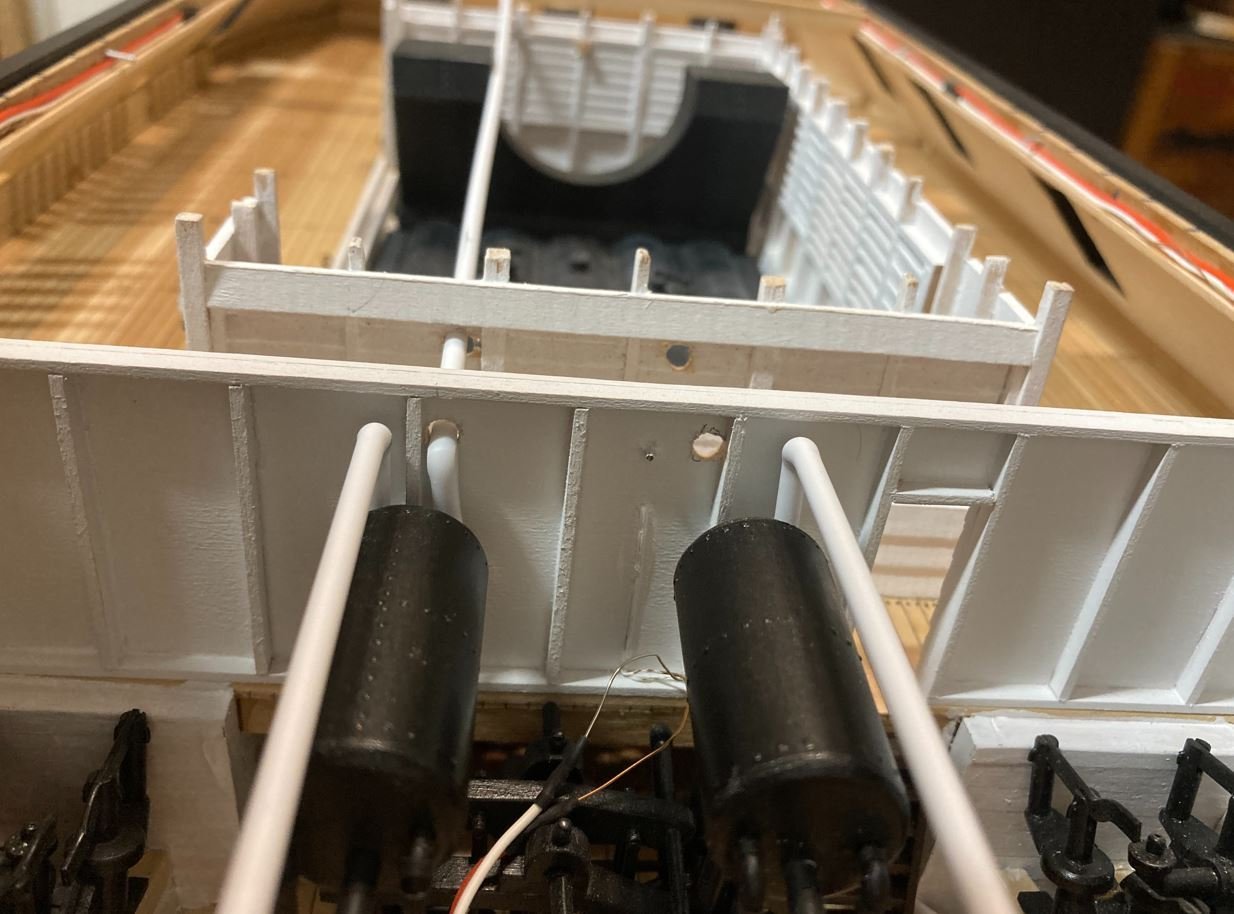
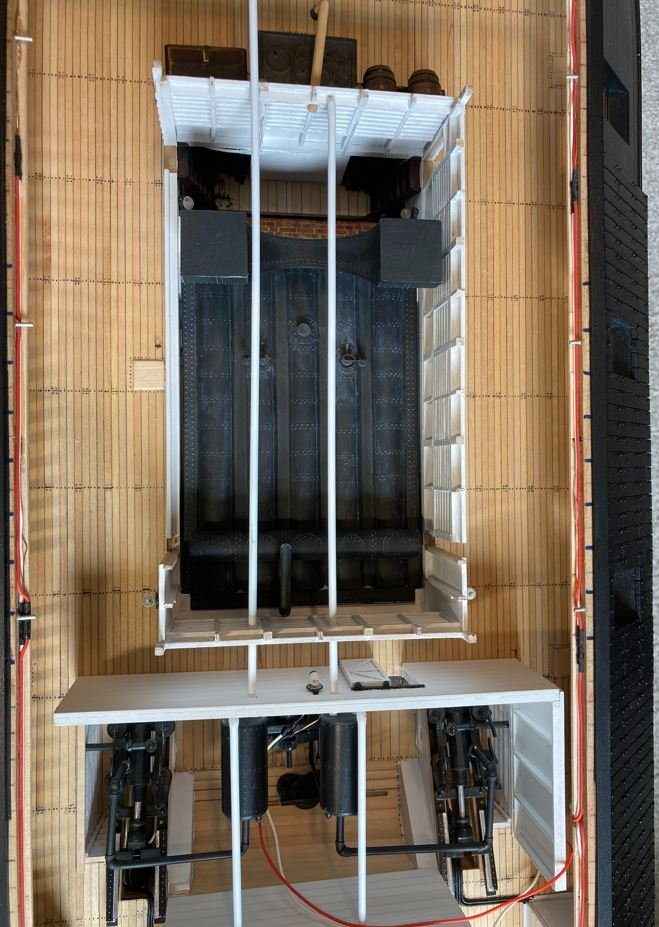
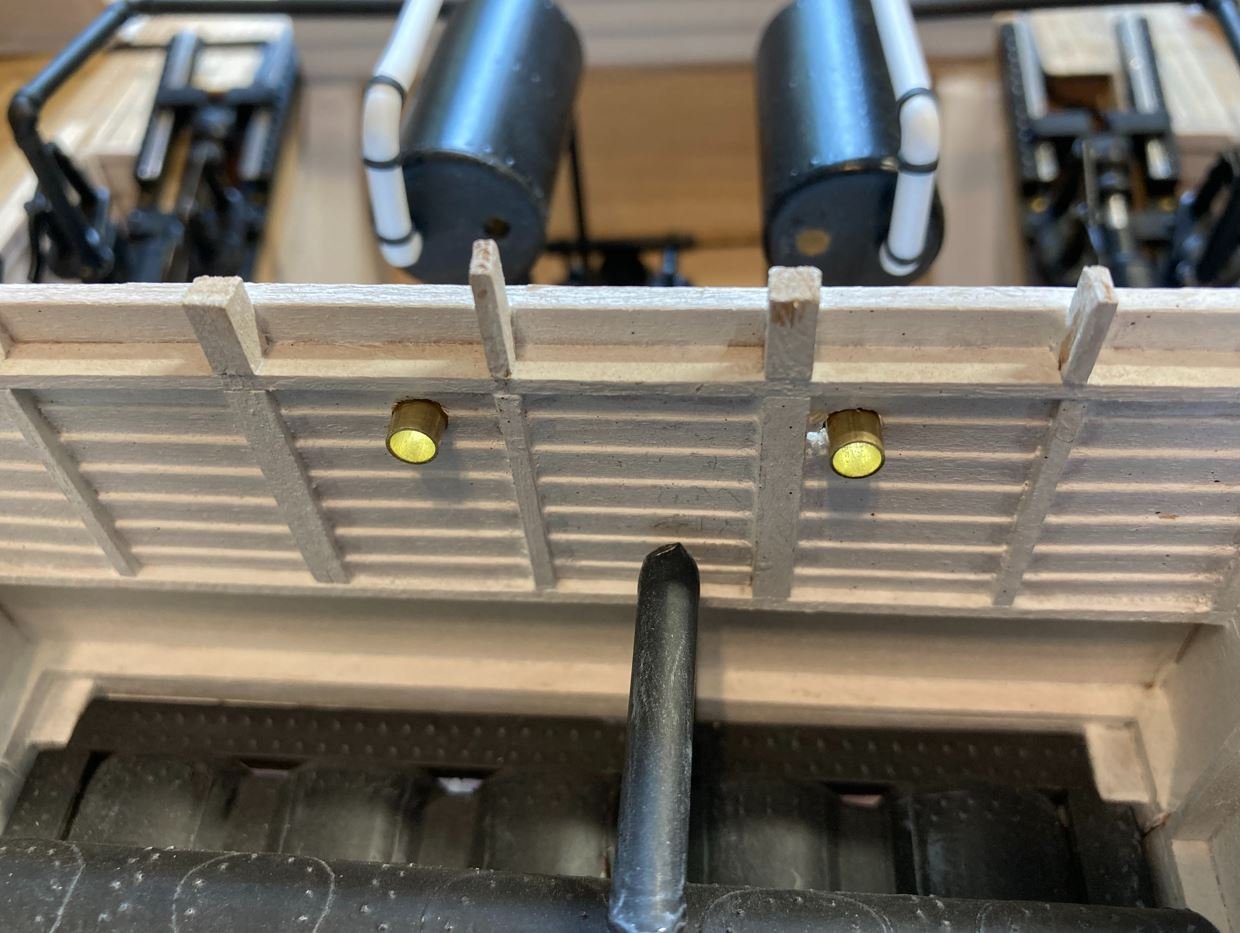
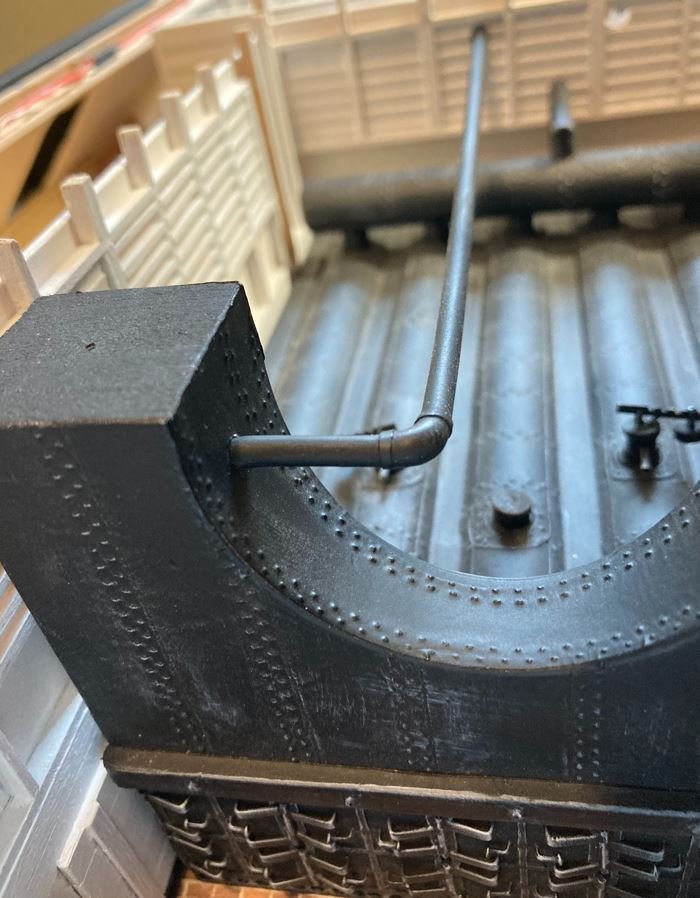
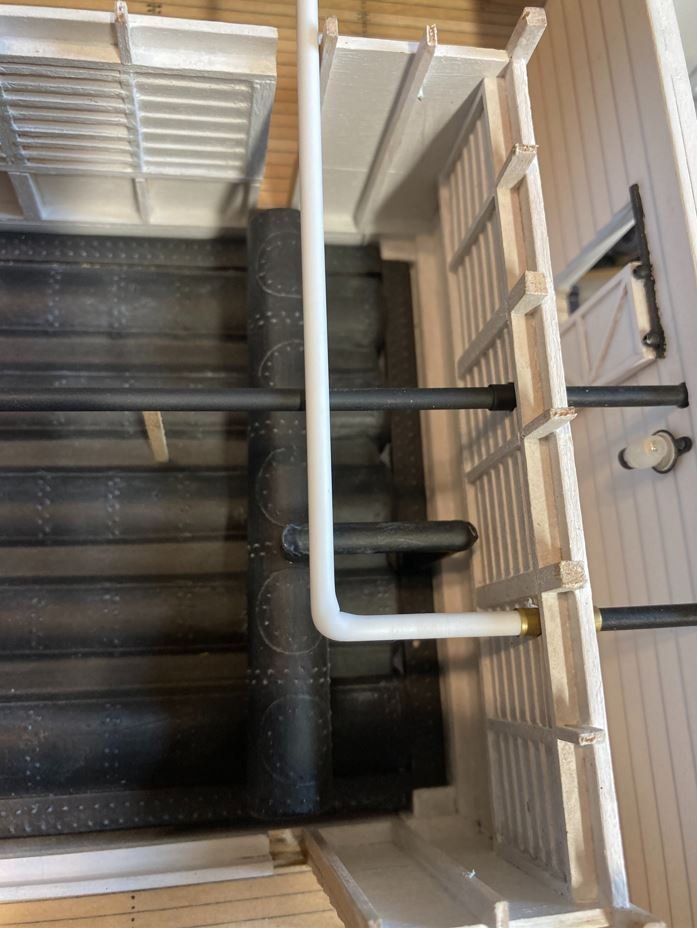
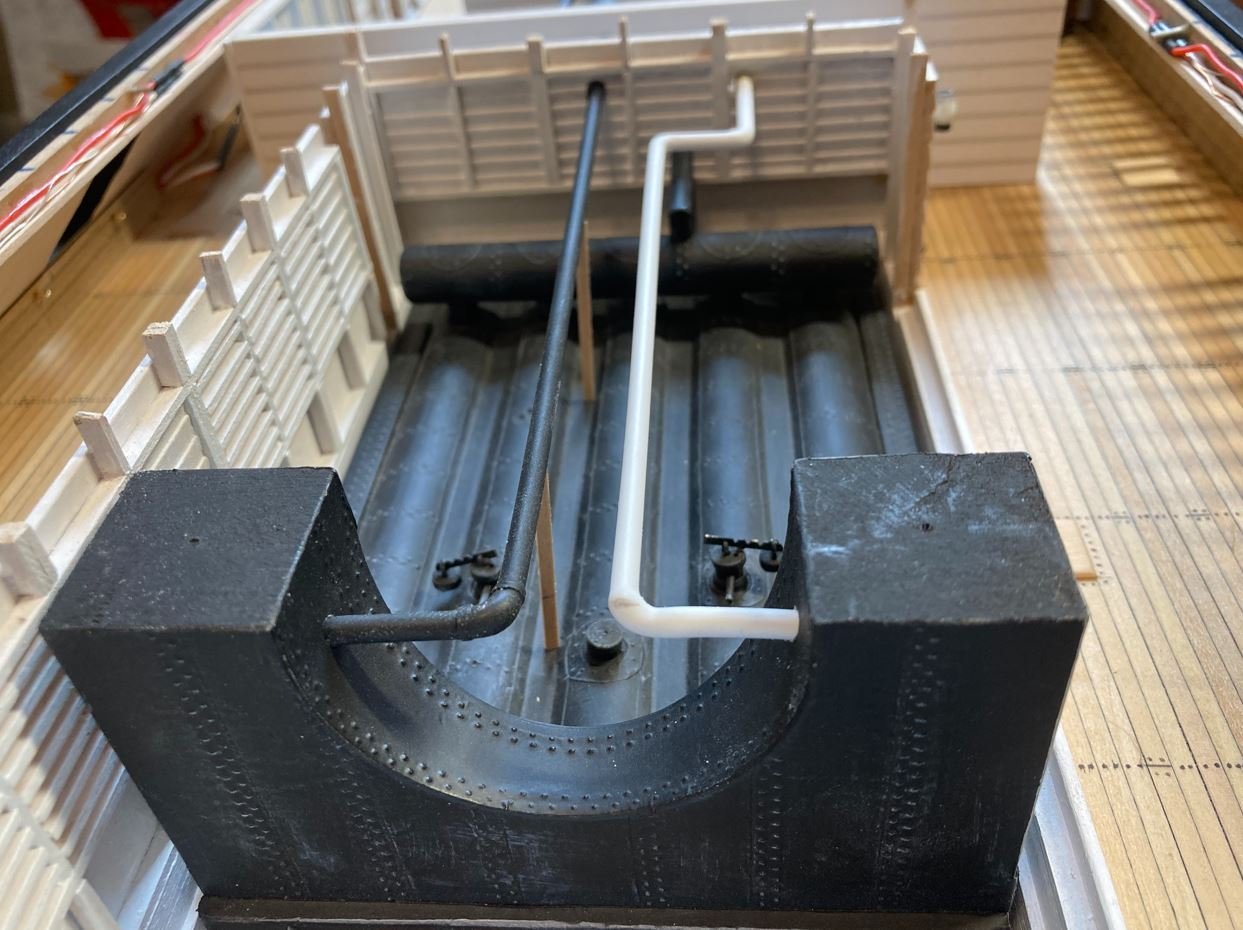
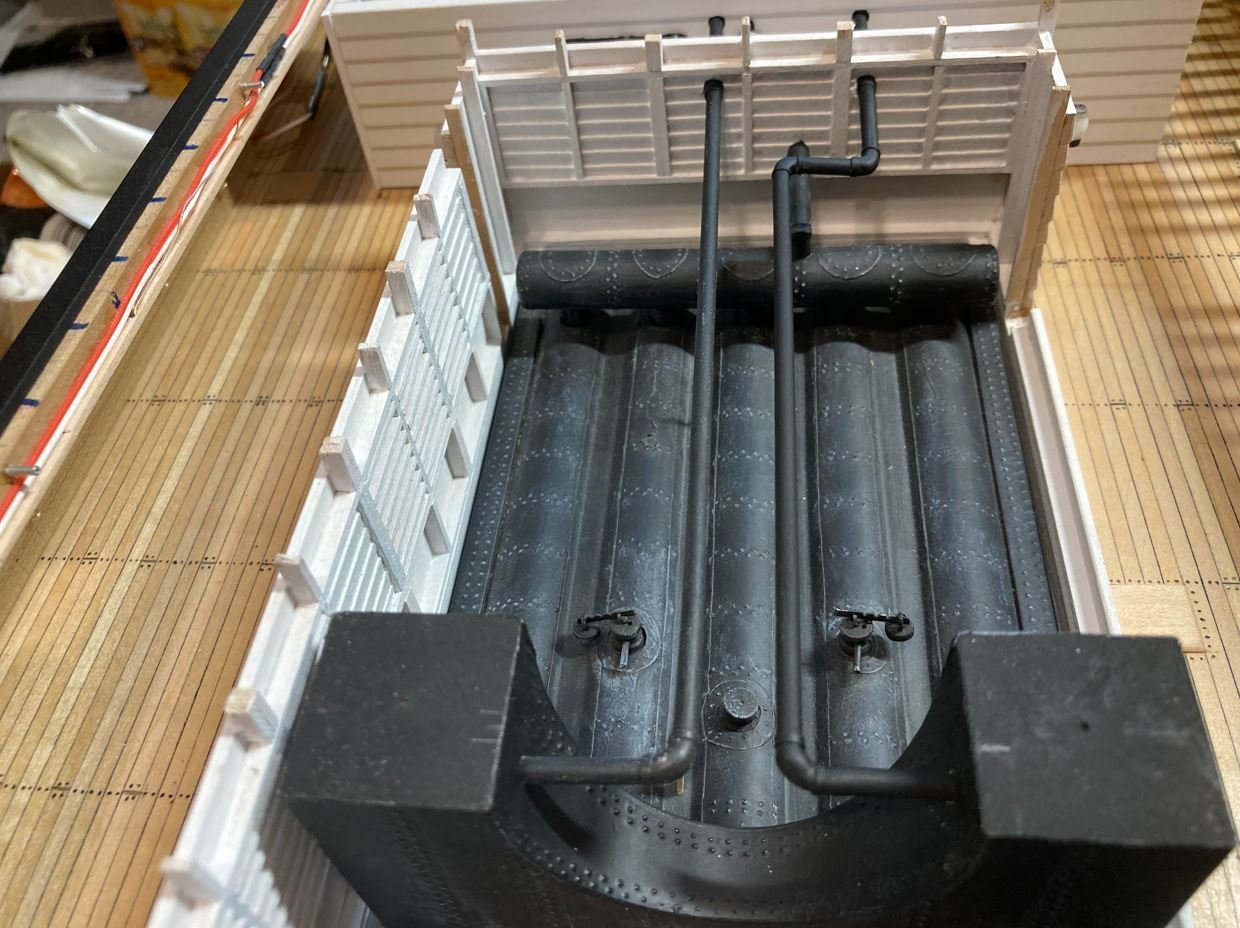
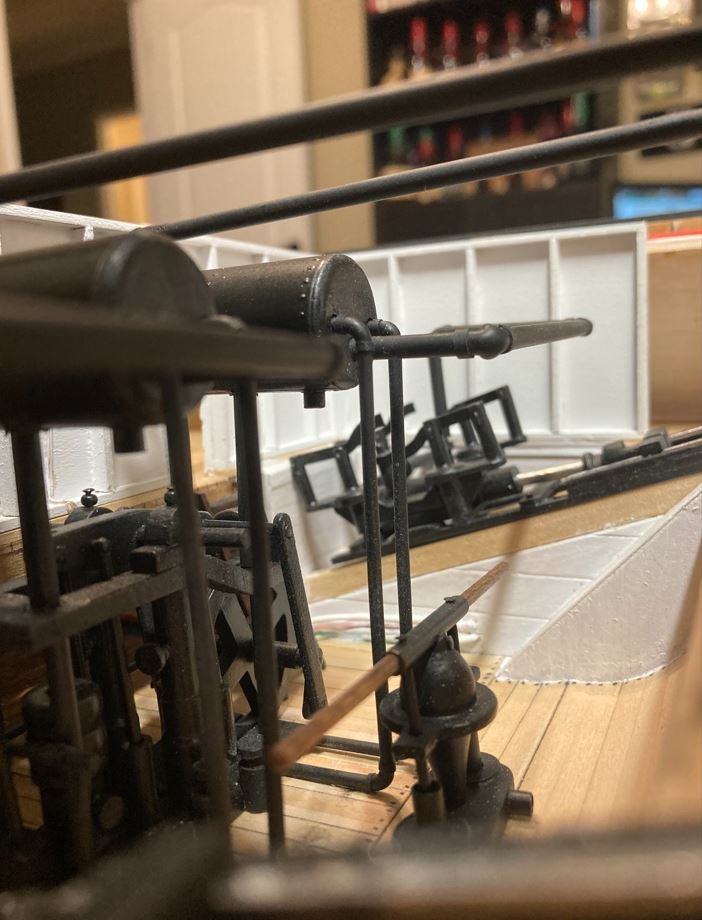
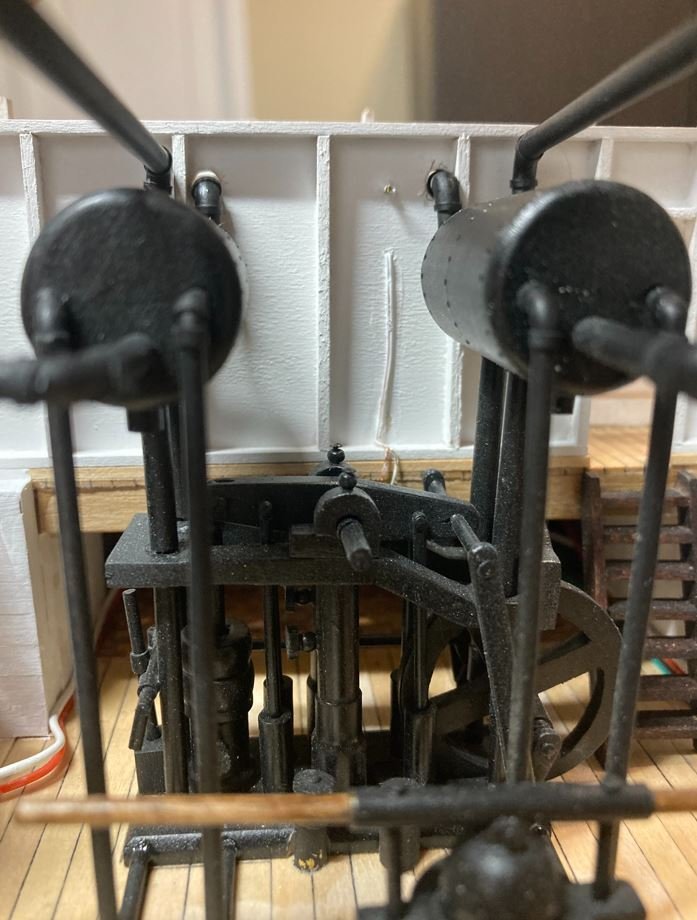
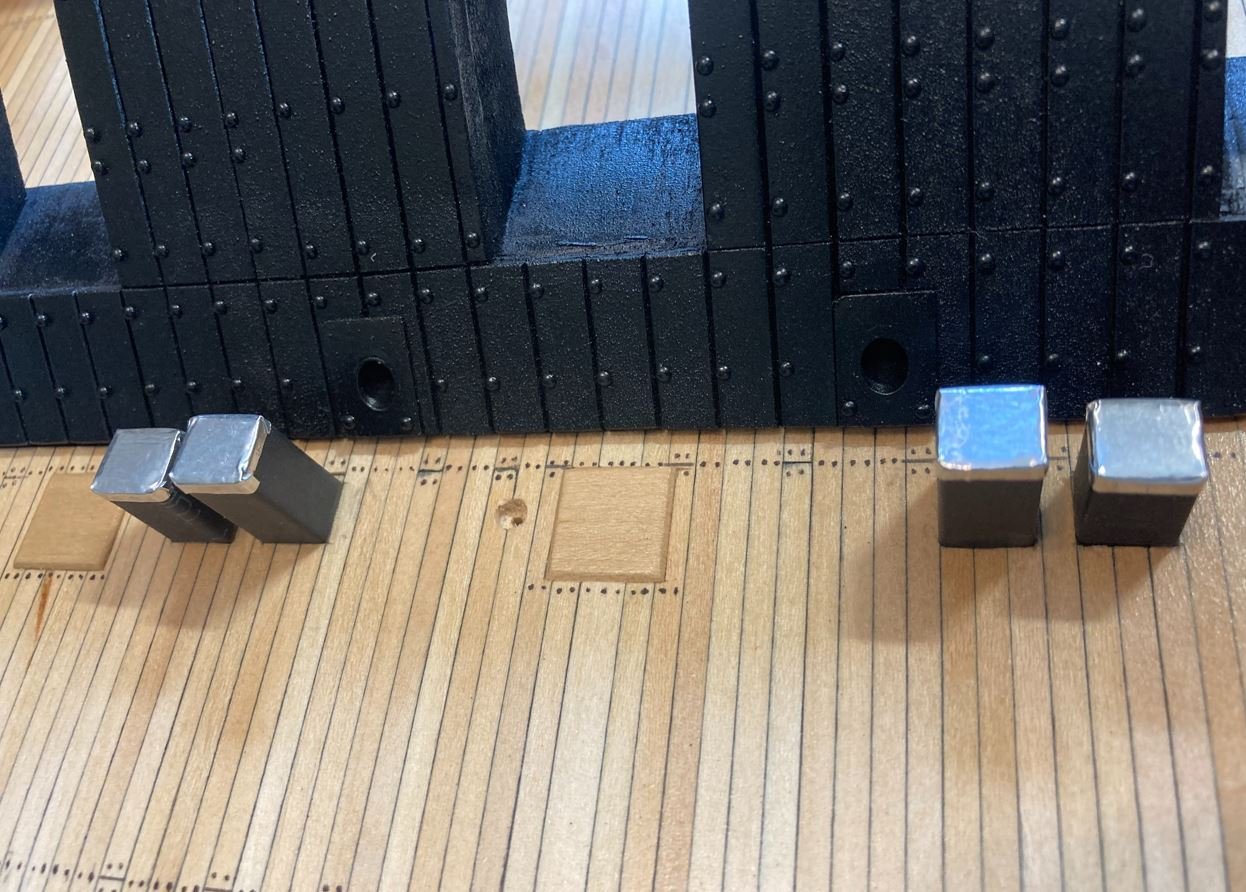
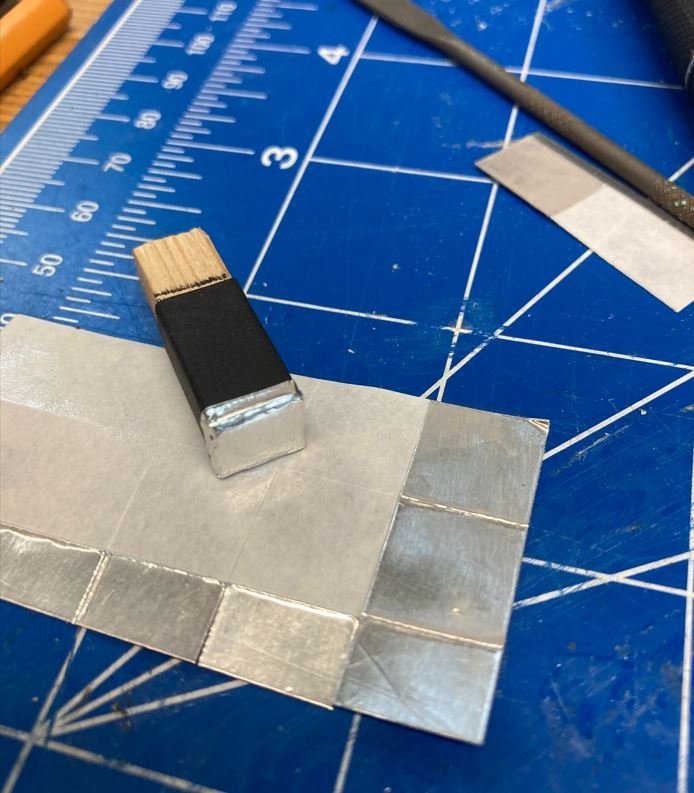
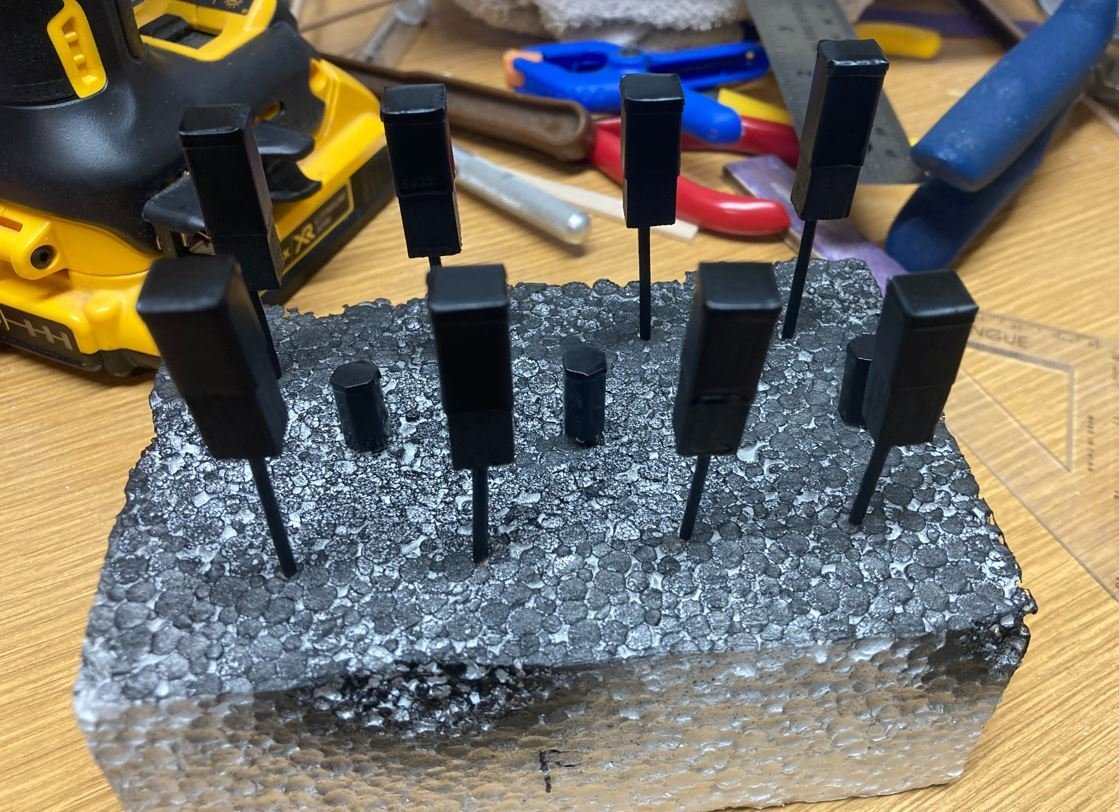
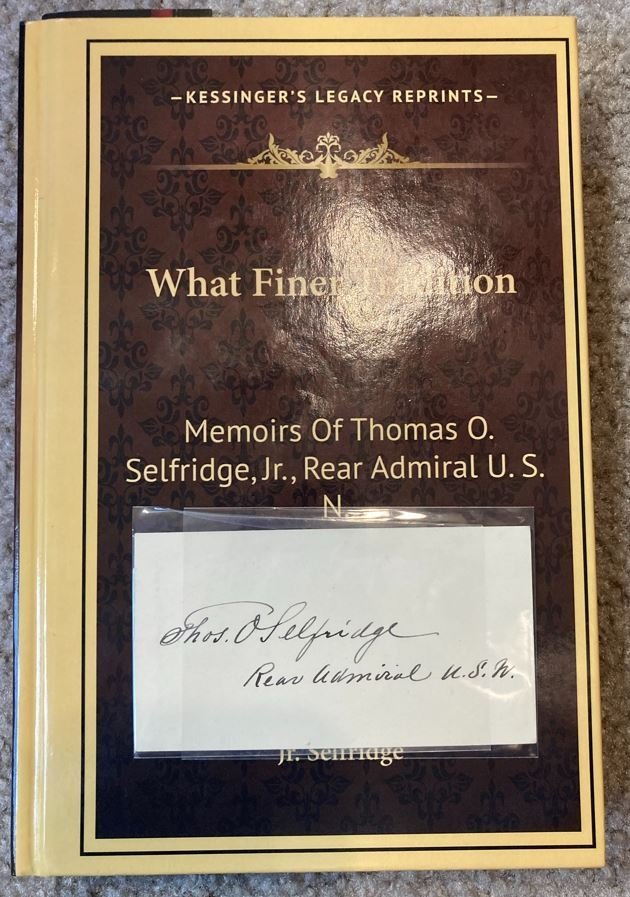
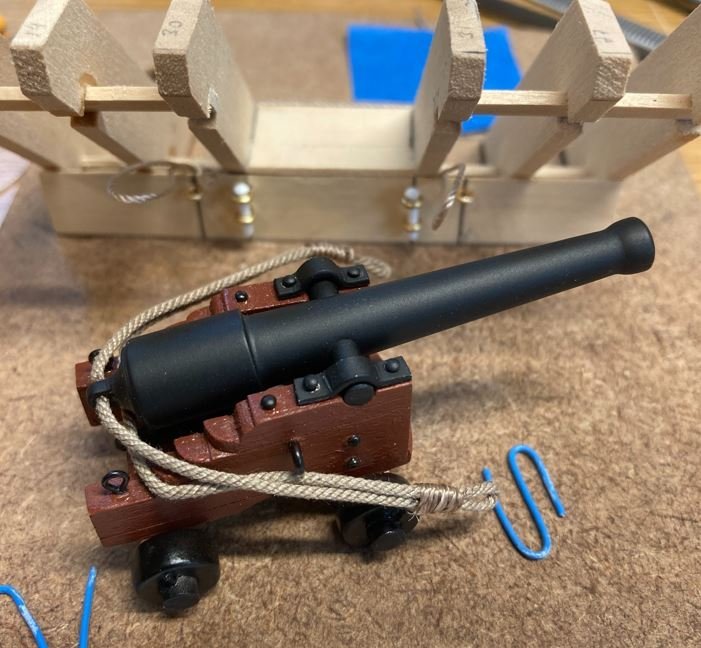
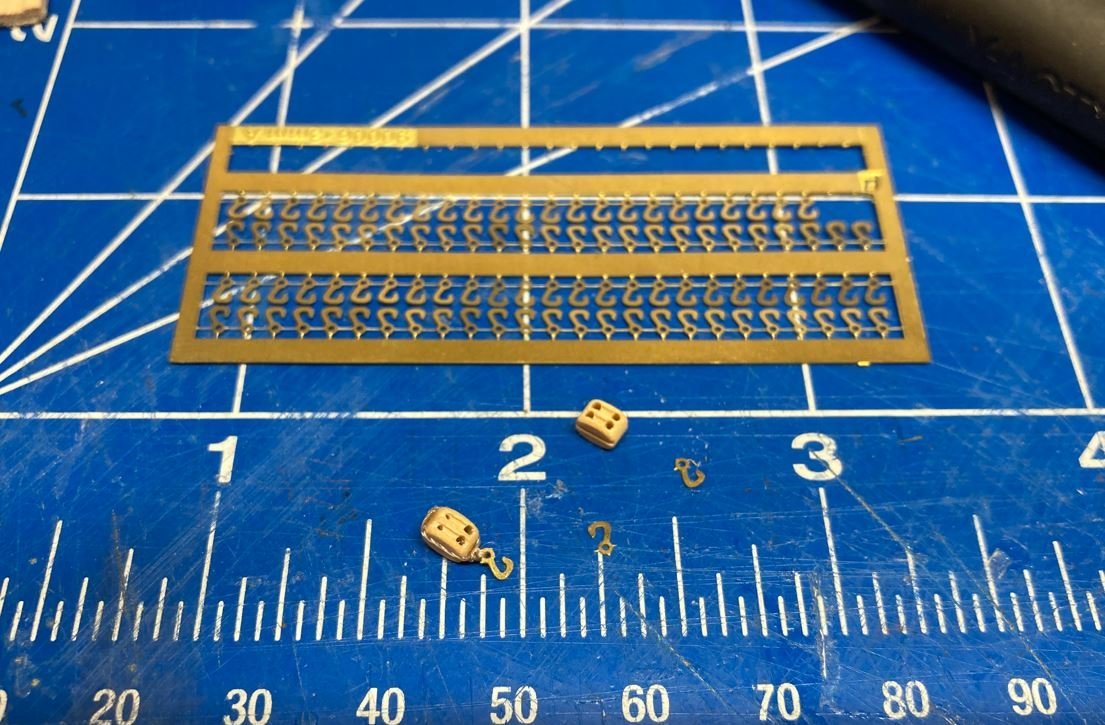
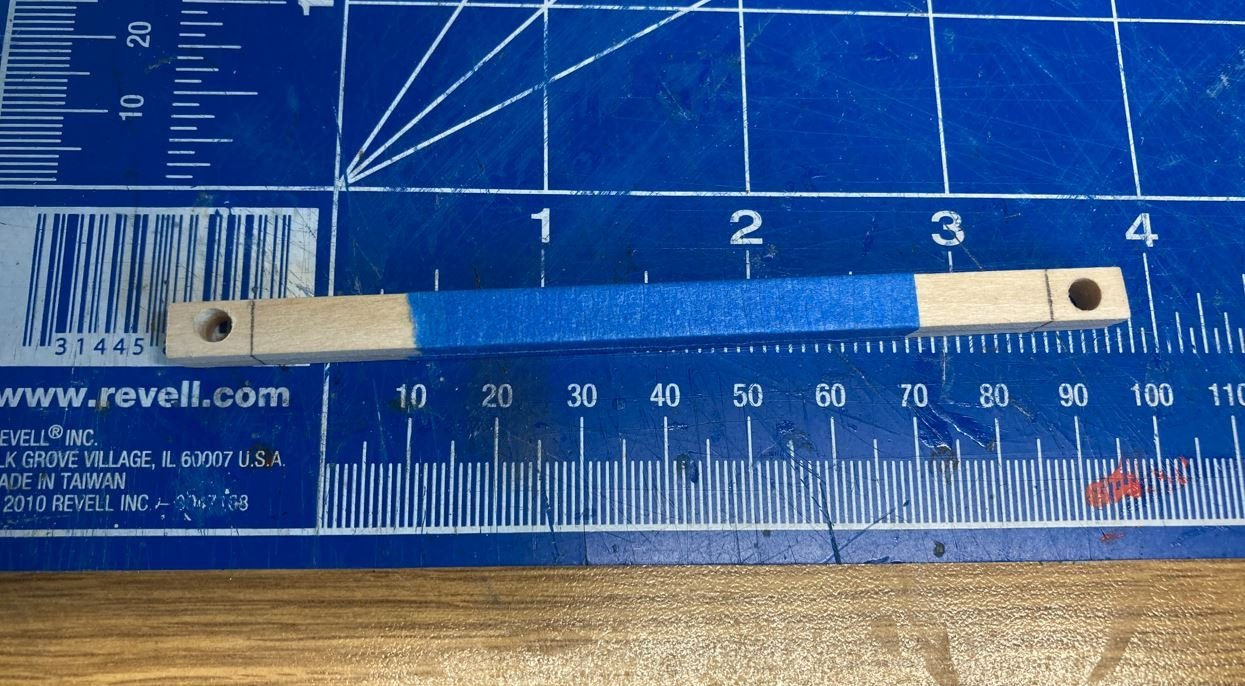
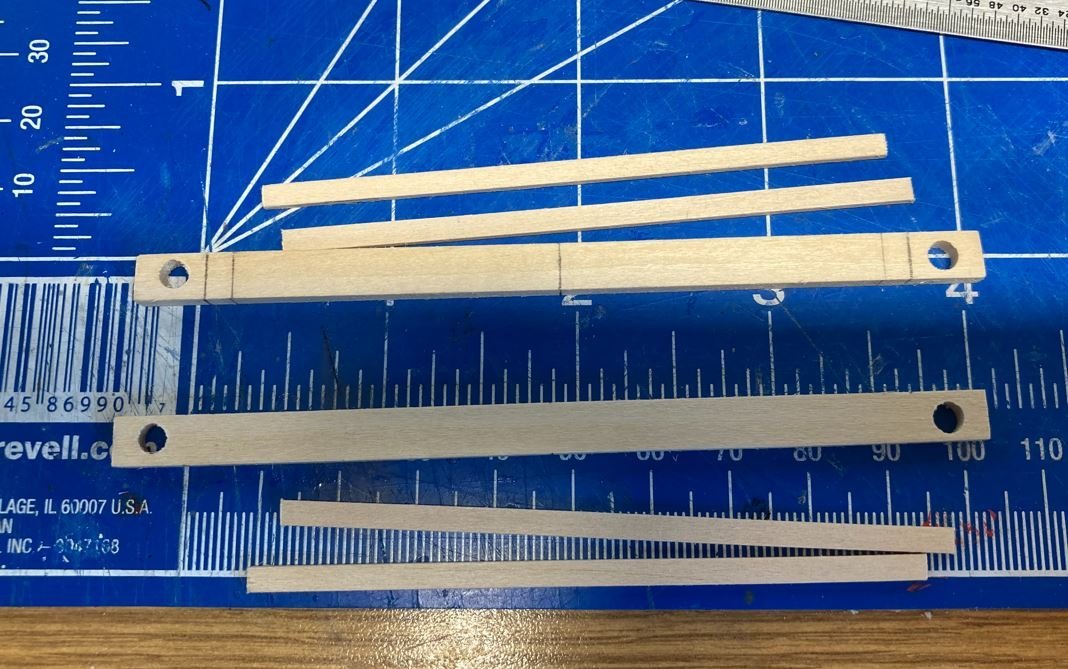
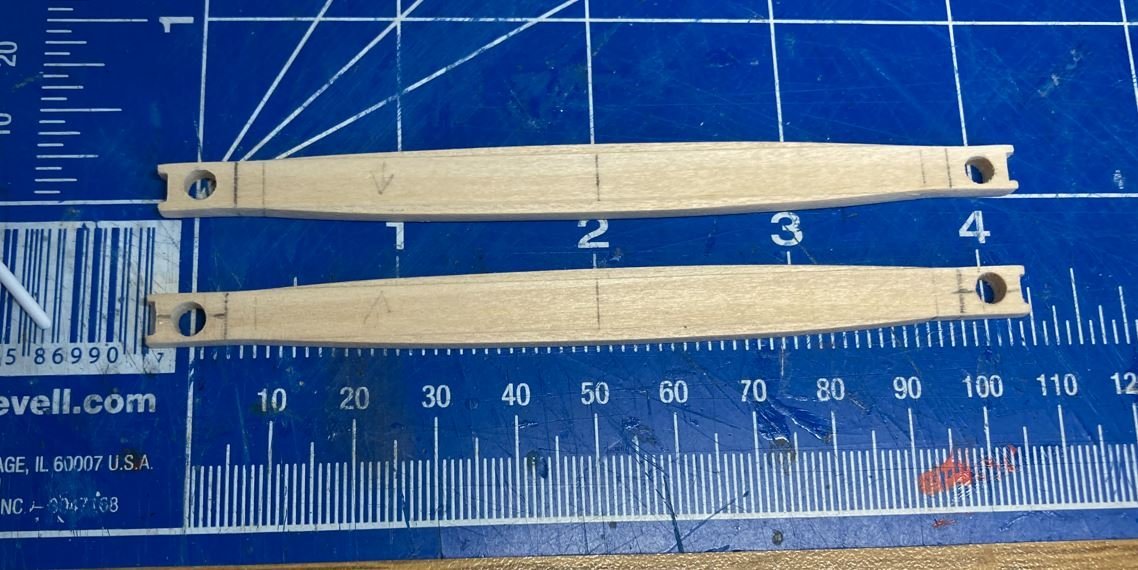
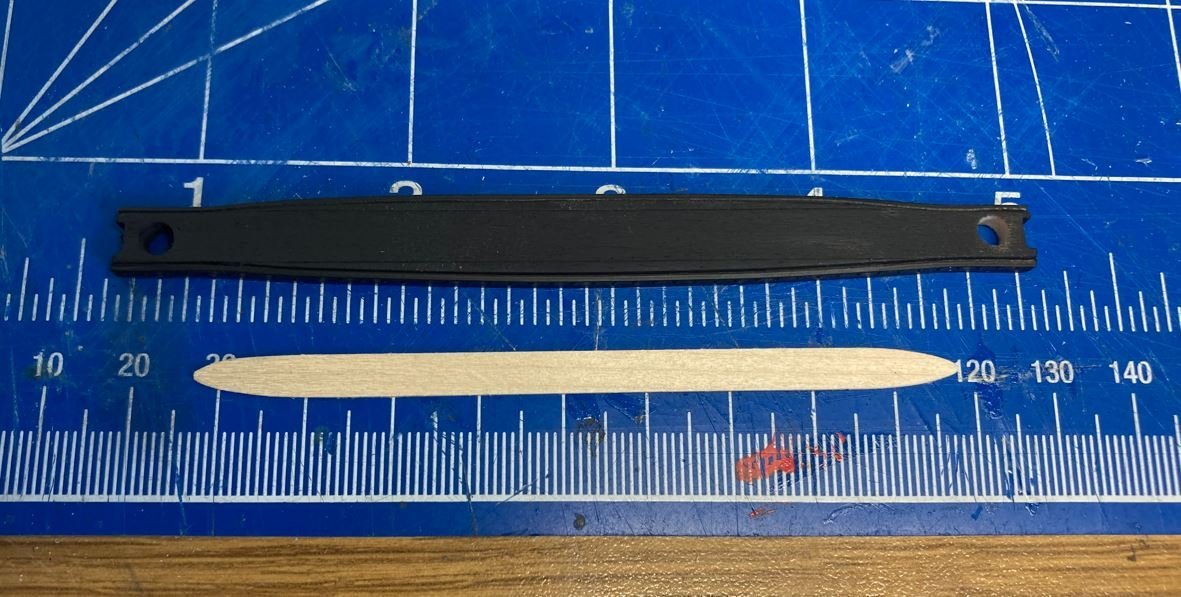
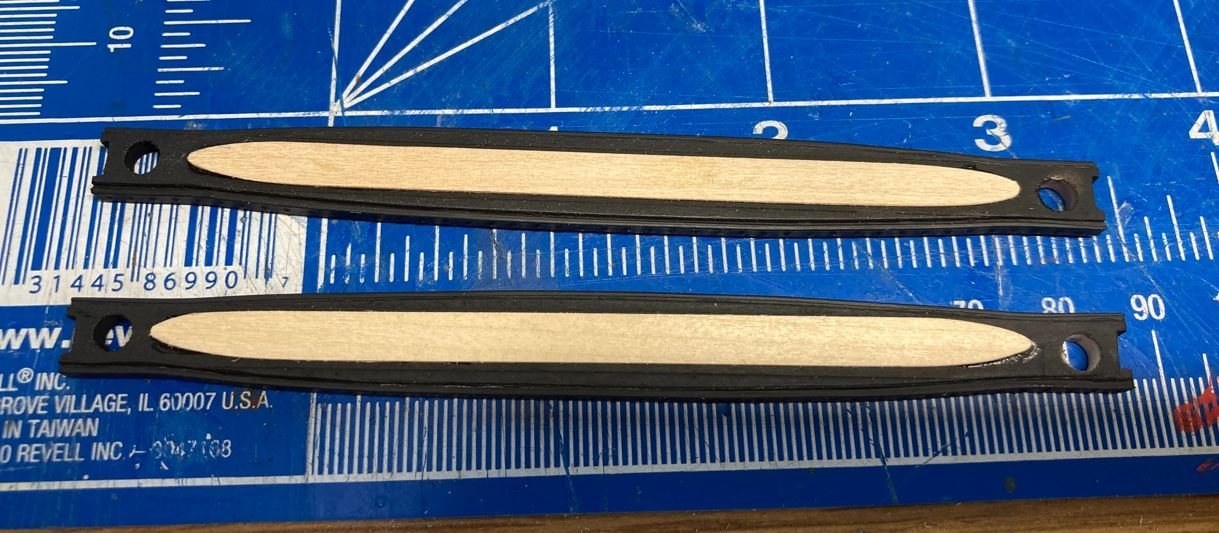
Hello again everyone, Back with another update, this time with more to report. Before I start though, I wanted to show a couple of acquisitions I recently purchased. First is a little reading material I found "What Finer Tradition: The Memoirs of Thomas O. Selfridge, Jr., Rear Admiral U.S.N". Thomas Selfridge Jr. was Captain of the Cairo at the time of her sinking. Along with the book I have an autograph of Rear Admiral Thomas O. Selfridge Jr. himself. A big thank you Keith Black for sending me the info for the autograph, this will make a nice addition to incorporate into the display when I am finished. Now on to my accomplishments since the last update. First up was work on more of the steam plumbing. Before I was able to complete the plumbing, there were a couple of things that needed to be done first. Since the some of the steam exhaust plumbing is attached to the smokestacks I was going to have to install the boiler. But before I could do that I had to verify all the wiring was good and the lights worked since the wiring was all under the boiler assembly. Testing out the lighting. ...and everything seems to work. And yes the pictures are a little out of order, since I forgot to take the pictures of the lighting before the plumbing was done. So starting the plumbing, I needed the four exhaust pipes, two of which ran from each of the pre-heaters to the smokestacks and out into the wheel house. This part was one of those projects where I felt like I painted myself into a corner, since there were several walls that needed to be in place before running the pipes, and also needed to be in place to line up the holes. For the piping, I again used styrene rods. This material is so easy to work with and coupled with the heat shrink rings, gives the perfect illusion of pipefittings. Rearward exhaust pipes. Forward running pipes going in. I worked out a solution to be able to run the plumbing through the bulkheads without having to build all of the interior walls. I used a couple of short pieces of brass tubing to form a coupling between the boiler room bulkhead and the engine room bulkhead. This allowed me to insert one short piece from the pre-heaters to the couplers and the longer piece can go the length of the boilers to the smokestacks. The coupler also functions as a heat shield against the timber walls. Since none of this plumbing survived the recovery, this was another build that I used my best judgment on and some builders liberties. I used the drawings that the guys building the St. Louis used as my design (I didn't post that picture here since the picture belongs to their build log but if you would like to take look at it it, the drawing can be found at the following link, post #21). Before the couplers were added. I wasn't able to make the multiple bends in the styrene rods and get everything lined up properly. Couplers added. All painted and in place. Next up was finishing up on the bollards. These have been in place for a while, but it was time to get them finished up and painted. I used some of the aluminum foil tape to make caps for the timbers to prevent them from prematurely rotting from water penetrating the exposed end grain. First cap in place. All timbers capped. Painted up. As of this posting, I realized that I didn't take a picture of the finished bollards in place. I'll see if I can remember to take some and post them in the next update. Next up was the placement of the inside gunwales (I'm guessing that is the proper term for them on this type of boat) along with the eyebolts for the cannon rigging. Waterways added to the bottom. Port and Starboard sides in place, painted and varnished. Next on the list was the construction of the Pittman arms. Very little of these will be seen, but I wanted to put some detail in them without going overboard. Finally for this update, was the rigging of the first cannon. I started with the aft cannons, the 30 pound Parrot Rifle and 32 pound Smooth Bore due to their placement and accessibility. These need to be installed before I can complete the Captains quarters due to the confined space available. As it is, these were a royal pain to get the outboard rigging in place. The first cannon I completed was the 30 pound Parrot Rifle. I started the rigging in my casemate mockup to get the correct lengths on the ropes. Breech ropes in place. Ends seized. Photoetched hooks for the blocks and running rigging. Forward assist ropes in place. Now the fun part, placing them in their ports. Rear assist rigging in place. One final picture, I am not sure what happened here, but I can promise you the cannon is not bent. I guess it is all in the lighting, but I just wanted to get a view of the cannon in it's port. If I may, I have to give plug to Chuck over at Syren Ship Model Company for the outstanding quality ropes, hooks and blocks I used for the cannon rigging. He doesn't fool around on getting them shipped to you either. From ordering to my mailbox was about three days. Thanks Chuck! That is all I have for now. I am going to finish up on the 32 pound smooth bore, more of the internal walls, and the crank arms for the next update. Thank you all for stopping by and the kind comments and likes. Until next time, please stay safe and well. -Brian


- 739 replies
-
- 23
-
-
-
….and away you go. Looking forward to another wonderful and informative build from you Eric. Love the property, we are in the process of getting our property the way we want it as well. We’ve only been going at it for a little over four years and still have a long way to go, but just like model shipbuilding, it takes time and patience. -Brian
-
Thank you Gary. I’m liking the way it’s coming along and the paint definitely makes look more complete, even though I have a long ways to go. -Brian
-
Mark, After I posted the shots above and it dawned on me that quite possibly you were wanting a side view with the hull color and cutaway in the same view. If not, well here’s an extra picture. 😁 -Brian
-
Pat/MCB/wefalck/Eric, Thank you all for the valued input. I am definitely happy with the way the colors turned out. -Brian
-
Keith, Now there is a tempting purchase. I could incorporate Selfridge’s signature into the display somehow when I’m done. What a conversation piece that would make. Thanks for the link. -Brian
-
Mark, As requested, here are a few from Port and Starboard sides. I assumed you were wanting a clearer or overall picture of the cutaway, but I took pictures of both sides just in case. I very much appreciate the input. -Brian


- 739 replies
-
- 15
-
-
-
Vlad, Just catching up on the progress, and I must say you are moving along at a Clippers pace. Beautiful job on the bowsprit and the planking is coming along great! Nice to see the fine lines of these beautiful ships come together. -Brian
-
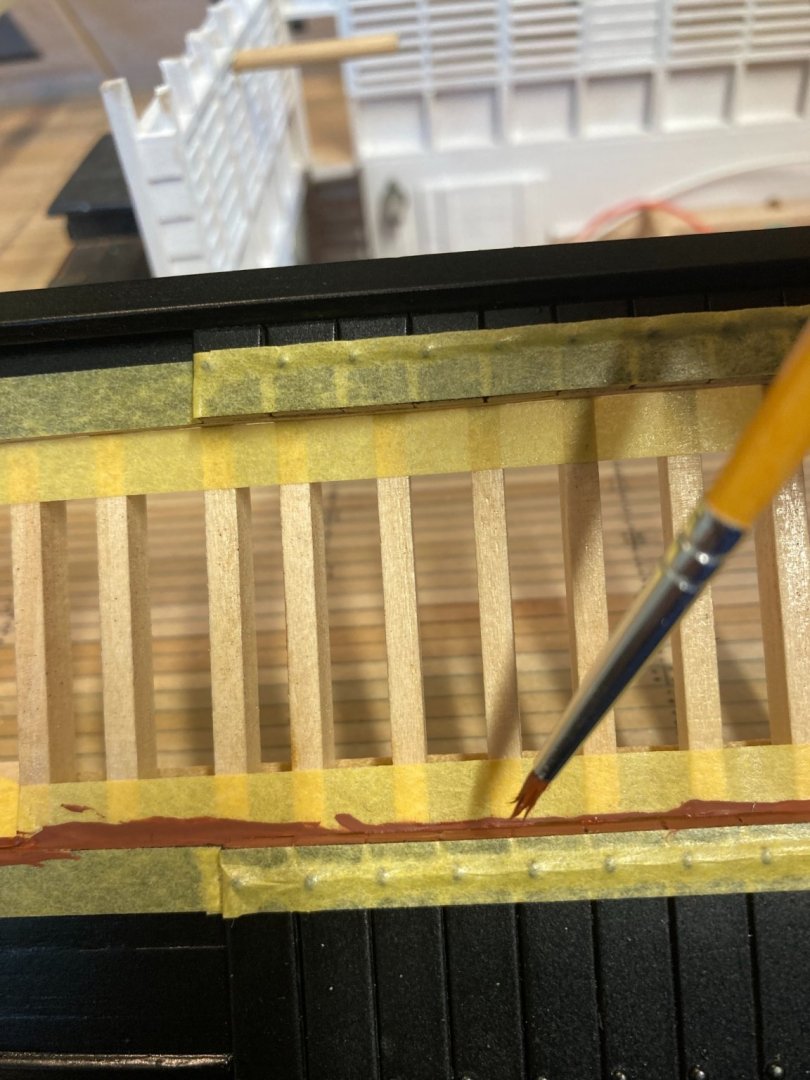
Hello everyone, Looking for an opinion here. I painted up the cutaway edge with the reddish-brown I used for the hull. I’m liking the color and think it provides a nice separation from the black paint and the natural wood color of the frames. I just thought I’d throw this out there to see what everyone else’s thought. Please feel free to chime in, I always welcome constructive criticism. -Brian

- 739 replies
-
- 18
-
-
Beautiful build Eric. As always it’s sad to see them end, but what a great journey it has been. Thank you so much for sharing your work and research with us. -Brian
-
Eric, Excellent job on the anchor. One of the things I enjoy most about your builds are that you make use of materials you have on your property. I try to incorporate something in each of my builds as well, albeit most of them are are small obscure pieces, like the woodpile on my Chaperon (which by the way I took your advice and entered in the contest as well). While I was in Kentucky last month I picked up a few barrel staves from one of the distilleries we visited and I plan on using some of that material on my Cairo. Haven’t quite decided yet on where, but it will be a nice French White Oak addition to the build (with the wonderful aroma of bourbon). Glad to see that you are on your way to completing this build soon. Can’t wait to see what you have in store for us next. I truly have enjoyed this one. -Brian
-
Eric, Thank you for the kind comments. I have actually been using that drawing in your link for a while now. If I remember correctly they have the same drawing at the Cairo Museum and this is where I got the template for building my crew quarters from. There is no documentation or photos of the actual crew bunks available but the HSR drawings show the toe-board outlines on them and this picture has the full structure, so with those two references, that Is what I based my build on. Now as to it's historical accuracy, that is an unknown, so once again I took my builders liberties and built it the way I wanted. As for the cannon rig in the drawing, it does look to be a standard Naval rig so in keeping with that theme, I am most likely going to rig them that way and as Keith suggested, let the viewer make the connection on how they were maneuvered out of the way during resupply. -Brian
-
Keith, I think you hit the nail on the head with this one. Hadn't really thought about letting the viewers imagination do the work. One option that I had considered was taking one of the cannons in the cutaway section and turning it sideways to show the access, but all I could think of was people asking why it was mounted that way then having to explain. I still may do this, but you are right, I may just go with a standard rig and leave it at that. -Brian
-
Bob, Thank you for stopping by. It's mostly when I look back on previous posts of mine that I see a lot more pictures in them than my last that makes it look like not a whole lot of work was done. In reality, the most time consuming work of my last post was masking everything off. The painting, as everyone knows, was a lot of hurry up and wait between coats. Without the wait time included, I had about 10 hours worth of work done. By my normal standards, that is not much over a weeks time. Plus given the fact that it has been a month since my last post, I really feel that progress has slowed down tremendously. But enough of my rambling, I am seriously thinking of using the reddish-brown color that I used for the hull to trim the cutaway in. It's a nice muted color and brings the color up from the bottom to a more focused on spot without being too distracting. I'll give it a shot and see how it looks. Nice thing about paint, if you don't like the color you can always change it. Keith, Thank you Keith. I had pondered that as well, but since I was leaving the framing in its natural color, I wanted to show some separation between the two. Like I told Bob above, I'm going to give the reddish-brown color a try and see how it comes out. Pat, Thank you for the input. These great comments are always welcome. I think this is going to be one of my next steps to see how the reddish-brown looks trimming the cutaway out. I'll be sure to post photos of the look, even if I do change my mind and go with a different color. -Brian