MORE HANDBOOKS ARE ON THEIR WAY! We will let you know when they get here.
×


mbp521
-
Posts
996 -
Joined
-
Last visited
Content Type
Profiles
Forums
Gallery
Events
Everything posted by mbp521
-
 Mark, I totally agree. I am going to stick with the black hull and go with a light color (white-ish) for the interior. This will allow me to put a little darker stain on the oars so that they somewhat stand out in the boats. -Brian
 -
Keith, this makes perfect sense, and most likely the route that I am going to take. There has been a lot of great input on this discussion. Time to compile it all and see what I come up with. -Brian
-
Brian, Thank you for the kind words and stopping by. This seems to be one of the hardest parts of this build, interpreting the color scheme from old black and white photos. The lack of documentation on these boats surely has it's challenges. The good part is that there are so many knowledgeable people on this forum willing to share their expertise and help point you in the right direction. I think that my course of action is going to be taking bits and pieces of all of the info and suggestions that I have been given, piecing them together and seeing what I can come up with. -Brian
-
Thank you for the excellent info Wefalck, this gives me some direction to take with my oars. As for Druxey's build, this was my first time seeing it and it has definitely sparked the creative juices to flowing. There look to be several ideas of inspiration to use in my boats. -Brian
-
Ken, Thanks for stopping by and for the info. I thought it was a Monitor, I just had not researched which one. Nice little tidbit of history to file away. -Brian
-
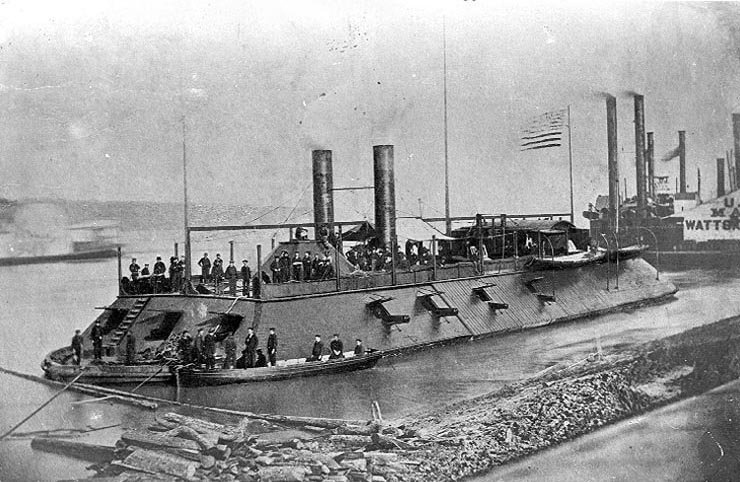
Wefalck, What a great bit of information, and it is very much appreciated. It does seem that a lot of the worlds navies employ some of the same procedures and methods, I would think that this would have held true in the 1860's as well. Here is a question that I just started pondering as I was writing this. When the City Class Ironclads were designed and built, they were done so under the U.S. Department of the Army. It wasn't until later on in 1862 that they were transferred to the U.S. Navy. Originally, they were crewed by the Army with several Navy men on board to assist. I wonder that if when they were built and commissioned, did the Army follow Navy standards or did they develop their own. If the latter is the case, then they may not have the standard paint schemes as Navy vessels. The only known picture of the Cairo was taken shortly after her launch which would have placed it under the Army at the time. This picture clearly shows the boats had black hulls and white interiors, which follows the standard listed in your previous post. However, in the pictures of other City Class boats, some of their boats have white hulls and and white interiors while others others have black hulls with dark interiors. None of the pictures that I have been able to find that show the ships boats have a date on them, so it is hard to tell what timeframe they were taken. This makes it difficult to determine if they were still under the Army or had already been handed over to the Navy. There are also several other pictures that clearly show some of the modifications that took place over time, one would assume that they were after the Navy took possession late in 1862, but none of them show the ships boats in them. USS Pittsburgh. Ships boats with black hulls, white stripe and white interiors. USS Cincinnati: Ships boats with white hull and white interior and another with a black hull and white interior. USS Cairo: Ships boats with black hulls and white interiors. USS Louisville: Ships boats with black hulls and what looks to be black interiors. The more I think about this, the more I believe I'm headed down a rabbit hole where it may take a whole bottle of red and blue pills to get out of. It really seems that the possibilities are endless as to what the colors actually were so I believe that I may just keep it simple and paint the hull exteriors black and interiors white with the oars stained a somewhat dark natural color. I'm contemplating either a rope wrapped handle or simulated leather sleeve just to add some additional detail and leave it at that. For the floor boards, I'll keep the stained wood look to offset the white interior and throw in some rope coils and possibly a few other odds and ends. I apologize for being long winded on this, and thanks for bearing with me. Sometimes it helps me make a decision when I write out my thought processes. -Brian
.jpg.4797ee95bb718aa0a6c743904cc8e99c.jpg)

-
Mark, The rope info is very much appreciated. I may just have to add this little detail into my oars. Originally I was going to cover all but one of my boats, and researched several videos and articles on how to simulate tarps, I just felt that this wasn't a technique that I was ready to take on just yet. I felt that it would take me a while to get it done correctly, and I just didn't want to chew up that much time, time that I could be focused elsewhere on my build. Some day I may play around with making tarps, but I think that right now I want to learn how to properly weather this build, and learning two new skills would really task my little pea brain. -Brian
-
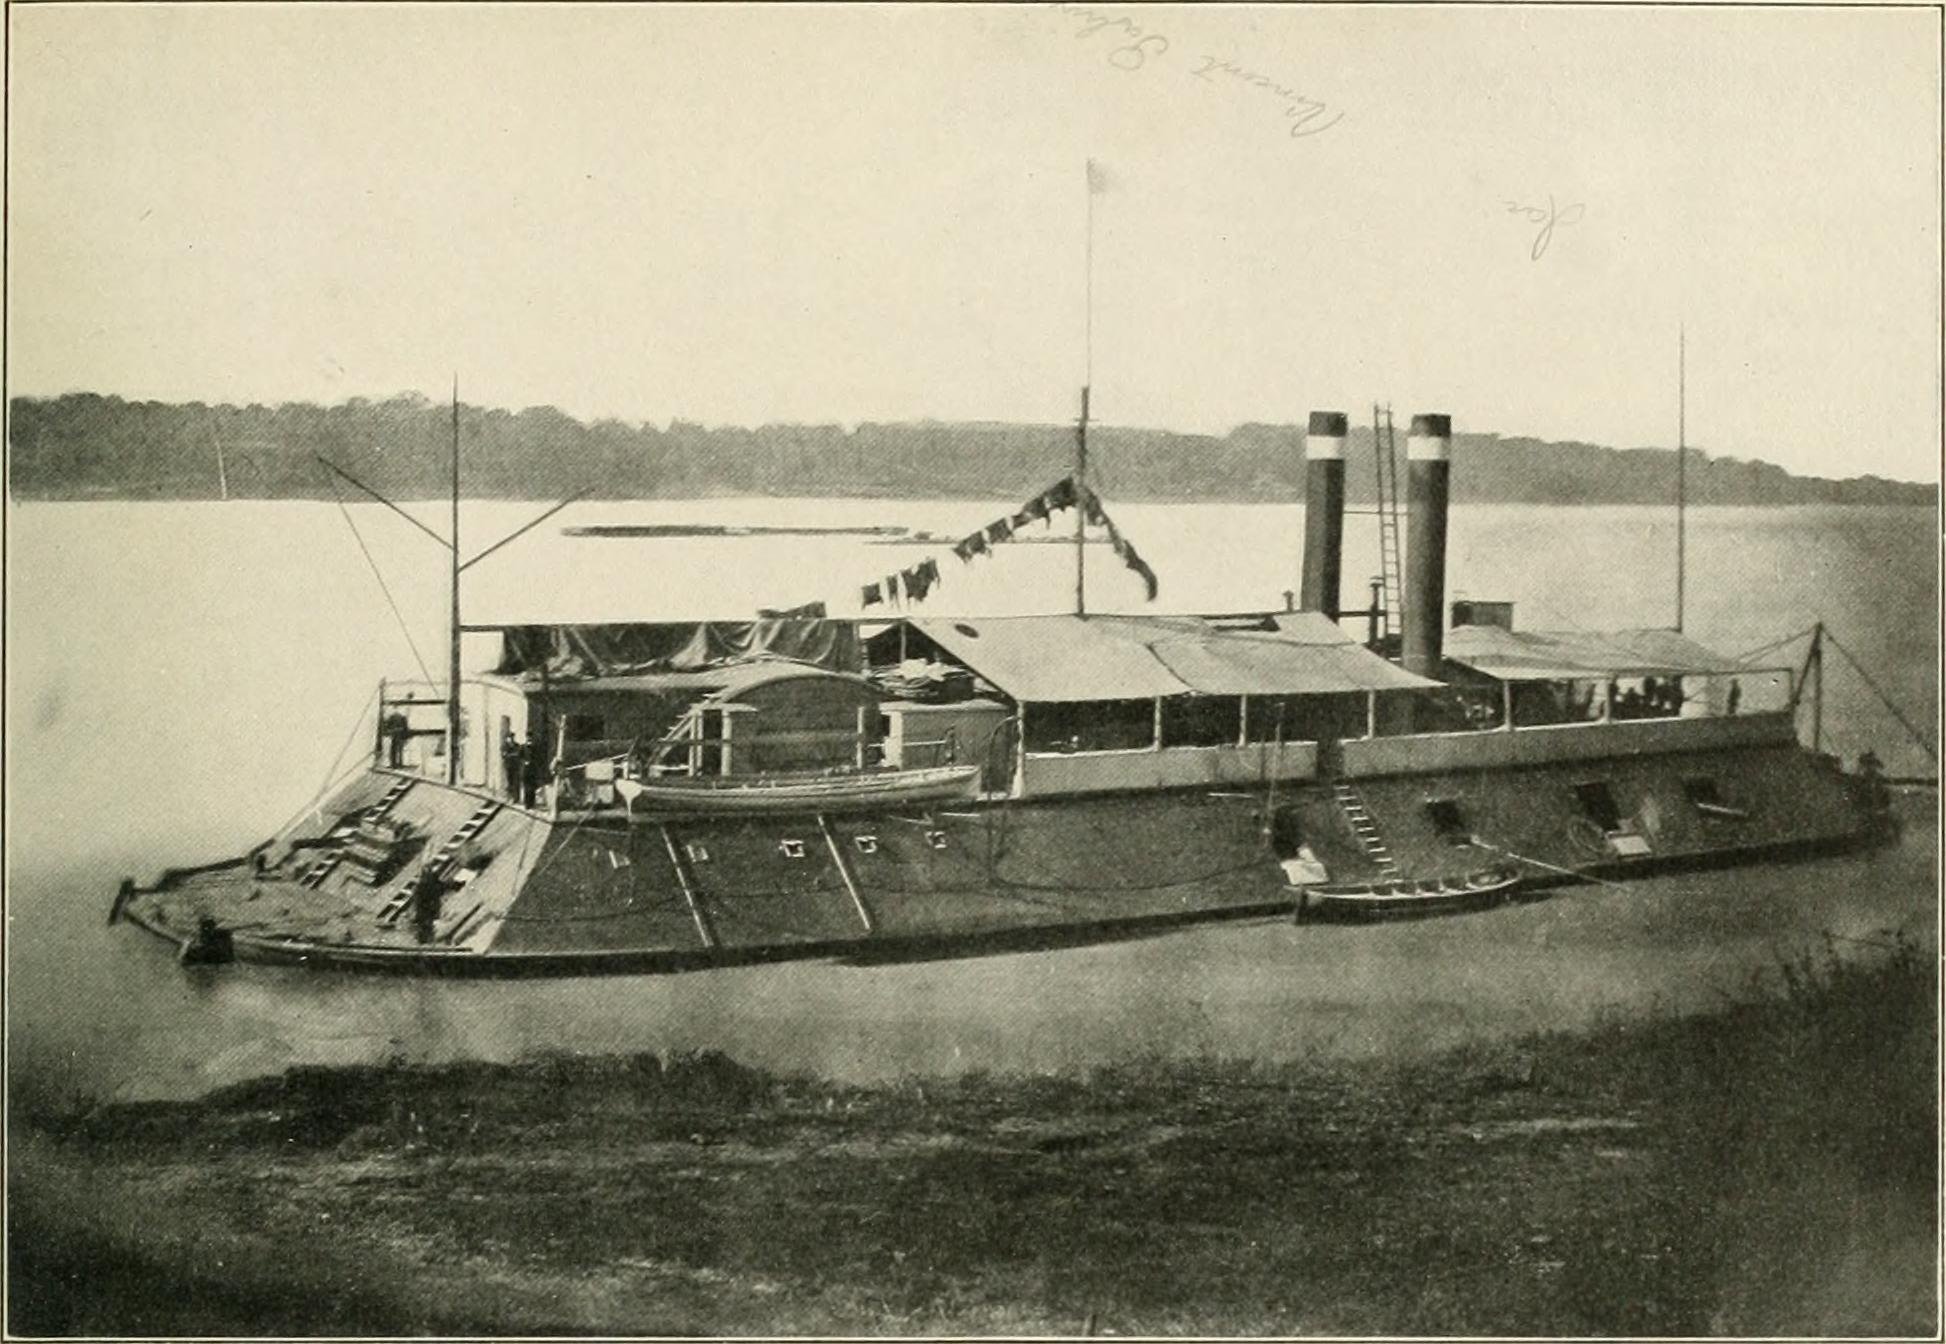
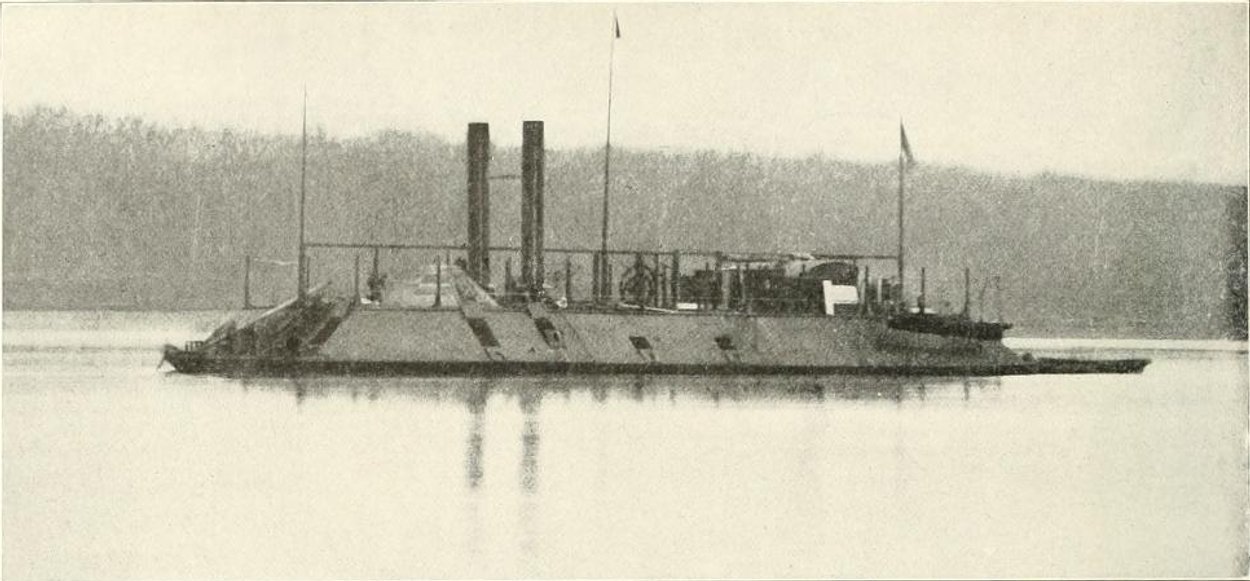
Keith, Thanks for the photo. I can not get enough of looking at these moments in history. I often stare at them for long periods just wondering what was actually going on at the time the photograph was taken, just like this one. It looks like a Monitor type boat anchored in the river possibly waiting on resupply, or just taking it easy for the day. But upon closer inspection there is another row boat in the background headed in the opposite direction. Possibly a scouting mission to find a good landing place to set up camp for troops? Who knows. But then if you look even further back into the picture there is what looks to be a partially sunken hulk on the right side. Was this a mission to see what could be salvaged from the wreck? Again, who knows. It's just simple things like this that get my brain cogs to turning, and chews up a lot of time, but just totally engrosses my curiosity. But getting back to the original part of the post, the interior does appear to be white as do all the ones on the Cairo picture. This may just be a change I'll have to make on my boats. Another thing that piqued my curiosity was what are the little round doohickeys hanging off the side of the boat. Are they some sort of bumper? Inquiring minds want to know. -Brian
-
What an excellent start Keith. The tedium of stropping all those block will be well worth it in the end. I would have to break the monotony though by stropping a few then installing them on the yards; wash, rinse, repeat until they were all done. I also really don't think the hooks will be missed, from what I see everything looks great! -Brian
-
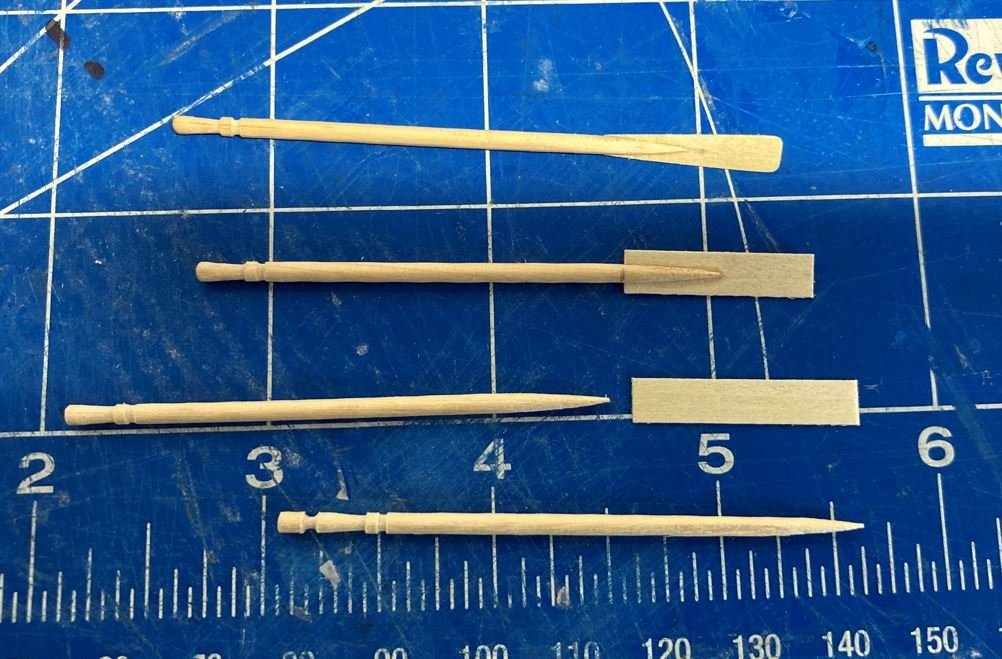
Keith, I actually bought these decorative toothpicks a few years ago when I was building my Chaperon. I used them to build the ships wheel, and thought later on they would make perfect oar handles. I had built a few for my Chaperon, but never used them, then I revived the idea with this build. Hopefully you will be able to use the idea some time. -Brian
-
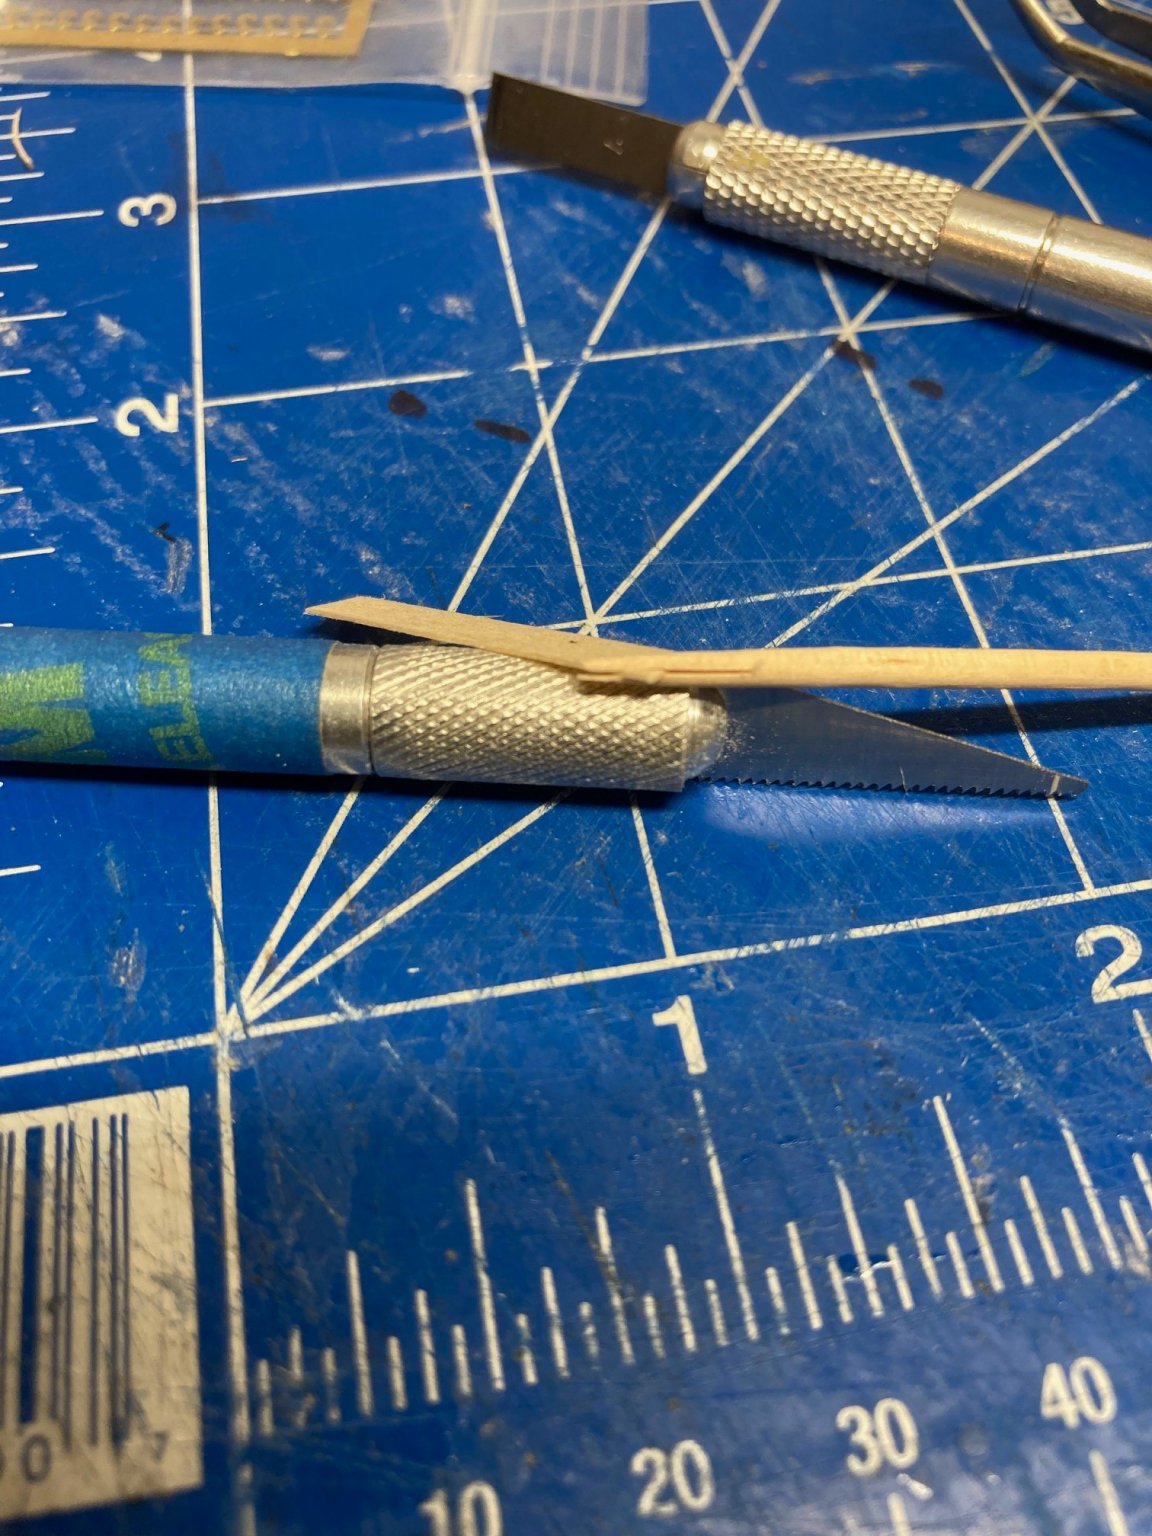
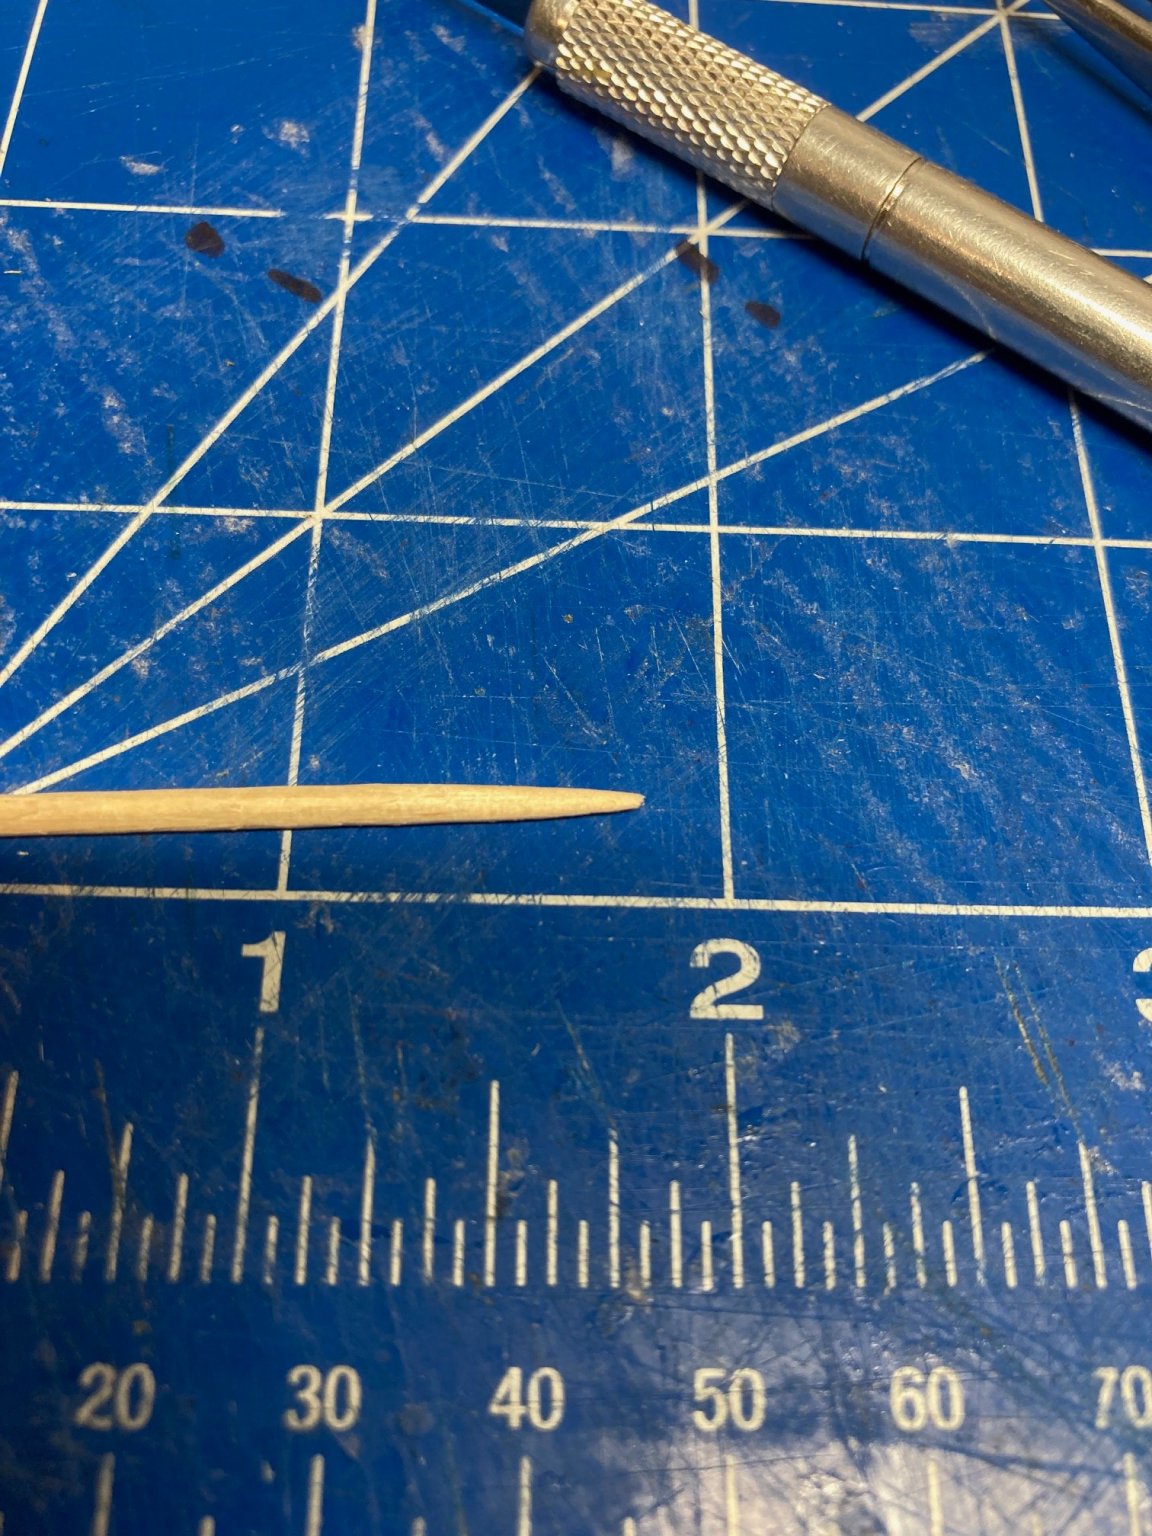
Hi Bob, All I basically did was cut the tip of the toothpick off. Not too much, just enough to blunt it enough to get my Xacto saw on. Then all I did was saw a small slit down the toothpick to the desired length. After that I sanded the slot smooth and inserted strip into place and sanded to shape. It was fairly easy. Getting the saw started in the center of the toothpick was the toughest part. -Brian


-
George, It never gets old hearing that! Comments like this are what keep me going. As for the boats, it seems that all of the City Class Ironclads had work boats with black hulls (at least that is what I can interpret from the photos that I have been able to uncover on them). I am assuming that the hulls were painted to match the Ironclads paint schemes. The interiors on the other hand are a different story. As I told Keith Black above, from the pictures, it looks like the Cairo's boats had a white interior and black exterior. From the picture you show, it does look like the oars are a darker color on the handles with rope wrapped around them, but it hard to tell the color of the blades. The forward one looks like it almost has a white painted blade. I may have just opened up an oar wormhole with this one. -Brian
-
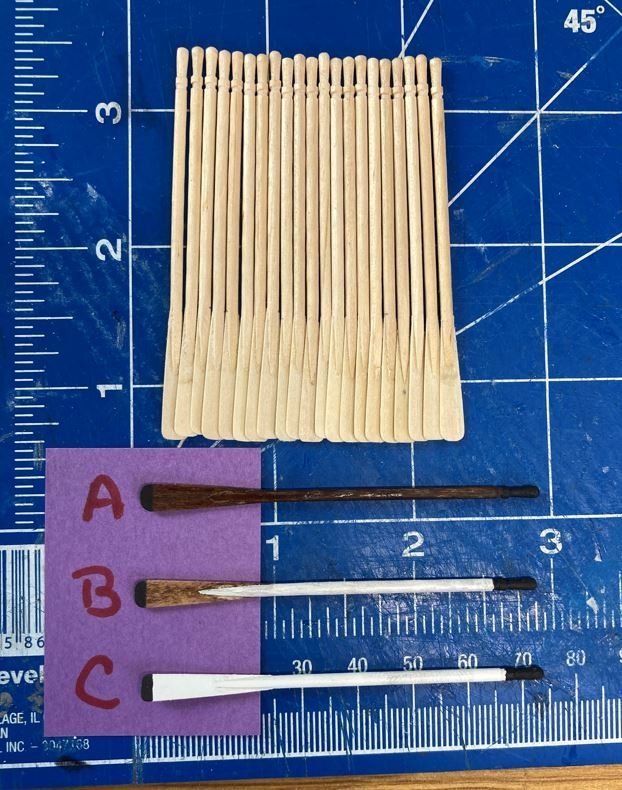
Thank you Pat! I mainly just painted the tips on a whim. I ran across several pictures of them that had the tips painted different colors and thought it looked neat. Not real sure of it's accuracy though. One other detail that I found was some had rope wrapped around them somewhere half way between the handles and the blades. I thought of doing this as well. I want to do a little more research on this to see what purpose it served first. -Brian
-
Mark, Thank you for the compliments. I have searched several different museum models of the City Class boats (Cairo, Carondelet and St. Louis) and they all seem to have the work boats covered with a tarp. I am beginning to think that there is a reason for this. Possibly that there just isn't any or enough information out there on what they truly looked like. -Brian
-
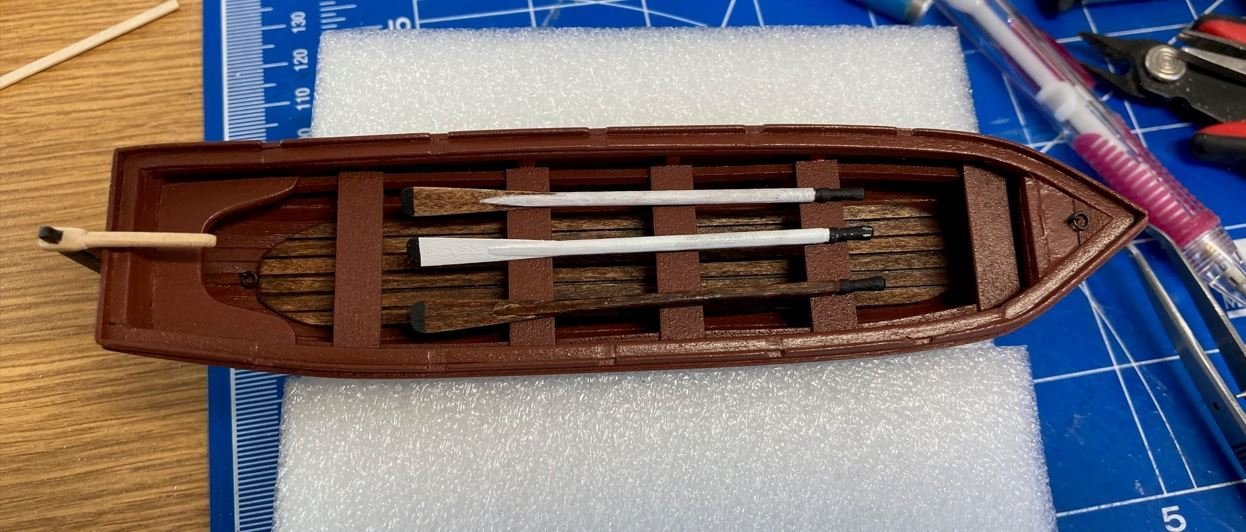
Keith, Thank you for the input and compliments. I'm right there with you. I was thinking the same thing, but if you look at the below picture of the Cairo boat, it looks like the interior is painted white or some sort of light color. I'm leaning to white since it was pretty much readily available at the time, and cheap. To me the white would stick out like a sore thumb if they were trying to be stealthy. This was the reason for experimenting with the white oars. And you are correct, it would be harder to see the darker ones. I still cannot make up my mind as to how I want to paint them up. I want them to be seen when looking at the model (since I am going through all the effort of researching them and building them, but I want them to be as accurate as possible. Oh the decisions we have to make. 🤪 -Brian
-
Hello everyone, I have been somewhat busy on the build and will have an update coming in the near future. It's been a lot of tedious work, especially with the ships boats. The have taken on a life of their own, and in reality I could have started a separate build log on these themselves. The research on them has been time consuming to say the least, and one thing that I discovered is that there was no consistency with any of the City Class Ironclads in what type of boats they carried. To be honest, I think they just used whatever they had on hand that would fit in the davits. What I settled on was to build a couple of cutters and a couple gigs and leave it at that since only one of the boats from Cairo is clearly visible in it's picture. More to come on these in my next updates. This time around I am seeking some advice and opinions. While working on the ships boats, I started constructing the oars for them. More research involved with this as well to get the right style. I finally determined that there are 100's of types out there that were used in the mid 19th century and none of the old pictures show what was used on the Ironclads boats, so I picked the style that I though fit best. This is when I ran into a problem. While I like the style that I chose, I am stuck on the paint scheme that they may have used. Again, none of the pictures of the City Class Ironclads have a clear shot of any paint schemes on them and of course, what is available is all black and white, so I wanted to ask advice and opinions. I have about 24 oars made up right now and painted up a few of them with different colors. Here are the steps I took to make up the oars: The handles are made with decorative toothpicks and the paddle faces are just thin strips of basswood. I cut a slit in the toothpick from the point and slid the strips into the slot. Glued the strips into place, then sanded everything to shape. Pretty straight forward. I scaled these out at between 11' and 12' long. This seemed to be the standard for 25' boats of the time according to my research. This calculated out to be about 2 3/4" at 1:48 scale. Then I painted up a few to get some sort of idea of how they would look. Even though these are the schemes that I came up with, it doesn't mean that I have to go with any of them. I want to get them as accurate a possible. Here they are in the still, yet to be finished work boat, to see what they look like with these colors. Even though they will all be lashed together, I don't want them getting lost in the colors of the boat. As always, I value any comments or opinions, so please feel free to let me know. Thanks for looking. -Brian
- 739 replies
-
- 10
-

-
Keith, I find that the research is half the fun of the build. Given that I am only on my second build that I have done any research on, I am by no means an expert, but digging through tons of information on a particular ship or part of the ship sometimes uncovers a treasure trove of information. I also have to admit that if it weren’t for MSW I would have never attempted a scratch build or done any research on any build and just built straight from the kit. Unfortunately there are those ships that the information is just totally limited to one or two photos and you have to resort to similar (or sister) ships to get a general idea of how it looked. To me the in depth research gives me the satisfaction that I did what I could to make sure the outcome is as true to real thing as possible, and if it happens to be somewhat off, no one is none the wiser due to the limited information. I’m really looking forward to seeing your progress after all of your research. Thanks for teasing us. -Brian
-
Looking good Eric. I admire your perseverance on this, especially with milling your own lumber. That is a task that I have never even given a thought to. It’s just too easy to purchase it already done. Not to mention the limited availability of quality lumber on my property. I’m sure that the coloring in juniper would make for an interesting look, but mesquite, bois d’arc and honey locust just aren’t that appealing. Out of curiosity, and you may have mentioned this already, but did you mill the planks a little thicker than normal to allow for variances and to give you the opportunity to be able to sand the planks all even without sanding through? Only reason I ask is that my ships boats have been giving me fits getting the hull contouring correct and I have resorted to using thicker planks after sanding through several of the thinner provided planks. -Brian
-
Simply amazing detail. It’s such a pleasure to follow your work. -Brian
-
Just found your build and what a great job you have done so far. I will be following along on this journey with great interest. -Brian
-
Vaddoc, Glad to see you back. Beautiful work on the planking so far. Can’t wait to see more. -Brian
-
Ken, Thanks for the link, it was indeed helpful. I just read though Rob Manley's techniques section of this site and it confirmed what I was thinking. For the best results you need to apply a flat finish prior to weathering. -Brian
-
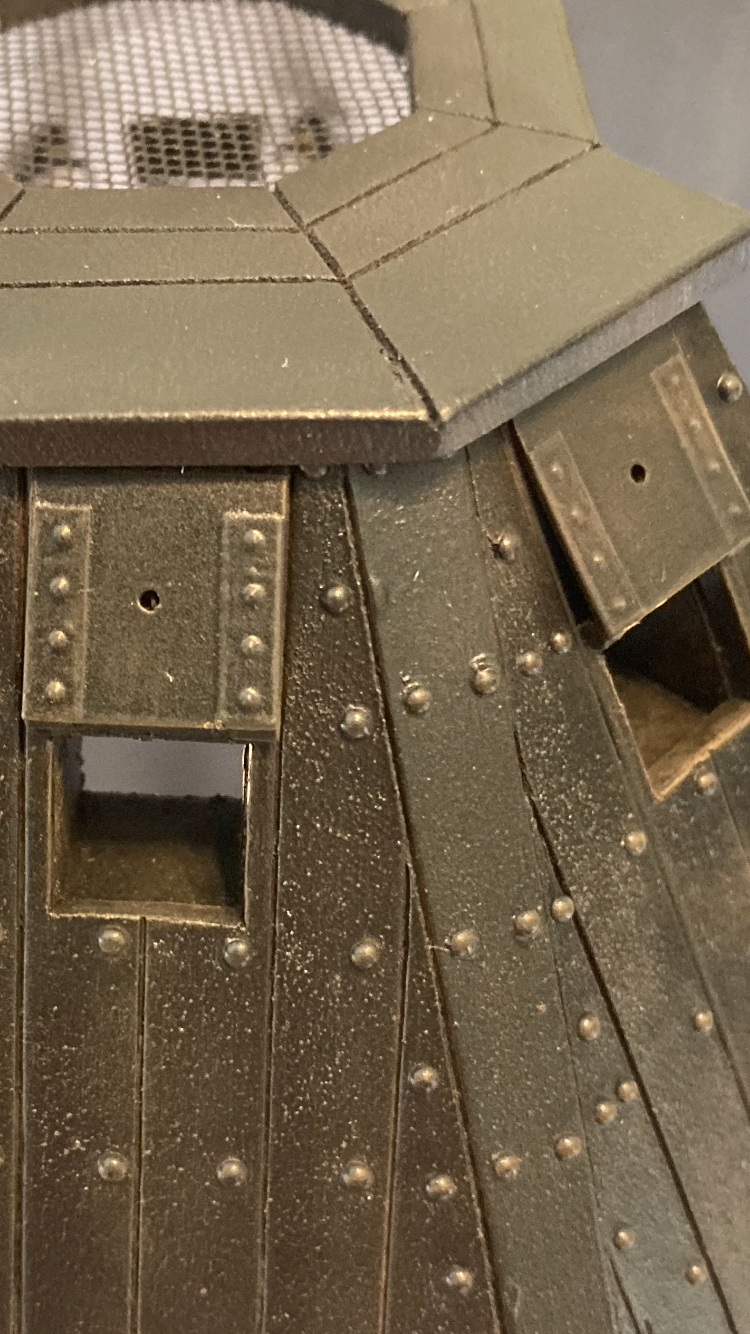
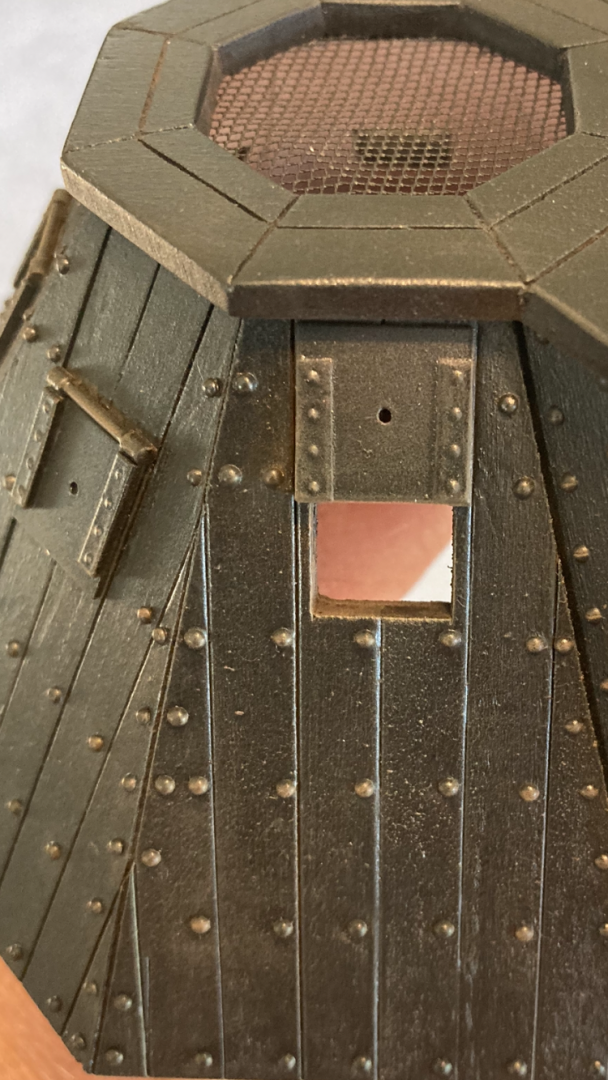
So here was another stab I took at weathering the pilot house. I used a basic brown pastel to get into the seams of the armor plating with orange for the rivet accents and portal cover hinges. I then went with a very light coat of white pastel to accent the portal openings. The colors seem a bit subtle and the pictures don’t do much justice for it but they did knock a bit of the satin sheen off. I’m thinking that I may go ahead and put a matte finish on my mock-up and try again on that. I am definitely open to any thoughts or opinions. -Brian

- 739 replies
-
- 10
-