


Fright
-
Posts
562 -
Joined
-
Last visited
Content Type
Profiles
Forums
Gallery
Events
Posts posted by Fright
-
-
-
My heart goes out to you on the damage to your 1st ship. I'm going to tag along on this build of yours. So far, I too have purchased and worked on only plastic model ships up until now. I picked up an old Scientific wooden kit of the Bluenose and I've turned my attention to finishing her before I return to my Constitution by Revell. Working with wood literally has a different 'feel', and in some ways, is more forgiving than plastic but, like you mentioned, wooden kits certainly are pricier. I've got my mind set on purchasing an entry level wooden kit once I improve on some of my skills. With that, I wish you easier success on your Bounty! I see you're using wood on masts, bowsprit for extra strength - I'm planning on doing the same on my Connie.
-
HOF - What wonderful pictures of your Bluenose ll ! She looks great and and some of the detail work is an inspiration to someone like myself trying to develop modeling skills. Compliments to the chef!!!
-
-
George - hello and welcome! I, myself, am finding working with wood a whole new experience from plastic and I'm working on a very basic kit. There are some fantastic modelers in here that can offer some great tips and advice when needed. They have certainly helped me get where I am with my skills. Smooth sailing on your Enterprise!
-
-
Your kit is starting to take shape - great work! Ah, those subtle moments when one hears a 'snap' while working on a piece! Like I said in my post, I'm getting off easy when I look at work like this. I'm on board but only as a passenger! Looking forward to seeing her set sail!
-
I think your lines adds some dimension and realism to the decks. It's coming alone nicely!
")
-
Your build is coming along nicely! Your decks look pretty straight and the seams are barely noticeable. If you haven't done so already, you may want to reinforce the seams from the underneath side of the deck with either some styrene plastic sheet strips or some thin wood strips. I used 1/16" thick basswood strips for reinforcement - I have since purchased a pack of assorted styrene sheets and strips from Evergreen. There is some pressure that is needed when you go to install the decks into the hull. I'd hate to see anything break apart on you.
-
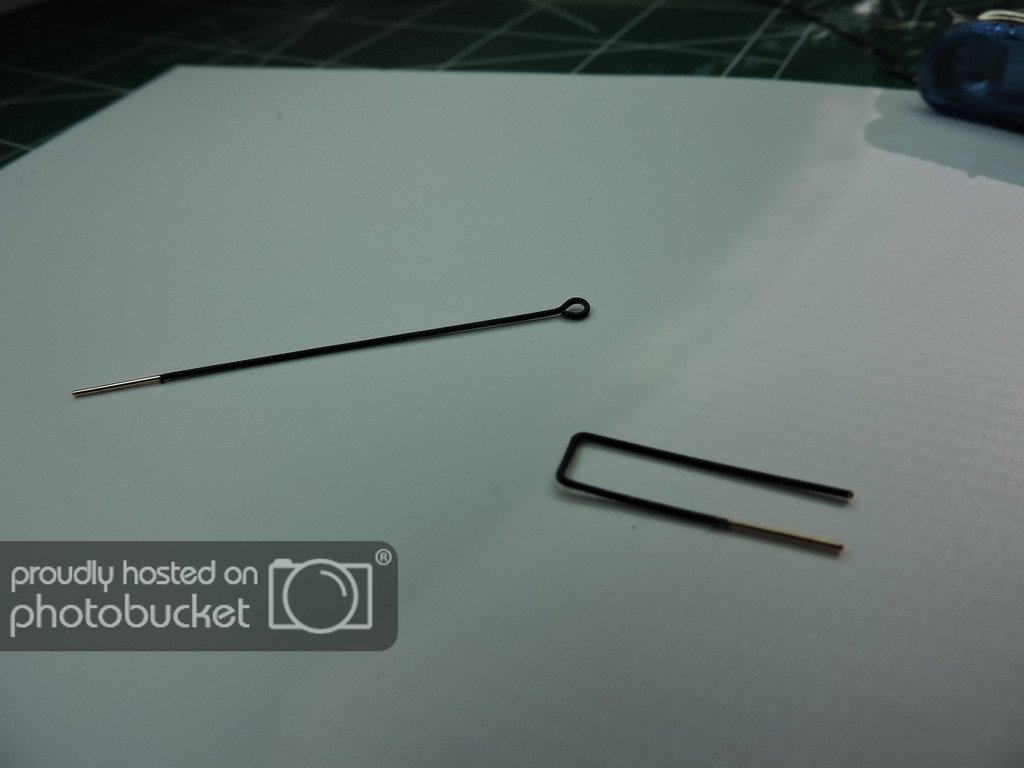
Here's a pic of my eye pins that I purchased. I spray them flat black and have to touch up sometimes - the pro's use a blackening agent. You can find the 'eye' in a several mm sizes. The length runs about 1"-2". Just snip where you need to and SAVE the pins! They can come in handy. I used them to fabricate my baffle on the stove's smoke funnel. Also, check out the book, "Anatomy of the Ship: The 44-Gun Frigate USS Constitution" by Karl Heinz Marquardt. It's not a 100% accurate, but darn close with some excellent clear diagrams that one can follow.
- husky1943, hexnut and CaptainSteve
-
 3
3
-
Thanks Rob - no genius but good listener! LOL After reading a lot of tips and suggestions by other modelers on sites like this, it will help things along with modeling. I've come a long way because of some great advice by some very talented people.
- husky1943 and CaptainSteve
-
2
-
Racer - Definitely reinforce that seam! I ran a bead of CA glue down the seam and, after that dried, I ran a thick bead of Testors tube glue. A couple of reasons why I did this:
1) I planned on drilling holes and run lighting wiring from my base through those two holes in hull. I also glued down metal washers over those support holes to have a good, solid base to tighten down my nuts on the bolt.
2) When you go to add your two decks into the hull, you have to put pressure by carefully bending the hull open to 'pop' the decks in. This puts pressure on the hull seam - mine slightly cracked (thank goodness, only the glue) when I had to reinstall my gun deck because I forgot to hook up a vital link in my lighting. Be safe - Make sure that seam is reinforced!!!
Here's some other things to think about ahead of time. Many people, and I took their advice, recommend using metal eye pins instead of the plastic eye bolts that come with the ship. If the plastic part snaps (especially with rigging) due to the tension for lines, it will be a nightmare to correct. I found eye pins really inexpensive on Ebay and at HobbyLobby.
I wish you good experiences with this kit and I look forward to seeing your work along the path. If you need help/advice, there are a lot of very talented people in here that will help shine light on your work. They certainly have helped me get as far as I have with my build of this wonderful ship. Cheers!!!
- Racer2000, husky1943 and CaptainSteve
-
3
-
Tom - your work (and pictures) are excellent! In going back on your posts, I extend my condolences to you and family with the loss of your father. People continue on with every thought and memory. I look forward to your work ahead!
-
Welcome Bruce - 1st off, you picked a good website to join. The people in here are very helpful in giving tips and information, as well as building some amazing ships! As for question about wood or plastic, I had the same exact questions. Having really no experience in modeling, I went with plastic as my 1st build. One, it was free! - second, it would allow me to get a handle on some basics such as cutting, puttying, sanding (lots), painting and doing research on my kit and making a few subtle changes.
I'm now working on my 4th plastic ship ( Revell's 1:96 scale USS Constitution) and I've moved up to fabricating some parts, lighting for ship, and using after market blocks, eye pins, upgrade of lines, adding a wood deck etc. I now feel I have the confidence and basic skills to attempt a wooden ship without 'destroying' my investment. This is only my opinion and what worked for me. I picked up an old Scientific wooden kit of the Bluenose sailboat (it's really basic) and it is much different from using plastic, both the directions and fitting parts.
Whichever way you go, I wish you the best on your project(s) and hope you will share your works with all of us! Cheers!
-
-
-
Henry - Your craftsmanship on the gun tackle is outstanding! I am at awe how you can work with such fine detailed parts and scale. I'm trying to do a 'bare minimum' job on my gun tackle and I'm all thumbs.
 An incredible job on all of your painting detail and mold making. Hi 5 on your model!
 -
Mac - here's a link of a Model Expo build of the USS Constituion by Bill Bergmark. I also think he has seperate posts of his build on youtube.
Hope this may help you out!- thibaultron, Canute, CaptainSteve and 2 others
-
5
-
Wow! Amazing craftsmanship on your project. I liked your idea of using Sculpy for the hammocks instead of rolling up tissue, which was my plan. Your work on the cannon rigging is also very impressive! I ordered some blocks in hopes that I can simulate the same kind of realism to the cannons if my skills and eyes are up for it! Compliments to the chef on your work so far and look forward to following your future work!
-
Compliments to the chef on this one! Very nice indeed.

-
Tom - thanks for the encouragement. What size blocks did you use on your gun tackle? What company did you purchase them from? Thanks again. Cheers!
-
usedtosail - your detail work on the gun carriages is amazing! I'm really new to building a model sailing ship and the level of skills that you, and others display an your builds are outstanding.Compliments to the chefs!!! Very impressive indeed.
- usedtosail and CaptainSteve
-
2
-
Jim L - where did you find the Midnight Blue paint? I've been trying to find color scheme used on the Bluenose but no luck so far. This will be my 1st attempt at a wooden ship model. Thanks for sharing your build!
Robert O
-
Hello Paul - i just purchased the Bluenose by Scientific online as my 1st wooden ship build. I'm not concerned right now about accuracy as I am with getting some experience in building a wooden kit. I have been trying to find out what colors were used on this ship. I found one site that charges $60 for 'authentic' paint scheme. I'm currently working on Revells 1/96 USS Constitution plastic model kit and I've been using Model Master paints but, if anyone has any tips on colors used, I'd appreciate their help on the Bluenose boat. Good luck on your build!
 Welcome to MSW! Looking forward to seeing your photos!

Hello from Colorado
in New member Introductions
Posted
Hello Dave from another sod pounder missing my ocean!