
Haliburton
-
Posts
335 -
Joined
-
Last visited
Reputation Activity
-

 Haliburton reacted to ccoyle in Curtiss P-40K Kittyhawk Mk III by realworkingsailor - Special Hobby - 1/72
Researching family military history in the various records can be very rewarding. When I began doing genealogy work years ago, no one in my immediate family had any knowledge of our family's service prior to WW2. Through unit roll calls and a variety of other sources, I was able to piece together my 2x-great grandfather's service in the Palmetto Sharpshooters during the 'Late Unpleasantness'. I was very surprised to learn that the PSS were a highly regarded unit within the Confederate armed forces and fought in many of its bloodiest engagements, including Second Manassas, the Peninsula Campaign, Antietam, and The Wilderness. I'm sure my ancestor could have recounted many harrowing tales, but sadly I have no evidence suggesting he ever left any written accounts.
Good luck on both your projects!
-
Haliburton reacted to realworkingsailor in Curtiss P-40K Kittyhawk Mk III by realworkingsailor - Special Hobby - 1/72
For those following at home, my hobby time has been a little curtailed as of late last winter. Other projects took priority and time at the bench has been limited. I'm not yet ready to get back to it, since the weather continues to slowly improve, and the outdoor projects are stacking up, but I thought I would at least start a topic as a placeholder for when I get back into model building.
This particular project has come about as a result of another project I've been working on over the winter (and will be working on for a long time yet). It began with a google query made on the spur of the moment, and has since snowballed from there. To provide a little clarity, my great uncle was an officer in the 2nd Medium Regiment, Royal Canadian Artillery, during the second world war. He served in the Italian campaign as well as the final liberation of the Netherlands. He never spoke much of his experiences when he was alive, and even my uncles and aunt don't really know what he did during the war either. Just for a laugh, I decided to see if the regimental war diary was available online. Well, I had great success there and I have discovered some amazing stories. Cross referencing the war diary with some history books, I've been able to put things in their proper context, and I'm endeavouring to create a more readable history to share with the rest of the family.
Anyway, getting more to the project at hand.
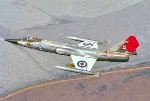
My great uncle and his regiment arrived in Sicily in early November 1943. As part of the wheeling and dealing that saw the Canadian forces in Italy brought up to Corps strength, they arrived without any of their heavy equipment (no transport, no guns, just the packs on their backs). They remained in Sicily until the end of the year, before moving to the mainland in January '44. While the regiment's time in Sicily was largely uneventful, one particular occurrence caught my eye.
On the evening of the 21st of November, a plane was seen to crash near one of the regiment's battery HQs:
My uncle was assigned to "Q" battery, so I'm certain he was well aware, if not involved in, the aftermath of the event. The war diary recorded few details concerning the plane that crashed, including the type and the serial number. This provided a great jumping off point and I was able to find some interesting information, and a bit of a mystery.
Researching the serial number, I found an online compilation of aircraft flown by the somewhat legendary 112 Squadron RAF. FR213, 42-45817 was delivered to the squadron as in July 1942, and assigned the code letters GA Q. It occasionally wore the code GA ? when used by squadron leader Billy Drake. The record I found doesn't note much else about the plane, other than it was a short tailed P-40K-5. The fate of the plane is recoded as "unknown".
From my research, 112 squadron was based at a place recorded as "Mileni" towards the end of October 1943, and didn't move again until early '44. Although I can't locate the exact location, I think it was in the Foggia area. This brings up the first of many questions. If FR213 was still assigned to 112 Squadron, what was it doing in Sicily while the squadron was near Foggia (on the Adriatic side of Italy)? Secondly, it seems to have been quite an old plane by WW2 standards, almost 18 months, to still be in (front line?) operation, especially for the rough service conditions it would have experienced in the North African desert, maybe it's a good testament to the durability of the P-40 (its sister plane FR215 was struck off charge in April 1944, and some others made it until 1945!!). The third mystery is who this American pilot may be. Nothing else is noted, so was the plane returned to the USAAF (which should have been recored somewhere)? If so when?
These questions aside, the thought of modelling FR213 (or at least, a version of FR213) proved to be very tempting. I will continue in part II with a description of the kit as well as some of the extras I've bought to go along with it.
Andy
-
Haliburton reacted to DocRob in AEG G.IV - Creature of the Night by DocRob - Wingnut Wings - 1/32
The AEG got it´s teeth - hmmh, well - besides the painted on jaws I mean. The LMG 17/17 Parabellum are from Gaspatch, airbrushed satin black and then I rubbed on steel pigments with a cotton swab. Stock and grip are painted with oil colors and after seeing the pictures, I decided to put on some varnish for a more realistic look. The kit guns are not bad and I used one inside the fuselage, but detail of the Gaspatch ones is absolutely fantastic.
Positioning of the guns is not final. I also made some touch ups and detail painting and added the artificial horizon.
Gun mounts and other details got sprayed aluminum, then covered with hairspray with the dark sea blue on top and finally weathered with a toothpick.
Cheers Rob
-
Haliburton reacted to CDW in NASCAR Asphalt Modified Racer - Woody Pitkat by CDW - SalvinosJR - 1:25 Scale
SalvinosJR is one of a few(?) companies who manufacture model kits in the USA these days, located in California. To this point their focus has been on NASCAR kits where they offer them for sale at major NASCAR events throughout the country as well as online. Recently, the kits have been finding their way into local hobby shops as well, including my local haunts. I've never been a big fan of NASCAR kits, but seeing the Asphalt Modifieds piqued my interest, so I bought one at a local shop. When I checked out the contents of the kit, I was very pleased at the quality of the model. When you pick up the box, you know it's substantial from the weight of it. Lots of plastic parts.
Here is an interesting and informative video that explains the NASCAR Asphalt Modified series, it's history and the current cars racing in that division.
-
Haliburton reacted to chadwijm6 in Westland Sea King HU.5 by chadwijm6 - Airfix - 1/48
The whirlybird is fully assembled now but I'm not finished yet...
I've started to build a simple diorama to sit him on, which needs some grass variation and some mud adding over the next few days. Maybe a few bushes.
Another lovely kit from Airfix and I'm pretty pleased with result.
-
Haliburton reacted to chris watton in Chris Watton and Vanguard Models news and updates Volume 2
Many innocent sheets of material died to bring you these pictures...
This is the fifth hull I have made up, with incremental changes with each new version. I usually just remove and replace the parts I change, but there are many interlocking parts with this one, that I felt more comfortable restarting the whole hull assembly with all updated designs, so that I know all fits as they should. This will not be the final form, however, but am comfortable continuing using the hull form (which is final) to get more information for parts that fit onto it.
Hull has been sanded, ready to take gunport bulwark template (which are next to design)
(This will be thrown away once all info has been garnered from it...)
-
Haliburton reacted to chadwijm6 in Westland Sea King HU.5 by chadwijm6 - Airfix - 1/48
In the meantime there's a couple of aircraft/modelling events coming up in the UK that I've bought tickets to go to.
First up is Model world live at the NEC in Birmingham. This has been set up by Pete Waterman, he's one of the producers behind Kylie Minogue and Rick Astley amongst many others from the 80's, and he's a keen model railway fan. The event has lots going on ... https://www.keymodelworld.com/modelworldlive
The next one is the Midlands air festival with the Red Arrows, hot air balloon displays, wing walking display, fly pasts from a Spitfire, Lancaster, Mustang etc. and large model aircraft too.
https://www.midlandsairfestival.com
-
Haliburton reacted to chadwijm6 in B-25J Mitchell by Chadwijm6 - HK Models - 1/32
Well for my next project I'm trying a new brand, HK Models, as a change from the Airfix I started with. This will be my 4th build. I love bombers, my first model was the Lancaster, this will dwarf it though a that was a 1/72.
I bought this on eBay, saving £100 off a new one and as you can see in the pictures, everything is still in their bags.
I've not done any research yet so I think a read through the instructions and a Google will be the next steps....
-
Haliburton reacted to king derelict in Nabopolassar King of Babylon and Daffadar, Skinners Horse by king derelict - Art Girona - 54 mm
I am getting a bit frustrated with only being able to work on the Flowers for short periods because I forget what I am doing or just don't have time to complete something.
so I thought I would try this as something that can be worked on in short sessions.
I have been amazed by the expertise of the figure painters here and have wanted to try a figure in its own right rather than the 10mm and 1/72 figures in my dioramas
Art Girona is a Spanish company making figures across a wide spectrum of subjects and they seem to be superbly sculpted. The prices including shipping from Spain didn't seem too crazy so I ordered three figures to try my hand with
The contents of the Nabopolassar box shows some of the great detail\
I was highly impatient and assembled both the Skinners Horse figure and the Nabopolassar one. Nabopolassar went together very easily with everything fitting well. The lancer was harder and even with some careful filing there are some joints that will need filling. I'm not sure what would be the best putty; possibly thick CA or CA with a powder addition to thicken it.
Although the figures are the same scale Nabopolassar is significantly taller than the Bengal lancer.
I used CA glue which seems to be holding okay. I'm trying to work out how to hold them for painting. They are heavy so I don't think the usual Blu Tac will work. Both figures come with bases which I had planned to leave until the end thinking it would make painting easier but maybe I should attach them and use the base to hold them while painting.
I'm sure I will be back to the community for help as I progress.
Thanks for looking in
Alan
-
Haliburton reacted to PvG Aussie in Fokker Dr1 by PvGAussie - FINISHED - Artesania Latina - 1/16 Scale
At long last I have finished this model. After all the cutting, grinding and reshaping I have finally managed to put the pieces of this jigsaw together (approx 150 hours).
I would NOT recommend this kit to anyone unless you are good with metals as many of the pieces simply don't fit and you have to settle for second rate joins or try and modify the diecast and PE pieces.
Looking at the images, it has come up reasonably good as it is difficult to see the problem sections!
-
 Haliburton reacted to CDW in Ferrari 288 GTO Yellow by CDW - Fujimi Enthusiast Series - 1:24 Scale
If you laugh at me for what I'm about to tell you/show you, I won't blame you one bit. I'm laughing at myself, just to keep from crying (in a metaphorical sense of course).
After owning this particular kit for close to 30 years, bought it second-hand, I'm only just now realizing I'm missing one front wheel and tire.
Was it missing when I bought it? Did I lose it somewhere along the way since I bought it? I have no idea, but I do know that it is gone now. Hmmmm....what to do next.
I guess I'll start looking for a suitable replacement, or maybe an entire different set of wheels and tires? I'll just have to see what I can find and what's reasonable.
I do know this kit has become more costly and difficult to find and it wouldn't make sense for me to buy an entire kit just to rob one tire and wheel. Sheesh. What a goofy lack of attention and consequence. Had I known this was missing, I would have never gone this far building and painting it.
Or then again, maybe just display it in the Fujimi garage, with it jacked up and one tire off for repair? That could be a potential, reasonable solution.
-
Haliburton reacted to CDW in NASCAR Asphalt Modified Racer - Woody Pitkat by CDW - SalvinosJR - 1:25 Scale
At this moment, SalvinosJR are taking pre orders on a new line of modern Indy car kits they are producing. I am looking forward to these as it’s been a long while since Indy racers have been in styrene plastic.
By the way, their line of NASCAR speedway racers are fabulous.
-
Haliburton reacted to mtaylor in NASCAR Asphalt Modified Racer - Woody Pitkat by CDW - SalvinosJR - 1:25 Scale
The look of that beast brings back memories.... one variation was the so-called "outlaw" class, if I remember right. Good times on Friday and/or Saturday nights at the oval tracks.
-
Haliburton reacted to CDW in NASCAR Asphalt Modified Racer - Woody Pitkat by CDW - SalvinosJR - 1:25 Scale
Similar situations in the South. Many tracks that were once filled to capacity on weekends and Friday nights are gone. There are a few that remain but only a handful compared to earlier years. Average guys were the ones who campaigned those race cars of old. The sport has become far too expensive to keep a car on the track anymore. I had a friend we called "DLD", an acronym for dead last Danny. The fellow had a literal junk-yard on his rural property where he salvaged car parts to build his racers. I always gave him props for having the fortitude and determination to get in there and race because he rarely ever won, placed or show. Always at or near dead last. Last I heard not more than a few months ago, he's still racing.
My dad was a huge racing fan. He loved auto racing, motorcycle racing, horse racing, buggy racing, trotters, you name it. If it raced, he went to see it. I was blessed to have him take me with him all the time except when he travelled out of town to races like Indy. My fondest racing memories were of the fairgrounds clay track where they raced sprint cars and motorcycles. Man, I saw some thrilling, hair-standing action with some of the best drivers on the planet for those type races. Back in that day, Offys were king in the sprint cars and midgets while Harleys ruled the motorcycle events.
-
Haliburton reacted to gsdpic in Sopwith Camel by gsdpic - FINISHED - Artesania Latina - 1/16th scale
Thanks as always for the likes and comments. Ken, you may be right, though I thought this kit was fairly new. But I do not know its full history for certain. But I can say that I cannot imagine this kit without laser cut wood. Trying to hand cut all of the "lightening holes" in the ribs would drive me insane.
Anyway, with a bit of a struggle, I've attached the landing gear, the engine, and the front cowl. I already noted issues with the landing gear. The engine was mostly easy though I did have to snip off a couple "locator pins" on the back of the engine that did not have corresponding holes in the firewall. The cowl was definitely more of a struggle. The biggest issue was that it was a rather tight fit and it is tricky to figure out how to grasp the model firmly without breaking things.
At this point, there are just a handful of small parts remaining, plus the propeller and the rigging. The prop is laminated from 6 or 7 laser cut pieces of a dark wood...mahogany or walnut or something...and then sanded to shape. I've started on that but have a way to go with it.
Oh, they also provide an acrylic stand that needs to be assembled and glued together if one wishes to use that.
-
Haliburton reacted to gsdpic in Sopwith Camel by gsdpic - FINISHED - Artesania Latina - 1/16th scale
And here's the prop sanded to shape and with one coat of satin wipe on poly applied. I'll let it dry a bit more, sand a bit more, apply another coat, and repeat several more times.
-
Haliburton reacted to gsdpic in Sopwith Camel by gsdpic - FINISHED - Artesania Latina - 1/16th scale
Just a couple quick notes. I've not yet tossed this thing in the bin but the temptation has been going up of late 😬
I decided I wanted a glossier finish for my propeller, so moving in that direction and brushed on some microscale clear gloss. Was also wondering about/tempted to try some thinned down Tamiya "Clear Yellow" to warm up the color a bit more.
I started on the rigging with some of the rigging around the cockpit and it has been tricky. Not entirely pleased with the results but they are good enough, though in doing the rigging I also pulled loose one of the upper side metal cockpit parts.
I decided to take a break from the rigging and assemble the acrylic stand, only to discover that three of the six pieces of the stand are missing. In the very first post of this log, with the unboxing photos, you can see the shrink wrapped stand with a large base and two curved upright pieces. There are supposed to be three additional smaller pieces that connect the two uprights. I went to the AL website and submitted a "parts request". We'll see how that goes. Looking at those photos, I also do not see the clear windscreen piece so I suspect it may have also been missing from the kit and not misplaced.
-
Haliburton reacted to gsdpic in Sopwith Camel by gsdpic - FINISHED - Artesania Latina - 1/16th scale
Just a quick note that I already received a reply from Artesania Latina and they are sending the missing parts for the stand. So, happy with that level of service. I assume they are sending from Spain, be interesting to see when they get here.
-
 Haliburton got a reaction from Landlubber Mike in French FT-17 Renault Light Tank by Haliburton - Meng - 1/35
So I’m hijacking my own thread, but as a side build I’ve been working on a Canadian LAV 3. This is from trumpeter. Here is the finished product. I was impressed with the quality of this kit. I did not apply the decals which were used in Afghanistan.
Scott
-
Haliburton got a reaction from Landlubber Mike in French FT-17 Renault Light Tank by Haliburton - Meng - 1/35
A small start on the interior.
-
Haliburton reacted to CDW in US Army K51 Radio Truck + K52 Trailer by Rik Thistle - MiniArt - 1:35 - 1944/45
As soon as I saw that straight 6 engine, I knew it was a Chevrolet. It looks almost identical to the engine that was in my ‘51 Chevrolet. Down to the detail.
-
Haliburton reacted to Egilman in US Army K51 Radio Truck + K52 Trailer by Rik Thistle - MiniArt - 1:35 - 1944/45
My pleasure My Friend...
Here's a couple of pics of what the trailer looked like...
Hope it helps....
-
 Haliburton reacted to DocRob in AEG G.IV - Creature of the Night by DocRob - Wingnut Wings - 1/32
One side done . I finished the rigging with pulling all lines taught and add a drop of CA to the anchor points to secure everything. This part of rigging was much easier, than the nacelles and inner rigging. I had to fabricate new turnbuckle tubes, which is not the most exciting work, but now, I have enough for side number two.
Cheers Rob
-
Haliburton reacted to DocRob in AEG G.IV - Creature of the Night by DocRob - Wingnut Wings - 1/32
Today, I pre rigged one wing in about four hours, not too bad. First, I fitted all the lines to the eyelets, like shown above for the entire lower wing. Then I added the struts, where the inner ones had eyelets in their connecting stubs, which were also pre fitted with fishing line. With a pulling test, I made sure, all connections were ok. This is a step, where you want to make proper preparations, as mounting on the second side, the upper wing is more difficult, due to space limitations.
I also made sure, that all the struts fit completely into the wing holes.
In the next step, I pushed the lower wing onto it´s connecting tab, but still without glue and carefully slid the upper wing onto it´s tab, without breaking the struts. When everything aligned correctly, I glued the wings and upper strut connections in place. Luckily the fit is very good. Then I turned the AEG onto it´s upper wing and made the same loop and tubes like before with the upper wing eyelets. This is, where I am now. The fishing line isn´t pulled taut and CA secured for now, as this will be done in one flush, to maintain taut lines in the correct positions throughout.
Cheers Rob
-
Haliburton reacted to Rik Thistle in US Army K51 Radio Truck + K52 Trailer by Rik Thistle - MiniArt - 1:35 - 1944/45
Hi all,
Thanks for all the feedback...appreciated as always.
Another short update, whilst the garden etc currently dominates my time 🙂
Most of the following pics are related to the frame and the engine. Plus adding some Photo Etch.
I was still using my flat pliers, rather than the new PE bending tool mentioned earlier.
The engine block starts to get assembled
And some parts being added to the block.
Three of the sprues included in the kit...there are about x25 more sprues still to be used. This kit is way more detailed than I had imagined.
A final close up of the finished engine, soon to be fitted to the chassis, then all the services, exhaust pipes etc.
Sorry this is so short, but best I post something now or I will never be able to recollect what I was up to last time I posted.
Once I get through the chassis build I should start to be adding some panel work etc.
All for now,
Richard