


Modeler12
-
Posts
1,716 -
Joined
-
Last visited
Content Type
Profiles
Forums
Gallery
Events
Everything posted by Modeler12
-

What is your favorite hand tool(s)??
Modeler12 replied to Modeler12's topic in Modeling tools and Workshop Equipment
Dave, It might not be the 'ultimate' toolbox, but I don't mind putting a list together of what we have thus far. Give me time. What I find interesting is that the replies varied from your block plane to a can opener for the 'end-of-the-day refreshment', hah, hah. Of course, the most popular so far is the opti-visor (or whatever you have to see a little closer). Like, we all need better eyesight? -
Looking for tips on creating sail seams by pencil
Modeler12 replied to bhermann's topic in Masting, rigging and sails
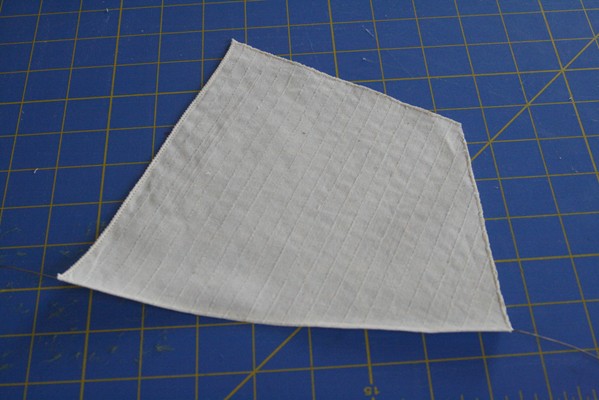
I am sorry, but if your wife or girlfriend has a sewing machine, I think you should still give that a try. I made sails for my Conny, learned how to use the machine and found it not too difficult. The little blue dots were left over after I copied the spacing from a drawing, but the 'seams' are actual stitches. I used thread that had almost the same color as the cloth so they would not stand out too much. But, of course, you can use any color you like. I even cross-stiched the edges to incorporate a line.
-
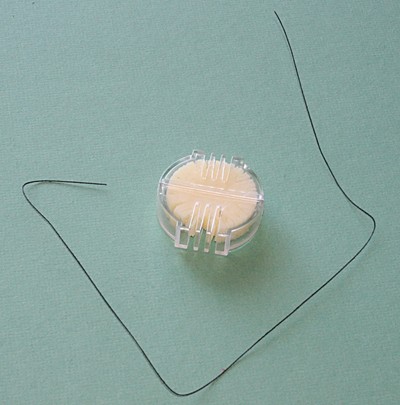
Beeswax helps to soften rope or yarn. It has been used by seamstresses for eons and can be bought at yardage shops such as Joann's. Below is a piece of .018 inch thick rigging line before and after I ran it through the wax. Note that the plastic holder for the wax has some slots which make it easy to draw the thread through. After I had ran it through the wax I simply threw it on the green mat and that is how it landed. One note of caution. If you intend to use glue on the line (stropping blocks, for example) coat the line afterwards. After all, it is wax!!

-
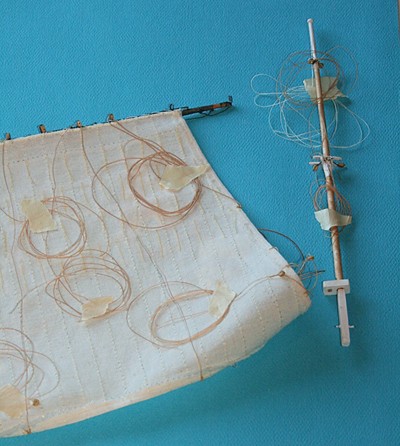
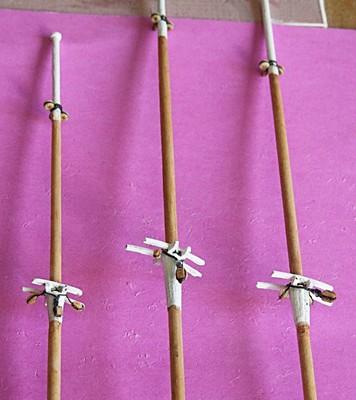
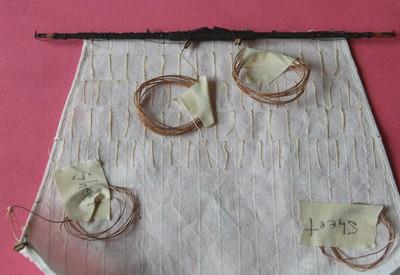
At this point things are getting a bit more 'complicated'. Besides the lines shown on the sail and top masts, I have also pre-rigged the haliards and stored them in an envelope (they are some of the last lines to go onto the ship). There are also four davits and their lines in a bag. A couple of stays have been rigged on the lower main and I made the two fore stays with their 'snakes'. There are shrouds in another bag and I know there are several more stays to go between the masts. But . . . I think it is about time I got going on making the bowsprit and all its details.
- 732 replies
-
- 2
-

-
- constitution
- model shipways
- (and 1 more)
-
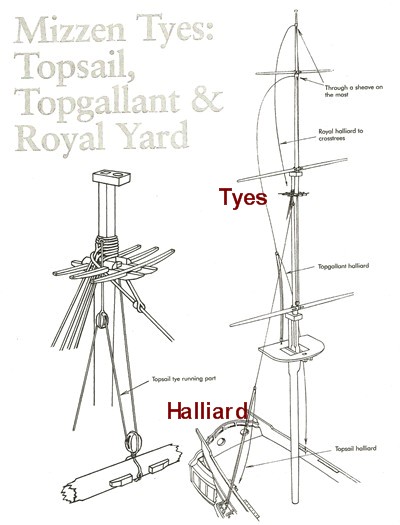
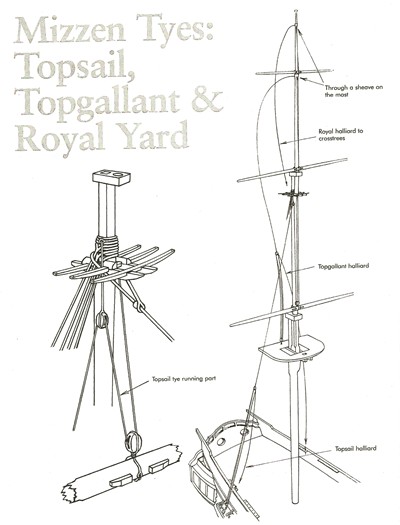
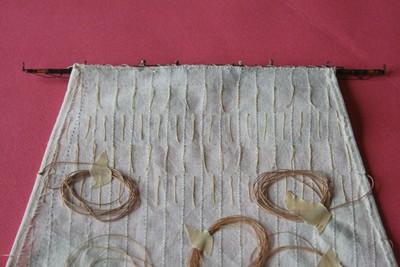
I would say yes, Geoff. These lines are for the halliards, the lines that raise the spars up and down (whether or not the sails are there). The top part of the lines are referred to as tyes and they go down to where they meet and are attached to the halliards which in turn go to the channels. If you were to leave them off, I think it would look odd not to see those lines coming down to the channels. Take a look at drawing number eight, lower right corner and you'll see what I mean. Meanwhile I have also removed the blocks for the top-gallant tyes (halliards as the drawing calls them) and put in 'sheaves' for the same reason. Again other drawings I mentioned above show it that way. I might add that there is only one tye and halliard for the royal and top-gallant spars. One goes to the port channel and the other to starboard (see drawing 8). But there are two for the larger top-sail spars. They do have one block on each side of the mast instead of sheaves. The sketch above shows a closeup of the block and tye for the top-sail.
-
Back to the royal halliards. After I took the 2mm blocks down, I decided to replace them with a sheave going through the mast. That is the way it is shown in Marquardt's book 'Anatomy of the ship', pg 93 and in the book by Petersson 'Rigging period ship models', pg 30. It is a lot cleaner looking, even though the kit plans don't show it that way. I also continued adding more lines such as the halliards for the flags on top of the masts and the halliards for the royal and top-gallant spars.
-
Thanks Larry for your reply. I took a look at the Harbor Freight drums and found that they may have the same problem. I don't mean that they fall apart, which was my experience with the Woodcraft unit, but they may cause a bit of unbalance because of the mounting mechanism. Was there any vibrations or wobble when you used them? Keep in mind that I really want some really fine sand paper on these things and 40 to 80 grit is pretty rough for our kind of work. And any kind of unbalance causes a dimpling effect on the surface of the plank.
-
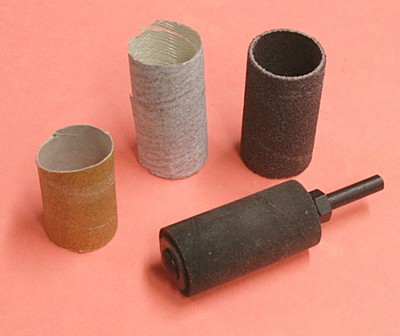
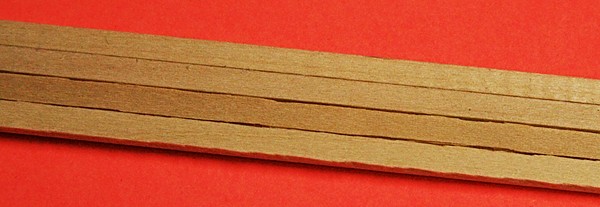
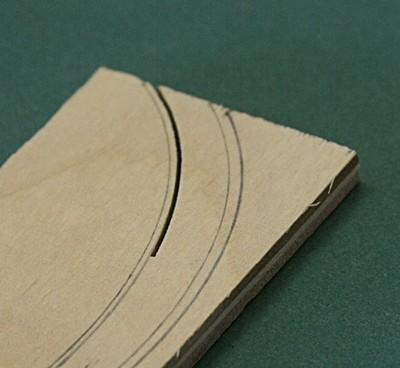
Earlier I showed how I made my thickness sander for a drill press. Go to the end of http://modelshipworld.com/index.php?/topic/244-using-a-drill-press-for-other-operations/ see post #13 at the bottom. Because of space restrictions I settled on using a one diameter sanding drum. The first unit I bought at Woodcraft for about $26 was totally useless. As soon as I put it in my drill press, the little plug that holds the sand paper in place fell out (it is actually a piece of brass tubing crunched down a bit flatter, so when it rotates it is supposed to hold the sand paper against the wall). Besides that the unit wobbled like crazy. Back to the store, and I settled for the one inch diameter rubber drum shown below. Without sanding drums this unit cost me about $6. Now I had another problem. The only drums available were 60 and 80 grit, way too coarse for my purpose. Even grinding the sanding surface down with a coarse stone did not do it. So, I made my own sanding drums. They are not pretty but work very well. What I did at first is to wrap two layers of masking tape around a wooden dowel. They were spiral wrapped with no overlap. The sand paper was put on the same way. Another version used reinforced tape. In both cases I put the adhesive sides of the tape together. The sand paper was put on with spray contact adhesive. My point is that if you are interested in doing some drum sanding don' t buy the Woodcraft unit O6P21 or any of the other sizes. They are no good, in my opinion, despite the fact that they claim that they are good for making your own sanding drums. Maybe I got a reject, but even the store people were puzzled. To give you an idea what I was hoping to do was to get wooden slats with a better edge than those that came with my kit. The picture below shows the result of using my thickness sander with one of the home-made drums. The bottom slats are un-sanded, the top ones were after a pass through.
-
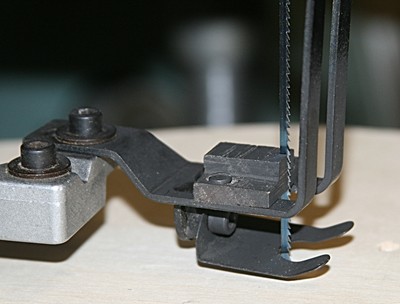
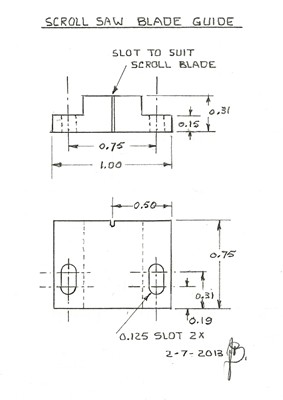
Here is my final set-up of supporting the blade laterally. I made an oak block as shown in the drawing, drilled and tapped two #4-40 holes in the hold-down foot of the machine and used a couple screws to hold the guide in place. I made four more to keep in reserve. The 1/8 inch wide slot is so I can make final adjustments fore and aft. Again this worked like a charm and I believe it could be a nice add-on feature to any scroll saw.
-
What is your favorite hand tool(s)??
Modeler12 replied to Modeler12's topic in Modeling tools and Workshop Equipment
I agree, Joe. Besides small six inch rulers, I rely a lot on my calipers. It has a dial indicator (digital, I guess, is ok also) and I can rapidly find out what the sizes are; be it diameter, thickness, even spacing such as planking, etc.
-
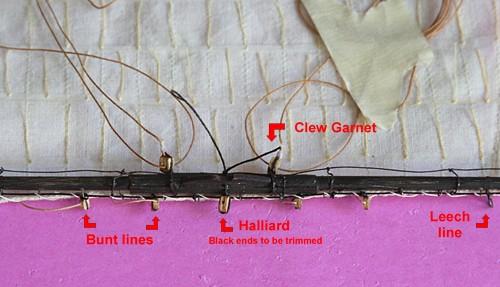
I finished (so I thought) with the main and fore topsails. I threaded the blocks as much as I could and then discovered another block to be added to the spars. It is the halliard that lifts the spars and sails into position. Below I show the mizzen spar and topsail again (upside down) with the various blocks now in place. Keep in mind that the bunt, leech lines and clew lines are on port and starboard. My god, I hope I didn't leave anymore out at this point. But I know the main and foremasts will have some more surprises! Meanwhile I have also added some blocks and bullseyes to the top of the masts. The bullseyes will lead the royal stays, coming from the mast or bowsprit and then go down to the tops (one is extra). The two blocks along the side are for the lifts (which I will not install, so the poor devils will just flutter in the breeze). There is also a halliard block that iis hidden partly behind the masts. Then below you have a similar arrangement for the top-gallant spars. When I look at this, I think I may have a problem with the royal halliards. They should be in front of the mast???? And, yet the line goes down behind the mast. ???? I think I may move them, because the royal would be coming up twisted if the halliard comes around the mast at that point. Anyway, the halliards for the top-gallants are in front. So, I solve my own problem (thank you).
- 732 replies
-
- 1
-
-
- constitution
- model shipways
- (and 1 more)
-
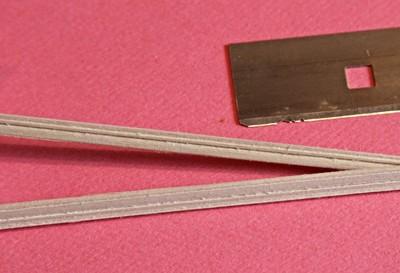
Good points Rocker, thank you. If your machine only uses the clamp-on blades, just knock the pin out of the blades that come that way. Loosely hold the blade on top of a vise with the pin down, and you can tap the pin out. It is just welded in place. If the blades are too long, cut them shorter and clamp them. I agree to using good blades, but I am confused with your latter comment about 'some machines are fixed' (a bit like our cat?). By the same token, just like Exacto blades, the blades are disposable and can easily be replaced. I hate sanding, and I don't like being fixed. Seriously though, a good machine is worth the money if you are careful in the selection. When you get one be sure to EXPERIMENT and learn what it can and cannot do. Break a few blades and find out. I did that with mine and found a couple ways to improve what I had. I am still improving the scroll-saw and other tools. But that is only a side line of working on my model. Meanwhile I have improved the blade guide and made it so it can be mounted on the foot with two screws and be 'replaceable. The real advantage of having a guide near the bottom is to help prevent the blade from curving away when making a curved cut. In other words, when you put a slight force on the work piece that goes sideways, the blade tends to want to bend also. It results in not being able to follow the line you want to cut. The guide block helps to reduce that.
-
Thank you guys. I know I will have to buy some of those and follow your suggestions. Meanwhile, I also want to order some collets for my mini lathe. I will be sure to add the 3/32 inch one for the bits Mike R. referred to. Speaking of Mini Lathe; any suggestions about collets? Or is this the wrong place to ask?
-
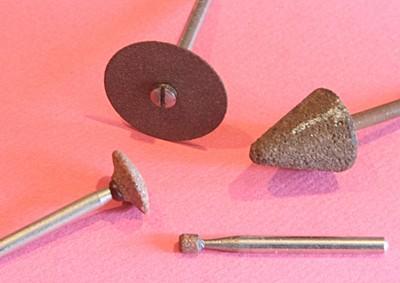
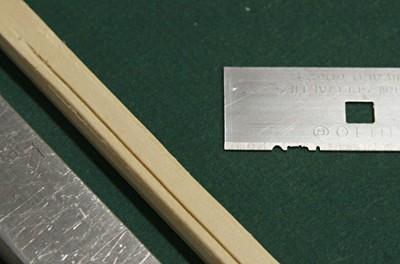
Ok two more things and then I'll be quiet. The same shape on the razor blade can give you different types of molding. The two pieces below were made by shifting the guide bar over a fraction of an inch. These were as scraped, not after I touched them up with some 400 grit paper and a sharp edge. These samples are from some basswood. Other woods might give you a sharper outline. Furthermore, you don't have to limit the grinding to the Dremmel type cut-off wheel. You might have others that can give you the curved cuts you want. Experiment!
-
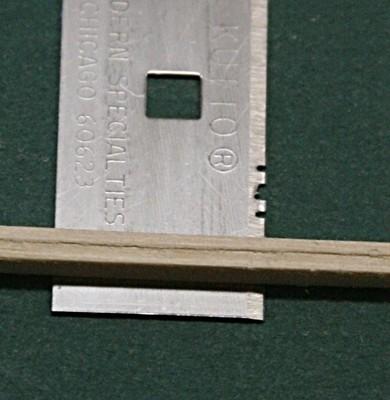
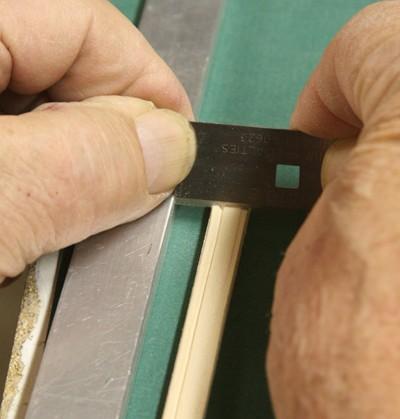
Tom, let me add one more comment about the scraping. It is not as easy as it sounds and takes a bit of practice. It is difficult to keep a straight line by hand. Even the picture below shows a wiggly groove. I did use a fixture to guide the razor blade along. It is simply a piece of 1/4 inch thick aluminum stock clamped to a flat surface. I then also clamp the work piece parallel to the bar and let the edge of the razor blade ride against the bar. Again it takes a few tries to get it right. Also, keep in mind that the groove in the razor blade is what is left behind and it is the bottom edge that obviously does the digging. That does make it a bit more difficult to make rounded corners. Here is one more example of how I scrape and the 'rounded' blade to give some interesting contours. The exact shape is hard to control, but the experiments are fun. PS I held the blade the wrong way for this picture. I also would recommend several passes to get a 'clean' cut.
-
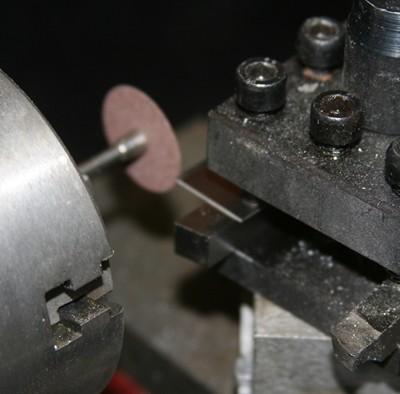
I agree Greg. If you have a lathe that is the safest way to grind a razor blade. I mounted the razor blade in the tool rest on top of a new tool bit. Run the cutting disk at pretty high speed and slowly advance the blade into it. Sorry the picture is a bit out of focus, but I think you get the idea.
-
Man, I would never consider grinding a razor blade by hand as Zeptrader shows in one of his pictures.!!! I can just see something going wrong and the person doing it this way receives a sliver of razor blade in the face. Just think how close your eyes will be to the razor's edge!!! I am well aware that this technique of grinding blades to make scrapers is neat and I have used that. But I would also recommend that the grinding tool be fixed in a lathe or drill-press and that the blade be in a vise of some sort. Wear safety glasses.
-
Thanks Geoff. It is indeed a learning process. When I thought about doing this I didn't know a leech from a bunt. Now I am in the middle of all those terms and smiling. I just hope that pulling all those lines and belaying them is not going to drive me more nuts.
-
After posting the last message above, I went ahead and threaded the lines through the blocks. That then reminded me of this trick I had learned from another ship modeler. I used to thread blocks using one of those needle threaders that you can buy in fabric shops. Then I learned that if you take a drop of CA adhesive, smear it along the end of the line, it will stiffen the end. Then if you cut the very tip off with a razor blade or exacto knife you get a nice point. Threading blocks is now much easier.

- 732 replies
-
- 1
-
-
- constitution
- model shipways
- (and 1 more)
-
At this point I have rigged the mizzen topsail with the various lines and laced it to the spar. The lacing goes through the jackstays and not around the spar. I intend to show the model on a starboard tack with the starboard outwards when it is displayed along a wall. I say this because I have a 'bad side' on this model. The port side has been my 'experimental side' and has a few more flaws than the starboard side. Hence the front of the sail facing port is not pretty with bad seams and ratty finishes. I may touch that up a bit before I mount this on the mast. It is the second picture below. I could have threaded the two clewlines down through the blocks in the bottom corners and I will do that also before installing this. Next come the main and foresails.
-
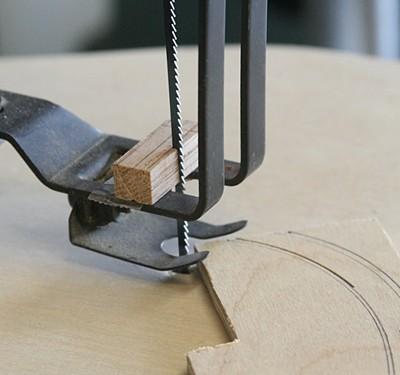
Wouter, I hope you don't mind me adding one more suggestion for Robert. Since I got this scroll-saw at a bargain price, I still had to do some experimenting. With the 'zero clearance' table mod I am able to get pretty close to no tear out on the back side. But I was curious if I could improve how steady the blade is while in motion. Bandsaws have guides for the blades and I thought this might work on a scroll-saw. The first picture below shows my experiment of using a piece of oak. I cut a groove part way and double back taped that behind the blade. It worked quite well and I was able to follow a line better than I had done before. I may make a better setup rather than using double back tape. But at least the idea worked.
-
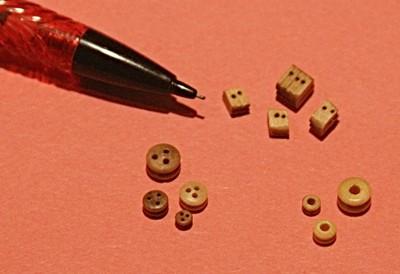
Thank you B.E. What I find interesting about the blocks in the kit I am working on is that the blocks look terrible, but the deadeyes and bullseyes are pretty decent. It would seem that whoever made one should be able to do the same quality job on the others. Not only is the shape of those blocks way off but the holes don't line up and are of different sizes. If I were involved with the QC of stuff coming in from China (or where ever) I would reject the blocks for sure.
-
Gary I made my own sails out of a very light weight muslin cloth. For details go to http://www.brentjes.com/conny%20rigging.html Thus far I have rigged the spanker sail and am working on attaching the various lines to the square sails and spars. There are a couple pictures earlier in my build log.
-
Hi Gary, Please again, there are no pitfalls, just stumbling blocks. I just found some ways to jump a bit further and higher The kit of this model by Model Shipways does include eight large drawings that are mostly to the model scale. The rigging is drawn half of that, but very detailed (some special details are full scale and in perspective). I have selected only six out of a total of 38 sails that the plans call for (and that does not include the spritsail and others, unknown?). Thus far the running rigging of the six sails alone keeps me busy and pandering. I hate to think what the ship's mates had to go through to not only know when and what, but where.
-
JS. The 'practicum' that you bought helped me tremendously at first. The Conny is very complicated for a first build (I bit the bullet and went ahead quite some time ago). I did do a few things a bit differently but I wouldn't call them 'pitfalls'. They were just a different way that made more sense to me. I must also point out that I jumped around a lot and did not always follow the order of things. If you take a look at Geoff's pictures (see his post above) you can appreciate the great details he crafted. The netting on the rails, for example, are quite delicate, I am sure. So when working on the deck details I did not want to damage them with my clumsy fingers. Hence I am holding off with that and other parts along the sides until I have done a lot of detailed work inboard. Good luck and happy modeling.