Modeler12
-
Posts
1,716 -
Joined
-
Last visited
Content Type
Profiles
Forums
Gallery
Events
Everything posted by Modeler12
-

Are there any lines that go in front of the sail?
Modeler12 replied to Modeler12's topic in Masting, rigging and sails
Thank you fellows. I also found the spot on the drawings for the USS Constitution where it said 'buntlines and leechlines are forward of the sail. All others are aft.' When I think about it that makes sense because the men standing on the footropes would be behind the spar hauling up the sail on the other side. The reef tackle would be along the sides of the sail, which leaves the clewline. it shares a double block with the sheet of the sail above it and goes behind the sail. So that's the way I will go for the three topsails. -
Of all the sail lines (lifts, buntlines, clewlines, sheets, reef tackles, leechlines and bowlines) are there any that should go in front of the sail? Perhaps I should exclude the bowlines, because they do go forwards anyways. It seems I read somewhere that there are lines in front of the sail, but I don't remember which they are.
-
bending planks on an old tin can
Modeler12 replied to maaaslo's topic in Modeling tools and Workshop Equipment
I love it also. It is a bit like relaxing your limbs in a sauna versus a steam bath. If I could only have a massage and twist my limbs into the right shape again! That would take more than a old coffee can and a candle, I am afraid. -
Geoff, nice work as always. As you show in your pictures, it is amazing what can be done with strips of white styrene strips for the bow, and in this case for the masts. You showed some, Bob R. has more on his build-log, and I have used it also. I like it. Of course we know where the idea (at least for us) came from and I wonder if it might be of general interest here. Have a go at it, please.
-
I would like to add that if you go that way buy a couple more than what you need. These things are so small they: 1. Get lost on the floor. 2. Require careful stropping (which in my case doesn't always work the first time and need repeat, repeat, etc) 3. File the grooves where the strop goes around. (thank you Alistair for that suggestion). 4. DRILL THE HOLES OUT A BIT BIGGER. 5. Experiment like I had to in order to get used to threading them. But the results are really worth the effort!!!
-
Ok, one more question about jack. If he is a spar as well as being cross, why are there 'jackstays' on the topsail spars above him? Is it because they have the upper hand? At least that's what my Conny plans show; and I follow those pretty closely.
-
Be careful with this. Min-Wax comes in different base formulas. You don't want to mix Elmers (a water based glue) with a solvent base. I prefer the water-based stains by General Finishes (available at Woodcraft) and mix a little of that with carpenter's glue (the yellow glue) and saw dust. Especially if the stain is going to be the same final color. Experiment!!!
-
If the ship is mostly, or all, painted the copper is very effective. If it is all wood, keep it woody.
-
Indeed Geoff, great workmanship. All your details are crisp, clean and well done. I will continue to watch your work and learn. How far are you with the rigging? I suppose you have the masts, spars and bowsprit made?
-
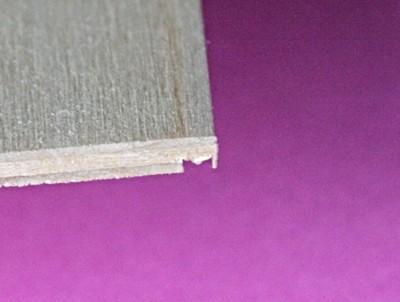
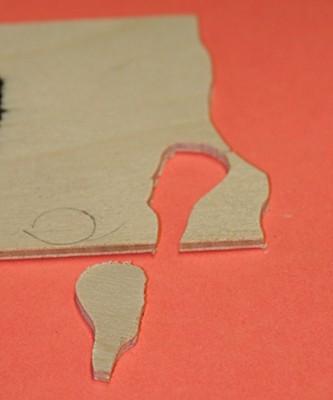
Thanks Michael, I took a new blade I have, made a new table insert with zero clearance and ran a couple test cuts on a piece of 3/4 inch thick poplar. The blade is one of the red Diablo blades with 90 teeth and is claimed to give an 'Ultimate Flawless Finish', ha. It does cut very well but nothing is 'flawless'. I cut some 16 inch longs strips that were 0.050 inch thick (3/4 inch wide). I measured their thickness and found them to be within pom .002 inches along the length (except for the first inch or so and a bit at the end). The finish was quite good but not totally smooth. A touch of 400 grit paper would take care of it, though. I was not able to cut the rabbet you showed with one pass. The teeth of my blade are slanted to that the cut leaves a "M' shape for the kerf. The following picture shows this when I cut the end off a piece of 1/8 inch plywood. The kerf width is .093 inches and the little sliver you see ran the full length at a width of .015 inches. I would have to make another pass after turning the part at a right angle. I have done that a lot for larger recesses. But I think I would have to clamp the part to a right angle frame before I would try to do that. All and all, I think I will be able to do a decent job of cutting planks when I need to make my own. My small table saw and thickness sander will take care of the rest.
-
Thanks Geoff and Carl for your comments. I have been a wood worker for several years but never had to do such fine detail work that model ship building requires. I am having fun but lately I had to do a few other projects and my Conny has been waiting for more hands on deck. I had to make an oak desk for a friend, got a mini lathe and scrollsaw that required some modifications and then I designed and made a thickness sander for my drill press. See http://modelshipworld.com/index.php?/topic/244-using-a-drill-press-for-other-operations/ Pretty soon it is back to work on the sails and bowsprit. Geoff I have not yet taken a look at your Conny, but I always admired your work not only on the ship itself but also the four or five tenders and boats you made. Are you still involved with the other forum?
-
Michael, I like your presentation and I appreciate the fact that you are showing that thin cuts can be made on a large saw. The fact that you are able to make such thin cuts only shows what can be done. If you want to go thicker (which is usually what we need) it would involve a simple adjustment. Shavings from a block plane would not be my choice for thicker planks. Any suggestions about the kind of blade you use or prefer?
-
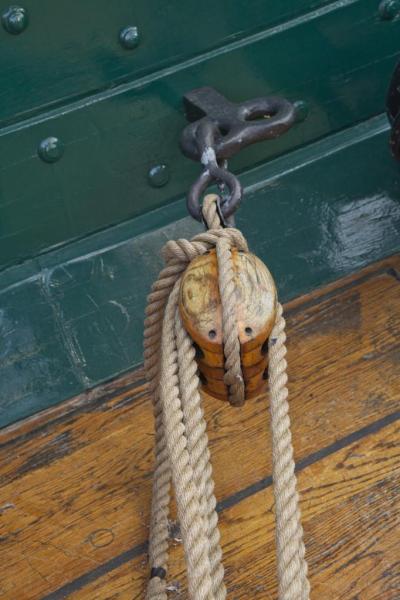
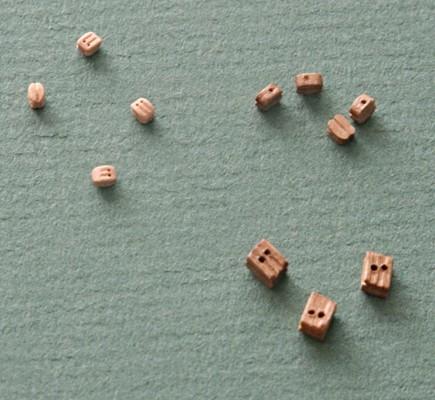
Hi Jeff. I have shown the two pictures below before, but maybe they help. I had to hold off continuing my deck detailing until I got the new blocks from Utah and I am not sorry I waited. I also show what the ship's blocks really look like by comparison. as received in the kit versus Warner West's versus real PS I am not too proud of my hooks but ignore that, please

-
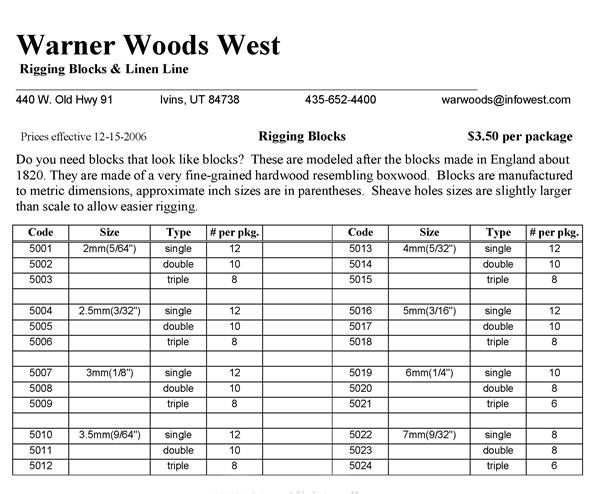
If you are really interested you can contact him for some samples, but here is his order form that I used. Apparently he has not changed the prices since 2006. I paid what he shows. He also makes rope and I received samples that looked fine, but I have my own ropewalk. Unfortunately he does not show pictures. But here is also a comparison of blocks I got in the kit of my USS Constitution versus the same size from Warner West. His were actually very close to the actual size while the kit's were way too big. I will let you decide which are whose.

-
I have ordered his blocks a couple times and have been very pleased with the tiny units. Below is his list of blocks and price list. Indeed you have send an order form to him at the address shown and include a personal check (no credit card, etc.). He does have an email address that is on the price list. He can send you the order form online.
-
Hi Rembrandt, I mean Ron. Being a bit new to this forum, i just came across your build log, and I must say you are doing a fantastic job with this brig. At first I thought this was a 'scratch build' but now I will have to look at all of your pictures and check out these model kits for future projects. I just clicked on the 'follow this topic'. I also noticed your favorite tool, the 1/4 inch chisel. Did you sharpen it?
-
Sinan, of course you shouldn't stop making models because of my comment. If had the powers to persuade people that way I would be a preacher.Indeed the sea is not all that far from your city when I compare that with Utah and other places much further from the seas. You mentioned Monte Negro which reminded me of our trip there last year. We were in Kotor and loved the little excursion we took to the church on the rock (the little island in the middle of this beautiful fjord). I know this is not part of the topic but I couldn't help myself.

-
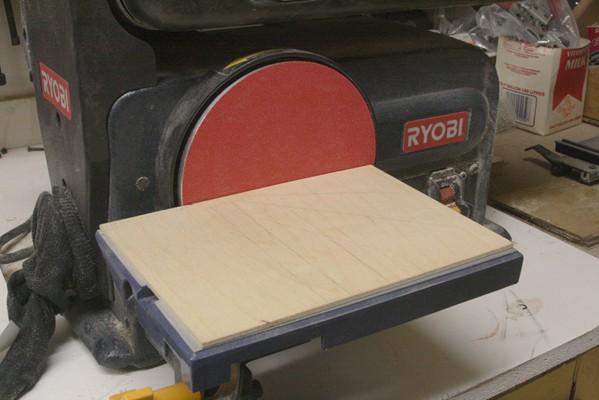
Robert here are a couple pictures of my 'mod' for the Ryobi scroll saw. As I explained above, I put a sheet of 1/8 inch birch plywood on top of the table. Located and drilled a small hole for the blade to go through, etc. The first picture below shows this setup as well as my addition of a PVC elbow to redirect the saw dust. This will be painted black and hooked up to a vacuum system later on. I removed the hold-down foot and blower for this picture, but will re-install the foot but not the hose. The second picture is a sample of cutting a random shape out off the same plywood. I turned the piece up-side-down to show that there is a little fuzz on top where I turned the corner a bit too fast. But otherwise the 'tear-out' was minimal.

-
What is your favorite hand tool(s)??
Modeler12 replied to Modeler12's topic in Modeling tools and Workshop Equipment
I agree with the diamond coated sharpeners. I keep one in the drawer in front of me and when an Exacto blade gets a bit dull, I can sharpen it faster than replacing it with a new one. Of course, if the tip is broken then that is another matter.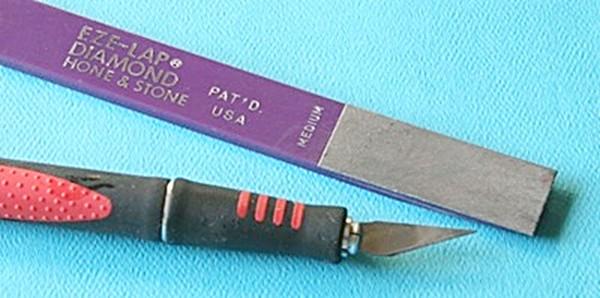
-
I have not personally made a plank on frame model yet. But I think poplar would be a great wood to use for frames. Like I said earlier it machines and sands well, is a bit soft compared with other 'hard woods' but for frames a good choice.
-
Sinan, I had to look up where Kriva Palanka is located in Macedonia. I found it but now I am curious why you are building ship models when you are a long way from the oceans. Do you have poplar trees in your part of the world?
-
Using a drill press for other operations.
Modeler12 replied to Modeler12's topic in Modeling tools and Workshop Equipment
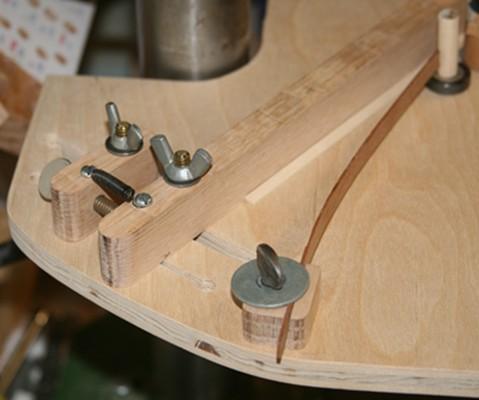
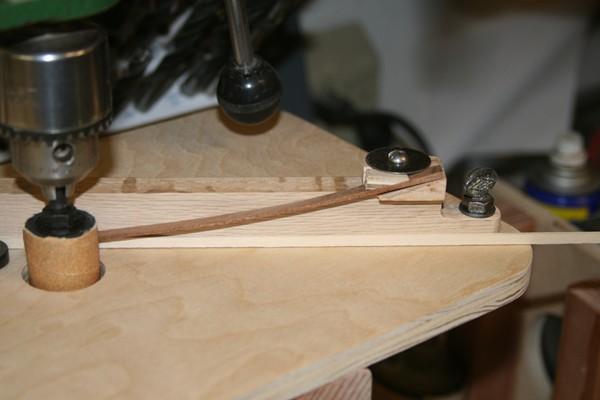
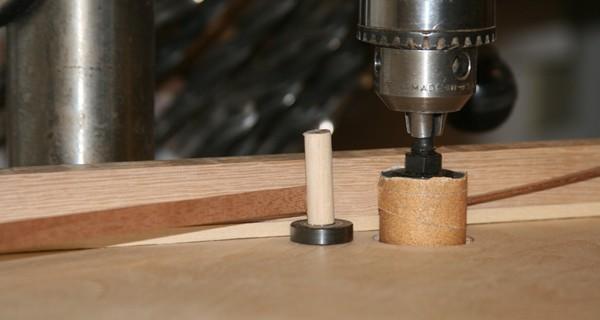
That is what I like about this forum. It is full of great ideas and I decided to borrow a couple to make my own thickness sander. I want to thank both Garward and Dave Shortgrass for providing me with the ideas that I tried to incorporate in the one shown below. I am very space limited (and who is not). So I had to make the table and fence at an angle to clear some cabinets that are to the right. I can open the door to the left if I have to. I did not think I would sand anything very tall or wide, hence the oak fence you see is low and can move to give me a maximum clearance of 1.5 inches. I can always move the pivot point of the fence (to the far right) if I have to go wider. There are a couple features I should explain. The fence can be moved minutely by using the little block and screw to the far left. With the lever arm of the fence and using a 1/4-20 screw in the micro block (I'll just call it that) I can adjust the thickness by about .003 inches if I turn the screw 1/8 turn. The block has two redundant parts. The pin that rides in the narrow slot prevents the block from rotating and the small spring is supposed to keep the fence in contact with the block. In practice they are not necessary. To keep the part to be sanded against the table and fence I used two 'feather boards'. The one to the right keeps the part down, but I don't like the way it is held on top of the fence and will have to modify that. I wanted to keep both 'springs' (thin pieces of mahogany) as close as possible near the drum sander. I decided to use a small ball bearing wheel as shown. It works very well. Before I start, the wheel is against the fence, but as soon as the part makes contact with the wheel, it moves out of the way and continues to apply side pressure. One more comment about the bolts and thread. Both the micro block and fence have a T-bolt that rides in the wide slot and clamps from below. The threaded parts for the pivot points and the micro block use a steel nut that is epoxied in an oversize hole. Thus far I have made a few trial runs and found that I can control the width of thin planks to within .003 inches over a 24 inch length. I have not measured thickness variations as yet.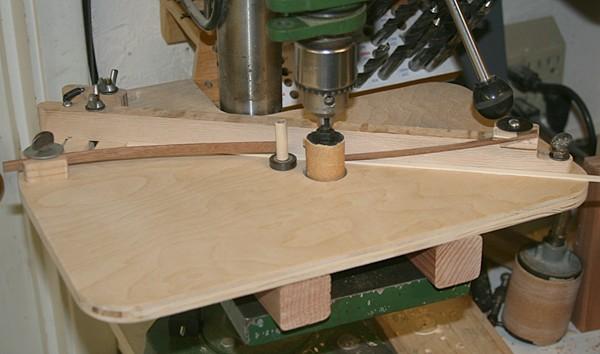

-
What is your favorite hand tool(s)??
Modeler12 replied to Modeler12's topic in Modeling tools and Workshop Equipment
Dave I think we can all agree that a good magnifying head set is almost mandatory for fine detailing. A couple years ago I bought a cheap one to try it out. I am still using it but should really get a better version. I wonder what brand or type others recommend. For more general work I often use a LED head lamp to give me bright light. -
I had a look at your Spray, Bob, and it looks great. I would like to add to my post and picture above that the color change in poplar does not effect the way it handles. In fact, for projects such as model ships, it is easy enough to select the parts of a board that work for you. It does mean that you have to cut your own lumber. At my Home Depot the poplar is right next to oak and some maple. I would suggest you buy a piece and see what you can do with it. To find out more here is another web site http://www.hobbithouseinc.com/personal/woodpics/poplar.htm It mentioned that the green coloring is because of mineral absorption. That would probably mean that the color changes are more of a visual than working variation.
-
Robert all I did in this case was to take a section of 1/8 birch plywood and drilled a hole just big enough so the saw blade can pass through. Then I first applied several strips of double back tape to the back side of the plywood with the paper still on it. I positioned the plywood with the blade loosely in place and peeled away the paper of the tape and pressed the plywood in place on the table. I tightened the blade in place and slowly started the saw. It took a few hickups and manually turning the motor shaft (it has a screwdriver slot in the end) until the blade found its 'home'. I hope this all makes sense. I know what you mean about the insert getting lost. I tried to make one out of the plywood but it did not want to stay in place. So I thought why not the whole table. I have done the same with my disk sander, band and table saw. Sorry no picture yet of the scroll saw. BTW the piece of plywood I am using is 10 x 10 inches. So it takes a bit of jockeying it around to get it lined up before removing the paper. Don't press down until you feel the blade and hole are pretty closely in place. I have not yet changed blades and hope that won't be too much of a struggle. If nothing else I may have to enlarge the hole a bit.