Modeler12
-
Posts
1,716 -
Joined
-
Last visited
Content Type
Profiles
Forums
Gallery
Events
Everything posted by Modeler12
-
Cog if you are a complete nerd , you should try one of those suggested. If I were you I would learn how to use the drafting tools a bit and create something like a 'lion statue'. After that, forget that you are Dutch and go and invest some money (American dollars preferred; after all, the Chinese versions of CAD are terrible, unless you can read Chinese).
-
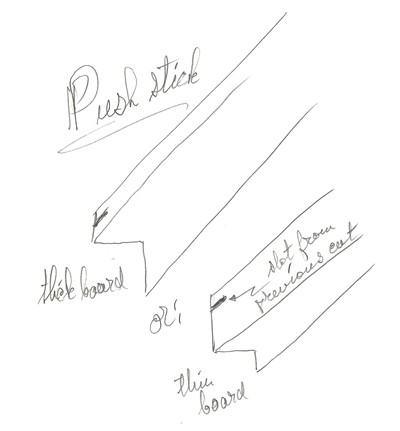
Cole, here are some suggestions from someone who has experienced 'kick-back'. This happened, of course, many years ago on a larger machine when I reacted and tried to grab my work piece. But the same thing applies with smaller saws: Use a push-stick!!! After my accident, I make my own push sticks out of scrap pieces of good wood. They have a square cut-out to hold the part down on the table. Crude sketch below. But I am not afraid to use my hands as long as they are away from the blade. I start to cut a piece, say 12 inches long, and feed it into the blade by holding the first part down on the table with my left hand. When it gets close (you be the judge), I grab the push stick (which is right next to my right hand) and continue with it until the part comes out free and clear. So the push stick has a groove, or two, or ten. I can make another one in no time. BTW what I am describing above is for small saw blades (4 inch diameter or so) and does not apply to large table saws. For those I will use a push stick a bit longer and a feather board as well. But I am still not 'scared' and will react cautiously if something is not quite right.
-
 I was not aware of this until just now Bob. You must have had the shock of your life. I guess you did not run into anything else while driving under the influence of shock. Please say you are going to fix the damage. Sorry I just saw your post above that you have fixed the damage.
 -
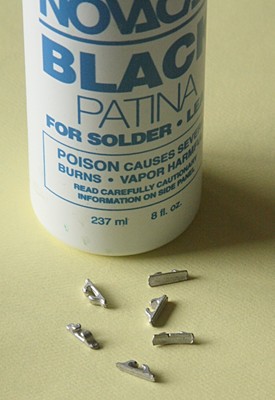
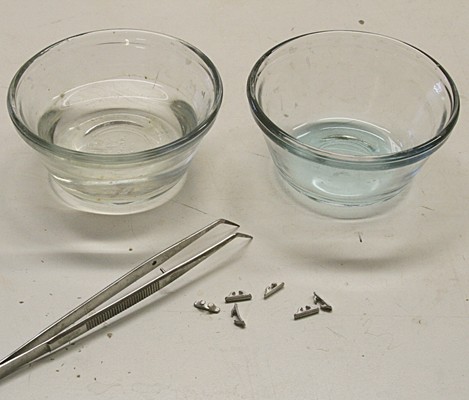
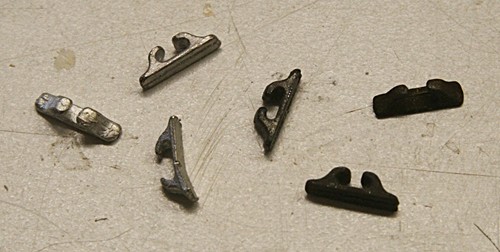
Britannia. It is an alloy made up of zinc, lead and a little antimony. It is the same as pewter, but both can vary in composition, melting points and other characteristics. Britannia melts at a low temperature and is easy to cast, hence it is used for our small parts such as the 'cleats'. Like I said, I have used the patina on lots of pieces made out of this material including the larger gun barrels and anchors. Before someone comments, let me correct myself. The pieces I used for the experiment were 'chocks', not cleats. They are all part of the metal pieces supplied in the USS Constitution kit.
-
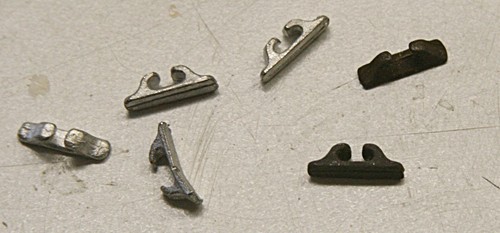
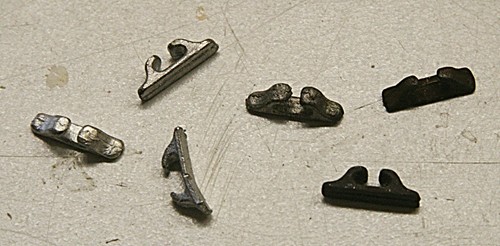
Good question. The coating does not completely rub off. What happens is that if the coating is very thick, some of the 'soot' does come off but the base remains fine. In fact, if you rub it with a paper towel the surface shows a nice sheen. I took the sample I used above and gave them a quick rub with a paper towel and you can see the results. Will it last? I have used this stuff on stained glass windows about 20 or 30 years ago. One piece has been outdoors (on my tool shed door) and the black is still there. Also have a look at the gun barrels I treated about a year ago http://www.brentjes.com/Conny%20Deck.html#black There are three pictures of a gun barrel with one treatment, two treatments and after rubbing it with a paper towel. I don't remember the concentration I used at the time.
-
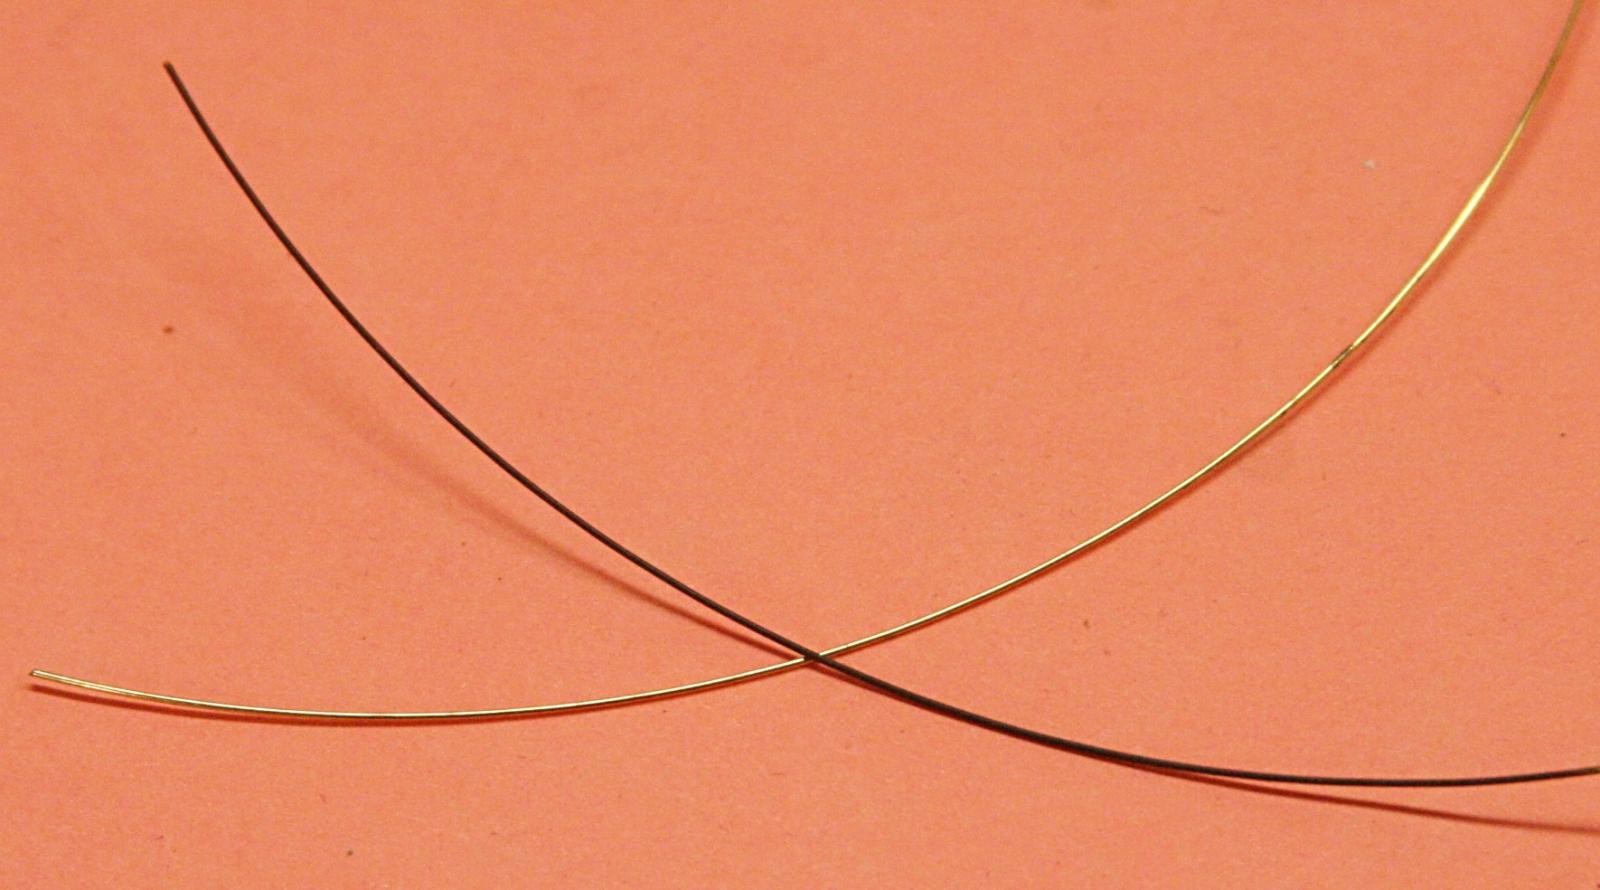
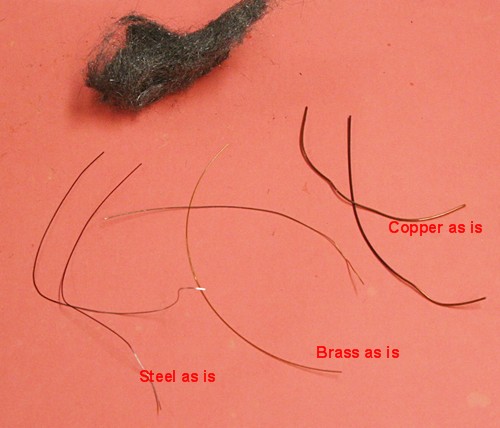
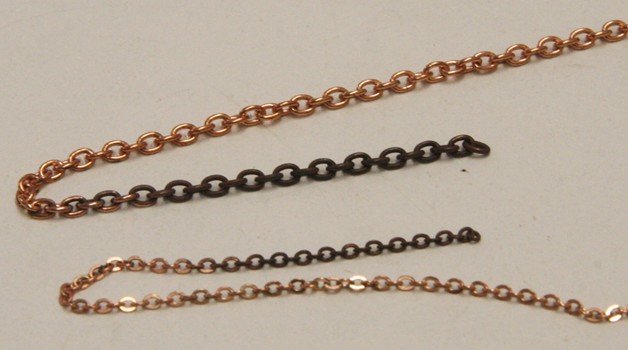
Here is one more experiment. The question was raised about cleaning brass wire before blackening. I know that some wire you buy in craft shops has a polymer coating to prevent tarnishing. But what about some of the others? Here is what I did. I took samples off three kinds of wire. 1.Steel wire used by florists. This happened to come from China. 2. Brass wire from a craft shop. 3. Copper wire I had lying around and I have no idea if it was coated or not. One of each I used 'as is', the other piece I 'cleaned' with some steel wool. Then I dipped each one in the reduced solution of the patina as discussed above (2 parts water : 1 part patina). I held the piece with my fingers at the end (bottom part) and submerged it for about 10 to 12 seconds. Results: 1. The steel wires turned black almost immediately. 2. The brass 'as is' had a couple small black spots but really was not affected. The piece I had 'cleaned' had more black showing, but not really enough!!! Hmmmm. . . 3. The copper 'as is' turned black but again not a deep black. The cleaned copper turned uniformly black. I knew that the brass should have done better. So I repeated the experiment using straight patina out of the bottle. And sure enough the sample I had cleaned with steel wool turned black almost instantly. It only goes to show that the concentration of the solution has a lot to do with the material you are trying to blacken. My suggestion is: TRY IT YOURSELF.

-
Another one is the mizzen mast. Right behind it is the spanker mast with all those wooden rings. The two mast fit together at the top and fit into their own hole at the base. Be sure all the rings are in place before gluing the two masts together. That is the reason I started with the rigging of the spanker sail so early. It would have been more difficult if I had glued the masts in place.
-
It is hard to find, but see sheet 7. It talks about the shroud sizes as well as the deadeyes. They vary in size not only for the three masts, but also their function.
-
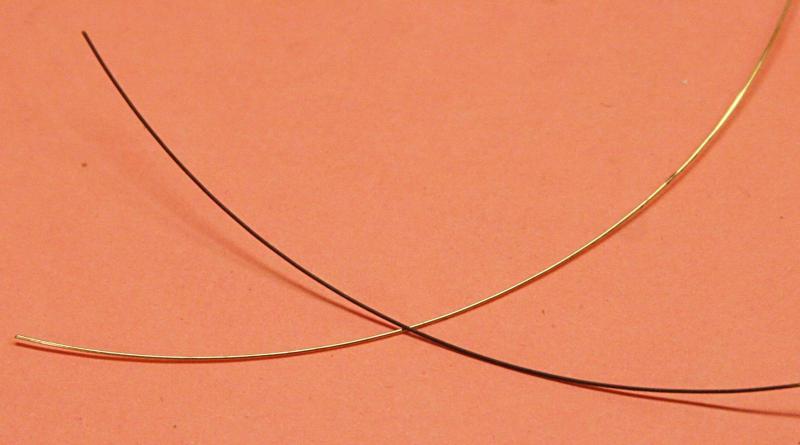
You know Mark, I still find that I do not follow my own advise all the time. Just this afternoon I pulled out some pre-assembled blocks and lines for my rigging. The blocks had brass wire for strops and I noticed the wire had not been blackened yet. I dipped them in my 'solution of choice' and . .. by golly, they did not blacken! The solder joints looked fine, but not the rest. Sure enough I had forgotten to clean off the polymer coating on the brass wire. . . . .
-
Adding the shrouds was easy. I had made sure the loop on them would slip over the mast part on top. First came the pendants (one on each side) then the six shrouds in pairs per the drawing, and finally the swifters, one on each side. I taped the lines to the side of the hull. Just in case I changed my mind again (and that happens a lot). And thus far it looks ok. The swifter lines had to be tightened a bit, but what I still don't like are the blocks for this. Since this part of the rigging will be showing from the viewing side, I want to replace them with better blocks later on (here I come again, Floyd!). Hence the line going down is really only taped to the side of the hull like the rest. It should be going up and wrap around the double block's strop. Meanwhile the spanker is hanging loose, as are other lines in the background. But hopefully they will all come together some day.

-
The mizzen stay and preventer stay are in place and I am now at a point where the mizzen shrouds can be added. I have pre-assembled them along with two pendants and swifters. I think what I will do is to attach them to the mast top but wait with threading the deadeyes until later. They should be easy enough to get to. Meanwhile I can go ahead with adding the top masts, etc. Oh, notice that the peak halliard line is not long enough. It weaves back and forth five times and takes up a lot of thread. I can either redo it or splice on a section starting right at the top triple block. We'll see.
-
Steve I have seen that method and tried it on the first square sail I made. It is very messy and the two fans I tried were not strong enough to do the job. Then there was the issue of attaching all those reefing knots. I could not see myself doing that after or before filling the sails. In addition, I wanted to add the various lines (leech, reefing, bunt and sheets) and again would run into the same problems. I may try this method again on the two jib sails because they are stretched a bit out off shape after I attached the rings along the front edge. They should be easier to work with than the spanker and square sails. If nothing else I know what will work is to fill the sails while the ship is lying on its side and then spray starch. I will let gravity do its work then. I appreciate the suggestion and have watched your progress with great interest.
-
You got that right Jim. There is also some food down there. Breadcrumbs falling out of my mouth as I slaved over open pits.
-
marking water line
Modeler12 replied to ross's topic in Painting, finishing and weathering products and techniques
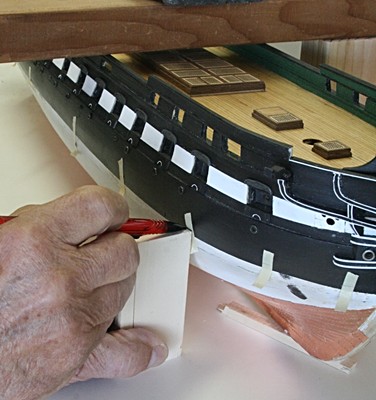
I took a similar approach. Instead of a paper cup, I used a piece of wood and made marks on the hull all around as shown below. The marks were made on the pieces of tape. After that was done I ran a piece of tape all around matching the marks. All of this was done before finishing the copper plating on the hull but the same could hold if you paint. However, it is important that the hull sits level fore and aft as well as sideways. You can see how I fixed the sideways, but the fore/aft was done by locating the waterline on the bow and stern and then I used shims to get the hull the right height from the table top.
-
You can also get it from Amazon http://www.amazon.com/s/?ie=UTF8&keywords=novacan+black+patina&tag=googhydr-20&index=aps&hvadid=6174778157&hvpos=1s1&hvexid=&hvnetw=s&hvrand=1352652181391960790&hvpone=&hvptwo=&hvqmt=b&ref=pd_sl_9fwmosevqy_b
-
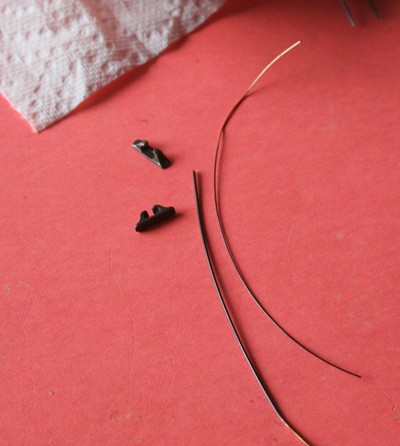
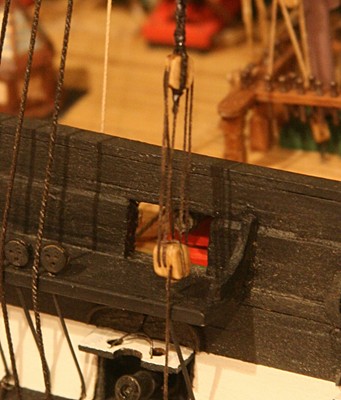
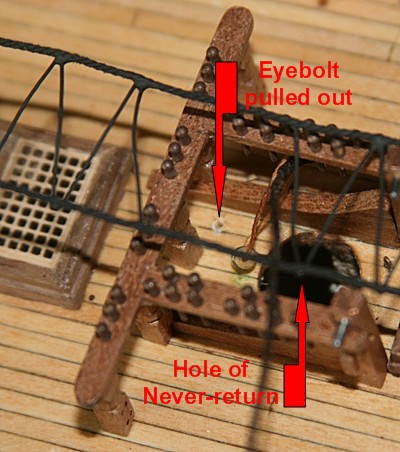
Jeff if I may offer a word of caution as you go along with the gun tackles and other deck furnishings. Be careful of those black holes. I am talking about the open hatches and mast holes in the deck. Just yesterday I added more ballast to my Conny when I dropped a tiny block and stropped hook into the foremast opening. No way can I get to it, so I made another one. I also happened to pull out an eyebolt when the darn hook slipped and disappeared. You might consider putting a piece of tape across the holes.
-
I just read some of the horror stories on the other thread about blackening metals and I am amazed. As I showed above, I have not had any significant problems with any material such as solder, brass, copper, ordinary steel (exclude ss) and britannia. Indeed make sure that there is no coating on any of these (particularly wire) and then go ahead. I have touched the metal before blackening: no problem. I have used it after soldering brass and steel wire: no problem. I have . . . well you get the idea. One thing I did not mention is that the patina leaves a black coating on the surface. If you leave the part in much longer than 'just right' the coating becomes heavier and afterwards will rub off as a black 'soot'. That is the selenium oxide and you should wash your hands afterwards (don't smoke). If you have to leave the part in the solution for more than a minute you are simply using it too diluted. See my experiments above.
-
Using Blacken-IT
Modeler12 replied to fnkershner's topic in Painting, finishing and weathering products and techniques
The reason your brass wire did not blacken is that it is coated with a material that prevents it from tarnishing. Take a piece of steel wool or fine sandpaper and drag the wire across that. I bet it will blacken afterwards. -
HSM would you do me a favor and let me know if you find some and what you think after using it. Other than JB it seems that we are the only two who have used this stuff and I am surprised that others have not come across this. Maybe the two of us have just been lucky.
-
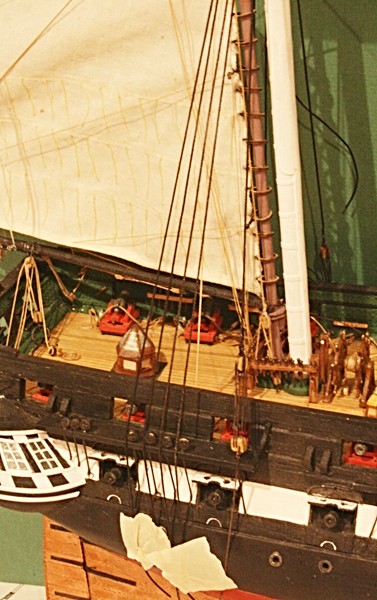
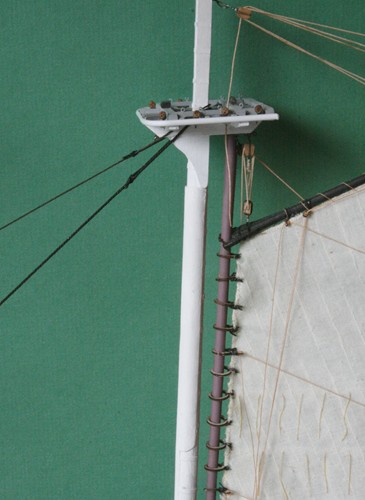
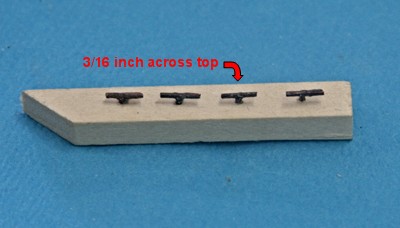
Geoff, just a couple of suggestions before you glue the masts in place. Take a hard look at some of the fittings that go onto the mast and decide if it would not be easier to do them on the bench rather than on the ship. For example. There are a couple blocks and strops that go around the masts for some of the stays. Below you can see those that go around the main mast. They are for the mizzen main and preventer stays. Then there are three eyebolts on the tops for the main and foremasts that have stays attached (for the royal and topgallant mast tops). They are right behind the square part and would be difficult to reach later on. I know I have gone overboard with all the lines, but I think I can handle that. For example, I have attached the backstays on the top parts of the masts and they would be easy to attached much later on. They go from the top to the channels.

-
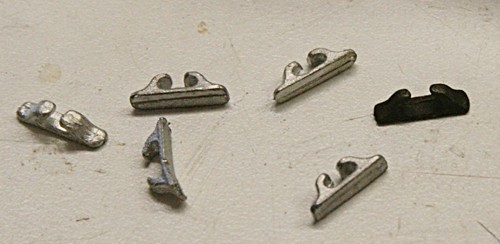
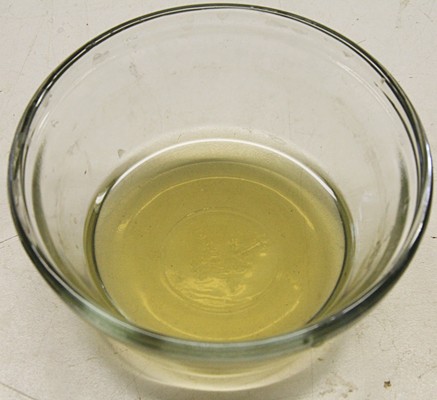
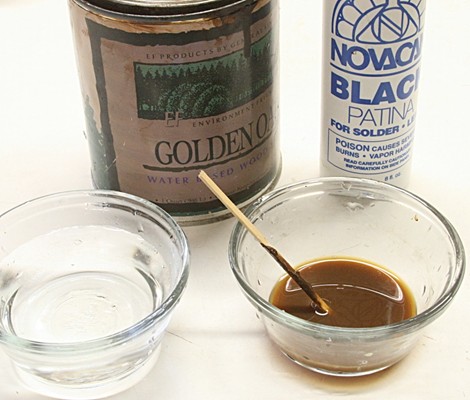
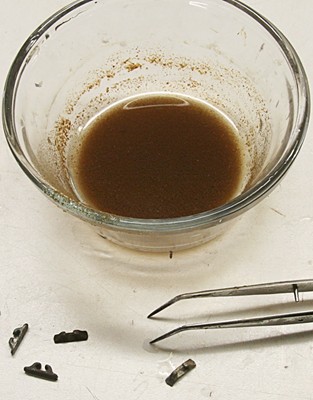
I have used ‘patina’, a blackening agent used in stain-glass work, for quite some time and for me it has worked great. I know there are other agents on the market, but I have only worked with this one. I decided to run some experiments with different concentrations and materials. Here are some of the results. I have found that the casting material britannia is the most sensitive to blackening, so I tried to use that for these trials. I had a number of cleats shown below. First I used a scrub brush and soap to remove any release agents that are typically used in the casting process. The patina is a nitric-acid base with a selenium compound. The way I understand it, the acid attacks the metal and the selenium creates a selenium oxide that is then coated onto the metal. I used a couple glass bowls, one with plain water for rinsing and the other with full strength patina to start with. Notice the light blue color. Even when it evaporates, there are blue crystals left over that can be reconstituted with a bit of water. As soon as I put one cleat into the bath it turned black almost instantly. I pulled it out after five seconds (with a dedicated pair of tweezers) and rinsed it. The result is shown to the right in the picture above. I then reduced the concentration by adding the same amount of water (1 : 1). The part was left in for 10 seconds and I could see the color gradually changing. This is the piece towards the bottom above. Next I reduced the acid by adding once more the same amount of water, thus the ratio was 1 part patina and 3 parts water. After 15 seconds I took the part out and rinsed it. The result is shown above in the center. This is not enough, I thought, so I returned it to the 1 : 3 solution for another minute. It turned a bit darker, but again I don’t think it is enough. I have settled on using a 1 : 2 solution for my blackening. Notice that even after these few tries, the solution has turned from blue to brownish. I don’t know what this is, but have found that the process continues working fine for quite some time afterwards. There comes a time when things slow down, however. What I wanted to try and see is what would happen if I added a water-based stain or paint. Would that be incorporated in the coating? I added stain to some water, fine, and then added patina to that. It immediately reacted and the stain precipitated out. The same thing happened with acrylic paint. So forget that idea. What about other materials? I have used the patina on copper, brass, solder and even steel wire and nails. So far I have found that it does not work with stainless steel. Some wires have a protective coating which can be removed quickly with some steel wool or sandpaper. I have also found that once coated the metal will not solder but bonds well with CA and epoxy. Because of that I have made wire strops and hooks with bare wire and then blackened the whole thing block and all. After a good rinse and drying, the wood did not seem to be affected. I know someone will say that acid is bad for cotton, but I still think that a good rinse will take care of that.

-
Looking for tips on creating sail seams by pencil
Modeler12 replied to bhermann's topic in Masting, rigging and sails
Allan, I really don't know the designation of the cloth I used for the sails. I went to a fabric shop (Joann's) and looked for the lightest cloth I could find. At first I used white (used that for making flags) and later decided on muslin. It has the same color as canvas, so I don't need to dye it and from a distance looks OK to me. The bolt from which it came should have had the thread count but thus far I have not checked that nor bothered to actually count. However, when thread counts go over 500 it is not the same as what I know about this. Here is part of an article on Wikipedia: 'Thread count is often used as a measure of fabric quality, so that "standard" cotton thread counts are around 150 while good-quality sheets start at 180 and a count of 200 or higher is considered percale. Some, but not all, of the extremely high thread counts (typically over 500) tend to be misleading as they usually count the individual threads in 'plied' yarns (a yarn that is made by twisting together multiple finer threads). . . . ." I should also add that the cross stitching along the selvage was easy. But I was not as successful when I did that along an edge that was cut at a diagonal. I ran into a lot of ragged edges. But I charged ahead thinking some of that would go against the mast or spars any way. The leading edges of the jibs also run along the selvage, but the leech is not. -
You know, I am still surprised that I go through all of this confusion and still enjoy the puzzles.
- 732 replies
-
- 4
-

-
- constitution
- model shipways
- (and 1 more)
-
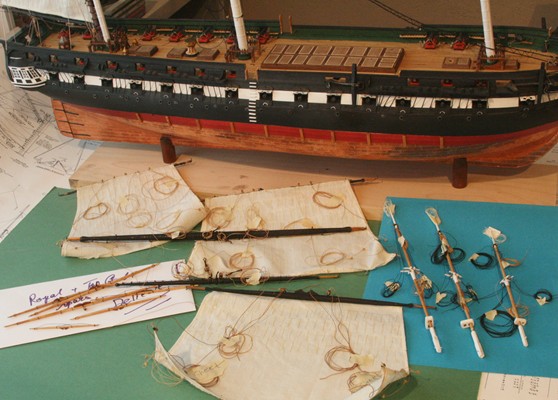
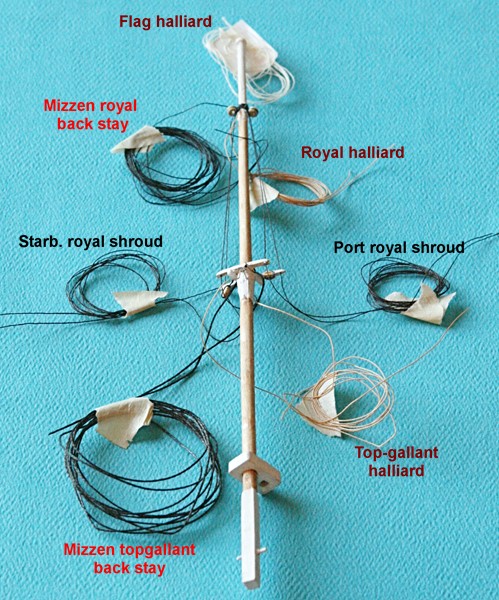
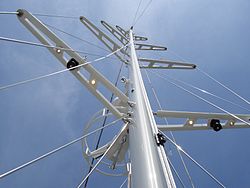
Someone suggested to do the rigging on the bench as much as possible. So I am continuing to add more lines. Below is the mizzen royal/topgallant mast with all the lines I can identify. Notice the thin shrouds coming down from the top. They go through the tip of the topgallant crosstree (to me that is really a 'spreader', see second picture). Yes, there will be more shrouds at the bottom, but those have to be attached later. I labelled the various lines and I'll make a copy of this so I can remember what is what.
-
You are right. That is why I make my own. One long piece will last me a long time. The ends may not look 'professional' but the result is a lot better than wrapping a piece of sandpaper around the drum and shoving the edge into a groove. I bought one of those and had to return it because the pin fell out and the whole thing wobbled like crazy.